

Page 1

1
Page 2

Page 3
1
Quick Guide
Switch the Micro Alti on by sliding the switch on the right side toward the top
corner. The Micro Alti will cycle through the display and bleep when it is ready.
Charge the Micro Alti via the USB socket if it doesn’t function.
This manual will begin with a brief introduction to each function and a full
description is given later in the manual. Time, altitude and other displays show
examples of typical readings.
To begin exploring the Micro Alti, press
each button and take a look at the menus.
The displayed functions can be adjusted by
pressing each button for about 2 seconds.
So, Short key presses are used to select the functions and and long key presses
aect the functions associated with each button.
Note that when the altimeter is displayed it won’t respond to very brief key presses,
this avoids inadvertent operation when you are ying.
Miscellaneous functions such as Averager, G-Meter, Temperature etc. are
accessed from the SET button and changes to how the Micro Alti responds;
Volume, Thresholds, Units etc. are accessed with a long initial press on the
SET button. To do this you may have to leave the SET menu by pressing ALTI
or TIMER, then press SET for 2 seconds. Most of the items on this menu can be
adjusted with the TIMER and ALTI buttons, this is shown in the manual and on
the Micro Alti as: v and ^
To nish, keep pressing the SET button to reach the end of the menu.
Page 4
2
Short Press
Alti 1
Alti 2
Barometer
QNE
1013.25mB
(Sea level
reference)
Long Press
(After selecting ALTI function in the left column)
Sets alti to zero (+/- 1)
Adjust height:
H is displayed. Use v and
^
press [SET]
Adjust to pressure reference (QNH) :
P is displayed. Use v and
^
press [SET]
baro ashes, then pressure is shown below vario.
Barometer trend (t ashes.)
Scale indicates rising and falling air pressure
to predict weather trend.
Scale is 0.25mB per segment
Reset trend (Long press in trend mode
resets to current pressure)
(To set QNE see Detailed instructions on
page 6)
ALTI Button
Function AdjustmentDisplay
Page 5
3
Long Press
(After selecting TIMER function in left column)
Function
Time clock
(example)
Alarm timer
(example)
Stopwatch
Auto start
Stopwatch
Start/Pause
/Continue
Adjustment
Set hours Use v and
^
press SET
Set minutes Use v and
^
press SET
Set hours Use v and
^
press SET
Set minutes Use v and
^
press SET
Press TIMER to start Timer
(Alarm on)
Long press on TIMER stops Alarm
(Alarm o).
Long press on TIMER to activate. Stopwatch
starts when altitude varies by +/- 30ft/10m.
Stop the timer manually after landing to
record ight duration. Other functions can still
be used when the stopwatch is running. You can
skip Auto if not required.
Long press on TIMER to resets Stopwatch
Display
TIMER Button
Short Press
Tip!
Keep the up or
down buttons
pressed to rapidly
change settings.
(Flashing)
Page 6
4
SET Button
Short Press
Averager
G Meter
G Meter
Maximum
Temperature
(deg C) (e.g.)
Maximum Lift
Maximum Height
Maximum Sink
Minimum Height
Battery level
(Shown in segments)
Long Press (After selecting SET function in left column)
Long press holds the display in Averager
mode and AL is displayed.
Reset maximum G reading
Displays temperature in Fahrenheit
(e.g.) 82F
Reset Lift
Reset Max height to current altitude.
1- indicates a reading higher than can be displayed.
Reset Sink
Reset Minimum height to current altitude.
1- indicates a reading higher than can be displayed.
Displays battery Voltage e.g. 3v75
Function AdjustmentDisplay
Page 7
5
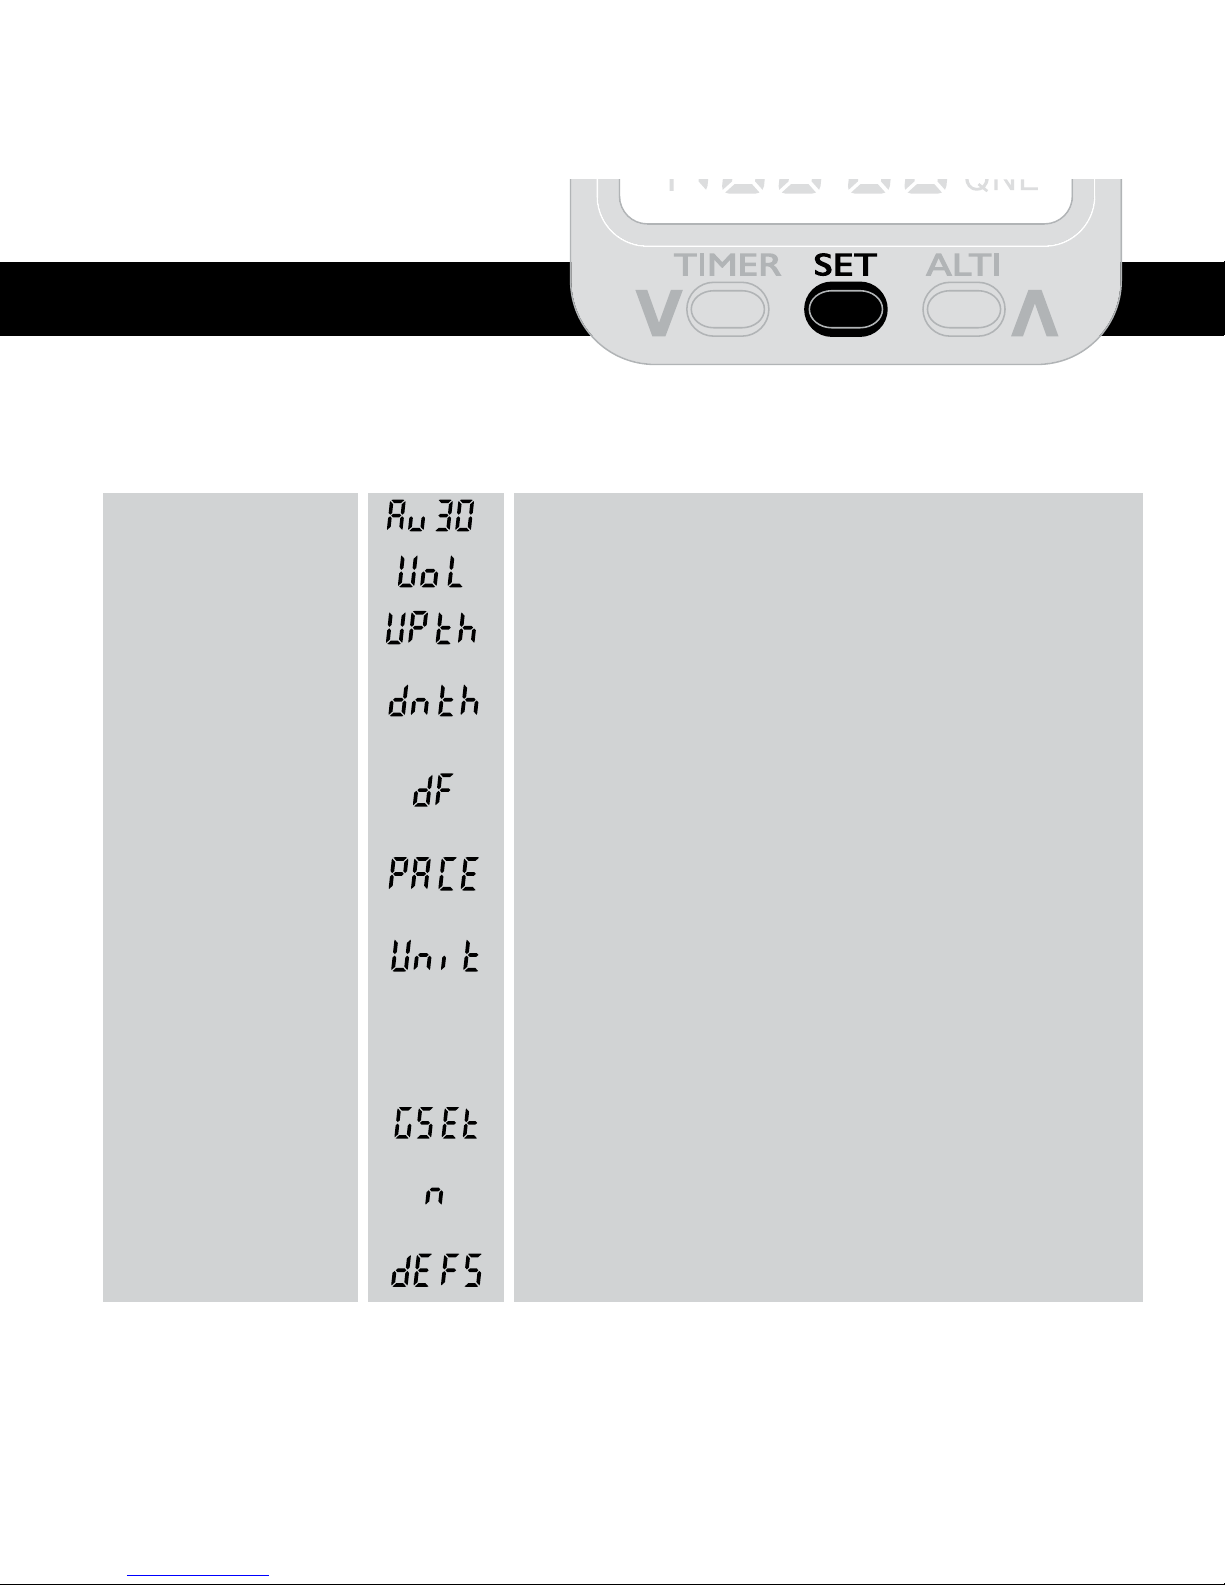
Long initial press on SET
(Not available if already using SET menu. Exit SET menu by pressing ALTI and return with a long key press)
Function
Averager
Volume
Up threshold
Down threshold
Damping factor
Tone rate
Units
G-Meter
Serial number
Restore defaults
Adjustment
v and
^
adjusts averaging time in seconds.
v and
^
adjusts volume.
v and
^
adjusts the threshold at which up
tones begin.
v and
^
adjusts the threshold at which
down tones begin.
v and
^
adjusts the speed of the vario’s
response.
v and
^
adjusts the spread of the tone
and interrupt scales.
v and
^
sets units:
1. Metres
2. Feet
3. Metric vario, alti in feet.
Hold SET button, place on a at surface, press
SET, G-meter will calibrate and continue to:
(unique serial number scrolls across the screen).
Long press to restore defaults.
Display
Changing Settings
Page 8
6
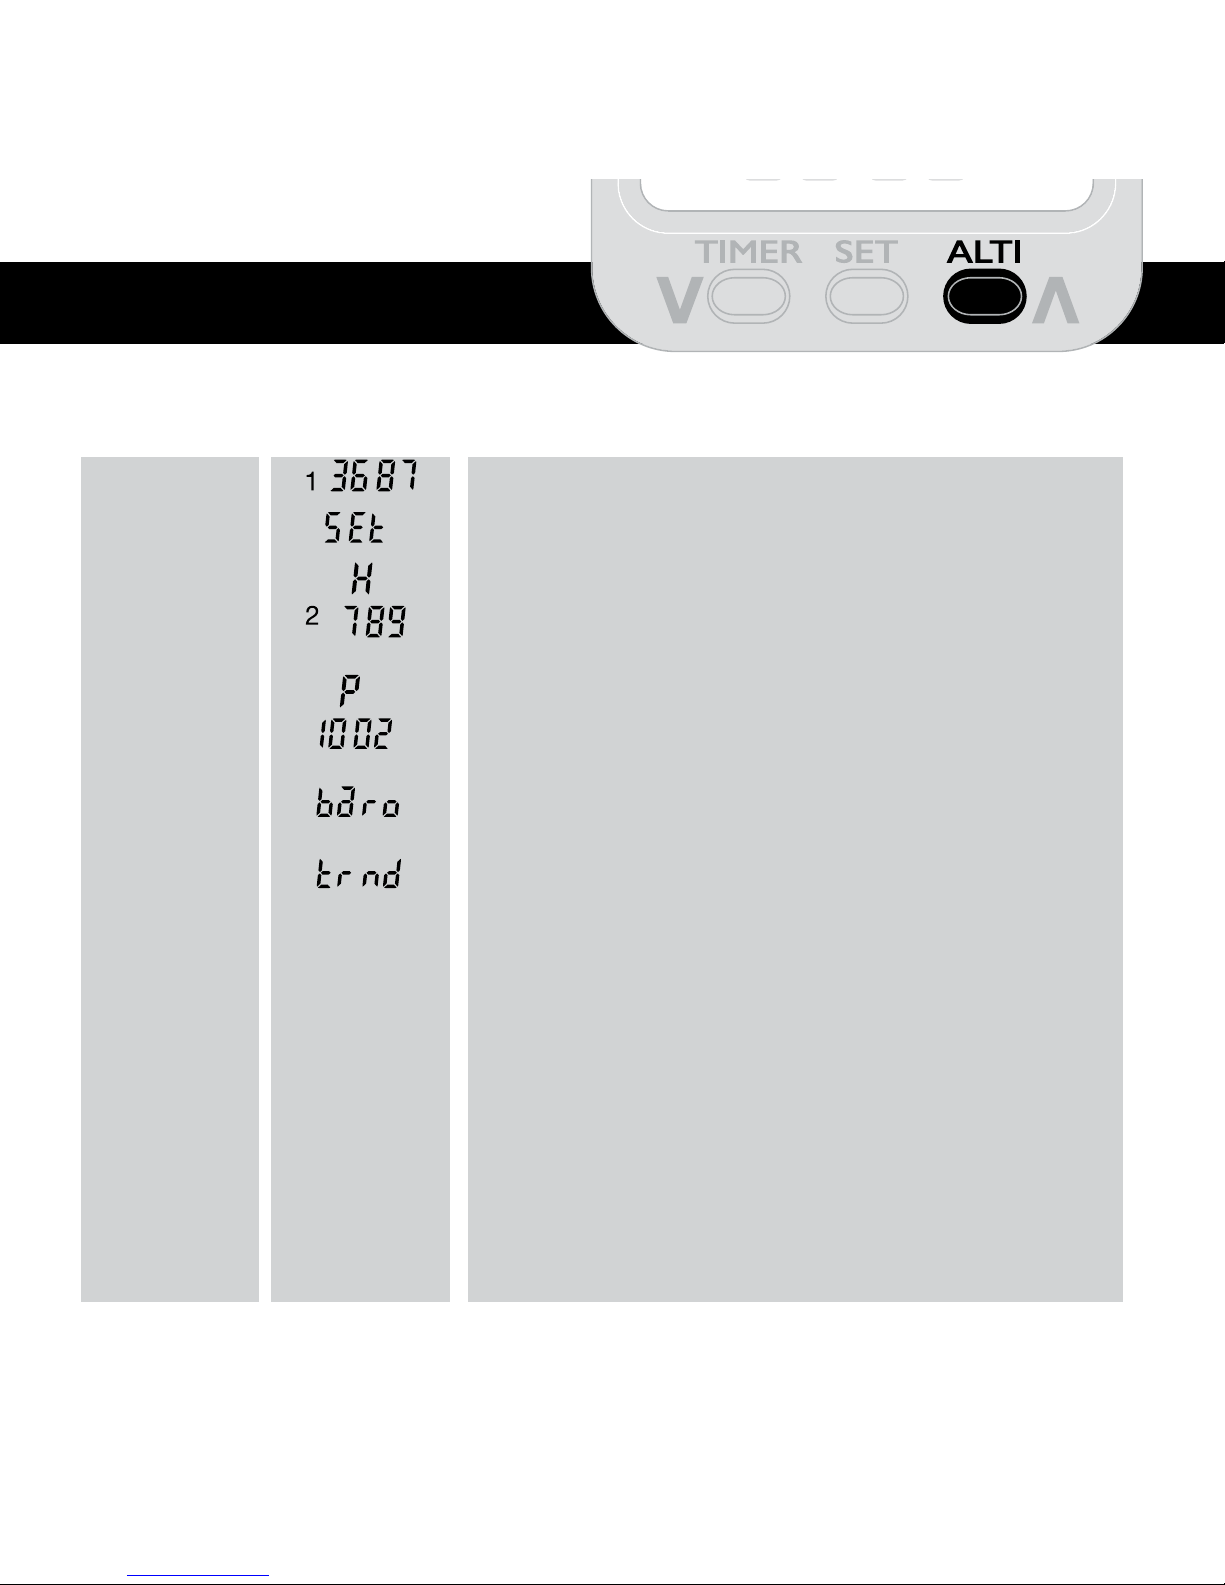
The ALTI button
Three types of altimeter and the barometer are accessed with the ALTI button.
Note: Keys have to be pressed for one second when the altimeter is
displayed which prevents inadvertent changes to the altimeter readings.
QNE indicates altitude relative to the standard pressure of 1013.25mB.
This is equivalent to pressure at mean sea level dened by the International
Standard Atmosphere.
A one second press of the ALTI button moves the display to ALTI 1, this can be
zeroed with a long key press and can be used as your ground or take o reference.
Press the ALTI button again to give ALTI 2. This altimeter can be set to a
given height or a pressure reference (QNH).
Hold the ALTI button when alti “2” is showing on the left and H will be
displayed showing height setting mode.
Use the UP and DOWN arrows v and
^
(TIMER/ALTI keys) to set your
height to a known reference such as the height of the hill or aireld.
Press the SET button to store this setting and P is then indicated. The up
and down arrows can then be used to set a pressure reference (QNH) if
required, for example when QNH is given by an aireld. The SET button
can be used to skip either one of these setting procedures.
Detailed Instructions
Page 9

7
The last option on the ALTI button is the barometer indicated by “baro”
(when this option is rst selected). This will indicate your local barometric
pressure which will usually dier from barometric pressure in weather reports
etc. which are referenced to sea level. Your altitude will cause a decrease in
pressure by approx 1mB per 30 feet above sea level (This holds true at low
altitudes but the rate of change reduces with increasing altitude).
With the barometer displayed, hold the ALTI button to reveal the
barometric trend indication (ashing t in the display). This shows how
local air pressure is changing over time and can give an indication of a
potential change in the weather. This function will be aected if you y
or change altitude and is only provided as a guide if you are deciding
whether to y. Allow an hour or so for the trend indicator to register any
change or leave it on overnight before you y.
In TREND mode the segmented scale indicates in quarter millibar
increments.
Current pressure is indicated by a ashing segment while
other segments will have registered previous pressure excursions. These
indications are relative to the pressure displayed when the trend indicator
was rst selected and can be reset to current pressure with a long press
on the ALTI button so you can compare the dierence.
QNE can be adjusted to compensate for small changes as the altimeter’s
pressure sensor ages. We don’t recommend that this is undertaken
without the user having at least one precision reference. To change QNE,
hold the ALTI button for 10 seconds until it gives a double bleep, change
the altitude reading with the
v and
^
keys, nally press SET, ^ , SET to
store the setting.
Page 10

8
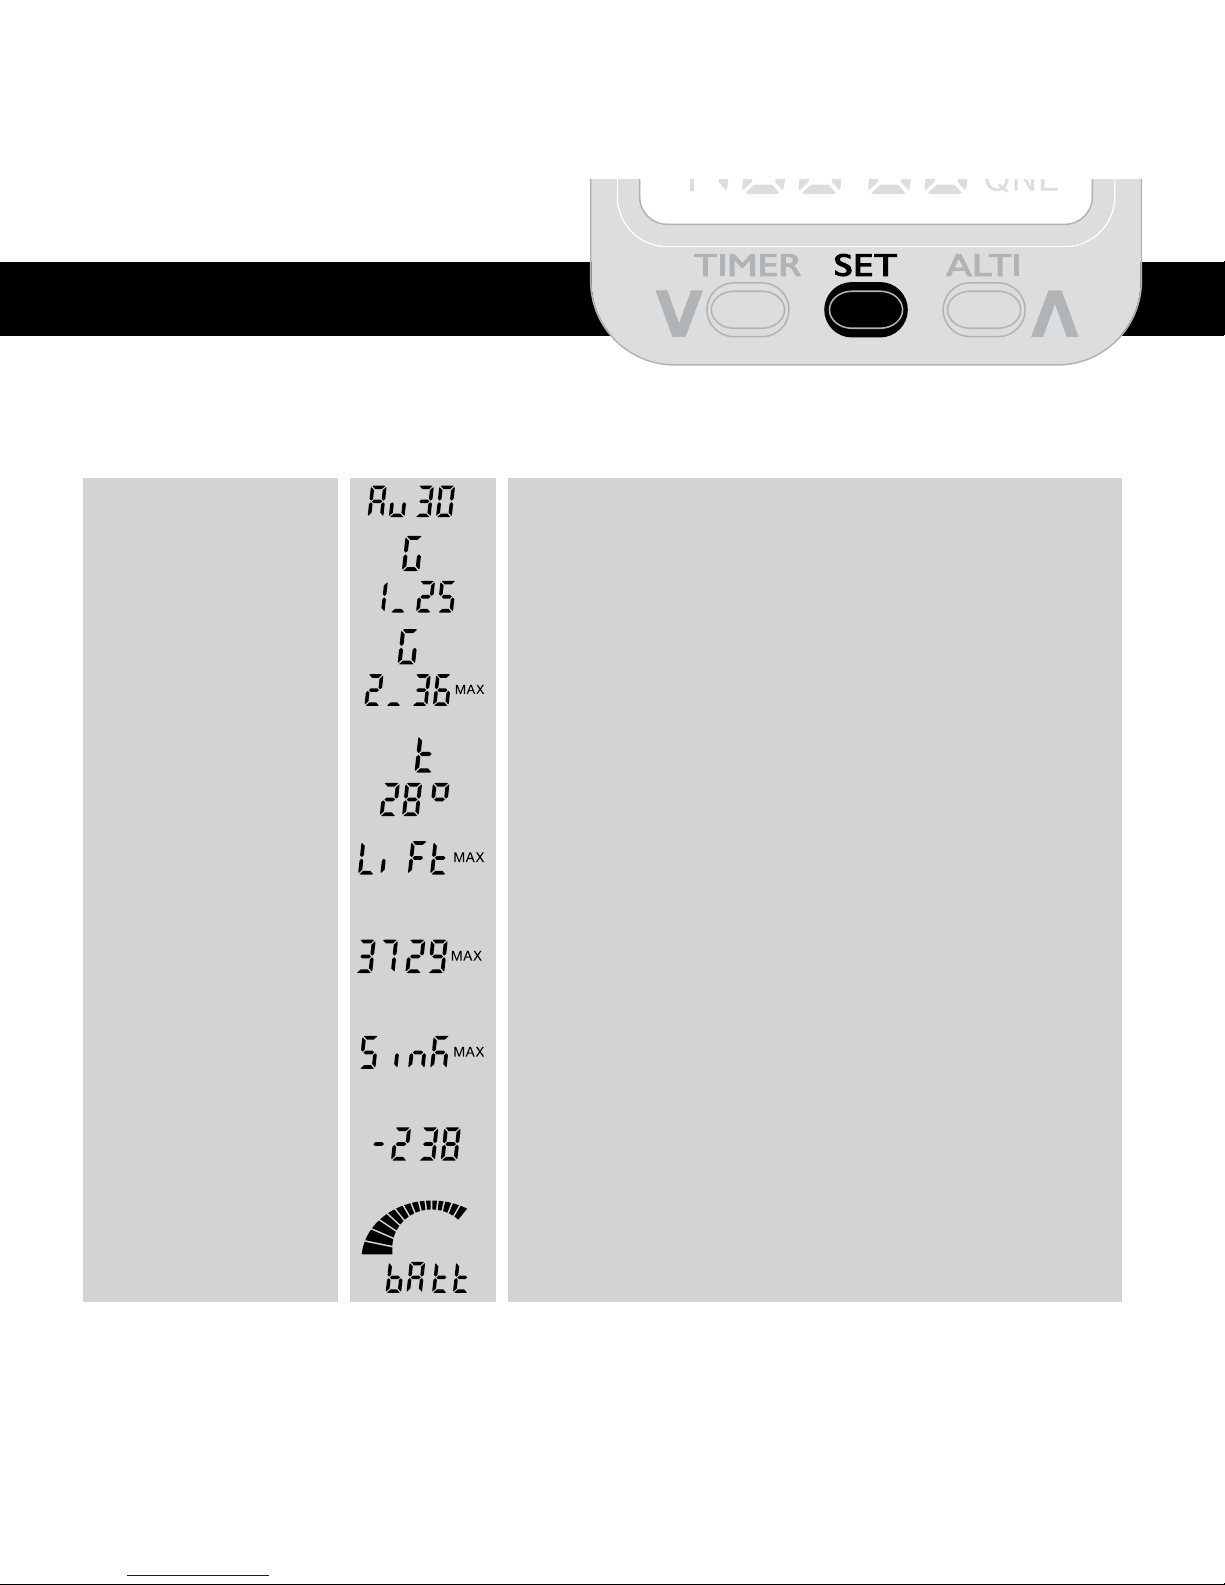
The SET button
The SET button is used to check various readings (with a short press)
and change settings associated with the current display (with a long
press). For example changing the temperature display from degrees
Celsius to Fahrenheit. The SET button is also used to set preferences
such as volume and thresholds, but to do this you will have to leave the
SET menu (by pressing ALTI) and then press SET for 2 seconds. See
“Changing Settings” later in the manual.
The rst option on the SET menu is always the Averager. This is a useful
tool to nd your overall rate of climb when ying conditions create short
bursts of lift and sink.
In averager mode Av is displayed followed by the preset averaging
period, for example Av 30. The averaged rate of climb is displayed on
the vario scale but the audio tones will still respond quickly if lift or sink
is encountered.
The Micro Alti will return to the normal altimeter/vario display after 10
seconds to avoid further key presses. However if you hold the SET button
in while the averager is displayed the display will “lock” and won’t keep
returning to the normal display. In this mode AL is displayed but you can
still return to the normal alti/vario display manually by pressing ALTI.
The averager can be adjusted to smooth out variations of lift and sink
over a 5 to 60 second period. Press the SET button for 2 seconds to
Page 11

9
enter settings mode and Av followed by the time period will appear. The
Up and down buttons, v and
^
can then be used to set the required
averaging period. Finish by pressing SET to continue to the end of the
settings menu.
The average lift or sink is also displayed as a blinking segment in the
normal vario mode but as this can complicate the display, it can be
switched o by setting the averaging time to zero.
The G-Meter is the next option on the SET menu and this shows the
strength of gravitational or centrifugal force acting on the pilot in any
direction and normally indicates 1G at rest, displayed as G 1_00
Higher “G” may be encountered during a turn or dive and the G-Meter
will indicate this to 2 decimal places, for example: G 2_15 (i.e. just over
twice the Earth’s gravitational force).
A further press of the SET button gives the maximum G-force
encountered during your ight, so the example above would be indicated
as G 2_15 MAX This will be permanently stored and will only be updated
if higher G-force is registered. This reading can be reset back to 1.00 G
with a long key press.
The forth menu option is temperature of the vario in degrees Celsius
which equates to local air temperature if the vario is not heated by sunlight
or body temperature etc. A long press gives temperature in Fahrenheit.
The next options on the SET button gives maximum and minimum
readings relating to your ight. All readings are stored permanently and
Page 12

10
can be individually reset with a long key press. So the Micro Alti can store
your personal height record although you will probably want to reset max
and min lift. Minimum height can be used to check your lowest point
below take-o, to a maximum of -999 feet or -999 metres. Maximum
altitude is 19,999 feet and over 6000 metres.
Maximum LIFT is shown rst followed by maximum altitude, then max
sink followed by minimum altitude.
Battery level is the nal display on this button. A long key press gives
the actual battery voltage. The upper segments of the display will only
indicate while charging, after which a full charge is indicated with around
75% of the segments showing. i.e. around 4 volts. “batt” will ash
whenever the battery voltage drops to level “2” on the battery display.
Recharge the vario otherwise the time clock may need to be set again if
required, and to keep the battery in good condition. No other settings are
aected if the battery is allowed to run down completely and the battery
is protected from over-discharge.
Tip* The averager always appears rst on the SET button menu. However
if, for example you are interested in regularly checking the temperature,
press the SET button until temperature is displayed and then press the
the ALTI button to return to the usual alti/vario display. Temperature will
now always appear straight after the averager when the SET button is
next used, so it will always be easy to nd!
Page 13

11
Changing settings
A long initial press on the SET button allows the user to make changes
according to the user’s preferences. If you are already using functions on
the SET button you will rst have to leave this mode by pressing ALTI
before accessing the settings menu with a long key press.
The rst option is Volume. The v and ^ buttons allow the volume to be
set as required. This does not eect the headset volume which you can
set internally according to your headset type.
The next option sets the rate at which the vario begins to bleep when
ascending. This is the vario’s UP threshold which is indicated on the
vario’s numerical display in metres/sec plus 0.1m/s for each segment
visible in the vario display.
This is followed by the down threshold which is set in the same way.
You may wish to set the down threshold to respond only when you are
descending rapidly as a warning that you are in sinking air.
A fourth key press in the settings menu allows the Damping factor to
be set. This controls how quickly the audio and visual vario indications
respond to height variations. A short response will cause the vario to
respond quickly to any change in height but it may respond too readily
to small changes, particularly wind bueting the vario. You may prefer a
slower response which will average out small and rapid variations. Once
you are ying the Alti Vario will tend to silence until lift is detected.
Page 14

12
The fth option sets the tone rate or “Pace”. This denes the rapidity of
the vario’s bleeps. So if you are usually searching for small amounts of
lift as in ridge-soaring, a high setting will give more rapid bleeps at fairly
low levels of lift. If on the other hand you often make use of thermals and
are used to ying at high climb rates, a lower setting will be more useful
as the bleep rate will increase more gradually.
The sixth option allows metric or imperial units to be selected (options
1 and 2) or metric vario and imperial altitude (option 3). Metric units are
altitude in metres and lift/sink in metres per second. Imperial units are
altitude in feet and lift/sink in feet (x100) per minute.
Option seven provides calibration of the G-Meter which may need to be
set up initially or if the G-Meter does not show approximately 1G at rest.
To do this, press and hold the SET button and “Flat” will appear in the
display. Place the Micro Alti on a at, stationary surface and press SET.
The G Meter will then calibrate and will be ready for use.
The eighth key press in this sequence reveals the vario’s unique serial
number, which scrolls across the screen in pairs of digits, (you may wish
to take a note of this). The last key press allows defaults to be restored
with a long key press.
Page 15

13
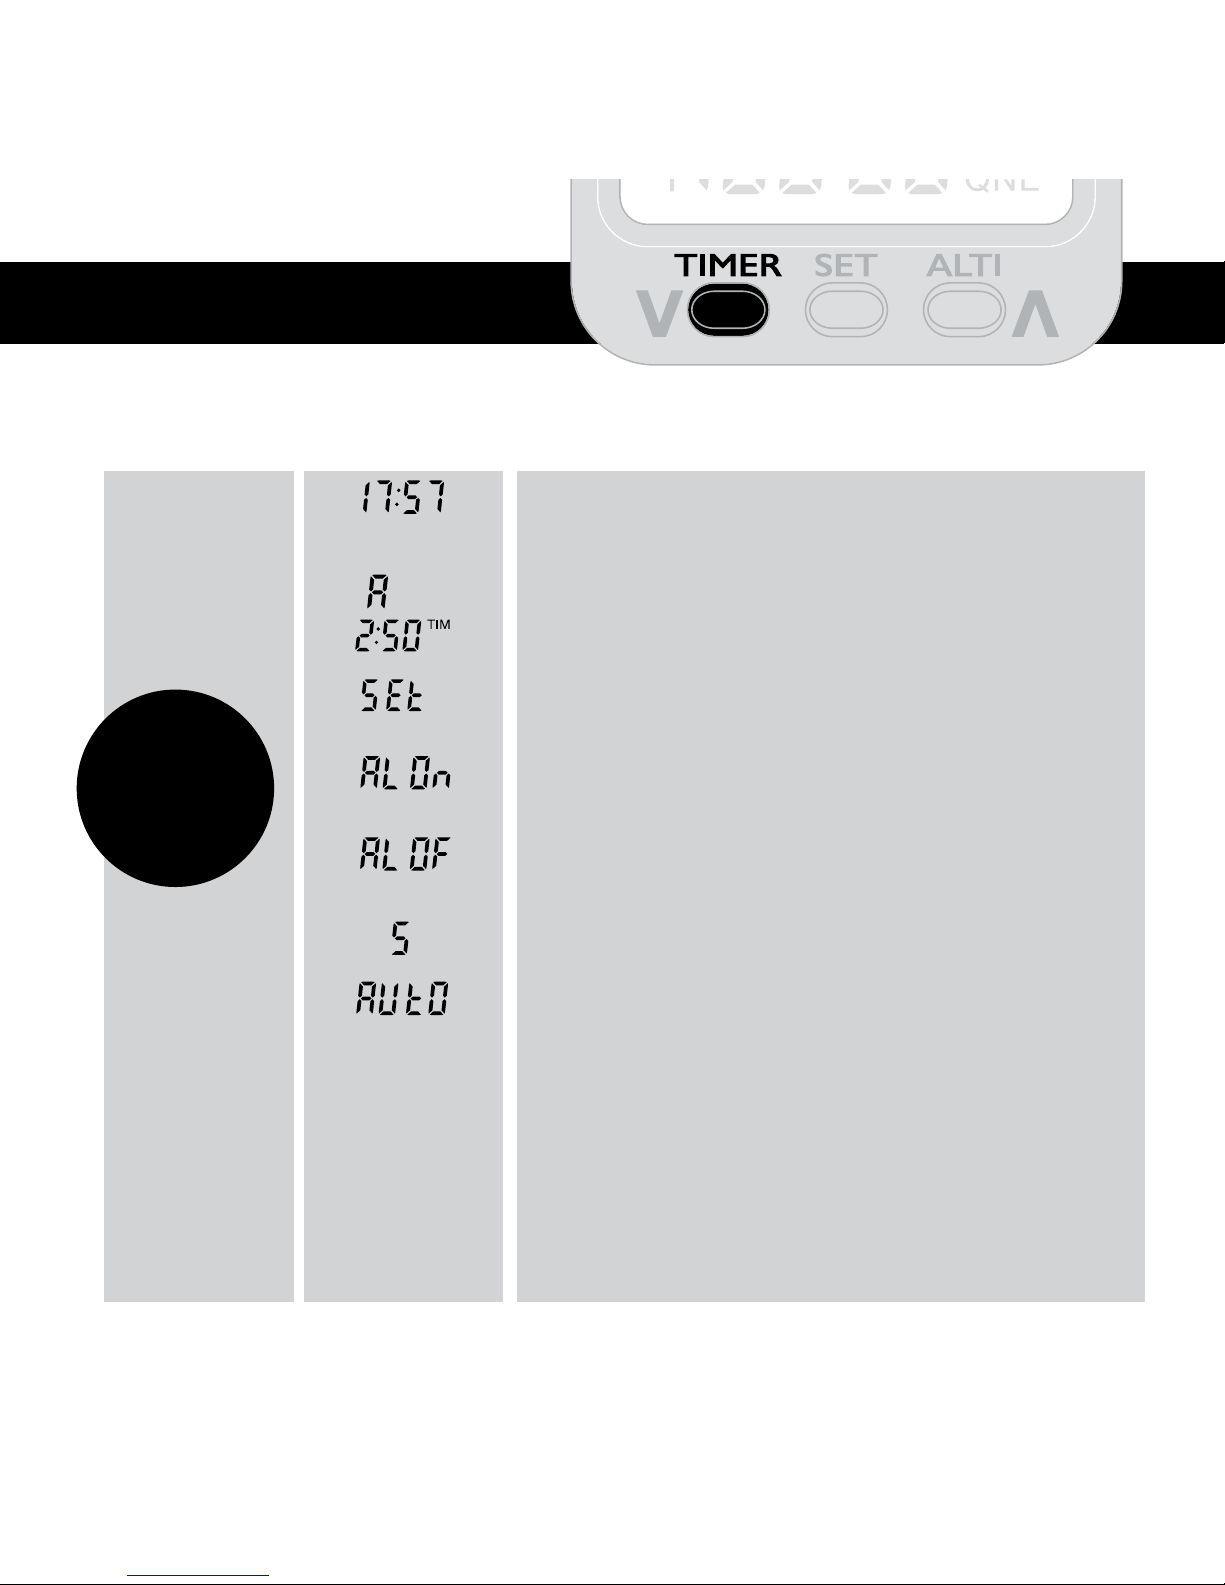
The TIMER button
The TIMER button gives access to the time clock, alarm timer and
stopwatch.An initial press of the TIMER button shows current time
and will automatically revert to its previous mode (current altimeter,
temperature etc.) without further key presses after 2 seconds. A long key
press when the clock is displayed allows you to set the clock. First hours
will ash and can be adjusted with the v and ^ keys, use the SET button
to set hours and then set minutes in the same way.
A second press gives the Alarm timer which can be used as an alarm
clock, or if you are using your Micro Alti with a paramotor and headset,
the alarm timer can be used to time your fuel usage in cross country
ying, providing you are familiar with your paramotor’s fuel usage and
allow for sucient reserve. The alarm timer will permanently store the
last used time period, so the same duration can be used again without
having to set it.
Alarm mode is indicated with Alar and an A in the vario display. A long
key press on the TIMER button allows the hours and minutes to be set
in the same way as the clock. SEt will ash and a nal key press on SET
begins the alarm countdown and AL on is displayed. A long key press on
SET when in the alarm display mode will cancel the alarm and AL oF is
displayed. Switching o the Micro Alti will also cancel the alarm but the
duration will have been stored ready for next time.
The third press on the TIMER key gives the stopwatch display. Auto
(ight timer) can be initiated with a long key press and SEt will be
Page 16

14
1
2
3
Near side
Middle
Near USB
Low
Medium
High
Link Position Volume
displayed. The stopwatch will then start as soon as height changes
by +/- 30 feet/10M. The stopwatch can also be started, paused and
restarted with further key presses and can be zeroed with a long press
on the TIMER button. TIM ashes when the stopwatch is running.
Mode Switch
Next to the power switch is the Mode Switch. This will silence the vario
in the middle position (excluding alarms), sliding the switch across to the
position nearest the power switch will put the Micro Alti into Low Power
mode. This will consume less power while displaying only the clock or
altitude and can be useful to extend the battery life when hiking or when
the displayed battery level is low. Slide the switch to the position furthest
away from the power switch to return to normal operation.
Headphone/external bleeper socket
As well as having an internal audio sounder or “bleeper” the Alti Vario has a
socket for an external bleeper that can be worn under the helmet or inside
a headset cup. This is particularly useful to paramotor iers who make use
of thermals to extend their ights. For helmets that are open around the
ears, the bleeper can be mounted in the padding of the helmet.
Page 17

15
Note: When using a piezo extension bleeper, use a stereo jack plug and
leave the jack’s ring unconnected. (Fairhaven can supply this part). With
an intercom or piezo earpiece, use a mono jack, this will connect a lter
to give a smoother sound.
Reassembly: Take care when replacing the 4 screws. Engage the threads
by turning the screws slightly anti-clockwise before tightening. Do not
over tighten.
Audio tones
Tones are typical with a “bleep-bleep” that increases in rate and tone
frequency to indicate lift and a continuous tone for sink. The sink tone
starts high and reduces in tone with increasing sink. See “Changing
Settings” to customise the vario’s tone response.
Any type of stereo earbuds can be used too, or the Alti Vario can be
connected to an intercom for tandem or sailplane gliding, to your paramotor
headset auxiliary input, or as an aid if you have impaired hearing.
You can set the Alti Vario to match your headset type and volume
preference with a moveable link inside the case, situated behind the
power switch. Use the lower settings for headphones and the higher
settings for an external piezo bleeper. Headset volume is independent of
the volume settings for the internal bleeper.
Page 18

16
Mounting
The Alti Vario can be mounted on your wrist, over a coat sleeve or on your
risers, or it can be panel-mounted in sailplane gliders etc. We supply a
spare strap that can be cut down as required and 2 adhesive Velcro pads
that will stick to most surfaces and can be sewn onto clothing. The strap
retainer can be xed horizontally or vertically or removed if the Micro Alti
is mounted onto a at surface. Additionally you may wish to tie a loop
of cord to the strap retainer and pass the cord around your wrist or riser
for extra security. Ensure that this will not entangle with lines or controls.
Battery
The battery is a 100mA re-chargeable Lithium Polymer type that is
automatically re-charged when the Micro Alti is plugged in to any USB
5 volt supply, such as a computer, phone charger, satnav lead or solar
charger and we have included a neat little charger that plugs into your
car’s cigarette lighter socket.
The Micro Alti lights up when charging and a full charge of one hour will
supply the Alti Vario for up to 5 days of typical use, but even a short charge
is sucient for most ights. The charger will switch o automatically and
the light will extinguish at the end of the charge period.
Note: This product is designed as an aid in the sport of amateur ying
under visual ight rules. It is not guaranteed for use in obstacle or
aircraft avoidance.
The specication may change from time to time and rmware upgrades can be provided if required.
Page 19

Page 20

18
 Loading...