

Page 1
Washer-dryer installation and operation manual
Manual de instalación y uso de la lavadora-secadora
Manuel d’installation et d’utilisation de le lave-linge séchant
FAS 3612 / FAS 3612X
Page 2

27
28
29
33
43
45
48
ADVERTENCIAS
ESPECIFICACIONES
INSTALACIÓN Y MONTAJE
USO DEL APARATO
Y CONSEJOS PRÁCTICOS
MANTENIMIENTO
Y LIMPIEZA DEL APARATO
SEGURIDAD
Y SOLUCIÓN DE PROBLEMAS
ADVERTENCIAS SOBRE
EL MEDIO AMBIENTE
4
5
6
10
20
22
25
WARNINGS
SPECIFICATIONS
INSTALLATION AND ASSEMBLY
USING THE APPLIANCE.
PRACTICAL TIPS
MAINTENANCE
AND CLEANING
SAFETY
AND TROUBLESHOOTING
ENVIRONMENTAL
WARNINGS
washing machine
contents
lavadora
índice
Page 3

49
50
51
55
65
67
70
AVERTISSEMENTS
SPÉCIFICATIONS
INSTALLATION ET MONTAGE
UTILISATION DE L’APPAREIL
ET CONSEILS PRATIQUES
MAINTENANCE
ET ENTRETIEN DE L’APPAREIL
SÉCURITÉ
ET RÉSOLUTION DE PROBLÈMES
AVERTISSEMENTS SUR
L’ENVIRONNEMENT
lave-linge
index
Page 4

4
warning
To reduce the risk of fire, electric shock, or injury to persons, read the IMPORTANT SAFETY INSTRUCTIONS
before operating this appliance.
1) Read all instructions before using the appliance.
2) Do not wash articles that have been previously
cleaned in, washed in, soaked in, or spotted with
gasoline, dry-cleaning solvents, or other flammable
or explosive substances, as they give off vapours
that could ignite or explode.
3) Do not add gasoline, dry-cleaning solvents, or
other flammable or explosive substances to the
wash water. These substances give off vapours
that could ignite or explode.
4) Under certain conditions, hydrogen gas may be
produced in a hot-water system that has not been
used for 2 weeks or more. HYDROGEN GAS IS
EXPLOSIVE. If the hot-water system has not been
used for such a period, before using a washing
machine, turn on all hot-water faucets and let the
water flow from each for several minutes. This will
release any accumulated hydrogen gas. As the
gas is flammable, do not smoke or use an open
flame during this time.
5) Do not allow children to play on or in the
appliance. Close supervision of children is
necessary when the appliance is used near children.
6) Before the appliance is removed from service
or discarded, remove the door.
7) Do not reach into the appliance if the tub or
agitator is moving.
8) Do not install or store this appliance where it
will be exposed to the weather.
9) Do not tamper with controls.
10) Do not repair or replace any part of the
appliance or attempt any servicing unless
specifically recommended in the user-maintenance
instructions or in published user-repair instructions
that you understand and have the skills to carry
out.
important safety instructions
WARNING - To reduce the risk of fire, electric shock, or injury to persons when using your appliance,
follow basic precautions, including the following:
grounding instructions
This appliance must be grounded. In the event of malfunction or breakdown, grounding will reduce the
risk of electric shock by providing a path of least resistance for electric current. This appliance is equipped
with a cord having an equipment-grounding conductor and a grounding plug. The plug must be plugged
into an appropriate outlet that is properly installed and grounded in accordance with all local codes and
ordinances.
WARNING - Improper connection of the equipment-grounding conductor can result in a risk of electric
shock. Check with a qualified electrician or serviceman if you are in doubt as to whether the appliance is
properly grounded.
Do not modify the plug provided with the appliance - if it will not fit the outlet, have a proper outlet installed
by a qualified electrician.
SAVE THESE INSTRUCTIONS
Page 5
5
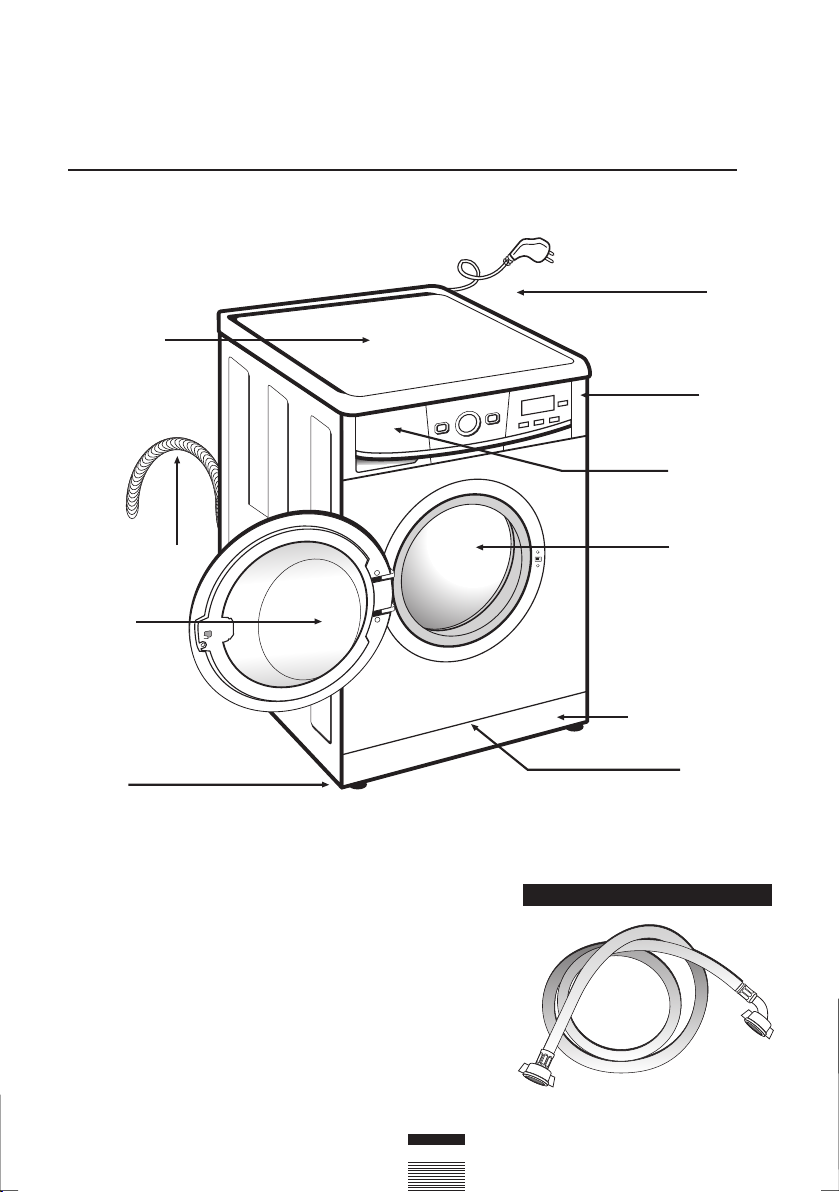
washing machine
Water inlet hose.
specifications
Power
cord
Control
panel
Detergent
dispenser
Stainless
steel drum
Accesible filter
(behind kickplate)
Kickplate
Drain hose
Hatch
Adjustable
feet
Work top
ACCESSORIES
Page 6
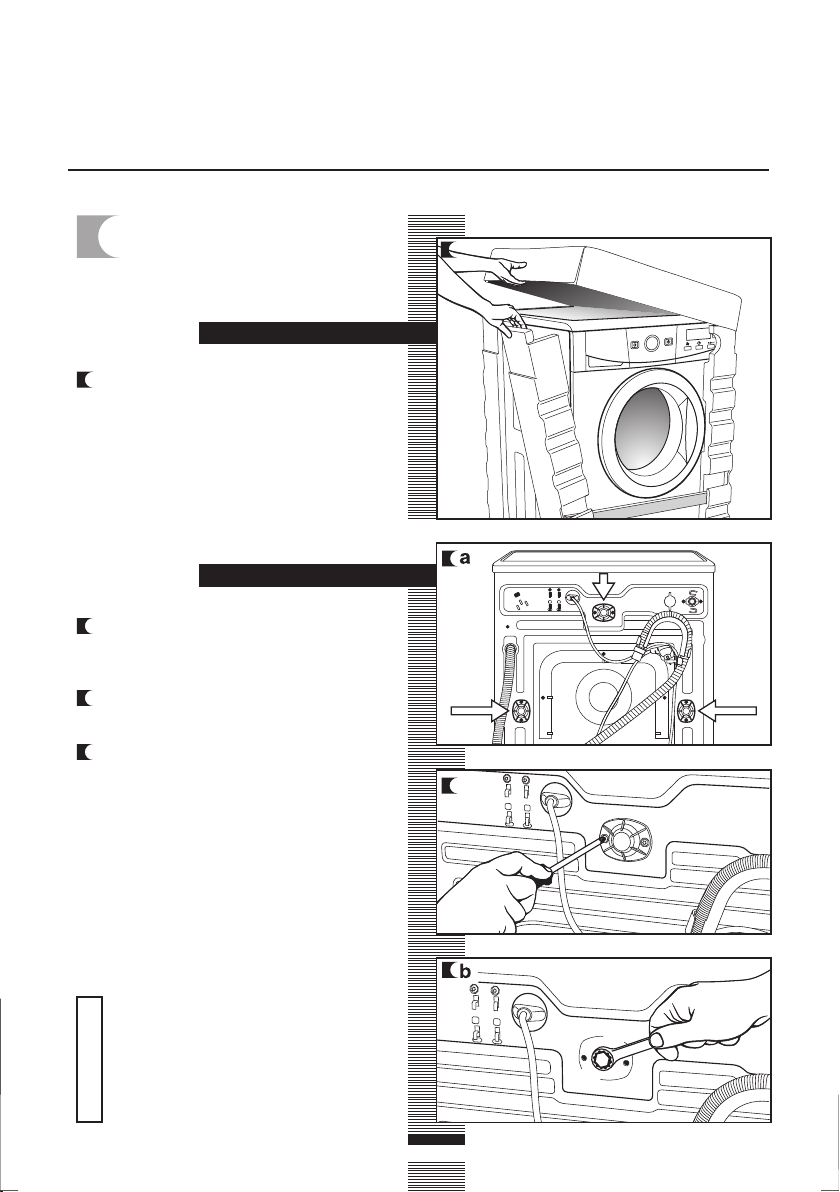
6
a/c
a
washing machine
a Remove the screws holding the plastic
covers to the back of the washing
machine.
b Loosen and remove the 3 blocking
screws.
c Cover the holes with the plastic covers
you have just removed.
installation and assembly
Keep all the blocking screws: You will
need them again if the machine needs
to be moved again to another
location.
Important
a Remove the base, corner protectors and
top cover.
1
UNPACKING AND
UNBLOCKING THE
WASHING MACHINE
UNBLOCKING
UNPACKING
Page 7
7
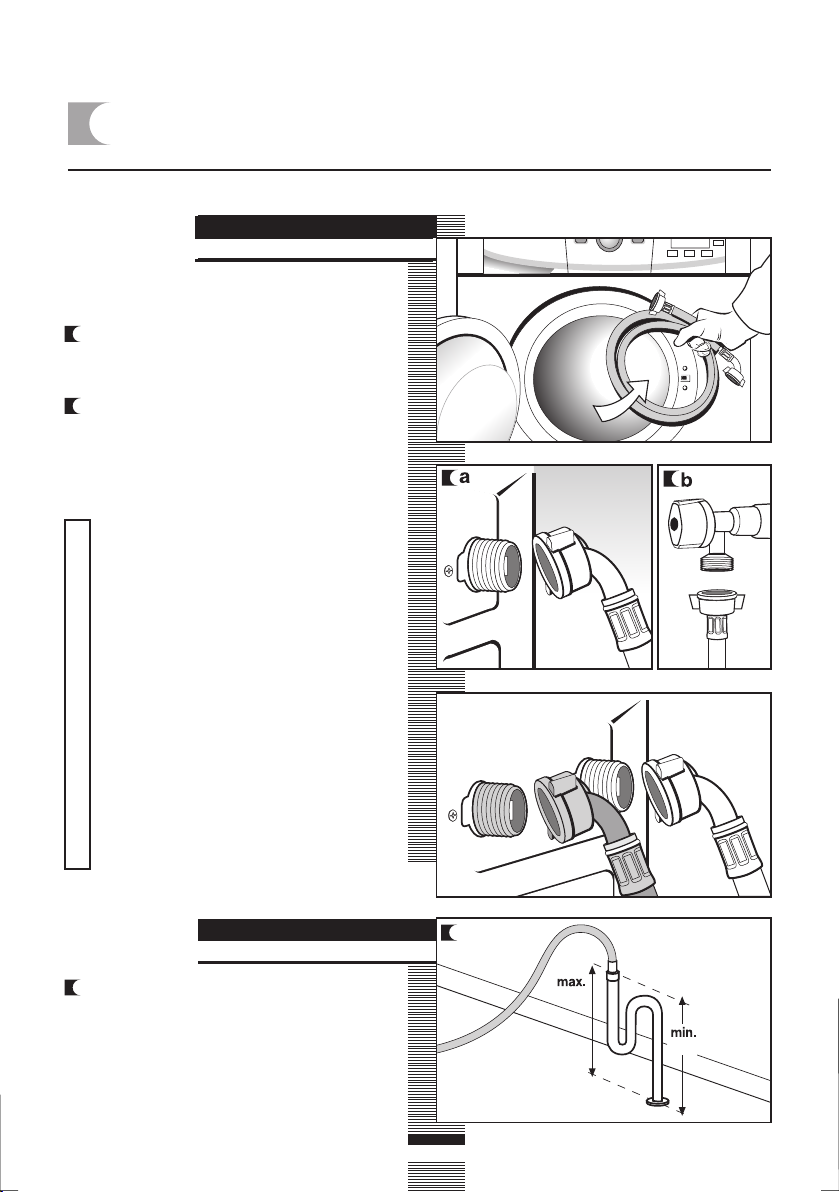
2
a
28’’
20’’
DRAINAGE
CONNECTION
WATER AND DRAINAGE CONNNECTION
The water supply hose is inside the drum:
a Connect the bent end of the hose to the
threaded inlet located on the back of
the washing machine.
b Connect the other end of the hose to
the water intake. Then securely tighten
the connection nut.
installation and assembly
It is important that the drain hose is
correctly fastened to the outlet, to
prevent any risk of it becoming
detached and causing flooding.
If your washing machine has a hot
water intake, connect the hose with
the red threaded end to the hot water
tap, and to the electrovalve with the
red filter.
The machine must be connected to
the mains water supply, using the
new hoses supplied with the
appliance. Do not use water supply
hoses that have been used before.
For your washing machine to work
properly, the water pressure-must be
between 0.05 and 1MPa (0.05 and 10
Kgr/cm
2
).
a It is recommended that you have a fixed
drainage outlet 20-28 inches from the
floor.
Make sure there are no kinks or bends
in the hose.
Important
WATER
CONNECTION
Page 8
8
3
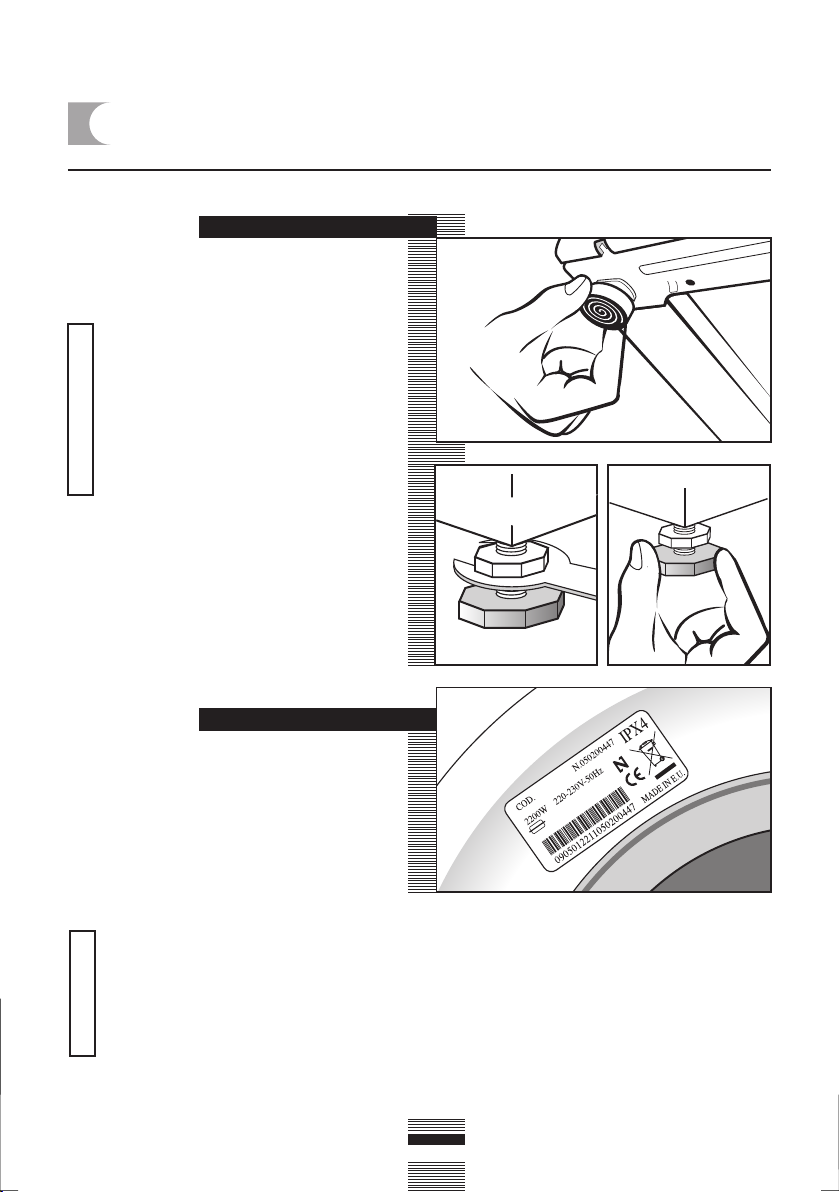
Important
Use the adjustable feet to level the
washing machine. Levelling your
appliance correctly will provide it with
stability and prevent unnecessary
noise, vibrations and shifting during
operation.
If the floor is not perfectly level,
compensate for the unevenness by
tightening or loosenig the adjustable
feet.
You will need to use a wrench for the
models that have a nut.
Important
LEVELLING AND ELECTRICAL CONNECTION
installation and assembly
Consult the specification plate located on the
hatch door of the washing machine before
making electrical connections.
The specifications plate contains
important reference information, therefore
it is not recommended to be removed
from the appliance.
ELECTRICAL CONNECTION
LEVELLING
It is very important to correctly ground
the washing machine. The socket must
be able to sustain the appliances
maximum power load indicated on the
specification plate.
Do not plug the washing machine in with
wet or damp hands.
To disconnect, pull on the body of the
plug.
Be sure not to unplug the unit by pulling
on the cord or you may cause damage the
wiring.
If the power cord is damaged, it must be
replaced by an approved technical service
person.
If you intend to build this unit in, ensure
that, the plug is accessible after installation.
Connect to individual branch circuit.
Page 9
9
4
a
c
b
After your washing machine has been installed,
we recommend that you pre-clean it.
This is to check that the installation, the
connections and the drainage are all correct,
and to thoroughly clean the inside of the
washing machine before any wash programs
are run (see the operating instructions on the
following pages).
a Press ON/OFF button.
b Select the normal program at 140ºF.
c Press the start/pause button.
UNDER COUNTER DIMENSIONS AND PRE-CLEANING
DIMENSIONS
APPLIANCES DIMENSIONS
• Wide: 23
1/4”
• High: 33
1/2”
• Depth: 23
1/4”
MINIMUM CLEARANCE
• Wide: 23
5/8”
• High: 32
5/16” - 35 3/8”
• Depth: 23
5/8”
PRE-CLEANING
Your washing machine may be fitted
underneath a kitchen countertop by first
removing the machine’s worktop.
Page 10
10
Important
Before using the drying
program, first check the
label on the garment to
make sure it can be
tumble dried.
Make sure
beforehand
that your
woollens are
machine
washable.
washing machine
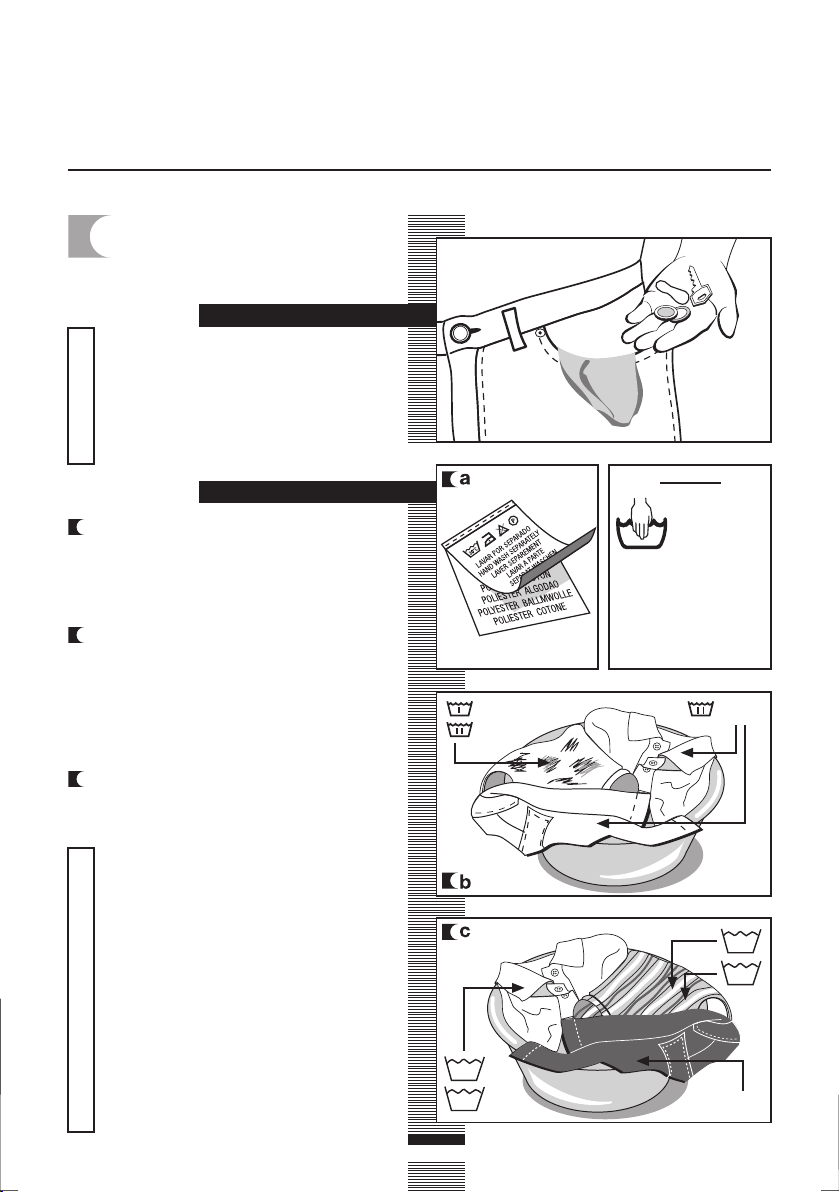
a Sort laundry by garment label
instructions.
We recommend using delicate programs
for sensitive fabrics. There is a special
wool program for woollens.
b Sort laundry according to soil level:
• Wash lightly soiled garments using a
short program.
• Use a program without prewash for
medium-soiled garments.
• Wash heavily soiled garments using a
long program with prewash.
a Sort your clothes according to color.
Wash whites and colors separately.
using the appliance and practical tips
Before placing the clothes in the
drum, make sure all pockets are
empty.
Any small objects may block the drain
pump.
Prewash
Wash
Wash
1
PREPARING
GARMENTS FOR
LAUNDERING
86
140
194
104
Cold
Important
We recommend loading the washing
machine to its full capacity. This
means savings on water and energy.
Whenever possible, we recommend
that you wash garments of different
sizes within the same wash program.
This improves the washing action and
also aids the correct distribution of
the garments in the drum when spindrying.
It is a good idea to put small garments
in a wash bag.
SORTING LAUNDRY
Important
PREPARATION
Page 11

11
2
a
b
c
DETERGENT AND
ADDITIVES
a Your washing machine’s detergent
dispenser has three compartments.
b Add detergent and softener to the
dispenser before starting the wash
program.
c Liquid detergents may be used in this
washing machine. An optional
detergent dispenser is to be used for
this, which can be obtained from the
Technical Service Network.
Place this optional dispenser inside the
wash compartment.
The level of liquid must never be
higher than the MAX mark printed on
the dispenser wall.
Remember that the amount of detergent to
be used will always depend on:
The amount of clothes to be washed.
How heavily the clothes are soiled.
The hardness of the water (Information on
water hardness in your area can be obtained
from your local authorities).
We recommend the use of a
decalcifying product if the water
hardness is high in your area.
USING DETERGENT AND ADDITIVES
eco-note
using the appliance and practical tips
Remember that concentrated detergents
exist which are more environment- and
nature-friendly.
The use of more detergent than
necessary will not improve
washing results, and apart from costing
you money it will have a negative effect
on the preservation of the
environment.
We therefore recommend you follow
the detergent manufacturer’s
instructions.
Wash
Fabric softener
Prewash
Important
Important
Page 12
3
SELECTING THE WASH AND DRY PROGRAM
The procedure for selecting the wash and
dry program is as follows:
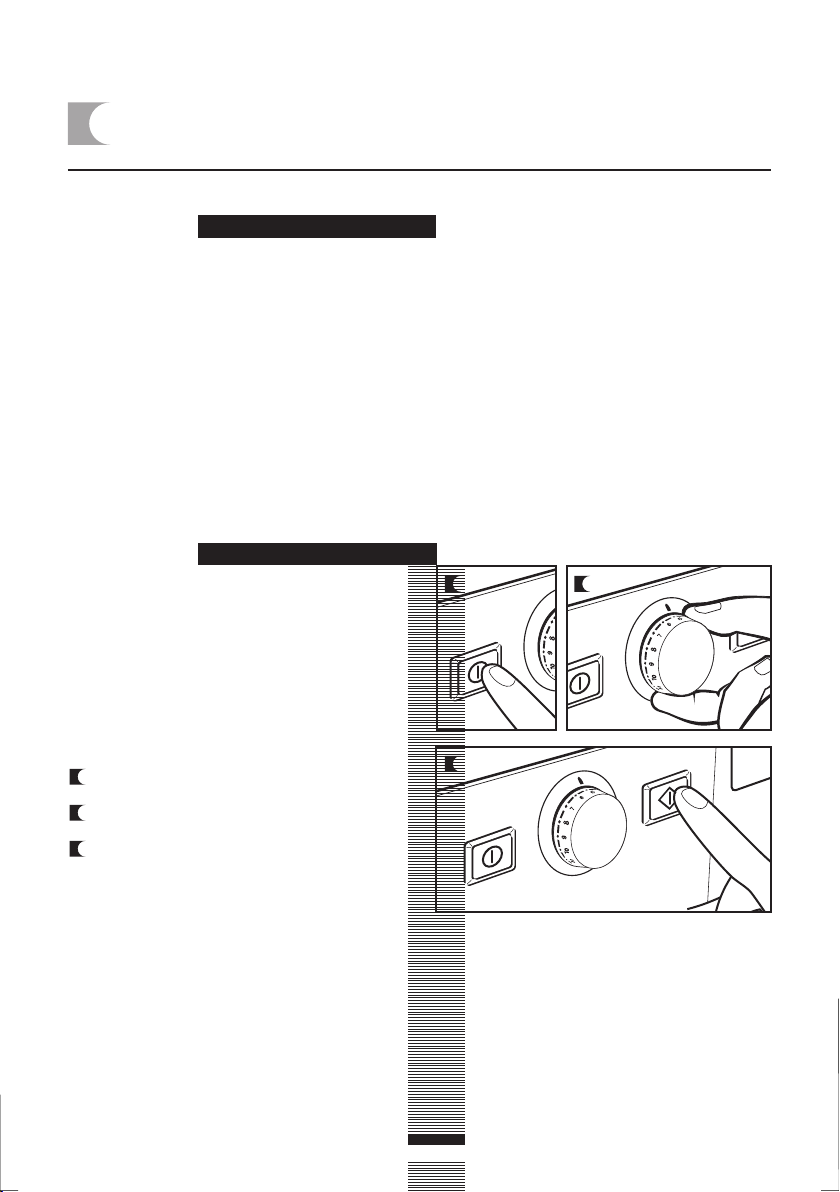
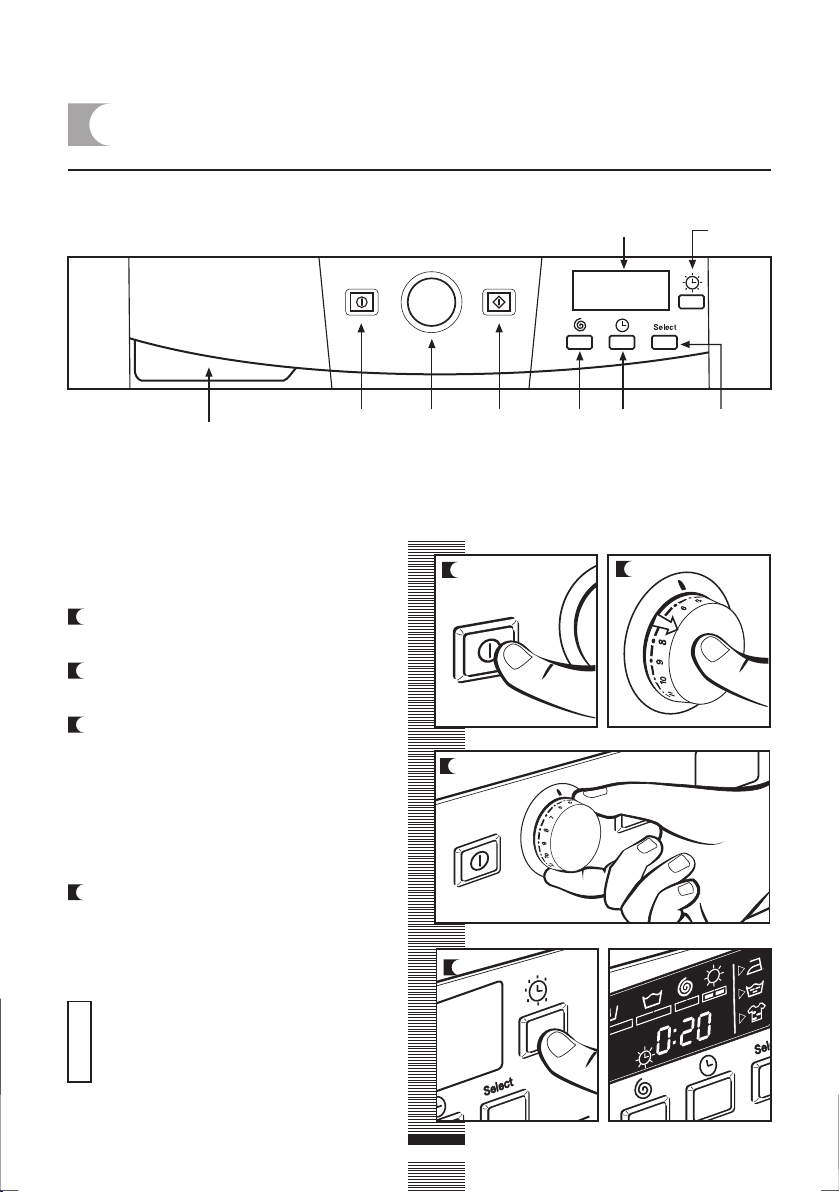
a Switch the washing machine on by
pressing ON / OFF.
b Activate the program selector by pressing
it to release it.
c Select the wash program by turning the
program selector dial (see program table).
12
drying
time
button
The procedure for selecting the drying time
is as follows:
a Select the drying time by pressing the
drying time button.
The time will appear on the display,
increasing each time the drying time
button is pressed.
If you select a wash + dry option, the
load must not be over 9 lbs. (3,5 lbs.
for delicate wash programmes).
a
a
b
Important
c
using the appliance and practical tips
program
selector
ON/
OFF
button
start/
pause
button
additional
function
button
time
delay
button
spin and
anti-crease
button
screen
detergent dispenser
Page 13
13
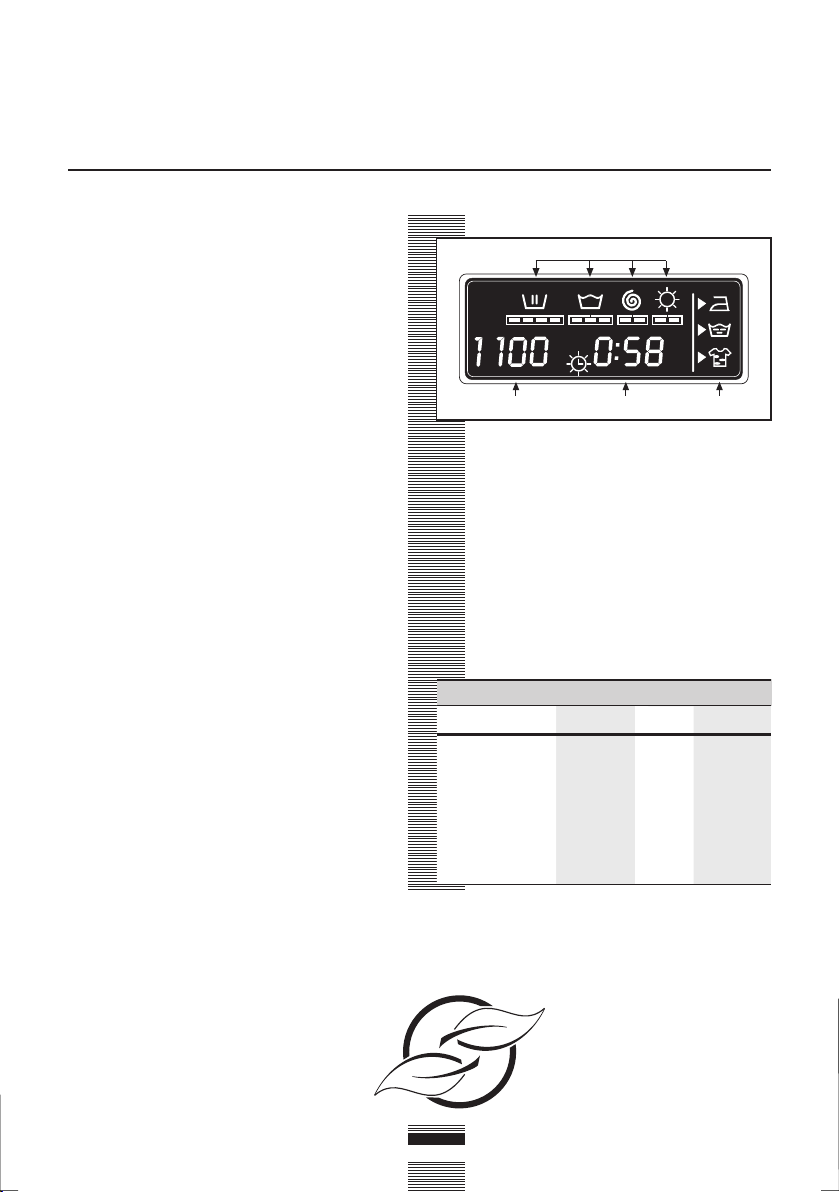
1
234
using the appliance and practical tips
When you select the desired program, the
following information will be displayed:
1 Wash and dry program status:
Wash
Rinse
Spin-drying
Dry
2 Spin speed
3 Number Program (for a few
seconds) and then program
duration.
4 Additional functions
Easy iron
Extra rinse
Intensive wash
There are four types of programs:
Normal program
Delicate program
Auxiliary program
Drying program
We recommend you choose a wash
program without prewash whenever
possible. This will save you money and
help protect the environment.
eco-note
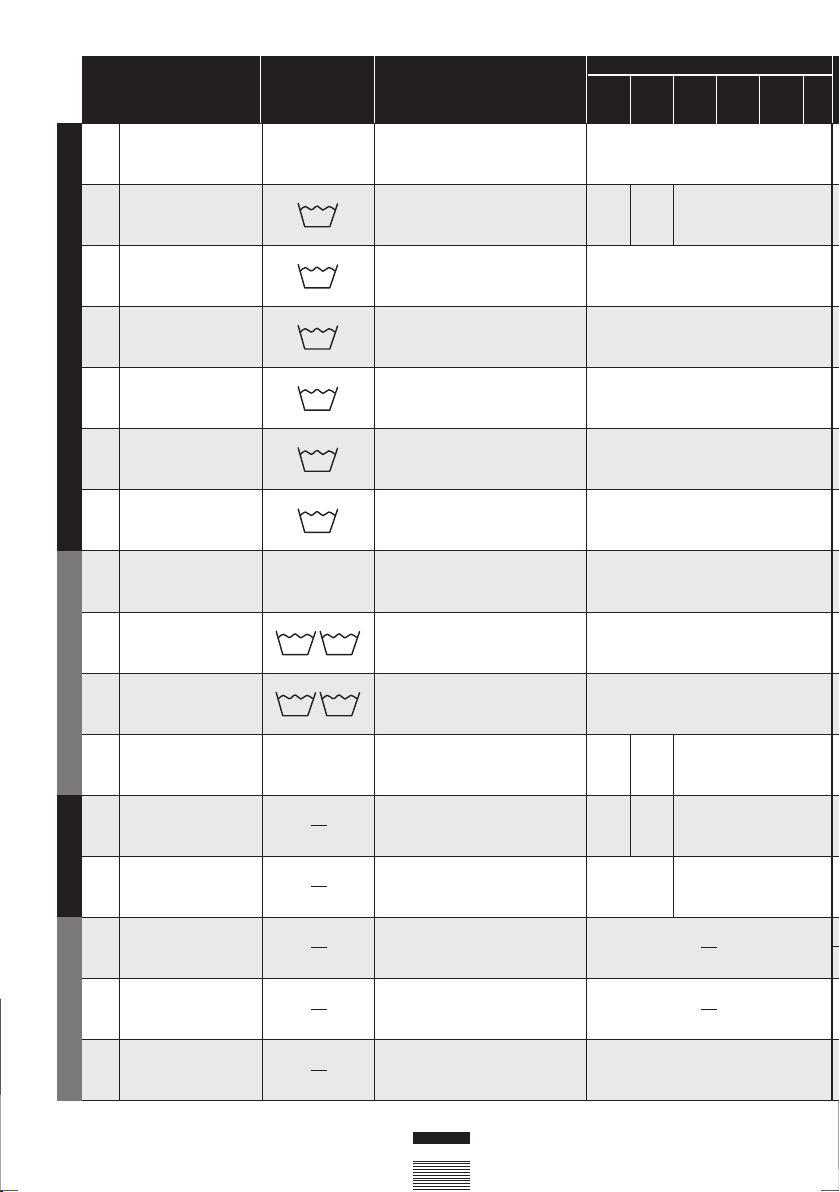
Normal Delicate Auxiliary Drying
PROGRAMS
Normal Wash-Cold
Quick Wash
Normal Wash-Light Soil
Normal Wash-Warm
Normal Wash-Medium Soil
Hygenizer
Pre-Wash
Cold Wash
Light Soil
Medium Soil
Wool
Rinse
Spin
Normal Dry
Delicate Dry
Drain
1
2
3
4
5
6
7
8
9
10
11
12
13
14
15
16
Page 14
YES NO YES
YES
YES
YES
YES
YES
YES
YES
YES
YES
YES
YES
YESNO
NO
1
2
3
4
5 (*)
6
7
8
9
10
11
12
13
14
15
16
Drying Programmes
Cold
Cold
Wool 95
86
86
104
140
194
140
104104
8686
YES NO
Normal prog.Delicate prog.
Aux. prog.
Program
Temperature
Fabric type
Extra
rinse
Intensive
wash
Easy-iron
Spin speed
selection
No spin
Anti-crease
Possible option buttons
YES NO
Cotton/Linen
delicate colours
very light soil
Cotton/Linen
whites/colours
very light soil
Cotton/Linen
delicate colours
light soil
Cotton/Linen
fast colours
light soil
Cotton/Linen
fast colour
medium soil
Cotton/Linen
whites
heavy soil
Cotton/Linen
whites/fast colours
heavy soil
Synthetic/mix cotton
delicate colours
very light soil
Synthetic/mix cotton
delicate colours
light soil
Synthetic/mix cotton
delicate colours
medium soil
Wool/wool mix
whites/colours
light soil
Cotton/cotton mix
Synthetic/Delicate
Wool/wool mix
Cotton/cotton mix
Synthetic/Delicate
Wool/wool mix
Cotton/Linen
Synthetic/mixed fabrics
Cotton/cotton mix
Synthetic/Delicate
Wool/wool mix
(*)
Programme for wash and energy consumption assessment
in accordance with standard EN60456, press intensive wash
button.
14
Normal WashCold
Quick Wash
Normal WashLight Soil
Normal WashWarm
Normal WashMedium Soil
Hygenizer
Pre-Wash
Cold Wash
Light Soil
Medium Soil
Wool
Rinse
Spin
Normal Dry
Delicate Dry
Drain
Page 15
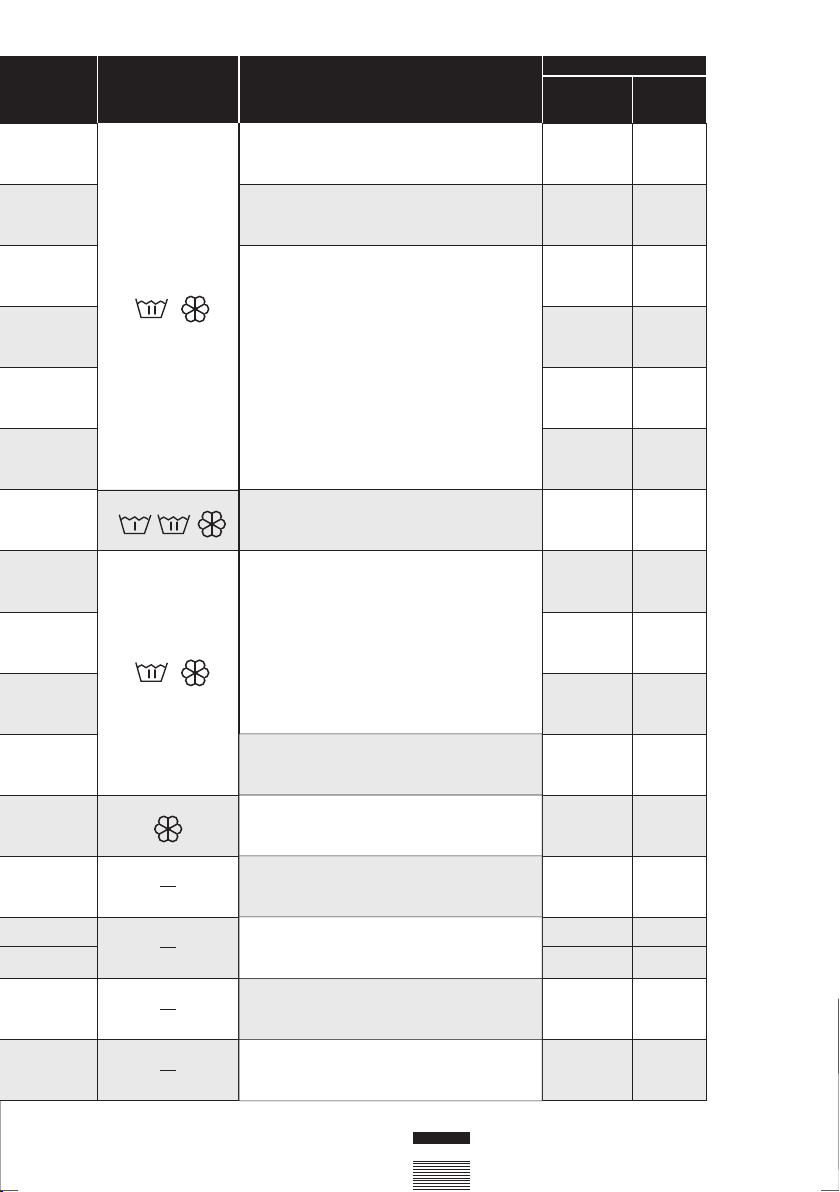
0,15/49
0,20/30
0,40/49
0,65/49
1,02/49
1,90/55
1,45/60
0,15/55
0,35/55
0,60/55
0,50/60
0,05/30
0,05/0
2,8/48
1,8/27
1,2/26
0,00/0
60
30
82
87
91
110
105
50
50
55
40
23
10
160
100
95
2
13
3
13
13
13
13
13
7
7
7
2
13
13
9
7
3
13
Wash
product
compartment
Programme
description
Total
consumption
KWh/Litres
Approx.
duration
(minutes)
Max load
of clothes
(Lbs.)
Normal wash, rinses,
automatic additive absorption if
desired and long final spin
Short wash, rinses,
automatic additive absorption if
desired and long final spin
Normal wash, rinses,
automatic additive absorption
if desired and
long final spin
Prewash, normal wash, rinses,
automatic additive absorption if
desired and long final spin
Delicate wash, rinses,
automatic additive absorption
if desired and
gentle final spin
Wool wash, rinses
automatic additive absorption if desired
and gentle final spin
Rinses, automatic additive
absorption if desired and
long final spin
Drain and long final spin
Normal dry
Delicate dry
Drain and end of programme.
NOTE: the KWh and litre consumptions and programme durations may vary depending
on the type and amount of clothes, water pressure, etc.
15
TURBO TIME
Page 16

16
4
b
c
a
d
Select
Select
Select
Select
SPIN SPEED SELECTION
using the appliance and practical tips
SPIN-DRYING
Additonal wash options must be selected after
choosing the wash program. Any program
change during selection cancels the previously
selected options.
a Spin speed selection and anti-crease
button
The selected program has its own
particular spin speed.
b You can change it by repeatedly pressing
the spin button. The spin speed will
gradually be reduced at 100 r.p.m.
intervals to 400 r.p.m. for display models.
On non-display models the LED will
light up.
c No spin
Press the spin button again to get to the
no spin option. This program disables
the final spin process to prevent creasing
when washing special fabrics.
d Anti-crease option
The wash program stops on the last
rinse, leaving garments to soak in water.
When the function is deactivated, the
washing machine continues the program,
draining and spin-drying.
It is used, for example, when you are
not at home and want to delay the spindrying until you get home, to prevent
clothes from being left in the drum and
becoming wrinkled.
Page 17
17
5
b
Select
Select
Select
a
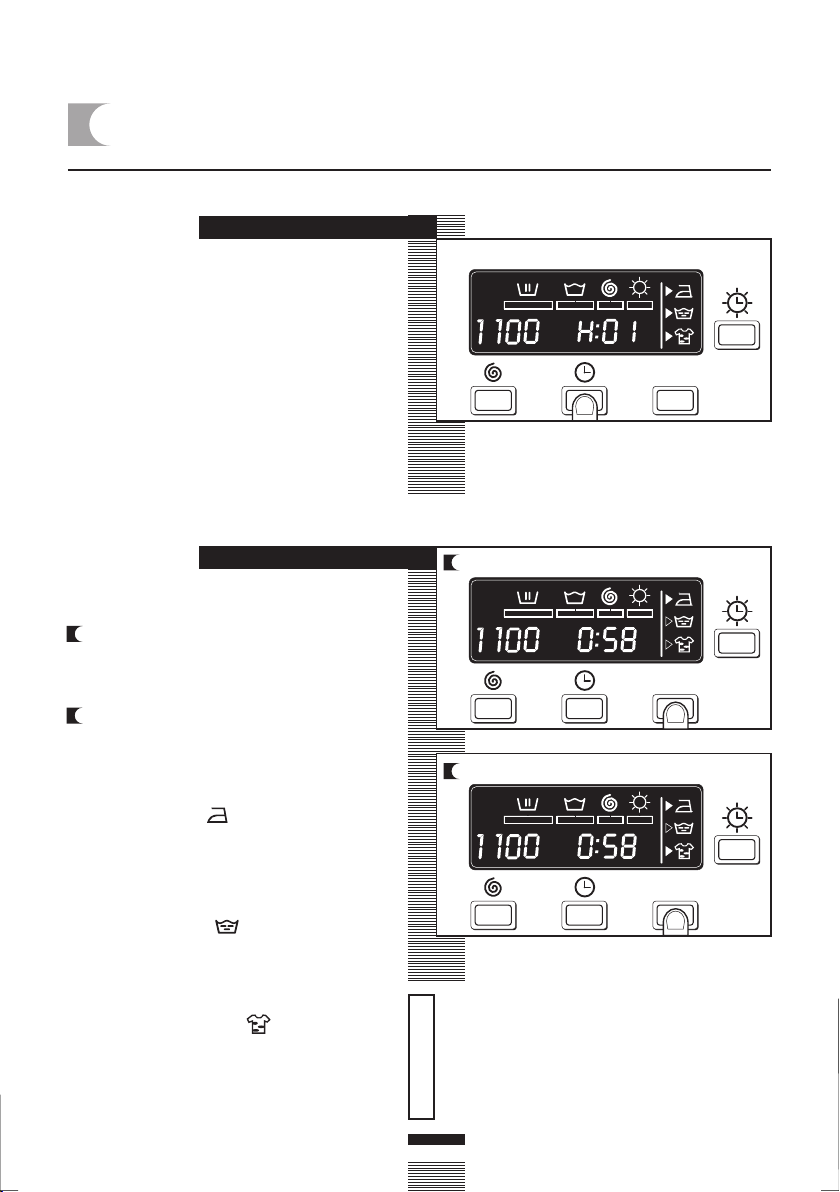
Time delay selection button
A delay of up to 24 hours can be selected.
The delay must be selected after choosing the
wash program.
To set the time delay, press the clock button.
Each time the button is pressed the wash
program will be delayed by 1 hour.
Cancelling the delay
To cancel the delay you must press the clock
button successively. The delay will be cancelled
when 24 hours have been reached and the
button is pressed once more. If the program
is changed the delay will also be cancelled.
TIME DELAY SELECTION AND
ADDITIONAL FUNCTIONS
using the appliance
Additional function selection button
depending on program.
a There are 3 options: easy iron, extra
rinse and intensive wash.
Press the button and the desired option
will be displayed.
b By pressing the button several times you
can choose between several
combinations of one, two or three
additional functions at the same time
depending on the program selected.
Button: Easy-iron ( )
This option prevents garments from
wrinkling by means of unique drum
rotations that help to fluff out garments
after spin-drying and make them easier
to iron.
Button: Extra rinse ( )
Increases the final rinse; suitable for large
loads or for garments belonging to
people with sensitive skin. Increases
water consumption!
Button: Intensive wash ( )
This option, is recommended for heavily
soiled, stained clothes. Achieves better
results by extending the normal wash
cycle.
TIME DELAY
ADDITIONAL FUNCTIONS
If during the additional function selection, the
program is changed or the ON/OFF button is
pressed, the functions selected will be
cancelled.
Important
Page 18
18
6
Select
a
a
b
Select
Select
Start/pause button
a To start up the washing machine you
must press the start/pause button. The
minutes remaining until the end of
washing and drying will appear on the
display at all times.
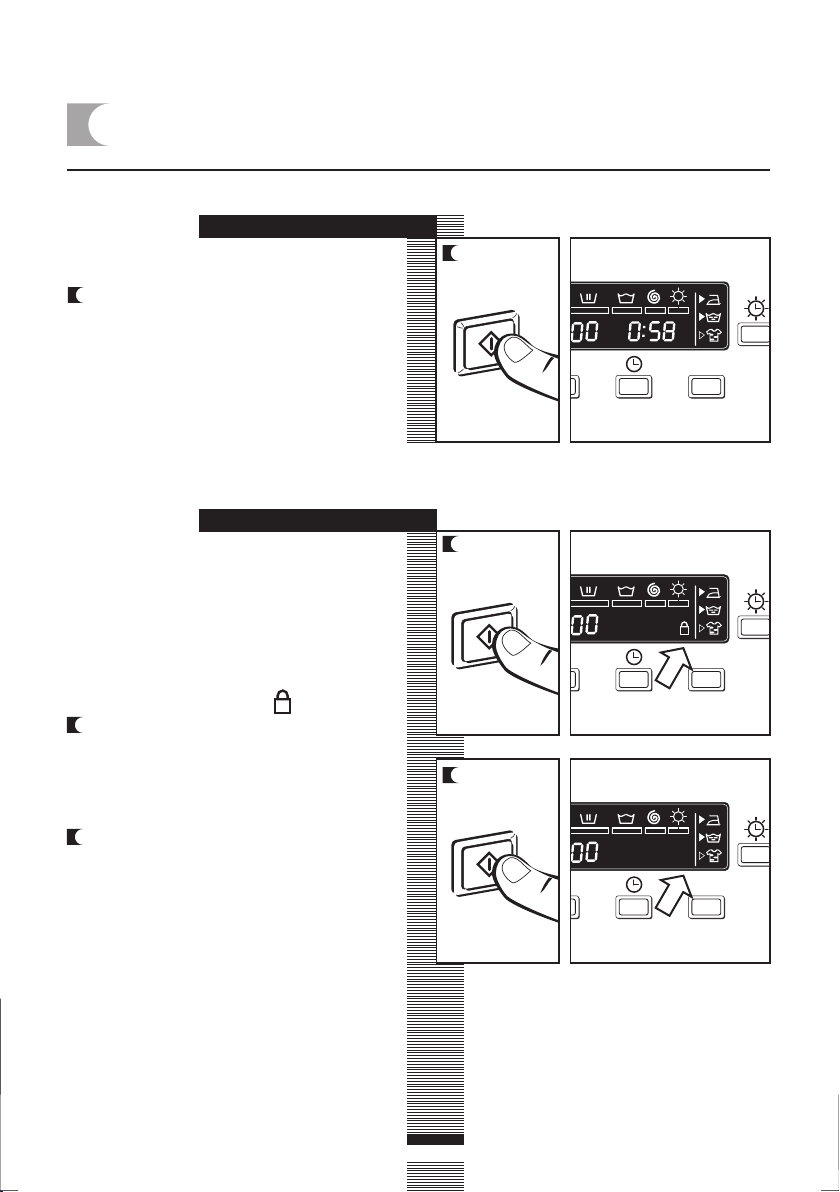
STARTING UP AND
CHLD SAFETY LOCK FUNCTION
using the appliance
STARTING UP
Lock function selection
The lock function ensures that the program
will not be interrupted if any buttons are
pressed.
The block function should be activated after
the wash program and additional options have
been selected.
Activating the lock function
a The lock function can be activated by
pressing the start/pause button and
holding it down for at least 3 seconds.
The display will show if it is activated.
Deactivating the lock function
b The lock function is cancelled when the
wash programme comes to an end. If
you want to deactivate the block function
before the end of the programme, you
have to hold the start button down again
for at least 3 seconds. After 3 seconds,
the block function indicator will disappear
from the display, and it will go into pause
status.
The ON/OFF button does not cancel
the block function.
CHLD SAFETY LOCK FUNCTION
Page 19
19
7
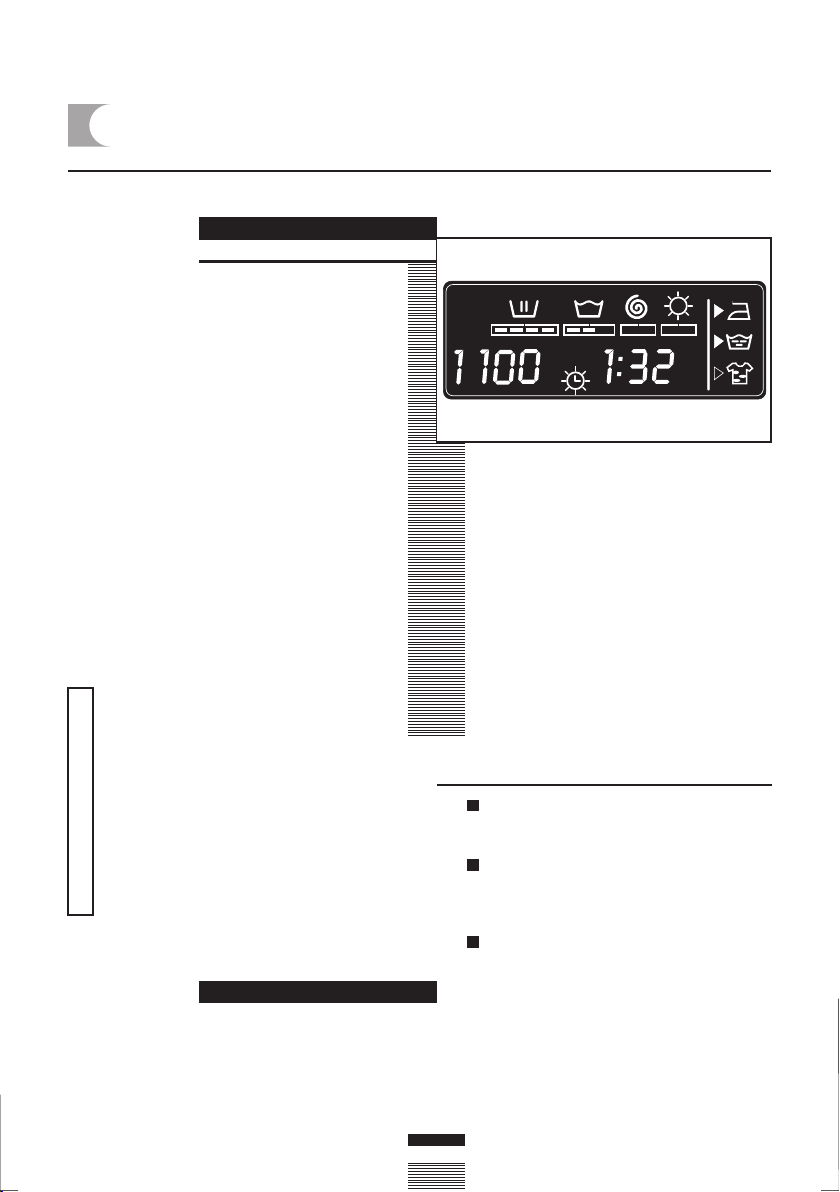
When the program is running, the program
phase and the time remaining for it to end will
appear on the display.
The active phases will appear successively at
the top of the display as the program
progresses. The time remaining until the end
of the program will also appear on the display.
Please Note: the display will update itself at
regular intervals, but not minute by minute.
Any option button can be selected provided
the wash phase in which it takes effect has
not been passed and when the programme
allows for the option.
Pressing the delay button during washing will
have no effect on the washer-dryer.
Pressing the start/pause button during the
wash activates the PAUSE function.
WASH PROGRAM PHASES
AND POWER OUTAGES
using the appliance
If there is a power outage, the washing machine
will continue to run from where it left off after
power is restored. The same will happen if the
ON/OFF button is pressed.
POWER OUTAGES
PROGRAM
PHASES
If the program is changed on the
selector dial during the washing and
drying process, the washer-dryer will
switch itself to PAUSE status and the
original program will be cancelled.
If you need to add or remove a
garment during a program, press the
start/pause button and wait for the
door to unlock itself that the
temperature inside is not high. Press
the start/pause button again to restart
the wash from the same cycle phase
it had stopped at.
Important
warnings
Level the washing machine by adjusting the
feet to reduce the noise level produced during
the spin cycle.
Try and wash clothes of different sizes in
the same wash program to even out the
distribution of the clothes inside the drum
during spin-drying.
This model is equipped with a safety system
for spin-drying that prevents spin-drying from
being carried out if the distribution of the
clothes inside the drum is too concentrated.
This prevents the appliance from vibrating too
much.
If you find that the clothes are still excessively
wet after the spin cycle, try re-starting the spin
cycle after distributing the clothes more evenly
in the drum.
Page 20
20
a
b c
washing machine
maintenance and cleaning
After each wash, we recommend leaving
the door open for a while to allow air to
circulate freely inside the machine.
From time to time, depending on the
hardness of your water, it is
recommended to run a full wash cycle
using a decalcifying product. This will
extend the life of your washing
machine.
MAINTENANCE
The washing machine should be
disconnected from the main
electricity supply before any
cleaning or maintenance is carried
out.
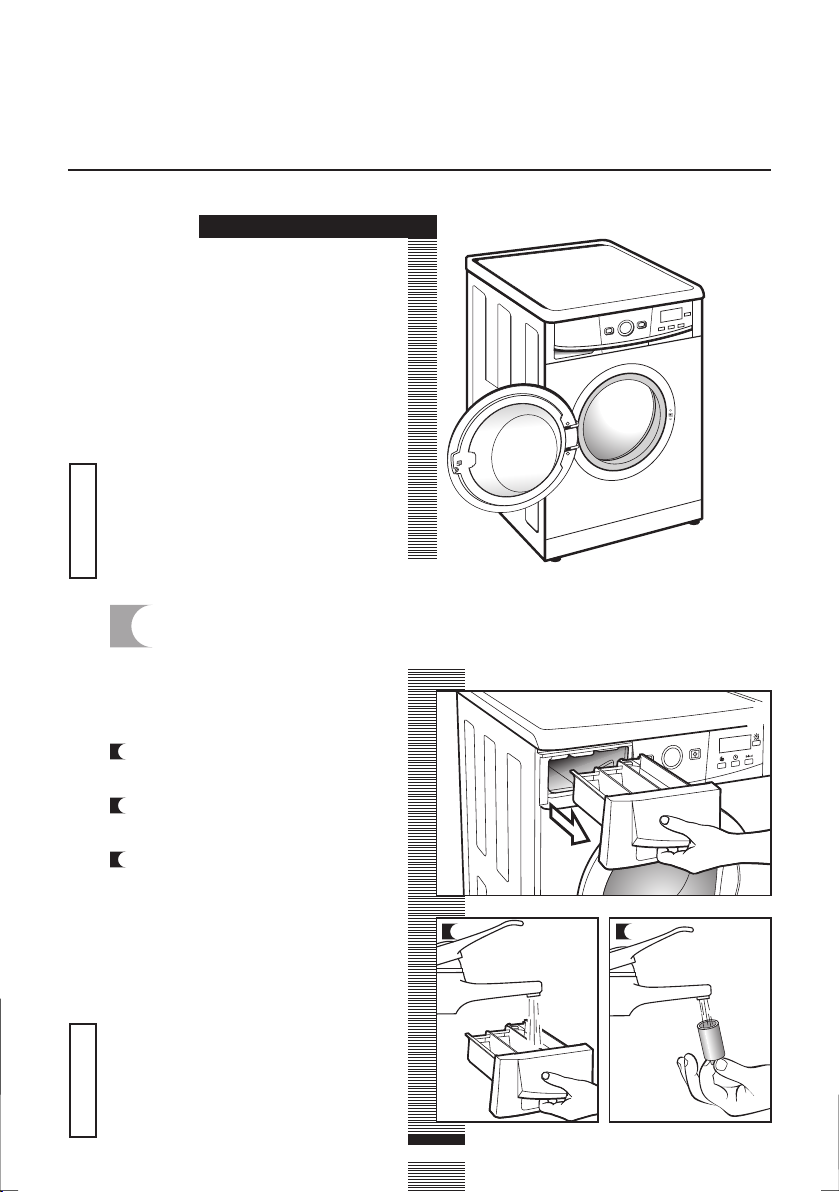
Clean the detergent dispenser whenever
there is any detergent residue left inside.
a Pull the detergent dispenser
outwards to remove it completely.
b Use warm water and a brush to
clean the compartments.
c Also clean the fabric softener
compartment siphons, having
removed them first. Once they
have been cleaned, put them back
making sure that they fit right in to
the back.
Put the dispenser back into the
washing machine.
A dirty or incorrectly fitted siphon
will prevent the additives from
being taken in and leave water
inside the compartment at the
end of the wash.
Important Important
1
CLEANING THE DETERGENT DISPENSER
Page 21
21
2
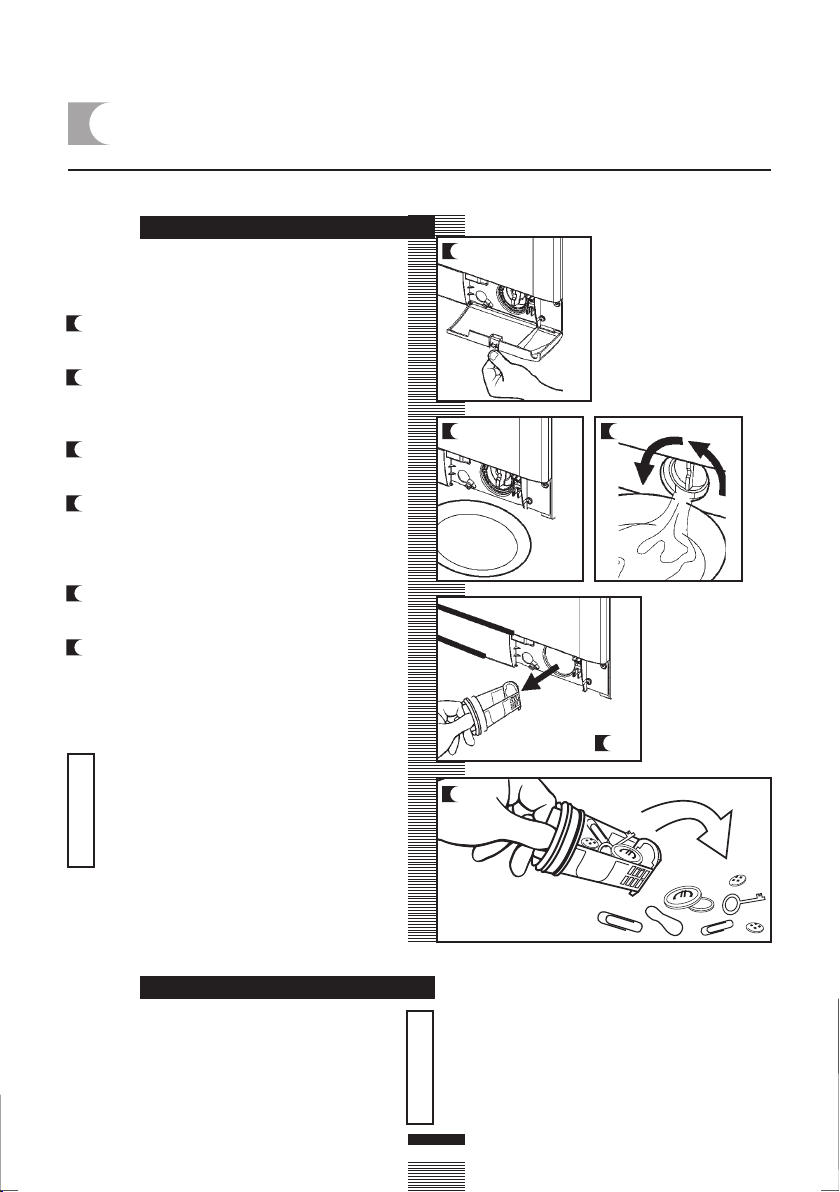
Clean the accessible filter if the drain pump
is blocked by any foreign objects.
a Open the plinth cover, by pressing the
lug and pulling gently on it.
b Place a container under the drain pump
filter in order to collect any water that
comes out of it.
c Half turn the filter to the left. Water will
begin to come out.
d When all the water has drained out of
the washing machine, turn the filter
several times until it can be completely
removed by gently pulling on it.
e Remove the objects or fluff caught in the
filter or the drain pump.
f Put the filter and kickplate back in place
again.
e
CLEANING THE FILTER
maintenance and cleaning
To avoid burns, do not carry out this
operation when the wash water is at
a temperature of over 86ºF.
Do not allow detergent spills to settle
on the washing machine cabinet as
they can be corrosive to the finish.
Important
Important
CLEANING THE OUTSIDE
CLEANING THE FILTER
The outside of the washing machine should
be cleaned with warm soapy water or a gentle
cleaning agent. Do not use abrasive cleaning
products or solvents.
After washing, be sure to dry thoroughly with
a soft cloth.
d
a
b c
Page 22

washing machine
safety and troubleshooting
22
If you detect any problems with
your washing machine, you will
probably be able to rectify them
yourself by consulting the following
instructions.
If this is not the case, unplug the
appliance and contact
TECHNICAL SERVICE.
PROBLEMS
Never attempt to make
technical repairs to your
appliance. There is no fuse
or similar component inside
that can be replaced by the
user.
Why won’t the washing
machine start?
Why is the washing machine
vibrating or making too
much noise?
This may be due to the following:
Check the door is properly shut.
The washing machine is not plugged in or there is no
voltage in the supply.
The Start/Pause button has not been pressed.
If the washing machine door is not properly shut, F04
will appear on the display.
This may be due to the following:
The blocking and transport screws have not been
removed.
The washing machine has not been correctly levelled.
CODE
FO1
FO2
CO3
FO4
FO5
.
.
.
.
.
F10
Definition
No water coming in
Does not drain or spin-dry
Does not spin-dry
Does not start
Call Technical Service
Important
Page 23

safety and troubleshooting
23
Why doesn’t the washing
machine take in water?
Why doesn’t the washing
machine drain or spin-dry?
Why doesn’t the washing
machine spin-dry?
Why can’t I see any water in
the drum during the wash?
Indicator F01, no water coming in, this may be due to
a cut in the water supply, a tap turned off or a blocked
water inlet filter.
The possible solutions are as follows: wait for the water
supply to be reconnected, turn on the tap, or remove
the water inlet hose and clean the filter.
If this failure is detected, F01 will appear on the display.
The reasons for the F02 indicator may be the following:
washing machine drain pump blocked, building drainage
pipes blocked, or incorrect pump connection.
Solution: if the pump is blocked, gain access to it as
described in section 2, maintaining and cleaning the
appliance.
If this failure is detected, F02 will appear on the display.
This may be due to an uneven distribution of garments
in the drum and may cause an excessive level of
vibration.
The solution is to select a spin-drying program.
If this failure is detected, C3 will appear on the display.
This is due to the fact that the washing machine is provided
with a system which is able to adapt to the load and type
of fabrics, adjusting the levels of water and energy used,
in order to aid in environmental preservation.
So, although the water level you can see through the hatch
may look low, there is no cause for concern as washing
and rinsing efficiency will still be optimum.
Page 24

24
safety and troubleshooting
Why is there water in the
detergent dispenser?
Why can’t I open the hatch
immediately after the wash
has finished?
Why doesn’t the remaining
time shown on the clock
coincide with the real time
left until the selected cycle
finishes?
Additional Codes
This may be because the dispenser needs cleaning. This
simple operation is described in Maintaining and cleaning
the appliance.
1- Cleaning the detergent dispenser.
This washing machine is equipped with a safety system
that locks the hatch for two minutes after the wash cycle
is complete. This allows the unit to drain properly.
This time is for guidance purposes only and may be affected
by the conditions under which the selected program is being
run. For example: initial water temperature, size of load or,
an unbalance caused by garments during spin drying.
The washing machine may display other codes that
indicate operational issues. When other indicators appear
on the display such as: F05, F06..., F10.
Please call Technical Service.
Page 25

25
washing machine
environmental warnings
When your appliance is of no further use, it should
not be disposed of together with general domestic
waste.
It can be taken, free of charge, to a specific waste
collection center, run by your local authority, or
dealers who provide this service.
Disposing of waste domestic appliances separately
means avoiding possible negative consequences
for the environment and health, derived from
incorrect disposal. This will enable the materials
in them to be treated and recycled, obtaining
important savings in energy and resources.
To highlight the obligation of collaborating with
selective waste collection, the product is marked
with a symbol to warn against using traditional
waste disposal methods for of the appliance.
For further information, contact
your local authority or the dealer
where you purchased the product.
INFORMATION FOR THE CORRECT DISPOSAL OF WASTE ELECTRICAL AND
ELECTRONIC APPLIANCES
eco-note
Page 26

26
Page 27

27
advertencia
Para reducir el peligro de incendio, descargas eléctricas, o daños personales, lea las IMPORTANTES
MEDIDAS DE SEGURIDAD antes de utilizar su aparato.
1) Leer todas las instrucciones antes de utilizarlo.
2) No lavar artículos que hayan sido limpiados o
lavados con gasolina, disolventes, productos de
lavado en seco u otras substancias inflamables o
explosivas, o que hayan estado a remojo en dichos
productos, ya que esas substancias emiten
vapores que podrían inflamarse o explotar.
3) No añadir gasolina, disolventes para limpieza en
seco u otras substancias inflamables o explosivas
en el agua de lavado, ya que esas substancias
emiten vapores que podrían inflamarse o explotar.
4) En un sistema de agua caliente que no haya
sido utilizado durante dos semanas o más, se
puede producir hidrógeno. EL HIDRÓGENO ES
EXPLOSIVO. Si no se ha utilizado el sistema de
agua caliente durante un cierto tiempo, abrir todos
los grifos de agua caliente y dejar que corra el
agua durante varios minutos antes de utilizar una
lavadora; de este modo saldrá el hidrógeno que
se haya podido acumular. El hidrógeno es
inflamable, por lo que no se debe fumar o utilizar
un aparato con llama mientras fluya el agua.
5) No permitir que los niños jueguen sobre o en
del aparato. Se debe vigilar a los niños si están
cerca del aparato cuando esté funcionando.
6) Antes de deshacerse del aparato al final de su
vida útil, retire la puerta.
7) No meta la mano en el aparato mientras se esté
moviendo la cuba o el agitador.
8) No instalarlo o colocarlo en un lugar en el que
esté expuesto a la intemperie.
9) No modificar los mandos.
10) No reparar o cambiar las piezas del aparato
ni realizar su mantenimiento, salvo que las
instrucciones indiquen que puede ser efectuado
por el usuario y si comprende bien las instrucciones
y posee los conocimientos necesarios.
importantes medidas de seguridad
ADVERTENCIA - Para reducir los riesgos de sufrir heridas, incendio o electrocución al utilizar el aparato,
es importante tomar las precauciones elementales de seguridad y:
puesta a tierra
El aparato debe ir conectado a tierra. En caso de mal funcionamiento o de deterioro del aparato, la puesta
a tierra reducirá el riesgo de sufrir una descarga eléctrica al ofrecer un recorrido de menor resistencia a
la corriente eléctrica. El aparato cuenta con un cable de tierra y una toma con puesta a tierra. Conéctela
a un enchufe correctamente instalado y con conexión a tierra de acuerdo con los códigos y normas locales.
ADVERTENCIA - Una mala conexión del conductor de tierra puede conllevar riesgos de sufrir una descarga
eléctrica. Consulte a un electricista o a un técnico cualificado si no está seguro de que el aparato está
adecuadamente conectado a tierra.
No modifique la toma. Si no se puede introducir bien en el enchufe, pida a un electricista debidamente
cualificado que la cambie.
CONSERVE ESTAS INSTRUCCIONES
Page 28

28
lavadora
Manguera de entrada del agua.
especificaciones
Cable de
alimentación
Panel de
mandos
Cubeta de
detergente
Tambor de lavado
de acero inoxidable
Filtro accesible
(detrás del zócalo)
Zócalo
Manguera
de desagüe
Escotilla
Patas
regulables
Encimera
ACCESORIOS
Page 29

29
lavadora
a Suelte los tornillos que sujetan las 3
placas de plástico a la parte posterior
de la lavadora.
b Suelte los 3 tornillos de bloqueo y
retírelos.
c Cubra los agujeros con las placas de
plástico anteriormente retiradas.
instalación y montaje
Guarde los tornillos de bloqueo en
previsión de un posterior traslado.
Importante
a/c
a Retirar la base, cantoneras y la cubierta
superior.
1
DESEMBALADO Y
DESBLOQUEO DE
LA LAVADORA
DESBLOQUEO
DESEMBALADO
a
Page 30

a
28’’
20’’
CONEXIÓN
A LA RED DE DESAGÜE
CONEXIÓN
A LA RED DE AGUA
30
CONEXIÓN A LA RED DE AGUA Y
DESAGÜE
En el interior del tambor encontrará el
conducto de entrada de agua:
a Conecte el extremo acodado del
conducto en la entrada roscada de la
electroválvula situada en la parte
posterior del aparato.
b Conecte el otro extremo del tubo a la
toma de agua. Una vez realizada la
operación apriete bien la tuerca de
conexión.
instalación y montaje
Es importante que el codo del tubo
de desagüe quede bien anclado en
la salida para evitar la caída y
consiguiente riesgo de inundación.
Si su lavadora admite toma de agua
caliente, conecte el tubo con rosca
roja al grifo de agua caliente, y a la
electroválvula con filtro de color rojo.
La lavadora deberá conectarse a la
red de alimentación de agua, usando
los tubos de alimentación nuevos que
se suministran con el aparato. No
deberán usarse los tubos de
alimentación de agua anteriormente
utilizados.
Para un funcionamiento correcto de
la lavadora, la presión de la red de
agua deberá estar comprendida entre
0,05 a 1MPa (0,5 a 10 Kgr/cm
2
).
a Se recomienda disponer una salida fija
de desagüe a una distancia del suelo
de 20 a 28 pulgadas.
Evite que el tubo de desagüe quede
muy ajustado, tenga pliegues o
estrangulamientos.
2
Importante
Page 31

Importante
Nivele la lavadora operando sobre las
patas regulables de forma que asiente
perfectamente en el suelo, conseguirá
reducir el nivel de ruido y evitar
desplazamientos durante el lavado.
Evite extraer excesivamente las patas,
se consigue mejor estabilidad.
En los modelos que llevan tuerca, hay
que fijarla con una llave.
Importante
31
NIVELACIÓN DE LA LAVADORA Y
CONEXIÓN A LA RED ELÉCTRICA
instalación y montaje
3
Consulte los datos de la placa de características
situada en la escotilla de la lavadora antes de
realizar las conexiones eléctricas. Asegúrese
de que la tensión que llega a la base del
enchufe es la que aparece en la placa.
No retire la placa de características, los
datos que contiene son importantes.
CONEXIÓN ELÉCTRICA
NIVELACIÓN
La lavadora se debe conectar a una toma
de corriente con una puesta a tierra
reglamentaria.
La instalación eléctrica, enchufe, toma
de corriente, fusibles o interruptor
automático y contador deben estar
dimensionados para la potencia máxima
indicada en la placa de características.
No introducir el enchufe de la lavadora
en la toma de corriente con las manos
mojadas o húmedas.
Para extraer el cable de la toma de
corriente tirar del cuerpo de la clavija.
Si el cable de alimentación está dañado,
debe ser sustituido por un cable o conjunto
especial a suministrar por el fabricante o
su servicio posventa.
En las lavadoras encastradas, la clavija de
toma de corriente deberá ser accesible
después de la instalación.
Conectar la lavadora a su instalación
eléctrica individual.
Page 32

Ahora que ha instalado satisfactoriamente la
lavadora, le aconsejamos que haga una
limpieza previa de la lavadora.
Esto sirve para comprobar la instalación, las
conexiones y el desagüe, además de limpiar
completamente el interior antes de llevar a
cabo un programa de lavado en la lavadora
(ver instrucciones de uso en hojas siguientes).
a Pulse la tecla ON/OFF.
b Seleccione el programa normal a 140ºF.
c Pulse la tecla arranque/pausa.
32
DIMENSIONES DE LA LAVADORA
Y LIMPIEZA PREVIA
DIMENSIONES
DIMENSIONES DEL APARATO
• Ancho: 23
1/4”
• Alto: 33
1/2”
• Fondo: 23
1/4”
DIMENSIONES MÍNIMAS
• Ancho: 23
5/8”
• Alto: 32
5/16” - 35 3/8”
• Fondo: 23
5/8”
4
LIMPIEZA PREVIA
a
Usted tiene la posibilidad de colocar la
lavadora bajo la encimera de la cocina.
c
b
Page 33

PREPARACIÓN
33
lavadora
a Clasifique la ropa por su tejido o por
su elaboración.
Le aconsejamos utilizar los programas
delicados para prendas sensibles. Las
prendas de lana pueden ser lavadas en
un programa especial de lana.
b Clasifique su ropa por su suciedad.
• Las prendas ligeramente sucias lávelas
en un programa corto.
• Las prendas normalmente sucias
lávelas en un programa sin prelavado.
• Las prendas muy sucias puede lavarlas
en un programa largo con prelavado.
c Clasifique su ropa según sus colores.
Lave separadamente las prendas
blancas y las prendas de color.
uso del aparato y consejos prácticos
Antes de introducir la ropa en el
tambor, asegúrese de que todos los
bolsillos están vacíos.
Los pequeños objetos pueden
obstruir la motobomba de descarga
de agua.
Prelavado
Lavado
Lavado
Importante
Si va a utilizar los
programas de secado,
asegúrese previamente
que la prenda lo permite.
Ver etiqueta de la prenda.
Asegúrese
previamente
de que sus
prendas de
lana pueden
ser lavadas a
máquina.
1
PREPARACIÓN DE
LA ROPA ANTES
DEL LAVADO
Importante
Recomendamos cargar la lavadora a
su máxima capacidad. Con ello
ahorrará agua y energía.
Le recomendamos lavar siempre que
le sea posible prendas de ropa de
diferentes tamaños en un mismo
programa de lavado, de manera que
se refuerce la acción del lavado. Así
además favorece la distribución de
la ropa dentro del tambor a la hora
del centrifugado con lo que
conseguirá que la máquina trabaje
más silenciosamente.
Es conveniente que las prendas de
tamaño reducido se introduzcan en
una bolsa de lavado.
86
140
194
104
Frío
CLASIFICACIÓN ROPA
Importante
Page 34

DETERGENTE
Y ADITIVOS
34
a La cubeta de detergente de su lavadora
dispone de tres compartimentos.
b Introduzca antes del comienzo del
programa de lavado el detergente o
aditivo en la cubeta de detergente.
c En esta lavadora usted también puede
emplear detergentes líquidos utilizando
para ello la cubeta opcional que puede
ser adquirida a través de la Red de
Asistencia Técnica.
902 10 50 10.
La cubeta opcional debe ser colocada
en el compartimento de lavado.
El nivel del líquido no debe en ningún
caso superar la señal MAX de
referencia, grabada en la pared de la
cubeta.
Recuerde que la dosis de detergente a
emplear dependen siempre de:
Cantidad de ropa a lavar.
Suciedad de la ropa.
Dureza del agua (Las informaciones de
grado de dureza del agua pueden solicitarse
en las entidades locales competentes).
Recomendamos usar un producto
antical si la dureza del agua de su
zona es alta.
2
UTILIZACIÓN DEL DETERGENTE Y
LOS ADITIVOS
nota ecológica
uso del aparato y consejos prácticos
Tenga en cuenta que existen detergentes
concentrados que son más cuidadosos
con la naturaleza y el medioambiente.
La utilización de mayor cantidad de
detergente no ayuda a mejorar los
resultados de lavado y además de suponer
un perjuicio económico contribuye
negativamente a la conservación
del medioambiente.
Por eso, le recomendamos que siga las
instrucciones del fabricante de
detergente.
LAVADO SUAVIZANTEPRELAVADO
a
ImportanteImportante
b
c
Page 35

3
SELECCIÓN DEL PROGRAMA
DE LAVADO Y SECADO
uso del aparato y consejos prácticos
Para seleccionar el programa de lavado y
secado debe seguir los siguientes pasos:
a Encienda la máquina con la tecla
ON / OFF.
b Accionar el mando de selector de
programas pulsando hacia fuera.
c Seleccionar el programa de lavado
girando el mando de selector de
programas (ver tabla de programas).
35
mando
selector de
programas
tecla
ON/
OFF
tecla
arranque/
pausa
tecla
funciones
adicionales
tecla
retardo
horario
tecla
centrifugado
+ flot
pantalla
cubeta de detergente
tecla
tiempo de
secado
Para seleccionar el tiempo de secado debe
seguir los siguientes pasos:
a Seleccionar el tiempo de secado
pulsando la tecla tiempo de secado.
En la pantalla visualizará el tiempo que
irá incrementando pulsando
sucesivamente de nuevo la tecla tiempo
de secado.
Si se selecciona una opción de lavado
+ secado la carga no deberá ser
superior a 9 lbs. (3,5 lbs. en caso de
programas de lavado delicados).
a
a
b
Importante
c
Page 36

36
uso del aparato y consejos prácticos
Al seleccionar el programa visualizará
la siguiente información:
1 Fases del programa de lavado y
secado
Lavado
Aclarado
Centrifugado
Secado
2 Nº de revoluciones
3 Nº de programa (durante unos
segundos) y a continuación la
duración del mismo.
4 Funciones adicionales
Fácil planchado
Aclarado extra
Lavado intensivo
Usted dispone de cuatro tipos de programas:
Programas normales
Programas delicados
Programas auxiliares
Programas de secado
Normales Delicados Auxiliares Secado
PROGRAMAS
Frío
Rápido
Suciedad ligera
Templado
Suciedad normal
Hygenizer
Prelavado
Frío
Suciedad ligera
Suciedad normal
Lana
Aclarado
Centrifugado
Secado normal
Secado delicado
Vaciado
1
2
3
4
5
6
7
8
9
10
11
12
13
14
15
16
Le recomendamos elegir el programa
adecuado y evitar el prelavado siempre
que sea posible. Ahorrará dinero y ayudará
a conservar mejor el medioambiente.
nota ecológica
1
234
Page 37

Algodón/Lino
colores delicados
suciedad muy ligera
Algodón/Lino
blanco/color
suciedad muy ligera
Algodón/Lino
colores delicados
suciedad ligera
Algodón/Lino
colores sólidos
suciedad ligera
Algodón/Lino
colores sólidos
suciedad normal
Algodón/Lino
blanco
suciedad fuerte
Algodón/Lino
blanco/colores sólidos
suciedad fuerte
Sintético/mezcla algodón
colores delicados
suciedad muy ligera
Sintético/mezcla algodón
colores delicados
suciedad ligera
Sintético/mezcla algodón
colores delicados
suciedad normal
Lana/mezcla lana
blanco/color
suciedad ligera
Algodón/mezcla algodón
Sintético/Delicado
Lana/mezcla de lana
Algodón/mezcla algodón
Sintético/Delicado
Lana/mezcla de lana
Algodón/lino
Sintético/mezcla
Algodón/mezcla algodón
Sintético/Delicado
Lana/mezcla de lana
SI NO SI
SI
SI
SI
SI
SI
SI
SI
SI
SI
SI
SI
SINO
NO
(*)
Programa para valoración de lavado y consumo de energía
según norma EN60456, accionando la tecla de lavado intensivo
.
1
2
3
4
5 (*)
6
7
8
9
10
11
12
13
14
15
16
Frío
Rápido
Suciedad ligera
Templado
Suciedad normal
Hygenizer
Prelavado
Frío
Suciedad ligera
Suciedad normal
Lana
Aclarado
Centrifugado
Secado normal
Secado delicado
Vaciado
Programas normalesProgramas delicadosProg. auxiliar.Progamas secado
SI NO
Aclarado
extra
Lavado
intensivo
Fácil
planchado
Selección
centrifugado
Elimina
centrifugado
Antiarrugas
Temperatura
aconsejada
SI NO
Frío
Frío
Lana 95
86
86
104
140
194
140
104104
8686
37
Programa
Tipo de tejido
Teclas de opciones posibles
Page 38

38
0,15/49
0,20/30
0,40/49
0,65/49
1,02/49
1,90/55
1,45/60
0,15/55
0,35/55
0,60/55
0,50/60
0,05/30
0,05/0
2,8/48
1,8/27
1,2/26
0,00/0
60
30
82
87
91
110
105
50
50
55
40
23
10
160
100
95
2
NOTA: los consumos de kWh y litros, así como la duración de los programas pueden
variar en función del tipo y cantidad de ropa, presión de la red de agua, etc.
13
3
13
13
13
13
13
7
7
7
2
13
13
9
7
3
13
Lavado normal, aclarados,
absorción automática de aditivos si
se desean y centrifugado final largo
Lavado corto, aclarados,
absorción automática de aditivos si
se desean y centrifugado final largo
Lavado normal, aclarados,
absorción automática de
aditivos si se desean y
centrifugado final largo
Prelavado, lavado normal, aclarados,
absorción automática de aditivos si
se desean y centrifugado final largo
Lavado delicado, aclarados,
absorción automática de
aditivos si se desean y
centrifugado final suave
Lavado de lana, aclarados,
absorción automática de aditivos si se
desean y centrifugado final suave
Aclarados, absorción automática
de aditivos si se desean y
centrifugado final largo
Vaciado y centrifugado final largo
Secado normal
Secado delicado
Vaciado y fin de programa.
Compartimento
productos
de lavado
Descripción
del programa
TURBO TIME
Consumo
total
KWh/litros
Duración
aprox.
(minutos)
Carga
de ropa
máx (Lbs.)
Page 39

39
4
SELECCIÓN DEL
CENTRIFUGADO
uso del aparato y consejos prácticos
CENTRIFUGADO
Las opciones de lavado se deben seleccionar
siempre después de elegir el programa de
lavado. Cualquier cambio de programa durante
la selección anula las opciones previamente
seleccionadas.
a Tecla de selección de centrifugado y
antiarrugas (flot)
El programa seleccionado tiene asociado
unas revoluciones de centrifugado.
b Puede modificarla pulsando
sucesivamente la tecla centrifugado y el
número de revoluciones irá
descendiendo de 100 en 100 hasta 400.
c Eliminación de centrifugado
Pulsando de nuevo la tecla centrifugado
llegamos a la opción eliminación de
centrifugado. Un programa sin
centrifugado final, se usa para evitar la
formación de arrugas de tejidos
especiales.
d Opción: flot/antiarrugas
Se para en el último aclarado,
quedándose la ropa con agua. Cuando
la función se desactiva la lavadora
continúa el programa desaguando y
centrifugando. Se usa, por ejemplo,
cuando no se está en casa y se
desea atrasar el centrifugado hasta
llegar, para evitar las arrugas de la ropa
tras el centrifugado y su espera en el
tambor para ser extraída.
b
c
a
d
Select
Select
Select
Select
Page 40

40
Tecla de selección de retardo horario
Puede seleccionarse un retardo de hasta 24
horas. El retardo debe seleccionarse después
de elegir el programa de lavado.
Para seleccionar las horas de retardo, pulse
la tecla del reloj. En cada pulsación retrasamos
el inicio en 1 hora.
Anulación del retardo
Para anular el retardo hay que pulsar
sucesivamente la tecla del reloj. El retardo se
anulará alcanzando las 24 horas y pulsando
una vez más. Si se cambia el programa
también se anula el retardo.
5
SELECCIÓN DEL RETARDO HORARIO Y
FUNCIONES ADICIONALES
uso del aparato
Tecla de selección de funciones
adicionales según programas.
a Posee 3 opciones: fácil planchado,
aclarado extra y lavado intensivo.
Pulse la tecla y podrá visualizar la opción
deseada.
b Con varias pulsaciones podrá elegir entre
varias combinaciones de una, dos y
hasta tres funciones adicionales a la vez
en función del programa seleccionado.
Tecla: Fácil planchado ( )
Esta opción evita la formación de arrugas
en las prendas mediante la realización
de un programa especial con giros
especiales para ahuecar las prendas
después del centrifugado y facilitar su
planchado.
Tecla: Aclarado extra ( )
Aumenta el grado de aclarado final
obtenido en la ropa; indicado para
grandes cargas y prendas de personas
con piel sensible. ¡Incrementa el
consumo de agua!
Tecla: Lavado intensivo ( )
Esta opción, especialmente
recomendada para prendas muy sucias
y con manchas, consigue mejores
resultados al alargar el ciclo normal de lavado.
RETARDO HORARIO
FUNCIONES ADICIONALES
b
Si durante la selección de funciones
adicionales, se cambia de programa o se
pulsa la tecla ON/OFF, se anulan todas las
funciones hasta entonces seleccionadas.
Importante
Select
Select
Select
a
Page 41

41
Tecla arranque/pausa
a Para poner en marcha la lavadora hay
que pulsar la tecla de arranque / pausa.
En la pantalla se visualizará en cada
momento los minutos que le quedan
hasta acabar el lavado y secado.
6
PUESTA EN MARCHA Y
SELECCIÓN DEL BLOQUEO
uso del aparato
PUESTA EN MARCHA
Selección del bloqueo
Mediante el bloqueo se asegura que las
manipulaciones de las diferentes teclas no
van a afectar al programa y opciones de lavado
y secado seleccionadas. Se usa para evitar
manipulaciones por parte de niños, etc.
El bloqueo se debe activar después de haber
seleccionado el programa de lavado y todas
las opciones del mismo.
Accionar el bloqueo
a El bloqueo se acciona manteniendo
pulsada la tecla de arranque/pausa
durante, al menos, 3 segundos. En la
pantalla podrá visualizar que está
activado.
Desaccionar el bloqueo
b El bloqueo se elimina al terminar el
programa de lavado.
Si se desea desactivar el bloqueo sin
llegar al final del programa hay que
mantener pulsada, nuevamente, la tecla
de marcha durante, al menos, 3
segundos. Al pasar los 3 segundos
desaparecerá el indicador de bloqueo
de la pantalla, quedándose en estado
de pausa.
La tecla ON/OFF no elimina el bloqueo.
Select
a
BLOQUEO
a
b
Select
Select
Page 42

42
Cuando el programa está en marcha puede
visualizar en la pantalla en qué fase se
encuentra, así como el tiempo que resta para
que finalice.
Las fases activas irán apareciendo
sucesivamente en la parte superior de la
pantalla a medida que avanza el programa.
El tiempo que resta para que acabe el
programa también irá apareciendo en la
pantalla. Se actualiza a intervalos periódicos,
pero no minuto a minuto.
Cualquier tecla de opción puede seleccionarse
siempre que no haya pasado la fase de lavado
en la que tenga efecto y cuando el programa
admita esta opción.
El accionamiento de la tecla de retardo durante
el lavado no tiene ningún efecto sobre la
lavadora-secadora.
El accionamiento de la tecla arranque/pausa
durante el lavado deja la lavadora en estado
de PAUSA.
7
DESARROLLO DEL PROGRAMA DE LAVADO Y SECADO
Y CORTE EN EL SUMINISTRO ELÉCTRICO
uso del aparato
Importante
Si se produce un corte en el suministro
eléctrico, al restablecerse el mismo la lavadora
continúa su funcionamiento normal en el punto
donde se había parado (tiene memoria de
pocas horas). Esto mismo sucede para el caso
de accionar la tecla ON/OFF.
CORTE EN EL
SUMINISTRO ELÉCTRICO
advertencias
Para reducir el ruido en el centrifugado:
nivele la lavadora operando sobre las patas
regulables.
Trate de lavar prendas de ropa de diferentes
tamaños en un mismo programa de lavado
favoreciendo la distribución de la ropa dentro
del tambor a la hora del centrifugado.
Todos los modelos disponen de un sistema
de seguridad en el centrifugado que impiden
que éste se realice en el caso de que la
distribución de la ropa dentro del tambor esté
muy concentrada, de esta manera se evita
que el aparato alcance un nivel excesivo de
vibraciones.
Si en algún caso detectara que la ropa no sale
convenientemente escurrida, vuelva a intentar
centrifugarla después de haber repartido de
forma más uniforme la ropa en el tambor.
DESARROLLO DEL
PROGRAMA
Si durante el lavado y secado se
cambia el programa mediante el
selector, la lavadora-secadora
quedará en estado de PAUSA,
quedando anulado el programa.
Si necesita añadir o retirar alguna
prenda, pulse la tecla arranque/pausa
y asegúrese de que el nivel de agua
no supera el de desbordamiento de
la puerta y de que la temperatura en
el interior no sea elevada. Volviendo
a pulsar la tecla arranque/pausa, el
lavado se reanuda desde la misma
fase de ciclo en que se detuvo.
Page 43

43
lavadora
mantenimiento y limpieza
a
b
Después de cada lavado deje abierta la
puerta de carga durante un tiempo con
el fin de que el aire circule libremente
por el interior de la máquina.
Es aconsejable realizar de vez en
cuando, dependiendo de la dureza del
agua, un ciclo de lavado completo
empleando un producto descalcificante.
De esta forma alargará la vida de su
lavadora.
MANTENIMIENTO
Antes de llevar a cabo cualquier
operación de limpieza o
mantenimiento, es aconsejable
desconectar la lavadora de la red
eléctrica.
Limpie la cubeta de detergente siempre
que aprecie en ella residuos de algún
producto de lavado.
a Extraiga totalmente la cubeta de
detergente tirando del asa con
energía hacia fuera.
b Limpie los compartimentos de la
cubeta. Emplee agua templada y
un cepillo.
c Limpie también los sifones de la
cubeta de aditivos, extrayéndolos
previamente y una vez limpiados
colóquelos asegurando que estén
bien encajados en el fondo.
Vuelva a introducir la cubeta en la
lavadora.
Un sifón mal encajado o sucio
impide la toma de aditivos y deja
agua en el compartimento al final
del lavado.
Importante Importante
1
LIMPIEZA DE LA CUBETA DE DETERGENTE
c
Page 44

Limpie el filtro accesible en caso de que
haya quedado bloqueada la bomba de
desagüe por objetos extraños.
a Abra la tapa del zocalo, pulsando la
pestaña y tirando ligeramente de ella.
b Para recoger el agua que saldrá al soltar
el filtro, sitúe un plato u otro recipiente
debajo del mismo.
c Gire el filtro un cuarto o media vuelta hacia
la izquierda. Comenzará a salir agua.
d Cuando haya terminado de evacuar el
agua de la lavadora, gire varias vueltas
el filtro hasta que sea posible su
extracción total, tirando ligeramente de él.
e Retire los objetos o pelusas que hayan
podido quedar en el filtro o dentro de la
bomba de desagüe.
f Volver a colocar en su sitio el filtro y el
zócalo.
44
LIMPIEZA DEL FILTRO ACCESIBLE Y
LIMPIEZA EXTERIOR
mantenimiento y limpieza
Para evitar quemaduras no realizar
esta operación cuando el agua de
lavado supere los 86ºF.
Cuando existan derrames de
detergente o aditivos de la cubeta
sobre el mueble de la lavadora,
limpielos cuanto antes, son corrosivos.
2
Importante
Importante
LIMPIEZA EXTERIOR
LIMPIEZA FILTRO
Para la limpieza exterior de la lavadora emplee
agua templada jabonosa, o un agente de
limpieza suave que no sea abrasivo ni
disolvente.
A continuación, séquela bien con un paño
suave.
e
d
a
b c
Page 45

lavadora
seguridad y solución de problemas
45
En el caso de detectarse algún
problema en el uso de su lavadora,
probablemente usted pueda
resolverlo tras la consulta de las
indicaciones que siguen.
De no ser así, desenchufe el
aparato y póngase en contacto con
el SERVICIO DE ASISTENCIA
TÉCNICA.
INCIDENCIAS
Le rogamos no manipule
en ningún caso el aparato.
En el interior no existe
ningún fusible o
componente análogo que
pueda ser sustituido por
el usuario.
¿Por qué la lavadora no se
pone en marcha?
¿Por qué vibra ó hace ruido
excesivo la lavadora?
Puede ser debido a:
Compruebe que la puerta esté bien cerrada.
La lavadora no está conectada a la red eléctrica, o no
hay tensión en la toma de corriente.
No ha pulsado la tecla de Arranque/Pausa.
Cuando la puerta de la lavadora está mal cerrada
visualiza en la pantalla F04.
Puede ser debido a:
Los tornillos de bloqueo y transporte no han sido
extraídos.
La lavadora está mal nivelada o asentada sobre el suelo.
Indicador
FO1
FO2
CO3
FO4
FO5
.
.
.
.
.
F10
Incidencias
No entra agua
No desagüa, ni centrifuga
No centrifuga
No se pone en marcha
Avisar al Servicio de Asistencia Técnica
Importante
Page 46

seguridad y solución de problemas
46
¿Por qué no carga agua la
lavadora?
¿Por qué la lavadora no
desagua ni centrifuga?
¿Por qué no centrifuga la
lavadora?
¿Por qué no veo agua en el
tambor durante el lavado?
El indicador F01, falta de entrada de agua, puede ser
debido a un corte en el suministro de agua, grifo de
entrada de agua a la lavadora cerrado ó filtro de entrada
de agua a la lavadora obstruido.
Por lo tanto las actuaciones posibles son: esperar a
que vuelva el suministro de agua, abrir el grifo de
entrada de agua, y soltar la manguera de entrada de
agua y limpiar su filtro.
Cuando esto ocurra se visualiza en la pantalla F01.
Los motivos del indicador F02 pueden ser : obstrucción
de la motobomba de desagüe de la lavadora,
obstrucción en la cañería de desagüe del edificio, ó
mala conexión eléctrica de la motobomba.
Actuación: si el motivo es la obstrucción de la
motobomba, acceder a ella según indica apartado 2,
mantenimiento y limpieza del aparato.
Cuando esto ocurre se visualiza en la pantalla F02.
Esto es debido a que la distribución de ropa en el
tambor está descompensada y puede producir un nivel
excesivo de vibraciones.
La forma de actuación es seleccionar un programa de
centrifugado.
Cuando esto ocurre se visualiza en la pantalla C3.
Esto es debido a que la lavadora está dotada de un sistema
que tiene la capacidad de adaptarse a la carga de la ropa
y a la naturaleza del tejido, ajustando el nivel de agua y
energía utilizados, con el fin de preservar el medio ambiente.
Por lo tanto, aunque la cantidad de agua que usted puede
observar a través de la escotilla le resulte bajo, no se
preocupe, el grado de eficacia de lavado y aclarado será
el óptimo.
Page 47

47
seguridad y solución de problemas
¿Por qué queda agua en la
cubeta?
¿Por qué no puedo abrir la
escotilla inmediatamente de
acabar el lavado?
¿Por qué el tiempo restante
indicado en el reloj no
coincide con el tiempo real
de finalización del ciclo
seleccionado?
Otras indicaciones
Puede deberse a que quizás la cubeta necesite limpiarse.
Esta sencilla operación se describe en Mantenimiento y
limpieza del aparato.
1- Limpieza de la cubeta de detergente.
Las lavadoras actuales están dotadas de sistemas de
seguridad para los usuarios. Uno de ellos es que no se
pueda abrir la lavadora sin garantizar que el tambor está
totalmente quieto. De ahí que se tarde unos 2 minutos en
poder abrir la escotilla.
Este tiempo es orientativo y puede verse afectado por las
condiciones en las que se desarrolla el programa
seleccionado. Por ejemplo: temperatura inicial del agua,
carga de ropa o desequilibrio generado por la ropa durante
los centrifugados.
La lavadora tiene la posibilidad de detectar otras
indicaciones. Cuando esto ocurra se visualizan en la
pantalla diversos indicadores F05, F06..., F10.
Deberá llamar al Servicio Técnico Oficial.
Page 48

48
lavadora
advertencias sobre el medio ambiente
Al final de la vida útil del aparato, éste no debe
eliminarse mezclado con los residuos domésticos
generales.
Puede entregarse, sin coste alguno, en centros
específicos de recogida, diferenciados por las
administraciones locales, o distribuidores que
faciliten este servicio.
Eliminar por separado un residuo de
electrodoméstico, significa evitar posibles
consecuencias negativas para el medio ambiente
y la salud, derivadas de una eliminación
inadecuada, y permite un tratamiento, y reciclado
de los materiales que lo componen, obteniendo
ahorros importantes de energía y recursos.
Para subrayar la obligación de colaborar con una
recogida selectiva, en el producto aparece el
marcado que se muestra como advertencia de la
no utilización de contenedores tradicionales para
su eliminación.
Para más información, ponerse en
contacto con la autoridad local o
con la tienda donde adquirió el
producto.
INFORMACIÓN PARA LA CORRECTA GESTIÓN DE LOS RESIDUOS DE APARATOS
ELÉCTRICOS Y ELECTRÓNICOS
nota ecológica
Page 49

49
avertissement
Pour réduire les risques d’incendie, de choc électrique et de blessure, lire les IMPORTANTES MESURES
DE SÉCURITÉ avant d’utiliser cet appareil.
1) Lire toutes les instructions avant d’utiliser
l’appareil.
2) Ne pas laver des articles qui ont été nettoyés ou
lavés avec de l’essence, des solvants pour nettoyage
à sec ou d’autres substances inflammables ou
explosives, ou que l’on a fait tremper dans ces
produits. Ces substances dégagent des vapeurs
qui peuvent s’enflammer ou exploser.
3) Ne pas ajouter d’essence, de solvants pour
nettoyage à sec ou d’autres substances
inflammables ou explosives à l’eau de lavage. Ces
substances dégagent des vapeurs qui peuvent
s’enflammer ou exploser.
4) De l’hydrogène peut être produit dans un
système à eau chaude qui n’a pas été utilize depuis
deux semaines ou plus. L’HYDROGÈNE EST
EXPLOSIF. Si le système à eau chaude n’a pas
été utilisé depuis un certain temps, ouvrir tous les
robinets d’eau chaude et laisser l’eau couler
pendant plusieurs minutes avant d’utiliser une
laveuse, l’hydrogène accumulé, le cas échéant,
s’échappera. L’hydrogène étant inflammable, ne
pas fumer ou utiliser un appareil à flamme nue
pendant que l’eau coule.
5) Ne pas permettre aux enfants de jouer sur ou
dans l’appareil. Surveiller étroitement les enfants
lorsqu’ils se trouvent près de l’appareil qui
fonctionne.
6) Avant de mettre l’appareil hors service ou de le
jeter, retirer la porte.
7) Ne pas mettre la main dans l’appareil lorsque
la cuve ou l’agitateur bougent.
8) Ne pas installer ou placer cet appareil dans un
endroit où il sera exposé aux intempéries.
9) Ne pas trafiquer les commandes.
10) Ne pas réparer ou remplacer les pièces de
l’appareil ou procéder à l’entretien de celui-ci sauf
si les instructions visant l’entretien et les réparations
qui doivent être effectués par l’utilisateur le
spécifient, si vous comprenez bien ces instructions
et si vous possédez les connaissances nécessaires.
importantes mesures de sécurité
AVERTISSEMENT - Pour réduire les risques d’incendie, de choc électrique ou de blessure quand.
l’appareil est utilisé, prendre les précautions élémentaires et:
mise à la terre
Cet appareil doit être mis à la terre. En cas de mauvais fonctionnement ou de bris de l’appareil, la mise à
la terre réduira les risques de choc électrique en offrant un parcours de moindre résistance au courant
électrique. Cet appareil est pourvu d’un cordon à conducteur de terre et d’une fiche de mise à la terre.
Brancher la fiche dans une prise installée adéquatement et mise à terre conformément à tous les codes
et règlements locaux.
AVERTISSEMENT - Une mauvaise connexion du conducteur de terre peut présenter des risques de
choc électrique. Consulter un électricien ou un technicien qualifiés si vous n’êtes pas certain que
appareil soit mis à terre adéquatement.
Ne pas modifier la fiche de l’appareil. Si elle ne pénètre pas bien dans la prise, faire installer une prise
adéquate par un électricien qualifié.
CONSERVER CES INSTRUCTIONS
Page 50

Cordon
d’alimentation
Bandeau
de commandes
Cuvette à
produits lessiviels
Tambour de
lavage en acier
inoxydable
Filtre accessible
(derrière la plinthe))
Plinthe
Tuyau de
vidange
Hublot
Pieds
réglables
Couvercle
Accessoires
50
lave-linge
Tuyau d’alimentation en eau.
spécifications
Page 51

1
DÉSEMBALLAGE ET
DÉBRIDAGE DU
LAVE-LINGE
a
DÉSEMBALLAGE
51
a/c
lave-linge
a Dévissez les vis qui maintiennent les 3
traverses en plastique situées à l’arrière
du lave-linge.
b Dévissez les 3 brides métalliques
d’immobilisation de l’appareil et retirezes.
c Recouvrez les orifices avec les traverses
en plastique préalablement retirées.
installation et montage
Conservez les brides métalliques
d’immobilisation, elles vous seront
utiles si vous devez transporter
postérieurement votre appareil.
Important
a Retirer la base, les cornières et le capot
de protection supérieur.
DÉBRIDAGE
Page 52

2
Important
RACCORDEMENT À LA
CANALISATION D’EAU
52
RACCORDEMENT À LA
CANALISATION D’ÉVACUATION
RACCORDEMENT À LA CANALISATION D’EAU ET
D’ÉVACUATION
Vous trouverez, à l’intérieur du tambour,
le tube d’alimentation d’eau :
a Raccordez l’extrémité coudée du tube
à l’entrée cannelée de l’électrovanne,
située à l’arrière de l’appareil.
b Raccordez l’autre extrémité du tube à
la canalisation d’eau. Veillez, ensuite, à
bien serrer l’écrou de serrage.
installation et montage
Veillez à raccorder correctement le
coude du tuyau à la canalisation
d’eau, afin d’éviter tout risque
d’inondation.
Si votre lave-linge permet le
raccordement à une entrée d’eau
chaude, branchez le tube cannelé
rouge au robinet d’eau chaude et à
l’électrovanne au filtre de couleur
rouge.
Le lave-linge doit être raccordé à la
canalisation d’eau à l’aide des tuyaux
d’alimentation neufs fournis avec
l’appareil. Ne pas utiliser les tuyaux
d’alimentation anciens. Pour un
fonctionnement correct du lave-linge,
la pression de l’eau devra se situer
entre 0,05 et 1MPa (0,5 à 10 Kg/cm
2
).
a Il est recommandé de disposer d’un
tuyau de vidange fixe à une distance du
sol de 20 à 28’’.
Veillez à ce que le tuyau de vidange ne
soit ni coincé, ni plié, ni pincé.
a
28’’
20’’
Page 53

Important
Mettez à niveau l’appareil à l’aide des
pieds réglables, afin de réduire les
bruits et d’éviter le déplacement du
lave-linge pendant le lavage.
Evitez d’extraire excessivement les
pieds, pour une plus grande stabilité
de l’appareil.
Sur les modèles munis d’écrous, les
serrer à l’aide d’une clé.
Important
53
3
MISE À NIVEAU DU LAVE-LINGE ET RACCORDEMENT
ÉLECTRIQUE
installation et montage
Consultez la plaque signalétique, située sur le
hublot du lave-linge, avant de procéder au
raccordement électrique. Vérifiez que la tension
du secteur correspond bien à celle mentionnée
sur la plaque signalétique.
Ne jamais retirer la plaque signalétique,
elle contient des informations précieuses.
MISE À NIVEAU
Pour débrancher l’appareil de la prise de
courant, tirer de la fiche, jamais du cordon.
Si le cordon d’alimentation est
endommagé, il doit être aussitôt remplacé
par un cordon ou ensemble spécial fourni
par le fabricant ou par son service aprèsvente.
Sur les lave-linge encastrés, la fiche de
raccordement au secteur devra être
accessible après l’installation.
Connecter l’appareil sur votre installation
électrique individuelle.
Veillez à bien brancher votre lave-linge à
une prise reliée à la terre.
L’installation électrique, la fiche, la prise
de secteur, les fusibles ou le disjoncteur
automatique et le compteur doivent être
capables de résister la puissance
maximale mentionnée sur la plaque
signalétique.
Ne jamais brancher la fiche du lave-linge
au secteur avec les mains mouillées ou
humides.
RACCORDEMENT ÉLECTRIQUE
Page 54

Maintenant que votre lave-linge est correctement
installé, nous vous conseillons de procéder à un
nettoyage préalable de l’appareil.
Vous pourrez ainsi vérifier l’installation, les
raccords et la vidange, tout en procédant à
un lavage complet de l’intérieur de l’appareil,
avant de procéder au premier lavage de linge
(voir instructions ci-après).
a Appuyer sur la touche ON/OFF.
b Sélectionner le programme normal à
140ºF.
c Appuyer sur la touche départ/pause.
54
4
Vous avez la possibilité d’installer le lavelinge sous le plan de travail de votre
cuisine.
ENTRETIEN PRÉALABLE
c
b
MISE EN PLACE DU LAVE-LINGE SOUS PLAN ET
ENTRETIEN PRÉALABLE
DIMENSIONS
a
DIMENSIONS DU APPAREIL
• Largeur: 23
1/4”
• Haut: 33
1/2”
• Fond: 23
1/4”
LAISSEZ AU MOIS CES DISTANCES
• Largeur: 23
5/8”
• Haut: 32
5/16” - 35 3/8”
• Fond: 23
5/8”
Page 55

PRÉPARATION
1
PRÉPARATION DU
LINGE AVANT LE
LAVAGE
Important
Il est recommandé de charger votre
lave-linge au maximum, afin
d’économiser de l’eau et de l’énergie.
Nous vous conseillons de laver
ensemble, dans la mesure du
possible, des pièces de linge de
différentes dimensions, afin
d’optimiser le lavage et de favoriser
la répartition du linge à l’intérieur du
tambour lors de l’essorage, réduisant
ainsi les bruits de la machine.
Lavez les petites pièces fragiles dans
un filet à linge.
TRI DU LINGE
Important
lave-linge
a Triez le linge par type de textile.
Nous vous conseillons d’utiliser les
programmes délicats pour les textiles
fragiles. Utilisez pour les lainages les
programmes spécialement conçus pour
laver la laine.
b Triez les textiles selon le degré de
salissure.
• Utilisez de préférence un programme
court à l’eau froide pour laver le linge
peu sale.
• Utilisez un programme sans prélavage
pour laver le linge pas trop sale.
• Réservez les programmes longs avec
prélavage pour laver le linge très sale.
c Triez les textiles selon leur couleur.
Lavez séparément le linge blanc et le
linge de couleur.
utilisation de l’appareil et conseils pratiques
Avant d’introduire le linge dans le
tambour, veillez à bien vider les
poches.
Les petits objets risquent de boucher
la pompe de vidange.
55
Prélavage
Lavage
Lavage
b
Important
Si vous allez utiliser le
programme de séchage,
vérifiez au préalable que le
textile est apte pour le
séchage en machine.
Consultez l'étiquette.
Vérifiez au
préalable que
vos lainages
peuvent être
lavés en
machine.
86
140
194
104
Froid
Page 56

a La cuvette à produits de votre lave-linge
est divisée en 3 compartiments.
b Avant de procéder au lavage, versez le
produit lessiviel et les additifs dans les
bacs à produits correspondants.
c Vous pouvez également utiliser, dans ce
lave-linge, des détergents liquides. Pour
ce faire, utilisez le compartiment
optionnel, que vous pouvez acquérir en
vous adressant au Réseau d’Assistance
Technique.
Installer ce compartiment optionnel à la
place du compartiment de lavage.
Les compartiments sont marqués
d’une ligne MAX, qui indique le niveau
maximum de produit à ne pas
dépasser.
N’oubliez pas que la dose de produit lessiviel
dépendra de :
La quantité de linge à laver.
Du degré de salissure du linge.
De la dureté de l’eau (pour connaître la dureté
de votre eau, adressez-vous aux autorités
locales compétentes).
Nous vous recommandons d’utiliser
un produit anticalcaire si votre eau est
particulièrement dure.
a
Lavage
Assouplissant
Prélavage
b
c
ImportantImportant
56
2
PRODUIT LESSIVIEL
ET ADDITIFS
note écologique
utilisation de l’appareil et conseils pratiques
N’oubliez pas qu’il existe des produits
lessiviels concentrés, qui préservent
davantage la nature et l’environnement.
Une plus grande quantité de produit
lessiviel n’améliorera pas les résultats
de lavage. Par contre, outre le coût
économique que cela implique, vous
ne contribuerez pas à la protection
de l’environnement.
Nous vous recommandons vivement
de respecter les instructions du
fabricant de produit lessiviel.
UTILISATION DU PRODUIT LESSIVIEL ET DES ADDITIFS
Page 57

Important
3
SÉLECTION DU PROGRAMME DE LAVAGE ET SÉCHAGE
Pour sélectionner le programme de lavage
et séchage, procéder comme suit :
a Allumer l’appareil en appuyant sur la
touche ON / OFF.
b Enfoncer la commande du sélecteur de
programmes.
c Sélectionner le programme de lavage
en faisant tourner la commande du
sélecteur de programmes (voir tableau
des programmes).
57
touche
durée de
séchage
Pour sélectionner la durée de séchage,
procéder comme suit :
a Sélectionner la durée de séchage en
appuyant sur la touche "Durée de
Séchage".
L’écran affichera la durée. Pour
augmenter progressivement la durée de
séchage, appuyer sur cette touche
plusieurs fois.
Si vous sélectionnez une fonction
lavage+séchage, veillez à ne pas
dépasser une charge de linge
supérieure à 9 lbs. (3,5 lbs. sur les
programmes de lavage délicats).
a
a
b
utilisation de l’appareil et conseils pratiques
commande
sélecteur de
programmes
touche
ON/
OFF
touche
départ/
pause
touche
fonctions
complémentaires
touche
départ
différé
touche
essorage
+ flot
écran
cuvette à produits
c
Page 58

58
1
234
utilisation de l’appareil et conseils pratiques
L’écran affichera l’information suivante :
1 Cycles du programme de lavage
et séchage
Lavage
Rinçage
Essorage
Séchage
2 Nbre de tours
3 Nº du programme (durant
quelques secondes) et
ensuite sa durée.
4 Fonctions complémentaires
Repassage facile
Rinçage extra
Lavage intensif
Votre lave-linge dispose de 4 types de
programmes :
Programmes normaux
Programmes délicats
Programmes complémentaires
Programmes séchage
Nous vous recommandons de choisir le
programme le mieux adapté à votre linge,
afin d’éviter le prélavage, dans la mesure
du possible. Vous économiserez de l’argent
et vous contribuerez à la protection de
l’environnement.
note écologique
Normaux Délicats
Complémentaires
Séchage
PROGRAMMES
Froid
Rapide
Linge peu sale
Chaud
Salissure normale
Hygenizer
Prélavage
Froid
Linge peu sale
Salissure normale
Laine
Rinçage
Essorage
Séchage normal
Séchage délicat
Vidange
1
2
3
4
5
6
7
8
9
10
11
12
13
14
15
16
Page 59

Coton/Lin
couleurs délicates
linge très peu sale
Coton/Lin
blanc/couleur
linge très peu sale
Coton/Lin
couleurs délicates
linge peu sale
Coton/Lin
couleurs résistantes
linge peu sale
Coton/Lin
couleurs résistantes
salissure normale
Coton/Lin
blanc
linge très sale
Coton/Lin
blanc/couleurs résistantes
linge très sale
Synthétique/mélange coton
couleurs délicates
linge très peu sale
Synthétique/mélange coton
couleurs délicates
linge peu sale
Synthétique/mélange coton
couleurs délicates
salissure normale
Laine/mélange laine
blanc/couleur
linge peu sale
Coton/mélange coton
Synthétique/Délicat
Laine/mélange laine
Coton/mélange coton
Synthétique/Délicat
Laine/mélange laine
Coton/Lin
Synthétique/mélange
Coton/mélange coton
Synthétique/Délicat
Laine/mélange laine
OUI NON OUI
OUI
OUI
OUI
OUI
OUI
OUI
OUI
OUI
OUI
OUI
OUI
OUINON
NON
1
2
3
4
5 (*)
6
7
8
9
10
11
12
13
14
15
16
Froid
Rapide
Linge peu sale
Chaud
Salissure normale
Hygenizer
Prélavage
Froid
Linge peu sale
Salissure normale
Laine
Rinçage
Essorage
Séchage normal
Séchage délicat
Vidange
Prog. normauxProg. délicatsProg. compl.Programmes séchage
OUI NON
Température
conseillée
Rinçage
extra
Lavage
intensif
Repassage
facile
Essorage
Elimination
de l’essorage
Antifroissage
OUI NON
Froid
Froid
Laine 95
86
86
104
140
194
140
104104
8686
59
(*)
Pour programmes de lavage et consommation conformes à
la Norme EN60456, appuyer sur la touche de lavage intensif.
Programme
Type de textile
Touches options possibles
Page 60

60
0,15/49
0,20/30
0,40/49
0,65/49
1,02/49
1,90/55
1,45/60
0,15/55
0,35/55
0,60/55
0,50/60
0,05/30
0,05/0
2,8/48
1,8/27
1,2/26
0,00/0
60
30
82
87
91
110
105
50
50
55
40
23
10
160
100
95
2
13
3
13
13
13
13
13
7
7
7
2
13
13
9
7
3
13
Charge
de linge
max. (Lbs.)
Bacs à
produits
Description
du programme
Consommation
totale
KWh/litres
Durée
approx.
(minutes)
Lavage normal, rinçages,
absorption automatique d’additifs
le cas échéant et essorage final long
Lavage court, rinçages,
absorption automatique d’additifs
le cas échéant et essorage final long
Lavage normal, rinçages,
absorption automatique
d’additifs le cas échéant
et essorage final long
Prélavage, lavage normal, rinçages,
absorption automatique d’additifs
le cas échéant et essorage final long
Lavage délicat, rinçages,
absorption automatique
d’additifs le cas échéan et
essorage final réduit
Lavage laine, rinçages,
absorption automatique d’additifs le
cas échéant et essorage final réduit
Rinçages, absorption automatique
d’additifs le cas échéant
et essorage final long
Vidange et essorage final long
Séchage normal
Séchage délicat
Vidange et fin de programme.
REMARQUE: Les consommations en KW/h et litres, de même que la durée des
programmes, peuvent varier en fonction du type et du volume de linge, de la pression
de l’eau, etc.
TURBO TIME
Page 61

d
61
4
b
c
a
Select
Select
Select
Select
FONCTION ESSORAGE
utilisation de l’appareil et conseils pratiques
ESSORAGE
Sélectionner toujours les fonctions de lavage
après avoir sélectionné le programme de
lavage. Toute modification du programme
durant la sélection annulera les options
préalablement sélectionnées.
a Touche fonction essorage et
antifroissage (flot)
Le programme sélectionné a été
préalablement associé à un certain
nombre de tours d’essorage.
b Pour le modifier, appuyer successivement
sur la touche essorage et le nombre de
tours diminuera de 100 à chaque fois
jusqu’à atteindre les 400 sur les modèles
avec écran, ou le témoin lumineux
s’allumera sur les modèles sans écran.
c Élimination de l’essorage
Appuyer sur la touche essorage pour
sélectionner la fonction élimination de
l’essorage. Le lave-linge effectue un
programme sans essorage final. À utiliser
pour éviter de froisser les textiles
spécialement délicats.
d Fonction: flot/antifroissage
L’appareil s’arrête après le dernier
rinçage, l’eau demeurant à l’intérieur de
la cuve.
Si l’on désactive cette fonction, la
machine complète le programme et
procède à la vidange et à l’essorage. À
utiliser si vous souhaitez retarder
l’essorage, en cas d’absence du foyer,
pour éviter que le linge ne se froisse
après l’essorage, en attendant que vous
le retiriez du tambour.
Page 62

5
Select
Select
b
Select
Si l’on modifie le programme durant la
sélection de fonctions complémentaires ou
si l’on enfonce la ON/OFF, toutes les fonctions
préalablement sélectionnées seront annulées.
Important
Touche fonction départ différé
Possibilité de sélectionner un départ différé de jusqu’à
24 heures. Sélectionner toujours le départ différé après
avoir sélectionné le programme de lavage. Pour
sélectionner les heures de retard, appuyer sur la touche
horloge. Sur les modèles avec écran, chaque fois que
la touche est enfoncée, le départ différé est retardé d’1
heure. Sur les modèles sans écran, choisir 3, 6 ou 9
heures de retard. Chaque fois que la touche est
enfoncée, le départ est retardé d’1 heure.
Annulation du départ différé
Pour annuler le départ différé, appuyer
successivement sur la touche horloge, jusqu’à
atteindre les 24 heures. Enfoncer alors une nouvelle
fois la touche, pour valider l’annulation. Tout
changement de programme annule également la
fonction départ différé.
FONCTION DÉPART DIFFÉRÉ ET FONCTIONS
COMPLÉMENTAIRES
utilisation de l’appareil
Touche fonctions complémentaires selon
programmes.
a 3 Fonctions possibles : repassage facile,
super rinçage et lavage intensif.
Appuyer sur la touche pour visualiser
l’option souhaitée.
b En enfonçant la touche plusieurs fois,
vous pourrez combiner jusqu’à trois
fonctions complémentaires à la fois, selon
le programme sélectionné.
Touche : Repassage facile ( )
Cette fonction évite que le linge ne se
froisse, grâce au programme spécial qui
fait tourner le tambour en douceur pour
défouler le linge après l’essorage et faciliter
ainsi le repassage.
Touche : Rinçage extra ( )
Rinçage final réalisé avec une plus grande
quantité d’eau. Convient aux grandes
charges de linge et aux personnes à la
peau sensible. Mais il augmente la
consommation d’eau !
Touche : Lavage intensif ( )
Convient au linge très sale. Meilleurs
résultats de lavage grâce à l’allongement
du cycle normal.
DÉPART DIFFÉRÉ
FONCTIONS COMPLÉMENTAIRES
a
62
Page 63

Select
Select
63
6
Select
a
a
b
VERROUILLAGE
Touche départ/pause
a Pour mettre en route le lave-linge,
appuyer sur la touche départ/pause.
L’écran affichera en tout moment les
minutes qui restent pour la fin du
programme de lavage et séchage.
MISE EN ROUTE ET
FONCTION VERROUILLAGE
utilisation de l’appareil
MISE EN ROUTE
Fonction verrouillage
La fonction verrouillage sert à éviter toute
manipulation intempestive des touches risquant
de modifier le programme et les fonctions de
lavage et séchage sélectionnés. Tout spécialement
conçue comme sécurité-enfants, etc…
Activer le verrouillage après avoir sélectionné
le programme de lavage et toutes les fonctions
souhaitées.
Activer le verrouillage
a Pour activer le verrouillage, maintenir
enfoncée la touche départ/pause
pendant au moins 3 secondes.
L’écran indiquera que cette fonction est
activée.
Désactiver le verrouillage
b Le verrouillage est automatiquement
éliminé dès que le programme de lavage
est achevé.
Si vous souhaitez désactiver le
verrouillage avant la fin du programme,
maintenez enfoncée à nouveau pendant
au moins 3 secondes la touche de
Marche. L’indicateur de verrouillage
disparaîtra de l’écran, qui restera en état
de pause.
Le fait d’enfoncer la touche ON/OFF
n’élimine pas le verrouillage.
Page 64

64
7
avertissements
Pour réduire les bruits lors de l’essorage,
procédez à la mise à niveau du lave-linge, à
l’aide des pieds réglables.
Lavez ensemble, dans la mesure du
possible, des pièces de différentes dimensions
sur un même programme, afin de permettre
une meilleure répartition du linge à l’intérieur
du tambour et, donc, un essorage plus
performant.
Tous les modèles sont dotés d’un système
de sécurité essorage, qui annule l’essorage si
le linge est excessivement tassé dans le
tambour, afin d’éviter un excès de vibrations.
Si vous constatez que le linge ne sort pas
suffisamment égoutté, procédez à un nouvel
essorage, après avoir réparti uniformément le
linge dans le tambour.
Si durant le lavage et séchage, le
programme est modifié à l’aide du
sélecteur de programmes, le lave-linge
séchant se situera automatiquement en
état de PAUSE et le programme en cours
sera annulé.
Si vous devez ajouter ou enlever une pièce,
appuyez sur la touche départ/pause et
vérifiez que l’eau ne risque pas de
déborder en ouvrant la porte et que la
température de l’eau ne soit pas trop
élevée. Pour relancer et poursuivre le cycle
de lavage en cours, appuyez à nouveau
sur la touche départ/pause.
Après une panne de courant, la machine
relance et poursuit automatiquement le cycle
en cours (qui est mémorisé pendant quelques
heures). Il en est de même lorsque l’on appuie
sur la touche OFF/ON.
PANNE DE
COURANT
DÉROULEMENT
DU PROGRAMME
Important
Le programme une fois lancé, l’écran affichera
le cycle de lavage en cours, ainsi que le temps
qui reste pour la fin du programme.
Les cycles actifs de lavage en cours seront
affichés successivement sur le haut de l’écran,
de même que le temps qui reste pour la fin
du lavage, à intervalles périodiques mais pas
par minutes.
Les fonctions complémentaires peuvent être
sélectionnées en tout moment, à condition
que le cycle de lavage correspondant ne soit
pas achevé et que le programme admette
cette fonction.
Le fait d’enfoncer la touche de départ différé
durant le lavage n’aura aucun effet sur le lavelinge séchant.
L’activation de la touche départ/pause durant
le lavage provoquera l’arrêt du lave-linge qui
se situera en état de PAUSE.
DÉROULEMENT DU PROGRAMME DE
LAVAGE ET PANNE DE COURANT
utilisation de l’appareil
Page 65

c
65
a
b
1
NETTOYAGE DE LA CUVETTE À PRODUITS
lave-linge
maintenance et entretien
Après chaque lavage, laissez le hublot
ouvert un moment, afin que l’air puisse
circuler librement à l’intérieur de l’appareil.
Nous vous conseillons d’effectuer, de
temps en temps, en fonction de la dureté
de l’eau, un cycle de lavage complet
avec un produit détartrant. Vous
prolongerez ainsi la vie de votre lavelinge.
MAINTENANCE
Avant de procéder à une quelconque
opération d’entretien ou de
maintenance, débranchez le lavelinge du secteur.
Nettoyez la cuvette à produits
régulièrement, pour éliminer tout reste
de produit lessiviel.
a Retirez complètement la cuvette
à produits en tirant vers l’extérieur.
b Nettoyez les compartiments de la
cuvette à produits. Utilisez de l’eau
tiède et une brosse.
c Nettoyez également les siphons
du compartiment à additifs, après
les avoir retirés et remettez-les
correctement en place.
Remettez la cuvette à produits
dans son logement.
Un siphon mal remis en place ou
sale empêche la prise d’additifs
et la vidange totale de la cuvette
à la fin du lavage.
Important Important
Page 66

66
2
Importante
Nettoyez le filtre accessible si la pompe de
vidange est bloquée par des objets
indésirables.
a Ouvrez la trappe de la plinthe en appuyant
sur la languette et en tirant légèrement.
b Pour recueillir l’eau qui va s’écouler
lorsque vous retirerez le filtre, déposez
un récipient en dessous.
c Faites tourner le filtre un quart ou un
demi-tour à gauche. L’eau commencera
à sortir.
d Une fois achevée l’évacuation de l’eau
du lave-linge, faire tourner le filtre
plusieurs tours, jusqu’à son extraction
totale, en tirant légèrement.
e Débarrassez le filtre des objets et
peluches qu’il contient.
f Remettez en place le filtre et la plinthe.
NETTOYAGE DU FILTRE ACCESSIBLE ET NETTOYAGE
EXTÉRIEUR DE L’APPAREIL
maintenance et entretien
Pour éviter tout risque de brûlure, ne
pas effectuer cette opération si la
température de l’eau dépasse les
86ºF.
Éliminez aussitôt tout reste de produit
lessiviel ou d’additifs sur l’extérieur
du lave-linge, pour éviter la corrosion
de l’appareil.
e
Important
Important
NETTOYAGE EXTÉRIEUR
NETTOYAGE DU FILTRE
Pour nettoyer l’extérieur du lave-linge, utilisez
de l’eau tiède savonneuse, ou un produit non
agressif. Ne jamais utiliser de produits abrasifs
ni solvants.
Séchez à fond, à l’aide d’un chiffon.
d
a
b c
Page 67

lave-linge
sécurité et résolution de problèmes
67
Si vous observez une anomalie
quelconque, consultez les
indications suivantes.
Si elles ne vous aident pas à
résoudre le problème, débranchez
l’appareil et adressez-vous au
SERVICE D’ASSISTANCE
TECHNIQUE.
INCIDENCES
Nous vous prions de ne
jamais ouvrir l’appareil. Il
n’y a, à l’intérieur, aucun
fusible ou composant
quelconque pouvant être
remplacé par le client.
Le lave-linge ne démarre
pas?
Le lave-linge vibre ou est
excessivement bruyant?
Causes possibles :
Vérifiez que la porte est bien fermée.
Le lave-linge n’est pas branché au secteur ou il n’y pas
de courant.
La touche Départ/Pause n’est pas enfoncée.
Si la porte du lave-linge est mal fermée, l’écran affichera
F04.
Causes possibles :
Les cales d’immobilisation du tambour et de transport
de l’appareil n’ont pas été retirées.
Le lave-linge n’est pas bien nivelé ou n’est pas stable.
Indicateur
FO1
FO2
CO3
FO4
FO5
.
.
.
.
.
F10
Incidences
Il n’y a pas d’arrivée d’eau
Le lave-linge ne vidange pas et n’essore pas
Il n’essore pas
Il ne se met pas en route
S’adresser au Service d’Assistance Technique
Important
Page 68

sécurité et résolution de problèmes
68
Le lave-linge ne se remplit
pas d’eau?
Le lave-linge ne vidange pas
et n’essore pas?
Le lave-linge n’essore pas?
Je ne vois pas d’eau dans
le tambour durant le lavage.
Si l’écran affiche l’indication F01 : Vérifier s’il n’y a pas
de panne d’alimentation en eau, si le robinet de l’eau
est ouvert et si le filtre de l’entrée d’eau au lave-linge
n’est pas bouché.
Remède : Attendre le retour de l’eau, ouvrir le robinet
d’arrivée de l’eau, retirer le tuyau d’arrivée de l’eau et
nettoyer le filtre.
Si cette défaillance se produit, l’écran affichera F01.
Si l’écran affiche l’indication F02 : Vérifier que la pompe
ne soit pas bouchée, que le conduit d’évacuation de
l’immeuble ne soit pas bouché ou que la pompe soit
mal raccordée.
Remède: Si la pompe est bouchée, suivre les instructions
de l’alinéa 2 de Maintenance et Entretien de l’appareil.
Si cette défaillance se produit, l’écran affichera F02.
Cause : Le linge es mal réparti dans le tambour et cela
risque de provoquer un niveau excessif de vibrations.
Remède : Répartir correctement le linge et lancer un
programme d’essorage.
Si cette défaillance se produit, l’écran affichera C3.
Le lave-linge est doté d’un système capable de s’adapter
à la charge et à la nature des textiles et il calcule
automatiquement la quantité d’eau et d’énergie nécessaires,
afin de contribuer à la protection de l’environnement. Par
conséquent, ne vous inquiétez pas si la quantité d’eau
que vous observez à travers le hublot vous semble
insuffisante: le lavage et le rinçage seront tout aussi
performants.
Page 69

69
sécurité et résolution de problèmes
Pourquoi reste-t-il de l’eau
dans la cuvette?
Pourquoi je ne peux pas
ouvrir le hublot
immédiatement après la fin
du lavage?
Pourquoi le temps qui reste
affiché sur l’horloge ne
coïncide pas avec le temps
réel de fin du cycle
sélectionné?
Autres indications
Vérifiez que la cuvette soit propre. Pour la nettoyer, suivre
les indications de Maintenance et Entretien de l’appareil.
1- Nettoyage de la cuvette à produits.
Les lave-linge actuels sont dotés de systèmes de sécurité
pour l’usager. Il est notamment impossible d’ouvrir le lavelinge si le tambour n’est pas totalement arrêté. De là qu’il
faille attendre environ 2 minutes avant de pouvoir ouvrir le
hublot.
Ce temps est orientatif et il peut se voir affecté par les
conditions de déroulement du programme sélectionné. Par
exemple : température initiale de l’eau, chargement du
linge ou déséquilibre causé par le linge lors de l’essorage.
Le lave-linge peut également détecter d’autres anomalies.
L’écran affichera dans ce cas les indications F05, F06...,
F10.
Appeler les Service Technique Agréé.
Page 70

70
lave-linge
avertissements concernant l’environnement
A la fin de la vie utile de l’appareil, ce dernier ne
doit pas être éliminé mélangé aux ordures
ménagères brutes.
Il peut être porté, sans coût additionnel, aux centres
spécifiques de collecte, agréés par les
administrations locales, ou aux prestataires qui
facilitent ce service.
L’élimination séparée d’un déchet d’électroménager
permet d’éviter d’éventuelles conséquences
négatives pour l’environnement et la santé, dérivées
d’une élimination inadéquate, tout en facilitant le
traitement et le recyclage des matériaux qu’il
contient, avec la considérable économie d’énergie
et de ressources que cela implique.
Afin de souligner l’obligation de collaborer à la
collecte sélective, le marquage apposé sur le
produit vise à rappeler la non-utilisation des
conteneurs traditionnels pour son élimination.
Pour davantage d’information,
contacter les autorités locales ou
votre revendeur.
INFORMATION POUR LA CORRECTE GESTION DES DÉCHETS D’APPAREILS
ÉLECTRIQUES ET ÉLECTRONIQUES
note écologique
Page 71

71
Page 72

06/10 LJ6A034I4 / B0J6A2100
Fagor America Inc.
PO Box 94
Lyndhurst, NJ 07071
www.fagoramerica.com
1.800.207.0806
 Loading...