

Fagor America 3FCA-68NFX User Manual
CARE & INSTRUCTIONS MANUAL
GUIDE D’UTILISATION ET D’ENTRETIEN
MANUAL DE INSTRUCIONES Y MANTENIMIENTO
REFRIGERATOR RÉFRIGÉRATEUR FRIGORÍFICO
• 3FCA-68NFX
NOTE: To avoid accident and damage, please read these instructions carefully before operating the appliance.
NOTE: Veuillez lire ces instructions attentivement a fi n d’éviter accidents et dommages.
NOTA: Por favor, lea este manual de instrucciones atentamente para evitar posibles daños o accidentes.


TABLE OF CONTENTS
Page
1. Important
2. Installation ...................................................................................... 4
2.1 Installation Requirements .......................................................... 4
2.2 Electrical Requirements.............................................................. 4
2.3 Installation Instructions.............................................................. 5
2.4 Before First Use.......................................................................... 5
3. Features of the Refrigerator and the Freezer .............................. 6
3.1 Temperature Regulation.............................................................. 7
3.2 Control Panel (No Frost)............................................................ 7
3.3 Functions .................................................................................... 8
4. Operation of the Refrigerator ...................................................... 9
4.1 Multifresh System........................................................................ 9
4.2 Double Fresh System .................................................................. 10
4.3 Bio Filter .................................................................................... 10
4.4 Normal Refrigerator Noises ...................................................... 11
5. Operation of the Freezer .............................................................. 12
5.1 Ice Making .................................................................................. 12
5.2 Defrosting.................................................................................... 12
5.3 Defrosting Food.......................................................................... 12
6. Care and Cleaning .......................................................................... 13
7. Troubleshooting .............................................................................. 14
8. Customer Service ............................................................................ 16
9. Product Warranty .......................................................................... 17
Safety Instructions
........................................................ 3
Please read these instructions carefully before use.
Keep this manual for future reference.
1


1. IMPORTANT SAFETY INSTRUCTIONS
READ BEFORE INSTALLING AND USING.
FAILURE TO FOLLOW THESE INSTRUCTIONS CAN RESULT
IN SERIOUS OR EVEN FATAL INJURY.
WARNING: To reduce the risk of fire, electric shock, or injury when using your refriger-
ator, follow these basic precautions:
• This refrigerator must be properly installed in accordance with the Installation
Instructions before it is used.
• Always plug into a grounded 3 prong outlet, do not remove ground prong.
• Do not use an adapter or an extension cord.
• Replace all panels before operating.
• Keep flammable materials and vapors, such as gasoline, away from refrigerator.
• Use two or more people to move and install refrigerator.
• Unplug the refrigerator before cleaning, making repairs, changing the light bulbs or
servicing the refrigerator.
• Never clean refrigerator parts with flammable fluids. The fumes can create a fire
hazard or explosion.
• Never allow children to operate, play with, or crawl inside the refrigerator. They
could damage the refrigerator and seriously injure themselves.
• Do not touch the cold surfaces in the freezer compartment when hands are damp or
wet. Skin may stick to these extremely cold surfaces.
• Keep fingers out of the “pinch point” areas; clearances between the doors and cabinet are necessarily small. Be careful closing doors when children are in the area.
ENGLISH
IMPORTANT: Child entrapment and suffocation are not problems of the past. Junked or
abandoned refrigerators are still dangerous – even if they will sit for “just a few days.” If
you are getting rid of your old refrigerator, please follow these instructions to help prevent
accidents.
Before you throw away your old refrigerator or freezer:
• Take off the doors.
• Leave the shelves in place so that children may not easily climb inside.
SAVE THESE INSTRUCTIONS FOR FUTURE REFERENCE.
3

2. INSTALLATION
2.1 INSTALLATION REQUIREMENTS:
➭ Ensure that the refrigerator is located away from heat sources
(stoves, radiators, etc.) and protected from direct sunlight, which
increases energy consumption.
➭ Allow air flow around the rear of the refrigerator. Do not cover
the space between the refrigerator and the floor or the top of the
refrigerator with any object.
➭ The refrigerator must not be installed outdoors or exposed to rain.
➭ To ensure better energy efficiency, a 1 inch space is recommend-
ed between the back of the refrigerator and the wall.
➭ On certain occasions, relative humidity and room temperature
may generate condensation on the inside and outside of the refrigerator.
To avoid vibrations and noise, ensure that the refrigerator is
stable and level.
2.2 ELECTRICAL REQUIREMENTS:
➭ Plug specifications: grounded 220-240 V.
➭ Do not use adaptors or extension cables.
➭ Ensure that the cable is not in contact with the motor.
➭ Ensure that the cable is not caught under the refrigera-
tor.
4
2.3 INSTALLATION INSTRUCTIONS:
TOOLS REQUIRED:
➭ A Phillips screwdriver.
PROCEDURE:
1. Unplug the refrigerator.
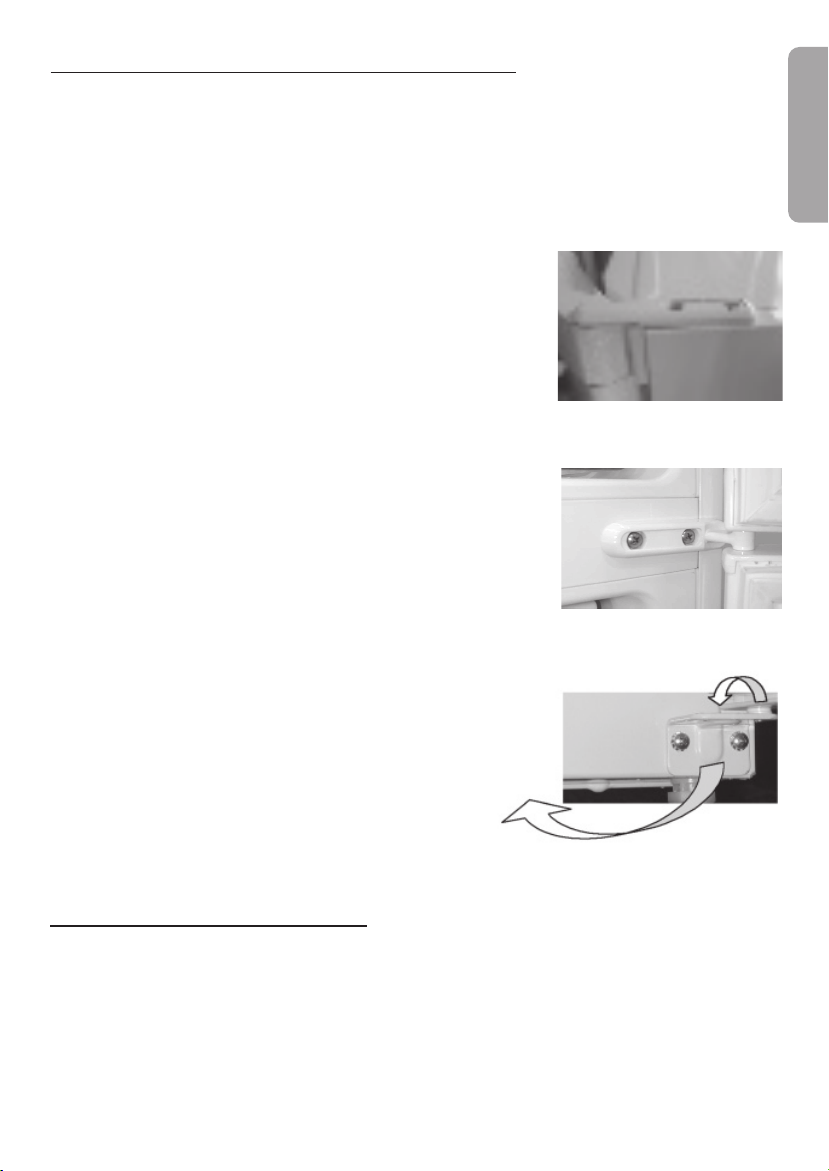
2. Remove the cover from the top hinge. (Fig.1)
3. Loosen the top hinge screws. (Fig.1)
4. Take the door off with an upward movement.
5. Remove the cover of the central hinge screws,
and loosen the two screws holding it in place.
(Fig.2)
6. With the screws loose, move the freezer door
upward to release it.
7. Lastly, remove the screws and take out the bottom hinge. (Fig.3)
8. Change the position of the bottom hinge shaft,
placing it on the opposite side. (Fig.3)
9. If fitted, change the lateral handles to the other
side.
ENGLISH
Fig. 1 Top hinge
Fig. 2 Central hinge
10. Reverse this procedure to refit the doors.
Fig. 3 Bottom hinge
2.4 BEFORE FIRST USE:
➭ Clean the inside with warm water and baking soda. Rinse carefully and allow to
dry completely.
➭ Wait for 2 hours before starting to ensure that the motor lubricants have stabi-
lized.
➭ If the refrigerator has been switched off, wait 4 hours after restarting before plac-
ing food inside.
5
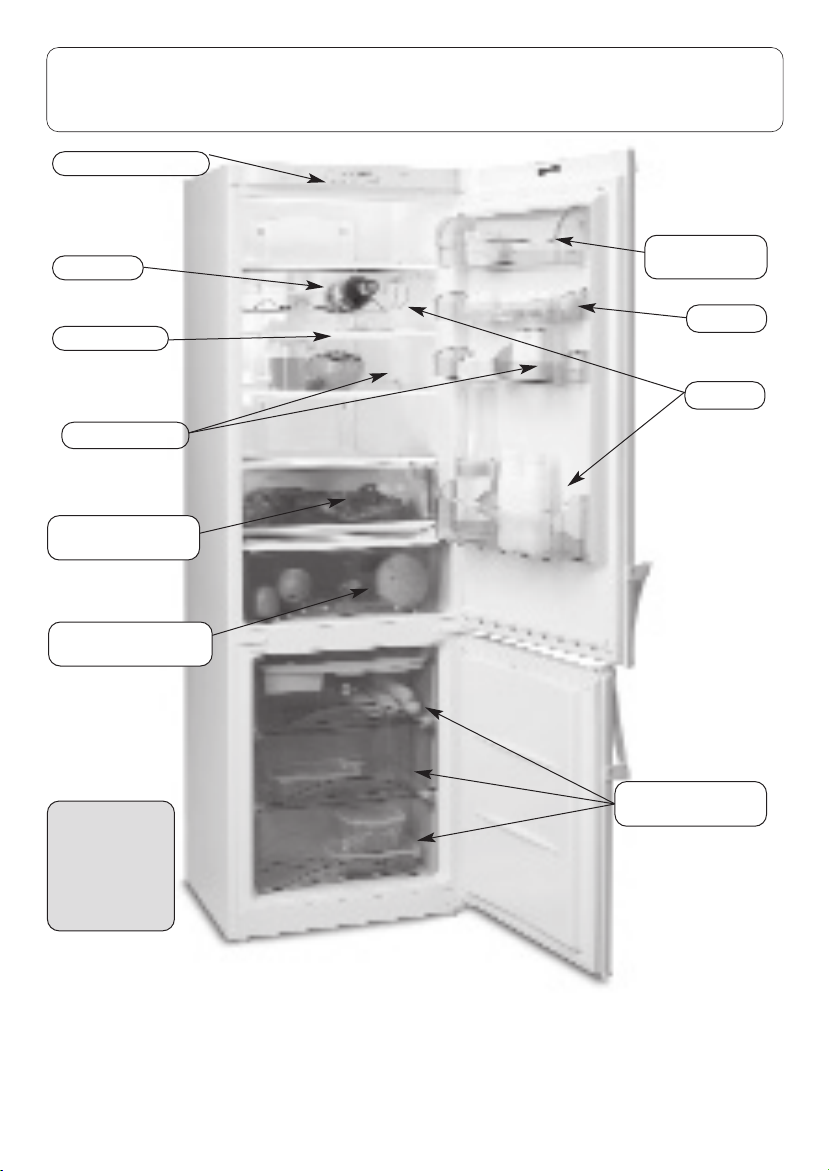
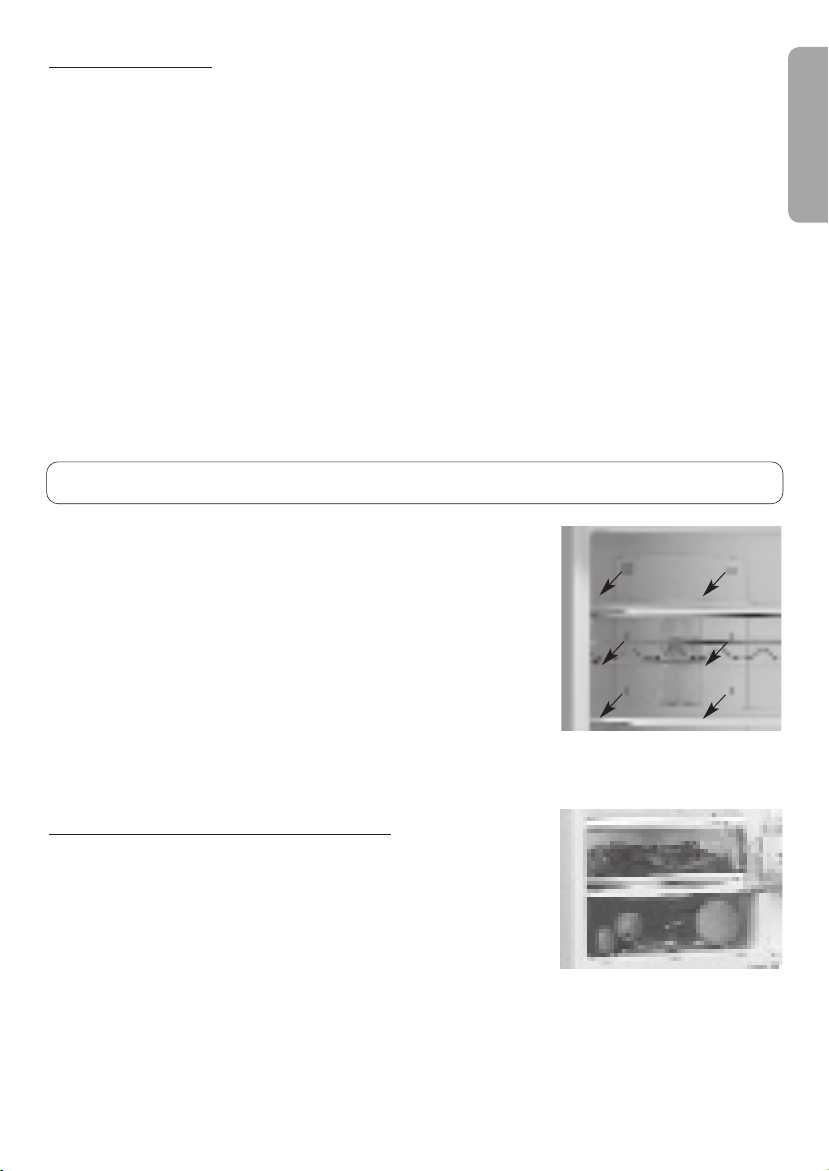
3. FEATURES OF THE REFRIGERATOR
•
•
AND THE FREEZER
Control panel
Cheese, butter,
Light
medicines
BIO FILTER
Cans and jars
MULTIFRESH
Meat compartment
DOUBLE FRESH
Vegetable compartment
NOTE:
This diagram
may not
correspond
exactly to your
refrigerator.
Eggs
Bottles
Frozen food and
ice cubes
FEATURES OF THE REFRIGERATOR:
➭ This refrigerator includes a four star (****) freezer compartment enabling you
to freeze food.
➭ This refrigerator will operate correctly between the following temperatures:
No-Frost Models 50ºF-116ºF (10ºC-43ºC)
6
3.1 TEMPERATURE REGULATION:
➭ In normal conditions, the recommended approximate temperature is
38ºF (4ºC) in the refrigerator and about –8ºF (-19ºC) in the freezer.
➭ To regulate the temperature, use the temperature selection controls.
Temperatures are indicated in ºF.
WARNING: The inside refrigerator temperature depends on:
➭ Room temperature.
➭ The location of the refrigerator.
➭ Door-opening frequency
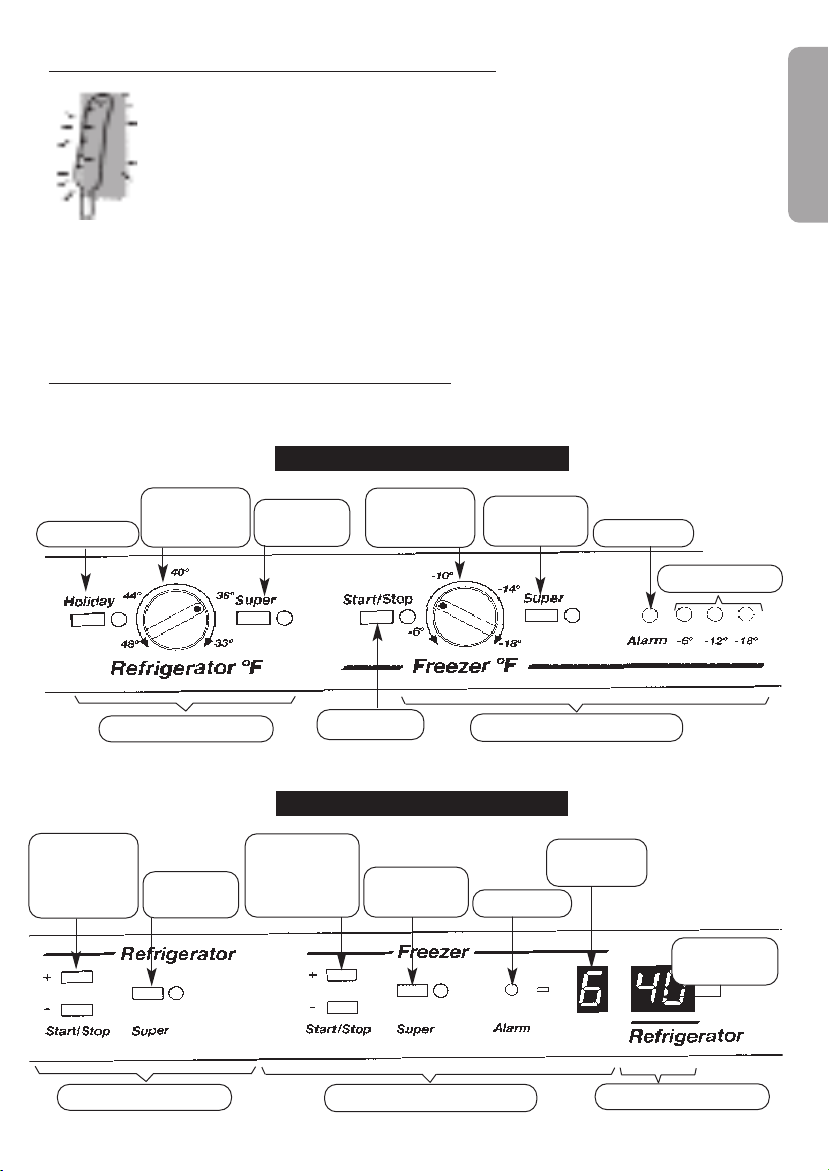
3.2 CONTROL PANEL (No-Frost)
Your refrigerator will have either a LED control panel or a digital control panel.
LED control panel
ENGLISH
Holiday
Refrigerator
Temperature
Selection or
Holiday
Refrigerator
Temperature
Selection
REFRIGERATOR
SUPER
COOLING
SUPER
COOLING
ON / OFF
Digital control panel
Freezer
Temperature
Selection or
ON / OFF
Freezer
Temperature
Selection
SUPER
FREEZING
SUPER
FREEZING
FREEZER
ALARM
ALARM
Cold level
Freezer
Display
Refrigerator
Display
REFRIGERATOR FREEZER
7
REFRIGERATOR

➡
➡
➡
➡
3.3 FUNCTIONS
ON/OFF
LED control panel
The refrigerator is switched on and off using the "ON/OFF" button.
Digital control panel
The refrigerator is switched on and off using the freezer temperature selection buttons. If a
number appears on the freezer displays, this means the refrigerator is running. To switch off
the refrigerator, press + or – repeatedly until the displays switch off.
Freezer (ºF) OFF -4 -6 -8 -10 -12 -14 -16 -18 OFF
Freezer (ºC) OFF -17 -18 -19 -20 -21 -22 -23 -24 OFF
Temperature selection
LED control panel
The refrigerator and freezer temperatures in ºF can be selected by turning the dials. The
coldest temperature is obtained by turning the dial clockwise as far as it will go.
Refrigerator (ºF) +32 +34 +36 +38 +40 +42 +44 +46 +48
Freezer (ºF) -6 -8 -10 -12 -14 -16 -18
Refrigerator (ºC) +1 +2 +3 +4 +5 +6 +7 +8 +9
Freezer (ºC) -18 -19 -20 -21 -22 -23 -24
Digital control panel
The refrigerator and freezer temperatures in ºF can be selected by pressing the + and – buttons. While the number display flashes, choose the temperature required. Once this is done
the temperature in the compartment will be shown on the display and will gradually move
to the level chosen.
Refrigerator (ºF) H +32 +34 +36 +38 +40 +42 +44 +46 +48 H
Freezer (ºF) OFF -4 -6 -8 -10 -12 -14 -16 -18 OFF
Refrigerator (ºC) H +1+2+3+4+5+6+7+8+9H
Freezer (ºC) OFF -17 -18 -19 -20 -21 -22 -23 -24 OFF
SUPER COOLING
With this function running, the refrigerator temperature is regulated automatically to maximum cold for six hours. It switches off automatically but can also be
turned off automatically before the 6 hours is up.
SUPER FREEZING
With this function running, the freezer temperature is automatically adjusted to
maximum cold. This is to facilitate freezing of food and it is recommended that it
is turned on 24 hours before introducing a large amount of food. The function will
turn off automatically, and can also be switched off manually.
Alarm
A light and audio signal is activated if the freezer temperature is abnormally low.
The audio alarm can be turned off manually using the SUPER FREEZING function.➡When the refrigerator door is left open for more than 120 seconds, an alarm
will sound intermittently. This alarm will be switched off by closing the door.
Cold level
The number of lights on will indicate freezer cold level. The more lights on, the
colder the freezer.
8
Holiday Function
➡
➡
➡
➡
➡
➡
Used when you want the freezer to work normally and the refrigerator to be
switched off when you do not plan to use it for a long period of time, for example,
during a vacation. Before enabling this option, empty the refrigerator, clean it and
close the door. Then activate this function to ensure that your refrigerator is maintained in optimum conditions to avoid generating unpleasant odors. When you
come back from your holiday, simply deactivate the holiday function and the temperature in the refrigerator will drop once again to the pre-selected level.
To activate or deactivate the Holiday function:
LED control panel
Press the Holiday function button and close the refrigerator door.
Digital control panel
Press the + or – button used for selecting the refrigerator temperature until the
letter H (Holiday) appears on the refrigerator display.
4. OPERATION OF THE REFRIGERATOR
Leave enough space between food items to let air
flow around them.
Do not leave the door open longer than necessary.
Do not put hot food in the refrigerator.
Do not obstruct the ventilation grills. (Fig.4)
To prevent stored food from drying out, we recommend
that you place them in an airtight container or wrap
them in aluminium foil or plastic food wrap.
Fig. 4 Ventilation grills
ENGLISH
4.1 MULTIFRESH SYSTEM
If your refrigerator has a Multifresh compartment:
➭ This guarantees ideal conservation of fresh food
such as meat, fish, and also vegetables, allowing
these items to be conserved for longer periods of
time without having to freeze them.
➭ This area has the coldest temperatures in the refrigerator and is also the area
least affected by frequent opening.
➭ For meat and fish, an intermediate refrigerator temperature is recommended.
➭ For greater capacity in the refrigerator, remove the top rack and cover, and store
directly on the tray. This area loses the benefits outlined above.
9
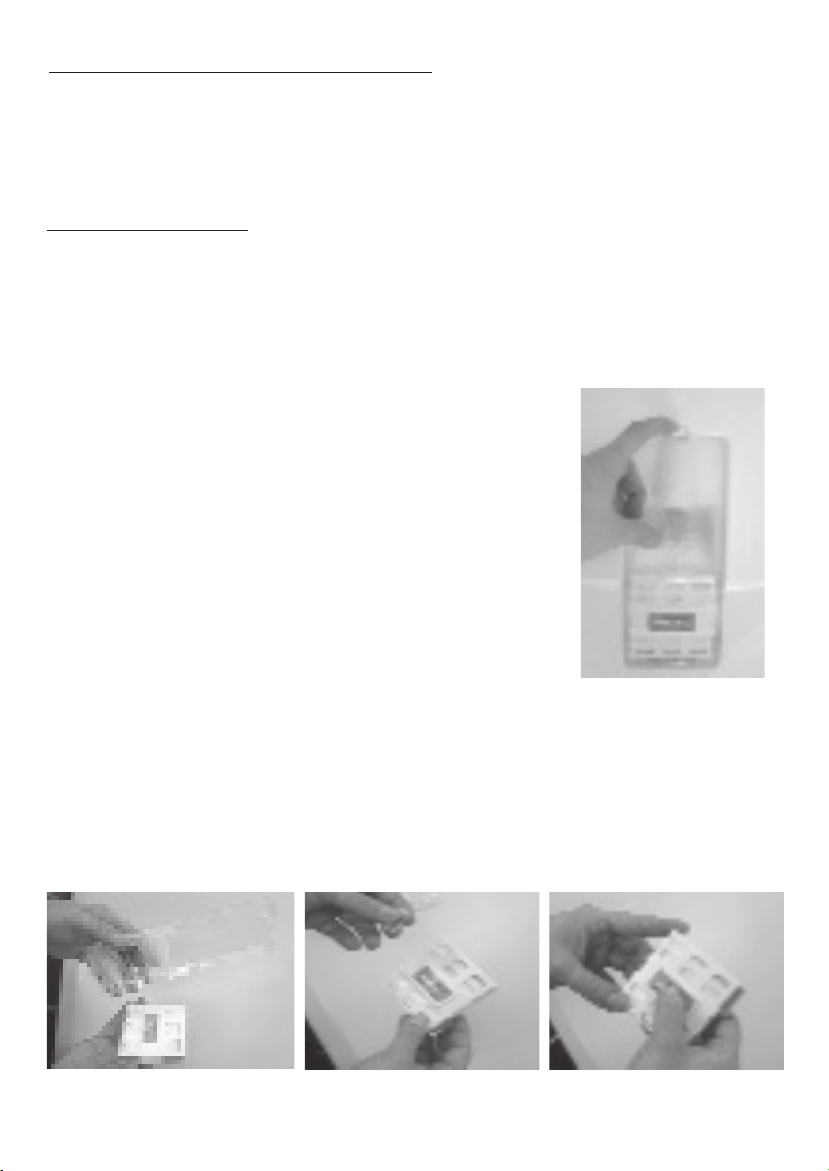
4.2 DOUBLE FRESH SYSTEM
Your refrigerator is fitted with this system. The top rack covering the fruit and vegetable baskets has a membrane filter maintaining a high level of humidity in the baskets. The humidity level provided is ideal to ensure that vegetables do not dry out,
ensuring that they retain their texture, flavor and nutritional value.
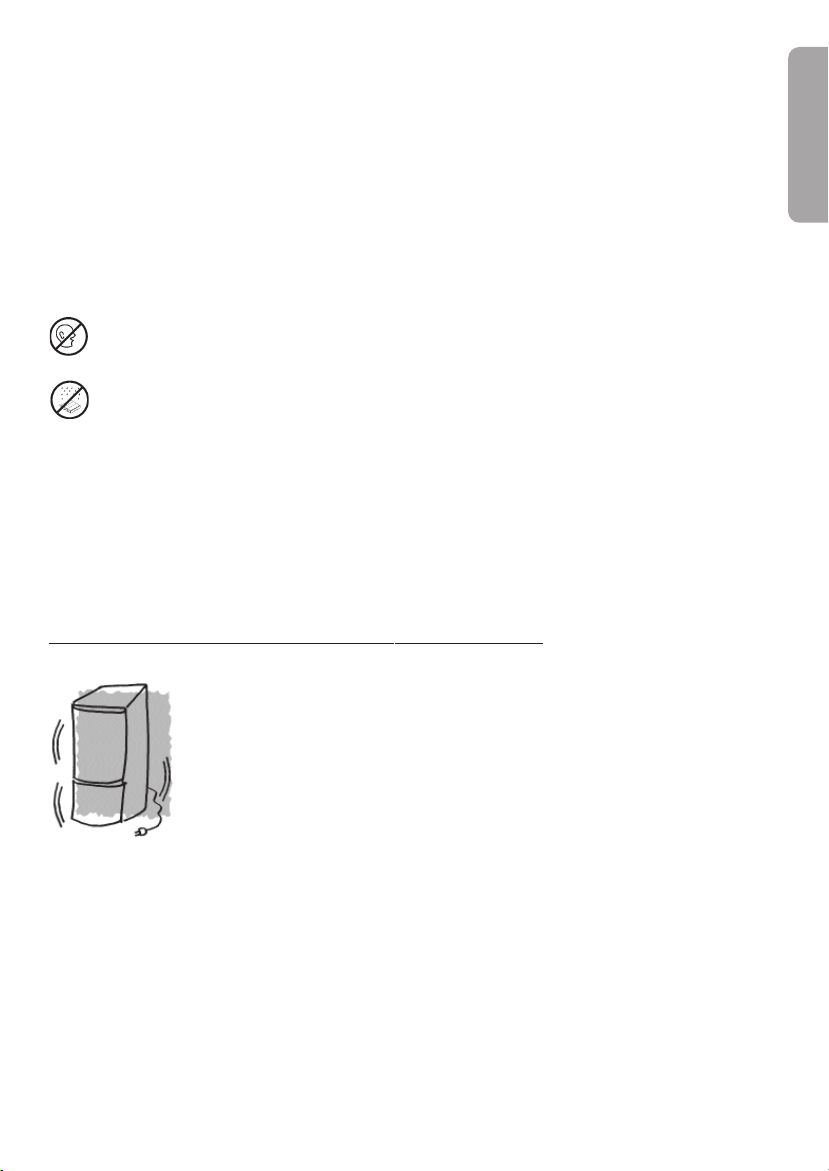
4.3 BIO FILTER
Function
The refrigerator may be equipped with a filter that absorbs any unpleasant smells
produced by the food, and retains microorganisms (mold and bacteria) from the
circulating air.
Location
The BIO FILTER is located on the inside of the reflector
cover on the refrigerator light.
Activation
If your refrigerator has a BIO FILTER, the procedure for
activating it is as follows:
1. Press the top tab and remove the light reflector cover
(Fig.5).
2. Separate the filter from the cover (Fig.6) and remove
the seals by pulling on the red tabs (Fig.7).
Fig.5
3. Then press on the BIO FILTER window until you hear a click. After a few
seconds the time scale will begin to change color (Fig.8).
4. Put the filter back in place and fit the cover into its corresponding recess
(first, position the lower part and then click the top part into place.)
Fig.7Fig.6
10
Fig.8
Duration and replacement
The BIO FILTER only maintains its properties for a certain time (approx. 6
months). The BIO FILTER window shows when it needs changing. To replace it,
follow the activation directions on previous page. Replacement parts can be purchased in the shop where you bought your refrigerator by calling ____________.
The code 993010246 will be printed on the rear of the filter.
Caution
➭ Keep all replacement parts and used BIO FILTERs out of reach of
children. They could be dangerous if swallowed.
➭ Do not get the BIO FILTER wet, as it will lose its properties.
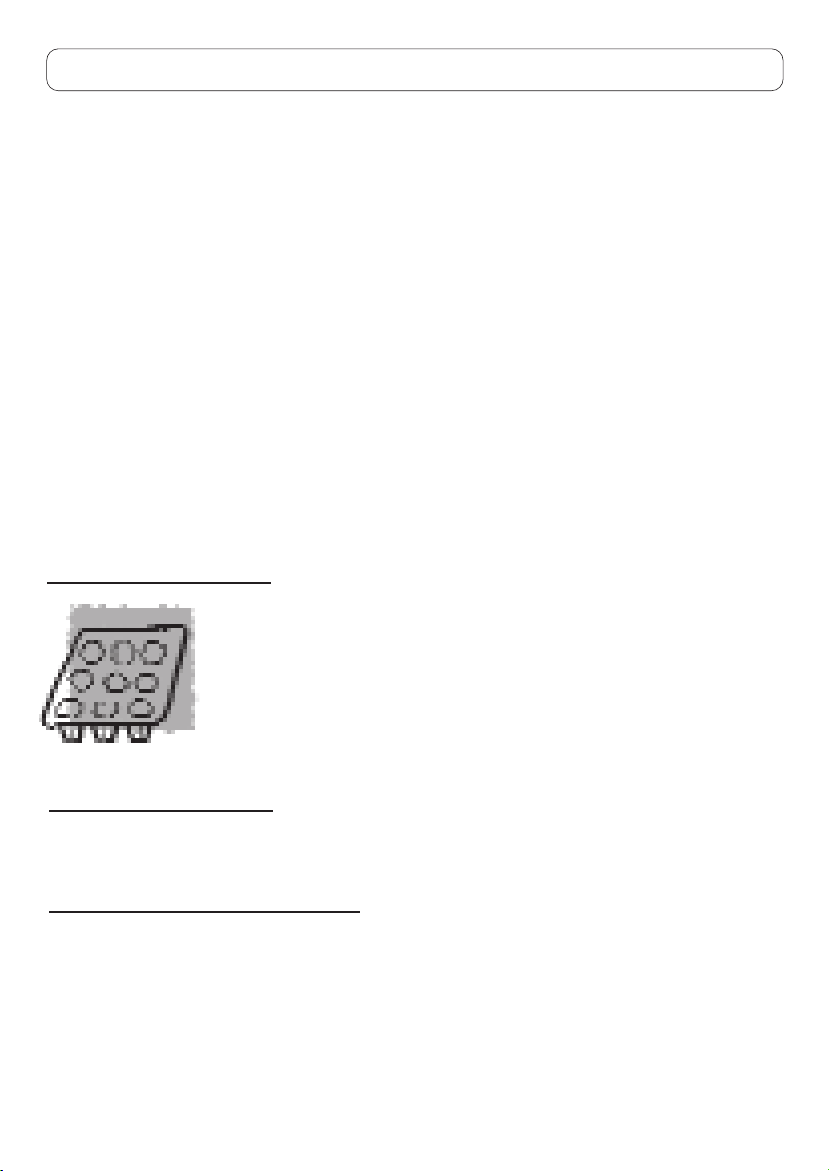
4.4 NORMAL REFRIGERATOR NOISES
ENGLISH
➭ The refrigerating gas may produce bubbling sounds as it
flows through the unit.
➭ The compressor may buzz and/or produce a light knocking
noise, which maybe louder when started.
➭ Cracking sounds produced by expansion and contraction of
the materials used.
➭ The insulation used amplifies sound levels.
➭ You may hear a gentle murmur when your refrigerator is
switched on. This is due to the working fan incorporated to
ensure adequate air circulation inside the appliance.
➭ You will note the effect of the fan in the freezer, which cools
the entire refrigerator evenly.
11
5. OPERATION OF THE FREEZER
➭ The amount of food to be frozen at once must not exceed the freezing power
indicated on the specifications plate.
➭ Ensure that your food to be frozen is in good condition.
➭ Observe the best-by date.
➭ To prevent the food from drying out, wrap it in aluminium foil or plastic wrap.
➭ Do not put food to be frozen in contact with food already frozen.
➭ Never refreeze thawed food.
➭ Freeze in daily servings.
➭ Do not store bottles with carbonated drinks or glass bottles containing liquids in
the freezer. They may burst.
➭ Do not eat very cold ice-cream or food; this may burn your mouth.
➭ Label the wrapping, indicating the contents and the freezing date.
➭ For best energy yield, keep the ice-cube holder full, along with the ice holder on
the upper basket tray.
5.1 ICE-MAKING:
➭ Fill the trays in the freezer up to three quarters with water.
➭ Place the trays in the freezer.
➭ Once the water has frozen, the cubes can be removed by
twisting the tray slightly. Store the cubes in the ice compartment.
5.2 DEFROSTING
➭ No-Frost refrigerators do not generate layers of frost or ice.
5.3 DEFROSTING FOOD
Not all food should be defrosted in the same way.
➭ If you have bought frozen food, follow the instructions on the package.
➭ Vegetables should be cooked directly per instructions.
➭ In general, prepared or pre-cooked foods can be cooked directly from freezer.
➭ Meat and fish must be defrosted slowly in the refrigerator over several hours, or
you can use a microwave.
12
6. CARE AND CLEANING
6.1 CLEANING:
➭ Switch off the refrigerator using the ON/OFF button before
starting to clean it.
➭ Clean the interior with water and baking soda, with a sponge
or cloth, this will prevent the formation of odors.
➭ Never use steam cleaning machines, solvents or abrasive
detergents. This may damage the inside of your refrigerator. Do
not place the inside shelves in the dishwasher.
➭ It is recommended that the rear grill be cleaned once a year using a vacuum
cleaner. If it is dusty and dirty, it reduces the refrigeratorʼs performance and
increases its consumption.
6.2 CHANGING THE LIGHT
➭ Switch the refrigerator off.
➭ Remove the light reflector cover by pressing the top tab.
Remove the bulb and replace it with another of the same type,
➭
screw type E14, 220-240 V, with a maximum of 15 W.
6.3 WHAT TO DO IN CASE OF A POWER OUTAGE:
➭ If possible, do not open the refrigerator doors.
ENGLISH
➭ When power is restored, check to see if the food has defros-
ted, if so please discard.
6.4 WHAT TO DO IF THE REFRIGERATOR IS NOT TO BE
USED FOR A LONG PERIOD OF TIME:
➭ Empty the refrigerator.
➭ Switch off and clean the refrigerator as described in the Cleaning section.
➭ Leave the doors open to prevent formation of unwanted odors.
➭ Holiday function: If your refrigerator is to be out of use for any length of time
and you wish to keep food in the freezer, you may switch it off and activate the
Holiday function, leaving the door closed. The refrigerator will then function at
a very low rate of energy consumption and no bad odors will be produced.
13
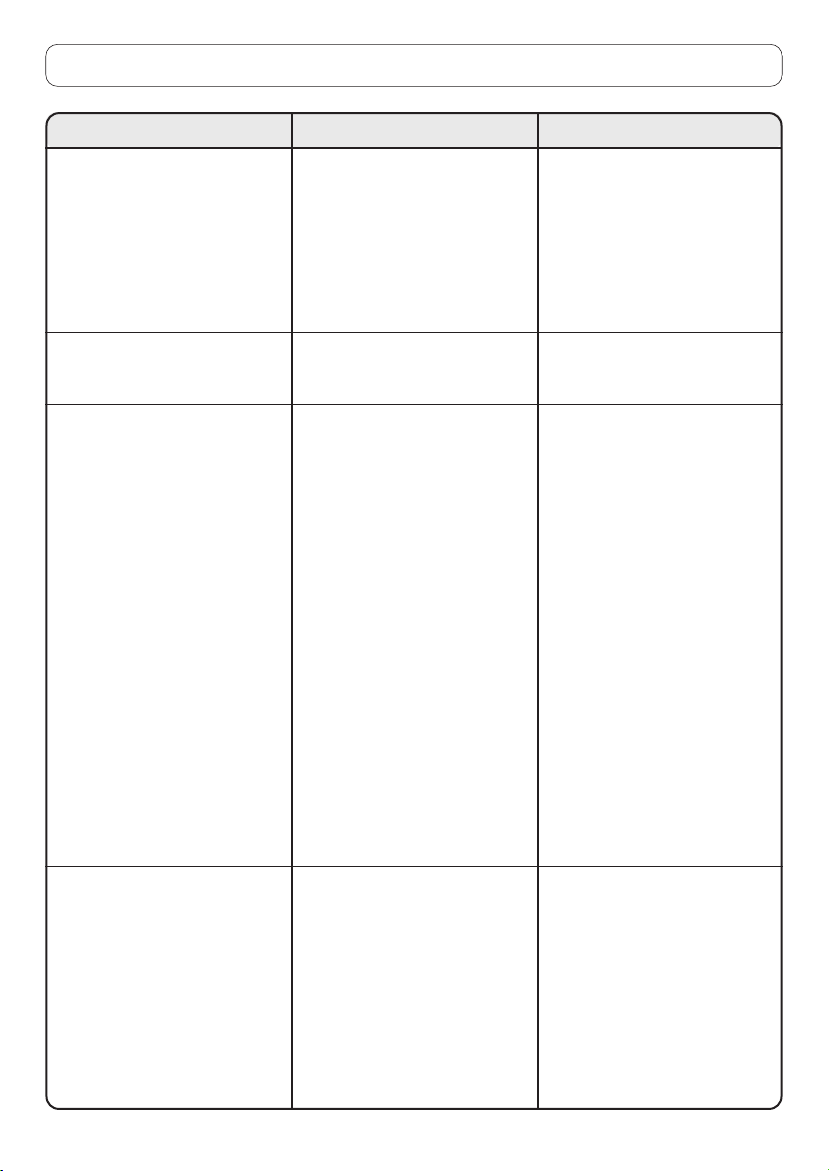
7. TROUBLESHOOTING
The refrigerator does not operate
The refrigerator vibrates
The refrigerator or freezer is
not very cold
CAUSEPROBLEM
• It is not plugged in.
• There is no electrical current
to the plug because the fuse
has blown or the automatic
power switch has activated.
• The controls are not on.
• The refrigerator is not properly level.
• Temperature selection is set
too hot.
• The door is not properly
closed, is opened frequently
or was left open.
• The space between the refrigerator and floor or the
top of the refrigerator has
been covered.
• The refrigerator is exposed
to direct sunlight or a heat
source.
• A large amount of food has
been stored.
• There is something obstructing the ventilation grills.
SOLUTION
• Plug in.
• Change the fuse or reset the
automatic power switch.
• Switch the controls on.
• Level the refrigerator properly, with the leveller bases.
• Set temperature selection to
maximum cold.
• Ensure that the door does
not remain open too long.
• Keep these areas free as described in the "Installation"
section of this manual.
• Relocate the refrigerator or
protect it from these heat
sources.
• Consult the section on
"Operation and Use of the
Refrigerator".
• Remove any obstacles
blocking the air outlet of the
ventilation grills.
The motor runs constantly
• The doors are not properly
closed.
• The doors are opened often.
• The food was stored recently.
• Temperature selection is in
the high position.
14
• Close the door properly.
• Avoid opening the door frequently.
• Wait for the appliance to return to normal.
• Set the temperature switch
to less cold.
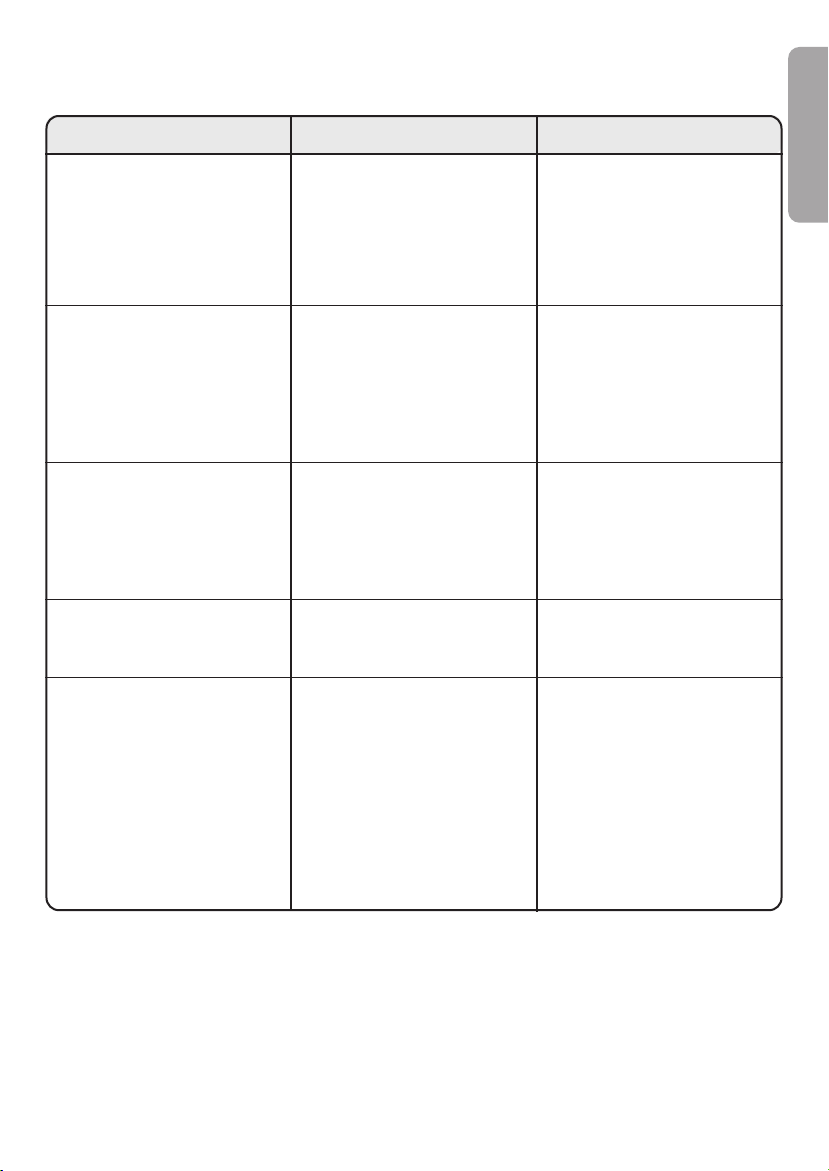
PROBLEM SOLUTION
CAUSE
The door does not close
Too much ice at the front of the
freezer drawers
Odor in the refrigerator
The food dries out
The refrigerator light does not
come on
• The refrigerator is not levelled correctly.
• The door was closed violently.
• It is prevented from closing
by a product inside.
• The door is open.
• The door has been opened
often.
• Some food is producing
odors in the refrigerator.
• The food is not properly
wrapped.
• The light is loose.
• It has blown.
• The plug is not connected to
the power.
• There is no electrical current to the plug because the
fuse has blown or the automatic power switch has activated.
• Level the refrigerator
correctly.
• Close the doors gently.
• Rearrange food.
• Check to see if food is preventing the door from being
closed.
• Ensure that the door does
not remain open for too
long.
• Wrap the food or cover it
correctly or replace the BIO
FILTER, in models which
have this function.
• Wrap the food or cover it
correctly.
• Screw it in properly.
• Change the light as explained in the manual.
• Plug in.
• Change the fuse or reset the
automatic power switch.
ENGLISH
15
 Loading...