

Page 1
Code 903 - 056 - 020 (rev. 04/04)
Gentile Signora, Egregio Signore,
ci congratuliamo con Lei per la sua nuova macchina
per caffè.
Con questo acquisto Lei ha scelto una macchina per caffè
espresso d'avanguardia, costruita secondo i più avanzati
principi della tecnica moderna; una macchina che non soltanto
è in grado di offrirLe una perfetta sintesi di efficienza e
funzionalità ma mette a Sua disposizione tutti gli strumenti per
darLe la "sicurezza di lavorare meglio".
Il consiglio di dedicare un poco di tempo alla lettura di questo
libretto di istruzioni per l'uso nasce dal desiderio di aiutarLa a
prendere confidenza con la Sua nuova macchina; desiderio
che siamo certi Lei condividerà pienamente.
Le auguriamo buon lavoro.
FAEMA SpA
Dear Customer,
We congratulate with you for your new Faema.
With this purchase youve chosen an up to date machine,
built after the most advanced principles of modern
technology, a unit, which gives you not only a perfect
synthesis of efficiency and functonality, but puts also at
your disposal everything you need for a good working.
The advice we give you of spending a bit of your time in
reading this manual comes from our desire of helping you in
reaching a good knowledge of your new machine.
Were sure of finding you of the same advice.
With our best wishes of a good work.
FAEMA SpA
Sehr geehrter Kunde,
Wir gratulieren lhnen zur lhrer neuen Maschine
und heissen sie in unserem Kundenkreis willkommen. Mit
diesem Gerät haben Sie eine Maschine ausgewählt, die nach
den letzten technischen Entwicklungen auf diesem Sektor
gebaut wurde: eine Maschine die mehr als die perfekte
Synthese zwischen Leistungsfähigkeit und Funktionalität
anbietet: nämlich die Gewissheit, ein betriebsicheres, seinen
Aufgaben gewachsenes Gerät zu besitzen.
Wir empfehlen lhnen dieses Handbuch zum Studium, wissend,
dass Sie damit lhre Kenntnisse über lhre neue Maschine
vertiefen können.
Wir verbleiben mit unseren besten Wünschen für ein gutes
Arbeiten mit lhrem neuen Gerät.
FAEMA SpA
Cher Client,
Nous vous félicitons pour lacquisition de votre
nouvelle Faema.
Avec cet achat vous avez choisi une machine à café moderne,
construite selon les principes les plus avancés de la technique
daujourdhui, une machine qui vous offre une parfaite synthèse
defficacité et de fonctionnalite et qui met ê votre disposition tout
ce dont vous avez besoin pour obtenir un bon travail.
Le conseil que nous vous donnons de consacrer un peu de
votre temps à la lecture de cette brochure vient du désir que
nous avons de vous aider à atteindre une bonne connaissance
de votre nouvelle machine.
Nous sommes certains que vous serez du même avis. Avec
nos meilleurs souhaits de bon travail.
FAEMA SpA
Exmª. Senhora, Exm°. Senhor,
Felicitamo-nos e a si pela sua nova Faema.
Com deste acquisição escolheu uma máquina para café de
vanguarda, construída segundo os mais avançados principios
da técnica moderna, uma máquina que está não somente em
condições de lhe oferecer uma sintese perfeita de eficiência
e funcionalidade, mas põe à sua disposição todos os
instrumentos para dar-lhe a "segurança de trabalhar melhor".
O conselho de dedicar um pouco de tempo à leitura deste livreto
de uso e manutenção nasce do desejo de o ajudar a tomar
familiaridade com a sua nova máquina; desejo que estamos
certos partilhará plenamente.
Desejamos-lhe bom trabalho.
FAEMA SpA
Exmª. Senhora, Exm°. Senhor,
Felicitamo-nos e a si pela sua nova máquina para
café.
Com deste acquisição escolheu uma máquina para café de
vanguarda, construída segundo os mais avançados principios
da técnica moderna, uma máquina que está não somente em
condições de lhe oferecer uma sintese perfeita de eficiência
e funcionalidade, mas põe à sua disposição todos os
instrumentos para dar-lhe a "segurança de trabalhar melhor".
O conselho de dedicar um pouco de tempo à leitura deste livreto
de uso e manutenção nasce do desejo de o ajudar a tomar
familiaridade com a sua nova máquina; desejo que estamos
certos partilhará plenamente.
Desejamos-lhe bom trabalho.
FAEMA SpA
I
F
GB
P
D
E
INEI
Istituto Nazionale Espresso
Italiano
Page 2
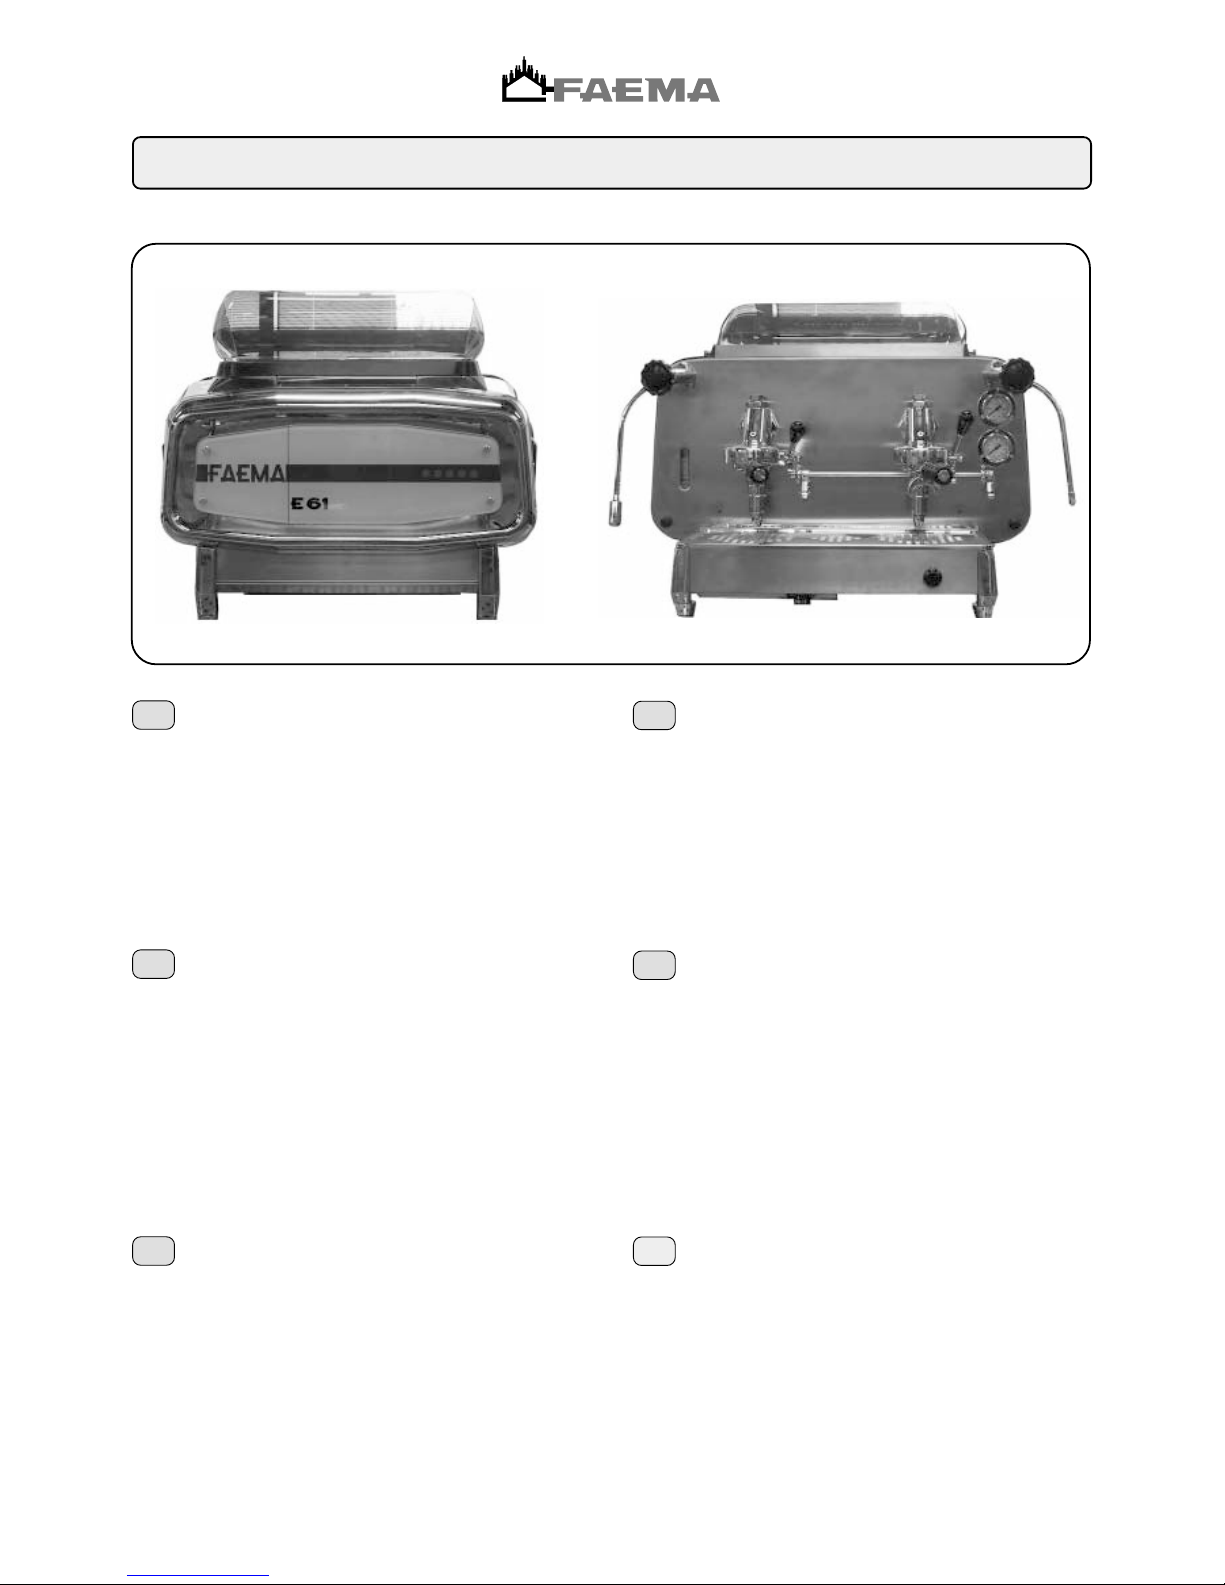
Manuale - Manual - Manuel - Handbuch - Manual - Manual
E61
GB
Read the instructions in this manual carefully before using or
handling the machine in any way. The instructions provide
important information regarding the safety precautions to be
followed.
The coffee machine is to be used solely for preparing
expresso coffee and hot drinks made with hot water or
steam and for heating cups.
Improper use of the machine for operations other than the
above can constitute a safety risk to persons and to the
equipment.
The producer disclaims all liability in case of damage due to
improper use of the coffee machine.
Bevor Sie die Maschine einschalten oder gebrauchen, sollten
Sie die vorliegende Bedienungsanleitung genau durchlesen,
da sie wichtige Angaben zum sicheren Einsatz der Maschine
enthält.
Die Maschine darf ausschließlich zur Zubereitung von
Espressokaffee und von mit heißem Wasser und Dampf
zubereiteten Getränken sowie zum Vorwärmen von
Kaffeetassen eingesetzt werden.
Alle anderen Arten des Einsatzes gelten als unsachgemäß
und beinhalten die Gefahr der Verletzung oder der
Beschädigung der Maschine.
Der Hersteller übernimmt keine Haftung für Schäden oder
Verletzungen, die auf einen unsachgemäßen Einsatz der
Kaffeemaschine zurückzuführen wären.
D
F
Lire attentivement les informations contenues dans ce manuel
avant que vous n’utilisiez et que vous ne manipuliez la machine
à café de manière erronnée. En effet, ces informations vous
fourniront d’importantes indications concernant la sécurité
d’utilisation de votre machine à café.
La machine à café n’est apte qu’à la préparation de cafés
espresso et de boissons chaudes, en n’utilisant que de l’eau
chaude ou de la vapeur , ou encore, pour chauffer vos tasses.
Toute opération différente de celles qui sont indiquées cidessus ne peut être effectuée car elle pourrait être la source
de dangers pour les personnes et pour la machine même.
Le producteur ne s’assume aucune responsabilité dans le
cas de dommages provenant d’une utilisation incorrecte de la
machine à café.
I
Leggere attentamente le avvertenze contenute nel presente
manuale, prima di utilizzare o manipolare in qualsiasi modo la
macchina, in quanto forniscono importanti indicazioni
riguardanti la sicurezza d'uso della stessa.
La macchina per caffè è prevista unicamente per la
preparazione di caffè espresso e bevande calde mediante
acqua calda o vapore e per il preriscaldamento delle tazzine.
Ogni utilizzazione diversa da quella sopra descritta è impropria
e può essere fonte di pericolo per persone e macchina.
Il produttore non assume responsabilità alcuna in caso di danni
risultanti da un uso improprio della macchina per caffè.
E
Leer cuidadosamente las advertencias contenidas en el
presente manual antes de utilizar o manejar de cualquier forma
la máquina, ya que proporcionan importantes indicaciones
sobre la seguridad de manejo de la misma.
La máquina para café sólo está prevista para la preparación
de café expreso y bebidas calientes mediante agua caliente o
por vapor, así como para el calentamiento de las tacitas.
Cualquier utilización diferente de la anteriormente descrita es
impropia y puede ser fuente de peligro para las personas y la
máquina.
El fabricante no se asume ninguna responsabilidad en el caso
de daños causados por un empleo impropio de la máquina
para café.
Ler atentamente as advertências contidas no presente
manual, antes de utilizar a máquina ou de a manusear, visto
fornecerem indicações importantes relativas à segurança
de utilização da mesma.
A máquina de café destina-se unicamente à preparação de
café expresso e bebidas quentes com água quente ou vapor
e para o aquecimento prévio das chávenas.
Qualquer utilização diferente das acima descritas é imprópria,
podendo tornar-se fonte de perigo para as pessoas e a
máquina.
O construtor não assume nenhuma responsabilidade perante
danos decorrentes de um uso impróprio da máquina de café.
P
Page 3
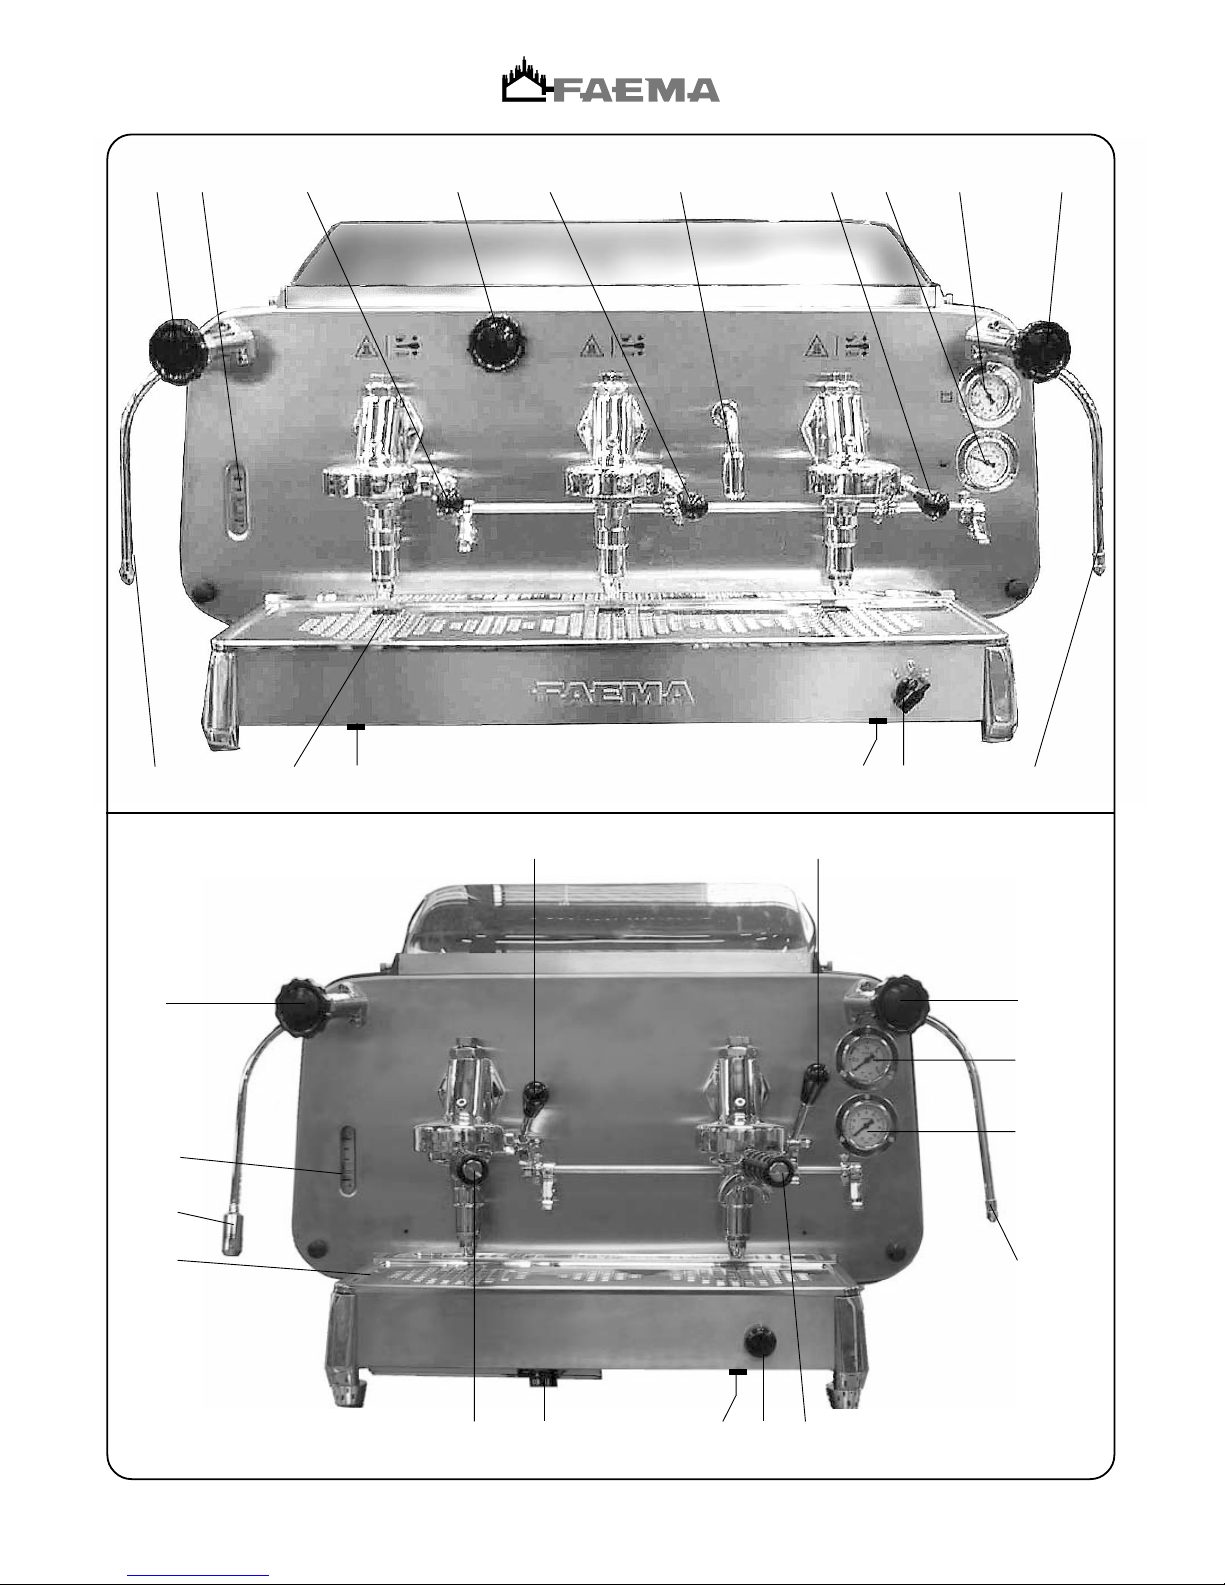
10
15
1
2
13
5
6
7
10
14
9
8
16
2
18
15 1
213
5 6
7149 8162
18
2
7
6
E61 3 GR
E61 2 GR
Page 4
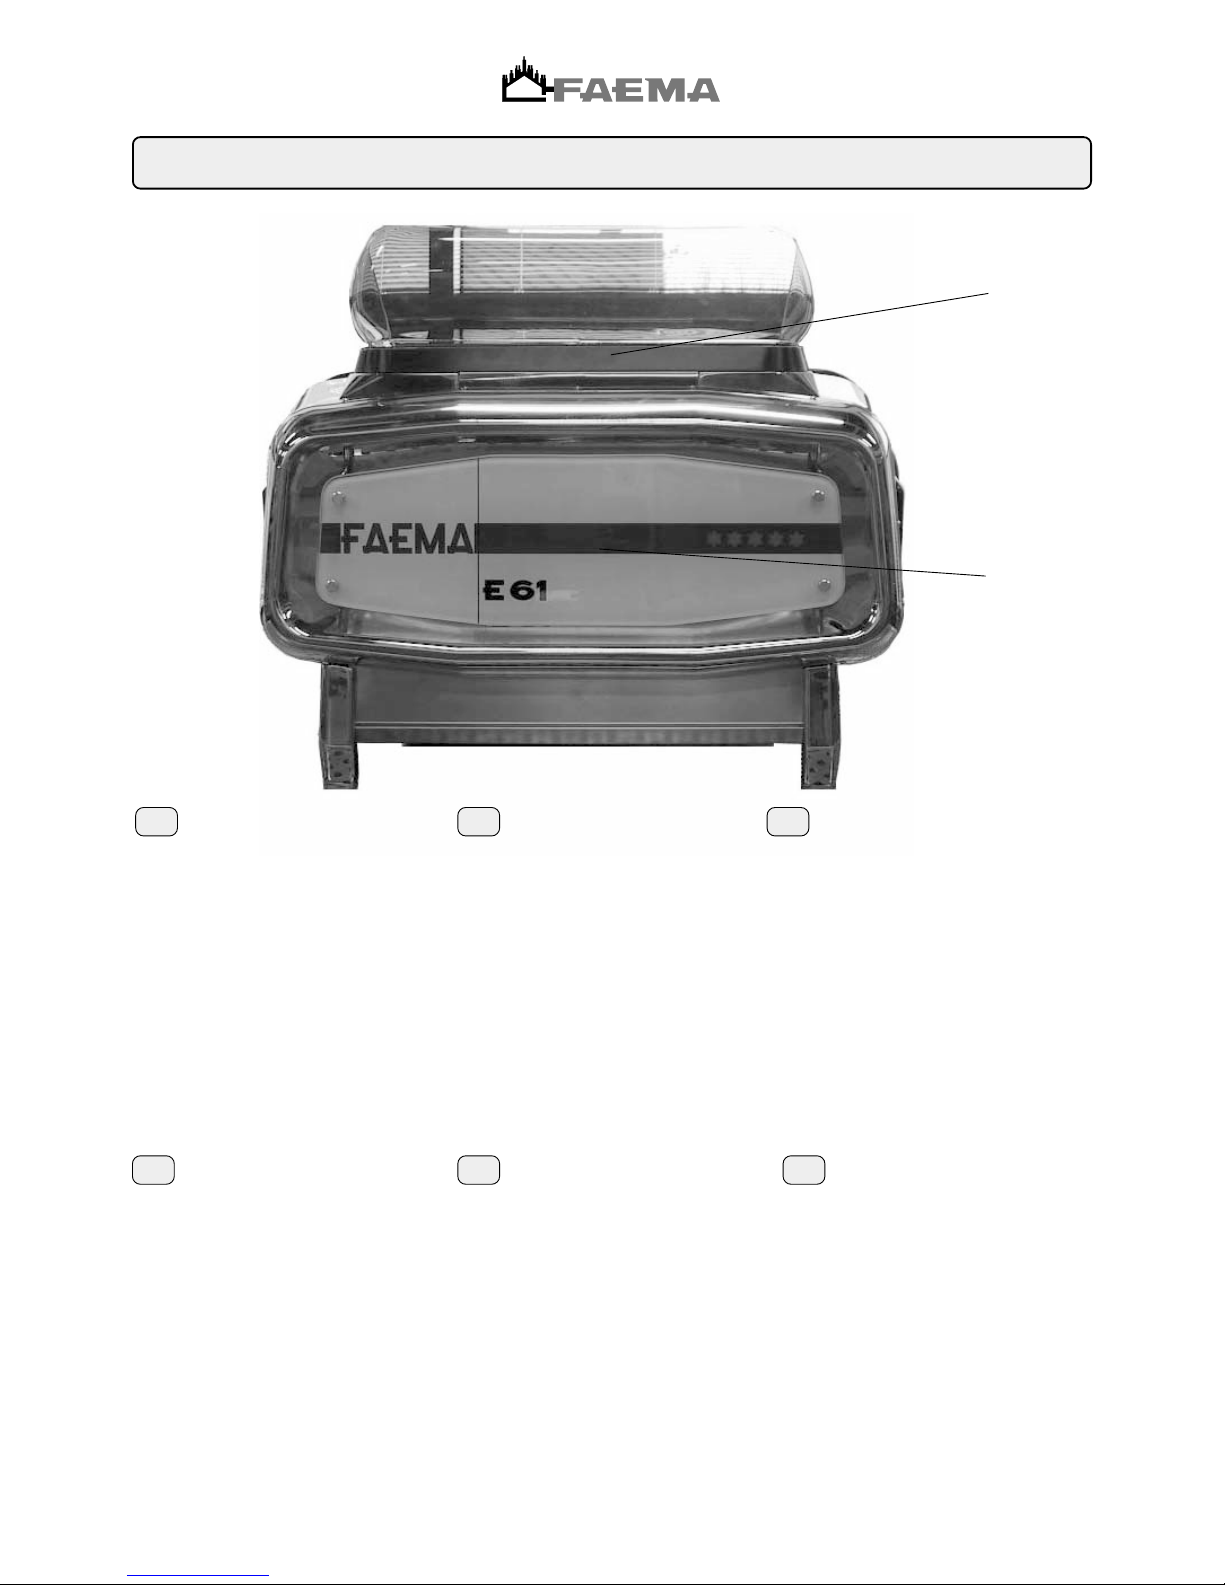
Legenda - Legend - Legende - Legende - Leyenda - Legenda
17
19
LEGENDE
1 Interrupteur général
2 Levier de débit du café
5 Levier de chargement de l’eau dans la chaudière
6 Tuyau (lance) de la vapeur
7 Poignée de réglage de la vapeur
8 Tuyau (lance) d’eau chaude
9 Poignée de débit de l’eau chaude.
10 Porte-filtres
13 Indicateur du niveau d’eau dans la chaudière
14 Manomètre de la chaudière
15 Cuvette
16 Manomètre
17 Plan chauffe-tasses
18 Interrupteur verre rétro-éclairée
19 Verre rétro-éclairée
F
I LEGENDA
1 Interruttore generale
2 Levetta erogazione caffè
5 Leva caricamento acqua in caldaia
6 Tubo (lancia) vapore
7 Manopola regolazione vapore
8 Tubo (lancia) acqua calda
9 Manopola erogazione acqua calda
10 Portafiltro
13 Indicatore livello acqua in caldaia
14 Manometro caldaia
15 Bacinella
16 Manometro pompa
17 Piano scaldatazze
18 Interruttore cristallo retroilluminato
19 Cristallo retroilluminato
LEGEND
1 Main ON/OFF switch
2 Coffee dispensing lever
5 Boiler water filling lever
6 Steam jet pipe
7 Steam adjustment knob
8 Hot water dispensing pipe
9 Hot water dispensing knob
10 Filter holder
13 Boiler water level indicator
14 Boiler pressure gauge
15 Pan
16 Pressure gauge pump
17 Cup warmer tray
18 Backlit glass switch
19 Backlit glass
GB
LEGENDA
1 Interruptor geral
2 Botão de distribuição do café
5 Botão de carregamento da água na
caldeira
6 Tubo (bico) do vapor
7 Manípulo de regulação do vapor
8 Tubo (bico) da água quente
9 Manípulo de distribuição da água quente
10 Porta-filtro
13 Indicador do nível da água na caldeira
14 Manómetro caldeira
15 Tabuleiro
16 Manómetro da bomba
17 Tabuleiro para aquecer as chávenas
18 Interruptor de cristal retro-iluminado
19 Cristal retro-iluminado
P
LEYENDA
1 Interruptor general
2 Palanca para erogacion del café
5 Palanca para cargar agua en la caldera
6 Tubo (lanza) vapor
7 Mando regulación vapor
8 Tubo (lanza) agua caliente
9 Mando erogación agua caliente
10 Portafiltro
13 Indicador nivel agua en la caldera
14 Manómetro caldera
15 Bandeja
16 Manómetro bomba
17 Bandeja calienta-tazas
18 Interruptor cristal retroiluminado
19 Cristal retroiluminado
E
LEGENDE
1 Hauptschalter
2 Hebel Kaffeeabgabe
5 Hebel Wasserauffüllung in Heizkessel
6 Dampfabgaberohr
7 Dampfabgaberegler
8 Rohr Heißwasserabgabe
9 Regler Heißwasserabgabe
10 Filterhalter
13 Anzeige Wasserstand in Heizkessel
14 Manometer Heizkessel
15 Wanne
16 Manometer Pumpe
17 Abstellfläche zur Tassenvorwärmung
18 Schalter Leuchttaste aus Glas
19 Leuchttaste aus Glas
D
Page 5
Installazione - Installation - Installation - Installation - Instalación - Instalação
!
I
GBGB
GBGB
GB
!
D
F
! !
ATTENZIONE
L'installazione, lo smontaggio e le
regolazioni devono essere eseguite
esclusivamente da personale tecnico
qualificato.
ATTENTION
Installation, disassembly and setting should
be carried out by qualified technical personnel only.
ATTENTION
L’installation, le démontage et les réglages
doivent être faits uniquement par le
personnel technique qualifié et autorisé.
ACHTUNG!
Die Installation, die Demontage und die
Einstellung des Gerätes darf nur durch
entsprechend qualifizierte Fachkräfte
vorgenommen werden.
E
!
ATENCIÓN
Las operaciones de instalación, desmontaje
y regulación tienen que ser realizadas por
personal técnico capacitado.
P
ATENÇÃO
A instalação, a desmontagem e as
regulações terão de ser executadas
exclusivamente por pessoal técnico
qualificado.
!
Page 6
Installazione - Installation - Installation - Instalación
INDICAZIONI PER L'INSTALLAZIONE
1. Leggere attentamente le avvertenze contenute nel presente libretto
in quanto forniscono importanti indicazioni riguardanti la sicurezza
di installazione, d'uso e di manutenzione. Conservare con cura
questo libretto per ogni ulteriore consultazione.
2. Questo apparecchio dovrà essere destinato solo all'uso per il quale
è stato espressamente concepito. Il costruttore non può essere
considerato responsabile per eventuali danni derivanti da usi
impropri, erronei ed irragionevoli.
3. Dopo aver tolto l'imballaggio assicurarsi dell'integrità
dell'apparecchio. Gli elementi dell'imballaggio (sacchetti in plastica,
polistirolo espanso, chiodi, ecc.) non devono essere lasciati alla
portata dei bambini in quanto potenziali fonti di pericolo.
4. Prima di collegare l'apparecchio accertarsi che i dati di targa siano
rispondenti a quelli della rete di distribuzione elettrica e idrica.
5. La macchina per caffè deve essere appoggiata su una superficie
piana e stabile, ad una distanza minima di 20 mm dalle pareti e
dalla superficie d'appoggio. Inoltre deve essere installata tenendo
conto che la superficie d’appoggio più alta (scaldatazze) sia ad
un’altezza non inferiore a 1,5 metri.
6. Deve avere i collegamenti di alimentazione (energia elettrica ed
acqua) e lo scarico dell'acqua dotato di sifone nelle immediate
vicinanze; inoltre occorre prevedere una superficie di appoggio per
gli accessori.
7. All'installazione occorre prevedere un interruttore onnipolare con
distanza di apertura dei contatti uguale o superiore a 3 mm e una
protezione da corrente di dispersione con valore pari a 30 mA.
8. La sicurezza elettrica di questo apparecchio è assicurata soltanto
quando lo stesso è correttamente collegato ad un efficace impianto
I
di messa a terra come previsto dalle vigenti norme di sicurezza
elettrica. E' necessario verificare questo fondamentale requisito di
sicurezza e, in caso di dubbio, richiedere un controllo accurato
dell'impianto da parte di personale professionalmente qualificato. Il
costruttore non può essere considerato responsabile per eventuali
danni causati dalla mancanza di messa a terra dell'impianto.
9. In generale è sconsigliabile l'uso di adattatori, prese multiple e/o
prolunghe. Qualora il loro uso si rendesse indispensabile è
necessario utilizzare solamente adattatori semplici o multipli e
prolunghe conformi alle vigenti norme di sicurezza, facendo però
attenzione a non superare il limite di portata in valore di corrente,
marcato sull'adattatore semplice e sulle prolunghe, e quello di
massima potenza marcato sull'adattatore multiplo.
10. Per evitare surriscaldamenti pericolosi, si raccomanda di svolgere
per tutta la sua lunghezza il cavo di alimentazione.
11. Per salvaguardare le caratteristiche di funzionalità e di sicurezza,
si raccomanda di non lasciare la macchina per caffè esposta ad
agenti atmosferici (pioggia, sole, gelo).
12. Non installare in locali (cucine) in cui sia prevista la pulizia mediante
getti d'acqua.
13. Non ostruire le aperture o fessure di ventilazione o di smaltimento
calore.
14. In caso di danneggiamento del cavo di alimentazione, lo stesso
deve essere sostituito solo dall'assistenza tecnica autorizzata.
15. Se la macchina viene immagazzinata in locali in cui la temperatura
può scendere sotto il punto di congelamento, vuotare in ogni caso
la caldaia e le tubazioni di circolazione acqua.
NOTICE FOR THE SERVICEMAN
1. Carefully read the instruction herein, which contain important
information for safe installation, use and maintenance. Keep this
booklet on hand for further reference.
2. This appliance shall only be used for its specific purpose. The
manufacturers shall not be liable for damages due to improper,
wrong or unreasonable use.
3. Unpack and check machine for soundness. Do not leave packaging
components ( plastic bags, expanded polystyrene, nails, etc.) within
children's reach, as they represent potential hazards.
4. Prior to plugging in, check that nameplate data correspond with
those of the electric and water mains.
5. The coffee machine should be placed on a stable flat surface with
the bodywork at a minimum distance of 20 mm from the supporting
surface and the walls. Furthermore, it must be installed taking into
account that the highest shelf (cup warmer) must sit at a height
that is at least 1.5 meters.
6. The (electricity and water) supply connections and a water outlet
fitted with a siphon should be close to the machine. A support
surface should also be available for accessories.
7. Install an omnipolar switch with minimum 3 mm. gap between
contacts and 30 mA dispersion-current protection.
GB
8. This appliance is electrically safe only when properly earthed as
set forth in the current electric safety specifications. Check for
compliance and, when in doubt, have the wiring thorougly inspected
by skilled personnel. The manufacturers shall not be liable for any
damage caused by faulty earting.
9. Using adapters, multiple plugs and cable extensions is not
recommended. Should they be indispensable, use simple or multiple
adapters and extensions that comply with the current safety
regulations, take care not to exceed the limit current load shown on
simple adapters and extensions, and the limit power load shown on
multiple adapters.
10. To prevent dangerous overheating, uncoil the power cable to its full
length.
11. To ensure correct operation and safety, the coffee machine should
not be exposed to outdoor weather conditions (rain, sun, ice).
12. Do not install in rooms (kitchens) cleaned using water jets.
13. Do not plug or clog the ventilation and heat-exhausting louvres.
14. If the machine’s electrical cord is damaged, it should be replaced.
This should only be done by an authorized service technician.
15. If the machine is stored on premises where the temperature may
drop below freezing point, always empty the boiler and the water
circulation pipes
Page 7
Installazione - Installation - Installation - Installation - Instalación - Instalação
!
!
INDICATIONS POUR L'INSTALLATION
1. Lire attentivement les avertissements contenus dans le présent
livret du fait qu'ils fournissent d'importantes indications
concernant la sécurité d'installation, d'utilisation et d'entretien.
Conserver ce livret avec soin pour toute consultation ultérieure.
2. Cet appareil dévora être employé seulement par l'usage par le
quel a été expressivement construit. Le constructeur ne peut
être tenu pour responsable des dommages éventuels provoqués
par usage impropres, erronées où non corrigés.
3. Après avoir retiré l'emballage, s'assurer de l'integrité de l'appareil.
Les éléments de l'emballage (sachets de plastique, polystyréne
expansé, clous, etc.) ne doivent pas être laissées à la portée
des enfants dans la mesure où ils constituent des sources de
danger potentielles.
4. Avant de brancher, l'appareil s'assurer que les donnée de la
plaque correspondent à celles du réseau de distribution électrique
et hydrique.
5. La machine pour café doit être plaçée sur une surface plate et
stable, à une distance minimum de 20 mm des cloisons et de la
surface d'appui. En outre, elle doit être installée en tenant compte
du fait que la surface d'appui la plus élevée (chauffe-tasses) se
trouve bien à une hauteur qui n'excède pas 1,5 m.
6. Elle doit avoir les connexions d’alimentation (énergie électrique
et eau) ainsi que le déchargement de l’eau, doté de siphon à un
endroit très proche; en outre, vous devrez prévoir un plan d’appui
pour les accessoires de la machine.
7. Lors de l'installation, il convient de prèvoir un interrupteur omnipolaire
avec un écartement des contacts supérieur ou égal à 3 mm et protection
contre la dispersion de courant ayant une valeur égale à 30 mA.
8. La sécurité électrique de cet appareil est assurée seulement lorsqu'il
est correctement raccordé à une installation de mise à terre efficace,
F
comme prévu par les normes de sécurité électrique en vigueur. Il est
nécessaire de vérifier cette condition fondamentale de sécurité et, en
cas de doute, de demander un contrôle complet de l'installation par du
personnel professionnellement qualifié. Le constructeur ne peut être
tenu pour responsable des dommages éventuels provoqués par la
non mise à terre de l'installation.
9. En géneral, il est déconseillé d'utiliser des adaptateurs, prises
multiples et/uo des rallonges. S'avérerait au cas où leur utilisation
indispensable, il est nécessaire d'utiliser seulement des
adaptateurs simples ou multiples et des rallonges conformes
aux normes de securité en vigueur, en prêtant cependant attention
à ne pas dépasser la limite de débit maximum en valeur de courant,
indiquée sur l'adaptateur simple et sur les rallonges, ou celle de
puissance maximum figurant sur l'adaptateur multiple.
10. Afin d'éviter des surchauffes dangereuses, on recommande de
dérouler le câble d'alimentation sur toute sa longueur.
11. Pour sauve-garder les caractéristiques de bon fonctionnement
et de sécurité de votre machine à café, il est recommandé de ne
pas l’exposer à des agents atmosphériques tels que la pluie, le
soleil, le gel, etc...
12. Ne pas installer votre machine à café dans des pièces (sur une
cuisinière par exemple) où l’on prévoit un nettoyage par jets d’eau.
13. Ne pas obstruer les ouvertures ou fentes de ventilation et
d'evacuation de la chaleur.
14. Si le câble d’alimentation est endommagé, s’adresser uniquement
à un centre d’assistance technique autorisé pour le substituer.
15. Si l’appareil devait être mis dans des pièces où la température pourrait
descendre sous un degré de congélation, vider de toute manière la
chaudière ainsi que les conduites de circulation de l’eau.
ANGABEN ZUR INSTALLATION
1. Die im vorliegenden Anleitungsheft enthaltenen Anweisungen sind
aufmerksam zu lesen, da sie wichtige Hinweise zur Installation,
Bedienungs- und Wartungssicherheit liefern. Dieses Anleiungsheftt
ist zum späteren Nachschlagen sorgfältig aufzubewahren.
2. Dieses Gerät darf ausschließlich nur für den vorgesehenen
Verwendungszweck eingesetzt werden. Der Hersteller kann nicht
für eventuelle eintretende Schäden herangezogen werden, die auf
unsachgemäßen, fehlerhaften oder fahrlässigen Gebrauch
zurückzuführen sind.
3. Nach Entfernung des Verpackungsmaterials ist das Gerät auf
Unversehrtheit zu überprüfen. Das Verpackungsmaterial
(Kunststoffbeutel, Styropor, Nägel usw.) kann für Kinder gefährlich
sein - halten Sie es von ihnen fern.
4. Bevor Sie das Gerät anschließen, vergewissern Sie sich, daß die
Angaben auf dem Typenschild den Lieferwerten des Strom- und des
Wassernetzes entsprechen.
5. Stellen Sie die Kaffeemaschine auf eine stabile und ebene Fläche, in
einem Abstand von mindestens 20 mm zu den Wänden und zur
Aufstellfläche. Die Maschine muß so installiert werden, daß die
Bodenhöhe der höchsten Auflagefläche (Tassenvorwärmer)
wenigstens 1,5 m beträgt.
6. Vergewissern Sie sich, daß in unmittelbarer Nähe der
Aufstellungsfläche die verschieden Anschlüsse zur Versorgung der
Maschine (Strom und Wasser) sowie ein Ablaß mit Syphon vorhanden
sind und daß eine weitere Fläche zur Ablage der Zubehörteile
vorhanden ist. ri.
7. Bei der Installation des Geräts ist ein allpoliger Schalter mit einer
Kontaktöffnungsweite von mindestens 3 mm. vorzusehen und
fehlerstromschutz für 30 mA.
8. Die elektrische Betriebssicherheit dieses Geräts ist nur gewährleistet,
wenn es sachgerecht mit einer wirksamen Erdschlußanlage
D
verbunden ist, wie von den einschlägigen Bestimmungen zur Sicherheit
von Elektroanlagen vorgesehen. Es muß garantiert sein, daß diese
grundlegende Sicherheitsanforderung erfüllt wird; lassen Sie im
Zweifelsfall eine sorgfältige Kontrolle der Elektroanlage durch
qualifiziertes Fachpersonal vornehmen. Der Hersteller kann nicht für
eventuelle Schäden herangezogen werden, die auf mangelnde Erdung
der Elektroanlage zurückzuführen sind.
9. Vom Gebrauch von Stecker-Adaptern, Mehrfachsteckern und/oder
Verlängerungskabeln wird allgemein abgeraten. Sollte ihre Verwendung
unerläßlich sein, dürfen ausschließlich Ein- bzw. Mehrfach-Adapter
und Verlängerungskabel benutzt werden, die den einschlägigen
Sicherheitsbestimmungen entsprechen; man muß jedoch sicherstellen,
daß bei Einfach-Adaptern und Verlängerungskabeln der darauf
markierte Stromabgabe-Grenzwert nicht überschritten wird bzw. der
markierte Leistungs-Höchstwert bei Mehrfach-Adaptern.
10. Um gefährliche Überhitzungen zu verhüten, empfiehlt es sich, das
Speisungskabel in seiner ganzen Länge abzuwickeln.
11. Um eine einwandfreie Funktion und den sicheren Betrieb der Maschine
zu gewährleisten, darf die Kaffeemaschine keinen kritischen
Umgebungsbedingungen (Regen, starke Sonneneinstrahlung, Frost)
ausgesetzt werden.
12. Stellen Sie die Maschine nicht in Räumen auf (Küche), in denen eine
Reinigung mittels Wasserstrahl vorgesehen ist.
13. Die Öffnungen oder Schlitze zur Belüftung bzw. zur Wärmeableitung
sind frei zu halten.
14. Wenn das Netzkabel beschädigt wird, darf es nur durch einen
autorisierten Kundendiensttechniker ersetzt werden.
15. Sollte die Maschine in Räumen gelagert werden, in denen Frostgefahr
gegeben ist, so müssen in jedem Falle sowohl der Wassertank als
auch die Leitungen des Wasserkreises geleert werden.
Page 8
Installazione - Installation - Installation - Installation - Instalación - Instalação
!
!
INDICACIONES PARA LA INSTALACIÓN
1. Leer atentamente las advertencias contenidas en el presente
manual ya que las mismas suministran importantes indicaciones
con respecto a la seguridad de instalación, de uso y de
manutención. Conservar con cuidado este manual para cualquier
ulterior consulta.
2. Este aparato deberá ser destinado solo par el uso por el cual ha
sido expresamente concebido. El fabricante no puede ser
considerado responsable de los eventuales daños derivados
por usos impropios, erróneos o irracionales.
3. Después de haber quitado el embalaje, controlar la integridad
del aparato. Los elementos del embalaje (bolsitas de plástico,
poliestirol expandido, clavos, etc.) no deben ser dejados al
alcance de los niños ya que constituyen potenciales fuentes de
peligro.
4. Antes de conectar el aparato, controlar que los datos de la placa
correspondan a los de la red de distribución eléctrica e hidrica.
5. La máquina para café se tiene que apoyar sobre una superficie
plana y estable, a una distancia mínima de 20 mm de las paredes
y de la superficie de apoyo. Además se tiene que instalar teniendo
en cuenta que la superficie de apoyo más alta (calienta-tazas)
esté a una altura no inferior a 1,5 metros.
6. Tiene que tener las conexiones de alimentación (energía eléctrica
y agua) y el desagüe del agua equipado con un sifón cerca,
además hay que prever una superficie de apoyo para los
accesorios.
7. En el momento de la instalación es necesario preveer un
interruptor omnipolar con distancia de abertura de los contáctos
igual o superior a 3 mm e una proteccion contra corriente de
dispersion con valor de 30 mA.
8. La seguridad eléctrica de este aparato está aseguranda
E
solamente cuando el mismo se halla correctamente conectado
con una eficaz instalación de puesta a tierra, según lo previsto
por las normas de seguridad eléctrica en vigor. Es necesario
controlar este fundamental requisito de seguridad y, en caso de
duda, requerir un cuidadoso control de la instalación por parte
de personal profesionalmente cualificado. El fabricante no puede
ser considerado responsable de los eventuales daños causados
por la falta de puesta a tierra de la instalación.
9. En general no es aconsehable el uso de adaptadores, tomas
múltiples y/o extensiones. En el caso de que el uso de los
mismos fuera indispensable, es necesario utilizar solamente
adaptadores simples o múltiples y extensiones conformes a las
normas de seguridad en vigor, prestando atención a no superar
el limite de alcance en valor de corriente, marcado en el adaptador
simple o en las extensiones, o el de maxima potencia marcado
en el adaptador múltiple.
10. Para evitar peligrosos recalentamientos, se recomienda
desenvolver en toda su longitud el cable de alimentación.
11. Para salvaguardar las características de funcionalidad y de
seguridad, se aconseja no dejar la máquina de café expuesta a
la acción de los agentes atmosféricos (lluvia, sol, hielo).
12. No instalar en locales (cocinas) en los que se prevea la limpieza
mediante chorros de agua.
13. No obstruir las aberturas u orificios de ventilación o de dispersión
de calor.
14. En caso de que el cable de alimentación resulte dañado, el mismo
debe ser substituido sólo por la asistencia técnica autorizada.
15. Si la máquina se almacena en locales en los que la temperatura
puede descender por debajo del punto de congelación, vaciar
en cualquier caso la caldera y los tubos de circulación del agua.
INDICAÇÕES PARA A INSTALAÇÃO
1. Ler atentamente todas as advertências contidas na presente
publicação as quais fornecem indicações importantes relativas
à segurança da instalação, uso e manutenção. Conservar
devidamente esta publicação para futuras consultas.
2. Este aparelho deverá ser usado apenas para a finalidade para a
qual foi especificamente concebido. O construtor não pode ser
considerado responsável por eventuais danos derivados de
usos impróprios, errados ou irracionais.
3. Depois de se ter retirado a embalagem, controlar que o aparelho
se encontre em perfeitas condições. Os vários componentes da
embalagem (sacos de plástico, esferovit, agrafes, etc.) devem
ser mantidos fora do alcance das crianças dado que se podem
demonstrar muito perigosos
4. Antes de conectar el aparato, controlar que los datos de la placa
correspondan a los de la red de distribución eléctrica e hidrica.
5. A máquina de café deve ser apoiada sobre uma superfície plana
e estável e a uma distância de 20 mm das paredes e da superfície
de apoio. Além disso, tem de ser instalada, considerando que a
superfície de apoio mais alta (aquecedor de chávenas) se
encontra a uma altura não inferior a 1,5 metros.
6. As ligações de alimentação (energia eléctrica e água) e a
descarga da água dotada de sifão deverão ficar muito próximas;
é necessário ainda prever uma superfície de apoio para os
acessórios.
7. É necessário montar na instalação um interruptor omnipolar com
uma distância entre os contactos igual ou superior a 3 mm, uma
protecção da corrente de dispersão com valor igual a 30 mA.
8. A segurança eléctrica deste aparelho è garantida apenas quando
o mesmo se encontra devidamente ligado a uma eficaz instalação
P
de terra, tal como previsto pelas vigentes normas de segurança.
É necessário verificar esta importante norma de segurança e, no
caso de dúvida, solicitar um controle da instalação por parte de
pessoal técnico profissionalmente qualificado. O fabricante não
pode ser considerado responsável por eventuais danos causados
pela falta de ligação á terra da instalação.
9. Em geral é desaconselhável o emprego de adaptadores, tomadas
múltiplas e extensões. No caso em que o seu uso fosse
indispensável é necessário usar apenas adaptadores simples
ou múltiplos e extensões conformes às vigentes normas de
segurança, prestando no entanto atenção a não ultrapassar o
limite maximo de capacidade do valor da corrente, marcado sobre
o adaptador simples ou sobre as extensões e aquele de potência
máxima marcado sobre o adaptador múltiplo.
10. A fim de evitar sobreaquecimentos perigosos, recomenda-se
utilizar o cabo eléctrico de alimentação completamente
desenrolado.
11. Para proteger as características de funcionalidade e de
segurança, recomenda-se não deixar a máquina de café exposta
aos agentes atmosféricos (chuva, sol, gelo).
12. Não instalar em locais (cozinha) em que a limpeza seja realizada
mediante jactos de água.
13. Não obstruir a aberturas ou canais de ventilação e de dispersão
do calor.
14. No caso de desarranjo do cabo de alimentação, o mesmo deve
ser substituído apenas pela assistência técnica autorizada.
15. Se a máquina for armazenada em locais em que a temperatura
possa baixar para além do ponto de congelação, esvaziar a
caldeira e os tubos de circulação da água.
Page 9
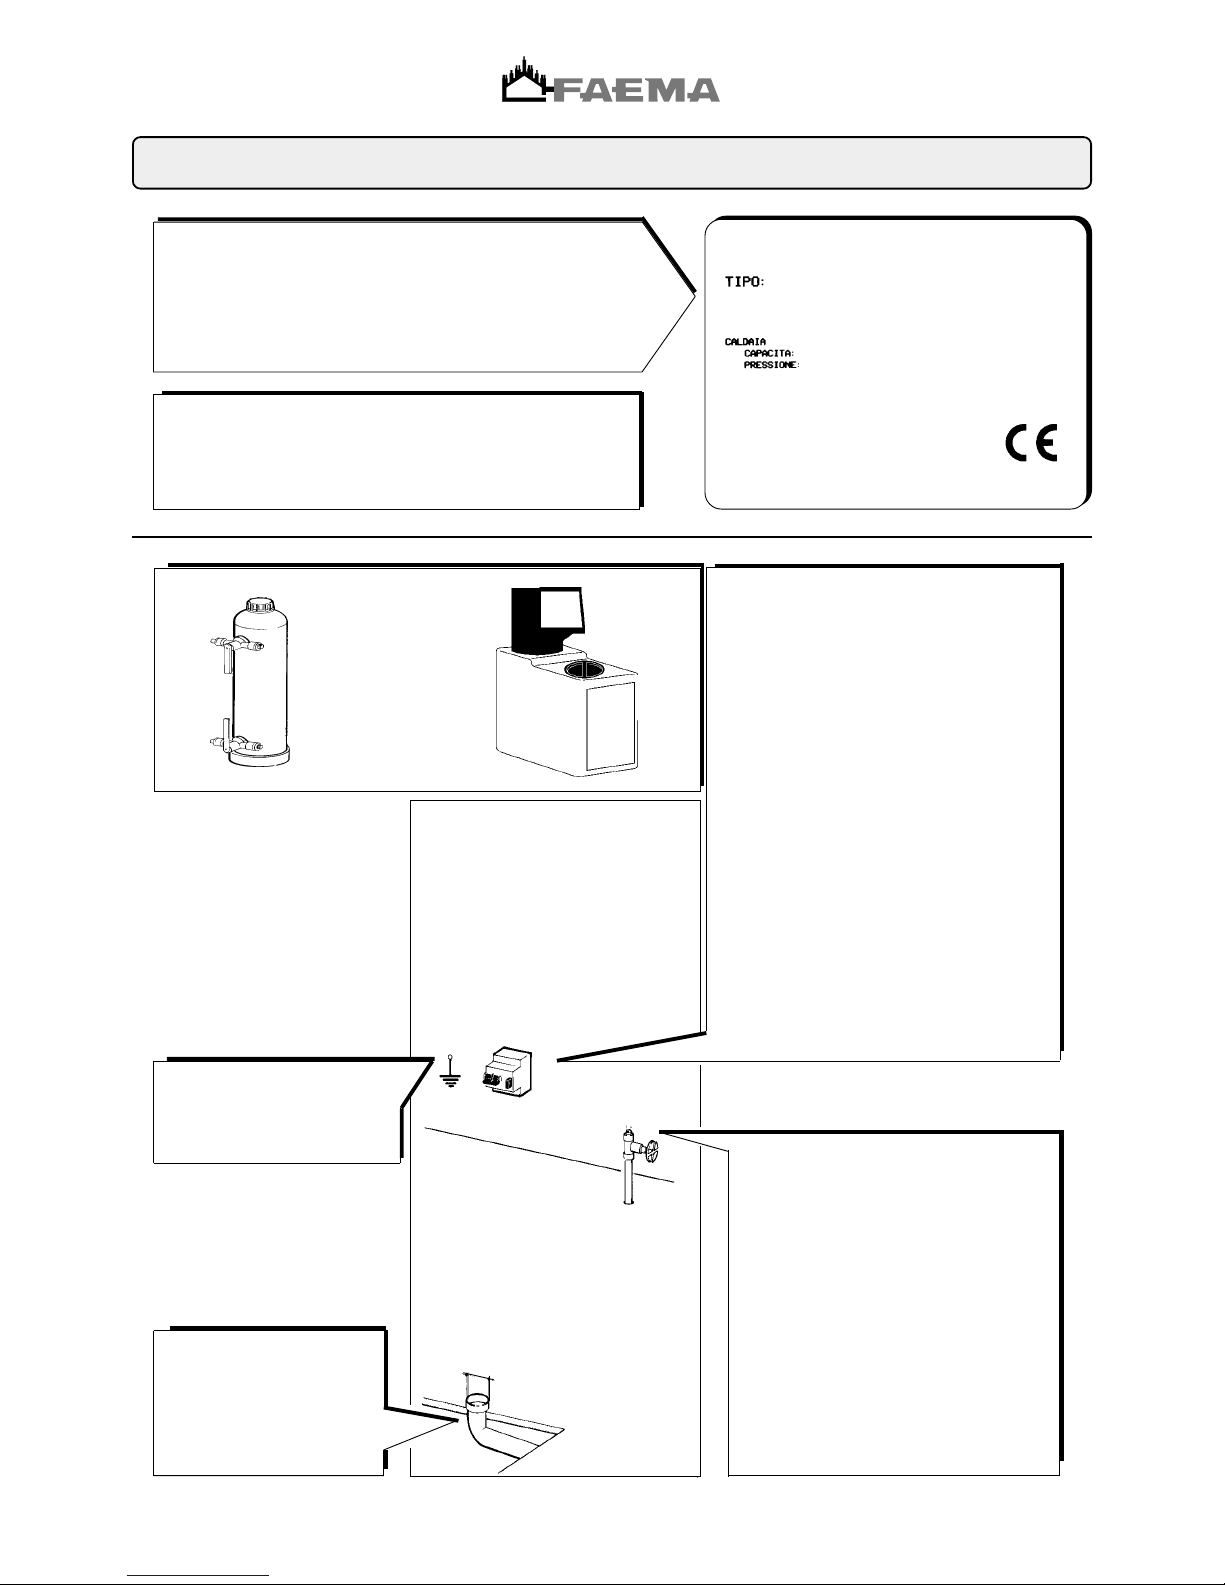
RUMOROSITA'
NOISE
BRUIT
GERÄUSCH
RUIDOSIDAD
RUIDO
L'apparecchio non supera i 70 dB
The equipment does not exceed 70dB
L'appareil ne depasse pas 70 dB
Das Gerät überschreitet 70 dB nicht
El aparato no supera los 70 dB
O aparelho não ultrapassa os 70 dB
z IMPIANTO CLIENTE
z CONNECTIONS WHICH MUST BE
PREPARED BY THE CUSTOMER
z BRANCHEMENTS, QUI DOIVENT
ÉTRE PRÉPARÉS PAR LE CLIENT
z VOM KUNDEN ZU ERSTELLENDE
ANSCHLÜSSE
z CONEXIONES, QUE DEBEN SER
PREPARADAS POR EL CLIENTE
z CONEXÕES QUE DEVEM SER
PREPARADAS PELO CLIENTE
Min. Ø 50 mm.
Ø 3/8 GAS
(per pressioni più alte installare un riduttore di pressione)
(for pressure beyond this value, install a pressure reducer)
(pour pression plus haute installer un deténdeur)
(bei höheren Druckwerten Druckreduzierer erforderlich)
(para presiones más altas instalar un reductor de presión)
(para pressões mais elevadas instalar um redutor de pressão)
PRESSIONE MAX. RETE
WATER MAINS MAX. PRESSURE
PRESSION MAX. EAU DE VILLE
MAX. DRUCK DER WASSERLEITUNG
PRESION MAX. RED
PRESSÃO MAX. REDE
6 bar
Vedere la targa dati della macchina
See the machine's nameplate
Voir la plaque signalétique de la machine
Siehe Datenschild der Maschine
Ver la placa con los datos de la máquina
Ver a placa das características da
máquina
Dati tecnici
Technical data
Données techniques
Technische Daten
Datos técnicos
Datos técnicos
ADDOLCITORE
SOFTENER
ADOUCISSEUR
ENTHÄRTER
ADULCORADOR
ADOÇADOR
SCARICO A PAVIMENTO
DRAIN
VIDANGE DU LOCAL
BODENABFLUSS
DESCARGA
DESCARGA
INTERRUTTORE :
Onnipolare con distanza di apertura contatti 3 mm
Protezione da corrente di dispersione con valore pari a 30 mA
SWITCH :
Omnipolar switch with 3 mm contact opening
30 mA dispersion-current protection
INTERRUPTEUR:
Omnipolaire, avec distance d’ouverture des contacts égale à 3 mm.
Protection contre la dispersion de courant ayant une valeur égale à 30 mA.
SCHALTER:
Allpoliger Schalter mit Kontaktöffnungsweite von 3 mm
Fehlerstromschutz für 30 mA
INTERRUPTOR:
Omnipolar con distancia de apertura contactos 3 mm
Proteccion contra corriente de dispersion con valor de 30 mA
INTERRUPTOR:
Omnipolar com uma distância de abertura dos contatos de 3 mm
Protecção da corrente de dispersão com valor igual a 30 mA
MESSA A TERRA
GROUNDING
MISE A TERRE
ERDUNG
PUESTA A TIERRA
INSTALAÇÃO DE
TERRA
OBBLIGATORIA
COMPULSORY
OBLIGATOIRE
VORGESCHRIEBEN
OBLIGATORIA
OBRIGATORIA
Installazione - Installation - Installation - Installation - Instalación - Instalação
Page 10
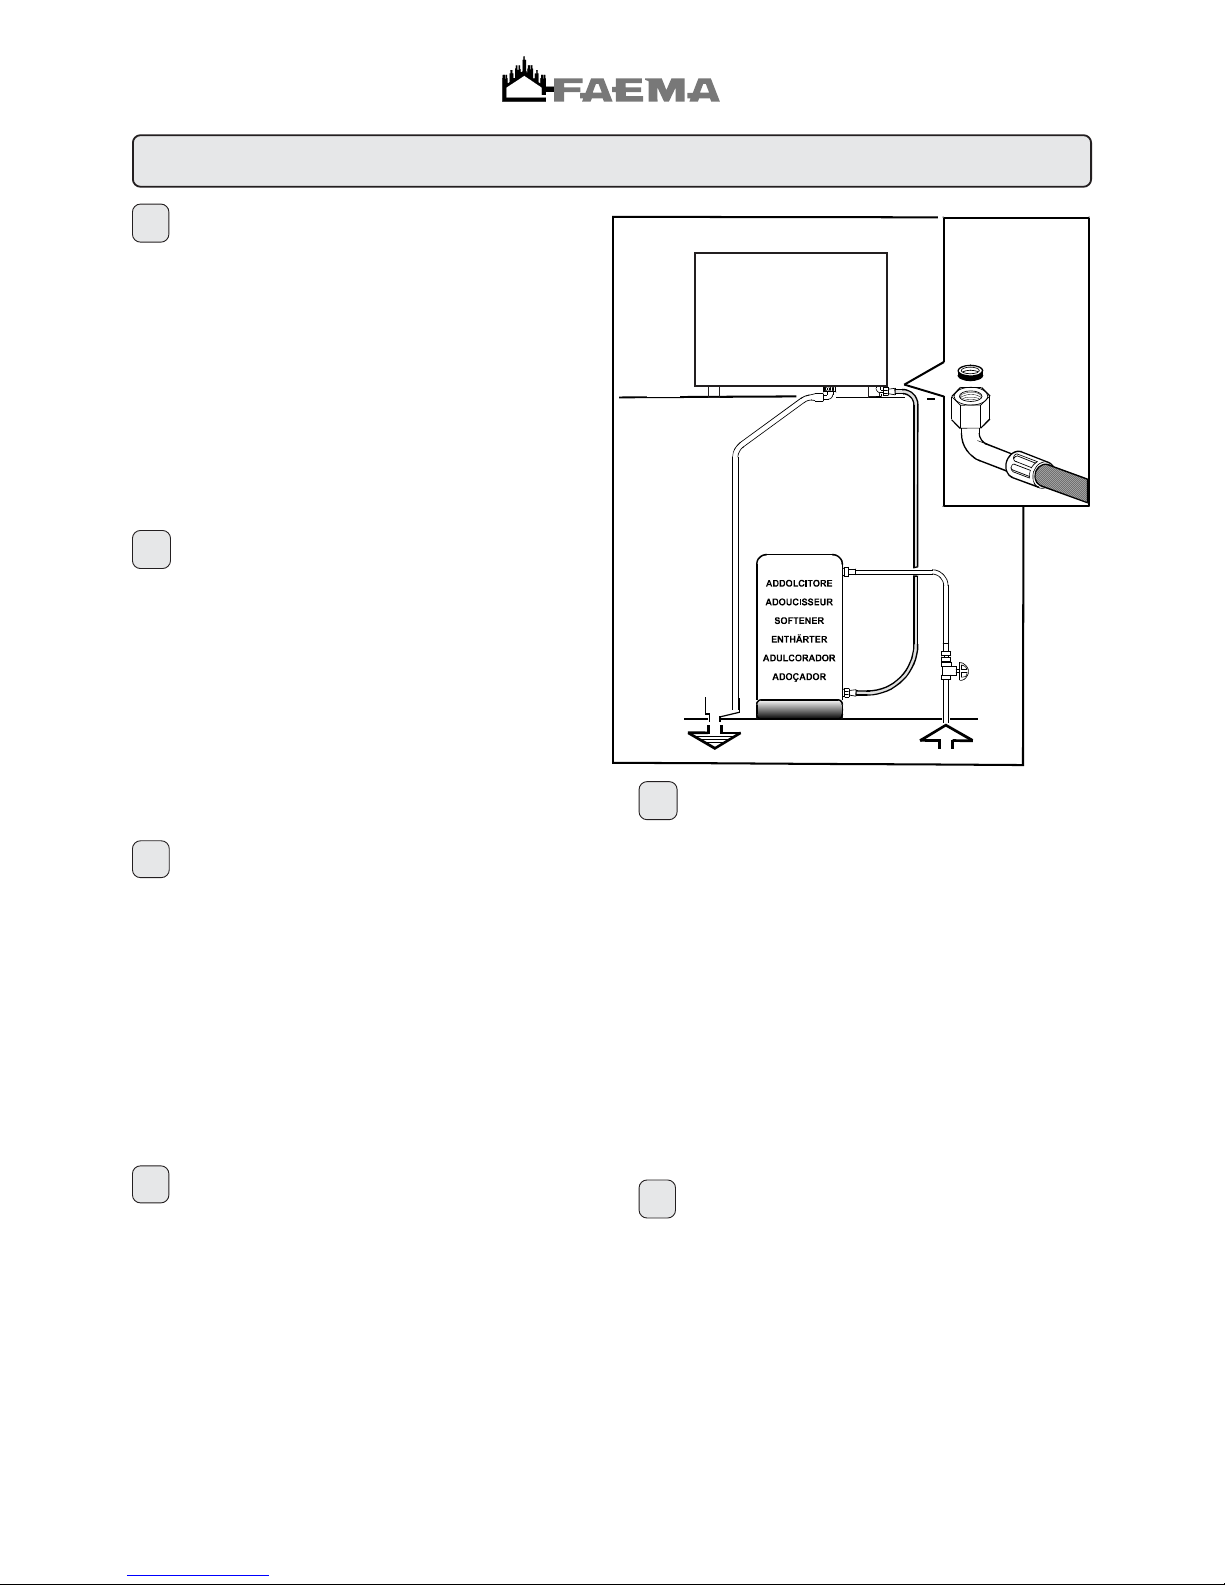
MACCHINA
MACHINE
MACHINE
MASCHINE
MÁQUINA
MÁQUINA
Installazione - Installation - Installation - Installation - Instalación - Instalação
CONNECTION HYDRAULIQUE
Positionner l'appareil parfaitement horizontal en agissant sur les pieds.
Faire les connections hydrauliques comme indiqué dans la fig.
Installer le siphon de vidange de l'eau de façon bien accessible, afin
de faciliter son nettoyage périodique.
Se rappeler d'interposer dans les jonctions entre tuyaux et raccords
les joints relatifs.
Si la dureté de leau est supérieure à 8°F, il est conseillé dinstaller un
adoucisseur approprié; pour faire son choix, se référer aux normes
locales en vigueur en matière dhygiène.
Au cas où lalimentation de la machine avec une eau de dureté
supérieure à 8°F serait nécessaire, pour le bon fonctionnement de
cette dernière, appliquer un plan dentretien spécifique.
La quantité de chlore contenue dans l'eau ne doit pas dépasser 100 mg/l;
en cas contraire veiller à l'installation de dispositifs appropriés.
N. B. : Dans les cas où la pression de réseau puisse monter à plus
de 6 bar installer, avant de l'adoucisseur, un réducteur de pression
taré à 2 ÷ 3 bar.
F
E
CONEXIONES HIDRAULICAS
Posicionar el aparato en un perfecto plano horizontal, obrando sobre
los piés, luego fijarlos.
Efectuar las conexiones hidràulicas según lo indicado en la figura.
Instalar el sifón de la salida del agua de manera bien accesible, de
manera tal que la limpieza periódica sea fácil.
Acordarse de interponer las relativas ensambladuras en los
empalmes que unen los tubos a las conexiones.
Si la dureza del agua es superior a los 8°F, se aconseja la instalación
de un adecuado ablandador; para la elección hay que tener en
cuenta las normas locales vigentes en materia de higiene.
En el caso de que tuviese que alimentar la máquina con agua que
tenga una dureza superior a los 8°F, para el buen funcionamiento de
la misma, hay que aplicar un programa de mantenimiento específico.
La cantidad de cloro contenida en el agua no tiene que superar los
100 mg/l; en caso contrario, hay que instalar adecuados dispositivos.
N. B. : Si la presión de la red hidrica pudiese subir a más de 6 bar,
instalar antes del adulcorador un reductor de presión, calibrado a
2 ÷ 3 bar.
COLLEGAMENTI IDRAULICI
Posizionare l'apparecchio in perfetto piano orizzontale agendo sui
piedini, indi fissarli.
Eseguire i collegamenti idraulici come indicato in figura.
Installare il sifone dello scarico dell'acqua in maniera ben accessibile,
in modo da facilitarne la periodica pulizia.
Ricordarsi di interporre nelle giunzioni tra tubi e raccordi le relative
guarnizioni.
Se la durezza dellacqua è superiore ai 8°F, si consiglia linstallazione
di un appropriato addolcitore; per la scelta attenersi alle norme locali
vigenti in materia di igiene.
Nel caso si dovesse alimentare la macchina con acqua di durezza
superiore agli 8°F, per il buon funzionamento della stessa, occorre
applicare un piano di manutenzione specifico.
La quantità di cloro contenuta nell'acqua non deve superare i 100 mg/l; in
caso contrario provvedere all'installazione di appropriati dispositivi.
N. B. : Nel caso la pressione di rete possa salire oltre 6 bar, prima
dell'addolcitore installare un riduttore di pressione tarato a 2 ÷ 3 bar.
I
HYDRAULIC CONNECTION
Place the machine on a perfectly levelled surface, adjusting and then
fixing the feet in place.
Make the hydraulic connections as per Figure.
Install the drain siphon in the water-drain line so that it is easily
accessible and will thus facilitate periodic cleaning.
Remember to put the relevant washer in the junctions between the
tubes and the connectors.
If water hardness is higher than 8° F, it is advised to install a water
softener. For the choice, please comply with local hygiene laws.
If the machine is fed with water with a hardness of over 8° F, a
specific maintenance plan must be implemented to ensure correct
functioning of the machine.
The amount of chlorine in the water must not exceed 100 mg/l;
otherwisw, install the appropriate devices.
N. B. : If the main pressure could rise above 6 bar, install a pressure
reducer calibrated at 2 ÷ 3 bar before the softener.
GB
LIGAÇÕES HIDRÁULICAS
Colocar o aparelho em perfeita posição horizontal regulando mediante
os pés e depois fixá-los.
Proceder às ligações hidráulicas tal como ilustrado na figura.
Instalar o sifão para descarga de água de modo bem accessível, a
fim de facilitar una limpeza periodica.
Não esquecer de interpor nas ligações entre os tubos e os acessórios
as respectivas juntas.
Se a dureza da água for superior a 8°F, aconselha-se a instalação
de um adoçante apropriado; para a escolha respeitar as normas
locais em vigor em matéria de higiéne.
Caso se tenha de alimentar a máquina com água de dureza superior
aos 8°F, para um bom funcionamento da mesma, é necessário aplicar
um plano de manutenção específico.
A quantidade de cloro existente na água não deve superar os 100 mg/l;
caso contrário proceder à instalação de dispositivos apropriados.
N. B. : No caso em que a pressão de rede possa subir além de 6 bar,
antes do adoçador instalar um redutor de pressão tarado a 2 ÷ 3 bar.
P
D WASSERANSCHLÜSSE
Die Maschine muß vollkommen waagerecht stehen (zu diesem
Zweck sind die entsprechenden verstellbaren Füße zu verwenden);
dann sind die Füße mit den Sperrmüttern zu sichern.
Die Wasseranschlüsse sind nach Abbildung herzustellen.
Den Wasserablauf-Siphon an zugänglicher Stelle anbrigen, damit
dieser unschwer regelmässig gereinigt werden kann.
Es ist daran zu erinnern, daß Dichtungen zwischen Rohre und
entsprechende Anschluß-stücke zu fügen sind.
Bei einer Wasserhärte über 8°F wird geraten, einen Wasserenthärter
zu installieren. Halten Sie sich bei der Wahl des zu installierenden
Systems an die am Aufstellungsort der Maschine in Sachen der
Hygiene geltenden Bestimmungen.
Sollte die Maschine mit Wasser mit einer Härte über 8°F versorgt
werden müssen, so muß, um die vorschriftsmäßige Funktion der
Maschine zu gewährleisten, ein spezifischer Wartungsplan
eingehalten werden.
Der Chlorgehalt des Wassers darf 100 mg/l nicht überschreiten;
anderenfalls muß ein geeignetes Klärsystem installiert werden.
ANMERKUNG: Falls der Netzwasserdruck über 6 bar steigen könnte,
ist vor dem Enthärter ein auf 2 bis 3 bar tarierter Druckreduzierer zu
installieren.
Page 11
Installazione - Installation - Installation - Installation - Instalación - Instalação
I
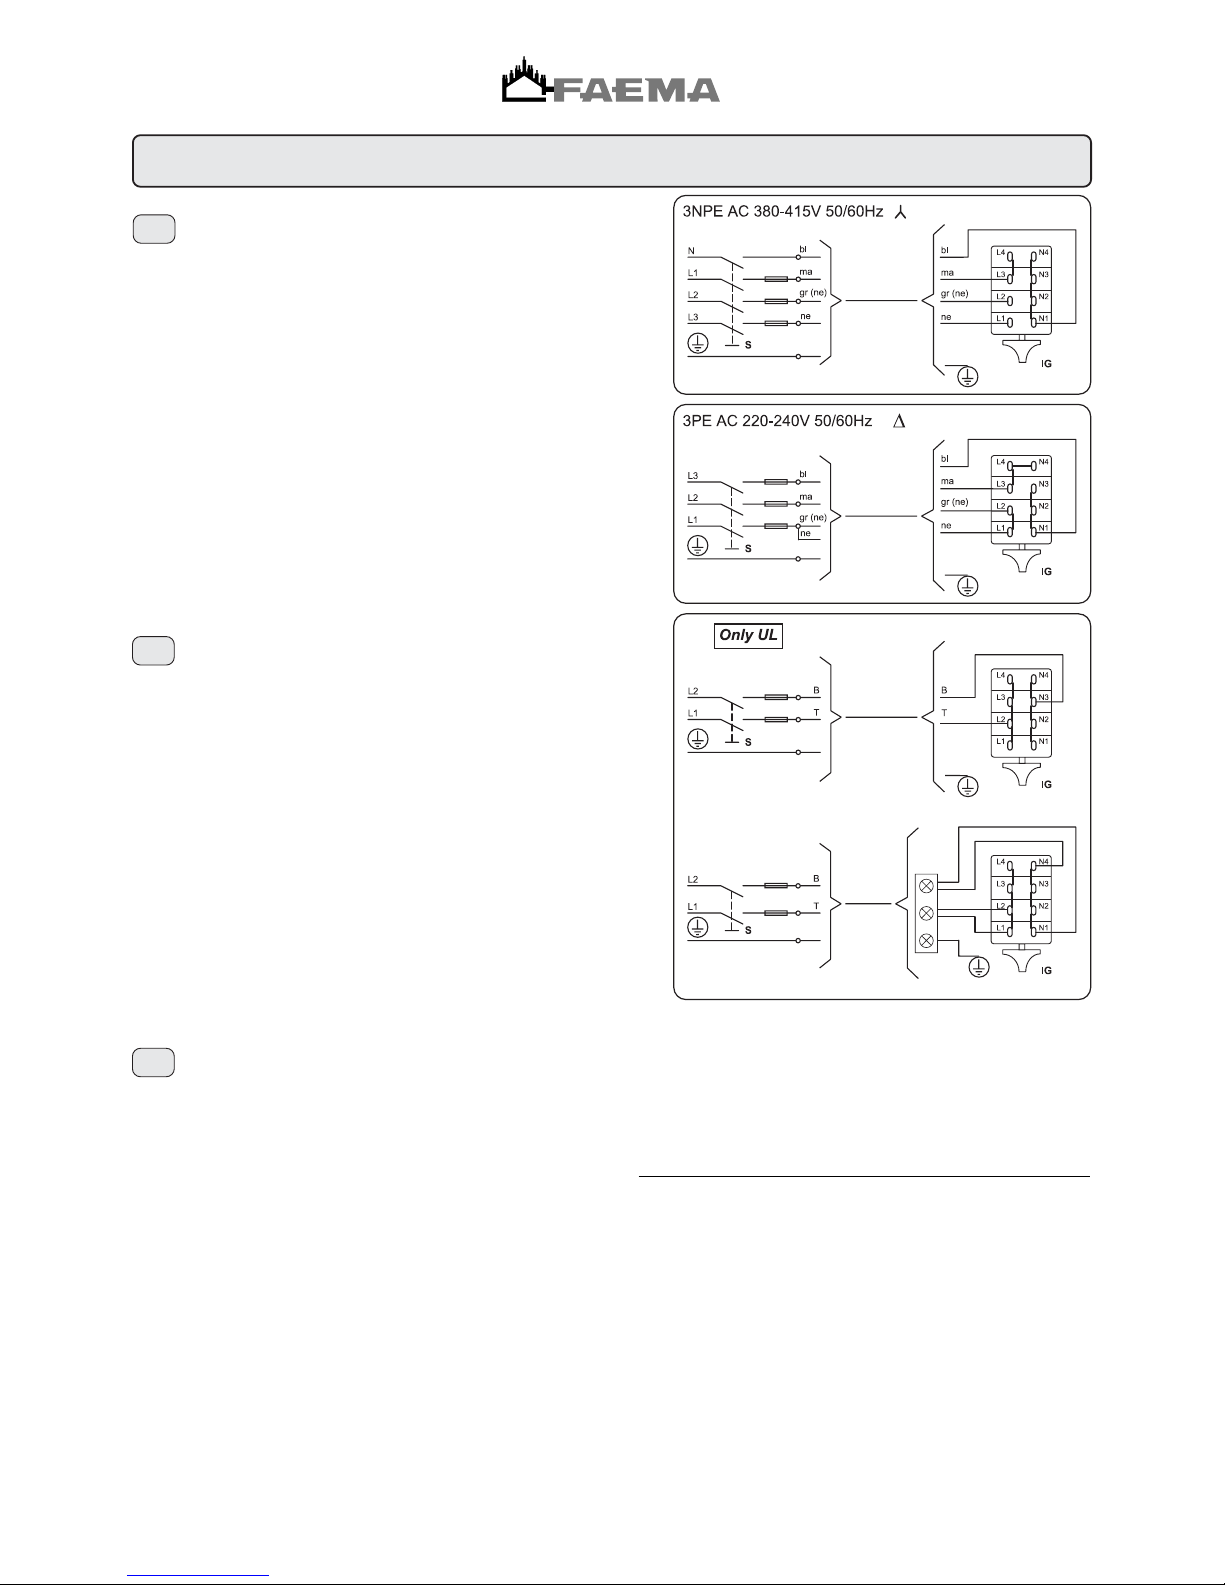
COLLEGAMENTO ELETTRICO
l Prima del collegamento verificare se l'impianto elettrico predisposto
a cura del Cliente rispetta le norme vigenti e se ha la messa a terra
regolamentare. Ricordiamo che la Faema Spa non risponde dei danni
provocati da un non corretto collegamento elettrico. Ricordiamo inoltre
la responsabilità dell'installatore nel caso di danni.
l Controllare inoltre:
- il tipo di collegamento indicato sulla etichetta posta sul cavo di
alimentazione
- la tensione deve corrispondere a quella indicata sulla targa dati
posta sul coperchio scatola.
l Le macchine sono predisposte per un collegamento: normalmente Y
(fig. 1)
l Nel caso si debba modificare il collegamento da (Y) a (∆) occorre
intervenire seguendo gli schemi indicati in figura 2.
l Le macchine con collegamento monofase sono con cablaggio
specifico (vedi UL).
ELECTRIC CONNECTION
l Before making the connection, verify that the electric wiring prepared
by the customer follows the current regulations and that it has been
earted according to regulations. Remember that Faema Spa is not
responsible for damages due to incorrect electrical connections
and, furthermore, that the installer is responsible in case of damage.
l Besides the above, check:
- the type of connection indicated on the label found on the power
cable.
- that the voltage corresponds to that indicated on the nameplate
data found on the box cover.
l The machines are planned for these connections: normally Y (fig.
1).
l If the connection between (Y) and (∆) needs to be changed, fol-
low the instructions in the diagrams in Figure 2.
l The machines with single phase connection have a special wir-
ing system (see UL).
GB
BRANCHEMENT ELECTRIQUE
l Avant de brancher, vérifier que l'installation électrique prédisposée
par le client respecte les normes en vigueur et que la mise à terre
soit règlementaire. Rappelons que Faema Spa ne répond pas des
dommages provoqués par un mauvais branchement électrique.
Rappelons en outre la responsabilité de l'installateur en cas de
dégâts.
l Contrôler également:
- le type de branchement indiqué sur l'étiquette apposée sur le
câble d'alimentation.
- la tension doit correspondre á celle qui est indiquée sur la plaquette
de données apposée sur le couvercle de la boîte.
l Les machines sont prédisposées pour un branchement: normalement
Y.
l Au cas où une modification du raccordement monophase de (Y)
avec (∆) serait nécessaire, intervenir en suivant les schémas
indiqués dans la figure 2.
l Les machines à raccordement monophase sont dotées dun câ-
blage spécifique (voir UI).
F
Legenda - Legend - Legende - Legende - Leyenda - Legenda
S = Interruttore onnipolare - Omnipolar switch
Interrupteur omnipolaire - Allpoliger Schalter
Interruptor omnipolar - Interruptor omnipolar
IG = Interruttore generale - Main ON/OFF switch
Interrupteur général - Hauptschalter
Interruptor general - Interruptor principal
Colore cavi - Wires colour Wires colour for UL
Couleur cables -Farbe der Drähte machines only
Color cables - Cor cabos
bl Azzurro - Blue - Bleu B White
Blau - Azul - Azul
gr Grigio (Nero) - Grey (Black) T Black
Gris (Noir) - Grau (Schwarz)
Gris (Negro) - Cinza (Preto)
ma Marrone - Brown - Brun
Braun - Maròn - Marron
ne Nero - Black - Noir
Schwarz - Negro - Preto
fig. 1
fig. 2
Page 12
Installazione - Installation - Installation - Installation - Instalación - Instalação
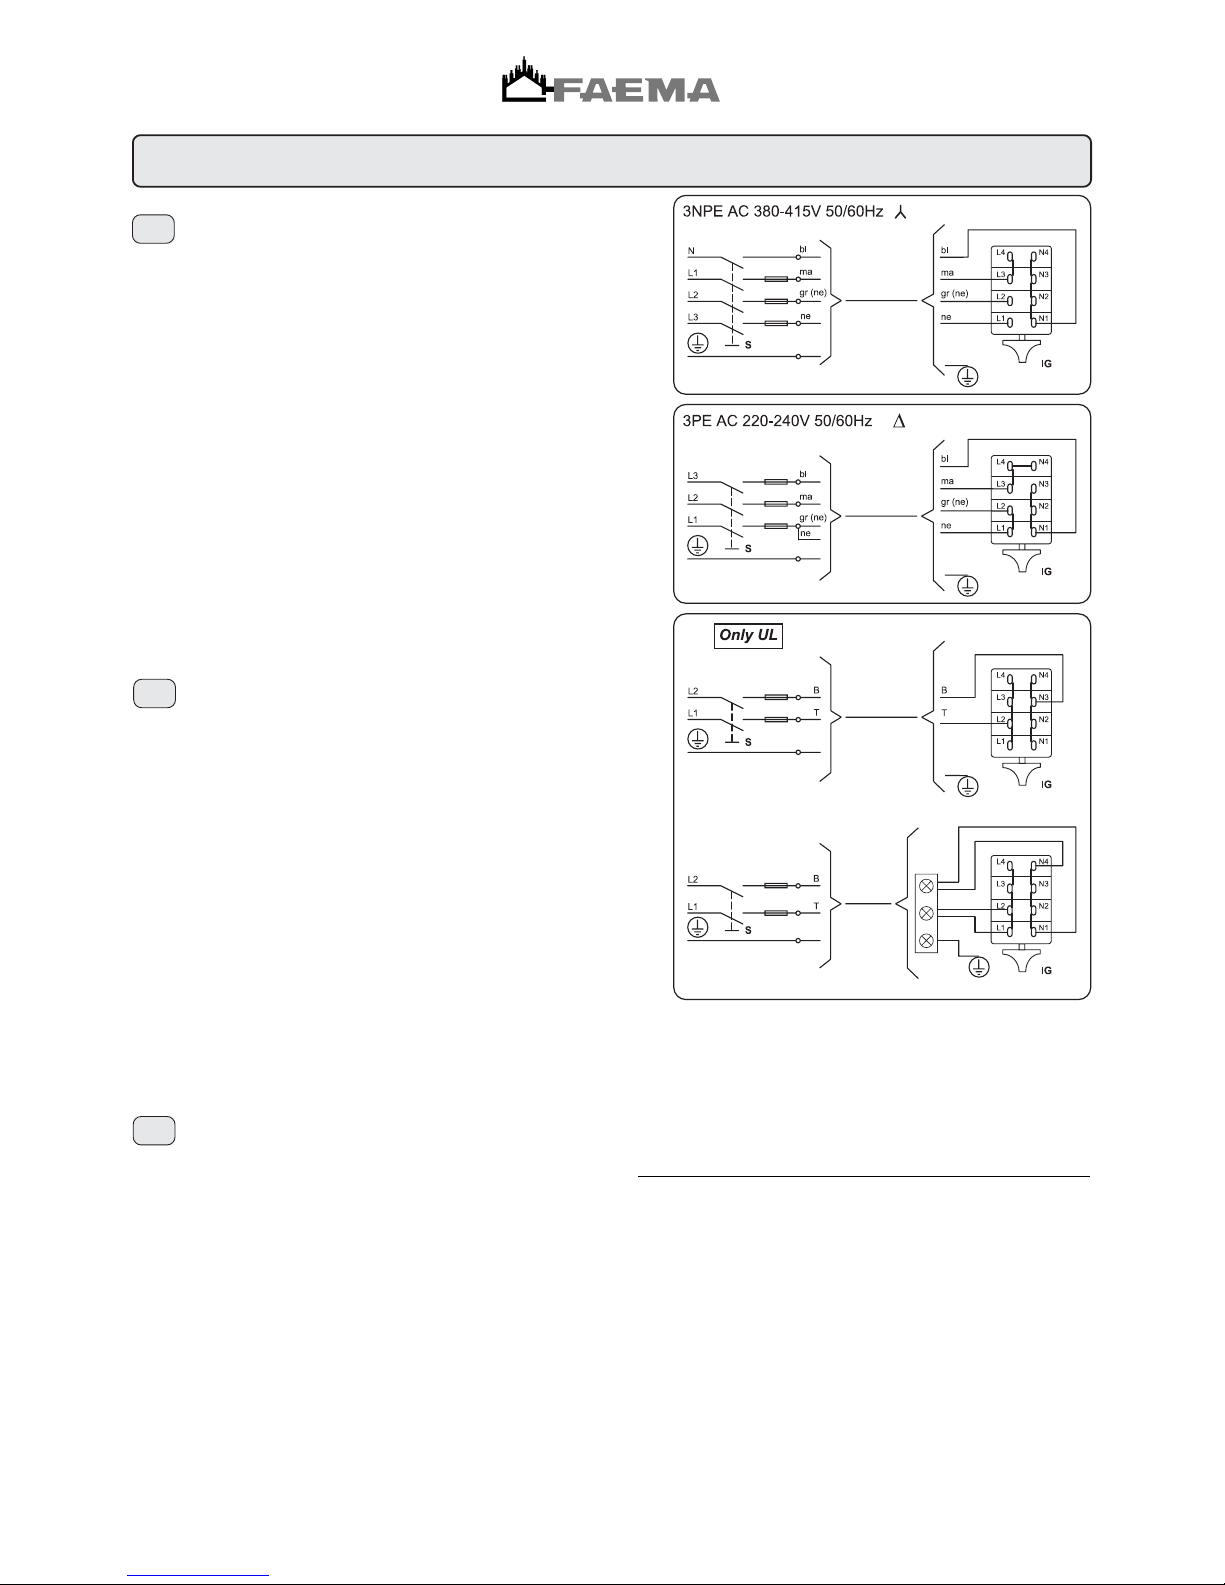
STROMANSCHLUSS
l Überprüfen Sie vor der Erstellung des Stromanschlusses, ob die
vom Kunden vorbereitete Elektroanlage den einschlägigen
Bestimmungen entspricht und über eine vorschriftsmäßige Erdung
verfügt. Wir weisen erneut darauf hin, daß die Firma Faema keinerlei
Haftung für Schäden übernimmt, die durch eine unsachgemäße
Elektroanlage verursacht werden. Wir erinnern außerdem an die
Haftbarkeit des Installateurs für eventuell enstehende Schäden.
l Ferner folgendes kontrollieren:
- die am Stromkabel angegebene Anschlußart
- ob die Netzspannung mit den Angaben des Typenschilds
übereinstimmt, das auf dem Gehäusedeckel des Geräts
angebracht ist.
l Die Geräte sind für folgende Anschlußarten vorgesehen:
Normalerweise Stern-Verbindung ( Y ).
l Gehen Sie zur Modifikation der Verbindung zwischen (Y) und (∆)
wie in der Abbildung 2 dargestellt vor:
l Die Maschinen mit einphasigem Anschluß haben eine spezifische
Verdrahtung (siehe UL).
D
CONEXION ELECTRICA
l Antes de conectarse, verificar si la instalación eléctrica efectuada
por el cliente está conforme con las normas vigentes y si la puesta
a tierra es regulamentar. Hacemos presente que la Faema Spa no
responde de los daños causados por una instalación électrica
defectuosa. Recordamos además la responsabilidad del instalador,
en el caso de que se verificasen daños.
l Además hay que controlar:
- o tipo de ligação indicado na etiqueta colocada sobre o cabo de
alimentação
- la tensión tiene que corresponder a la indicada en la placa con los
datos situada sobre la tapa del contenidor.
l Las máquinas están ya predispuestas para las siguientes
conexiónes: normalmente Y.
l En el caso de que se tenga que modificar la conexión de (Y) a (∆),
hay que intervenir siguiendo los esquemas indicados en la figura 2.
l Las máquinas con conexión monofásica tienen un cableado
específico (véase UL).
E
LIGAÇÃO ELÉCTRICA
l Antes da ligação verificar se o equipamento eléctrico preparado
pelo Cliente respeita as normas em vigor e tem a instalação à terra
regulamentar. Recordamos que a Faema Spa não responde pelos
danos provocados por uma ligação eléctrica
l Verificar ainda:
- el tipo de conexión indicado en la etiqueta situada en el cable de
alimentación.
- a tensão deve corresponder àquela indicada sobre a placa dos
dados colocada sobre a tampa da caixa.
l As máquinas são preparadas para uma ligação: geralmente Y (fig.
1).
l No caso de se ter que modificar a ligação de (Y) para (∆) é necessário
intervir seguindo os esquemas indicados na figura 2.
l As máquinas com ligação mono-fásica têm uma cablagem específica.
(ver UL).
P
Legenda - Legend - Legende - Legende - Leyenda - Legenda
S = Interruttore onnipolare - Omnipolar switch
Interrupteur omnipolaire - Allpoliger Schalter
Interruptor omnipolar - Interruptor omnipolar
IG = Interruttore generale - Main ON/OFF switch
Interrupteur général - Hauptschalter
Interruptor general - Interruptor principal
Colore cavi - Wires colour Wires colour for UL
Couleur cables -Farbe der Drähte machines only
Color cables - Cor cabos
bl Azzurro - Blue - Bleu B White
Blau - Azul - Azul
gr Grigio (Nero) - Grey (Black) T Black
Gris (Noir) - Grau (Schwarz)
Gris (Negro) - Cinza (Preto)
ma Marrone - Brown - Brun
Braun - Maròn - Marron
ne Nero - Black - Noir
Schwarz - Negro - Preto
fig. 1
fig. 2
Page 13
Installazione - Installation - Installation - Installation - Instalación - Instalação
GB
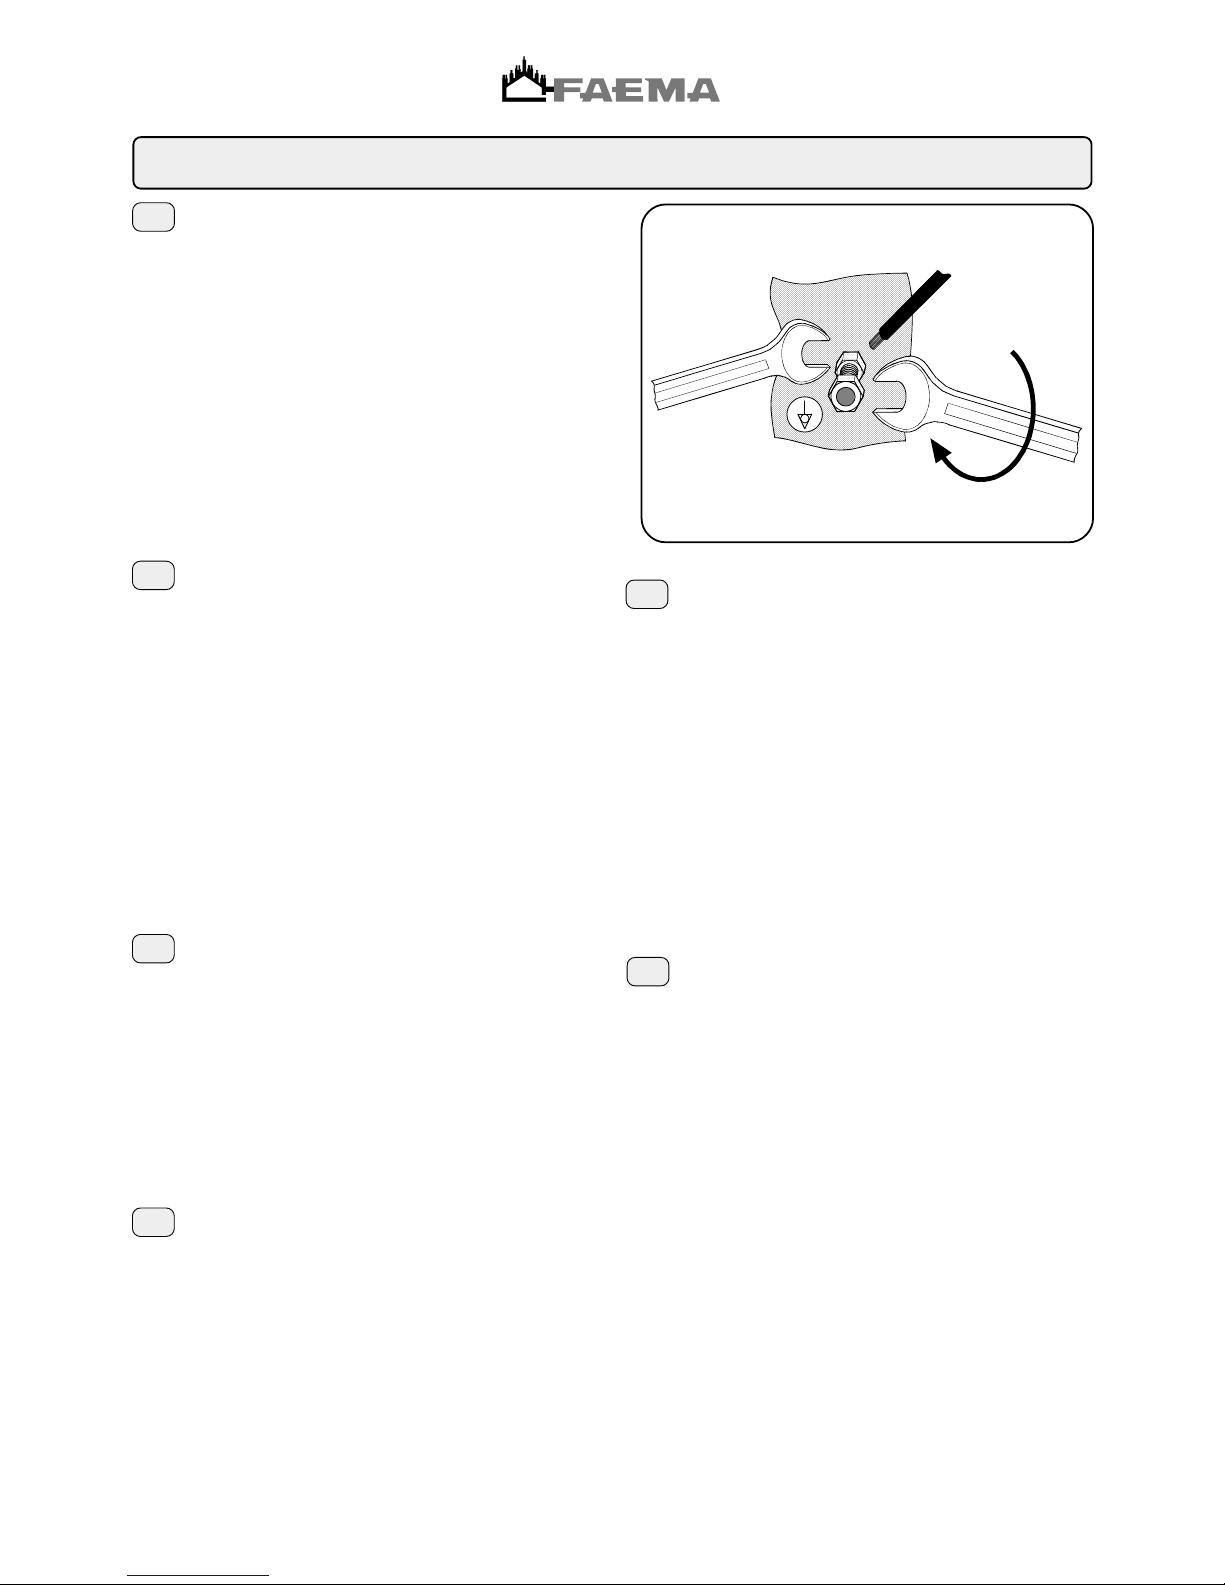
POTENTIAL-EQUALIZING CONNECTION
This connection, which is the one called for by several norms, avoids
electrical potential differences building up between any equipment that
may be installed in the same room.
There is a terminal clip on the under side of the base of the machine to
which an external potential-equalizing wire should be connected.
This connection is ABSOLUTELY NECESSARY and must be made right
after the machine is installed.
- Use a wire whose cross-sectional area conforms to the existing
norms.
- Make the terminal connection (see diagram) and then connect the
other end to the ground connections located on the adjacent
equipment.
Failure to do observe these safety precautions will exempt the
manufacturer from any responsibility as regards damage caused to
persons or property.
NOTE: DO NOT CONNECT THE MACHINE’S TERMINAL CLIP TO THE
MAINS GROUND TERMINAL BECAUSE THE GROUND TERMINAL OF
ANY MAIN SOURCE OF ELECTRICAL POWER IS NOT CONSIDERED
TO BE A POTENTIAL-EQUALIZING CONNECTION.
I
COLLEGAMENTO EQUIPOTENZIALE
Questo collegamento previsto da alcune norme, ha la funzione di evitare
le differenze di livello di potenziale elettrico, tra le masse delle
apparecchiature installate nello stesso locale.
Questo apparecchio è predisposto con un morsetto posto sotto il
basamento per il collegamento di un conduttore esterno equipotenziale.
Terminata l'installazione è NECESSARIO eseguire questo tipo di
collegamento:
- usare un conduttore avente una sezione nominale in conformità con
le norme vigenti.
- collegare al morsetto (vedi figura) e l'altro capo alle masse delle
apparecchiature adiacenti.
La mancata attuazione di questa norma di sicurezza scagiona il costruttore
da ogni responsabilità per guasti o danni che possano essere causati a
persone o cose.
N.B. NON COLLEGARE ALLA MESSA A TERRA DELL'IMPIANTO DI
DISTRIBUZIONE ELETTRICA IN QUANTO IL CONDUTTORE DI MESSA
A TERRA IN UN CAVO DI ALIMENTAZIONE NON VIENE CONSIDERATO
UN CONDUTTORE DI COLLEGAMENTO EQUIPOTENZIALE.
D
STROMANSCHLUSS MIT POTENTIALAUSGLEICH
Dieses Gerät ist unter dem Untergestell mit einer Anschlußklemme
versehen, die mit einem externen Stromausgleichsleiter zu verbinden
ist.
Nach der Installation MUSS der Stromanschluß wie folgt vorgenommen
werden:
- Einen Leiter verwenden, dessen Nennquerschnitt den einschlägigen
Unfallschutzbestimmungen entspricht;
- ihn wie in der Abbildung gezeigt an die Klemme anschließen.
Bei Nichtbeachtung dieses Sicherheitshinweises schließt der Hersteller
jedwede Haftungsansprüche für Personen- oder Sachschäden aus.
HINWEIS: NICHT AN DIE ERDUNG DER STROMZUFUHRANLAGE
ANSCHLIESSEN, DA DER ERDUNGSLEITER EINES
SPEISUNGSKABELS NICHT ALS AUSGLEICHSLEITER GELTEN KANN.
LIGAÇÃO EQÜIPOTENCIAL
Este aparelho está equipado com um borne, colocado sob a sua base,
para a ligação a um condutor externo eqüipotencial.
Uma vez terminada a instalação é NECESSÁRIO efectuar este tipo de
ligação:
- usar um condutor com uma secção nominal em conformidade com as
normas vigentes;
- ligar o borne, ver a figura.
A falta de cumprimento desta norma de segurança alivia o fabricante de
qualquer responsabilidade por avarias ou danos que poderiam ser
causados a pessoas ou bens.
NOTA.
NÃO LIGAR À LIGAÇÃO DE TERRA DA INSTALAÇÃO DE
DISTRIBUIÇÃO ELÉCTRICA ENQUANTO O CONDUTOR DE LIGAÇÃO
DE TERRA NÃO É CONSIDERADO UM CONDUTOR DE LIGAÇÃO
EQÜIPOTENCIAL.
P
E
CONEXION EQUIPOTENCIAL
Este aparato está preajustado con un borne ubicado debajo de la base
para la conexión de un conductor externo equipotencial.
Una vez terminada la instalación es NECESARIO efectuar este tipo de
conexión:
- usar un conductor con una sección nominal conforme con las normas
vigentes.
- conectar al borne (ver figura).
La falta de respeto de esta norma de seguridad exime al fabricante de
toda responsabilidad por desperfectos o daños que puedan ser
causados a personas o cosas.
NOTA: NO CONECTAR CON LA PUESTA A TIERRA DE LA
INSTALACION DE DISTRIBUCION ELECTRICA DADO QUE EL
CONDUCTOR DE PUESTA A TIERRA EN UN CABLE DE ALIMENTACION
NO ES CONSIDERADO UN CONDUCTOR DE CONEXION
EQUIPOTENCIAL.
F
CONNEXION EQUIPOTENTIELLE
Ce raccordement, prévu par certaines normes, permet d'éviter les
différences de niveau de potentiel électrique entre les masses des
appareils installés dans une même pièce.
Cet appareil poss de sous sa base d’une borne servant pour la connexion
d’un conducteur externe équipotentiel.
Une fois terminée l’installation, il est NECESSAIRE d’effectuer ce type de
connexion:
- utiliser un conducteur ayant une section nominale conforme aux
normes en vigueur;
- relier à la borne (voir figure) et l'autre extrémité aux masses des
appareils adjacents.
Le non-respect de cette norme de sécurité libère le fabricant de toute
responsabilité en cas de panne ou de dommages causés aux personnes
ou aux choses.
N.B.: NE PAS RELIER A LA TERRE DE L’INSTALLATION DE
DISTRIBUTION ELECTRIQUE CAR LE CONDUCTEUR DE TERRE D’UN
CABLE D’ALIMENTATION N’EST PAS CONSIDERE COMME ETANT
UN CONDUCTEUR DE CONNEXION EQUIPOTENTIEL.
Page 14

CHECK-UP FUNCIONAMIENTO
Verificar las condiciones para un buen
funcionamiento:
1) ENLACE HIDRAULICO
No deben verificarse pérdidas en las conexiones o en las tuberías.
2) FUNCIONAMIENTO
Hermeticidad de la válvula contra el rechupe (anterechupe).
Presión en caldera y del ejercicio correspondiente a los valores
normales.
Funcionamiento correcto del presóstato.
Funcionamiento correcto del auto-nivel.
Correcto funcionamiento de las válvulas de expansión.
Comprobación de la erogación de agua del grupo
Comprobación de las dósis
Comprobación de la temperatura de erogación de agua caliente.
Comprobación de las dósis del molido y del funcionamiento del molinillo.
CHECK-UP FUNCIONAMENTO
Verificar as condições necessária para se obter um
bom funcionamento:
1) LIGAÇÃO DA ÁGUA
Ausência de perdas
2) FUNCIONAMENTO
Vedação da válvula "anti-chupagem"
Pressão da caldeira e de funcionamento correspondentesmaos
valores normais
Perfeito funcionamento do pressostato
Perfeito funcionamento do auto-nivel
Perfeito funcionamento das válvulas de expanção
Controle da saida de água do grupo
Verificar as doses
Controle temperatura do fornecimento de água quente
Controle da dose de café moido e do funcionamento do moínho de
café
RUNDUM-ÜBERPRÜFUNG FUNKTIONSTÜCHTIGKEIT
Überprüfen Sie, ob die Bedingungen für eine
einwandfreie Funktionstüchtigkeit gegeben sind:
1) WASSERANSCHLUSS
keine Austritte bei den Anschlüssen und Leitungen vorhanden.
2) BETRIEB
Dichtigkeit des Ruecksaugschutzventils
Kessel- und Betriebsdruckwert entsprechen den Normalwerten
Einwandfreie Funktion des Druckschalters
Einwandfreie Funktion des Wasserniveaureglers
Einwandfreie Funktion der Überdruckventile
Überprüfung der Soll-Wasserausgabe aus der Ausgabe-Gruppe
Überprüfung der Dosiermengen
Überprüfung der Kaffeepulver-Dosiermengen und der
Funktionstüchtigkeit der Kaffeemühle
Installazione - Installation - Installation - Installation - Instalación - Instalação
I
CHECK UP FUNZIONAMENTO
Verificare le condizioni per un buon funzionamento
1) ALLACCIAMENTO IDRAULICO
Assenza di perdite dagli allacciamenti o dai tubi.
2) FUNZIONAMENTO
Tenuta valvola antirisucchio
Pressione in caldaia e d’esercizio rispondenti ai valori normali
Corretto funzionamento del pressostato
Corretto funzionamento dell’autolivello
Corretto funzionamento delle valvole di espansione
Verifica dell’erogazione di acqua dal gruppo
Verifica dosi
Verifica temperatura di erogazione acqua calda
Verifica della dose di macinato e della funzionalità del macinacaffé
CHECK-UP OPERATIONS
For correct operation, check these conditions:
1) HYDRAULIC CONNECTION
Absence of leaks from the connection or from the tubes.
2) OPERATION
Antisuction valve seal
Boiler pressure and operating pressure in conformity with normal
values
Correct functioning of the pressurestat
Correct functioning of the autolevel
Correct functioning of the expansion valve
Check of the water output of the group
Dose check
Temperature check of the hot water output
Check of the ground doses and of the functioning of the coffee
grinder
GB
F
CHECK-UP FONCTIONNEMENT
Vérifier les conditions pour un bon fonctionnement
1) RACCORDEMENT HYDRAULIQUE
Absence de pertes des raccords ou des tuyaux.
2) FONCTIONNEMENT
Tenue valve anti-remous
Pression en chaudière et de fonctionnement répondant aux valeurs
normales
Fonctionnement correct du pressostat
Fonctionnement correct des valves d’expansion
Vérification du débit d’eau du groupe
Vérification des doses
Vérification de la température du débit d’eau chaude
Vérification des doses de moulu et du bon fonctionnement du moulin
à café
D
E
P
Page 15
!
!
!
!
ATTENTION: AFTER INSTALLING THE MACHINE
AND BEFORE STARTING TO OPERATE IT, CLEAN
ALL THE INTERNAL COMPONENTS AS DESCRIBED
BELOW:
COFFEE DISPENSERS:
- Connect the (empty) filter-holders to the dispenser units.
- Dispense water from each dispenser for about one minute.
HOT WATER:
- Dispense hot water repeatedly (using the relative command) until at
least 6 liters of water have been dispensed from the 2-group
machine, 9 liters of water from the 3-group machine and 12 liters
from the 4-group machine.
STEAM:
- Allow the steam to flow through the nozzles for approximately one
minute, using the appropriate commands.
NOTE: See the instructions in the USE and MAINTENANCE MANUAL
for dispensing water, hot water and steam.
ACHTUNG: IST DIE AUFSTELLUNG ERFOLGT
MÜSSEN DIE INNEREN BESTANDTEILE GESPÜLT
WERDEN, BEVOR DIE MASCHINE IN BETRIEB
GESETZT WIRD. MAN MUß DABEI
FOLGENDERMAßEN VORGEHEN:
FUNKTIONSEINHEITEN:
- Die Filterhalter in die Einheiten einrasten (ohne Kaffee).
- Aus jeder Einheit etwa 1 Minute lang Wasser ausströmen lassen.
WARMES WASSER:
- Wiederholt (über den entsprechenden Steuerbefehl) Heißwasser
austreten lassen, bis bei Maschinen mit 2 Abgabeeinheiten
wenigstens 6 Liter, bei Maschinen mit 3 Abgabeeinheiten wenigstens
9 Liter und bei Maschinen mit 4 Abgabeeinheiten wenigstens 12
Liter abgegeben wurden.
DAMPF:
- Führen Sie den Zyklus zur Wasserdampfabgabe etwa eine Minute
lang durch, indem Sie wiederholt die entsprechenden Tasten drücken.
Nebenbemerkung: In dieser Gebrauchs- und Wartungsanleitung wird
erklärt wie man das Wasser, bzw. das warme
Wasser oder den Dampf ausströmen läßt.
ATTENTION: UNE FOIS TERMINÉE L’INSTALLATION
ET AVANT DE COMMENCER À UTILISER LA
MACHINE, EFFECTUER UN LAVAGE DES
COMPOSANTS INTERNES EN SUIVANT LES
INDICATIONS REPORTÉES CI-APRÈS.
GROUPES:
- fixer les porte-filtres aux groupes (sans café);
- faire couler l’eau par chaque groupe pendant 1 minute environ.
EAU CHAUDE:
- Débiter de façon répétée de l’eau chaude (en enclenchant la
commande correspondante) jusqu’à ce que vous ayez prélevé au
moins 6 litres d’eau par machine à 2 groupes, 9 litres par machine à
3 groupes, 12 litres par machine à 4 groupes.
VAPEUR:
- Faire sortir la vapeur des tuyaux pendant environ une minute, en
utilisant ses propres touches de commande.
N.B.: pour l’émission de l’eau froide ou chaude ou de la vapeur, voir
les instructions reportées sur le MANUEL D’UTILISATION ET
D’ENTRETIEN.
!
ATENCION: UNA VEZ TERMINADA LA
INSTALACION, ANTES DE COMENZAR EL
TRABAJO EFECTUAR UN LAVADO DE LOS
COMPONENTES INTERNOS SIGUIENDO LAS
INSTRUCCIONES MENCIONADAS A
CONTINUACION.
GRUPOS.
- Enganchar los portafiltros a los grupos (sin café)
- Erogar agua de cada grupo durante cerca de 1 minuto.
AGUA CALIENTE:
- Abrir el agua caliente de forma continua, accionando el mando
correspondiente, hasta sacar al menos 6 litros de agua de la máquina
a 2 grupos, 9 litros de la máquina a 3 grupos, 12 litros de la máquina
a 4 grupos.
VAPOR:
- Erogar vapor de las lanzas durante aproximadamente un minuto,
usando los mandos correspondientes.
NOTA: para efectuar la erogación de agua, agua caliente y vapor ver
las instrucciones en el MANUAL DE USO Y MANUTENCION.
F D
ATTENZIONE: TERMINATA L'INSTALLAZIONE
PRIMA DI INIZIARE IL LAVORO ESEGUIRE UN
LAVAGGIO DEI COMPONENTI INTERNI SEGUENDO
LE ISTRUZIONI SOTTOINDICATE:
GRUPPI
- Agganciare i portafiltri ai gruppi (senza caffè).
- Eseguire erogazioni per circa un minuto, per ogni gruppo.
ACQUA CALDA
- Erogare ripetutamente acqua calda (azionando il relativo comando)
sino a prelevare almeno 6 litri di acqua per macchina a 2 gruppi, 9 litri
per macchina a 3 gruppi, 12 litri per macchina a 4 gruppi.
VAPORE
- Erogare vapore dalle lance per circa un minuto, usando i relativi
comandi.
NB. per eseguire le operazioni sopra riportate vedere le istruzioni
riportate nei capitoli EROGAZIONE.....
I GB
E
!
ATENÇÃO: UMA VEZ TERMINADA A INSTALAÇÃO
DA MÁQUINA, ANTES DE INICIAR O TRABALHO
PROCEDER À LAVAGEM DO INTERIOR SEGUINDO
AS INSTRUÇÕES A SEGUIR INDICADAS.
GRUPOS:
- Prender o manípulo dos filtros aos grupos (sem café).
- Mandar sair água de cada grupo durante cerca de 1 minuto.
ÁGUA QUENTE:
- Distribuir mais vezes água quente (accionando o respectivo comando) até levantar pelo menos 5 litros de água para a máquina de
2 grupos, 8 litros para a máquina de 3 grupos, 10 litros para a
máquina de 4 grupos.
VAPOR:
- Mandar sair vapor dos esguichos por cerca de um minuto, utilizando
os comandos específicos.
NB: para proceder à distribuição de água, água quente e vapor
consultar as instruções contidas no MANUAL DE UTILIZAÇÃO E
MANUTENÇÃO.
!
P
Installazione - Installation - Installation - Installation - Instalación - Instalação
Page 16
EnglishEnglish
CE Declaration of conformity
According to the EC Directives
We , FAEMA S.P.A. hereby declare that the design and construction of the machines designated below, as marketed FAEMA conform to the
relevant safety and health requirements of the EC Directive.
This declaration shall not apply to machines modified without FAEMA approval.
Machine type: E61 ......
Machine number: refer to machine data
Relevant EC Directives: 98/37/CE EC Machinery Directive
73/23/CEE, 93/68/CEE EC Low Woltage Directive
89/336/CEE EC Electromagnetic Compatibility Directive
97/23/CE Pressure Equipment Directive (PED)
Applied harmonized EN 292-1, EN 292-2, EN 60335-1, EN 60335-2-15,
Standards: EN 55014, EN 61000-3, EN 61000-4, EN 60335-2-75
Certification for materials in contact with food used in FAEMA products
We, FAEMA S.P.A. hereby certify that the cleaning materials (used as specified in the manual) and the materials used in our products in contact with
food, are suitable for foodstuff or substances for personal use, and the machine is conform to the HACCP system.
Description pressure equipment:
T
max
Service boiler 2 bar 133° C water/steam 11 17,5
Capacity (L)
2 units
FluidP
max
T
max
Heat exchanger 12 bar 133° C water
0,65 2 3
N° Heat exchanger
2 units
FluidP
max
Capacity
(L)
Applied standard: Raccolte M, S, VSR edizione '78 e '95
Source of applied standards: : Via Manzoni 17, Binasco (Mi), Italy
Date: 01.11.2003
Signature: ....................................
USE
INDEX
Daily Switch-On
Heating phase
Delivery of the coffee
Other hot beverages
Water lever control of boiler
Cleaning and maintenance
Cautions
The Group
Defects - Malfunctions
3 units
3 units
Page 17
EnglishEnglish
“Before using the machine make sure that:
the main electricity supply ON/OFF switch is ON;
the water supply and water softener taps are open .”
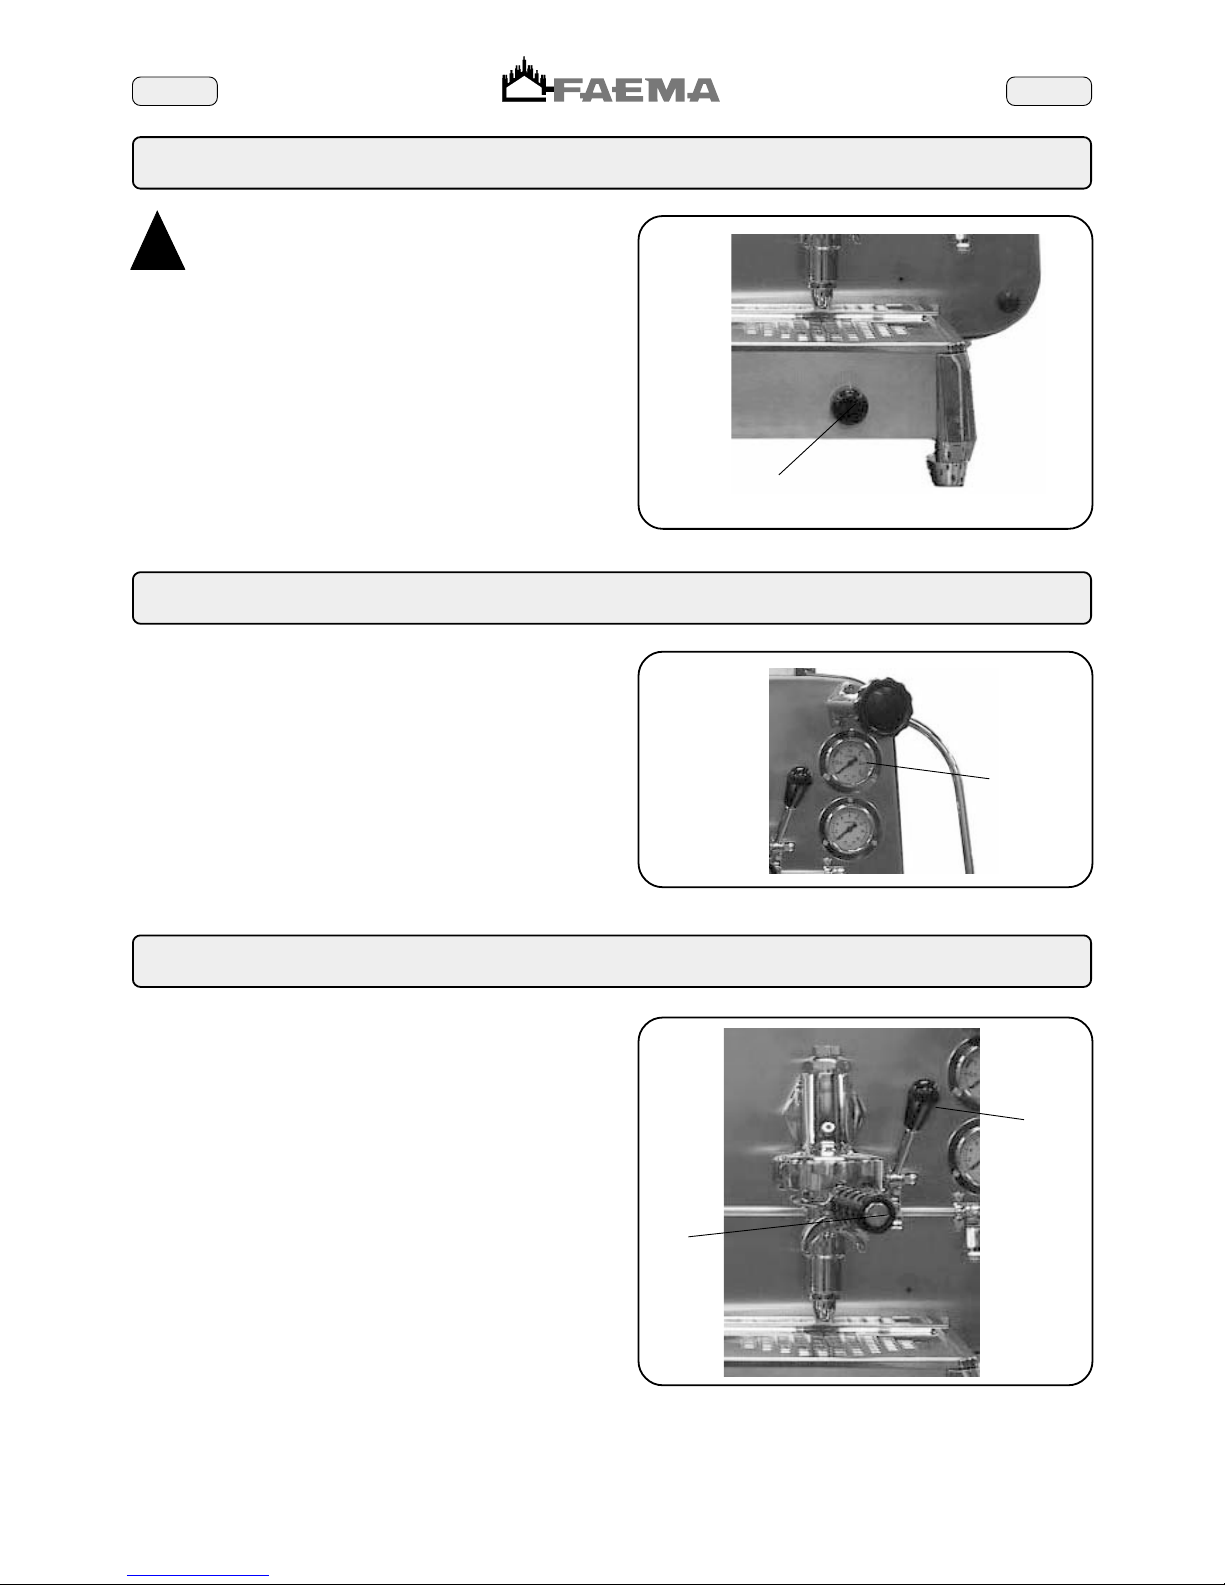
Electric switching on
Turn the main switch (1) to position 1.
The boiler is filled until the set level is reached.
Turn the main ON/OFF switch (1) to position 2.
“Heating” now begins.
Daily Switch-On
!
At the end of the day, turn the machine OFF by turning the main ON/
OFF switch (1) to position 0.
Heating phase
While awaiting for the machine to be ready for use, insert the filter baskets
(10) in the groups.
Do not cover the cup warmer with cloths to prevent over-heating of the
machine.
When the pressure gauge (14) indicates normal working pressure, the
machine is ready to be used.
Delivery of the coffee
1. Unhook the filter-holder (10) from the group.
2. Place the grounds in the grounds drawer.
3. Fill the filter with a dose of ground coffee.
4. Level out with the coffee press.
5. Insert the filter-holder (10) into the group ensuring it that the gasket
provides a good seal.
6. Place the cups (or cup) under the dispensing spouts.
7. Raise the lever (2) of the group to a vertical position.
From this moment, no coffee will be issued for 5-6 seconds. This
is the time required for the pressure to reach pump delivery head
value. Infusion occurs at this time, i.e. the preliminary “cooking” of
the coffee. Dispensing commences at the end of the infusion, during
which the coffee flows out continuously. Once the required quantity
of coffee has been obtained, dispensing is stopped by replacing
the lever (2) in the horizontal position.
14
2
10
1
0
12
Page 18
EnglishEnglish
Other hot beverages
Water level control of boiler
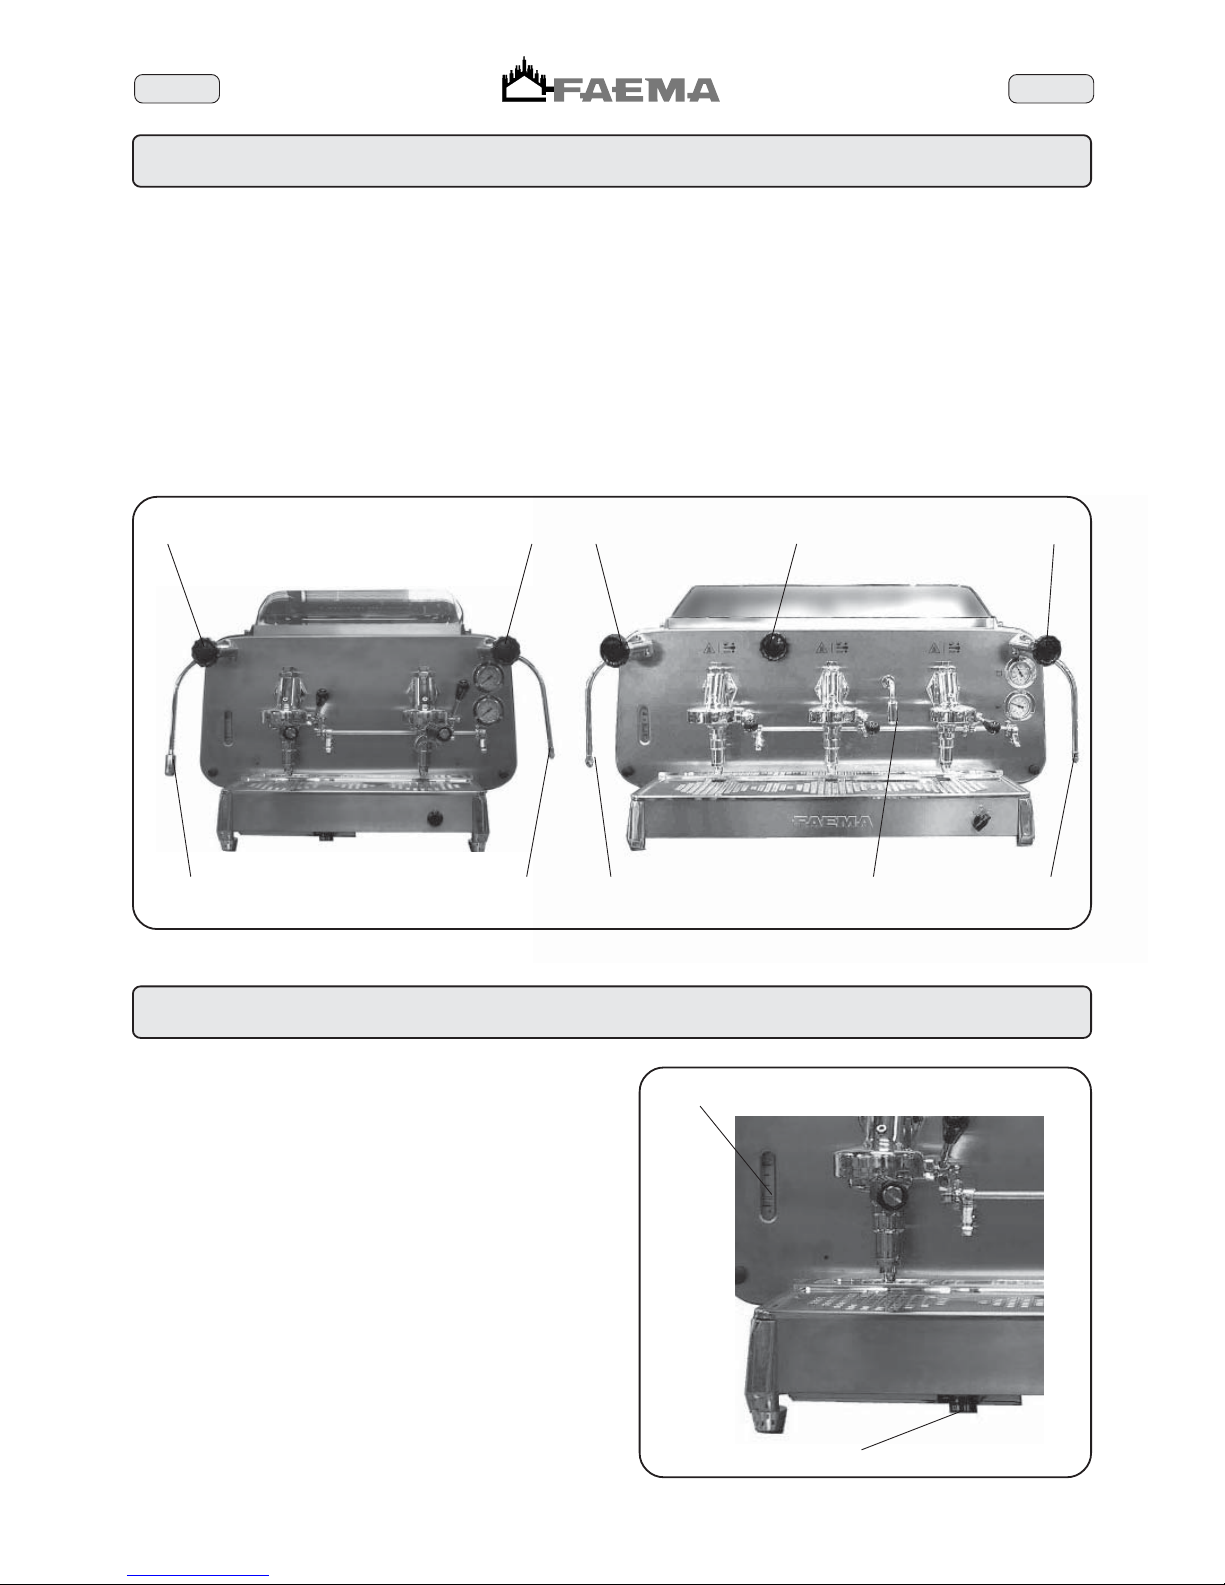
The machine is fitted with a series of automatic level control devices to
keep the water in the boiler at a pre-set level.
Filling the boiler with water using the manual service tap
This function should be used only if the electronic level control devices
are not working correctly.
Press the filling lever (5), taking care not to exceed the MAX. level on
the boiler water level indicator (13).
Steam dispensing
Put a cup with the beverage you wish to heat under the right or left
steam nozzle (6).
Completely immerse the steam nozzle in the beverage.
Gradually open up the steam ta (7) , allow the beverage to heat to the
desired temperature, stop the flow of steam by turning knob (7) the other
way (towards 0).
Dispensing hot water
Put the pot below of pipe (8) and open the tap (9).
13
5
Heating milk for frothy coffee (cappuccino)
Use a tall narrow jug and fill it up to about the half-way mark. Then
plunge the steam jet pipe (6) into the milk.
Gradually open up the steam tap (7) and heat the milk for a few seconds.
When the required amount of froth has been made and the temperature
is sufficiently high, stop the flow of steam by turning knob (7) the other
way (towards 0).
When the steam jet pipe (6) is no longer required, clean it thoroughly
with a sponge and a clean cloth.
Note: At the conclusion of each steam dispensing phase,
clean the inside of the steam nozzle as follows:
Turn the nozzle towards the cup tray and carefully
activate steam dispensing at least once.
86
97
668
977
Page 19
EnglishEnglish
!
Cleaning and maintenance
Cleaning the dispenser units
This procedure should be carried out at the end of the working
day on all dispenser units.
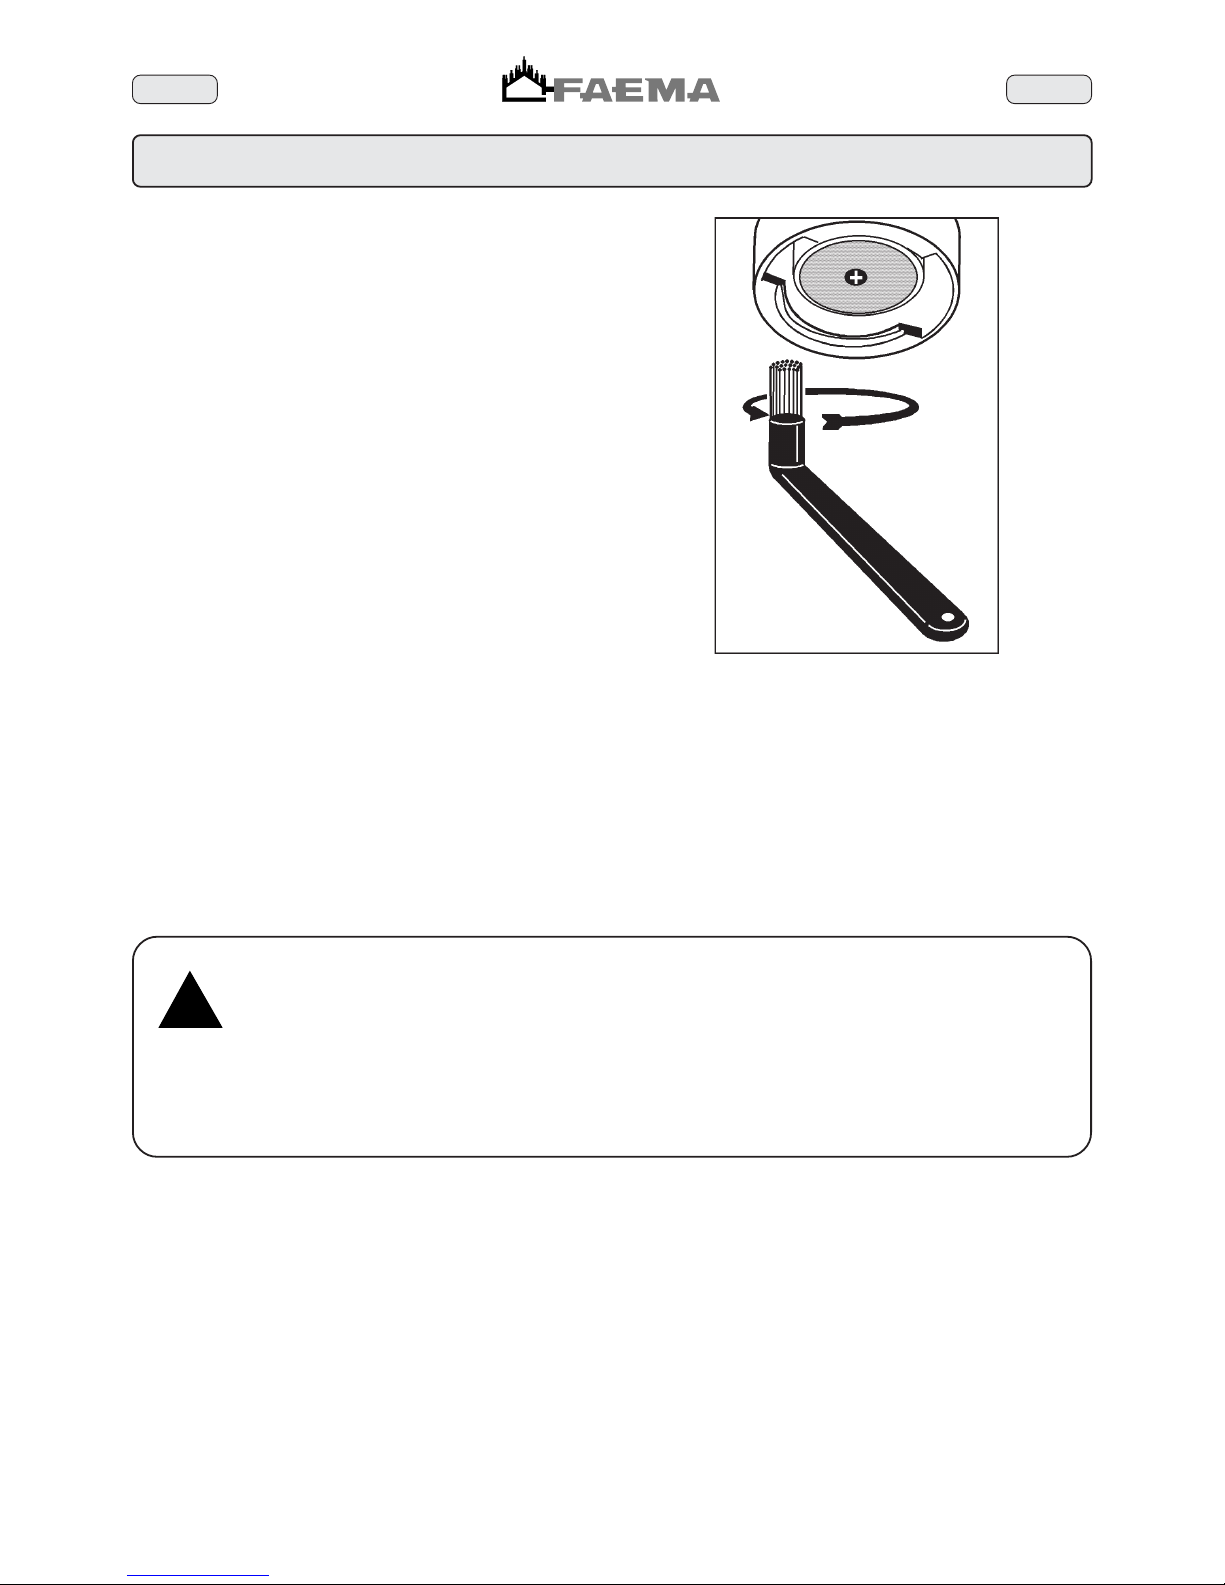
1) Clean the underpan gasket with a brush.
2) Fit the blank ring into the filter holder.
3) Pour in the filter holder the content of a sachet or a measure of
detergent powder.
4) Connect the filter carrier to the group and perform a few cycles.
5) Remove the filter carrier, clean the spout with a sponge.
6) Rinse by dispensing water from each group for about 30".
Filter Holders
1) Pour 1 litre of cold water and a dose of detergent into a suitable
receptacle.
2) Remove the filters from the filter holders.
3) Leave the filters and filter holders in the solution for at least two
hours.
4) Remove any residues with a sponge and rinse in plenty of cold
water.
5) Refit the filters in the filter holders, making sure that the filter fixing
spring is in the correct position.
Steam and hot water dispensing pipe
Using a clean sponge, wash with hot water removing any organic residue
present. Rinse carefully.
To clean the inside of the steam nozzle, follow these steps:
Turn the nozzle towards the cup tray and carefully activate steam
dispensing at least once.
Drip pan
Remove the drip plan and complete the cleaning with running water
Discharge tank
At the end of the working day, pour a jug of hot water into the discharge
tank, removing any organic residue present.
Bodywork
Use a soft cloth and cleaning products WITHOUT ammonia or
abrasives, removing any organic residue present in the work area.
N.B. Do not spray liquids into the panel slots.
ATTENTION
When the machine has not been used for more than 8
hours, and in any case once a day, the internal
components must be washed before use, in
accordance to the following instructions:
Supply Groups
Insert the filter carriers into the groups (without coffee) and dispense
from each group for one minute.
Hot water
Dispense hot water repeatedly (using the relative command)
until at least 6 liters of water have been dispensed from the 2group machine, and 9 liters from the 3-group machine.
Steam
Dispense steam from the steam pipe for about one minute,
using the relative commands.
Page 20
EnglishEnglish
!
GENERAL
The manufacturer disclaims all liability for damages to items or
persons due to improper use or due to the coffee machine being
used for reasons other than its intended use.
Never work the coffee machine with wet hands or naked feet.
Cup-warming plate
Place only coffee cups, cups and glasses to be used in conjunction
with the coffee machine on the cup-warming plate.
Ensure that the coffee cups are completely drained before placing
them on the cup-warming plate.
No other objects shall be placed on the cup-warming plate.
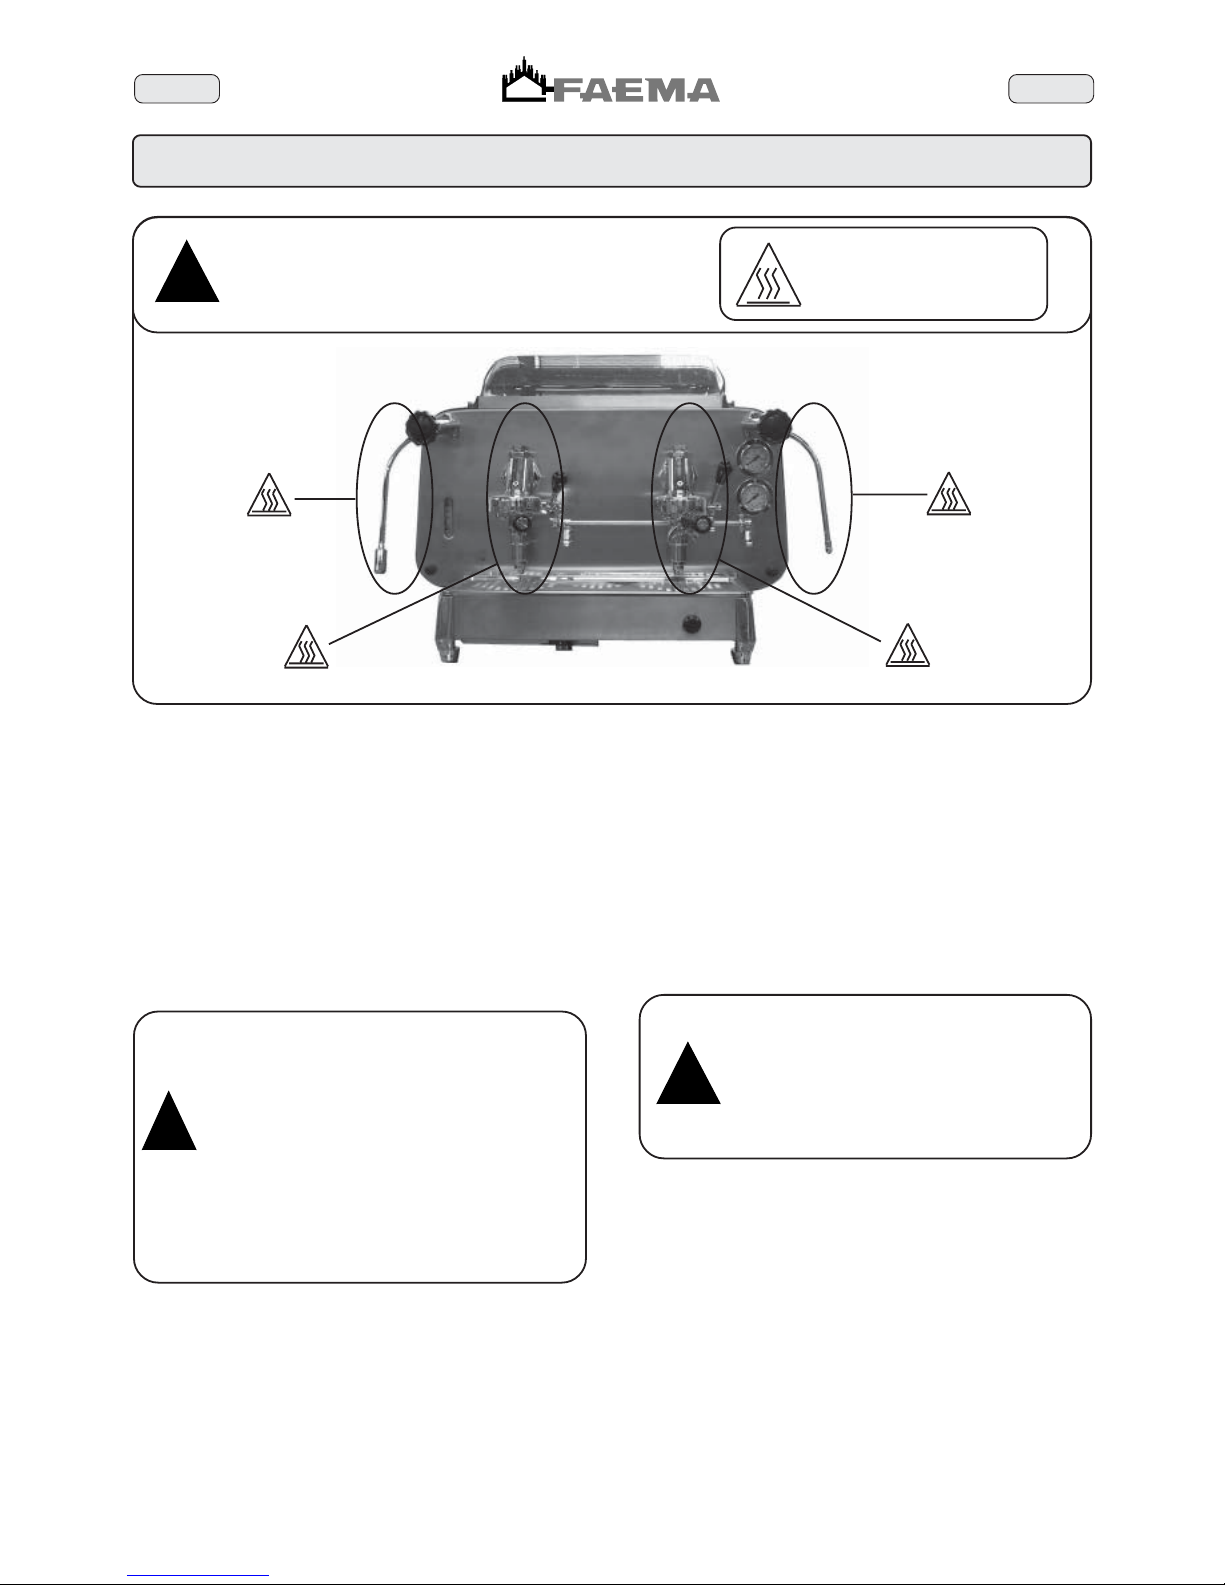
Danger of Burns
Do not place the hands or other parts of the body close to the coffee
distribution points, or near to the steam and hot water nozzles.
Ensure that the machine is not handled by children or persons who
have not been instructed in its correct use.
MAINTENANCE AND REPAIR
If the machine does not function correctly, switch it off, turn off the
main switch and call the service agent.
Only qualified and authorised servicing personnel should be called.
Use only original spare parts.
Maintenance activities performed by unqualified personnel may
jeopardise the safety of the machine.
If the electric cable is damaged, switch off the machine and apply to
the servicing department for a replacement.
Regeneration of the Water Softener
The machine must be installed with an ionic resin water softener.
The water softener may be of different types, with different resin
capacities and different periods of validity.
The resins are regenerated by adding coarse kitchen salt or salt pastilles
to the water softener.
If the regeneration of the resins is not made at the due dates, calcareous
deposits will form which progressively decrease the machines efficiency
until its functions are completely blocked.
The regeneration due dates and method thereof may be found in the
instructions provided with the equipment.
If regeneration is performed at the due dates, the machine is maintained
in ideal working conditions.
The following measures are indispensable for
ensuring operational and functional safety:
- Comply with all the manufacturers instructions.
- Ensure that specialized technicians periodically
verify that the protection devices are intact and
that all the safety devices function correctly (the
first inspection should be made within 3 years
and subsequently once yearly).
Danger of burns
The areas marked with this sign become hot.
Great care should be taken when in the
vicinity of these areas.
WARNING: Hot surface
ACHTUNG: Heisse Oberfläche
ATTENTION: Surface chaude
ATTENZIONE: Superficie calda
!
Cautions
MACHINE CLOSE-DOWN
When the machine remains unattended for
a long period of time (at night, during the
weekly closing day or during holidays) the
following operations shall be performed:
- Remove the plug or switch off the main
switch.
- Close the water tap.
- Close the gas tap.
Non-compliance with these safety measures
exonerates the manufacturer from all liability
for malfunctions or damage to persons or
items.
!
Page 21
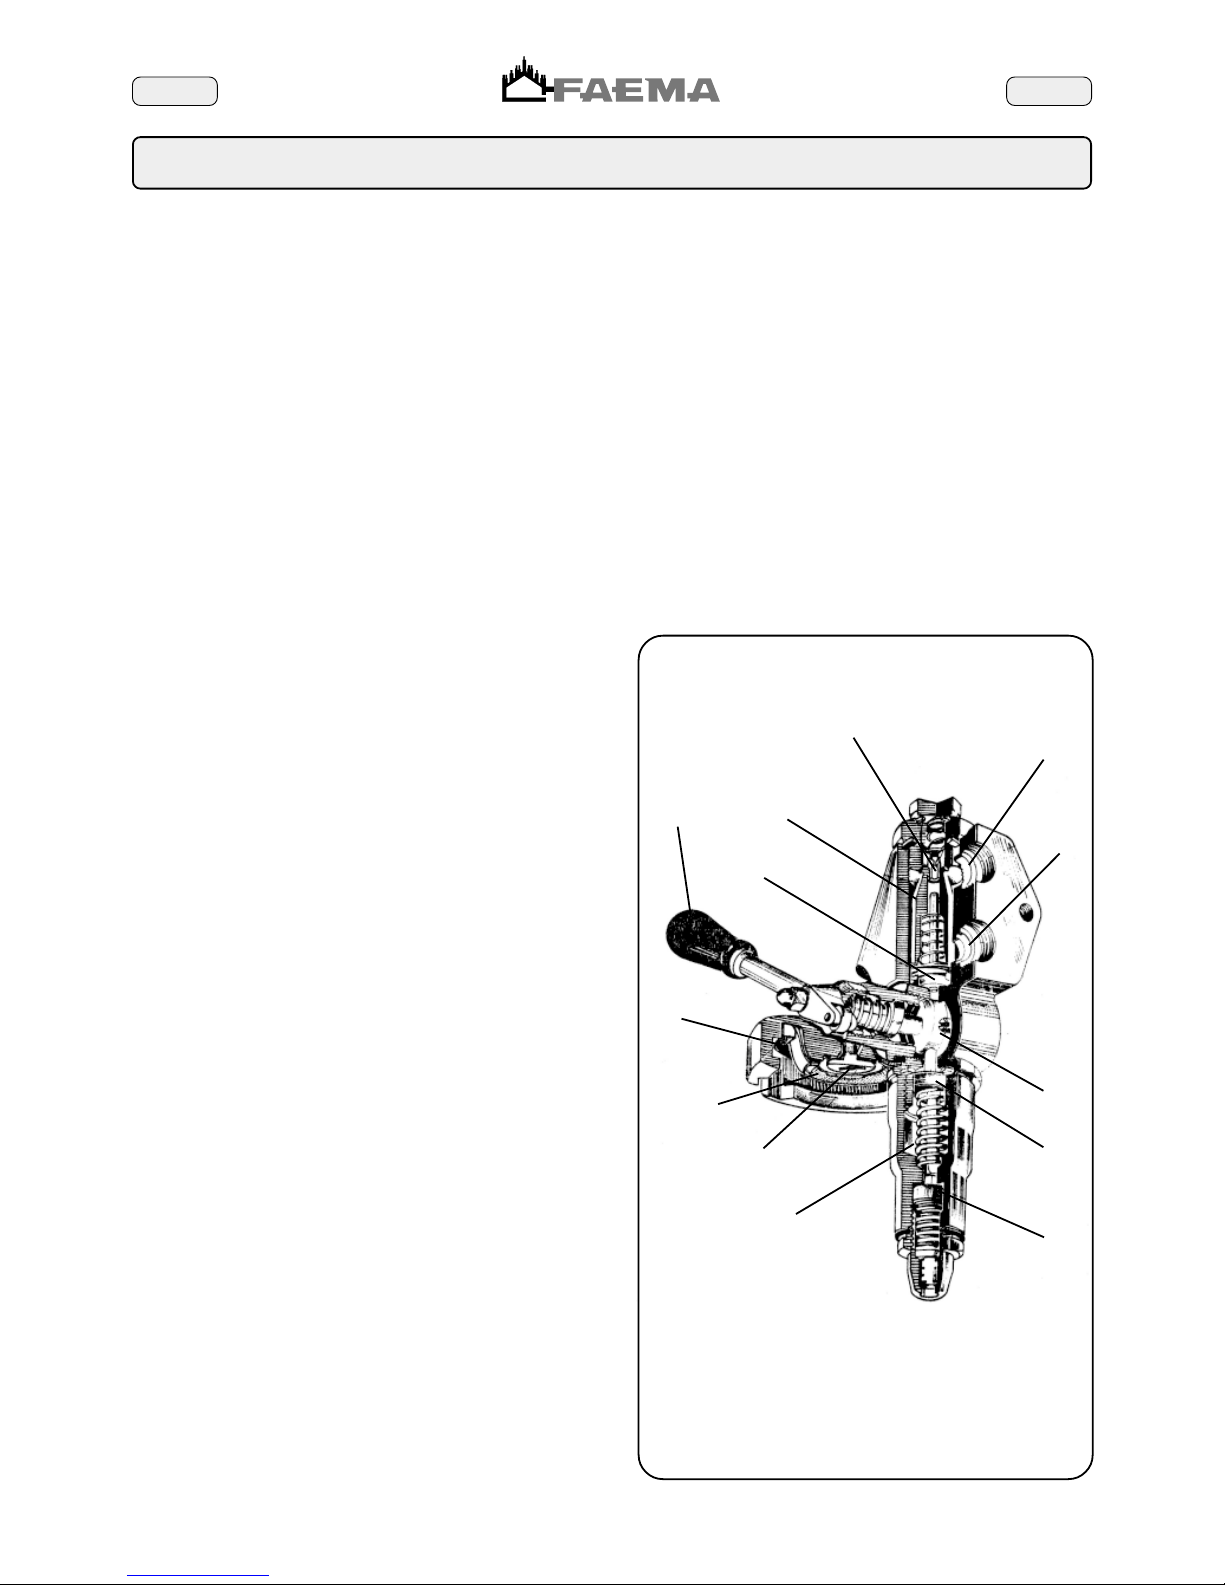
EnglishEnglish
Every group is independently thermoregulated, with its own separate
“THERMOSIPHON CIRCULATION”.
The following devices are found on the front of the machine where
the filter-holder is inserted:
- the flow block (M)
- the spout (N)
- the under cup gasket (P)
On the rear are the water entry and exit perforations (A and B respectively)
for the themosiphon circulation water and for the coffee.
The three group valves perform the following functions:
1. The dispensing valve (E). When the group is operating this valve
is open and allows the passage of water to the ground coffee.
The valve is closed when the group is not operating and allows
the thermosiphon circulation.
2. Infusion valve (I). Determines the “cooking” of the coffee thanks
to a play on the pressure.
3. Drainage valve (S). This valve is closed during dispensing. It
opens and drains the group at the end of the dispensing,
controlled by the command lever cam wheel.
HOW THE GROUP FUNCTIONS
A. Group at rest.
1. Group command lever (2) - horizontal.
2. Thermosiphon circulation - the water circulates in the changer
around the central head (G) .(metal tube), maintaining the group
thermoregulated.
3. Dispensing valve (E) - Closed.
4. Infusion valve (I) - Kept open by the cam (C).
5. Drainage valve (S) - Kept open by the cam (C).
6. Filter-holder - Inserted and containing the previous coffee
grounds.
7. Pump - Standstill.
B. Group in operation
1. Filter-holder - Inserted with freshly ground coffee.
2. Group command lever (2) - Vertical.
3. Pump - In operation.
4. Dispensing valve (E) - Kept open by the cam (C).
5. Infusion valve (I) - Closed.
6. Drainage valve (S) - Closed.
Group command lever (2) in vertical position acts on the cam shaft which
presses on the microswitch button of the pump motor.
INFUSION TIME
- The pressure in the thermosiphone circulation reaches the pump
delivery head value (8 ÷ 9 bar).
- The water under pressure enters the chamber above the nozzle (H)
via the 4 perforations in the central head.
- Nozzle (H) permits the passage of a small calibrated quantity of water
into the group (cam chamber, dispensing chamber, ducts and space
on the ground coffee) which gradually fills up until the level of pressure
is reached that opens the infusion valve (I).
- At this point, the infusion chamber (L) is filled.
- While the infusion chamber is being filled, the air contained therein
has contact with the ground coffee. Steam is formed in this air bubble.
- The entire group is now at infusion pressure and remains at this level
until the entire infusion chamber is filled. At this point, the pressure
rises to reach the pump delivery head value.
- Completion of the infusion requires about 6 seconds from the moment
the group command lever (2) rises. This is the “INFUSION PERIOD”.
- During this period hot water comes into contact with the ground coffee
at a pressure that is not sufficient to overcome the resistance.
- The water pressure gradually increases on the ground coffee, causing
its preliminary swelling and “cooking”.
The Group
COFFEE DISPENSING
- At the end of the infusion period, i.e. when the water pressure on
the ground coffee has reached the pump delivery head, dispensing
of the “coffee cream” commences and continues until the group is
halted. Dispensing of a normal coffee must last about 25 seconds.
- These times are based on the type of coffee (blend) used, its correct
roast level and above all to its grinding degree.
NOTE: The closure of the group must be made quickly so that the cushion
of steam that forms upon contact with the coffee grounds can contribute
to an effective drainage from the group and consequently the drying of
the coffee grounds.
Upon completion of the dispensing, the group drains automatically to
remove the pressure and thus making it safe to remove the filterholder.
C. DISPENSING COMPLETION
1. All the group components return to the point A position.
2. The opening of the infusion valves (I) and drainage valves (S)
via the cam (C) empties the spaces under the dispensing valve.
H
A
B
G
E
2
C
I
S
L
M
N
P
Page 22
EnglishEnglish
Defects - Malfunctions
PROBLEM SOLUTIONCAUSE
Direct action by the customer
Before calling service personnel, to avoid useless expense, check whether the machine problem corresponds to one of the cases listed below.
Leaking from the filter-holder rim (10). Clean using the special brush provided.Underpan gasket dirty with coffee.
Coffee dispensing time too short. Use a finer grind.
Use new coffee.
Coffee ground too coarse.
Coffee too old.
Coffee drips out of machine. Clean.
Use a coarser grind.
Filter holes blocked or filter-holder (10)
outlet hole dirty.
Coffee ground too fine.
Loss of water under the machine. Clean.
Clean.
Discharge well clogged up.
Discharge pan hole blocked.
Defects - Malfunctions
Interventions by a specializes technician
PROBLEM COMMENTSCAUSE
Infusion time too short
Rapid dispensing.
Coffee very bland, without cream.
(Same defects on all groups).
Infusion time very short.
Rapid dispensing.
Coffee very bland, without cream.
(Same defects on all groups).
Low coffee yield.
Slow dispensing.
Coffee cold and bland.
Fast dispensing, coffee bland.
Pressure gauge pump indicates pressure
greater than 9 bar.
Low coffee yield.
Fast dispensing.
Coffee hot and bland.
Coffee cold, bland and without cream.
Normal infusion and dispensing times.
Coffee cold in the morning at start of work.
Dispensing slow.
Coffee burnt and cold.
Cream very dark, with tendency of formation
of an “eye”.
This defect is associated to other secondary
symptoms which may be caused by a number
of other causes as per the previous points.
Do not adjust the machine until all other
causes have been excluded.
The capacity of the group without filter must
be 100 cm³ in 8 ÷ 10 seconds.
If the group is operated without the filterholder, thin, isolated jets will be dispensed
instead of one central jet.
Coffee grounds in cup.
Move group to and fro to remove air bubble.
When touching the water tube it is warm near
to the machine.
Pressure gauge calibrated with values that are
too low.
See switching on instructions.
Coffee grounds too course.
Old coffee.
Group nozzle widened through use.
OR gasket in cone-shaped section leaks.
Infusion valve remains open
Filter edge broken.
Spout dirty.
Pump out of calibration.
By-pass valve blocked.
Filters with perforations widened.
Coarse grinding.
Air bubble in thermosiphon circulation.
Check valve does not hold (with low
pressure in system).
Heat exchangers emptied.
Heat exchanger defective (shows pressures
higher than real values).
Air in boiler.
Coffee grounds too fine.
Low pressure in pump.
Mesh filter above spout dirty.
Spout partially blocked.
Page 23
EnglishEnglish
Defects - Malfunctions
Interventions by a specializes technician
PROBLEM COMMENTSCAUSE
Dispensing slow, coffee burnt.
Pressure gauge pump lower than 9 bar.
Drainage tube leaks when group is at rest
(defect only on one group).
Coffee dispensed normally.
Group at rest
Dispensing valve gasket fails rapidly.
Water leak from the drainage tube.
Coffee dispensed normally.
Defect on all groups.
Group at rest.
Continuous loss of cold water in the drainage
tray.
Groups do not dispense any more coffee and
the pressure gauge pump shows low values.
Group in operation.
Drainage tube leaks.
No coffee.
Group in operation.
Loss of cold water in drainage tray.
Coffee bland.
Dispensing slow.
Group leaks at cam shaft.
Difficult to move the groups.
Machine does not go into pressure or reaches
pressure level slowly.
Groups function normally.
Pressure gauge pump does not give correct
pressure reading (8 ÷ 9 bar).
Pump does not reach pressure level.
No dispensing.
Pump noisy.
If this defect is not corrected immediately, the
water softener runs out long before the expiry
time, with consequent scale deposit.
If this defect is not corrected immediately, the
water softener runs out long before the expiry
time, with consequent scale deposit.
If this defect is not corrected immediately, the
water softener runs out long before the expiry
time, with consequent scale deposit.
Remove the glands taking care not to mark
the housings.
Do not use tools made of steel or other hard
materials.
Before remounting, clean the shaft thoroughly,
especially the grooves
Steam taps leak:
Pump out of calibration.
Pump with reduced capacity.
Dispensing valve does not hold.
Expansion valve with calibration too high
(above 12 bar).
Expansion valve remained open.
Drainage valve does not hold.
Expansion valve out of calibration (opens at
less than 9 bar).
Leak on the two glands.
Cam profile worn.
No electricity.
Automatic switch gone off.
Resistances burned.
Electric circuit to resistance interrupted.
No water in boiler.
Pressure gauge defective.
Motor does not work:
- No electricity.
- Capacitor burnt.
- Microswitch burnt.
- Motor burnt.
Check valve pump open.
By pass valve completely opened.
Pump defective.
No water in system.
Page 24
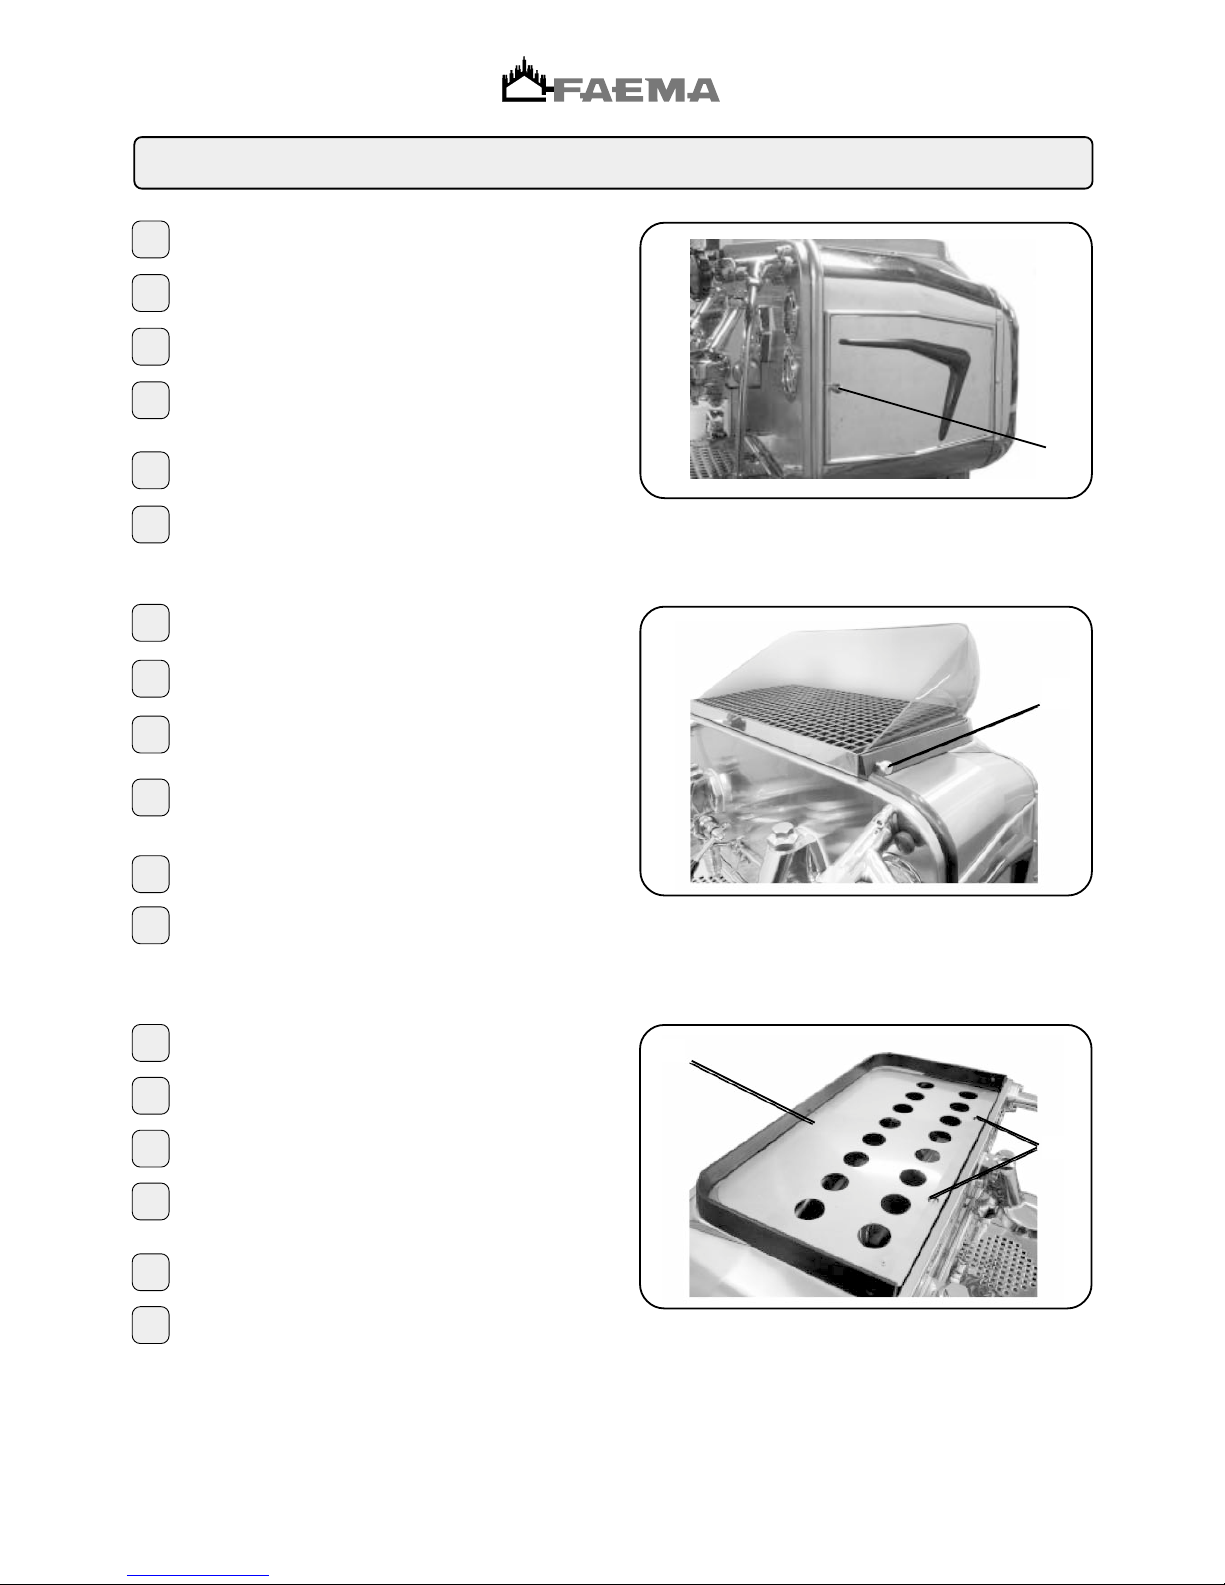
Smontaggio - Disassembly - Demontage - Abmontierung - Desmontaje - Desmontage
C
C
Smontaggio pannelli superiore
Svitare le viti (C) e rimuovere il pannello.
Disassembly of top panels
Unscrew screws (C) and remove the panel.
Démontage des panneaux supérieurs
Dévisser les vis (C) et retirer le panneau.
Demontage der oberen Paneele
Lösen Sie die Schrauben (C), und nehmen Sie das obere
Paneel ab.
Desmontaje panel superior
Destornillar los tornillos (C) y quitar el panel.
Desmontagem dos painéis superiores
Desaparafusar os parafusos (C) e remover o painel.
I
GB
F
D
E
P
B
Smontaggio piano scaldatazze e vetrinetta
Allentare i fissaggi (B) e rimuovere il piano.
Disassembly of the cup warmer tray and glass panels
Loosen fasteners (B) and remove the tray.
Démontage du plan de chauffe-tasses et de petite
vitrine
Desserrer les fixages (B) et retirer le plan.
Demontage der Abstellfläche zur Tassenvorwärmung
Lösen Sie die Feststellklemmen (B), und nehmen Sie
Abstellfläche zur Tassenvorwärmung ab.
Desmontaje bandeja calienta-tazas y vitrina
Destornillar las fijaciones (B) y quitar la bandeja
Desmontagem do tabuleiro para aquecer as chávenas
e da montra
Afrouxar os parafusos de fixação (B) e remover o tabuleiro.
F
GB
I
D
E
P
A
Smontaggio pannelli laterali
Svitare la vite (A) e rimuovere il pannello.
Disassembly of side panels
Unscrew screw (A) and remove the panel.
Démontage des panneaux latéraux
Dévisser la vis (A) et retirer le panneau.
Demontage der Seitenpaneele
Lösen Sie die Schrauben (A), und nehmen Sie das
Seitenpaneel ab.
Desmontaje paneles laterales
Destornillar el tornillo (A) y quitar el panel.
Desmontagem dos painéis laterais
Desaparafusar o parafuso (A) e remover o painel
D
E
P
F
GB
I
Page 25
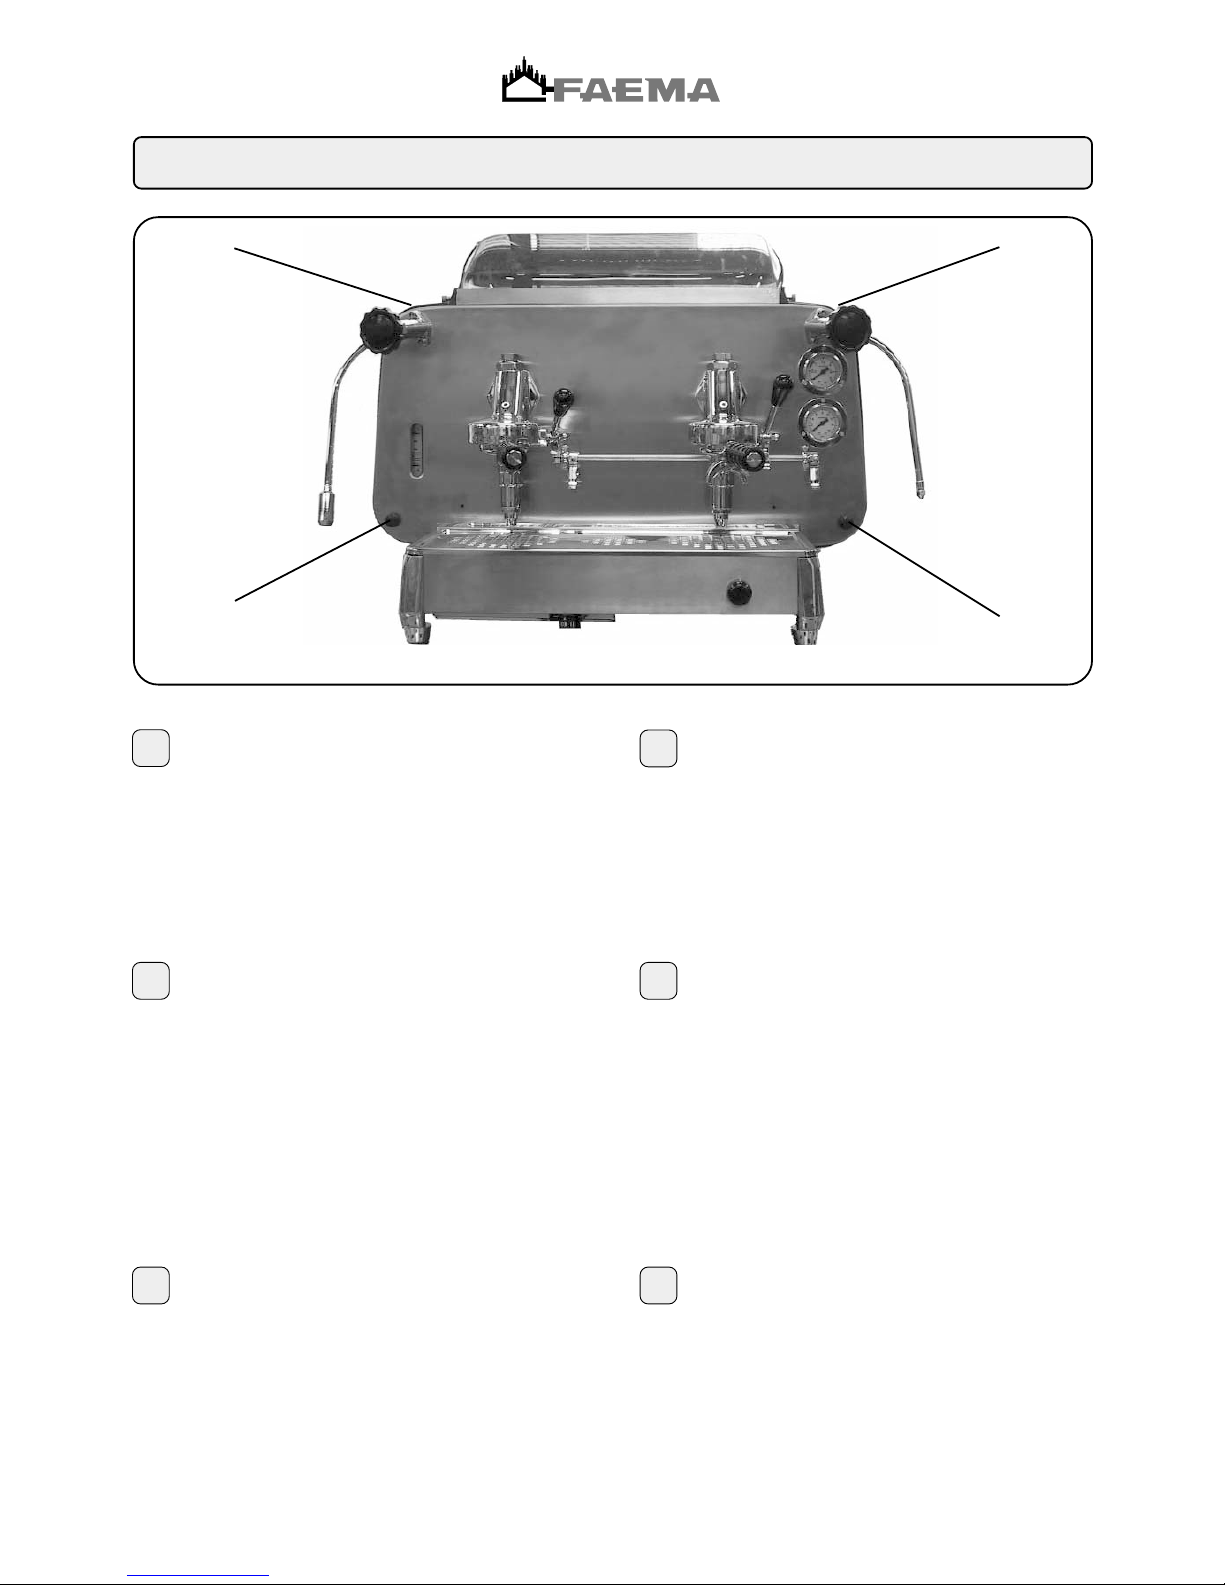
Smontaggio carrozzeria
1 - Svitare le manopole (D) ai 4 angoli della carrozzeria.
2 - Estrarre la carrozzeria dal retro, prendendola dai due
lati inferiori e facendola ruotare leggermente verso l'alto.
3 - Scollegare il connettore del pannello illuminato.
4 - Appoggiare la carrozzeria con cautela sui 4 prigionieri
verso terra, lontano dalla zona di lavoro.
5 - Alla fine della riparazione, seguire le istruzioni in senso
inverso da 5 a 1.
I
Disassembly of the framework
1 - Unscrew the knobs (D) at the four corners.
2 - Remove the framework from the rear, holding it by the
two lower sides and slightly rotating towards the top.
3 - Disconnect the connector of the lighted panel.
4 - Place the framework down carefully on the the 4 stud
bolts towards the ground, away from the work area.
5 - Upon completion of the repair, follow the instructions from
5 to 1.
GB
Smontaggio - Disassembly - Demontage - Abmontierung - Desmontaje - Desmontage
Desmontaje revestimiento
1 - Destornillar los pomos (D) situados en los 4 ángulos de la
carrocería.
2 - Quitar la carrocería de la parte posterior, cogiéndola de
los dos lados inferiores y haciéndola girar ligeramente hacia
arriba.
3 - Desconectar el conector del panel iluminado.
4 - Apoyar la carrocería con cautela su los 4 pernos
prisioneros hacia tierra, lejos de la zona de trabajo.
5 - Al final de la reparación, volver a realizar las mismas
instrucciones pero desde el punto 5 al 1.
E
Desmontagem da estrutura
1 - Desaparafusar os manípulos (D) colocados nos 4 cantos
da estrutura.
2 - Extrair a estrutura a partir da parte traseira, pegando nela
nos dois lados inferiores e fazendo-a rodear levemente para
cima.
3 - Desligar o conector do painel iluminado.
4 - Apoiar a estrutura cuidadosamente sobre os 4 parafusos
prisioneiros para terra, longe da zona de trabalho.
5 - No final da reparação, seguir as instruções em sentido
contrário de 5 a 1.
P
Démontage de la carrosserie
1 - Dévisser les poignées (D) aux 4 angles du châssis
2 - Extraire le châssis du derrière en le prenant par les deux
Côtés inférieurs et en le faisant pivoter légèrement vers le
haut
3 - Débrancher le connecteur du tableau illuminé
4 - Poser soigneusement le châssis sous les 4 prisonniers
vers le sol, loin de la zone de travail
5 - A la fin de la réparation, suivre les instructions de 5 à 1.
F
Demontage des Gehäuses
1 - Schrauben Sie die Drehschrauben (D) an den 4 Ecken
des Gehäuses ab.
2 - Nehmen Sie das Gehäuse von der Rückwand ab, indem
Sie es an der unteren Kante anfassen und leicht nach oben
drehen.
3 - Ziehen Sie den Steckverbinder von der beleuchteten
Tafel ab.
4 - Setzen Sie das Gehäuse vorsichtig mit den 4
Feststellbolzen auf dem Boden in einem angemessenen
Abstand zum Arbeitsbereich ab.
5 - Führen Sie die o.a. Arbeitschritte nach Ausführung der
Reparatur in umgekehrter Reihenfolge aus.
D
D
D
D
D
Page 26
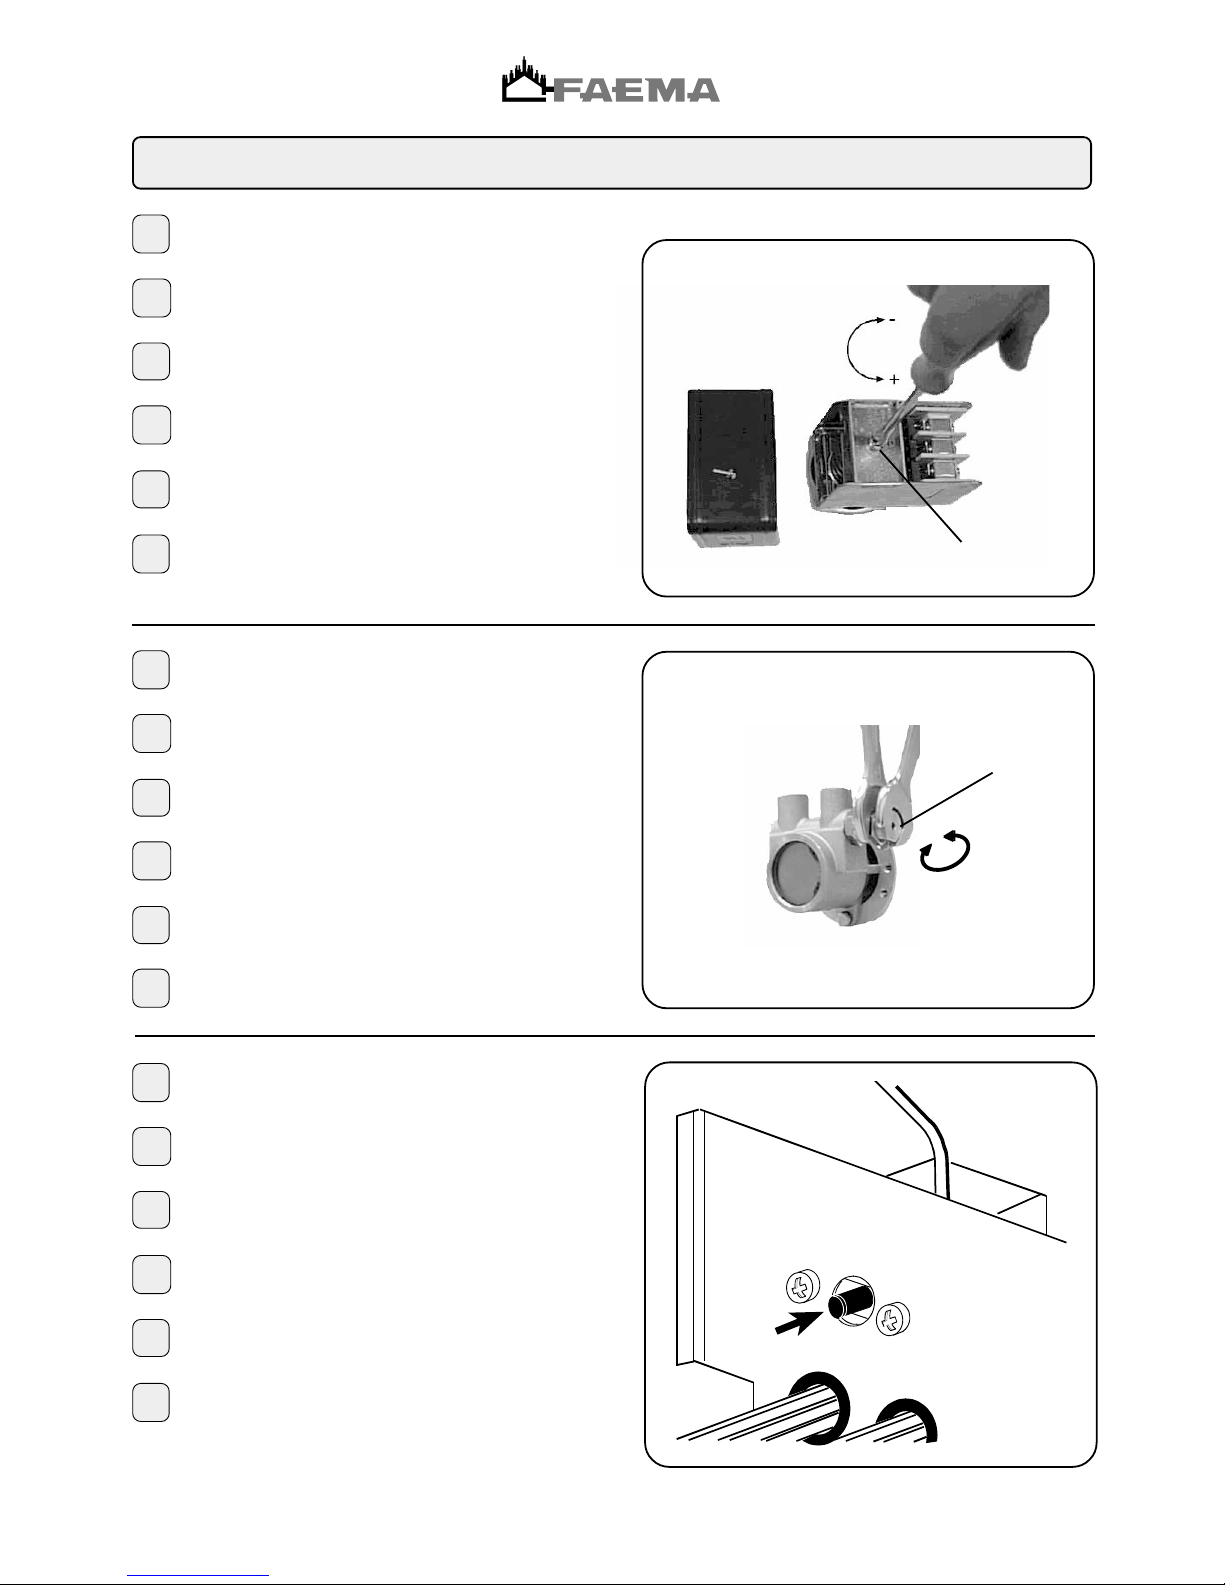
Regolazioni - Setting - Reglages - Einstellungen - Regulaciones - Regulações
+
-
A
A
I
PRESSOSTATO
A - Vite di regolazione pressione caldaia
GB
PRESSURESTAT
A - Screw for adjusting the boiler pressure
F
PRESSOSTAT
A - Vis de réglage pression chaudière
D
DRUCKSCHALTER
A - Kesseldruck-Einstellschraube
E
PRESSOSTATO
A - Tornillo regulación presión caldera
P
PRESSOSTATO
A - Parafuso de regulação pressão caldeira
I
MACCHINA EQUIPAGGIATA CON TERMOSTATO DI
SICUREZZA
In caso di intervento del termostato, riarmare
GB
MACHINE EQUIPPED WITH SAFETY THERMOSTAT
In case of thermostat intervention, switch on again
F
MAQUINE EQUIPÉE DE THERMOSTAT DE SURETÉ
En cas d'intervention du thermostat, brancher de nouveau
D
MIT SICHERHEITSTHERMOSTAT AUSGESTATTETE
MASCHINE
Falls der Thermostat ausgelöst wird, ihn wiedereinschalten
E
MAQUINAS EQUIPADAS CON THERMOSTATO DE
SEGURIDAD
En caso de intervención del thermostato, reencender de nuevo
P
MAQUINA EQUIPADA COM THERMOSTATO DE
SEGURANÇA
Em caso de intervenção do thermostato, reacender de novo
P
BY-PASS
A - Parafuso de regulação pressão bomba
E
BY-PASS
A - Tornillo regulación bomba
D
BY-PASS
A - Pumpendruck-Einstellschraube
F
BY-PASS
A - Vis de réglage pression pompe
GB
BY-PASS
A - Screw for adjusting the pump pressure
I
BY-PASS
A - Vite di regolazione pressione pompa
Page 27
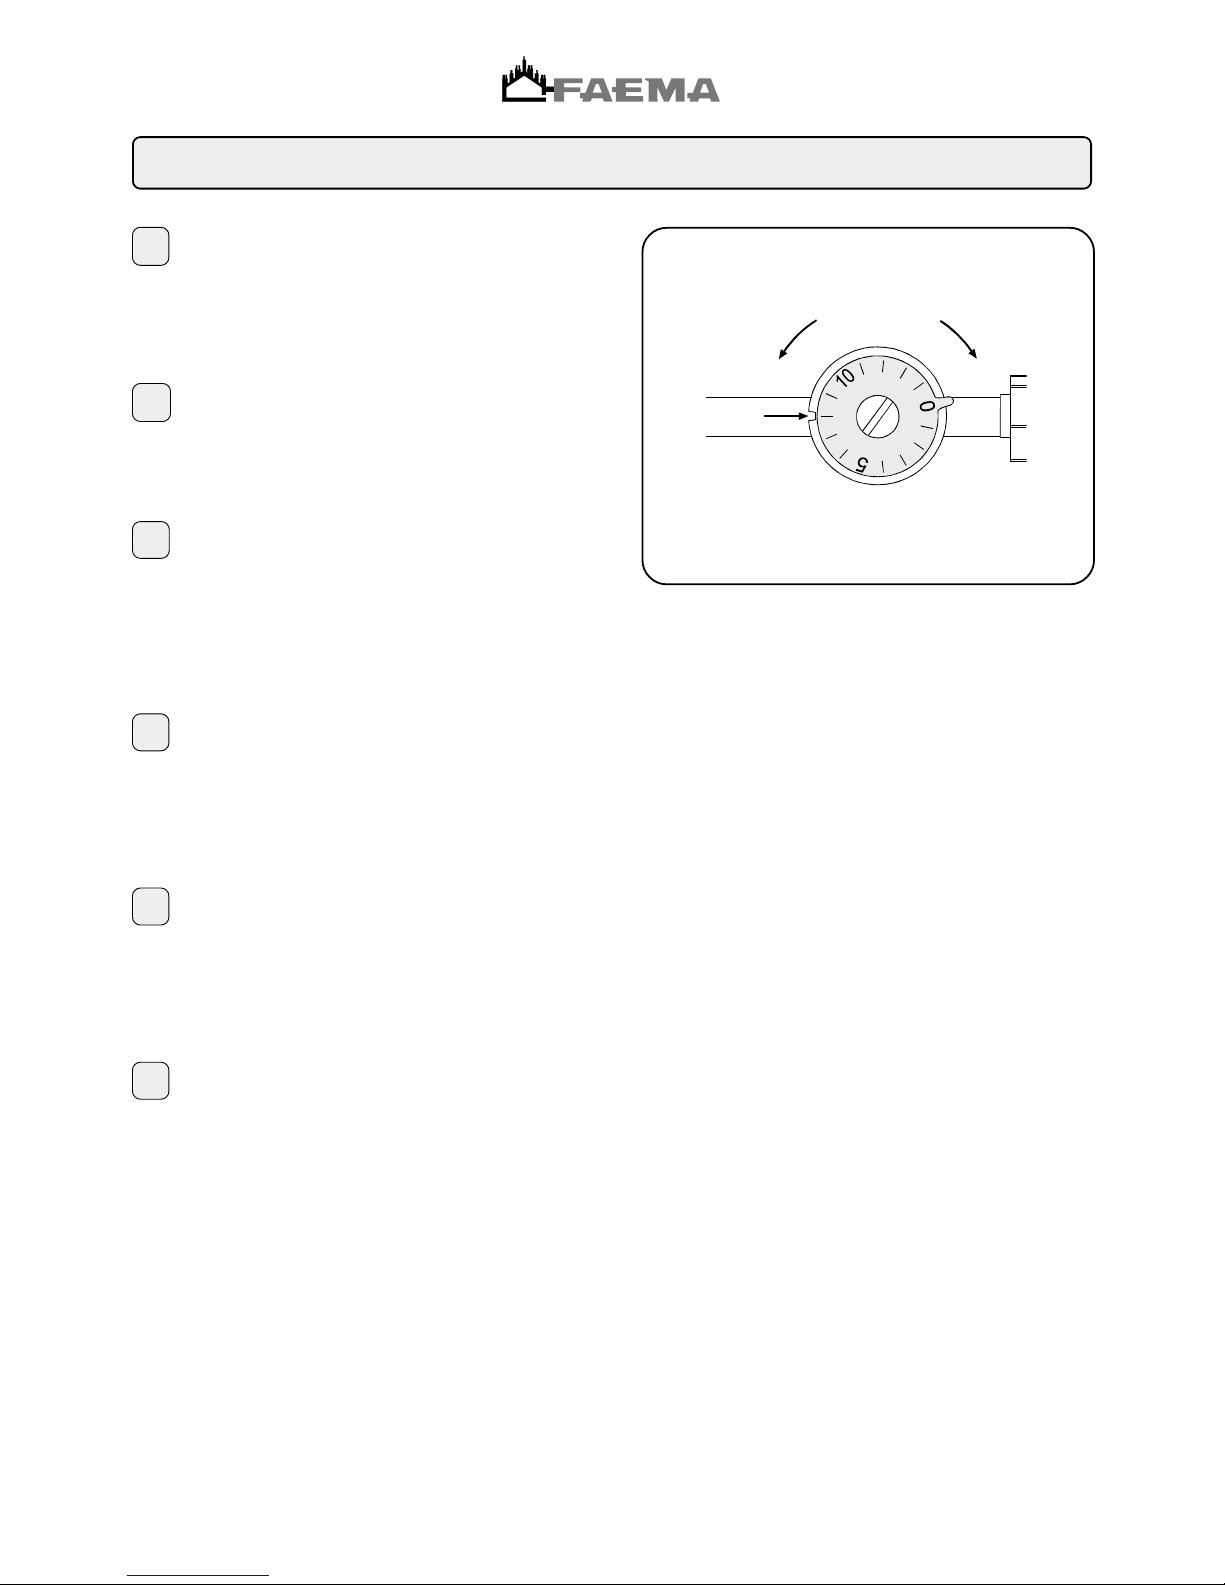
Regolazioni - Setting - Reglages - Einstellungen - Regulaciones - Regulações
+
-
A
REGULACIÓN CIRCULACIÓN TERMOSIFÓN
Para regular la temperatura del grupo, utilizar el pomo de la
siguiente forma:
- en sentido contrario a las agujas del reloj (+) para grupo
más caliente;
- en el sentido de las agujas del reloj (-) para grupo más frío.
A – índice de referencia: regulación estándar = 8.
E
REGULAÇÃO DA CIRCULAÇÃO DO TERMOSIFÃO
Para regular a temperatura do grupo, actuar sobre o manípulo
como se segue:
- em sentido contrário aos ponteiros do relógio (+) para o
grupo mais quente;
- em sentido horário (-) para o grupo mais frio.
A- Índice de referência: ajuste standard = 8
P
EINSTELLUNG DES WÄRMEUMLAUFKREISES
Gehen Sie zur Einstellung der Betriebstemperatur der Einheit
wird folgt vor:
- Drehen Sie den Regler zur Erhöhung der Betriebstemperatur
gegen den Uhrzeigersinn (+);
- Drehen Sie den Regler zur Reduzierung der
Betriebstemperatur im Uhrzeigersinn (-);
A - Bezugsmarke - Standardeinstellung: 8
D
F
RÉGLAGE DU CHAUFFAGE À THERMOSIPHON
Pour régler la température du groupe, agir sur la poignée
comme suit:
- dans le sens contraire des aiguilles d’une montre (+) pour le
groupe le puls chaud;
- dans le sens des aiguilles d’une montre (-) pour le groupe le
plus froid.
A - index de référence: tarage standard: 8.
I
REGOLAZIONE CIRCOLAZIONE TERMOSIFONICA
Per regolare la temperatura del gruppo, agire sulla manopola
come segue:
- in senso antiorario (+), per gruppo più caldo;
- in senso orario (-), per gruppo più freddo.
A - Indice di riferimento: taratura standard = 8
GB
SETTING THE THERMOSIPHON CIRCULATION
To set the group temperature, turn the knob as follows:
- Anticlockwise (+), for a warmer group.
- Clockwise (-), for a colder group.
A - Reference index: standard calibration - 8
Page 28
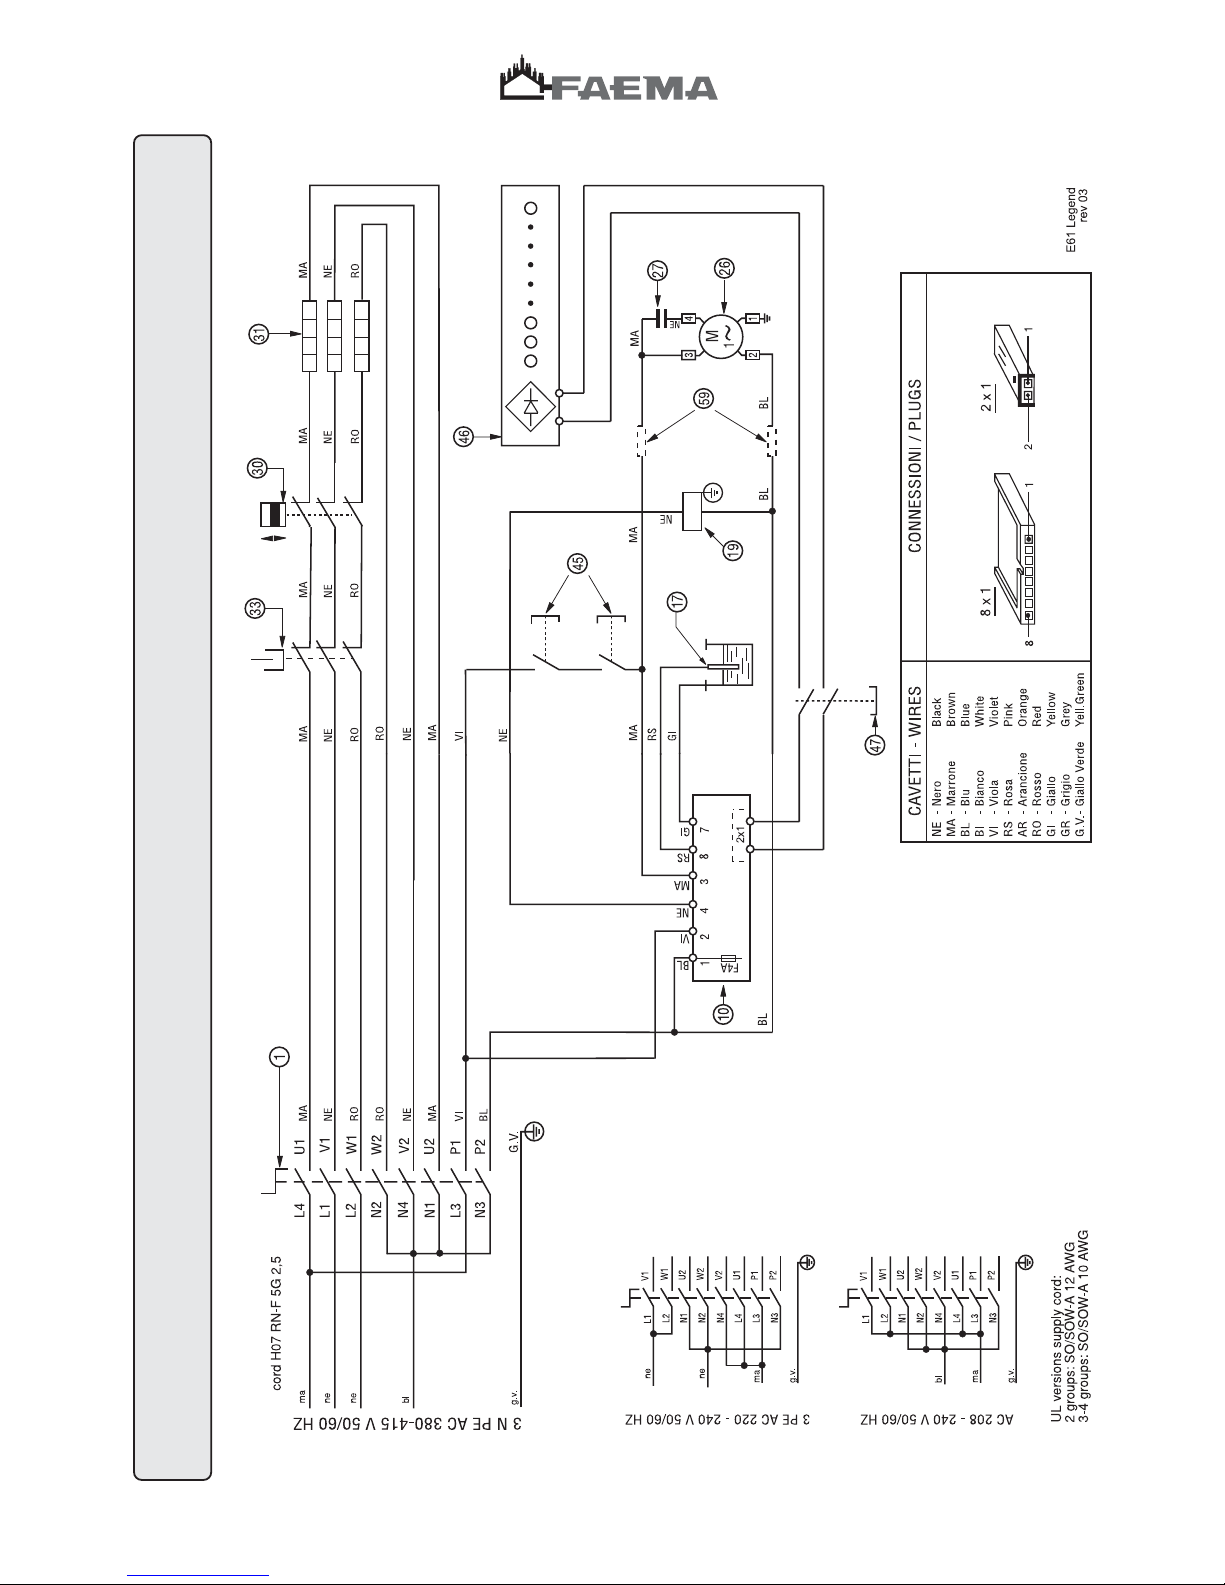
Schema elettrico - Wiring diagram - Schéma éléctrique - Elektrischer Shaltplan - - Esquema electrico - Esquema eléctrico
Page 29

= Interruttore generale
= Scheda autolivello
= Sonda livello
= Elettrovalvola livello
= Motore pompa
= Condensatore pompa
= Pressostato
= Resistenze caldaia
= Protettore termico caldaia
= Switch motore pompa
= Scheda led
= Interruttore led
= Fusibili pompa *
I componenti - * - sono applicati solo in
alcune configurazioni di prodotti.
Legenda - Legend - Legende - Legende - Leyenda - Legenda
= Main switch
= Automatic level board
= Level probe
= Automatic level solenoid valve
= Pump motor
= Pump capacitor
= Pressure switch
= Boiler heating element
= Boiler thermal cut-out
= Pump motor switch
= Led electronic board
= Led switch
= Pump fuses *
Items marked - * - are fitted in some product
configurations only.
1
10
17
19
26
27
30
31
33
45
46
47
59
LEGEND
GB
E
= Interruptor general
= Tarjeta electrónica
= Sonda nivel
= Electroválvula nivel
= Motor bomba
= Condensador bomba
= Presostato
= Resistencia caldera
= Protector térmico caldera
= Switch motor bomba
= Tarjeta led
= Interruptor led
= Fusible bomba *
Los detallos - * - se pueden aplicar sólo en
algunas configuraciones del producto.
1
10
17
19
26
27
30
31
33
45
46
47
59
LEYENDA
D
= Hauptschalter
= Karte elektronische Standkontrolle
= Standfühler
= Magnetventil Wasserstand
= Pumpenmotor
= Pumpenkondensator
= Druckwächter
= Heizelemente Heizkessel
= Schutzschalter Heizkessel
= Schalter Pumpenmotor
= Led-Karte
= Led-Schalter
= Sicherungen pumpe *
Die mit - * - gekennzeichneten Komponenten
sind nur in bestimmten Modellen installiert.
1
10
17
19
26
27
30
31
33
45
46
47
59
LEGENDE
LEGENDA
I
1
10
17
19
26
27
30
31
33
45
46
47
59
F
= Interrupteur général
= Fiche niveau automatique
= Sonde niveau
= Electrovalve niveau
= Moteur pompe
= Condensateur pompe
= Pressostat
= Résistance chaudière
= Protecteur thermique chaudière
= Switch moteur pompe
= Carte led
= Interrupteur led
= Fusibles pompe *
Les détails - * - ne sont appliqués
qu'à certaines configurations
de produit.
1
10
17
19
26
27
30
31
33
45
46
47
59
LEGENDE
P
= Interruptor geral
= Ficha autonível
= Sonda nível
= Electroválvula nível
= Motor bomba
= Condensador bomba
= Pressóstato
= Resistências caldeira
= Protector térmico caldeira
= Switch motor bomba
= Ficha led
= Interruptor led
= Fusível da bomba *
Os pormenores - * - são aplicados apenas
em algumas configurações de produto.
1
10
17
19
26
27
30
31
33
45
46
47
59
LEGENDA
Page 30
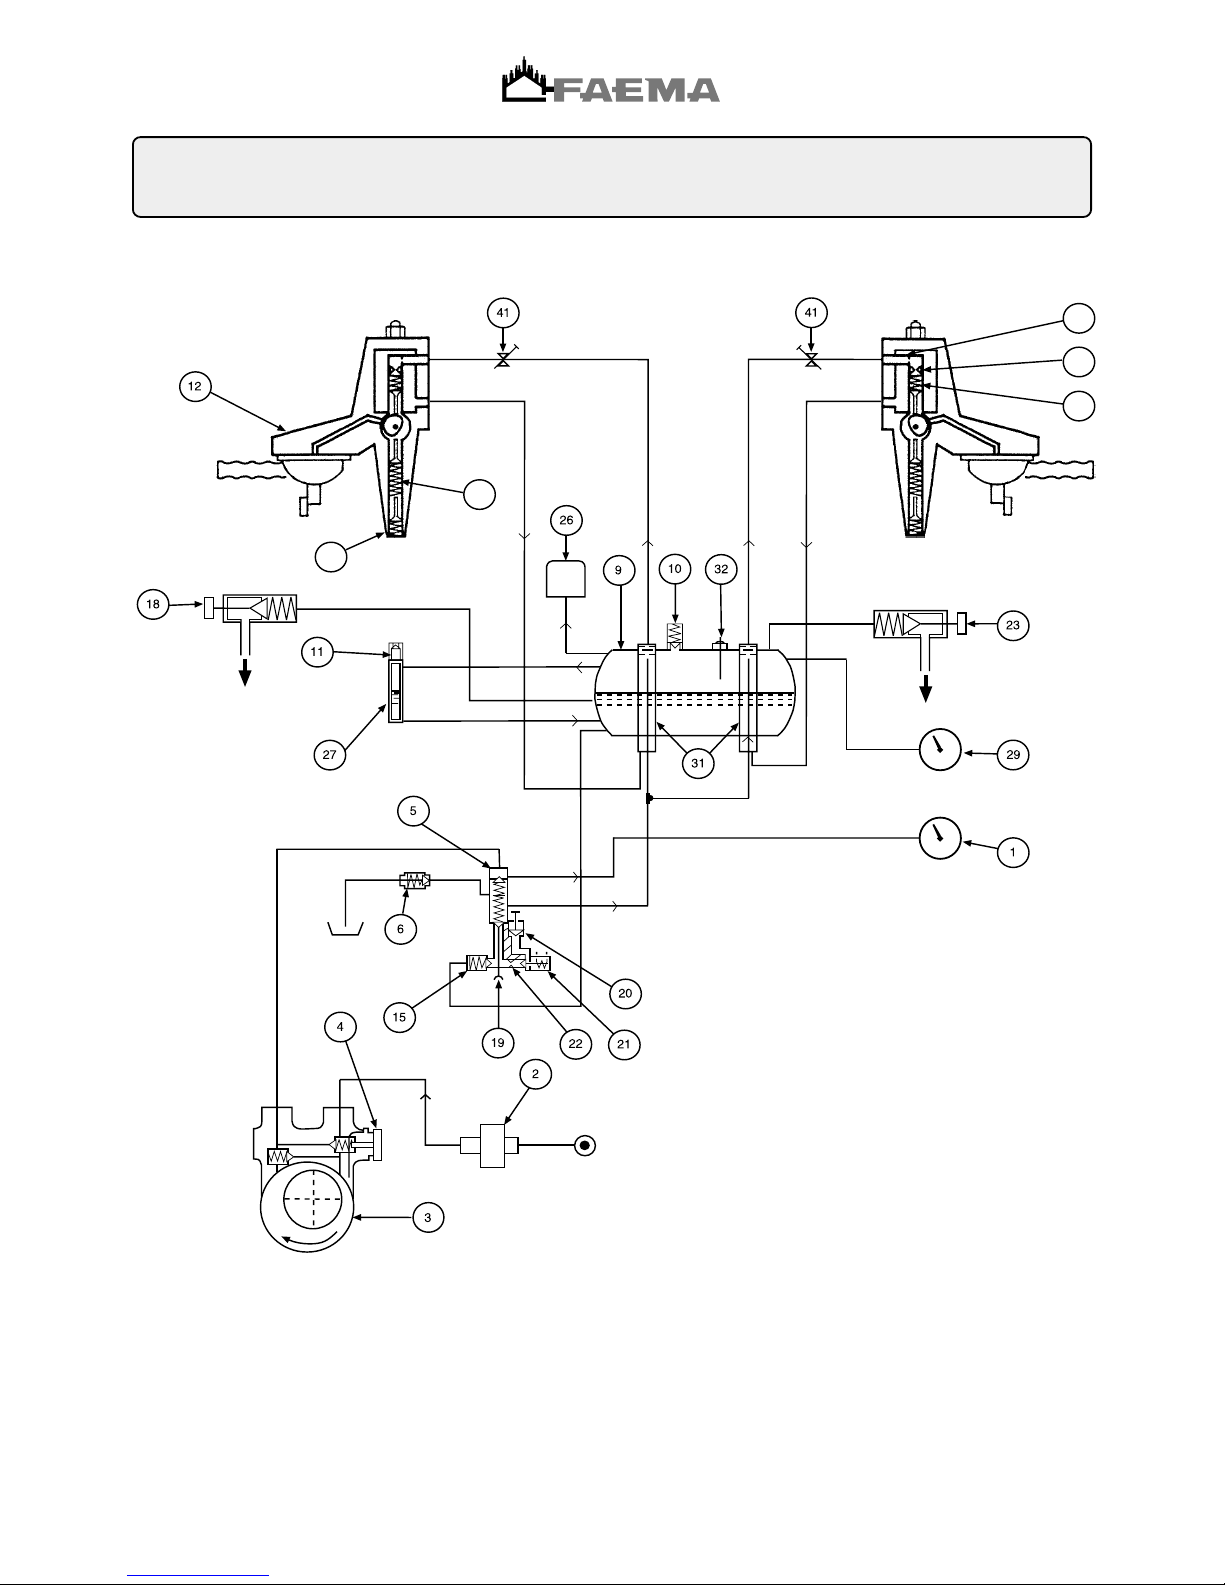
Circuito idraulico - Hydraulic circuit - Circuit hydraulique
Hydraulikplan - Circuito hidraulico - Circuito hidráulico
36
37
40
39
38
Page 31

Legenda - Legend - Legende - Legende - Leyenda - Legenda
LEGENDA
I
1
2
3
4
5
6
9
10
11
12
15
18
19
20
21
22
23
26
27
29
31
32
36
37
38
39
40
41
= Manometro rete/pompa
= Filtro per pompa
= Pompa
= Regolazione pressione pompa
= Valvola non ritorno scambiatori
= Valvola espansione
= Caldaia
= Valvola di sicurezza
= Valvola anti-depressione
= Gruppo erogatore
= Valvola non ritorno caldaia
= Rubinetto acqua calda
= Valvola carico manuale
= Perno esclusione elettrovalvola
= Elettrovalvola livello
= Strozzatura autolivello
= Rubinetto vapore
= Pressostato
= Livello ottico
= Manometro caldaia
= Scambiatori di calore
= Sonda autolivello
= Valvola scarico
= Valvola infusione
= Valvola erogazione
= Ugello infusione
= Filtro ugello
= Regolatore circolazione termosifonica
LEGEND
GB
1
2
3
4
5
6
9
10
11
12
15
18
19
20
21
22
23
26
27
29
31
32
36
37
38
39
40
41
= Pump pressure gauge
= Pump filter
= Pump
= Pump pressure regulator
= Non return valve (heat exch.)
= Expansion valve
= Boiler
= Safety valve
= Vacuum release valve
= Coffee dispenser group
= Boiler non return valve
= Hot water tap
= Water filling manual valve
= Pin-tap for solenoid valve 21
= Automatic filling solenoid valve
= Automatic filling neck
= Steam tap
= Pressure switch
= Level indicator
= Boiler pressure gauge
= Heat exchangers
= Automatic level probe
= Drain valve
= Infusion valve
= Dispensing valve
= Infusion nozzle
= Nozzle filter
= Thermosiphon setup valve
D
LEGENDE
1
2
3
4
5
6
9
10
11
12
15
18
19
20
21
22
23
26
27
29
31
32
36
37
38
39
40
41
= Manometer Leitung / Pumpe
= Pumpenfilter
= Pumpe
= Druckregler Pumpe
= Rückschlagventil Wärmetauscher
= Ausdehnungsventil
= Heizkessel
= Sicherheitsventil
= Druckablaßventil
= Abgabeeinheit
= Rückschlagventil Heizkessel
= Ventil Heißwasser
= Ventil manueller Ablaß
= Bolzen zum Ausschluß Magnetventil
= Magnetventil Wasserstand
= Drosselung elektronische Standkontrolle
= Dampfventil
= Druckwächter
= Optische Standanzeige
= Manometer Heizkessel
= Wärmetauscher
= Sonde elektronische Standkontrolle
= Ablaßventil
= Aufgußventil
= Ventil Ausgabe
= Aufgußdüse
= Filter Düse
= Regler Siphon-Wärmeumlaufkreis
F
LEGENDE
1
2
3
4
5
6
9
10
11
12
15
18
19
20
21
22
23
26
27
29
31
32
36
37
38
39
40
41
= Manomètre réseau/pompe
= Filtre pour la pompe
= Pompe
= Réglage de la pression de la pompe
= Valve non-retour des échangeurs
= Valve d'expansion
= Chaudière
= Valve de sécurité
= Valve anti-dépression
= Groupe de débit
= Valve de non retour de la chaudière
= Robinet eau chaude
= Valve de chargement manuel
= Pivot d'exclusion de l'électrovalve 21
= Electrovalve niveau
= Etranglement niveau automatique
= Robinet de la vapeur
= Pressostat
= Niveau optique
= Manomètre chaudière
= Echangeurs de chaleur
= Sonde niveau automatique
= Soupape d'échappement
= Soupape d'infusion
= Soupape de débit
= Buse d'infusion
= Filtre pour la buse
= Régleur circulation à thermosiphon
E
LEYENDA
1
2
3
4
5
6
9
10
11
12
15
18
19
20
21
22
23
26
27
29
31
32
36
37
38
39
40
41
= Manómetro red/bomba
= Filtro para bomba
= Bomba
= Regulación presión bomba
= Válvula de retención cambiadores
= Válvula expansión
= Caldera
= Válvula de seguridad
= Válvula anti-depresión
= Grupo erogador
= Válvula de retención caldera
= Válvula agua caliente
= Válvula carga manual
= Perno exclusión electroválvula
= Electroválvula nivel
= Estrangulación autonivel
= Válvula vapor
= Presostato
= Nivel óptico
= Manómetro caldera
= Cambiadores de calor
= Sonda autonivel
= Válvula de descarga
= Válvula de infusión
= Válvula de erogación
= Boquilla de infusión
= Filtro para boquilla
= Regulador circulación por termosifón
P
LEGENDA
1
2
3
4
5
6
9
10
11
12
15
18
19
20
21
22
23
26
27
29
31
32
36
37
38
39
40
41
= Manómetro rede/bomba
= Filtro para bomba
= Bomba
= Regulação da pressão na bomba
= Válvula de não regresso permutadores
= Válvula de expansão
= Caldeira
= Válvula de segurança
= Válvula anti-depressão
= Grupo distribuidor
= Válvula de não regresso caldeira
= Torneira da água quente
= Válvula de carga manual
= Pino de exclusão da electroválvula
= Electroválvula nível
= Estrangulamento autonível
= Torneira do vapor
= Pressóstato
= Nível óptico
= Manómetro caldeira
= Permutadores de calor
= Sonda autonível
= Válvula de descarga
= Válvula de infusão
= Válvula de distribuição
= Injector de infusão
= Filtro do injector
= Regulador circulação por termosifão
Page 32

I
GB
FAEMA S.p.A.
Via Manzoni, 17
20082 Binasco
(MI) Italy
Tel. .. 39 2 90.04.81
Fax ..39 2 90.54.818
www.faema.it
FAEMA si riserva il diritto di apportare cambiamenti all'equipaggiamento
della macchina a seconda delle esigenze di singoli Paesi e di effettuare
modifiche dovute agli avanzamenti del progresso tecnico.
Nessuna parte di questa pubblicazione può essere usata, copiata o
pubblicata senza il permesso scritto di FAEMA S.p.A.
© Copyright by FAEMA S.p.A., Milano
Tutti i diritti riservati
F
D
FAEMA S.p.A.
Via Manzoni, 17
20082 Binasco
(MI) Italy
Tel: +39-2-90.04.81
Fax: +39-2-90.54.818
www.faema.it
La société FAEMA se réserve le droit d'apporter des changements à
l'équipement de la machine selon les exigences des pays, et
d'effectuer des modifications dûes aux avancements du progrès
technique.
Aucune partie de cette publication ne peut être utilisée, copiée ou
publiée sans l'autorisation écrite de FAEMA S.p.A.
© Copyright by FAEMA S.p.A., Milano
Touts droits réservés
FAEMA S.p.A.
Via Manzoni, 17
20082 Binasco
(MI) Italy
Tel: +39-2-90.04.81
Fax: +39-2-90.54.818
www.faema.it
FAEMA behält sich vor, Änderungen der Maschine entsprechend
den spezifischen nationalen Gegebenheiten sowie entsprechend
dem Fortschritt der Technik vornehmen zu können.
Die vorliegende Veröffentlichung darf in keinen Teilen ohne
entsprechende Genehmigung der Firma FAEMA S.p.A. vervielfältigt,
kopiert oder veröffentlicht werden.
© Copyright by FAEMA S.p.A., Milano
Alle Rechte vorbehalten
E P
FAEMA S.p.A.
Via Manzoni, 17
20082 Binasco
(MI) Italy
Tel: +39-2-90.04.81
Fax: +39-2-90.54.818
www.faema.it
FAEMA se reserva el derecho de aportar cambios al equipamiento
de la máquina según las exigencias de cada uno de los países y de
realizar modificaciones debidas a los desarrollos del progresso
técnico.
Ninguna parte de esta publicación se puede usar, copiar o publicar
sin el permiso escrito de FAEMA S.p.A.
© Copyright by FAEMA S.p.A., Milán
Todos los derechos están reservados
FAEMA S.p.A.
Via Manzoni, 17
20082 Binasco
(MI) Italy
Tel: +39-2-90.04.81
Fax: +39-2-90.54.818
www.faema.it
FAEMA reserves the right to make changes to the machines in
accordance with the needs of individual countries and on the basis
of technological progresses.
This publication may not, either in whole or in part, be used, copied or
published without the written authorisation of FAEMA S.p.A.
© Copyright by FAEMA S.p.A., Milan, Italy
All rights reserved
FAEMA S.p.A.
Via Manzoni, 17
20082 Binasco
(MI) Italy
Tel: +39-2-90.04.81
Fax: +39-2-90.54.818
www.faema.it
FAEMA reserva-se o direito de modificar o equipamento da máquina
segundo as exigências de cada País e efectuar alterações devidas
aos avanços do progresso tecnológico.
Nenhuma parte desta publicação poderá ser utilizada, copiada ou
publicada sem autorização escrita de FAEMA S.p.A.
© Copyright by FAEMA S.p.A., Milano
Todos os direitos são reservados
Page 33
I
FAEMA e il "SERVICE LINE"
Il servizio assistenza della società FAEMA, nell'intento di essere vicino ai SIGG. Clienti nella scelta dei prodotti per il miglior utilizzo della macchina
da caffè, visualizza la linea:
ECO LINE - Prodotti per la pulizia
A) 4991-134458 liquido per i cappuccinatori;
B) 4991-134682 in polvere per i gruppi, i portafiltri, le tazze da caffè;
C) 4991-134681 bustine per i gruppi, i portafiltri, le tazze da caffè;
D) 4991-134683 pastiglie per i gruppi nelle macchine superautomatiche.
Per ordinare trasmettete il numero di codice al Vs. Concessionario.
FAEMA and the "SERVICE LINE"
The FAEMA Company's client service, the aim of which is to assure top coffee-machine performance for its clients at all times, also makes
available its ECO LINE, a series of specific cleaning products expressly designed for this purpose.
ECO LINE - Cleaning products
A) For cappuccino makers in liquid form 4991-134458;
B) For dispensers, filter-holders, coffee cups in powder form 4991-134682;
C) For dispensers, filter-holders, coffee cups in small envelops 4991-134681;
D) For superautomatic-machine dispensers in tablet form 4991-134683.
Order directly from your local distributor and refer to the particular item you require by its number, as shown above.
FAEMA et la "SERVICE LINE"
La service d'assistance de la société FAEMA, dans l'intention d'être à côté de ses clients, dans le choix des produits et en vue d'une meilleure
utilisation de la machine à café, propose la ligne:
ECO LINE - Produits de nettoyage
A) 4991-134458 liquide pour les fouettes-lait;
B) 4991-134682 en poudre pour les groupes, les porte-filtre, les tasses à café;
C) 4991-134681 sachets pour les groupes, les porte-filtre, les tasses à café;
D) 4991-134683 pastilles pour les groupes des machines tout-auto.
Pour commander, transmettre le numéro de code à votre concessionnaire.
F
D
FAEMA und die "SERVICE LINE"
Mit der Absicht dem Kunden bei der Produktwahl für den bestmöglichen Gebrauch der Kaffeemaschine beizustehen, weist der Kundendienst der
FAEMA Gesellschaft auf folgende Produktlinie hin:
ECO LINE - Produkte für die Säuberung
A) 4991-134458 Flüssig für die Cappuccino-Bereiter;
B) 4991-134682 in Pulverform für die Gruppen, die Filterhalter, die Kaffeetassen;
C) 4991-134681 Tüten für die Gruppen, die Filterhalter, die Kaffeetassen;
D) 4991-134683 Tabletten für die Kaffeegruppen der vollautomat Maschinen.
Für eine Bestellung bitte dem Vertreter die Katalog-Nr. angeben.
E
FAEMA y el "SERVICE LINE"
Con el deseo de facilitar a los Srs. CLIENTES la selección de los productos para el uso correcto de la máquina de café, el servicio de asistencia
de la sociedad FAEMA les muestra la linea:
ECO LINE - Productos para la limpieza
A) 4991-134458 líquido para los cappuccinadores;
B) 4991-134682 en polvos para los equipos, los portafiltros, las tazas de café;
C) 4991-134681 en sobres para los equipos, los portafiltros, las tazas de café;
D) 4991-134683 en pastillas para los equipos de las máquinas superautomáticas.
Para los pedidos, envío el número de código a su Concesionario.
P
FAEMA e o "SERVICE LINE"
O Serviço de Assistência de empresa FAEMA, com a finalidade de aconselhar os Clientes na escolha dos produtos para a melhor utilização da
máquina de café, apresenta a linha:
ECO LINE - Produtos para a limpeza
A) 4991-134458 líquido para o kit cappuccino;
B) 4991-134682 en pó para os grupos, manípulo dos filtros, chávenas de café;
C) 4991-134681 carteiras para os grupos, manípulo dos filtros, chávenas de café;
D) 4991-134683 pastilhas para os grupos das máquinas superautomáticas.
Para encomendar, indicar o número de código ao seu Concessionário.
GB
SERVICE LINE
 Loading...