

Page 1
TRIVIEW MEDICINE CABINET
CLEANING
LIMPIEZA
TOOLS REQUIRED
HERRAMIENTAS NECESARIAS
ILUSTRACIÓN DE GABINETE MONTADO SOBRE UNA
BOTIQUÍN DE TRES PUERTAS
INSTALLATION INSTRUCTION
INSTRUCCIONES DE INSTALACIÓN
UNPACKING
Care should be taken when you unpack your medicine cabinet.
DESEMPACAR
Debe tener cuidado cuando desempaque el gabinete para baño.
Use a household liquid glass cleaner to keep mirror and glass
surfaces clean. Do not use abrasive cleaners containing ammonia.
Utilice un limpiador de vidrios líquido para mantener limpias las
superficies de los espejos y los vidrios. No utilice limpiadores
abrasivos que contengan amoníaco.
Measuring tape
Level
Philips head screwdriver
Electric drill for surface mounting
Cinta métrica
Nivel
Destornillador Phillips
SURFACE MOUNTED CABINET SHOWN
Taladro eléctrico para montaje superficial
SUPERFICIE
BEFORE YOU START
Unpack your medicine cabinet with care. Close the sink drain to avoid dropped parts from falling into the
drain.
Before installing your medicine cabinet, determine if you will install your medicine cabinet as a surface
or recess mount and which side the door will open.
Use a stud finder to locate stud in the desired mounting position. If mounting locations align with stud,
use stud mounting. If there are no available studs, use anchors and screws for drywall mounting.
ANTES DE COMENZAR
Desempaque el botiquín para baño con cuidado. Cierre el drenaje del lavabo para evitar que las piezas caigan
en él.
Antes de instalar el botiquín para baño, determine si va a instalarlo en superficie o empotrado y para qué
lado abrirá la puerta.
Utilice un detector de vigas para ubicar la viga en el lugar donde desee montar el botiquín. Si las posiciones
de montaje se alinean con la viga, utilice el montaje en vigas. Si no hay vigas, utilice anclajes y tornillos
para montaje sobre drywall.
Page 2
WARNING: SAFELY DISCARD ALL PACKING MATERIAL. KEEP PLASTIC BAGS AND SMALL PARTS AWAY FROM CHILDREN.
Model number
Nº del Modelo
Overall size
Tamaño General
Rough wall opening
Abertura aproximada en la pared
SAVE THESE INSTALLATION INSTRUCTIONS FOR FUTURE REFERENCE. RECORD MODEL NUMBER FROM
CONSERVE ESTAS INSTRUCCIONES PARA FUTURAS CONSULTAS ANOTE EL NÚMERO DE MODELO QUE
SAFETY GLASSES SHOULD BE WORN AT ALL TIME.
ADVERTENCIA: DESECHE DE FORMA SEGURA TODO EL MATERIAL DE EMPAQUE. MANTENGA LAS BOLSAS PLÁSTICAS
Y LAS PIEZAS PEQUEÑAS FUERA DEL ALCANCE DE LOS NIÑOS. DEBE UTILIZAR GAFAS DE SEGURIDAD EN TODO
MOMENTO.
SPECIFICATION
ESPECIFICACIÓNES
511286 48 inch x 26 inch x 5 inch 46-3/8 inch x 24-3/8 inch x 3-7/8 inch
511287 36 inch x 31 inch x 5 inch 34-3/8 inch x 29-3/8 inch x 3-7/8 inch
511288 48 inch x 31 inch x 5 inch 46-3/8 inch x 29-3/8 inch x 3-7/8 inch
NOTE: ROUGH OPENING IS NOT AN EXACT MEASUREMENT. THE EXTRA ALLOWS MEDICINE CABINET TO BE INSERTED INTO THE OPENING.
ADD SHIMS TO LEVEL AND TIGHTEN SPACE IF NECESSARY. ADDITIONAL FRAMING MAY BE REQUIRED.
NOTA: LA ABERTURA APROXIMADA NO ES UNA MEDIDA EXACTA. EL ESPACIO ADICIONAL PERMITE QUE EL BOTIQUÍN PARA BAÑO
PUEDA SER INSERTADO EN LA ABERTURA. UTILICE CUÑAS PARA NIVELARLO Y AJUSTE EL ESPACIO A SU ALREDEDOR SI FUERA
NECESARIO. QUIZÁ SE NECESITEN MARCOS ADICIONALES.
THE PACKAGE LABEL;
APARECE EN LA ETIQUETA DEL EMPAQUE;
Page 3
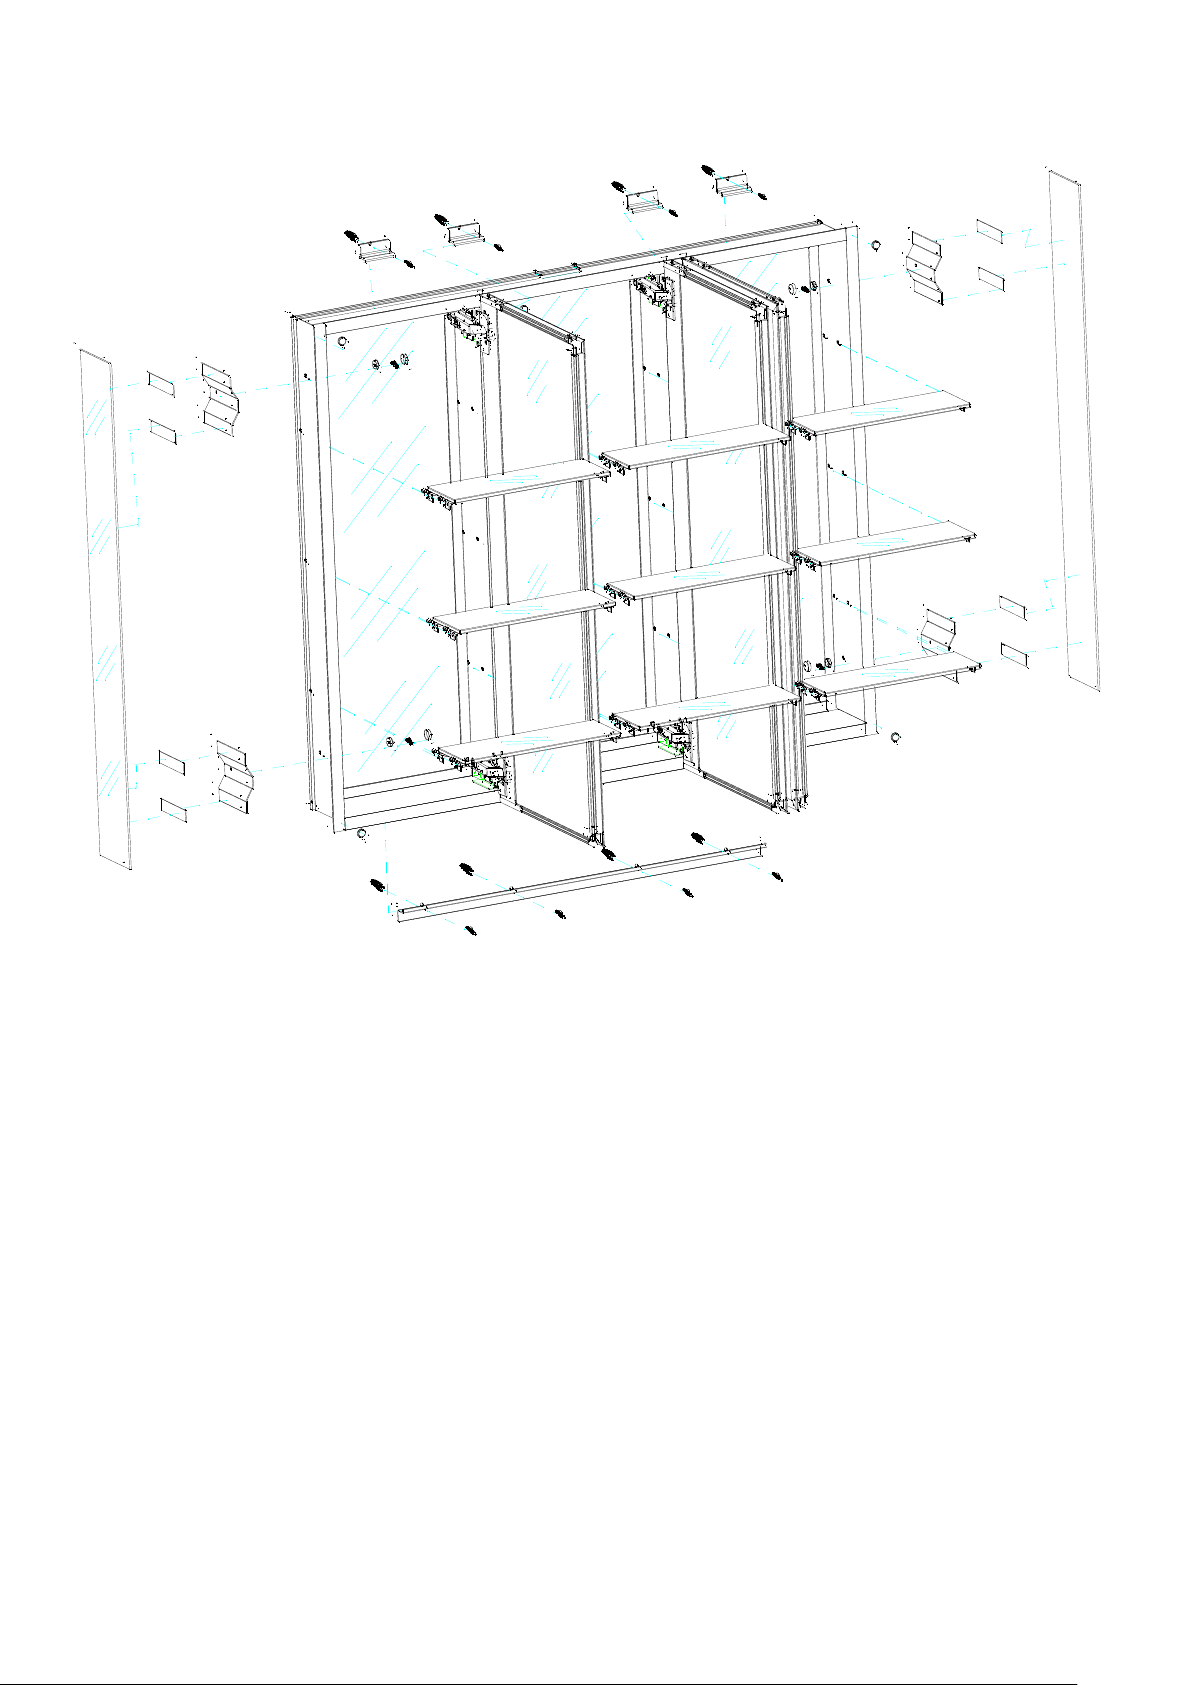
Explode view
Vista explosiva
Page 4

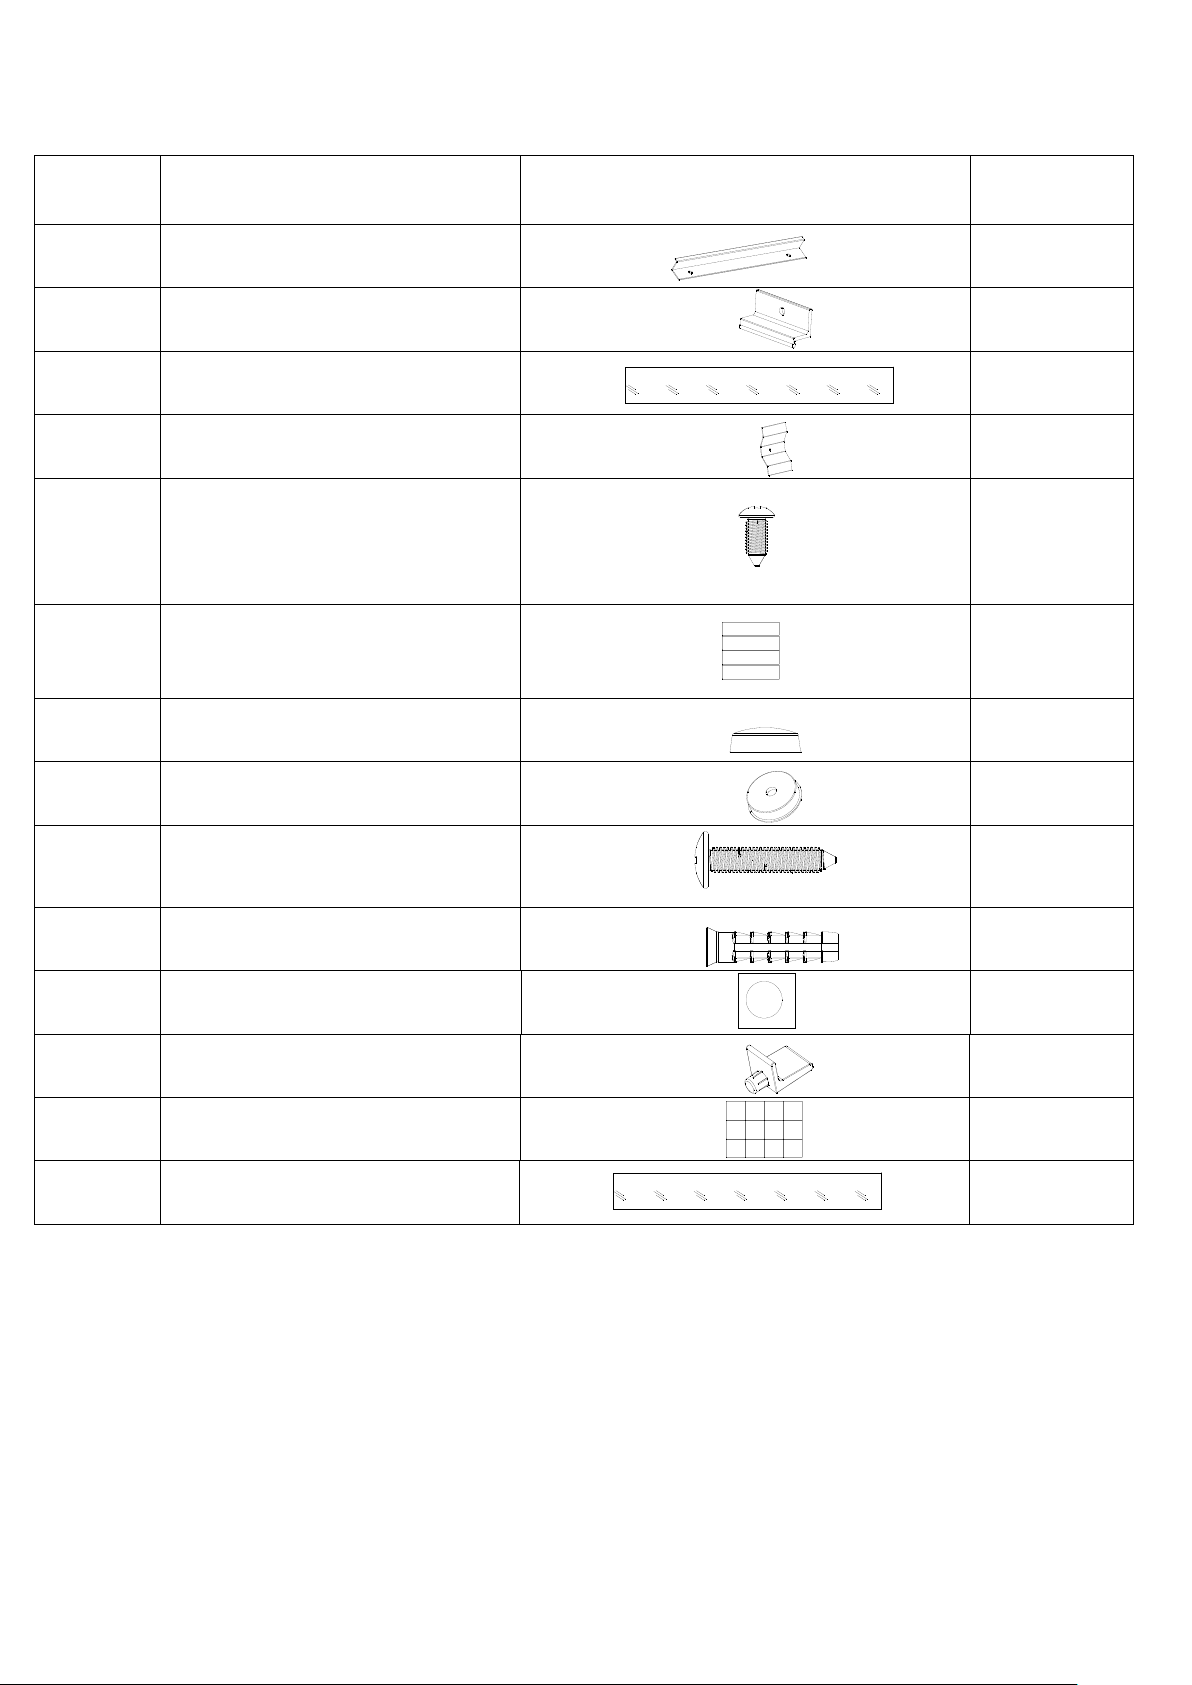
511286 & 511288
Item
Artículo
Description
Descripción
Drawing
Dibujo
Quantity
Cantidad
side mirror bracket
Cinta para soportes de espejos
Kits hardware, including following parts
Kits de herrajes, incluyendo las siguientes piezas
1
2
3
4
5
6
7
8
9
Bottom bracket
Soporte inferior
Top clip
Ganchos
Side mirror
Espejos laterales
Side mirror bracket
Soportes de espejos laterales
#8*3/8 inch
screws
Tornillos para soportes de espejos
los laterales #8*3/8 inch
Side mirror bracket tape
laterales
Snap cap
Tapa a presión
Washer
Arandela
#8*1 1/2 inch Philips head screws
Tornillos Philips 1-1/2 inch, #8*
superiores
4
1
2
4
4
8
4
4
8
10
11
12
13
14
Wall anchors
Anclajes para pared
Bumper
Tapa a presión
Shelf clip
Ganchos para estantes
Shelf clip tape
Cinta para ganchos de estantes
Shelf glass
Protector de Borde
8
6
36
36
9
Page 5
511287
Item
Artículo
Description
Descripción
Drawing
Dibujo
Quantity
Cantidad
side mirror bracket
ra soportes de espejos
Kits hardware, including following parts
Kits de herrajes, incluyendo las siguientes piezas
1
2
3
4
5
6
7
8
9
Bottom bracket
Soporte inferior
Top clip
Ganchos
Side mirror
Espejos laterales
Side mirror bracket
Soportes de espejos laterales
#8*3/8 inch
screws
Tornillos para soportes de espejos
los laterales #8*3/8 inch
Side mirror bracket tape
Cinta pa
laterales
Snap cap
Tapa a presión
Washer
Arandela
#8*1 1/2 inch Philips head screws
Tornillos Philips 1-1/2 inch, #8*
superiores
4
1
2
4
4
8
4
4
8
10
11
12
13
14
Wall anchors
Anclajes para pared
Bumper
Tapa a presión
Shelf clip
Ganchos para estantes
Shelf clip tape
Cinta para ganchos de estantes
Shelf glass
Protector de Borde
8
6
24
24
6
Page 6
STEP 1 SURFACE MOUNT ONLY
10
1. Mounting the bottom bracket to the wall and sit the mirror cabinet on it.
2. Height of bottom bracket should be a minimum 2 inch above faucet
PASO 1 SOLO PARA MONTAJE EN SUPERFICIE
1. Instale el soporte inferior a la pared y coloque encima el botiquín con espejo.
2. EL soporte inferior debe quedar al menos 2 inch por encima del grifo.
1
9
STEP 2 SURFACE MOUNT ONLY
1. Install the top clip by inserting the rounded end into the cabinet rear top slot.
2. Slide the top clip to the left and right.
3. Using 1-1/2 inch screws through the top clip
PASO 2 SOLO PARA MONTAJE EN SUPERFICIE
1. Instale el gancho superior insertando el extreme Redondo en la abertura superior de la parte
de atras del gabinete.
2. Deslice el gancho superior hacia la izquierda y otro gancho hacia la derecha
3. Coloque dos tornillos de 1-1/2 pulgadas para fijar el gancho superior.
2
10
9
Page 7

STEP 3 SURFACE MOUNT ONLY
1. Stick side mirror bracket tape on the Side mirror bracket
PASO 3 SOLO PARA MONTAJE EN SUPERFICIE
1. Pegue la cinta para el soporte de los espejos laterales en los lados de éste.
4
6
STEP 4 SURFACE MOUNT ONLY
1. Attach the side mirror brackets with 3/8 inch screws and washers.
2. Install the snap caps to cover the screw of mounting mirror bracket.
3. Stick the side mirror to the cabinet side
PASO 4 SOLO PARA MONTAJE EN SUPERFICIE
1. Coloque los soportes de los espejos laterals usando los tornillos y arandelas de 3/8 inch
2. Coloque las tapas a presion para cubrir el tornollo del soporte para montaje del espejo.
3. Instale el espejo lateral en uno de los lados del botiquin.
3
8
5
7
Page 8

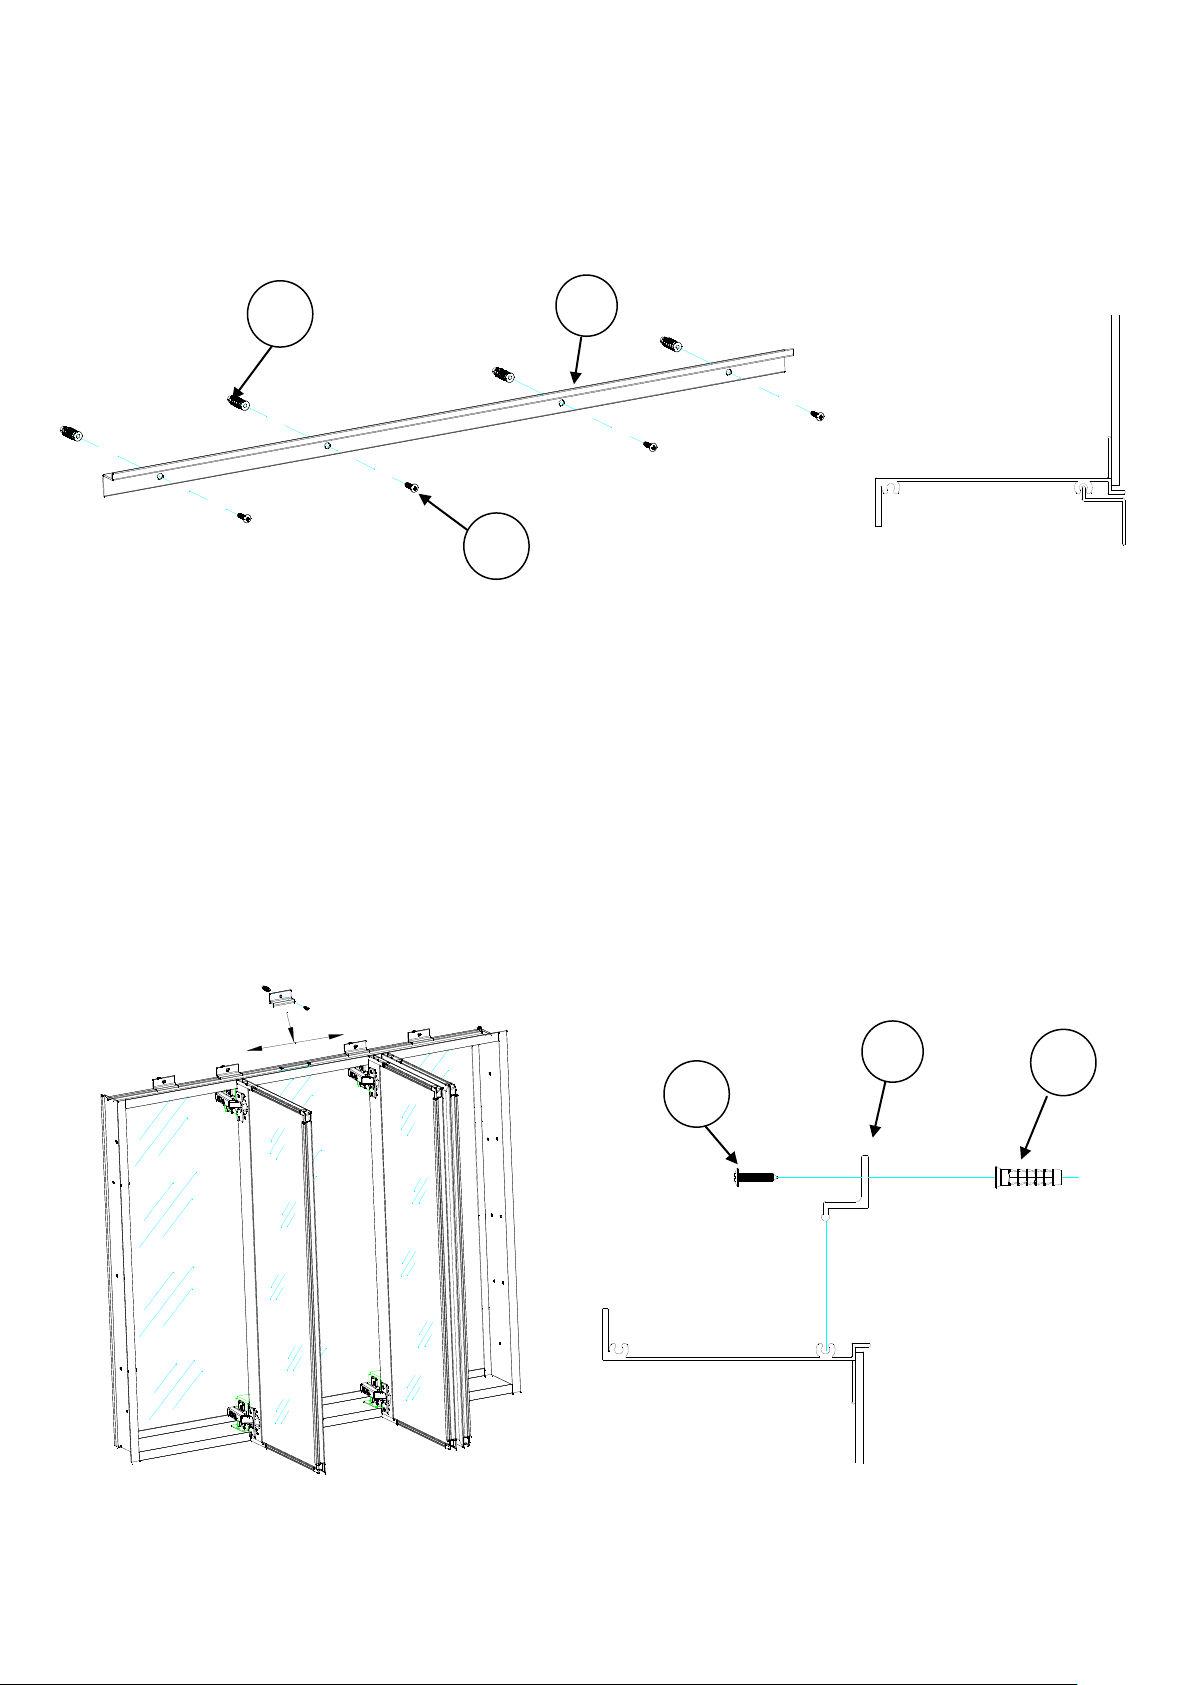
STEP 5 RECESS MOUNT ONLY
7
13
1. Drill a 3/16 inch diameter hole at the mounting screw location. Place a Philips screwdriver
in recess of the wall anchor and turn clockwise until the flange touches the wall.
2. Fasten both sides of the cabinet box using 1-1/2 inch long screws and clear washers.
3. Install the snap caps to cover the screw heads.
PASO 5 SOLO PARA MONTAJE ENPOTRADO
1. Taladre un orificio de 3/16 inch en el lugar donde ira el tornillo de montaje. Inserte. Inserte
un destornillador Phillips en la abertura de la pared donde esta el anclaje y gire de izquierda
a derecha hasta que el reborde toque la pared.
2. Apriete ambos lados de la caja del gabinete usando tornillos y arandelas transparentes de 1-1/2
inch de largo.
3. Coloque las tapas a presion para cubrir el tornillo.
8
9
STEP 6 SURFACE MOUNT AND RECESS MOUNT
1. Stick the tape on the shelf clip
2. Insert shelf clip into empty holes.
3. Carefully install shelf glass
PASO 6 MONAJE EN SUPERFICIE O EMPOTRADO
1. Pegue las cintas a los ganchos para estantes.
2. Inserte los ganchos para estantes en los orificios correspondientes.
3. Con cuidado, instale el vidrio del gabinete.
12
14
(511286 & 511287 & 511288)
Page 9

11
(511287)
STEP 7 SURFACE MOUNT AND RECESS MOUNT
1. Stick the bumpers on the surface of cabinet frame. As below drawing.
PASO 7 MONTAJE EN SUPERFICIE O EMPOTRADO
1. Pegue los protectores de borde sobre la superficie del marco del botiquín. Como se muestra
a continuación.
E N D
F I N
 Loading...