

Page 1

SAMPLE COPY
34 Series
Serie 34
Série 34
Single Control Kitchen Faucet
Grifo monomando para la cocina
Mitigeur de Cuisine
Lifetime Limited Mechanical & Pnish Warranty
Price Pster
Covers Pnish and Pfunction for as Long as You
Own Your Home
(Commercial Applications Limit the Duration of the
Warranties as Provided Below)
Price Pster provides the following Warranties for its products. Proof
of Purchase may be required in order to obtain any of the benets set
forth below.
Limited Warranties: Price Pster warrants that for as long as the original
purchaser owns the home in which the Price Pster product (the “Product”)
is originally installed, the Product will be free of all defects in material
and workmanship that would impair the intended and proper use of the
Product. If the Product is installed in a commercial application, the above
mechanical warranty shall be limited for a period of ten (10) years from the
date of purchase of the Product.
Price Pster warrants against deterioration of the Product’s nish for as long
as the original purchaser owns the home in which the Product is originally
installed. If the Product is installed in a commercial application, the above
nish warranty for Products that do not contain the Pforever nish shall be
limited to a period of ve (5) years from the date of purchase.
Exclusive Remedy: In the event of any defect in the Product that breaches
the foregoing warranties, Price Pster, at its option, will repair or replace
the defective part of the Product. Repair or replacement of the Product is
the exclusive remedy.
For any remedy under this warranty, Price Pster is to be notied describing
the problem. In order to notify Price Pster and receive assistance or service
under this warranty, the original purchaser may: (1) call 1-800-Pfaucet
(1-800-732-8238) for a consumer service representative who can assist
you, or (2) write consumer service department c/o Price Pster Inc., 19701
DaVinci, Lake Forest, CA 92610, and include a description of the problem,
model number, your name, address, phone number and approximate date of
purchase, or (3) email Price Pster’s customer service department by going
to www.PricePster.com, or (4) notify the location or distributor from which
the Product was purchased. In any case, you may be required to return the
Product to Price Pster for inspection and proof of purchase may be required.
Limitations and Exclusions:
PRICE PFISTER WILL NOT BE LIABLE FOR ANY OTHER DAMAGES
OR LOSSES, INCLUDING, BUT NOT LIMITED TO, INCIDENTAL
AND/OR CONSEQUENTIAL DAMAGES, REGARDLESS OF THE
LEGAL THEORY ASSERTED, INCLUDING ANY CLAIM OR BREACH
OF WARRANTY HEREUNDER OR ANY OTHER CAUSE, AND
WHETHER ARISING IN CONTRACT OR IN TORT (including negligence
and strict liability).
Price Pster has the right to discontinue or modify any product at any
time. Some states do not allow limitations or exclusions of incidental or
consequential damages, so the above limitations or exclusions may not
apply to you. This warranty gives you specic legal rights, and you may
also have other rights which vary from state to state.
The above warranties do not cover damage resulting from improper
maintenance, repair, cleaning or installation, misuse, abuse, alterations,
accidents or acts of God.
09-02-10 EO7723A
Copyright © 2010, Price Pster, Inc.
Garantía Mecánica y sobre el Acabado Limitada de por Vida
Price Pster
Cubre las funciones y el acabado por el tiempo en que usted sea
propietario de su casa
(Las Aplicaciones Comerciales Limitan la Duración
de las Garantías)
Price Pster suministra las siguientes Garantías para sus productos. Es
posible que se requiera la presentación de una Prueba de compra para obtener
cualquiera de los benecios indicados a continuación.
Garantías Limitadas: Price Pster garantiza que por el tiempo en que el
comprador original sea propietario de la casa en el que se hubiese instalado
inicialmente el producto Price Pster (el “Producto”), este Producto estará
libre de todo defecto en material y mano de obra que pueda afectar el
uso proyectado y correcto del Producto. Si el Producto se instala en una
aplicación comercial, la garantía mecánica que antecede estará limitada a
un período de diez (10) años a partir de la fecha de compra del Producto.
Price Pster garantiza el acabado del Producto contra deterioro por el
tiempo en que el comprador original sea propietario de la casa en la que
hubiese instalado inicialmente el Producto. Si el Producto se instala en
una aplicación comercial, la garantía sobre el acabado que precede para
Productos que no contengan el acabado “Pforever” estará limitada a un
periodo de cinco (5) años a partir de la fecha de compra.
Recurso exclusivo: En el caso de que haya un defecto en el Producto
que viole las garantías que preceden, Price Pster, a su opción, reparará o
reemplazará la pieza defectuosa del Producto. La reparación o el reemplazo
del Producto es el recurso exclusivo.
Para todo recurso con respecto a esta garantía, Price Pster deberá ser
noticado, con una descripción del problema. Para noticar a Price Pster y
recibir ayuda o servicio bajo esta garantía, el comprador original puede: (1)
llamar al 1-800-Pfaucet (1-800-732-8238) para hablar con un representante
de servicio al cliente que lo pueda ayudar, o (2) escribir al departamento de
servicio al consumidor, c/o Price Pster Inc., 19701 DaVinci, Lake Forest,
CA 92610 U.S.A., e incluir una descripción del problema, el número del
modelo, su nombre, dirección, número de teléfono y fecha aproximada de
compra, o (3) enviar un e-mail al departamento de servicio al consumidor
de Price Pster entrando en la página web www.PricePster.com, o (4)
avisarle al lugar o al distribuidor en donde se compró el Producto. En
cualesquiera de los casos, podría pedírsele devolver el Producto a Price
Pster para su inspección y es posible que se requiera la presentación de
una prueba de compra.
Limitaciones y Exclusiones:
PRICE PFISTER NO SE HARÁ RESPONSABLE DE NINGÚN OTRO DAÑO
O PERJUICIO, INCLUYENDO, PERO SIN ESTAR LIMITADO A DAÑOS
INCIDENTALES Y/O CONSECUENTES, SIN IMPORTAR LA TEORÍA LEGAL
A LA QUE SE ALEGUE, INCLUYENDO TODO RECLAMO O VIOLACIÓN DE
LA GARANTÍA PRESENTE O CUALQUIER OTRA CAUSA, Y YA SEAN COMO
RESULTADO DE LA LEY CONTRACTUAL O LA DE ANTECEDEN TES
(incluyendo negligencia y responsabilidad estricta).
Price Pfister tiene el derecho de discontinuar o modificar cualquier
producto en cualquier momento. Ciertos estados no permiten limitaciones
o exclusiones de daños incidentales o consecuentes, de manera que es
posible que las limitaciones o exclusiones que preceden no correspondan
en su caso. Esta garantía le otorga derechos legales especícos y es posible
que usted también tenga otros derechos que dieren entre un estado y otro.
Las garantías que preceden no cubren daños y perjuicios ocasionados
como resultado de mantenimiento, reparaciones, limpieza o instalación
inadecuados, mal uso, abuso, alteraciones, accidentes o causas de fuerza
mayor.
Price Pster
Une garantie limitée à vie
pour ce qui est de l’aspect mécanique et de la nition,
tant et aussi longtemps que vous serez propriétaire
de votre domicile.
(Garantie limitée en cas d’utilisation commerciale
– voir ci-dessous)
Veuillez noter qu’une preuve d’achat peut être requise en cas de recours
au titre de la garantie.
Garantie limitée : Tant et aussi longtemps que l’acheteur sera propriétaire
du domicile dans lequel le produit Price Pster a été installé, nous lui
garantissons que ce dernier sera exempt de tout défaut de matériau ou
vice de fabrication pouvant en entraver l’utilisation correcte tel que prévu.
Dans le cas des produits d’utilisation commerciale, la garantie exprimée
ci-dessus est restreinte à une période de dix (10) ans.
Par ailleurs, tant et aussi longtemps que l’acheteur sera propriétaire
du domicile dans lequel le produit Price Pster a été installé, nous lui
garantissons un article dont la nition ne pourra se détériorer. Dans le
cas des produits d’utilisation commerciale qui ne comportent pas la
nition “Pforever”, la garantie est restreinte à une période de cinq (5) ans.
Recours exclusif : En cas de défaut du produit relevant de la garantie,
le fabricant pourra, à sa discrétion, réparer ou remplacer la partie
défectueuse. Cette mesure constitue un recours exclusif.
Pour tout recours au titre de la garantie, les clients doivent communiquer
avec le fabricant pour lui faire part du problème. L’acheteur d’origine
peut : (1) composer le 1 800 732-8238 pour parler à un représentant qui
l’assistera; (2) écrire au service à la clientèle : Price Pster Inc., 19701
DaVinci, Lake Forest, CA 92610 U.S.A., et fournir une explication du
problème, en précisant le numéro de modèle, son nom, son adresse et
son numéro de téléphone, ainsi que la date d’achat approximative; (3)
communiquer par courrier électronique avec le service à la clientèle en
utilisant le site www.PricePster.com, ou (4) aviser le détaillant qui a
vendu le produit. On peut être obligé de retourner le produit au fabricant,
et une preuve d’achat peut être exigée.
Limitations et exclusions :
PRICE PFISTER NE SERA PAS RESPONSABLE DES AUTRES
DOMMAGES OU PERTES, Y COMPRIS LES DOMMAG ES
INDIRECTS, INDÉPENDAMMENT DE TOUTE THÉORIE
Y COMPRIS TOUTE RÉCLAMATION SELON LAQUELLE IL
Y AURAIT EU RUPTURE DE GARANTIE, QUE CE SOIT PAR
RAPPORT À UN CONTRAT OU PAR VOIE DE NÉGLIGENCE (cela
comprend la négligence et la responsabilité stricte).
Price Pster se réserve le droit de discontinuer ou de modier un produit
en tout temps. Certaines provinces ne permettent pas l’exclusion ou la
limitation des dommages indirects, de sorte que la limitation exprimée
peut ne pas s’appliquer. La présente garantie octroie aux clients certains
droits d’ordre juridique, et ceux-ci pourraient en avoir d’autres, selon la
province où ils habitent.
La garantie ne s’applique pas aux dommages résultant d’un entretien, d’un
nettoyage ou d’une installation fautivement effectués, ou encore d’usages
fautifs, d'abus, de modications, d'accidents ou de catastrophes naturelles.
JURIDIQUE,
31678-0500
A COMPANY
Page 2
ENGLISH
Thank you for purchasing this Price Pster product. All Price Pster products are carefully engineered, and factory tested to
provide long trouble-free use under normal conditions. This product is easy to install using basic tools and our easy to follow
illustrated instructions. If you have any questions regarding this product, call 1-800-Pfaucet (1-800-732-8238).
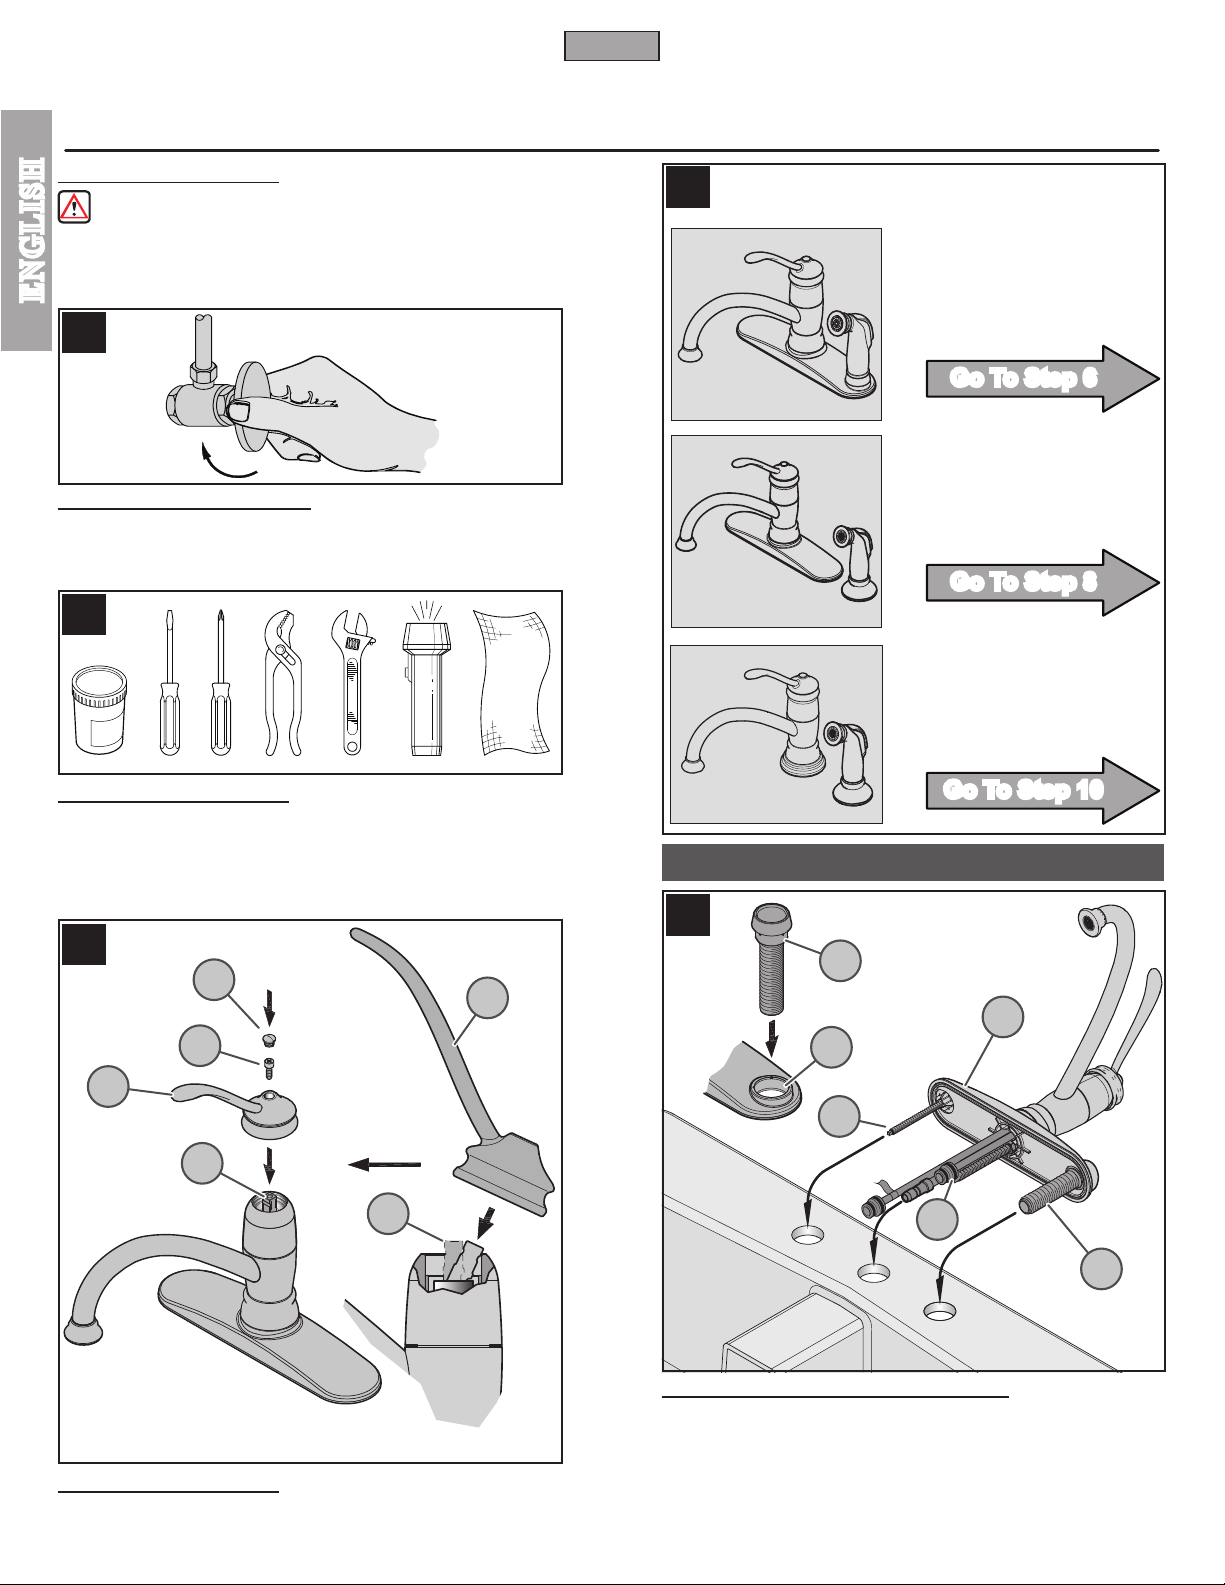
1 BEFORE PROCEEDING
WARNING: Read all the instructions completely before proceeding. Price Pster
recommends calling a professional if you are uncertain about installing this product!
This product should be installed in accordance with all local and state plumbing and
building codes.
ENGLISH
2
2 SHUT OFF WATER SUPPLY
Locate water supply inlets and shut off the water supply valves. These are usually found
under the sink or near the water meter. If you are replacing an existing faucet, remove
the old faucet from the sink and clean the sink surface thoroughly.
3
5
These instructions cover three
different installations
Models
34-3AL
For 3 Hole Installation
With Side Spray
Go To Step 6
Models
34-4AL
For 4 Hole Installation
With Side Spray
Go To Step 8
Models
34-4ALS 34-4ALY
For 2 Hole Installation
With Side Spray
3 TOOLS RECOMMENDED
• Plumber's putty • Slotted screwdriver
• Pliers • Adjustable wrench • Flashlight
• Cloth
Your installation may require new supply lines and / or shut-off valves or other additional
tools.
• Philips head screwdriver
4
4D
4C
4A
FORWARD
4B
4B
4A
Go To Step 10
FAUCET INSTALLATION
6
6D
6A
6E
6C
6B
6D
4 HANDLE ATTACHMENT
Place Lever Handle (4A) onto Valve Stem (4B) and secure with Fastener (4C) as shown.
Insert Decorative Button (4D) onto Lever Handle (4A).
6 THREE HOLE FAUCET INSTALLATION
Following manufacturer’s recommendations on use, apply plumber’s putty into putty
groove in Deck Plate (6A). Insert Hose Guide (6D) into the Side Hole (6E) in the Deck
Plate (6A). Align the hose guide Tabs to those in the Deck Plate Hole. Insert the faucet
Supply Tubes (6B) through the center hole of the sink. Inser t faucet Shank (6C) and
Hose Guide (6D) through the end holes of the sink.
Deck Plate (6A) can be placed with Hose Guide (6D) in either the left or right side (see step 10
for Deck Plate removal).
2
Page 3
ENGLISH
7 9
9A
7C
7E
7D
7F
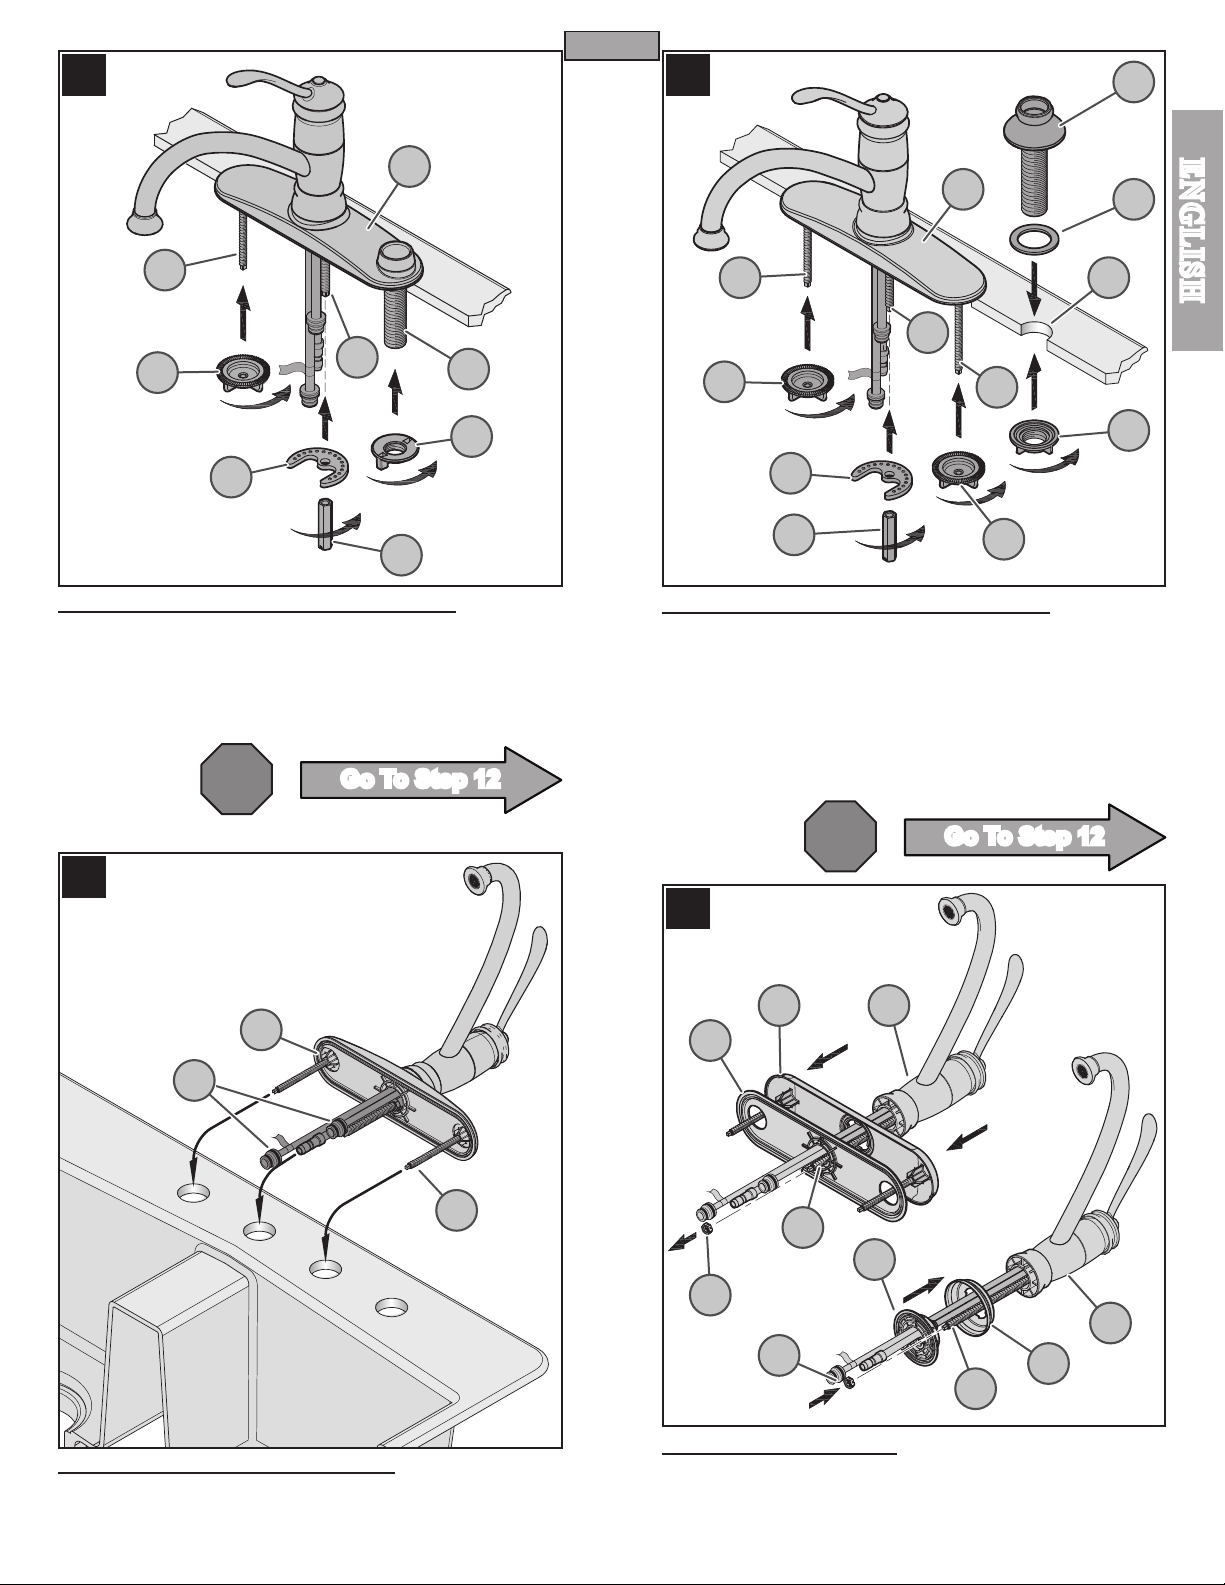
7 SECURING THREE HOLE FAUCET TO DECK
From underneath sink, secure the Hose Guide (7A) by screwing the Plastic Locknut
(7B). Secure Deck Plate (7C) by screwing Wing Nut (7D) to Mounting Post (7E). Hand
tighten. Remove any excess putty from around the outside edge of Deck Plate (7C).
Secure faucet by placing the Metal Washer (7F) and the Long Nut (7/16 Hex.) (7G) onto
Mounting Post (7H). Make sure that the bumps on the Metal Washer (7F) are facing up.
Tighten until the faucet is rmly connected to the sink. Do not over tighten!
STOP
7H
7G
Go To Step 12
7A
7B
9G
9K
9E
9H
9J
9 SECURING FOUR HOLE FAUCET TO DECK
From above sink, insert Hose Guide Shank (9A) through Flange Gasket (9B) and into
the sink hole (9C).
From underneath sink, secure Hose Guide (9A) by screwing Plastic Locknuts (9D). Hand
tighten. Hand tighten Wing Nuts (9E) to Mounting Posts (9F). Remove any excess putty
from around the outside edge of Deck Plate (9G).
Washer (9H) and the Long Nut (7/16 Hex.) (9J) onto the Mounting Post (9K). Make sure that
the bumps on the Metal Washer (9H) are facing up. Tighten using a at head screwdriver
or an adjustable wrench until the faucet is rmly connected to the sink.
Do not over tighten!
9F
9E
Secure the faucet by placing the Metal
9B
9C9F
9D
ENGLISH
8
8B
8A
8C
10
10C
10A
STOP
10D 10F
10B
10G
10A
Go To Step 12
10F
10E
10B
8 FOUR HOLE FAUCET INSTALLATION
Following manufacturer’s recommendations on use, apply plumber’s putty into putty
groove in Bottom Plate (8A). Insert the faucet Supply Tubes (8B) through the center
hole of the sink. Insert faucet Shanks (8C) through the end holes of the sink.
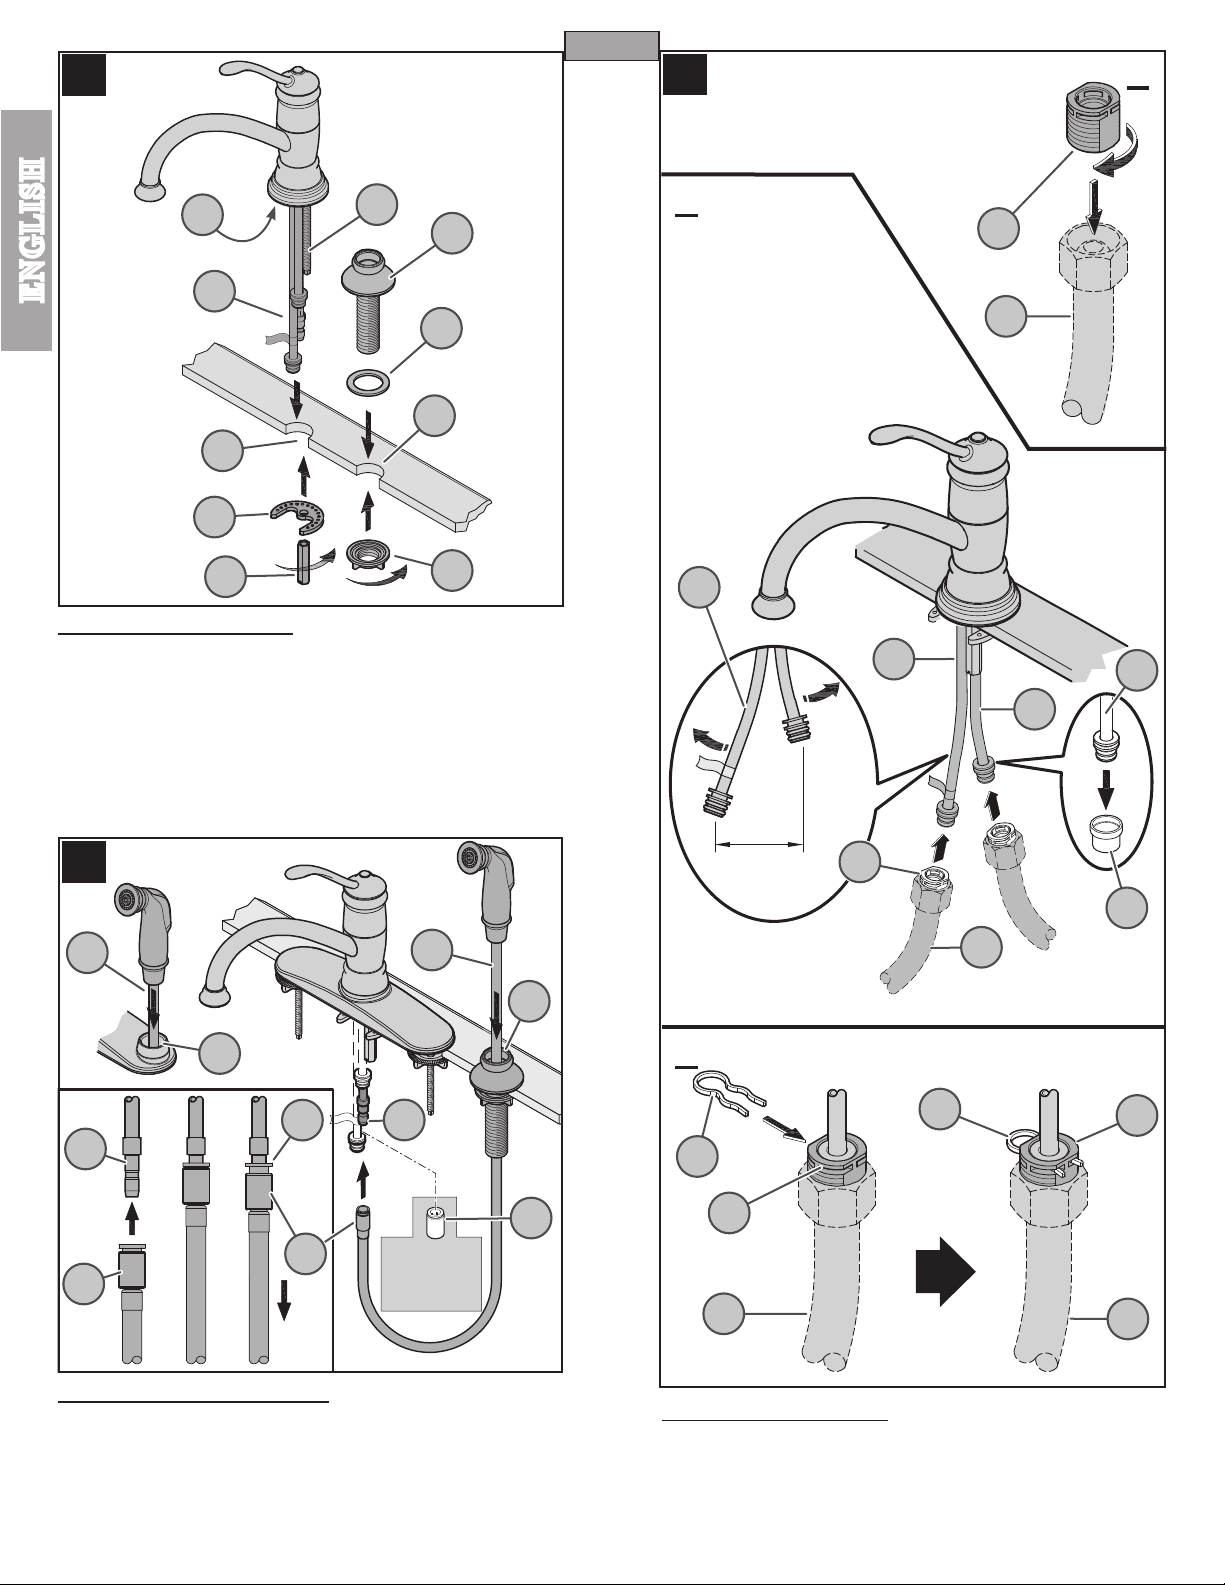
10 FAUCET PREPARATION
From underneath faucet, remove Nut (10A) from Mounting Post (10B). Remove Putty
Plate (10C) and Deck Plate (10D) from Faucet Body (10F). Assemble Mounting Ring
(10E) and Putty Ring (10G) to Faucet Body (10F). Secure by placing and threading
Nut (10A) onto Mounting Post (10B).
3
Page 4
11
ENGLISH
13
CAUTION: Incorrect application of supply lines and ttings may
result in the failure or leak of the supply lines and ttings.
Water Supply Lines are not included. Please consult
manufacturer and/or its instructions for the correct
method of installation of supply lines and ttings.
A
11A
11J
11D
ENGLISH
11B
11E
11F
11C
11G
11H
11 FAUCET INSTALLATION
Following manufacturer’s recommendations on use, apply plumber’s putty into putty
groove in Putty Ring (11A). Insert the faucet Supply Tubes (11B) through the center
hole of the sink (11C). Insert Hose Guide Shank (11D) through Flange Gasket (11E)
and into the sink hole (11F).
From underneath sink, secure the faucet by placing the Metal Washer (11G) and the
Long Nut (
the Metal Washer (11G) are facing up. Tighten until the faucet is rmly connected to
the sink. Secure Hose Guide (11D) by screwing Plastic Locknuts (11K). Hand tighten.
Remove any excess putty from around the outside edge of Putty Ring (11A).
Do not over tighten!
7
/16 Hex.) (11H) onto the Mounting Post (11J). Make sure that the bumps on
11K
B
13C
13C
13A
13B
13C
13C
12
12A
12B
12E
12D
12C
12C
12 SIDE SPRAY INSTALLATION
Insert Side Spray Hose (12A) through Hose Guide (12B).
From underneath sink, push Quick Connect Housing (12C), located on the end of the Spray
Hose (12A), rmly upward onto the receiving Tube (12D), until unable to push any further.
Pull down on the quick connect housing (12C). If the housing and the Inner Collet (12E)
separate slightly, but do not pull off the receiving Tube (12D), quick connect is secure.
When installing without side spray, a Plug (12F) 972-044 must be used and is to be
ordered separately.
12A
12B
12D
12F
OPTIONAL
(Must be ordered
separately)
1" Max.
(26 mm)
13A
13B
HOT COLD
C
13D
13D
13E
13B
13 WATER SUPPLY LINES
Thread Inlet Connectors (13A) into Water Supply Lines (13B).
A.
B. Remove Protective Cap (13F). Gently separate hot and cold Faucet Inlets (13C),
approximately 1 in. (26 mm) apart. Connect Water Supply Lines (13B) onto Faucet Inlets
(13C). Hot water supply line goes to hot inlet tting indicated by red tag.
C. Insert Clip (13D) into Inlet Connector Holes (13E) to secure water supply lines, as
shown.
4
13F
13A
13B
Page 5

14
ENGLISH
17
14 UNIT START UP
Turn on hot and cold water supplies, and check for leaks above and below the sink
Note: After installation is complete, ush faucet (see step 17).
FAUCET FUNCTIONS
15
ON
15A
17E
17B
ENGLISH
17D
.
17 FLUSHING & AERATOR CLEANING
After installation is complete, remove Aerator Housing (17A). Turn Valve (17B) on
and allow both hot and cold water to run for at least one minute each. While water is
running, check for leaks. To clean the aerator, disassemble Aerator Housing (17A) by
separating the Aerator Shell (17C), Basket (17D), and Washer (17E). Once parts have
been cleaned, reassemble by reversing steps.
17C
17A
MAINTENANCE & CARE
18
18B
18A
HOT
15B
15A
COLD
15 FAUCET FUNCTION
By lifting the Lever Handle (15A) up, the valve will be activated allowing water to ow.
The water ow will increase by continuing to lift up the Lever Handle (15A). By rotating
the Lever Handle counter-clockwise, the water temperature will decrease to cold ow
only. By rotating the Lever Handle clockwise, the water temperature will increased to
hot ow only.
The Spout (15B) can be rotated around the Faucet Body in any direction.
16
16A
16B
18C
18D
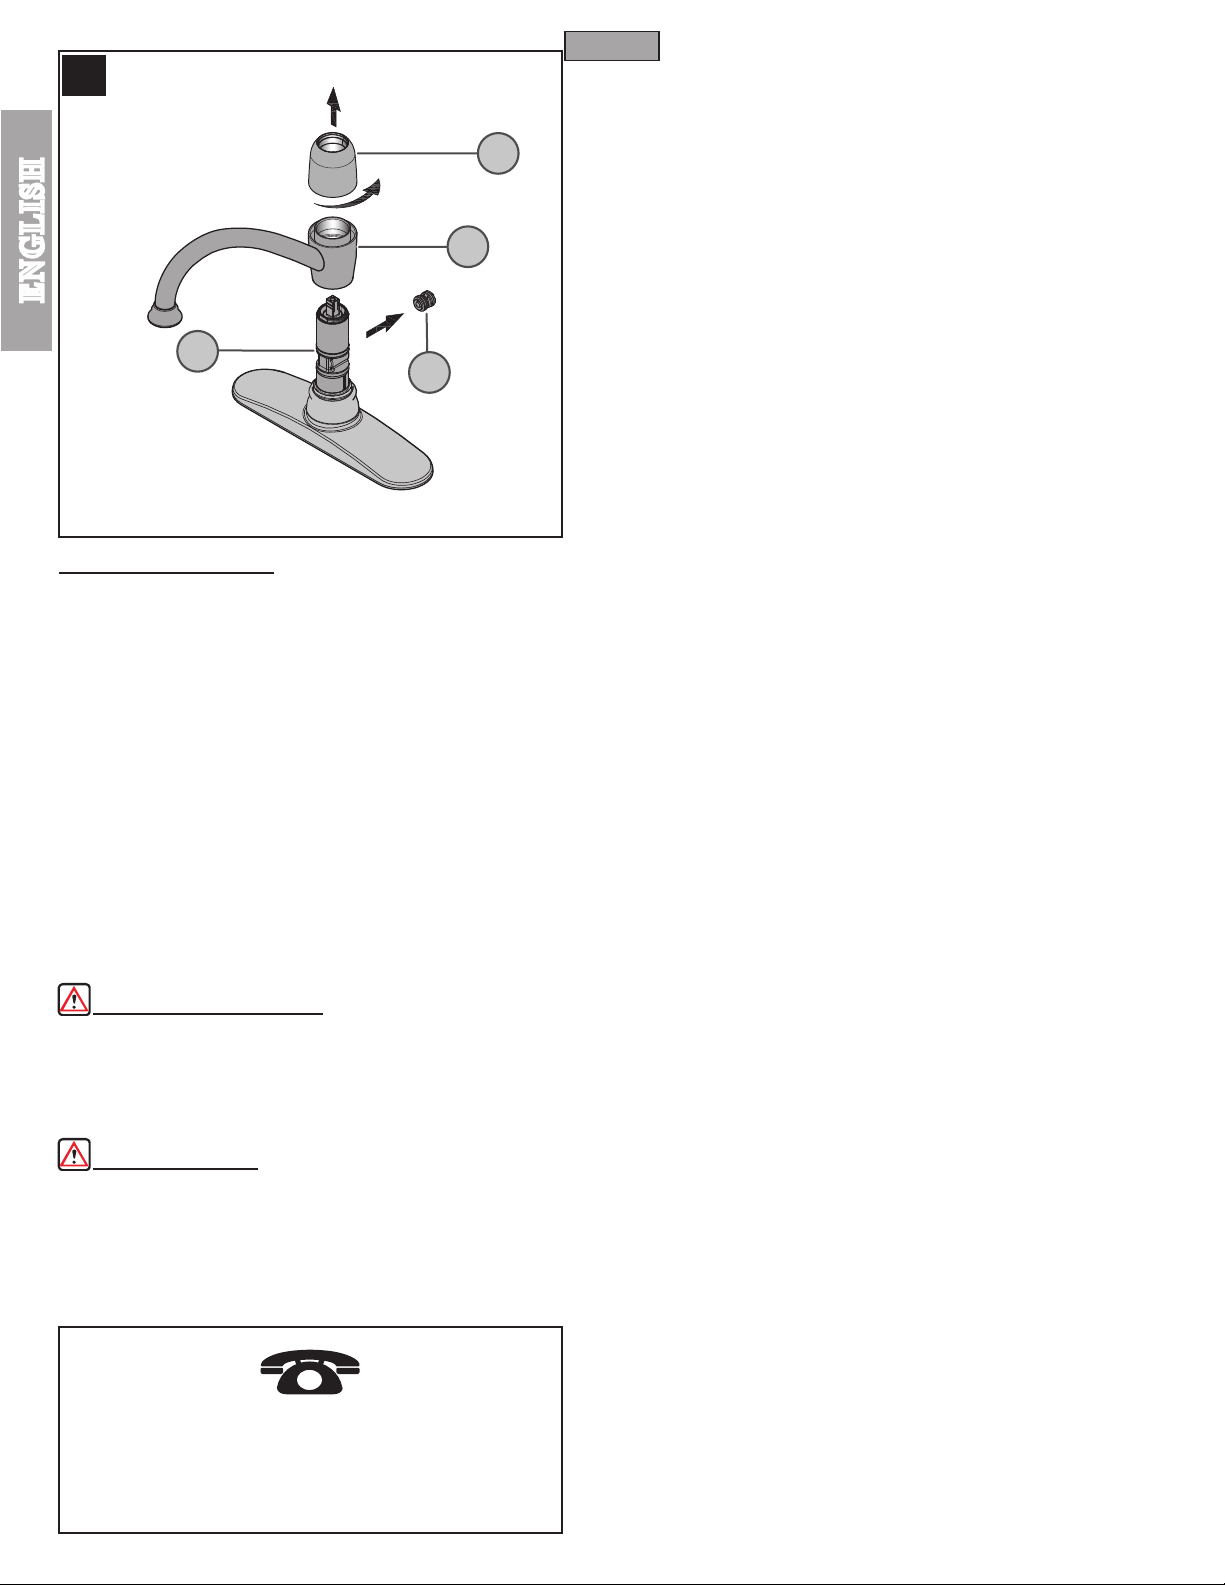
18 HANDLE REMOVAL
Turn off water before proceeding!
Button (18A), unscrew Fastener (18B), and remove Handle Hub (18C) from Valve Stem (18D).
19
19B
With valves in closed position, detach Decorative
19A
19C
16 SIDE SPRAY OPERATION
The Side Spray (16A) can be pulled forward to spray water in any direction. To activate
the Side Spray, press the Toggle Button (16B) located on the back of the Side Spray (16A).
19 CARTRIDGE REMOVAL
Turn off water supplies and relieve pressure before working on your faucet (see step 2). Remove
Handle (See step 18) Remove the Dome Cap (19A) by unscrewing it in a counterclockwise
direction. Using an adjustable wrench, unscrew the Retainer Ring (19B). Carefully remove the
Cartridge (19C) by pulling it straight up and out. Inspect Cartridge (19C) for debris or damage.
Clean or replace the Cartridge (19C). Reassemble faucet by reversing steps.
5
Page 6
20
20B
20C
ENGLISH
20D
20A
20 DIVERTER REMOVAL
If the side spray fails to work properly the diverter mechanism may be clogged with debris
or may need replacing. To check and/or replace Diverter (20A), shut off water supply
and relieve pressure before working on your faucet (see step 2). Remove handle
(see step 17) and Dome Cap (20B) and carefully lift up the Spout Assembly (20C). The
Diverter Mechanism (20A) is located on the backside of Inner Faucet Body (20D) Carefully
remove the Diverter Mechanism (20A) and check for debris. Clean or replace the Diverter
Mechanism (20A). Reassemble faucet by reversing steps.
ENGLISH
CAUTION: Maintenance
DISASSEMBLY
1. Replacement parts may be available at the store where you purchased your faucet.
2. When replac ement parts are not available, please write or call Price Pster
Consumer Service.
3. Always turn off water and relieve pressure before working on your faucet.
NOTE: Trim Care
Cleaning Instructions:
For all Handles and decorative nishes, use only a soft damp cloth to clean and shine.
Use of polish, detergents, abrasive cleaners, organic solvents or acid may cause
damage. Use of other than a soft damp cloth will nullify our warranty!
Special Trim:
Trim products which contain Porcelain or other similar substance are not acceptable for
public areas or Commercial use. Installation of Said Trim is at Users Risk!
1–800–PFAUCET (1–800–732–8238)
For Toll-Free Pfaucet information call 1–800–PFAUCET
(1–800–732–8238) or visit www.pricepster.com
• Installation Support
• Care and Warranty Information
6
Page 7

ESPAÑOL
Gracias por haber comprado este producto Price Pster. Todos los productos Price Pster están diseñados cuidadosamente y son sometidos a
pruebas en la fábrica para ser utilizados sin problemas bajo condiciones normales. Este producto es fácil de instalar con herramientas básicas
y nuestras instrucciones ilustradas fáciles de seguir. Si tiene alguna pregunta sobre este producto, llame al 1-800 Pfaucet (1-800-732-8238)
.
1 ANTES DE PROCEDER
ADVERTENCIA: Antes de proceder, lea completamente todas las instrucciones.
Price Pster recomienda llamar a un profesional si no se está seguro acerca de cómo
instalar este producto.
Este producto debe instalarse de acuerdo a los códigos de plomería y de construcción
locales y estatales.
2
2 CIERRE EL SUMINISTRO DE AGUA
Ubique las entradas del suministro de agua y cierre las válvulas de suministro de agua.
Generalmente se encuentran debajo del fregadero o cerca del medidor de agua. Si se
trata de un reemplazo de grifo, quite el grifo viejo y limpie completamente la supercie
del fregadero.
3
5
Estas instrucciones cubren tres
instalaciones distintas:
Modelos
34-3AL
Instalación en 3 agujeros con
rociador lateral
Continúe con el Paso 6
Modelos
34-3AL
Instalación en 4 agujeros
con rociador lateral
Continúe con el Paso 8
Modelos
34-4ALS 34-4ALY
Instalación en 2 agujeros
con rociador lateral
ESPAÑOL
3 HERRAMIENTAS RECOMENDADAS
• Masilla para plomería • Destornillador recto • Destornillador en cruz
• Tenazas • Llave ajustable • Linterna de mano
• Paño
Para hacer la instalación podría ser necesario contar con nuevas tuberías de suministro,
válvulas de cierre o herramientas adicionales.
4
4D
4C
4A
DELANTERO
4B
4B
4A
Continúe con el Paso 10
INSTALACIÓN DEL GRIFO
6
6D
6A
6E
6C
6B
6D
4 CÓMO UNIR LA MANIJA
Coloque la manija de palanca (4A) sobre el vástago de la válvula (4B) y asegúrela
con el sujetador (4C) según lo demostrado. Inserte el botón decorativo (4D) sobre la
manija de palanca (4A).
6 INSTALACIÓN DEL GRIFO DE 3 AGUJEROS
En la ranura para masilla de
siguiendo las instrucciones del fabricante.
lateral (6E ) de la placa de cubierta (6A). Alinee las lengüetas de la guía de manguera
con aquellas en el agujero de la placa de cubierta.
(6B) del grifo en el agujero central del fregadero. Introduzca la espiga (6C) y
manguera (6D)
La placa de la cubierta (6A) se puede colocar con la guía de la manguera (6D) en el
lado derecho o izquierdo (
del grifo en los agujeros extremos del fregadero.
la placa de cubierta
consulte al paso
(6A), coloque masilla para plomería
Inserte la guía de manguera (6D) en el agujero
Introduzca los tubos de suministro
10 para el retiro de la placa de la cubierta).
7
a guía de
Page 8

ESPAÑOL
7 9
7C
9G
9A
9B
7E
7D
7H
7A
7B
7F
7G
ESPAÑOL
7 ASEGURAR EL GRIFO DE 3 AGUJEROS AL FREGADERO
Desde abajo del fregadero, sujete la guía de la manguera (7A) atornillando la contratuerca
de plástico (7B). Sujete la placa de cubierta (7C) atornillando la tuerca de mariposa (7D)
al poste de montaje (7E). Apriete con la mano. Quite el exceso de masilla de alrededor
del borde exterior de la placa de cubierta (7C).
metal (7F) y la tuerca larga (
Asegúrese de que las protuberancias en la arandela de metal (7F) queden apuntando
hacia arriba. Apriete hasta que el grifo esté rmemente conectado al fregadero.
¡No apriete en exceso!
7
/16 pulg. Hexagonal) (7G) sobre el poste de montaje (7H).
ALTO
Sujete el grifo colocando la arandela de
Continúe con el Paso 12
9C9F
9K
9E
9F
9D
9H
9J
9 ASEGURAR EL GRIFO DE 4 AGUJEROS AL FREGADERO
Sobre el fregadero, inserte la espiga de la guía de manguera (9A) a través de la
empaquetadora (9B) en el agujero (9C) del fregadero.
Desde abajo del fregadero, sujete la guía de manguera (9A) atornillando las contratuercas
de plástico (9D). Apriete con la mano. Apriete las tuercas de mariposa (9E) a los postes
de montaje (9F). Quite el exceso de masilla de alrededor del borde exterior de la placa de
cubierta (9G). Sujete el grifo colocando la arandela de metal (9H) y la tuerca larga (
Hexagonal) (9J) sobre el poste de montaje (9K). Asegúrese de que las protuberancias en
la arandela de metal (9H) queden apuntando hacia arriba. Apriete con un destornillador de
hoja plana o una llave ajustable hasta que el grifo esté rmemente conectado al fregadero.
¡No apriete en exceso!
ALTO
Continúe con el Paso 12
9E
7
/16 pulg.
8
8A
8B
8C
8 INSTALACIÓN DEL GRIFO DE 4 AGUJEROS
En la ranura para masilla de la placa inferior (8A), coloque masilla para plomería
siguiendo las instrucciones del fabricante. Introduzca los tubos de suministro(8B) del
grifo en el agujero central del fregadero. Introduzca las espigas (8C) del grifo en los
agujeros extremos del fregadero.
10
10D 10F
10C
10B
10G
10A
10A
10B
10 PREPARACIÓN DEL GRIFO
Por debajo del grifo, retire la tuerca (10A) desroscando la del poste del montaje (10B).
Retire la placa inferior (10C) y la placa para plataforma (10D) de el cuerpo del grifo (10F).
Monte el aro de montaje (10E) y el aro para masilla (10G) en el fondo del cuerpo del grifo
(10F). Asegure colocando y roscando la tuerca (10A) sobre el poste del montaje (10B).
8
10E
10F
Page 9

11
11A
11B
11J
11E
11F
11D
ESPAÑOL
La s Líne as de Abast ecimie nto de agua no so n
13
incluidas. Por favor consulte al fabricante y/o sus
instrucciones para el correcto método de instalación de líneas
de abastecimiento y accesorios.
PRECAUC IÓN: La apli caci ón in c orre cta de lín eas de
abastecimiento y accesorios puede causar el fracaso o el
agujero de las líneas de abastecimiento y accesorios.
13A
B
13B
A
11C
11G
11H
11 INSTALACIÓN DEL GRIFO
En la ranura para masilla de el aro para masilla (11A), coloque masilla para plomería
siguiendo las instrucciones del fabricante. Introduzca los tubos de suministro (11B) del
grifo en el agujero central (11C) del fregadero.
(11D) a través de la empaquetadora (11E) en el agujero (11F) del fregadero.
Desde abajo del fregadero, sujete el grifo colocando la arandela de metal (11G) y la
tuerca larga (
que las protuberancias en la arandela de metal (11G) queden apuntando hacia arriba.
Apriete hasta que el grifo esté rmemente conectado al fregadero. Sujete la guía de
manguera (11D) atornillando las contratuercas de plástico (11K). Apriete con la mano.
Quite el exceso de masilla de alrededor del borde exterior de el aro para masilla (11A).
¡No apriete en exceso!
7
/16 pulg. Hex.) (11H) sobre el poste de montaje (11J). Asegúrese de
Inserte la espiga de la guía de manguera
11K
12
12A
12A
12B
13C
13C
1 Pulg.
Max.
(26 mm)
13A
13B
CALIENTE FRIA
ESPAÑOL
13C
13C
13F
12B
12E
12D
12D
12F
12C
12C
12 INSTALACIÓN DEL ROCIADOR LATERAL
Sobre el fregadero, inserte la manguera del rociador lateral (12A) a través de la guía de
la manguera (12B). Desde abajo del fregadero, presione el recinto de conexión rápida
(12C), que se encuentra en el extremo de la manguera del rociador lateral (12A), rmemente
hacia arriba, hacia el tubo receptor (12D), hasta que ya no se le pueda presionar más. Tire
del recinto de conexión rápida (12C). Si el recinto y el collarín interno (12E) se separan
ligeramente pero no se salen del tubo receptor (12D), la conexión rápida está segura.
Para las instalaciones que no requieren ningún rociador lateral, un enchufe (12F) 972-
044 se debe utilizar y se debe ordenar por separado.
OPCIONAL
(Debe ser
ordenado por
separado)
C
13D
13D
13E
13B
13 CONEXIONES DE SUMINISTRO DE AGUA
Enrosque los conectadores de entrada (10A) en las líneas de suministro de agua
A.
(10B).
B. Retire la tapa protectora (10F). Separe suavemente los tubos de entrada de agua
caliente y fría (10C) aproximadamente 1 pulg. (26 mm). Conecte las linias de suministro
de agua (10B) a los tubos de entrada del grifo (10C). Conecte la línea de suministro
de agua caliente al tubo de entrada de agua caliente indicado con la etiqueta roja.
9
13A
13B
Page 10

14
ESPAÑOL
17
14 CÓMO ENCENDER LA UNIDAD
Active el suministro de agua fría y caliente y verique que no hay fugas arriba y abajo
del fregadero.
Nota: Después de que la instalación sea completa, purgue el grifo (consulte al paso 17).
FUNCIONES DEL GRIFO
15
ABIERTA
15A
ESPAÑOL
17E
17D
17C
17 ENJUAGUE Y LIMPIEZA DEL AEREADOR
Luego de efectuar la instalación, retire la caja del aereador (17A). Gire la válvula (17B) a
la posición abierta y deje correr el agua fría y caliente por lo menos un minuto cada una.
Mientras el agua corre, verique que no hay fugas. Para limpiar el arreador, desarme la caja
del aereador (17A) separando el casco (17C), la cesta (17D) y la arandela (17E) del arreador.
Una vez que haya limpiado las partes, re-ensámblelas siguiendo estos pasos en orden inverso.
17B
17A
MANTENIMIENTO Y CUIDADO
18
18B
18A
CALIENTE
15B
FRÍA
15 FUNCIÓN DE LA VÁLVULA
Al levantar la manija de palanca (15A), la válvula se activará y permitirá el ujo de
agua. El ujo de agua aumentará al continuar levantando la manija de palanca (15A).
Al girar la manija de palanca (15A) en sentido contra-horario, la temperatura del agua
disminuirá hasta ujo frío únicamente. Al girar la manija de palanca (15A) en sentido
horario, la temperatura del agua aumentará hasta ujo caliente únicamente.
El surtidor (15A) puede girarse alrededor del cuerpo del grifo en cualquier dirección.
16
16A
16B
15A
18C
18D
18 CÓMO QUITAR LAS MANIJAS
¡Cierre el suministro de agua antes de continuar! Manteniendo las válvulas en la
posición cerrada, quite el botón decorativo (18A), desenrosque el sujetador (18B) y
saque el núcleo de la manija (18C) del vástago de la válvula (18D).
19
19B
19A
19C
16 FUNCIONAMIENTO DEL ROCIADOR LATERAL
El rociador lateral (16A) puede tirarse hacia adelante para rociar agua en cualquier
dirección. Para activar el rociador lateral, oprima el botón basculante (16B) situado en
la parte posterior del rociador lateral (16A).
10
19 REEMPLAZO DEL CARTUCHO
Cierre los suministros de agua y alivie la presión antes de trabajar en el grifo (consulte
el paso 2). Retire la manija (consulte el paso 18) Quite la tapa en forma de cúpula (19A)
destornillándola en sentido contra-horario. Destornille el anillo de retención (19B) con una llave
ajustable. Quite el cartucho (19C) con cuidado halándolo en forma recta hacia arriba y hacia
afuera. Inspeccione el cartucho (19C) para asegurar que no contenga residuos o esté dañado.
Limpie o reemplace el cartucho (19C). Re-ensamble el grifo siguiendo los pasos en orden inverso.
Page 11

20
ESPAÑOL
20B
20C
20D
20A
20 MANTENIMIENTO DEL DEFLECTOR
Si el rociador lateral no funciona correctamente, el mecanismo del deector puede estar
tapado con residuos o puede necesitar reemplazo. Para revisar y/o reemplazar el deector
(20A), cierre el suministro de agua y alivie la presión antes de trabajar en el grifo
(consulte el paso 2). Retire la manija (consulte el paso 18) y la tapa en forma de cúpula (20B)
y levante cuidadosamente el conjunto del surtidor (20C). El mecanismo del deector (20A)
está situado en la sección posterior del cuerpo interior del grifo (20D). Retire cuidadosamente
el mecanismo del deector (20A) y revise para ver si hay residuos. Limpie o reemplace el
mecanismo del cartucho (20A). Re-ensamble el grifo siguiendo los pasos en orden inverso.
PRECAUCIÓN: Mantenimiento
CÓMO DESARMAR:
1. El almacén donde compró su grifo podría tener repuestos disponibles.
2. Cuando no hay repuestos disponibles, sírvase escribir o llamar al departamento de
servicio al consumidor de Price Pster.
3.
Siempre antes de efectuar algún trabajo en su grifo, cierre el agua y elimine la presión.
NOTA: Cuidado del Acabado
Instrucciones para limpieza:
Para limpiar y hacer brillar las manijas y el acabado decorativo use solamente un paño
suave y húmedo. El uso de pulidores, detergentes, limpiadores abrasivos, solventes
orgánicos o ácidos puede provocar daños. ¡El uso de algo más que un paño suave
y húmedo invalida nuestra garantía!
Acabados especiales:
Los productos con acabados que contienen porcelana u otras substancias similares
no son aceptables para áreas públicas ni para usos comerciales. ¡Su instalación bajo
tales circunstancias es bajo el riesgo del usuario!
ESPAÑOL
1–800–PFAUCET (1–800–732–8238)
Para obtener información mediante llamadas gratis, llame al
1-800-PFAUCET (1-800-732-8238) o visite www.pricepster.com
• Apoyo a instaladores
• Información sobre cuidado y garantías
11
Page 12

FRAN
ÇAIS
Merci d’avoir acheté ce produit Price Pster. Tous les produits Price Pster sont fabriqués avec soin et contrôlés à l’usine pour offrir une
longue durée de service sans problème dans des conditions d’utilisation normales. Il est facile de poser ce produit à l’aide d’un outillage
de base et de nos illustrations très claires. Pour toute question concernant ce produit, appeler le 1-800-Pfaucet (1-800-732-8238).
1 AVANT DE PROCÉDER À LA POSE
AVERTISSEMENT : lire attentivement toutes les instructions avant de procéder à
la pose. Price Pster recommande de faire appel à un professionnel en cas d’incertitude
quant à l’installation de ce produit !
Ce produit doit être installé conformément à l’ensemble de la réglementation locale et
provinciale applicable à la plomberie et à la construction.
5
Ces instructions s’appliquent à trois
installations différentes :
Modèles
34-3AL
Installation 3 trous Avec
Douchette Latérale
2
Passer à l’étape 6
Modèles
34-4AL
2 COUPURE DE L’ARRIVÉE D’EAU
Repérer les arrivées d’eau et fermer leurs robinets. Ces robinets se trouvent généralement
sous le lavabo ou à côté du compteur d’eau. En cas de remplacement d’un robinet existant,
le déposer du lavabo et nettoyer soigneusement la surface de ce dernier.
Installation 4 trous avec
douchette latérale
Passer à l’étape 8
3
3 OUTILLAGE RECOMMANDÉ
• Mastic de plombier • Tournevis plat •Tournevis cruciforme
• Pince • Clé à molette • Lampe de poche
• Chiffon
L’installation peut exiger des tuyaux d’arrivée et/ou des vannes d’arrêt neufs ou d’autres
outils.
FRANÇAIS
4
4D
4C
4A
VERS L’AVANT
4B
4A
Modèles
34-4ALS 34-4ALY
Installation 2 trous avec
douchette latérale
Passer à l’étape 10
INSTALLATION DE ROBINET
6
6D
6A
6E
6C
4B
4 COMMENT ATTACHER LA POIGNÉE
Placez de la poignée de levier (4A) sur de le tige de valve (4B) et assurez avec la xation
(4C) selon ce qui était démontré. Insérez le bouton décoratif (4D) sur la poignée de
levier (4A).
12
6B
6D
6 INSTALLATION DE ROBINET DE 3 TROUS
Appliquer du mastic de plombier dans la rainure prévue à cet effet sur le
I
nsérer le guide de exible (6D) dans le trou latéral (6E) de l’applique (6A). Aligner ses
ergots et ceux du trou de l’applique.
central de l’évier. Passez les doigts sur les tiges letées de robinet (6C) et
exible (6D)
Le l’applique (6A) peut être placé avec le
côté droit (consultez au pas 10 pour le déplacement de l’applique).
dans les trous d’extrémité de l’évier.
Faire passer les tubes d’arriéve (6B) dans le trou
guide de exible
(6D) dans la gauche ou le
l’applique
le guide de
(6A).
Page 13

FRAN
ÇAIS
7 9
7C
9G
9A
9B
7E
7D
7H
7A
7B
7F
7G
7 FIXATION DU ROBINET DE 3 TROUS À L'ÉVIER
Depuis le dessous de l’évier, xer le guide de exible (7A) en vissant l’écrou de blocage en
plastique (7B). Fixer l’applique (7C) en vissant l’écrou à oreilles (7D) sur la tige letée de
montage (7E). Le serrer avec les doigts. Enlever tout excédent de mastic du pourtour du
bord extérieur de l’applique (7C).
et l’écrou long (
que les bosses de la rondelle métallique (7F) sont sur le dessus. Serrer jusqu’à ce que
le mitigeur soit xé solidement à l’évier. Ne pas trop la serrer !
7
/16 po. Hexagonal
Fixer le mitigeur en plaçant la rondelle métallique (7F)
) (7G) sur la tige letée de montage (7H). S’assurer
STOP
Passer à l’étape 12
9C9F
9K
9E
9F
9D
9H
9J
9 FIXATION DU ROBINET DE 4 TROUS À L'ÉVIER
De au-dessus de l’évier, introduire le tube leté de le guide de tuyau (9A) au travers du
joint (9B) dans les trous (9C) de l’évier.
Depuis le dessous de l’évier, xer le guide de exible (9A) en vissant les contre-écrous en
plastique (9D). La serrer avec les doigts.
à oreilles (9E) avec les doigts sur les tiges letées de montage(9F ). Enlever tout
excédent de mastic du pourtour du bord extérieur de l’applique (9G). Fixer le mitigeur
en plaçant la rondelle métallique (9H ) et l’écrou long (
tige letée de montage (9K). S’assurer que les bosses de la rondelle métallique (9H)
sont sur le dessus. Serrer à l’aide d’un tournevis plat ou d’une clé à molette jusqu’à ce
que le mitigeur soit xé solidement à l’évier.
Ne pas trop la serrer !
STOP
Depuis le dessous de l’évier, serrer les écrous
Passer à l’étape 12
9E
7
/16 po. Hexagonal
) (9J) sur la
FRANÇAIS
8
8A
8B
8C
8 INSTALLATION DE ROBINET DE 4 TROUS
Appliquer du mastic de plombier dans la rainure prévue à cet effet sur la plaque inférieure
(8A). Faire passer les tubes d’arriéve (8B) dans le trou central de l’évier. Passez les
doigts sur les tiges letées de robinet (8C) dans les trous d’extrémité de l’évier.
13
10
10D 10F
10C
10B
10G
10A
10F
10A
10B
10 PRÉPARATION DE ROBINET
De sous le robinet, enlevez l’écrou (10A) du poteau de support (10B). Retirez la plaque
inférieure (10C) et la plaque pour plate-forme (10D) du corps du robinet (10F). Assemblez
l’bague de montage (10E) et l’bague de mastic (10G) au fond du corps de robinet (10F).
Fixez en plaçant et en letant l’écrou (10A) sur le poteau de support (10B).
10E
Page 14

11
11A
11B
11G
11C
11J
11E
11F
11D
FRAN
ÇAIS
Les tubes d’arrivée d’eau ne sont pas incluses. Consultez
13
le fabricant et/ou ses instructions pour la méthode correcte
pour l’installation.
PRUDENCE: L’application incorrecte des tubes d’arrivée et des
connecteurs d’arrivée peut être suivie par l’échec ou la fuite des
lignes.
B
A
13A
13B
11H
11 INSTALLATION DU ROBINET
Appliquer du mastic de plombier dans la rainure prévue à cet effet sur l’bague de
mastic (11A). Faire passer les tubes d’arriéve (11B) par le trou central (11C) de l’évier.
Introduire le tube leté de le guide de tuyau (11D) au travers du joint (11E) dans les
trous (11F) de l’évier.
Depuis le dessous de l’évier, xer le mitigeur en plaçant la rondelle métallique (11G) et
l’écrou long (
de la rondelle métallique (11G) sont sur le dessus. Serrer jusqu’à ce que le mitigeur
soit xé solidement à l’évier.
plastique (11K). La serrer avec les doigts.
bord extérieur de l’bague de montage (11A).
Ne pas trop la serrer !
7
/16 po.) (11H) sur la tige letée de montage (11J). S’assurer que les bosses
Fixer le guide
de tuyau
Enlever tout excédent de mastic du pourtour du
(11D) en vissant les contre-écrous en
11K
12
FRANÇAIS
12A
12B
12E
12D
12A
12B
12D
13C
C
13D
13C
1 Po. Max.
(26 mm)
13A
13B
CHAUD FROID
13D
13C
13C
13F
13A
12F
12C
12C
12 POSE DE LA DOUCHETTE LATÉRALE
De au-dessus de l’évier, insérer le exible de douchette (12A) dans son guide (12B).
Depuis le dessous de l’évier, pousser fermement le raccord rapide (12C) qui se trouve à
l’extrémité du le exible de douchette latérale (12A) à fond vers le haut pour le placer sur le tube
récepteur (12D). Tirer sur le raccord rapide (12C). Si ce raccord se sépare légèrement du collet
intérieur (12E) mais ne se détache pas du tube récepteur (12D), le branchement est solide.
Pour l’installation qui n’exige pas d’une douchette latérale, un prise (12F) 972-044 doit être
utilisé (ordonné séparément).
OPTIONNEL
(Doit être ordonné
séparément)
14
13E
13B
13 RACCORDEMENTS DES ARRIVÉES D’EAU
Vissez les connecteurs d’entrée (10A) aux tuyaux d’arrivée d’eau (10B).
A.
B.
Retirez la couverture protecteur
chaude et d’eau froide (10C) d’environ 26 mm (1 po). Et puis, assemblez les tuyaux
d’arrivée d’eau (10B) aux tubes d’arrivée (10C). La ligne d’approvisionnement en eau
chaude va à l’essayage d’arrivée chaud indiqué par l’étiquette rouge.
C. Insérez l’agrafe (10D) dans les trous du connecteur d’entrée (10E) pour xer les
lignes d’approvisionnement en eau, comme il est montré.
(10F). Avec précaution, écartez les tubes d’arrivée d’eau
13B
Page 15

14
FRAN
ÇAIS
17
14 MISE EN SERVICE DU MÉLANGEUR
Ouvrir les robinets d’arrivée d’eau chaude et d’eau froide, puis vérier le dessus et le
dessous du lavabo pour voir s’il y a des fuites.
Note : Après que l’installation est complète, purgez le robinet (consultez au pas 17).
FONCTIONNEMENT DES ROBINETS
15
OUVERTURE
15A
17E
17D
17C
17 RINÇAGE ET NETTOYAGE DE L’AÉRATEUR
Une fois que l’installation est terminée, retirer le logement d’aérateur (17A). Ouvrir
le robinet (17B) et laisser l’eau chaude et l’eau froide couler pendant au moins une
minute chacun. Contrôler l’étanchéité pendant que l’eau coule. Pour nettoyer l’aérateur,
démonter son logement (17A) en séparant le boîtier d’aérateur (17C), la crépine (17D)
et la rondelle (17E). Une fois que les pièces ont été nettoyées, remonter l’aérateur en
procédant dans l’ordre inverse.
17B
17A
ENTRETIEN ET SOINS
18
18B
18A
CHAUD
15B
FROID
15 FONCTIONNEMENT DU ROBINET
Le relevage de la manette (15A) active le robinet pour permettre à l’eau de couler. Le débit
augmente au fur et à mesure que l’on relève la manette (15A). Lorsqu’on tourne la manette
(15A) dans le sens antihoraire, la température de l’eau baisse jusqu’à ce que celle-ci soit tout
à fait froide. Lorsqu’on tourne la manette (15A) dans le sens horaire, la température de l’eau
augmente jusqu’à ce que celle-ci soit très chaude.
Le bec (15B) peut pivoter dans n’importe quel sens autour du corps du mitigeur.
16
16A
16B
15A
18C
18D
18 DÉPOSE DES MANETTES
Couper l’eau avant de commencer !
le bouton décoratif (18A), dévisser la xation (18B) et retirer le moyeu de manette (18C)
de la tige de robinet (18D).
19
19B
Les robinets étant en position fermée, détacher
19A
19C
FRANÇAIS
16 FONCTIONNEMENT DE LA DOUCHETTE LATÉRALE
La douchette latérale (16A) peut être tirée vers l’avant pour pulvériser de l’eau dans toute
direction. Pour l’activer, appuyer sur la bascule (16B) qui se trouve au dos de la douchette (16A).
15
19 REPLACEMENT DE LA CARTOUCHE
Couper les arrivées d’eau et dépressuriser avant de travailler sur le mitigeur (voir
l’étape 2). Retirer la manette (voir l’étape 18). Retirer le capuchon bombé (19A) en le
dévissant dans le sens antihoraire et enlever(19B). Dévisser l’anneau de retenue (19C) à
l’aide d’une clé à molette. Retirer la cartouche (19C) avec précaution en la tirant droit vers le
haut. Examiner la cartouche (19C) pour voir si elle est encrassée ou endommagée. Nettoyer
la cartouche (19C) ou la remplacer. Remonter le mitigeur en inversant l’ordre des opérations.
Page 16

20
20B
20C
20D
20A
20 ENTRETIEN DU MÉCANISME DE DÉRIVATION
Si la douchette latérale ne fonctionne pas correctement, il est possible que le mécanisme de
dérivation soit encrassé ou doive être remplacé. Pour vérier et/ou remplacer le mécanisme
de dérivation (20A), couper l’arrivée d’eau et dépressuriser avant de travailler sur le
mitigeur (voir l’étape 2). Retirer la manette (voir l’étape 18) et le capuchon bombé (20B),.
puis soulever le bec (20C) avec précaution. Le mécanisme de dérivation (20A) se trouve à
l’arrière du corps intérieur de mitigeur (20D). Retirer le mécanisme de dérivation (20A) avec
précaution pour voir s’il est encrassé. Nettoyer ou remplacer le mécanisme de dérivation
(20A). Remonter le mitigeur en inversant l’ordre des opérations.
ATTENTION : entretien
DÉMONTAGE
1. Il se peut que les pièces de rechange soient disponibles dans le magasin dans lequel
le mélangeur a été acheté.
2. Lorsque des pièces de rechange ne sont pas disponibles, bien vouloir contacter le
département du service après-vente de Price Pster par courrier ou par téléphone.
3.
Toujours couper les arrivées d’eau et dépressuriser avant de travailler sur le mélangeur.
REMARQUE : entretien des garnitures
Instructions de nettoyage :
N’utiliser qu’un chiffon humide pour nettoyer et polir toutes les manettes et ornementations
décoratives. L’utilisation de pâte à polir, de détergents, de produits nettoyants abrasifs,
de solvants organiques ou d’acide peut endommager ces pièces. L’utilisation d’autre
chose qu’un chiffon humide annulera la garantie !
Garnitures spéciales :
les garnitures contenant de la porcelaine ou une autre substance similaire ne sont pas
acceptables dans les lieux publics ou les établissements commerciaux. La pose de telles
garnitures se fait aux risques de l’utilisateur.
1–800–PFAUCET (1–800–732–8238)
Pour les renseignements concernant les services sans
frais de Pfaucet, appelez (1–800–732–8238) ou visitez
www.pricepster.com
• Aide pour le montage
•
Renseignements sur l’entretien et la garantie
Page 17

Page 18
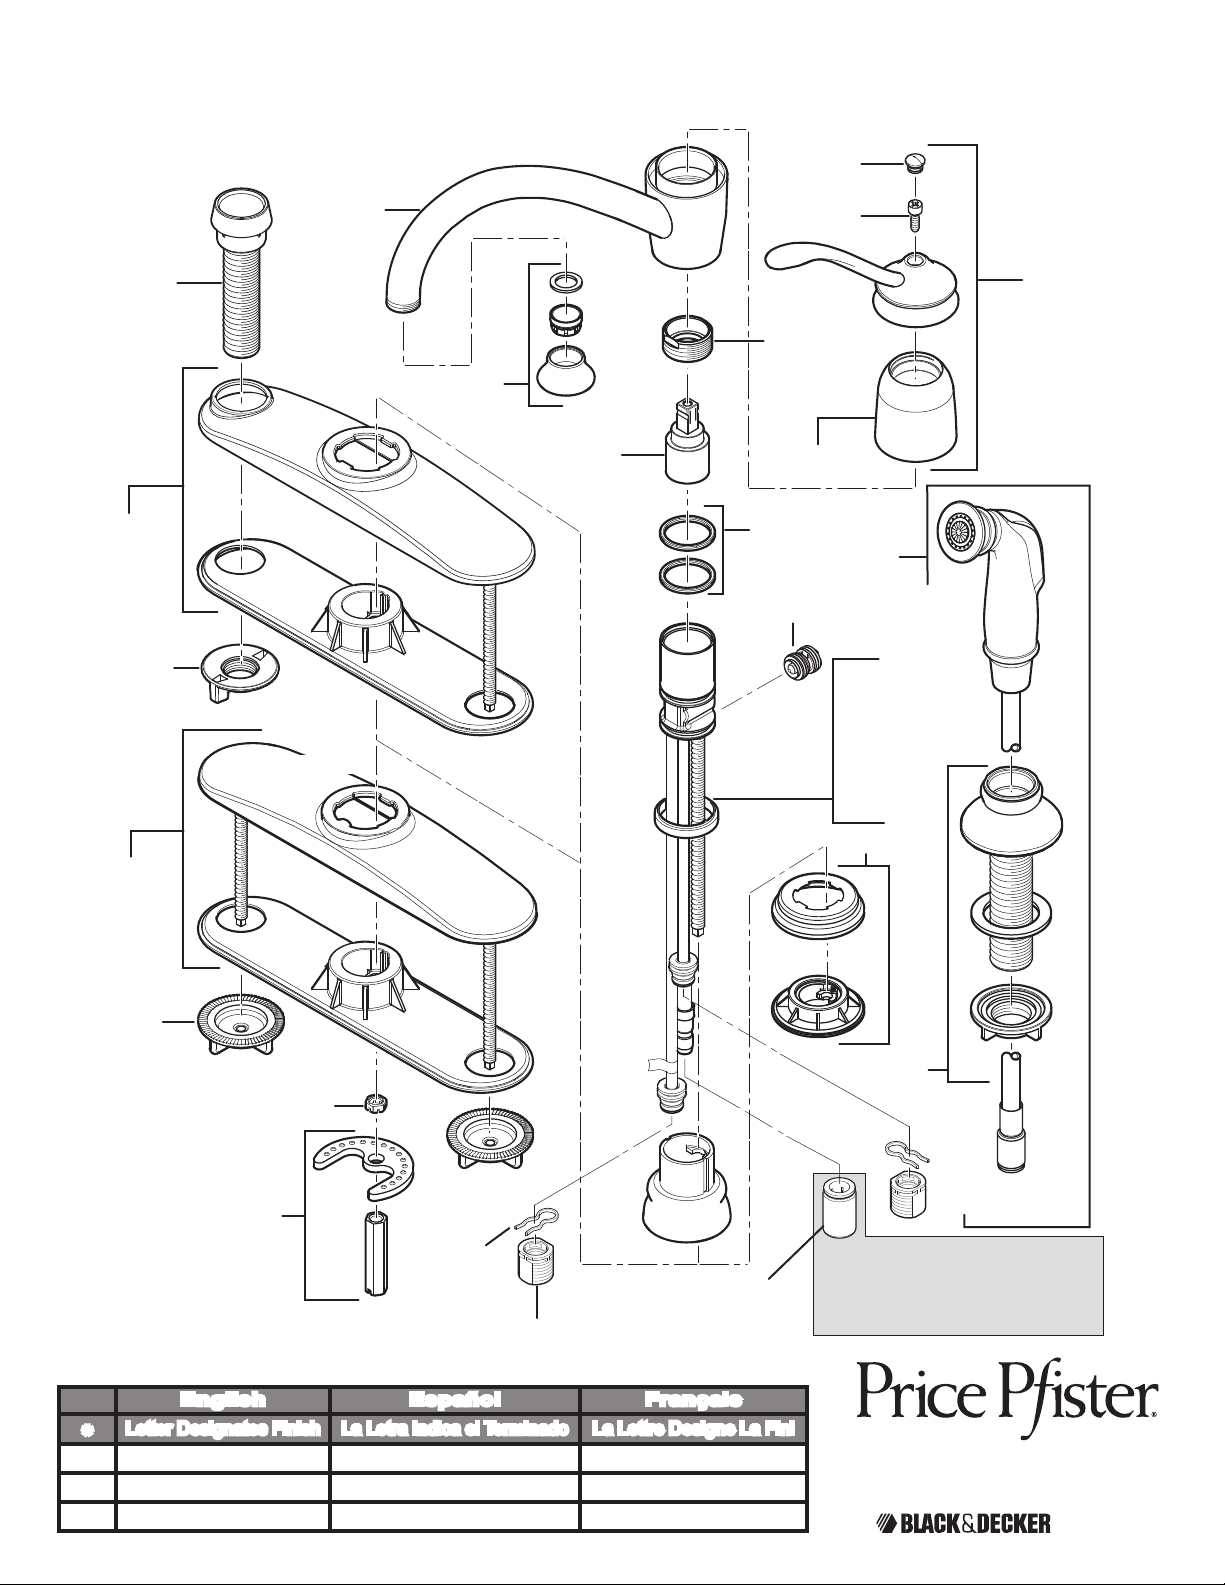
34-4AL ■ 34-3AL
941-900*
951-030*
961-088*
931-960
920-131*
34-3AL
34-4AL
941-561*
974-074
971-058
940-095*
962-075
950-118*
950-165
951-078*
951-084
949-052C
Gray
Gris
Gris
949-052B
Black
Negra
Noire
931-052*
962-029
951-049
962-001
950-198
972-044
970-056
English Español Français
Letter Designates Finish La Letra Indica el Terminado La Lettre Designe La Fini
*
A Polished Chrome Cromo Pulido Chrome Poli
S Stainless Steel Acero Inoxidable Acier Inoxydable
Y Tuscan Bronze Bronce Toscano Bronze Le Toscan
931-046*
931-053*
34-4AL
Order this part separately when installing without
side spray.
Ordene esta parte por separado al instalar sin el
rociador lateral.
Ordonnez cette partie séparément en cas
d’installation sans douchette.
19701 DaVinci
Lake Forest, CA 92610
Phone: 1-800-Pfaucet
www.pricepster.com
A COMPANY
 Loading...