

Page 1

Installation instructions
Contempo series Zero Radius Sink
General Recommendations:
Please read installation and maintenance instructions thoroughly.
Inspect your sink for any noticeable damage before installation.
Check all local applicable plumbing and building codes.
These instructions are based on application to composite material or solid surface countertop installation only;
countertop application to stone, marble, granite or butcher-block should be referred to an experienced
countertop fabricator for custom installation.
Contempo series Zero Radius Sinks are individually hand-crafted and HOUZER suggests using
experienced and professional installers only. For custom cutting of countertop and installation
of the actual sink, on-site installation is also recommended. Acceptable variances are approximately 1/8 of
an inch. Alignment to the cut-out and precise application and trimming of any adhesive sealant are critical to
a superior fit and finished look. Please take extra care in this regard.
HOUZER does not accept any liability for damage to countertop, sink fixture, faucets or personal injury
during installation. Warranty is void if installation instructions are not followed.
Tools and Materials needed:
Tape Measure Framing Square Eye Protection
Hacksaw/Jigsaw Ear Protection Silicone Adhesive Sealant
Rags Shims Wood Braces
Pencil (NOT ink) Denatured Alcohol
Be sure to use proper tools and always wear personal safety devices for your protection.
1
Page 2
INSTALLATION INSTRUCTIONS
Please carefully read complete instructions before beginning installation.
Note: These instructions are for installation with solid surface, composite material countertops.
Houzer recommends professional countertop installers and is not responsible for damages to the
countertop or sink during installation.
1. Unpack the new sink and check the contents of the materials supplied: (1) Sink, (12) Mounting
brackets, (1) Cutout template.
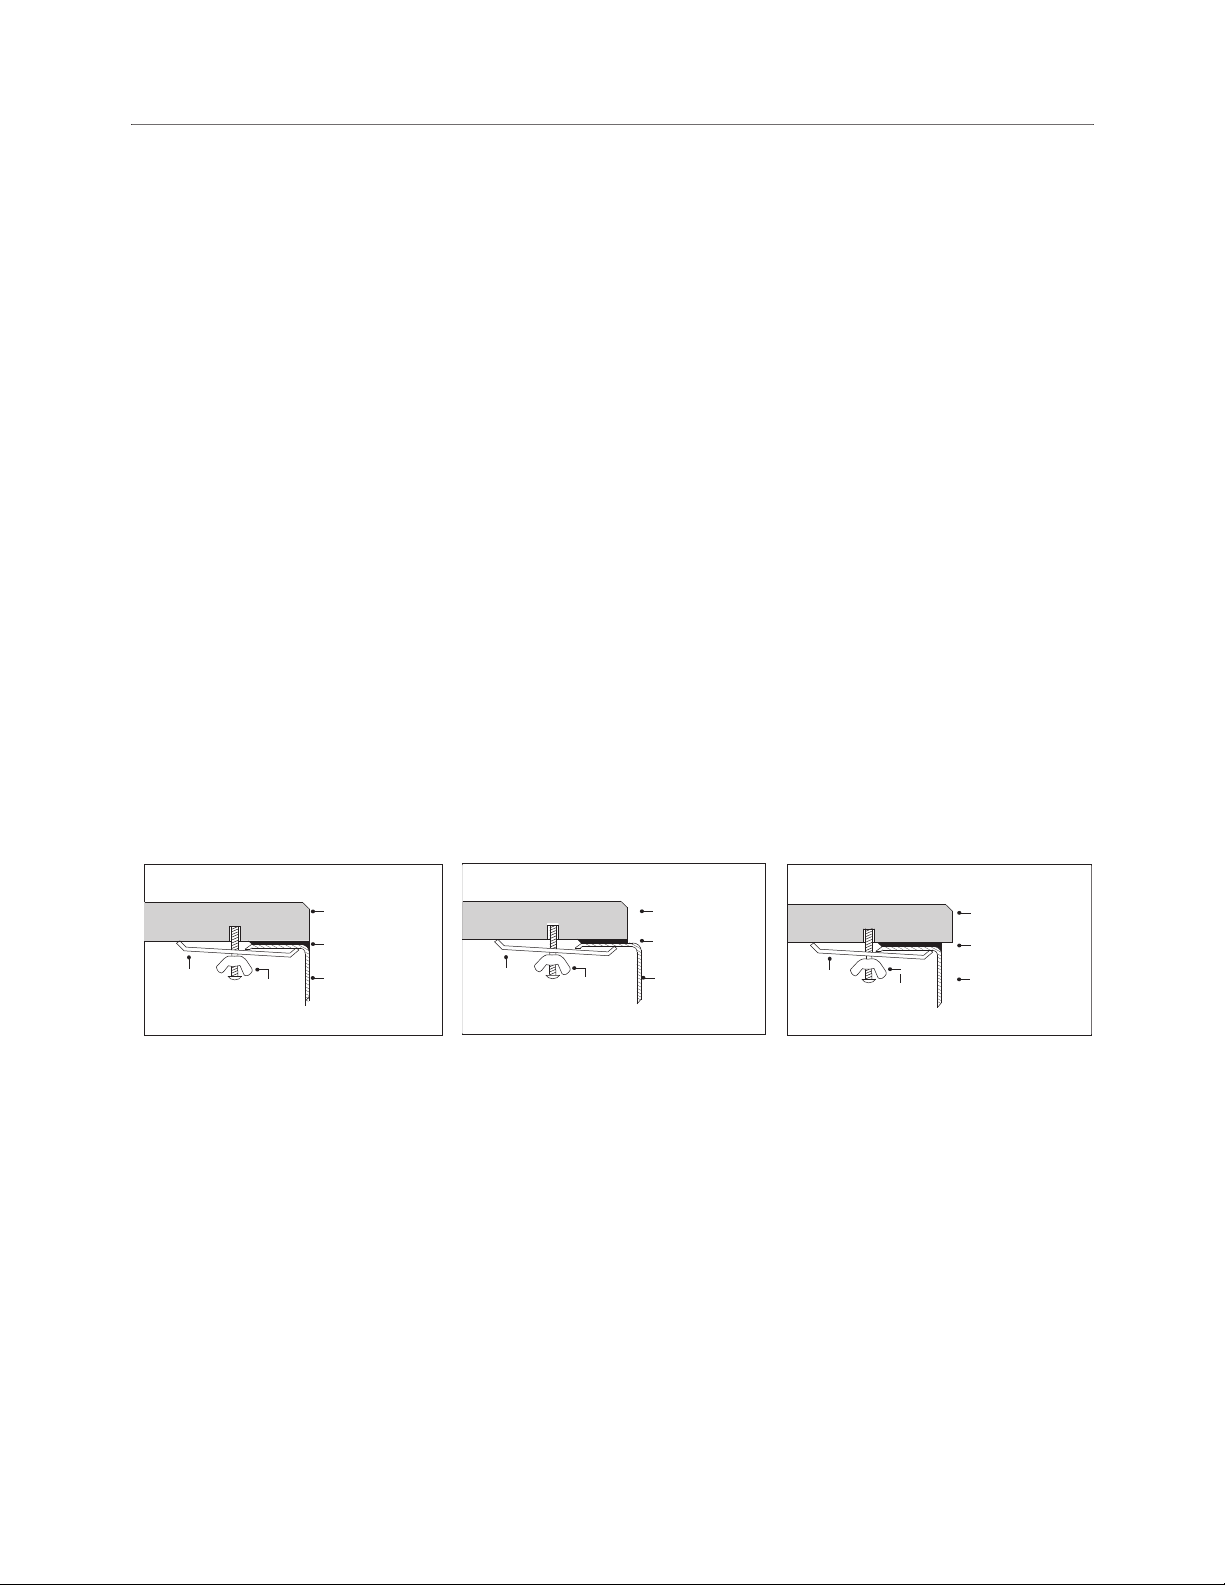
2. Supplied cutout template provides three options of installation:
A. Flush mount: Sink edge is flush with countertop opening. (Figure 1)
B. Reveal mount: Sink rim is exposed approximately 1/4" from the edge of countertop opening.
(Figure 2)
C. Recess mount: Sink rim is recessed approximately 1/8" from the edge of countertop opening.
Cut countertop approximately 1/8" inside of flush mount cut line. (Figure 3)
MOUNTING
BRACKET
FASTENER
Figure 1
COUNTERTOP
SILICONE CAULK
(NOT FURNISHED)
SINK
MOUNTING
BRACKET
FASTENER
Figure 2
COUNTERTOP
SILICONE CAULK
(NOT FURNISHED)
SINK
MOUNTING
BRACKET
FASTENER
Figure 3
COUNTERTOP
SILICONE CAULK
(NOT FURNISHED)
SINK
3. Cut out the appropriate template for your sink model and desired installation option. Place
template in desired position on countertop, locating center of the bowl over cabinet and faucet holes.
4. Trace the outline of the template and cut countertop along the inside of the line using appropriate
cutting tools. Template is for guide only. Use physical sink to ensure accurate cutout opening.
2
Page 3

5. Locate and drill holes on the underside of the counter top,
approximately 1" from edge of the sink to be installed.
Holes should be evenly spaced approximately 6" to 8"
apart starting from every corner as shown in Figure 4.
It is recommended to install a faucet at this point before
installing the sink.
6. Loosely attach mounting brackets to the countertop,
parallel to the cutout opening using
the supplied
mounting screws and butterfly nuts. Mounting screws
with brass inserts are supplied with the sink,
however, countertop materials vary and the correct
type of fasteners should be recommended by your
installer or supplier.
7. Clean sink flange and underside of cutout area of
countertop, making sure that the area is smooth and
free from grease. Apply continuous bead of silicone caulk
evenly on top of sink flange. (Figure 5)
8. Position and align sink over the countertop opening
and press sink onto countertop. Turn bent end of
mounting bracket to snug over the sink rim. (Figure 6)
Figure 4
Figure 5
9. Check alignment of sink again and tighten fasteners
to secure sink.
Figure 6
10. Wipe away excess silicone caulk with a damp cloth. Connect drain and water supply according to
manufacturer's instructions.
3
Page 4

Care and Maintenance
ALWAYS
Clean everyday by thoroughly rinsing with a mild soap and warm water and wipe dry.
•
•
Rub lightly with a soft cloth in the direction of grain lines on a regular basis for additional preventive cleaning.
Keep the sink free of any standing water as this can cause a buildup of mineral deposit, which can affect
•
the appearance of your sink.
Any stubborn stains should be removed by scrubbing in the direction of the grain with a mild abrasive such as Comet.
•
Always rinse the sink after using any cleaning agent and wipe dry.
•
Clean any mineral deposits built up over time with a mild solution of vinegar and water followed by a thorough
flushing with water.
•
Remove any scratches with a Scotch-Brite pad and cleaning agent rubbing in the direction of the
grain. NOT RECOMMENDED FOR MIRROR FINISH.
NEVER
Leave water spots, steel cookware or utensils in the sink for lengthy periods; iron particles often develop rust
•
spots in the stainless steel surface.
•
Use a steel wool or scoring pad as it damages the sink surface and causes discoloration.
•
Let household cleaning agents or bleach sit in your sink for long periods of time as this may ruin the finish
of your sink.
•
Leave rubber mats, sponges or cleaning pads in the sink overnight as this will trap water and could stain and
discolor the sink surface.
•
Use any drain cleaning products containing sulfuric or hydrochloric acid as this will attack the sink.
Silver cleaners can also contain acids that will damage the sink surface.
Use the inside of the sink as a cutting surface.
•
Lifetime Limited Warranty
HOUZER stainless steel sinks are produced to the highest manufacturing standards and are covered by a limited lifetime
warranty that protects the original purchaser against any defects in materials and workmanship under normal use.
If upon determination by HOUZER that the sink is defective, HOUZER will replace without charge, with an equivalent sink or
refund, will be sent to the original purchaser that it has been used in a residential application and installed, used and maintained
according to the instructions supplied with the sink, and not damaged due to abuse, misuse or negligence. This warranty
will not cover any labor charges incurred in installation, removal, replacement or repair, transportation cost or any
consequential damages, which might be caused by the product. HOUZER shall not be liable in case of ;
•
HOUZER Inc.
©HOUZER 2007 All rights reserved
Improper installation or modification of original product
•
Damages resulting from abuse, such as scratches by dropping heavy objects into the sink
•
Scratches resulting from scrubbing with steel wool, abrasive pads or cleaners
•
Improper application such as exposure to corrosive chemicals, or photographic solutions
•
Any commercial application
If the original purchaser finds a defect in material or workmanship, please contact HOUZER Warranty Service,
2605 Kuser Road, Hamilton, NJ 08691
expand or modify this warranty. This warranty supersedes all other warranties, expressed or implied.
2605 Kuser Road, Hamilton, NJ 08691
. Please include proof of purchase-save sales receipt. The law in some states may
Phone 1.800.880.3639 Fax 1.609.584.1930 www.HouzerSink.com
4
 Loading...