

Facom E.316-30D, E.316-135D, E.316-200D, E.316-340D User guide
t
L
mm mm kg
9 x 12 1/4’’ 360 1,52
375 1,52
3/8’’
1/2’’
kg.cm
mini. max.
in.lb
min. max.
ft.lb
min. max.
N.m
SPECIFICATIONS
ISO 6789 Type 2 Classe A Torque wrench precision : ± 2%
min. max.
1,5 ➜ 30 1,11 ➜ 22,12 13,3 ➜ 265,5 15,3 ➜ 306,1
E.316-30D
6,8 ➜ 135 5 ➜ 99,5 60 ➜ 1195 69 ➜ 1378 9 x 12
E.316-135D
14 x 18 1/2’’ 594 2,56
14 x 18 1/2’’ 474 2,4
17 ➜ 340 12,5 ➜ 250,7 150 ➜ 3009 173 ➜ 3469
10 ➜ 200 7,4 ➜ 147,5 88 ➜ 1770 102 ➜ 2041
E.316-340D
E.316-200D
EN
Dear Customers,
Thank you for purchasing our digital torque wrench. This manual will help you
to use the many features of your new digital torque wrench. Before operating
the torque wrench, please read this manual completely, and keep it
nearby for future reference
MAIN FEATURES
■ Head Interchangeable
■ Digital torque value readout
■ +/-2 % accuracy
■ +/-2 ° accuracy for 90° angle rotation
■ CW and CCW operation
■ Peak hold and track mode selectable
■ Buzzer and LED indicator for the 9 pre-settable target torques
■ Engineering units (N-m, ft-lb, in-lb, kg-cm, ‘‘°’’) selectable
■ 50 or 250 data memory for recall and joint torque auditing
■ Auto Sleep after about 2 minutes idle
■ Both AA and rechargeable batteries are compatible
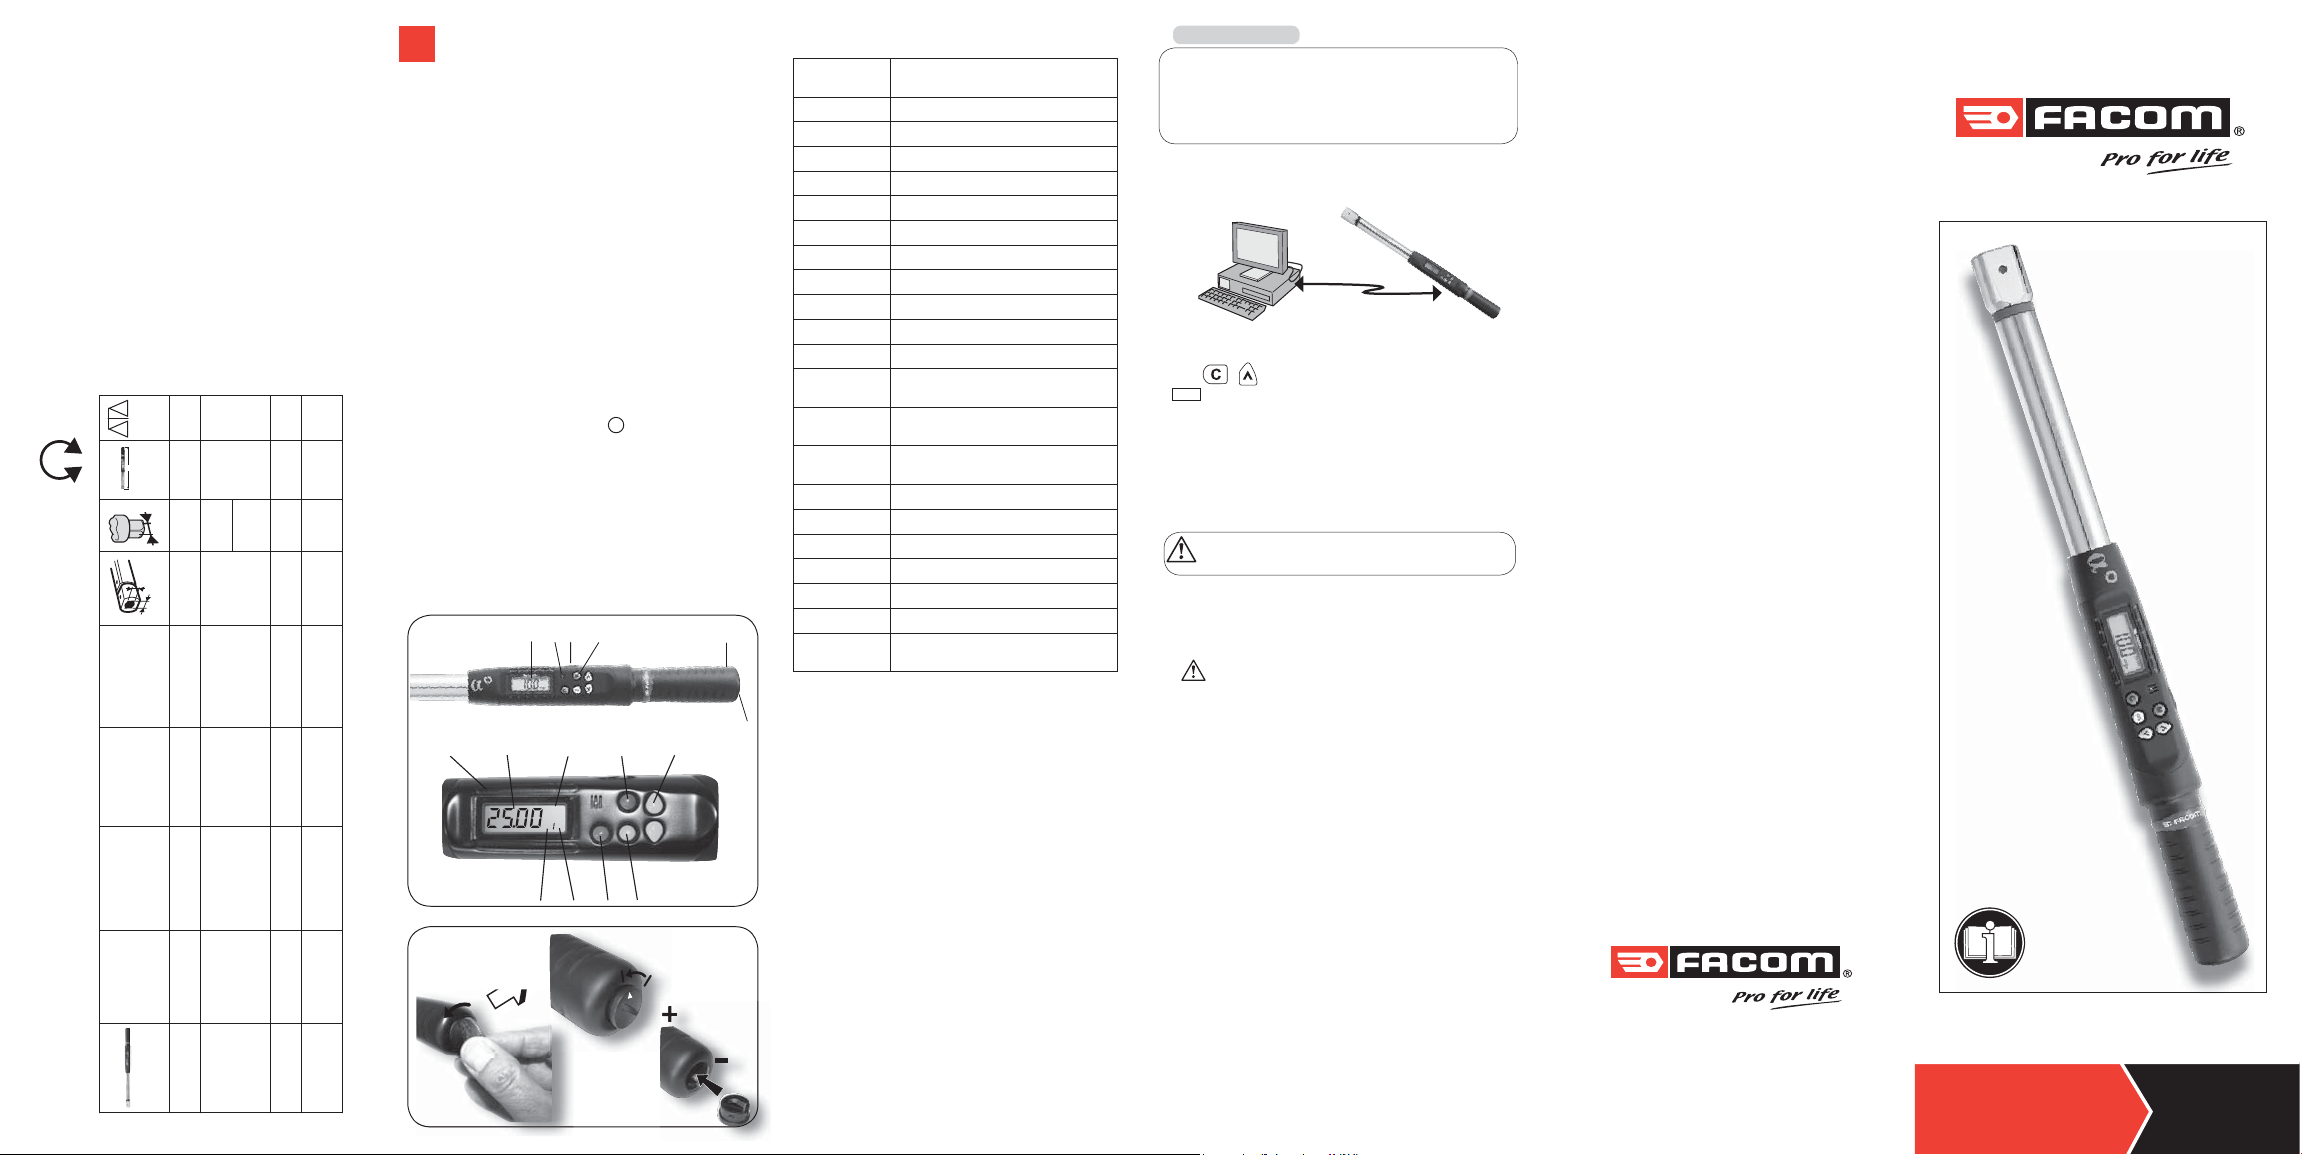
NAMES AND FUNCTIONS OF PARTS A
1. LCD Display 9. Max. Value Index
2. Buzzer 10. Units(N.m, ft-lb, in.lb, kg.cm)
3. Communication Port 11. P(Peak hold mode) /T(Track mode)
4. Buttons 12. Clear Button
5. Battery Compartment 13. Max. Value Select
6. Battery Cover 14. Unit/Setting Button
7. LED Indicator 15. Up/Down Button
8. Torque / Angle value
A
1 2 3 4 5
6
7 8 10 13 15
N.m
M
T
9 11 12 14
B
➩
SPECIFICATIONS
E.316-30D - E.316-135D
E.316-200D - E.316-340D
Torque Accuracy *1 ±2%
Angle Accuracy *2
Data memory size 250
PC Connectivity *3 Yes / USB
Pre-setting No. 9 sets
Bright LED 12 LED / 2 Red+10 Green
Operation Mode Peak Hold / Track
Unit Selection N.m, ft.lb, in.lb, kg.cm
Head Type Round Head Ratchet Insert
Button 2
Battery AA x 2
Battery Life *4
(Continuous operation)
Battery Life *4
(Standby)
Operating Tempe-
rature
Storage Temperature
Humidity Up to 90% non-condensing
Drop Test 1 m
Vibration Test *5 10 G
Life time *6 10000 cycle
Environmental test *7 Pass
Electromagnetic
compatibility test *8
+/-2 ° for 90° angle rotation
60 hrs.
1 Year
-10°C ➜ 60°C
-20°C ➜ 70°C
Pass
Note:
*1: The accuracy of the readout is guaranteed from 20% to 100% of
maximum range + /- 1 increment. The torque accuracy is a typical value.
Calibration line is at the middle line of the dark spot on the rubber handle. For
keeping the accuracy, calibrate the wrench for a constant period time (1 year).
And the accuracy is based on the zero degree of offset from perpendicular drive.
*2: The angle accuracy is guaranteed at + /- 2° when rotating wrench to
90° at the speed of 30°/sec.
Use a special designed USB cable (accessory) to upload record data to PC.
*3:
*4: Use two AA batteries (Test condition: Toshiba carbon-zinc R6UG battery)
*5: Horizontal and vertical test
*6: One cycle means swing the torque wrench from 0 N.m to maximum
range and back to 0 N.m.
*7: Environmental test:
a. Dry heat e. Impact (shock)
b. Cold f. Vibration
c. Damp heat g. Drop
d. Change of temperature
*8: Electromagnetic compatibility test:
a. Electrostatic discharge immunity (ESD)
b. Radiated susceptibility
c. Radiated emission
COMMUNICATION
Precaution:
1. Communication function is only supported on some models. Check the
model no. and its specifi cation before using communication function.
2. Do not insert the plug of communication cable into torque wrench that
does not support communication function.
CONNECTING COMMUNICATION CABLE
• Connect the accessory cable between the USB COM port of PC and
torque wrench.
UPLOADING RECORD DATA
• Make sure the connection between PC and wrench is normal.
• Press together to reset the wrench.
• Change the wrench operation mode to “Send”. (Refer to “Peak Hold
Mode Recorded Value Review ” section)
• Use PC to start the uploader program.
• In uploader program, fi rst select the correct COM port No.
• Next, select the fi le path to save the uploaded data.
• Finally, press “upload” button to transmit the torque records to PC.
• The uploaded data is then shown on the column and saved in the *.csv
fi le. Use Microsoft Excel to view *.csv fi le.
CAUTIONS:
Refer to the uploader program user guide for the detail operations
.
MAINTENANCE AND STORAGE
ATTENTION:
One-year periodic recalibration is necessary to maintain accuracy.
Please contact your local dealer for calibrations.
CAUTION:
1.
Over-torque (110% of Max. torque range) could cause breakage or lose accuracy.
2. Do not shake violently or drop wrench.
3. Do not use this wrench as a hammer.
4. Do not leave this wrench in any place exposed to excessive heat,
humidity, or direct sunlight.
5. Do not use this apparatus in water.(not waterproof)
6. If the wrench gets wet, wipe it with a dry towel as soon as possible. The
salt in seawater can be especially damaging.
7. Do not use organic solvents, such as alcohol or paint thinner when
cleaning the wrench.
8. Keep this wrench away from magnets.
9.
Do not expose this wrench to dust or sand as this could cause serious damage.
10. Do not apply excessive force to the LCD panel.
11. Apply torque slowly and graspe the center of the handle. Do not apply
load to the end of handle
BATTERY MAINTENANCE
When the wrench is not used for an extended period of time, remove the battery.
1.
2. K
eep a spare battery on hand when going on a long trip or to cold areas.
3. Do not mix battery types or combine used batteries with new ones.
4.
Sweat, oil and water can prevent a battery’s terminal from making elec-
trical contact. To avoid this, wipe both terminals before loading a battery.
5. Dispose of batteries in a designated disposal area. Do not throw
batteries into a fi re.
FACOM Belgie B.V.B.A.
BELGIQUE
LUXEMBOURG
DEUTSCHLAND
Egide Walschaertsstraat 14-16
2800 MECHELEN
BELGIQUE
✆
: +32 (0) 15 47 39 35
Fax : +32 (0) 15 47 39 71
FACOM NORDEN
DANMARK
Nordre Strandvej 119B
FINLAND
3150 HELLEBÆK
ISLAND
DENMARK
NORGE
✆
SVERIGE
ESPAÑA
PORTUGAL
: +45 49 76 27 77
Fax : +45 49 76 27 66
FACOM
Stanley Deutschland GmbH
Otto-Hahn-Straße 9
42369 Wuppertal
DEUTSCHLAND
✆
: +49 202 69 819-329
Fax : +49 202 69 819-350
FACOM Herramientas S.L.
Poligono industrial de Vallecas
C/Luis 1°, s/n-Nave 95 - 2°Pl.
28031 Madrid
ESPAÑA
✆
: +34 91 778 21 13
Fax : + 34 91 380 65 33
SWK Utensilerie S.r.l.
ITALIA
Via Volta 3
21020 Monvalle (VA)
ITALIA
✆
: (0332) 790 381
Fax : (0332) 790 307
En France, pour tous renseignements techniques sur l'outillage à main,
téléphonez au : 01 64 54 45 14
NETHERLANDS
MAGYARORSZAG
FRANCE
INTERNATIONAL
&
FACOM S.A.S.
6-8, rue Gustave Eiffel B.P.99
F-91423 Morangis cedex
FRANCE
✆
: 01 64 54 45 45
Fax : 01 69 09 60 93
http:/ /www.facom.com
FACOM Gereedschappen BV
Martinus Nijhofflaan 2
2624 ES DELFT
P.O. BOX 1007 . 2600 BA Delf
NETHERLANDS
✆
Fax : 0800 237 60 20
FACOM TOOLS FAR EAST
SINGAPORE
N° 25 Senoko South Road
FAR EAST
Woodlands East Industrial Estate
Singapore 758081
SINGAPORE
✆
Fax : (65) 6752 2697
FACOM WERKZEUGE GMBH
SUISSE
Ringstrasse 14
ÖSTERREICH
8600 DÜBENDORF
SUISSE
ČESKÁ REP.
✆
Fax : 41 44 802 8091
FACOM-UK
UNITED
Europa view
KINGDOM
SHEFFIELD BUSINESS PARK
EIRE
Europa link
SHEFFIELD S9 1 XH
ENGLAND
✆
Fax : (44) 114 273 9038
FACOM Tools Polska Sp. zo.o.
POLSKA
ul.Modlińska 190
03-119 Warszawa
POLSKA
✆
Fax : (48 22) 510-3656
: 0800 236 236 2
: (65) 6752 2001
: 41 44 802 8093
: (44) 114 244 8883
: (48 22) 510 3627
E.316-30D
845011
E.316-200D
845038
Instruction manual
E.316-135D
845020
E.316-340D
845046
NUen-E.316/0410
BEFORE USING THE WRENCH
BATTERY INSTALLATION B
•
Remove the battery cover.
• Insert two AA batteries matching the -/+ polarities of the battery to
the battery compartment.
• Put on the battery cap and rotate it tightly according to the following
fi gures.
POWER ON AND RESETTING THE WRENCH
• Press to power on the digital torque wrench.
• Usually press to reset the digital torque wrench before using it.
ATTENTION:
N.m
M
T
If an external force is applied to the torque wrench during power-on/reset
or wake up period, an initial torque offset will exist in the memory.
ACTIVATION DURING SLEEP MODE
• The wrench will auto sleep after about 2 minutes idle for power
saving. Press
to wake up the wrench during the sleep mode.
CAUTIONS:
During communication period (Send appears), the sleep function is disabled.
RESETTING THE WRENCH
• To reset the wrench, loosen the battery cap then tighten it to re-start.
• After reset, remember to press
.
LOW BATTERY VOLTAGE PROTECTION
• If the battery serial voltage is under 2.3 volts, the wrench will display
a battery symbol and then turn off after a while.
N.m
M
T
SET UP
4
1 . Power On/Clear
2 . Unit Selection/Setting
3 . Up/Down Button
4 . Pre-Setting No.
3
2
1
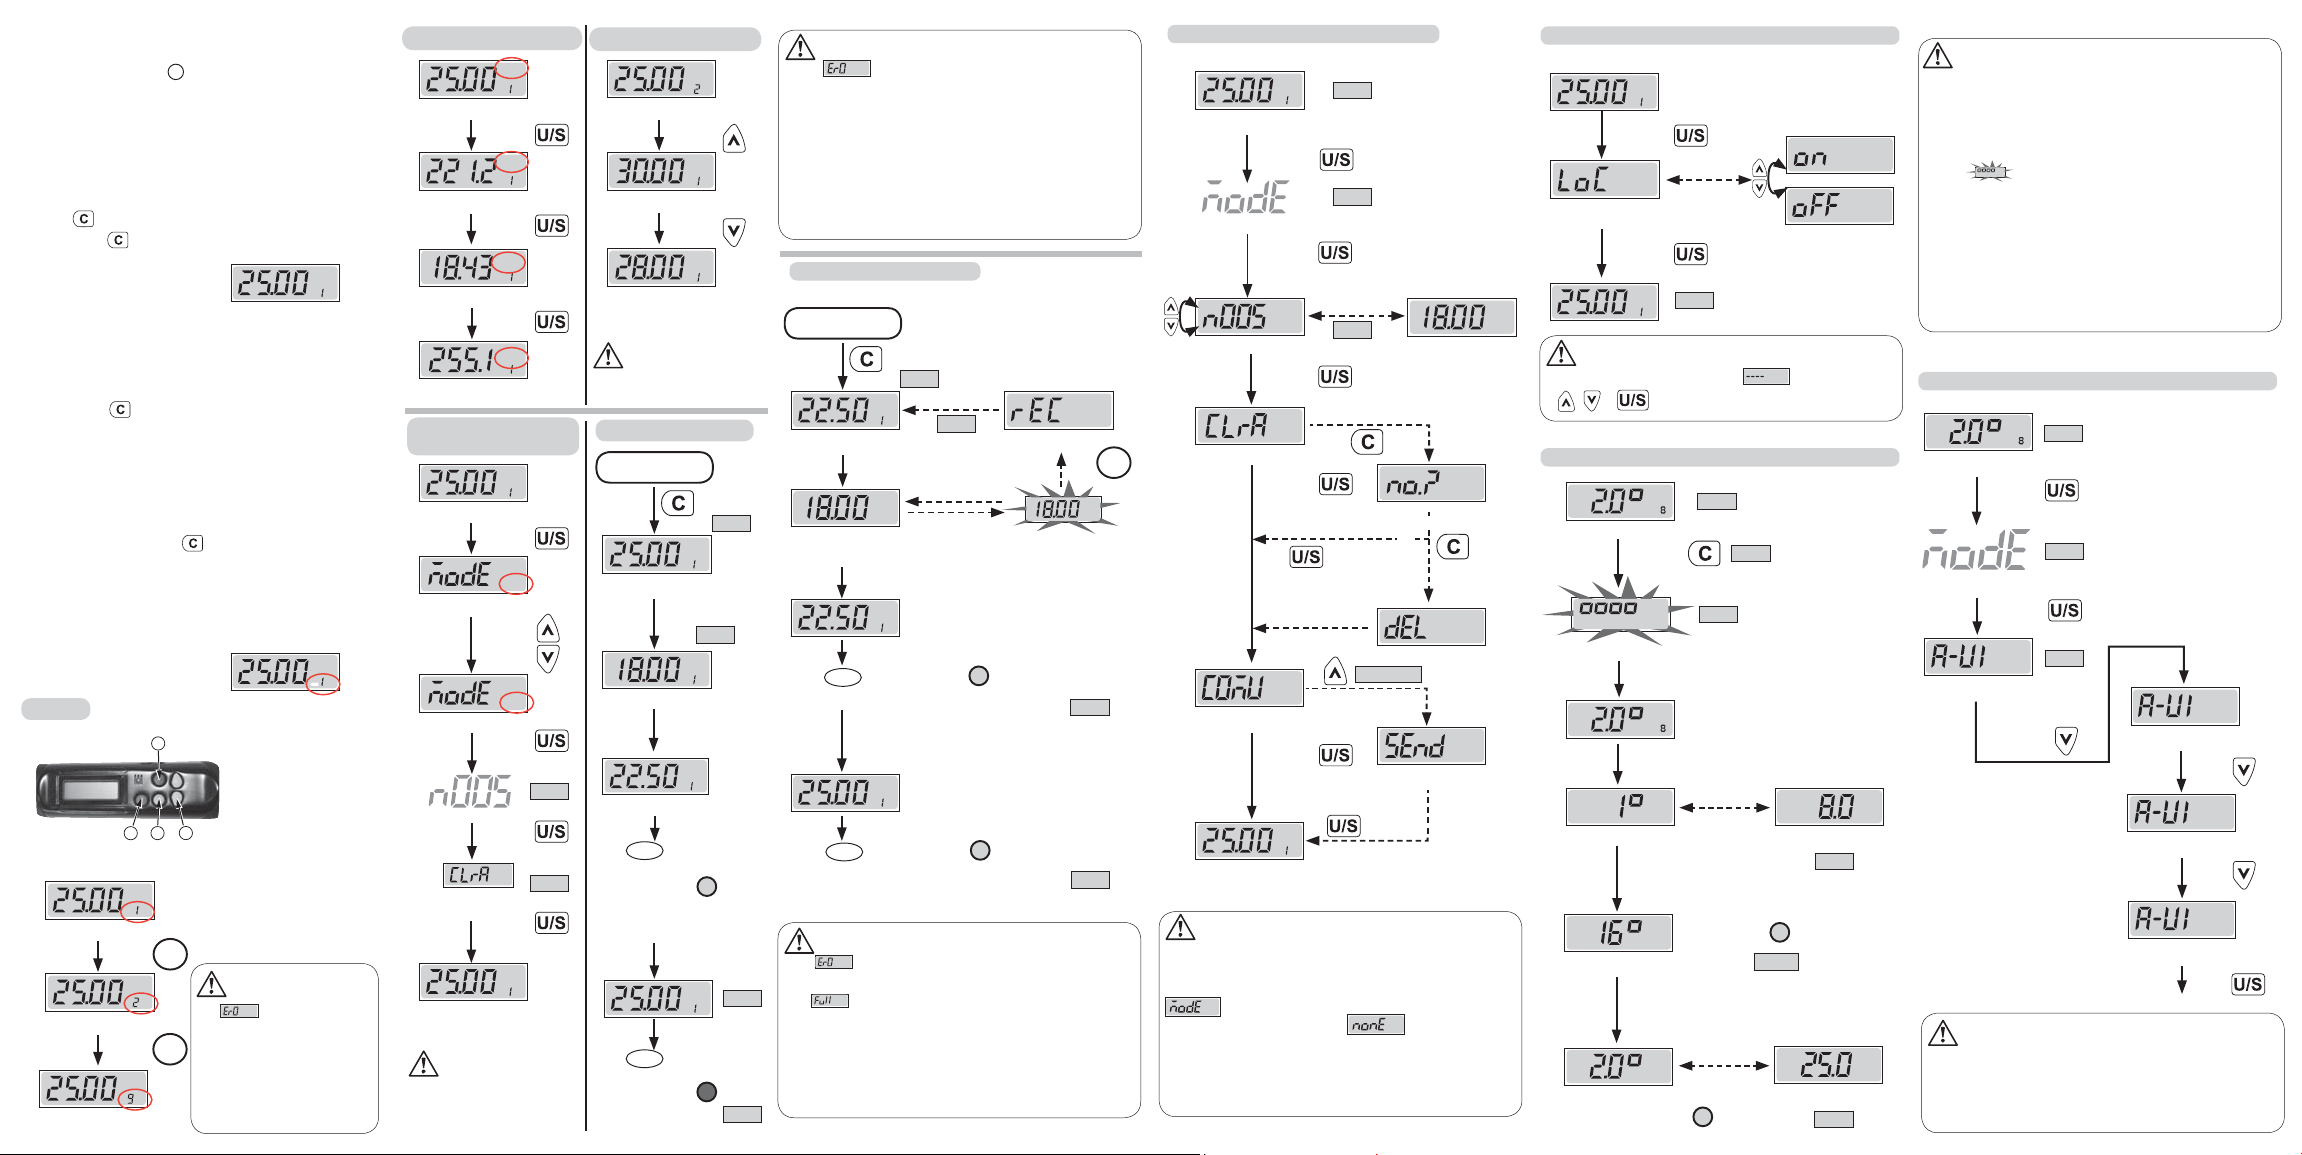
STEP 1: PRE-SETTING NO.
N.m
M
T
Pre-setting: M1
Note:
1.If is appeared, that
Pre-setting: M2
means this wrench has ever been
applied more than 110% of maximum
torque.
2.The maximum capacity for
“Pre-setting No.” is 9 sets.
3.
Pre-setting: M9
N.m
M
Press
N.m
M
Press
M
T
M
T
The “Pre-Setting No.” is in sequential.
STEP 2: UNIT SELECTION
N.m
M
T
Pre-setting: Unit: N.m
Press
in.lb
M
T
Pre-setting: Unit: in.lb
Press
ft.lb
M
T
Pre-setting: Unit: ft.lb
Press
kg.cm
M
T
Pre-setting: Unit: kg.cm
STEP 4: PEAK HOLD /TRACK
MODE SELECTION
N.m
M
T
Track Mode
Long Press
T
Set Peak/Track mode
Press
for selection
Set Peak/Track mode
P
Press
*Note 1
Record No.
Press
*Note 1
Clear Record
Press
N.m
M
P
Peak Hold Mode
Note:
1.Please skip this procedure and
continue to the next spet.
STEP 3: SET TORQUE VALUE
N.m
M
T
Pre-setting Torque Value
Press
N.m
M
T
Increase Max. Torque Value
Press
N.m
M
T
Decrease Max. Torque Value
Note:
1.The “Unit Selection” is in sequential.
TRACK MODE OPERATION
START
(system initial)
*Note 1
N.m
M
T
Max. Target Value
Apply torque over 5 N.m
*Note 2
N.m
M
T
Current Torque Value
Over 80% of Max.
Target Value
N.m
M
PT
Current Torque Value
((...((... ...))...))
Buzzer
((...((... ...))...))
Green LED
Over 80% of Set Torque
Approach
Max.
Target Value
N.m
*Note 3
M
T
(((((((( ))))))))
Buzzer
(((((((( )))))))
Red LED
Approach Max. Set Torque
*Note 4
Note:
1. If
is appeared, that means this wrench has ever been
applied over than 110% of maximum torque.
2. When using track mode, if you apply torque over 5 N.m, the LCD
dispay will start to display the torque value. If the applied is less than
5 N.m, the LCD display does not have any value changes.
The smallest torque for E.316-30D series is 0.5 N.m.
3. The green LED will be on for 80%, 85%, 90%, 95% and 97.5% of
maximum setting torque.
4. The red LED will be on 99,5% of maximum setting torque.
PEAK HOLD MODE OPERATION
START
(system initial)
*Note 1
N.m
M
P
Max. Target Value
Apply torque
Current Max. Value
*Note 2
Released
N.m
P
Apply torque
Recording
Flashing
M
N.m
P
(Peak Hold)
N.m
M
P
((...((... ...))...))
Buzzer
((...((... ...))...))
Green LED
Over 80% of Set Torque
*Note 3
Approach Max. Target Value
N.m
M
P
((((((( )))))))
Buzzer
((((((( ))))))))
Red LED
Approach Max. Set Torque
*Note 4
Note:
1. If
is appeared, that means this wrench has ever been
applied over than 110% of maximum torque.
2. If
is appeared, that means the wrench’s memory is full and
the next value record can not be written in. Please refer the “Peak Hold
Mode Recorded Value Review” section to clear the momory data.
3. The green LED will be on for 80%, 85%, 90%, 95% and 97.5% of
maximum setting torque.
4. The red LED will be on for 99,5% of maximum setting torque.
PEAK HOLD MODE RECORDED VALUE REVIEW
N.m
*Note 1
M
P
Peak Hold/Track Mode
Long Press
*Note 2
Set Peak/Track Mode
Press
Auto Change
*Note 3
N.m
Record Value
Record No.
Press
Clear Record
Press
Yes
(give up)
No
(Clear)
Deleted
*Note 4, 5, 6
Communication
Press
Communication
N.m
M
P
(Exit)
Peak Hold/Track Mode
Note:
1. The “Peak Hold” mode recorded value review also can be operated in
“Track” mode operation.
2. If you operate in the “Peak Hold” mode, the display will show
and please go to next step.
P
3. If the record is empty, it will show
.
4. This function is not supported on all type of models.
5. Communication mode is for uploading record data to PC.
6. Communication mode is also for calibration of torque wrench. Please
contact your local dealer for more information.
KEY LOCK
N.m
M
P
Long Press
Auto Change
Lock on/off selection
Press
N.m
*Note
M
P
Note:
If ‘‘LoC on’’ is set, the display will show
, ,
ANGLE MODE OPERATION
*Note 1
M
Angle Mode
Press
*Note 3
Flashing
M
Apply force and turn
Loose
Current Angle
Auto Change
Apply force and turn
Approach 80% of target degree
Reach 80% of target degree
Apply force and turn
Approach target degree
Loose
Auto Change
Current Degree
((...((... ...))...))
while pressing
*Note 2
Current Torque
*Note 4
((...((... ...))...))
*Note 5
Current Torque
*Note 6
Note 2:
1. When entering angle mode, the unit will be Degree.
2. When angle is in auto initial mode, please keep the wrench steady
without any disturbance.
3. After a while, the angle function will be in initiative mode with the
fl ashing
.
4. When loosing the wrench with angle mode, the display will show the
corresponding torque value with fl ashing state.
5. The Green LED will be on with 80%, 85%, 90%, 95% and 97.5% of
target degree.
6.
When reaching the target degree, the green and red LED will be on at the
same time.
TORQUE UNIT SELECTION UNDER ANGLE MODE
*Note 1
M
Angle Mode
Long Press
*Note 2
Set Peak/Track Mode
Press
N.m
*Note 3
Pre-setting Unit: N-m
Press
Unit Selection: in-lb
in.lb
Press
N.m
ft.lb
Pre-seting Unit: ft-lb
Press
kg.cm
Pre-setting Unit: kg-cm
Press
N.m
Note:
1. The unit setting could be also entered from the torque mode.
2. Please skip the procedure and go to next step.
3. The unit selection is cyclic
 Loading...