

Page 1
TX16 Expansion & Direct Attached SAS Storage
Setup Guide
Prior to installing your new hardware, please contact
Facilis Support for further installation instructions.
To reach support please call 1 978 562 7022 option
2 or email [email protected]
1
Page 2

TO THE EXTENT ALLOWED BY LOCAL LAW, NEITHER FACILIS TECHNOLOGY NOR ITS THIRD PARTYSUPPLIERS
MAKE ANY OTHER WARRANTY OR CONDITION OF ANY KIND, WHETHER EXPRESS OR IMPLIED, WITH RESPECT TO
THE FACILIS TECHNOLOGY PRODUCTS, AND SPECIFICALLY DISCLAIM THE IMPLIED WARRANTIES OR CONDITIONS
OF MERCHANTABILITY, SATISFACTORY QUALITY, AND FITNESS FOR A PARTICULAR PURPOSE.
Limitations of Liability
To the extent allowed by local law, the remedies provided in this Warranty Statement are the customer's sole and exclusive
remedies.
TO THE EXTENT ALLOWED BY LOCAL LAW, EXCEPT FOR THE OBLIGATIONS SPECIFICALLY SET FORTH IN THIS WARRANTY
STATEMENT, IN NO EVENT SHALL FACILIS TECHNOLOGY OR ITS THIRD PARTY SUPPLIERS BE LIABLE FOR DIRECT, INDIRECT,
SPECIAL, INCIDENTAL, OR CONSEQUENTIAL DAMAGES, WHETHER BASED ON CONTRACT, TORT, OR ANY OTHER LEGAL THEORY
AND WHETHER ADVISED OF THE POSSIBILITY OF SUCH DAMAGES.
Local Law
This Warranty Statement gives the customer specific legal rights. The customer may also have other rights that vary from state to
state in the United States, from province to province in Canada, and from country to country elsewhere in the world.
To the extent that this Warranty Statement is inconsistent with local law, this Warranty Statement shall be deemed modified to be
consistent with such local law. Under such local law, certain disclaimers and limitations of this Warranty Statement may not apply to
the customer. For example, some states in the United States, as well as some governments outside the United States (including
provinces in Canada), may:
Preclude the disclaimers and limitations in this Warranty Statement from limiting the statutory rights of a consumer (e.g., the United
Kingdom);
Otherwise restrict the ability of a manufacturer to enforce such disclaimers or limitations; or Grant the customer additional warranty
rights, specify the duration of implied warranties which the manufacturer cannot disclaim, or not allow limitations on the duration of
implied warranties.
FOR CONSUMER TRANSACTIONS IN AUSTRALIA AND NEW ZEALAND, THE TERMS IN THIS WARRANTY STATEMENT, EXCEPT TO
THE EXTENT LAWFULLY PERMITTED, DO NOT EXCLUDE, RESTRICT, OR MODIFY, AND ARE IN ADDITION TO, THE MANDATORY
STATUTORY RIGHTS APPLICABLE TO THE SALE OF FACILIS TECHNOLOGY PRODUCTS TO SUCH CUSTOMERS.
© Facilis Technology Inc. TX16 Direct-attached SAS Storage – Setup Guide 7.1, March 2018
2
Page 3

Table of Contents Page Number
Chapter 1 – Using This Guide 04
Who Should Use This Guide
What This Guide Contains
Symbols and Conventions
Documentation Comments
How to Download this Manual
Chapter 2 – Overview & Hardware 05
Overview
Features
Hardware
Dimensions
Tools and Utilities
Chapter 3 – Installation for TerraBlock Expanded Storage 09
Server RAID Adaptor Installation
Cabling
Power Cord
Bringing the RAID Set Online
Taking the RAID Set Offline
Adding the TX16 Volume for Multi-user Write
Chapter 4 – Installation for Direct Attached Storage 12
Before You Begin
Environmental Considerations
Electrical Specifications
System Setup
RAID Adaptor Installation
Cabling
Power cord
Bringing Raid Set Online
Client Configuration
Appendix A – Recreating disk set 15
Recreate Disk set
Appendix B – Upgrading R680 Firmware 18
Firmware Settings During Upgrade
3
Page 4

Chapter 1 - Using This Guide
Who Should Use This Guide
This guide is intended for any user or administrator of the TX16 SAS Storage
system.
What This Guide Contains
This guide covers the information you will need to:
Understand the concept behind the TX16
Hardware components and connections
Adding the TX16 to a TerraBlock server
Direct connect instructions
Understand the workflow of the TX16
Symbols and Conventions
Important Caution or Instruction
Related Information or Tip
Checklist
Description or Definition
Documentation Comments
If you have comments relating to the documentation, please Email
[email protected], and specify the page and error or omission in the guide.
How to Download This Manual
We offer a download location on our main web site. Go to www.facilis.com and click
on Downloads on the top of the home page - follow instructions.
4
Page 5

Chapter 2 – Overview & Hardware
Overview
The Facilis TX16 is a Serial Attached SCSI (SAS) storage enclosure featuring
expansion capabilities for a TerraBlock 24D or fully populated TerraBlock 24EX. The
TX16 SAS interface supports up to 32 Terabytes (TB) of disk storage designed for
Post Production and Content Creation applications. The TX16 product is supported as
direct attached server on Windows®, Linux and Macintosh operating systems out of
the box. TerraBlock expansion is supported with Windows® 7 64Bit version.
Features
The Facilis TX16 SAS storage enclosure is a sixteen-drive array supporting RAID
Level SATA drives. The TX16 ships with 4 and 8 Terabyte (TB) capacity drives and
provides capacity up to 128 Terabytes (TB) of expandable or raw storage in a single
enclosure.
TerraBlock Expansion Storage
The TX16 is also designed to be expansion or “add-on” storage to an existing
TerraBlock 24D or fully populated TerraBlock 24EX.
The Facilis TX16 SAS chassis is connected via the ATTO SAS H680 Host Bus Adapter
(HBA) controller board. Once installed, the TerraBlock server active drive set is
expanded to include the TX16.
Once attached to the TerraBlock server, the TX16 will be seen as usable storage via
the TerraBlock Managers user interface. Virtual volumes can be created with raid
protection using the TerraBlock servers DynaRaid functionality (see TerraBlock User
Guide for creating and managing virtual volumes).
Direct Attached
The TX16 can also be used as direct attached client storage. It comes “turn-key”
pre-configured for direct attached use. The RAID set has already been built with
factory presets. Some client configuration is required.
The ATTO Configuration Tool allows both easy configuration and access to detailed
operational information about the Facilis TX16 SAS.
The Facilis TX16 SAS is powered by the ATTO SAS RAID R680 Host Bus Adapter
(HBA) controller board. Once installed in your Windows, Macintosh, or Linux
workstation in a PCI Express (PCIe®) slot, the RAID controller board provides SAS
connectivity and RAID functionality.
The Facilis TX16 SAS storage is pre-configured RAID level 5 out of the box. RAID
level 6 is supported as well, but will require recreating the RAID set (see Appendix
A). In a Facilis TX16 SAS storage 16-drive system, if a drive fails, the TX16 storage
can automatically begin the rebuild process once a new drive is installed into the
enclosure.
5
Page 6
Hardware Components Kit
Depending on the TX16 SAS enclosure application (direct attached or expansion)
hardware components will slightly differ. Each Facilis TX16 enclosure kit contains:
TX16 enclosure with eight (16) SATA Disk drives
1 Spare drive
ATTO R680 ExpressSAS RAID PCIe HBA (direct attached or near-line)
ATTO H680 HBA (expansion)
2 MiniSAS cable (three meter length)
2 Power cords
USB Key with Drivers, Documentation, and Utilities such as the ATTO
Configuration Tool for easy configuration.
Hardware
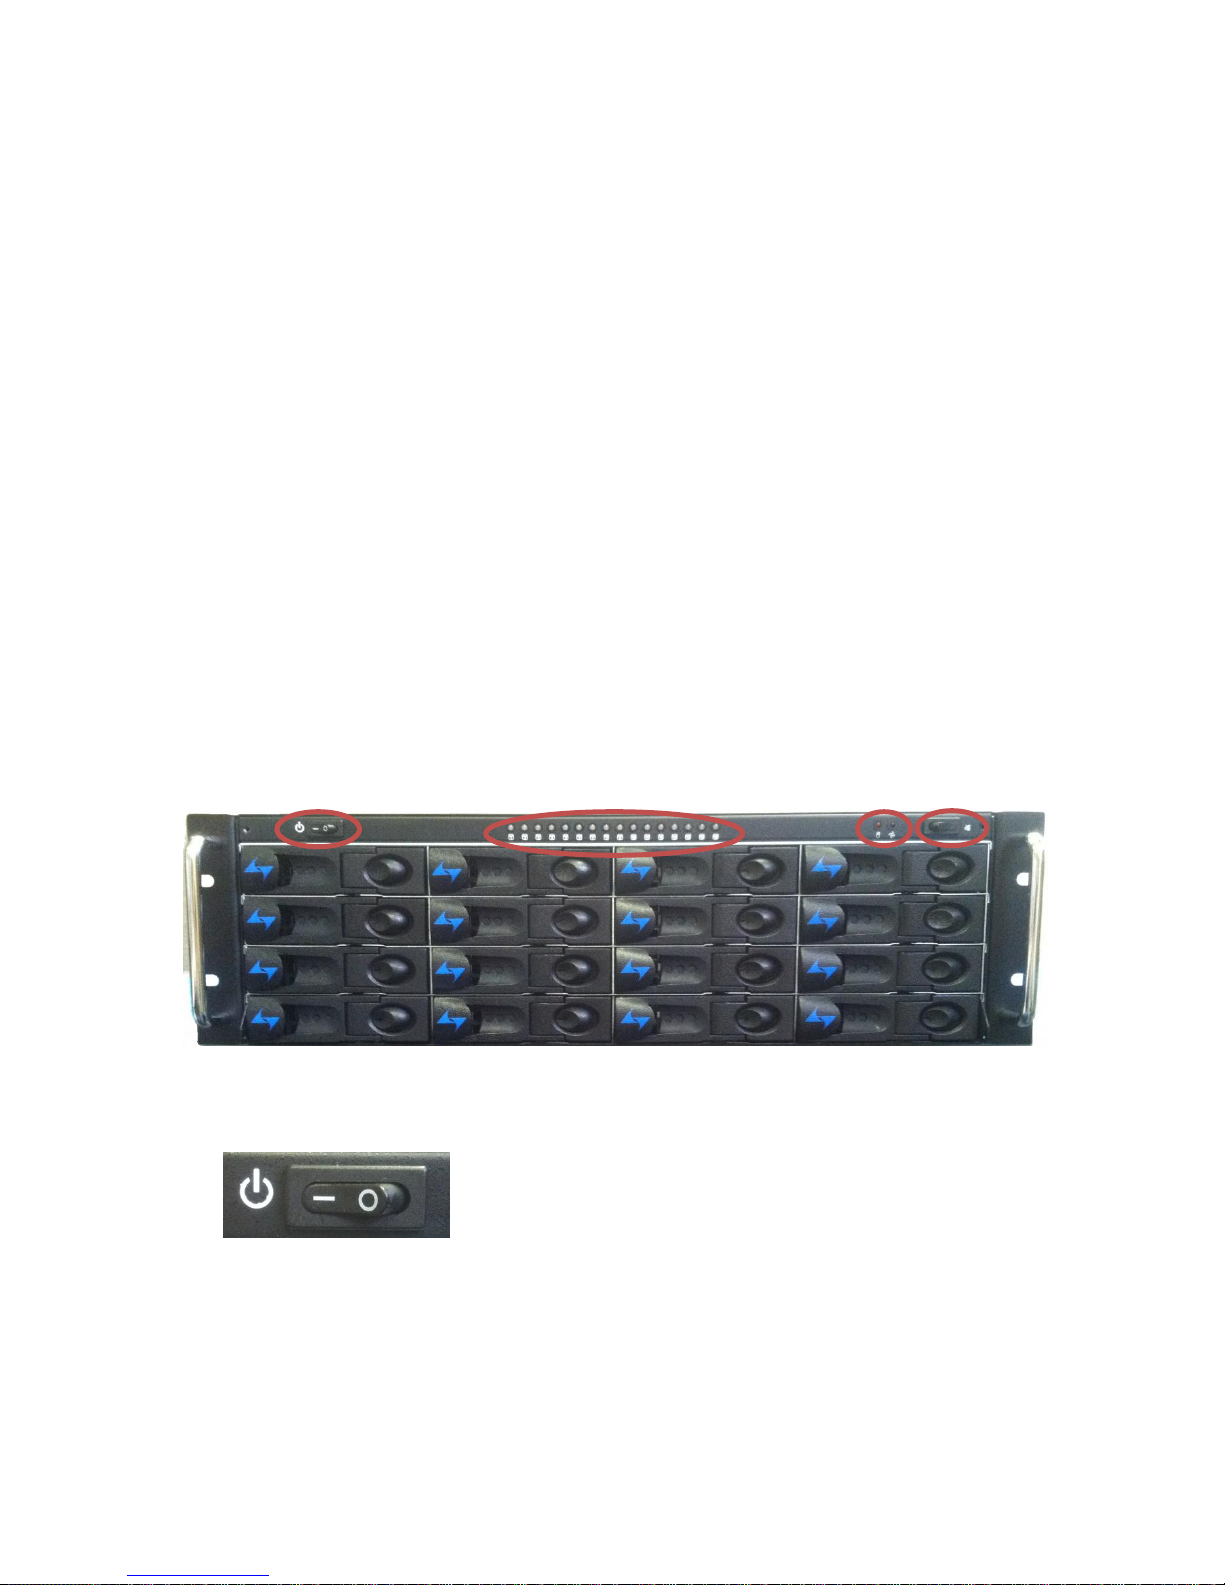
The TX16 SAS chassis contains available slots for 16 hard drives. The drives are
delivered pre-configured in drive sled carriers for easy installation. The chassis
functionality as well as status indicators are detailed below:
Front Panel
1 2 3 4
1. Power on/off – Use to power the enclosure
on/off. Toggle the switch to the left to power on the
unit.
6
Page 7
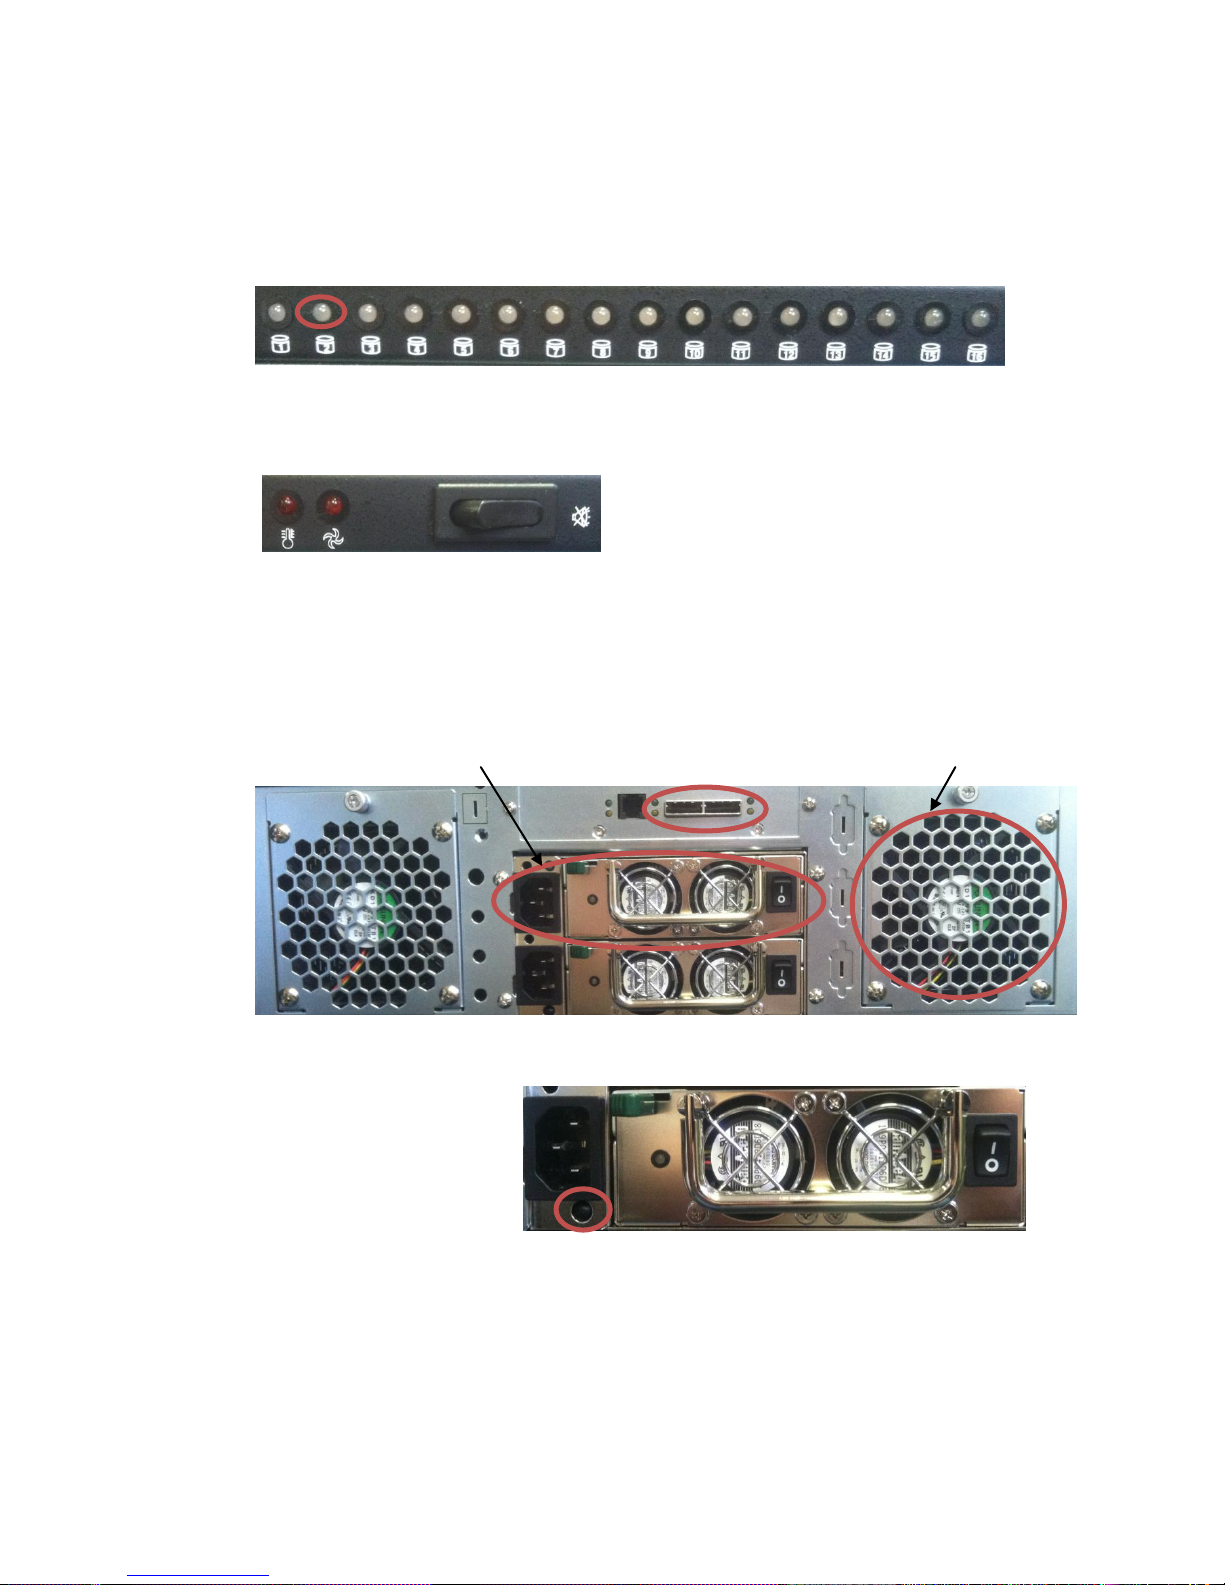
2. Drive LED Indicators – There are 16 total LED indicators, one for each hard
drive. The LED will be solid green when the unit and hard drive is powered on.
The LED’s are dual sensing and will blink with an amber color when activity
(reads and writes) take place on the drive(s).
3. Temp and Fan LED Indicators – The temp and fan LED’s will be illuminated
“solid” red when the box is powered and operating properly. If the box is to
overheat or a fan should fail, the red
illuminated LED will begin flashing
accompanied with an audible alarm that
will “BEEP” approx. once a second.
4. Temp and Fan Alarm Silencer – In the case where the temp or fan alarms
are activated and the red LED’s are blinking, the audible “BEEPING” alarm can be
silenced by toggle this switch. The switch is spring loaded and will return to its
original position.
Rear Panel
1 2 3
1. Power Supplies –
There are two power
supplies in the
center of the rear
panel of the TX16.
Toggle the on/off
switches upward
before fully powering the unit from the front panel. The unit may run with
one power supply if a failure should occur. It is recommended to run with
both at all times. In the event of a failure, and audible alarm with “BEEP”
approx. 3 times a second. The alarm can be silenced by depressing the
black button directly below where the power cord inserts on the bottom
power supply.
7
Page 8
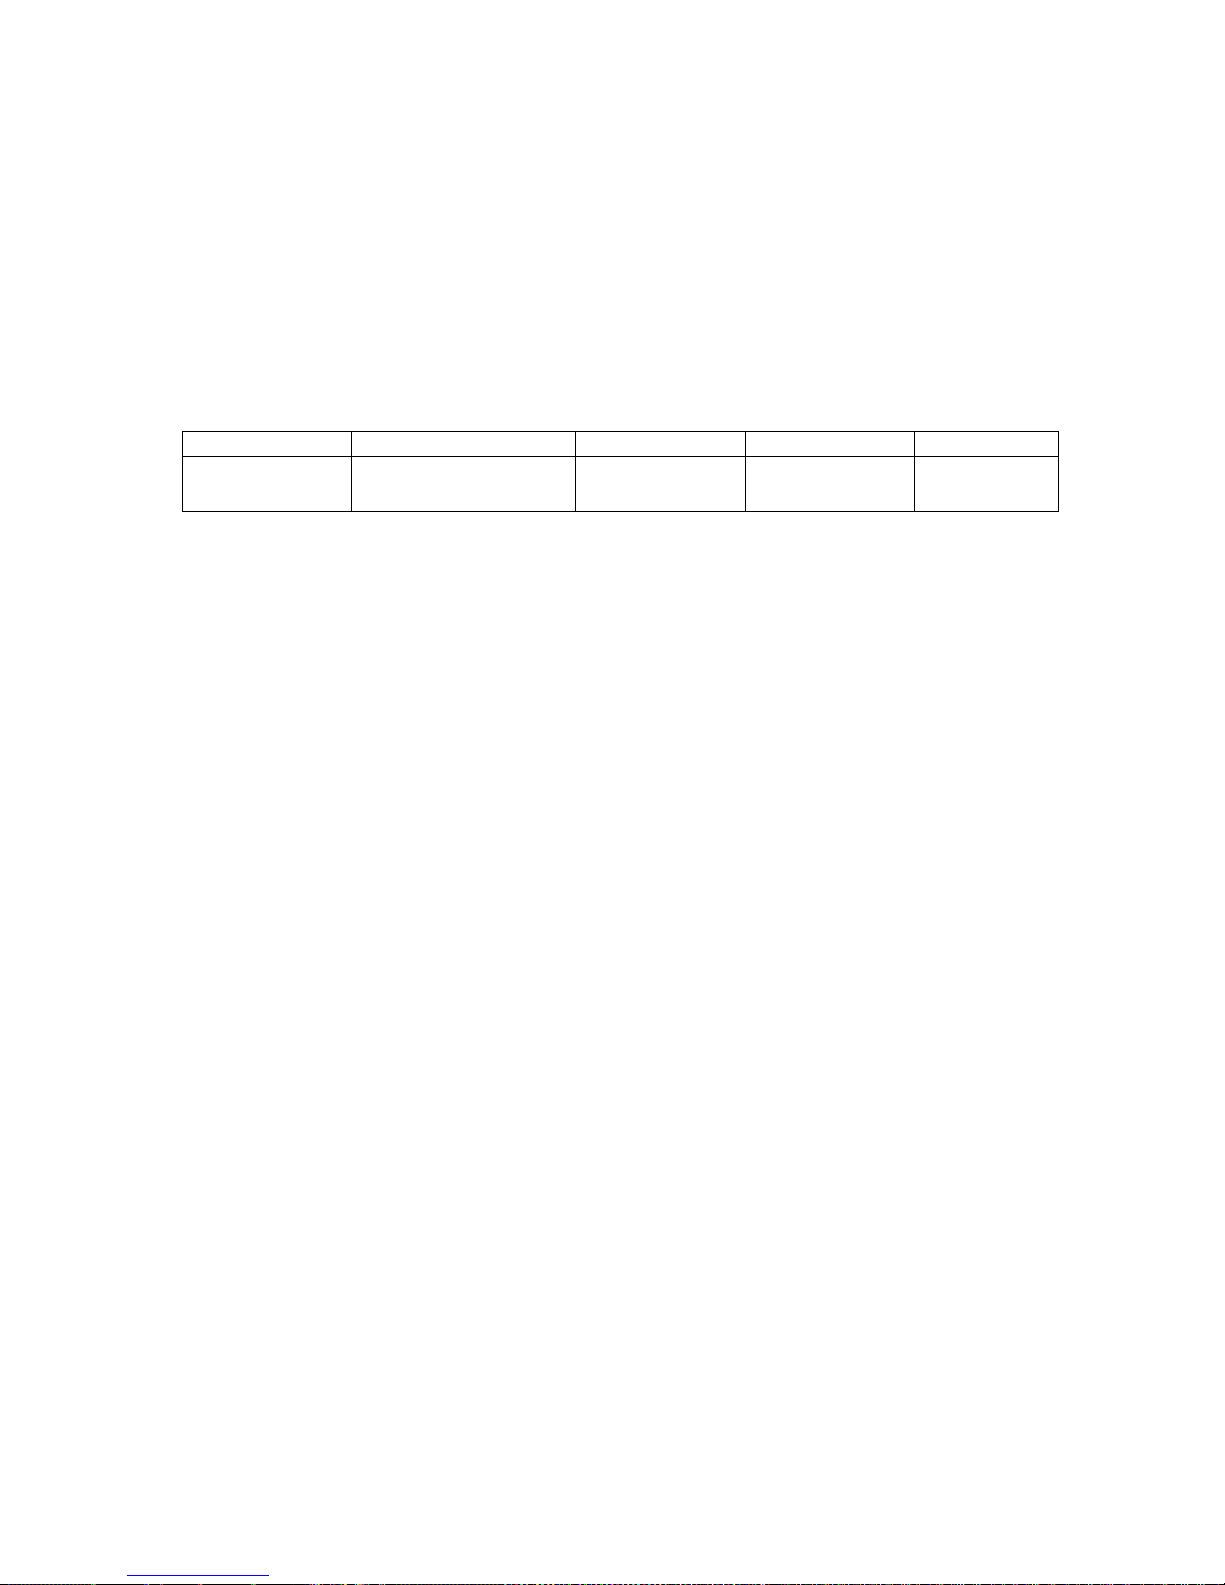
2. SAS Interconnect - The top center of the rear panel is the SAS inter-
Product
Weight with Drives
Depth
Width
Height
TX-16
63 Lbs
28.6 Kg
25.6 in
65 cm
19 in
48.26 cm
5.2 in (3u)
13.2 cm
connect for a direct attached client or TerraBlock server expansion addon. The LED lights will not illuminate when the unit is connected and
functioning properly.
3. Fans – There are two fans on the rear panel. In the event of a failure an
audible alarm will “BEEP” and be indicated on the front panel. The rear
fan units are field replaceable units.
Dimensions
Tools and Utilities
There are several tools and utilities available which can help you monitor the status
of your Facilis TX16 SAS Storage system. SNMP Monitoring is supported as well for
direct attached clients. Please refer to the ATTO Utilities Manual that comes with your
enclosure. For TX16’s configured as expansion storage, please refer to the
TerraBlock Users Guide.
8
Page 9
Chapter 3 – Installation for Expansion Storage
Equipment
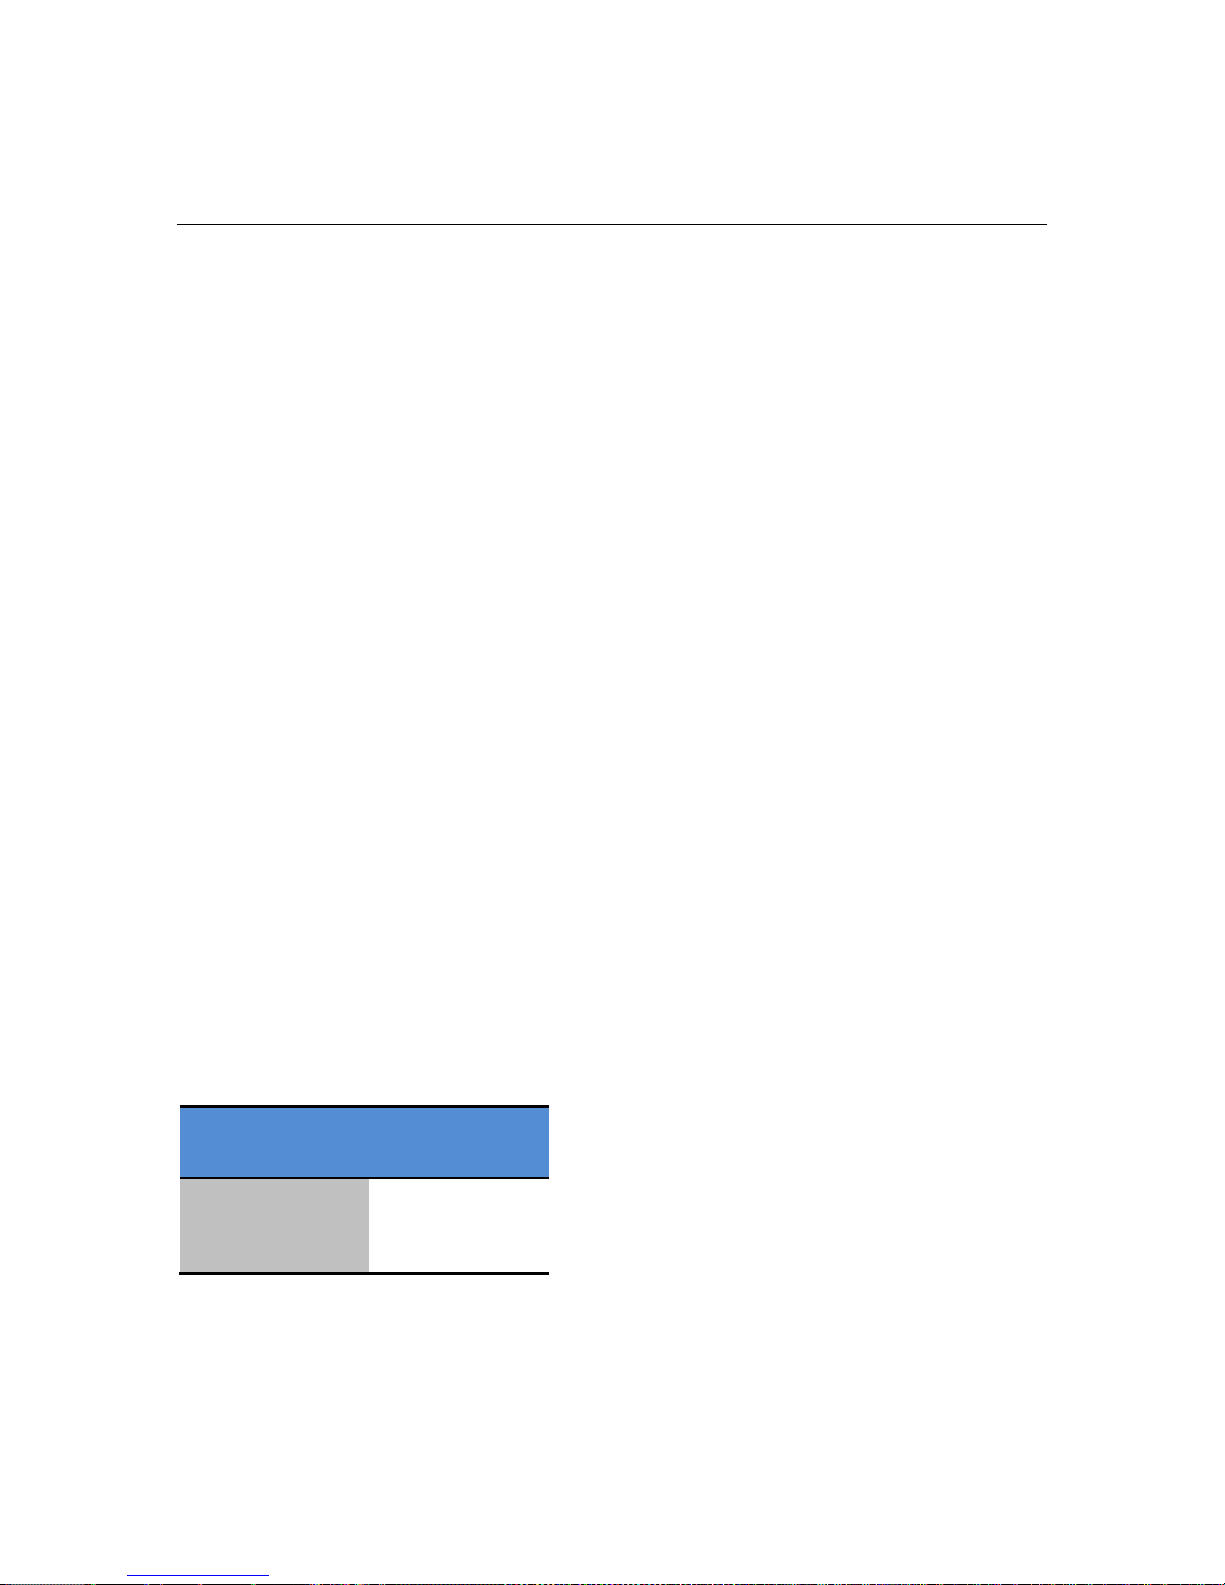
TX16 SAS
Storage
Voltage
100 – 240 VAC
Auto Sensing
Frequency
47 ~ 63 Hz
to a TerraBlock Server
This chapter describes how to install and configure your TX16 SAS Storage system
to a TerraBlock server for use as expanded storage.
Before You Begin
Unpack the TX16 storage unit and make sure you have all the components that
shipped with the system available at the time of installation. If you are missing any
of the components listed above (see page 6 - Hardware Components Kit), do not
attempt installation until contacting your dealer.
Environmental Considerations
The TX16 storage unit should be placed in a location that meets the following
environmental requirements:
Unobstructed airflow
No significant temperature or humidity changes.
Sturdy, level surface or rack unit not subject to vibration.
Placed away from radio frequency emissions, high-traffic, or high-noise areas.
Keep in mind the following electrical requirements:
Make sure your enclosure is placed away from major electrical equipment such as
motors, HVAC equipment, elevators/escalators, etc….
Areas free from Electrostatic discharge (ESD) or buildup.
Electrical Specifications
Avoid using extension cords. Make sure you do not overload circuits. Facilis
recommends the use of an uninterruptible power supply (UPS) appropriately sized for
your system configuration. The UPS provides system protection against sudden
power surges or losses that could cause you to lose your work.
9
Page 10
System Setup
The attached TX16 chassis will function as an additional Group (3) within the Facilis
TerraBlock Manager to create and manage additional virtual volumes (see the
TerraBlock User Guide for creating virtual volumes). Support for attaching the TX16
to a TerraBlock server requires:
1. Version 5.5.x or later release of the TerraBlock server.
2. The TerraBlock server must be a Windows 7 64Bit server (See the TerraBlock
Release Notes for server upgrade options, or contact Facilis Sales).
3. The ATTO H680 SAS HBA installed in the TerraBlock server.
4. A valid license. A new license from Facilis is required if running any version
prior to 7.1. Consult your dealer or contact Facilis Sales.
Server RAID Adapter Installation
Installation of the ATTO H680 HBA into the TerraBlock Server requires the server to
be shutdown. All clients should save their work and then shutdown prior to the
installation and power down of the TerraBlock Server.
Install the ATTO H680 HBA into the TerraBlock Server (see the ATTO installation
guide on the USB key supplied).
Boot the server and install the appropriate drivers for the Windows 7 64 Bit
Operating System (OS) found on the supplied Facilis USB Key (Drivers directory on
USB Key).
Install the ATTO Configuration tool for Windows found on the supplied USB key onto
the TerraBlock (Utilities directory on USB Key).
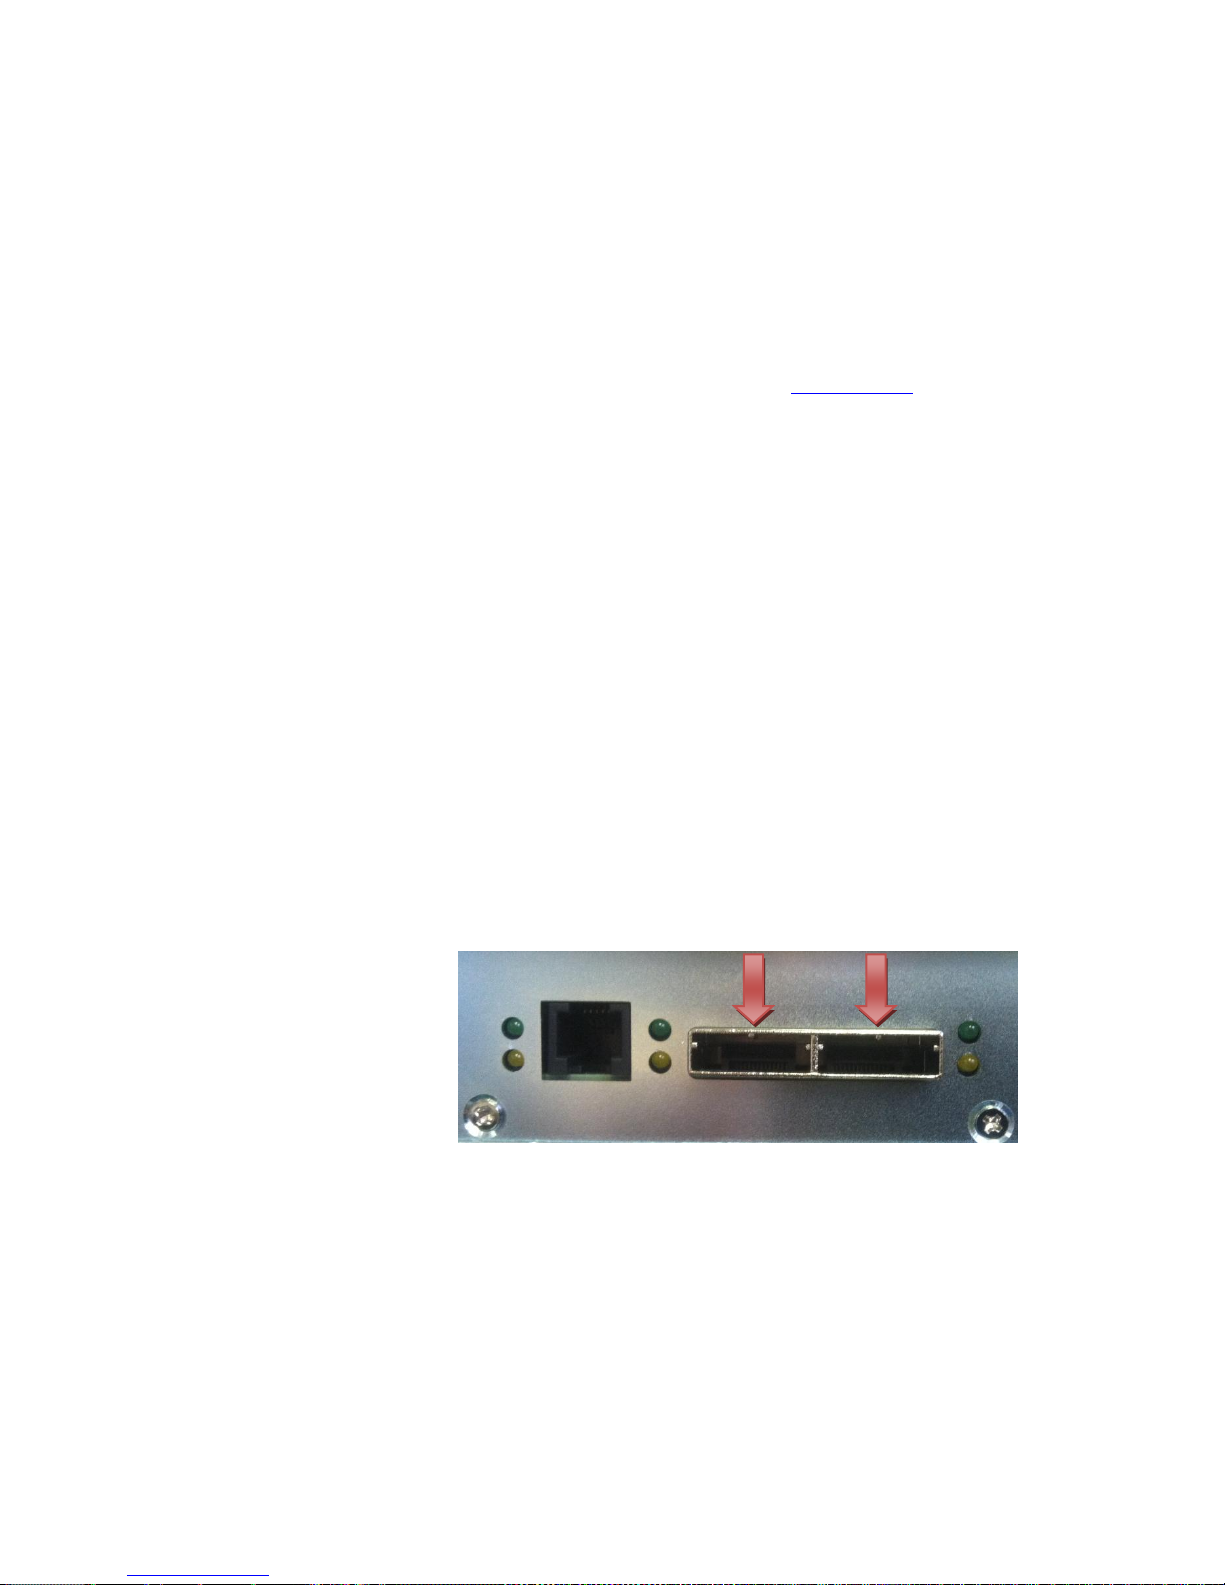
Cabling
Connect the external
SAS cables (supplied)
from the TX16 (both
ports) to the TerraBlock
server’s ATTO SAS HBA
(port A and B). Refer to
the section “Bringing the
Expansion Chassis
Online” before physically
connecting the cable.
Power cords
Connect the power cord (supplied) into the AC port on the rear of the enclosure.
Before turning on the TX16, make sure that you have all the drive carriers installed
in the enclosure. Proceed to the next section before powering on the TX16. The
Power button is located on the front of the enclosure (enclosure door open).
10
Page 11

Bringing the Expansion Chassis online
The TerraBlock 24D or fully populated 24EX model will contain 24 drives. The TX16
chassis will expand the working drive set to include an additional 16 drives. Before
the expansion upgrade is started, be sure there are no drive errors or volumes in
recovery on the system. When connecting the expansion chassis, the server must be
shut down.
Note: The ATTO SAS HBA should be installed in the TerraBlock server and
appropriate drivers installed before proceeding. Confirm the cabling of the TX16
expansion chassis is correct (See previous section).
Shut down procedure
1. Confirm all clients are powered down.
2. On the server, go to Computer Management (Right click “Computer” and
choose “Manage”) – Services and Applications – Services
3. Find the SMDrive Service, right click and select “Properties”.
4. Select “Manual” for the service Startup Type, click OK.
5. Shut down the TerraBlock server.
Start the TerraBlock server.
Starting the Service for Expansion
1. Navigate to C:\Program Files\Facilis\TerraBlock\Utilities. Find the Facilis
Drive Checker utility. Run this to verify all disks are present (40 Disks with a
single TX16, 56 Disks with two TX16’s). Close the utility after confirmation.
2. Next go to the Start menu, select “Run”.
3. Type CMD (hit enter).
4. In the command prompt, type “cd C:\Program Files\Facilis\TerraBlock”
5. The command prompt path should change to C:\Program
Files\Facilis\TerraBlock
6. Type “SMDrive –c –a”
7. After the expansion is complete, the service will stop within 30 seconds
8. Close the CMD window
9. Go to Computer Management (Right click “Computer” and choose “Manage”) –
Services and Applications – Services
10. Find the SMDrive Service, right click and select “Properties”.
11. Select “Automatic” for the service Startup Type, click OK.
12. Restart the TerraBlock Server.
All volumes and data created on the 24D/EX prior to the expansion will remain
intact. New volumes can be created utilizing the new group (Group 3) as Raid5 or
unprotected if no Raid is required. Raid50 Tandem volumes can be created from the
TerraBlock server utilizing existing groups from the 24D/EX in combination with the
new group (Groups 2 and 3 together for example). Raid50 Tandem volumes would
be for Multi-user volume use and workflow. Please refer to the TerraBlock User
Guide for creating and managing volumes.
11
Page 12
Chapter 4 – Installation for Direct Attached
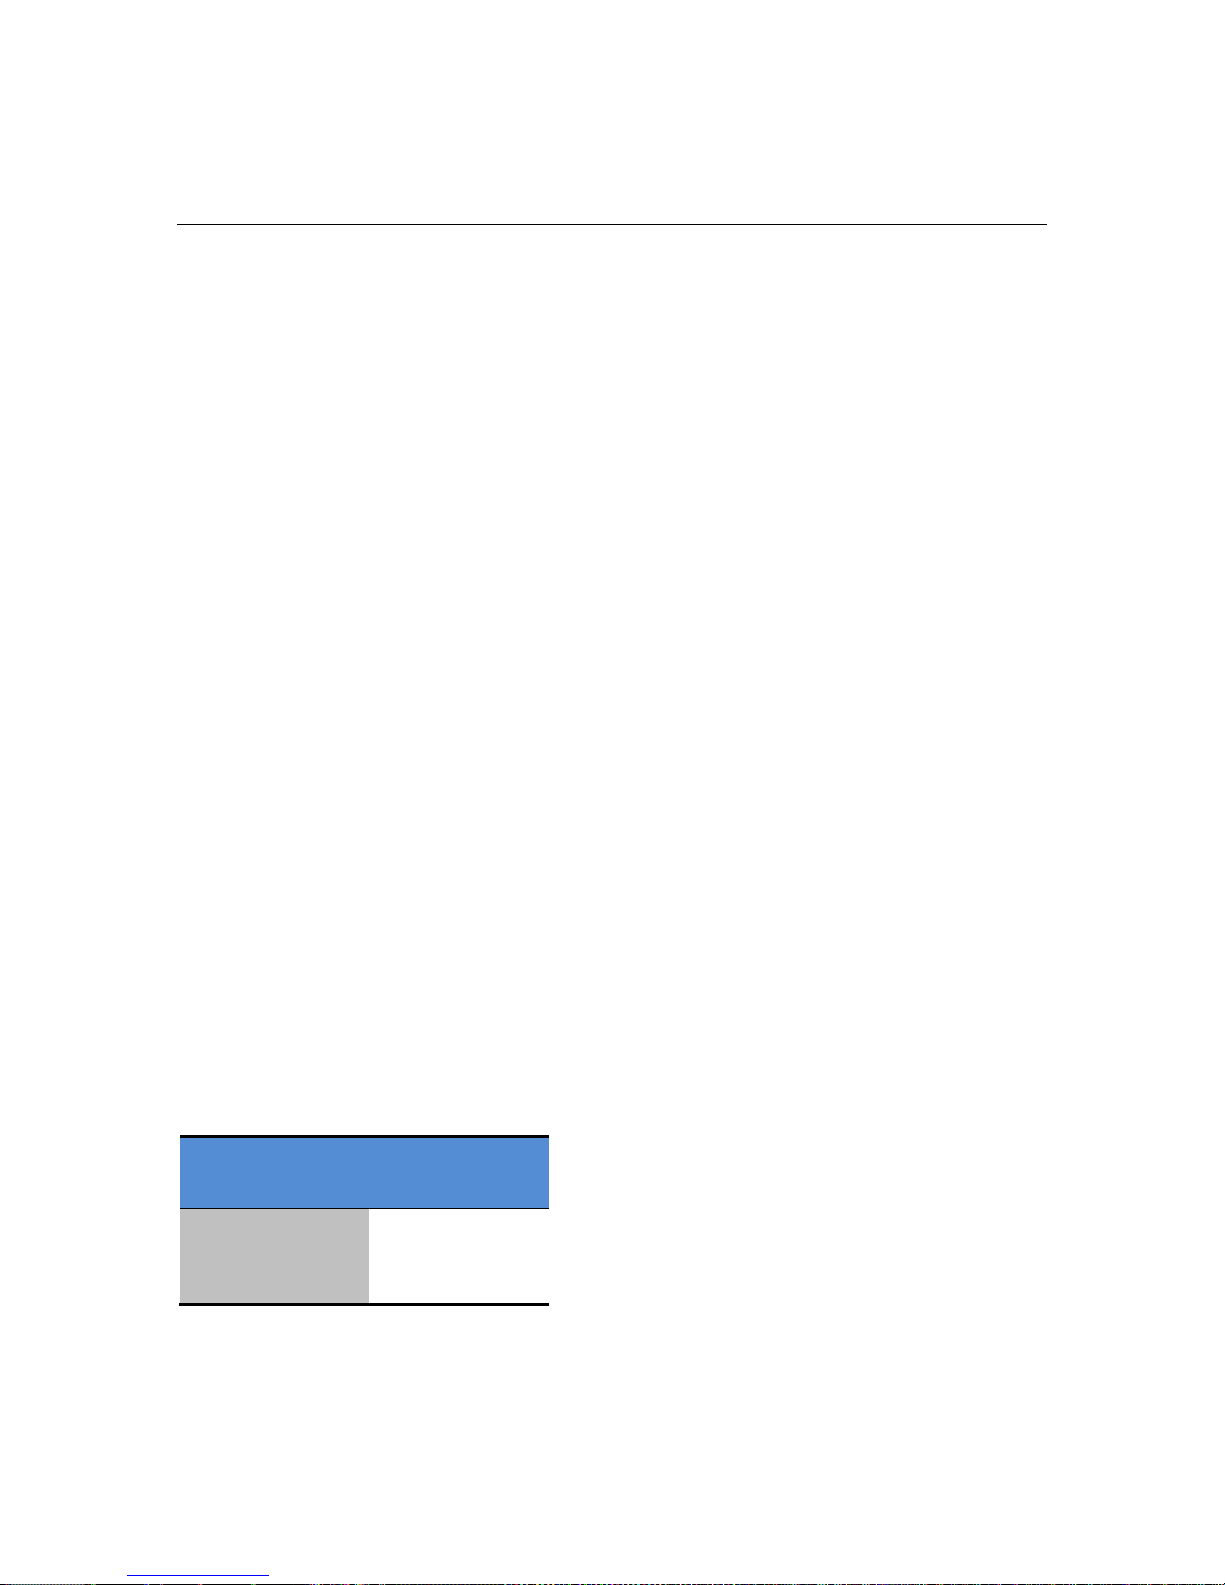
Equipment
TX16 SAS
Storage
Voltage
100 – 240 VAC
Auto Sensing
Frequency
47 ~ 63 Hz
Storage
This chapter describes how to install and configure your TX16 SAS Storage system
as direct attached storage for single client system.
Before You Begin
Unpack the TX16 storage unit and make sure you have all the components that
shipped with the system available at the time of installation. If you are missing any
of the components listed above (see page 6 - Hardware Components Kit), do not
attempt installation until contacting your dealer.
Environmental Considerations
The TX16 storage unit should be placed in a location that meets the following
environmental requirements:
Unobstructed airflow
No significant temperature or humidity changes.
Sturdy, level surface or rack unit not subject to vibration.
Placed away from radio frequency emissions, high-traffic, or high-noise areas.
Keep in mind the following electrical requirements:
Make sure your enclosure is placed away from major electrical equipment such as
motors, HVAC equipment, elevators/escalators, etc….
Areas free from Electrostatic discharge (ESD) or buildup.
Electrical Specifications
Avoid using extension cords. Make sure you do not overload circuits. Facilis
recommends the use of an uninterruptible power supply (UPS) appropriately sized for
your system configuration. The UPS provides system protection against sudden
power surges or losses that could cause you to lose your work.
12
Page 13
System Setup
The system is very easy to setup. The disk set was created prior to shipping so the
RAID set is ready for use out of the box (see Appendix A for instructions should you
need to re-create the disk set).
RAID Adapter Installation
Install the ATTO R680 HBA into the client to be used (see the ATTO installation guide
on the USB key supplied).
Boot the client and install the appropriate drivers for your Operating System (OS)
found on the supplied Facilis USB Key (Drivers directory on USB Key).
Install the ATTO Configuration tool for your OS found on the supplied USB key onto
the client (Utilities directory on USB Key).
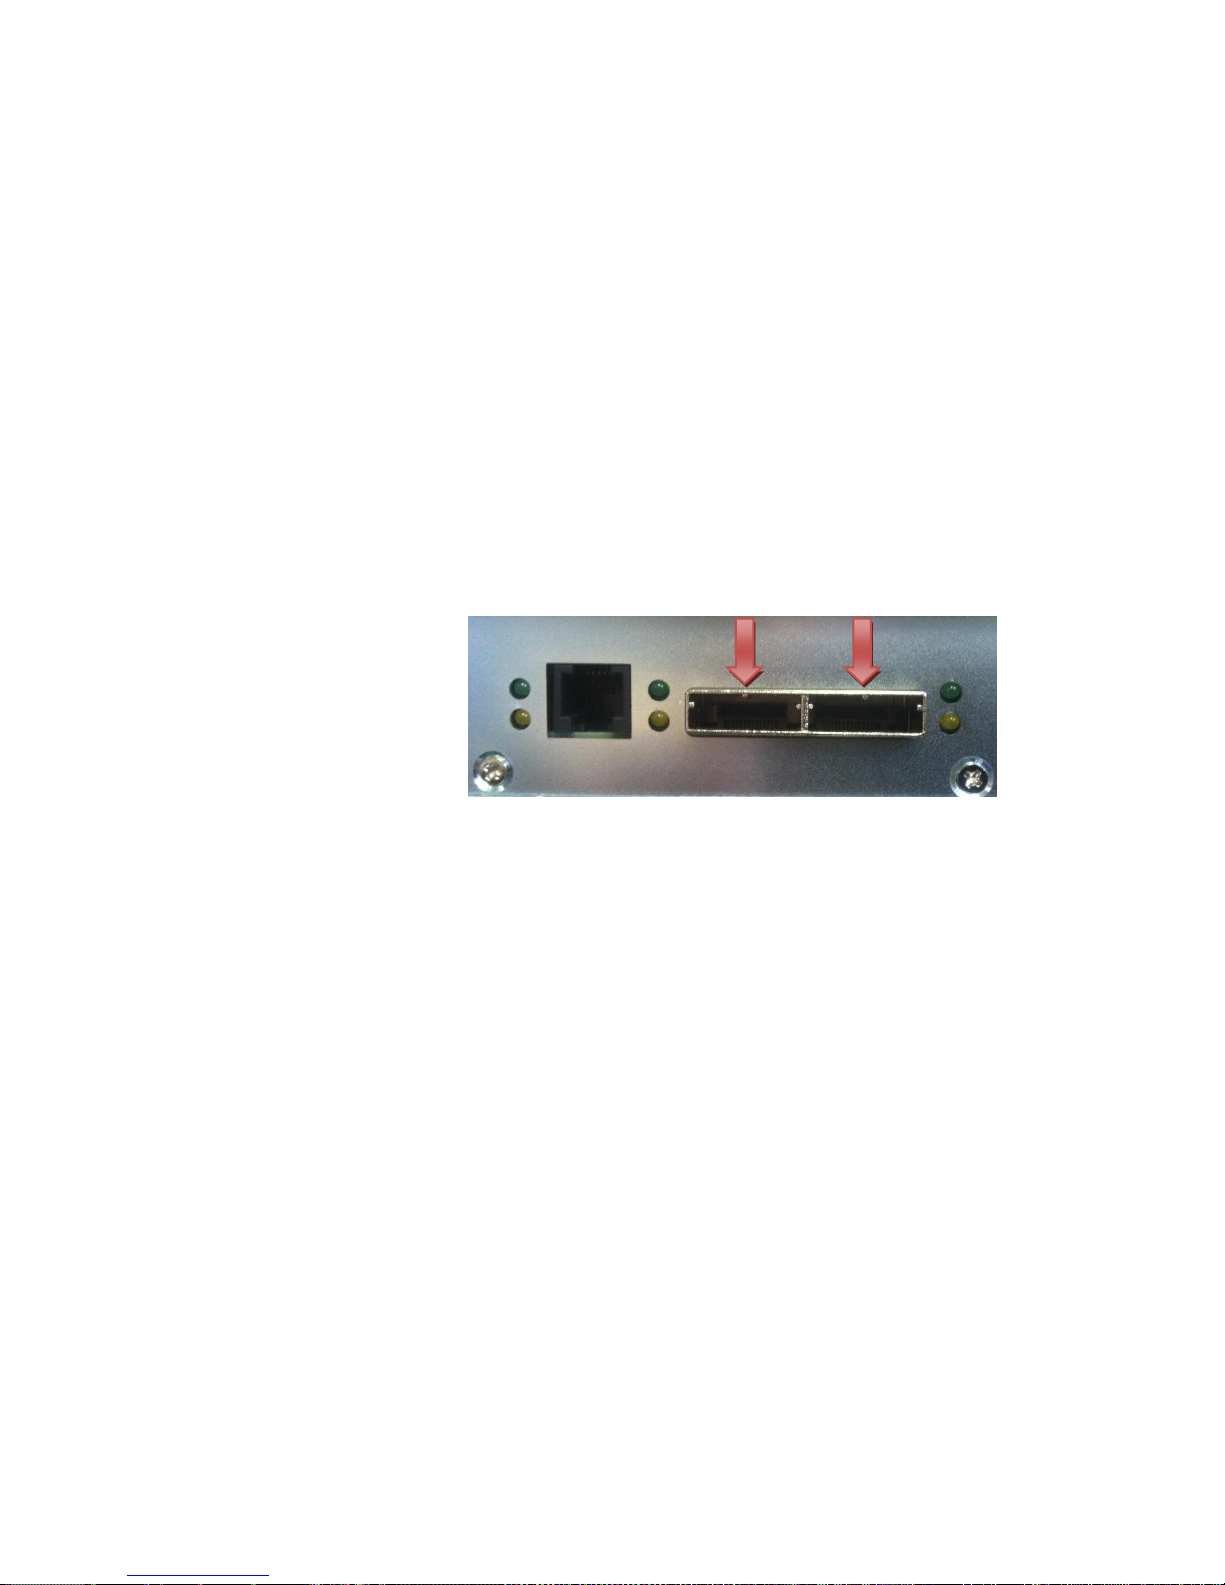
Cabling
Connect the external SAS
cable (supplied) from the
TX16 (both ports) to the
client ATTO SAS HBA
(ports A and B).
Power cords
Connect the power cords (supplied) into the AC ports on the rear of the enclosure.
Before turning on the TX16, make sure that you have all the drive carriers installed
in the enclosure in order. You can now turn on the TX16. The Power button is
located on the front of the enclosure (enclosure door open) in the upper left corner.
Turn it to the on position.
Bringing the RAID set online
Using the ATTO configuration tool, verify that the RAID is online.
Version of 3.38 or higher of the ATTO Configuration is required for
use with the TX16 as Direct Attached SAS Storage
1. Open the ATTO configuration tool on your Mac or Windows client.
2. Highlight the ATTO R680 HBA on the left pane. Then select the RAID tab at
the top right.
3. The RAID set should be seen and the drives, provided the enclosure is cabled
properly, should list in order. Verify the RAID set is error free, without any
warnings. In the lower window, highlight the Groups tab.
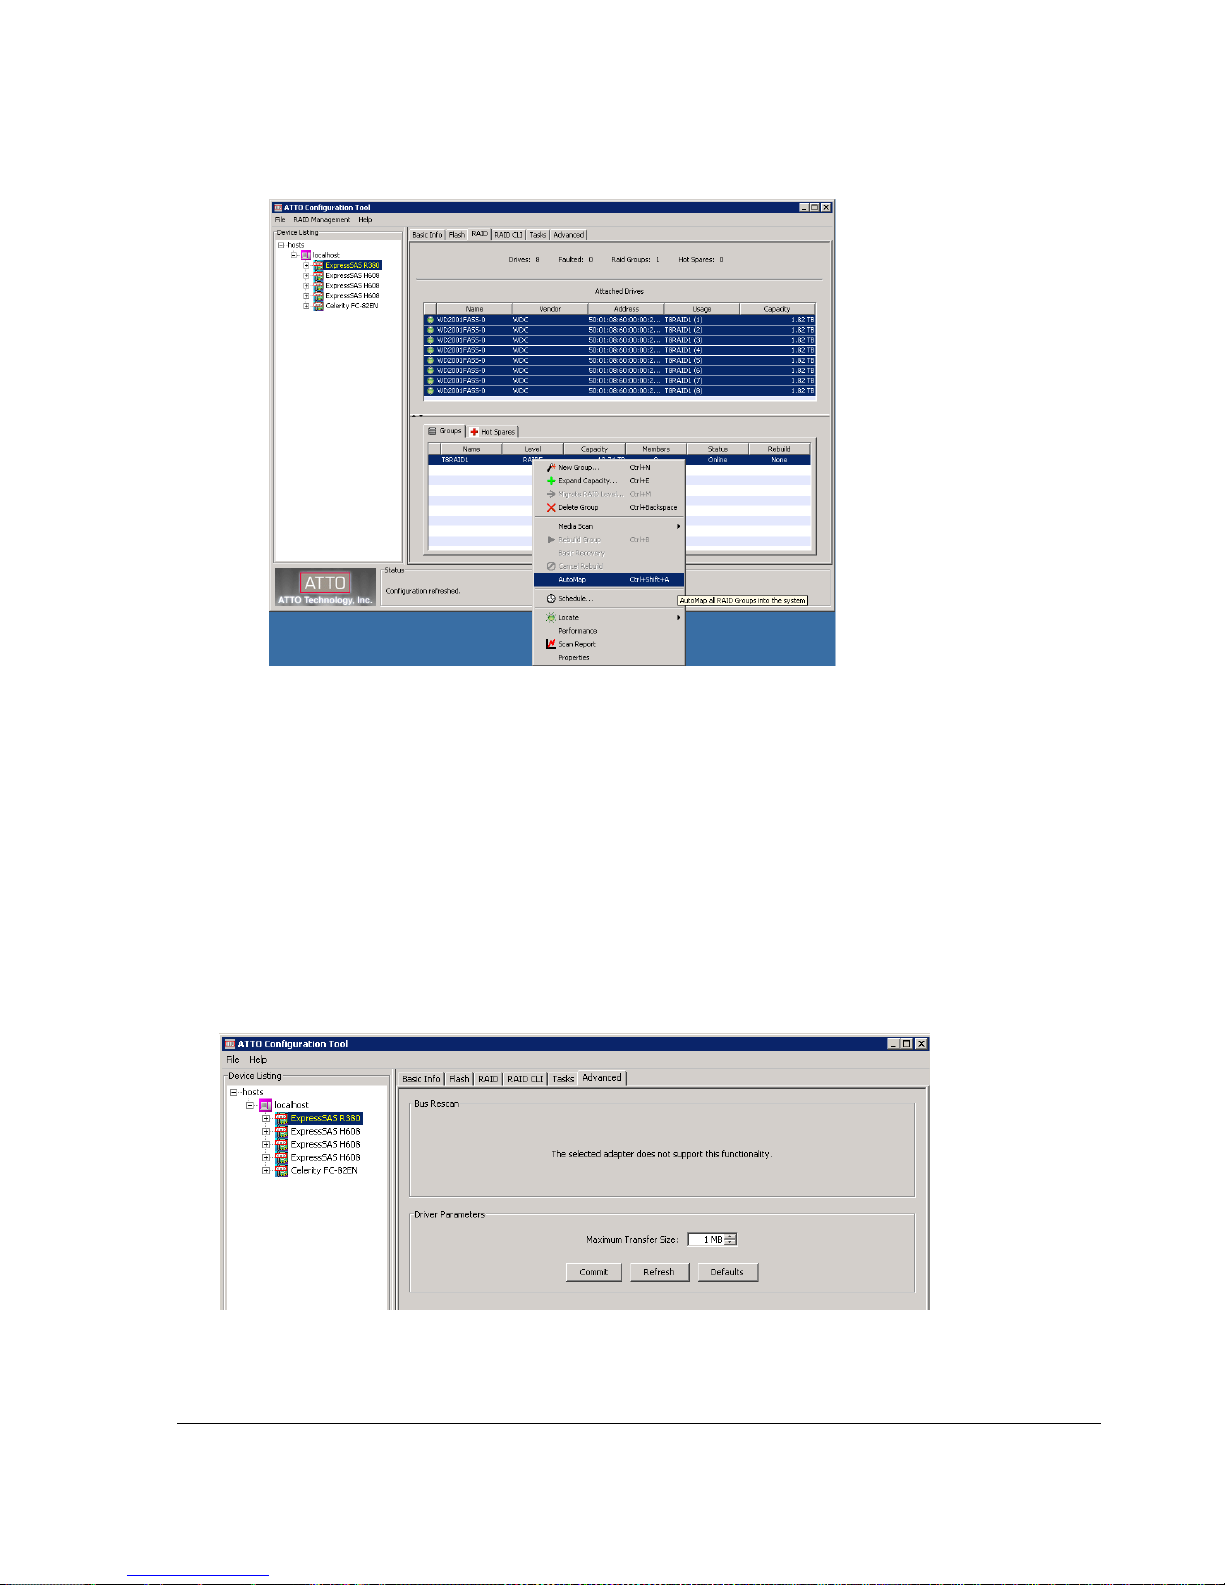
4. TX16RAID should be seen as the RAID set. Right click or from the RAID
Management menu at the top, choose AutoMap. This will bring the RAID set
online for the client workstation. This action will persist after the client
workstation is rebooted.
13
Page 14
5. Format the RAID set volume on your Mac or Windows client accordingly.
For Windows, use
Disk Management
to format the drive
NTFS as needed.
On Mac, use Disk
Utility to format
the drive HFS+
(Mac OS Extended
Journaled) as
needed. On
Linux, use Disk
Partitioner or LVM
to format the
drive, XFS is
preffered.
Client Configuration
The Mac or Windows client workstation utilizing the TX16 storage array will need to
set the correct transfer size for the R680 HBA to provide optimal performance.
1. Open the ATTO configuration tool on your Mac or Windows client.
2. Highlight the ATTO R680 HBA on the left pane. Then select the Advanced tab
at the top right.
3. Under Driver Parameters, change the Maximum Transfer Size to 1MB.
4. Select the Commit button at the bottom of the window. A reboot is required
for changes to take effect.
5. Reboot the client workstation.
You can now utilize the Facilis TX16 storage array with your content creation
applications.
14
Page 15
Appendix A – Recreating the disk set (Direct
Attached use only)
This Appendix describes how to recreate the disk set should that be necessary. This will
destroy any data present on the drives. This process takes approximately 8 hours.
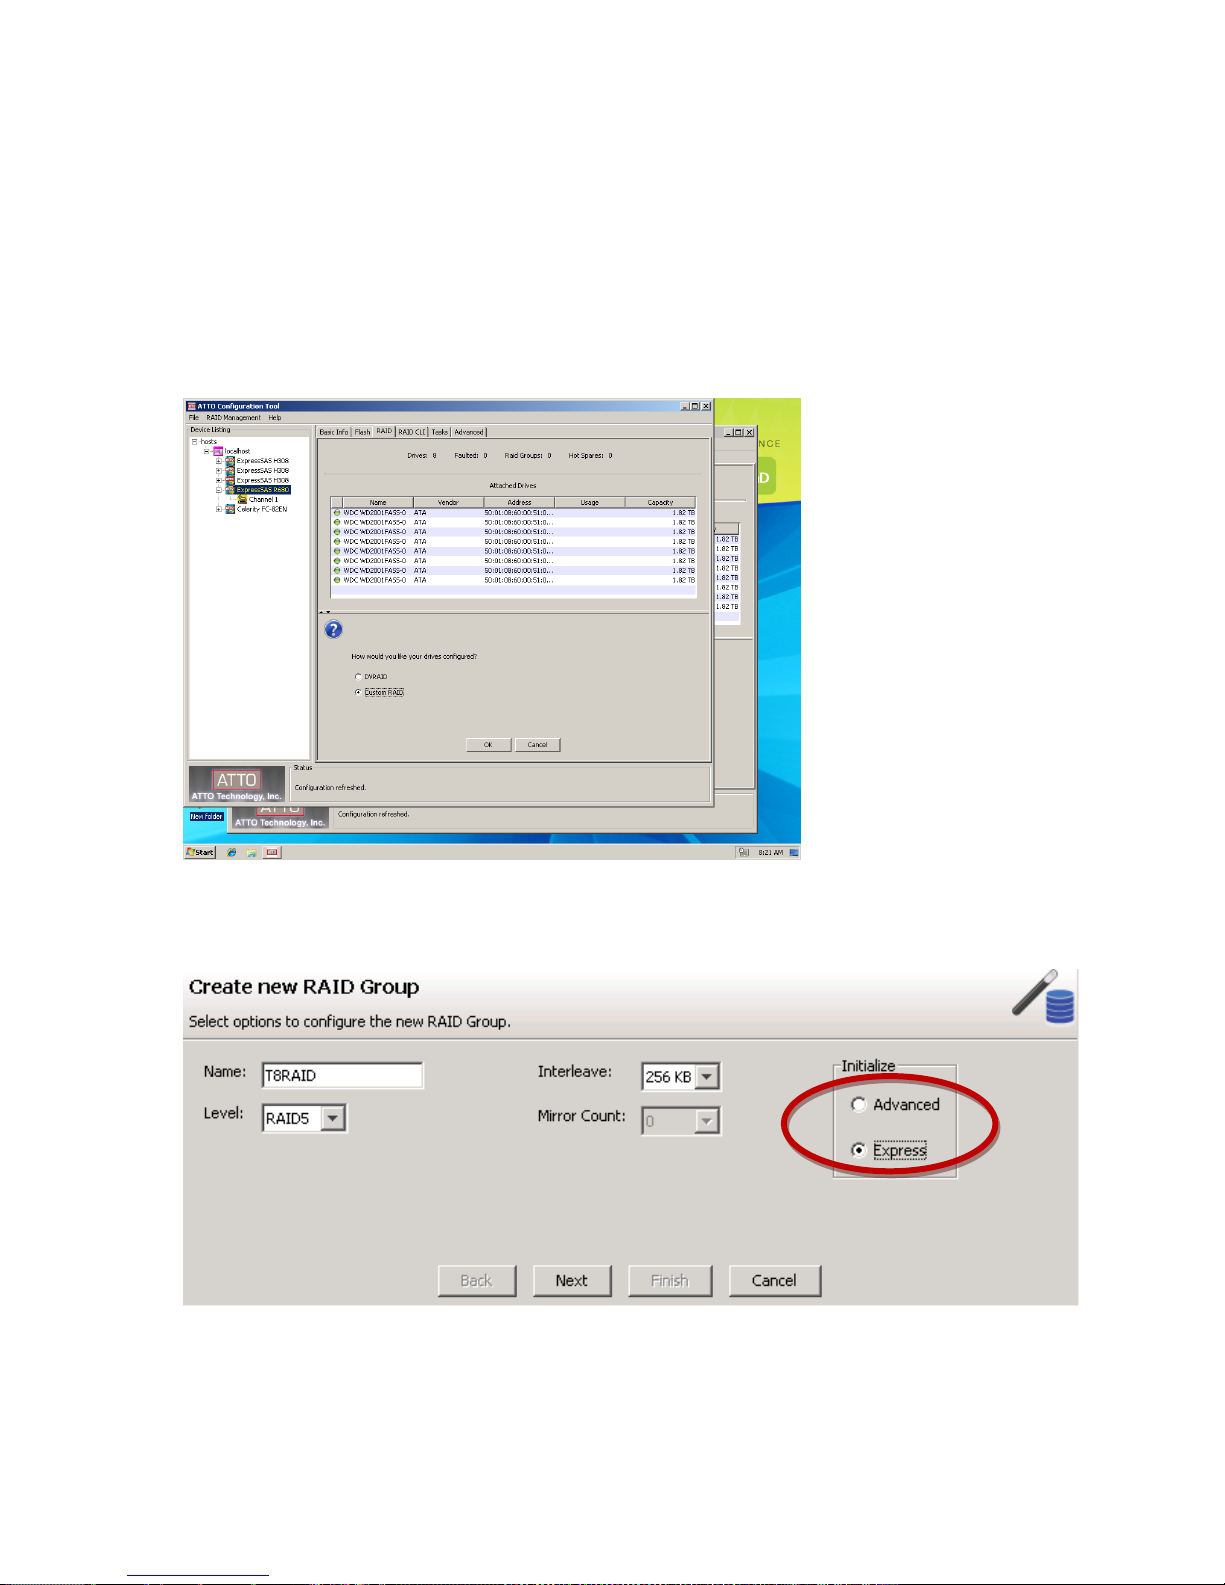
Launch the ATTO Configuration Tool. Go to the RAID tab and select “Custom RAID”;
Click OK.
Input the Options shown below (Name, Level, Interleave and Initialize) and click Next.
Note: The Name will be TX16Raid if using the 16 drive chassis.
Create a new RAID group by highlighting all of the drives in the upper window and
dragging to lower window. Click Next.
15
Page 16
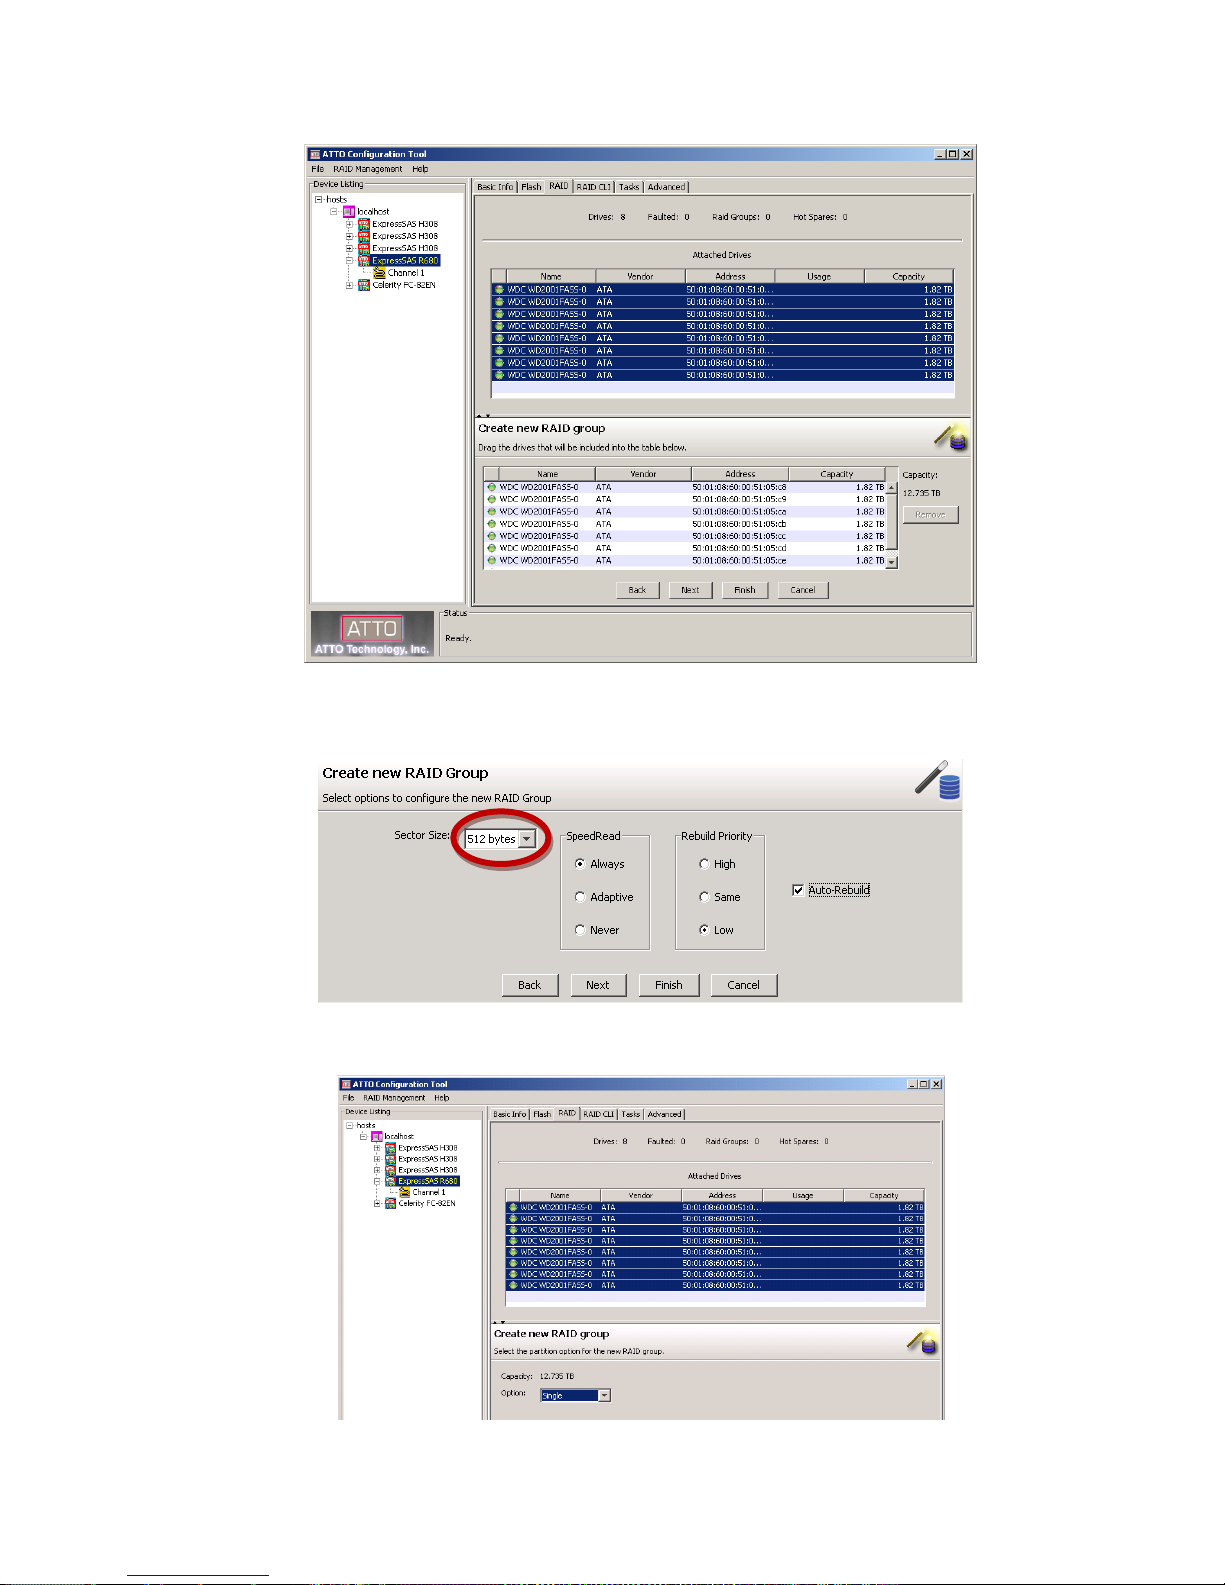
Select options to configure the new RAID Group (Sector size 512 bytes, SpeedRead,
Rebuild Priority, and make sure Autobuild button is checked. Click Finish.
Make sure you have selected “Single” for Option.
16
Page 17
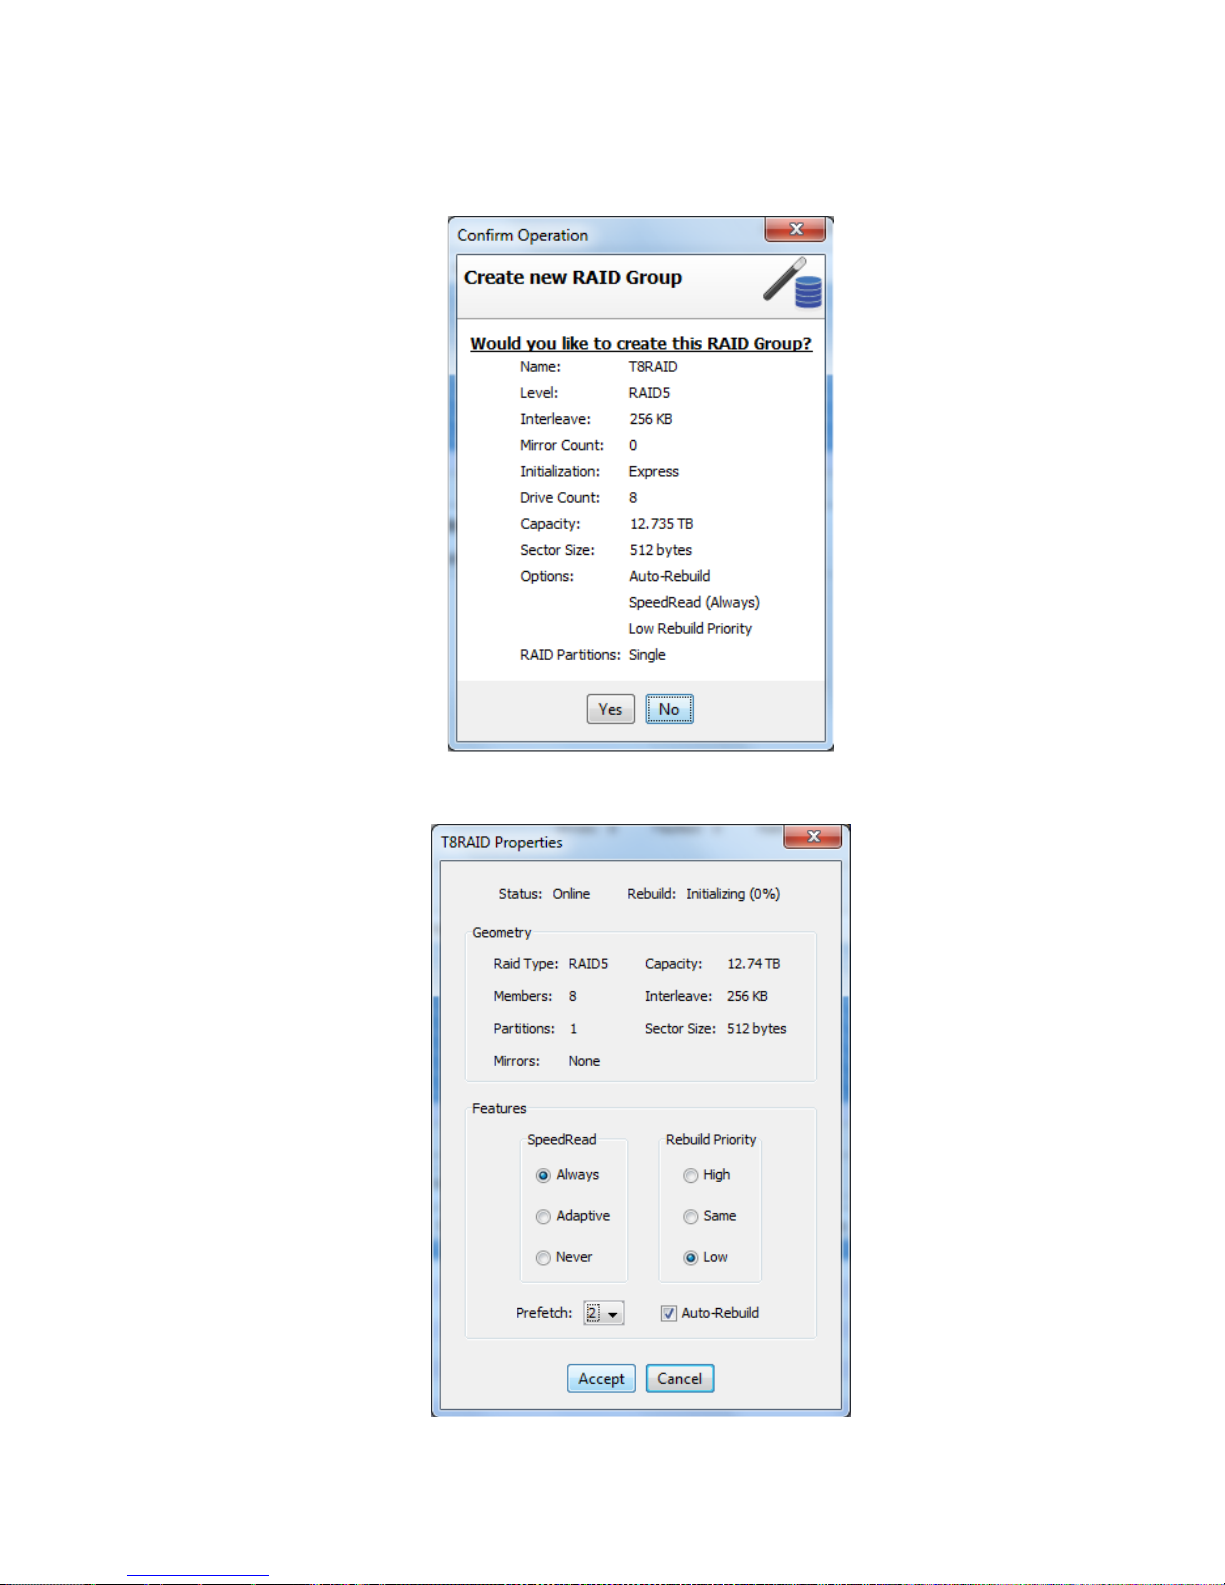
Check all your parameters; Click Yes.
Right click on the RAID set and set Prefetch to “2” and click Accept.
17
Page 18
Appendix B – Upgrading R680/H680 Firmware
This Appendix describes how update the firmware of the R680/H680 HBA should that be
necessary. The latest firmware can be found in the Firmware directory of the supplied
USB Key or at http://www.attotech.com/.
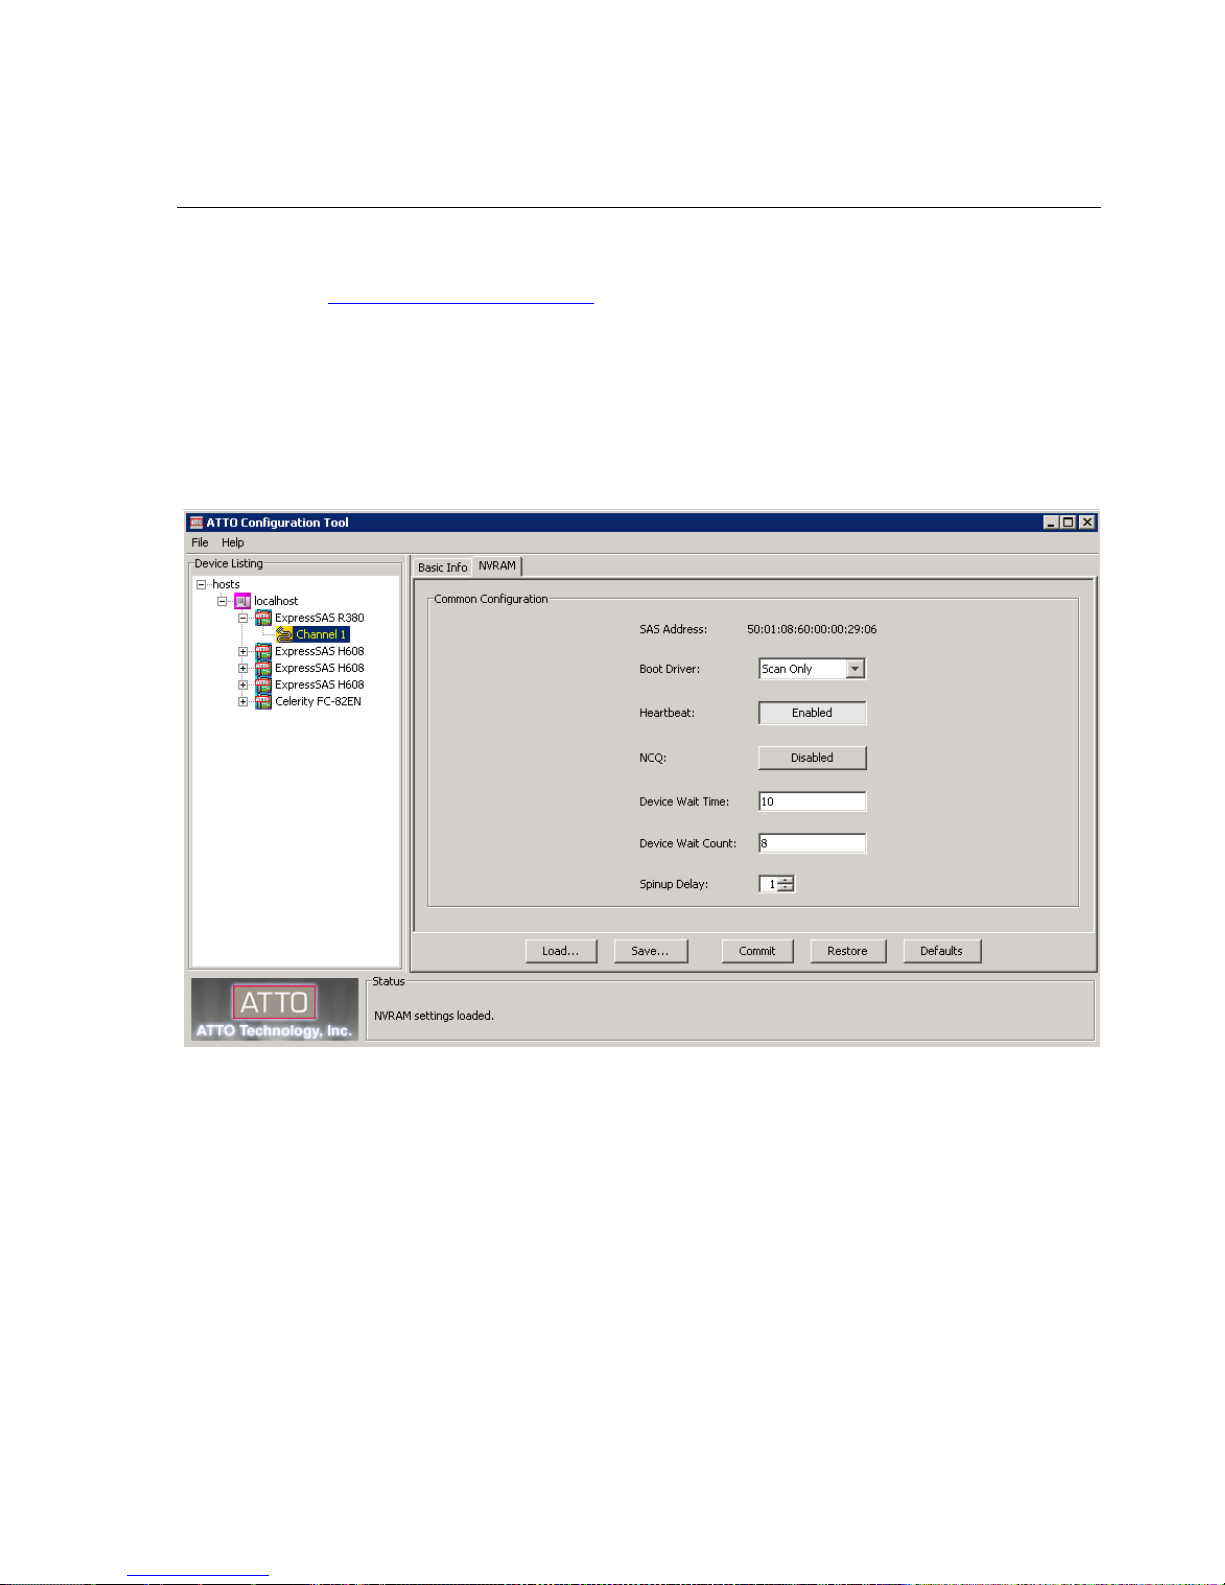
Launch the ATTO Configuration Tool. Select the R680/H680 HBA in the left pane. Next
select the “Flash” tab to the right. Browse to the current flash. Choose “Update”.
Before rebooting, select the HBA on the left and turndown the “+”. Select Channel 1.
Next select the NVRAM tab on the right. Verify the settings are as follows. If not, adjust
accordingly before rebooting.
18
 Loading...