

Page 1
2008-2015 FORD SUPER DUTY 4WD
REAR LIFT FOR 8” F-250 w/ FACTORY OVER LOAD
LEAF FTS22105 REAR LIFT KIT
PARTS LIST:
FTS22105 F-250 8" Rear Kit FT30316 Hdwr Sub-Assembly
Part # Description Qty Part # Description
Qty
2 FTBK5 5" Block 1 FT58H 5/8" Hardware
4 FT749U U-Bolt 2 FT90080 Center Pin Kit
1 FT30316 Hdwr Sub-Assembly Kit 2 FT30284 Leaf Spring Spacer
2 FT30275 Add-A-Leaf 4 37000005081 3/8" SAE Flat Washer
1 FT30240BK Drv. Sway Bar Brkt 2 37160003052 3/8"-16 NyLok Nut
1 FT30241BK Pass. Sway Bar Brkt 2 37161001081 3/8"-16 x 1" Bolt
1 FTS419 Shim Kit 4 50000005081 1/2" SAE Flat Washer
2 50130003052 1/2"-13 Nylok Nut
2 50131501081 1/2"-13 x 1 1/2" Bolt
1 FT22105i Instruction Sheet
Tool List: (Not Included)
Floor Jack
Jack Stands
Assorted Metric and S.A.E Sockets & Allen Wrenches
Kit
READ ALL INSTRUCTIONS THOROUGHLY FROM START TO FINISH BEFORE BEGINNING INSTALLATION!
Page 2
INSTRUCTIONS:
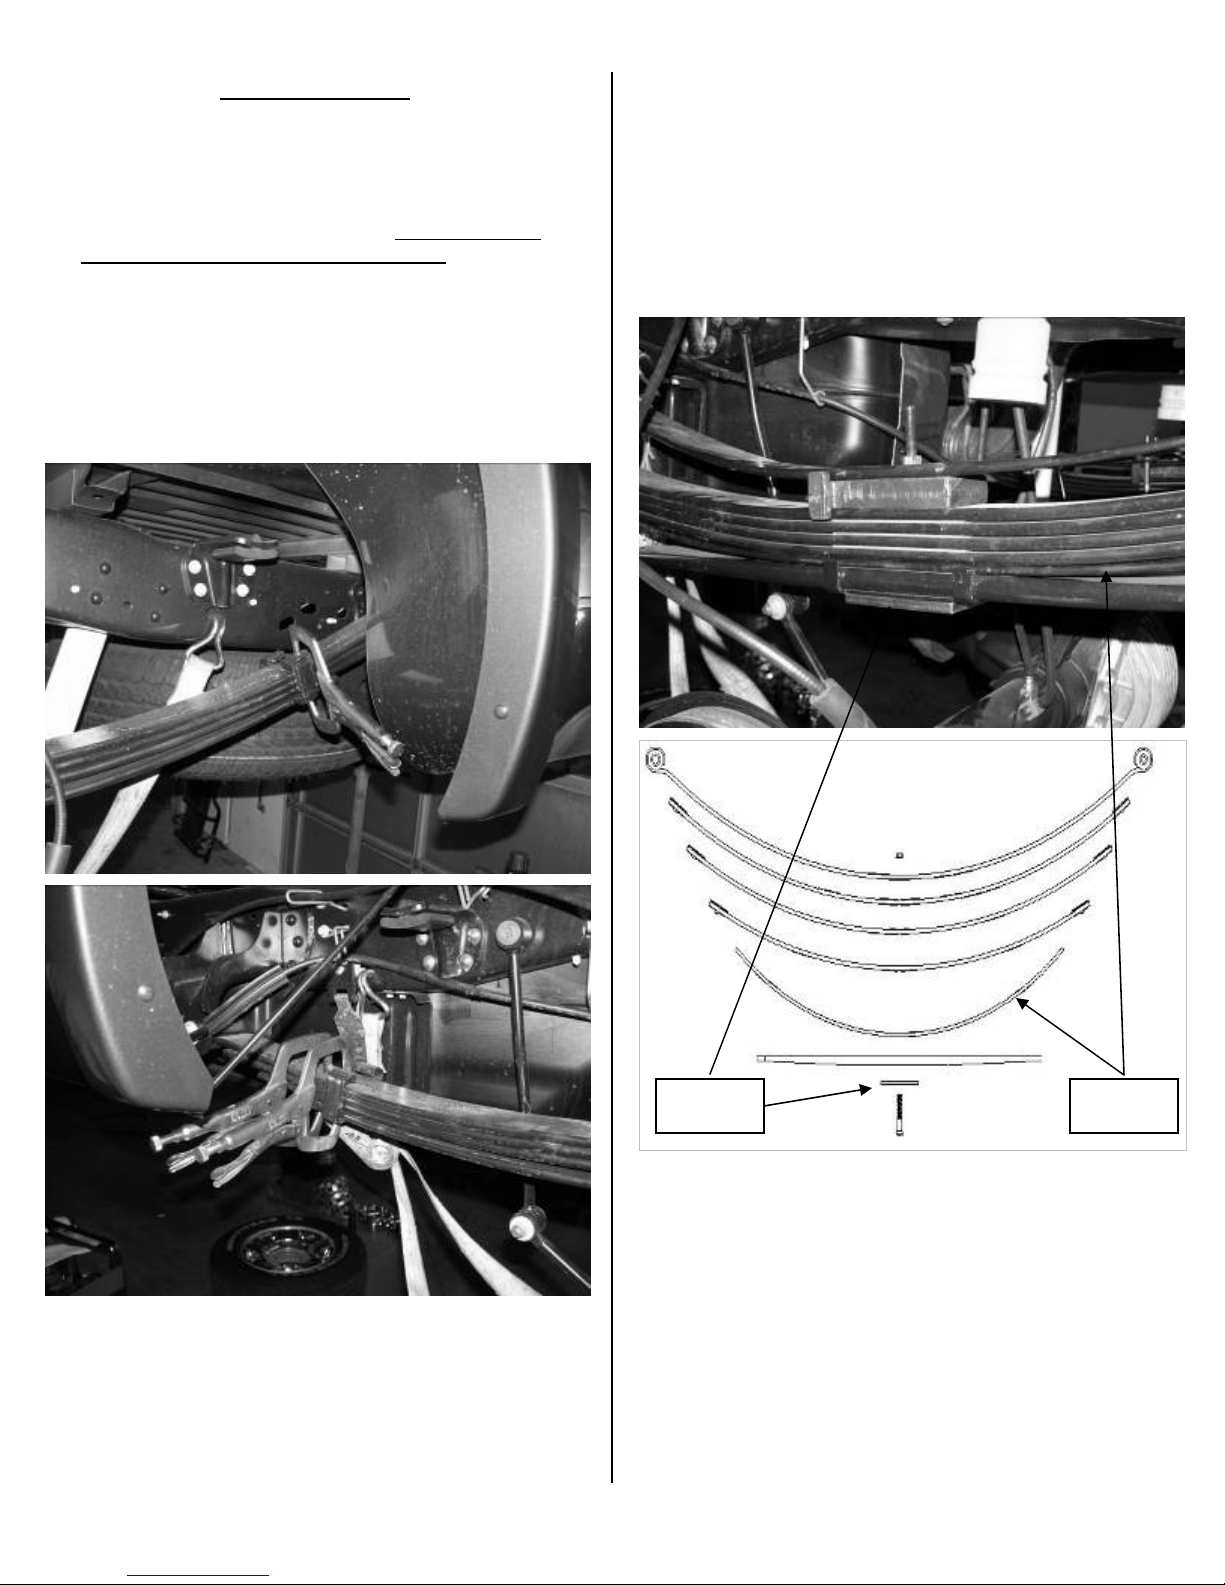
1. Disco
2. Locate the E-Brake Cable mount on the driver side spring
nnect the negative terminal on the battery. Jack up th
rear end of the vehicle and support the frame rails with jack
st
ands. Supporting the rear differential remove and di
scard
the rear shocks and u-bolts. Lower the axle down slowly. Use
.
care not to over extend the brake hose
NEVER WORK
UNDER AN UNSUPPORTED VEHICLE!
pack perch. R
emove the bolt attaching it to th
e perch and save
the hardware
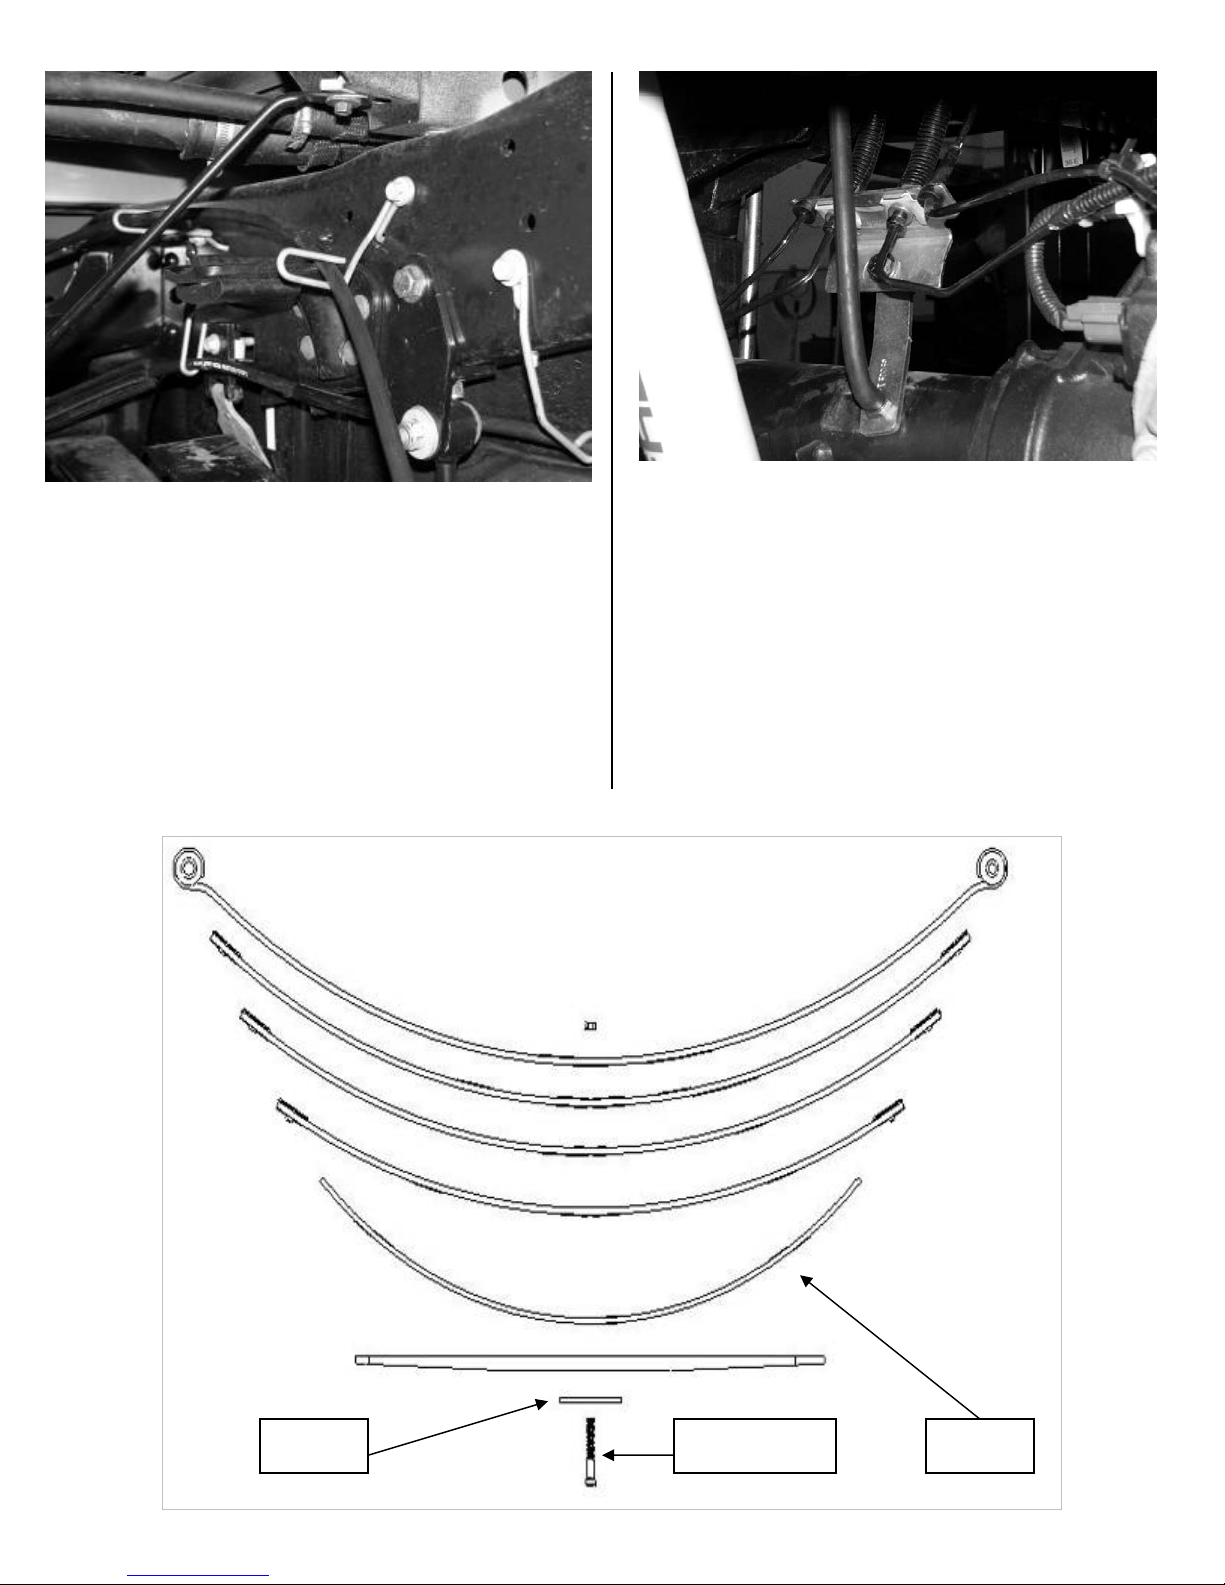
4. Separate the individual leafs and install the provided FT30275
d a leafs with the new center bolt in a pyramid pattern
ad
e
smallest on the bottom graduating to the longest on top. The
factory flat overload leaf should remain on the top of the pack.
Locate FT30284 Leaf Spring Spacer and place on the bottom
of the stack. Clam
p the spacer and springs and tighten the
center bolt as not to leave a gap between the springs. Cut the
thread of the bolt smooth with the nut. The nut should be on
the top of the leaf spring pack. SEE DRAWING AND
PHOTO BELOW
3. C
lamp the leaf spring in the middle of the spring and rem
the center bolt. (DO NOT REMOVE THE LEAF SPRING
FROM THE TRUCK) SEE PHOTOS BELOW
ove
FT30284
Spacer
FT30275
Add-a-leaf
5. Locate the upper leaf spring plate. Use a drill with a 13/16”
rill bit and enlarge the factory hole in the plate. This is so th
d
n
ew center pin nut will fit inside the pl
ate. SEE PHOTO ON
NEXT PAGE
e
Page 3
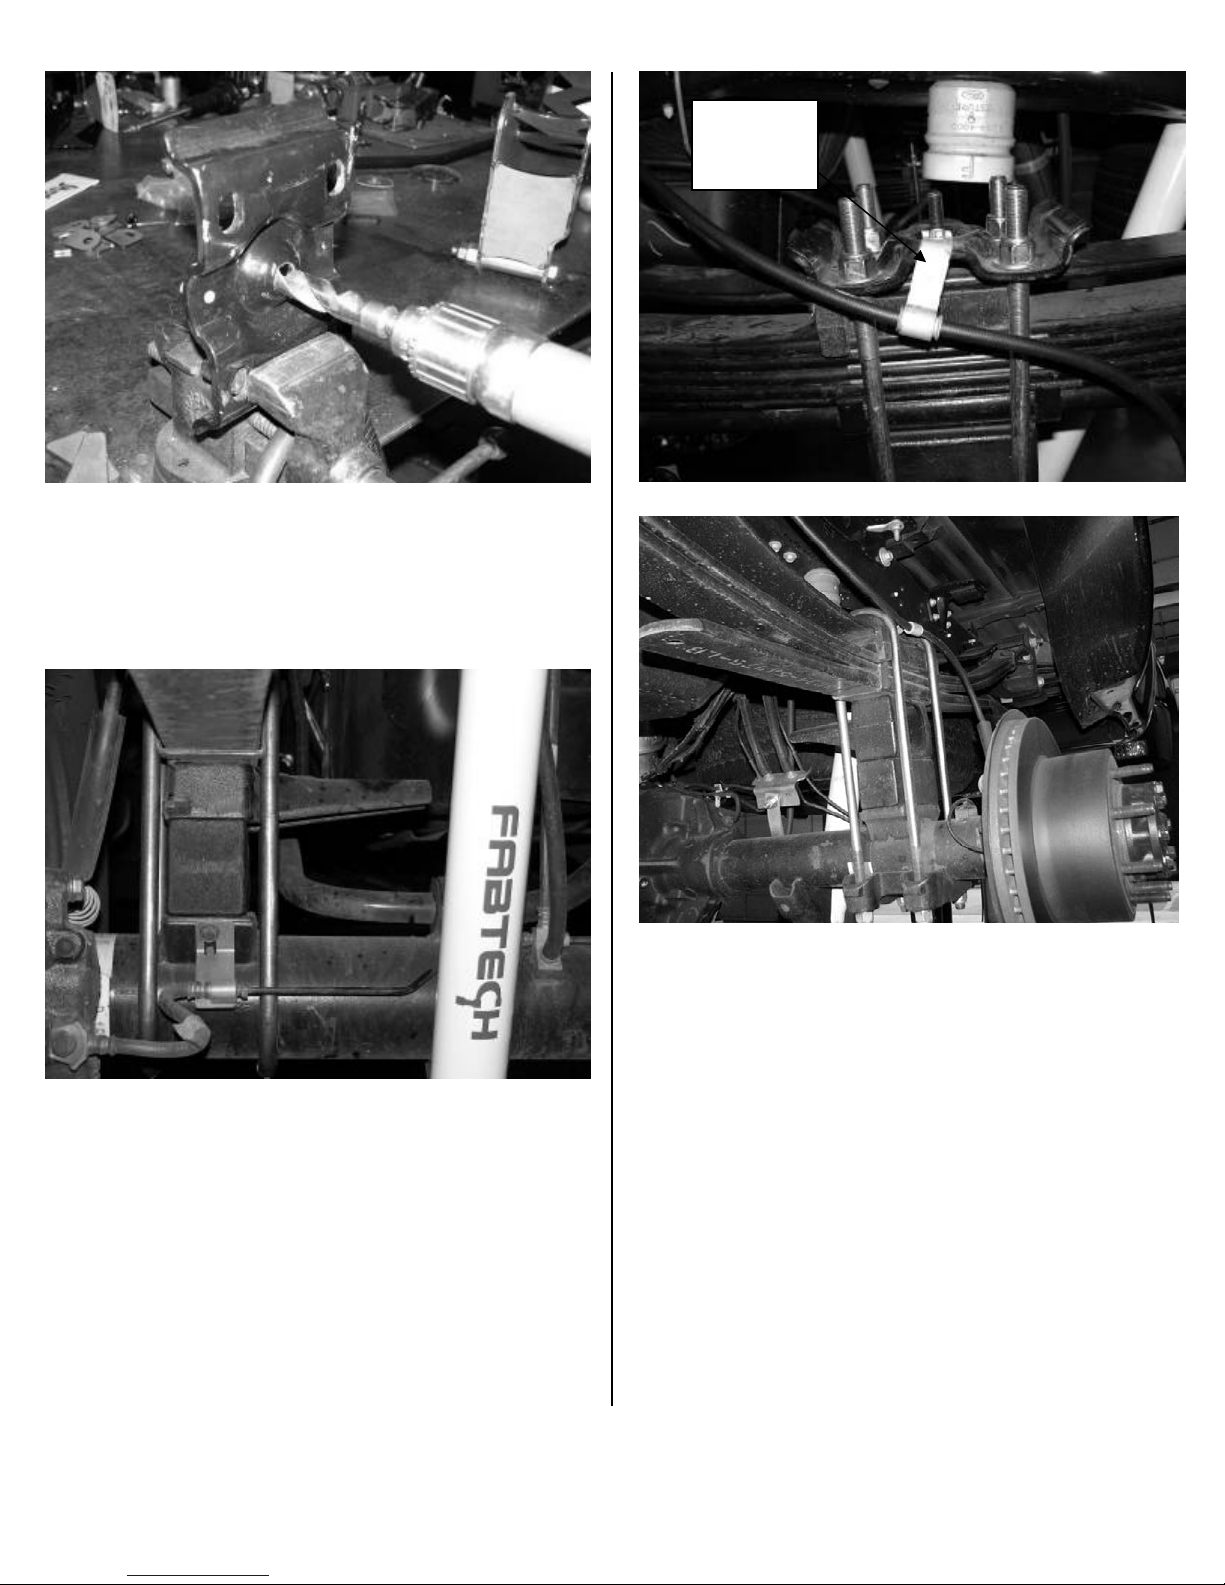
6. Locate and install the rear lift blocks, the factory block will be
tioned on top of the new Fabtech block, with the short
posi
center pin of both blocks facing down, to the axle. The short
end of the blocks should face to the front of the vehicle.
Usi
ng the supplied u-bolts, nuts, and washers align axle, lift
blocks, and springs and torque to U-Bolts to 180 ft-lbs. SEE
PHOTO BELOW
Bend bracket
forward to
give the cable
more slack
7. Install Fabtech shock part number FTS7266 Performance
Shocks or FTS81005 Di
the factory hardware and torque bolts to 65l
rt Logic Shocks (not included) with
bs.
8. Rotate the E-Brake cable bracket so that it positions the cable
below the spring plate and attach to the plate with the factory
hardware. Once t
ightened, bend
the bracket forward towards
the front of the truck. Locate the upper E-brake cable bracket
on the frame and bend it outward / down to give the cable
some more slack. SEE PHOTOS IN NEXT COLUMN
2011 configuration shown above
Page 4
9. Install FTS419 Shim Kit per the instructions in the FTS419
box.
10. 2011 models only .Locate the factory brake line mount on the
dri
ver side of the axle. Remove the vent line from the bolt
rem
ove bolt, save hardware. Locate the supplied brake lin
and
e
bracket FT30059 in front box kit; attach the side with the
sleeve to the axle using the fact
ory hardware. Using th
e
supplied 3/8” x 2” bolt, nut, and washer attach the brake line
t
o the other end. Reattach vent lin
e. SEE NEXT PHOTO.
11. Recheck all bolts for proper torque. Recheck brake hoses and
lines for proper clearances.
12. Inst
all tires and wheels and torque lug nuts to wheel
manufacturer’s specifications. Turn front tires left to right
check for appropriate tire clearance. Note-
Some oversi
zed
and
tires may require trimming of the front bumper & valance.
13. C
heck front-end alignment and set to factory specificati
ons.
Readjust headlights.
14. Check the front-end alignment and set to the factory
specifications.
FT30284
Spacer
FT90080
Center Pin & Nut
FT30275
Add-a-leaf
 Loading...