


Need to ask a question?
Contact technicalsupport@fablicator.com 10/24/2017
FABLICATOR
User Manual

Contents
Unpacking the Startup Kit ............................................................................................................................. 3
Unpacking the SX .......................................................................................................................................... 5
Loading Filament ........................................................................................................................................... 8
Removing Filament ..................................................................................................................................... 11
Slicing your first part ................................................................................................................................... 14
Printing Your First Part ................................................................................................................................ 17
Extruder Problems ...................................................................................................................................... 19
Clearing an Extruder Clog ............................................................................................................................ 21
Wedged Filament removal .......................................................................................................................... 23
Cleaning a blocked nozzle tip (simple method) .......................................................................................... 28
Cleaning a blocked nozzle tip (involved method) ....................................................................................... 32
2
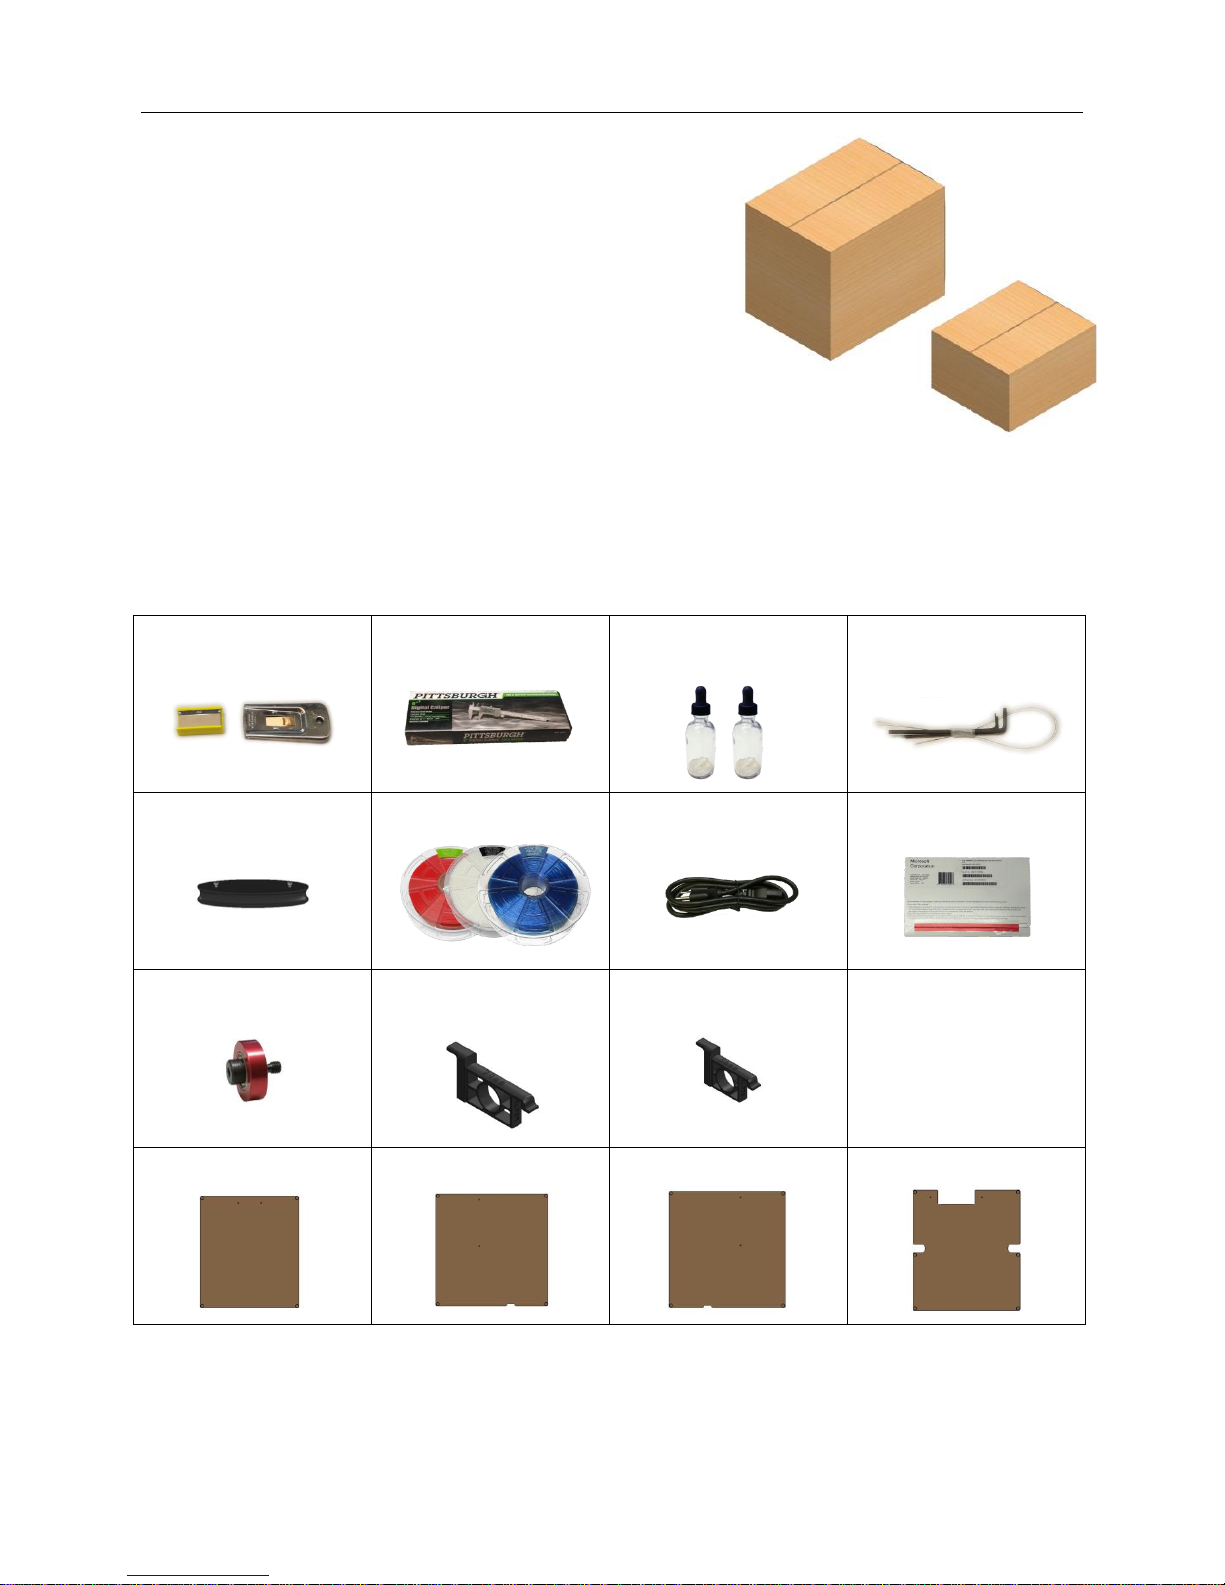
Unpacking the Startup Kit
1.
Verify the following are contained within the small startup
kit box.
Part Scraper Tool
Calipers
Primer Bottles
Allen Wrenches and
music wire
Front Panel Handle
3 Spools Filament
Power Cord
Windows Backup CD
Flex Idler
76mm Spool Holder
54mm Spool Holder
User Manual
Front and Back panels
Left Side Panel
Right Side Panel
Top Panel
3
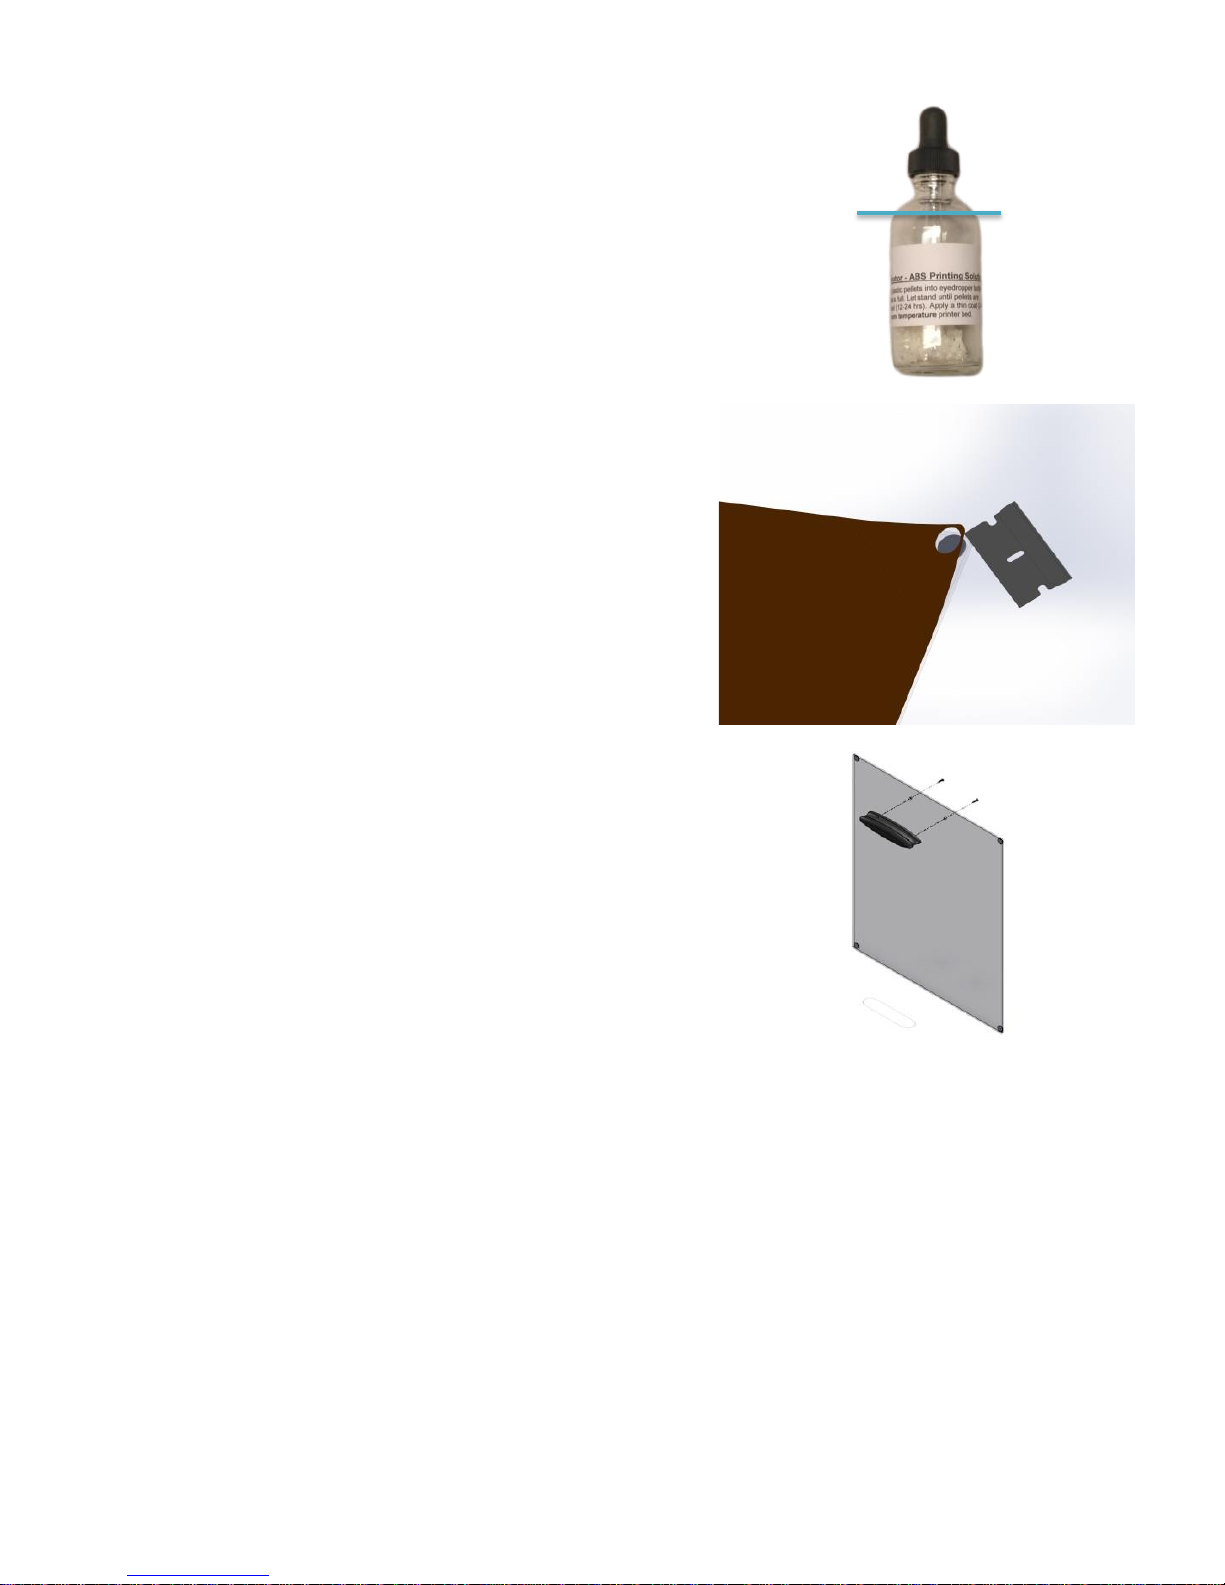
2.
Add acetone to the dropper bottles to begin dissolving the
primer pellets.
The bottles should be filled to the line shown.
3.
Peel the protective covers from the plastic panels. Use your
fingernail or a razor blade to lift up the edge to get them
started.
4.
Assemble the front panel and front panel handle.
4
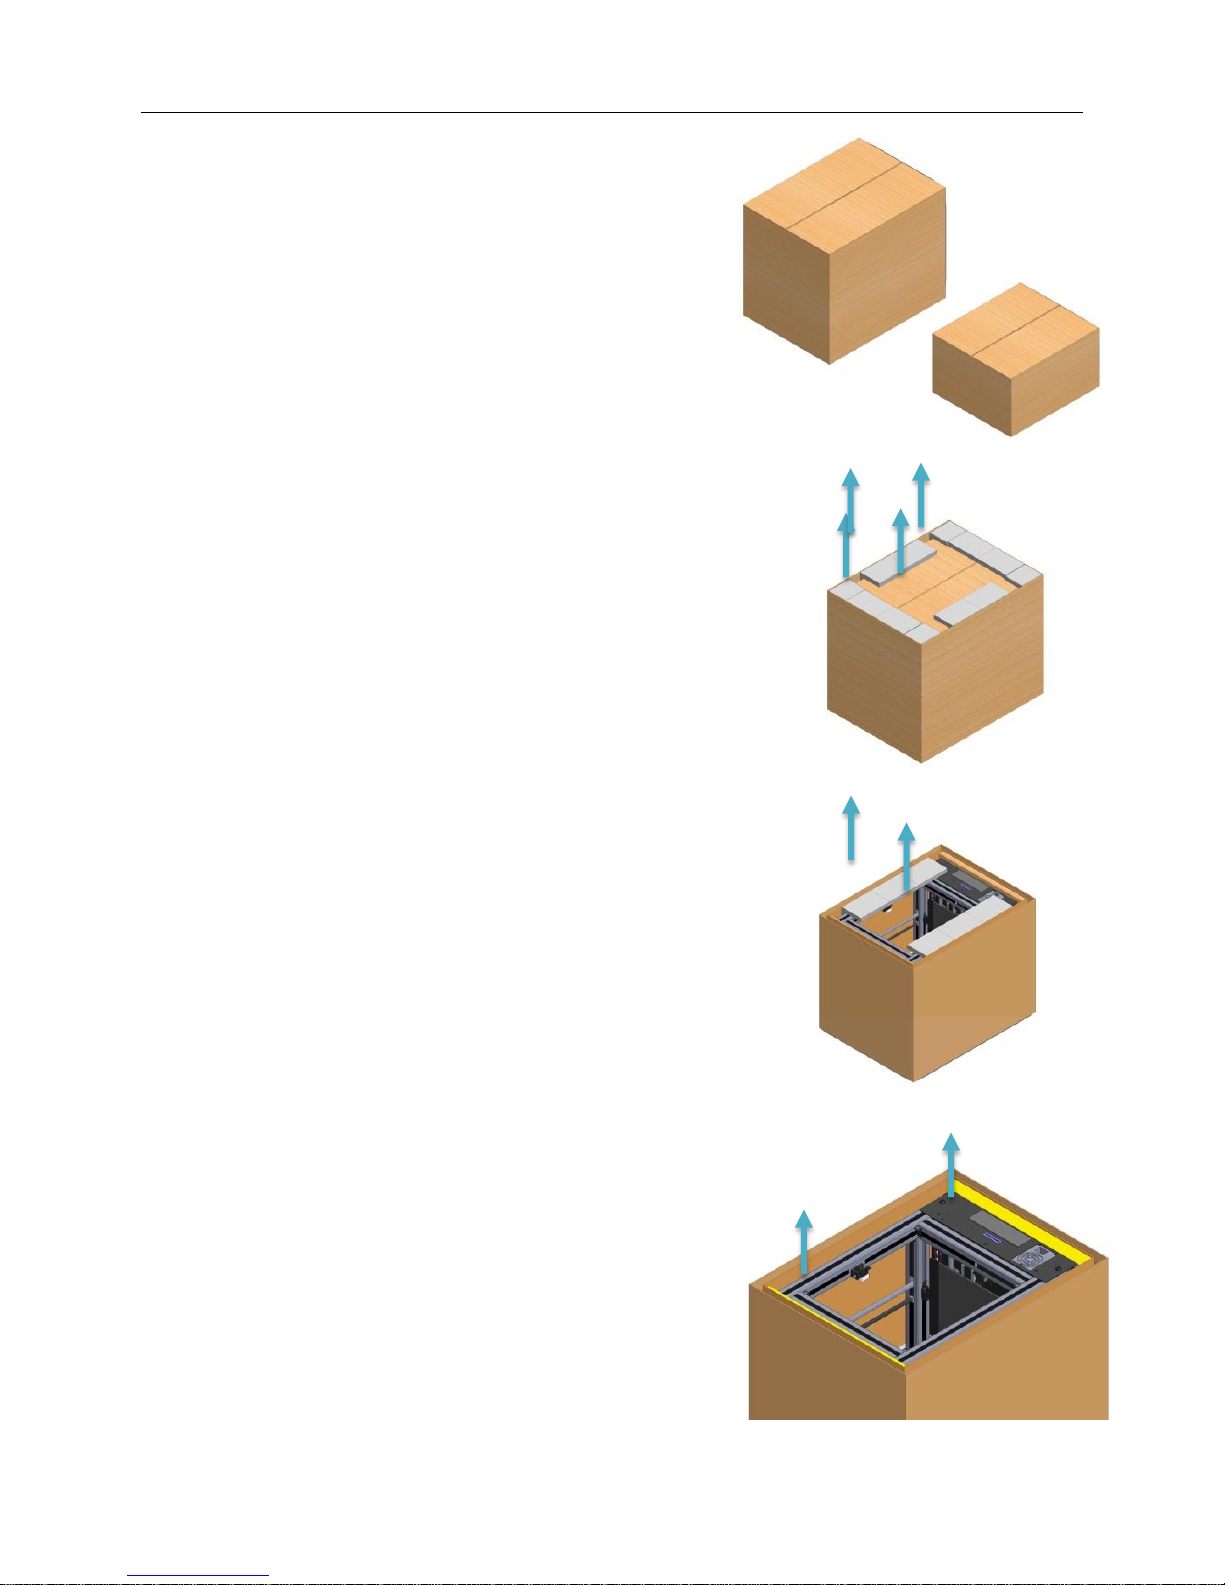
Unpacking the SX
1.
The SX is shipped in two Packages. One large package
containing the printer and one smaller package
containing the required accessories.
Unpacking the unit and accessories in an uncluttered
area is recommended.
2.
Start by opening the large box and removing the
protective foam inserts.
3.
Open the inner box and remove the foam inserts
4.
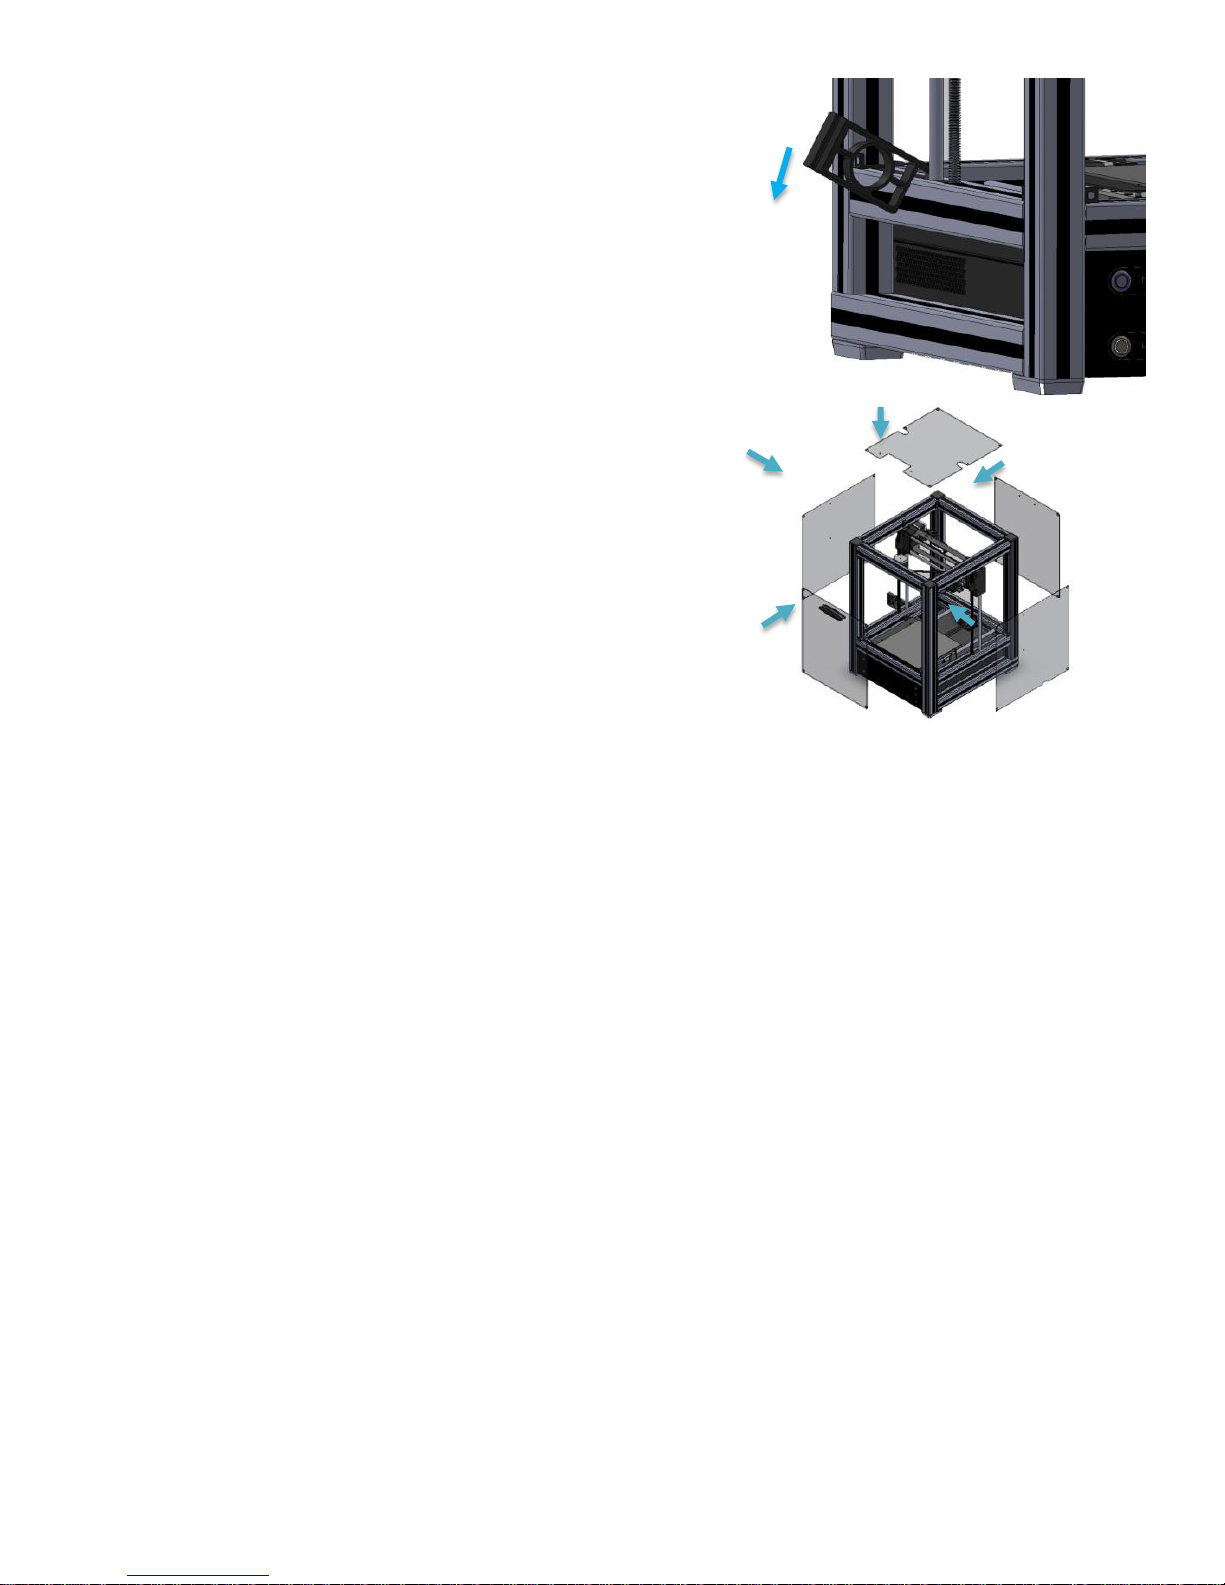
Remove the protective wood and cardboard panels
above and below the machine. (Highlighted in yellow)
5
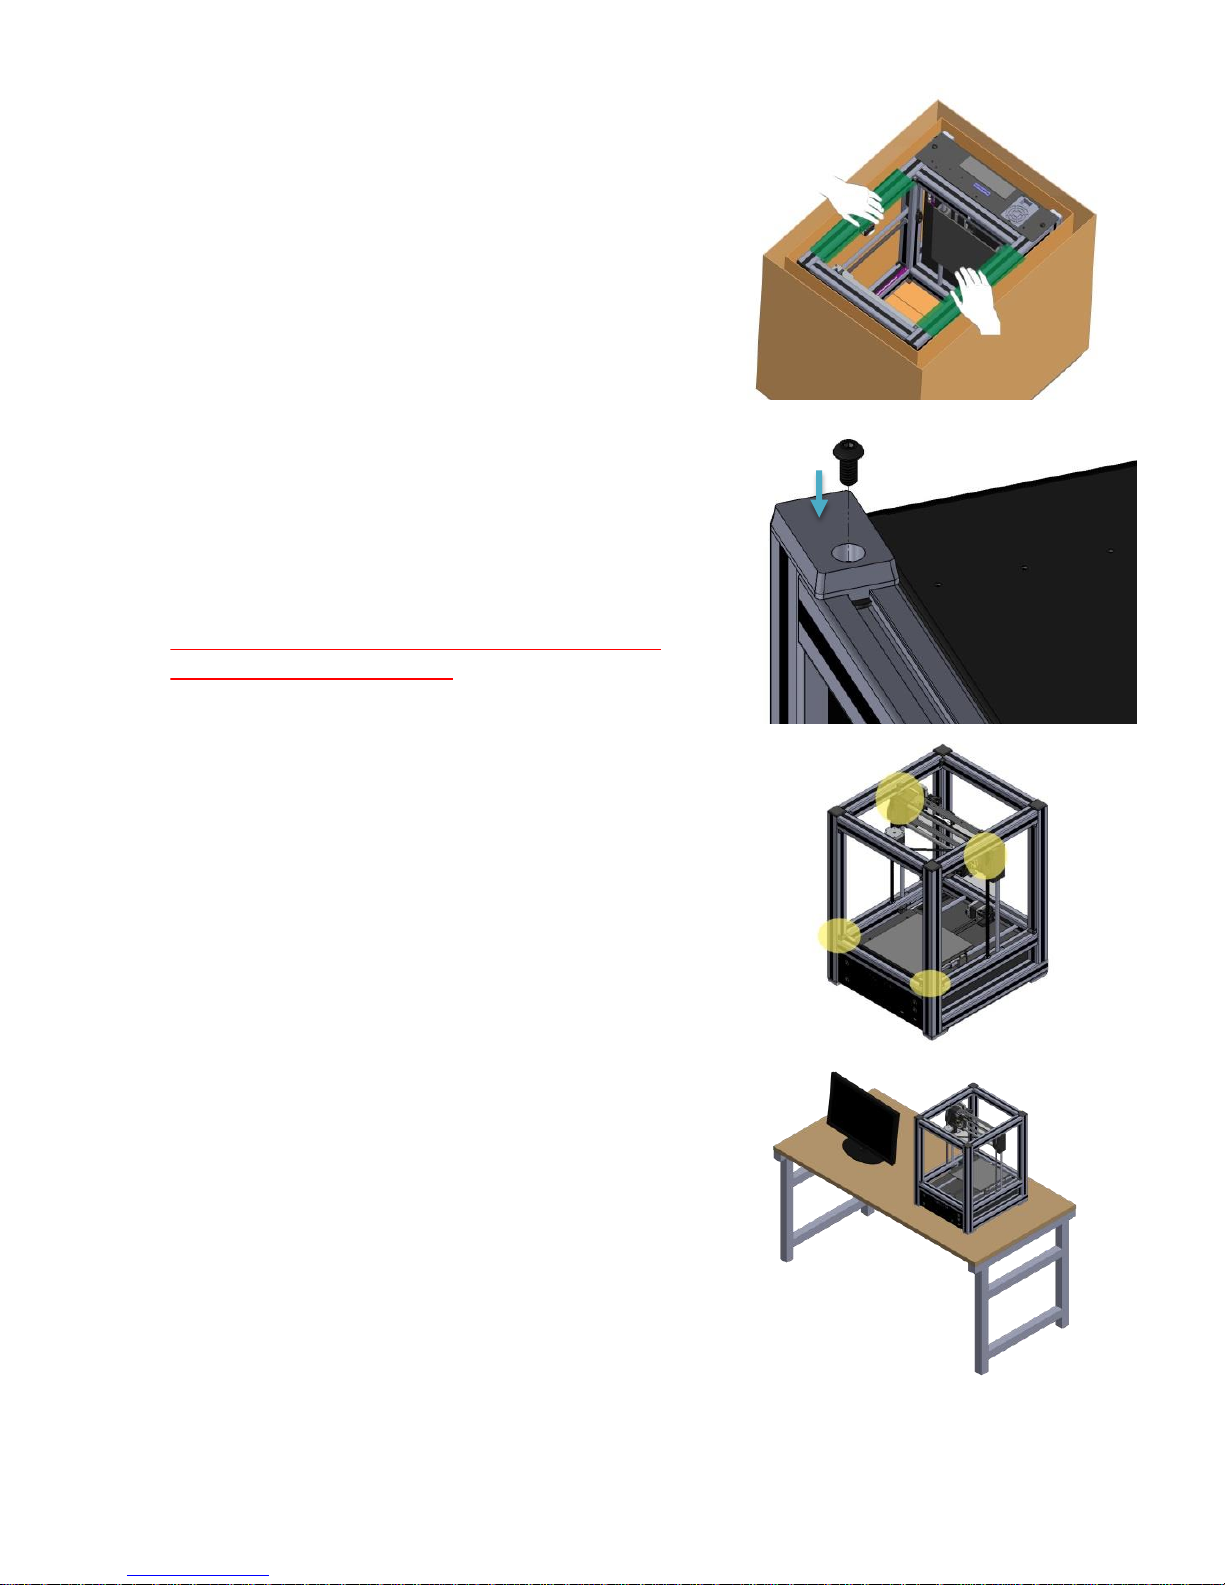
5.
A second person is very helpful for this step.
Lift the printer by the green highlighted areas, and set
upside-down onto a flat, clean, non-abrasive surface.
6.
Cut the feet free of the zip ties on the side of the
printer.
Screw the feet to the bottom four corners of the
machine as shown using the existing hardware.
Failure to attach the feet will cause the printer to
badly scratch most surfaces!
7.
Place the Fablicator on a sturdy table or desk
Remove the yellow Z axis spacers and all remaining
yellow zip ties.
8.
Connect your monitor, keyboard, mouse, and power
cord to the printer. The connections are on the back of
the machine and are the same as a standard PC.
6
9.
Insert the spool holder into the frame on either side of
the machine.
10.
Attach the clear magnetic panels to the machine.
The Fablicator SX is now completely assembled and
ready to start printing.
7
Loading Filament
1.
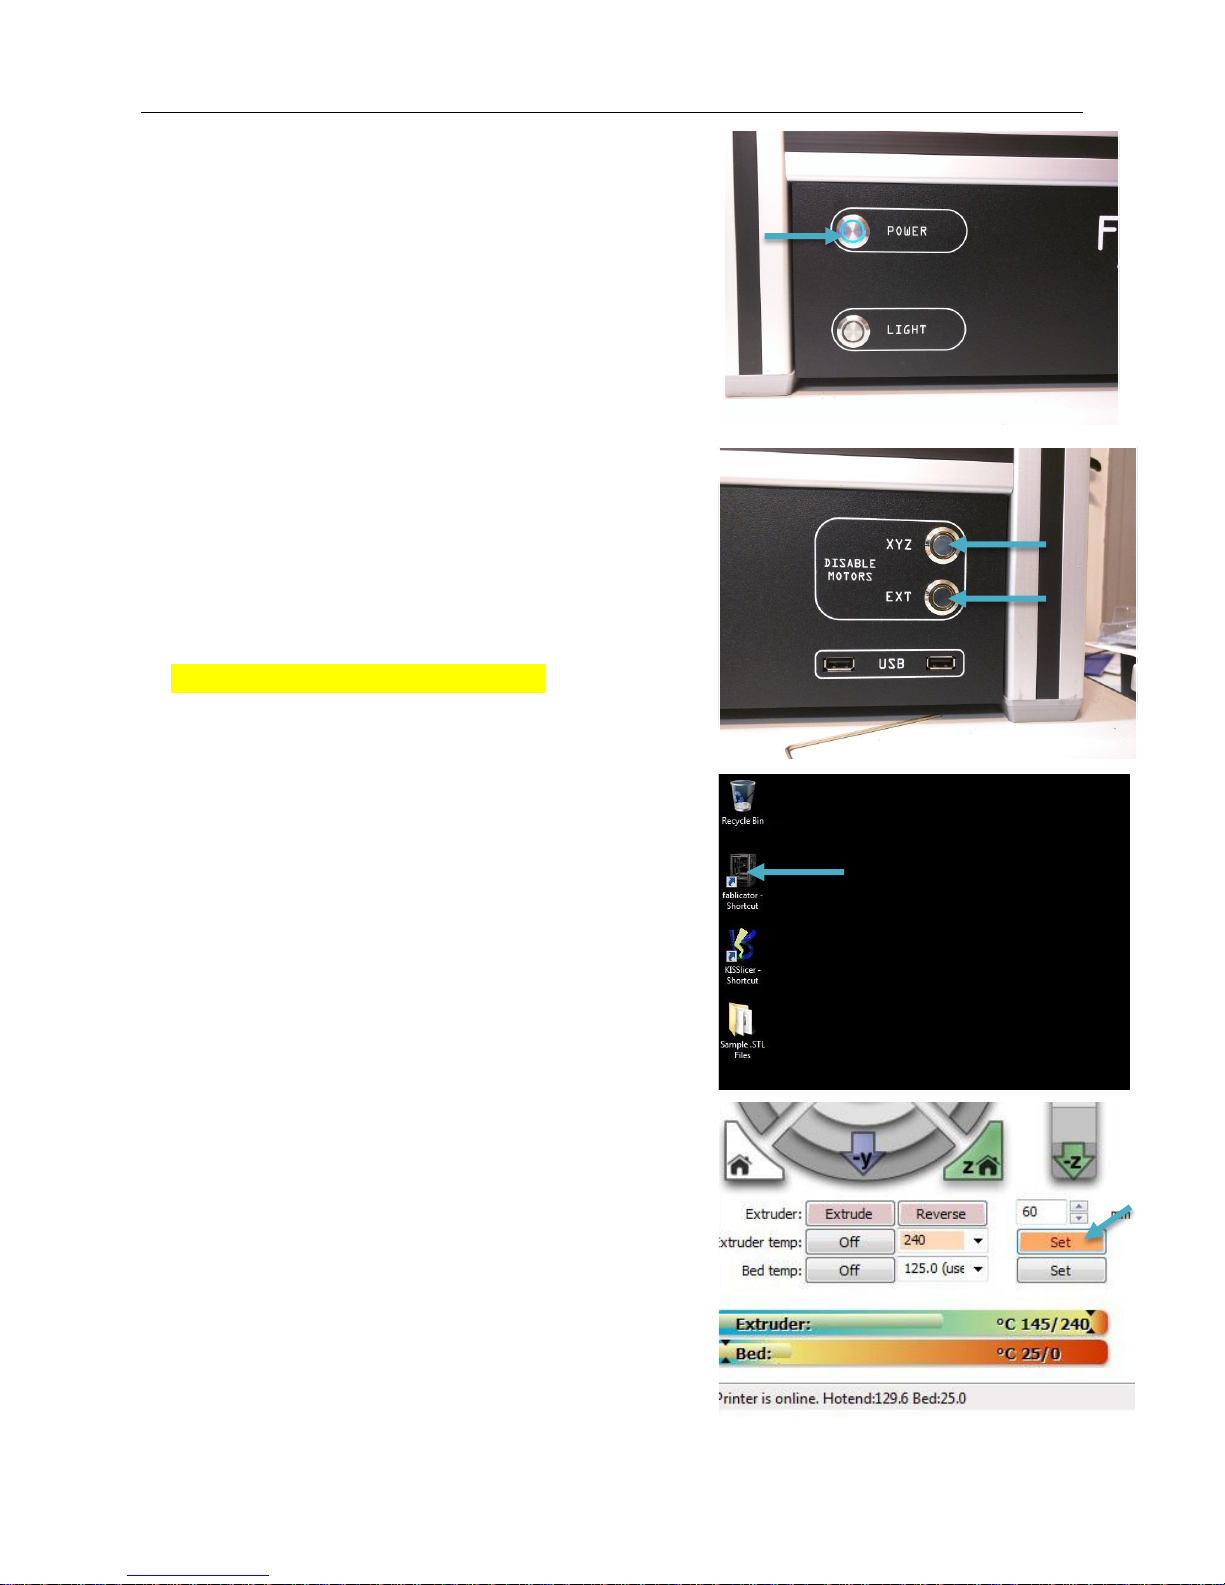
Turn on the printer using the blue power button
2.
Turn off the XYZ and EXT disable switches on the front
of the machine. These switches disable the motors
controlling the extruder and XYZ axis when
illuminated.
The built in yellow LEDs should be OFF
3.
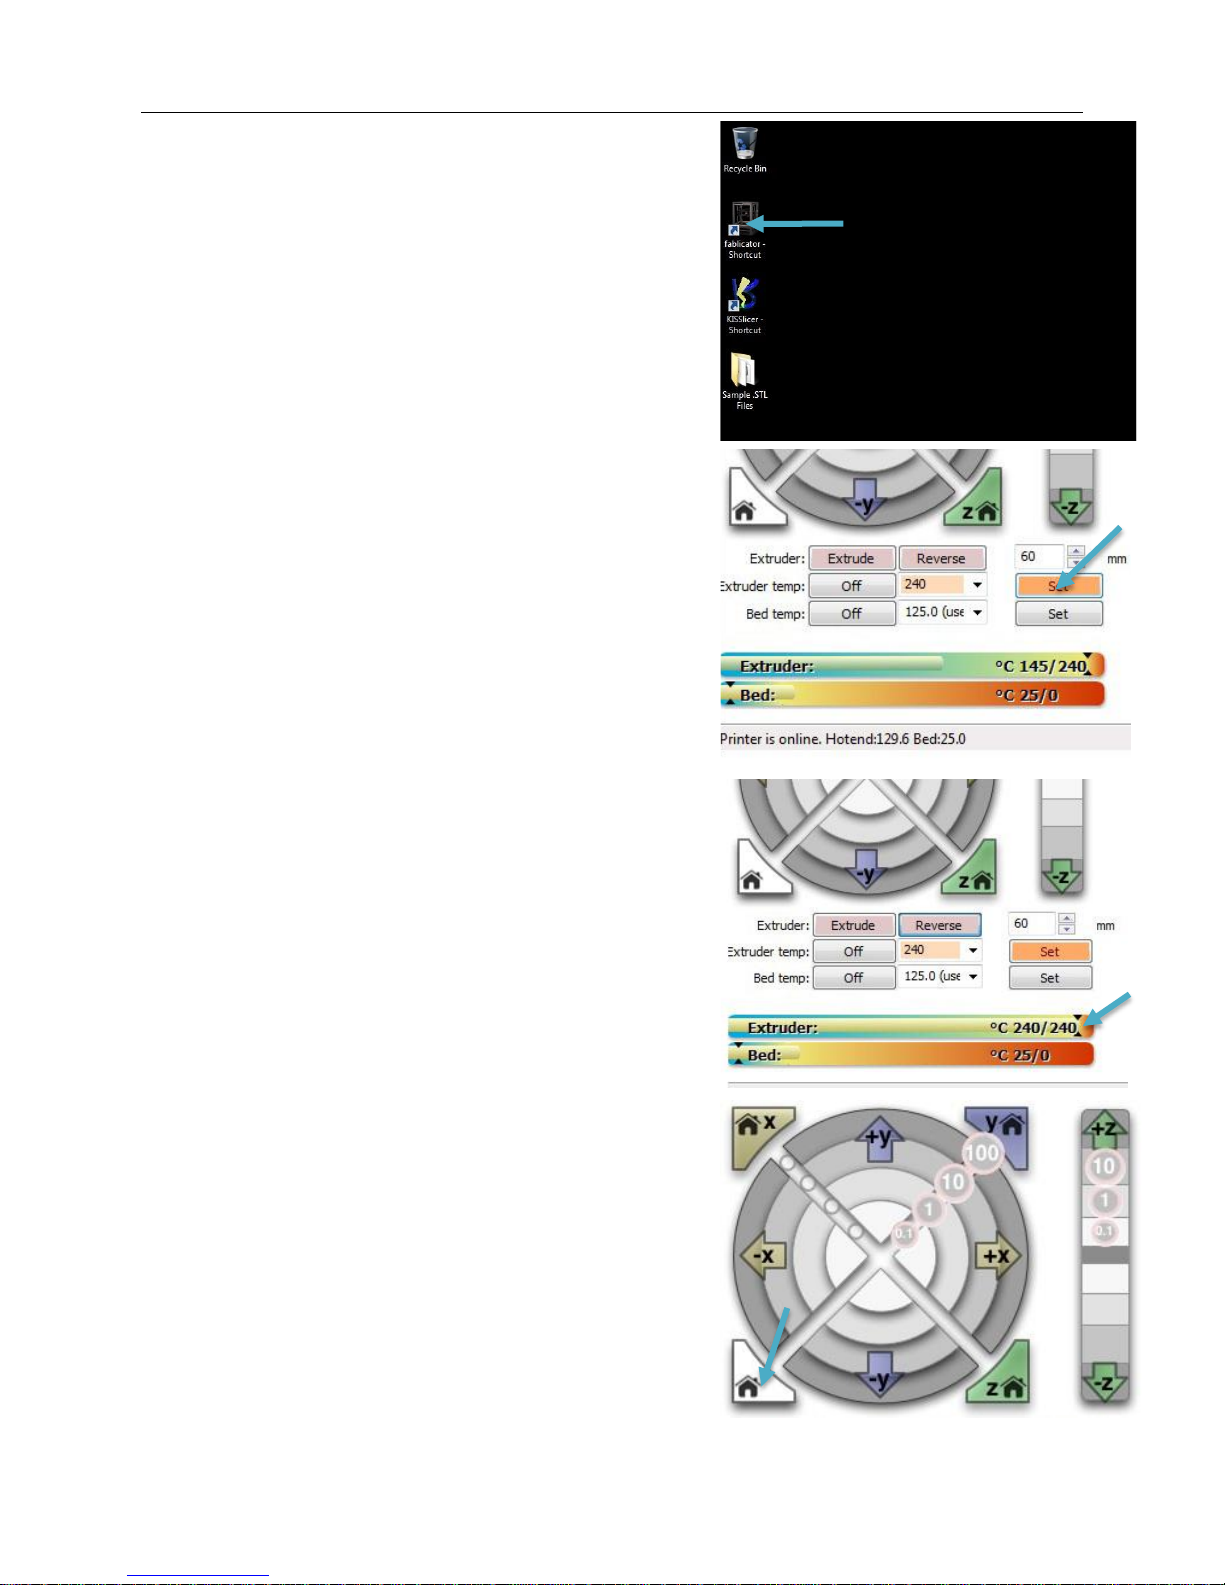
Open the Fablicator shortcut on the desktop
This will open the interface to control the Fablicator
SX.
4.
First, the filament needs to be loaded into the
machine.
Press the Set button to the right of the Extruder Temp
text to set the extruder to 240C. . This will heat up the
extruder so filament can be loaded and unloaded.
Caution: After this step, the tip of the extruder will be
extremely hot. Do not touch it.
8
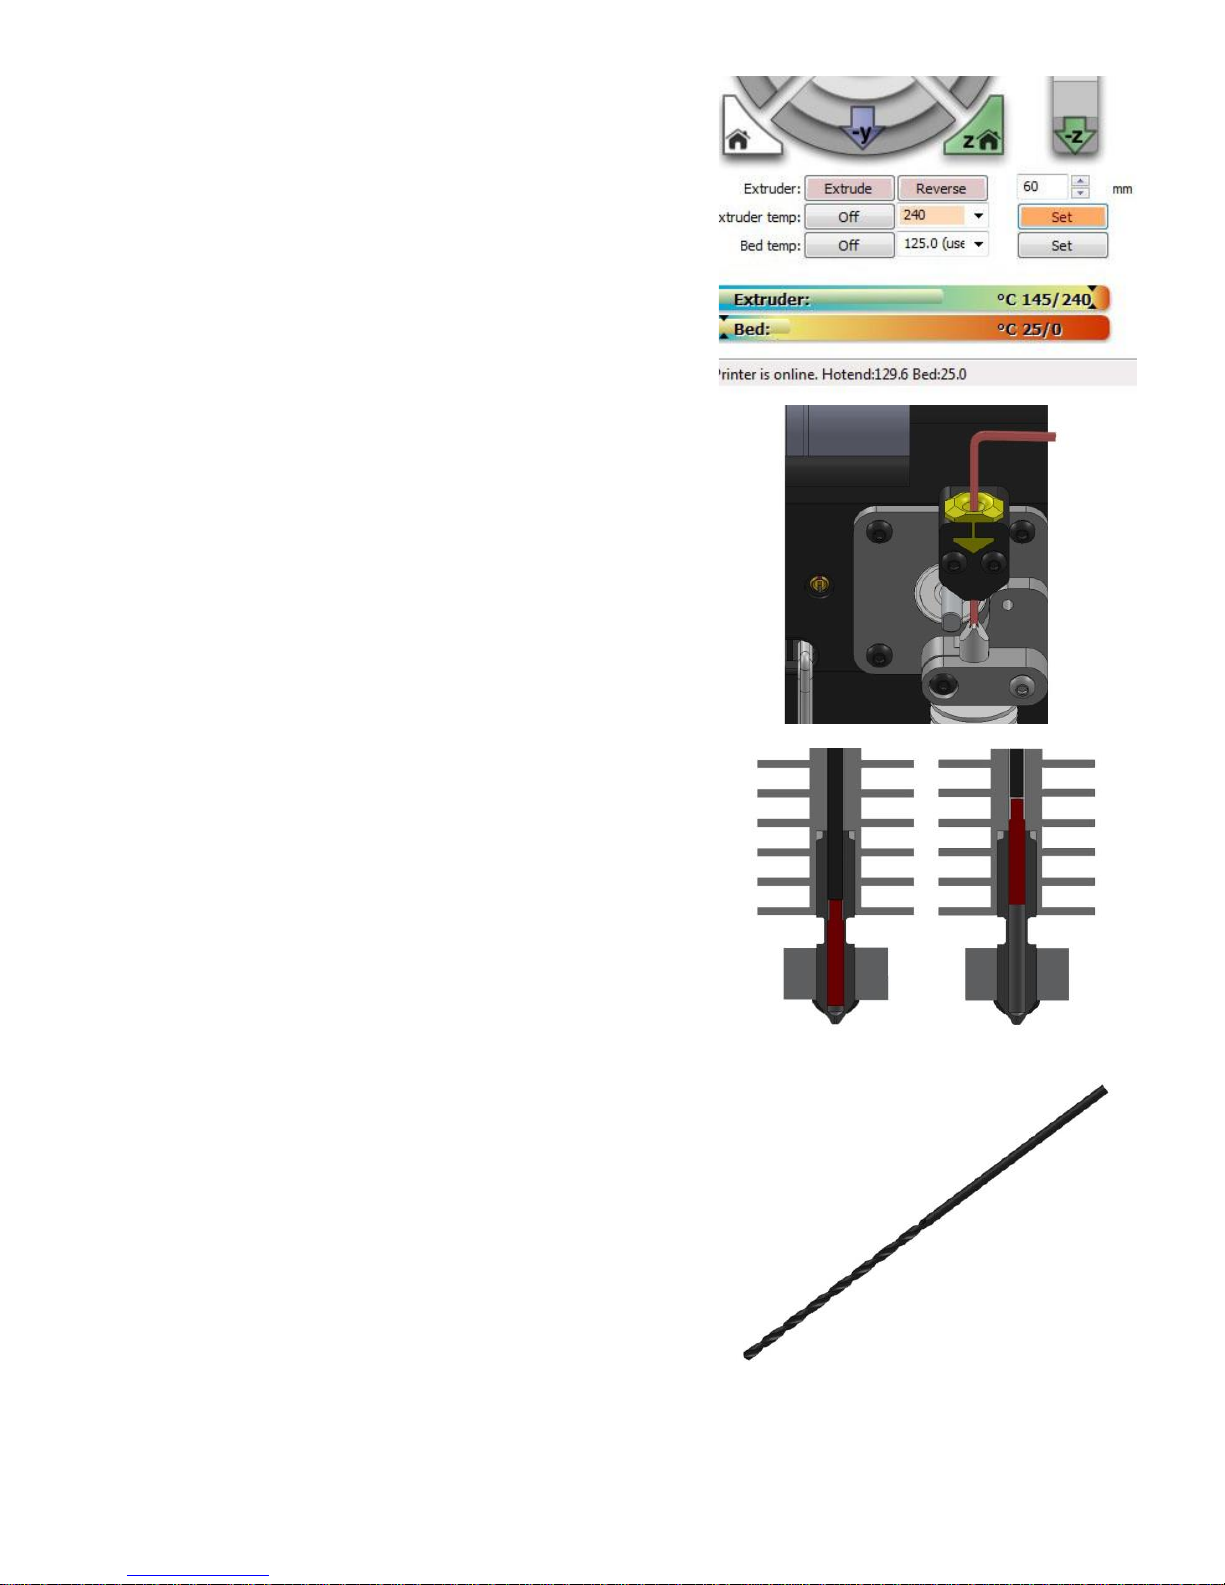
5.
Wait for the Extruder temp to exceed 200 C
The extruder temp bar shows the current extrude
temperature vs. the set temperature
6.
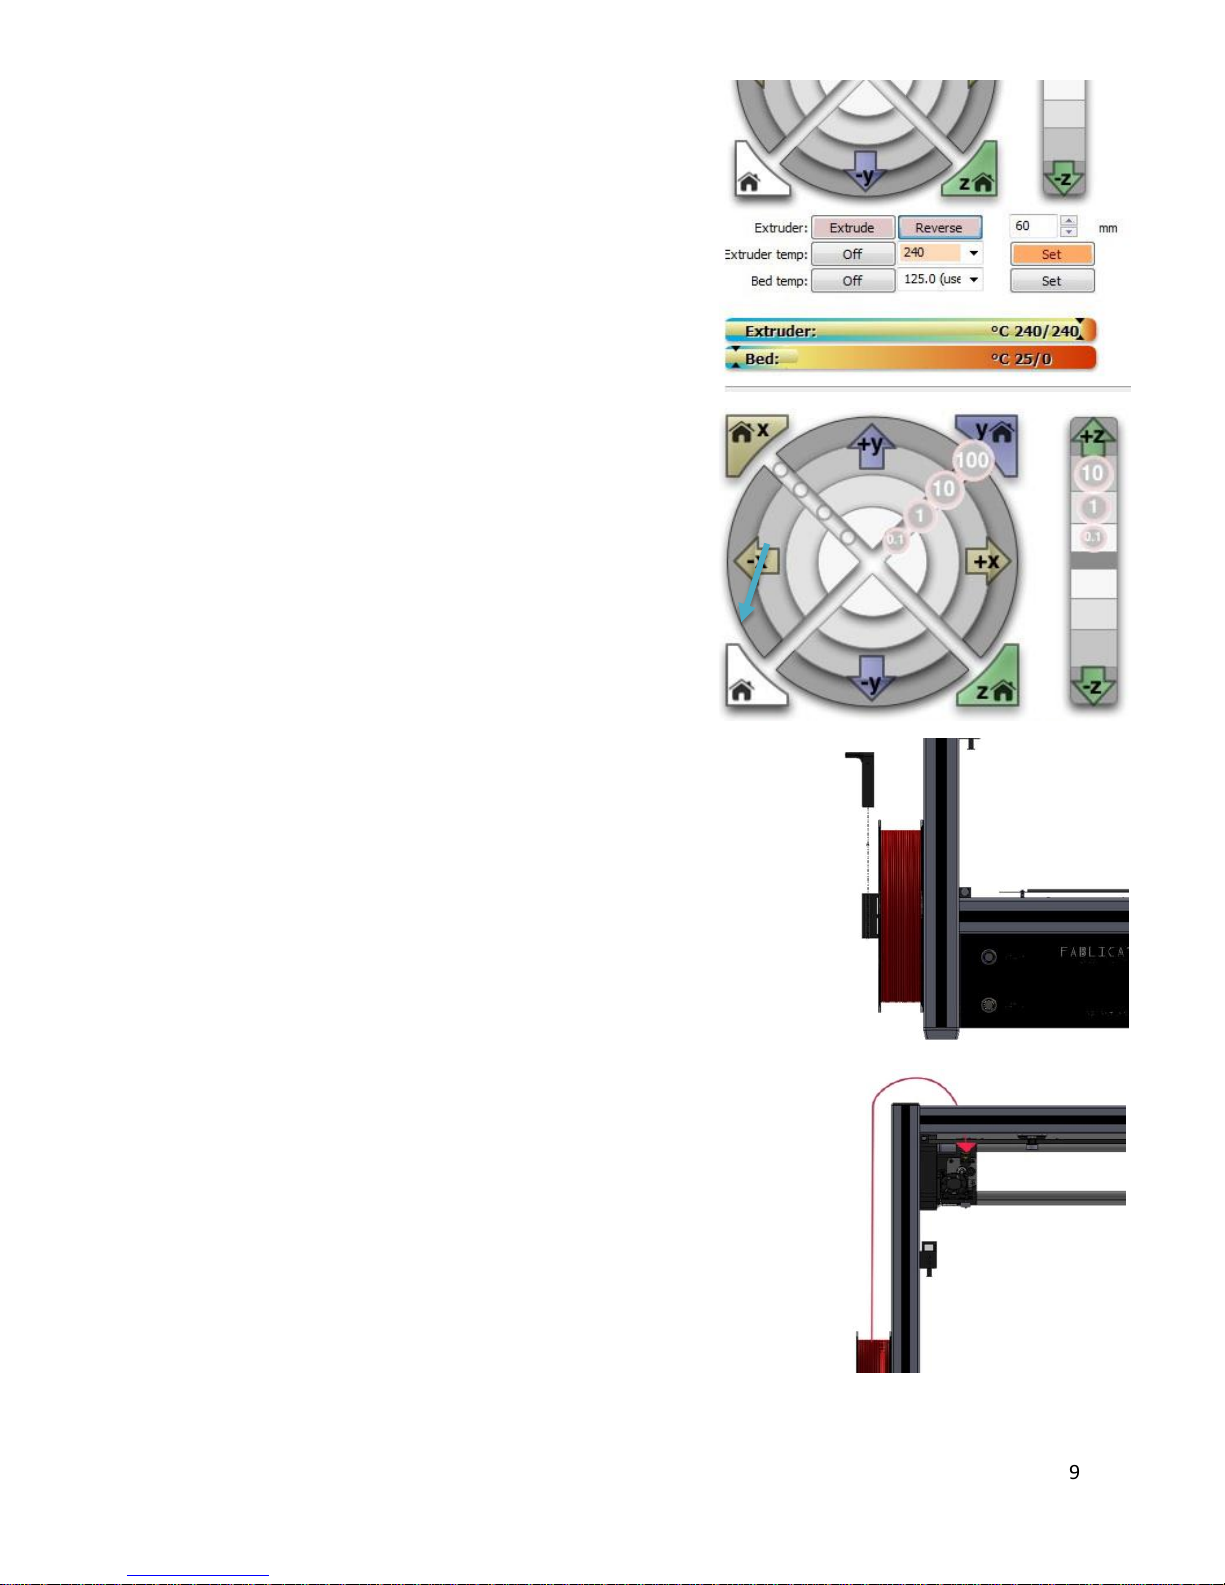
Home all axis to make sure the print head is in a
convenient position.
7.
Attach a spool to the spool holder.
There are different sized spools and holders, so you
may need to change the spool holder if it does not fit
the spool you want to use.
8.
Loop the filament over the extrusion, and into the
entrance of the extruder (marked with a yellow arrow)
5.
The extruder temp bar shows the current extrude
temperature vs the set temperature
Wait for the Extruder temp to exceed 200 C
9

9.
The filament should be inserted so it just touches the
drive wheel and idler.
10.
Hold the filament against the drive wheel and idler
while pressing the Extrude button in the Fablicator
interface.
The extruder motor will start to turn and grip the
filament. One press moves the filament 60mm and
stops automatically.
Once the filament starts to move you can let go of the
material.
11.
Press the Extrude button again if filament has not
been extruded at the nozzle tip by the time the
extruder stops.
Once melted filament has come out the tip of the
extruder, the filament is fully loaded.
Remove the excess material from the nozzle tip.
12.
Turn off the extruder by pressing the Off button next
to the Extruder temp text. This is only necessary if you
do not plan to print an object in the next few
minutes.
10
Removing Filament
1.
Open the Fablicator shortcut on the desktop
This will open the interface to control the Fablicator
SX.
2.
The nozzle needs to be heated up to remove the
filament.
Press the Set button to the right of the Extruder
Temp text to set the extruder to 240C. . This will heat
up the extruder so filament can be loaded and
unloaded.
Caution: After this step, the tip of the extruder
will be extremely hot. Do not touch it.
3.
Wait for the Extruder temp to exceed 200 C
The extruder temp bar shows the current extrude
temperature vs. the set temperature
4.
Home all axis to make sure the print head is in a
convenient position.
11

5.
Press the Reverse button which will back out 60mm of
filament from the extruder.
6.
After the extruder motor stops, lightly pull on the
filament and it should come out of the extruder
assembly.
7.
Trim the last 4 inches off of the filament so only
unmarred plastic is visible.
8.
Wrap the loose filament back onto the spool and lock
the strand through the holes on the side of the spool
If the end of the filament is loose, it will get tangled
on the spool and eventually cause knots.
12

9.
If you wish to add another spool of filament, now is a
good time.
Otherwise, turn off the extruder by pressing the Off
button next to the Extruder temp text.
13

Slicing your first part
1.
Open the Fablicator shortcut on the desktop
This will open the interface to control the Fablicator SX.
2.
Click the Load file button in the top left corner
This will allow you to select a .STL file to prepare it for
printing.
3.
Select a .stl file (The example we are using is located in
Desktop > Sample .STL Files >Engineering Samples>
Ruler 6in .STL) and click the “Open” button
This will open the file with KISSlicer.
4.
Once KISSlicer has loaded, a 3D representation of the
part will be visible in the main window. The sample
part is a short ruler in this case.
A Small thumbnail of the part will also be visible in the
“part box” on the top right of the screen (highlighted in
yellow)
14

5.
A right click on the part box allows a part to be scaled,
multiplied, or transformed (rotated, flipped) if desired.
Additional parts can be added to the print using the
Open button.
6.
Select the Style tab, and set this part to 01 Coarse,
Solid using the drop down menu.
The Style primarily changes the layer thickness and
infill density of the part.
Thinner layers and more solid parts take longer to
print.
7.
Select the Support tab, and set this part to 00. No
Support
8.
Select the Ext Map tab, and select the printing material
from the drop down box. We will be printing the
sample part in PLA-PHA
The material set in this window must match the
material loaded into the printer. Incorrect material
setting will lead to failed prints and potential damage
to the printer.
15
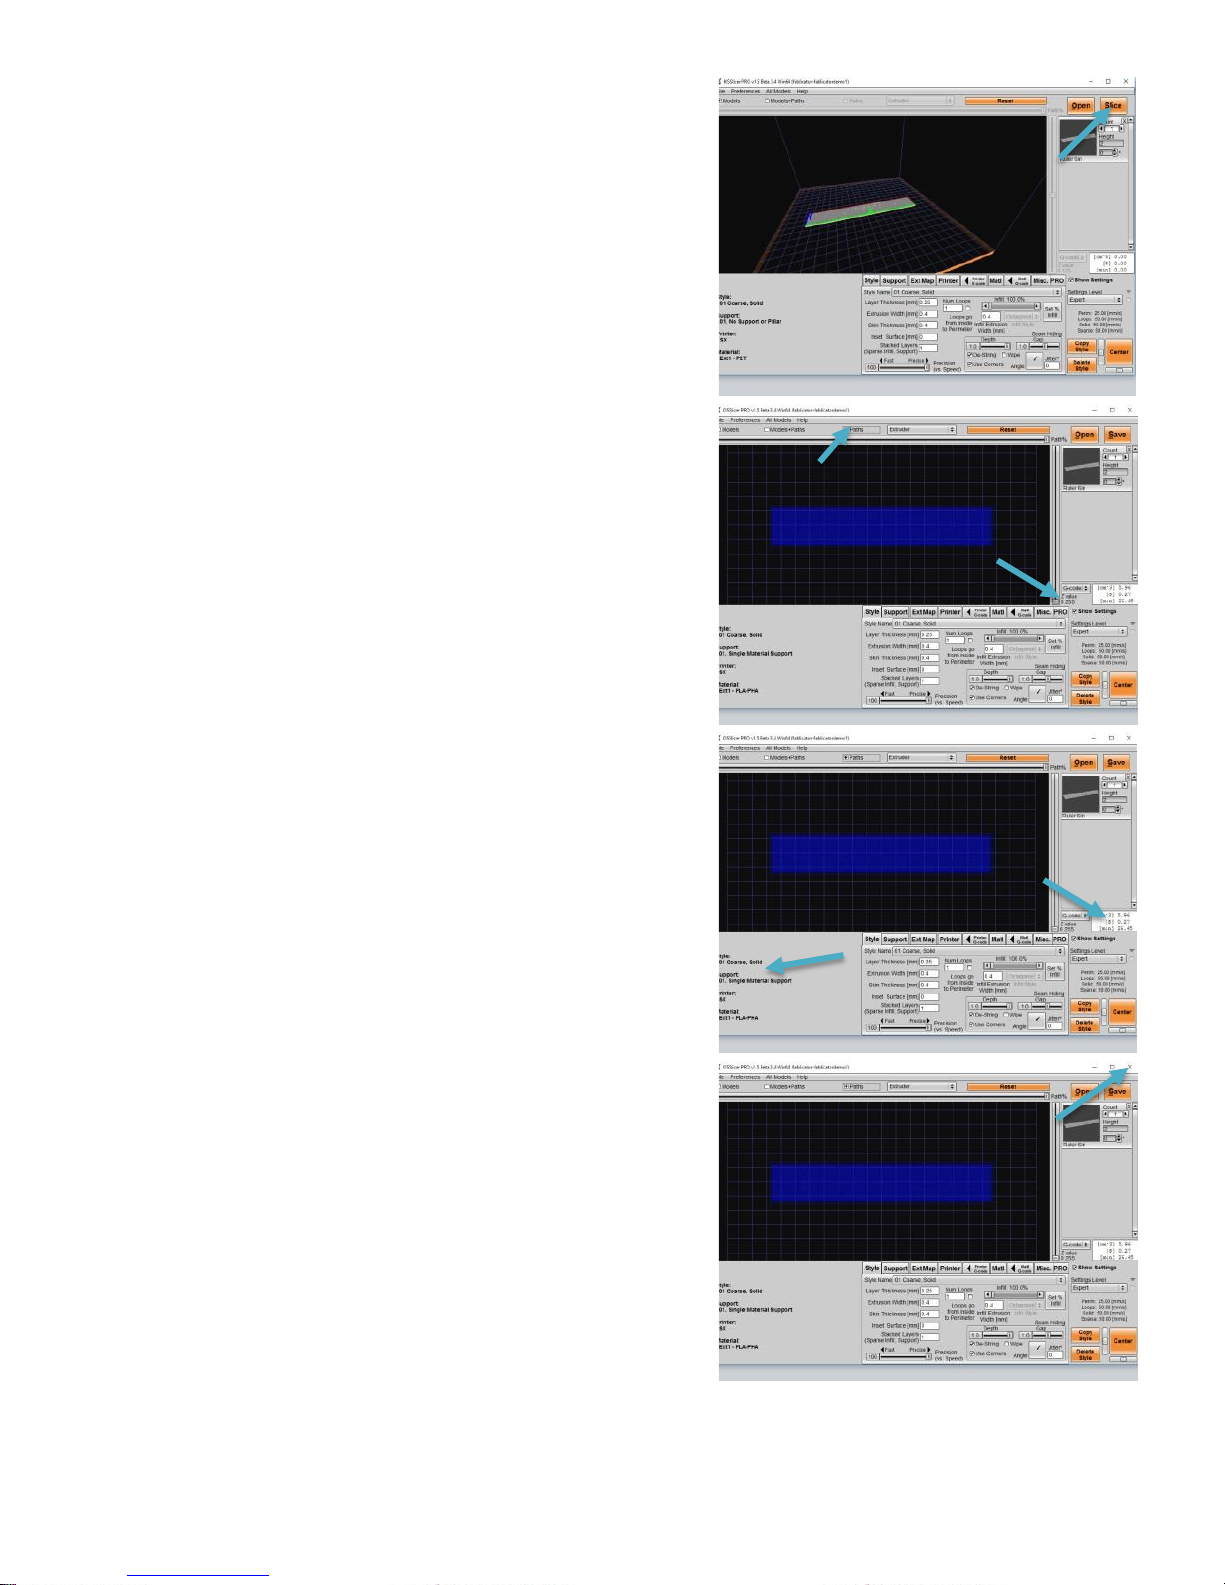
9.
Once all the settings are selected, Click the Slice button
in the top right corner.
Choose a filename and save the file to the desktop to
create G-Code for the part. It is good practice to
include the type of material used in the file name for
future reference.
10.
After the file is sliced, you can preview the layers using
the paths radio button.
You can use the vertical slider on the right side of the
preview window to scroll through the layers and see
exactly what the printer will do line by line.
It is recommended to always preview these paths.
11.
There is also a Time, Material Volume, and Cost
estimate visible on the right side of the screen
Lastly, the settings used to slice your part are visible on
the bottom right of the screen.
12.
When done previewing your print, close KISSlicer.
You MUST close KISSlicer before loading the g-code file
into the Fablicator interface
16
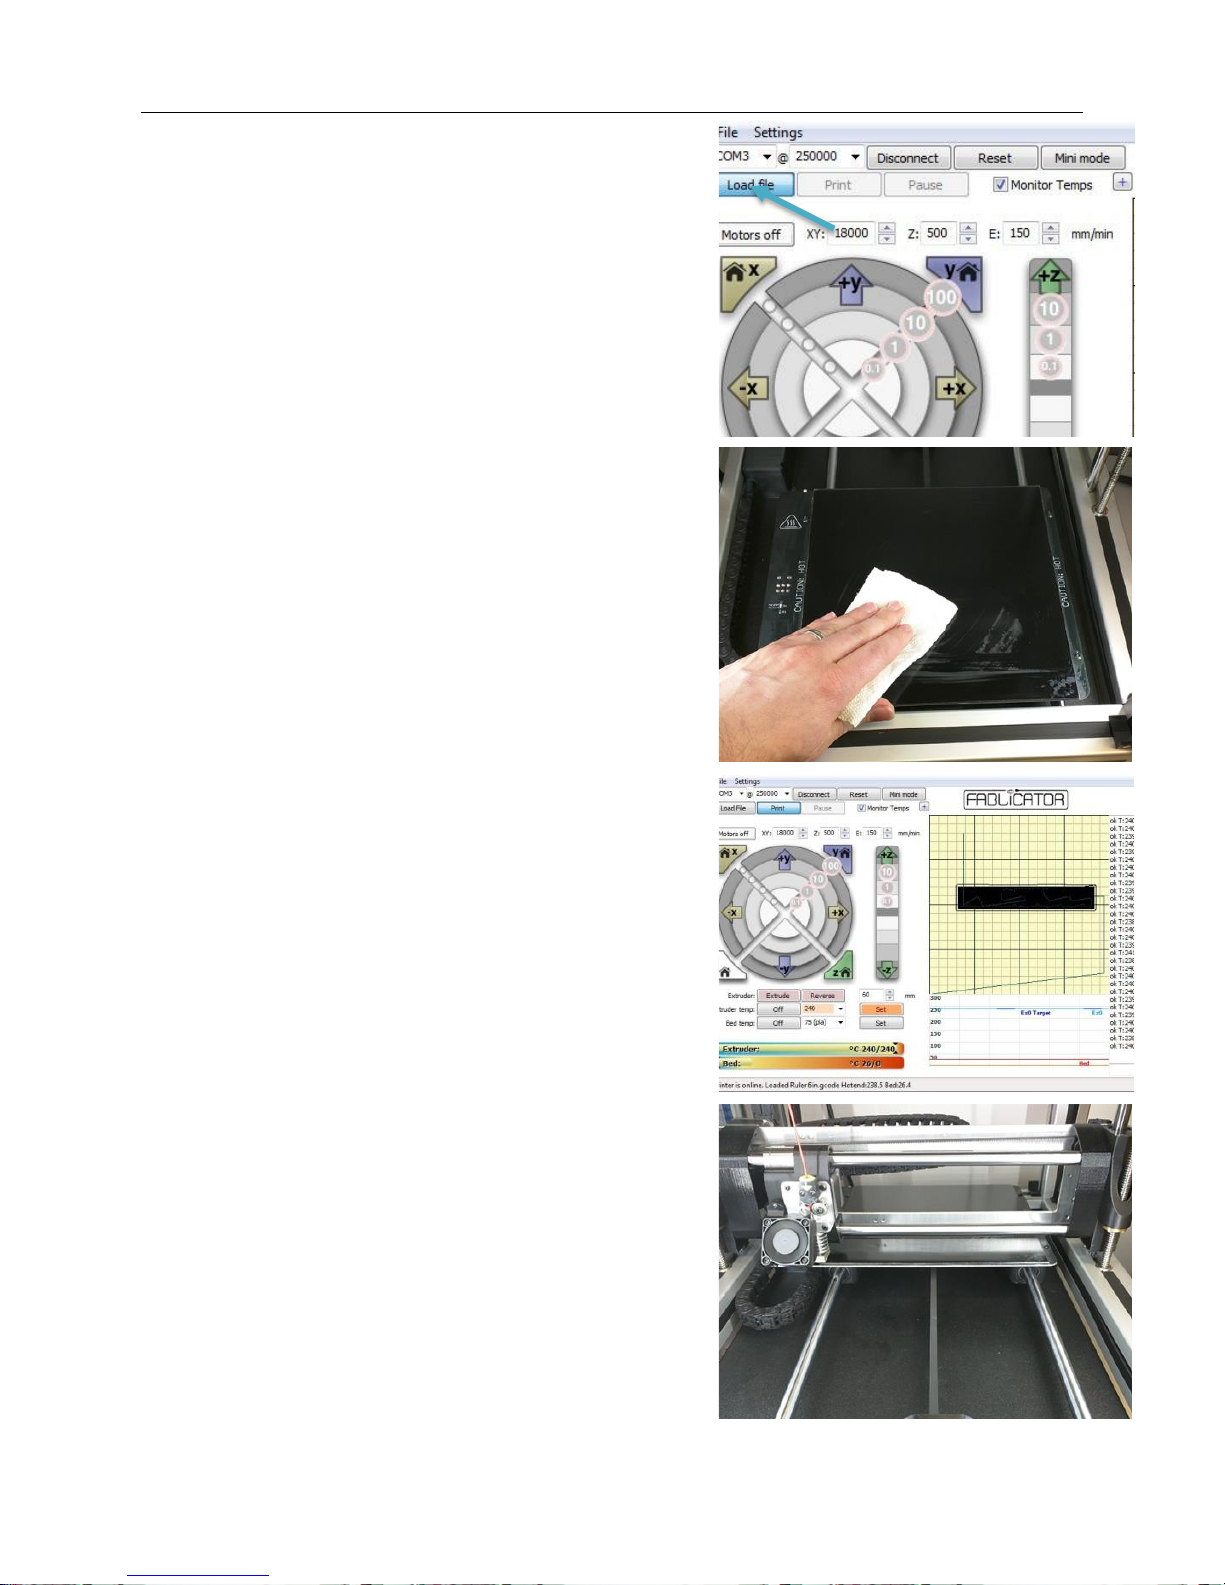
Printing Your First Part
1.
Open the Fablicator interface, and Click the “Load File”
button.
Select the G-Code file that was just created, and click Open.
In this example it is Ruler 6in.gcode unless you renamed the
file something else.
2.
Before starting the print, always apply a thin coat of the
primer solution to the print surface. Using a paper towel,
apply 1-3 squirts and wipe the bed in a circular motion to
achieve an even coat.
The bed should still be damp when you finish wiping, and it
will air dry within a few seconds. Video of this process can
be found at LINK
3.
Once the bed is primed and G-Code file loaded, press the
Print button
The Fablicator will automatically home all axis, and move
the extruder to a corner of the bed. The printer will also
automatically heat up the bed and extruder to the material
settings from KISSlicer.
4.
When the bed reaches the target temperature, the print will
begin.
Once the print has finished, the extruder and bed will turn
off automatically.
17

5.
When the print is complete, wait for the bed to cool down
before removing the part with the safety razor, generally the
bed should be below 40C. Cooler is better.
If you do not wait for the part to cool down, it may deform
when you try and remove it, or be extremely difficult to
remove.
18
Extruder Problems
1.
If filament is not exiting the extruder while printing or
manually extruding, you likely have a problem with the
extruder.
If the filament extrudes fine in air, but makes a clicking
sound when printing the first layer of a part, it is most likely
a bed leveling issue instead. See the section on bed leveling
and calibration
2.
First, check that the nozzle is heating up. Set the
temperature within the Fablicator interface to 240
and see if it rises from room temperature.
If no change is seen on-screen, physically check to
see if the heater block is getting hot. Pressing a
piece of filament onto the side of the block is a good
way to tell.
3.
If the heater block is hot, but the software says it’s
cold, the PT100 temperature sensor is likely to
blame.
Check the PT100 connections at the extruder and
computer case. If the connections seem OK, replace
the PT100 sensor.
4.
If the heater block is still cold, the problem is likely
the heater cartridge or controller board.
Check the heater cartridge connections in the
extruder and at the case. If the connections look OK,
test the resistance of the heater cartridge and wires
leading to it.
A functioning cartridge should have a resistance of
~3.5 ohms.
19

5.
If the heater cartridge is very high or low resistance,
replace it.
If the heater cartridge resistance is OK, replace the
controller board.
6.
The second thing to check is that the cooling fan is
spinning and not obstructed by dirt or other debris.
Clean excessive debris and/or check the fan’s
connection. A stopped fan will likely need to be
replaced.
7.
Third, check the entrance to the nozzle between the
idler and drive wheel. If a small piece of filament or
other foreign object is bent over the nozzle entrance
new material will not be able to get past it.
Remove the obstruction as necessary. The idler, fan
shroud and drive wheel may need to be removed for
easy access to this area.
8.
If all of the above are OK, you most likely have an
extruder clog.
20

Clearing an Extruder Clog
1.
There are two main types of extruder clogs
1. Debris or charred filament can be blocking the tip
of the nozzle (most common)
2. A piece of filament has gotten wedged in along
the feed path
2.
First, remove the filament from the extruder by
heating the nozzle up and pressing reverse within
the Fablicator interface.
If the filament breaks off rather than pulls out
normally you likely have a piece of wedged filament.
3.
Try feeding a piece of the .012” music wire from the
tip of the nozzle to the top of the extruder.
4.
Use small pliers to hold the wire a short distance
from its end.
A small bit of force may be needed to get the wire
past the first 1/16” of the nozzle
Be very careful to prevent the wire from bending.
21
5.
If the wire easily passes through the entire metal
body of the nozzle assembly, there is probably a
small piece of debris blocking the nozzle.
6.
If the wire stops partway up the metal extruder
body, there is probably a piece of wedged filament
blocking its path.
7.
If you can’t get the wire into the nozzle tip at all, let
someone else have a try. It can be a little tricky, but
is a critical step.
If the wire cannot be fed into the nozzle, the tip of the
nozzle may be damaged and need replacement.
22
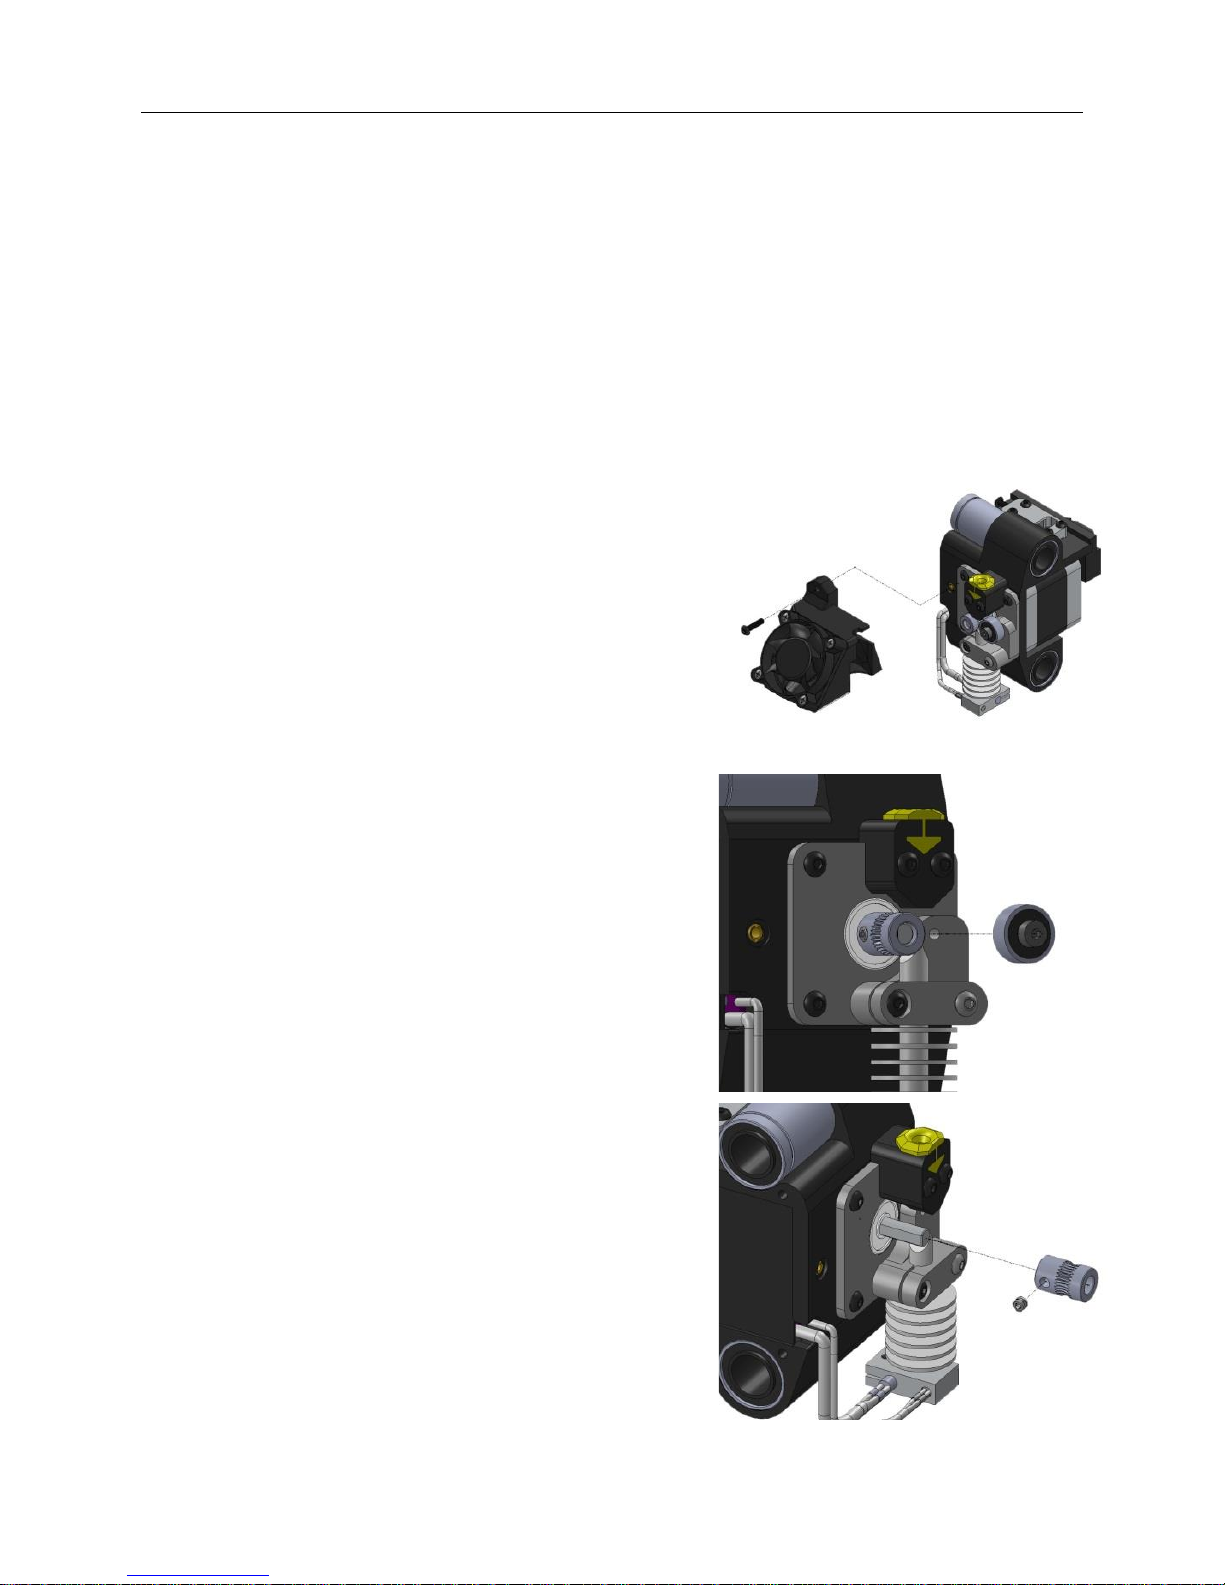
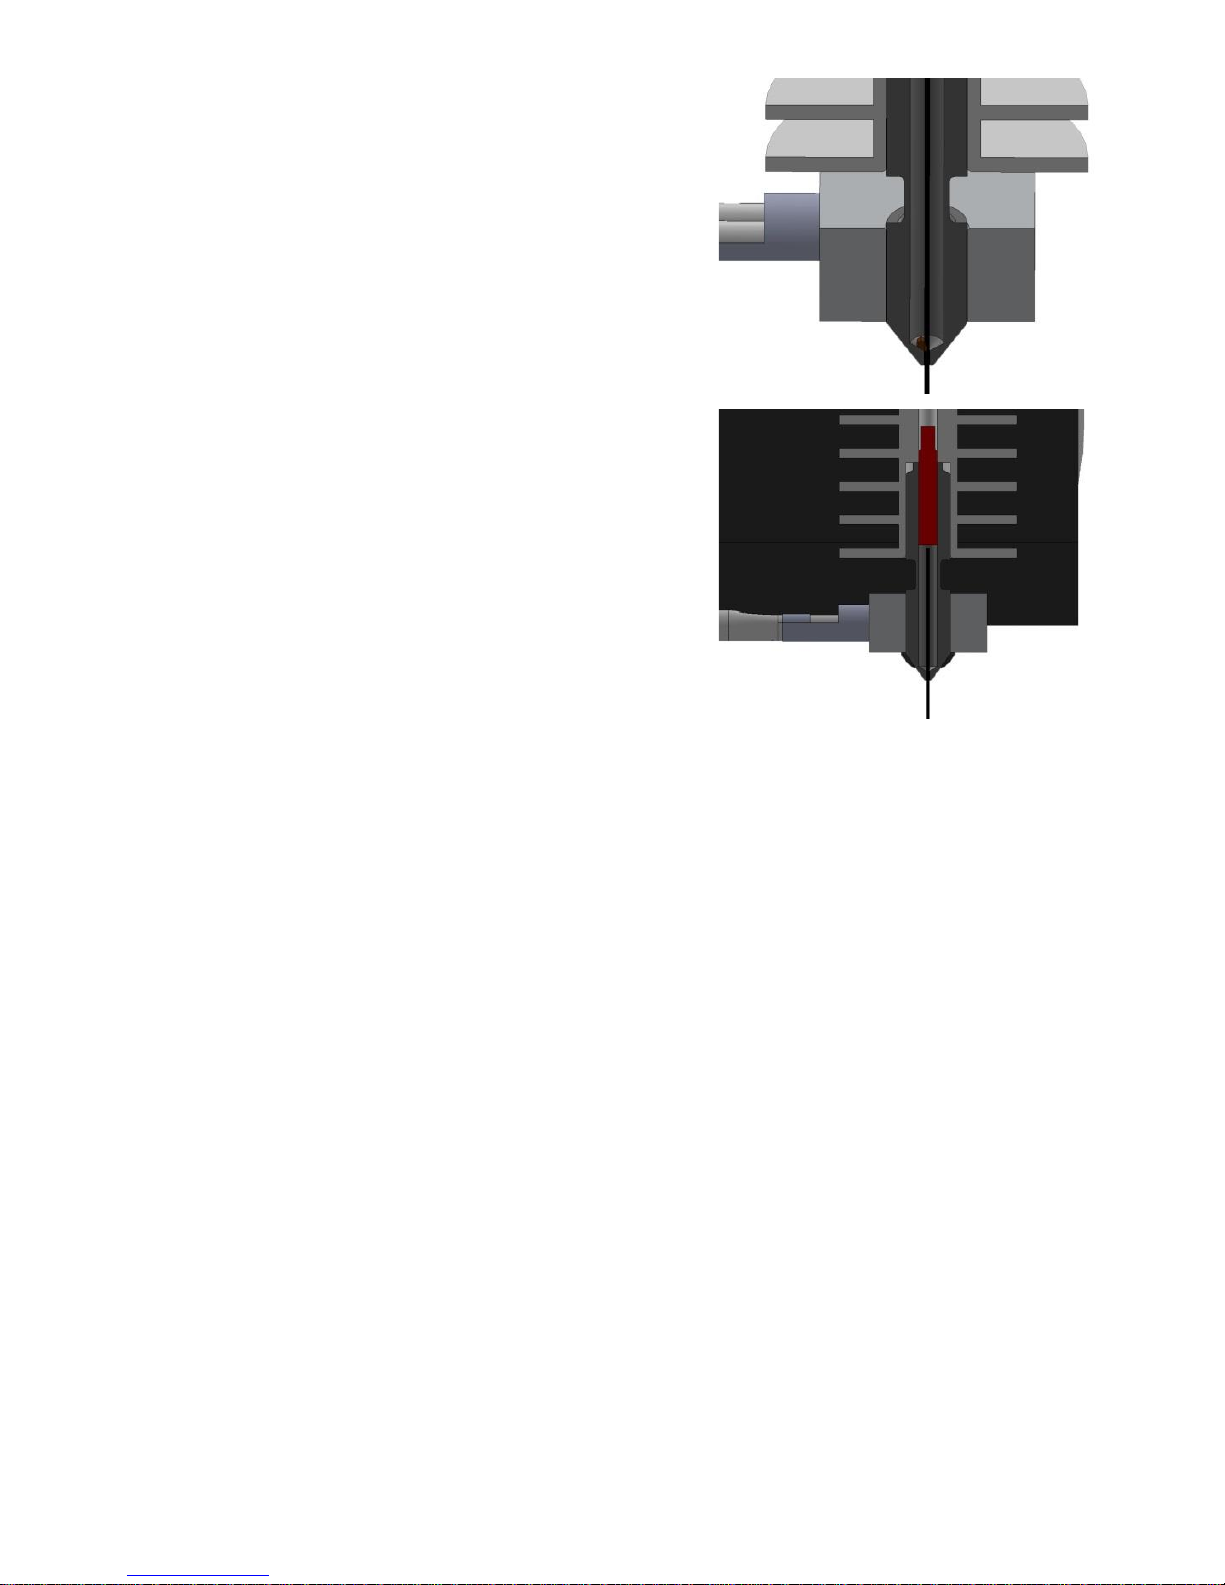
Wedged Filament removal
1.
Once determined you are dealing with a piece of
wedged filament, there are two methods to get it unstuck.
2.
First, remove the fan shroud
Remove the screw, and tilt the shroud out of the
way.
Be careful, as the fan wire will remain attached.
3.
Second, remove the idler wheel using the 2mm hex
key
4.
Third, Remove the filament driver (attached with a
grub screw using a 1/16” allen key included in the
startup kit)
You may need to use the front EXT disable switch to
allow manually moving the drive wheel, and then
rotate the driver so the set screw is at an easy to
access position
23
5.
Make sure the fan shroud is not in contact with the
nozzle heater block. A piece of tape is suggested to
hold it out of the way.
Then heat up the extruder in the Fablicator interface
6.
Using the long arm of the 1/16” Allen key, push
down hard on the key to attempt to dislodge the
filament. The Allen key is highlighted in red for
clarity
Lightly tapping the Allen key with a hammer may be
of assistance.
7.
If the filament starts to push down into the nozzle
continue until the clog has passed and is re-melted
in the nozzle tip.
Some plastic should exit the tip.
8.
If the clog will not budge, using an extra-long 5/64”
drill bit may be necessary.
24
9.
Mark the drill bit with tape to below its maximum
insertion depth as shown.
Going too far risks cutting into the tip of the nozzle.
10.
Carefully drill down into the filament, removing 1/8
to 1/16 inch of plastic before removing and cleaning
the bit.
Pulling the bit out of the nozzle and cleaning off the
built up plastic is crucial.
DO NOT EXCEDED THE DEPTH MARKED WITH
TAPE
11.
Once the filament path is all clear, heat up the nozzle
in the Fablicator interface and manually push
filament down into the nozzle before doing any
reassembly.
The filament should flow easily.
12.
If not, you may have additional debris blocking the
nozzle tip.
Continue with cleaning a blocked nozzle tip.
If everything appears to be flowing nicely,
reassemble the extruder.
25

13.
To reassemble the extruder, pull the filament out of
the nozzle while the extruder is hot.
14.
Reattach the filament driver. (the side with the set
screw should be closest to the motor)
Align the flat on the extruder motor with the set
screw on the filament driver. You may need to use
the front EXT disable switch to allow manually
moving the drive wheel, and then rotate the driver so
the set screw is at an easy to access position
15.
Now reattach the idler wheel.
16.
Reattach the cooling fan and shroud.
The fan tilts in around the extruder heat sink.
Do not allow the wires to be pinched on the side of
the shroud when reassembling.
26

17.
After double checking the Driver set screw, idler
screw, and fan shroud screws are all snug, the
extruder is ready to be used again.
27

Cleaning a blocked nozzle tip (simple method)
1.
With some luck, there is a quick way to remove the
debris from the Fablicator nozzle tip.
2.
First, heat the nozzle to 240C and pass the music
wire completely through the nozzle from the tip
through the inlet.
3.
Next, load PLA or PLA/PHA filament into the
extruder as normal.
Extrude the material until it exits the tip and/or you
hear a clicking sound from the extruder typical of a
clog.
Even if the extruder seems to be working fine at this
point, please continue.
4.
Turn the extruder heater off.
28

5.
Press the disable motor switch on the front of the
machine marked EXT.
The yellow LED should be illuminated.
6.
Wait for the extruder temperature to reach 90C.
AS SOON AS the temperature reaches 90C, pull up
on the filament and manually remove it from the
extruder in a firm, but not violent, manner.
7.
Ideally, the filament should have a bit of a cone
shaped tip to it, and may have a black or discolored
tip which indicates you have removed some of the
material blocking the nozzle.
8.
If the nozzle does not have a cone shaped tip, reheat
the extruder, turn off the extruder disable switch,
and re-load fresh filament.
29

9.
Repeat steps 3-8, slightly varying the temperature
when you pull the filament out (maybe 80c or 85c)
10.
Once an approximately cone shaped tip is visible, reheat the extruder
If you are unable to get the cone shaped tip after a
few tries, skip to step 12.
If a clog persists, try the involved method in the next
section
11.
Feed the music wire from tip to entrance one last
time.
12.
Make sure the disable switch is no longer activated
(no yellow LEDs) and load fresh filament as usual
30

13.
Press the extrude button a few times to ensure
filament is extruding freely.
You may need to repeat this method a few times to
completely remove a tough clog.
If a clog persists, you can continue to the involved
method in the next section
31

Cleaning a blocked nozzle tip (involved method)
1.
First, remove the fan shroud
2.
Second, remove the idler wheel
3.
Third, Remove the filament driver (attached with a
grub screw using a 1/16” allen key included in the
startup kit)
4.
Make sure the fan shroud is not in contact with the
nozzle heater block. A piece of tape is suggested to
hold it out of the way.
Then heat up the extruder in the Fablicator interface
32

1.
Try and feed a piece of the .012” music wire from
the tip of the nozzle to the top of the extruder.
2.
If you encounter resistance, use small pliers to hold
the wire a short distance from its end.
A small bit of force may be needed to get the wire
past the first 1/16” of the nozzle
Be very careful to prevent the wire from bending.
3.
If you can’t get the wire into the nozzle tip at all, let
someone else have a try. It can be a little tricky, but
is a critical step.
If the wire cannot be fed into the nozzle, the tip of the
nozzle may be damaged and need replacement.
4.
Once the wire has been fed through the extruder,
guide the long 5/64” drill bit into the extruder
nozzle and gently spin it between your fingers. Until
you meet resistance.
Do not apply a large amount of force to the bit. We
only want to remove the excess filament and
contaminants, not drill into the metal of the
extruder.
33

5.
Remove the drill from the extruder, and clean off the
removed filament.
Be careful, the drill tip and filament will be hot.
6.
Insert the music wire again, and repeat steps 4-6 a
few times until it appears all the molten filament has
been removed from the nozzle tip.
7.
Manually add new filament into the nozzle and try
pushing it through with your fingers. If it still feels
blocked, remove the filament and repeat steps 1-6
again.
If both the simple and involved methods fail to fix a
clog, please contact Fablicator technical support.
34
 Loading...