

Page 1
IT
Libretto di Istruzioni
EN
Instructions Manual
FR
Manuel d’Instructions
DE
Bedienungsanleitung
NL
Gebruiksaanwijzing
ES
Manual de instrucciones
RU
Руководство по эксплуатации
Page 2
IT
Attenzione!!!
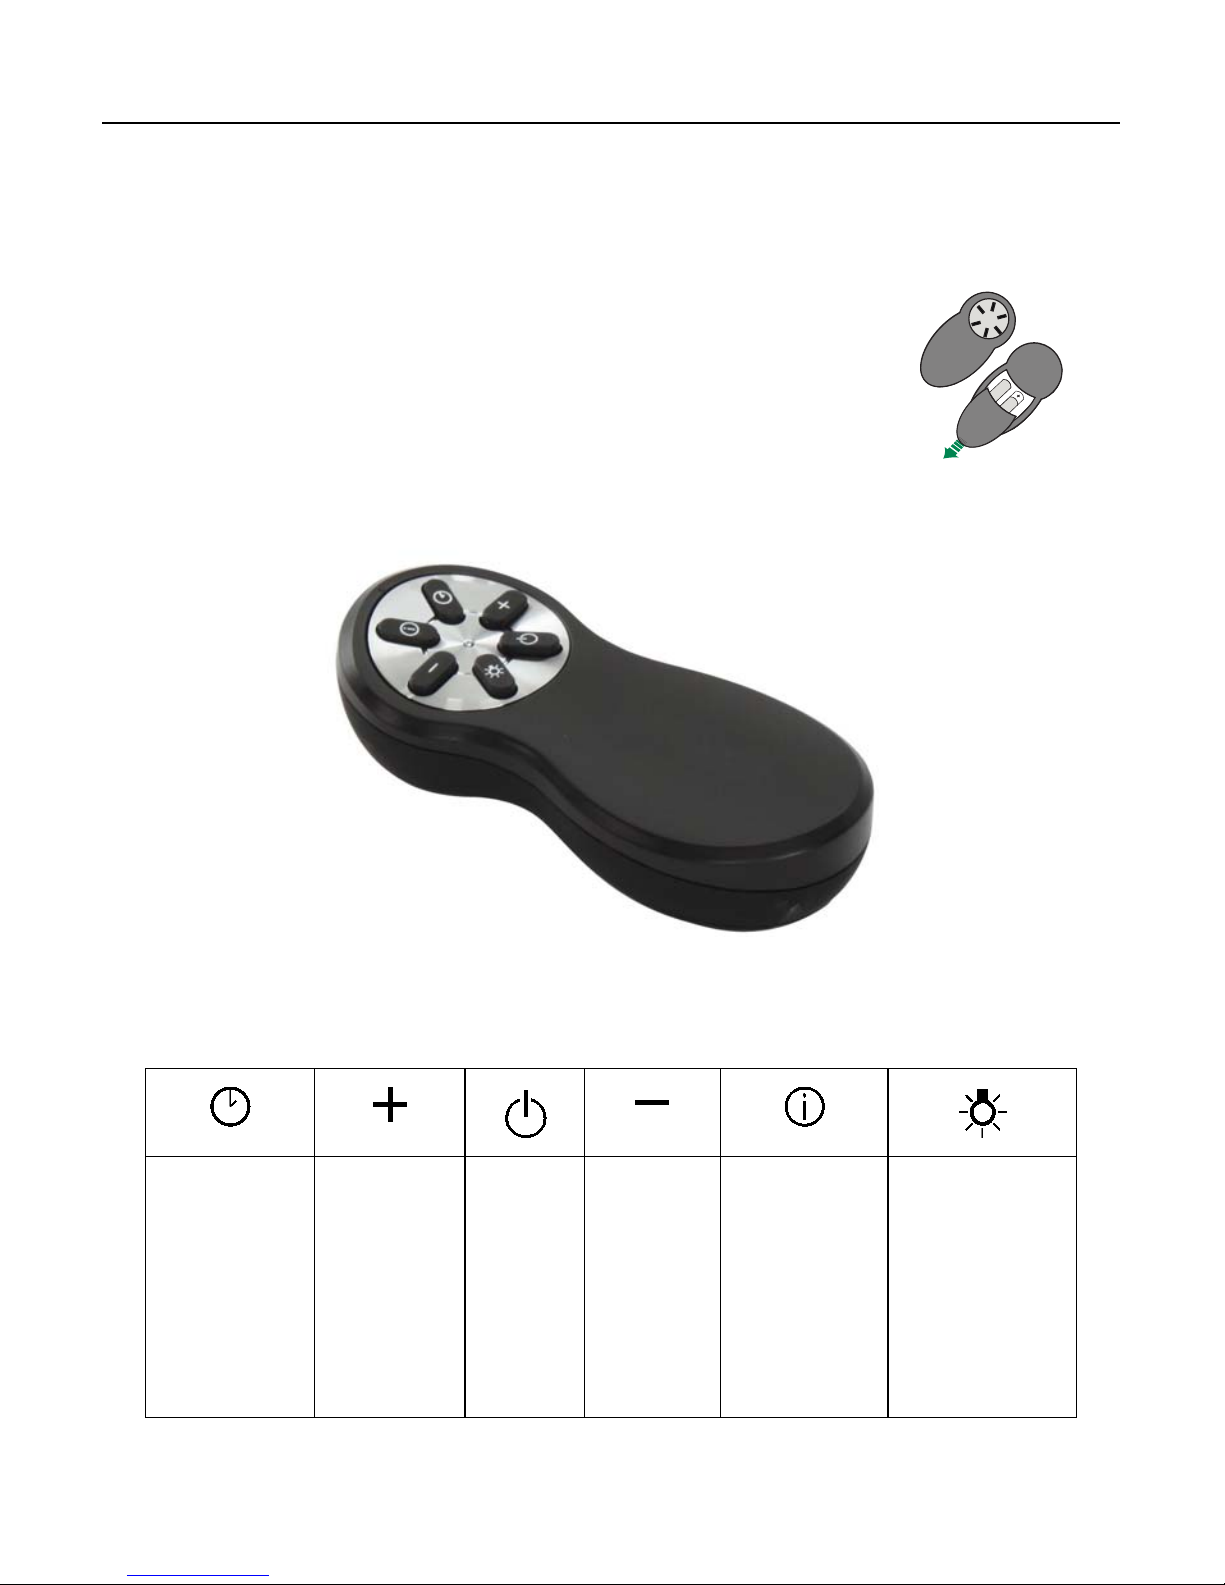
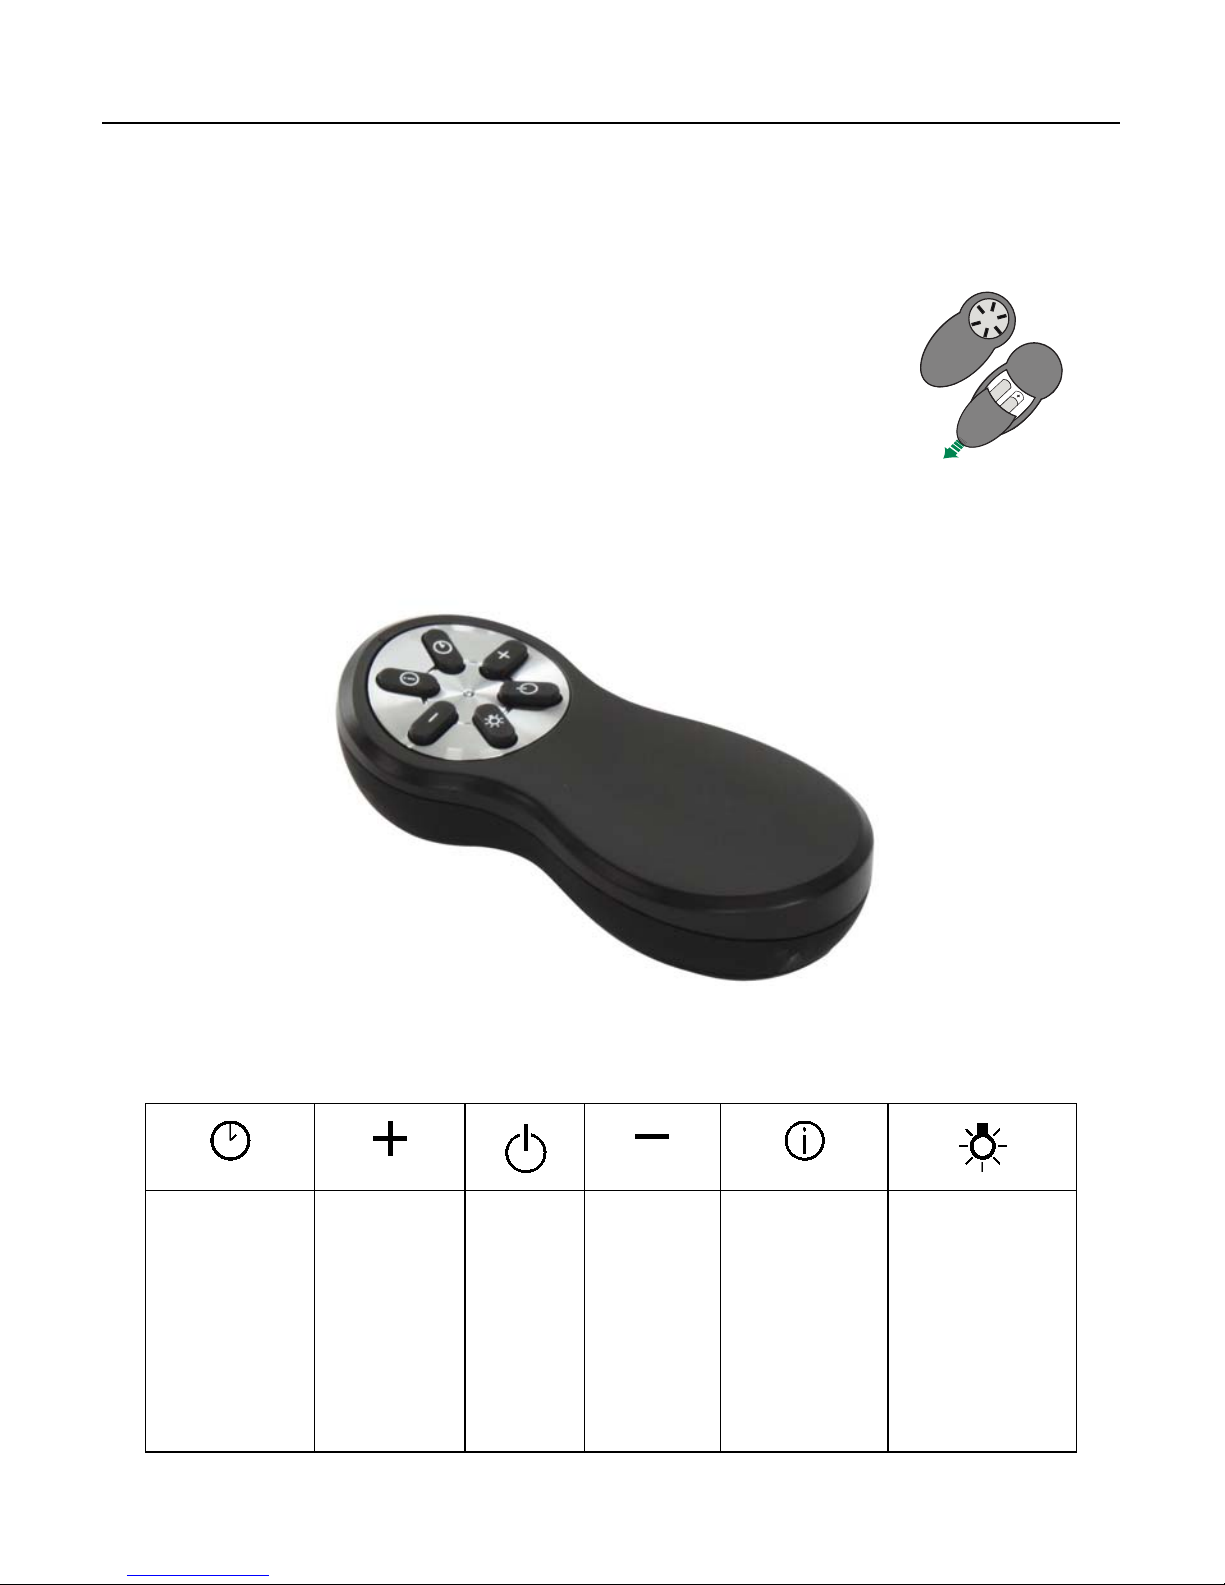
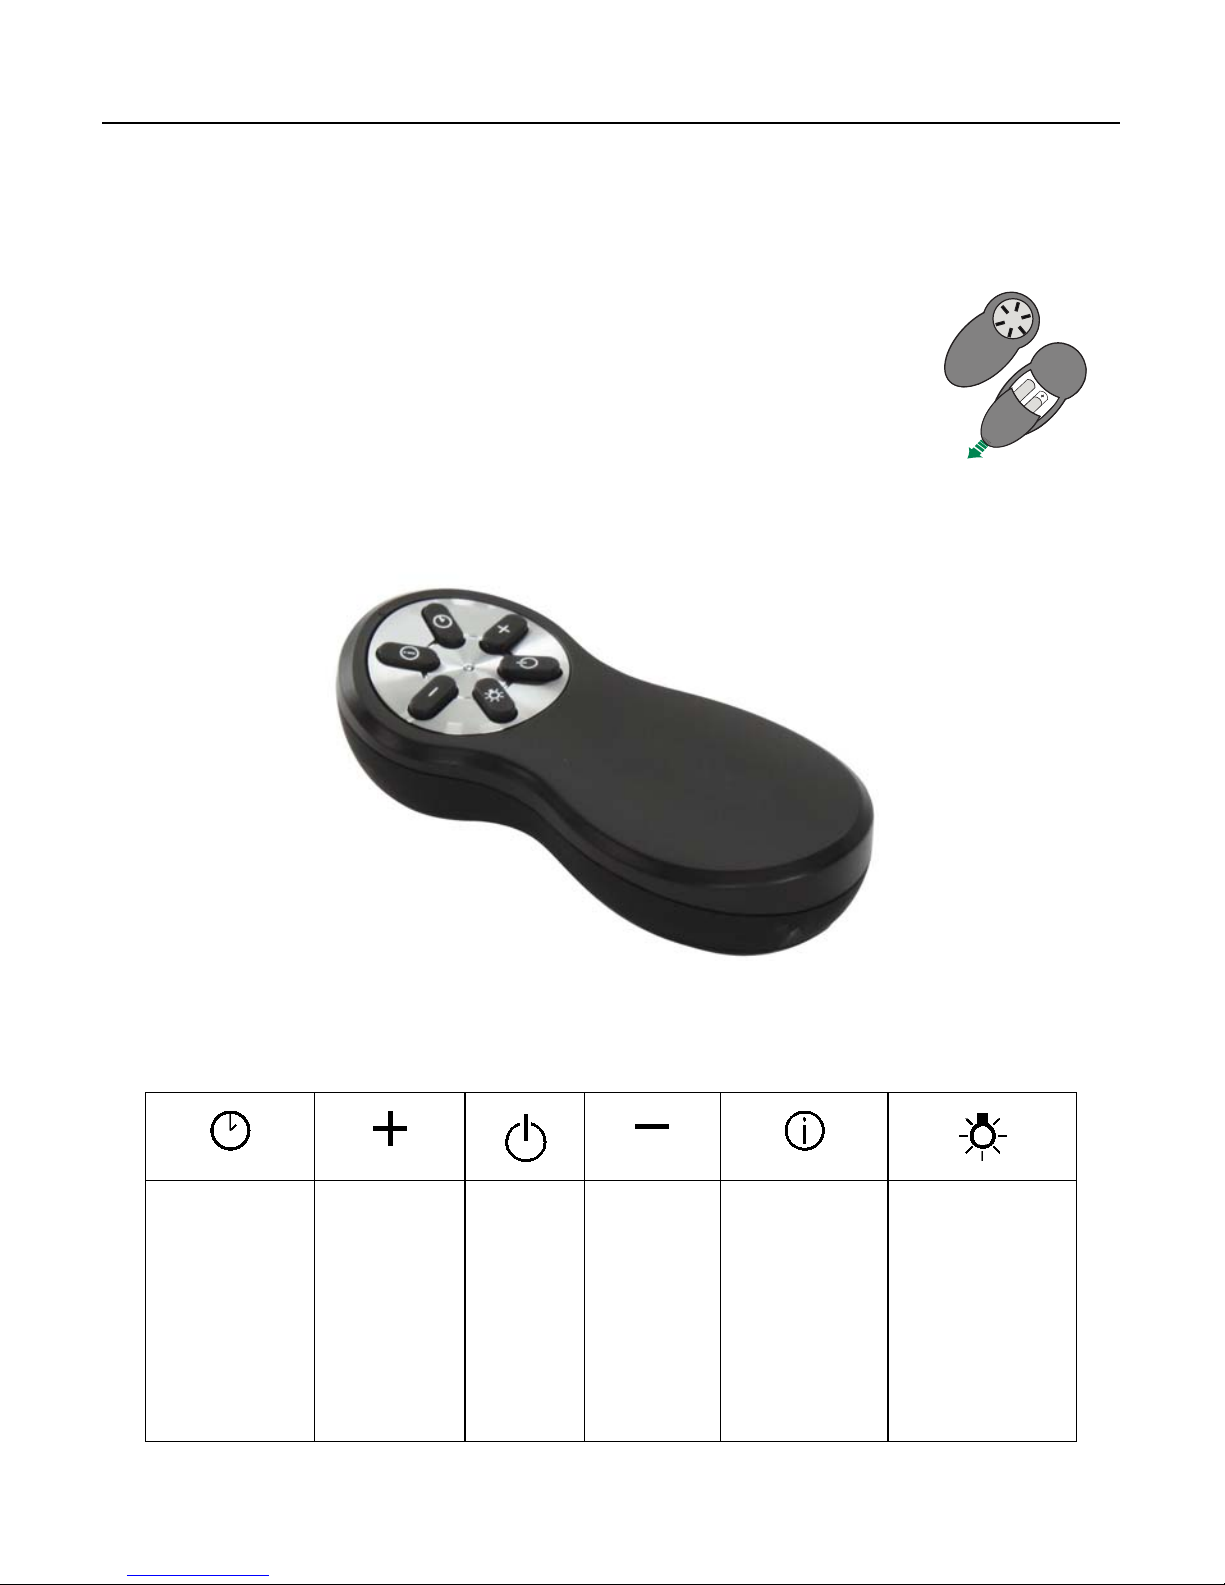
Il telecomado replica le funzioni del quadro comandi che si ha in dotazione con la cappa. Per una migliore comprensione di tali funzioni si rimanda al libretto istruzioni allegato alla cappa.
Avvertenze
• Il telecomando è alimentato con pile alcaline zinco-carbone da 1,5 V del tipo standard LR03-AAA (non incluse).
• Non riporre il telecomando in prossimità di fonti di calore.
•
Non disperdere le pile nell’ambiente, depositarle negli appositi contenitori.
Attiva e Disattiva la
funzione Delay.
(Nelle cappe dove
questa funzione è
presente).
Incrementa la
velocità di esercizio del motore.
Accende e
spegne il
motore.
Decrementa la
velocità di
esercizio del
motore.
Attiva/Disattiva il
motore alla velocità
Intensiva da qualsiasi velocità anche
da motore spento.
Breve pressione, accende/spegne le luci
alla massima luminosità.
Lunga pressione, accende/spegne la luce
alla modalità “cortesia”. (Nelle cappe
dove questa funzione
è presente).
Page 3
(A - C) (A - C)
(B - F) (A – D)
(A - E)
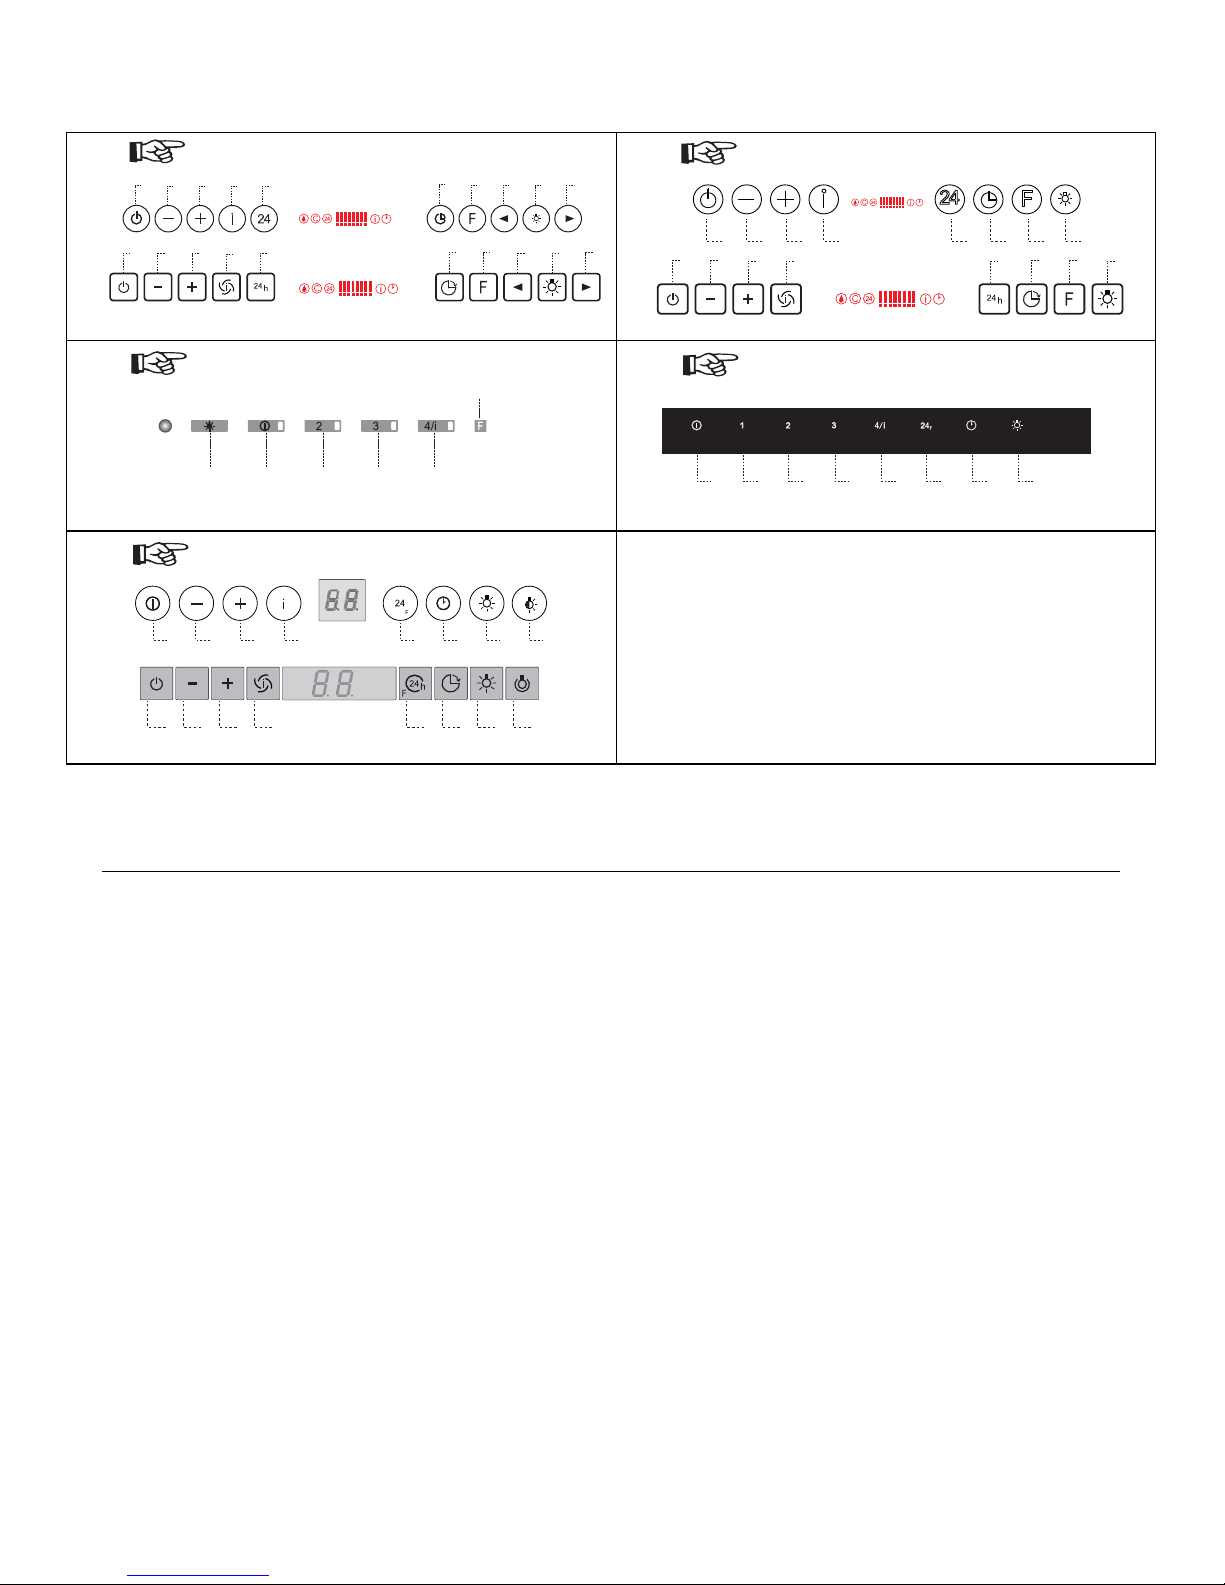
Procedura Attivazione Ricevitore Telecomando
Prima di iniziare la procedura di attivazione provare la funzionalità del telecomando e qualora non funzioni
procedete come descritto.
La procedura di attivazione va effettuata esclusivamente dal quadro comandi della cappa.
PROCEDURA A
• Spegnere le Luci e il Motore di aspirazione.
• Tenere premuto il tasto Delay per circa 5secondi fino a quando:
• i leds OFF MOTORE e VELOCITA’ 1 lampeggiano 2 volte indicando l’ATTIVAZIONE;
• i leds OFF MOTORE e VELOCITA’ 1 lampeggiano 1 volta indicando la DISATTIVAZIONE.
PROCEDURA B
• Spegnere le Luci e il Motore di aspirazione.
• Tenere premuto il tasto Intensiva per circa 5secondi fino a quando:
• il rispettivo led lampeggiando 2 volte indica l’ATTIVAZIONE del ricevitore del telecomando;
• il rispettivo led lampeggiando 1 volta indica la DISATTIVAZIONE del ricevitore del telecomando;
L
S1
T1 T2 T3 T4
A B C D E F G H
E F G HA B C D
B
A
D
C
E
G
F
I
H
L
A B C D E F G H
A B C D E F G H
B
A
D
C
G
F
H
E
B
A
D
C
E
G
F
I
H
L
Page 4

PROCEDURA C
• Spegnere le Luci e il Motore di aspirazione.
• Toccare il tasto “24H” per circa 5 secondi fino all’accensione delle icone relative alle funzioni già attive.
• Rilasciando il tasto, l’icona
inizia a lampeggiare, entro 3 secondi toccare di nuovo il tasto “24H” il display vi-
sualizzerà:
• Accensione dei punti di riferimento della barra di potenza del motore
segnala l’ATTIVAZIONE del
ricevitore del telecomando.
• Spegnimento dei punti di riferimento della barra di potenza del motore segnala la DISATTIVAZIONE del ri
cevitore del telecomando.
PROCEDURA D
• Spegnere le Luci e il Motore di aspirazione.
• Premere per 5 secondi il tasto
fino a quando:
• 2 Lampeggi tasti
e ATTIVAZIONE del ricevitore del telecomando;
• 1 Lampeggio tasti
e DISATTIVAZIONE del ricevitore del telecomando;
PROCEDURA E
• Spegnere le Luci e il Motore di aspirazione.
• Scollegare la cappa dall’alimentazione di rete.
• Tenendo premuto il tasto
ripristinare il collegamento di rete.
• Mantenere premuto il tasto
, in base alla versione del software si verificheranno due condizioni:
A) Il display visualizza “SE“, quindi rilasciare subito il tasto
, il display visualizza una sequenza animata ed en-
tro 3 secondi premere il tasto “24H“, il display visualizzerà :
• “ TC “ per 2 Volte segnalando l’ATTIVAZIONE del ricevitore del telecomando;
• “ TC “ per 1 Volta segnalando la DISATTIVAZIONE del ricevitore del telecomando.
B) Dopo alcuni secondi il display non visualizza nulla, rilasciare il tasto
, il display visualizza una sequenza a-
nimata ed entro 3 secondi premere il tasto “24H“, il display visualizzerà :
• “ TC “ per 2 Volte segnalando l’ATTIVAZIONE del ricevitore del telecomando;
• “ TC “ per 1 Volta segnalando la DISATTIVAZIONE del ricevitore del telecomando.
PROCEDURA F
• Spegnere le Luci e il Motore di aspirazione.
• Tenere premuto il tasto V2 per circa 5secondi fino a quando:
• il led V4 lampeggiando 2 volte indica l’ATTIVAZIONE del ricevitore del telecomando;
• il led V4 lampeggiando 1 volta indica la DISATTIVAZIONE del ricevitore del telecomando;
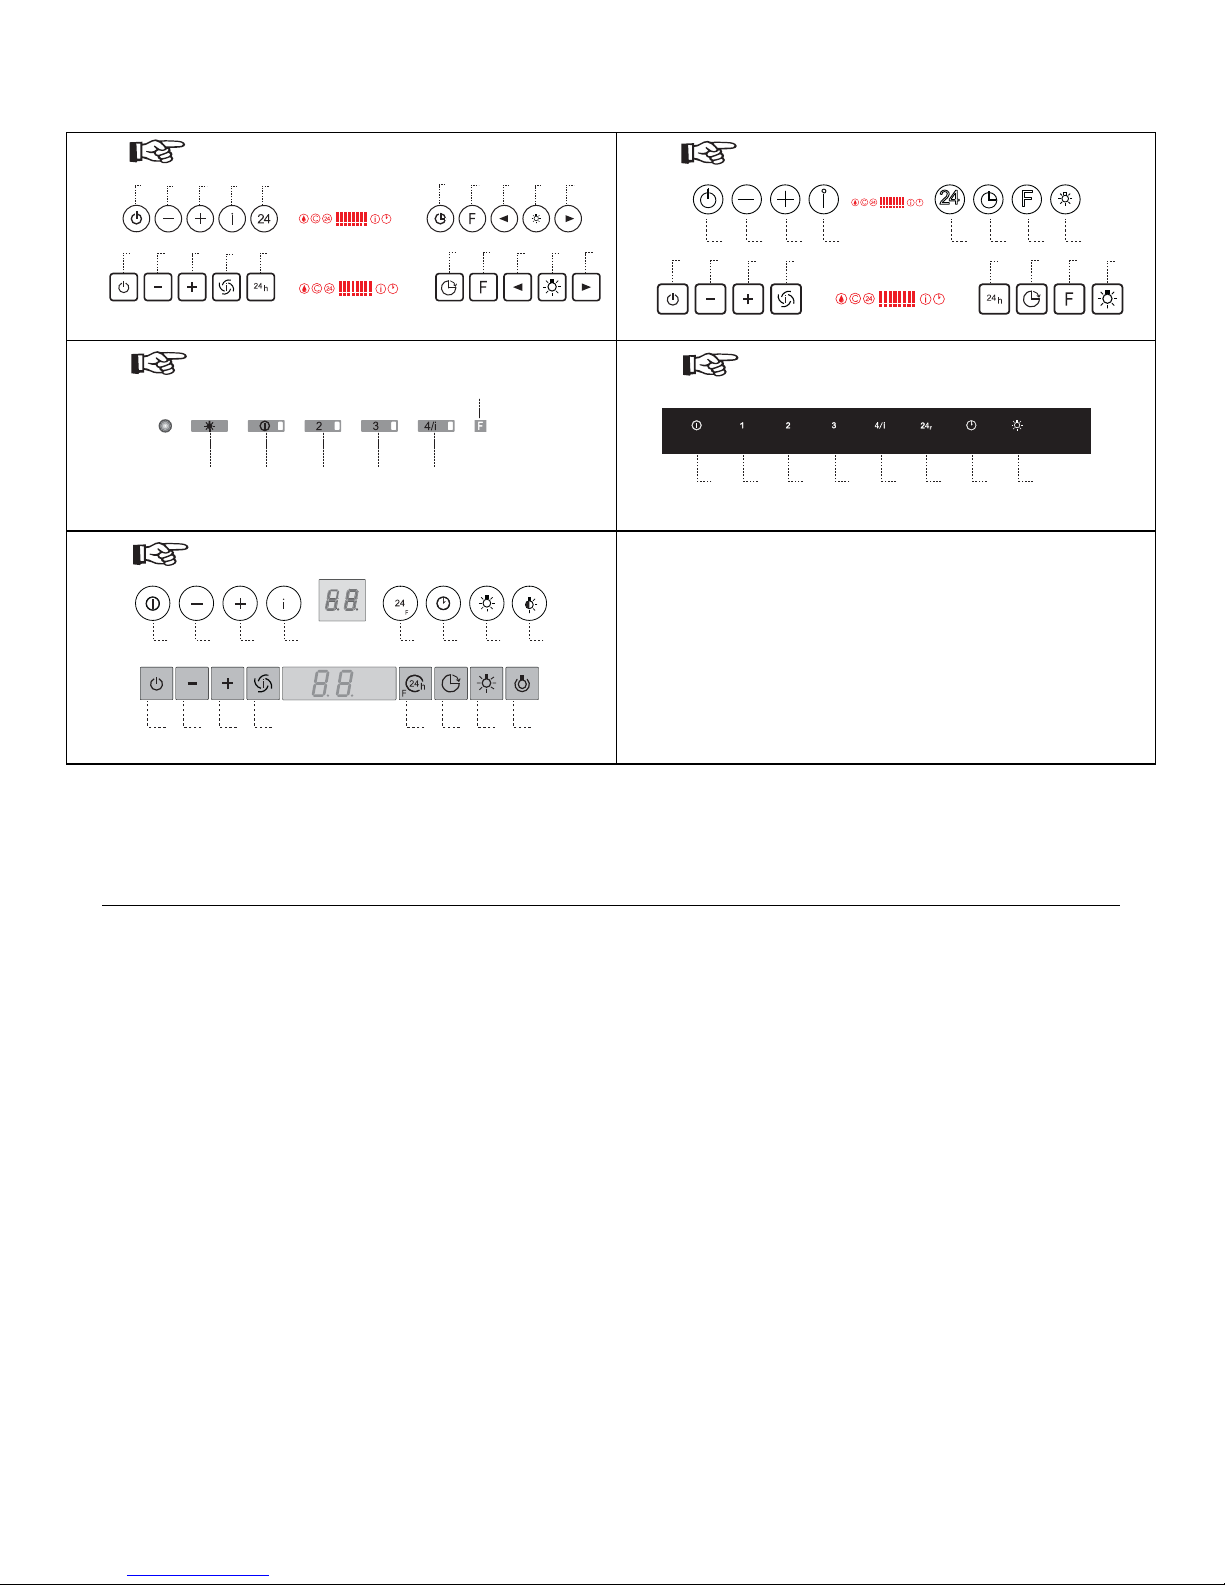
Attenzione!!!
Le immagini indicate sono generiche, il vostro prodotto potrebbe avere simbologia e/o estetica diverse, seguire le
procedure indicata finchè non si attiva il ricevitore garantendo il funzionamento del Telecomando.
Page 5
EN
Warning!!!
The remote control replicates the functions on the control panel supplied with the hood. For a clearer understanding
of these functions, please consult the instruction manual enclosed with the hood itself.
Avvertenze
• The remote control is powered by a 1.5 V carbon-zinc alkaline batteries of the
standard LR03-AAA type (not included).
• Do not place the remote control near to heat sources.
• Used batteries must be thrown in the battery bank.
Start up and disconnect the function Delay (where
the hood is provided for).
Increases the
working speed.
Turns the
suction motor on and
off.
Decreases the
working speed.
Start up / disconnect the motor to
the intensive speed
starting from each
speed (even with
switched off motor).
Short pressure, switch
on /off lights up to the
highest brightness.
Long pressure, switch
on /off lights up to
soft light (where the
hood is provided for).
Page 6
(A - C) (A - C)
(B - F) (A – D)
(A - E)
Activation process of remote control Receiver
Before carrying out any activation of the remote control it is necessary to verify the correct functioning of it.
In the case that of the activation is necessary, please follow the below instructions.
This activation should be carried out exclusively from the hood control panel.
PROCEDURE A
• Switch off the light and the motor.
• Press the “Delay”-key for about 5 seconds until:
• the leds OFF MOTOR and SPEED 1 flash twice to indicate the ACTIVATION of the remote control receiver;
• the leds OFF MOTOR and SPEED 1 flash once indicate the DISCONNECTION of the remote control re-
ceiver;
PROCEDURE B
• Switch off the light and the motor.
• Press the “Intensive”-key for about 5 seconds until:
• the relative Led flash twice to indicate the ACTIVATION of the remote control receiver;
• the relative Led flash once to indicate the ACTIVATION of the remote control receiver;
L
S1
T1 T2 T3 T4
A B C D E F G H
E F G HA B C D
B
A
D
C
E
G
F
I
H
L
A B C D E F G H
A B C D E F G H
B
A
D
C
G
F
H
E
B
A
D
C
E
G
F
I
H
L
Page 7

PROCEDURE C
• Press the “24H”-key for about 5 seconds until the icons of activated functions will be lit.
• When releasing the key, the
-symbol starts to flash, within 3 seconds press again the “24H”-key and the follow-
ing will appear on the display:
- the points under the motor LEDS
are lit, the receiver of the remote control is ACTIVATED;
- the points under the motor LEDS are unlit, the receiver of the remote control is DISCONNECTED.
PROCEDURE D
• Switch off the light and the motor.
• Press for about 5 seconds the -key until you will see:
- “
+ “ twice, to indicate the ACTIVATION of the remote control receiver;
- “
+ “ once, to indicate the DISCONNECTION of the remote control receiver;
PROCEDURE E
• Switch off the motor and the lighting system.
• Unplug the hood from the mains supply.
• Re-establish the net connection by pressing the button
.
• Keep on pressing the button
, and on the basis of software's version two situations might appear:
A) On the display you can see "SE", then, please immediately release the button
, within 3 seconds on the dis-
play you can see a sequence, at this point please press the button "24H", you will see :
- "TC" twice, to indicate the ACTIVATION of the remote control receiver;
- "TC" once, to indicate the DISCONNECTION of the remote control receiver.
B) After few seconds nothing will appear on the display, please release the button
, within 3 seconds on the dis-
play you can see a sequence, at this point please press the button "24H", you will see:
- "TC" twice, to indicate the ACTIVATION of the remote control receiver;
- "TC" once, to indicate the DISCONNECTION of the remote control receiver.
PROCEDURA F
• Switch off the light and the motor.
• Press the “V2”-key for about 5 seconds until:
• the Led V4 flash twice to indicate the ACTIVATION of the remote control receiver;
• the Led V4 flash once to indicate the ACTIVATION of the remote control receiver;
Warning!!!
The pictures shown are generic, your product may have symbolic and / or different aesthetic, follow the steps indicated until you turn the receiver ensuring the operation of the Remote Control.
Page 8
FR
Attention :
La télécommande réplique les fonctions du tableau des commandes fourni avec la hotte. Pour une meilleure
compréhension de ces fonctions, voir le manuel d’instructions annexé à la hotte.
Avertissements
• La télécommande est alimentée avec des piles alcalines zinc-carbone de 1,5 V type
standard LR03-AAA (non comprises).
• Ne pas ranger la télécommande à proximité de sources de chaleur.
•
Ne pas jeter les batteries dans la nature, les déposer dans les conteneurs prévus à
cet effet.
Branche et
Débranche la
fonction Delay
(Dans les hottes où
cette fonction est
présente).
Augmente la
vitesse
d’exercice du
moteur.
Branche et
débranche le
moteur.
Diminue la
vitesse
d’exercice du
moteur.
Active/Désactive le
moteur à la vitesse
Intensive à partir de
n’importe quelle
vitesse, même avec
le moteur à l’arrêt.
Brève pression,
allume/éteint les
lumières à la
luminosité maximum.
Pression longue,
allume/éteint les
lumières en mode de
“courtoisie”. (Dans les
hottes où cette
fonction est présente).
Page 9

(A - C) (A - C)
(B - F) (A – D)
(A - E)
Procédure Activation Récepteur Télécommande
Avant de commencer la procédure d’activation, tester les fonctions de la télécommande et, au cas où celleci ne fonctionnerait pas, suivre la marche ci-dessous.
La procédure d’activation doit être effectuée exclusivement à partir du tableau de commande de
la hotte.
PROCEDURE A
• Éteindre les lumières et le moteur d’aspiration.
• Garder appuyée la touche Delay pendant environ 5 secondes jusqu’à ce que :
• les leds OFF MOTEUR et VITESSE 1 clignotent 2 fois en indiquant l’ACTIVATION ;
• les leds OFF MOTEUR et VITESSE 1 clignotent 1 fois en indiquant la DÉSACTIVATION.
PROCEDURE B
• Éteindre les lumières et le moteur d’aspiration.
• Garder appuyée la touche Intensive pendant environ 5 secondes jusqu’à ce que :
• la led correspondante clignote 2 fois en indiquant l’ACTIVATION du récepteur de la télécommande ;
• la led correspondante clignote 1 fois en indiquant la DÉSACTIVATION du récepteur de la télécommande ;
L
S1
T1 T2 T3 T4
A B C D E F G H
E F G HA B C D
B
A
D
C
E
G
F
I
H
L
A B C D E F G H
A B C D E F G H
B
A
D
C
G
F
H
E
B
A
D
C
E
G
F
I
H
L
Page 10

PROCEDURE C
• Éteindre les lumières et le moteur d’aspiration.
• Toucher la touche “24H” pendant environ 5 secondes jusqu’à l’éclairage des icônes relatives aux fonctions déjà
actives.
• Au relâchement de la touche, l’icône
commence à clignoter, dans les 3 secondes, toucher de nouveau la touche
“24H” l’afficheur indiquera :
• Éclairage des points de référence de la barre de puissance du moteur
, indique l’ACTIVATION du
récepteur de la télécommande.
• Extinction des points de référence de la barre de puissance du moteur, indique la DÉSACTIVATION du
récepteur de la télécommande.
PROCEDURE D
• Éteindre les lumières et le moteur d’aspiration.
• Appuyer pendant 5 secondes sur la touche
jusqu’à ce que :
• 2 clignotements touches
et ACTIVATION du récepteur de la télécommande ;
• 1 clignotements touches
et DÉSACTIVATION du récepteur de la télécommande ;
PROCEDURE E
• Éteindre les lumières et le moteur d’aspiration.
• Débrancher la hotte du secteur.
• En gardant appuyée la touche
restaurer la connexion du secteur.
• Garder appuyée la touche
, selon la version du logiciel deux conditions se vérifieront :
A) L’afficheur indique “SE”, relâcher ensuite tout de suite la touche
, l’afficheur indique une séquence animée
et dans les 3 secondes appuyer sur la touche “24H”, l’afficheur indiquera :
• “ TC ” pour 2 Fois en signalant l’ACTIVATION du récepteur de la télécommande ;
• “ TC ” pour 1 Fois en signalant la DÉSACTIVATION du récepteur de la télécommande.
B) Après quelques secondes, l’afficheur n’indiquera plus rien, relâcher la touche
, l’afficheur indique une
séquence animée et dans les 3 secondes appuyer sur la touche “24H“, l’afficheur indiquera :
• “ TC “ pour 2 Fois en signalant l’ACTIVATION du récepteur de la télécommande ;
• “ TC “ pour 1 Fois en signalant la DÉSACTIVATION du récepteur de la télécommande.
PROCÉDURE F
• Éteindre les lumières et le moteur d’aspiration.
• Garder appuyée la touche V2 pendant environ 5 secondes jusqu’à ce que :
• la led V4 clignote 2 fois en indiquant l’ACTIVATION du récepteur de la télécommande ;
• la led V4 clignote 1 fois en indiquant la DÉSACTIVATION du récepteur de la télécommande ;
Attention!!!
Les images indiquées sont indicatives, votre produit pourrait présenter des symboles et/ou une esthétique
différentes, suivre les procédures indiquées jusqu’à ce que le récepteur s’active en garantissant le fonctionnement
de la Télécommande.
Page 11

DE
Achtung!!!
Die Fernbedienung enthält dieselben Funktionen wie das Bedienfeld, das zusammen mit der Abzugshaube geliefert
wird. Für die nähere Beschreibung dieser Funktionen wird auf die Betriebsanleitung der Abzugshaube verwiesen.
Hinweise
• Die Fernbedienung funktioniert mit alkalischen Zink-Kohle-Batterien zu 1,5 V vom
Standardtyp LR03-AAA (nicht enthalten).
• Die Fernbedienung soll nicht in der Nähe von Wärmequellen abgelegt werden.
• Altbatterien nicht unkontrolliert wegwerfen, sondern in die dafür vorgesehenen
Sammelbehälter geben.
Aktivier/Deaktiviert
die Funktion Delay.
(Hauben mit DelayFunktion).
Erhöht die
Motordrehzahl.
Schaltet den
Motor ein
und aus.
Verringert die
Motordrehzahl.
Aktiviert/Deaktiviert
von jeder
Geschwindigkeit
aus, auch bei
abgestelltem Motor,
die
Intensivgeschwindig
keit.
Kurzes Drücken:
schaltet die
Beleuchtung bei
maximaler Intensität
ein/aus.
Langes Drücken:
schaltet die
Notbeleuchtung
ein/aus. (Hauben mit
Notbeleuchtungsfunk
tion).
Page 12

(A - C) (A - C)
(B - F) (A – D)
(A - E)
Prozedur zur Aktivierung des Empfangsteils der Fernbedienung
Bevor mit der Aktivierungsprozedur begonnen wird, sollte die Funktionstüchtigkeit der Fernbedienung ausprobiert werden; falls diese nicht funktionieren sollte, wie beschrieben vorgehen. Die Aktivierungsproze-
dur wird ausschließlich über das Bedienfeld der Haube ausgelöst.
PROZEDUR A
• Die Beleuchtung und den Absaugmotor abstellen.
• Die Taste Delay ungefähr 5 Sekunden lang drücken, bis:
• Die LEDs OFF MOTOR und GESCHWINDIGKEIT 1 2 Mal blinken, um die AKTIVIERUNG zu bestätigen;
• Die LEDs OFF MOTOR und GESCHWINDIGKEIT 1 1 Mal blinken, um die DEAKTIVIERUNG zu bestätigen;
PROZEDUR B
• Die Beleuchtung und den Absaugmotor abstellen.
• Die Taste Intensivgeschwindigkeit ungefähr 5 Sekunden lang drücken, bis:
• das 2-malige Blinken der betreffenden LED zeigt die AKTIVIERUNG des Empfangsteils der Fernbedienung an;
• das 1-malige Blinken der betreffenden LED zeigt die DEAKTIVIERUNG des Empfangsteils der Fernbedienung an;
L
S1
T1 T2 T3 T4
A B C D E F G H
E F G HA B C D
B
A
D
C
E
G
F
I
H
L
A B C D E F G H
A B C D E F G H
B
A
D
C
G
F
H
E
B
A
D
C
E
G
F
I
H
L
Page 13

PROZEDUR C
• Die Beleuchtung und den Absaugmotor abstellen.
• Die Taste “24H” ungefähr 5 Sekunden lang berühren, bis sich die Ikonen der bereits aktiven Funktionen einschalten.
• Nach Loslassen der Taste beginnt die Ikone
zu blinken, innerhalb von 3 Sekunden erneut die Taste “24H”berühren; am Display
ergibt sich folgendes:
• Das Einschalten der Bezugspunkte des Balkens der Motorleistung
zeigt die AKTIVIERUNG des Empfangsteils der
Fernbedienung an;
• Das Ausschalten der Bezugspunkte des Balkens der Motorleistung zeigt die DEAKTIVIERUNG des Empfangsteils der
Fernbedienung an;
PROZEDUR D
• Die Beleuchtung und den Absaugmotor abstellen.
• 5 Sekunden lang die Taste
drücken, bis:
• 2 Mal Blinken der Tasten
und AKTIVIERUNG des Empfangsteils der Fernbedienung;
• 1 Mal Blinken der Tasten
und DEAKTIVIERUNG des Empfangsteils der Fernbedienung;
PROZEDUR E
• Die Beleuchtung und den Absaugmotor abstellen.
• Die Abzugshaube von der Netzversorgung trennen.
• Die Taste
gedrückt halten und die Netzversorgung wieder herstellen.
• Die Taste
gedrückt halten; je nach Software-Version stellt sich eine dieser beiden Bedingungen ein:
A) Am Display erscheint “SE”, nun die Taste
loslassen; das Display zeigt eine Folge bewegter Bilder; innerhalb von 3
Sekunden die Taste “24H“ drücken, am Display erscheint:
• 2 Mal “ TC ”, was die AKTIVIERUNG des Empfängers der Fernbedienung anzeigt;
• 1 Mal “ TC ”, was die DEAKTIVIERUNG des Empfängers der Fernbedienung anzeigt;
B) Nach einigen Sekunden wird am Display nichts mehr angezeigt, die Taste
loslassen; das Display zeigt eine Folge bewegter
Bilder; innerhalb von 3 Sekunden die Taste “24H“drücken, am Display erscheint:
• 2 Mal “ TC ”, was die AKTIVIERUNG des Empfängers der Fernbedienung anzeigt;
• 1 Mal “ TC ”, was die DEAKTIVIERUNG des Empfängers der Fernbedienung anzeigt;
PROZEDUR F
• Die Beleuchtung und den Absaugmotor abstellen.
• Die Taste V2 ungefähr 5 Sekunden lang drücken, bis:
• das 2-malige Blinken der LED V4 die AKTIVIERUNG des Empfängers der Fernbedienung anzeigt;
• das 1-malige Blinken der betreffenden LED die DEAKTIVIERUNG des Empfängers der Fernbedienung anzeigt;
Achtung!!!
Die Abbildungen sind als Beispiele gedacht. Das Ihnen vorliegende Produkt könnte andere Symbole und/oder Aussehen aufweisen. Die beschriebenen Prozeduren befolgen, bis sich das Empfangsteil aktiviert und so die Funktion
der Fernbedienung sicherstellt.
Page 14

NL
OPGELET!!!
Uw afstandsbediening heeft precies dezelfde funkties als uw wasemkap. Lees hierover de gebruiksaanwijzing even
door.
Waarschuwing
• De afstandbediening werkt met standard 1,5 V batterijen type LR03-AAA (niet inbegrepen) .
• Houw de afstandsbediening weg van hitte bronnen.
•
Batterijen gaan in de daarvoor voorziene afvalbakken weggeworpen.
In- en uitschakeling
Delay funktie.
(voor de wasemkappen waar deze
funktie aanwezig
is).
Motor snelheid
verhogen.
Motor aan –
uitschakeling.
Motor snelheid
verminderen.
In- en uitschakeling
van de intensive
snelheid vanuit
alle snelheden ook
met niet werkende
motor .
Verlichting wordt
door een licht druk
aan- en uitgeschakelt.
Indien voorzien, kan
door een lange druk
op deze toets een
“mood light” aan- of
uitgeschakelt worden.
Page 15

(A - C) (A - C)
(B - F) (A – D)
(A - E)
Aanwijzingen voor het opstarten van de afstandsbedieningsontvanger
Voor het opstarten van de afstandsbedieningsontvanger kontroleren dat de afstandsbediening wel degelijk
werkt.
Het opstarten kan enkel via het bedieningspaneel van de wasemkap uitgevoerd worden.
PROCEDURE A
• Verlichting en motor uitschakelen.
• Hou de toets Delay voor ca 5 seconden ingedrukt, tot dat :
• de leds OFF MOTOR en VERLICHTING 1 2-maal knippert . De afstandsbedieningsontvanger is INGE-
SCHAKELT;
• de leds OFF MOTOR en VERLICHTING 1 1-maal knippert. De afstandsbedieningsontvanger is nu UITGE-
SCHAKELT.
PROCEDURE B
• Verlichting en motor uitschakelen.
• Hou de intensieve snelheidstoets voor ca 5 seconden gedrukt , tot dat :
• de led 2-maal knippert. De ontvanger is nu INGESCHAKELT;
• de led 1-maal knippert . De ontvanger is nu UITGESCHAKELT;
L
S1
T1 T2 T3 T4
A B C D E F G H
E F G HA B C D
B
A
D
C
E
G
F
I
H
L
A B C D E F G H
A B C D E F G H
B
A
D
C
G
F
H
E
B
A
D
C
E
G
F
I
H
L
Page 16

PROCEDURE C
• Verlichting en motor uitschakelen.
• druk op de toets “24H” voor ca 5 seconden tot de symbolen van de funkties aanschakelen.
• Laat de toets los, het symbool
begint de knipperen, na 3 seconden opnieuw de toets “24H” indrukken. Op het
paneel verschijnt nu :
• de referentiepunten van de motorcapaciteit
zijn ingeschakelt . De afstandsbedieningontvanger is nu IN-
GESCHAKELT.
• indien de referentiepunten van de motorcapaciteit uitgeschakelt zijn is de afstandsbedieningsontvanger UITGE-
SCHAKELT.
PROCEDURE D
• Verlichting en motor uitschakelen.
• 5 seconden op de toets
drukken tot dat:
• de toetsen
en 2-maal knipperen. De afstandsbedieningsontvanger is nu INGESCHAKELT;
• de toetsen
en 1-maal knipperen. De afstandsbedieningsontvanger is nu UITGESCHAKELT;
PROCEDURE E
• Verlichting en motor uitschakelen.
• de wasemkap van het stroomnet uitsluiten.
• door op de toets
te drukken de stroomverbinding opnieuw aansluiten.
• hou de toets
ingedrukt. Afgezien van het software kunnen 2 situaties tot stand komen :
A) Op het paneel verschijnt “SE“, laat onmiddelijk de toets
los, het paneel knippert en na 3 seconden op de
toets “24H“ drukken, op het paneel verschijnt :
• “ TC “ voor 2 maal . De afstandsbedieningsontvanger is nu AANGESLOTEN;
• “ TC “ voor 1 maal . De afstandsbedieningsontvanger is nu UITGESCHAKELT.
B) Na enkele seconden de toets
loslaten, il display visualizza una sequenza animata ed entro 3 secondi premere
il tasto “24H“, il display visualizzerà :
• “ TC “ voor 2 maal . De afstandsbedieningsontvanter is nu AANGESLOTEN;
• “ TC “ voor 1 maal . De afstandsbedieningsonvanger is nu UITGESCHAKELT.
PROCEDURA F
• Verlichting en motor uitschakelen.
• Hou de toets V2 ingedrukt voor 5 seconden tot :
• de led V4 2-maal knippert . De afstandsbedieningsontvanger is nu AANGESLOTEN;
• de led V4 1-maal knippert. De afstandsbedieningsontvanger is nu UITGESCHAKELT.
OPGELET !!!
De in deze gebruiksaanwijzing weergegeven beelden zijn algemene beelden. Het kan dus voorkomen dat uw wasemkap afwijkende symbolen en/of estetik heeft , volg de proceduren tot de ontvanger ingeschakelt is waardoor de
werking van de afstandsbediening gewaarborgd is.
Page 17

ES
¡¡¡Atención!!!:
El telemando replica las funciones del tablero de mandos que se recibe en dotación con la campana. Para una
comprensión mejor de dichas funciones consultar el manual de instrucciones que se anexa a la campana.
Advertencias
• El telemando es alimentado con pilas alcalinas de cinc-carbono de 1,5 V del tipo
estándar LR03-AAA (no incluidas).
• No guardar el telemando en las proximidades de fuentes de calor.
•
No tirar las pilas en el ambiente, depositarlas en los contenedores específicos.
Activa/desactiva la
función Delay.
(En las campanas
donde esta función
está presente).
Incrementa la
velocidad de
ejercicio del
motor.
Enciende y
apaga el
motor
Decrementa la
velocidad de
ejercicio del
motor.
Activa/desactiva el
motor a la
velocidad intensiva
desde cualquier
velocidad incluso
desde motor
apagado.
Breve presión,
enciende/apaga las
luces a la máxima
luminosidad.
Presión prolongada,
enciende/apaga la luz
en la modalidad
“cortesía” (En las
campanas donde esta
función está presente).
Page 18

(A - C) (A - C)
(B - F) (A – D)
(A - E)
Procedimiento activación del receptor del telemando.
Antes de iniciar el procedimiento de activación probar la funcionalidad del telemando y en el caso no
funcione proceder como se describe a continuación.
El procedimiento de activación debe efectuarse exclusivamente desde el tablero de mandos de la
campana.
PROCEDIMIENTO A
• Apagar las luces y el motor de aspiración.
•
Mantener presionada la tecla Delay por 5 segundos aproximadamente hasta cuando:
• los leds OFF MOTOR y VELOCIDAD 1 parpadean 2 veces indicando la ACTIVACIÓN;
• los leds OFF MOTOR y VELOCIDAD 1 parpadean 1 vez indicando la DESACTIVACIÓN.
PROCEDIMIENTO B
• Apagar las luces y el motor de aspiración.
• Mantener presionada la tecla Intensiva por 5 segundos aproximadamente hasta cuando:
• el led respectivo parpadeando 2 veces indica la ACTIVACIÓN del receptor del telemando;
• el led respectivo parpadeando 1 vez indica la DESACTIVACIÓN del receptor del telemando;
L
S1
T1 T2 T3 T4
A B C D E F G H
E F G HA B C D
B
A
D
C
E
G
F
I
H
L
A B C D E F G H
A B C D E F G H
B
A
D
C
G
F
H
E
B
A
D
C
E
G
F
I
H
L
Page 19

PROCEDIMIENTO C
• Apagar las luces y el motor de aspiración.
• Tocar la tecla “24H”por aproximadamente 5 segundos hasta el encendido de los iconos relativos a las funciones ya
activas.
• Liberando la tecla, el icono
inicia a parpadear, dentro de 3 segundos tocar de nuevo la tecla “24H” el display
visualizará:
• Encendido de los puntos de referencia de la barra de potencia del motor
señala 1a ACTIVACIÓN del
receptor del telemando.
• Apagado de los puntos de referencia de la barra de potencia del motor señala 1a DESACTIVACIÓN del
receptor del telemando.
PROCEDIMIENTO D
• Apagar las luces y el motor de aspiración.
• Presionar por 5 segundos la tecla
hasta cuando:
• 2 parpadeos teclas
y ACTIVACIÓN del receptor del telemando;
• 1 parpadeo teclas
y DESACTIVACIÓN del receptor del telemando;
PROCEDIMIENTO E
• Apagar las luces y el motor de aspiración.
• Desconectar la campana de la alimentación de red.
• Mantener presionada la tecla
recuperar la conexión de red.
• Mantener presionada la tecla
, según la versión del software se verificarán dos condiciones.
A) El display visualiza “SE“, luego liberar inmediatamente la tecla
, el display visualiza una secuencia animada
y dentro de 3 segundos presionar la tecla “24H”, el display visualizará:
• “ TC “ por 2 Veces señalando la ACTIVACIÓN del receptor del telemando;
• “TC“ por 1 Vez señalando la DESACTIVACIÓN del receptor del telemando;
B) Después de algunos segundos el display no visualiza nada, liberar la tecla
, el display visualiza una secuencia
animada y dentro de 3 segundos presionar la tecla “24H”, el display visualizará:
• “TC“ por 2 Veces señalando la ACTIVACIÓN del receptor del telemando;
• “TC “ por 1 Vez señalando la DESACTIVACIÓN del receptor del telemando;
PROCEDIMIENTO F
•Apagar las luces y el motor de aspiración.
•Mantener presionada la tecla V2 por 5 segundos aproximadamente hasta cuando:
• el led V4 parpadeando 2 veces indica la ACTIVACIÓN del receptor del telemando;
• el led V4 parpadeando 1 vez indica la DESACTIVACIÓN del receptor del telemando;
¡¡¡Atención!!!
Las imágenes indicadas son genéricas, vuestro producto podría tener una simbología y/o estética diferentes, seguir
el procedimiento indicado hasta que se active el receptor garantizando el funcionamiento del telemando.
Page 20

RU
Внимание!
Пульт ДУ выполняет те же функции, что и панель управления вытяжки. Для наилучшего понимания этих
функций смотрите прилагаемое к вытяжке руководство по эксплуатации.
Предупреждения
• Пульт ДУ работает от щелочных батареек (уголь-цинк) 1,5 В стандартного типа
LR03-AAA (не входят в комплект поставки).
• Не оставляйте пульт близко от источников тепла.
•
Не выбрасывайте батарейки в мусор, складывайте их в специальные сборные
контейнеры.
Включает и
отключает
функцию
задержки (Delay).
(В вытяжках, в
которых данная
функция есть).
Повышает
скорость
работы
двигателя.
Включает и
выключает
двигатель.
Снижает
скорость
работы
двигателя.
Включает /
выключает
двигатель на
интенсивной
скорости из
любой скорости
даже при
выключенном
двигателе.
Краткое нажатие,
включает /
выключает
освещение
максимальной
яркости.
Долгое нажатие,
включает /
выключает дежурное
освещение
. (В
вытяжках, в которых
данная функция
есть).
Page 21

(A - C) (A - C)
(B - F) (A – D)
(A - E)
Процедура включения приемника пульта ДУ
Прежде чем приступать к выполнению операций по приведению пульта дистанционного управления
в рабочее состояние, проверьте его действие, и если он не работает, выполните описанные далее
операции.
Процедура включения пульта должна выполняться только с панели управления вытяжки.
ПРОЦЕДУРА A
• Выключите освещение и двигатель всасывания.
• Держите нажатой кнопку Delay в течение примерно 5 секунд до тех пор, пока:
• индикаторы ВЫКЛ ДВИГАТЕЛЬ и СКОРОСТЬ 1 не вспыхнут 2 раза, указывая на ВКЛЮЧЕНИЕ
пульта;
• индикаторы ВЫКЛ ДВИГАТЕЛЬ и СКОРОСТЬ 1 не вспыхнут 1 раз, указывая на ВЫКЛЮЧЕНИЕ
пульта.
ПРОЦЕДУРА В
• Выключите освещение и двигатель всасывания.
• Держите нажатой кнопку Интенсивная скорость в течение примерно 5 секунд до тех пор, пока:
• 2 вспышки соответствующего индикатора не укажут на ВКЛЮЧЕНИЕ приемника пульта ДУ;
• 1 вспышка соответствующего индикатора не укажет на ВЫКЛЮЧЕНИЕ приемника пульта ДУ;
L
S1
T1 T2 T3 T4
A B C D E F G H
E F G HA B C D
B
A
D
C
E
G
F
I
H
L
A B C D E F G H
A B C D E F G H
B
A
D
C
G
F
H
E
B
A
D
C
E
G
F
I
H
L
Page 22

ПРОЦЕДУРА С
• Выключите освещение и двигатель всасывания.
• Прикоснитесь к кнопке “24H” в течение примерно 5 секунд, пока не загорятся символы уже включенных
функций.
• Отпустите кнопку, символ
начинает мигать, в течение 3 секунд вновь прикоснитесь к кнопке “24H”.
Дисплей показывает:
• включение штрихов на полосе настройки мощности двигателя
, указывающее на ВКЛЮЧЕНИЕ
приемного устройства пульта управления.
• выключение штрихов на полосе настройки мощности двигателя, указывающее на ВЫКЛЮЧЕНИЕ
приемного устройства пульта управления.
ПРОЦЕДУРА D
• Выключите освещение и двигатель всасывания.
• Нажмите в течение 5 секунд кнопку
до тех пор, пока:
• 2 вспышки кнопок
и не укажут на ВКЛЮЧЕНИЕ приемника пульта ДУ;
• 1 вспышка кнопок
и не укажет на ВЫКЛЮЧЕНИЕ приемника пульта ДУ.
ПРОЦЕДУРА Е
• Выключите освещение и двигатель всасывания.
• Отсоедините вытяжку от сети электропитания.
• Держите кнопку
в нажатом состоянии, чтобы и восстановить подключение к электрической сети.
• В зависимости от версии программного обеспечения при нажатой кнопке
могут выявиться два условия:
A) на дисплее высвечивается “SE“, сразу же отпустите кнопку
; на дисплее поочередно загораются
символы, в течение 3 секунд нажмите кнопку “24H“, на дисплее :
•“ TC “ 2 раза вспыхивает, указывая на ВКЛЮЧЕНИЕ приемника пульта ДУ;
• “ TC “ 1 раз вспыхивает, указывая на ВЫКЛЮЧЕНИЕ приемника пульта ДУ.
B) Через несколько секунд с дисплея исчезают все надписи, отпустите кнопку
, после чего на дисплее
отображается ряд картинок и в течение 3 секунд нажмите кнопку “24H“. На дисплее:
• “ TC “ 2 раза вспыхивает, указывая на ВКЛЮЧЕНИЕ приемника пульта ДУ;
• “ TC “ 1 раз вспыхивает, указывая на ВЫКЛЮЧЕНИЕ приемника пульта ДУ.
ПРОЦЕДУРА F
• Выключите освещение и двигатель всасывания.
• Держите нажатой кнопку V2 в течение примерно 5 секунд до тех пор, пока:
• индикатор V4 не вспыхнет 2 раза, указывая на ВКЛЮЧЕНИЕ приемника пульта ДУ;
• индикатор V4 не вспыхнет 1 раз, указывая на ВЫКЛЮЧЕНИЕ приемника пульта ДУ.
Внимание!
В руководстве показаны общие символы, на вашем пульте символы и эстетическое оформление может быть
другим; выполните описанные процедуры, чтобы включить приемник и обеспечить работу пульта ДУ.
Page 23

Page 24

Il simbolo sul prodotto o sulla confezione indica che il prodotto non deve essere considerato come un normale rifiuto domestico, ma deve essere portato nel punto di raccolta appropriato per il riciclaggio di apparecchiature elettriche ed elettroniche. Provvedendo a smaltire questo prodotto in modo appropriato, si contribuisce a evitare potenziali conseguenze negative per l’ambiente e per la salute, che
potrebbero derivare da uno smaltimento inadeguato del prodotto. Per informazioni più dettagliate sul riciclaggio di questo prodotto, contattare l’ufficio comunale, il servizio locale di smaltimento rifiuti o il negozio
in cui è stato acquistato il prodotto.
The symbol on the product or on its packaging indicates that this product may not be treated as household waste. Instead it shall be handed over to the applicable collection point for the recycling of
electrical and electronic equipment. By ensuring this product is disposed of correctly, you will help prevent potential negative consequences for the environment and human health, which could otherwise be
caused by inappropriate waste handling of this product. For more detailed information about recycling of this product, please contact your local city office, your household waste disposal service or the shop
where you purchased the product.
Le symbole sur le produit ou son emballage indique que ce produit ne peut être traité comme déchet ménager. Il doit plutôt être remis au point de ramassage concerné, se chargeant du recyclage du
matériel électrique et électronique. En vous assurant que ce produit est éliminé correctement, vous favorisez la prévention des conséquences négatives pour l’environnement et la santé humaine qui, sinon,
seraient le résultat d’un traitement inapproprié des déchets de ce produit. Pour obtenir plus de détails sur le recyclage de ce produit, veuillez prendre contact avec le bureau municipal de votre région, votre
service d’élimination des déchets ménagers ou le magasin où vous avez acheté le produit.
Das Symbol auf dem Produkt oder seiner Verpackung weist darauf hin, dass dieses Produkt nicht als normaler Haushaltsabfall zu behandeln ist, sondern an einem Sammelpunkt für das Recycling
von elektrischen und elektronischen Geräten abgegeben werden muss. Durch Ihren Beitrag zum korrekten Entsorgen dieses Produkts schützen Sie die Umwelt und die Gesundheit Ihrer Mitmenschen.
Umwelt und Gesundheit werden durch falsches Entsorgen gefährdet. Weitere Informationen über das Recycling dieses Produkts erhalten Sie von Ihrem Rathaus, Ihrer Müllabfuhr oder dem Geschäft, in
dem Sie das Produkt gekauft haben.
Het symbool op het product of op de verpakking wijst erop dat dit product niet als huishoudafval mag worden behandeld. Het moet echter naar een plaats worden gebracht waar elektrische en
elektronische apparatuur wordt gerecycled. Als u ervoor zorgt dat dit product op de correcte manier wordt verwijderd, voorkomt u mogelijk voor mens en milieu negatieve gevolgen die zich zouden kunnen
voordoen in geval van verkeerde afvalbehandeling. Voor meer details in verband met het recyclen van dit product, neemt u het best contact op met de gemeentelijke instanties, het bedrijf of de dienst belast
met de verwijdering van huishoudafval of de winkel waar u het product hebt gekocht.
El símbolo en el producto o en su embalaje indica que este producto no se puede tratar como desperdicios normales del hogar. Este producto se debe entregar al
punto de recolección de equipos eléctricos y electrónicos para reciclaje. Al asegurarse de que este producto se deseche correctamente, usted ayudará a evitar posibles
consecuencias negativas para el ambiente y la salud pública, lo cual podría ocurrir si este producto no se manipula de forma adecuada. Para obtener información más
detallada sobre el reciclaje de este producto, póngase en contacto con la administración de su ciudad, con su servicio de desechos del hogar o con la tienda donde
compró el producto.
Символ на изделии или на его упаковке указывает, что оно не подлежит утилизации в качестве бытовых отходов. Вместо этого его следует сдать в соответствующий пункт
приемки электронного и электрооборудования для последующей утилизации. Соблюдая правила утилизации изделия, Вы поможете предотвратить причинение окружающей среде
и здоровью людей потенциального ущерба, который возможен, в противном случае, вследствие неподобающего обращения с подобными отходами. За более подробной
информацией об утилизации этого изделия просьба обращаться к местным властям, в службу по вывозу и утилизации отходов или в магазин, в котором Вы приобрели изделие.
436005034_04 - 110803
 Loading...