

Page 1
1
(FORTE 90SS)
Page 2

2
TO The Users
Please keep the instruction manual, warranty card
and invoice properly for the long term service from
our company.
Thanks for your choosing of the products from us. The top grade kitchen ware series
products produced by FABER have elegant outlooking, high quality material and most fine
process.
Please read the instruction manual carefully before installation and operation to the
products.
Please consult the local agency or dial the service telephone number of the company
directly if you have any questions or problems about our products.
Product characters:
1. Advance shape and strong sense of the times: streamline, luxurious, elegant and
Page 3

3
fashionable contour design.
2. Big suction power, which can eliminate the oil smoke thoroughly, the unitized tensile gas-
collection hood fits with the exhaust fume collecting area for kitchen in better manner. It
introduces the twin air-intake centrifugal blower fan with very large air exhaust amount, which
can eliminate the smoke more thoroughly.
3. Low noise level: the lower fan is designed elaborately with ball bearing motor and multi-
blade centrifugal wheel according to the aerodynamic principle. Which can run stably and
quite.
4. Easy clean: the high quality stainless steel shield of the glass faceplate can be cleaned
easily. The takable stainless steel filter is easy take or fix no need any tools
5. The oil channel is introduced with particular multi-oil channel design which doesn't
accumulate oil, drip oil or impregnate oil.
Attentions:
1. The wall fix the cooker hood should be strong and certain bearing strength, which can
support the weight of the product.
2. Keep away from the wires laid in the wall when installing the bores to avoid electric shock.
3. The wind from the cooker hood cant be discharged into the hot flue that used to discharge
the smoke of coal gas or other fuel.
4. Keep good ventilation of the room space when using the cooker hood with the cooking
utensils that consumes coal gas and other fuel together.
5. Don't bake the cooker hood directly with fire. Or it will be damaged or fired.
6. Please turn off the cooker hood at once when the oil in the boiler is on fire. Check whether
the power lead is damaged before using again, if you are not sure about it, please contact our
maintenance center for help.
7. Clean out the greasy stain on the wind wheel and airflow to ensure the smoke exhaust
effect. Empty the oil cup in time to avoid the overflow of the oil.
8. Be particularly careful when cleaning the wind wheel. Don't hit or throw away the clump
weight to avoid damage its dynamic balance and cause the vibration of the complete machine
and increase the noise.
9. Clean the cooker hood with the detergent, such as neutral detergent, prescribed in the
instruction. Don't clean it with gasoline or other volatile flammable solvent or it may cause the
cooker hood on fire.
10. The damaged power lead of the cooker hood must be replaced with the special power
lead provided by us.
Page 4
4
11. Turned off the power plug before replacing the light bulb. Turn on the cooker hood to
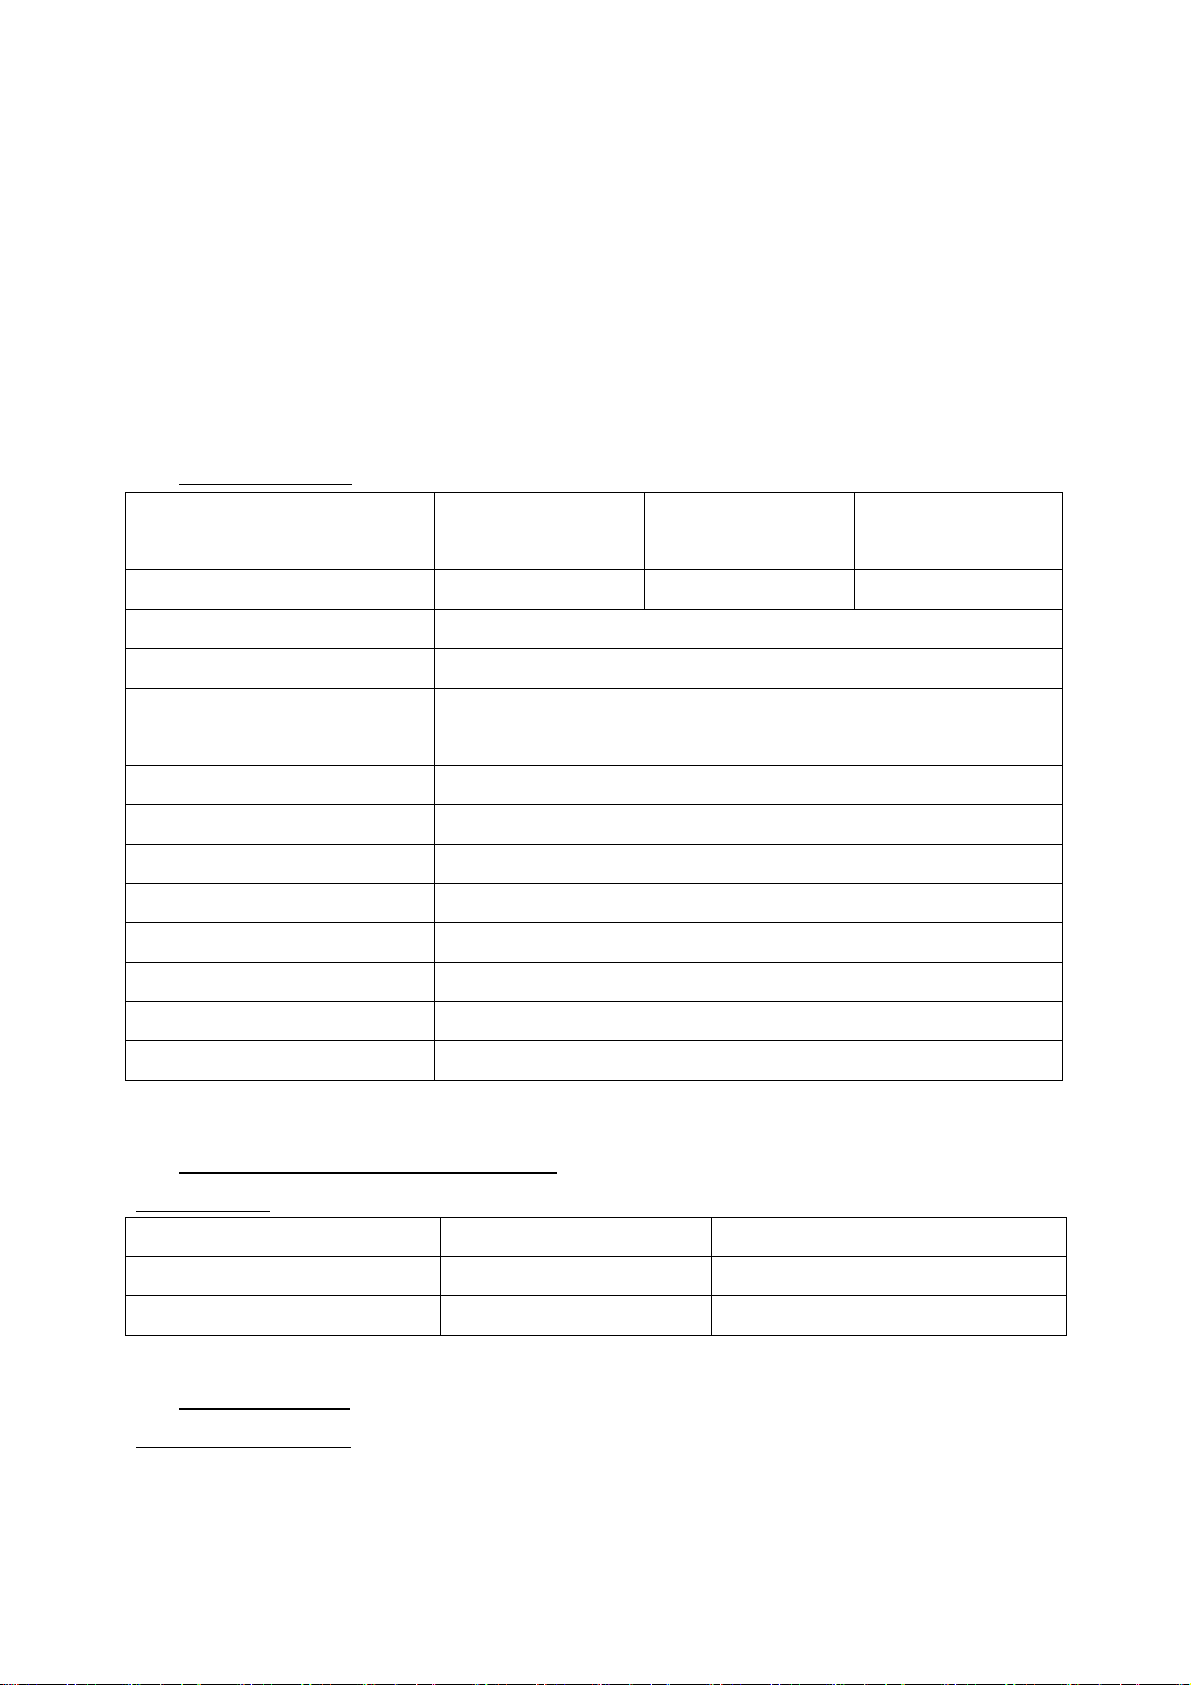
Model
TORENTINO
90SS
OSIMO 90SS
FORTE 90SS
Air quantity(Max.)
1000m3/Hr
1000m3/Hr
1000m3/Hr
Power supply
220~240V/50Hz
Product Dimension
W900 x D500 x H500-900 (mm)
Input power of motor
80W
General Input Power
218W
Noise Level (dB)
≤ 68
Control panel
Sensor touch control
Levels Of Speed Control
3 Levels
Motor Type
Metal
Fan Type
Sirocco
lamp
LED light
Filtration Type
Washable cone type stainless steel filter
1. Pencil or marker
2. Utility knife
3. Measuring tape
4. Spirit level
5. Powered screwdriver
6. Flat blade screwdriver
7. Phillips screwdriver
8. Protective gloves
ensure the power supply is cut off. The power of the bulb replace must be lower than 2W to
avoid damaging the oil and smoke exhauster for overheating and ignition.
12. Don't touch the shade of the light directly after long time use to avoid the burning of your
hands.
13. Turned off the power plug before maintenance. Turn on the range hood switch to ensure
the power supply is cut off then put on protective gloves for cleaning.
Specifications
(the actual figures maybe different with the figures from our Lab. test )
TOOLS, PARTS & ACCESSORIES
Tools needed
INSTALLATION
1) Exhaust Ventilation
Under this vented installation, the cooker hood’s air outlet will be connected to the wall and
reach the outdoor through a ducting. The cooking fumes and air in the kitchen will draw into
Page 5

5
the cooker hood and cleaned by the grease filters and then directed outside. The anti-
Upper chimney flue
Range hood glass casing
Air chamber outlet
Motor casing
Lower chimney flue
backflow vent cap is needed for this operation mode. The anti-backflow vent cap will be fixed
at the end of the ducting which is outside the kitchen at the opening on the wall. This vent cap
is to block the vented fumes and air flow back into the ducting and the vent cap will be closed
once the cooker hood turns off. Diagrams below are some examples of exhaust ventilation.
(the cooker hood can be installed in different ceiling type )
2) Installation Instruction
* The measurement are measured in mm.
* The above displayed cooker hood figure maybe varied from the actual product
Page 6

6
3) Installation Notes
Before installation, it is very important and needed to read and understand the stated safety
notes, instructions and related information in this manual. This is to ensure the appliance
could be installed appropriately and the user would use it in a proper method in order to avoid
any unnecessary injury and damages. To avoid the risk of fumes suffocation, the cooker hood
should be installed according to the stated instructions and notes in this manual. Next, the
range hood has to install in accordance to the local building guides and regulations therefore
please seek approval from the building management or inspector if necessary before
installation.
4) Venting requirements
1. Do not vent the cooking fumes and air into attic, ceiling and any enclosed area.
2. Make sure the ducting is clean inside for efficient ventilation.
3. The recommended distance between the top surface of cooking hob and the bottom part of
the cooker hood is only between 20 inches to 25 inches (can be adjusted according to
different cooking way).
4. Make sure the mounting height is appropriate as the range hood could be badly damage
and in fire hazard if the range hood mounted too low. If the range hood mounted too high, its
performance and efficiency will be decreased.
5. Both the size of the ducting and the size of air chamber outlet should be consistent.
6. Do not make the ducting turns 90oC more than 2 times as each turn will reduce the airflow
efficiency.
7. Make sure the ducting has a length of at least of 24 inches (61cm) before a 90oC turn and
between 2 different 90oC turn in the same ducting. This is to allow the drawn in fumes and air
have enough room to push through the ducting smoothly.
8. Minimize the length of the adopted ducting and the 90oC bents so the range hood could
work at its best. Always make sure the total ducting does not go beyond
9. Please ensure the vent system is completely sealed, if not please use the silver tape or duct
tape to seal it to ensure proper ventilation.
10. Use silicon, plaster and etc. to seal the exterior wall opening or roof opening around the
cap.
11. If turns are needed in the installation, please make sure make it as far as possible from the
air chamber outlet.
12. If the ducting is directed into a central vent flue of a building or house, the ducting outlet
must be adjusted to the flow direction of the vent flue.
Page 7

7
5) Electrical requirements
1. The electrical work should be carried out by a suitably qualified and authorized professional
in strict accordance with the current local and national safety regulations.
2. Make sure the appliance is not connected to the power supply while during the installation.
3. Do not connect the appliance to the extension lead of a power socket as this will not
guarantee safety of using this appliance.
4. Check the power supply of the house and make sure it is match with the appliance. The
connection data is listed on data plate on the cooker hood.
5. Install this appliance with a proper 3 pins plug that match local and national safety standard
and make sure the power is easily accessible after the appliance has been completely built in.
6. Make sure the cooker hood is properly grounded.
6) Installation steps
1. Please take note of the user who use this range hood most often and make sure there is
enough space to cook comfortably under the range hood and able to reach the control panel
easily at the same time.
2. As this appliance is heavy, please make sure that the supporting or framework being used
is stable and secured enough in the wall.
3. Mark the locations of the support mounting bracket holes, ducting cut out (if used) and
power supply cable cut out on the ceiling and then use drill and saber saw or other tools to cut
the openings for power supply cable and ducting.
4. Please seal the exterior wall or roof openings under the exhaust ventilation installation.
5. Turn off the main electrical supply, prepare and run the wires through ceiling or wall. Leave
approximately about 12 inches of electrical cord hanging from the ceiling. Do not restore
power until the wiring is complete.
6. For glass cooker hood, please handle it with extra care and remove the glass before
installation if possible. Do not put excessive pressure onto the glass.
7. Measure the distance between cook top and the bottom of cooker hood and make sure the
right distance between the cook top and the bottom of range hood for different hobs.
8. Make sure the range hood is level horizontally and not tilted. Mark the locations of it.
9. Place the mounting bracket directly above the range hood, level it, and mark the locations
of the mounting bracket holes on the wall.
10. Place aside all equipments and locate marked regions and then drill holes. Attach the
range hood to the wall using anchors recommended for your type of wall:
- Sheet rock wall: Attach range hood to stud blockings if possible. If stud
Page 8

8
blockings are not available, it is required to build a supporting
structure behind the sheet rock for best weight support.
- Concrete wall: Use designated screws (not provided).
- Wood wall: Use at least 4 inches long wood screws (not provided).
11. Place the mounting bracket (or air diverter) against the wall and align the holes from
mounting bracket (or air diverter) with holes from type A anchors, fasten two type B screws
through the holes onto the anchors as shown in below picture. Leave approximately 1/16
inches of gap between the wall and the mounting bracket (or air diverter).
Fasten mounting bracket
Slide up and secure
Upper chimney flue to
Hold in position and
Secure lower chimney flue
to range hood
* The displayed figures maybe varied from the actual product.
12. Calculate the height of the ducting and extend approximately 6 inches longer than
required, connect the lower end of the ducting to the range hood and the upper end to the
outlet (or air diverter). Make sure the main electrical supply remains disconnected then
connect power plug to the electrical cord or wall socket.
13. Have one person carefully position both upper and lower chimneys on the cooker hood as
to allow another installer slide the sides of the chimney flues into the 1/16 inches gap. Fasten
both chimneys flues with four type C screws.
14. Install the oil cup back to its place and place the cone filters under the cooker hood.
15. The user may check the operation and performance of the cooker hood after the above
stated installation steps are done.
Page 9

9
SWITCH OPERATION
[ MODEL NO.: OSIMO 90SS/FORTE90SS ] [ MODEL NO.: TORENTINO 90SS ]
Light : To turn on/ off the LED light
Low : To work at low speed
Medium : To work at medium speed
High : To working at high speed
Timer : To Delay-off time after cooking
This range hood is designed to remove smoke, cooking vapour and odour from the cook top
area. For best results, turn on the range hood a few minutes before cooking and also allow it
to operate for several minutes after the cooking is complete as to clear the remaining cooking
fumes and odour from the kitchen room(please press the Timer button for this function).
Light: The user can turn on the range hood illumination through pressing on the ‘Light’ button.
Press once to turn it on and once more to turn it off. The light function is independent from
other function which will not be affected by other functions or adjustment.
Fan speed setting: The range hood is operated at 3 fan speed setting. The user may adjust
the fan speed setting through pressing on “1,2,3” buttons for different fan speeds. The
previous fixed fan speed will be saved in the memory and the cooker hood will adjust itself to
the previously fixed fan speed in the next operation.
Delay-off timer: when the motor is working (at any speed),Press the “Timer” button to turn on
the delay-off timer. The cooker hood may stop working after 10mins at the setting speed. e.g.
When the cook hood work at 3 speed, Press Timer button, the cooker hood will run into the
timer function, press Timer again to stop the motor. In the delay-off function, you can change
the motor speed from 3 speed to 1 or 2 speed which means the speed is changable in delay-
off function. But the delay-off time (10mins) cant be changed. and Once the range hood
reaches the 10mins, the range hood will be turned off automatically.
You can turn off the cook hood by press Timer at any time if its no need working more.
Page 10

10
The setting timer is for 10 minute.
Note: Light settings are independent from other settings (including delay-off) and lights have
to be manually turned on or off.
Note: The range hood will saves user configurations, setting such as fan speed and they will
remain the same until next use.
Circuit diagram
MAINTENANCE & CLEANING
Do not start any maintenance and cleaning work unless the appliance is disconnected from
the power supply. Make sure the power is turned off and the plug is withdrawn out from it
completely.
Cleaning the hood casing
1. Clean the hood casing periodically with warm soapy water and clean cotton cloth.
2. Do not use corrosive or abrasive detergent and steel wool or scoring pads, which will
scratch and damage the stainless steel surface. For heavier soil, please use only the mild
degreaser with warm water to clean it.
Page 11

11
3. For stainless steel hood, user may use stainless steel cleaner to clean the surface of the
hood. Please avoid the cleaning solution penetrate into the control panel. Do not leave the
cleaner on the hood too long as this may damage to the surface. Use soft towel to wipe off the
cleaning solution, gently rub off any stubborn spots. Use clean and dry soft towel to dry the
hood.
4. The user may buff up the stainless steel hood with stainless steel polish after cleaning.
5. Do not allow stains and dirt to accumulate on the hood casing.
6. Do not use ordinary steel wool or steel brushes as it may scratch off and damage the
surface. These scratches and damaged parts may cause rusting in long run.
7. Do not allow salt solutions, disinfectants, bleaches, or cleaning compounds to stick on the
stainless steel surface. Many of these compounds contain chemicals, which may be harmful to
the casing. To clean these compounds, rinse it with water and wipe it dry with a clean soft
cloth.
8. Do not use stainless steel cleaner on the control panel as it may spoil the surface of it or
discolor it.
Cleaning the grease filter (please wear the protective gloves before clean the cone filter)
1. The grease filters fitted by the factory are intended to filter out residue and grease from
cooking. It need not be replaced on a regular basis but are required to be kept clean
frequently and its easy disassemble without any tools needed.
2. The filters are recommended to be cleaned after every 20 hours of cooking(maybe varied
according to different cooking habits and frequency). If the cooking habit is very heavy which
involve a lot of deep frying and stir frying with lots of oil, the filter has to be cleaned more often
than the recommended basis.
3. To clean the filters, the user could soak it with warm soapy water for sometime and then
rinse it with clean water. The user could softly brush the filter with soapy water and clean cloth
as well and then rinse it clean water.
4. After rinse off the soapy solution, the user has to dry the filters before they could place back
to the cooker hood. The filters have to place back before it start operates again.
5. The damaged filter has to replace immediately, the filter could be purchase from our
authorised dealers.
Page 12

12
6. Do not use abrasive detergent, powder cleaner, oven cleaner, cream cleaner and any other
Problems
Guidance
The range hood or the light bulb does not
work.
Make sure the power supply is well
connected and turned on.
Make sure the wires are in good condition
and well connected.
Change a new bulb to see whether it is
working or not.
The range hood starts vibrate after it turned
on.
The range hood maybe not well installed,
please check it with the installer and reinstall
the cooker hood if necessary.
corrosive cleaning agent that will damage or discolor the filters.
7. Depend on the cleaning detergent used, to clean the filters in a dishwasher can cause
permanent dis-color to the filters. However, the filters could still be used as the structure is not
damage.
Caution: A saturated and unclean filter could result in fire hazard.
During operation
1. Always leave the filters or safety grills in place. Without these components, the operating
fan could catch the hair, fingers, loose clothing and other small and light particles.
2. Never dispose cigarette ashes, ignitable substances, or any foreign objects into the
operating fans.
3. Never leave the cooking unattended. When frying, oil in the pan can easily overheat and
catch fire. The risk of self combustion is higher if the oil has been used several times.
4. Never cook with flare ups or flames in the cookware under the range hood. Handle the
deep-fryers well during use as the overheated oil may be flammable.
Motor maintenance
Do not turn on the range hood when the grease filters are removed. Never disassemble parts
to clean without proper instructions. Disassembly is recommended to be performed by
qualified personnel only. The qualified technician needs to read and understand all the
instructions and warnings in this manual for cleaning and maintenance. Customer should not
clean the motor but arrange an authorised professional to clean and service the motor.
TROUBLESHOOTING
Page 13

13
The range hood performs badly.
Make sure the ducting is of 7 inches
diameter.
Make sure the ducting is not too long or have
more than 2 bents.
Make sure the vent cap is not lock tight.
Refer to the exhaust ventilation for more
guides.
The light is working but the fan is not spinning
at all.
The cooker hood may be damaged during
transportation, please contact us or the
authorized dealers.
The range hood is not venting out the cooking
fumes efficiently.
Make sure the installation distance falls
between the recommended distances.
Make sure the length and bents of the ducting
do not go beyond the recommended levels.
Make sure the ducting work is well sealed.
Turn the fan speed to higher setting for heavy
cooking.
In the event that the user cannot correct any of the stated or not stated technical problems,
please do not hesitate to contact us or your nearest dealers for further services or
consultations.
--------Thanks---------
Page 14

14
 Loading...