

Page 1
INSTALLATION MANUAL
FT-LVDS-AUD5
REV 090117
Page 2

PRESENTATION
• Congratulations for purchasing the video interface FT-LVDS-AUD5.
• Please, read this manual with attention before installing your new device.
• Keep this manual with you in order to check the functioning procedures and
the security information.
• We recommend that a professional, with experience in the field of installation
of vehicle devices, is the one to install this interface.
• The car ignition must be off during all the installation process.
CHARACTERISTICS
• Enables 3 AV inputs
• Enables front camera and rear camera inputs*
• DVD and TV can be controlled via steering wheel commands
• 12V, ACC and CAMERA output
• Plug and play connections
• 1-year warranty against manufacturer defect
• Compatible vehicles:
eo-lvds-aud5
*3rd AV input can be setup to be used as AV, NAV or Front Camera.
www.faaftech.com/produtos/interface-de-video/ft-vid-
1
Page 3
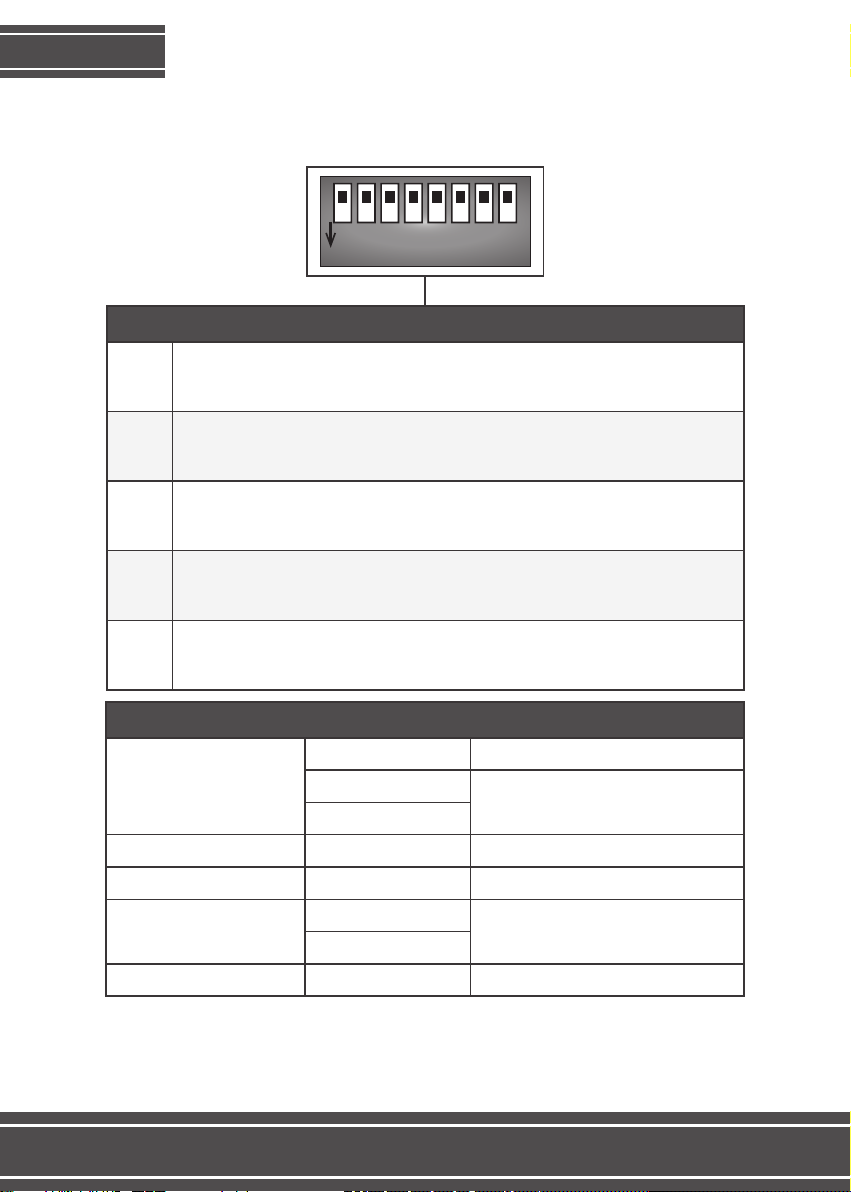
DIP SWITCHES
Set up the interface’s DIP Switches while the equipment is unplugged from the
whip, and while the car ignition is off.
1 2 3 4 5 6 7 8
ON
SETUP
DIP 1
DIP 2
DIP 3
DIP 4
TV FAAFTECH
TV LBSAT
TV NAVBRAS
DVD FAAFTECH
UP enables AV1 (DVD) input
DOWN disables AV1 input
UP enables AV2 (TV) input
DOWN disables AV2 input
UP enables AV3, NAV or FRONT CAM input (check pages 9-10)
DOWN disables AV3 input
UP on cars with a 7” screen
DOWN on cars with a 6,5” screen
No functionDIP 5
TV and DVD selection
FT-TV-1SEG DIP 6 up DIP 7 down
FT-TV-1SEGII
FT-TV-HDII
LBCR-1100
FULL HD
FT-DVD-1/2DIN
FT-DVDII
VDVD-155DVD SOUNDSTREAM
DIP 6 down DIP 7 down
DIP 6 up DIP 7 up
DIP 6 down DIP 7 down
DIP 8 up
DIP 8 down
2
Page 4
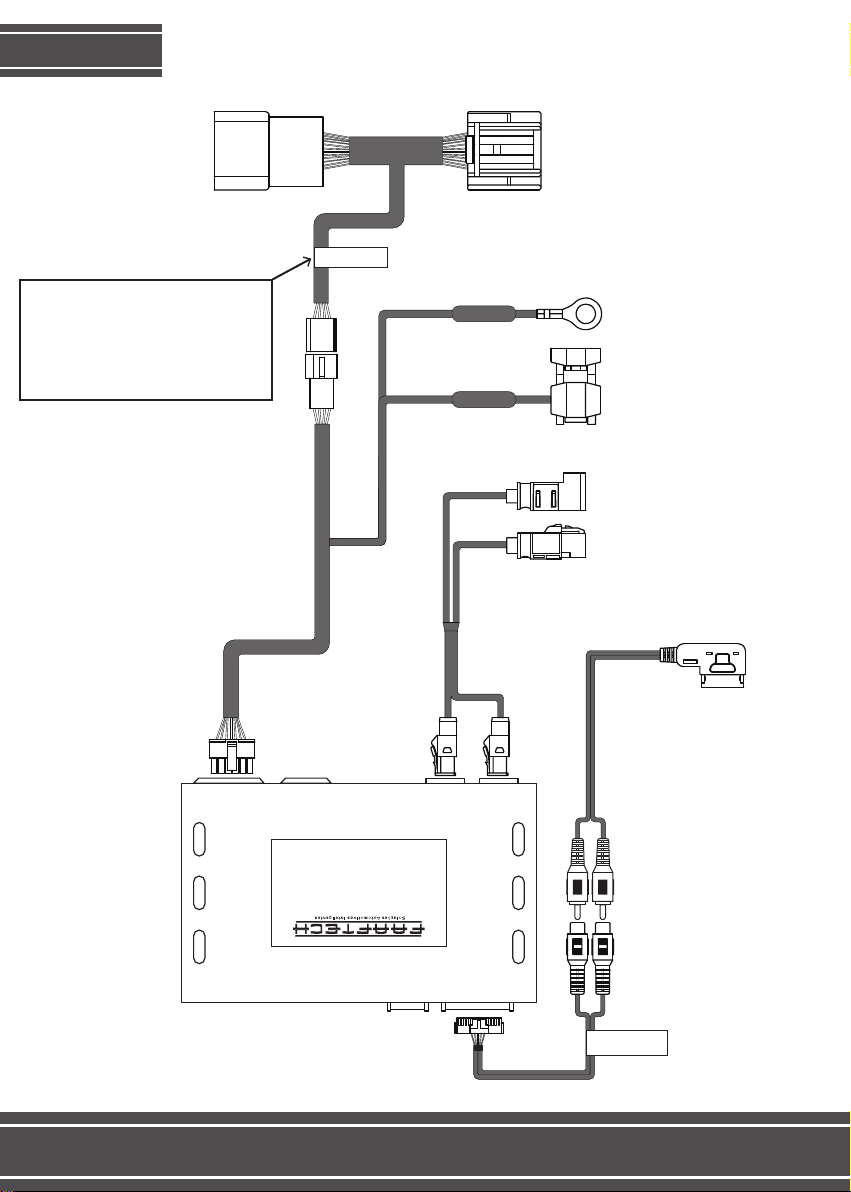
CONNECTIONS
Plug in to the
original whip
Note: on the FT-LVDS-AUD5
there are 2 whips with dierent
connectors. Check on the
vehicle’s connector which one
of the whips will plug correctly.
Conector A
Black
Yellow
Plug in to the connector on
the steering wheel column
• Remove the steering wheel
column cover to find the location
Connect to the negative
Connect to the 12V
straight
Bridge it on the
radio’s Pink or
Gray LVDS plug
Connect to the AMI input on the
console or glove compartment
DIP
SELECT
OUT
CAN/POWERINPOWER
UPDATE
S/N: xxxxxxxxxx
Versão: xx
Modelo: FT-LVDS-AUD5
DATA OUT/
ANTENAAVIN/OUT
3
IN/OUT
LVDS
Saída Áudio
Page 5
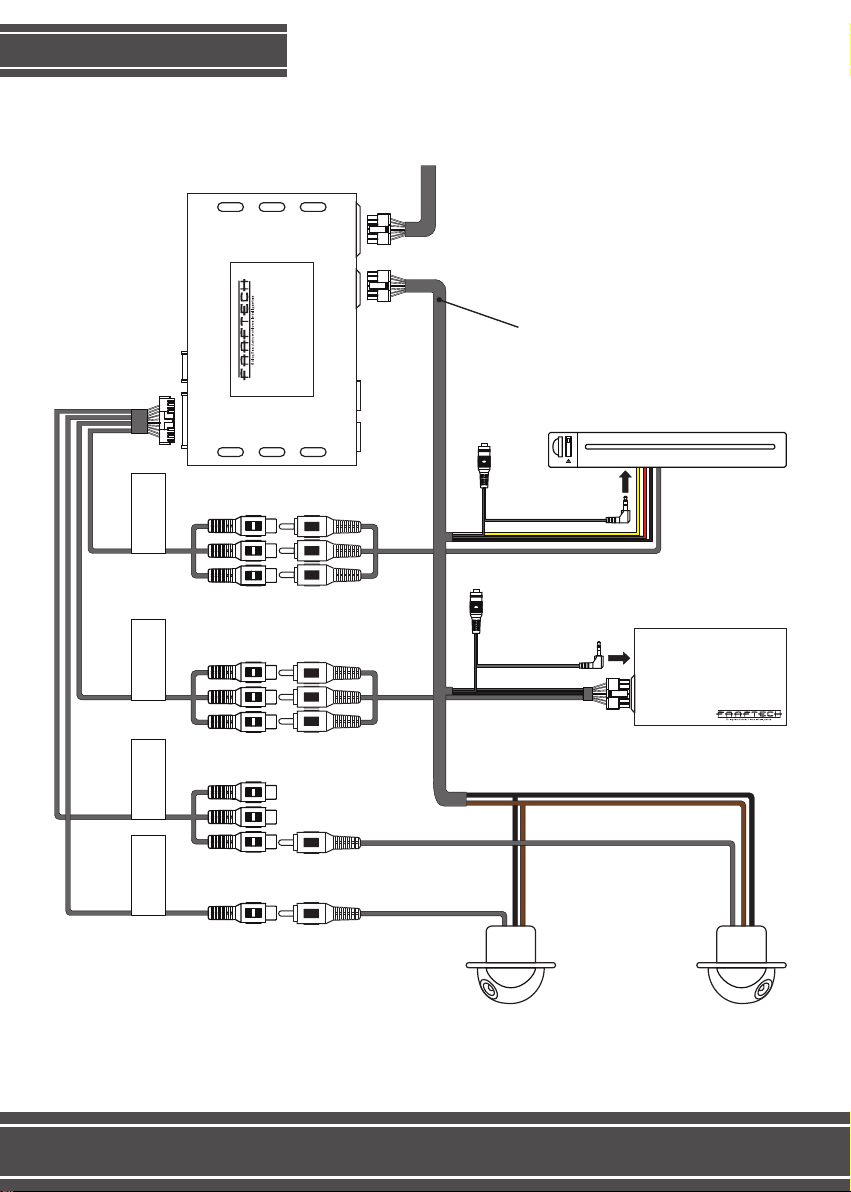
ACCESSORY CONNECTIONS
Check an example of an installation with a DVD, TV, front camera in the AV3
input, and a rear camera.
SELECT
DIP
UPDATE
DATA OUT/
ANTENA
Modelo: FT-LVDS-AUD5
IN/OUT
AV
(AV1)
Entrada DVD
Versão: xx
S/N: xxxxxxxxxx
IN
CAN/POWER
OUT
POWER
LVDS
IN/OUT
Use the auxiliary outputs to power
the accessories, such as DVD, TV
and camera, in case they are being
installed
MOBILE MULTI-MEDIA PLAYER
SD
DVD
(AV2)
Entrada TV
Entrada AV3
Entrada
Video Camera
Accessories such as DVD, TV and cameras are sold separately.
4
Digital TV Receptor
Front CameraRear Camera
Page 6
ACCESSORIES FUNCTIONING
Follow the steps below in order to access the accessories you have installed
on the interface’s AV inputs.
1° Select the AUX audio input on the multimedia;
2° Use one of the following methods to access the interface’s AV mode and flip
between the accessories installed:
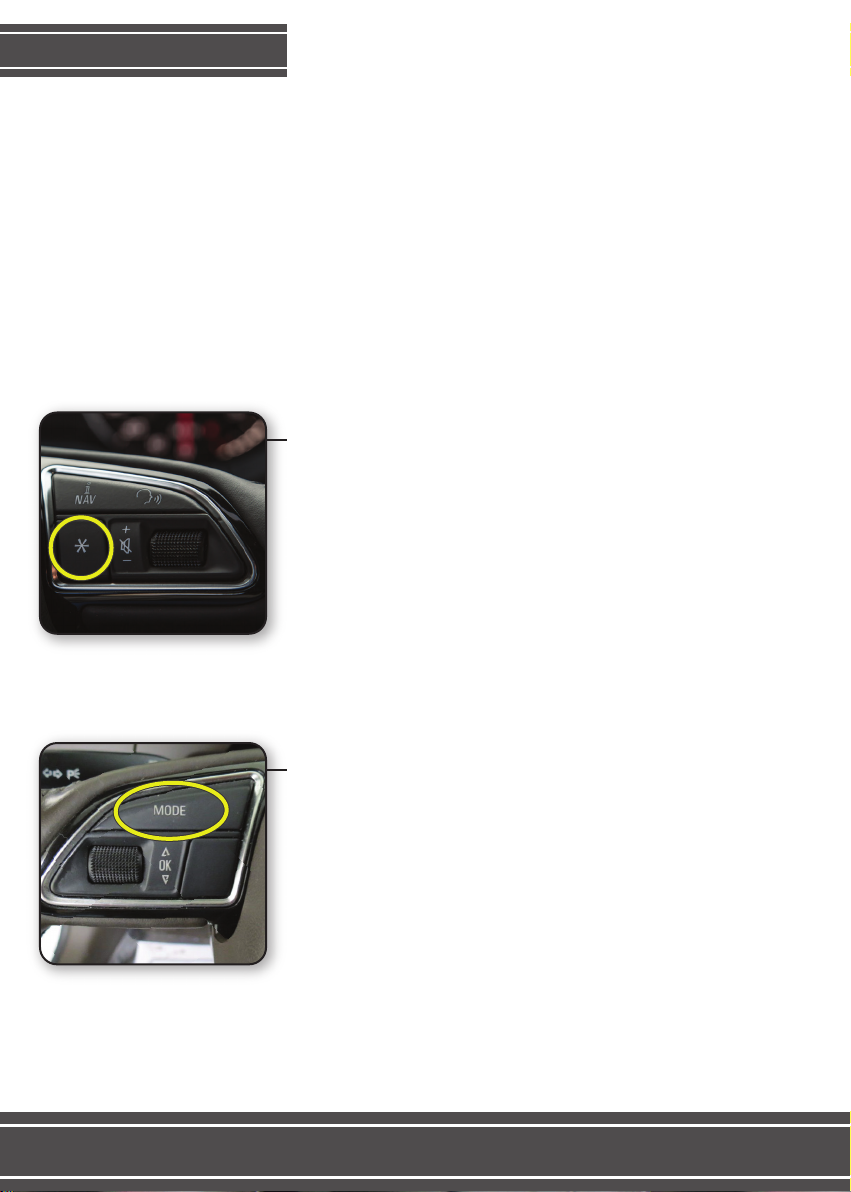
Audi A1 and Q3
Press the “ASTERISK” key for 2 seconds to gain
access to the interface’s AV mode, then simply touch
the same key to toggle between AV1 (DVD), AV2
(TV) and AV3. Press and hold the key for 2 seconds
to return to the original menu.
Audi A4, A5 and Q5
Press the “MODE” key for 2 seconds to gain access
to the interface’s AV mode, then simply touch the
same key to toggle between AV1 (DVD), AV2 (TV)
and AV3. Press and hold the key for 2 seconds to
return to the original menu.
8
5
Page 7
ACCESSORIES FUNCTIONING
1
2
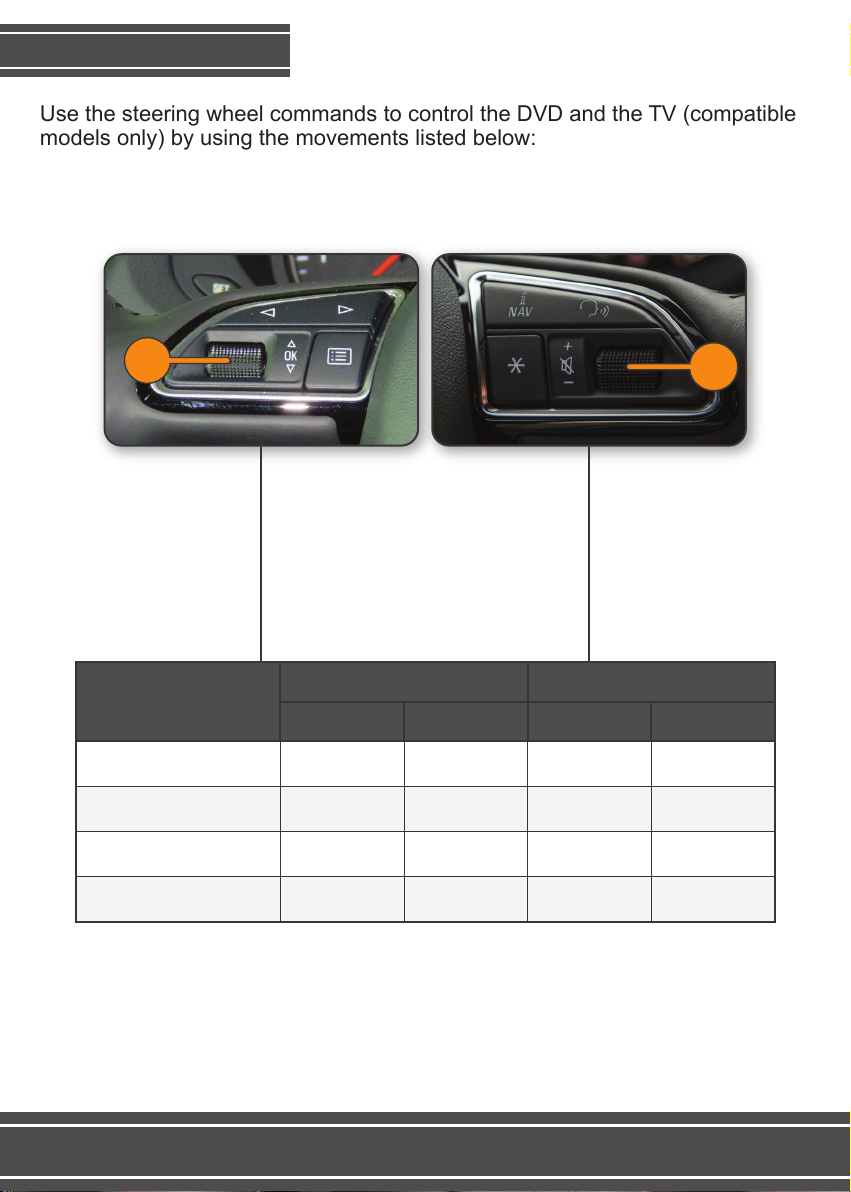
Use the steering wheel commands to control the DVD and the TV (compatible
models only) by using the movements listed below:
BUTTON
Simple touch
Channel + ---------- Track + ----------Spin button 1 up
Channel - ---------- Track - ----------Spin button 1 down
DVD COMMANDSTV COMMANDS
2-seconds Simple touch 2-seconds
----------List/Enter Enter MenuPress button 1
Scan---------- ---------- ----------Press button 2
8
6
Page 8
FUNCTIONING OF THE CAMERAS
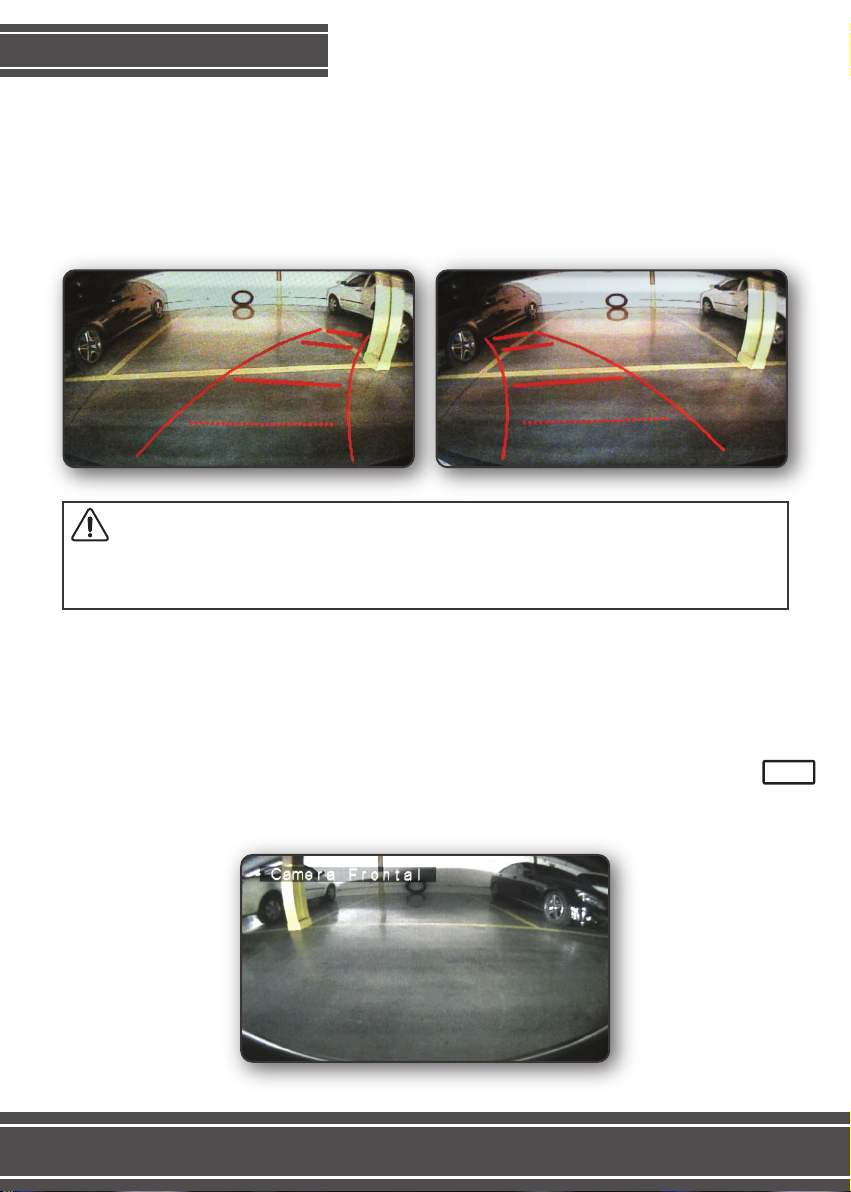
Rear Camera
The rear camera will show automatically once you put the car on the reverse
gear.
When you spin the steering wheel, the parking guide lines will move, showing
the approximate direction the vehicle will go to.
Important Notice
The parking guides are not 100% precise regarding to the way they show.
Use the parking guides only as an auxiliary resource while parking.
Front Camera
The front camera will show automatically once you put the car on the reverse
gear and then put it on N or D. The camera will stay on for 30 seconds, or until
the car reaches the speed of 15km/h (9.32mph), or until you press the NAV
button on the steering wheel (see image of the NAV button on the next page).
7
Page 9
FUNCTIONING OF THE CAMERAS
Camera Viewing
You can view the installed cameras at any time by following the steps below:
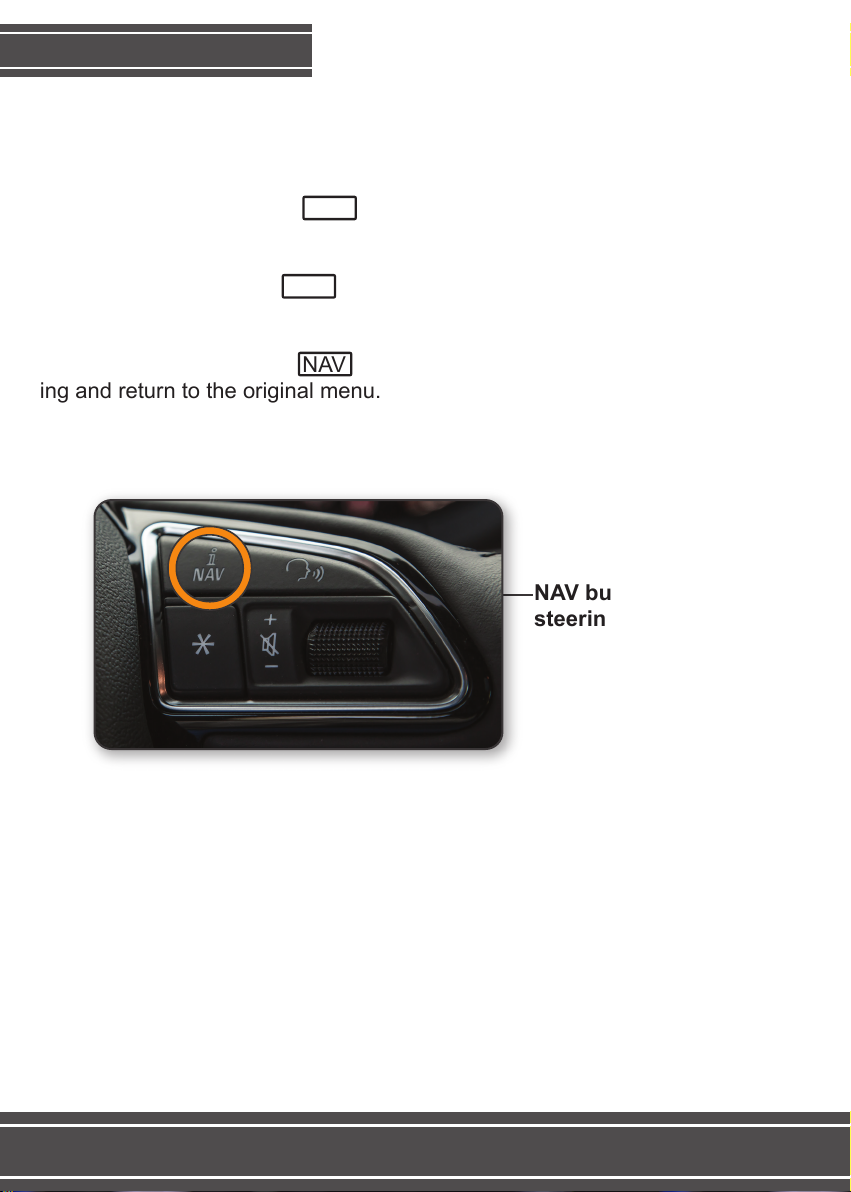
• Press and hold the NAV button on the steering wheel for 3 seconds to
view the rear camera;
• Simply touch the NAV button to switch between the rear and the front
camera (in case both are installed);
• Press and hold the NAV button for 3 seconds to leave the camera viewing and return to the original menu.
NAV button on the
steering wheel
Note: the rear camera viewing is not compatible with the OEM camera.
8
Page 10

SETUP MENU
Check below how to access the setup menu of the FT-LVDS-AUD5:
1. Access the AV1 (DVD), AV2 (TV) or AV3 input;
2. After selecting one of those sources, press the OK button on the steering
wheel command and hold it for about 5 seconds to view the setup menu;
3. Use the scroll to roll between functions and press it to access the options
you wish:
Cámara Tras.
Linhas Est.
AV1
AV2
AV3
Idioma
PORTUGUES
ON
ON
DVD
TV
AV3
Reset
Camera Tras (Rear Camera):
ON – If you are installing a rear camera.
OFF – If you aren’t installing a rear camera.
OEM – If the car already has an OEM rear camera.
Linhas Est. (Parking Lines):
ON – Enables the parking lines when the rear camera is being viewed.
OFF – Disables the parking guide lines.
AV1:
Select the name of the auxiliary input AV1 (DVD or AV1).
9
Page 11

SETUP MENU
AV2:
Select the name of the auxiliary input AV2 (TV or AV2).
AV3:
AV3 – Select to use AV3 as the third audio/video input.
NAV – Select to use AV3 as GPS.
CAM FRONT – Select to use AV3 as a front camera input.
Idioma (Language):
PORTUGUES – Change the setup menu language to Portuguese.
ENGLISH – Change the setup menu language to English.
Reset:
Restore every options on the setup menu to the original manufacturer’s
configurations.
10
Page 12

TROUBLESHOOTING
1. After installing the interface, the multimedia won’t turn on.
• Review the installation process and check if the connections have been done
according to the images shown on pages 3 and 4;
• Check if the connectors are plugged in tightly and if there are no wires loose on
the connectors.
2. When I put the car on reverse, the camera image won’t show.
• Check on the setup menu if the “Camera Tras” (Rear Camera) option is set up
properly.
3. When I put the car on reverse, I see an “incompatible video” message.
• Check if the rear camera installed is compatible. LVDS will only accept cameras that work with the NTSC video system. Other formats are incompatible.
4. I have installed a front camera, but it won’t show after I take the car off
of reverse.
• Access the Setup Menu (page 11), go to the AV3 option and set it up as CAM
FRONTAL (FRONT CAM).
5. I see the accessories (DVD, TV, et. al.) images, but I can hear no audio.
• Before accessing the accessories, you need to select the AUX audio source
from the multimedia menu.
811
Page 13
WARRANTY
FAAFTECH assures their clients a 01 (one) year period against defects in materials and workmanship, proved by presenting both the receipt of purchase from
the reseller to the costumer and the present Warranty Certificate filled, observing the following:
1. FAAFTECH will null the warranty if Faaftech or their authorized technical
assistance concludes that the equipment suffered from damage caused by poor
usage, by inadequate installing, by accidents (crashes, falls, and others), or if
there are any signs of the product having been violated, adjusted or fixed by
non-authorized personnel;
2. The Warranty Certificate is only valid when filled and presented together with
the receipt from the reseller to the costumer, as well as the attendance number
that is generated by our Technical Support, which can be reached from the numbers: +55 0800 603 2330 (landlines only) or +55 62 3241 4600. From Mondays
to Fridays, from 8 a.m. to 6 p.m. (GMT -03:00).
3. Any repairs and maintenances of the equipment still covered by the warranty
will be exclusively handled by FAAFTECH.
4. This warranty will not cover any products with unreadable or adulterated serial
code numbers.
5. The expenses with shipping, securing and packaging are not covered by this
warranty, and they are the full responsibility of the owner of this equipment.
Warranty Certificate
Equipment: FT-LVDS-AUD5
Buyer’s name:
Phone number: ( ) City: State/Province:
Address:
Date of purchase: Receipt number:
Serial Number:
Attention: This Warranty Certificate is only valid when filled and presented together with the receipt from the
reseller to the costumer. Keep this in a safe place.
Attendance number:
12
8
1 Year
Page 14

Page 15

Page 16

TECHNICAL SUPPORT
Follow us on social media
+55 0800 603 2330 or +55 62 3241 4600
www.faaftech.com.br
Available from Monday to Friday, from 8 a.m. to 6 p.m. Brasilia time
 Loading...