

Page 1

FirePassTM Server Administrator Guide
version 4.0
MAN-0081-00
Page 2

Page 3

Product Version
Legal Notices
This manual applies to product version 4.0 of the FirePass™ Server Administrator Guide.
Copyright
Copyright © 1999-2003, F5 Networks, Inc. All rights reserved.
F5 Networks, Inc. (F5) believes the information it furnishes to be accurate and reliable. However, F5
assumes no responsibility for the use of this information, nor any infringement of patents or other rights of
third parties which may result from its use. No license is granted by implication or otherwise under any
patent, copyright, or other intellectual property right of F5. F5 reserves the right to change specifications at
any time without notice.
Trademarks
F5, F5 Networks, the F5 logo, BIG-IP, 3-DNS, iControl, GLOBAL-SITE, SEE-IT, EDGE-FX, FireGuard,
Internet Control Architecture, IP Application Switch, Packet Velocity, iRules, SYN Check, FirePass, and
Webifyer are registered trademarks or trademarks of F5 Networks, Inc. in the U.S. and certain other
countries. All other trademarks mentioned in this document are the property of their respective owners. F5
Networks' trademarks may not be used in connection with any product or service except as permitted in
writing by F5.
Export Regulation Notice
This product may include cryptographic software. Under the Export Administration Act, the United States
government may consider it a criminal offense to export this product from the United States.
Export Warning
This is a Class A product. In a domestic environment this product may cause radio interference in which
case the user may be required to take adequate measures.
FCC Compliance
This equipment generates, uses, and may emit radio frequency energy. The equipment has been type tested
and found to comply with the limits for a Class A digital device pursuant to Part 15 of FCC rules, which
are designed to provide reasonable protection against such radio frequency interference.
Operation of this equipment in a residential area may cause interference, in which case the user at his own
expense will be required to take whatever measures may be required to correct the interference.
Any modifications to this device, unless expressly approved by the manufacturer, can void the user's
authority to operate this equipment under part 15 of the FCC rules.
Canadian Regulatory Compliance
This class A digital apparatus complies with Canadian I CES-003.
Standards Compliance
The product conforms to ANSI/UL Std 1950 and Certified to CAN/CSA Std. C22.2 No. 950.
FirePass™ Server Administrator Guide i
Page 4

ii
Page 5

Table of Contents
Page 6

Page 7

1
Introducing the FirePass Server
The FirePass remote access solution ........................................................................................1-1
The FirePass server models ........................................................................................................1-1
The FirePass server features .......................................................................................................1-2
Overview of features ............................................................................................................1-2
FirePass server features .......................................................................................................1-3
About this guide ..............................................................................................................................1-4
Audience ..................................................................................................................................1-4
Finding help and technical support resources ..........................................................................1-5
2
Deploying the FirePass Server
Overview of deploying the FirePass server .............................................................................2-1
Summary of tasks for installing and deploying the FirePass server ............................2-1
Configuring a firewall to work with the FirePass server ......................................................2-2
Overview of the firewall configuration process ............................................................2-3
About the traffic between a remote user’s browser and the FirePass server ........2-5
About the traffic between the FirePass server and network services .....................2-6
About the traffic between FirePass server and application services ........................2-7
About the traffic between the FirePass server and the Desktop Agent .................2-9
Understanding name resolution issues for FirePass servers with
a private IP address .................................................................................................................... 2-11
Installing the FirePass server .................................................................................................... 2-12
Unpacking the FirePass server ......................................................................................... 2-12
Installing the FirePass server in an equipment rack .................................................... 2-12
Connecting the FirePass server to a network and powering up ............................. 2-12
Performing the initial FirePass IP configuration ........................................................... 2-14
Testing network connectivity ..................................................................................................2-16
Using the Administrative Console to configure the FirePass server .............................. 2-17
Logging Into the Administrative Console ...................................................................... 2-17
Changing the superuser password ................................................................................ 2-18
Installing your license ......................................................................................................... 2-19
Displaying a list of current settings and licensed features ........................................ 2-19
Using the Administrative Console to access the Maintenance Console ............... 2-20
Logging out of the Administrative Console .................................................................. 2-20
Using the Maintenance Console ............................................................................................... 2-21
What’s next? ................................................................................................................................ 2-23
Table of Contents
3
Setting Up FirePass Server Security
Overview of setting up FirePass server security .....................................................................3-1
Working with groups ....................................................................................................................3-2
Working with user accounts ....................................................................................................3-11
FirePass™ Server Administrator Guide v
Creating groups ......................................................................................................................3-3
Deleting groups ......................................................................................................................3-4
Moving users to a different group ......................................................................................3-4
Showing a list of all users in a group .................................................................................3-4
Using Windows domain-based group mapping ...............................................................3-4
Using LDAP-based group mapping ....................................................................................3-6
Manually adding user accounts ....................................................................................... 3-11
Importing user accounts from a Windows domain server ....................................... 3-13
Importing user accounts from an LDAP server .......................................................... 3-15
Importing user accounts from a comma or tab delimited text file ......................... 3-16
Page 8

Table of Contents
Using signup templates to add user accounts .............................................................. 3-16
Using NFS user permissions from a UNIX password file ......................................... 3-17
Changing user accounts ................................................................................................... 3-19
Activating, deactivating, or deleting user accounts .................................................... 3-19
Assigning administrative privileges to a user account ............................................... 3-19
Searching for user accounts ............................................................................................. 3-21
Generating a My Desktop client software installation key ....................................... 3-21
Installing My Desktop client software at a user’s computer ..................................... 3-22
Setting up FirePass server authentication .............................................................................. 3-23
Converting to internal database authentication .......................................................... 3-23
Setting up RADIUS server authentication ................................................................... 3-24
Setting up a RADIUS server to work with the FirePass server ............................... 3-25
Setting up Windows domain server authentication ................................................... 3-25
Setting up LDAP server authentication ........................................................................ 3-27
Setting Up VASCO DigiPass authentication ................................................................ 3-28
Setting up certificates .................................................................................................................. 3-29
Changing the FirePass server name ................................................................................ 3-30
Generating a server certificate request ......................................................................... 3-30
Installing or renewing a server certificate ..................................................................... 3-31
Using client certificates to authenticate a user’s computer ...................................... 3-31
Limiting access to the administrative console by IP address ............................................. 3-35
What’s next? ................................................................................................................................. 3-35
4
Configuring the FirePass Webifyers
Overview of the FirePass Webifyers ..........................................................................................4-1
Configuring the My Files Webifyer ............................................................................................4-3
Defining Network Folder Favorites for the My Files Webifyer ................................4-3
Limiting a group’s access to the Network Folder Favorites ......................................4-3
Enabling virus scanning and file uploading for the My Files Webifyer ......................4-4
Configuring advanced settings for the My Files Webifyer ............................................4-4
Using client certification validation for the My Files Webifyer ..................................4-5
Configuring the My NFS Webifyer ............................................................................................4-6
Defining favorites for the My NFS Webifyer .................................................................4-6
Defining NFS shared folders for the My NFS Webifyer ...............................................4-7
Limiting a group’s access to the NFS Favorites .............................................................4-7
Using client certification validation for the My NFS Webifyer ..................................4-7
Configuring the My Intranet Webifyer .....................................................................................4-8
Defining intranet favorites for the My Intranet Webifyer ............................................4-8
Limiting a group’s access to the Intranet Favorites .................................................... 4-10
Using client certification validation for the My Intranet Webifyer ........................ 4-10
Configuring the My E-mail Webifyer ...................................................................................... 4-11
Configuring an email account .......................................................................................... 4-11
Obtaining each user’s email information based on an LDAP query ...................... 4-12
Disabling email attachment downloads ........................................................................ 4-13
Obtaining email addresses from an LDAP server ...................................................... 4-13
Using client certification validation for the My E-mail Webifyer ............................ 4-14
Configuring the Terminal Services Webifyer ....................................................................... 4-15
Configuring screen resolution and Terminal Services Favorites ............................. 4-15
Limiting a group’s access to the Terminal Service Favorites ................................... 4-17
Using client certification validation for the Terminal Service Webifyer ............... 4-17
Configuring the AppTunnels Webifyer .................................................................................. 4-18
Configuring AppTunnel Favorites .................................................................................. 4-18
Compressing traffic between the client and the FirePass server ........................... 4-20
Limiting a group’s access to the AppTunnels Favorites ............................................. 4-20
vi
Page 9

Table of Contents
Using client certification validation for the AppTunnels Webifyer ........................ 4-20
Configuring the Host Access Webifyer ................................................................................. 4-21
Configuring Host Access Favorites ............................................................................... 4-21
Displaying active host access sessions .......................................................................... 4-22
Limiting a group’s access to the host access favorites .............................................. 4-22
Using client certification validation for the Host Access Webifyer ....................... 4-22
Configuring SSL-VPN ................................................................................................................. 4-23
Configuring global SSL VPN settings ............................................................................. 4-24
Configuring global SSL VPN packet filter rules ........................................................... 4-25
Configuring global SSL VPN timeout rules .................................................................. 4-26
Configuring global SSL VPN client appearance ........................................................... 4-26
Configuring the SSL VPN Webifyer for a group ........................................................ 4-27
Configuring group packet filter rules ............................................................................ 4-29
Configuring drive mappings for the SSL VPN Webifyer ........................................... 4-29
Launching applications automatically with the SSL VPN Webifyer ........................ 4-30
Using client certification validation for the SSL VPN Webifyer ............................. 4-30
Configuring the My Desktop Webifyer ................................................................................. 4-31
Configuring the My Desktop server ports .................................................................. 4-31
Configuring My Desktop Webifyer for cluster servers ............................................ 4-32
Disabling bridge access to desktops .............................................................................. 4-32
Using client certification validation for the My Desktop Webifyer ....................... 4-33
Configuring the Guest Access Webifyer ..................................................................... 4-33
Configuring the X-Windows Access Webifyer ................................................................... 4-35
Configuring X-Windows hosts for remote access ..................................................... 4-35
Using client certificate validation for Webifyers ................................................................... 4-38
5
Managing, Monitoring, and Maintaining the FirePass Server
Maintaining the network configuration settings .....................................................................5-1
Configuring IP addresses and subnets ...............................................................................5-1
Configuring routing tables and rules .................................................................................5-2
Configuring Domain Name Servers (DNS) .....................................................................5-4
Configuring host names ........................................................................................................5-5
Configuring services ..............................................................................................................5-5
Configuring Desktop services .............................................................................................5-8
Other network settings ........................................................................................................5-8
Configuring IPSec for the FirePass server ................................................................................5-9
Managing FirePass licenses ......................................................................................................... 5-11
Obtaining a license for the first time .............................................................................. 5-11
Installing your license ......................................................................................................... 5-11
Adding capacity or features to your license ................................................................. 5-11
Mapping FirePass users to NFS users .................................................................................... 5-12
Specifying HTTP and SSL proxies ........................................................................................... 5-14
Configuring an SNMP agent .....................................................................................................5-15
Shutting down and restarting FirePass .................................................................................... 5-17
Shutting down the FirePass server ................................................................................. 5-17
Restarting the FirePass server or services .................................................................... 5-17
Stopping and starting the bridge .................................................................................... 5-18
Backing up and restoring the FirePass server ...................................................................... 5-19
Specifying the email server ...................................................................................................... 5-20
Specifying the FirePass administrator’s email address ......................................................... 5-20
Granting Administrator privileges to other users ................................................................ 5-21
Specifying the time, time zone, and NTP server ................................................................. 5-22
Configuring client caching and compression settings ......................................................... 5-23
Managing log files ........................................................................................................................ 5-25
FirePass™ Server Administrator Guide vii
Page 10

Table of Contents
Updating the FirePass server’s firmware ............................................................................... 5-27
Adding definitions for other types of browsers .................................................................. 5-28
Monitoring the FirePass server ............................................................................................... 5-29
Monitoring the load on a FirePass server .................................................................... 5-29
Displaying FirePass server statistics .............................................................................. 5-30
Capturing network packets to troubleshoot networking problems ..................... 5-30
Customizing the user’s home page .......................................................................................... 5-31
Providing SSH access for Technical Support ......................................................................... 5-31
6
Using FirePass Reports
Overview of FirePass server reports ........................................................................................6-1
Using the Logon report ................................................................................................................6-2
Using the My Desktop Activations report ...............................................................................6-3
Using the Session report ..............................................................................................................6-4
Using HTTP Log reports ..............................................................................................................6-5
Using the Application Log report ..............................................................................................6-6
Using the Summary report ..........................................................................................................6-7
Using the Group report ...............................................................................................................6-8
7
Configuring FirePass Failover Servers and Cluster Servers
Using FirePass failover servers ...................................................................................................7-1
Installing FirePass failover servers ....................................................................................7-1
Configuring the IP addresses for failover servers .........................................................7-1
Powering up failover servers .............................................................................................7-2
Configuring the failover settings .......................................................................................7-3
Making a standby server the active server .....................................................................7-4
Using FirePass server clusters ....................................................................................................7-5
Installing multiple FirePass servers as a cluster .............................................................7-5
Powering up FirePass server clusters ..............................................................................7-5
Configuring FirePass server clusters ................................................................................7-6
Preliminary configuration .....................................................................................................7-6
Configuring clustered servers .............................................................................................7-7
Accessing a slave server’s configuration while connected to a master server ........7-8
Displaying statistics for a FirePass server cluster ..........................................................7-8
Index
viii
Page 11

1
Introducing the FirePass Server
• The FirePass remote access solution
• The FirePass server models
• The FirePass server features
• About this guide
• Finding help and technical support resources
Page 12

Page 13

The FirePass remote access solution
The FirePass™ server is a network appliance providing remote users with
secure access to corporate networks, using any standard Web browser. The
FirePass server can be installed in a few hours and it requires no
modifications to corporate applications. No configuration or setup is
required at the user’s remote location. If the user’s Web browser can
connect to Web sites on the Internet, then that browser can connect to the
the FirePass server.
The FirePass server provides a web-based alternative to traditional
remote-access technologies such as modem pools, RAS servers, and
IPSec-layer Virtual Private Networks (VPNs). By leveraging the browser as
a standard “thin client,” FirePass server enables a corporation or
organization to extend secure remote access easily and cost-effectively to
anyone connected to the Internet with no special software or configuration
on the remote device. Also, no additions or changes are necessary to the
back-end resources being accessed. This approach eliminates the IPSec
VPN support burden and adds application functionality well beyond mere
connectivity.
Introducing the FirePass Server
The FirePass server provides full access to network and desktop resources,
including:
• File servers
•Email
• Intranet
• Terminal servers
• Legacy mainframe, AS/400, and Telnet applications
• Client/server applications
• All desktop PC applications
The FirePass server models
The FirePass server is available in two models:
◆
FirePass 1000:
• Supports up to 100 concurrent users
• 1U rackmount chassis
• Includes one 10/100 Ethernet port and supports an option for a second
10/100 Ethernet port
• 200 watt power supply
◆
FirePass 4000:
• Supports up to 1000 concurrent users
• 2U rackmount chassis
• Includes two 10/100 Ethernet ports
• 480 watt power supply
FirePass™ Server Administrator Guide 1 - 1
Page 14

Chapter 1
The FirePass server features
Overview of features
◆
Security
FirePass server was built from the ground up to adhere to the highest
standards of best security practices.
• Encryption—FirePass server offers several strengths of encryption,
depending on the capability of the browser in use and on the optional
security settings of the FirePass implementation. FirePass server
offers encryption keys up to 1024 bits.
• Authentication—FirePass server includes an internal user database for
password authentication, and it can use existing RADIUS, LDAP, and
Windows domain servers for authentication. Administrators can
require different authentication methods for different groups. If you
want to use two-factor authentication, FirePass server supports RSA
SecurID
built-in implementation of VASCO Digipass
• Access Control—FirePass server grants access to specific
applications to individuals or to groups of users. With FirePass
server’s access controls, you can restrict individuals and groups to
particular resources. For example, partners can be have restricted
access to an extranet server only, while sales staff can connect to
email, the company Intranet, and the CRM system.
®
token-based authentication, and also offers an optional,
®
.
◆
Availability
Unlike IPSec VPNs, Web-based remote access works over all ISP
connections and works from behind other firewalls. ISPs cannot detect
and block FirePass server conversations as they might with detected
IPSec traffic. Failover and clustering options provide high availability
and high capacity. FirePass servers can be clustered to support up to
10,000 concurrent connections on a single logical URL without
performance degradation.
◆
Ease of use, deployment, maintenance, and management
FirePass server installs in a few hours. Users are presented with an
intuitive, browser-based interface and they require minimal training after
a brief introduction. FirePass server can be upgraded in the field over the
Web. Automatic release update notifications prompt the FirePass server
administrator to download new versions when they become available.
Features and capacity can also be added over the Web.
1 - 2
Page 15

FirePass server features
The following features are available on both FirePass server models.
◆
Standard Web browser support
FirePass server can be used with most standard browsers supporting
secure HTTP (also known as HTTPS). These include Internet Explorer®,
Netscape Navigator®, Opera®, and Mozilla®.
◆
WAN security
FirePass server supports common encryption technologies, including
RC4 and 3DES. It uses standard SSL encryption from the client browser
to the FirePass server.
◆
Authentication
FirePass server performs basic authentication using an internal database.
It also supports two-factor (token-based) authentication methods like
RSA SecurID® and VASCO Digipass.
FirePass server authenticates devices using signed digital certificates.
FirePass server can be integrated with LDAP directories and Windows
Domain Servers.
Introducing the FirePass Server
◆
Application access using standard Webifyers
FirePass server provides access to virtually all corporate and desktop
applications, including email, file, and Intranet access, client-server
application access, legacy host application access (mainframe, AS/400,
X-Windows, and Telnet), and Terminal Services/Citrix® application
access.
◆
Mobile device access
FirePass server provides email, file, and Intranet access from
mini-browsers on mobile devices. These include Internet-enabled (WAP
and iMode) telephones, PDAs (PalmOS® and Pocket PC), and RIM
Blackberries™.
◆
Administration
FirePass server provide a web–based Administrator Console. The
Console includes tools for installing and managing the FirePass server,
including user and group enrollment and management, clustering and
failover configuration, certificate generation and installation, and user
interface customization.
◆
Audit trail
FirePass server provides audit tools including full-session audit trails,
drill-down session queries, and customizable reports and queries.
◆
Client/Server application support
FirePass server offers a Client-Server Connector™ providing
application-specific tunnels for client-server applications like
Microsoft® Outlook®, ERP package applications, and custom TCP/IP
applications.
FirePass™ Server Administrator Guide 1 - 3
FirePass server also provides a VPN Connector™ giving full network
access comparable to that offered by a traditional IPSec VPN connection.
Page 16

Chapter 1
About this guide
◆
Desktop Access
FirePass server offers web–based access to authorized desktops with
support for remote control, lightweight email/file access, guest access,
and Web conferencing.
◆
High availability
FirePass servers can be configured to failover to hot standby servers.
◆
Scalability
FirePass server clusters support up to 10,000 users on a single logical
server.
This FirePass Administrator Guide provides information and step-by-step
instructions for installing and administering the FirePass™ 1000 and 4000
servers.
This guide is available as an Adobe Acrobat file (.pdf). (To install a free
version of Adobe Acrobat Reader, see http://www.adobe.com.)
Audience
This guide is for system and network administrators who install and
configure IT equipment and software. This guide assumes that
administrators have experience installing software and working with
network configurations.
1 - 4
Page 17

Introducing the FirePass Server
Finding help and technical support resources
You can find additional technical documentation about the FirePass server
in the following locations:
◆
Release notes
Release notes containing the latest information for the current version of
FirePass server are available from the Administrative Console. Click the
Maintenance tab and then click the Online Update link. Release notes
include a list of new features and enhancements, a list of fixes, and a list
of known issues.
◆
Online help for FirePass features
You can find help online for virtually all screens on the Administrative
Console. Click the Help Page button in the upper right of the panel.
◆
Technical support through the World Wide Web
®
The F5
provides the latest technical notes, answers to frequently asked questions,
updates for the Administrator Kit (in PDF format), updates for the
release notes, and the Ask F5 natural language question and answer
engine.
Networks Technical Support web site, http://tech.f5.com,
Conventions used in this manual
Information that you type appears in a bold, monospace font. For example:
admin
A Tip suggests ways to make administration easier or faster. For example:
Tip
An easy way to enter a user agent string is to copy and paste the string from
the Logons report.
A Note or Important contains important information. For example:
Note
If you are powering up a server cluster, always power up the master server
first.
Important
If your superuser password is lost, con tact Technical Support.
A Warning describes actions that can cause data loss or problems. For
example:
FirePass™ Server Administrator Guide 1 - 5
WARNING
Do not turn the FirePass server off by using the Power switch on the front
panel.
Page 18

Chapter 1
1 - 6
Page 19

2
Deploying the FirePass Server
• Overview of deploying the FirePass server
•Configuring a firewall to work with the FirePass
server
• Understanding name resolution issues for FirePass
servers with a private IP address
• Installing the FirePass server
• Testing network connectivity
• Using the Administrative Console to configure the
FirePass server
• Using the Maintenance Console
• What’s next?
Page 20

Page 21

Deploying the FirePass Server
Overview of deploying the FirePass server
This section contains an overview of the tasks for deploying the FirePass™
server.
Summary of tasks for installing and deploying the FirePass server
Table 2.1 provides a summary of the tasks for installing and deploying the
FirePass server.
Task For more information, see
Configure the firewalls at your site to allow traffic to and
from the FirePass server.
If the FirePass server has a private IP address, set up
name resolution for internal users and client software.
Install the FirePass server, and power it up. Using the
WAN port, create an isolated network to reach the
FirePass server using its factory default IP address.
Enter basic configuration information using either the
Administrative Console (recommended) or the
Maintenance Console (available as a backup).
Connect the FirePass server to the network. Test that the
FirePass server is accessible on the network, and test
DNS resolution of the FirePass server’s host name inside
and outside firewall.
After the FirePass server is up and running and the
network connections are working, use the Administrative
Console to finish configuring the server from a Web
browser.
(Recommended) Change the superuser password. Changing the superuser password, on page 2-18
Configure one or more authentication methods for
FirePass users. Then add groups and user accounts.
Configuring a firewall to work with the FirePass server, on
page 2-2
Understanding name resolution issues for FirePass
servers with a private IP address, on page 2-11
Installing the FirePass server, on page 2-12
Using the Administrative Console to configure the
FirePass server, on page 2-17
Testing network connectivity, on page 2-16
Using the Administrative Console to configure the
FirePass server, on page 2-17
Chapter 3, Setting Up FirePass Server Security
Configure the FirePass server’s Webifyers that you want
to make available to users. For example, configure the
SSL VPN Webifyer, if necessary.
Install a new SSL certificate. Setting up certificates, on page 3-29
(Optional) If necessary, customize the appearance of the
user’s home panel, such as the logo and terms used for
logging in.
Table 2.1 Overview of FirePass Deployment Tasks
FirePass™ Server Administrator Guide 2 - 1
Chapter 4, Configuring the FirePass Webifyers
Customizing the user’s home page, on page 5-31
Page 22
Chapter 2
Configuring a firewall to work with the FirePass
server
The FirePass server enables remote access by communicating through
secure tunnels between remote users at untrusted or unprivileged hosts on
the Internet and your corporate LAN. This section describes the firewall
ports at your site that must be opened to allow traffic to and from the
FirePass server so that it can operate correctly.
The particular firewall ports that you must open at your site depend on
where you install the FirePass server relative to the firewalls, and which
network and application services the server must access. There are some
ports that must be open in all situations, such as ports 80 and 443 for HTTP
and HTTPS, on the external firewall between the FirePass server and remote
Web browsers. If the FirePass server is installed in a DMZ with an internal
firewall separating it from the corporate network, you also have to open
other ports as necessary to allow access to network services such as DNS,
and to use particular application services such as e-mail.
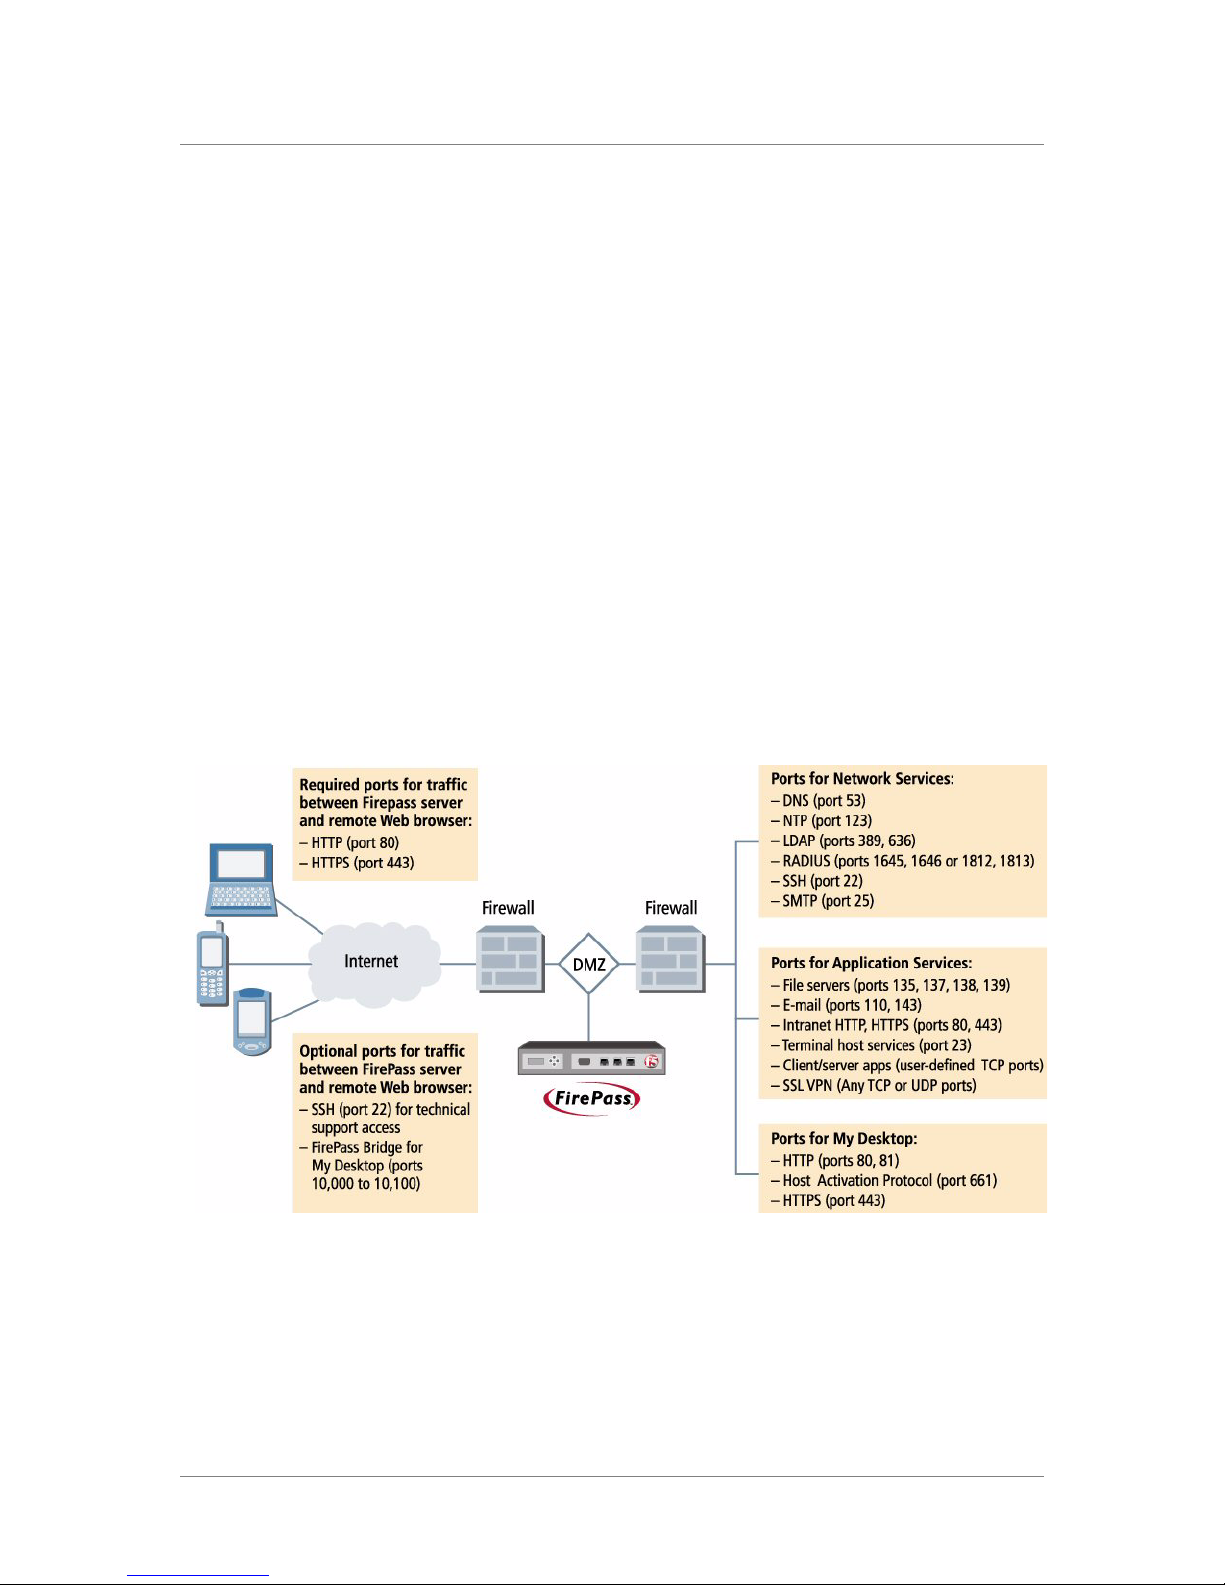
The illustration in Figure 2.1 shows the services and ports used by the
FirePass server.
.
Figure 2.1 Allowing traffic on firewall ports for a FirePass server
For more information on configuring the firewall ports, see the foll owin g
section and the tables on pages 2-6 through 2-10.
2 - 2
Page 23

Overview of the firewall configuration process
During the process of firewall configuration, you might consider opening
the firewall ports in phases. In the initial phase, you could focus on opening
the ports that allow access to the FirePass server from both inside and
outside the firewall when you specify the server’s host name in a Web
browser. In this initial phase, you might also open the ports for SMTP so
that the FirePass server can send email messages to the FirePass
administrator. For this initial phase, the following ports need to be opened:
• Assuming there is a firewall between the Internet and the FirePass server,
the firewall must allow inbound traffic on ports 80 (HTTP) and 443
(SSH) as a base configuration with a destination address of the publicly
accessible FirePass address.
• The firewall must also allow the FirePass server access to network
services such as NTP, DNS, and SMTP (on ports 123, 53, and 25). The
network services might be located on an external network (Internet), or
on the internal corporate network. The location of the network services
and your particular deployment scenario determines which firewall’s
ports must be open, assuming there is a firewall between the FirePass
server and these services.
• If there is a firewall between the FirePass server and the corporate LAN,
the firewall must allow traffic on ports 80, 443, and 661.
Deploying the FirePass Server
To verify that the FirePass server has access to DNS and SMTP services
after you have opened the ports and installed the FirePass server, you can
use the instructions in Testing network connectivity, on page 2-16.
After you have verified that the FirePass server has access to DNS and
SMTP services and that you can access the server from a Web browser from
either side of the firewall, then you can open up the specific ports that are
necessary for your particular deployment. See the following tables in this
section that describe the ports and services. For example, if you are using
LDAP for authentication, you must open ports 389 and 636. Here are some
other examples of application services you might need to support:
• To support My Files, the FirePass server needs access to Windows file
servers using Microsoft Networking (ports 135, 137, 138, 139).
• To support My Email, the FirePass server needs access to POP/IMAP
and LDAP (ports 110, 143, 389, 636).
• To support Host Access, the FirePass server needs access to Telnet (port
23).
The services are sometimes hosted locally behind a firewall, and sometimes
hosted remotely. If the services are hosted remotely, the external firewall
must allow the FirePass server to make connections to those services on
specific TCP/IP ports.
To allow access to the FirePass server from the Internet, you can create
either Network Address Translation (NAT) rules or port forwarding rules on
the firewall to forward inbound packets to the server. The advantage of
static NAT is that it does not require you to forward each individual port to
FirePass™ Server Administrator Guide 2 - 3
Page 24

Chapter 2
the FirePass server. To use static NAT, configure a rule that forwards all
allowable traffic from the public IP address to the private IP assigned to the
FirePass server. However, some firewalls only allow static NAT using a
public IP address other than its own public interface. In this case, you must
use port forwarding by setting up rules to forward the appropriate ports to
the private IP address assigned to the FirePass server.
Firewalls can be classified as stateful and non-stateful. Stateful firewalls
allow bi-directional communication (that is, they create a return rule for an
allowed service). Older firewalls, especially ones based on Linux IP chains,
are often non-stateful; they do not allow bi-directional communications. If
you have a stateful firewall (most newer commercial firewalls are stateful),
you only need to define rules for the actual traffic; the replies are
automatically allowed to pass. If you have a non-stateful firewall, you also
must define rules for traffic coming in and the replies with the ACK
(acknowledgement) bit set for those protocols.
For completeness, the following tables list the types of traffic (in pairs of
request and response) that must be allowed through the firewalls for each
category of FirePass server functionality.
All traffic associated with the FirePass server falls into in one of these
categories:
• Traffic between the remote user’s browser and the FirePass server. (See
About the traffic between a remote user’s browser and the FirePass
server, on page 2-5.)
• Traffic between the FirePass server and network services, such as LDAP,
RADIUS, and DNS. (See About the traffic between the FirePass server
and network services, on page 2-6.)
• Traffic between the FirePass server and application services, such as file
servers, email servers, and the Intranet. (See About the traffic between
FirePass server and application services, on page 2-7.)
• Traffic between the FirePass server and corporate LAN using My
Desktop. (See About the traffic between the FirePass server and the
Desktop Agent, on page 2-9.)
2 - 4
Note
A particular type of traffic shown in the tables is only required if Required
appears in the Comment column for the traffic, or, as stated previously, if
you are enabling an application service that requires the port to be opened.
Page 25

Deploying the FirePass Server
About the traffic between a remote user’s browser and the
FirePass server
To allow traffic between a remote user’s browser and the FirePass server,
you must open the firewall ports as shown in Table 2.2.
The FirePass bridge ports (10000-10100) are optional ports in the external
firewall that are used to distribute sessions to ensure that port 443 is open for
new requests. These ports are configurable, and can be set to any of the high
TCP/IP ports (1025 – 65535). If the number of concurrent My Desktop users
is low—less than 5 concurrent users on the FirePass 1000, or less than 20 on
the FirePass 4000—then there is no requirement to open the high TCP/IP
ports (1025 to 65535). The server uses the high ports if they are available,
otherwise it uses port 443.
During installation, or in case of severe malfunction, you may need to give
Technical Support access to your Maintenance Console using Secure Shell
(SSH). To allow this access while blocking routine SSH access, the FirePass
server provides temporary, encrypted keys, further protected by a
passphrase. For more information about providing SSH access to Technical
Support, see Providing SSH access for Technical Support, on page 5-31.
Source Destination
Traffic Type Protocol
HTTP TCP Remote
HTTP
(response)
HTTPS TCP Remote
HTTPS
(response)
FirePass
bridge
FirePass
bridge
Response
SSH TCP Local LAN 1025 to
TCP FirePass
TCP FirePass
TCP Remote
TCP FirePass
Browser
server
Browser
server
Browser
server
1025 to
65535
80 Remote
1025 to
65535
443 Remote
1025 to
65535
10000 to
10100
65535
FirePass
server
Browser
FirePass
server
Browser
FirePass
server
Remote
Browser
FirePass
server
Ack
bit
80 Required
1025 to
65535
443 Required
1025 to
65535
10000 to
10100
1025 to
65535
22 Optional
yes Required
yes Required
yes Optional for
CommentAddress Ports Address Ports
Optional for
My Desktop
My Desktop
SSH
(response)
TCP FirePass
Table 2.2 Traffic between a remote user’s browser and the FirePass server
FirePass™ Server Administrator Guide 2 - 5
server
22 Local LAN 1025 to
65535
Yes Optional
Page 26

Chapter 2
About the traffic between the FirePass server and network
services
The FirePass server needs access to the network services listed in Table 2.3,
some of which are optional and depend on your particular configuration. If
the services are hosted across a firewall from the FirePass server, you must
open the firewall ports to allow the FirePass server to access these services.
Important
Configure your internal DNS server such that your FirePass server host
name resolves to the server’s local IP address. This is to ensure that traffic
from the same side of the firewall can reach the FirePass server. You can do
this on a WINS server or on a DNS server if the DNS server is hosted
locally. (See Understanding name resolution issues for FirePass servers
with a private IP address, on page 2-11.)
Source Destination
Traffic Type Protocol
DNS TCP Local LAN 1025 to
DNS (response) TCP FirePass
server
NTP UDP Local LAN 1025 to
NTP (response) UDP FirePass
SSH TCP Local LAN 1025 to
SSH (response) TCP FirePass
SecurID
authentication
SecurID
authentication
(response)
TCP FirePass
TCP Local LAN 1645, 1646 FirePass
server
server
server
65535
53 Local LAN 1025 to
65535
123 Local LAN 1025 to
65535
22 Local LAN 1025 to
1025 to
65535
FirePass
server
FirePass
server
FirePass
server
Local LAN 1645,
server
53
65535
123
65535
22 Optional
65535
1646
1025 to
65535
Ack
bit
Yes
Yes Optional
Yes Optional
CommentAddress Ports Address Ports
Optional
LDAP TCP FirePass
LDAP (Response) TCP Local LAN 389, 636 FirePass
Table 2.3 Traffic between FirePass server and network services
2 - 6
server
1025 to
65535
FirePass
server
server
389,
636
1025 to
65535
Required for
LDAP
authentication
Yes Required for
LDAP
authentication
Page 27

Deploying the FirePass Server
Traffic Type Protocol
RADIUS TCP FirePass
server
RADIUS
(response)
SMTP Services TCP FirePass
SMTP Services
(response)
TCP Local LAN 1645, 1646 FirePass
server
TCP Local LAN 25 FirePass
Source Destination
1025 to
65535
1025 to
65535
Local LAN 1645,
1646
1025 to
server
Local LAN 25
server
65535
1025 to
65535
Ack
bit
Yes Required for
Yes
CommentAddress Ports Address Ports
Required for
RADIUS
authentication
RADIUS
authentication
Table 2.3 Traffic between FirePass server and network services (Continued)
About the traffic between FirePass server and application services
To allow traffic between the FirePass server and application services on the
corporate LAN, you must open the firewall ports as shown in Table 2.4. The
application services include the following services, some of which are
optional and depend on your particular configuration:
• File servers
•Email servers
• Intranet
• Terminal servers
• Legacy mainframe and AS/400 applications
• Client/server applications
•SSL VPN
FirePass™ Server Administrator Guide 2 - 7
A FirePass server that needs to use any of these application services must be
able to communicate with the local LAN on several ports. Most of these
ports are listed in Table 2.4 with the default port assignments. (Your
network may vary). Microsoft Networking requires four ports, two TCP/IP
ports and two UDP ports. Port 135 is the RPC port, port 139 is the NetBIOS
session, port 137 is the NetBIOS name service, and port 138 is the datagram.
These ports must be configured to allow users to use the My Files Webifyer
to view network file shares. A WINS server helps address resolution from
NetBIOS to TCP/IP to work properly.
Page 28

Chapter 2
Source Destination
Traffic Type Protocol
HTTP TCP Local LAN 1025 to 65535 FirePass
server
HTTP
(response)
HTTPS TCP Local LAN 1025 to 65535 FirePass
HTTPS
(response)
IMAP TCP FirePass
IMAP
(Response)
POP TCP FirePass
POP
(Response)
TCP FirePass
server
TCP FirePass
server
server
TCP Local LAN 143 FirePass
server
TCP Local LAN 110 FirePass
80 Local LAN 1025 to
server
443 Local LAN 1025 to
1025 to 65535 Local LAN 143 Required for
server
1025 to 65535 Local LAN 110 Required for
server
Ack
bit
80 Required
Yes Required
65535
443
Yes
65535
1025 to
65535
1025 to
65535
Yes Required for
Yes Required for
CommentAddress Ports Address Ports
email
email
email
email
Microsoft
Networking
Microsoft
Networking
(Response)
Microsoft
Networking
Microsoft
Networking
(Response)
Telnet/3270 TCP FirePass
Telnet/3270
(Response)
Client/Server
applications
TCP FirePass
server
TCP Local LAN 135, 139 FirePass
UDP FirePass
server
UDP Local LAN 137, 138 FirePass
server
TCP Local LAN 23 FirePass
TCP FirePass
server
1025 to 65535 Local LAN 135, 139 Required for
server
1025 to 65535 Local LAN 137, 138 Required for
server
1025 to 65535 Local LAN 23 Required for
server
1025 to 65535 Local LAN User-defin
Table 2.4 Traffic between FirePass server and application services
1025 to
65535
1025 to
65535
1025 to
65535
ed TCP
File services
Yes Required for
File services
File services
Yes Required for
File services
Host Access
Yes Required for
Host Access
Required for
each App
tunnel
2 - 8
Page 29

Deploying the FirePass Server
Traffic Type Protocol
Client/Server
applications
(response)
SSL VPN
Connector
SSL VPN
Connector
(response)
TCP Local LAN User-defined
TCP
UDP
ICMP
TCP
UDP
ICMP
Source Destination
TCP
FirePass
server
Local LAN Any ports as
1025 to 65535 Local LAN Any ports
needed
FirePass
server
FirePass
server
1025 to
65535
as needed
1025 to
65535
Ack
bit
Yes Required for
Yes Required for
CommentAddress Ports Address Ports
each App
tunnel
Required for
SSL VPN as
needed
SSL VPN as
needed
Table 2.4 Traffic between FirePass server and application services (Continued)
About the traffic between the FirePass server and the Desktop
Agent
To allow traffic from the FirePass server to the corporate LAN using the My
Desktop feature, you must open firewall ports as shown in Table 2.5.
The FirePass client on the desktop computer on the local LAN uses ports 80
and 81 to initiate communications with the FirePass server during My
Desktop sessions. The FirePass server “wakes” the client on port 661, then
communicates with it on port 443. The client then initiates a new connection
on port 81 back to the FirePass server.
Host Activation Protocol (HAP) is a registered port (661) which allows the
FirePass server to initiate a session with the FirePass Desktop Agent. The
FirePass server communicates with the Agent on port 443.
Note
The port numbers in the following table are default values which you can
change. For more information, see Configuring the My Desktop Webifyer,
on page 4-31.
FirePass™ Server Administrator Guide 2 - 9
Page 30

Chapter 2
Source Destination
Traffic Type Protocol
HTTP TCP Local LAN 1025 to 65535 FirePass
server
HTTP
(response)
Host Activation
Protocol (HAP)
Host Activation
Protocol (HAP)
(response)
HTTPS TCP FirePass
HTTPS
(response)
TCP FirePass
server
TCP FirePass
server
TCP Local LAN 661 FirePass
server
TCP Local LAN 443 FirePass
80, 81 Local LAN 1025 to
1025 to 65535 Local LAN 661 Required for My
server
1025 to 65535 Local LAN 443
server
80, 81 Required for My
65535
1025 to
65535
1025 to
65535
Table 2.5 Traffic between FirePass server and corporate LAN using My Desktop
Ack
bit
Yes Required for My
Yes Required for My
Yes
CommentAddress Ports Address Ports
Desktop
Desktop
Desktop
Desktop
2 - 10
Page 31

Deploying the FirePass Server
Understanding name resolution issues for FirePass
servers with a private IP address
If the FirePass server is installed on a corporate LAN or in a DMZ that uses
private IP addresses, the firewall or gateway performs Network Address
Translation (NAT). This means that the FirePass server has two different
DNS “identities”—one mapped to the public IP address, and another one to
the NAT'ed private IP address.
External users outside the firewall do not have name resolution problems
because the FirePass server’s name resolves to the public address of the
firewall or gateway. The firewall or gateway then forwards the user’s traffic
to the FirePass server.
However, internal users on the corporate LAN and the My Desktop client
software can be affected by internal name resolution problems unless you
prevent them. You can prevent name resolution problems by doing any of
the following:
◆
If you have an internal DNS server, set up a zone with a fully qualified
domain name (such as server-name.company.com), and then add an A
record to that zone that resolves to the FirePass server’s private address
(such as 10.0.0.8).
◆
If you have a WINS server, add a static entry for the FirePass server
name.
◆
If you have a firewall that supports a DNS alias feature (such as the
CISCO PIX), set up the firewall to redirect internal FirePass server
traffic originating from the corporate LAN to the FirePass server’s
private IP address.
◆
If there is no internal DNS server, WINS server, or suitable firewall, you
must use a local hosts file on each corporate LAN computer that must
connect to the FirePass server.
Note
This name resolution problem does not apply to a FirePass server that has a
public IP address because internal and external users can both use a name
that resolves to the same IP address for the server.
Important
To support the FirePass server’s application tunnels for clustered or load
®
balanced applications such as Oracle
, Citrix®, or SAP®, you must specify
the fully qualified domain names of the servers running the applications.
Those applications must also support the use of fully qualified domain
names when passing server address information to the client side
application. Single server applications may use the server IP address if the
remote client is also configured to do so.
FirePass™ Server Administrator Guide 2 - 11
Page 32

Chapter 2
Installing the FirePass server
This section describes how to install one or more FirePass servers in an
equipment rack, connect them to a network, and power them up.
When installing and connecting wiring to the FirePass server, be sure to
follow these basic safety precautions to avoid injury to you or damage to the
server:
• Read and understand all instructions.
• Do not disassemble the FirePass server.
• Do not restrict airflow through the fans or vents of the FirePass server.
• Connect the unit to a properly grounded and rated power supply circuit
that meets the provisions of the current edition of the National Electrical
Code, or other wiring rules that may apply to your location.
Unpacking the FirePass server
After unpacking the FirePass server, you should have the following items:
• FirePass server
• 120 VAC power cord
• Network cable
Installing the FirePass server in an equipment rack
Install a FirePass 1000 server in a standard 1U equipment rack, and a
FirePass 4000 server in a standard 2U equipment rack. Make sure that the
rack has adequate ventilation and power. We strongly recommend using an
Uninterruptible Power Supply (UPS).
Connecting the FirePass server to a network and powering up
To connect a FirePass server to a network and power up:
1. Connect an Ethernet cable from your network to the 10/100 Base-T
(RJ-45) WAN connector on the FirePass server.
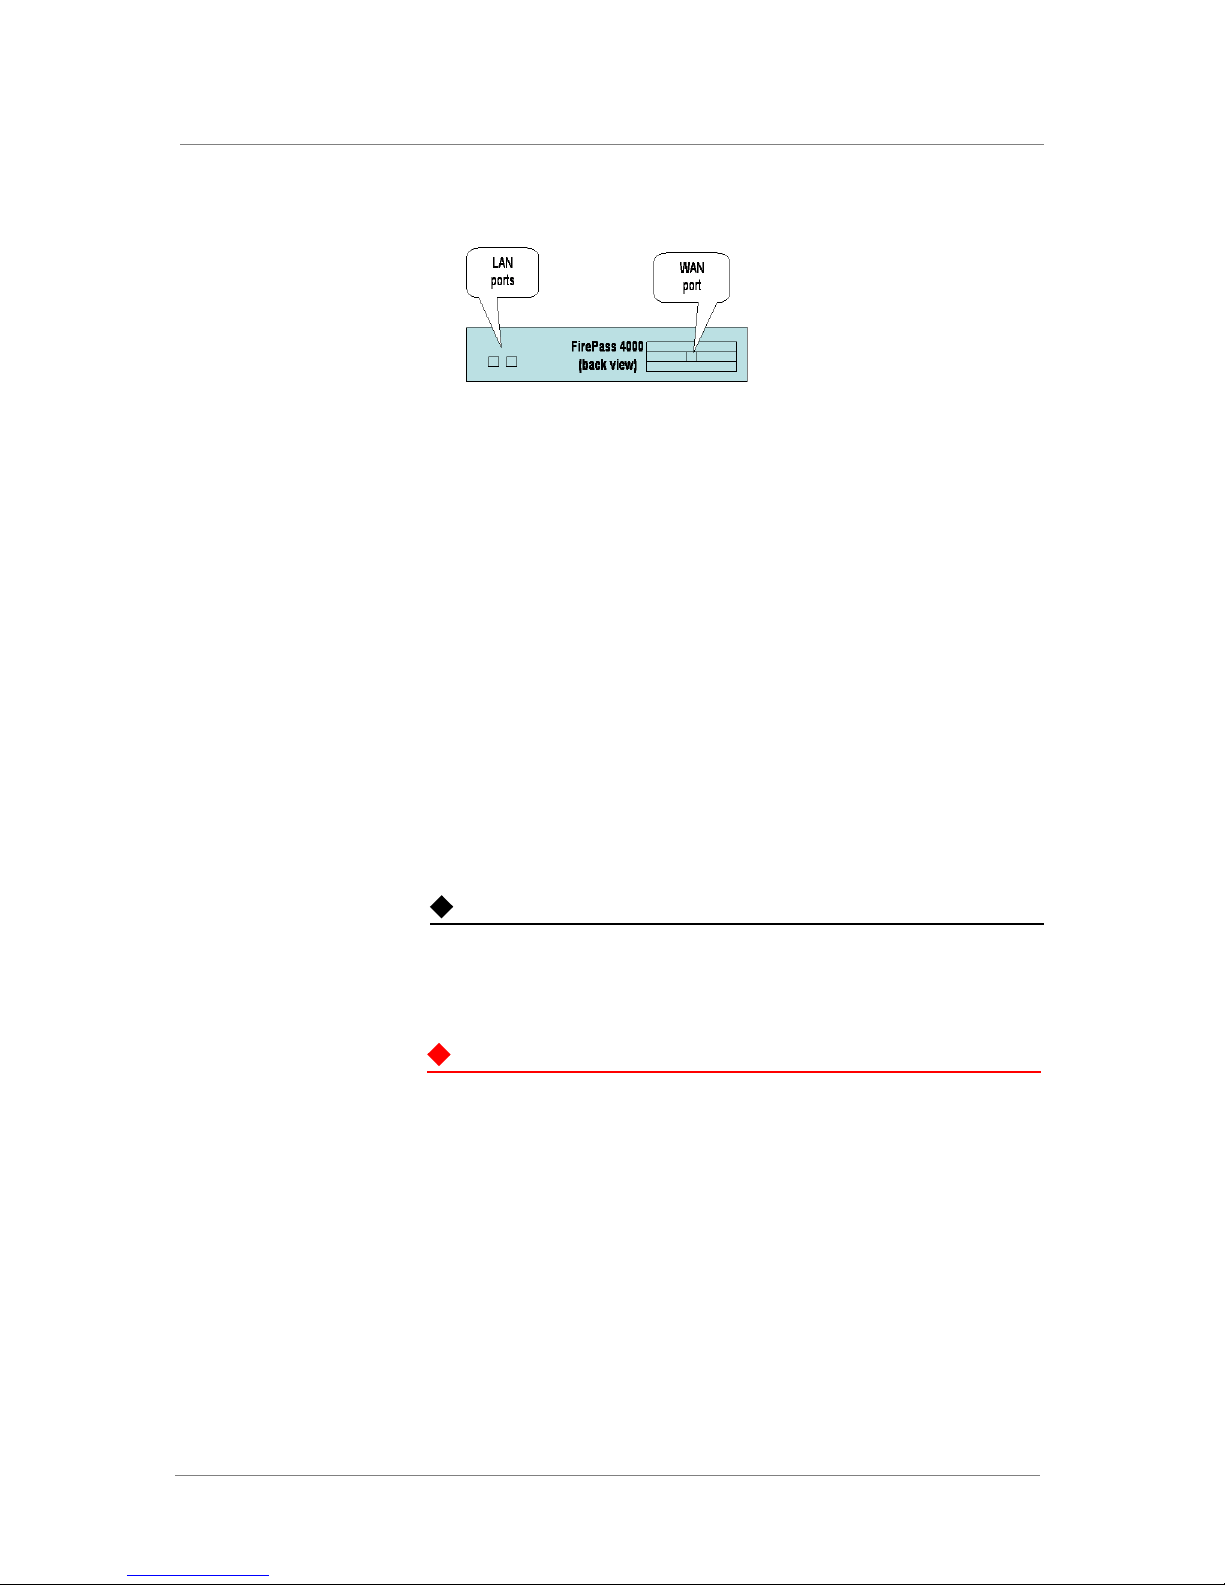
• FirePass 1000: the WAN port is clearly labeled on the front panel
of the server.
2 - 12
• FirePass 4000: the WAN port is on the back of the server. It is the
network port in the expansion slot on the right side (see FirePass
4000 port locations, on page 2-13).
Page 33
Deploying the FirePass Server
Figure 2.2 FirePass 4000 port locations
2. If you are connecting two dual-NIC FirePass servers in failover
pairs, connect the same corresponding NICs to the same subnet on
both servers. For example, connect the internal NIC on both servers
to the same subnet. For information on configuring FirePass failover
servers, see Chapter 7, Configuring FirePass Failover Servers and
Cluster Servers.
3. If you are connecting several FirePass servers as a cluster, connect
the primary NICs to the same subnet unless they are installed in
different geographic locations. For information on configuring
FirePass server clusters, see Using FirePass server clusters, on page
7-5.
4. Plug in the power cable into a 120 VAC wall outlet and into the
Power connector on the rear panel of the FirePass server.
5. Turn on the Power switch on the front panel of the FirePass server.
Note
If you are powering up a server cluster, always power up the Master server
first. If the Master server is not available when the slave servers power up,
then the cluster does not work properly.
WARNING
Do not turn the FirePass server off by using the Power switch on the front
panel. Data corruption might occur, possibly rendering the FirePass server
unavailable. To shut the FirePass server down, always use the Shutdown
commands in the Administrative Console or the Maintenance Console. For
more information, see Shutting down and restarting FirePass, on page
5-17.
FirePass™ Server Administrator Guide 2 - 13
Page 34

Chapter 2
Performing the initial FirePass IP configuration
The FirePass server comes pre-configured with a default set of networking
and server settings. The following table provides important default FirePass
settings.
Setting Factory default value
Admin Console User Name admin
Admin Console password admin
Maintenance Console User Name maintenance
Maintenance Console password <no password>
Server name firepass.company.xyz
Server IP Address/Mask 192.168.1.99 / 255.255.255.0
DNS Server IP Address 192.168.1.1
Gateway IP Address 192.168.1.1
Domain suffix company.xyz
SSL VPN Network Subnet 192.168.192.0 / 255.255.255.0
SSL Certificate firepass.company.xyz
Administrator’s email address [email protected]
SMTP Server mail.company.xyz
NTP Server ntp.nasa.gov
Table 2.6 FirePass default network settings
Perform the initial IP configuration using the web-based FirePass
Administrative Console interface (recommended) or the terminal-based
FirePass Maintenance Console.
To use the web-based Administrative Console for initial
configuration (recommended)
2 - 14
1. Create an isolated network that includes the FirePass server and
another machine with a web browser. Connect them directly using a
cross-over Ethernet cable, or indirectly with a standard Ethernet
cable and an isolated hub or switch. Enter the default URL,
Page 35

Deploying the FirePass Server
https://192.168.1.99/stats/ into the web browser (be sure to include
the final slash). One or more certificate warning messages may be
displayed. Accept these. You should see the FirePass login screen.
2. Login using the default administrator name admin and password of
admin.
3. Set up the IP configuration. Navigate to
Server/Maintenance/Network Configuration. Specify the IP address,
subnet, and port settings. For more information see Maintaining the
network configuration settings, on page 5-1.
4. DNS name resolution. Navigate to Server/Maintenance/Network
Configuration/Hosts. Enter the fully-qualified domain name
(FQDN) of your FirePass server and the IP Address of your Domain
Name Server. If you have not already done so, make the
corresponding entries in your Domain Name Server.
5. Shutdown/restart. Now shut down and restart FirePass. For more
information see Shutting down and restarting FirePass, on page
5-17.
6. Connect to your network. Disconnect the FirePass server from the
isolated network and reconnect it to your network. Test the network
connections by following the instructions in Testing netwo rk
connectivity, on page 2-16.
7. Finish configuring your FirePass server following the steps in
What’s next?, on page 2-23.
To use the terminal-based Maintenance Console for initial
IP configuration
First see To use the Maintenance Console to configure the FirePass server,
on page 2-21.
1. Configure the appropriate network settings for your environment.
2. Shut down and restart the FirePass server.
3. Login to the Administrator’s Console, and then finish configuring
the FirePass server following the steps in What’s next?, on page
2-23.
Note
You can also access the Maintenance Console using a Telnet session in the
Administration Console. For more information, see Using the
Administrative Console to configure the FirePass server, on page 2-17.
FirePass™ Server Administrator Guide 2 - 15
Page 36

Chapter 2
Testing network connectivity
After connecting the FirePass server to your network, powering it up , and
performing the initial IP address configuration, test that you can access the
server from your network, and that the FirePass server’s fully qualified
domain name resolves correctly both inside and outside the firewall.
To test network connectivity:
1. Test that the FirePass server is accessible from the LAN by entering
the following command on a host computer on the LAN:
ping x.x.x.x
where x.x.x.x is the FirePass server’s private IP address.
2. Test DNS resolution of the FirePass server’s name and address
inside the firewall. On a host computer inside the firewall, enter the
following command:
ping <fully qualified server name>
Inside the firewall, this name should resolve to the FirePass server’s
private IP address.
3. Test DNS resolution of the FirePass server’s name and address
outside the firewall. On a host computer outside the firewall, enter
the following command:
ping <fully qualified server name>
Outside the firewall, this name should resolve to the FirePass
server’s public IP address.
Note: You may not receive pings back from outside the firewall if
the firewall is not configured to pass ICMP packets.
4. Test accessing the server from a Web browser by entering the URL
for the FirePass server on computers both inside and outside the
firewall. For example, enter:
https://<host name of FirePass>/stats/
where <host name of FirePass> is the host name assigned to the
FirePass server. For example, enter:
https://server-name.company.com/stats/
The FirePass server’s login screen should appear when you enter
this URL.
Use the following information to troubleshoot problems accessing the
server:
◆
If you have trouble accessing the FirePass server with a Web browser on
a computer outside the firewall, the problem is usually caused by a
misconfigured firewall, or a firewall that does not allow packets to travel
in both directions. Non-stateful firewalls do not keep a connection state
history table and cannot identify packets returning from an open
connection unless a similar rule looking for an ACK bit is configured to
allow traffic to go in the opposite direction.
2 - 16
Page 37

Deploying the FirePass Server
◆
If you have trouble accessing the FirePass server by entering the fully
qualified domain name on a computer inside the firewall, try entering the
internal IP address. This problem is usually caused by DNS reflection,
which occurs when an internal host sends a packet to the external
interface of the firewall. When the firewall forwards the packet to the
FirePass server, the FirePass server replies to the external interface of the
firewall which cannot properly route the packet back to the internal host.
Some routers have a work-around for this problem.
Using the Administrative Console to configure the
FirePass server
After verifying that the FirePass server is accessible on your network, you
can use the Administrative Console in a Web browser to administer the
server and change configuration settings as necessary. You can run the
Administrative Console on any computer that can access the FirePass server
over the network.
Logging Into the Administrative Console
To log into the Administrative Console:
1. Enter the following URL in a Web browser on a computer that can
access the FirePass server over a network or the Internet:
https://<host name of FirePass>/stats/
where <host name of FirePass> is the host name assigned to the
FirePass server. For example, enter:
https://server-name.company.com/stats/
2. If a Security alert appears, click Yes to accept the SSL encryption
certificate.
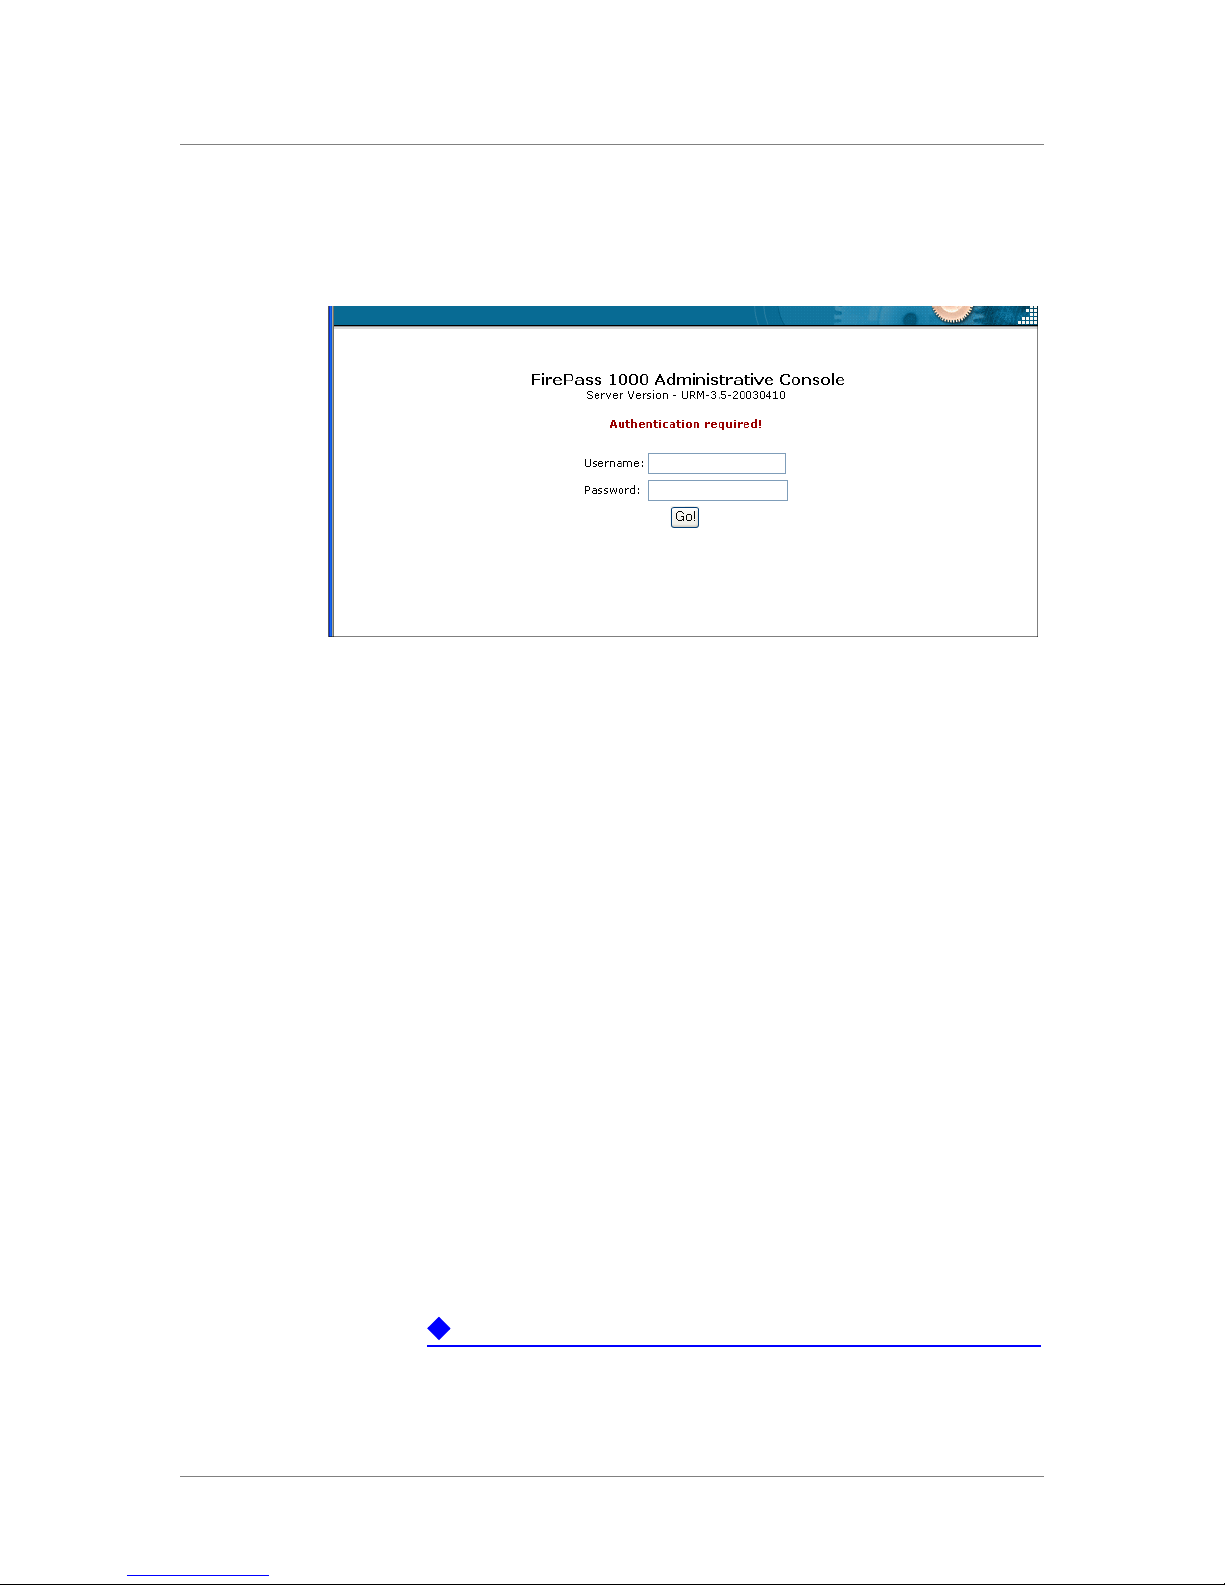
The FirePass login screen appears. (See below.)
3. Enter the following superuser user name: admin.
4. Enter the default superuser password: admin.
Note: The user name and password are case sensitive. If the
FirePass server rejects the user name and password, contact
Technical Support.
FirePass™ Server Administrator Guide 2 - 17
Page 38
Chapter 2
5. Click Login.
.
After you log in, the Welcome panel for the FirePass Administrative
Console appears. The Administrative Console is composed of several panels
where you select options, enter configuration information, and choose
commands to configure and administer the FirePass server. Some panels
contain status information and reports that you can use to monitor the server.
Click the tabs and links on the left side of the display to load each screen on
the right side.
Changing the superuser password
One of the first tasks you should do is change the default password for the
preconfigured Administrator (“superuser”) account.
To change the superuser password
1. Under the Server tab on the left side of the Administrative Console,
click the Security link.
2. Click the Password link.
The Change Superuser Password screen opens.
3. In the Old Password text box, type the current password.
4. In the Password and Confirm Password text boxes, type the new
password, and then click Go.
Important
You also see an option to disable the Superuser account. Do not check this
option before you have given comprehensive Administrator privileges,
including access to all links on the Server tab, to other named accou nts.
You can assign Administrator privileges to other users by navigating to
2 - 18
Page 39

Server/Security/Administrators. For more information about assigning
Administrator privileges, see Granting Administrator privileges to other
users, on page 5-21.
If your superuser password is lost, con tact Technical Support.
Installing your license
Getting your first license
Your server should already have an installation type, serial number and
registration key assigned. These show as the first three items in the Settings
table display. If the Serial number is shown as unknown, contact Technical
Support.
When you receive your new FirePass server, you should also have received
an email from Technical Support or the entitlement server. If so, follow the
directions in the email. If not, contact Support ([email protected]) to make
sure your license is ready.
Deploying the FirePass Server
Important
Licenses are time-limited, for security reasons. Install your license as soon
as you receive it.
Make sure that your firewall allows outbound Internet connections to port
443.
Navigate to Server/Settings. Then click on the Pick up new license... link. If
your license is ready and the server can contact the licensing server, your
new license is installed.
Adding capacity or features to your license
To add session capacity or features, see Adding capacity or features to your
license, on page 5-11.
Displaying a list of current settings and licensed features
You can display a list of the current configuration settings and licensed
features. To display a list of current settings and licensed features click the
Settings link under the Server tab. These are read-only, and are offered to
assist in troubleshooting.
FirePass™ Server Administrator Guide 2 - 19
Page 40

Chapter 2
Using the Administrative Console to access the Maintenance
Console
You can use a web browser to gain access to the Maintenance Console. You
do this by launching a Telnet session within the Administrative Console.
To use the Administrative Console to run the Maintenance
Console
1. Under the Server tab on the left side of the Administrative Console,
click the Maintenance link.
The Maintenance screen opens.
2. Click the Low-level link.
3. Under Telnet access, click the Telnet Session to the Maintenance
Account link.
4. At the Login prompt, enter the following:
No password is required.
5. Enter
Y
to agree to the conditions on the screen.
The Maintenance Console menu appears.
Logging out of the Administrative Console
If you do not log out of the Administrative Console, the FirePass server
automatically times you out after a period of inactivity. This time interval is
specified in the Inactivity Timeout option on the Customization panel of the
Administrative Console.
To log out of the Administrative Console
Use either option:
• Click the Logout link on the left side of the Administrative Console.
• Close your Web browser.
maintenance
.
2 - 20
Page 41

Using the Maintenance Console
If you intend to use the Administrative Console web interface
(recommended) to configure the FirePass IP address or if your server’s IP
address and network mask are already configured correctly, you can skip
this section.
However, if your server’s IP address and network mask are not configured
correctly, or if you are unable to connect to the server using a Web browser
on the network, you can use the Maintenance Console to make configuration
changes according to the instructions in this section. You can also use the
Maintenance Console to perform basic connectivity diagnostics.
Use one of the following methods to access the server and run the
Maintenance Console:
• Connect another computer’s serial port to the FirePass server’s serial
port, and then use a terminal emulation program.
• Connect a monitor and keyboard directly to the FirePass server (FirePass
4000 only).
Deploying the FirePass Server
To use the Maintenance Console to configure the FirePass
server
1. Use a 9-pin D-style, null modem cable to connect the serial port on
a serial terminal or on a computer to the FirePass server’s serial
console port on the server’s rear panel.
2. If necessary, turn on the FirePass server’s Power switch.
3. Do one of the following:
• If you connected a serial terminal, press Enter on the terminal’s
keyboard to start the Maintenance Console.
• If you connected a computer to the serial port, start a serial
terminal emulation application (such as HyperTerminal on
Windows
terminal emulation application to connect to the FirePass server
with the following communications settings:
Setting Value
Bits per second 9600
Data bits 8
Parity None
®
or Minicom on Linux) on the computer. Use the
FirePass™ Server Administrator Guide 2 - 21
Stop bits 1
Flow control Xon/Xoff
Page 42

Chapter 2
4. At the Login prompt, enter the following: maintenance
No password is required.
5. Enter
Y
to agree to the conditions on the screen.
The Maintenance Console menu appears.
6. To change the server name or other network settings, enter 1 for
Network Configuration and then press the Enter key.
Tip
The IP Address and Network Mask are the only settings that you must
configure to enable access to the server using the Administrative Console
running in a Web browser on the network. But you can also use the other
Maintenance Console commands at a later time to configure other settings.
7. At the Network Configuration prompts, enter the appropriate
information or press the Enter key to accept the current setting.
8. After you finish entering the settings, enter
Y
at the confirmation
prompt.
9. For some configuration changes, the server prompts you to restart.
• To restart the server, enter 6 for Restart Server on the command
menu, and then press the Enter key.
• Otherwise, enter 8 for Exit, and then press the Enter key to exit
the Maintenance Console.
10. Disconnect the serial cable.
2 - 22
Page 43

What’s next?
Deploying the FirePass Server
Now that the FirePass server is installed and accessible on the network, you
can use the Administrative Console to finish configuring FirePass.
◆
Set up security on the FirePass server by adding groups and user
accounts, and then configuring authentication. For more information, see
Chapter 3, Setting Up FirePass Server Security.
◆
(Optional) If necessary, change the FirePass server host name to a name
that is appropriate for your site. For more information, see Changing the
FirePass server name, on page 3-30.
◆
Install a new SSL certificate. For more information, see Setting up
certificates, on page 3-29.
◆
Configure the SMTP Server, Administrator’s password and email,
proxies, and SSL Server Certificate. See Chapter 5, Managing,
Monitoring, and Maintaining the FirePass Server, for directions.
◆
Install the license signature. You may have received an email from the
F5 entitlement server describing how to install your license. If so, use
those directions. If not, contact technical support ([email protected]) to
make sure your license is ready. Then navigate to
Server/Settings/License and click on the link to pick up your new license
signature.
◆
Configure the Webifyers that you want to make available to users. For
example, configure the SSL VPN Webifyer, if necessary. For more
information, see Chapter 4, Configuring the FirePass Webifyers.
◆
(Optional) If necessary, customize the appearance of the user’s home
page, such as the logo and terms used for logging in. For more
information, see Customizing the user’s home page, on page 5-31.
Note
After you use the superuser account to create user accounts, you can assign
administrative privileges to one or more user accounts. For more
information, see Assigning administrative privileges to a user account, on
page 3-19.
FirePass™ Server Administrator Guide 2 - 23
Page 44

Chapter 2
2 - 24
Page 45

3
Setting Up FirePass Server Security
• Overview of setting up FirePass server security
• Working with groups
• Working with user accounts
• Setting up FirePass server authentication
• Setting up certificates
• Limiting access to the administrative console by IP
address
• What’s next?
Page 46

Page 47

Setting Up FirePass Server Security
Overview of setting up FirePass server security
Here is an overview of the steps for setting up groups, user accounts,
authentication, and certificates on the FirePass™ server.
1. (Optional) If you want to use different settings for different users,
create one or more additional groups on the FirePass server.
Otherwise, use the default group for all users.
Authentication, Webifyers, and many other features are set up on a
per group basis on the FirePass server. If you are using the same
authentication and Webifyer settings for all FirePass server users,
you can simply add all users to the preexisting default group and use
the default group for all settings. But if you want to use different
authentication and Webifyer settings for different users, you must
create one or more additional groups on the FirePass server before
adding users or setting up authentication. (See Working with groups,
on page 3-2.)
2. (Optional) If the FirePass server users are stored in an LDAP or a
Windows Domain server, you can set up group mapping.
Group mapping automatically keeps the groups on the FirePass
server synchronized with the groups on the Windows Domain server
or LDAP server. That is, if a user is moved to a different group on
the Windows Domain or LDAP server, FirePass server
automatically moves the user to the corresponding mapped group in
its internal database the next time the user logs into FirePass server.
If you also choose to use a signup template for new FirePass server
users, group mapping can also have FirePass server query a
Windows Domain or LDAP server for each user’s group
membership, and automatically add the new user to the mapped
group in the FirePass server’s internal database. (See Using
Windows domain-based group mapping, on page 3-4 and Using
LDAP-based group mapping, on page 3-6.)
3. Add user accounts to each group on the FirePass server by using any
of the following methods:
• Manually add users to each group. (See Manually adding user
accounts, on page 3-11.)
• Import users into each group from a Windows Domain server, an
LDAP server, or a text file. (See page 3-13 through page 3-16.)
• Enable a signup template for each group to automatically add
users when they log in for the first time if the users have an
existing account in a RADIUS, LDAP, or Windows Domain
server. (See Using signup templates to add user accounts, on
page 3-16.)
FirePass™ Server Administrator Guide 3 - 1
All of these methods create user accounts in the FirePass server’s
internal database.
Page 48

Chapter 3
4. (Optional) If you want to give FirePass server users access to NFS
file servers, you can import the NFS permissions for each user that
is listed in a UNIX password file. (See Using NFS user permissions
from a UNIX password file, on page 3-17.)
5. Set up authentication for each group on the FirePass server.
You can have the FirePass server use its own internal database for
authentication, or you can have it use an external RADIUS,
Windows Domain, LDAP, or VASCO server for authentication.
(See Setting up FirePass server authentication, on page 3-23.)
6. (Optional) Set up server certificates specifically for your site, and
set up client certificates to validate clients.
If the FirePass server is a pilot deployment, we preinstalled a server
certificate that contains a server-name.FP.com URL. You can
change the FirePass server name to one that is appropriate for your
site, and then generate and install a new server certificate that uses
the new server name.
You can also install an optional client root certificate and optional
certificate revocation list (CRL), and configure the FirePass server
to validate client certificates installed at each user’s computer. You
can use the client certificates as part of a two-factor authentication
system, or to limit access to particular FirePass Webifyers.
For more information on changing the server name and setting up
server and client certificates, see Setting up certificates, on page
3-29.
Working with groups
Users, authentication methods, Webifyers, and other features are set up
separately for each Group defined in FirePass server. If you are using the
same authentication and Webifyer settings for all FirePass server users, you
can simply add all users to the preexisting FirePass server default group and
use the default group for all settings.
But if you want to use different authentication and Webifyer settings for
different users, you must create groups on the FirePass server before adding
users or setting up authentication requirements. For example, you can create
one group of users that uses RADIUS server authentication, and another
group that uses LDAP authentication.
Note
Group IDs for NFS users are not related to FirePass server groups. For
more information, see Using NFS user permissions from a UNIX password
file, on page 3-17.
3 - 2
Page 49
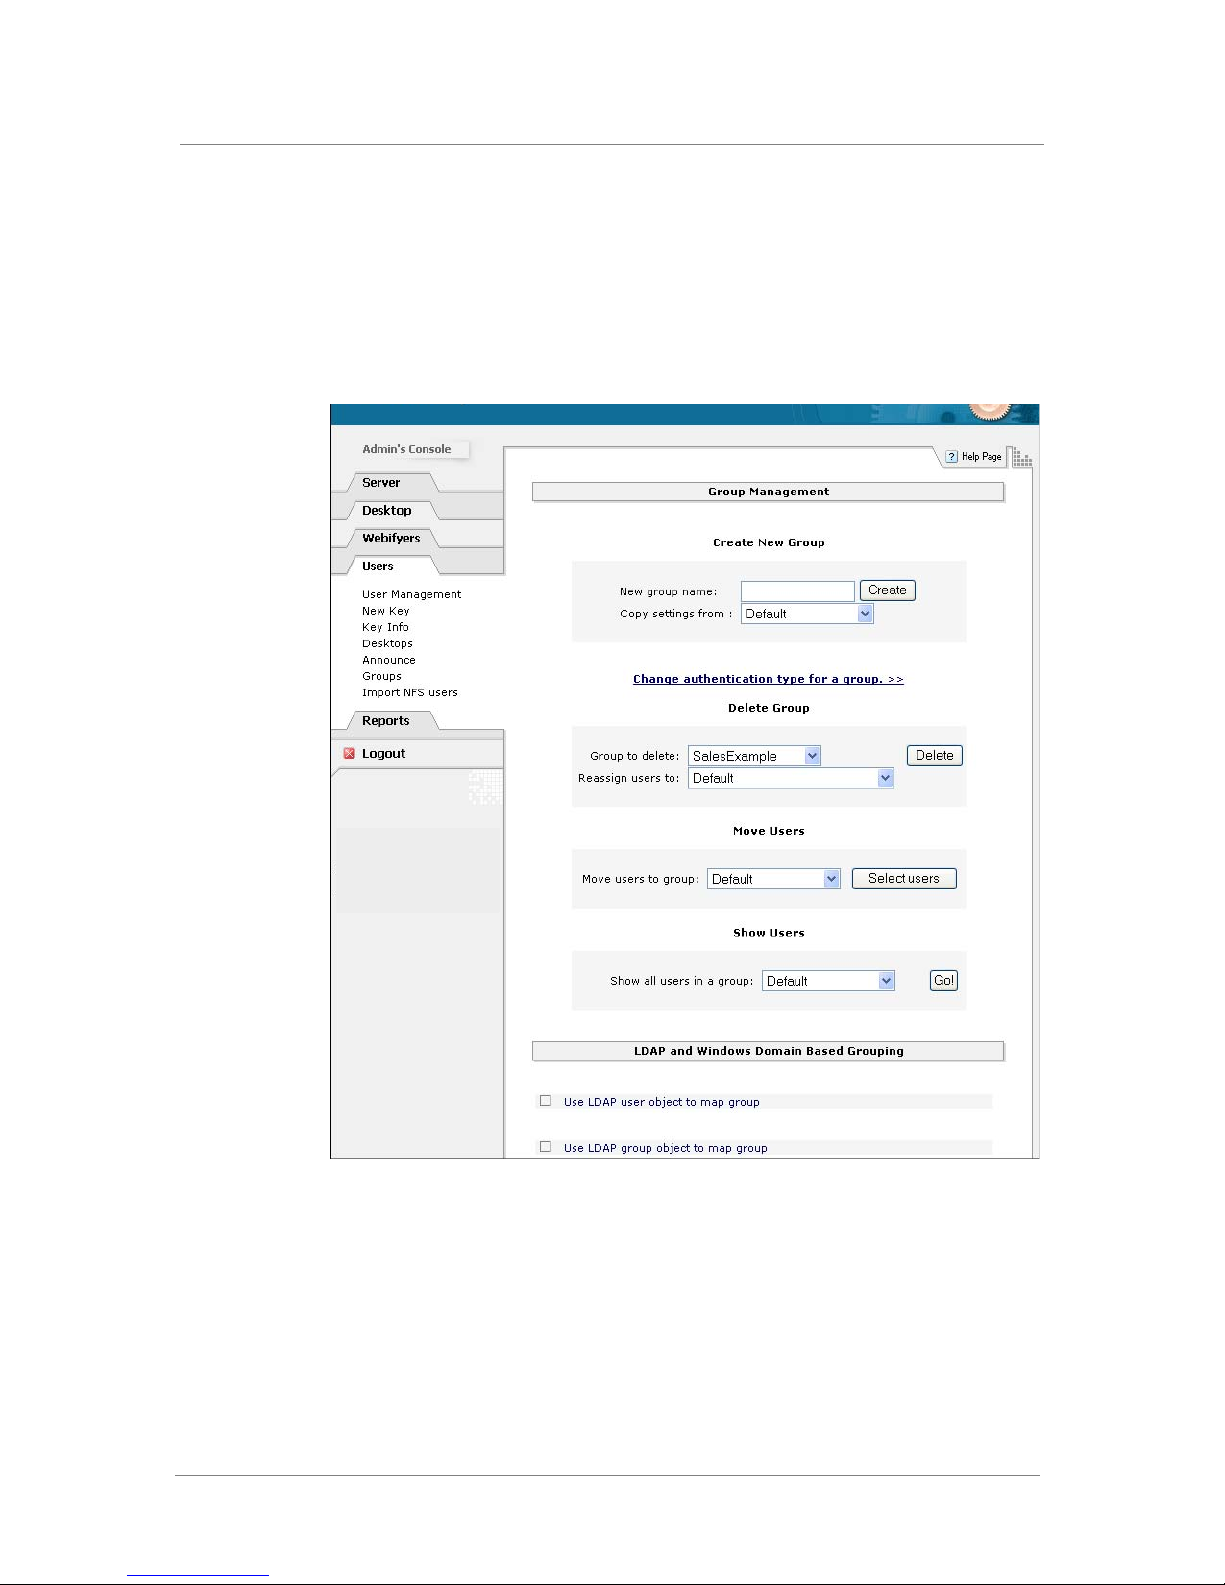
Creating groups
Setting Up FirePass Server Security
To create a group
Use the Group Management screen.
FirePass™ Server Administrator Guide 3 - 3
1. Under the Users tab on the left side of the Administrative Console,
click the Groups link.
The Group Management screen opens.
2. In the New group name box in the Create New Group section, enter
a name for the group.
Only alphanumeric symbols are allowed.
3. From the Copy settings from list, select the group whose settings
you want to copy to the new group.
All settings for authentication methods, Webifyers, and signup
templates are copied from the selected group to the new group.
Page 50

Chapter 3
4. Click the Create button.
The new group is now accessible from the Group list on the panels
for setting up authentication methods, Webifyers, and signup
templates.
Deleting groups
To delete a group
1. In the Delete Group section of the Group Management panel, select
the group from the Group to Delete drop-down list.
2. From the Reassign Users to drop-down list, choose the group to
which you want to reassign the users from the deleted group.
3. Click the Delete button.
Moving users to a different group
If you are not using group mapping for a group, you can move users to a
different group.
To move users to a different group
1. In the Move Users section of the Group Management panel, select
the group from the Move Users to Group drop-down list to which
you want to move users.
2. Click the Select Users button.
3. In the Move Users panel, select the users you want to move by
clicking the check box next to each name.
4. Click the Move To Group button.
Showing a list of all users in a group
To show a list of all users in a group
1. In the Show Users section of the Group Management panel, select
the group from the Show All Users in a Group drop-down list.
2. Click the Go button.
Using Windows domain-based group mapping
3 - 4
Typically, there are multiple groups defined within a Windows domain and
users belong to one or more of these groups. To use the group membership
information from the Windows domain, you can map the Windows domain
Page 51

Setting Up FirePass Server Security
groups to existing FirePass server groups. When a user logs into the
FirePass server, FirePass server queries the Windows domain groups for the
user’s name and attempts to match one of the domain groups to the FirePass
server’s configured mapping. The FirePass server then dynamically moves
the user to the FirePass server group based on a match. Note that the group
must already exist on the FirePass server and be mapped before the user logs
in. If the user is moved to a Windows domain group that does not exist on
the FirePass server, the user remains in the same FirePass server group.
Because a user can belong to more than one group within a Windows
domain, the first group mapping match is used to determine which FirePass
server group to move the user into. FirePass server uses the order in which
you create mappings to determine the order in which to check for matches.
That is, the first mapping you create is checked first. Keep this in mind
when mapping groups to make sure domain users are mapped properly.
To use Windows domain-based group mapping
1. In the LDAP and Windows Domain Based Grouping section of the
Group Management panel, select the Use Windows Domain Group
to Map Group option.
2. In the Domain Name box, specify the name of the Windows
domain you want to map users against.
3. (Optional) In the PDC Server Name box, specify the name of the
Primary Domain Controller (PDC) server if the domain or PDC is
on a different subnet than the FirePass server.
4. (Optional) In the WINS Server IP Address box, specify the IP
address of the WINS server if the domain or PDC is on a different
subnet than the FirePass server.
5. If the Windows domain PDC is not configured to accept anonymous
access to user and group information, click the Join Windows
Domain option. Then specify the Domain Admin Name and
Domain Admin Password.
6. Click the Retrieve Windows D omain Group s button to retrieve the
available domain groups from the Windows domain. If an error
message is displayed or the list under Windows Domain Group is
empty, verify the domain settings you specified.
7. To add mappings between domain groups and FirePass server
groups, select domain group entries under the Windows Domain
Group heading. Then select FirePass server groups from the
drop-down list under the Map to Group heading and click the Add
Mapping button.
FirePass™ Server Administrator Guide 3 - 5
Page 52

Chapter 3
8. To test which FirePass server group a user woul d be mapped to,
enter a user login name for the Windows domain, and then click the
Test Mapping button.
Note
If necessary, you can delete a mapping by selecting it and then clicking the
Delete link.
Using LDAP-based group mapping
LDAP-based group mapping automatically keeps the groups on the FirePass
server synchronized with the groups on an LDAP server. That is, if a user is
moved to a different group on the LDAP server, FirePass server
automatically moves the user to the new group in its internal database the
next time the user logs into FirePass server. If the user is moved to an LDAP
group that does not exist on the FirePass server, the user remains in the same
FirePass server group.
If you use a signup template for new FirePass server users, group mapping
can also have FirePass server query a LDAP or Windows Domain server for
each user’s group membership, and automatically add the new user to the
mapped group in FirePass server’s internal database. (For more information
on LDAP configuration, see Setting up LDAP server authentication, on page
3-27.)
There are two methods you can use to map LDAP groups:
• Based on LDAP user object information such as DN or any attribute.
(See Mapping based on LDAP user object information, following.)
• Based on a LDAP group object information. (See Using Windows
domain-based group mapping, on page 3-4.)
Note
See your LDAP administrator for more specific information about your
site’s LDAP configuration.
Mapping based on LDAP user object information
To map based on LDAP user object information
1. In the LDAP and Windows Domain Based Grouping section of the
Group Management panel, select the Use LDAP User Object to
Map Group option.
A new set of options appears.
3 - 6
2. In the LDAP Server box, enter the name of an LDAP server.
3. In the LDAP Port box, enter an LDAP port, such as 389.
Page 53

Setting Up FirePass Server Security
4. If you want to use SSL, select the Use SSL Connection option.
5. In the User DN box, enter a User DN. For example:
CN=Administrator,DC=demo,DC=FP,DC=com
6. In the User Password box, enter a password.
Note: You can leave the User DN and User Password text boxes
blank if your server allows anonymous access to perform a query.
7. In the Search Base DN box, enter a Search Base DN to specify
where DN searches start from. For example:
DC=demo,DC=FP works,DC=com
8. In the Filter Template box, enter a filter template to look up a user.
The filter template must be a valid LDAP query expression. Use%s
in the filter expression to insert a user name. For example, suppose
you enter the following filter template:
(&(objectclass=person)(cn=%s))
If the user name is george, the query when the user logs on is:
(&(objectclass=person)(cn=george))
9. Do one of the following:
• Select the Use Attribute to Map Group option if your LDAP
schema has an attribute that corresponds to a FirePass server
group.
• Select the Use Parent DN to Map Group option if the user’s
parent DN corresponds to a FirePass server group.
10. Click Update to display the appropriate mapping table next to the
Mapping option you just selected.
11. Do one of the following:
• If you selected the Use Attribute to Map Group option, and if
the attribute’s value corresponds verbatim to the name of a
FirePass server group, select the Map Query Result into Group
Name Verbatim option. Enter the LDAP attribute name in the
Attribute Name box.
• If you selected the Use Attribute to Map Group option, and the
attribute’s value does not correspond verbatim to the name of a
FirePass server group, enter an attribute name in the Attribute
Name box, and then enter an attribute value in the Attribute
Value box. From the Map to Group list, select the FirePass
server group that corresponds to the attribute value, and then
click the Add button. As necessary, continue mapping attribute
values to groups by entering attribute values, selecting the
FirePass server group from the list, and then clicking Add.
FirePass™ Server Administrator Guide 3 - 7
Page 54

Chapter 3
For example, suppose you have an LDAP attribute named
Department that has three attribute values Financial department,
Sales department, and Marketing department. Suppose you also
have three FirePass server groups named Financial, Marketing,
and Sales.
In that example, you map these attributes to these groups as follows.
Choose this FirePass server group
Enter this attribute value
Financial department Financial
Marketing department Marketing
Sales department Sales
from the menu
• If you selected the Use Parent DN to Map Group option, enter a
DN value in the DN Value box. From the Map to Group list,
select the FirePass server group that corresponds to the DN value,
and then click the Add button. As necessary, continue mapping
DN values to groups by entering DN values, selecting the
FirePass server group from the menu, and then clicking Add.
For example, suppose you have these three container objects in
your LDAP schema to store users for each department:
ou=Financial,o=MyCompany
ou=Marketing,o=MyCompany
ou=Sales,o=MyCompany
In that example, you map these DN values to groups as follows.
Enter this DN value
ou=Financial,o=MyCompany Financial
ou=Marketing,o=MyCompany Marketing
ou=Sales,o=MyCompany Sales
Choose this FirePass server group
from the menu
12. In the text boxes in the LDAP Attributes to Obtain Personal
Information section, enter the LDAP attributes for first name, last
name, and email address.
3 - 8
Page 55

For example, here are some attributes that are used in a standard
LDAP schema.
Enter one of these attribute values In this text box
Firstname, fn, name Attribute for First Name
surname, sn Attribute for Last Name
email, uid, mailto Attribute for email
Mapping based on a LDAP group object information
To use this method, you should have a group object in your LDAP schema
that may be used to map FirePass groups. This object should have at least
two multi-valued attributes to specify users that belong to this group. The
first attribute specifies static members and is the list of user’s DNs. The
second attribute specifies dynamic members and is presented as a list of
LDAP URLs or LDAP queries that define the criteria of the group’s
membership.
Setting Up FirePass Server Security
To map based on LDAP group object information
1. In the LDAP and Windows Domain Based Grouping section of the
Group Management panel, select the Use LDAP Group Object to
Map Group option.
A new set of options appears.
2. From the For the group drop-down list, choose the FirePass server
group that you want to map to.
3. Click the Add to List button to add the selected group to the
mapping list.
4. Click Edit next to the group you added to set up mapping
parameters for that group.
A new set of options appears.
5. In the LDAP Server box, enter the name of an LDAP server.
6. In the LDAP Port box, enter an LDAP port such as 389.
7. If you want to use SSL, select the Use SSL Connection option.
8. In the User DN box, enter a user DN. For example:
CN=Administrator,DC=demo,DC=FP works,DC=com
9. In the User Password box, enter a password.
Note: You can leave the User DN and User Password boxes blank if
your server allows anonymous access to perform a query.
FirePass™ Server Administrator Guide 3 - 9
10. In the Search Base DN box, enter a Search Base DN to specify
where DN searches start from. For example:
DC=demo,DC=FP works,Dc=com
Page 56

Chapter 3
11. In the Filter for Group box, specify an LDAP query. It must be a
valid LDAP query expression. For example:
OU=Groups,O=MyCompany
12. In the Query Template for Static Members box, specify a query
template for static members. Use %logon% in the filter expression
to insert a user name. For example:
(&(CN=Marketing)(uniqueMember=UID=%logon%,OU=People,
O=MyCompany))
13. In the Attribute for Dynamic Members box, specify an attribute
for dynamic members.
14. In the Search Base DN for User box, specify a Search Base DN.
For example:
OU=People,O=MyCompany
15. Click the Update button to store the mapping parameters for the
selected group.
16. (Optional) To test the mapping parameters, enter a LDAP user name
in the Test Logon box, and then click the Test Mapping button.
3 - 10
Page 57
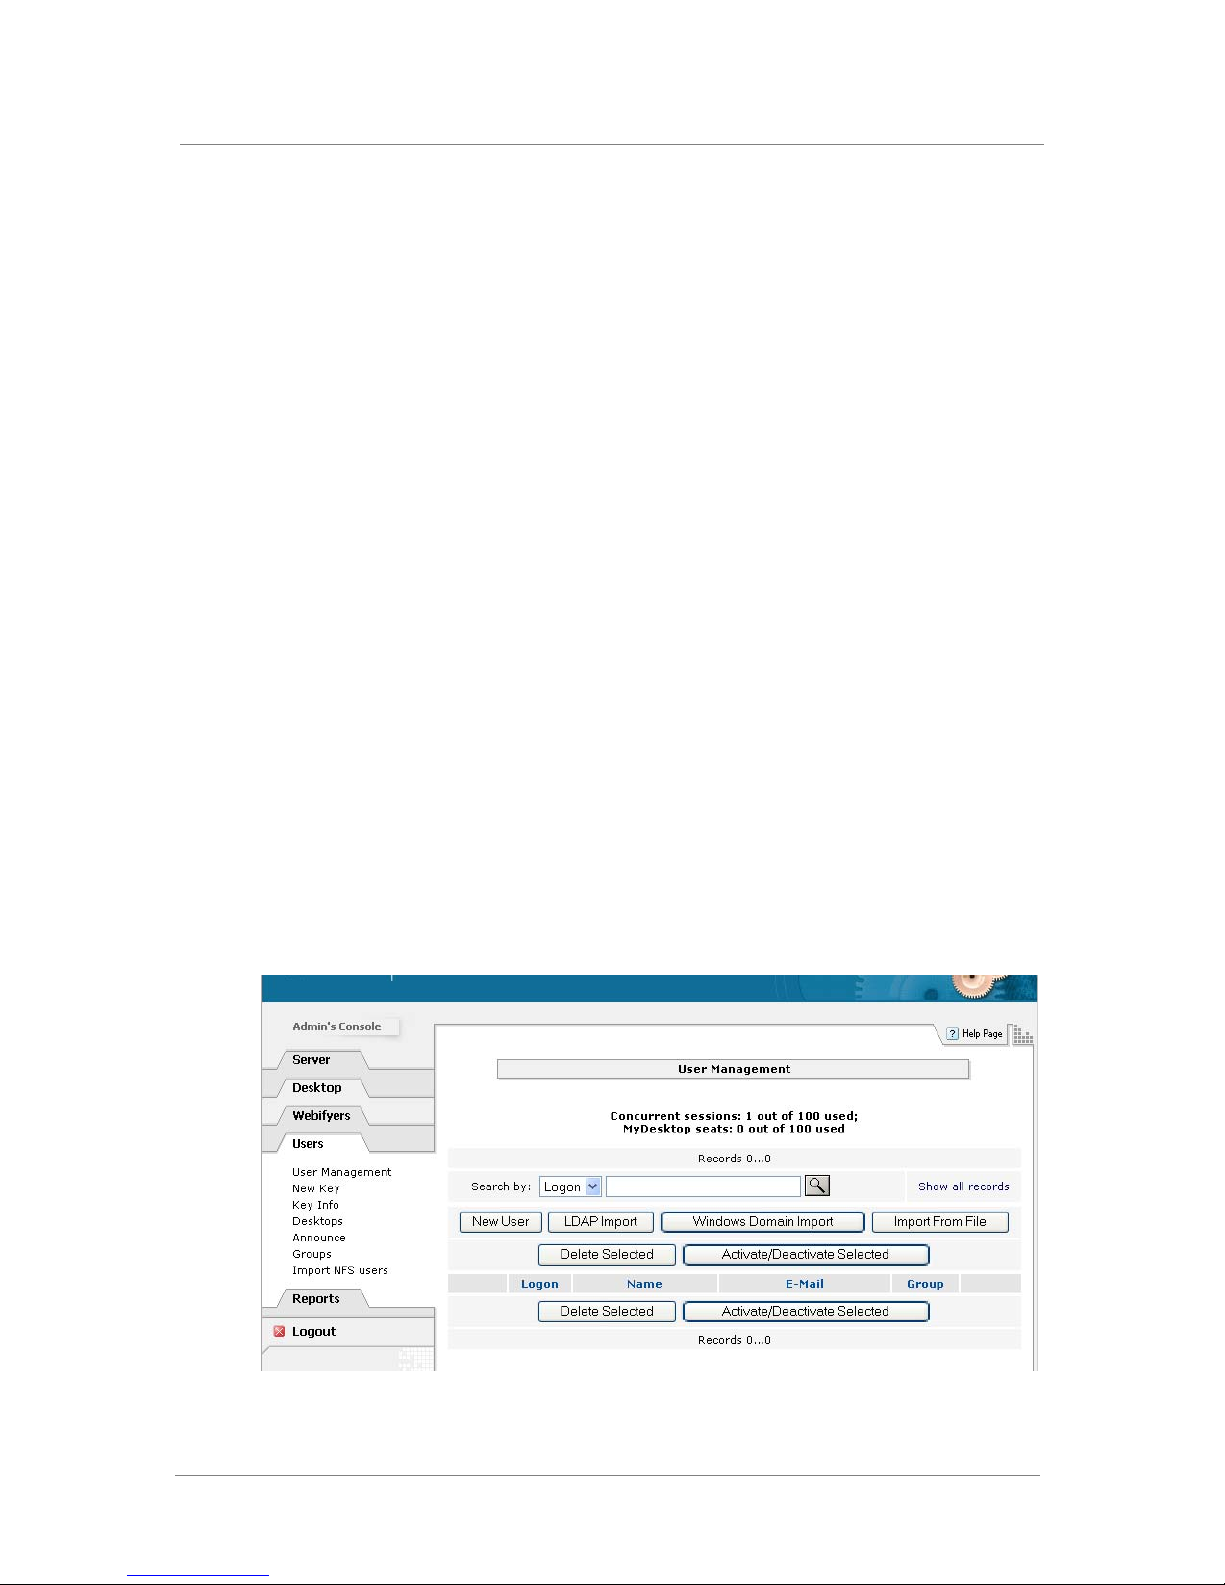
Working with user accounts
You can add user accounts to each group on the FirePass server by using
any of the following methods:
• Manually add users to each group. (See Manually adding user accounts,
following.)
• Import users into each group from a Windows Domain server. (See
Importing user accounts from a Windows domain server, on page 3-13.)
• Import users into each group from an LDAP server. (See Importing user
accounts from an LDAP server, on page 3-15.)
• Import users into each group from a text file. (See Importing user
accounts from a comma or tab delimited text file, on page 3-16.)
• Allow a signup template for each group to automatically adds users when
they log in for the first time, if the user has an existing account in a
RADIUS, LDAP, or Windows Domain server. (See Using signup
templates to add user accounts, on page 3-16.)
All of these methods create user accounts in the FirePass server’s internal
database.
Setting Up FirePass Server Security
Manually adding user accounts
To manually add a user account
1. Under the Users tab on the left side of the Administrative Console,
click the User Management link.
The User Management screen opens.
FirePass™ Server Administrator Guide 3 - 11
2. Click the New User button.
The User Details screen opens.
Page 58
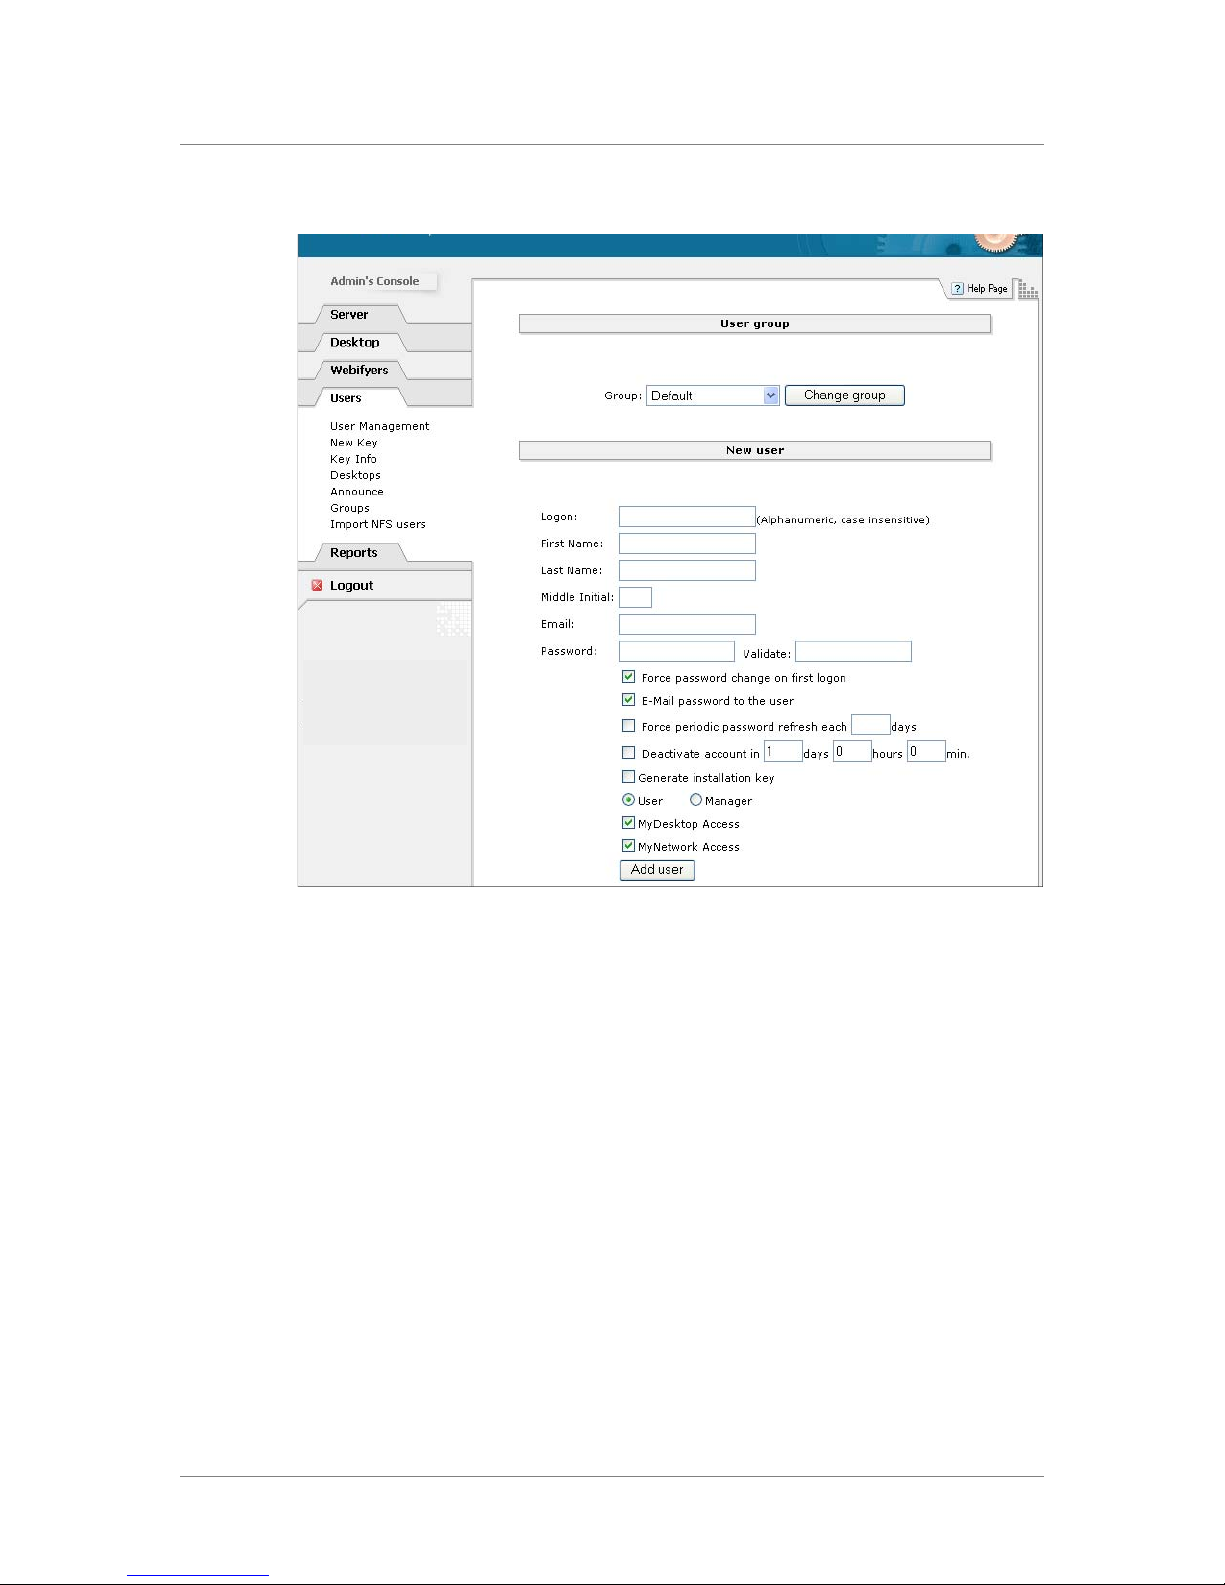
Chapter 3
3. If you want to add the user to a group other than the default group,
choose the group from the Group drop-down list and then click the
Change Group button.
4. In the Logon text box, enter a user name for the user.
5. In the First Name, Last Name, and Middle Initial boxes, enter the
user’s first and last names, and middle initial.
6. In the Email box, enter the user’s email address.
7. Do one of the following:
• If the authentication for the selected group is handled by the
FirePass server’s internal database, enter the user’s password in
the Password and Validate text boxes.
• If the authentication is handled by an external VASCO server,
enter the user’s Token ID in the Token ID text box. (See Setting
Up VASCO DigiPass authentication, on page 3-28.)
• If the authentication is handled by an external RADIUS, LDAP,
or Windows Domain server, skip this step. The passwords for
these three servers are stored in the external server instead of in
the FirePass server.
3 - 12
Page 59

Setting Up FirePass Server Security
8. (Optional) As necessary, select the options to force the user to
change their password on the initial logon, email the password to the
user, force periodic password changes, or deactivate the account
after a specified period of time.
9. To generate a key that enables the user to install the My Desktop
client software, select the Generate Installation Key option.
If you select this option, the FirePass server sends an email message
to the user that contains instructions for downloading and installin g
the My Desktop client software.
You can also generate the installation key at another time. (See
Generating a My Desktop client software installation key, on page
3-21.)
10. Select a User mode option for the user. A Manager can view the
FirePass server system statistics. A User can not view statistics.
11. To grant access permissions for the user, select the MyDesktop
Access option and/or the MyNetwork Access option.
12. Click the Add User button.
13. If you chose the option to generate a key, click the Click to Pick Up
the Key button in the next panel that appears.
The installation key for the user is listed in the Existing FirePass
server Installation Keys panel.
14. Do one of the following:
• Write down the installation key so you or the user can use it later
for installing the My Desktop client software. (See Installing My
Desktop client software at a user’s computer, on page 3-22.)
• Email the key to the user by clicking the Send button.
Importing user accounts from a Windows domain server
To import user accounts from a Windows domain server
1. In the User Management panel, click the Windows Domain Import
button.
The Windows Domain Import screen opens.
2. If you want to add the users to a group other than the default group,
select the group from the For the group drop-down list.
3. In the Domain Name box, specify the name of the Windows
domain you want to import users from.
FirePass™ Server Administrator Guide 3 - 13
4. (Optional) In the PDC Server Name box, specify the name of the
Primary Domain Controller (PDC) server if the domain or PDC is
on a different subnet than the FirePass server.
Page 60

Chapter 3
5. (Optional) In the WINS Server IP Address box, specify the IP
address of the WINS server if the domain or PDC is on a different
subnet than the FirePass server.
6. If the Windows domain PDC is not configured to accept anonymous
access to user and group information, select the Join Windows
Domain option. Then specify the Domain Admin Name and
Domain Admin Password.
7. Click the Query Domain button.
The FirePass server performs a query in the Windows domain for all
users and user groups, and displays the results. If no results are
displayed, or you see an error message displayed, verify the domain
settings you specified.
8. To restrict the list to users from a particular domain group, choose
the group from the Domain Group Filtering dro p-down list and
then click the Filter Results button.
9. To store the user’s Domain as part of his FirePass server logon user
name, select the FirePass Logon Formatted as
DOMAIN\Username option.
Note: This option is only necessary if there are FirePass server
users with identical user login names belonging to different
domains.
If you select this option during an import process, each imported
user must log in to the FirePass server using the format of
DOMAIN\username.
10. To automatically generate appropriate email addresses for users,
select an option from the Email Formatting drop-down list and
then click the Update Results button.
This step is necessary because email addresses are not available
when querying a Windows domain.
11. Select the users you want to add to the FirePass server. To select all
users in the list, click the Select All Users link at the bottom of the
panel.
12. As necessary, select the MyNetwork Access option and the
MyDesktop Access option to grant the users these access
privileges.
13. Select the Send Email to Users option if you want to notify new
users of their accounts.
14. Click the Add Users button to import the user accounts.
3 - 14
Page 61

Setting Up FirePass Server Security
Importing user accounts from an LDAP server
To import user accounts from an LDAP server
1. In the User Management panel, click the LDAP Import button.
The LDAP import screen opens.
2. If you want to add the users to a group other than the default group,
select the group from the Group list.
3. In the Host box, type the name or IP address of an LDAP server.
4. In the Port box, enter an LDAP port such as 389.
5. If you want to use SSL, select the Use SSL connection option.
6. In the User DN box, enter a user DN. For example:
CN=Administrator,CN=Users,DC=demo,DC=FP,DC=com
7. In the User Password box, enter a password.
Note: You can leave the User DN and User Password boxes blank if
your server allows anonymous access to perform a query.
8. In the Search Base DN box, enter a search base DN to specify
where DN searches start from. For example:
DC=demo,DC=FP,DC=com
9. In the Search Query box, enter a query that produces a draft user
list, which is basically the list of matching DNs.
The search query must be a valid LDAP query expression.
10. Click the Query button.
The LDAP import screen opens
11. Choose entries from the drop-down menus under the LDAP
Attribute heading to map the LDAP attributes into FirePass server
values, such as user name, first and last names, and email address.
Note that the first and last names can be extracted from a compound
attribute (such as cn). To avoid this, select the first empty item from
the Full Name drop-down list.
12. Click the Map Attributes button.
The query returns the list of matching users. Only the user records
that have attributes corresponding to user name have a check box in
front of them. The users with names already in the FirePass server
internal database do not have a check box.
13. Select the users you want to add to the FirePass server. To select all
users in the list, click the Select All Users link at the bottom of the
panel.
FirePass™ Server Administrator Guide 3 - 15
14. As necessary, select the MyNetwork Access option and the
MyDesktop Access option to grant the users these access
privileges.
15. Select the Send Email to Users option if you want to notify new
users of their accounts.
Page 62

Chapter 3
16. Click the Add Users button to import the user accounts.
Importing user accounts from a comma or tab delimited text file
You can import user accounts from a text file that contains either commas or
tabs between each element of information, such as first name, last name, and
so on.
To import user accounts from a comma or tab delimited
text file
1. In the User Management panel, click the Import from File button.
The Import Users From Comma or Tab Separated List screen opens.
2. Enter or browse to the text file and then click the Load List button.
3. In the next panel, specify the order of the information fields in the
text file by choosing a field name from each drop-down menu.
4. Select one of the options to import all of the list, or a subset based
on logons or names, and then click the Process List button.
5. If you want to add the users to a group other than the default group,
choose the group from the Group drop-down list.
6. (Optional) If you selected an option to import a subset of users,
select the users you want to import by clicking the check box next to
their logon or name.
7. (Optional) As necessary, select the options to force the user to
change their password on the initial logon, email the password to the
user, force periodic password changes, or deactivate the account
after a specified period of time.
8. To grant access permissions for the user, select the MyDesktop
Access option and/or the MyNetwork Access option.
9. Select an option to overwrite or skip users that already exist in the
FirePass server internal database.
10. Click the Import Users button or the Import Selected button.
Using signup templates to add user accounts
If some or all users at your site have an existing account in an external
RADIUS, LDAP, or Windows Domain server, you can use a signup
template to automatically add the users to the internal database when they
log in to the FirePass server for the first time. FirePass server displays a
dialog box where first-time users enter their user name, password, and other
information. The FirePass server retrieves the user’s login and account
information (except for password) from the external server and
automatically adds a user account to its internal database.
3 - 16
Page 63

Setting Up FirePass Server Security
If you are using an LDAP or Windows Domain server and you set up group
mapping, the FirePass server also retrieves the user’s group information and
adds the user to the corresponding mapped group in its internal database.
(See Using Windows domain-based group mapping, on page 3-4 and Using
LDAP-based group mapping, on page 3-6.)
Note
The FirePass server adds users to the first group specified on the Signup
Template panel that matches the first group where it locates the user in an
external server. That is, if a user is a member of several groups in the
external server and you have mapped all of the groups to groups in the
internal database, the FirePass server adds the user to the first group on the
external server that matches the first group in the order specified on the
Signup Template panel. If necessary, you can move users to different groups
in the internal database if the groups are not mapped. (See Moving users to
a different group, on page 3-4.)
To use a signup template
1. Under the Server tab, click the Signup templates link.
2. From the For the group drop-down list, select the group that you
want to use a signup template with.
The group must use RADIUS, LDAP, or Windows Domain
authentication.
3. Select the Allow Authenticated Signup by Template option.
4. Select a user mode option for the user.
•A Manager can view the FirePass server system statistics.
•A User cannot view statistics.
5. To grant access permissions for the user, select the MyNetwork
Access option and/or the MyDesktop Access option.
6. To generate and email a key that enables the user to install the My
Desktop client software, select the Generate and email installation
key option.
You can also generate the installation key later. (See Generating a
My Desktop client software installation key, on page 3-21.)
7. Click the Update Template button.
Using NFS user permissions from a UNIX password file
FirePass™ Server Administrator Guide 3 - 17
If you want to give FirePass server users the ability to access NFS file
servers using the FirePass server My NFS Webifyer (see Configuring the
My NFS Webifyer, on page 4-6), you must assign NFS user permissions to
the users. You can either assign the permissions manually for each
individual user, or you can import a list of user’s NFS user permissions from
a UNIX password file. FirePass server stores each user’s User ID and Group
Page 64

Chapter 3
ID in the user’s existing FirePass server account. Note that each FirePass
server user’s logon name (user name) must be identical to the logon name in
the NFS servers. For example, a user with the logon name of tjones on the
FirePass server must also have tjones as the logon name on the NFS servers.
Note that this procedure does not create any new user accounts on the
FirePass server. It simply imports the NFS user permissions for existing
FirePass server users so that they can access NFS file servers.
Importing NFS user permissions from a UNIX password file
To import NFS User Permissions from a UNIX password
file
1. If you have not already done so, create the user accounts in the
FirePass server and make sure the logon name in the FirePass server
account is identical to the logon name in the UNIX password file.
2. Under the Users tab on the left side of the Administrative Console,
click the Import NFS users link.
The Import NFS Settings screen opens.
3. Copy the contents of a UNIX password file that contains the user
IDs and group IDs you want to import.
4. Paste the contents of a UNIX password file into the text box on the
Import NFS Settings panel.
5. Click the Import button.
The NFS user permissions are listed on the next panel next to each
FirePass server user’s logon name.
Note
User IDs below 100 are ignored because they are reserved for system
services.
Manually assigning NFS user permissions to a FirePass server user
You can manually assign NFS user permissions to a FirePass server user
when you first create the account, or at any time later.
To manually assign NFS user permissions to a FirePass
server user
1. Do either of the following:
• Create a new FirePass server user with a login name that is
identical to the logon name in the NFS servers. (See Manually
adding user accounts, on page 3-11.)
3 - 18
• If the user account already exists, click the Edit button in the
User Management panel next to the user account you want to
assign NFS permissions to. Make sure the FirePass server login
name is identical to the logon name in the NFS servers.
Page 65

2. In the NFS Settings section at the bottom of the User's Details panel,
3. In the Group ID box, enter the NFS group ID.
4. Click the Add button.
Changing user accounts
To change a user account
1. In the User Management panel, click the Edit button next to the user
2. To change the user’s group membership, select a different group
3. Change the other user’s properties as necessary, and then click the
Setting Up FirePass Server Security
enter the NFS user ID in the User ID box.
account you want to change.
The User group screen opens.
from the Group list, and then click the Change group button.
Update user details button.
Activating, deactivating, or deleting user accounts
To activate, deactivate, or delete a user account
1. In the User Management panel, select one or more user accounts
that you want to activate, deactivate, or delete.
2. Do one of the following:
• To activate or deactivate the users, click the Activate/Deactivate
Selected button.
A lock icon is placed next to user accounts that are deactivated.
• Click the Delete Selected button, and then click the Delete button
to confirm the deletion.
Assigning administrative privileges to a user account
By default, the FirePass server includes a superuser account with the user
name of admin that has a complete set of administrative privileges. You can
also assign administrative privileges to an existing user account to allow the
user to be a FirePass server administrator.
To assign the administrative privileges, you must either be logged in as the
superuser, or logged in as a user who already has administrative privileges.
There is a range of administrative privileges that you can assign, such as
access to some or all of the tabs and panels in the Administration Console,
and to various groups of users. The activities of a user with administrative
privileges are logged in Application Logs.
FirePass™ Server Administrator Guide 3 - 19
Page 66
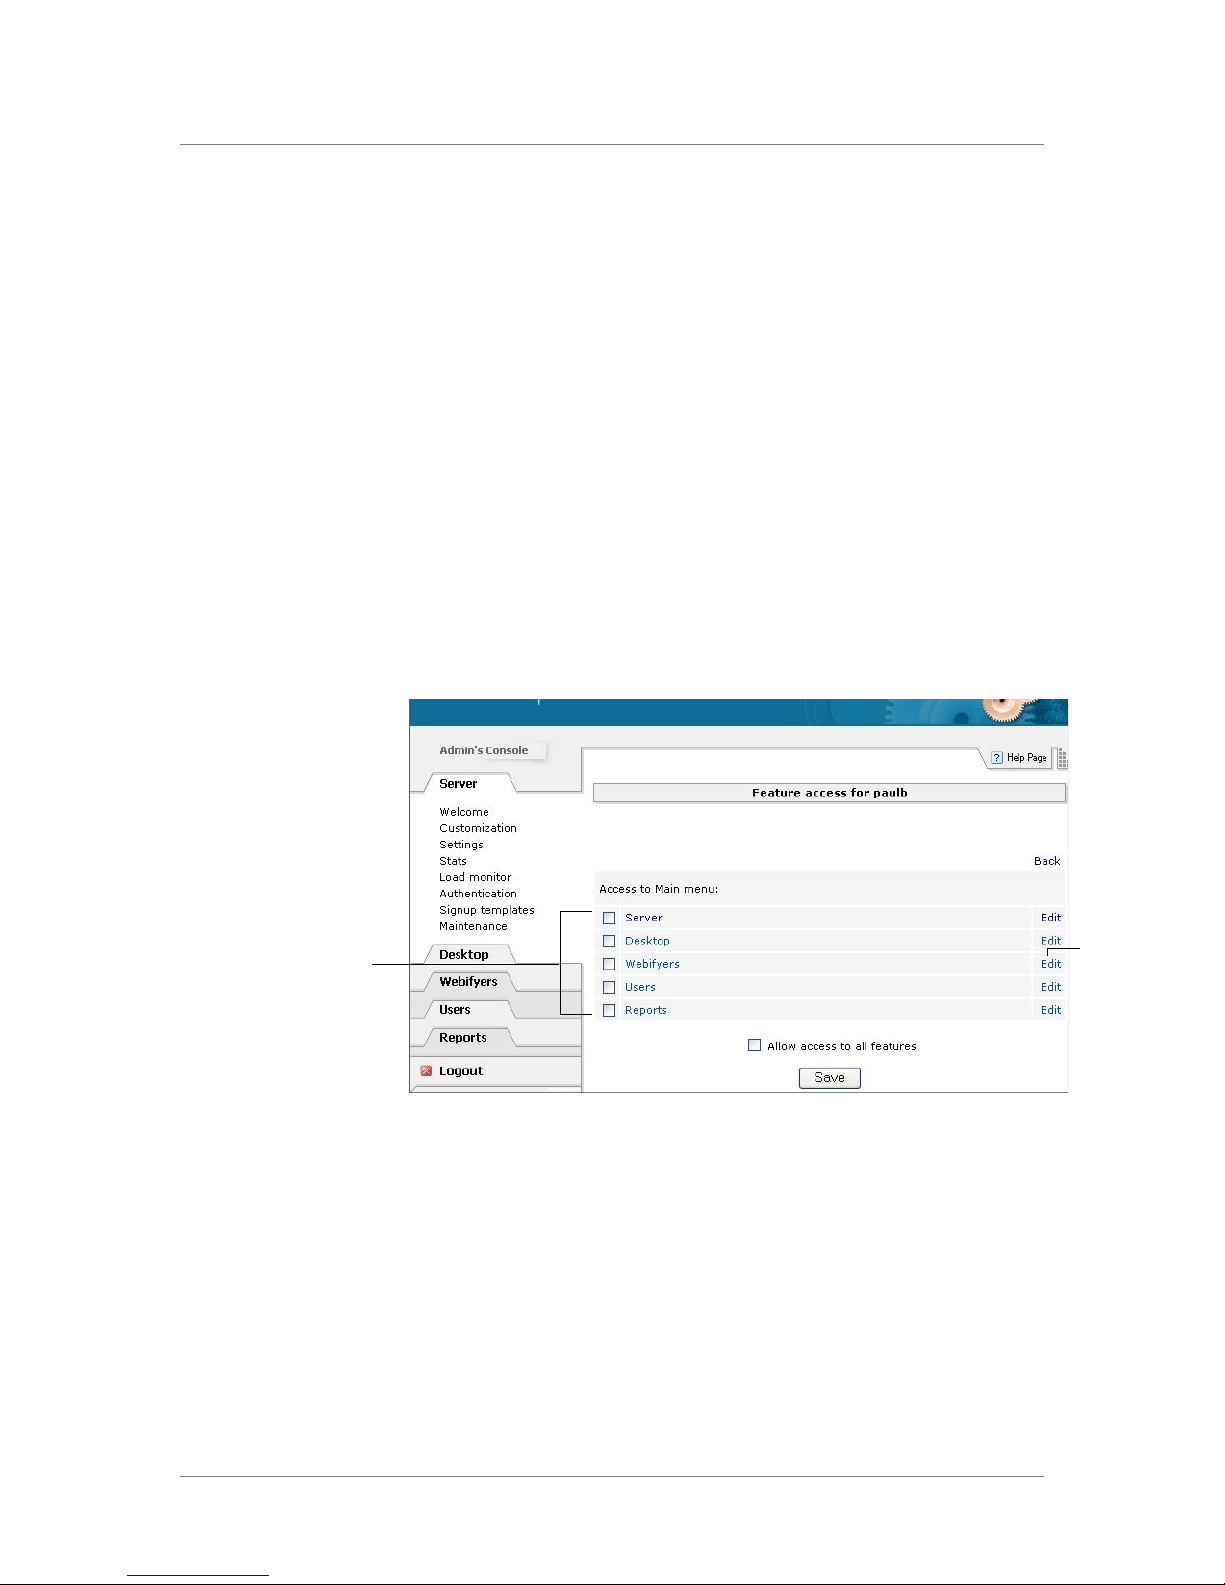
Chapter 3
To assign administrative privileges to a user account
1. Log into the Administrative Console as the superuser, or as a user
who already has administrative privileges.
2. Under the Server tab on the left side of the Administrative Console,
click the Security link.
3. On the Security screen, click the Administrators link.
4. Enter the user’s login name in the text box and then click the Add
button.
The user’s name is added to the list in the FirePass Administrators
panel, but the user does not have administrative privileges until you
explicitly assign them.
5. To assign administrative privileges for features in the
Administration Console, click the Edit link in the Feature Access
column next to the user’s name.
The Feature Access screen opens.
Select these tab names to
allow the user access to
the tabs in the
Administrative Console.
Click these
Edit links to
allow access
to a subset of
the panels for
a particular
tab.
6. Do any of the following:
• To allow access to all tabs, panels, and features in the
Administrative Console, select the Allow Access to All Features
option, and then click the Save button.
• To allow access to a subset of the tabs in the Administrative
Console, select the tab names on the Feature Access panel, and
then click the Save button.
3 - 20
Page 67

Setting Up FirePass Server Security
• To allow access to a subset of panels associated with a tab, click
the Edit link next to the tab. For example, click the Edit link next
to the Server tab name to specify access to the panels associated
with the Server tab in the Administrative Console. Then, click the
Save button.
7. To assign administrative privileges for user groups, click the Edit
link in the Group Access column next to the user’s name in the
FirePass Administrators panel.
8. To allow access to all groups, select the Allow Access to All Group
option.
9. Click the Save button.
10. After you are finished assigning the administrative privilege, the
user can log into Administrative Console by using the URL,
https://server-name.company.com/, and then clicking Admin
Console in the left panel.
Or, the user can log into Administrative Console directly by using
the URL, https://server-name.company.com/stats/.
Searching for user accounts
You can limit the scope and the size of the list of users on the User
Management panel by searching for logon, name, email, or group.
To search for user accounts
1. In the User Management panel, choose Logon, Name, email, or
Group from the Search By drop-down list.
2. In the text box next to the Search By drop-down list, enter the
logon, name, email, or group you want to find.
3. Click the magnifying button next to the text box.
4. To display the entire list of users, click the Show All Records link.
Generating a My Desktop client software installation key
To install the My Desktop client software, each user needs a unique
installation key. If you did not select the option to generate the installation
key when you added a user, or if you need additional keys, you can generate
the installation key.
To generate a My Desktop installation key
FirePass™ Server Administrator Guide 3 - 21
1. Under the Users tab, click the New Key link.
The Create New Installation Keys screen opens.
2. Enter your name, description of the user’s system, and the number
of keys.
Page 68

Chapter 3
3. Click the Generate Installation Keys button.
The FirePass server generates the keys and displays them on the
Existing FirePass Installation Keys panel, which displays the status
of generated keys.
4. To send the keys to users, enter each user’s email address in the
Send To box next to each key, and then click the Send button.
5. To drop a key so that you can generate a new one within your
license limits, click the Drop link next to the key.
Installing My Desktop client software at a user’s computer
You can install the My Desktop client software at a user’s computer on the
user’s behalf.
To install the My Desktop client software at a user’s
computer
1. If you are not at the user’s computer when you add the user’s
account, do not select the option to generate an installation key.
2. Using the user’s computer, log into the Administration Console.
3. Generate a new key by following the instructions in the previous
section, Generating a My Desktop client software installation key,
on page 3-21.
4. In the Existing FirePass Installation Keys panel, select the key, right
click, and then choose Copy from the context menu to copy the key
to the clipboard. Do not send the key to the user.
5. Under the Desktop tab, click the Download link.
6. In the panel that appears, click the Download Desktop Software
link.
7. Click Install from Current Location.
The download takes a few minutes (depending on the speed of the
computer). The installation program prompts you for an installation
(activation) key.
8. Right click in the installation program window, and then choose
Paste from the context menu to insert the key.
9. Enter the user name and password for the user.
3 - 22
Page 69

Setting Up FirePass Server Security
Setting up FirePass server authentication
Authentication is set up on a per group basis on the FirePass server. If you
are using the same authentication for all FirePass server users, you can
simply add all users to the FirePass server default group and use the same
authentication for the default group. But, if you want to use different
authentication for different users, you must create groups on the FirePass
server before setting up authentication. (See Working with groups, on page
3-2.)
You can either set up authentication using the FirePass server’s internal
database, or you can use an external server. The advantage of using an
external server is that you can use the same server to authenticate FirePass
server users as you use to authenticate network users.
You can set up FirePass server authentication using any combination of the
following methods for different groups:
◆
FirePass server’s internal database
This is the default authentication method. (See Converting to internal
database authentication, following.)
◆
RADIUS server
You can use a RADIUS server at your site that supports RSA’s SecurID
technology. Each user is issued a SecurID token. (See Setting up
RADIUS server authentication, on page 3-24.)
◆
Windows domain server
You can use a Windows domain server for authentication. (See Setting
up Windows domain server authentication, on page 3-25.)
◆
LDAP server
You can use an LDAP server for authentication. (See Setting up LDAP
server authentication, on page 3-27.)
◆
VASCO DigiPass
This is a two-factor authentication that uses a combination of a dynamic
password and a digital signature to grant access to the FirePass server.
(See Setting Up VASCO DigiPass authentication, on page 3-28.)
If authentication is handled by the FirePass server, then strong hashes of
each user’s password is stored in the internal database. If the authentication
is handled by an external server, then each user’s password is stored in the
external server.
Converting to internal database authentication
FirePass™ Server Administrator Guide 3 - 23
In most cases when you first set up the FirePass server, the default group
uses the internal database. If you then create new groups by copying settings
from the default group, the authentication for the new groups also uses the
internal database. In these cases, internal database authentication is already
Page 70

Chapter 3
set up and no other configuration is required. However, if you want to
convert a group’s authentication from an external server to the internal
database, use the following instructions.
To convert a group to internal database authentication
1. Under the Server tab, click the Authentication link.
The Authentication Scheme panel for the current authentication type
appears.
2. From the For the group drop-down list, select the group that you
want to set up authentication for.
3. Click the Internal User Database Authentication option link
toward the bottom of the panel.
Note
There is no other configuration required for internal database
authentication.
Setting up RADIUS server authentication
If the RADIUS authentication feature is licensed, the FirePass server can
authenticate using a RADIUS server. FirePass server fully supports RSA
extensions for RADIUS and is RSA-certified.
To set up RADIUS server authentication
1. Under the Server tab, click the Authentication link.
2. From the For the group drop-down list, select the group that you
want to set up authentication for.
3. Click the RADIUS authentication link from the list of options
toward the bottom of the panel.
4. In the Timeout box, enter the number of seconds before timing out
the authentication process.
Five seconds is recommended.
5. In the Retries box, enter the number of authentication retries.
Five retries is recommended.
6. In the Server box, enter the server’s name or IP address.
7. In the Port box, enter the server’s port.
By default, the port is 1645. If a different port is being used on the
RADIUS server, set the FirePass server to match.
3 - 24
8. In the Shared Secret box, enter the shared secret for the RADIUS
server.
9. (Optional) If you want to use a backup RADIUS server, select the
Use a Backup RADIUS Server option and enter the backup
server’s name or IP address, port number, and shared secret.
Page 71

Setting Up FirePass Server Security
10. Click the Save Settings button.
To test the RADIUS authentication settings
1. Click the Test button.
2. Enter a user name and password in the RADIUS server, and then
click the Test button.
Setting up a RADIUS server to work with the FirePass server
To use SecurID, make sure that the SecurID Radius service is running. The
FirePass server does not authenticate to the native SecurID protocol.
Even if the RADIUS service has been started from the SecurID options
window on an NT SecurID server, the service may not be active. In the
Windows Services Manager, make sure that the service is set to start each
time the server boots and is currently running. The RADIUS authentication
takes place on a different port than native SecurID authentication.
On the RADIUS server, the FirePass server needs to be set up as a client to
the RADIUS server. Then, a shared secret needs to be created and added to
both the RADIUS server and the FirePass server so the RADIUS server can
trust the FirePass server.
On all Secure ID servers, the SecurID server needs to be made a client of
itself to make the RADIUS server function. The RADIUS service functions
as a standalone process and if the SecurID server is not set up as a client of
itself, it rejects the authentication request and not store anything in the logs,
making this problem difficult at best to diagnose. The FirePass server
merely reports that the authentication has failed.
Note
The FirePass server uses the Radius protocol when communicating with the
RSA Radius or ACE server. If you are using a RSA ACE server, you must
add support for the Radius protocol in order for the FirePass server to
communicate with it. You can do this by adding a “Rad ius Agent Host” to
the RSA server configuration. For more information, see the documentation
for your RSA server.
Setting up Windows domain server authentication
If the Windows Domain authentication feature is licensed, you can use
Windows Domain authentication to authenticate users against an internal
Windows NT/2000/2003 based server. The following two authentication
modes are supported:
FirePass™ Server Administrator Guide 3 - 25
◆
Native NTLM authentication
Native NTLM authentication is supported if you specify domain
administrative credentials when you set up Windows Domain
Page 72

Chapter 3
authentication on the FirePass server. This allows FirePass server to add
a machine account for itself, join the domain, and create a trust
relationship with the Primary Domain Controller (PDC). FirePass server
can then authenticate users using native NTLM services.
◆
Netlogon Share
If you do not specify domain administrative credentials when you set up
Windows Domain authentication on the FirePass server, then FirePass
server uses a more basic method for authenticating users. FirePass server
connects to the Primary Domain Controller netlogon share using the
authenticating user’s credentials to determine whether the user has a
valid account within the domain.
To set up Windows domain server authentication
1. Under the Server tab, click the Authentication link.
The Authentication Scheme screen opens.
2. From the For the group drop-down list, select the group that you
want to set up authentication for.
3. Click the Windows Domain Authentication link at the bottom of
the panel.
The Windows Domain Authentication Scheme screen opens.
4. In the Domain Name box, enter the name of the Windows domain.
5. (Optional) In the PDC Server Name box, specify the name of the
Primary Domain Controller (PDC) server if you want to use a
particular PDC when joining the Windows domain, or if the PDC is
on a different subnet than the FirePass server.
6. (Optional) In the WINS Server IP Address box, specify the IP
address of the WINS server to aid in name resolution of the
configured domain or PDC.
Note: The WINS server IP address is usually only necessary if the
domain and PDC are on a different subnet than the FirePass server.
7. If there are FirePass server users with identical user names
belonging to different Domains, select the FirePass Logon
Formatted as DOMAIN\Username option to store the user’s
Domain as part of their FirePass server logon user name.
Note: This option is only necessary if there are FirePass server
users with identical user login names belonging to different
domains.
If you select this option, each user must log in to the FirePass server
using the format of DOMAIN\username.
8. If the FirePass server is able to retrieve Windows Domain groups
from the configured Domain, select a group from the User Must
Belong to Domain Group drop-down list.
This option restricts authentication to users within that domain
group.
3 - 26
Page 73

9. If the FirePass server is to become part of the Windows domain and
perform native NTLM authentication services, click the Join
Windows Domain option. Then specify the Domain Admin Name
and Domain Admin Password.
10. Click the Save Settings button.
To test the Windows Domain authentication settings
1. Click the Test Saved Settings button.
2. Enter a user name and password in the Windows domain, and then
click the Test Domain Authentication button.
Setting up LDAP server authentication
If the LDAP authentication feature is licensed, the FirePass server can
authenticate using any LDAP database, including a Windows Active
Directory.
Setting Up FirePass Server Security
To set up LDAP server authentication
1. Under the Server tab, click the Authentication link.
The Authentication Scheme screen opens.
2. From the For the group drop-down list, select the group that you
want to set up authentication for.
3. Click the LDAP Authentication link in the list of options.
4. In the Host box, enter the name or IP address of an LDAP server.
5. In the Port box, enter an LDAP port such as 389.
6. If you want to use SSL, select the Use SSL Connection option.
7. Do either of the following:
• Select the Lookup User's DN Using Template option. Then, in
the User DN Template box, enter a User DN template. Use
%logon% in the expression to insert a user name.
For example:
uid=%logon%,ou=People,o=acme
• Select the Lookup User's DN Using Query option. In the User
DN For Query box, enter a User DN query. In the Password
box, enter a password.
In the Search Base DN box, enter a Search Base DN to specify
where DN searches start from. For example:
ou=People,o=acme
FirePass™ Server Administrator Guide 3 - 27
In the Search Query Template box, specify a search query
template. Use %logon% in the expression to insert a user name.
For example:
(&(uid=%logon%))
8. Click the Update button.
Page 74

Chapter 3
Setting Up VASCO DigiPass authentication
If the VASCO DigiPass authentication feature is licensed, the FirePass
server can authenticate using a VASCO server.
Each user is issued a security token that generates a unique and dynamically
time-limited password. The server has a similar algorithm associated with
the token’s serial number. When logging in, the user enters a static password
and a dynamic password generated by the token.
Typically, the FirePass server comes preconfigured with the VASCO token
keys. If necessary, you can import new tokens into the server from a
VASCO file.
To set up VASCO DigiPass authentication
1. Under the Server tab, click the Authentication link.
The Authentication Scheme screen opens.
2. From the Group drop-down list, choose the group that you want to
set up authentication for.
3. Click the VASCO DigiPass Authentication link at the bottom of
the panel.
The VASCO DigiPass Authentication Scheme screen opens. The
tokens are listed in the Tokens section.
4. (Optional) To import additional tokens from a VASCO file, click
the Browse button and select the file. Then, in the Encryption box,
enter the encryption key and click the Import button.
Note: To assign a token to a user, enter the token ID in the User
Details panel when you add or edit a user’s properties. (See
Manually adding user accounts, on page 3-11, or Changing user
accounts, on page 3-19.)
5. (Optional) To delete a token, select it in the Tokens section and
click the Delete Selected button.
3 - 28
Page 75

Setting up certificates
A valid server certificate is very important in establishing a transparent
HTTPS connection. The browser running on the user’s computer checks the
certificate against its built-in list of Certificate Authorities and verifies that it
has not expired and that the name in the certificate matches the FirePass
server’s DNS name. If there is an error or a mismatch, some browsers
display security warnings; other browsers, notably wireless ones, may refuse
a connection.
If the FirePass server is a pilot deployment, it comes with a preinstalled
server certificate that contains a server-name.FP.com URL. If not, the
FirePass server now comes pre-configured with a default SSL server digital
certificate of firepass.company.xyz, signed by a FirePass root Certificate
Authority. This certificate may be used for initial FirePass server
configuration, testing, and licensing, but must not be used in a production
FirePass server. You receive warning messages from your web browser
when using this default certificate, indicating that the certificate signing
authority is unknown and that the certificate name does not match that of
your server.
Setting Up FirePass Server Security
Generating a new certificate request
When you deploy the FirePass server into production, you must purchase
and install a digital certificate matching the FirePass server’s configured
host name. You can use the FirePass Administrative Console to generate a
request to a Certificate Authority for a valid certificate. (See Generating a
server certificate request, on page 3-30.)
Installing a new certificate
You can change the FirePass server name to one that is appropriate for your
site, and then generate and install a new server certificate that uses the new
server name. It is important to keep your server certificate valid by renewing
it as necessary, usually every year. You can check the expiration date of the
server certificate on the Certificates panel. (See Installing or renewing a
server certificate, on page 3-31.)
Using certificates to authenticate client computers
You can also install an optional client root certificate and optional certificate
revocation list (CRL), and configure the FirePass server to validate client
certificates installed at each user’s computer. You can use the client
certificates as part of a two-factor authentication system, or to limit access to
particular FirePass server Webifyers. (See Using client certificates to
authenticate a user’s computer, on page 3-31.)
FirePass™ Server Administrator Guide 3 - 29
Page 76

Chapter 3
Changing the FirePass server name
If you have a pilot FirePass server named server-name.FP.com (or some
other default name), and you want to generate and install a new server
certificate that is specific to your site, you must first change the server name.
To change the FirePass server name
1. Under the Server tab on the left side of the Administrative Console,
click the Maintenance link.
2. Click the Network Configuration link.
3. Click the Hosts link.
Enter the new fully-qualified domain name (FDQN). Be sure to
make a corresponding entry in your domain name server.
4. Generate and install a new server certificate, as below.
Generating a server certificate request
To obtain a server certificate, you must first generate a certificate request.
Then you must submit the request to a Certificate Authority.
To generate a server certificate request
1. Under the Server tab on the left side of the Administrative Console,
click the Maintenance link.
The Maintenance screen opens.
2. Click the Network Configuration link.
3. Click the Web Services link at the top of the screen.
4. Click the Configure link for the host name you intend to use.
5. On the configuration screen, check the Use SSL box.
6. Two new links now appear below this box: Edit certificates, and
Generate new certificate request. Click the Generate... link.
7. Enter the correct information in the certificate request.
All the information in the certificate request must be valid. If this is
your first certificate request, the issuer may require additional
information to verify your identity and validity of the data you have
submitted.
8. (Optional) If you want to generate a new private key, select the
Private Key option and enter an encryption password.
3 - 30
9. Click the Generate Certificate Request button.
10. On the following screen, click the Here link at the bottom of the
panel to download a Zip file that contains a certificate request.
Page 77

11. Unzip the zip file and send the certificate request file (called
newcert.csr) to a known Certificate Authority to be signed. When
asked by the Certificate authority, specify the type of the certificate
as mod_ssl.
Installing or renewing a server certificate
When you receive a new signed certificate from the Certificate Authority,
you must install the certificate and, if you requested one, the new private
key.
To install or renew a server certificate
1. Under the Server tab on the left side of the Administrative Console,
click the Maintenance link.
2. Navigate to Network Configuration/Web Services.
Click the Configure SSL Certificates link.
3. Select the certificate you want to renew and click the Edit link, or
click the Add New Certificate button.
Setting Up FirePass Server Security
4. Copy the new signed certificate to the clipboard and then paste into
the upper text box.
5. If you generated a new key, paste it into the middle text box, and
then enter the encryption password you specified when you
generated the certificate request.
6. If your certificate comes from a chained Certificate Authority, paste
the intermediate certificate chain in the lower text box.
7. Click the Go button.
Using client certificates to authenticate a user’s computer
The server certificate verifies the server’s identity to a user’s computer. You
also can require client certificates verifying the identity of a user’s computer
to the server, or limiting access to particular FirePass Webifyers. Client
certificates can be used as part of a two-factor authentication system, where
users must have a valid client certificate installed on their computer in
addition to knowing their user name and password. Alternatively, valid
client certificates can be used to restrict access to particular Webifyers. For
example, access to the FirePass server SSL VPN service can be limited to a
laptop computer equipped with a valid client certificate. The user then
would have access to the SSL VPN service from the laptop, but would not
have access from other locations such as public access kiosks.
FirePass™ Server Administrator Guide 3 - 31
To use client certificates, you must have a server configured as a Certificate
Authority (CA) that can generate a client root certificate and the client
certificates based on the client root certificate. Or, you can purchase the
client root certificate and client certificates from an external CA.
Page 78

Chapter 3
Here is an overview of the steps for using client certificates to authenticate a
user’s computer:
◆
Install the client root certificate on the FirePass server. (See Installing a
client root certificate, following.)
◆
Enable the validation of client certificates. (See Enabling validation of
client certificates, on page 3-33.)
◆
Configure client certificate validation as part of the authentication for a
group. (See Configuring client certificate authentication, on page 3-33.)
◆
Instruct users how to download and install the client certificate on their
computer. (You can also email the client certificates to users.)
The FirePass server can then request and validate the computer’s client
certificate against its installed client root certificate as part of the
authentication process.
Whenever necessary, you can also install an optional certificate revocation
list (CRL) that contains a list of client certificates for users who you want to
deny access to the FirePass server. For example, you can exclude the client
certificates for users who have left your company. (See Installing a
certificate revocation list, on page 3-34.)
Installing a client root certificate
To install a client root certificate on the FirePass server
1. Under the Server tab on the left side of the Administrative Console,
click the Security link.
1. Click the Certificates link.
The Certificates screen opens.
2. In the Configure SSL Client Certificate Validation section, click the
Install Cert link.
3. Do one of the following:
• Click the Browse button and select the client root certificate file.
• Copy the contents of the client root certificate and paste it into the
text box.
4. Click the Install Certificate button.
Note
You can only have one client root certificate installed at any one time. If a
root client certificate is already installed, it is overwritten when you install
the new one. You can also delete the existing root client certificate by
clicking the Delete Certificate button if you do not want any root certificate
installed.
3 - 32
Page 79

Enabling validation of client certificates
To enable validation of client certificates
1. After you have installed a client root certificate, select the Request
and Validate Client Certificate option on the Certificates panel to
enable validation of client certificates.
This option configures the FirePass server to request a client
certificate as part of the SSL session negotiation which occurs
before the client computer attempts to log in to the FirePass server.
The server also validates and logs the client’s certificate, but it does
not restrict access to the server. For information on restricting
access using client certificates, see Configuring client certificate
authentication, following.
2. (Optional) To have the server automatically enter the user name on
the Login panel with the common name (CN) of the client
certificate, select the Auto-fill Login Username with Certificate
Common Name option.
This is useful if the client certificate common name is the same as
the user’s login name. The user must still enter a valid password to
gain access to the FirePass server.
Setting Up FirePass Server Security
Configuring client certificate authentication
After installing the client root certificate and enabling the validation of
client certificates, you can configure client certificate validation as part of
the authentication for a group.
To configure client certificate authentication
1. Under the Server tab, click the Authentication link. From the For
the group drop-down list, select the group that you want to set up
authentication for.
2. In the Configure Client-Side SSL Certificate Validation section ,
choose one of the following options from the Client Certificate
drop-down menu:
• Not Required
This option disables client certificate authentication. The
FirePass server requests and logs a client certificate, but users
without client certificates are given access to the server.
• Required for User Login
This option enables client certificate authentication for user login
and requires a valid client certificate for two-factor authentication
of users. For example, you can configure a combination of
internal database authentication with client certificate validation .
To require that the user name on the Login panel must match the
common name (CN) of the client certificate, select the Login
Username Must Match Certificate Common Name option.
FirePass™ Server Administrator Guide 3 - 33
Page 80

Chapter 3
• Required for Access to Select Webifyers
This option enables client certificate authentication for access to
a set of Webifyers that you specify. Click the Webifyers
Requiring Client Certificate for Access option and then select
the Webifyers you want to restrict access to. (You can also
restrict access to these Webifyers by choosing the Limit option in
the Client Certificate Validation section of each Webifyer
management panel.) To require that the user name on the Login
panel must match the common name (CN) of the client
certificate, select the Login Username Must Match Certificate
Common Name option.
Installing a certificate revocation list
To install a certificate revocation list (CRL) on the FirePass
server
1. Under the Server tab on the left side of the Administrative Console,
click the Security link.
2. Click the Certificates link.
The Certificates screen opens.
3. In the Configure SSL Client Certificate Validation section, click
the Install CRL link.
4. Do one of the following:
• Click the Browse button and select the CRL file.
• Copy the contents of the CRL and paste it into the text box.
5. Click the Install CRL button.
3 - 34
Page 81

Setting Up FirePass Server Security
Limiting access to the administrative console by IP
address
To increase the security of the FirePass server, you can limit access to the
Administrative Console by source IP address and/or subnets. Your current
browser’s source IP address is always allowed in order to protect you from
accidentally locking the server.
To limit access to the Administrative Console by IP address
1. Under the Server tab on the left side of the Administrative Console,
click the Security link.
2. Click the Access by IP link.
The Limit IP Access screen opens.
3. In the Option 1 text box, enter the IP addresses or subnets you want
to allow access to. Separate addresses in the list with a blank space.
Use the format xxx.yyy.zzz.www for an explicit address, or
xxx.yyy.zzz.www/vv for an address/mask. You can also use this
alternative form for a subnet: xxx.yyy.zzz. For example:
192.168.2.1 192.168.2.3
192.168.2.1/16
192.168.2
What’s next?
4. Click the Go button next to the Option 1 text box.
5. If you want to allow unlimited access to all IP addresses again, click
the Go button next to the Option 2 text box.
Now that FirePass server security is set up, you are ready to use the
Administrative Console to finish the remaining configuration tasks:
• Configure the Webifyers that you want to make available to users. For
example, configure the SSL VPN Webifyer, if necessary. For more
information, see Chapter 4, Configuring the FirePass Webifyers.
• (Optional) If necessary, customize the appearance of the user’s home
panel, such as the logo and terms used for logging in. For more
information, see Customizing the user’s home page, on page 5-31.
FirePass™ Server Administrator Guide 3 - 35
Page 82

Chapter 3
3 - 36
Page 83

4
Configuring the FirePass Webifyers
• Overview of the FirePass Webifyers
• Configuring the My Files Webifyer
• Configuring the My NFS Webifyer
• Configuring the My Intranet Webifyer
• Configuring the My E-mail Webifyer
• Configuring the Terminal Services Webifyer
• Configuring the AppTunnels Webifyer
• Configuring the Host Access Webifyer
• Configuring SSL-VPN
• Configuring the My Desktop Webifyer
• Configuring the X-Windows Access Webifyer
• Using client certificate validation for Webifyers
Page 84

Page 85

Overview of the FirePass Webifyers
The FirePass™ Webifyers™ provide remote users with web-based remote
access to a wide variety of network applications and resources, including
email servers, Intranet servers, file servers, terminal servers, and legacy
mainframe, AS/400, Telnet, and X-Windows applications. Each Webifyer
renders its respective resource into and out of Web browser formats. The
Webifyer’s particular tasks are dictated by the application being accessed
and the protocol being supported.
Webifyers are separately licensed. These Webifyers are available with
Release 4.0:
◆
My Files
Allows remote users to browse, upload, download, move, copy, or delete
files on shared directories. Supports SMB Shares, Windows
Workgroups, Windows NT 4.0 and Windows 2000 domains, and Novell
5.1/6.0 with Native File System pack. (See Configuring the My Files
Webifyer, on page 4-3.)
◆
My NFS
Allows remote users to browse, upload, download, move, copy, or delete
files on UNIX NFS servers. (See Configuring the My NFS Webifyer, on
page 4-6.)
Configuring the FirePass Webifyers
◆
My Intranet
Allows remote users access to internal Web servers, including Outlook
Web Access email servers. (See Configuring the My Intranet Webifyer,
on page 4-8.)
◆
My E-mail
Allows remote users access to POP/IMAP/SMTP email servers and
LDAP address books using a Web browser. Users can send and receive
messages, download attachments, and attach files stored on the internal
LAN to send email messages. (See Configuring the My E-mail Webifyer,
on page 4-11.)
◆
Terminal Services
Provides remote users with Web-based access to Microsoft Terminal
®
Servers, Windows XP network-access-enabled desktops, Citrix
MetaFrame applications, and VNC servers. No additional enabling
software is required on the Terminal Servers or Windows XP computers
being accessed. (See Configuring the Terminal Services Webifyer, on
page 4-15.)
◆
AppTunnels
Provides access from client applications on remote user’s computers to
TCP/IP application servers. The AppTunnels Webifyer enables a
client-side application to communicate back to the corporate application
server using a secure tunnel between the user’s Web browser and the
FirePass server. (See Configuring the AppTunnels Webifyer, on page
4-18.)
FirePass™ Server Administrator Guide 4 - 1
Page 86

Chapter 4
◆
Host Access
Provides remote users with Web-based access to legacy VT100, VT320,
Telnet, X-Term, and IBM 3270/5250 applications without any
modifications to the applications or application servers. (See Configuring
the Host Access Webifyer, on page 4-21.)
◆
SSL VPN
Provides remote users with the functionality of a traditional IPSec VPN
client. Unlike an IPSec VPN client, the SSL VPN Webifyer does not
require any pre-installed software or configuration on the remote user’s
computer, and no server-side changes are required. (See Configuring
SSL-VPN, on page 4-23.)
◆
My Desktop
Provides employees with full remote control access to their desktop
computers on the internal LAN. (See Configuring the My Desktop
Webifyer, on page 4-31.)
◆
X-Windows Access
Provides remote users with access to X-Windows applications hosted on
UNIX and Linux servers.
Because you configure Webifyers separately for each group, you can allow
different types of access to different groups of users. For example, you can
allow one group of users to use SSL VPN, and prevent another group from
using it.
4 - 2
Page 87

Configuring the FirePass Webifyers
Configuring the My Files Webifyer
The My Files Webifyer allows remote users to browse and view files stored
on internal LAN file servers. As the FirePass administrator, you can
configure the My Files Webifyer to limit access for a particular group to the
file shares you specify. The FirePass server does not allow unrestricted
browsing, or browsing folders above the level of the share you specify.
Defining Network Folder Favorites for the My Files Webifyer
To define a network folder favorite for the My Files
Webifyer
1. Under the Webifyers tab, click the My Files link.
2. From the For the group drop-down list, select the group that you
want to configure the My Files Webifyer for.
3. In the Edit Network Folder Favorites section, click the Add New
link.
4. In the Name box that appears, specify a name for the file share that
you are defining as a My Files Favorite.
This name is displayed as a label for the My Files Favorite in each
user’s Web browser under the My Network Files icon. For example:
Company Literature.
Important: The Administration Console does not verify the path you
specify, so be sure to enter it correctly.
5. In the Path box, specify a path for the file share in Microsoft UNC
format. For example:
\\server-name\share_name
You can also use the variables %username% or %group% in the
path to insert the user’s login name or group in the path. For
example, you might define a path for a favorite to each user’s folder
that is named the same as the user’s login name. That is, the path
\\server-name\%username% links to \\server-name\john_doe
for the user with the login name of john_doe.
6. Click the Add New button.
Limiting a group’s access to the Network Folder Favorites
If you want to limit a group’s access to the Network Folder Favorites you
specified, select the Limit MyNetwork Access to Folder Favorites Only
option.
FirePass™ Server Administrator Guide 4 - 3
Page 88

Chapter 4
Enabling virus scanning and file uploading for the My Files
Webifyer
By default, users can download files with the My Files Webifyer. You can
also choose to allow users in a group to upload files, and you can enable
virus scanning of all downloaded and uploaded files. If the FirePass server
detects a virus in the files, it terminates the download or upload process and
notes the termination in the session log.
Note
The FirePass server virus scanner is based on the open source virus
signatures. For information on the latest virus signatures, see
www.openantivirus.org.
To enable virus scanning for the My Files Webifyer
1. In the File Upload section of the My Files screen, select the Enable
Virus Scanner option.
To update the virus signatures for the My Files Webifyer
1. In the File Upload section of the My Files screen, click the Browse
button, select the VirusSignatures.credo file, and then click the
Upload button.
To enable file uploading for the My Files Webifyer
1. In the File Upload section of the My Files screen, select the Enable
File Upload option.
Configuring advanced settings for the My Files Webifyer
If the FirePass server contains two NICs, it is important to configure a
broadcast address for the internal NIC. If there is a WINS server on your
network, specify its address to facilitate name resolution of Windows
servers using the My Files Webifyer.
To configure advanced settings for the My Files Webifyer
1. In the Broadcast Address box in the Advanced My Network Files
Settings section, enter the broadcast address you want the FirePass
server to use for network broadcasts.
If the FirePass server contains one NIC, enter the server’s IP address
if the address is not already entered by default. If the FirePass server
contains two NICs, enter the IP address of the internal NIC (that is,
the NIC connected to the internal LAN).
4 - 4
2. In the WINS Address box, enter the IP address of the WINS server.
Page 89

Configuring the FirePass Webifyers
Important: The WINS Address setting is required for multi-segment
networks where the FirePass server and the LAN are on different
network segments, or when the LAN has multiple segments. If you
do not specify the IP address of the WINS server in a multi-segment
LAN environment, the My Files Webifyer does not work properly.
3. In the Default Domain/Workgroup box, enter the default domain
and workgroup for the FirePass server.
Important: The Default Domain/Workgroup setting is required for
deployments where the IP address of the FirePass server is not on
the target LAN.
4. To have the FirePass server attempt to automatically log into My
Files servers and shares using each user’s FirePass login user name
and password, select the Auto-login to My Network shares using
FirePass user login credentials option.
Using client certification validation for the My Files Webifyer
You can restrict access to the My Files Webifyer to users in a group who
have a valid client certificate installed on their computer. For more
information, see Using client certificate validation for Webifyers, on page
4-38.
FirePass™ Server Administrator Guide 4 - 5
Page 90
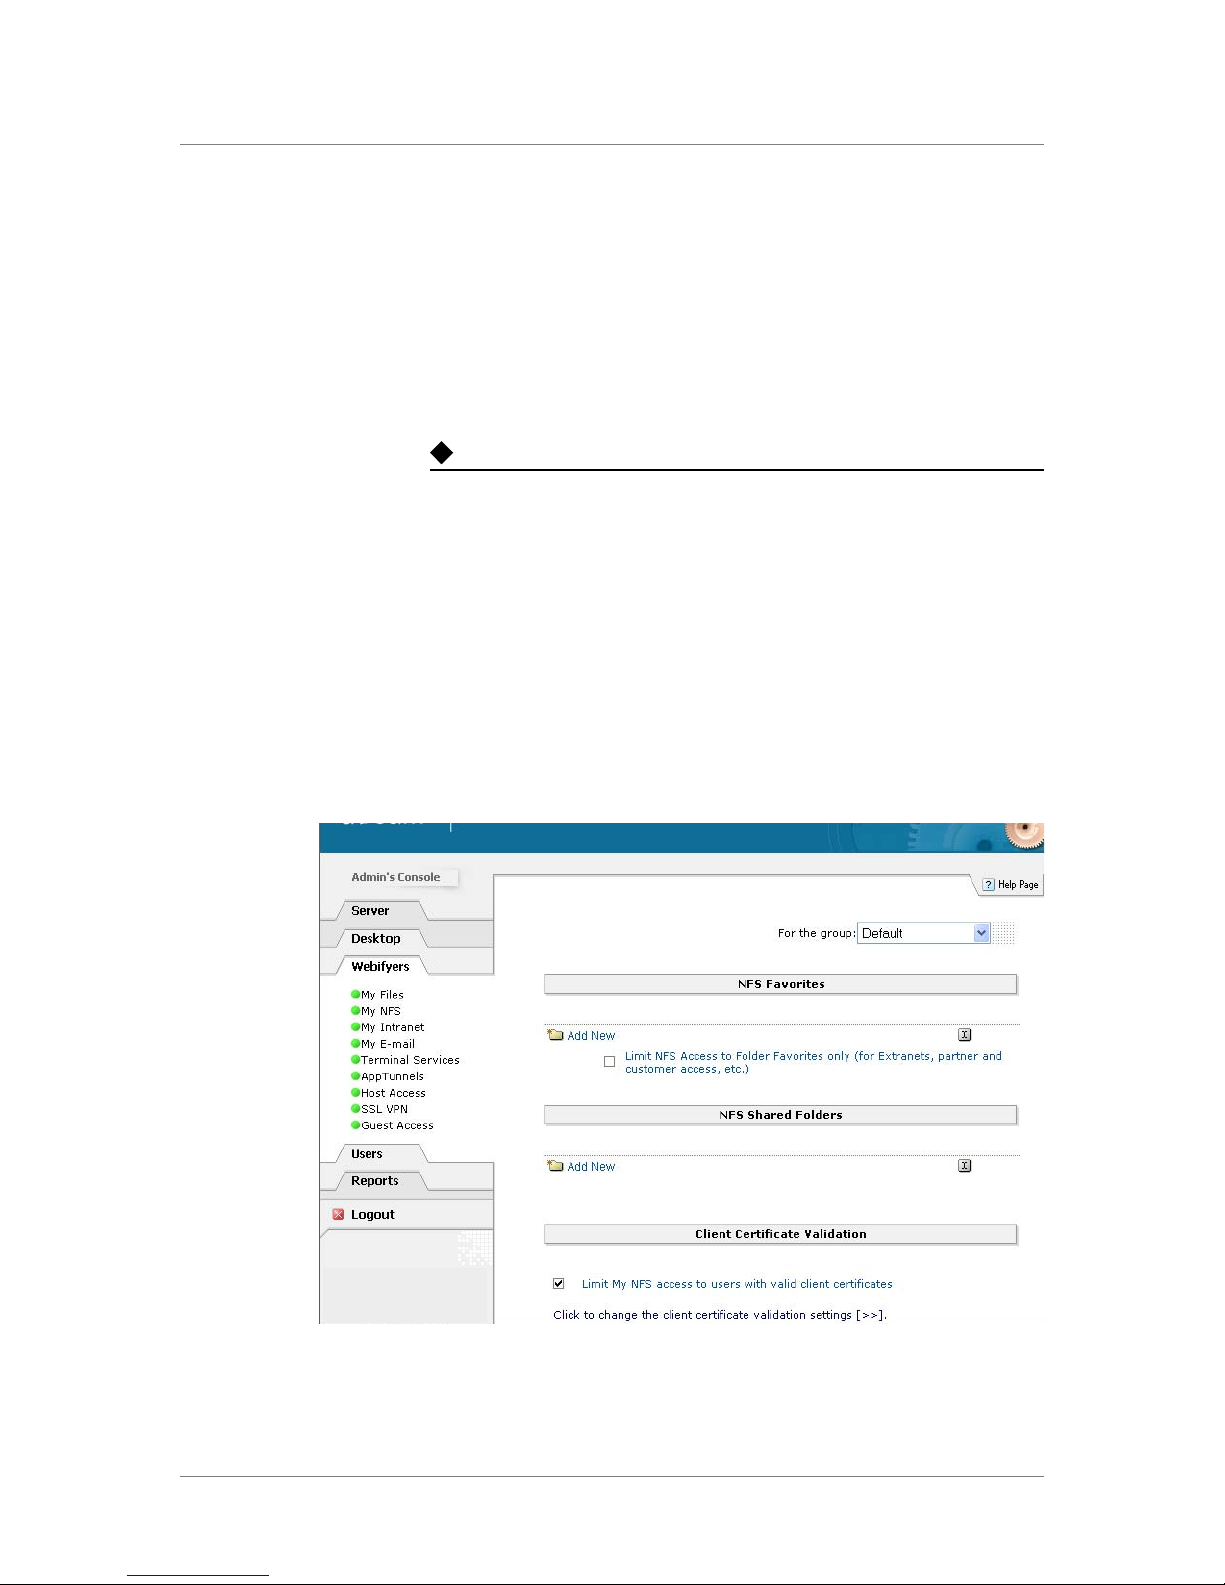
Chapter 4
Configuring the My NFS Webifyer
Like the My Files Webifyer, the My NFS Webifyer allows remote users to
browse and view files stored on internal UNIX NFS file servers. As the
FirePass administrator, you can configure the My NFS Webifyer to limit
access for a particular group to the NFS file shares you specify. The
FirePass server does not allow unrestricted browsing, or browsing
directories above the level of the specified server share.
Note
FirePass users cannot access NFS shares until they have been assigned a
UNIX-style User ID and Group ID. (See Using NFS user permissions from
a UNIX password file, on page 3-17.)
Defining favorites for the My NFS Webifyer
To define a NFS favorite for the My NFS Webifyer
Under the Webifyers tab, click the My NFS link to open the My NFS
Webifyer screen.
4 - 6
1. From the For the group drop-down list, select the group that you
want to configure the My NFS Webifyer for.
2. In the NFS Favorites section, click the Add New link.
Page 91

Configuring the FirePass Webifyers
3. In the Name box, specify a name for the path that you are defining
as a My NFS Favorite.
This name is displayed as a label for the My NFS Favorite in the
user’s Web browser under the My NFS Files icon. For example:
Legal Documents.
4. In the Path box, specify a path for the NFS file share. For example:
server-name.company.com:/directory_name
Important: The Administration Console does not verify the path you
specify, so be sure to enter it correctly.
5. Click the Add New button.
Defining NFS shared folders for the My NFS Webifyer
You can specify NFS shared folders that you want to allow remote users to
browse with the My NFS Webifyer icon on the left side of the user’s Web
browser window. (The My NFS favorites are displayed on the right side of
the browser window.) The FirePass server queries the NFS server for any
exported file systems.
To define a NFS shared folder for the My NFS Webifyer
1. In the NFS Shared Folders section of the My NFS screen, click the
Add New link.
2. In the Name box, enter the name for the path that you are defining
as a My NFS shared folder. This name is displayed as a label for the
NFS shared folder in the user’s Web browser. For example: Public
3. In the Path box, specify a path for the NFS shared folder. For
example:
server-name.company.com:/directory_name/public
Important: The Administration Console does not verify the path you
specify, so be sure to enter it correctly.
4. Click the Add New button.
Limiting a group’s access to the NFS Favorites
If you want to limit a group’s access to the NFS Favorites you specified,
select the Limit NFS Access to Folder Favorites Only option.
Using client certification validation for the My NFS Webifyer
FirePass™ Server Administrator Guide 4 - 7
You can restrict access to the My NFS Webifyer to users in a group who
have a valid client certificate installed on their computer. For more
information, see Using client certificate validation for Webifyers, on page
4-38.
Page 92
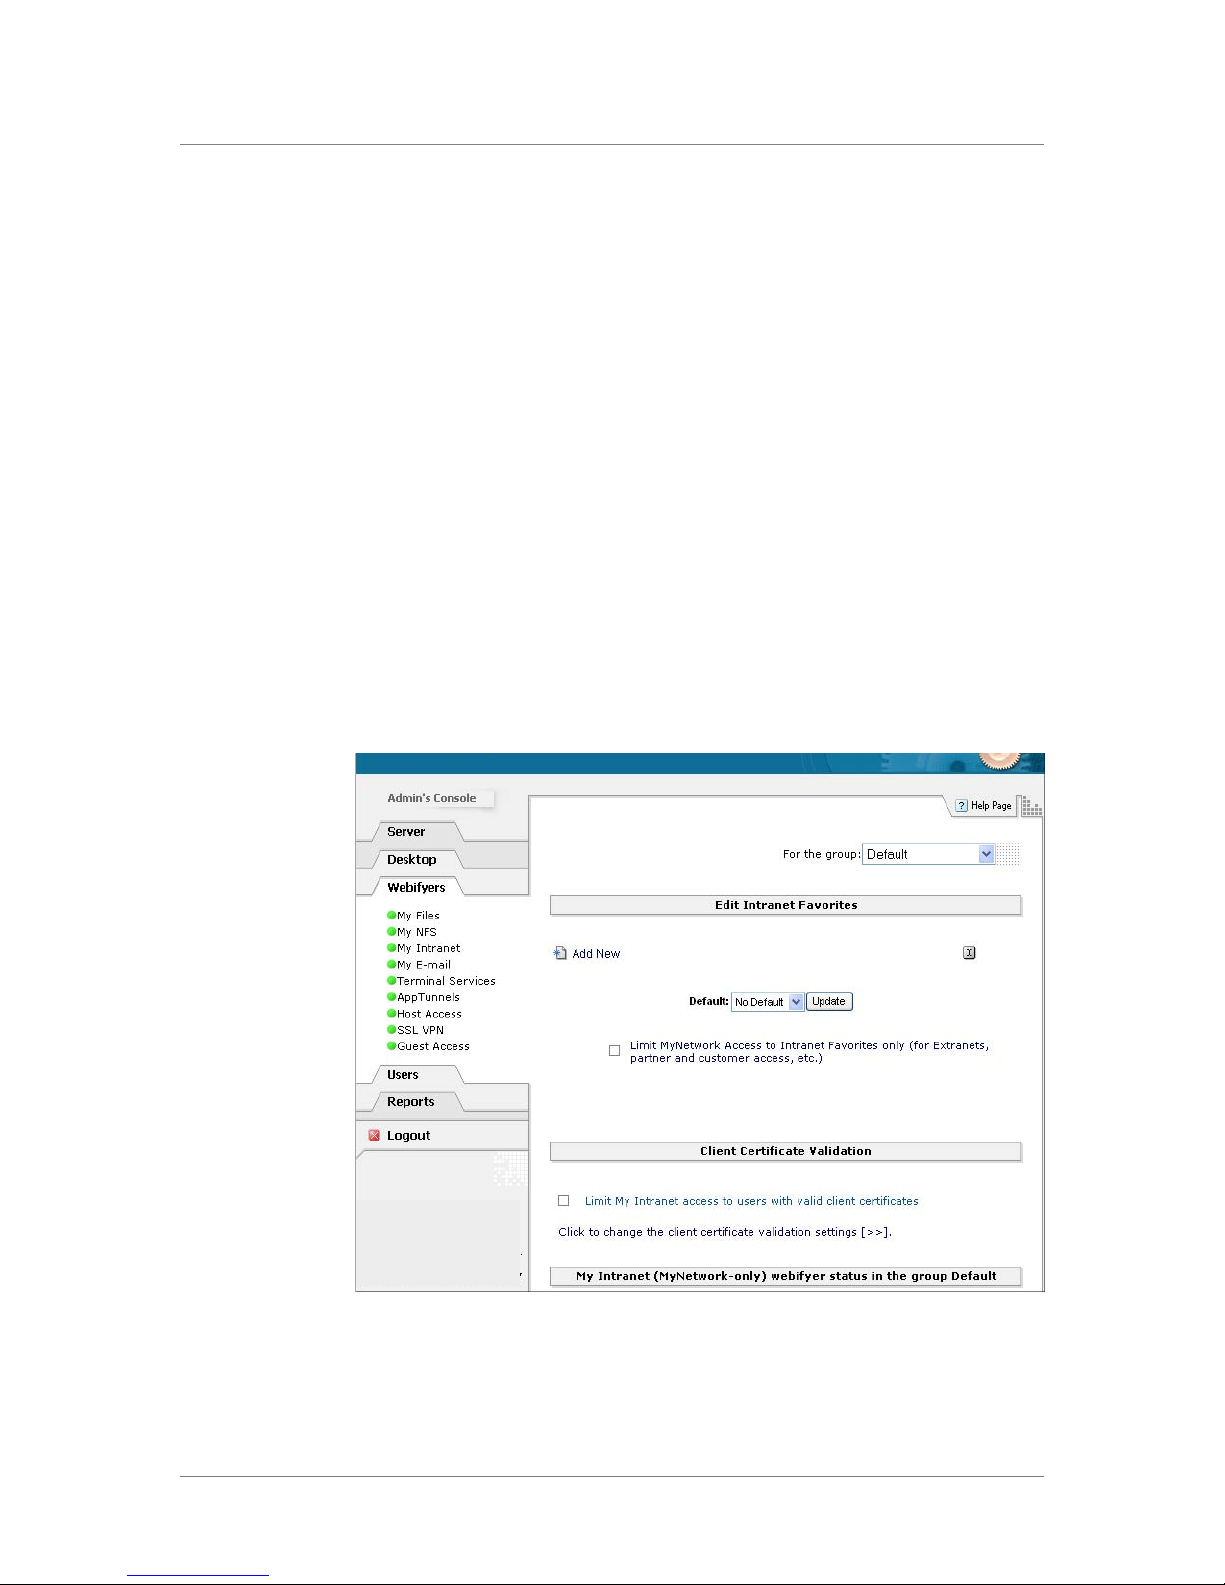
Chapter 4
Configuring the My Intranet Webifyer
The My Intranet Webifyer allows remote users to access Web servers on the
internal LAN in a unified and secure way. A user can either browse the
internal Web sites by the site’s name or internal IP address, or to use
Intranet Favorites that you define.
Defining intranet favorites for the My Intranet Webifyer
For each group, you can create a set of links to internal Web sites and URLs.
You can set any of these links or the Favorites screen as the default screen
that users see when displaying My Intranet for the first time during a
session. You can also specify whether you want a Web site to open inside
the existing browser window or in a separate window.
To define an Intranet favorite for the My Intranet Webifyer
Under the Webifyers tab, click the My Intranet link to open the My Intranet
Webifyer screen.
4 - 8
1. From the For the group drop-down list, select the group that you
want to configure the My Intranet Webifyer for.
2. In the Edit Intranet Favorites section, click the Add New link.
Page 93

Configuring the FirePass Webifyers
3. In the Name box, specify a name for the Intranet site that you are
defining as a My Intranet Favorite. This name is displayed as a label
for the My Intranet Favorite in each user’s Web browser under the
My Intranet icon. For example: Project XYZ Web Site
In the URL text box, specify the URL for an Intranet Web server.
For example:
http://server-name.company.com/index.html
4. (Optional) In the URL Variables box, specify variables to be either
appended or POSTed (see step 6) to the URL you specified in the
URL box. URL variables are useful in supporting automatic user
login to Intranet web sites or for customizing Intranet content for a
user. Specify the variables in the form:
variable1=value1&variable2=value2&variable3=value3
where the %username% and %password% parameters can be
used within values. The %username% and %password%
parameters are replaced with the user's FirePass login user name and
password.
For example, suppose you specify this URL:
http://server.company.com
and these URL variables:
show_custom_content=1&user=%username%@company.com
For a FirePass user named johndoe, these variables would result in
an actual Favorite link of:
http://server.company.com?show_custom_content=1&user=john
[email protected]
5. (Optional) If you want the URL variables you specified to be
POSTed instead of appended to the URL, select the Post URL
Variables option.
POSTing the variables is a more secure way to use a user name and
password for logging into an Intranet site, because the variables are
POSTed to the site instead of being included as part of the URL. For
more information on URL variables, see the Online Help for the My
Intranet Webifyer screen.
6. (Optional) In the Enforce User-agent box, specify a User-Agent
string which the FirePass server presents to the internal Web server
instead of the actual browser's User-Agent.
This option is useful in situations where you need to simplify the
FirePass content if errors are occurring.
Note: For Exchange 2000 OWA, it is necessary to simplify the
content by specifying the following User-Agent string: Mozilla/4.7
[en] (Windows NT 4.0; U)
FirePass™ Server Administrator Guide 4 - 9
Page 94

Chapter 4
The following table lists several other User-Agent strings.
Browser User-Agent String
IE 6.0 Mozilla/4.0 (compatible; MSIE 6.0; Windows 98;
Q312461)
IE 5.5 Mozilla/4.0 (compatible; MSIE 5.5; MSN 2.5; Windows
98)
IE 5.0 Mozilla/4.0 (compatible; MSIE 5.0; Windows NT;
IE 4.5 Mozilla/4.0 (compatible; MSIE 4.5; Windows NT)
IE 4.01 Mozilla/4.0 (compatible; MSIE 4.01; Windows NT)
Netscape 4.5 Mozilla/4.5 [en] (Win98; U)
Netscape 3.04 Mozilla/3.04Gold (Win95; U)
Opera 5 Opera/5.12 (Windows 2000; U) [en]
Opera 5 mimicking
Netscape
CPT-IE401SP1; DigExt)
Mozilla/4.0 (compatible; MSIE 5.0; Windows 98) Opera
5.01 [en]
Tip: An easy way to enter a user agent string is to copy and paste
the string from the Logons report. Click the Logons link under the
Reports tab, and copy the user agent string from the User Agent
column for various users in the group. Then paste the string into the
Enforce User-agent box in the My Intranet Webifyer screen.
7. To open the Intranet resource in a separate window on the user’s
screen, select the Open in New Window option.
8. Click the Add New button.
The Intranet Favorite is added to the Default drop-down list.
Limiting a group’s access to the Intranet Favorites
Using client certification validation for the My Intranet Webifyer
4 - 10
9. (Optional) To specify a default My Intranet Favorite that is accessed
automatically when users in the group open their My Intranet
Favorites, select a favorite from the Default drop-down list.
If you want to limit a group’s access to the Intranet Favorites you specified,
select the Limit MyNetwork Access to Intranet Favorites Only option.
You can restrict access to the My Intranet Webifyer to users in a group who
have a valid client certificate installed on their computer. See Using client
certificate validation for Webifyers, on page 4-38.
Page 95
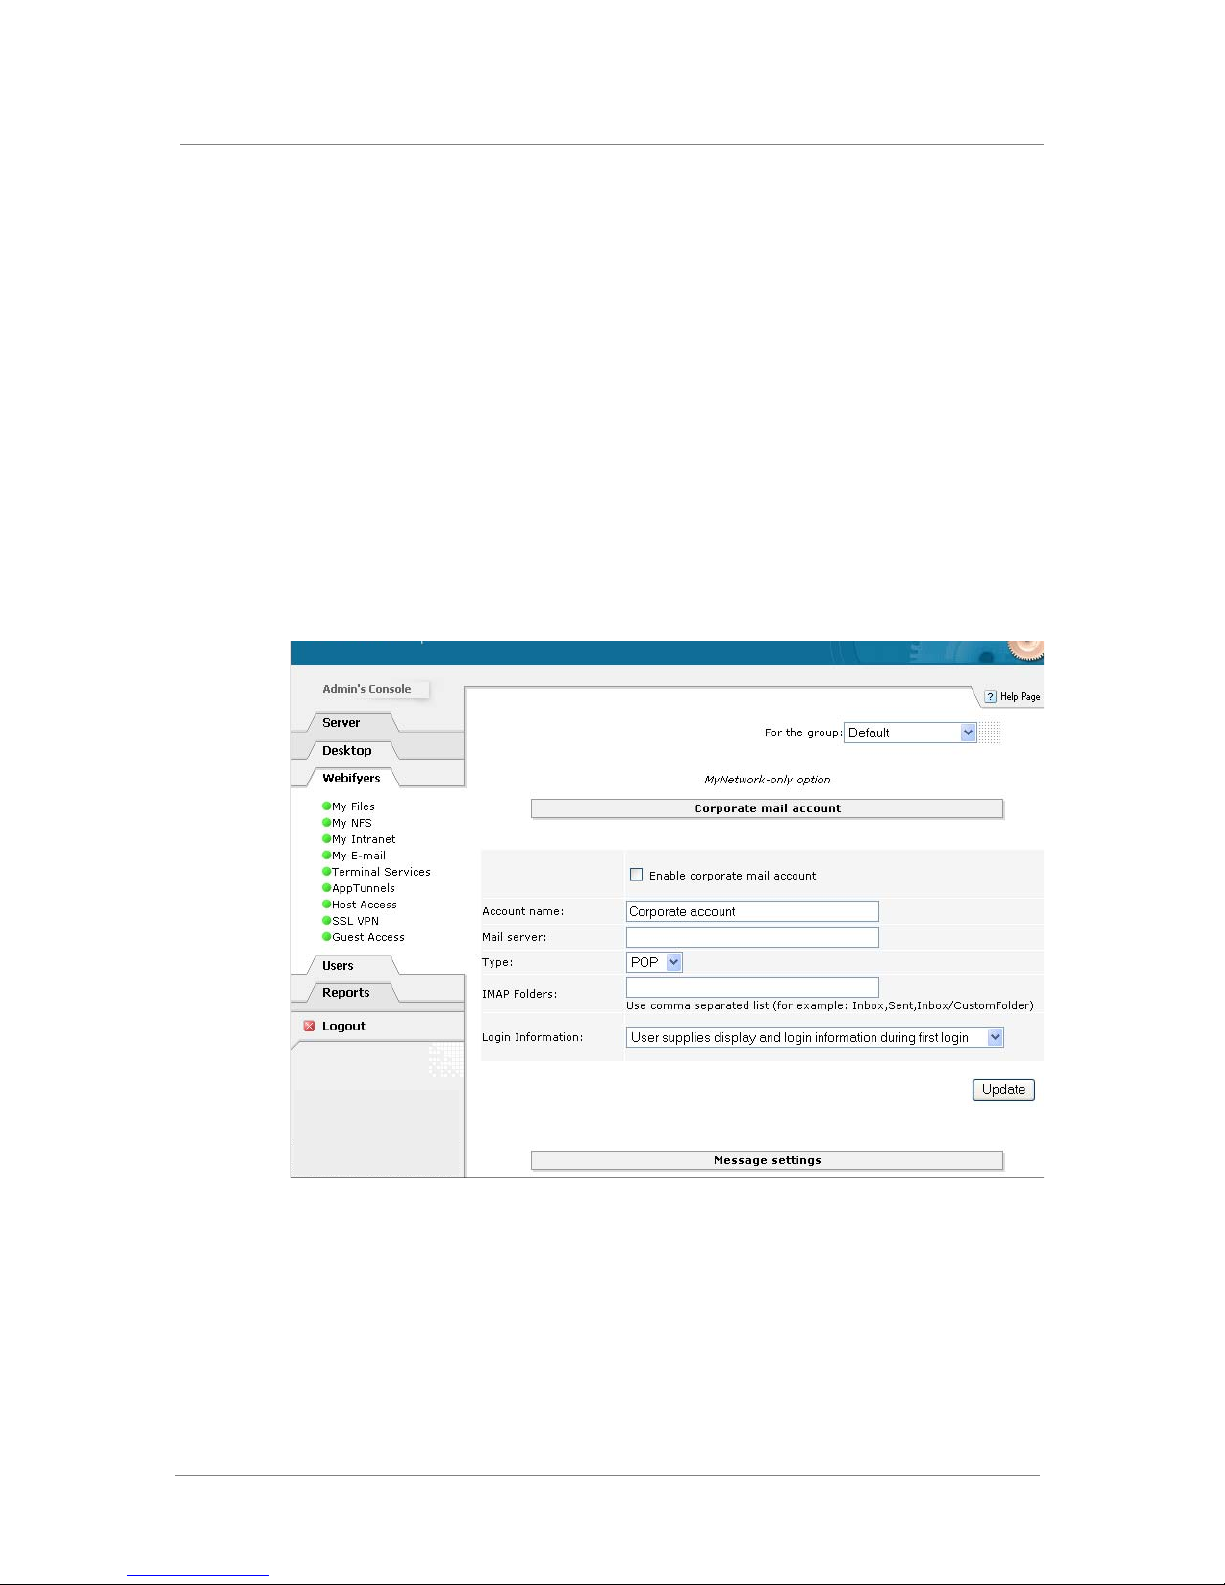
Configuring the FirePass Webifyers
Configuring the My E-mail Webifyer
The My E-mail Webifyer provides remote users with HTML access to
multiple POP and IMAP mailboxes, and LDAP address books. After
configuring a corporate email account, you can specify an LDAP server as a
source of email addresses instead of using the default list of FirePass users.
Configuring an email account
To configure an email account
Under the Webifyers tab, click the My E-mail link to open the My E-mail
Webifyer screen.
FirePass™ Server Administrator Guide 4 - 11
1. From the For the group drop-down list, select the group that you
want to configure the My E-mail Webifyer for.
2. Select the Enable corporate mail account option.
3. In the Account name box, enter a name, such as Corporate
Account, to identify the mail account.
4. In the Mail server box, enter the mail server’s host name or IP
address, such as f22.company.com.
Page 96

Chapter 4
5. From the Type drop-down list, select the mail server type (POP or
IMAP).
6. If you are using an IMAP mail server, enter a list of folders in the
IMAP Folders box that you want displayed. Enter a comma
between the folder names in the list.
This list prevents the confusion created by mail servers that display
items that are not email messages, such as contacts or calendars, as
empty email messages. Users can also add to the list themselves.
7. From the Login Information drop-down list, select one of the
following options:
• User supplies display and login information during first login
Select this option to obtain email information from each user
when they login for the first time.
• Use FirePass database for display and login information
Select this option to obtain each user’s email information from
the FirePass server’s internal database.
• Use LDAP query for mail server, display, and login
information
Select this option to obtain each user’s email information based
on an LDAP query. (See Obtaining email addresses from an
LDAP server, on page 4-13.)
8. Click the Update button.
Obtaining each user’s email information based on an LDAP query
You can dynamically obtain the mail server na me, display name, and login
information for each user based on an LDAP query.
To obtain each user’s email information based on an LDAP
query
1. From the Login Information drop-down list on the My E-mail
Webifyer screen, select Use LDAP query for mail server, display,
and login information.
A group of LDAP options appear.
2. In the LDAP server address box, enter the LDAP server name.
3. In the Port box, enter an LDAP port, such as 389.
4. If you want to use SSL, select the Use SSL Connection option.
5. In the Bind DN text box, enter the relative distinguished name to
bind to.
Note: You can leave this text box blank if you want to use the server
default.
4 - 12
6. In the Bind password box, enter a valid password.
Page 97

Configuring the FirePass Webifyers
Note: You can leave this text box blank if no authentication is
required.
7. In the Search Base box, enter the DN of the entry in the tree to be
used for the search. For example:
cn=Recipients,ou=Exchange,o=Acme, Inc.
8. In the Filter template box, enter a search filter. For example:
(&(uid=%s))
where %s is substituted by each user’s FirePass logon name.
9. In the Attribute for mail server box, enter the attribute in the
LDAP schema that contains the mail server name.
10. In the Attribute for user’s display name box, enter the attribute in
the LDAP schema that contains the user’s display name.
11. In the Attribute for user’s email address box, enter the attribute in
the LDAP schema that contains the user’s email address.
12. In the Attribute for user’s logon box, enter the attribute in the
LDAP schema that contains the user’s logon.
13. Click the Update button.
Disabling email attachment downloads
By default, email attachment downloads are enabled. If necessary, you can
disable attachment downloads.
To disable email attachment downloads
1. In the Message Settings section of the My E-mail Webifyer screen,
select the Disable attachment download option.
2. Click the Update button.
Obtaining email addresses from an LDAP server
By default, the My E-Mail Webifyer uses the FirePass internal database as a
source of email addresses. Alternatively, you can specify an LDAP server as
a source of email addresses.
To obtain email addresses from an LDAP server
1. In the Source for Address List section of the My E-mail Webifyer
screen, select the Use LDAP server to obtain addresses option
from the Address List drop-down list.
A group of LDAP options appear.
FirePass™ Server Administrator Guide 4 - 13
2. In the LDAP Server box, enter the LDAP server’s name or IP
address.
Page 98

Chapter 4
3. In the Port box, enter an LDAP port, such as 389.
4. If you want to use SSL, select the Use SSL connection option.
5. In the Bind DN box, enter the relative distinguished name to bind
to.
Note: You can leave this box blank if you want to use the server
default.
6. In the Bind password box, enter a valid password.
Note: You can leave this box blank if no authentication is required.
7. In the Search Base box, enter the DN of the entry in the tree to be
used for the search. For example:
cn=Recipients,ou=Exchange,o=FirePass server
8. In the Filter template box, enter a search filter template. For
example:
(&(objectclass=person)(cn=*%s*))
where %s is substituted by user’s FirePass logon name.
9. In the Name Attribute box, specify the name attribute, which is
typically cn.
10. In the Address Attribute box, enter the email address attribute,
which is typically mail.
11. Click the Update button.
Using client certification validation for the My E-mail Webifyer
You can restrict access to the My E-mail Webifyer to users in a group who
have a valid client certificate installed on their computer. For more
information, see Using client certificate validation for Webifyers, on page
4-38.
4 - 14
Page 99
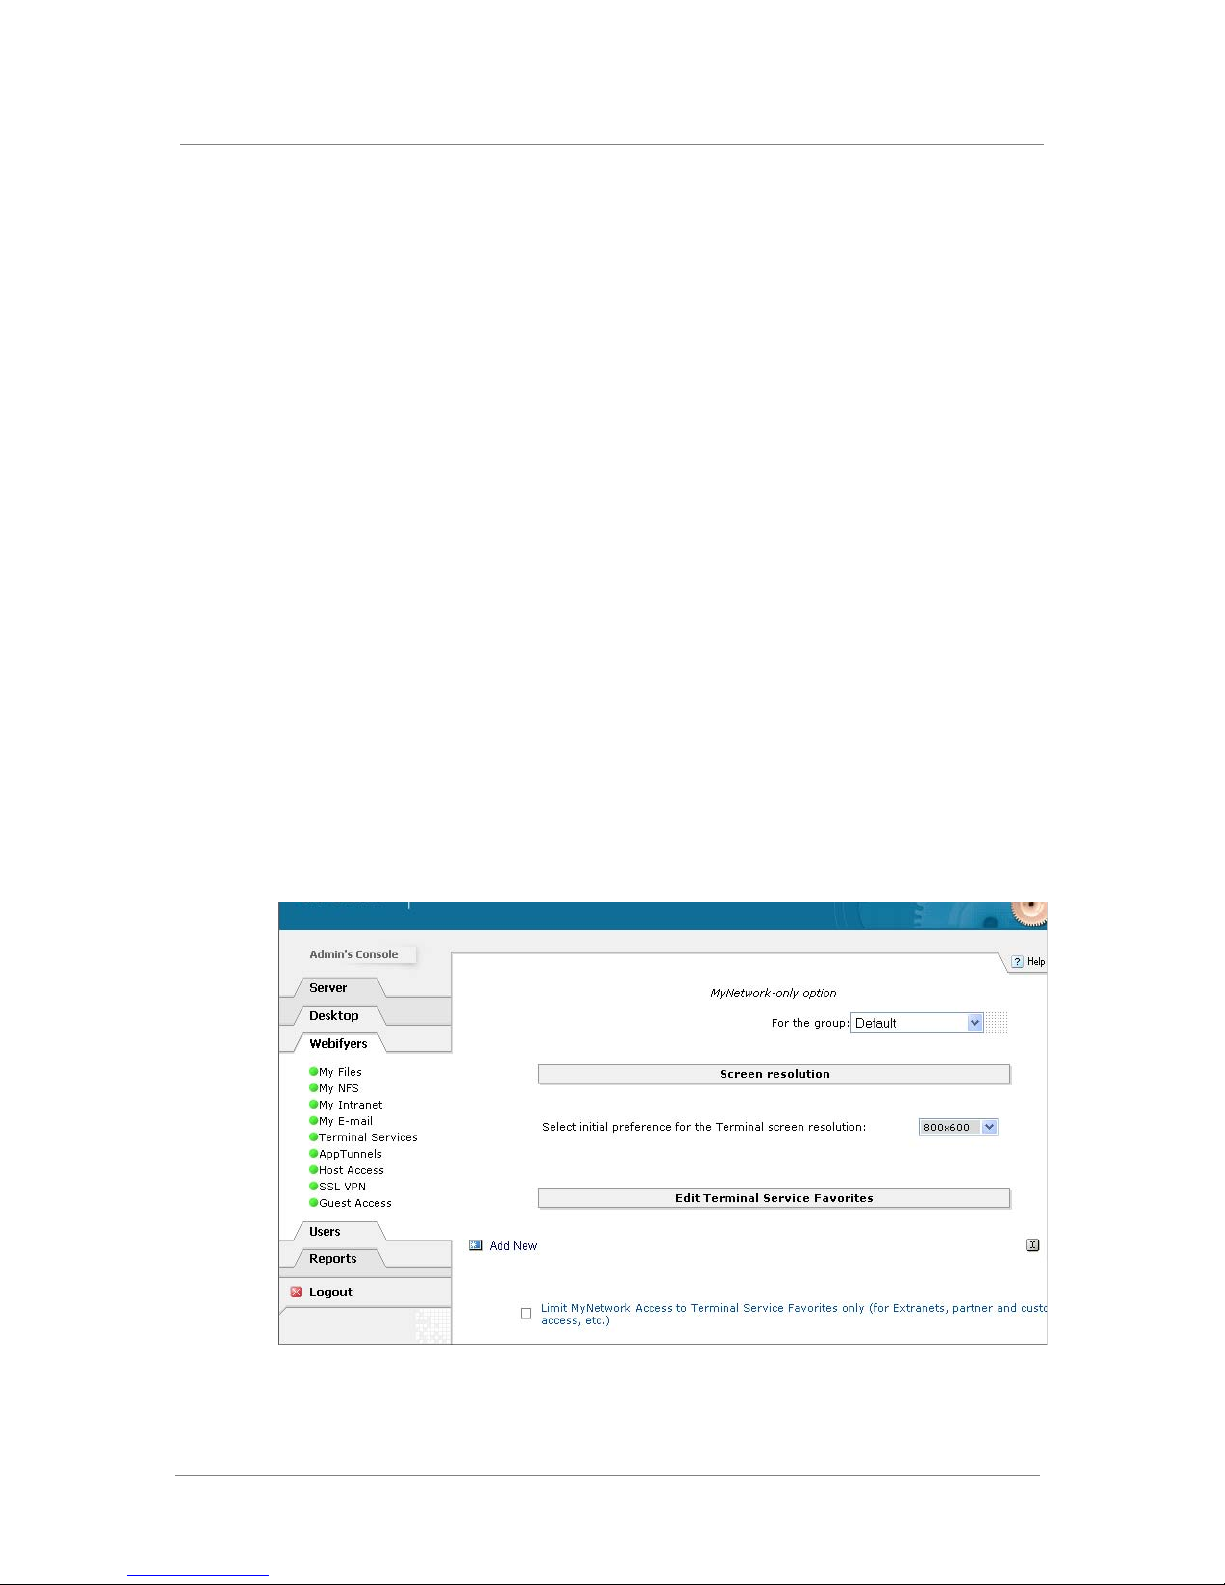
Configuring the FirePass Webifyers
Configuring the Terminal Services Webifyer
The Terminal Services Webifyer provides remote users with access to
internal LAN Microsoft Terminal servers, Windows XP desktop computers,
Citrix Metaframe servers, and VNC servers in a unified secure way. Users
have the option to either browse the servers by their name or internal IP
address, or to use favorites.
The Terminal Services Webifyer includes:
• Support for native Terminal Server-hosted applications
• Support for Citrix
• Automatic download and installation of the correct Terminal Services or
Citrix remote-platform client component, if it is needed but has not yet
been installed
For each user group, you can assign options and create a set of favorite links
to appropriate servers. You can also specify whether you want the terminal
services to open inside the existing browser window or in a separate
window.
®
MetaFrame applications
Configuring screen resolution and Terminal Services Favorites
Under the Webifyers tab, click the Terminal Services link to open the
Terminal Services Webifyer screen.
FirePass™ Server Administrator Guide 4 - 15
Page 100

Chapter 4
To configure screen resolution and Terminal Services
Favorites
1. From the For the group drop-down list, select the group that you
want to configure the Terminal Services for.
2. To set the initial screen resolution for Terminal Servers and Citr ix
Metaframe for the current group, select a resolution from the
drop-down list in the Screen Resolution section. Users can also
overwrite this setting on an individual basis.
3. In the Edit Terminal Service Favorites section, click the Add New
link.
4. In the Name box, specify a name for the terminal service that you
are defining as a Terminal Service Favorite. This name is displayed
as a label for the Terminal Services Favorite in each user’s Web
browser under the My Terminal Services icon. For example: Citrix
XYZ Application.
5. In the Host box, enter the host name or IP address of the server
running the terminal service.
Note: You can use a space separated list of IP addresses or host
names in the Host field for a Citrix Metaframe Server, a Citrix
Metaframe Browser, and VNC. The FirePass server attempts to use
the first entry in the list, and if that entry fails, the server proceeds
with other entries in the list until a working server is found.
6. From the drop-down list next to the Port box, select a server type.
After you select the server type, the appropriate default value for the
port is automatically entered in the Port text box. If necessary, you
can enter a different server port number.
Note: The Citrix Metaframe Browser type relies upon the Citrix
HTTPonTCP protocol, which must be enabled on the target server.
This type is useful in accessing Citrix server farms and resolving
application names to an IP address and port.
7. In the Select a Program box, enter the complete path and file name
of the program you want to run on the remote server, such as
c:\programs\notepad.exe.
8. In the Working Dir box, enter the directory where you want to run
the program. such as C:\temp.
9. To open the Terminal Service application in a separate window on
the user’s screen, select the Open in new window option.
10. To allow users access to the local drives on the remote server during
a terminal service session, select the Allow access to local drives
option.
11. Click the Add New button.
4 - 16
 Loading...