

Page 1

Contents
FOR YOUR SAFETY................................................5
UNPACKING ............................................................7
YOUR PHONE..........................................................8
Key Definition....................................................................9
Shortcuts..........................................................................10
Display Layout.................................................................12
Icons.................................................................................13
Backlight..........................................................................15
Phone Features ...............................................................16
GETTING STARTED ..............................................23
Your First Call..................................................................23
Installing the SIM card....................................................24
Charging the Battery.......................................................25
Switching the Phone On/Off ..........................................27
Access Codes..................................................................27
GENERAL FUNCTIONS.........................................30
Making a Call ...................................................................30
Making International Calls .............................................30
Correcting the Number...................................................30
Search number under Phonebook................................31
Page 1
Page 2

Making a Call from Phonebook .....................................31
Making a Call with Speed Dial........................................32
Making a Call from Message..........................................32
Redialing the Last Number ............................................33
Ending a Call ...................................................................33
Answering a Call.............................................................33
Emergency Call...............................................................34
Entering a “Pause or Wait”............................................35
Adjusting Earpiece Volume............................................35
Using the Ear/Microphone..............................................35
How to Use the Phone memory.....................................36
Menu Navigation .............................................................38
Security............................................................................39
IN-CALL OPTIONS.................................................40
Putting a Call on Hold/Un-hold......................................40
Making a Second Call.....................................................40
Making an International Second Call............................40
Answering a Second Incoming Call..............................41
Storing a Number............................................................41
Mute a Call .......................................................................41
Voice Recording a Call ...................................................42
Swapping Calls................................................................42
Conference Call...............................................................42
Page 2
Page 3

Sending Message............................................................43
Inter-working Phonebook...............................................43
TEXT INPUT...........................................................44
Text Input Tips.................................................................44
Text Input Methods .........................................................45
Spanish, T9 S panish, English & T9 English..............46
Numeric mode..............................................................48
Symbol mode...............................................................50
USING PHONEBOOK............................................51
Storing a Phone Number with a Name and an Image..51
Storing a Phone Number using the Phonebook Menu53
Searching the phonebook list........................................54
MENU MAP ............................................................55
MENU FUNCTIONS ...............................................65
1. Phonebook ...............................................................65
2. Messages..................................................................72
3. Call History...............................................................88
4. Settings.....................................................................93
5. Multimedia .............................................................. 115
6. Fun...........................................................................128
7. Tools........................................................................131
8. Services ..................................................................142
9. File Manager...........................................................146
Page 3
Page 4

SIM A T SERVICE ................................................151
SOLVING PROBLEMS .......................................152
USING THE BATTERIES ....................................155
SAFETY INFORMATION ....................................157
GLOSSARY..........................................................163
PC SYNC MANAGER ..........................................167
Page 4
Page 5

For Your Safety
For your safety, please refer to the guideline prior to using the
phone. Failure to comply with the guideline may cause
malfunctions or hazardous to user.
Road Safety Comes First
Please be careful not to use the phone while driving. In case you
need to use the phone, please pull over your vehicle first. In
some countries, it is illegal to use a wireless phone while driving.
Also, it is recommended to avoid using a mobile phone while
refueling at a gas station
Switch off in Aircraft
Mobile phones may cause interference to the aircrafts. Please
make sure the phone is switched off while in the airplanes.
Respect Special Regulations
Please follow special regulations in any areas where it is
suggested. It is recommended to switch off your phone
whenever it is illegal to use, or when it may cause interferences,
such as hospitals.
Page 5
Page 6

Interference
All mobile phones may be subject to radio interference, which
may affect the performance during calling and receiving.
Qualified Service
It is highly recommended to have a repair service by qualified
service personnel. Use only the approved accessories and
batteries.
Use Properly
Use only in the normal position (hold to the ear). Avoid
unnecessary contact with the antenna when the phone is
switched on.
Emergency Calls
When making an emergency calls, please ensure that the phone
is switched on and is in service. Enter the emergency number
(Official Emergency Number or another official emergency
number) and press the [Dial key]. Inform your current location.
Do not end the call until given permission to do so. You may
end the call by pressing the [End Key].
Page 6
Page 7

Unpacking
Thank you for purchasing this product. Please check the product
contents to see if you have all the available items as below.
*Images may vary from the actual product in your package.
Handset
Battery
Manual
Page 7
Ear/Microphone
PC Sync Manager CD &
USB Data Cable
Traveler’ s Charger
Page 8
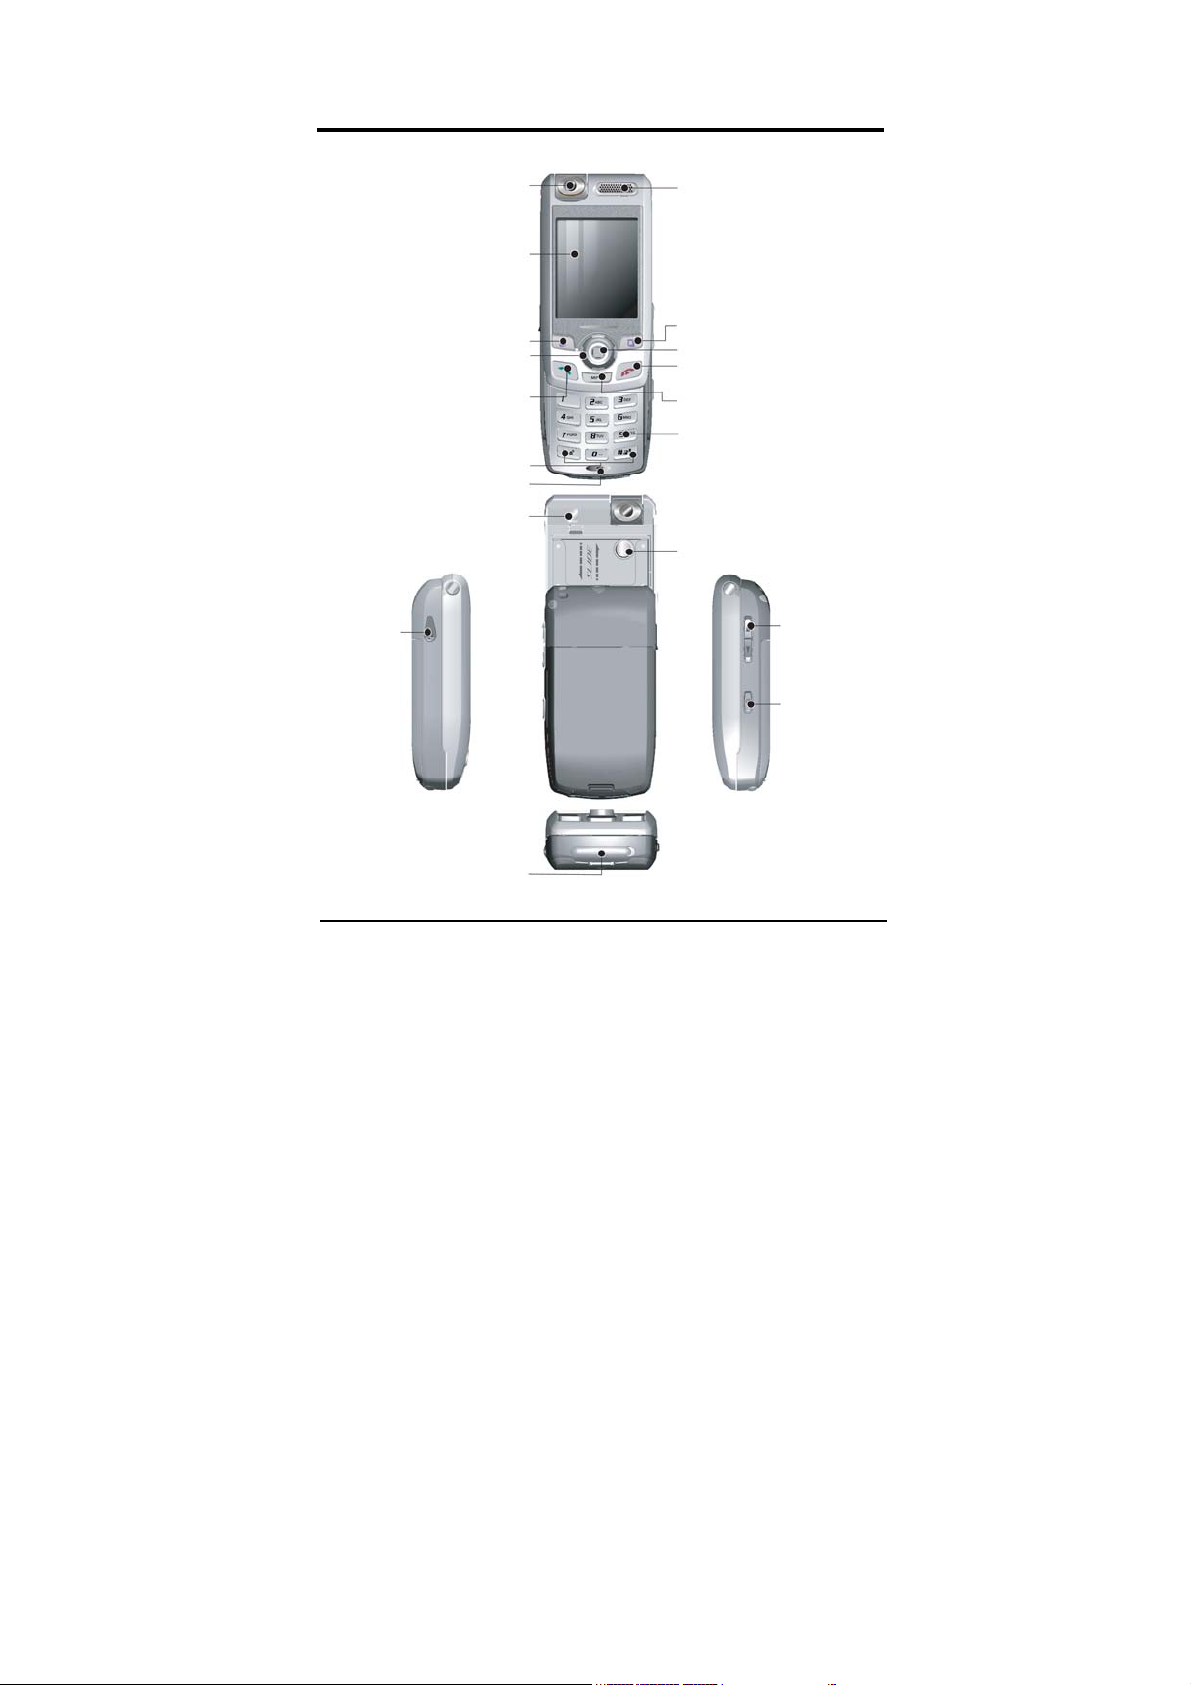
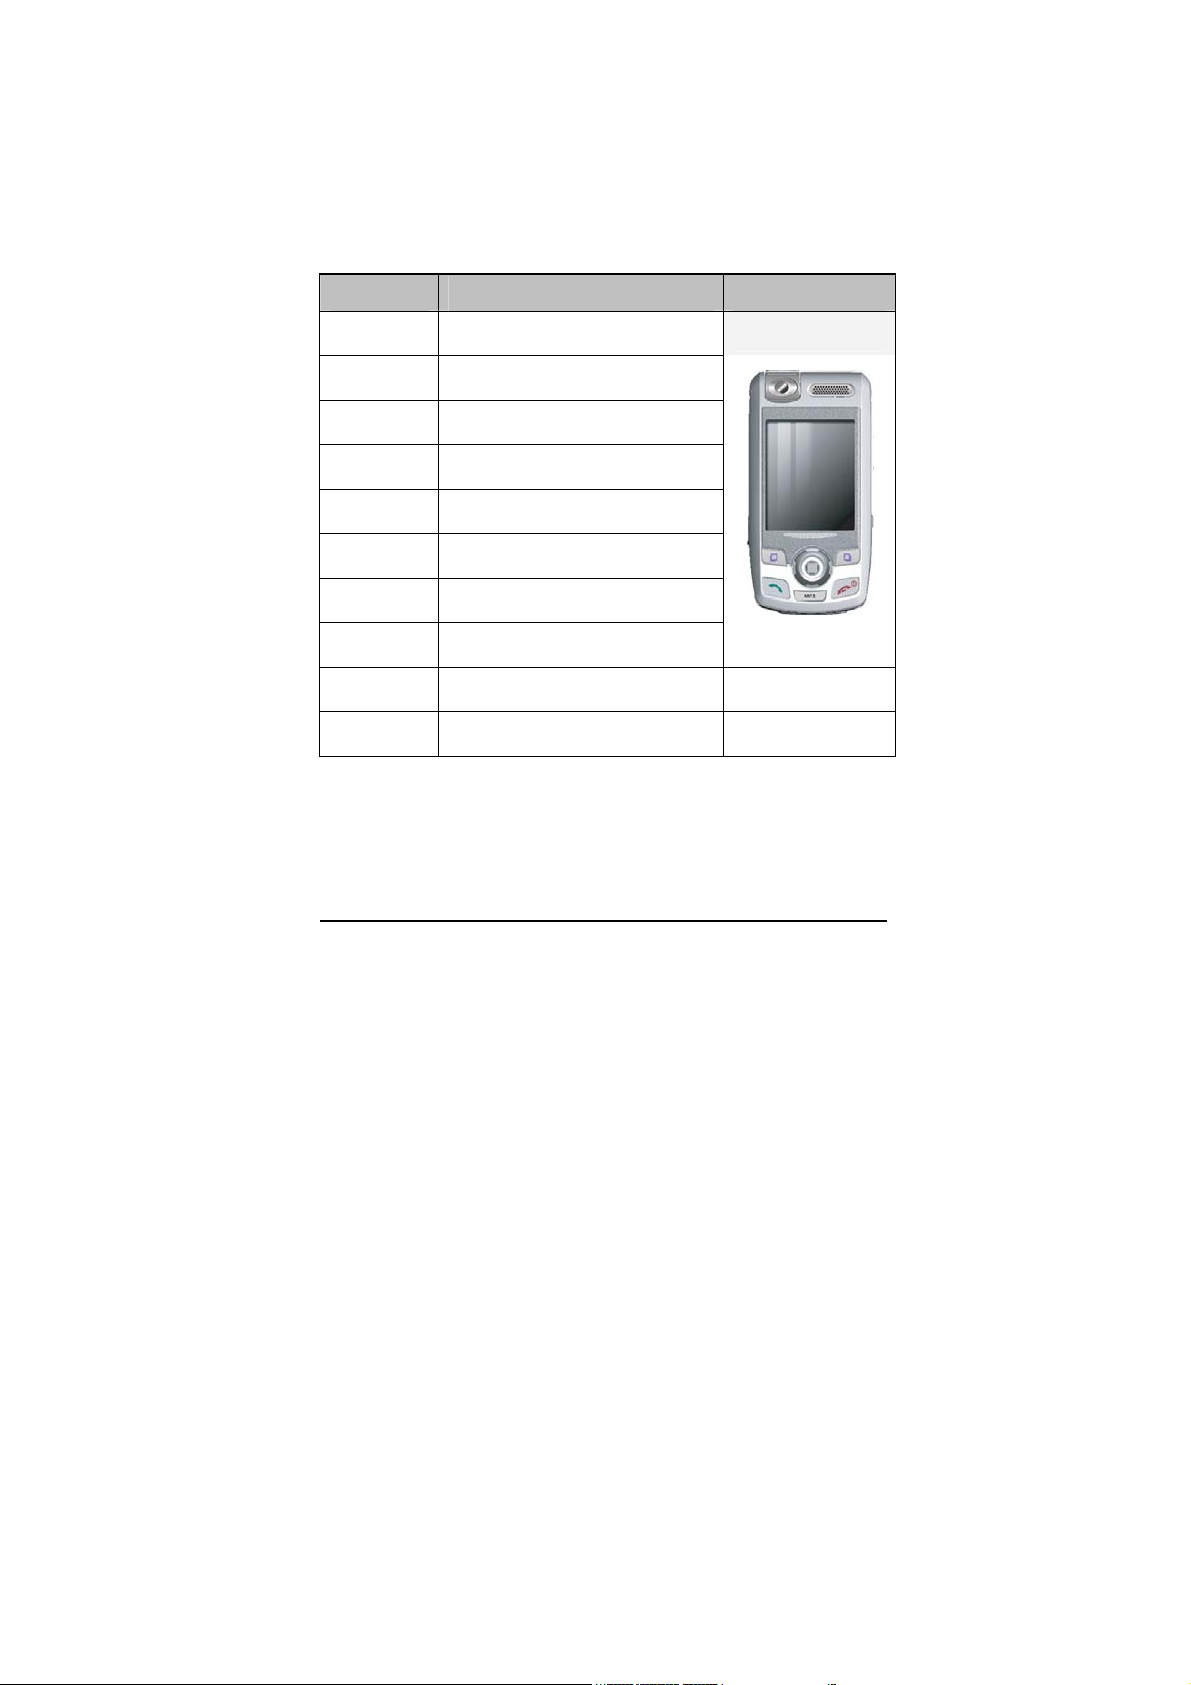
YOUR PHONE
Phone Layout
Camera
Display
Speaker
Soft Key
Navigation Key
Send Key
Special Function Keys
Mic
Flash
Ear/Mic
Port
Charging & USB Port
Soft Key
WAP Key
End Key
MP3 Hot Key
Alphanumeric Key
Mirror
Side
Volume Key
Camera Key
Page 8
Page 9
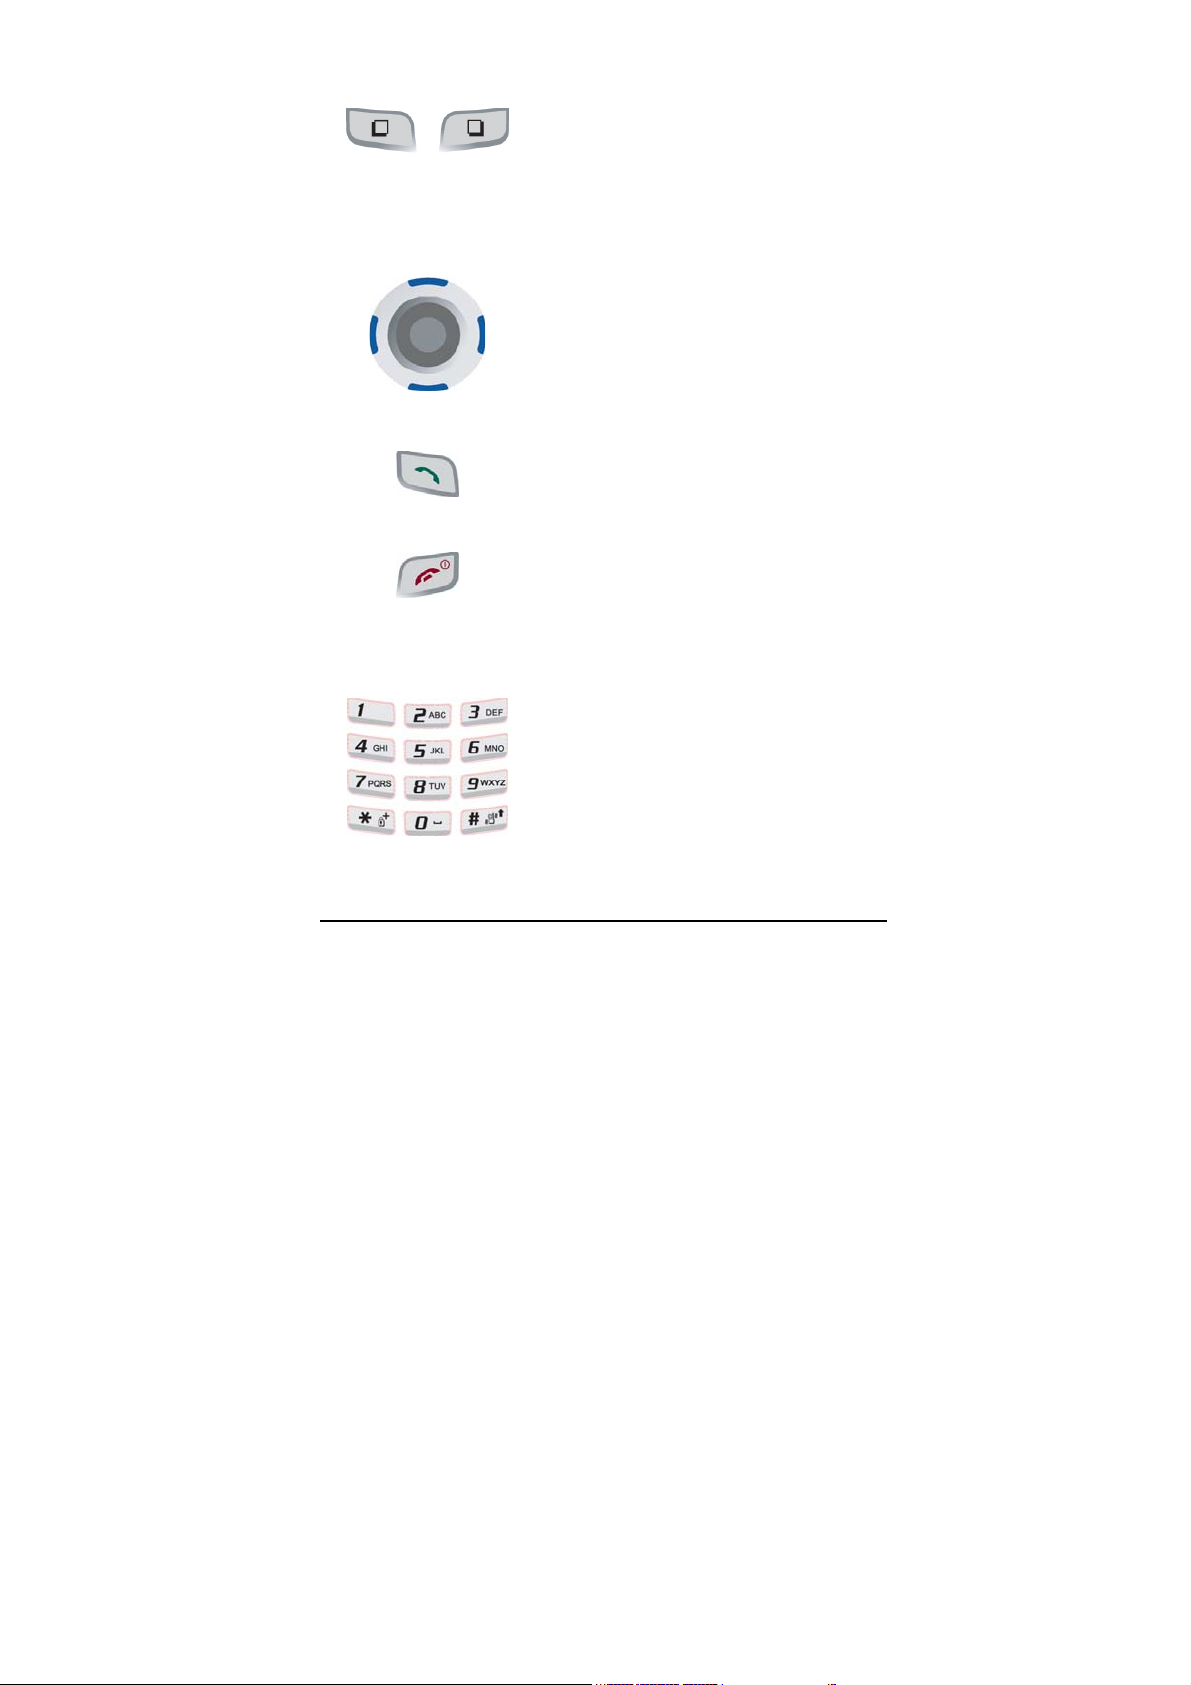
Key Definition
Soft Keys
Performs functions identified by
left/right display prompt.
Right button: Cancels numbers &
letters when you make a call or input
letter for phonebook, message or WAP.
Navigation Keys
Scrolls through the menu options.
Moves the cursor up and down in the
normal editing mode.
Moves the cursor to left and right in all
editing mode.
Dial Key
Dials or answers a call.
Recalls the last 10 numbers in the idle
mode.
Power on/off Key & End Key
Ends a call.
Switches the phone on and off. (press
this key and hold)
Cancels your input in the menu facility
and returns to the idle mode.
Alphanumeric Keys
You may enter numbers, letters and
special characters.
It changes camera settings in camera
mode.
Page 9
Page 10
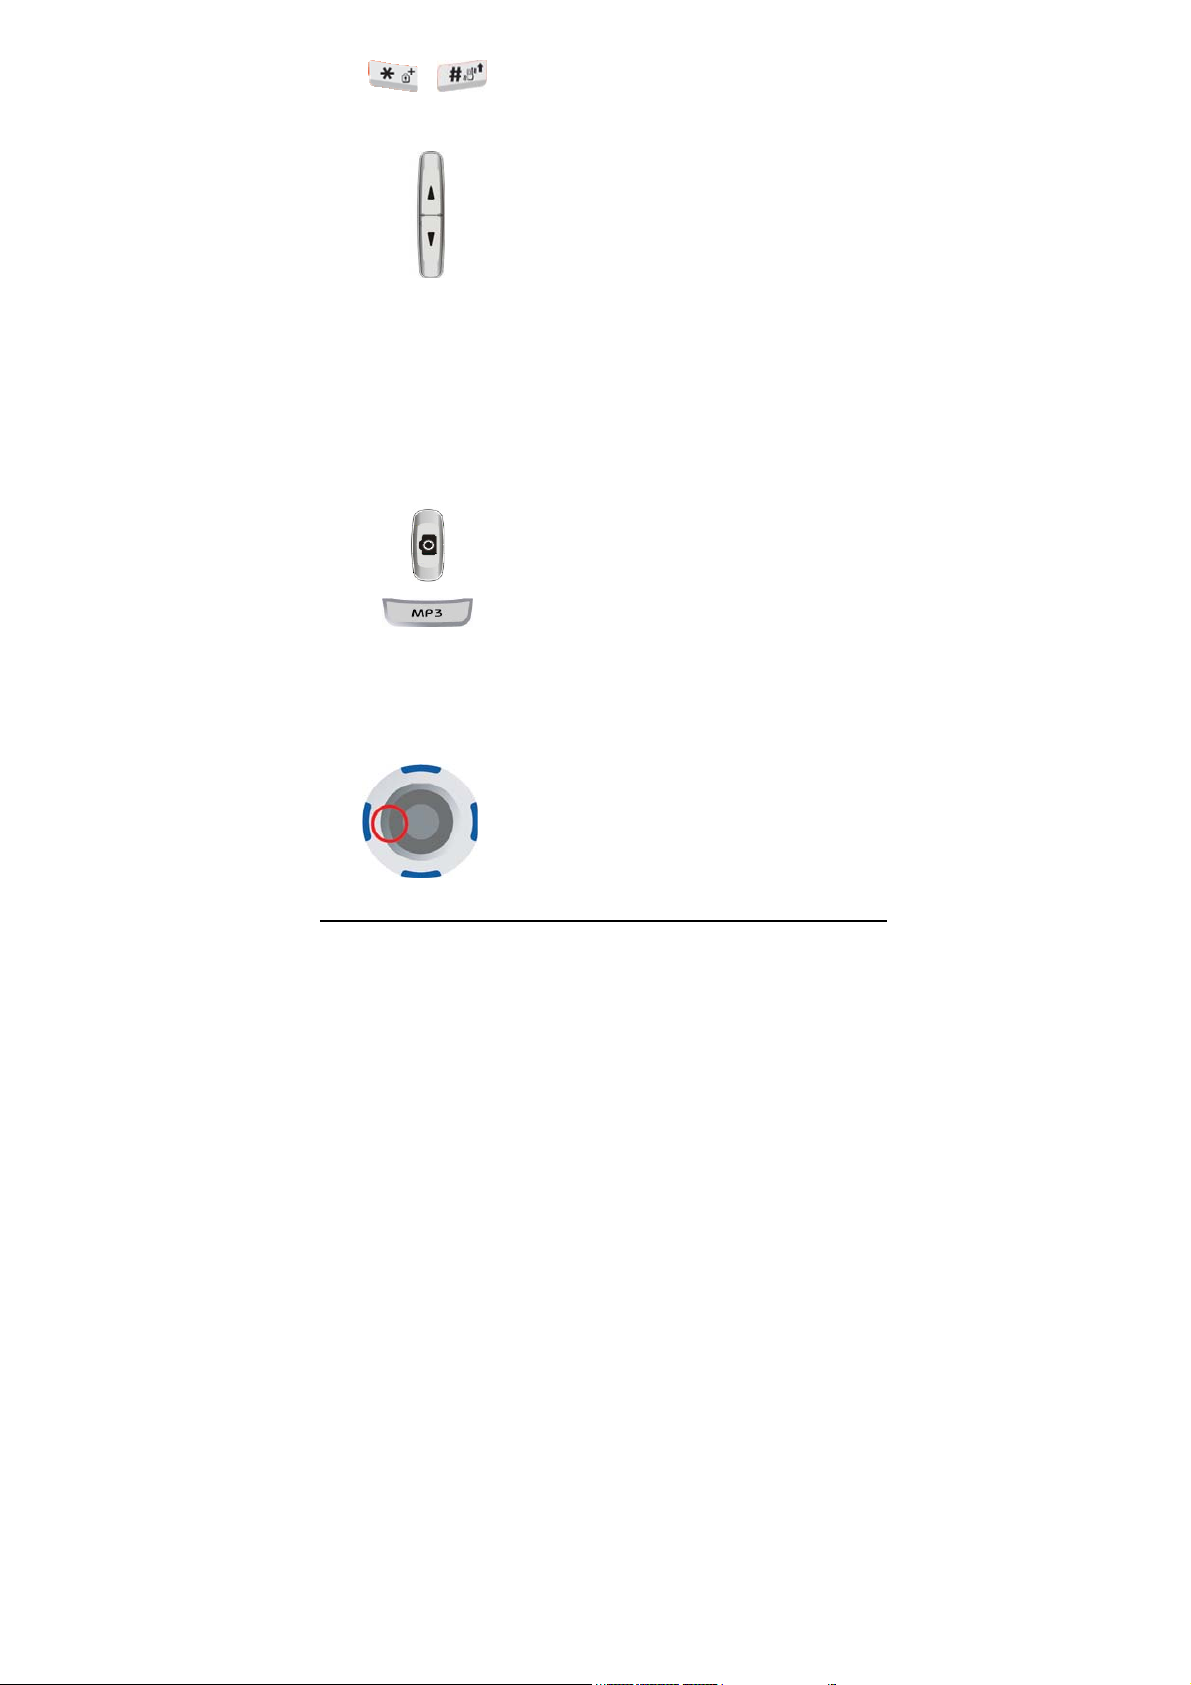
Special Function Keys
Enters Special Characters / Performs
Various Functions
Side Key(On the right side of your
phone)
Adjusts the key tone volume in idle
mode.
Flashes light on or off in idle mode by
pressing and hold the key.
Adjusts the earpiece volume during a
call by pressing briefly.
Starts “voice recording” during a call by
pressing and hold the side key (up).
Stops “voice recording” by pressing
and holding down the side key.
Adjusts the Audio Player volume.
Moves through months in calendar
mode.
Camera Side Hot Key
You may start the camera mode and
work as a shutter.
MP3 Hot Key
Accesses to Audio Player in idle mode.
Shortcuts
In an idle mode, you can access to
“Message” menu.
You may dedicate the left navigation key
for favorite menu in ‘Dedicated key’
setting menu (see 4.1.7)
Page 10
Page 11
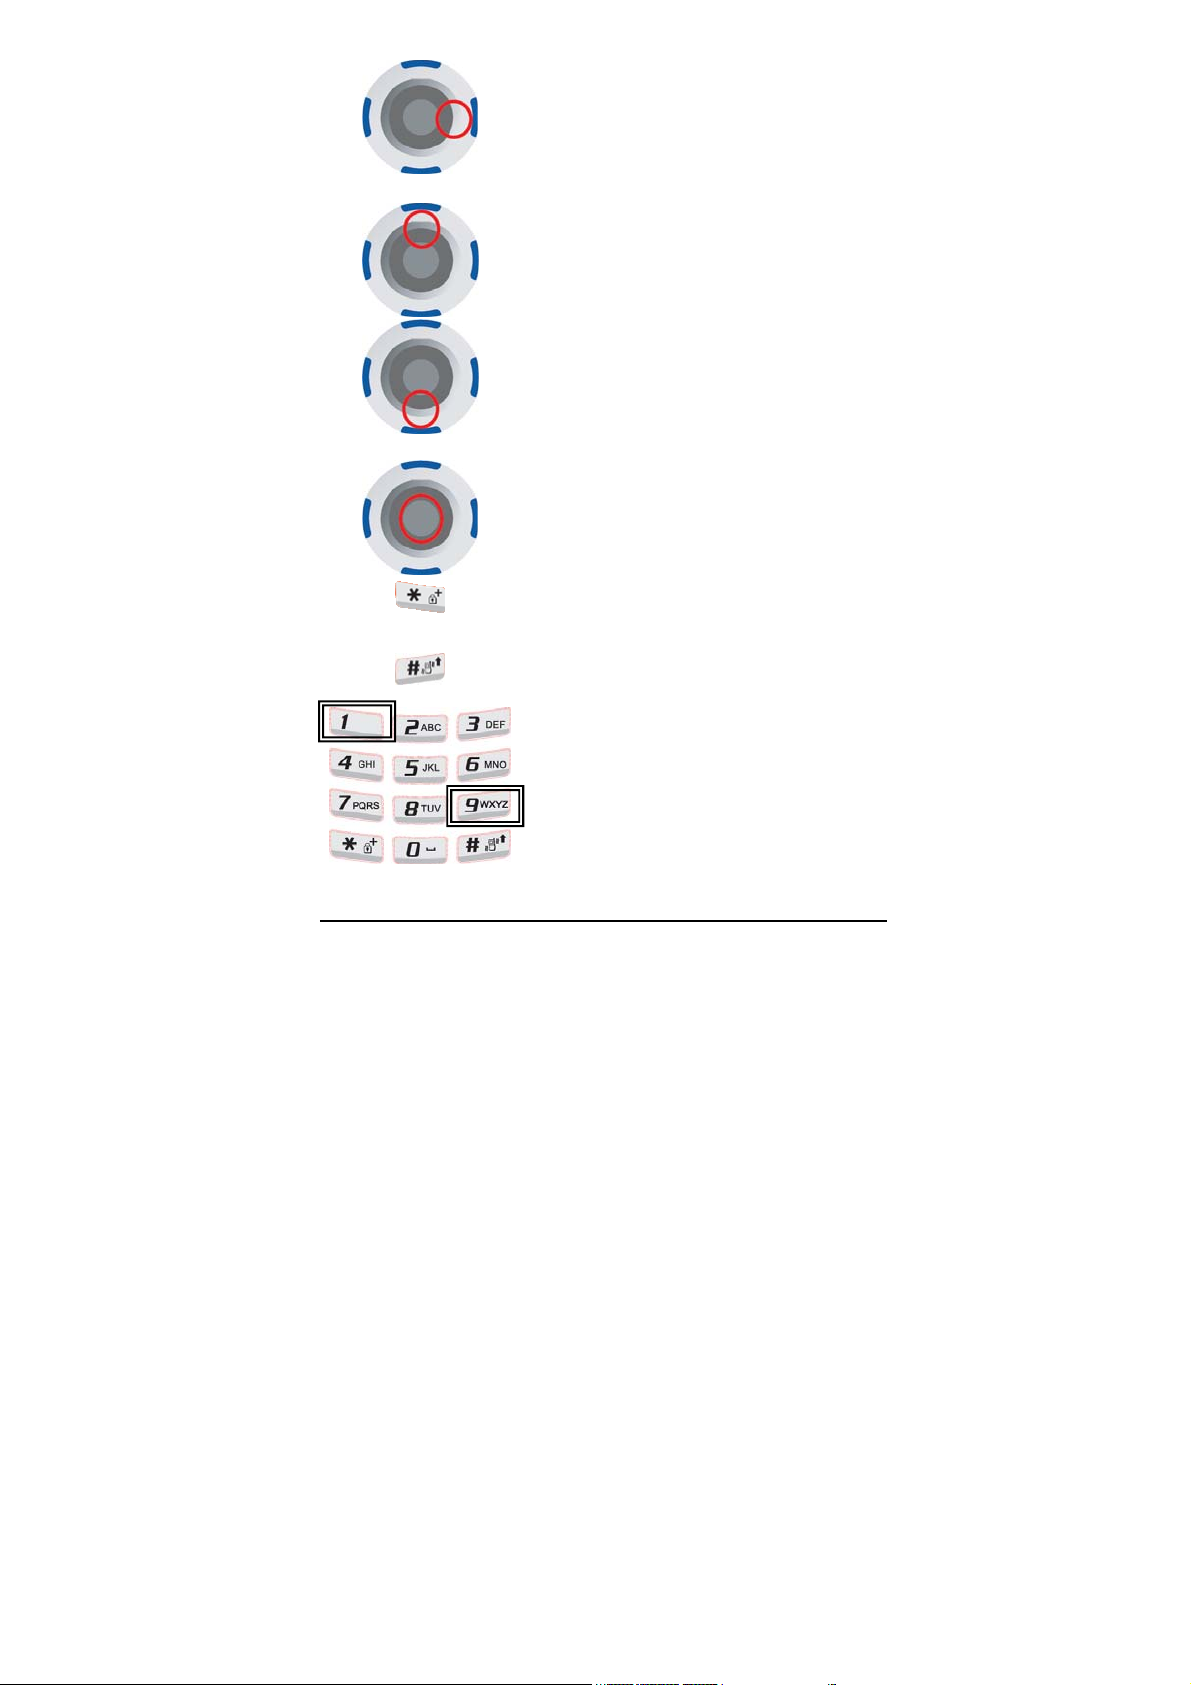
In an idle mode, it accesses to “Fun”
menu.
You can dedicate the left navigation key
to your favorite menu in ‘Dedicated key’
setting menu (see 4.1.7)
In an idle mode, it accesses to
“Shortcuts” menu.
In an idle mode, accesses to “Tone
Setup” menu. You can dedicate the left
navigation key to your favorite menu in
“Dedicated key” setting menu.
(See 4.1.7)
WAP Key
You may access to WAP menu (press
shortly), and launch WAP browser
(press and hold)
To activate the “Keypad Lock” option,
press this key and hold. Select time
from the Auto Keypad Lock menu.
To activate the “Silent Mode” option,
press this key and hold.
Number 1 key is dedicated for *86
Number 9 key is dedicated for
“emergencies” such as 911, 112 y 060
Page 11
Page 12

Displa y L ayout
The idle screen display includes three areas.
Status Indicator Icons
Tex t &
Graphic Area
Soft Keys
Page 12
Page 13
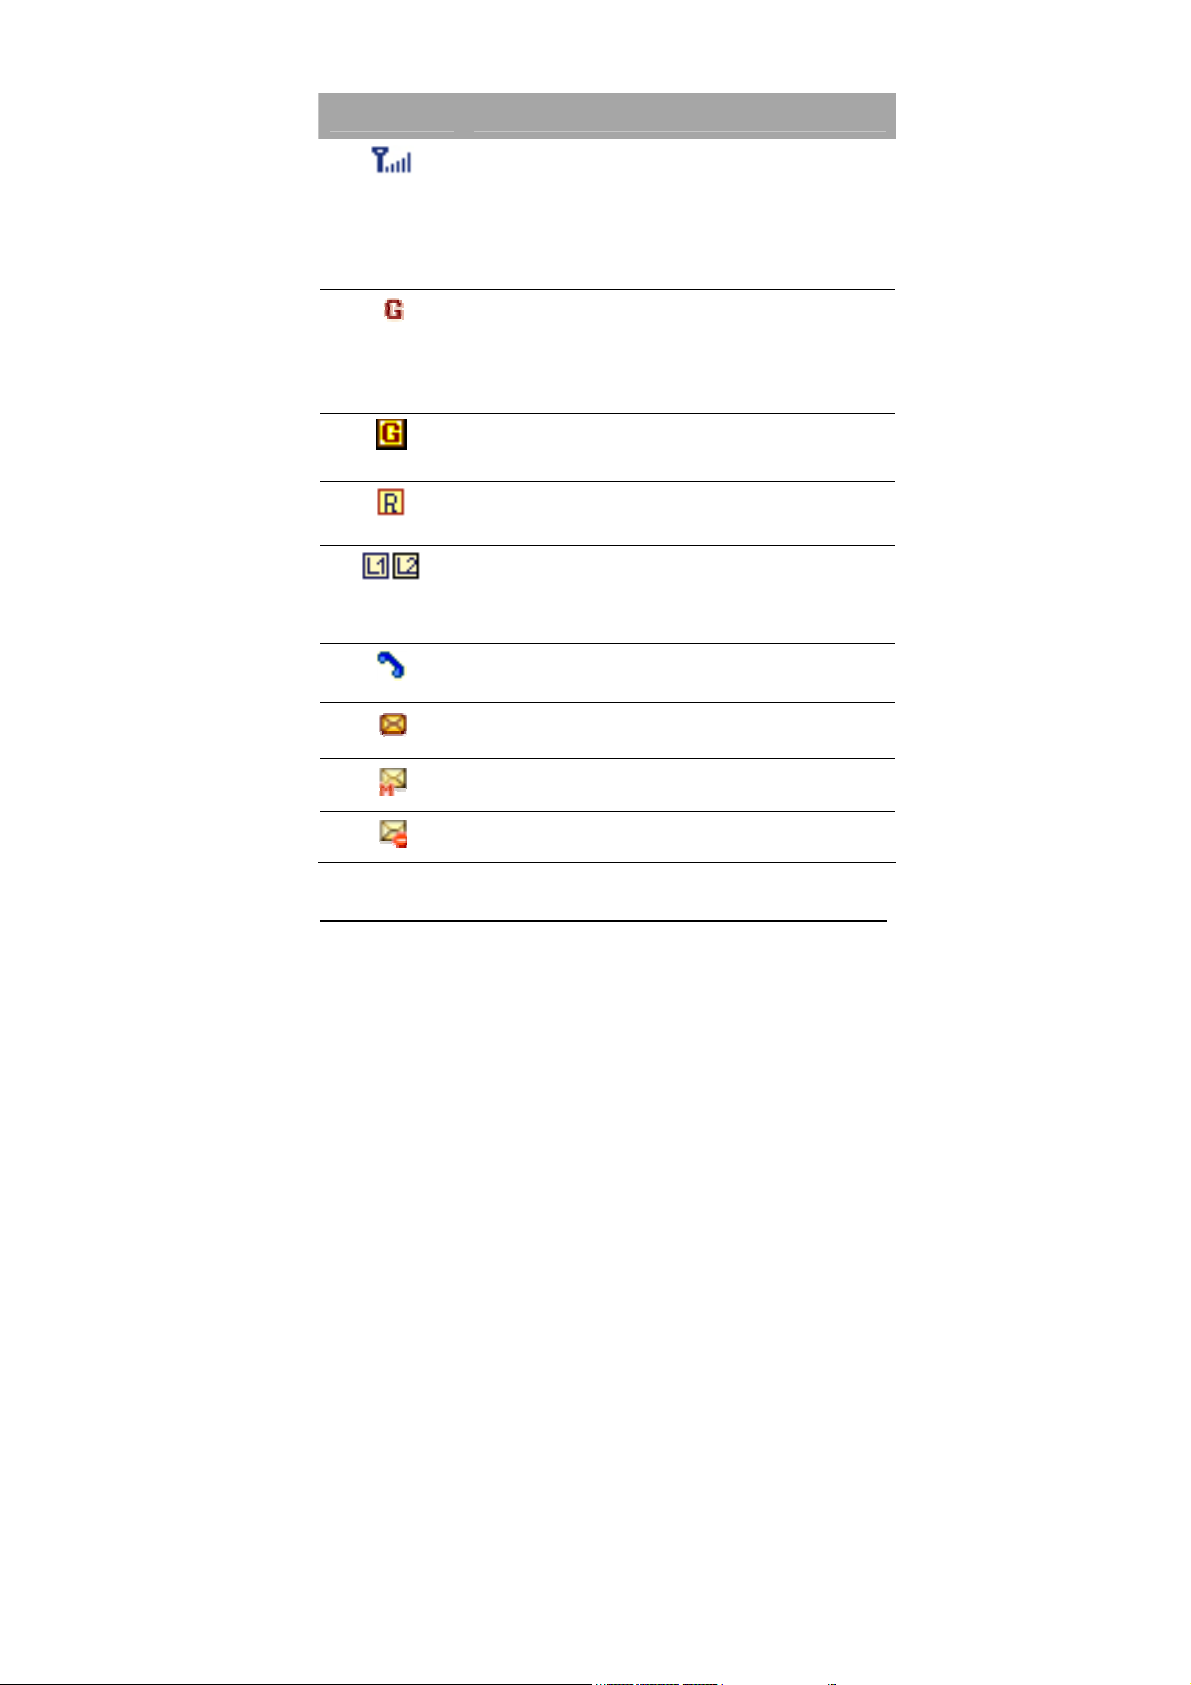
Icons
Icon Description
Signal Strength: Shows the strength of the
receiving signal.
The greater the number of bars, the better the
signal strength.
GPRS: Shows the strength of the receiving
GPRS signal.
The greater the number of bars, the better the
signal strength.
GPRS Connect: Appears when you connect
to GPRS.
Roaming: Appears when the phone is
roaming.
L1, L2: Some SIM cards support two phone
numbers and you can switch the number (line)
with this feature. The phone will display this
icon when you set a line.
Missed Calls: Appears when there is missed
call(s).
New Message: Appears when a new
incoming text message is arrived and unread.
MMS Unread: Appears when a new MMS
message is arrived and unread.
Page 13
MMS Busy: Appears when MMS is busy.
Page 14
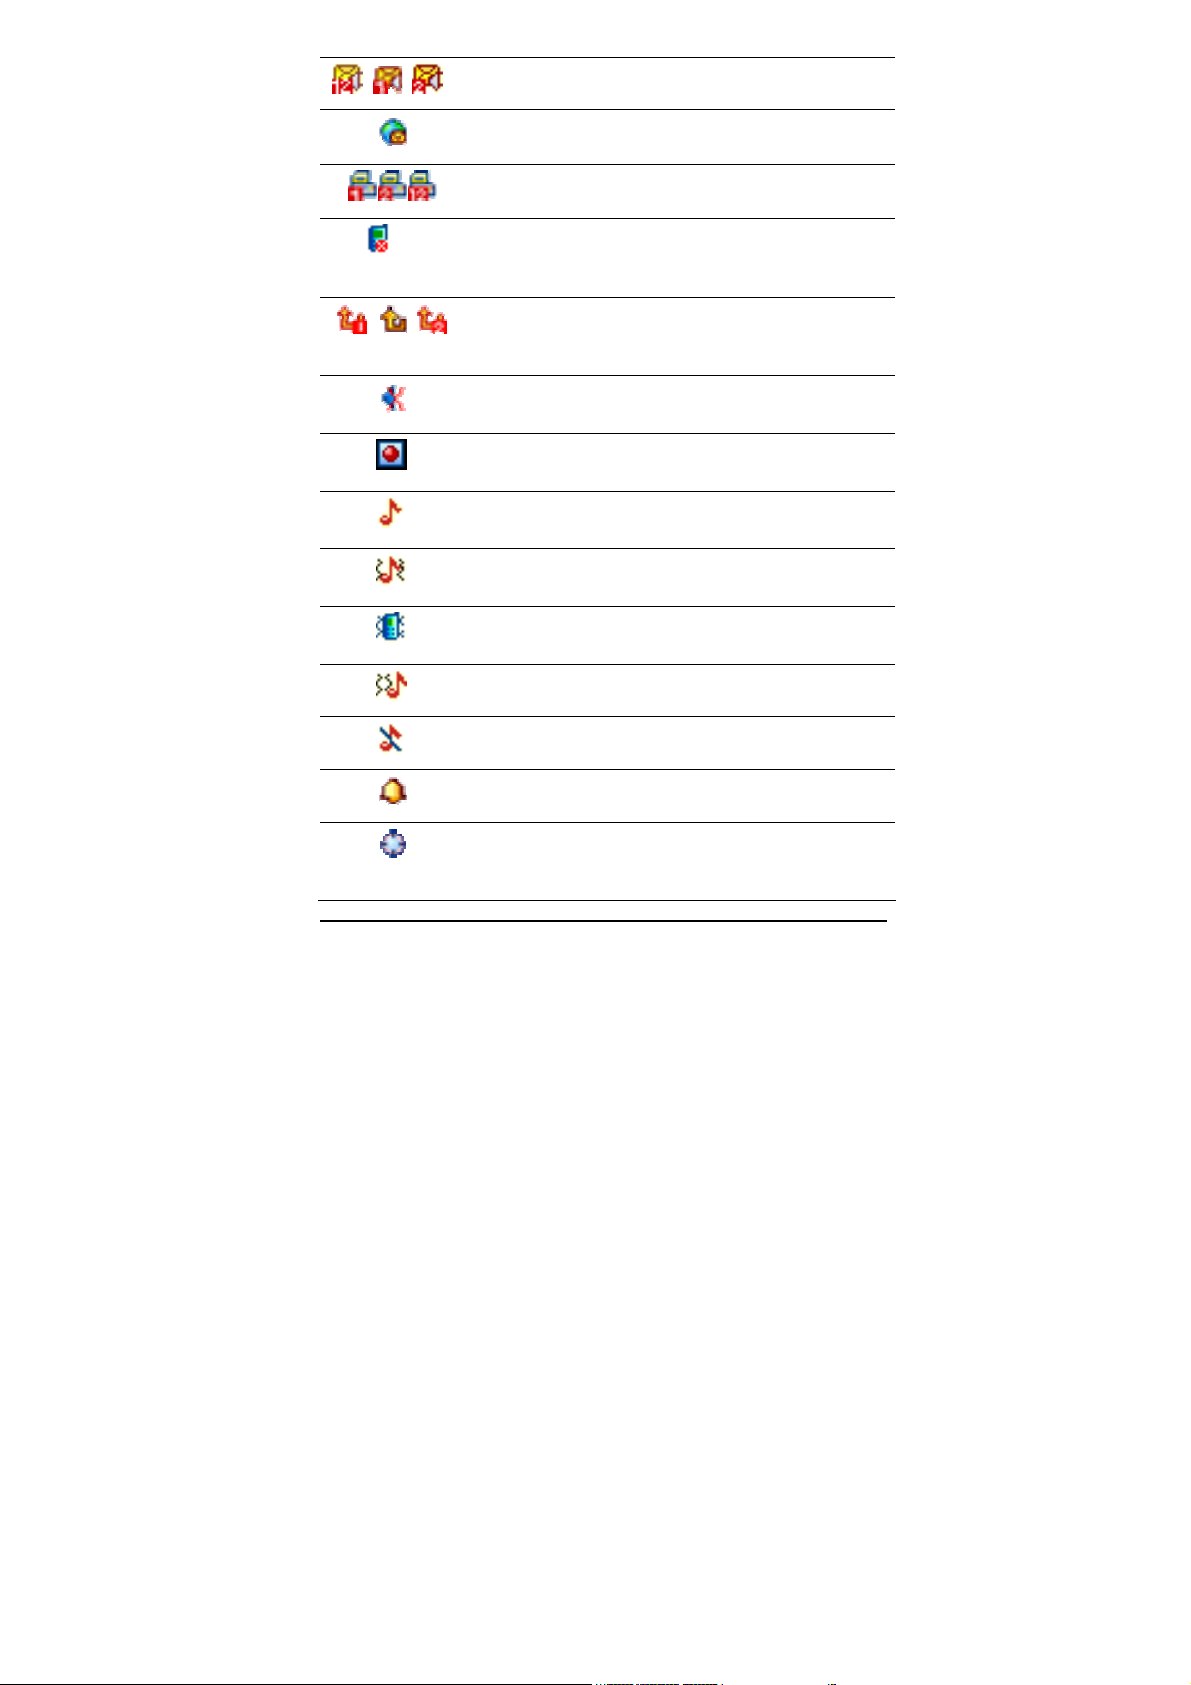
Voice Message: Appears when an incoming
voice message is arrived.
WAP Mail: Appears when WAP mail is
arrived.
Fax: Appears when the fax mode is active.
Call Barring On: Appears when the call
barring mode is active.
Call Forward: Appears when the call forward
mode is active.
Mute: Appears when the phone is in mute
mode while you are in a voice call.
Record: Appears when you are recording the
conversation while you are in a voice call.
Ring: Appears when the Ring mode is active.
Vibrate and Ring: Appears when the Vibrate
and Ring mode is active.
Vibrator On: Appears when the Vibration
mode is active.
Vibrate then Ring: Appears when the Vibrate
then Ring mode is active.
Silent Mode: Appears when the silent mode
(manner mode) is active.
Alarm On: Appears when you set the alarm.
Stopwatch: Appears when you set the
stopwatch.
Page 14
Page 15

Lock: Appears when you set the phone lock.
Battery Strength: Shows the level of your
battery.
The more bars you see, the more power you
have left.
Backlight
The display is illuminated by a backlight. When you press any
key, the backlight lights up.
It dims by two levels of illumination, if no key is pressed within a
given period, depending on the LCD Backlight option under the
Light sub menu in the Sound & Light menu.
(see 4.Settings/1.Phone Setup/1.Sound & Light)
To specify the length of time for which the backlight is active, set
the LCD Backlight option.
Page 15
Page 16
Phone Features
Your phone is a GPRS mobile phone using DCS 1900 RF. For
more information of your phone features, please refer to the
below table.
H/W Features
Feature Description Remarks
Dimension
Main LCD
Battery
Antenna
Camera
Flash Light
Vibrator
Speaker
Data
SIM
40 x 77 x 22.7mm
1.8” 65K TFT LCD (128 x 160)
650mAh (Standard)
Internal Antenna
CMOS 330K Pixel VGA Camera
Yes
Built-in vibrator
2 in 1 Speaker
USB Connection
3V
Image
Page 16
Page 17

S/W Features
Feature Description Remarks
RF
GSM
GPRS
WAP
Java
DCS1900
GSM Phase 2 & 2+
Class 8
WAP Version 2.0
SI (Service Indicator)
WAP Push
SL (Service Loading)
Wireless contents download
JPEG, WBMP, GIF87a,
Picture format
BMP
CLDC1.0 / MIDP2.0
Embedded Java Games
Max. 200KB per Game
(15 Applications
Application Download
downloadable, vary
from memory of
applications)
JAD/JAR Downloading
WSP
Protocol
Java Connectivity Protocol HTTP
Page 17
Page 18

MMS
Multimedia Message
Sending
- Picture, Sound & Text
- E-Mail & Multi Sending
- Page Effect
Multimedia Message
Receiving
- Saving Message / Each
Object
Options
- SMIL
- Validity Period
- Report – Read / Delivery
- Auto Download
Picture format
Audio format
Max 70KB
Max 20 x 3 (To, CC,
BCC)
70KB
JPEG, WBMP, GIF87a,
BMP
AMR, WAV, Midi,
iMelody, MP3
EMS
Sound Object
- 10 Pre-defined sound
- Support of user-defined
sound.
Image Object
Page 18
Page 19

- 20 User-defined small
Embedded, 16 x 16
SMS
pictures
- 20 User-defined large
pictures
- Downloaded pictures
Animation Object
- 15 Pre-defined animations
Message Concatenation
- Maximum 4 messages
Editing/Saving Text
Template
SMS multi-sending
Message Backup
pixel
Embedded, 32 x 32
pixel
Embedded, 16 x 16
pixels / frames
40 bytes max.
Predefined List: up to
10 numbers
Phonebook Numbers:
no limit
Message editing will be
saved upon incoming
call
Camera
640x480, 320x240,
Image Size Variation
160x120, 80x60
Page 19
Page 20

x1 ~ x4 zoom Captures
x2 capture size:
Wallpaper
Sound
Zoom (3 steps)
320x240, 160x120 and
80x60
x4 capture size:
160x120 and 80x60
Self Timer
Quality Fine, High, Normal, Low
Shutter Sound
3 cuts, 5 cuts
Multi Shot
640x480, 320x240,
160x120 and 80x60
Multi View
BMP, GIF, JPG 10 Wallpapers,
Analog/Digital Watch
BMP,GIF Size: 128x160
JPG Size: 640x480
MIDI, iMelody, WAV,
64 Poly Stereo
MP3
Selectable Key Tone
MP3
Page 20
MP3 Decoder Phone Storage: 32MB
Page 21

Sound
Recorder
Voice Record Formats: AMR, WAV
Fun
Security
Phone-
book
Call
Record
Tools
Sound &
Java Games and Games
PIN / Phone Lock
(Privacy/Phone Lock/PIN
Lock)
Multi Segmented Location
Phonebook
Memorize 250
Phonebook Entries
Caller Group Ring-tone
Last 10 Numbers Redial
(Dialed/Received/Missed)
Calendar, To-Do List, Alarm,
World Clock
Calculator, Unit Converter,
Currency Converter,
Stopwatch
Customized Settings:
General, Meeting, Outdoor,
Tone, Volume, Alert
Light
Indoor, Headset
Type, Ring Type,
Answer Mode, Backlight
Text Input
Page 21
Intelligent text input T9
Page 22

Shortcuts
Variable Shortcuts Favorite menu setting
PC Sync
Mode
& Storage
Mode
PC Sync Mode (PC Sync
Manager)
Phone Storage: 32MB
Storage Mode (USB)
Page 22
Page 23
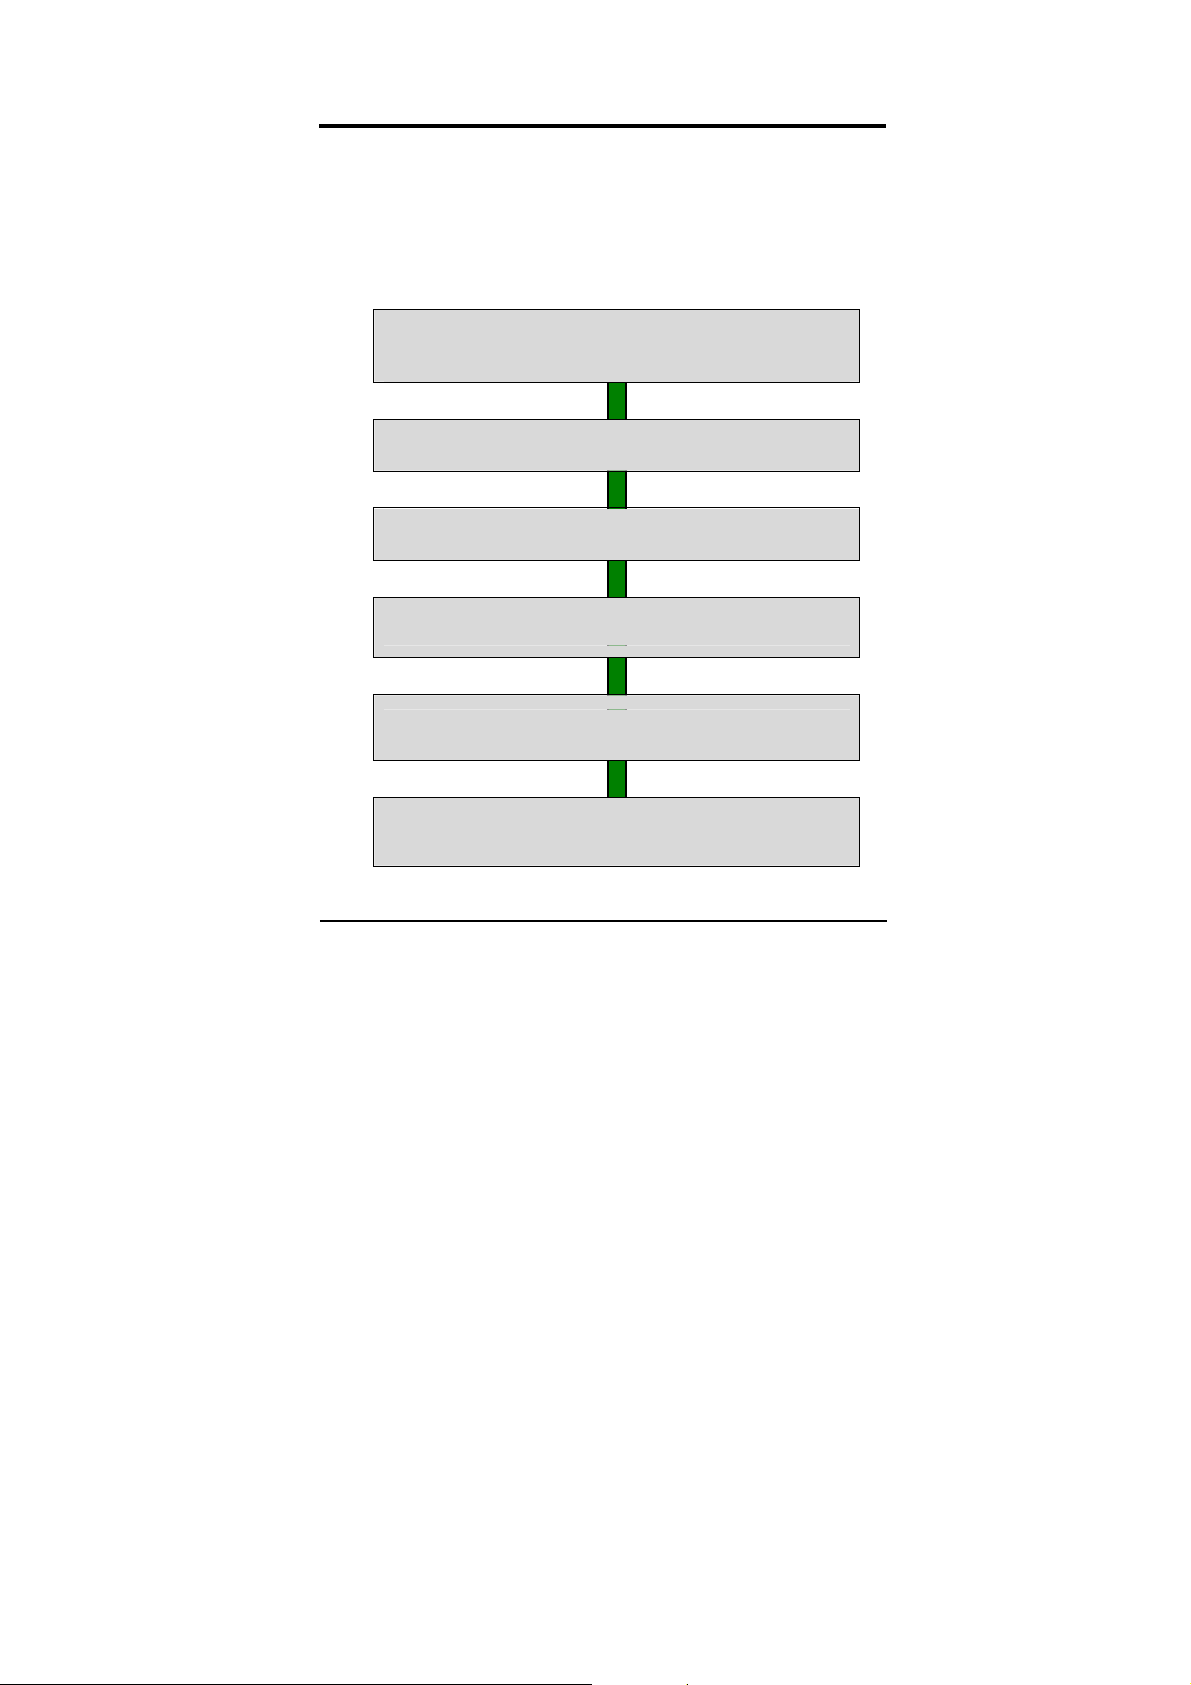
Getting Started
Your First Call
Please refer to the following diagram that describes the main
steps to make a first call.
INSERT A SIM CARD
(Phone is switched off and battery should be removed)
CHARGE THE BATTERY
SWITCH THE PHONE ON/OFF
ENTER YOUR PIN(ACCESS CODES)
DIAL THE PHONE NUMBER REQUIRED
WHEN FINISHED, END THE CALL
Page 23
Page 24
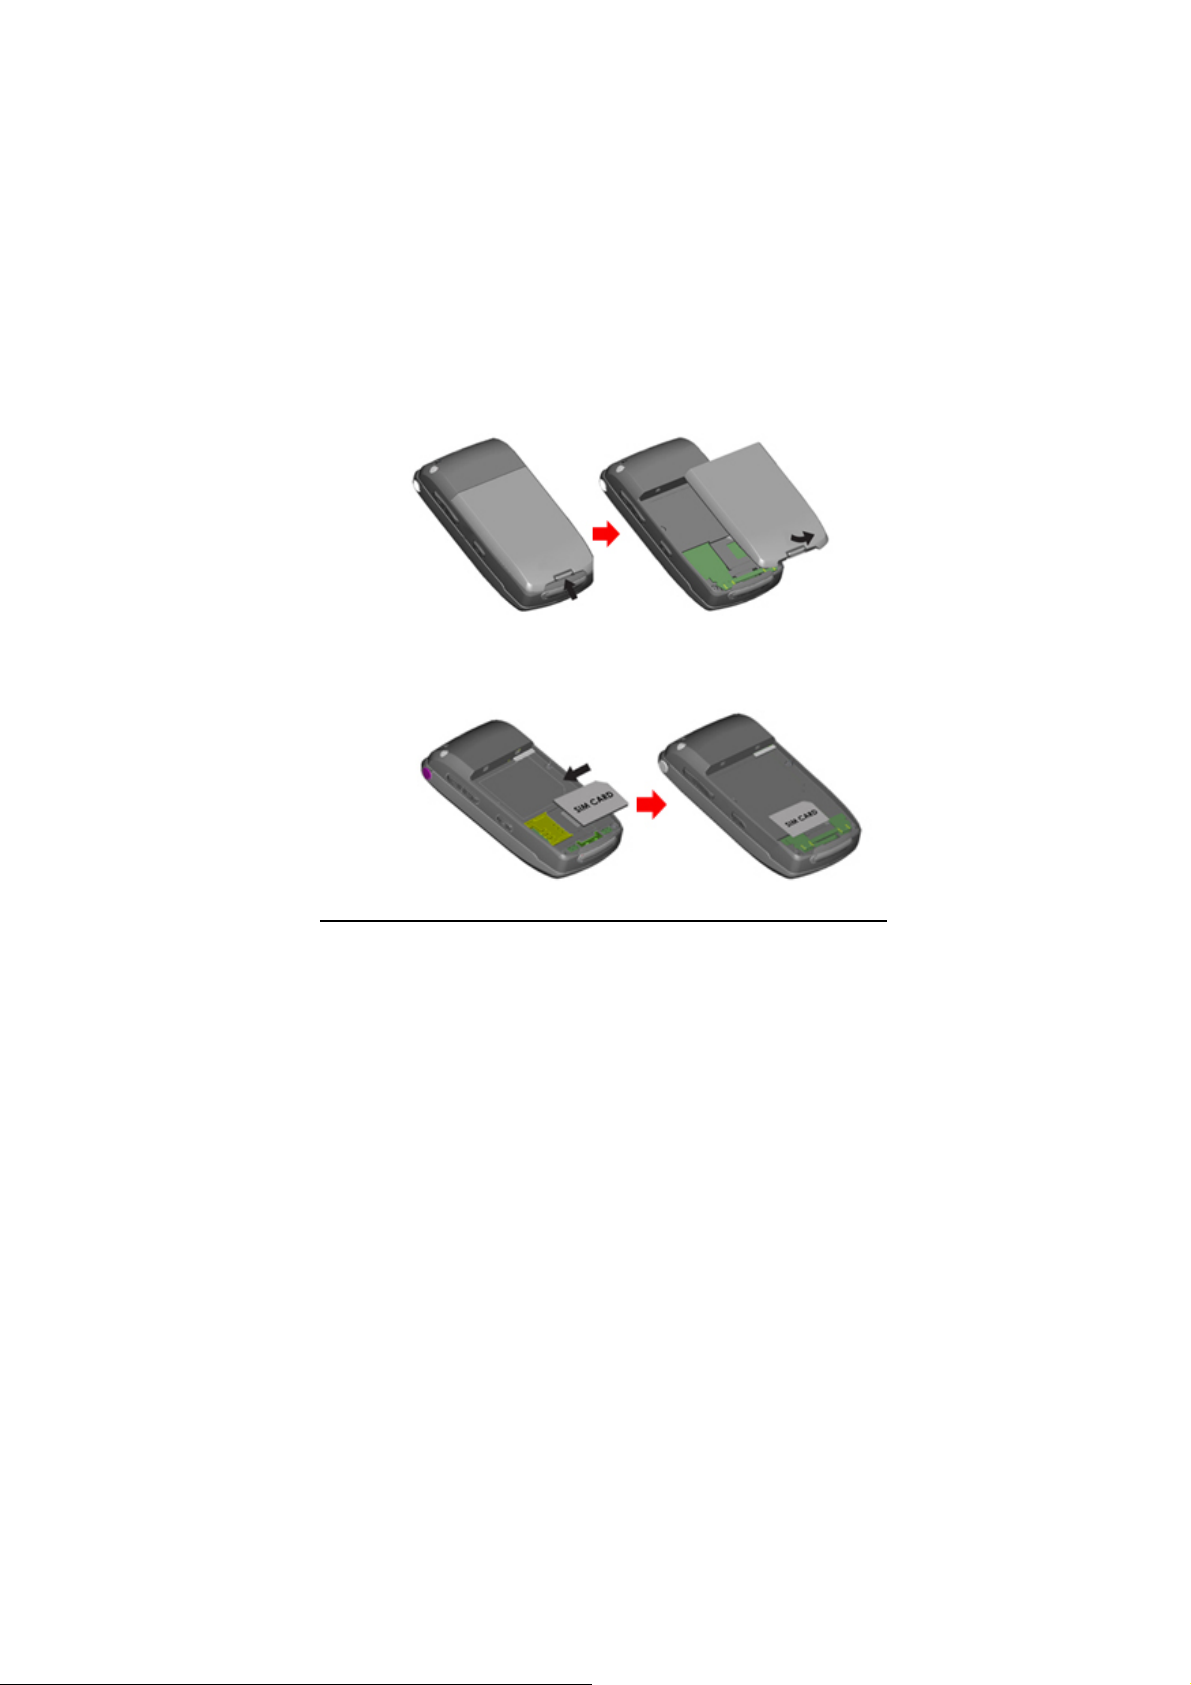
Installing the SIM card
When you subscribe to a cellular network, you will need a plug-
in SIM card loaded with your subscription details (PIN, and
optional services available).
1. If necessary, switch off the phone by holding down the
End/Power key until the Power off message appears.
2. Remove the battery by following the steps below:
① Press the locking hook and hold the locking catch
above the battery on the back of the phone.
② Lift the battery, as shown below.
3. Put the SIM card into the phone. Ensure that you insert
the SIM card properly.
Page 24
Page 25
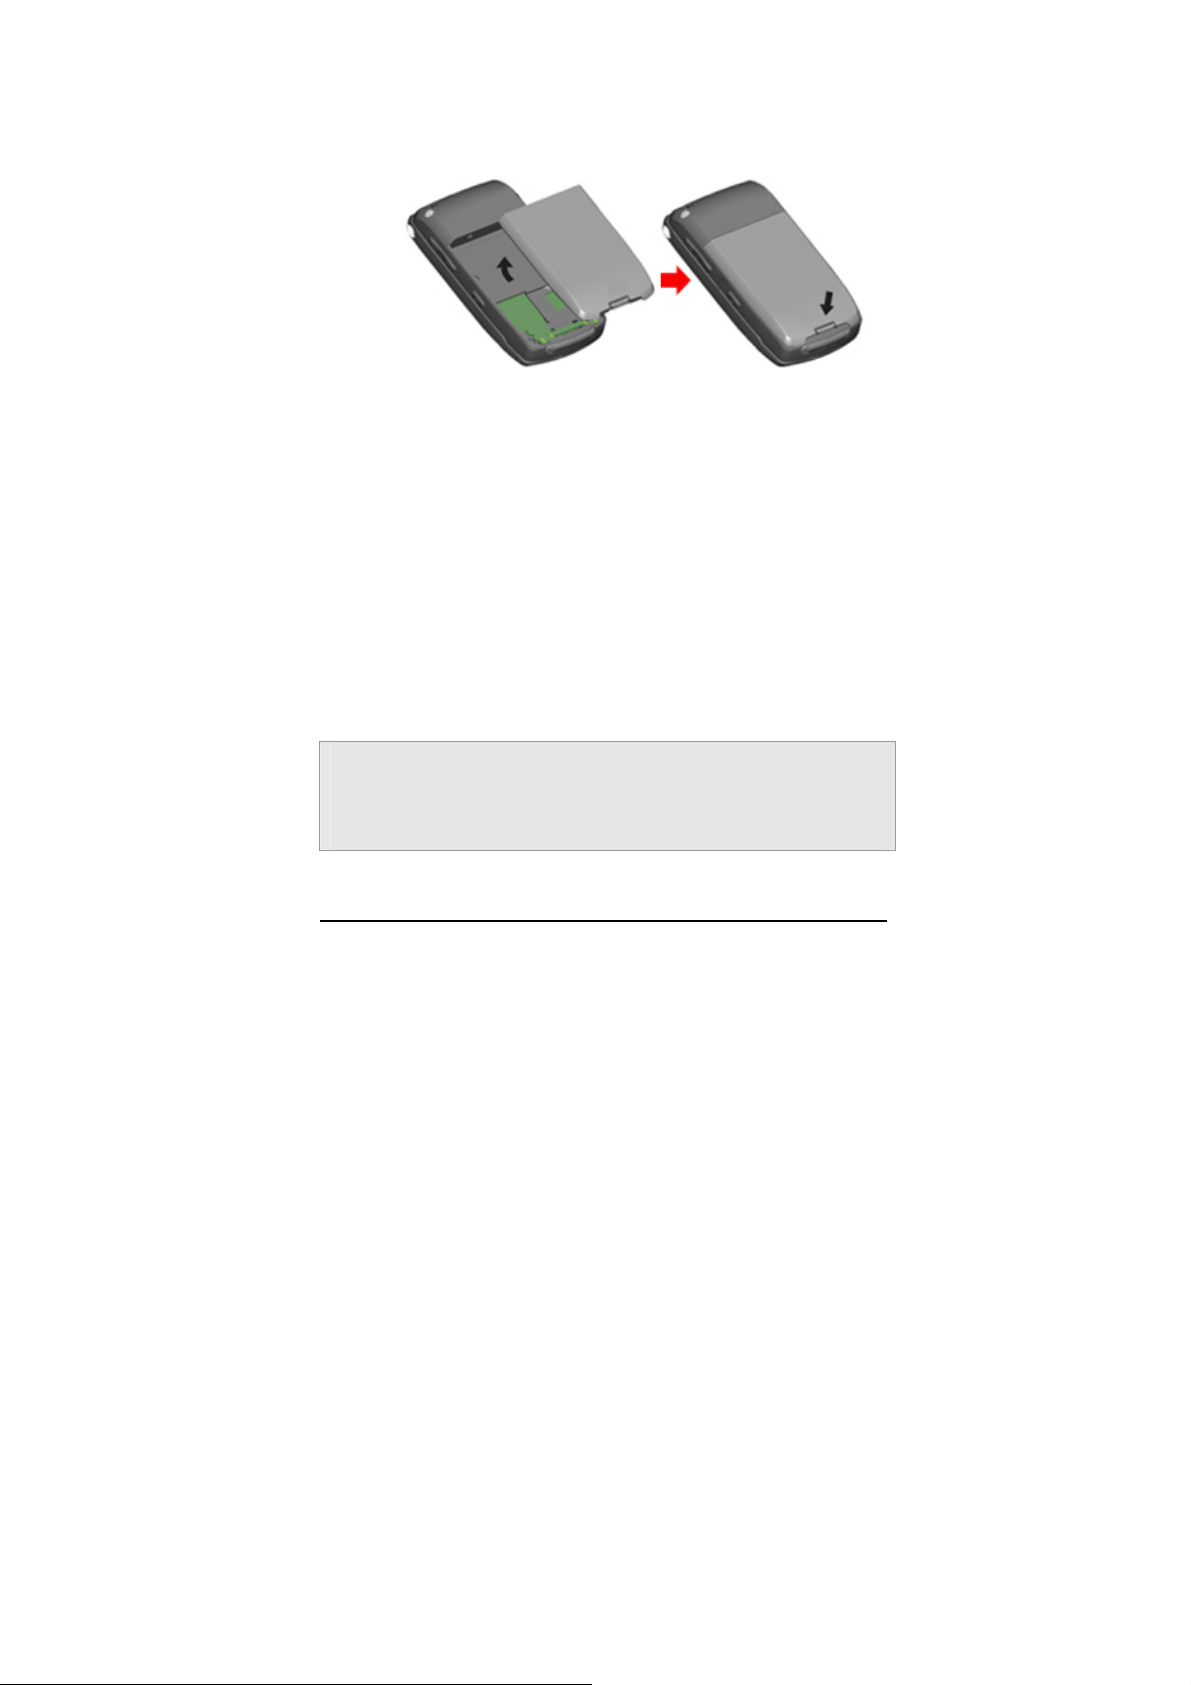
4. Place the battery on the phone. Align the bottom of the
battery with the corresponding slots in the phone and
press down and place the battery inside the phone.
Charging the Battery
Your phone package comes with a Li-ion battery, and a
traveler’s charger. You can also use USB data cable to charge
your phone, however, the charging time may be different from
traveler’s charger.
Use only approved batteries and chargers for your safety.
You may use the phone while charging the battery.
Note:
It is highly recommended to fully charge the battery prior to
using your phone for the first time
Page 25
Page 26

1. After putting the battery to the phone properly, insert the
charging plug into the charging port at the bottom of the
phone.
2. Connect the traveler’s charger
to a standard AC outlet.
3. When charging is completed, disconnect the traveler’s
charger from the power outlet and from the phone by
pulling the charging plug.
Low Battery Indicator
When the battery level is low, the phone will make a warning
sound and displays a warning message on the screen: When
the battery becomes too weak to operate, it switches off
automatically.
Page 26
Page 27

Note:
When the battery is discharged completely, and not used for a
while, the phone will not display the charging image for about
10 minutes while charging. After 10 minutes of charging, the
phone will display the charging image.
Switching the Phone On/Off
1. Hold down the power on/off key more than one
second to switch on.
2. If the phone asks for a PIN, key-in the PIN.
The phone searches for your network and when it finds it,
it will display the idle screen. The external display shows
the signal strength, battery strength and current time
and date.
Note:
To change the language, use the Language menu option in
Phone Setup sub menu 4. Settings menu
Access Codes
There are access codes for your SIM card. These codes help
Page 27
Page 28

you to protect the phone against unauthorized use.
When requested for any of the code explained below, key-in the
appropriate code (displayed as asterisks) and press the OK key.
PIN
The Personal Identification Number or PIN (4-8digits)
protects your SIM card against unauthorized use. The PIN
comes with the SIM card; see the SIM card instruction
provided with your card.
If you enter an incorrect PIN three times in succession, the
code will be disabled and cannot be used until you re-enable
it by entering the PUK.
PUK
The 8-digit PUK (Personal Unblocking Key) is required to
change a disabled PIN. The PUK may be supplied with the
SIM card. If not, or in case you have lost it, please contact
your service provider.
To re-enable your PIN, proceed as follows.
1. Key-in the PUK and press the OK key.
2. Enter a new PIN of your choice and press the OK
Page 28
Page 29

key.
3. When the Confirm New PIN message is displayed,
key-in the same code again and press the OK key.
If you enter an incorrect PUK ten times in succession, the
SIM card becomes invalid. Please contact your service
provider for a new card.
Pin Password
The 4 ~ 8 digits of password is required when you use the
Call barring function. You can obtain the password from your
service provider when you subscribe to this function.
Page 29
Page 30

General Functions
Making a Call
To make a call on your phone, check the phone if the screen is
idle and the phone indicates signal. Then key-in the area code
and phone number using the numeric keys and press the Dial
key.
If you set the Connect tone to ON, you will hear the connecting
tone when the call is answered by the caller. For details, please
refer to 4. Settings>1.Phone Setup>1.Sound & Light.
Making International Calls
Press the
Input the country code, area code (without the leading zero),
and the phone number. Then press the Dial key. The ‘+’
informs the network that it is the international call.
key twice to display “+” character.
*
Correcting the Number
Area Displays
The last digit displayed
Any other digit in the
number
Page 30
Press the [Clear] soft key (right).
Press the Right & Left navigation key
until the cursor is exactly to the right of
the digit to erase.
Page 31

Press the [Clear] soft key (right).
The whole display
Hold down the [Clear] soft key (right)
for more than two seconds.
Search number under Phonebook
When you make a call, press the [Name] soft key (right) from the
idle screen. You can choose a phonebook name by pressing the
up & down navigation keys. It will display a phone number under
the name. Press the Dial key to make a call. If you want to view
the details of the phonebook entry, select the [Option] soft key
and select “View.” Press the Dial key to make a call.
If there is no phone number in your phonebook, it will display
[Empty] pop-up.
Making a Call from Phonebook
You can store the names and phone numbers in the SIM card
and phone memory called [Phonebook]. If you want to find a
number by phonebook name, press the [Menu] soft key (left),
and then choose “Quick Search” menu or “Search Entry” menu.
By inputting full name or a first letter of the name, it will display
the matching entry. If you have found a name you want to make
a call, choose the name by moving the up & down navigation
Page 31
Page 32

keys. Press the Dial key to make a call. However, if there is
more than one entry in the selected name, it will display a list of
numbers. Then you may simply select one entry and press the
Dial key to make a call.
You can also select “Search Entry” menu under Phonebook
menu, if you want to search with other than the first letters. If
you want to see all lists of phonebook, just choose the [Option]
soft key (left) without inputting any letter and select “Search.”
Select one entry and press the Dial key to make a call.
Making a Call with Speed Dial
To use Speed Dial feature, press and hold the speed dial
number key, the phone will dial to the associated phone number.
(See 1.7 Speed Dial, for detail).
Making a Call from Message
You can make a call from message by pressing the [Ok] soft key
(left) and [Option] soft key (left) and select “Use Number” and
press the Dial key when the number you want to call back is
highlighted, or select “Dial” menu in the “Use Number” list.
Page 32
Page 33

Redialing the Last Number
The phone stores the last 10 numbers dialed. To recall any of
these numbers, proceed as follows.
1. If you have typed any characters on the display, clear
the display by pressing the [Clear] soft key, or press the
End key to go back to idle screen.
2. Press the Dial key to display a list of the last dialed
numbers.
3. Use the navigation keys Up & Down to scroll through
the numbers until the required number is highlighted.
4. In order to Dial the number highlighted, press the Dial
key
Ending a Call
When you have finished your call, press the End key for a short
time.
Answering a Call
When you answer a call, the phone rings or vibrates according
to the Sound & Light settings with the incoming call animation.
When the caller is identified, the phone will display the caller’s
phone number and name, if stored in the phonebook. If the
caller cannot be identified, only the caller’s phone number will be
Page 33
Page 34

displayed.
1. Press the Send key, if the Send Key answer option is
set to ON. Press any key to answer a call except for the
power on/off key, if the Any Key answ er option is set to
On. Slide up the phone to answer a call, if the Slider
Answer option is set to on.
2. To reject an incoming call, press the [Reject] soft key.
3. End the call by pressing the End key.
Emergency Call
Ensure that the phone is switched on and in service.
Enter the emergency number (Official Emergency Number or
second official emergency number) and press the Dial key.
Provide your location. Do not end the call until given permission
to do so. End the call by pressing the End key.
Note :
When “Enter Lock Code” or “Enter PIN” messages are
prompted on the display during power-on, some network may
not allow emergency call. However, some network may
request to insert a SIM card and enter Official Emergency
Number.
Page 34
Page 35

Entering a “Pause or Wait”
You may enter a pause (“P”) character into a dial string by
pressing the left special function key (
left special function key (
character into a dial string.
) four times to enter a wait (“W”)
*
) three times. Press the
*
Adjusting Earpiece Volume
During calling, you can adjust the earpiece volume by pressing
up or down side keys on the right side of this phone.
If you want to change the keypad tone, press the side volume
keys to up or down in an idle mode
Using the Ear/Microphone
If you insert the ear/microphone jack to the ear/microphone hole
in the left side of your phone, you can use it in the same way as
your phone’s earpiece and microphone.
You can answer or end a call by pressing the hook button on the
ear/microphone.
To answer another call while you are on the phone, you can
answer the waiting call by pressing the hook button on the
ear/microphone.
Page 35
Page 36

How to Use the Phone memory
Using the USB data cable
When you plug in the USB data cable to the powered off phone,
the phone will be in Storage Mode
displaying USB connection
animation. When you plug in the
USB data cable while the phone is
powered on, the phone will display
USB Configuration menu (Storage
Mode/PC Sync Mode). Select
Storage Mode for USB connection mode; otherwise select PC
Sync Mode for using the phone and charging it.
If you want to explore and edit the phone memory, select
Storage Mode. Open the Windows Explore of your PC and open
the Portable Disk Driver; the driver can be D:\, E:\ F:\ and so
forth depending on your PC setup.
You can use your phone as a portable disk; saving Music files
and Image Files. Press the MP3 key to play the Audio Player;
you can listen to the MP3, MIDI, WAV music files.
Note:
It is recommended that your mini SC card should have at
least 100KB free space for Audio File play list. If the phone
is full, the phone may not able to play a new music file.
Page 36
Page 37

If you select PC Sync Mode, the phone will remain powered on
and in the idle status for your usual phone usage.
Note:
The USB data cable from your package is used for both data
transmission and power charging cable, however, the
charging level will differ from the traveler’s charger.
Page 37
Page 38

Menu Navigation
Selecting Functions and Options
Your phone offers a set of functions that allow you to customize
your phone. These functions are arranged in menus and sub-
menus, accessible with the two soft keys. Each menu and sub-
menu allows you to view and alter the settings of a particular
function.
Using Soft Keys
The roles of the soft keys vary according to
the current context; the label on the bottom
line of the display just above each key
indicates its current role.
In an Idle screen, by pressing the left soft key
(labeled as “Menu”), you can access to
menus; by pressing the right soft key (labeled
as “Name”), you can view the phonebook list.
Using Navigation Keys
Left navigation key: You may go to upper depth menu from
the current depth.
Right navigation key: You may go to sub depth menu from
the current depth.
Page 38
Page 39

Security
There are six types of security setting categories, and you can
optimize security mode by choosing sub menus in “Security
Setup” in “Settings” menu. These security settings will help you
to keep privacy and to prevent other people from using the
phone without your permission.
Please see details of security features. For basic key protection,
please see the following description of the keypad lock function.
Keypad Lock
You have an option to lock the keypad of your phone to protect
from mistakenly pressed keys which may cause malfunctions.
Press the
locking time from 5 seconds to 5 minutes. When the Keypad
Lock feature is enabled, you must press the [unlock] soft key
key to activate the keypad lock, and select the key
*
(right) and then press the Right soft key and
each time you need to release the keypad lock. You may not
make a call or operate the phone if unlock code is not entered.
However, answering a call and receiving message are available
without entering the unlocking key sequence. (see Settings >
Security Setup > Auto Keypad Lock.)
Page 39
# key in sequence,
Page 40

In-Call Options
Your phone provides a number of call control functions which is
allowed to use during calling.
Putting a Call on Hold/Un-hold
You can put the current call on hold when the call is in active
state if this service is supported on the network. To activate,
press the [Hold] soft key.
To make the put on hold call reactivate, press the [Un-hold] soft
key.
Making a Second Call
You can make a second call during calling. To do this, key-in the
second phone number or fetch it up with Phonebook option and
press the Dial key. The first call is automatically put on hold.
Making an International Second Call
Press the
Key-in the country code, area code (without the leading zero),
and the phone number or fetch it up with Phonebook option.
Then press the Dial key. The first call will be automatically put
Page 40
key twice to display “+” character.
*
Page 41

on hold.
The ‘+’ tells the network that the call is international.
Answering a Second Incoming Call
You will be notified of an incoming call while you are in a call.
Call Waiting tone will sound in the earpiece, and the display will
show that a second call is coming. This feature, known as Call
Waiting, is only available if the network supports it.
You can answer the second incoming call by pressing the
[Accept] soft key or the Dial key.
The first active call is automatically put on hold, and then the
incoming call is active.
You can reject the incoming call during a call without answering
it by pressing the End key.
Storing a Number
You can store phone numbers to the phonebook by using the
[Phonebook] Menu even during you are in a call.
Mute a Call
You can mute your voice sound while you are on the phone.
Page 41
Page 42

Voice Recording a Call
You can record the conversation during a voice call.
Press and hold the side key (up) to start recording the call, and
press and hold the side key (down).
Swapping Calls
Between Active Call and Held Call
You can swap calls while there are active held calls on
conversation. To swap between the active call and the held call,
press the [SWAP] soft key.
The current active call is placed on hold and the held call is
reactivated.
Conference Call
You can make calls while there are active held calls on
conversation by using [Conference Call] menu in [Call Menu].
[Conference Call] menu is appearing only when you accept the
second call.
The current active call is placed on hold and the held call is
reactivated.
If you want to quit conference call and do not want to hang up
any call, you can choose [Split Call] Menu in [Call Menu]. [Split
Call] menu appears only when you are on a conference call.
Page 42
Page 43

Note:
Some networks do not allow the user to change this setting.
Sending Message
You can send messages by using the [SMS] Menu in
[Messages] even during you are calling.
Inter-working Phonebook
You can use [Phonebook] menu and sub menus even while you
are calling.
Page 43
Page 44

TEXT INPUT
Text Input Tips
Text Input Options:
While you are in text editing mode, you will be in several
modes.
When you see [Option] and [Clear] in the soft key, press left
soft key for option: you can save the entry or change the Text
Input Method. To erase a character, press the right soft key in
front of a character you want to erase. You can move among
the characters you typed in by pressing the 4 way navigation
keys.
There can be more than two options depending on what
contents you are editing.
When you see [Select] and [Back] soft key, press left soft key
to select the highlighted selection or press navigation key to
select from the choices. When you press [Back] soft key
(right), you can go back to the previous mode, which might
lead you to [Option] and [Clear] soft key display.
Page 44
Page 45

You can define the default Input Method of your
phone and change input methods time to time.
To define your preferred input method, go to “Phone Setup” sub
menu in “Settings” menu. Then select “Preferred Input Method.”
Once you set the preferred input method, next time you edit in
text input mode, the setting will be applied until you change to
another.
If you want to change the text input method temporarily, in the
text input mode, press [Option] soft key, and select “Input
Method” from the option. In addition, you can change the text
input method with the
you press the
# key.
# key; the input methods will swap when
Text Input Methods
You can use several input mode – Spanish ABC / abc, T9
Spanish ABC / abc, English ABC / abc, T9 English ABC / abc,
Numeric, and Symbol mode.
Page 45
Page 46

Spanish, T9 Spanish, English & T9 English
(ABC, abc)
Press To
[Option] Go to option menu screen, it will
Left Soft Key
Right Soft
Key
Left or Right
Navigation
Key
display several menus depending on the text-
editing situation. Usually you will have option
to save (done) and change Input method.
[Clear] Clear a character of the string entered
on the edit screen or a character on the active
word (the word remains active). To erase a
character, press the right soft key in front of a
character you want to erase. When you press
and hold [Clear], the entire entry will be
cleared.
[Back] When you press [Back] soft key (right),
you can go back to the previous mode.
Move the cursor to the left or right direction by
a character on the edit screen. When you
press and hold this key, it will scroll leftward or
rightward.
Page 46
Page 47

Move the cursor 1
[T9 mode]
Up or Down
Navigation
Key
~
line up or down on
the edit screen. When
you press and hold
this key, it will scroll
upward or downward.
When entering a word
and highlighted, up
and down navigation
key to swap words in
database.
Go back to the idle screen.
Insert a blank space (Press shortly) – It means
the previous word entry is accepted.
Stroke . : ) : - )
Select Spanish/English
[T9 mode]
characters & Arabic
Input a word by
numerals. Switch the
pressing the
character until the
alphanumeric keys
desired character is
in order of spellings
highlighted by pressing
of the word you
the alphanumeric key
wish to type-in.
from 2 to 9.
Select Symbols.
Switch the input methods.
Page 47
Page 48

Numeric mode
Press To
[Option] Go to option menu screen,
displaying several menus depending on the
Left Soft Key
Right Soft Key
Left or Right
Navigation
Key
text-editing situation. Usually you will have
option to save (done) and change Input
method.
[Clear] Clear a character of the string
entered on the edit screen or a character on
the active word (the word remains active).
To erase a character, press the right soft key
in front of a character you want to erase.
When you press and hold [Clear], the entire
entry will be cleared.
[Back] When you press [Back] soft key
(right), you can go back to the previous
mode.
Move the cursor to the left or right direction
by a character on the edit screen. When you
press and hold this key, it will scroll leftward
or rightward.
Up or Down
Navigation
Page 48
Move the cursor 1 line up or down on the
edit screen. When you press and hold this
Page 49

Key
~
key, it will scroll upward or downward.
Go back to the idle screen.
Input numbers by pressing 0 ~ 9 keys
shortly.
Select Symbols.
Switch the input methods.
Page 49
Page 50

Symbol mode
Press To
[OK] Accept the symbol selected on the
Left Soft Key
Right Soft
Key
Navigation
Keys
symbols screen, and then turns to the edit
screen.
[Back] When you press [Back] soft key (right),
you can go back to the previous mode.
Move the cursor to the direction by a symbol on
the select symbol screen.
Go back to the idle screen.
Go to Select Symbols mode.
Switch the input methods.
Page 50
Page 51

Using Phonebook
You can store phone numbers and its corresponding names in
the memory of your SIM card. In addition, you can store up to
250 entries and categorize in 5 groups. The SIM card and phone
memories, although physically separate, are used as if they
were a single entity, called phonebook.
Storing a Phone Number with a Name and
an Image
As soon as you start to enter a number, [Save] appears above
the soft key (left) to allow you to store numbers in the
phonebook.
1. Key-in the number to be stored. You can input the
number up to 40 digits.
Note:
If you make a mistake while entering a number, correct it by
using the [Clear] soft key (right). Press the [Clear] soft key to
clear one letter/digit at a time. Press and hold the [Clear] soft
key to clear the entire message or characters on the edit
screen.
2. Select the storage from “To SIM” or “To Phone.” You can
also check how many you have saved and total entries
Page 51
Page 52

you can store in the storage.
3. Select a category to edit. To select the category, scroll to
the category and press the [Edit] soft key (left).Ten
categories are available:
Name: Max. 30 English characters. Press [Edit] to
input the characters.
Number: Max. 40 digits. Enter digits by pressing
alphanumeric keys.
Home Number: Max. 40 digits. Enter digits by
pressing alphanumeric keys.
Company Name: Max. 30 English characters. Press
[Edit] to input the characters.
Email Address: Max. 60 English characters. Press
[Edit] to input the characters.
Office Number: Max. 40 digits. Enter digits by
pressing alphanumeric keys.
Fax Number: Max. 40 digits. Enter digits by pressing
alphanumeric keys.
Associate Picture: allows you to set an associate
picture as a Photo Caller ID; the phone will display
the selected image when you have an incoming call
or when you make a call. Select by pressing the
navigation key to the right or left. You can select
Page 52
Page 53

from pre-defined images or select from file manager.
Associate Sound: Select by pressing the navigation
key to the right or left.
Caller Group: 5 groups (Friends, Family, VIP,
Business and Others) or none. Select a caller group
by moving the navigation key. If you choose no
group, the number is saved and displayed “None.”
Note:
When you edit the name, press the [Edit] soft key (left). When
you are done with the editing, select the [Option] and then
select “Done.” This will only save the name.
When you edit the number, enter numbers by pressing
alphanumeric keys. If you want to save the phonebook entry,
press the [OK] soft key. If you need to correct a number, press
the [Clear] soft key.
When you select categories like picture, sound, group or done
with editing names, press the [Done] soft key(right) to save the
entry.
Storing a Phone Number using the
Phonebook Menu
1. Press the [Menu] soft key (left), and select the
[Phonebook] menu.
Page 53
Page 54

2. Scroll to [Add New Entry] by pressing up or down the
navigation key and press the [OK] soft key (left).
3. Select the storage from “To SIM” or “To Phone.” You can
also check how many you saved in the storage and total
entries you can store.
Note:
1. SIM: you can store a name and a number.
2. Phone: you can store up to ten categories per an entry.
(Support for up to 250 entries).
4. Select a category to edit. To select the category, scroll to
the category and press the [Edit] soft key (left).Ten
categories are available (see “Storing a Phone Number
with a Name and an Image” for selecting category, edit
and save the entries).
Searching the phonebook list
From Idle Screen
When the phone displays the idle screen, press the [Name]
soft key (right). Then, the phone will display the Phonebook
data on the screen sorted by name.
From Phonebook Menu
1. Quick Search (See detail in 1.1 Quick Search)
2. Search Entry (See detail in 1.2 Search Entry)
Page 54
Page 55

Menu Map
1. Phonebook
1.1 Quick Search
1.2 Search Entry
1.3 Add New Entry
1.3.1 To SIM
1.3.2 To Phone
1.4 Copy All
1.4.1 From SIM
1.4.2 From Phone
1.5 Delete All
1.5.1 From SIM
1.5.2 From Phone
1.5.3 One By One
1.6 Caller Group
1.7 Speed Dial
1.8 Special Number
1.8.1 Owner Number
1.8.2 Service Dial Number
1.8.3 SOS Number
Page 55
Page 56

1.9 Settings
1.9.1 Memory Status
1.9.2 Preferred Storage
1.9.3 Fields
2. Messages
2.1 SMS
2.1.1 Inbox
2.1.2 Outbox
2.1.3 Draft
2.1.4 Write Message
2.1.5 Template
2.1.6 Message Settings
2.2 MMS
2.2.1 Write Message
2.2.2 Inbox
2.2.3 Outbox
2.2.4 Drafts
2.2.5 Templates
2.2.6 Message Settings
2.3 Voice Mail
2.3.1 Voice Message Indicator
2.4 Broadcast Message
Page 56
Page 57

2.4.1 Receive Mode
2.4.2 Read Message
2.4.3 Languages
2.4.4 Channel Setting
3. Call History
3.1 Missed Calls
3.2 Dialed Calls
3.3 Received Calls
3.4 Delete Call Log
3.4.1 Missed Calls
3.4.2 Dialed Calls
3.4.3 Received Calls
3.5 Call Time
3.5.1 Last Call Time
3.5.2 Total Sent
3.5.3 Total Received
3.5.4 Reset All Time
3.6 Call Cost
3.6.1 Last Call Cost
3.6.2 Total Cost
3.6.3 Reset Cost
3.6.4 Max Cost
Page 57
Page 58

3.6.5 Price per Unit
3.7 SMS Counter
3.7.1 Sent
3.7.2 Received
3.8 GPRS Counter
3.8.1 Last Sent
3.8.2 Last Received
3.8.3 All Sent
3.8.4 All Received
3.8.5 Reset Counter
4. Settings
4.1 Phone Setup
4.1.1 Sound & Light
4.1.1.1 General
4.1.1.2 Meeting
4.1.1.3 Outdoor
4.1.1.4 Indoor
4.1.1.5 Headset
1) Tone Setup
2) Volume Setting
3) Alert Type
4) Ring Type
Page 58
Page 59

5) Extra Tone
6) Answer Mode
7) Light
4.1.2 Time and Date
4.1.2.1 Set Home City
4.1.2.2 Set Time and Date
4.1.2.3 Set Format
4.1.2.4 Auto Update of Date and Time
4.1.3 Display Settings
4.1.3.1 Wallpaper
4.1.3.2 Screen Saver
4.1.3.3 Main Menu Style
4.1.3.4 Themes
4.1.3.5 Greeting Text
4.1.3.6 Show Date and Time
4.1.4 Language
4.1.5 Preferred Input Methods
4.1.6 Contrast
4.1.7 Dedicated Key
4.1.8 Shortcuts
4.2 Call Setup
4.2.1 Caller ID
4.2.1.1 Set By Network
Page 59
Page 60

4.2.1.2 Send ID
4.2.2 Call Waiting
4.2.2.1 Activate
4.2.2.2 Deactivate
4.2.2.3 Query Status
4.2.3 Call Divert
4.2.3.1 All Voice Calls
4.2.3.2 If Unreachable
4.2.3.3 If No Answer
4.2.3.4 If Busy
4.2.3.5 All Data Calls
4.2.3.6 Cancel All Divert
4.2.4 Call Barring
4.2.4.1 Outgoing Calls
4.2.4.2 Incoming Calls
4.2.4.3 Cancel All
4.2.4.4 Change Barring PW
4.2.5 Line Switching
4.2.6 Call Time Reminder
4.2.6.1 Off
4.2.6.2 Single
4.2.6.3 Periodic
4.2.7 Call Time Display
Page 60
Page 61

4.2.8 Auto Redial
4.3 Network Setup
4.3.1 Network Selection
4.3.2 Preferred Networks
4.3.3 GPRS Connection
4.4 Security Setup
4.4.1 PIN Lock
4.4.2 Phone Lock
4.4.3 Auto Keypad Lock
4.4.4 Fixed Dial
4.4.5 Barred Dial
4.4.6 Change Password
4.5 Restore Factory Settings
5. Multimedia
5.1 Camera
5.2 Image Viewer
5.3 Audio Player
5.4 Sound Recorder
5.5 Melody Compose
6. Fun
6.1 Java
Page 61
Page 62

6.1.1 Launch
6.1.2 Setting
6.1.3 Information
6.2 Java Setting
6.2.1 Java Audio
6.2.2 Java Network Profile
6.2.3 Free Data Space
6.3 Games
6.3.1 Color Balls
6.3.2 Snake
6.3.3 Smash
6.3.4 Doll
6.4 Game Setting
6.4.1 Game Sound
6.4.2 Game Vibration
7. Tools
7.1 Calendar
7.2 To Do List
7.3 Alarm
7.4 World Clock
7.5 Calculator
7.6 Unit Converter
Page 62
Page 63

7.6.1 Weight
7.6.2 Length
7.6.3 Currency Converter
7.7 Health
7.7.1 BMI (Body Mass Index)
7.8 Stopwatch
7.8.1 Typical Stopwatch
7.8.2 nWay Stopwatch
8. Services
8.1 GSM Access
8.2 WAP
8.2.1 Homepage
8.2.2 Bookmarks
8.2.3 Recent Pages
8.2.4 Enter Address
8.2.5 WAP Push
8.2.6 Settings
8.3 Data Account
8.3.1 GSM Data
8.3.2 GPRS
9. File Manager
Page 63
Page 64

Page 64
Page 65

Menu Functions
1. Phonebook
Phonebook offers phonebook storage, management and
services. You can access to the phonebook from idle screen,
phonebook menu, and message writing modes.
From Idle screen, press the [Name] soft key (right), it will
display the phonebook data sorted by name in your SIM
Card and phone memory.
From the Phonebook menu, you will have eight sub menus
as following.
1.1 Quick Search
When you select the Quick Search in the Phonebook menu,
you will see all entries saved in the phonebook. This
function allows you to search the phonebook data by name.
You may simply type-in alphabet(s), the phone will show
you the search result dynamically.
To change text input method:
Press the # key. It will change the input method and display
icon on the top left.
Page 65
Page 66

From the phonebook list, you can also View, Edit, Delete,
Copy, Move, and Duplicate the entry.
1. View: allows you to view the entry’s contents such as
name, number and so on.
2. Edit: allows you to edit the entry items.
3. Delete: allows you to delete the entry.
4. Copy: allows you to copy the entry from SIM to Phone or
Phone to SIM. You will have the same entry in a different
storage. (SIM + Phone)
5. Move: allows you to move the entry from SIM to Phone
or Phone to SIM. The entry will be stored in the original
storage. (SIM Æ Phone, Phone Æ SIM)
6. Duplicate: allows you to duplicate the entry in the same
storage. You will have the same data in the same
storage. (SIM+SIM, Phone+Phone)
1.2 Search Entry
When you select the Search Entry, after storing numbers to
the phonebook, you can search them by Name.
1. Enter a name you want to search in the text input box.
Input full name or even a start letter and press the
[Option] soft key (left).
Page 66
Page 67

To change the text input method:
1) Press the [Option] soft key and select Input Method, and
then choose the input method from the list, or
2) Press the # key, it will change the input method and
display icon on the top left.
2. If there is a name, you want to call, choose the name by
moving up & down the navigation key.
3. Press the Dial key to make a call. However, if there is
more than one entry in the selected name, it will display
a list. Then you may simply select one entry and press
the Dial key to make a call.
Note:
The following options are available.
1) View: allows you to view the entry’s contents such as
name, number and so on.
2) Edit: allows you to edit the entry items.
3) Delete: allows you to delete the entry.
4) Copy: allows you to copy the entry from SIM to Phone or
Phone to SIM. You will have the same entry in a
different storage. (SIM + Phone)
5) Move: allows you to move the entry from SIM to Phone
or Phone to SIM. The entry will be stored in the original
storage. (SIM Æ Phone, Phone Æ SIM)
Page 67
Page 68

6) Duplicate: allows you to duplicate the entry in the same
storage. You will have the same data in the same
storage. (SIM+SIM, Phone+Phone)
1.3 Add New Entry
Please see [Storing a Number using the Phonebook
Menu].
1.4 Copy All
You can copy all phonebook data from SIM card to Phone or
from Phone to SIM. It is a useful function if you want to back
up your phonebook data from a SIM card to your phone and
vice versa.
1.5 Delete All
You can delete all phonebook data in SIM card or Phone. In
addition, you can delete the phonebook data one by one.
1.6 Caller Group
You can setup and edit Caller Group profiles as following.
1. Edit Group Name: Edit the group name, press the
[Option] soft key (left), and select “Done” to save the
changes.
Page 68
Page 69

2. Alert Type: Allows you to select the alert type to be used
for this group. Scroll left and right with the navigation
keys.
3. Alert Sound: Allows you to select the ring tone to be
used when you receive a call from a person in the group.
Scroll left and right with the navigation keys.
4. Alert Picture: Allows you to select incoming call picture
when you receive a call from a person in the group.
Scroll with the navigation keys to change the picture and
go to the next line to select. If you want to view and
select images, select the [View] soft key (left) and scroll
with the left and right navigation keys. To select the
picture, press the [OK] soft key (left).
5. Member List
A. After storing numbers in the phonebook, you can
search them by Group.
B. You can add or delete member(s) to the group
member list. Press [Option] soft key then select
“Add,” it will display a phonebook list excluding the
members already in the group. It is possible to set
a member in multiple groups.
1.7 Speed Dial
Page 69
Page 70

When you store phone numbers in the Phonebook, you can
set up to eight speed dial entries and dial the number more
conveniently by pressing the associated number key. This
menu allows you to enable, disable and edit the speed dial
on the number 2 ~ 9 keys. To use Speed Dial feature, press
and hold the speed dial number key, the phone will dial to
the associated phone number.
You can edit the speed dial list; press [Ok] soft key to select
the ‘2. Set Number’ option in the ‘Speed Dial’ menu. It will
display the speed dial list. Press [Option] soft key, and select
‘Edit’ and select the entry from the phonebook list by
pressing the [Ok] soft key (right).
1.8 Special Number
You can view and edit your mobile phone number (owner
number), Service Dial number and SOS number.
1. Owner Number: displays your mobile phone number.
You can edit owner’s name and phone number.
2. Service Dial Number: lists up the SIM SDN (Service Dial
Number) and allows you to access to the number by
pressing the [Dial] soft key (left) or the Send key.
3. SOS Number – lists up the SOS Number.
Page 70
Page 71

1.9 Settings
You can view and edit the settings for the Phonebook as
following.
1.9.1 Memory Status
You can check how many names and numbers are
stored in the phone book (SIM card and phone
memories) or how much free space is remained.
1.9.2 Preferred Storage
You can set your preferred storage either to SIM or to
Phone as a default storage in the phonebook.
1.9.3 Fields
There are eight fields that you can set on or off in your
phonebook entry. (Home, Office, Fax, Email Address,
Company Name, Associate Picture, Associate Sound
and Caller Group). Press the [On] or [Off] left soft key
(left) to turn on or off the field.
Page 71
Page 72

2. Messages
With this menu, you can use SMS, MMS, Voice Mail, and
Broadcast Message. These functions are available depending
on network services that your service provider supports.
2.1 SMS
The SMS (Short Message Service) function is a network
service and your network may not support the service. You
can send messages in Fax, Page, E-mail and Text format.
To send text messages by phone, you must obtain the SMS
center number from your service provider, and enter it on the
SC Address option in Profile Settings menu (2.1.5.1).
When the icon appears on the status indicators area, it
indicates that you have received a new message.
Note:
The SMS service may not be available on all networks. Some
network allows it only within its own network.
2.1.1 Inbox
With this menu, you can view the new text messages or
the read messages.
It will display the sender’s phone number or name (if
stored in the Phonebook) on the list.
Page 72
Page 73

If you choose the [Ok] soft key, you can view the
message contents.
Press [Option] soft key for the following options:
1) Reply: Allows you to reply to the sender.
2) Delete: Allows you to delete the viewed message
3) Edit: Allows you to edit the message, and send or
save the edited message.
4) Forward: Allows you to forward the message.
5) Delete All: Allows you to delete all messages in the
Inbox.
6) Use Number: Allows you to call the sender back or
save the number to the phonebook.
7) Select Objects: Allows you to save the objects
(NVM) of incoming messages.
2.1.2 Outbox
With this menu, you can view the sent or unsent
messages you have saved.
Send, Edit, Delete, Delete All and Use Number
options are available.
2.1.3 Write Message
With this menu, you can write a message and insert
Page 73
Page 74

EMS objects.
1. Select [Write Message] menu in the [SMS] menu.
2. Make a message. You can insert Template, Object,
change format text, and input method.
Note:
Format Text options are as following:
1) Text Style: Bold, Italic, Underline, Strikethrough
2) Alignment: Automatic, Left, Center, Right
3) New Paragraph: Automatic, Left, Center, Right
3. After you completed the message, press the [Option]
soft key (left) and then select “Done.” Choose one of
following options.
1) Send Only: Sends the message to the recipient
phone number. It will not save the message.
2) Save and Send
it to the required recipient.
: Saves the message, and send
3) Save Only: Saves the message so that you can
send it later.
4) Send to Many: Send the message to multiple
recipients. Select Edit List to add up to 10
recipient(s).
5) Send by Group: Sends the message to the
Caller Group. Select a Caller Group from the list.
Page 74
Page 75

4. You can input the number directly or get from the
phonebook by pressing the [Search] soft key (left).
5. The phone will display the Message sending Success or
Fail message on the screen for all recipients.
Note:
If you receive a call while you are writing a message, the
message will be backed-up and after hang up, the phone will
display [write message] mode. You can finish the message
without losing the data.
2.1.4 T emplates
You can edit and delete message templates in this
menu. You can store your frequently used messages up
to 10 messages. For example, “Call Me Now,” “How
about lunch,” “How are you,” and so forth. You can store
up to 40 English letters in each template. You can use
the Template by selecting [2.Use Template] option, when
you write a message.
2.1.5 Message Settings
You can setup default Message Information: Profile
Setting, Common Settings, Memory Status, Preferred
Storage, and Preferred Bearer.
Page 75
Page 76

2.1.5.1 Profile Setting
Depending on your service provider and service plan,
you can set the message profile setting.
Note:
You can edit the profile as following:
1) Profile Name: edit the profile name.
2) SC Address: you have to get the number from your
service provider.
3) Valid Period: choose from Maximum, 1 hour, 12 hours,
1 day, 1 week
4) Message Type : choose from Fax, Page, E-mail, Text
2.1.5.2 Common Setting
You can set on or off the following common settings
for SMS.
1) Delivery Report
This allows you to set delivery report on or off.
When this function is set to on, the network
informs you whether or not your message has
been delivered.
2) Reply Path
This menu allows the recipient of your Message to
send you a reply via your message center, if the
Page 76
Page 77

network provides Message service. Press the [On]
or [Off] soft key (left) to turn this option on and off.
2.1.5.3 Memory Status
This shows memory status of SMS in your SIM card
or Phone.
2.1.5.4 Preferred Storage
You can set your preferred storage for the SMS
messages: to SIM or Phone.
2.1.5.5 Preferred Bearer
You can set your preferred Bearer for SMS.
Bearer options are “Prefer GPRS, Prefer GSM,
GPRS Only and GSM Only.”
2.2 MMS
The MMS (multimedia messaging service), also called Photo
Message, allows end-users to send and receive messages
containing multimedia content (including images, video,
sound and text). It provides a rich media of personal
multimedia messages from between mobile to mobile, and
mobile to e-mail.
Page 77
Page 78

2.2.1 Write Message
With this menu, you can write a message and insert
Image, Sound, and Attachment.
1. Select [Write Message] menu in the [MMS] menu.
2. Make a message. You can edit To, CC, BCC, Subject,
and Content.
3. You can input the number directly or get from the
phonebook by pressing the [Search] soft key.
Note:
Edit Content options are as following:
1) Add Text / Edit Text / Remove Text
2) Add Image / Edit Image / Remove Image
3) Add Audio / Edit Audio / Remove Audio
4) Insert New Slide: adds a new slide to the message.
5) Preview: plays the MMS message.
6) Slide Timing: input slide timing in second.
4. After you complete the message, press the [Option]
soft key (left) and then select “Done.” Choose one of
following options.
1) Send Only: Sends the message. It will not save
the message.
2) Save and Send: Saves the message, and send
Page 78
Page 79

it to required recipient(s).
3) Save to Drafts: Saves the message to Drafts.
You may send it later.
4) Send Options: Validity Period, Delivery Report,
Read Report, Priority
5) Exit: Exits the Write Message, the phone will ask if
you want to save the message.
5. The phone will display the Message sending Success
or Fail message on the screen for all recipients.
Note:
If you receive a call while you are writing a message, the
message will be backed-up and after hang up, the phone will
display [write message] mode. You can finish the rest of the
message without losing the data.
2.2.2 Inbox
Please see descriptions in the Inbox in the 2.1 SMS.
2.2.3 Outbox
Please see descriptions in the Outbox in the 2.1 SMS.
2.2.4 Draft
Please see descriptions in the Draft in the 2.1 SMS.
Note:
Options on saved MMS messages are as following:
Page 79
Page 80

1) View: plays the MMS message.
2) Properties: shows properties of the message (From,
Cc. Subject, Date, and Memory)
3) Send: Sends the saved message to the recipient(s).
4) Edits Message
5) Delete: Deletes the message.
6) Delete All: Deletes all messages in the box.
7) Use Number: Dials or Saves to Phonebook.
2.2.5 T emplate
You can edit the MMS templates and write a message in
this menu. You can use the Template by selecting
[2.Use Template] option, when you write a message.
You can store your frequently using messages up to 10.
For example, “Call Me Now,” “How about lunch,” “How
are you,” and so forth. You can store up to 40 English
letters in each template.
Select a template and press the [Option] soft key:
1. View: allows you to view and listen to the template
message.
2. Properties: shows properties of the templates (From,
CC. Subject, Date, and Memory).
3. Write Message: allows you to write a message with
Page 80
Page 81

the template.
1) From, CC., and BCC: allows you to add number(s)
or email(s).
2) Subject: allows you to edit the text content.
3) Edit content: allows you to select from text, image,
or sound by pressing navigation keys up and down.
2.2.6 MMS Settings
Within the MMS sub-menu, you can define default
values on common parameters for mobile-originated
messages. By setting default values for MMS messages,
you can experience a more comfortable service.
You can set up the MMS related parameters for sending
and retrieving the MMS messages.
1. Sending
This sets up parameters when you send MMS
messages.
1) Validity Period
You can select the period in which the service
center try to deliver message. When the
message expires, message center will not
deliver the message.
(1) Max: Maximum period is what service
Page 81
Page 82

provider permits.
(2) 1 Week
(3) 1 Day
(4) 12 Hours
(5) 1 Hour
2) Delivery Report
This allows you to set delivery report on or off.
When this function is set to on, the network
informs you whether or not your message has
been delivered.
(1) On
(2) Off
3) Read Report
You can set whether to receive a read report
from every recipient.
(1) On
(2) Off
4) Priority
(1) High
(2) Normal
(3) Low
5) Sliding Timing
You can set how long you want the message to
Page 82
Page 83

play. Input number(s) in seconds.
6) Delivery Time
You can set how soon the phone will send your
message.
(1) Immediate
(2) In One Hour
(3) In 12 Hours
(4) In 24 Hours
2. Retrieval
This sets up parameters when you retrieve MMS
messages.
1) Home Network
(1) Immediate
(2) Delayed
2) Roaming
(1) As Home
(2) Delayed
(3) Restricted
3) Read Report
(1) On Request
(2) Send
(3) Never Send
Page 83
Page 84

4) Delivery Report
This allows you to set delivery report on or off.
When this function is set to on, the network informs
you whether your message has been delivered or
not.
(1) On
(2) Off
3. Filters
You can filter MMS Messages by three categories as
following.
1) Anonymous (Allow/Reject)
2) Max Size (KB)
3) Advertisement (Allow/Reject)
4. Edit Profile
Select from profile list. You can activate the profile or
edit the profile.
Profile Options:
1) Rename Profile : edit the profile name.
2) Homepage: Enter URL
3) Data Account: Select data account from the list.
4) Connection Type:
Page 84
Page 85

(1) Connection Oriented: When you select
Connection Oriented, you can edit the IP
Address.
(2) Connectionless: When you select
Connectionless, you can edit the IP Address.
(3) HTTP: when you select HTTP, you can edit
the Proxy Address and Proxy Port
5) Username: Enter Username
6) Password: Enter password
5. Memory Status
This shows usage count, total memory used, and
remaining memory.
2.3 Voice Mail
Your phone is capable of dialing with voicemail server
number (if provided by your network). If the voicemail has
arrived, your phone displays new message in the idle
screen and sets to inform you of the arrival.
Select the Voice Mail from the list and press [Option] soft
key (left). You can Edit and Erase the Voice Mail server
number.
By selecting the Connect to Voice, your phone will dial to
Page 85
Page 86

the configured number that has been stored in Voice Mail list.
You can then listen to the voicemail.
Note:
Voice mail is a network feature. Please contact your service
provider for more information.
2.3.1. Voice Message Indicator
When receiving a voice mail, this function displays
voice message as a SMS icon. After a user listens
to the voice message, the voice message indicator
icon will disappear
2.4 Broadcast Message
This network service allows you to receive the broadcast
messages on various topics such as weather, traffic, local
district code, local hospitals, taxis or pharmacy in your area.
You can also receive the message to be in a particular
language (For example, when you are abroad) by using
Language (2.4.3) option.
For more information about broadcast message topics,
please contact your service provider.
The phone will display the Broadcast Messages immediately
when they are arrived, providing;
Page 86
Page 87

1. The phone is in the idle mode
2. The Receive Mode (2.4.1) option is set to On
3. The message channel is currently active in the channel list.
Note:
This service may not be available on all networks.
The following options are available:
2.4.1 Receive Mode
You can turn the receive mode on and off by pressing
the soft key (left).
Allows you to enable or disable the reception of the
broadcasted text messages.
2.4.2 Read Message
With this menu, you can read all the broadcasted text
messages received. The title area of the screen will
display the name of the message subject item.
Whenever the phone receives new contents, the phone
will update the contents of the message subject.
2.4.3 Language
Allows you to select your preferred language for
displaying cell broadcast messages. The number of
languages you can select depends on your SIM card.
2.4.4 Channel
Page 87
Page 88

Allows you to indicate the channels from which you wish
to receive broadcast messages.
This menu allows you to read, add and delete the list by
using Select, Add, Edit and Delete option. The number
of items in the list depends on your SIM card. It will
display all items you selected.
Note: For more information about the available subjects,
please contact your network service provider.
3. Call History
With this menu, you can identify all call records that you have
dialed, received or missed.
It will display the number and name (if available), together with
the date and time at which the call was made or received.
Note: Your phone can keep up to ten numbers in each list.
3.1 Missed Calls
This menu lets you view the last 10 missed calls.
In the missed calls list, you can view the details of the record
by pressing the [Ok] soft key (left). In the view screen, you
can make a call to the number by pressing the Dial key.
There are four options in [Option] menu as following:
Page 88
Page 89

Delete: Allows you to delete the record
Save to Phone: Allows you to save the record to the
phonebook
Dial: Allows you to call back to the recorded number
Edit: Allows you to edit the number and save to the
phonebook
3.2 Dialed Calls
This menu lets you view the last dialed calls.
In the dialed calls list, you can view the details of the record
by pressing the [Ok] soft key (left). In the view screen, you
can make a call to the number by pressing the Dial key.
There are four options in [Option] menu as following:
Delete: Allows you to delete the record
Save to Phone: Allows you to save the record to the
phonebook
Dial : Allows you to call back to the recorded
number
Edit : Allows you to edit the number and save to
the phonebook
3.3 Received Calls
This menu lets you see the last 10 received calls.
Page 89
Page 90

In the list of received calls, you can view the details of the
record by pressing the [Ok] soft key (left). In the view screen,
you can make a call to the number by pressing the Dial key.
There are four options in [Option] menu as following:
Delete: Allows you to delete the record
Save to Phone: Allows you to save the record to
the phonebook
Dial : Allows you to call back to the recorded
number
Edit : Allows you to edit the number and save to
the phonebook
3.4 Delete Call Log
This menu lets you delete all call data of each category at
once.
There are three categories of call as following.
Missed Call: Allows you to delete all missed call
data
Dialed Call: Allows you to delete all dialed call data
Received Call: Allows you to delete all received call
data
3.5 Call Time
Page 90
Page 91

This menu lets you view the timers for calls made and
received. The following timers are available.
Last Call Time: length of the last call
Total Sent: total length of all calls made since the
last reset
Total Received: total length of all calls received
since the last reset.
Reset All Time: Allows you to reset the call timers
Note: The actual time invoiced for calls by your service
provider may vary, depending on network features, rounding-
off for billing purposes and so forth.
3.6 Call Cost
You can view the cost of the last call, or of all calls. It will
show costs, only if your network operator supports this
service. The following options are available.
Last Call Cost: Allows you to check the cost of the
last call.
Total Cost: Allows you to check the cost of all calls.
Reset Cost: Allows you to reset the call cost.
Max Cost: Enter PIN2 and input a limitation of the
Max Cost.
Price Per Unit: Enter PIN2 and input a limitation of
Page 91
Page 92

the price per unit.
Note: Not all SIM cards support this feature. The number of
items in these lists depends on the contents of your SIM card.
3.7 SMS Counter
You can view the numbers of sent and received SMS.
3.8 GPRS Counter
You can view how many GPRS message has been sent and
received, and reset the counter.
Last Sent: Allows you to view the last sent GPRS
Messages.
Last Received: Allows you to view the last received
GPRS Messages.
All Sent: Allows you to check the numbers of All
GPRS messages sent.
All Received: Allows you to check the numbers of All
GPRS messages received.
Reset Counter: Allows you to reset the GPRS
Counter.
Page 92
Page 93

4. Settings
You can change settings for your phone using this menu. There
are Phone Setup, Call Setup, Network Setup, Security Setup,
and Restore Factory Settings sub menu.
4.1 Phone Setup
With this menu, you can setup settings regarding display
and operations of the phone: Sound & Light, Time and Date,
Language, Preferred Input Methods, Default Encoding Type,
Display Settings, Contrast, Greeting Text, Dedicated Key
and Shortcuts setting.
4.1.1 Sound & Light
You can use the Sound and Light setting features to
customize various settings depending on environments,
such as General, Meeting, Outdoor, Indoor and Headset.
Select each environment and select “Activate” to
activate the setting, and select “Customize” to
customize the Sound and Light settings.
Customizable options are as following:
1. Tone Setup
Page 93
Page 94

This menu customizes the tones in the following
setups.
1) Incoming Call
This option allows you to select the required ring
tone. You can set the ring tone from sound files
downloaded from WAP download, MMS and EMS.
You can also forward files from Phone Memory to
the Tone Setup. Each time you select a tone, the
phone will play it for a few seconds.
2) Alarm
This option allows you to select the alarm sound.
You can set the alarm tone from sound files
downloaded from WAP download, MMS and EMS.
You can also forward files from Phone Memory to
the Tone Setup. Each time you select a tone, the
phone will play it for a few seconds.
3) Power On
You can select power on sound from 10 tones or
silent. The phone will play the Power On tone,
when you power on the phone by pressing the
End/Power key.
4) Power Off
You can select power on sound from 10 tones or
Page 94
Page 95

silent. The phone will play the Power Off tone,
when you turn off the phone by pressing the
End/Power key.
5) Message Tone
You can select power on sound from 10 tones or
silent. The phone will play the Message Tone,
when you receive a message.
6) Keypad Tone
This option allows you to select the tone that the
keypad generates when you press a key.
Silent: the keys do not make any sound
Tone: the keys will make sound.
7) Slide up
This option allows you to select a tone when
sliding up the phone.
8) Slide down
This option allows you to select a tone when
sliding down the phone.
2. Volume
This option allows you to adjust the ringing volumes
of keypad, call alert, alarm and message alert. You
can set different volume levels for the Ring Tone,
Page 95
Page 96

Key Tone and Slide Up/Down tone.
3. Alert Type
This option allows you to customize the alert type.
This setup will control the alerts your phone might
play.
You can customize the alert types as following.
Ring: the phone rings the ring tone selected
with the [Tone Setup] option.
Vibration Only: the phone vibrates without
ringing.
Vibra and Ring: the phone vibrates and rings
simultaneously.
Vibra then Ring: the phone vibrates first then
rings.
4. Ring Type
You can set the ring type for playing the ring tones.
Single: plays the ring tone once.
Repeat: plays the ring tone in repeated matter.
Ascending: plays the ring tone with ascending
volume.
Page 96
Page 97

5. Extra Tone
You can set the following alert tones on or off.
Warning
Error
Camp On
Connection
6. Answer Mode
This option allows you to select the way to answer
an incoming call by two ways.
The following options are available.
Any Key: You may select this mode to answer
a call by pressing any key except the [End key].
Send Key: You may select this mode to answer
a call by pressing Send Key.
You may press [Reject] soft key to reject a call in
both Any Key and Send Key modes
Slide Answer: You may select this function to
answer a call by sliding up the phone without
pressing any keys
7. LCD Backlight
You can select whether the phone uses the
Page 97
Page 98

backlight or not. You can increase the standby/talk
time by turning off the backlight.
The following options are available. The backlight
comes on for
5 Sec
15 Sec
30 Sec
45 Sec
4.1.2 Time and Date
You can set time and date for your phone.
1) Set Home City
This menu allows you to set a city as your home city.
Please select the closest city in the list.
2)
Set Time/Date
This menu allows you to set the current time and
date displayed in the idle screen.
1) HH:MM : You may input hour in 24 hour
format and minute, and then press navigation
key down
2) YYYY/MM/DD: You may input year, month
and day.
Page 98
Page 99

Press [Ok] soft key (left) to save the time and date.
3)
Set Format
Allows you to select a time display type between 12
Hour AM/PM type and 24 Hour type. When the time
format is in 12 Hour type, you can change AM and
PM by pressing the Navigation keys.
1) Time Format
24-Hours
12-Hours
2) Date Format
YYYY/MM/DD (ex. 2004/12/25)
YYYY-MM-DD (ex. 2004-12-25)
”MMM DD,YYYY” (ex. “Dec 25, 2004“)
DD-MMM-YYYY (ex. 25-Dec-2004)
DD/MM/YYYY (ex. 25/12/2004)
MM/DD/YYYY (ex. 12/25/2004)
4)
Auto update of Date and Time
This menu allows the phone to update the current
date and time automatically. You can turn on or off
this function by pressing the [On] or [Off] soft key
(left).
Page 99
Page 100

4.1.3 Display Settings
This menu allows you to customize desired phone
display items as below.
1) Wallpaper
You can select a wallpaper image as following.
1) System: You may select wallpaper image from
12 images including the Analog Clock and
Digital Clock.
2) User Define: You may search for images and
photos in the File Manager. However, there is
a size limitation to use an image as wallpaper
image.
2)
Screen Saver
This menu allows you to set the screen saver
setting. The phone will display the selected image in
a full screen, when there is no key input on the
phone.
1) Setting: On/Off
2) Select
(1) System: You may select screen saver
image from 12 images including Analog
Clock and Digital Clock
(2) User Define: You may search for images
Page 100
 Loading...