

Ezytrail Parkes Series, Parkes 13, Parkes 15, Parkes 18 Owner's Handbook Manual
OWNER’S HANDBOOK
PARKES RANGE
All the info you need to know when using your
Ezytrail Parkes Hybrid Offroad Caravan
www.ezytrail.com.au
Read owner’s manual before using the equipment. Third party component
manuals should be read in conjunction with this manual . Maintenance
guidelines must be met or exceeded, failing to meet these guidelines may
result in serious injury or death and property damage.

INDEX
All the info you need to know when using your Ezytrail Parkes Hybrid Offroad Caravan
Introduction 3 Corrosion Prevention 13
SETTING UP YOUR CARAVAN WHEELS AND TYRES
Loading your Caravan 4 Highway 14
Choosing a Spot to Set Up 5 Off Road 14
Levelling your Caravan 5 ANNEXE SETUP 15
Site Power 5 ELECTRICAL SYSTEMS
Kitchen 6 Chargers & Inverters 16
Preparing for Bad Weather 7 Battery Care 16
Packing Down your Caravan 7 12V Wiring Diagram 17
STORAGE AND CARE Control Panel 17
Long Term Storage 7 GAS & WATER SYSTEMS
Interior 7 Hot Water System 17
Exterior 7 Water Pumps 17
Batteries 8 Connecting the Gas 18
Securing your Caravan 8 Protecting from Mould 18
TORQUE SETTINGS Pre-Trip Checklist 19
Wheel Nuts 8 USEFUL ACCESSORIES
Hitch 8 Levelling Blocks 20
Trailing Arm Pivot Bolts 8 Wheel Chocks 20
BRAKES AND HANDBRAKE Covers 20
Brake Controller 9 Stone Protection 20
Operation 9 TROUBLE SHOOTING
Trailer Plug Wiring 9 Electrical 21
Breakaway Switch 10 Water 22
Hand Brake 11 Gas 22
Adjuster 11 Brakes 23
Correct Use of your Electric Brakes 12 HANDY TIPS
Important Safety Notice 12 Driving Off Road 24
Brake Adjustment 12 Trip Planning 25
Brake Cleaning and Inspection 12 Warranty Statement 26
Magnets 13 Maintenance 28
Shoes and Linings 13 Maintenance Schedule 29
PARKES SERIES
2

INTRODUCTION
WARNING– Before using this product you should read this manual and those manuals
supplied by component manufacturers applicable to this product.
This manual is supplied as a reference to required maintenance of your new Ezytrail
offroad camper. Failure to use and maintain the product in accordance with what is outlined
in this manual may affect your warranty.
Incorrect and/or insufcient maintenance may cause product failure resulting in property
loss, damage or injury or death. Maintenance intervals are critical for normal use, extreme use may require
shorter or additional maintenance intervals.
Manual content does not imply, express or other any warranty, the owner should read the limited warranty
terms included in this booklet.
Before using this product, you should be certain your tow vehicle is suitably rated and equipped to tow the
product safely and legally. The trailer and vehicle pairing must we within the safe “Maximum Towing Capacity”,
“Ball Weight Capacity” and “Gross Combination Mass” as stated by the vehicle manufacturer.
This caravan is tted with electric brakes and a “Breakaway System”. Requirements for breakaway systems
can vary from state to state. It is mandatory to supply a maintenance charge to the breakaway battery source
while driving. You MUST ensure this capability is tted to your vehicle. The maintenance charge is supplied to
the caravan via the Anderson plug on the drawbar.
www.ezytrail.com.au
3
SETTING UP YOUR CARAVAN
LOADING YOUR CARAVAN
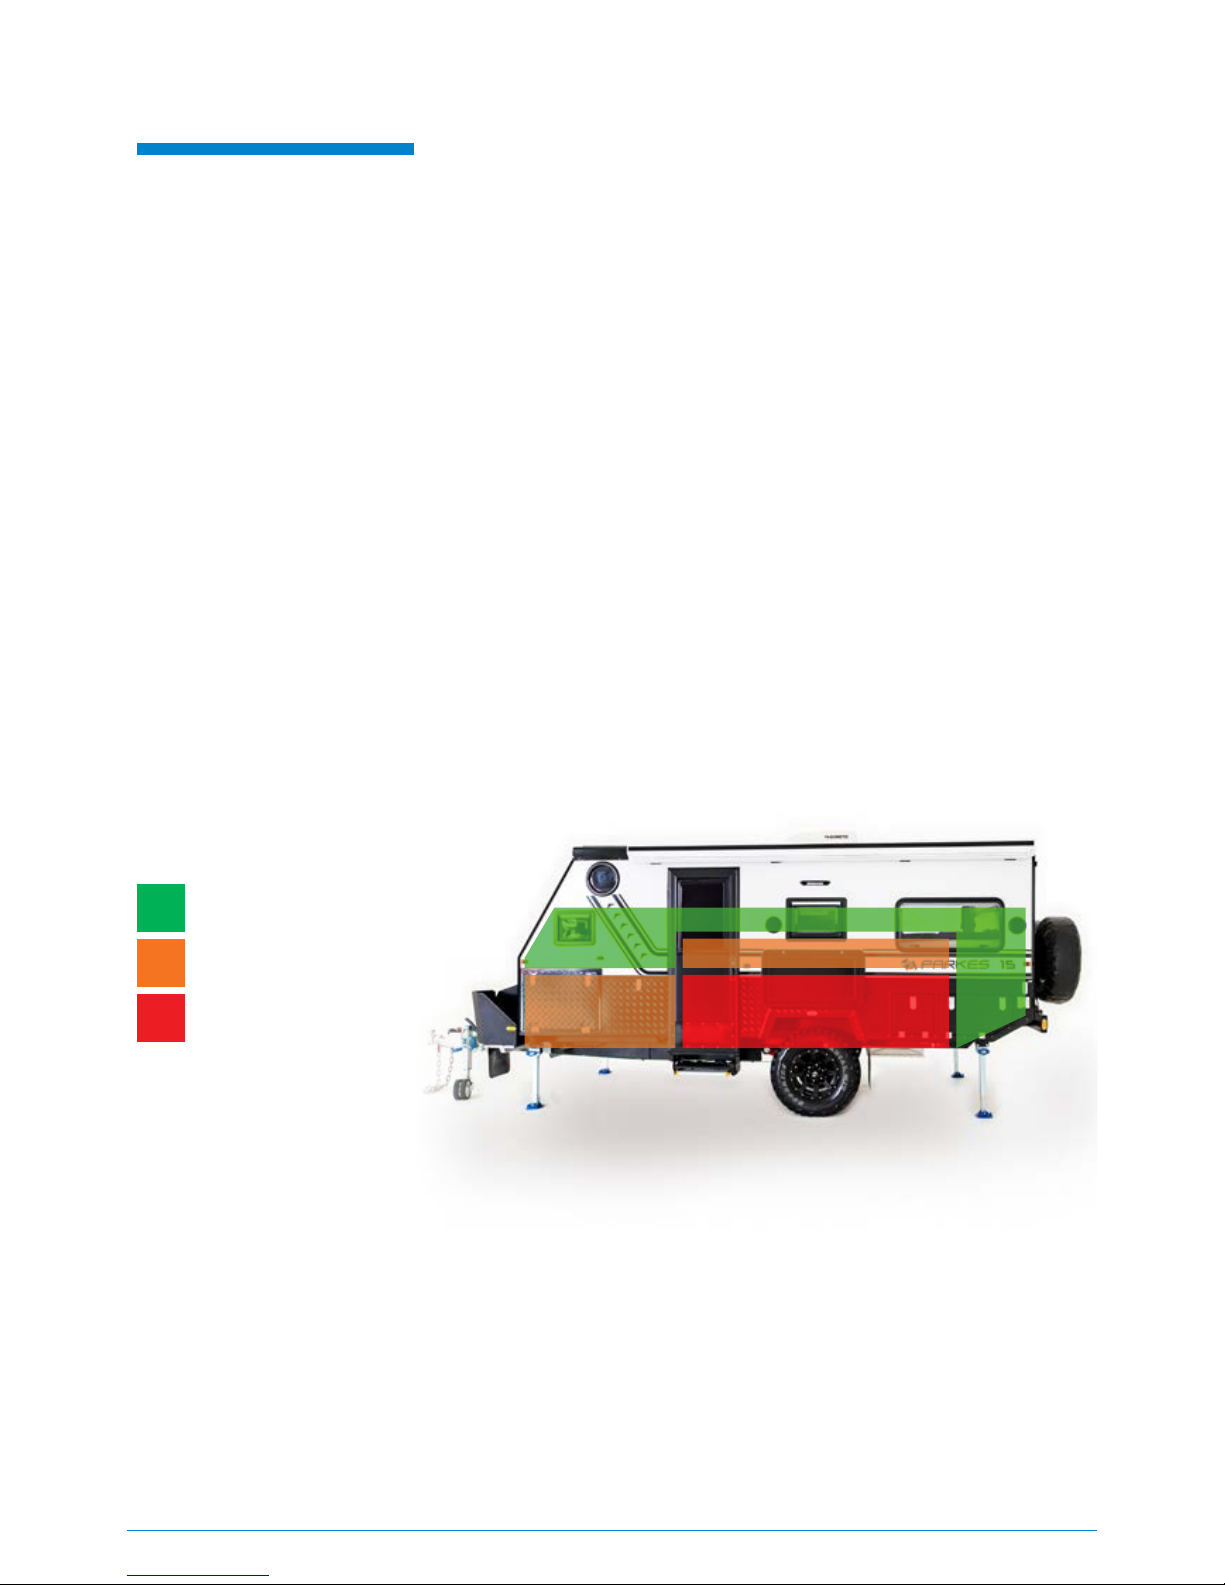
When heading away on your next big adventure it is important to load your caravan correctly to distribute weight
evenly and achieve a suitable ball weight load and prevent loading in a manner that can cause a caravan to sway
and/or roll excessively left and right. The optimum ball weight on a caravan is between 9 and 11% of the total
caravan weight.
WARNING: BALL LOADING (DOWNWARD LOAD ON TOW HITCH) MUST NOT EXCEED 350KG OR THE MAXIMUM
ALLOWABLE LOAD BY THE VEHICLE MANUFACTURER OR TOW BAR RATING, WHICH EVER IS THE LOWEST.
Exceeding these limits may result in an accident causing serious injury or death and/or property damage.
• Always load both sides of the caravan evenly
• Load heavy items low and directly over the axle.
• Secure all items to prevent damage to the caravan during travel.
• Consider water tank levels and how they may affect the balance front and back and the percentage of ball weight.
• Overhead cupboards should only be used for lightweight items such as clothes, personal items, bedding etc.
• Never store heavy items in overhead cupboards.
• Heavy cooking equipment should be stored in lower cupboards.
• Tinned and bottled food for cooking etc should be stored in the pantry cupboard.
• Never load in a manner that causes the ball weight to exceed the limit of the tow vehicle.
• The diagram below illustrates best placements of items based on weight.
This caravan is tted with electric brakes and a “Breakaway System”. Requirements for breakaway systems can
vary from state to state. It is mandatory to supply a maintenance charge to the breakaway battery source while
driving. You MUST ensure this capability is tted to your vehicle. The maintenance charge is supplied to the
caravan via the Anderson plug on the drawbar.
LIGHTWEIGHT ITEMS
MEDIUM WEIGHT ITEMS
HEAVY ITEMS
PARKES SERIES
4
LEVELLING YOUR CARAVAN
Levelling front to back can be done by
raising and lowering the jockey wheel prior
to adjusting the stabiliser legs.
The stabiliser legs on your caravan are not
designed for supporting the full weight of
the trailer, they are there to stabilise it once
it is level.
Getting the trailer level from left to right
should be done with drive on stepped
ramps as illustrated here.
Once levelled the legs can be lowered to
keep the trailer stable. On soft ground you
may want to use timber boards under the
stabiliser feet.
Using your stabilisers as a lifting
mechanism will void your warranty as will
extending them with a “rattle gun”
or “impact wrench”.
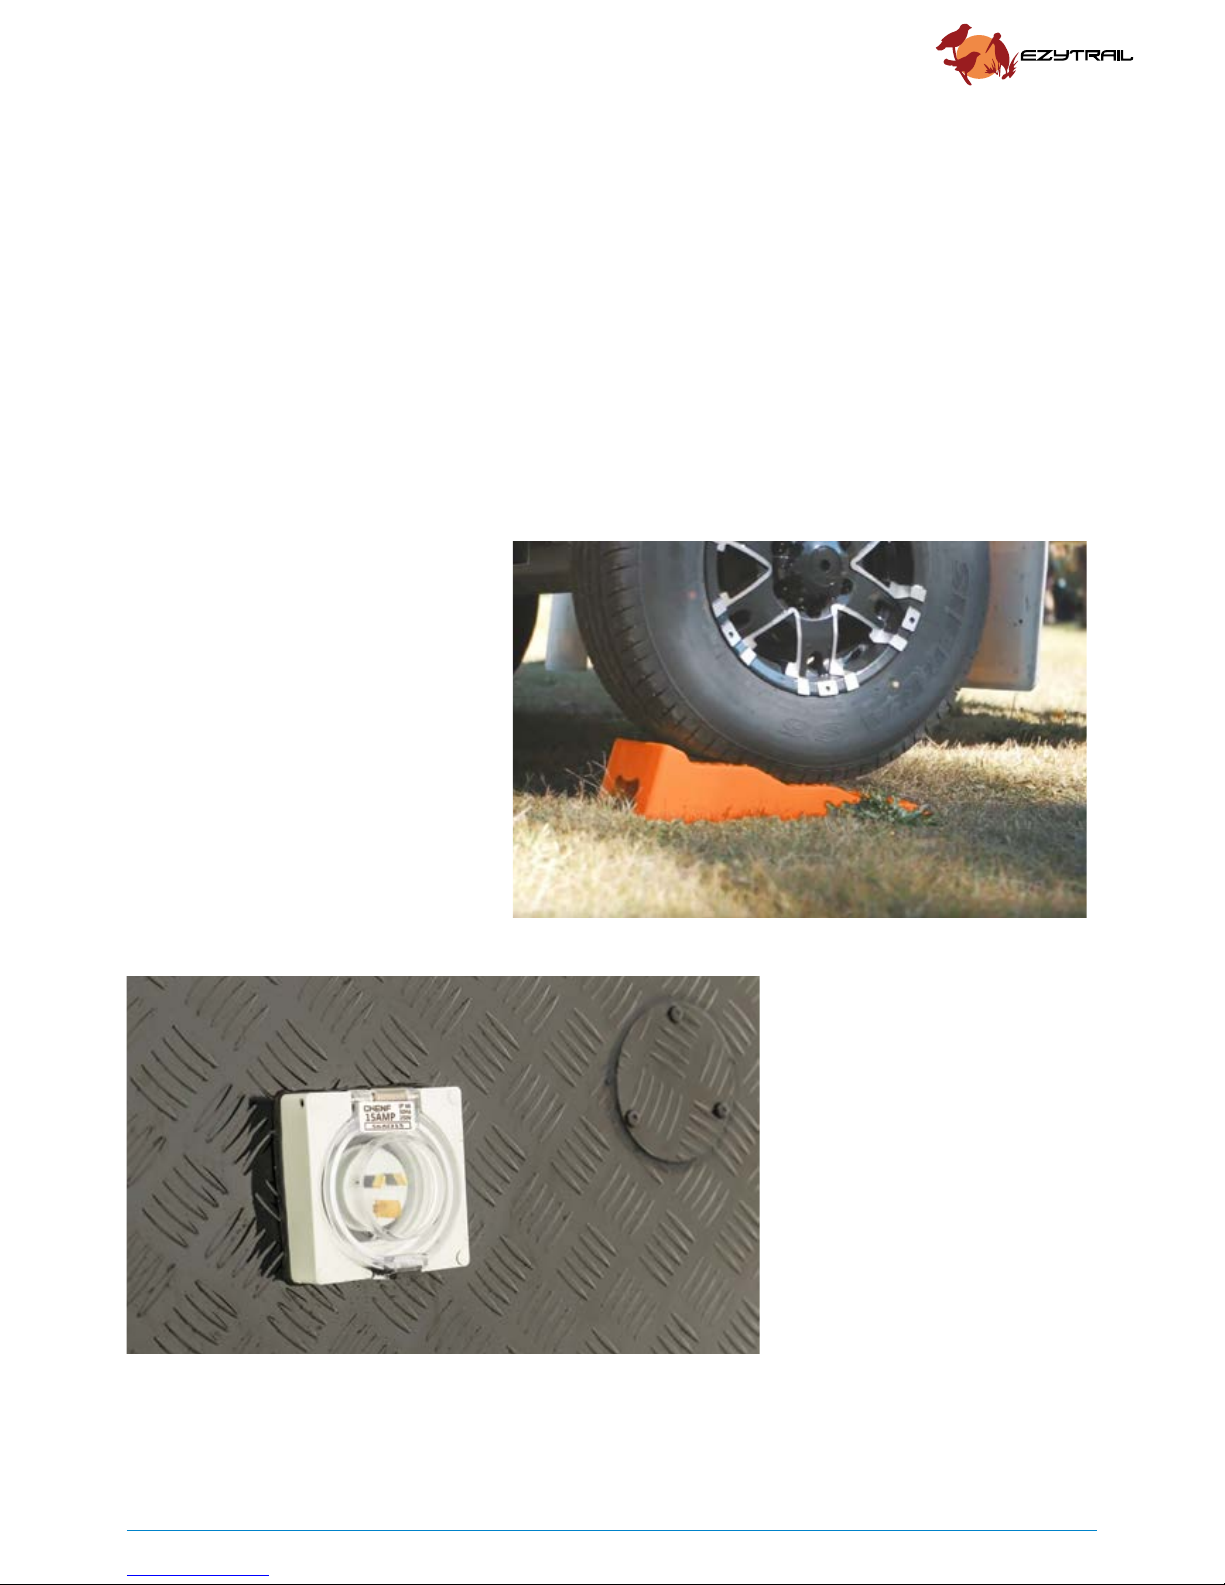
SITE POWER
The onboard charger in your
caravan is connected via the 15A
exterior socket. To use site power,
you will require a 15A power lead
connected to a 15A outlet, as
shown. In the event a 15A outlet
is unavailable you will need a
conversion box that will step up
from 10A to 15A with a safety switch.
Never leave power leads coiled
when in use, lay the lead out back
and forward in a manner that won’t
be a trip hazard or risk damage to
the lead.
CHOOSING A SPOT TO SET UP
When you arrive at your camp for the night it is important to choose a good spot to camp. One that will allow you
to rest easy. When choosing a spot to set up your caravan, start with a at area with no overhanging trees. Birds
and bats occupying trees can leave droppings on your caravan that can damage paint, and leaves and sap can
also stain the coating.
Ensure you are not camping in an area prone to ooding or with bad drainage in the event of rain.
Even the slightest hollow in the ground can put you in a mini lake. In hot weather if possible, set your caravan up
so the sun’s arc goes from front to back or back to front with the annex/awning in the general direction the sun
is arcing across. Doing this will keep the bulk of the caravan in shade and the inside cooler as it will be shaded
by the awning.
www.ezytrail.com.au
5
SETTING UP YOUR CARAVAN
KITCHEN
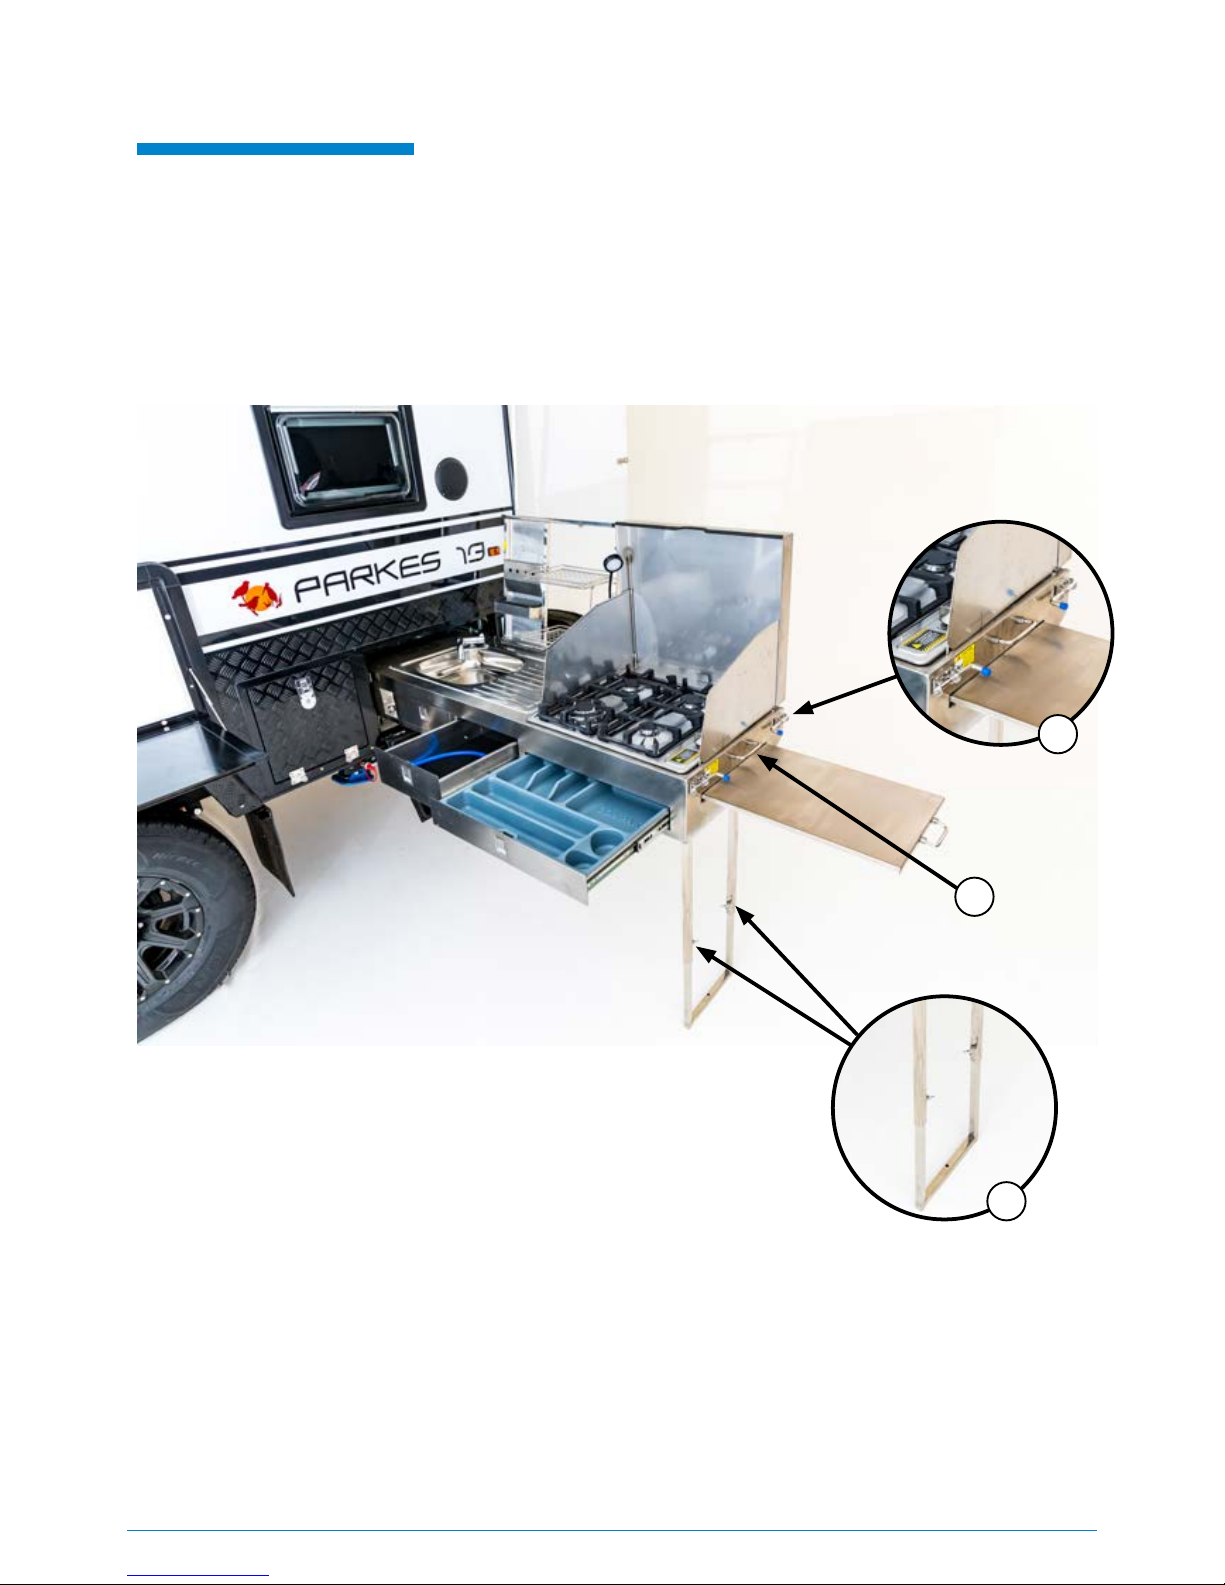
Your Parkes caravan is equipped with a quality stainless steel kitchen complete with 4 burner cook top,
sink and dryer rack. It is important to learn how to open and close your kitchen so it is secured when
driving and fully supported when at camp.
• Before sliding out kitchen, release the two pad bolts (1)
• Slide the kitchen out by pulling on the xed handle (2)
• When the kitchen is extended, fold down the support legs and adjust the height to suit (3)
1
2
3
PARKES SERIES
6

STORAGE AND CARE
PREPARING FOR BAD WEATHER
During bad weather such as rain, wind, or cyclone, the following should be done:
• Close all roof vents and hatches to prevent water entering.
• Protect the awning from high winds by retracting or securing with guy ropes and pegs.
• Ensure your caravan is not parked in ground that will become boggy and prevent exiting the camp area
• Close all external doors and hatches to prevent water ingress and wind damage
PACKING DOWN YOUR CARAVAN
When packing down your caravan check the following:
• Turn off all gas and electric appliances
• Gas is turned off at the gas bottle
• Pack away and secure all loose items so they can’t move and damage themselves or the caravan
• Secure and lock all cabinet doors, and close all drawers
• Lower the roof, and ensure over centre latches are locked with safety pin engaged
• Remove and stow the site power lead
• Ensure doorstep is raised and secured
• Lower and secure all roof hatches
• Ensure all windows are closed and locked
• Close and lock the main door
• All dust covers in place and secure
LONG TERM STORAGE
To maximise the life of your caravan you should consider additional protection from the elements. UV light and
moisture can have an adverse effect on materials when left unprotected outside. This section outlines some of
the things you can do as an owner to protect your investment.
INTERIOR
Moisture and your camper are not friends, in fact they are your enemy. Here are some tips to reduce moisure
and avoid mould. High humidity and cooling temperatures can create condensation, additionally condensation
can form under mattresses due to temperature differences between warm bodies on top and the bed base being
cold from outside temperatures.
As a precaution you can do the following:
• Check under mattress for moisture before packing up. If moisture is found allow to thoroughly dry
before closing your caravan.
• Store 1 or 2 moisture absorbing packs/dehumidier packs in the caravan to draw away any
residual water vapour.
• If packing up with damp or humid conditions, open and dry out the caravan at the rst opportunity
when returning home. Dry all canvas thoroughly and follow point 2.
EXTERIOR
Ensure all seals on the caravan have proper compression at 30-50%, are free of dirt and have nothing
protruding past the seals. UV light and the elements can over time cause seals and ttings to perish and
become brittle. The use of a camper cover or tarpaulin will extend the life of components and keep your
investment looking better for longer.
www.ezytrail.com.au
7

STORAGE AND CARE
TORQUE SETTINGS
BATTERIES
When storing your caravan, ensure all power is turned off to ensure batteries aren’t drained. Batteries should
be maintenance charged at least monthly when stored. Allowing batteries to drain below 12.05 volts may
permanently damage them.
If storing for as period longer than 1 month, consider a trickle charge setup, or a 24hours charge on 240V
every few weeks. Do not leave the 240V charge on constantly, as the battery memory can be affected.
SECURING YOUR CARAVAN
When parked and unhitched you should always use suitable wheel chocks to ensure the trailer can’t move in the
event of a handbrake failure. For security a wheel clamp or and hitch lock are highly recommended.
WHEEL NUTS
Wheel nuts should be tightened to correct torque using a torque wrench. Never trust a “rattle gun” as these
may over or under tighten. A quality torque wrench will ensure nuts are tightened correctly. It’s important to
remember to check your wheel nuts at 50km, 100km, and 500km and periodically thereafter.
The correct torque settings are: 125Nm for 12mm studs. Refer to the plate on your drawbar.
HITCH
The high tensile bolts securing your hitch should be tightened to 150Nm.
These should be checked at 5,000km intervals.
TRAILING ARM PIVOT BOLTS
The pivot bolts are a high tensile steel. The service interval for these bolts is 10,000km under normal use
and 5000km for harsh off-road conditions. During travel they should be inspected daily to ensure they
have not rotated or become damaged. Correct torque is 180Nm
1
2
4 5
6 3
IMPORTANT INFORMATION
Wheel nuts must be re-torqued to 125Nm
after the rst 50km, or after the wheels
have been re-mounted, and then at periodic
intervals. Wheel nuts should be checked
DAILY when on rough or unsealed roads.
Re-torque as per the diagram on the right:
PARKES SERIES
8
BRAKES AND HANDBRAKE
BRAKE CONTROLLER*
Your trailer is tted with electric brakes that require a brake controller that can be operated from the driver’s seat.
1. Manually adjustable to provide the correct braking capability for varying road, off-road and load conditions.
2. They can be modulated to provide variable braking force, thus easing the brake load on the towing vehicle.
3. There is very little lag time between the moment the tow vehicle’s brakes are actuated and the moment the
trailer brakes are actuated.
4. They can provide some braking independent of the tow vehicle in the event of an emergency.
*The requirements can vary from state to state. It’s important to check what is required in your state.
OPERATION
When electrical current is fed into the system by the controller, it activates the electromagnets in the brakes.
These electromagnets are energized and are attracted to the rotating surface of the drums which moves the
actuating levers in the direction that the drums are turning thus applying pressure from the brake linings to the
drum surface.
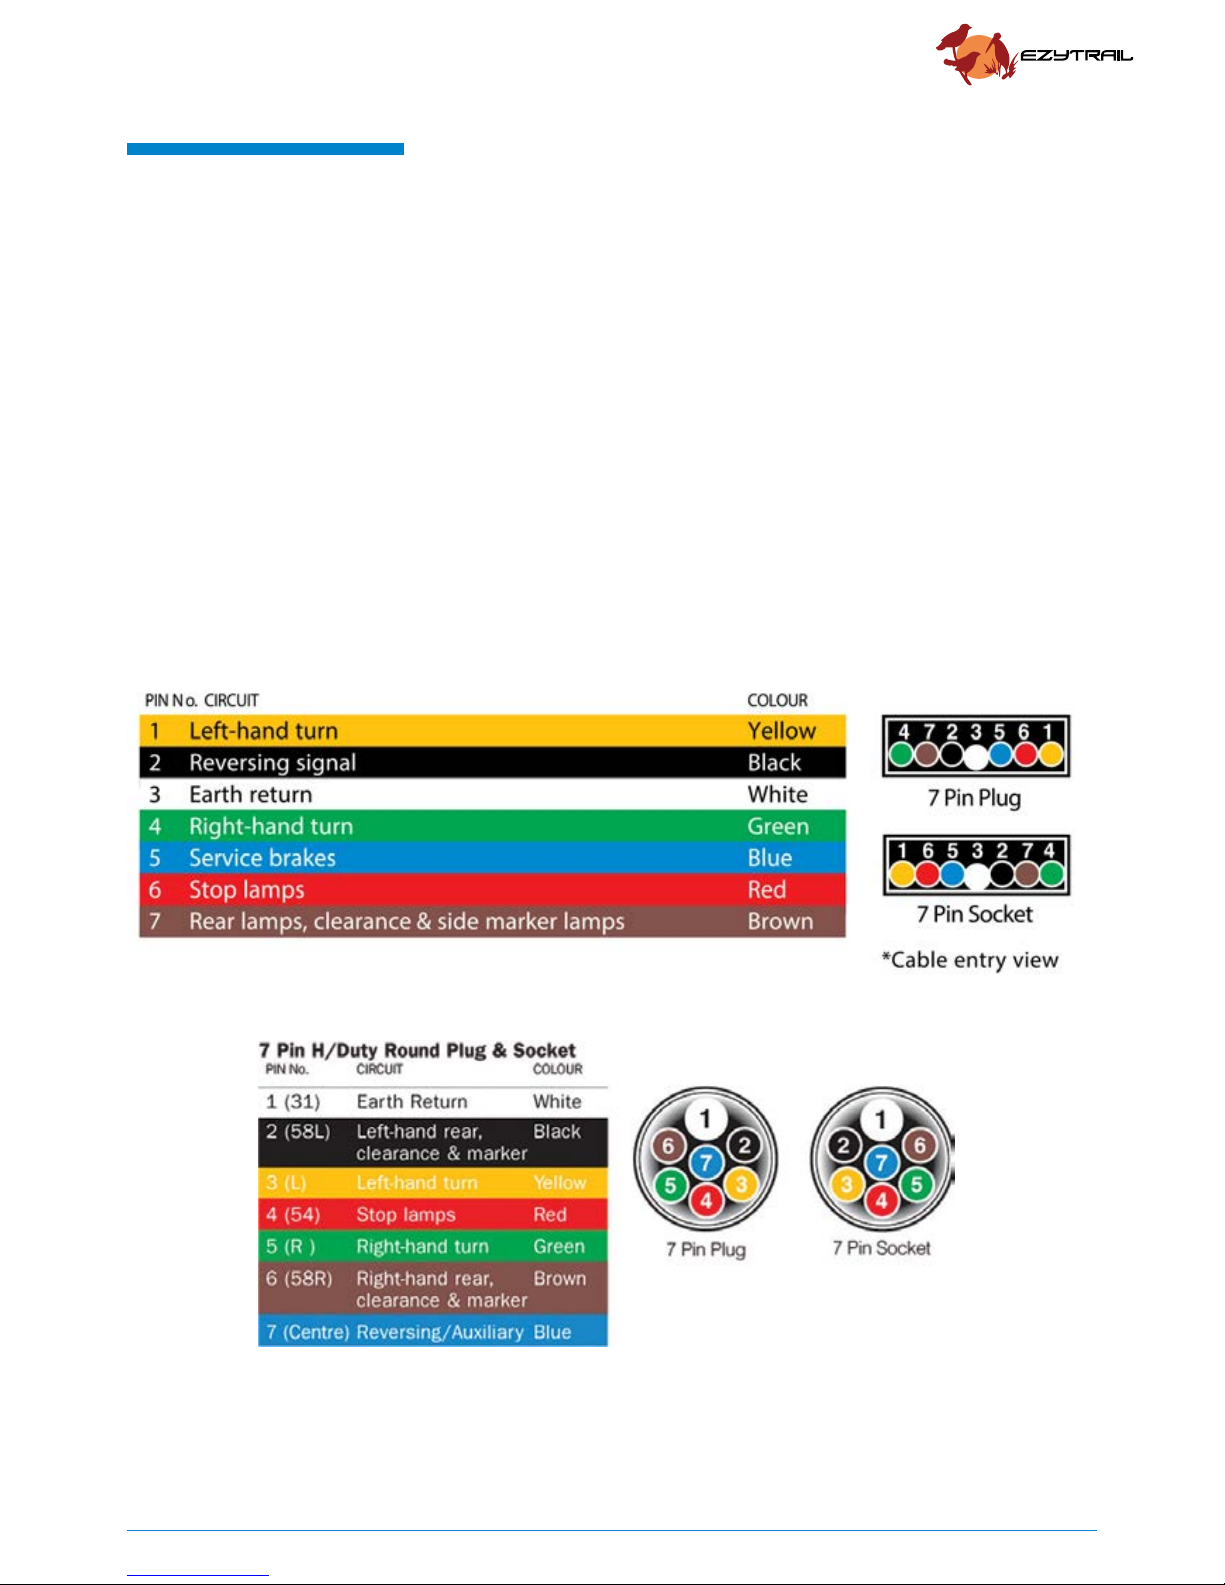
TRAILER PLUG WIRING
The following diagrams outline the correct wiring for at and round 7 pin plugs:
www.ezytrail.com.au
9
BRAKES AND HANDBRAKE
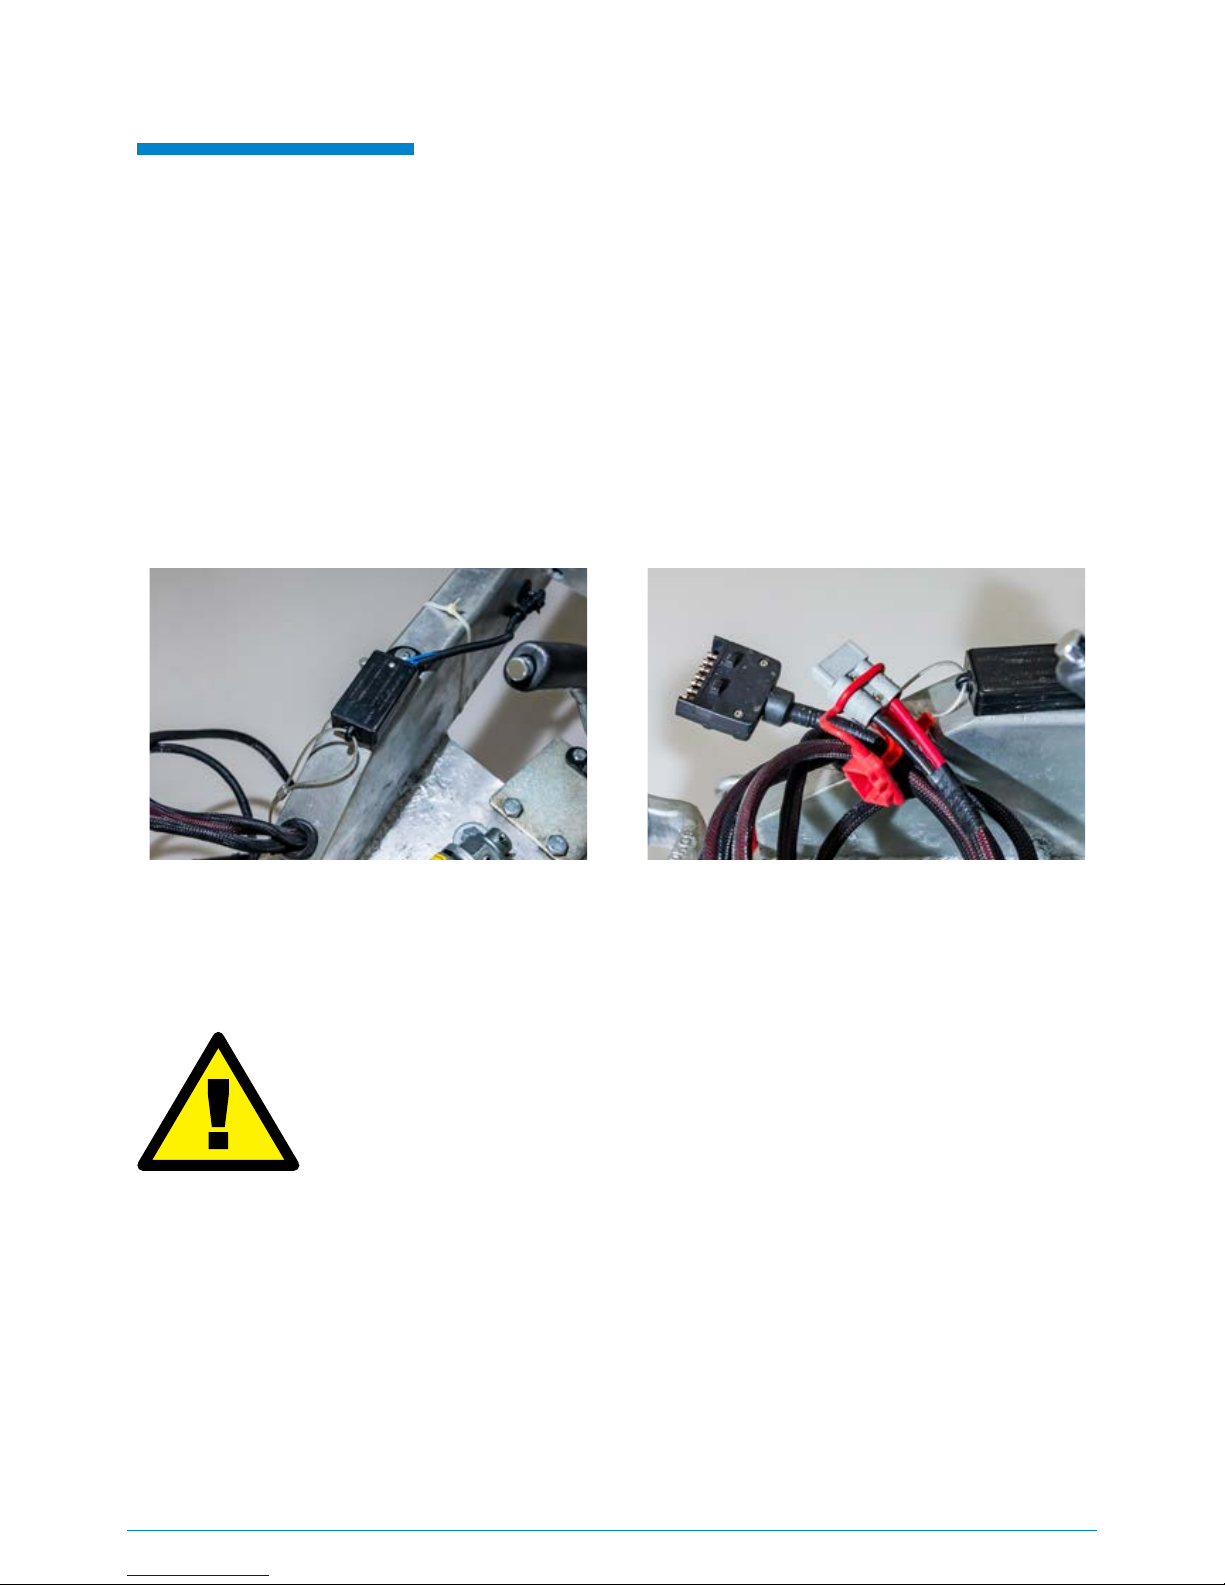
BREAKAWAY SWITCH
By law*, all trailers with an ATM of 2000kg or greater must have a “Breakaway System” to halt the trailer in the
event it becomes detached from the tow vehicle whilst traveling. Your caravan is tted with this system with the
switch mounted on the drawbar with a steel wire lanyard to connect to your tow vehicle. In the event that the
caravan becomes detached, the lanyard will pull the pin from the breakaway switch and the onboard batteries
will activate the brake system. The lanyard must be attached to a solid part of the vehicle. It is a mandatory
requirement that power be supplied by the tow vehicle to the breakaway power source while towing. This is done
via the 50amp Anderson Plug on the drawbar. Consult a qualied auto electrician to ensure this is tted to your
tow vehicle.
In NSW there is an additional requirement that the breakaway power source be monitored from the driver
position with a minimum of a “visual alarm” for low battery voltage. Consult a qualied auto electrician to
ensure this is tted to your vehicle.
*Each state can have different laws in regards to brakeaway systems.
It’s important to check what is required in your state.
CAUTION:
• DO NOT CONNECT THE BREAKAWAY LANYARD TO THE SAME POINT
AS THE SAFETY CHAIN SHACKLES.
• DO NOT USE THE BREAK AWAY AS AN ALTERNATIVE TO THE HANDBRAKE
AND DO NOT REMOVE THE PIN AS AN ALTERNATIVE SECURITY MEASURE.
REMOVING THE PIN WILL RAPIDLY DISCHARGE THE BATTERIES.
• IT IS A MANDATORY REQUIREMENT THAT THE BREAK AWAY BATTERY
SOURCE BE CHARGED DURING TOWING.
• NSW REQUIRES A BATTERY MONITOR VIEWABLE FROM THE DRIVERS
POSITION WITH A MINIMUM OF A VISUAL ALARM FOR LOW BATTERY VOLTAGE
Breakaway Switch Anderson Plug
PARKES SERIES
10

HAND BRAKE
Parking brakes are mechanically operated by a cable.
Use the cable adjuster to give enough tension to be able to set the handbrake lever on the last two notches of the
coupling or handbrake is 1/3 raised when unladen. This needs to be checked again when the trailer or caravan is
loaded. If the cable is too tight, the brakes will be applied as the axle moves backward under spring deection.
Adjuster Wheel
ADJUSTER
To adjust the handbrake cable tension release locknuts. To tighten the handbrake cable, turn the adjuster wheel
in a clockwise direction. Once adjusted retighten lock nuts and test. Always ensure that wheels turn freely when
handbrake is off. Overtightened cables can cause brakes to drag and damage the brake linings.
www.ezytrail.com.au
11

BRAKES AND HANDBRAKE
CORRECT USE OF YOUR ELECTRIC BRAKES
Your trailer brakes are designed to work in synchronisation with your tow vehicle brakes.
Never use your tow vehicle or trailer brakes alone to stop the combined load. Your trailer and tow vehicle will
seldom have the correct amperage ow to the brake magnets to give you comfortable, safe braking unless
you make proper brake system adjustments. Changing trailer load and driving conditions, as well as uneven
alternator and battery output, can mean unstable current ow to your brake magnets.
It is therefore imperative that you maintain and adjust your brakes as set forth in the controller manual, use a
properly modulated brake controller and perform the synchronisation/adjustment procedure recommended by
the brake controller supplier.
IMPORTANT SAFETY NOTICE
Proven and in some cases approved service methods and correct repair procedures are
essential for the safe, reliable operation of the brakes, suspension and axles as well as
the personal safety of the individual doing the work.
The numerous variations in procedures, techniques, tools and parts for servicing axles, as
well as in the skill of the individual doing the work will determine outcomes. This manual
cannot possibly anticipate all such variations nor provide advice or cautions as to each.
Accordingly, anyone who departs from the instructions provided in this manual must rst establish that they
neither compromise their personal safety nor the vehicle integrity by their choice of methods, tool’s or parts.
*IF AT ALL IN DOUBT PLEASE REFER ALL REPAIRS AND MAINTENANCE TO A SUITABLY QUALIFIED OR
EXPERIENCED MECHANICAL REPAIRER.
*EZYTRAIL CAMPERS ACCEPTS NO LIABILITY FOR PERSONAL INJURY, LOSS OR DAMAGE RESULTING FROM
INCORRECT APPLICATIONS, METHODS AND FAILURE TO PERFORM MAINTENANCE SAFELY AND CORRECTLY.
BRAKE ADJUSTMENT
Brakes should be adjusted:
1. after the rst 500km of operation when the brake shoes and drums have “burnished”
2. at no more than 10,000km intervals.
3. or as use and performance requires.
Never crawl under your trailer unless it is resting on properly placed jack stands. Do not
place supports on any part of the suspension system and use the designated jack point or
under the spring base plate to jack trailer.
BRAKE CLEANING AND INSPECTION
Your trailer brakes must be inspected and serviced at 10,000km or more often as required by use and
performance. Magnets and shoes must be changed when they become worn or scored to avoid inefcient
vehicle braking.
BRAKE LUBRICATION
This should only be done by qualied persons.
CAUTION - DO NOT GET GREASE OR OIL ON THE BRAKE LININGS, DRUMS OR MAGNETS.
PARKES SERIES
12
 Loading...