

EZ Way EZ 900HC, EZ 900 Series, EZ 900H, EZ 900HCW, EZ 900F Operator Instructions Manual
...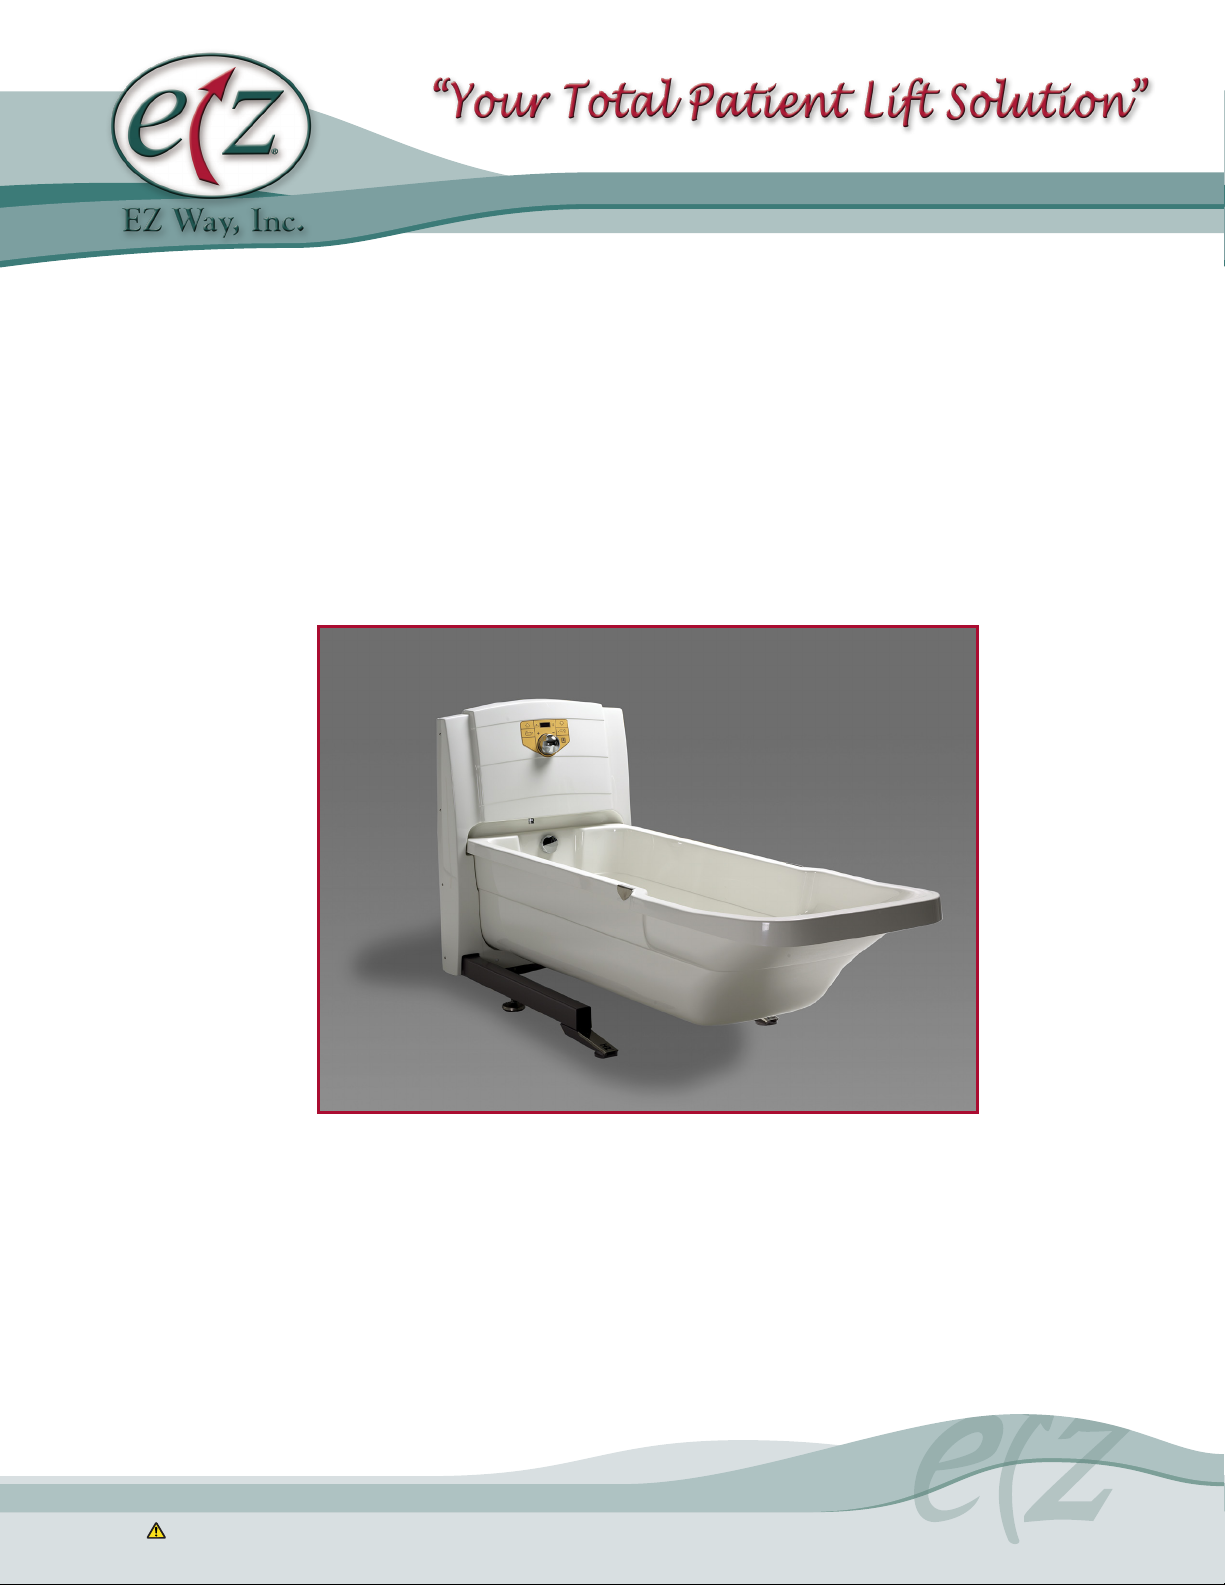
EZ 900
WARNING: Cancer and Reproductive Harm - www.P65Warnings.ca.gov.
Bathtubs
Operator’s Instructions
EZ Way, Inc.
PO Box 89
Clarinda, IA 51632
1-800-627-8940
www.ezlifts.com
Form 2-202
Rev. 7/31/18

Study this manual carefully before operating your bathing system.
This bath system is intended for professional use only where the patient is under supervision of trained personnel.
Operating instructions and recommended maintenance procedures are explained in the following pages. If you
have any questions regarding the operation or maintenance of your bathing system and cannot find the answer in
this manual, please contact us at 1-800-627-8940.
The system is designed for years of trouble-free operation, with proper use and maintenance. Bathtub and shower
water must be run at least every three days.
Height Adjustable Models
EZ 900H
EZ 900HC cleaning
EZ 900HCW cleaning/whirlpool
Fixed Height Models
EZ 900F
EZ 900FC cleaning
EZ 900FCW cleaning/whirlpool
2
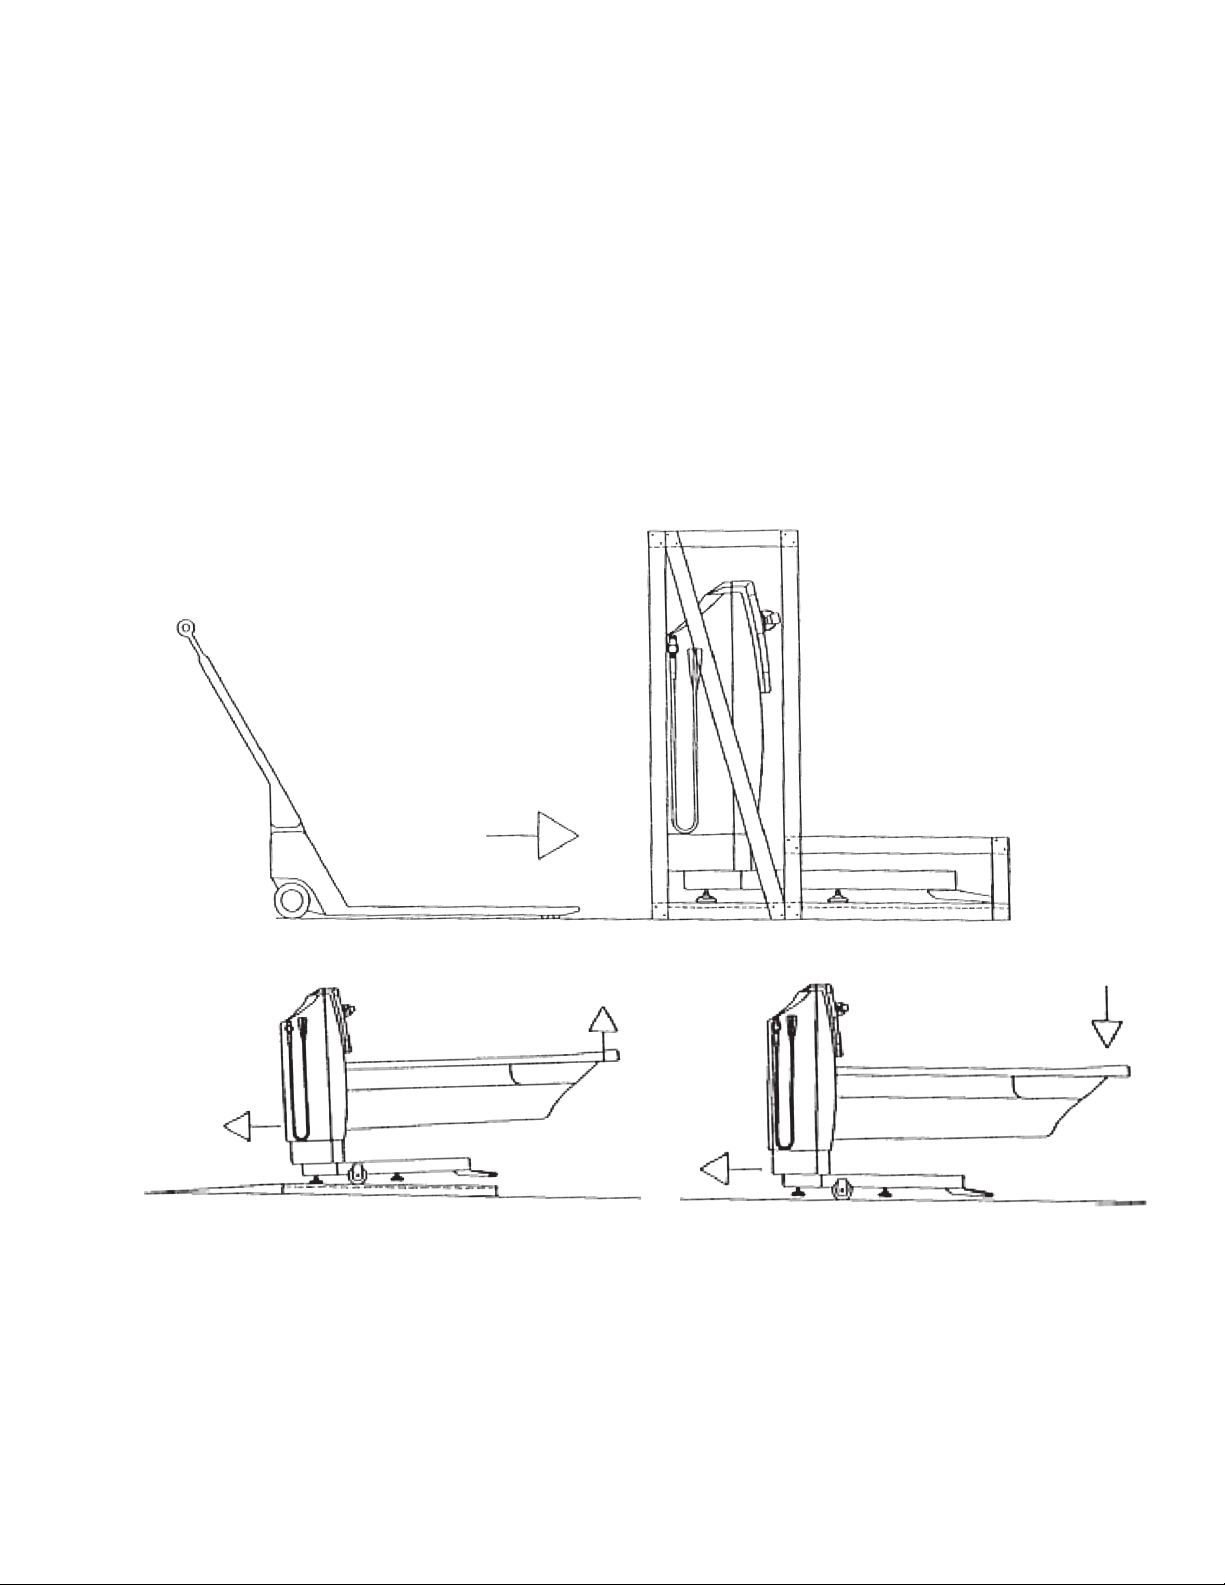
Unpacking Instructions
Unpack the EZ 900 Height Adjustable Bathtub panel by removing the screws (A) on both sides of the pallet and
remove the crate.
Assemble the bathtub (cardboard box) to the panel by removing the back of the panel, and use the transport
wheel beam (B) and wooden ramp L=4’1” (C), if ordered, to unload off pallet. The transport wheel beam can
also be used to transport the bathtub in place into the bathroom.
EZ Way recommends using at least two people when handling and transporting the tub.
Measurements: 5’ x 3’2” x 4’4” (L x W x H). Gross weight: 500 lbs.
C B
A
3
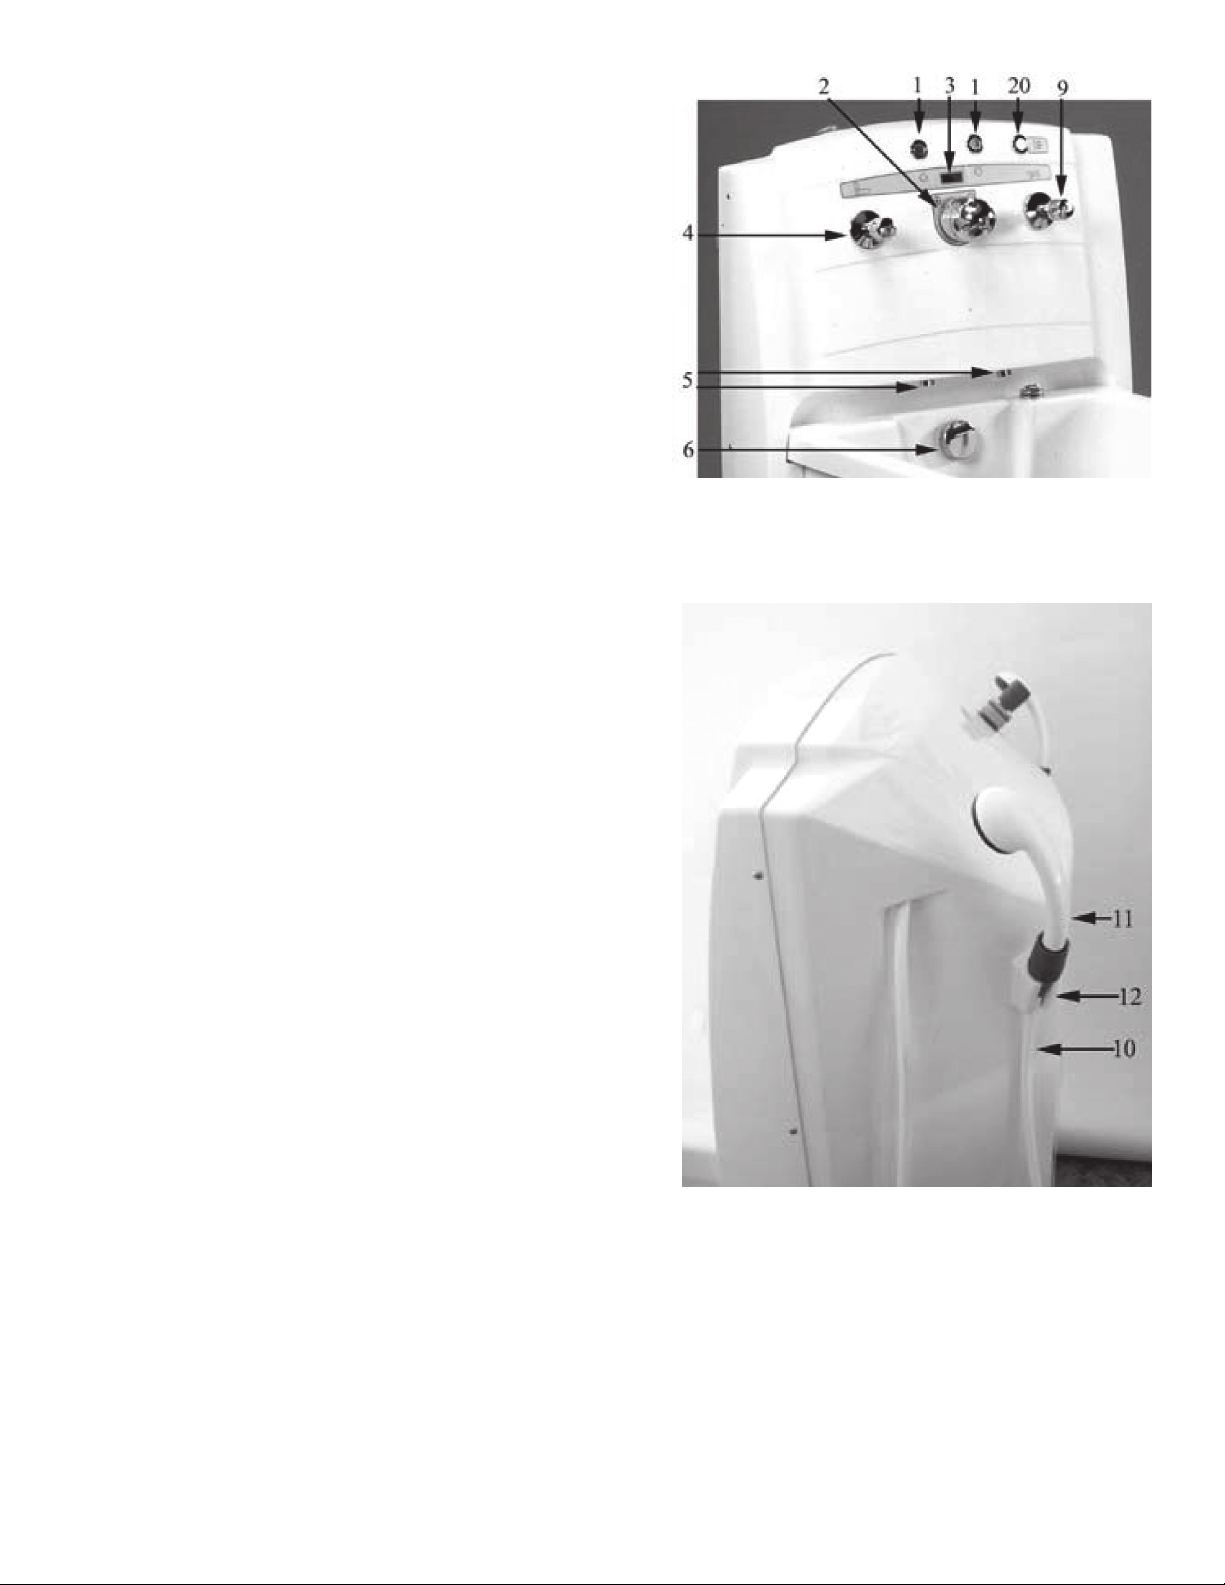
Features and Controls
Bathtub Height Adjustment and Filling
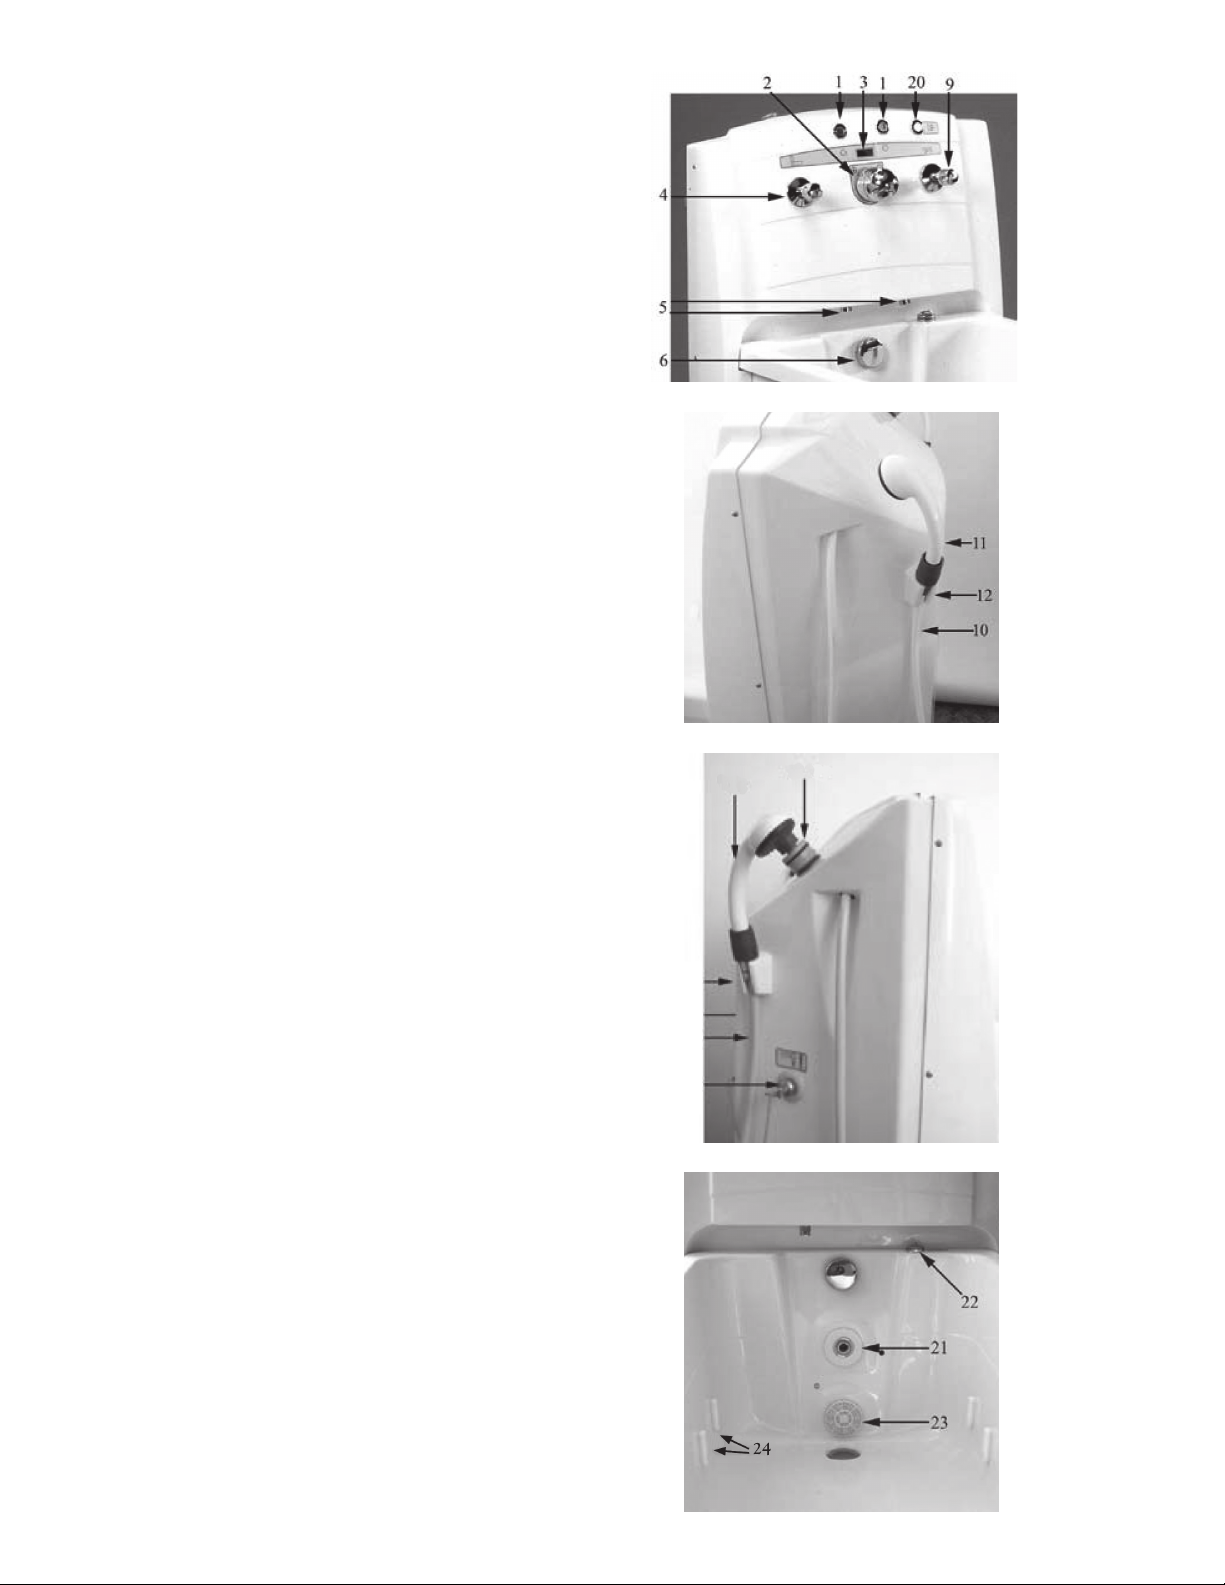
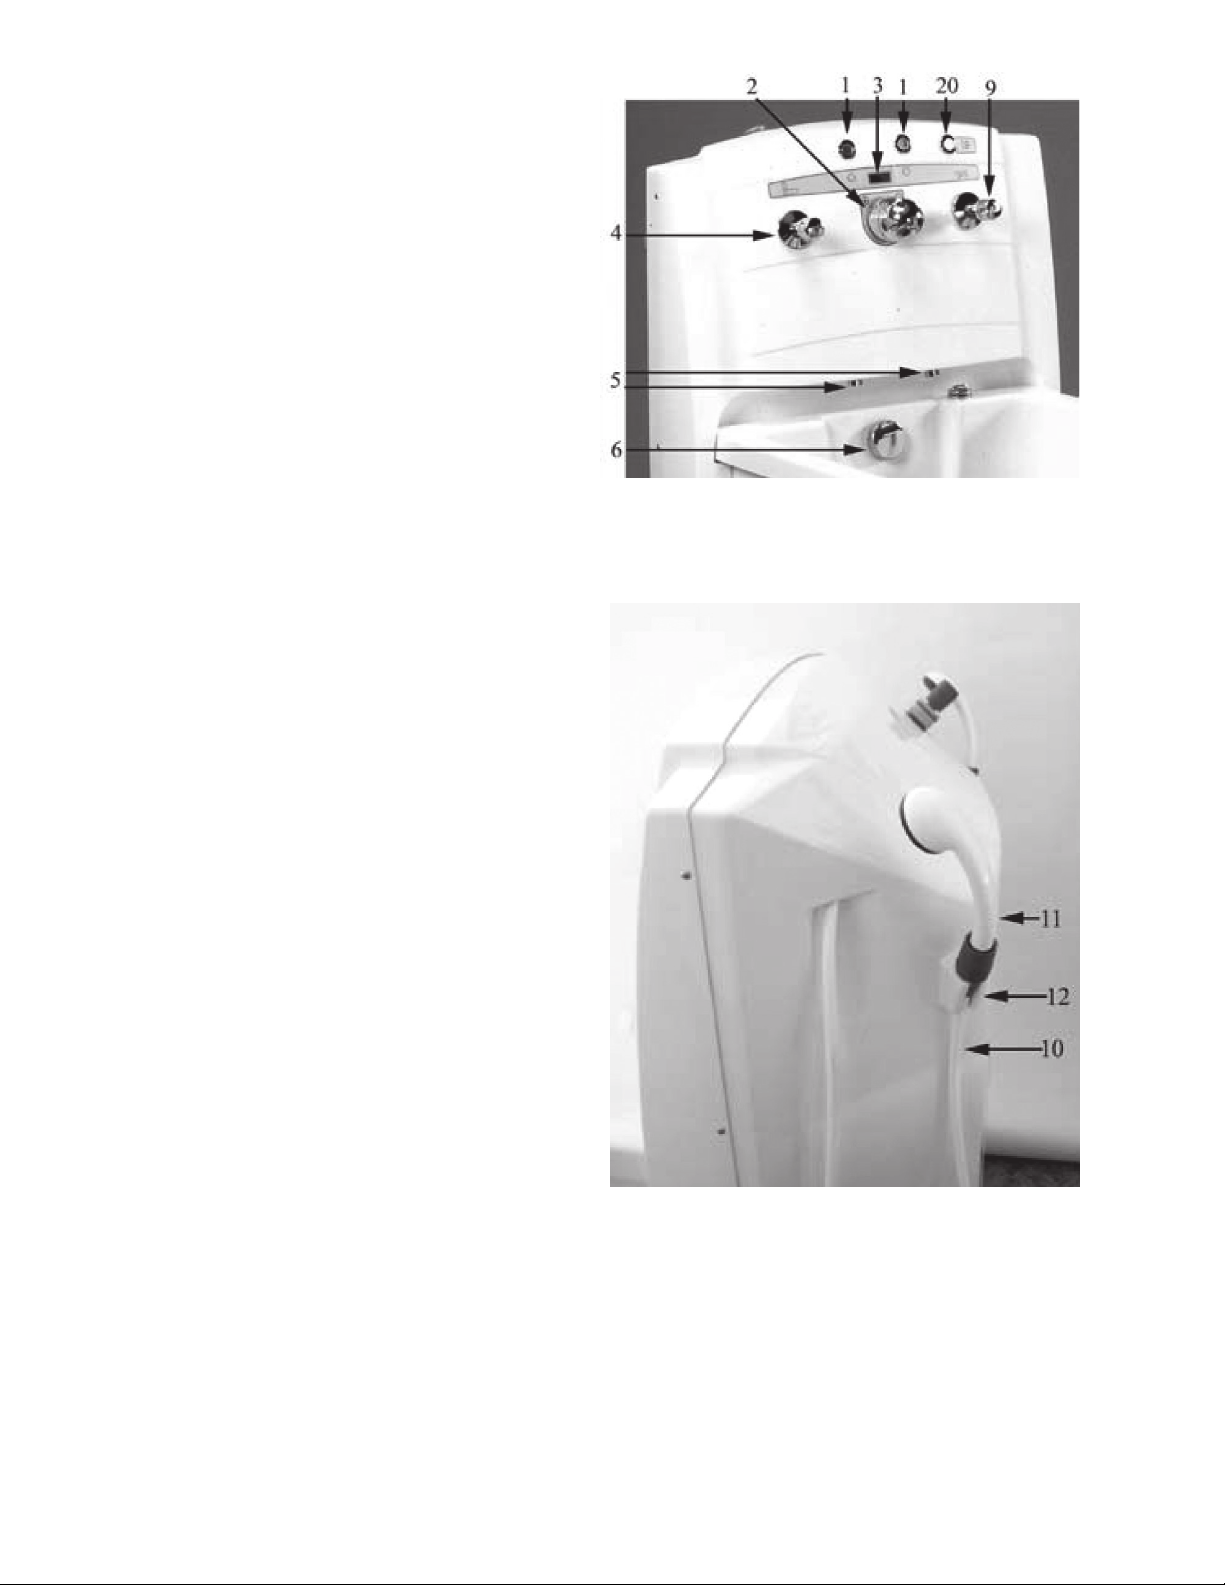
Position Description
1. Bathtub up/down control buttons
2. Thermoscopic mixer
3. Thermometer
4. On-off valve for bathtub filling
5. Bathtub filling spout
6. Bathtub overflow drain
Drain-close/open
Patient Shower
Position Description
2. Thermoscopic mixer
3. Thermometer
9. On-off valve for patient showering
10. Patient shower hose
11. Patient shower handle
12. Handle bracket
Cleaning System (C)
Position Description
13. Shut-off safety valve
14. Spray equipment hose
15. Spray handle
16. Spray handle bracket
17. Mixing setting screw (inside the panel)
18. Detergent filling lid
19. Yellow cleaning adapter, for whirlpool
Whirlpool System (W)
Position Description
20. Motor control on/off for whirlpool
21. Adjustable whirlpool jet
22. Aeration control valve
23. Whirlpool inlet safety screen
24. Adjustable footrest, two positions
18,19
15
16
17
14
13
4

Autofill Controls
Bathtub Filling
Start the automatic bathtub filling process by
pressing the “bathtub filling symbol” (4) to the left
of the thermostat (2). The green light (30) will be
lit and water will fill the bathtub.
Showering
Remove the shower handle (11) from the panel and
hold it over the bathtub away from the patient.
Press the “shower handle symbol” (9) to the right of
the thermostat. The green light (32) will illuminate
and water will spray from the shower handle.
The red “running water” light (31) to the right of
the thermometer indicates that the thermometer
shows the filling water temperature and can be
adjusted by turning the thermostat knob (2).
When the water level reaches the “waterline” inside
the bathtub, (about 53 gallons, 200 liters) the
bathtub filling will automatically stop and both the
green (30) and the red light (31) will switch off.
The light (33) automatically indicates that
the thermometer shows the still bathtub water
temperature.
More water can be added into the bathtub. When
pressing the “bathtub filling symbol” (4) once more,
the green light (30) will flash and water will be
added for approximately one minute.
This procedure can be repeated or stopped by
pressing the “bathtub filling symbol” (4).
WARNING: Always physically check water
temperature before and during bathing/showering
to ensure that the thermoscopic mixer (2) is
functioning.
The red “running water” light (31) to the right of
the thermometer indicates that the thermometer
shows the running shower water temperature and
can be adjusted by turning the thermostat knob.
Stop the water flow by pressing the “shower handle
symbol” (9) once. Both the green (32) and the red
(31) lights will switch off. The procedure can be
repeated.
The shower water flow is preset when installing the
bathtub. If other shower flows are required, set the
water flow by adjusting the black ball valve inside
the panel.
Whirlpool
To start the whirlpool system, press the whirlpool
symbol (20) and the green light (34) will be lit.
To stop the whirlpool system, press the whirlpool
symbol (20) and the green light (34) will switch off.
Important: Never start the whirlpool when the
water level is below the jet (21). Read separate
whirlpool instructions.
5
Basic Operating Procedures
Use the following controls for filling tub and
showering patients. The Whirlpool and cleaning
system are described separately.
Controls
The 900 Bathing System control panel and bathtub
are made of fiberglass. It has a thermoscopic mixer
(2) for the bathtub filling and the patient shower.
The thermoscopic mixer regulates water valve
temperature for the bathtub fill and the patient
shower.
To calibrate the thermoscopic mixer, see enclosed
product manual.
In addition, there are shut-off valves for the tub fill
(4) and patient shower (9).
The thermometer (3) measures bathtub filling water
and patient shower temperature in C.
The temperature probe is located close to the
thermoscopic mixer (2) to provide an accurate
reading of water temperature as the bathtub fills.
By monitoring the thermometer, you can precisely
regulate water temperature with use of the
thermoscopic mixer (2) as the tub fills or when the
patient shower (11) is used.
Height of the tub is adjusted with the tub up/down
controls (1). The tub can be adjusted to any level
from 600 mm (24”) to 1000 mm (40”) above the
floor.
To lower the tub, press and hold the down button
(1). To raise the tub, press and hold the up button
(1).
When releasing the up or down buttons, the
bathtub stops in desired height position.
6
Shower System Operation
The patient shower includes a handle (11) located
on the right side on the panel, the thermoscopic
mixer (2) and a shut-off valve (9) on the front of
the control panel. The handle nozzle has a rubber
strainer which is easy to clean, just rub your thumb
over the strainer.
Using the Shower
1. Lift the shower handle (11) and hold it over the
tub, away from patient.
2. Turn valve (9) to “ON” position for patient
shower.
3. Set the thermoscopic mixer (2) to desired
temperature.
4. Physically test water temperature and adjust
thermoscopic mixer (2) to suit. Adjust water
flow with shutoff valve (9) located on front of
control panel.
5. Shower or rinse patient with shower handle.
6. After showering, turn valve (9) to “OFF”
position and return handle (11) to its bracket
(12).
The patient shower system is also useful for rinsing
residue and debris from tub when cleaning (see
cleaning system description).
Please note: Shower handle should not be held in
the bath water while bathing.
Whirlpool
The shower hose shall be used when flushing the
whirlpool system, see separate description.
7
 Loading...