

Page 1
T10
Quick Start Guide
UD01225B
ET
LV
LT
Page 2

Page 3

COPYRIGHT ©2016 Hangzhou Hikvision Digital Technology Co., Ltd. or its subsidiaries. ALL RIGHTS
RESERVED.
About this Manual
The Manual includes instructions for using and managing the product. Pictures, charts, images and
all other information hereinafter are for description and explanation only. The information contained
in the Manual is subject to change, without notice, due to firmware updates or other reasons.
Please find the latest version in the ™ website (http://www.ezvizlife.com).
Any and all information, including, among others, wordings, pictures, graphs are the properties
of Hangzhou Hikvision Digital Technology Co., Ltd. or its subsidiaries (hereinafter referred to be
“Hikvision”). This user manual (hereinafter referred to be “the Manual”) cannot be reproduced,
changed, translated, or distributed, partially or wholly, by any means, without the prior written
permission of Hikvision. Unless otherwise stipulated, Hikvision does not make any warranties,
guarantees or representations, express or implied, regarding to the Manual.
Trademarks Acknowledgement
™, ™, and other Hikvision’s trademarks and logos are the properties of Hikvision
in various jurisdictions. Other trademarks and logos mentioned below are the properties of their
respective owners.
Legal Disclaimer
TO THE MAXIMUM EXTENT PERMITTED BY APPLICABLE LAW, THE PRODUCT DESCRIBED, WITH ITS
HARDWARE, SOFTWARE AND FIRMWARE, IS PROVIDED “AS IS”, WITH ALL FAULTS AND ERRORS,
AND HIKVISION MAKES NO WARRANTIES, EXPRESS OR IMPLIED, INCLUDING WITHOUT LIMITATION,
MERCHANTABILITY, SATISFACTORY QUALITY, FITNESS FOR A PARTICULAR PURPOSE, AND NONINFRINGEMENT OF THIRD PARTY. IN NO EVENT WILL HIKVISION, ITS DIRECTORS, OFFICERS,
EMPLOYEES, OR AGENTS BE LIABLE TO YOU FOR ANY SPECIAL, CONSEQUENTIAL, INCIDENTAL, OR
INDIRECT DAMAGES, INCLUDING, AMONG OTHERS, DAMAGES FOR LOSS OF BUSINESS PROFITS,
BUSINESS INTERRUPTION, OR LOSS OF DATA OR DOCUMENTATION, IN CONNECTION WITH THE USE
OF THIS PRODUCT, EVEN IF HIKVISION HAS BEEN ADVISED OF THE POSSIBILITY OF SUCH DAMAGES.
TO THE MAXIMUM EXTENT PERMITTED BY APPLICABLE LAW, IN NO EVENT SHALL HIKVISION’S TOTAL
LIABILITY FOR ALL DAMAGES EXCEED THE PURCHASE PRICE THE PRODUCT.
HIKVISION does not undertake any liability for personal injury or property damage, as the result of
product interruption or service termination cause by: a) improper installation or usage other than as
requested; b) the protection of national or public interests; c) Force Majeure; d) yourself or the third
Page 4

party, including not limitation, using any third party’s products, software, applications, and among
others.
REGARDING TO THE PRODUCT WITH INTERNET ACCESS, THE USE OF PRODUCT SHALL BE WHOLLY AT
YOUR OWN RISKS. HIKVISION SHALL NOT TAKE ANY RESPONSIBILITES FOR ABNORMAL OPERATION,
PRIVACY LEAKAGE OR OTHER DAMAGES RESULTING FROM CYBER ATTACK, HACKER ATTACK, VIRUS
INSPECTION, OR OTHER INTERNET SECURITY RISKS; HOWEVER, HIKVISION WILL PROVIDE TIMELY
TECHNICAL SUPPORT IF REQUIRED.
SURVEILLANCE LAWS VARY BY JURISDICTION. PLEASE CHECK ALL RELEVANT LAWS IN YOUR
JURISDICTION BEFORE USING THIS PRODUCT IN ORDER TO ENSURE THAT YOUR USE CONFORMS
TO THE APPLICABLE LAW. YOU FUTHER AGREE THAT THIS PRODUCT IS ONLY FOR CIVIL USE, AND
HIKVISION SHALL NOT BE LIABLE IN THE EVENT THAT THIS PRODUCT IS USED WITH ILLEGITIMATE
PURPOSES, SUCH AS THIRD PARTY RIGHTS INFRINGEMENT, MEDICAL TREATMENT, SAFETY
EQUIPMENT OR OTHER SITUATIONS WHERE THE PRODUCT FAILURE COULD LEAD TO DEATH OR
PERSONAL INJURY, OR WEAPON OF MASS DESTRUCTION, CHEMINCAL AND BIOLOGICAL WEAPON,
NUCLEAR EXPLOSION, AND ANY UNSAFE NUCLEAR ENERGY USES OR ANTI-HUMANITY USAGES. YOU
SHOULD UNDERTAKE ALL RESPONSIBILITIES FOR LOSSES OR DAMAGES RESULTING FROM THE
ABOVE USAGES WHATSOEVER.
IN THE EVENT OF ANY CONFLICTS BETWEEN THE ABOVE AND THE APPLICABLE LAW, THE LATER
PREVAILS.
Page 5

Regulatory Information
EU Conformity Statement
This product and - if applicable - the supplied accessories too are marked with
"CE" and comply therefore with the applicable harmonized European standards
listed under the EMC Directive 2004/108/EC, the RoHS Directive 2011/65/EU.
2012/19/EU (WEEE directive): Products marked with this symbol cannot be
disposed of as unsorted municipal waste in the European Union. For proper
recycling, return this product to your local supplier upon the purchase of
equivalent new equipment, or dispose of it at designated collection points. For
more information see: www.recyclethis.info.
2006/66/EC (battery directive): This product contains a battery that cannot be
disposed of as unsorted municipal waste in the European Union. See the product
documentation for specific battery information. The battery is marked with this
symbol, which may include lettering to indicate cadmium (Cd), lead (Pb), or
mercury (Hg). For proper recycling, return the battery to your supplier or to a
designated collection point. For more information see: www.recyclethis.info.
Industry Canada ICES-003 Compliance
This device meets the CAN ICES-3 (B)/NMB-3(B) standards requirements.
Импортер-поставщик в России: ЗАО "Хиквижн"
Импортер-поставщик в Республике Беларусь: ООО "Торговый дом "АВАНТ-ТЕХНО"
Page 6

Operations
T10 should be used cooperating with an Internet Alarm Hub (such as A1). And it is
required to be purchased separately.
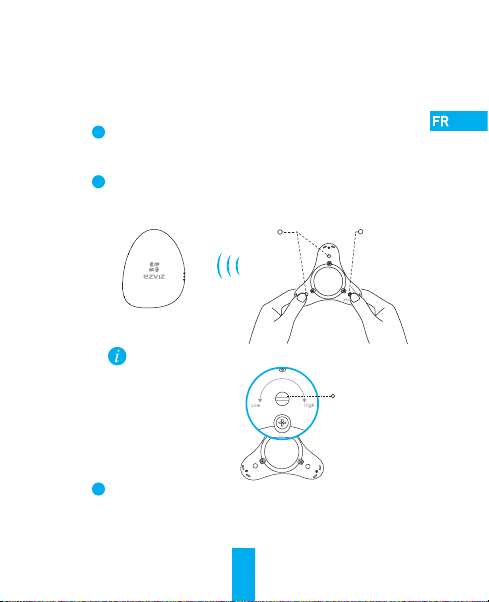
Step 1 Adding T10 to Internet Alarm Hub
• Option 1 (Recommended) Adding by EZVIZ App
1
Installing EZVIZ App
1. Connect your mobile phone to Wi-Fi.
2. Download and install the EZVIZ app by searching “EZVIZ” in App Store (iOS
version) and Google PlayTM (Android version).
3. Launch the app and register for an EZVIZ user account.
OR
2
Adding T10
1. Log in the EZVIZ app.
2. Find your Internet Alarm Hub and enter the Linked Device list.
3. Tap the “+” of the Linked Device and scan the QR code of T10, which is on
the bottom of T10, to link T10 to the Internet Alarm Hub.
T10 has a built-in battery by default. You are not required to install a battery again.
1
Page 7

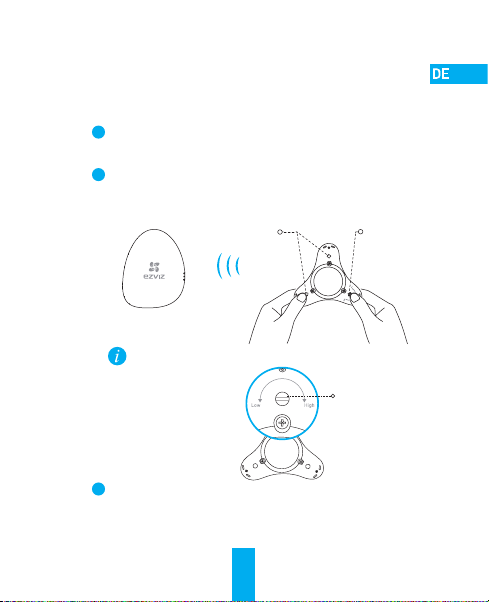
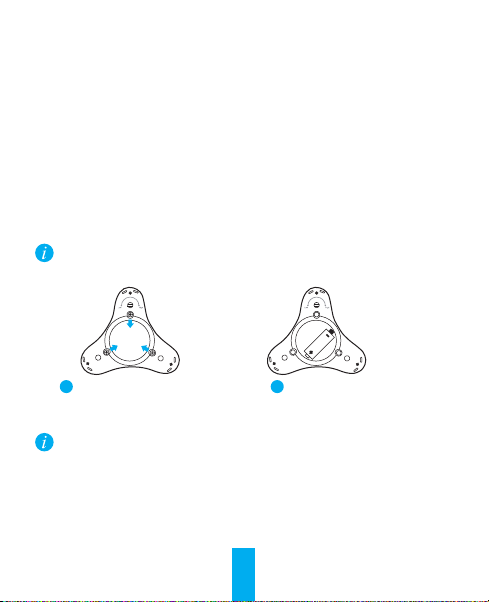
• Option 2 Adding by Operating the Internet Alarm
1
Enable the “Adding Detectors Mode” of your Internet Alarm Hub. Refer to Quick
Start Guide of your Internet Alarm Hub for details.
2
Take T10 close to the Internet Alarm Hub (within 50cm) and touch the Adjustment
Pin and at least one Fixed Pin at the same time with your hands. T10 alarms
indicating the adding signal has been sent.
Fixed Pins Adjustment Pin
Within 50cm
Internet Alarm Hub
The Adjustment Pin looks different from other two Fix Pins, as shown below.
3
The Internet Alarm Hub issues a voice prompt of the device type and serial No.
indicating T10 is added.
2
Adjustment Pin
Page 8

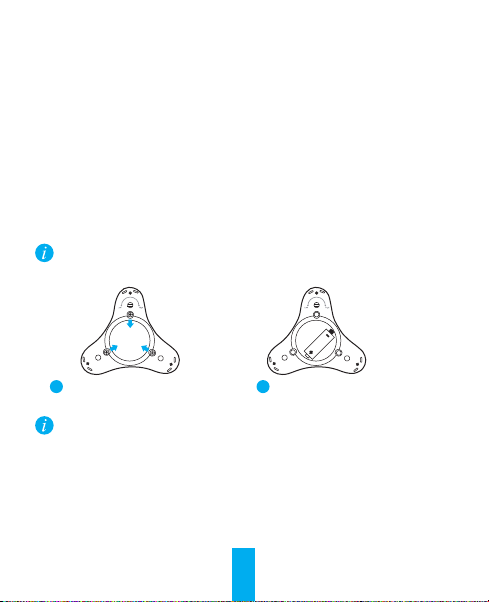
Step 2 Setting the Alarm Water Level
1
Set the height of the adjustment pin with your hand or a screw driver to set the
alarm water level as desired.
The alarm water level is the height between the pin and the ground. When
water reaches the level, an alarm will be triggered.
The level ranges from 0.4 mm to 3.2 mm. The default level is 0.4 mm .
0.4~3.2mm
Choose a installation place, such as kitchen, balcony, or washroom.
2
• Place T10 at a place that with the water leak possibility.
• Do not place T10 at a place that is already immersed by water.
• Do not place T10 at a place that with busy passenger, in case it is kicked away.
• Do not place T10 at a place that is in corrosive or high-intensity magnetic environment.
• You are recommended to use T10 at a place that is smaller than 200m2. If the place is
too large, the communication between T10 and Internet Alarm Hub may be interrupted.
You can purchase several Internet Alarm Hub if you want to use T10 at a larger place.
3
Test T10 after you choose a place: Place T10 in water to trigger alarm, then T10
beeps for 15 seconds, if the connected Internet Alarm Hub receives the alarm and
issues an alarm voice prompt, the connection and installation is compelete.
3
Page 9
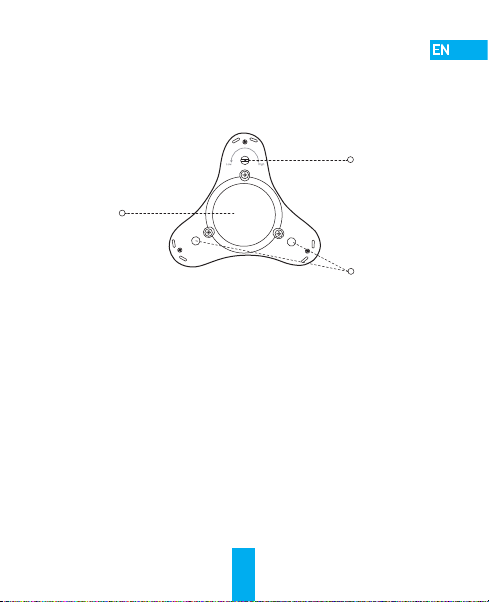
Appendix
Appearance
Adjustment Pin
Battery Cover
Fixed Pins
When the water level immerses the adjustment pin and at least one of the fixed pins, T10 alarms
and sends an alarm signal to the connected Internet Alarm Hub.
Function
Useing the conductivity of water, T10 is able to detect the water leak and send alarm to the
connected Internet Alarm Hub.
4
Page 10

Changing Battery
The battery model is CR123A and it can work for up to 24 months.
When the battery runs out, T10 sends a low battery signal to the connected Internet Alarm Hub
to remind you to change the battery.
1. Loosen the three lock screws on the bottom of T10 with a screw driver and take off the
battery cover.
2. Change the battery.
Do not oppositely place the positive and negative poles of the battery.
3. Replace the battery cover and tighten the three lock screws back in place.
1
Loosen the three lock screws.
2
Change the battery.
Do not move the black waterproof rubber ring inside the battery cover.
5
Page 11

Troubleshooting
Unable to trigger the alarm signal when you try to add T10 to Internet Alarm Hub.
Q:
Touch the Adjustment Pin and at least one Fixed Pin of T10 at the same time with your
A:
wet hands or other conductive objects.
The distance between T10 and Internet Alarm Hub should be less than 50 cm.
Unable to add T10 to Internet Alarm Hub by scanning its QR code.
Q:
When you use EZVIZ app to add T10 to Internet Alarm Hub, make sure your Internet
A:
Alarm Hub is working properly.
In EZVIZ app, the detector is offline.
Q:
Take T10 close to Internet Alarm Hub (within 50 cm) and manually trigger the T10 alarm.
A:
• If the connected Internet Alarm Hub alarms, the connection is normal. Please place
T10 as close to Internet Alarm Hub as possible to make sure the connection not
interrupted.
• If not, the battery has run out. Please change the battery.
For more information, please visit www.ezvizlife.com .
6
Page 12

Betrieb
Der T10 sollte in Verbindung mit einem Internet-Alarm-Hub (z.B. A1; separat zu
erwerben) benutzt werden.
Schritt 1 T10 zum Internet-Alarm-Hub hinzufügen
• Option 1 (empfohlen) Hinzufügen per EZVIZ App
1
EZVIZ App installieren
1. Verbinden Sie Ihr Smartphone mit dem Wi-Fi-Netz.
2. Laden Sie die EZVISZ App herunter und installieren Sie sie, indem Sie „EZVIZ" im
App Store (iOS-Version) oder bei Google PlayTM (Android-Version) suchen.
3. Starten Sie die App und erstellen Sie ein EZVIZ-Anwenderkonto.
ODER
2
T10 hinzufügen
1. Melden Sie sich bei der EZVIZ App an.
2. Suchen Sie den Internet-Alarm-Hub und rufen Sie die Liste der verknüpften Geräte auf.
3. T
ippen Sie auf das Pluszeichen (+) des verknüpften Geräts und scannen Sie den
QR-Code des T10 (unten im T10) ein, um den T10 mit dem Internet-Alarm-Hub zu
verknüpfen
.
Der T10 hat standardmäßig eine integrierte Batterie. Sie brauchen keine Batterie einz usetzen .
7
Page 13
• Option 2 Hinzufügen mittels Internet-Alarm-Hub
1
Aktivieren Sie den "Adding Detectors"-Modus am Internet-Alarm-Hub. Einzelheiten
enthält die Schnellstartanleitung zum Internet-Alarm-Hub.
2
Bringen Sie den T10 in die Nähe des Internet-Alarm-Hub (weniger als 50cm) und
berühren Sie gleichzeitig den Justierstift und mindestens einen Feststift. Der T10
bestätigt mittels Alarm, dass das Signal gesendet wurde.
Feststifte Justierstift
Max. 50cm
Internet-Alarm-Hub
Der Justierstift sieht anders als die beiden Feststifte aus (siehe Abbildung unten).
3
Der Internet-Alarm-Hub bestätigt per Voice Guide unter Angabe von Gerätetyp und
Seriennummer, dass der T10 hinzugefügt wurde.
8
Justierstift
Page 14

Schritt 2 Alarmwasserpegel konfigurieren
1
Stellen Sie mit dem Justierstift (per Hand oder Schraubendreher) den gewünschten
Alarmwasserpegel ein.
Der Alarmwasserpegel ist die Höhe zwischen Stift und Boden. Wenn das
Wasser den Pegel erreicht, wird Alarm ausgelöst.
Der Pegelbereich liegt zwischen 0,4 mm und 3,2 mm. Standardvorgabe ist 0,4 mm.
0.4 - 3.2 mm
2
Wählen Sie einen Installationsort (z.B. Küche, Balkon oder Badezimmer).
• Platzieren Sie den T10 dort, wo die Möglichkeit eines Wasserschadens besteht.
• Platzieren Sie den T10 nicht an einer Stelle, die bereits mit Wasser gefüllt ist.
• Platzieren Sie den T10 nicht an einer Stelle mit starkem Personenverkehr, weil
er sonst weggetreten werden könnte.
• Platzieren Sie den T10 nicht in einem korrosiven oder stark magnetischen Umfeld.
• Der T10 sollte an einem Ort platziert werden, der nicht größer als 200m2 ist. Bei
zu großen Flächen kann die Kommunikation zwischen T10 und Internet-Alarm-Hub
unterbrochen werden. Um den T10 auf größeren Flächen einzusetzen, können Sie
mehrere Internet-Alarm-Hubs kaufen.
T
esten Sie den T10 anschließend: Tauchen Sie den T10 in Wasser, um Alarm auszulösen.
3
Der T10 piept daraufhin 15 Sekunden lang. Wenn der angeschlossene Internet-AlarmHub den Alarm empfängt und eine Voice Guide-Bestätigung ausgibt, ist die Verbindung
hergestellt und die Installation abgeschlossen.
9
Page 15

Anhang
Erscheinungsbild
Justierstift
Batteriefachdeckel
Feststifte
Wenn der Wasserpegel den Justierstift und mindestens einen Feststift erreicht, löst der T10
Alarm aus und schickt das Alarmsignal an den angeschlossenen Internet-Alarm-Hub.
Funktion
Anhand der Leitfähigkeit des Wassers kann der T10 das Wasserleck erkennen und ein
Alarmsignal an den angeschlossenen Internet-Alarm-Hub schicken.
10
Page 16
Batteriewechsel
Die verwendete Batterie ist vom Typ CR123A und hält bis zu 24 Monate.
Wenn die Batteriekapazität nachlässt, schickt der T10 eine Ladestandswarnung an den
angeschlossenen Internet-Alarm-Hub, damit die Batterie ausgewechselt wird.
1. Lösen Sie mit einem Schraubendreher die drei Schrauben unten am T10 und entfernen
Sie den Batteriefachdeckel.
2. Tauschen Sie die Batterie aus.
Achten Sie auf die korrekte Ausrichtung der Pole.
3. Bringen Sie den Batteriefachdeckel mit den drei Schrauben wieder an.
1
Lösen Sie die drei Befestigungsschrauben.
2
Tauschen Sie die Batterie aus.
Entfernen Sie nicht den schwarzen Gummiring im Batteriefachdeckel.
11
Page 17

Problembehebung
Beim Versuch, den T10 zum Internet-Alarm-Hub hinzuzufügen, wird kein
F:
Alarmsignal ausgelöst.
Berühren Sie gleichzeitig den Justierstift und mindestens einen Feststift des T10 mit
A:
feuchten Händen oder anderen leitenden Gegenständen.
Der Abstand zwischen T10 und Internet-Alarm-Hub sollte weniger als 50cm betragen.
Der T10 lässt sich durch Scannen des QR-Codes nicht mit dem Internet-Alarm-Hub
F:
verbinden.
Um T10 und Internet-Alarm-Hub mittels EZVIZ App zu verbinden, müssen Sie
A:
sicherstellen, dass Ihr Internet-Alarm-Hub einwandfrei funktioniert.
Der Melder ist in der EZVIZ App offline.
F:
Bringen Sie den T10 nahe an den Internet-Alarm-Hub (weniger als 50cm) und lösen
A:
Sie manuell den T10-Alarm aus.
• Wenn der angeschlossene Internet-Alarm-Hub Alarm auslöst, ist die Verbindung
normal. Bringen Sie den T10 bitte so nah wie möglich an den Internet-Alarm-Hub,
um sicherzugehen, dass die Verbindung nicht unterbrochen wird.
• Andernfalls ist die Batterie schwach. Bitte die Batterie auswechseln.
Für weitergehende Informationen besuchen Sie bitte www.ezvizlife.com .
12
Page 18

Funciones
El T10 debería utilizarse junto con una central de alarmas por Internet (como A1).
Es obligatorio adquirirlo por separado.
Paso 1 Añadir el T10 a la central de alarmas por Internet
• Opción 1 (Recomendada) Añadir a través de la aplicación EZVIZ
1
Instalar la aplicación EZVIZ
1. Conecte el teléfono móvil a la red Wi-Fi.
2. Descargue e instale la aplicación EZVIZ buscando "EZVIZ"·en la App Store
(versión para iOS) y en Google Play™ (versión para Android).
3. Ejecute la aplicación y regístrese con una cuenta de usuario EZVIZ.
OR
Añadir T10
2
1. Inicie sesión en la aplicación EZVIZ.
2. Encuentre su central de alarmas por Internet y entre en la lista de
dispositivos vinculados.
3. Pulse "+" en el dispositivo vinculado y escanee el código QR del T10, que se
encuentra en la parte inferior, para vincularlo a la central de alarmas por Internet.
De manera predeterminada, el T10 cuenta con una batería integrada. No es necesario que vuelva a
instalar una batería.
13
Page 19

• Opción 2 Añadir a través de la alarma por Internet
1
Active el modo de adición de detectores en la central de alarmas por Internet. Consulte
la Guía de inicio rápido del centro de alarmas por Internet para obtener información.
2
Acerque el T10 a la central de alarmas por Internet (dentro de un área de 50 cm) y
manipule la clavija de ajuste y al menos una de las clavijas fijas al mismo tiempo.
El T10 alerta de que la señal de incorporación se ha enviado.
Clavijas fijas
Dentro de un área
Central de alarmas
por Internet
Tal y como se muestra a continuación, la clavija de ajuste es distinta a las
otras dos clavijas fijas.
3
La central de alarmas por Internet envía un mensaje de voz con el tipo de dispositivo
y el número de serie indicando que se ha añadido el T10.
de 50 cm
Clavija de ajuste
14
Clavija de ajuste
Page 20

Paso 2 Configurar el nivel de agua para la alarma
1
Establezca la altura de la clavija de ajuste con la mano o con la ayuda de un
destornillador para configurar el nivel de agua deseado para la alarma.
El nivel de agua para la alarma es la altura entre la clavija y el suelo.
Cuando el agua llegue a ese nivel, se activará la alarma.
El nivel oscila entre 0,4 mm y 3,2 mm. El nivel predeterminado es 0,4 mm.
0.4 - 3.2 mm
2
Elija un lugar para la instalación, como la cocina, el balcón o el aseo.
• Coloque el T10 en un lugar con posibilidad de fuga de agua.
• No coloque el T10 en un lugar que ya esté sumergido en agua.
• No coloque el T10 en un lugar transitado, para evitar que sea golpeado al pasar.
• No coloque el T10 en un lugar donde haya un ambiente corrosivo o de alta
intensidad magnética.
• Se recomienda que utilice el T10 en un lugar que mida menos de 200 m2. Si
el lugar fuera demasiado grande, la comunicación entre el T10 y la central de
alarmas por Internet se puede interrumpir. Puede adquirir varias centrales de
alarmas por Internet si desea utilizar el T10 en un lugar más amplio.
3
Pruebe el T10 cuando haya elegido el lugar: Coloque el T10 en el agua para activar la alarma,
en ese momento el T10 emitirá un pitido durante 15 segundos, si la central de alarmas por
Internet conectada recibe la alarma y envía un mensaje de voz de alarma, se ha completado
la conexión y la instalación.
15
Page 21

Apéndice
Aspecto
Clavija de ajuste
Cubierta de la
batería
Clavijas fijas
Cuando el nivel de agua sumerge la clavija de ajuste y al menos una de las clavijas fijas, el T10
alerta y envía una señal de alarma a la central de alarmas por Internet conectada.
Función
Mediante la conductividad del agua, el T10 es capaz de detectar una fuga de agua y enviar una
alarma a la central de alarmas por Internet conectada.
16
Page 22
Cambio de la batería
El modelo de la batería es CR123A y puede funcionar hasta durante 24 meses.
Cuando se agote la batería, el T10 enviará una señal de batería baja a la central de alarmas por
Internet conectada para recordarle que reemplace la batería.
1. Afloje los tres tornillos de fijación en la parte inferior del T10 con un destornillador y
retire la cubierta de la batería.
2. Reemplazo de la batería.
No coloque de forma opuesta los polos negativos y positivos de la batería.
3. Vuelva a colocar la cubierta de la batería y apriete los tres tornillos de fijación en
su lugar.
1
Afloje los tres tornillos de fijación.
No retire el anillo de caucho negro resistente al agua que está dentro de la cubierta de la batería
2
Reemplace la batería.
17
.
Page 23

Solución de problemas
No se ha podido activar la señal de alarma al intentar añadir el T10 a la
P:
central de alarmas por Internet.
Toque con las manos húmedas u otro objeto conductor la clavija de ajuste y al menos una
R:
de las clavijas fijas del T10 al mismo tiempo.
La distancia entre el T10 y la central de alarmas por Internet debería ser inferior a 50 cm.
No se ha podido añadir el T10 a la central de alarmas por Internet al escanear
P:
el código QR.
Cuando utilice la aplicación EZVIZ para añadir el T10 a la central de alarmas por
R:
Internet, asegúrese de que su central de alarmas por Internet funciona correctamente.
En la aplicación EZVIZ, el detector aparece desconectado.
P:
Acerque el T10 a la central de alarmas por Internet (dentro de un área de 50 cm) y
R:
active manualmente la alarma del T10.
• Si la central de alarmas por Internet señaliza la alarma, la conexión es normal.
Coloque el T10 lo más cerca posible de la central de alarmas por Internet para
asegurarse de que la conexión no se interrumpe.
• Si no funciona, se ha agotado la batería. Cambie la batería.
Para obtener más información, visite www.ezvizlife.com.
18
Page 24

Fonctionnement
Il convient d'utiliser le T10 conjointement au concentrateur d'alarme Internet (tel
qu'un A1). Il doit également être acheté séparément.
Étape 1 - Ajout du T10 au concentrateur d'alarme Internet
• Option 1 (recommandé) Ajout par l'application EZVIZ
1
Installation de l'application EZVIZ
1. Activez la fonction Wi-Fi sur votre téléphone portable.
2. Téléchargez l'application EZVIZ en recherchant EZVIZ dans l'App Store
(version iOS) ou sur Google Play
3. Lancez l'application et ouvrez un compte d'utilisateur EZVIZ.
2
Ajout du T10
1. Ouvrez une session dans l'application EZVIZ.
2. Repérez votre concentrateur d'alarme Internet puis parcourez la liste des
périphériques associés.
3. Appuyez sur la touche «+» du périphérique associé puis lisez le code QR
du T10, qui se trouve au bas de celui-ci, pour l'associer au concentrateur
d'alarme Internet.
Par défaut, le T10 est équipé d'une batterie intégrée. Vous n'êtes pas obligé d'en ajouter une.
TLM
(version Android).
OU
19
Page 25
• Option 2 Ajout en actionnant le concentrateur d'alarme Internet
1
Activez le mode Ajout de détecteurs de votre concentrateur d'alarme Internet. Pour
plus de précisions sur le fonctionnement de votre concentrateur d'alarme Internet,
reportez-vous au Guide de prise en main.
2
Approchez le T10 du concentrateur d'alarme Internet (50cm maxi) puis touchez la
broche de réglage et au moins une broche fixe en même temps. L'alarme du T10
retentit, indiquant que le signal d'ajout a été envoyé.
Broches fixes Broche de réglage
Moins de 50cm
Concentrateur d'alarme Internet
La broche de réglage a un aspect différent de celui des deux autres broches fixes, comme
le montre l'illustration ci-dessous.
Broche de réglage
3
Le concentrateur d'alarme Internet émet un message vocal indiquant que le type de
matériel et le n° de série, signalant que le T10 a été ajouté.
20
Page 26

Étape 2 - Réglage du niveau de l'alarme d'eau
1
Réglez la hauteur de la broche de réglage selon le niveau de l'alarme de fuite d'eau
manuellement ou à l'aide d'un tournevis.
Le niveau d'eau de l'alarme est la hauteur séparant la broche du sol.
Lorsque l'eau atteint ce niveau, une alarme se déclenche.
Ce niveau va de 0,4mm à 3,2mm. Le niveau par défaut est de 0,4mm.
0.4 - 3.2 mm
2
Choisissez l'emplacement d'installation, tel qu'une cuisine, un balcon ou une salle d'eau.
• Placez le T10 à un emplacement susceptible de subir une fuite d'eau.
• Ne le placez pas à un emplacement déjà inondé.
• Ne placez le T10 pas à un emplacement où se tiennent des passagers, car il
risquerait d'être arraché par un coup de pied.
• Ne placez pas le T10 à un emplacement situé dans un environnement corrosif
ou soumis à des ondes magnétiques de haute intensité.
• Il est conseillé d'installer le T10 dans un local de moins de 200m². Si le local
est trop grand, la communication entre le T10 et le concentrateur d'alarme
Internet risque d'être interrompue. Si vous souhaitez utiliser le T10 dans local
plus grand, vous pouvez acheter plusieurs concentrateurs d'alarme Internet.
3
Testez le T10 après avoir choisi un emplacement: Placez-le dans l'eau pour déclencher
l'alarme. Le T10 émet un bip pendant 15secondes. Si le concentrateur d'alarme Internet
connecté reçoit l'alarme et émet une invite vocale, cela indique que la connexion et
l'installation sont terminées.
21
Page 27

Annexe
Aspect
Broche de réglage
Couvercle du
compartiment de
la batterie
Broches fixes
Lorsque la broche de réglage et au moins une des broches fixes sont immergées, le T10
déclenche une alarme et la transmet au concentrateur d'alarme Internet connecté.
Fonction
La conductivité de l'eau permet au T10 de détecter la fuite et de transmettre une alarme au
concentrateur d'alarme Internet connecté.
22
Page 28

Remplacement de la batterie
La batterie, de type CR123A, a une autonomie de 24mois.
Lorsque la batterie est épuisée, le T10 envoie un avertissement au concentrateur d'alarme
Internet pour vous rappeler de la remplacer.
1. Desserrez les trois vis de blocage au bas du T10 avec un tournevis puis
retirez le couvercle.
2. Remplacez la batterie.
Évitez d'inverser les pôles positif et négatif de la batterie.
3. Remettez le couvercle en place puis resserrez les trois vis de blocage.
1
Desserrez les trois vis de blocage.
2
Remplacez la batterie.
Ne retirez pas le joint d'étanchéité en caoutchouc noir à l'intérieur du couvercle.
23
Page 29

Résolution des problèmes
Le signal d'alarme ne se déclenche pas lorsque vous essayez d'ajouter un
Q:
T10 au concentrateur d'alarme Internet.
Touchez la broche de réglage et au moins une broche fixe du T10 en même temps avec
R:
les mains mouillées ou au moyen d'un objet conducteur quelconque.
La distance entre le T10 et le concentrateur d'alarme Internet ne doit pas dépasser 50cm.
Il n'est pas possible d'ajouter le T10 au concentrateur d'alarme Internet au
Q:
moyen de son code QR.
Si vous utilisez l'application EZVIZ pour ajouter le T10 au concentrateur d'alarme
R:
Internet, assurez-vous d'abord du bon fonctionnement de celui-ci.
Dans l'application EZVIZ, le détecteur est hors ligne.
Q:
Placez le T10 à proximité (50cm maxi) du concentrateur d'alarme Internet puis
R:
déclenchez l'alarme du T10 manuellement.
• Si l'alarme du concentrateur d'alarme internet se déclenche, cela indique que
la connexion est normale. Placez le T10 le plus près possible du concentrateur
d'alarme Internet pour que la connexion ne soit pas interrompue.
• Sinon, cela peut indiquer que la batterie est épuisée. Remplacez la batterie.
Pour plus de précisions, rendez-vous sur www.ezvizlife.com .
24
Page 30

Funzionamento
T10 deve essere utilizzato in abbinamento a un hub per gli allarmi via internet (ad
esempio A1), da acquistare separatamente.
Passo 1 Aggiungere T10 all'hub per gli allarmi via internet
• Opzione 1 (consigliata) Aggiunta di App EZVIZ
1
Installare l'app EZVIZ
1. Collegare il telefono cellulare alla Wi-Fi.
2. Scaricare e installare l'app EZVIZ ricercando "EZVIZ" nell'App Store (versione
iOS) o in Google PlayTM (versione Android).
3. Eseguire l'app e registrare un account utente EZVIZ.
O
2
Aggiungere il T10
1. Accedere all'app EZVIZ.
2. Trovare l'hub per gli allarmi via internet e accedere alla lista dei dispositivi
collegati "Linked Device".
3. Toccare il "+" del dispositivo collegato e leggere il QR code del T10, che si trova
sulla sua parte inferiore, per collegarlo all'hub per gli allarmi via internet.
Il T10 integra una batteria. Non è necessario installare una batteria nuova.
25
Page 31

• Opzione 2 Aggiunta tramite l'hub per gli allarmi via internet
1
Attivare la modalità di aggiunta rivelatori "Adding Detectors Mode" dell'hub per gli
allarmi via internet. Fare riferimento alla Guida rapida dell'hub per gli allarmi via
internet per i dettagli.
2
Avvicinare il T10 all'Ihub per gli allarmi via internet (nel raggio di 50 cm) e toccare
contemporaneamente il perno di regolazione e almeno un perno fisso. Il T10 emette
un avviso acustica ad indicare che la richiesta di aggiunta è stata inviata.
Hub per gli allarmi via internet
Il perno di regolazione ha un aspetto diverso dagli altri due perni fissi, come
illustrato di seguito.
3
L'hub per gli allarmi via internet conferma l'aggiunta del T10 con un messaggio
vocale in cui specifica il tipo e il numero di serie del dispositivo.
Perni fissi Perno di regolazione
Entro 50 cm
Perno di regolazione
26
Page 32

Passaggio 2 Impostazione del livello dell'acqua per l'attivazione allarme
1
Impostare l'altezza del perno di regolazione con le dita o un cacciavite per definire
il livello dell'acqua che attiva l'allarme.
Il livello dell'acqua per l'attivazione dell'allarme è la distanza tra il
perno di regolazione e la superficie. Quando l'acqua raggiunge tale
livello, scatterà un allarme.
Il livello può essere impostato tra 0,4 mm e 3,2 mm. L'impostazione
predefinita a 0,4 mm.
0.4 - 3.2 mm
Scegliere il locale in cui posizionare il T10, ad esempio cucina, balcone o lavanderia.
2
• Collocare il T10 in un punto in cui c'è rischio di allagamento.
• Posizionare il T10 in un punto in cui non è già immerso nell'acqua.
• Non posizionare il T10 in un punto di passaggio, per evitare che venga calpestato o spostato.
• Non posizionare il T10 in un ambiente dove può essere esposto a sostanze
corrosive o campi magnetici di forte intensità.
• Si consiglia di utilizzare il T10 in un ambiente con dimensioni inferiori a
200 m2. Se l'ambiente è troppo grande, la comunicazione tra il T10 e l'hub per
gli allarmi via internet potrebbe interrompersi. Per utilizzare il T10 in ambienti
di grandi dimensioni è possibile acquistare più hub per gli allarmi via internet.
3
Collaudare il T10 dopo aver scelto dove posizionarlo: Immergere il T10 nell'acqua per attivare
l'allarme; il T10 emetterà un segnale acustico per 15 secondi; se l'hub per gli allarmi via
internet collegato emetterà un messaggio vocale di allarme, la connessione e l'installazione
sono completate correttamente.
27
Page 33

Appendice
Elementi
Perno di regolazione
Coperchio
batteria
Perni fissi
Quando il livello dell'acqua ricopre il perno di regolazione e almeno uno dei perni fissi, il T10
invia un segnale di allarme all'hub per gli allarmi via internet collegato.
Funzionamento
Basandosi sulla conduttività dell'acqua, il T10 è in grado di rilevare una perdita di acqua e
trasmettere l'allarme all'hub per gli allarmi via internet collegato.
28
Page 34

Sostituzione la batteria
La batteria CR123A può durare fino a 24 mesi.
Quando la batteria si esaurisce, il T10 Invia un segnale di batteria scarica all'hub per gli allarmi
via internet collegato per avvertire della necessità di sostituirla.
1. Allentare con un cacciavite le tre viti sul fondo del T10 e togliere il coperchio della
batteria.
2. Cambiare la batteria.
Non installare la batteria capovolta, ma rispettare l'orientamento dei poli negativo e positivo.
3. Rimettere il coperchio e serrare le tre viti.
1
Allentare le tre viti.
2
Cambiare la batteria.
Non spostare l'anello di gomma impermeabile nero all'interno del coperchio della batteria.
29
Page 35

Risoluzione dei problemi
Impossibile attivare il segnale di allarme quando si tenta di aggiungere il T10
D:
all'hub per gli allarmi via internet.
Toccare contemporaneamente il perno di regolazione e almeno un perno fisso del
R:
T10 con le mani bagnate o altri oggetti conduttivi.
La distanza tra il T10 e l'hub per gli allarmi via internet deve essere inferiore a 50 cm.
Impossibile aggiungere il T10 all'hub per gli allarmi via internet scansionando il
D:
QR code.
Quando si utilizza l'app EZVIZ per aggiungere il T10 all'hub per gli allarmi via internet,
R:
assicurarsi che l'hub per gli allarmi via internet stia funzionando correttamente.
Nell'app EZVIZ, il rivelatore è offline.
D:
Avvicinare il T10 all'hub per gli allarmi via internet (nel raggio di 50 cm) e attivare
R:
manualmente l'allarme del T10.
• Se l'hub per gli allarmi via internet attiva l'allarme, la connessione è corretta.
Avvicinare quanto possibile il T10 all'hub per gli allarmi via internet per
assicurarsi che la connessione non sia interrotta.
• In caso contrario, la batteria è esaurita. Cambiare la batteria.
Per ulteriori informazioni, visitare www.ezvizlife.com .
30
Page 36

Operações
O T10 deve ser utilizado em conjunto com um hub de alarme de Internet (como o
A1). Este equipamento tem de ser adquirido em separado.
Passo 1 Adição de T10 ao hub de alarme de Internet
• Opção 1 (Recomendado) Adição através da aplicação EZVIZ
1
Instalação da aplicação EZVIZ
1. Ligue o telemóvel à rede Wi-Fi.
2. Transfira e instale a aplicação EZVIZ pesquisando por "EZVIZ" na App Store
(versão iOS) e no Google PlayTM (versão Android).
3. Abra a aplicação e registe-se para criar uma conta de utilizador EZVIZ.
OU
2
Adicionar o T10
1. Inicie sessão na aplicação EZVIZ.
2. Localize o seu hub de alarme de Internet e aceda à lista de Dispositivos ligados.
3. Toque em "+" do Dispositivo ligado e leia o código QR do T10, que está na
parte inferior do T10, para ligar o T10 ao hub de alarme de Internet.
O T10 vem equipado com uma bateria. Não é necessário instalar uma nova.
31
Page 37

• Opção 2 Adição utilizando o alarme de Internet
1
Ative o "Modo de adição de detetores" do seu hub de alarme de Internet. Consulte o
Manual de iniciação rápida do hub de alarme de Internet para obter mais informações.
2
Aproxime o T10 do hub de alarme de Internet (cerca de 50cm) e toque no pino
de afinação e, pelo menos, num pino fixo ao mesmo tempo com as mãos. O T10
dispara o alarme indicando que o sinal de adição foi enviado.
Pinos fixos Pino de afinação
Menos de 50 cm
Hub de alarme de Internet
O pino de afinação tem um aspeto diferente dos outros dois pinos fixos, conforme
a ilustração abaixo.
3
O hub de alarme de Internet emite um comando de voz com o tipo e o n.º de série
do dispositivo, indicando que o T10 foi adicionado.
32
Pino de afinação
Page 38

Passo 2 Definição do nível de água do alarme
1
Regule a altura do pino de afinação com a mão ou utilizando uma chave de fendas
para regular o nível de água de alarme pretendido.
O nível de água de alarme é a altura entre o pino e o solo. Quando a
água atinge o nível, o alarme dispara.
O nível varia entre 0,4 mm e 3,2 mm. O nível predefinido é 0,4 mm .
0.4 - 3.2 mm
2
Escolha um local para a instalação, como a cozinha, a varanda ou a casa de banho.
• Coloque o T10 num local com possibilidade de fuga de água.
• Não coloque o T10 num local que já esteja submerso em água.
• Não coloque o T10 num local de passagem, para evitar que seja pisado ou pontapeado.
• Não coloque o T10 em
• Recomenda-se a utilização do T10 num local com menos de 200 m2. Se o
local for demasiado grande, a comunicação entre o T10 e o hub de alarme
de Internet pode ser interrompida. Caso pretenda utilizar o T10 num espaço
maior, pode comprar vários hubs de alarme de Internet.
Teste o T10 depois de escolher um lugar: Coloque o T10 dentro de água para fazer
3
disparar o alarme. O T10 emite um aviso sonoro durante 15 segundos. Se o hub de
alarme de Internet ligado receber o alarme e emitir um comando de voz de alarme,
a ligação e a instalação estão concluídas.
ambientes corrosivos ou com elevada intensidade magnética.
33
Page 39

Anexos
Aspeto
Pino de afinação
Tampa da
bateria
Pinos fixos
Quando o nível da água submerge o pino de afinação e, pelo menos, um dos pinos fixos, o T10
emite um alarme e envia um sinal de alarme para o hub de alarme de Internet ligado.
Função
Utilizando a condutividade da água, o T10 consegue detetar a fuga de água e envia o alarme ao
hub de alarme de Internet ligado.
34
Page 40

Substituição da bateria
O modelo da bateria é o CR123A e tem uma autonomia máxima de 24 meses.
Quando a bateria acaba, o T10 envia um sinal de bateria fraca ao hub de alarme de Internet
ligado para avisar que é preciso substituir a bateria.
1. Desaperte os três parafusos de bloqueio na parte inferior do T10 com uma chave de
fendas e retire a tampa da bateria.
2. Substitua a bateria.
Não coloque o polo positivo e o polo negativo da bateria em lados opostos.
3. Volte a colocar a tampa da bateria, seguida dos três parafusos de bloqueio e aperte-os.
1
Desaperte os três parafusos de bloqueio.
2
Substitua a bateria.
Não desloque o anel de borracha impermeável preto na parte de dentro da tampa da bateria.
35
Page 41

Resolução de problemas
Não consegue disparar o sinal de alarme quando tenta adicionar o T10 ao
P:
hub de alarme de Internet.
Toque no pino de afinação e, pelo menos, num pino fixo do T10 ao mesmo tempo
R:
com as mãos molhadas ou outros objetos condutores.
A distância entre o T10 e o hub de alarme de Internet deve ser inferior a 50 cm.
Não consegue adicionar o T10 ao hub de alarme de Internet lendo o
P:
respetivo código QR.
Quando utilizar a aplicação EZVIZ para adicionar o T10 ao hub de alarme de Internet,
R:
verifique se o seu hub de alarme de Internet está a funcionar corretamente.
Na aplicação EZVIZ, o detetor está offline.
P:
Aproxime o T10 do hub de alarme de Internet (cerca de 50 cm) e dispare o alarme
R:
do T10 manualmente.
• Se o hub de alarme de Internet ligado emitir o alarme, a ligação está normal.
Coloque o T10 o mais próximo possível do hub de alarme de Internet para ter a
certeza de que a ligação não é interrompida.
• Se não resultar é porque a bateria já não tem carga. Substitua a bateria.
Para obter mais informações, aceda a www.ezvizlife.com .
36
Page 42

Работа с датчиком
Датчик T10 должен использоваться в связке с Центром
управления Умным домом. (например, A1). Устройство
приобретается отдельно
Шаг 1 Подключение T10 к Центру управления
Умным домом
• Вариант 1 (рекомендуется) Подключение с помощью
приложения EZVIZ
Установка приложения EZVIZ
1. Подключите свой мобильный телефон к Wi-Fi.
2. Загрузите и установите приложение EZVIZ. Приложение
можно найти по запросу «EZVIZ» в App Store (версия для
iOS) и Google PlayTM (версия для Android).
3. Запустите приложение и зарегистрируйте учетную запись EZVIZ.
ЛИБО
Добавление датчика T10
1. Авторизуйтесь в приложении EZVIZ.
2. Найдите ваш Центр управления Умным домом и
откройте список связанных устройств..
37
Page 43

3. В списке связанных устройств нажмите «+» и просканируйте
Q
R-код датчика T10, расположенный на нижней стороне
датчика, чтобы связать его с Центром управления Умным
домом
Датчик T10 оснащен встроенной батареей.Повторная установка батареи
не требуется.
• Вариант 2 Подключение через Центр Умного дома
Активируйте «Режим добавления датчиков» вашего Центр Умного
дома
. За подробным описанием обратитесь к «Руководству по
началу работы» вашего Центра Умного дома.
Поднесите датчик T10 к Центру Умного дома
(на расстояние не более 50 см) и прикоснитесь руками
одновременно к установочному штифту и как минимум к одному
из фиксированных штифтов.T10 издаст звук, обозначающий
выполнение отправки сигнала о добавлении.
38
Page 44

Фиксированные
штифты
Не более 50 см
Центр Умного дома
Установочный штифт визуально отличается от двух
фиксированных штифтов, как показано на изображении
ниже.
Установочный штифт
Центр Умного дома воспроизведет голосовое сообщение о типе
устройства и его серийном номере. Это значит, что датчик T10
добавлен.
39
Установочный
штифт
Page 45

Шаг 2 Установка сигнального уровня воды
Рукой или отверткой настройте высоту установочного штифта,
чтобы установить необходимый сигнальный уровень воды.
Сигнальный уровень воды – это расстояние между штифтом
и поверхностью пола.Когда вода достигнет этого уровня,
сработает сигнализация.
Уровень может варьироваться в пределах от 0,4 мм до
3,2 мм. По умолчанию выставлен уровень 0,4 мм.
0,4–3,2 мм
Выберите место установки датчика, например, кухню, балкон или
ванную комнату.
• Установите датчик T10 в месте вероятной протечки воды.
• Не устанавливайте датчик T10 в месте, уже покрытом водой.
• Не размещайте датчик T10 в местах, где его могут задеть или
сбить.
• Не размещайте датчик T10 в коррозионной среде или в зоне
действия интенсивного магнитного поля.
40
Page 46

• Рекомендуется использовать датчик T10 в помещении,
площадь которого не превышает 200 м2.В слишком большом
помещении может быть нарушена связь между датчиком T10 и
концентратором сигнализации.Если требуется использовать
T10 в помещении с большей площадью, вы можете
приобрести несколько Центров Умного дома
После выбора места установки проверьте работу датчика
T10: Поместите T10 в воду, чтобы вызвать срабатывание
сигнализации. T10 будет издавать сигналы в течение 15 секунд.
Если подключенный концентратор сигнализации получает сигнал
тревоги и издает голосовое сообщение о тревоге, значит
подключение и установка завершены.
41
Page 47

Приложение
Внешний вид
Установочный
штифт
Крышка отсека
батареи
Фиксированные
штифты
Когда уровень воды достигнет установочного штифта и по меньшей мере
одного фиксированного штифта, датчик T10 сработает и отправит сигнал
тревоги на подключенный интернет-концентратор сигнализации.
Функционирование
Используя электропроводимость воды, датчик T10 может определять факт
протечки воды и отправлять сигнал тревоги на подключенный Центр Умного
дома.
42
Page 48

Замена батареи
Срок службы батареи модели CR123A составляет 24 месяца.
При разрядке батареи T10 посылает на Центр Умного дома сигнал о
низком заряде батареи, чтобы напомнить о необходимости ее замены.
1. С помощью отвертки открутите три зажимных винта на нижней
поверхности датчика и снимите крышку отсека батареи.
2. Замените батарею.
При установке батареи соблюдайте полярность.
3. Установите крышку отсека батареи на место и затяните три зажимных
винта.
Замените батарею.Открутите три зажимных винта.
Не удаляйте черное резиновое водозащитное кольцо внутри крышки
отсека батареи.
43
Page 49

Устранение неисправностей
При добавлении датчика T10 к Центру Умного дома не
В:
срабатывает сигнализация.
Одновременно прикоснитесь к установочному штифту и как минимум
О:
одному фиксированному штифту датчика T10 влажными руками или
любым токопроводящим предметом.
Расстояние между T10 и Центром Умного дома должно составлять
не более 50 см.
Не удается добавить T10 к Центру Умного дома путем
В:
сканирования QR-кода.
При использовании приложения EZVIZЕ для добавления T10 к
О:
Центру Умного дома убедитесь, что Центр Умного дома работает
должным образом.
В приложении EZVIZ датчик находится в состоянии «не в сети».
В:
Поднесите T10 к концентратору сигнализации (на расстояние не более
О:
50 см) и включите сигнализацию T10 вручную.
• Е
сли на подключенном концентраторе сработает сигнализация, значит
соединение исправно.Разместите T10 как можно ближе к Центроу Умного
дома , чтобы обеспечить отсутствие прерываний связи.
• Если результата нет, значит батарея разряжена.Замените батарею.
Для получения более подробной информации посетите www.ezviz.ru
44
Page 50

Kasutamine
T10 on mõeldud kasutamiseks koos Internet Alarm Hub-iga (näiteks A1). See tuleb osta eraldi.
Samm 1: T10 lisamine Internet Alarm Hub-i
• Valik 1 (soovitatud) Lisamine EZVIZi rakendusega
EZVIZi rakenduse paigaldamine
1. Ühendage enda mobiiltelefon WiFi võrguga.
2. Otsige poes App Store (iOS versioon) või Google PlayTM (Androidi versioon)
märksõna „EZVIZ“, laadige alla EZVIZi rakendus ja paigaldage see.
3. Käivitage rakendus ja registreerige EZVIZi kasutajakonto.
VÕI
T10 lisamine
1. Logige sisse EZVIZi rakendusse.
2. Leidke enda Internet Alarm Hub ja sisenege seotud seadmete loendisse.
3. Toksake T10 Internet Alarm Hubi ühendamiseks seotud seadme juures
asuvat „+“ märki ning skannige T10 QR-kood (asub T10 põhjal).
T10-l on vaikimisi integreeritud patarei. Patarei uuesti paigaldamine ei ole tarvilik.
45
Page 51

• Valik 2 Lisamine Internet Alarmi kasutades
Aktiveerige Internet Alarm Hubis valik „Detektorite lisamise režiim“. Täpsemat
teavet leiate Internet Alarm Hubi lühijuhendist.
Liigutage T10 Internet Alarm Hubile lähemale (mitte kaugemale kui 50 cm) ja
puudutage kätega üheaegselt reguleerimise kontakti ja vähemalt ühte fikseeritud
kontaktidest. T10 alarm kinnitab signaali saatmist.
Fikseeritud kontaktid
Mitte kaugemal
Internet Alarm Hub
Reguleerimise kontakt on kahest fikseeritud kontaktist erinev (vt altpoolt).
Internet Alarm Hubist kõlab T10 lisamist kinnitav heliteade seadme tüübi ja
seerianumbriga.
kui 50 cm
Reguleerimise kontakt
46
Reguleerimise
kontakt
ET
Page 52

Samm 2 Alarmi veetaseme seadistamine
Kasutage veetaseme alarmi meelepärasele tasemele seadistamiseks reguleerimise
kontakti. Reguleerimise kontakti kõrgust saate reguleerida käe või kruvikeerajaga.
Alarmi veetaseme kõrgus on võrdne kontakti ja maapinna vahelise
kõrgusega. Kui vesi jõuab määratud tasemeni, aktiveeritakse alarm.
Taset seab reguleerida vahemikus 0,4 mm kuni 3,2 mm. Vaikimisi
määratud tasemeks on 0,4 mm.
Valige paigaldamiseks koht, näiteks köök, rõdu või tualettruum.
• Paigaldage T10 võimaliku veelekke asukohta.
• Ärge paigaldage T10-t juba vee all olevasse kohta.
• Ärge paigaldage T10-t kohta, kus toimub palju liikumist. See võidakse minema lüüa.
• Ärge paigaldage T10-t kohta, mis on söövitav või kõrgelt magnetiline.
• Soovitame kasutada T10-t alla 200 m2 ruumis. Liiga suures ruumis võib T10 ja
Internet Alarm Hubi vaheline ühendus katkeda. Kui soovite T10-t kasutada
suuremas ruumis, ostke mitu Internet Alarm Hubi.
0,4 kuni 3,2 mm
Testige T10-t pärast koha valimist. Asetage T10 alarmi käivitamiseks vette,
T10 piiksub 15 sekundit. Kui ühendatud Internet Alarm Hub signaali vastu võtab ja
kõlab helisignaal, on ühendus ja paigaldamine lõpule viidud.
47
Page 53

Lisa
Välimus
Reguleerimise
kontakt
Patareipesa kaas
Fikseeritud
kontaktid
Kui vesi on katnud nii reguleerimise kontakti kui ka vähemalt ühe fikseeritud kontakti, annab
T10 sellest märku ja saadab signaali ka ühendatud Internet Alarm Hubi.
Funktsioon
Tänu vee elektrijuhtivusele suudab T10 veelekke tuvastada ja saata vastava märguande
ühendatud Internet Alarm Hubi.
48
ET
Page 54

Patarei vahetamine
Kasutatud CR123A-tüüpi patarei peab vastu kuni 24 kuud.
Patarei tühjenemisel saadab T10 ühendatud Internet Alarm Hubile signaali märguandega patarei
vahetamiseks.
1. Keerake kruvikeerajaga kolm T10 põhjal asuvat kinnituskruvi lahti ja eemaldage
patareipesa kaas.
2. Vahetage patarei.
Ärge asetage vastassuunaliselt patarei negatiivset ja positiivset poolust.
3. Asetage patareipesa kaas omale kohale tagasi ja kruvige kolm kruvi uuesti kinni.
Vahetage patarei.Keerake kolm kinnituskruvi lahti.
Ärge eemaldage patareipesa kaane siseküljel asuvat musta veekindlat kummi.
49
Page 55

Tõrkeotsing
Alarmi signaali ei aktiveerita pärast T10 lisamist Internet Alarm Hubi.
K:
Puudutage märgade käte või muu voolu juhtiva esemega üheaegselt reguleerimise
V:
kontakti ja vähemalt ühte fikseeritud kontaktidest.
Vahemaa T10 ja Internet Alarm Hubi vahel ei tohi olla suuremkui 50 cm.
T10 Internet Alarm Hubi lisamine ebaõnnestus QR-koodi skannides.
K:
Kui kasutate T10 Internet Alarm Hubi lisamiseks EZVIZi rakendust, veenduge Internet
V:
Alarm Hubi töökorras.
EZVIZi rakenduses on andur võrgust väljas.
K:
Liigutage T10 Internet Alarm Hubile lähemale (mitte kaugemale kui 50 cm) ja aktiveerige
V:
T10 alarm käsitsi.
• Kui ühendatud Internet Alarm Hub annab häiret, on ühendus tavapärane. Asetage T10 Internet
Alarm Hubile võimalikult lähedale ja veenduge, et ühendus on katkestusteta.
• Vastasel juhul on patarei tühi. Vahetage patarei.
Lisateavet leiate aadressilt www.ezvizlife.com.
50
ET
Page 56

Darbības
T10 ir jāizmanto kopā ar interneta signalizācijas centrāli (piemēram, A1). Tā ir
jāiegādājas atsevišķi.
1. solis. T10 pievienošana interneta signalizācijas centrālei
• 1. variants (ieteicamais) Pievienošana ar EZVIZ lietotni
EZVIZ lietotnes instalēšana
1. Pievienojiet jūsu viedtālruni Wi-Fi tīklam.
2. Lejupielādējiet un instalējiet EZVIZ lietotni, meklējot “EZVIZ”
pakalpojumā App Store (iOS versija) vai Google PlayTM (Android
versija).
3. Startējiet lietotni un reģistrējiet EZVIZ lietotāja kontu.
VAI
T10 pievienošana
1. Piesakieties lietotnē EZVIZ.
2. Atrodiet interneta signalizācijas centrāli un atveriet sarakstu
Pievienotās ierīces.
3. Nospiediet pogu “+” pievienoto ierīču sarakstā un noskenējiet
T10 QR kodu, kas atrodas T10 apakšdaļā, lai pievienotu
T10 interneta signalizācijas centrāleei.
51
Page 57

T10 pēc noklusējuma ir ievietota baterija. Jums nav nepieciešams atkārtoti
ievietot bateriju.
• 2. variants. Pievienošana, izmantojot interneta signalizāciju
Ieslēdziet Detektoru pievienošanas režīmu jūsu interneta signalizācijas
centrālē. Skatiet vairāk informācijas interneta signalizāciju centrāles ātrā
starta rokasgrāmatu.
Pietuviniet T10 interneta signalizācijas centrālei (ne vairāk kā 50 cm
attālumā) un vienlaicīgi pieskarieties regulēšanas tapai un vismaz vienai
fiksācijas tapai. T10 signāli norāda uz to, ka pievienošanas signāls ir
nosūtīts.
Interneta
signalizācijas
centrāle
Fiksācijas tapas Regulēšanas tapa
Ne vairāk kā
50 cm attālumā
52
LV
Page 58

Regulēšanas tapa atšķiras no divām fiksācijas tapām, kā redzams
attēlā tālāk.
Regulēšanas tapa
Interneta signalizācijas centrāle atskaņo balss uzvedni, kurā tiek
nosaukts ierīces veids un sērijas numurs, norādot, ka T10 ir pievienots.
2. solis. Ūdens līmeņa signalizācijas iestatīšana
Iestatiet regulēšanas tapas augstumu ar roku vai skrūvgriezi, lai iestatītu
vēlamo ūdens līmeni, pie kura ieslēdzas signalizācija.
Ūdens līmenis, pie kura ieslēdzas signalizācija, ir attālums no
zemes līdz tapai. Brīdī, kad ūdens sasniegs noteikto līmeni,
ieslēgsies signalizācija.
Līmeņa diapazons ir no 0,4 līdz 3,2 mm. Noklusējuma līmenis
ir 0,4 mm.
53
Page 59

0,4~3,2 mm
Izvēlieties uzstādīšanas vietu, piemēram, virtuvē, uz balkona vai vannas
istabā.
• Novietojiet T10 vietā, kur ir iespējama ūdens noplūde.
• Nenovietojiet T10 vietā, kas jau atrodas zem ūdens.
• Nenovietojiet T10 vietā, kur ikdienā bieži pārvietojas cilvēki, jo pastāv
risks, ka T10 tiks izkustināts ar kājām.
• Nenovietojiet T10 korozīvā vai augstas intensitātes magnētiskā vidē.
• Ieteicams izmantot T10 telpās ar platību zem 200 m2. Ja telpas ir
pārāk plašas, komunikācija starp T10 un interneta signalizācijas centrāli
var tikt traucēta. Ja vēlaties izmantot T10 lielākas platības telpās, jūs
varat iegādāties vairākas interneta signalizācijas centrāles.
Pēc vietas izvēles pārbaudiet T10: Ievietojiet T10 ūdenī, lai nostrādātu
signalizācija, pēc tam T10 pīkstēs aptuveni 15 sekundes. Ja pievienotā
interneta signalizācijas centrāle saņem trauksmes signālu un atskaņo
balss uzvedni, savienošana un instalēšana ir pabeigta.
54
LV
Page 60

Pielikums
Izskats
Regulēšanas tapa
Baterijas
nodalījuma
pārsegs
Fiksācijas tapas
Brīdī, kad regulēšanas tapa un vismaz viena fiksācijas tapa nonāk zem ūdens,
T10 signalizē un nosūta trauksmes signālu uz pievienoto interneta signalizācijas centrāli.
Funkcija
Izmantojot ūdens vadītspēju, T10 spēj noteikt ūdens noplūdi un nosūtīt trauksmes
signālu uz pievienoto interneta signalizācijas centrāli.
55
Page 61

Baterijas nomaiņa
Baterijas modelis ir CR123A, un tās darbmūžs ir līdz 24 mēnešiem.
Kad baterija izlādējas, T10 nosūta signālu par zemu baterijas līmeni uz pievienoto
interneta signalizācijas centrāli, lai atgādinātu jums par baterijas nomaiņu.
1. Ar skrūvgriezi atskrūvējiet trīs skrūves T10 apakšdaļā un noņemiet baterijas
nodalījuma pārsegu.
2. Nomainiet bateriju.
Ievietojiet bateriju atbilstoši negatīvā un pozitīvā pola norādēm.
3. Uzlieciet atpakaļ baterijas nodalījuma pārsegu un pieskrūvējiet skrūves.
LV
Atskrūvējiet trīs skrūves.
Nepārvietojiet melno gumijas gredzenu, kas atrodas baterijas nodalījuma
pārsega iekšpusē.
56
Nomainiet bateriju.
Page 62

Problēmu novēršana
Trauksmes signāls nenostrādā tad, kad mēģināt pievienot T10 interneta
J:
signalizācijas centrālei.
Ar slapjām rokām vai citiem priekšmetiem ar labu vadāmību vienlaicīgi
A:
pieskarieties T10 regulēšanas tapai un vismaz vienai fiksācijas tapai.
Attālums starp T10 un interneta signalizācijas centrāli nedrīkst pārsniegt 50 cm.
Nav iespējams pievienot T10 interneta signalizācijas centrālei, skenējot
J:
T10 QR kodu.
Ja izmantojat EZVIZ lietotni, lai pievienotu T10 interneta signalizācijas centrālei,
A:
pārliecinieties, ka interneta signalizācijas centrāle darbojas pareizi.
EZVIZ lietotnes detektors ir izslēgts.
J:
Pietuviniet T10 pie interneta signalizācijas centrāles (ne vairāk kā 50 cm
A:
attālumā) un manuāli iedarbiniet T10 signalizāciju.
•Ja pievienotā interneta signalizācijas centrāle reaģē, ir izveidots normāls
savienojums. Lūdzu, novietojiet T10 pēc iespējas tuvāk interneta
signalizācijas centrālei, lai nodrošinātu, ka savienojums netiek pārtraukts.
•Ja signalizācija neieslēdzas, baterija ir izlādējusies. Lūdzu, nomainiet bateriju.
Lai uzzinātu vairāk, lūdzam apmeklēt www.ezvizlife.com.
57
Page 63

Valdymas
T10 reikia naudoti kartu su internetinių pavojaus signalų centru (pvz., A1).
Jis parduodamas atskirai.
1 žingsnis. Kaip įtraukti T10 į internetinių pavojaus signalų
centrą
• 1 parinktis (rekomenduojama) Kaip įtraukti naudojant programėlę EZVIZ
Programėlės EZVIZ diegimas
1. Prijunkite savo mobilųjį telefoną prie „Wi-Fi“.
2. Atsisiųskite ir įdiekite programėlę EZVIZ, atlikdami paiešką
EZVIZ „App Store“ („iOS“ versija) arba „Google Play“
(„Android“ versija).
3. Paleiskite programėlę ir užregistruokite EZVIZ naudotojo paskyrą.
ARBA
Kaip įtraukti T10
1. Prisijunkite prie programėlės EZVIZ.
2. Raskite savo internetinių pavojaus signalų centrą ir atverkite
susietų įrenginių sąrašą.
3. Ties susietu įrenginiu palieskite „+“ ir nuskaitykite T10 įrenginio
QR kodą, kurį rasite T10 dugne. Taip susiesite T10 su internetinių
pavojaus signalų centru.
58
LT
TM
Page 64

T10 pagal numatytąją parinktį turi maitinimo elementą. Maitinimo elemento
papildomai įdėti nereikia.
• 2 parinktis. Įtraukimas internetiniu pavojaus signalu
Savo internetinių pavojaus signalų centre įjunkite „Detektorių įtraukimo
režimą“. Žr. savo internetinių pavojaus signalų centro sparčiosios
paleisties vadovą, kur rasite išsamios informacijos.
Prineškite T10 prie internetinių pavojaus signalų centro (iki 50 cm
atstumu) ir rankomis palieskite reguliavimo kontaktą bei bent vieną
fiksuotąjį kontaktą. Išsiunčiamas T10 pavojaus signalas, nurodantis
įtraukti įrenginį.
Fiksuotieji kontaktai
Iki 50 cm atstumu
Internetinių pavojaus
signalų centras
59
Reguliavimo
kontaktas
Page 65

Reguliavimo kontaktas atrodo kitaip nei kiti du fiksuotieji
kontaktai, kaip parodyta toliau.
Reguliavimo kontaktas
Internetinių pavojaus signalų centras ištransliuoja įrenginio tipo ir
serijos numerio balso patvirtinimą, nurodydamas, kad T10 įtrauktas.
2 žingsnis. Kaip nustatyti pavojaus signalo vandens lygį
Ranka arba atsuktuvu nustatykite reguliavimo kontakto aukštį, kad
parinktumėte pageidaujamą pavojaus signalo vandens lygį.
Pavojaus signalo vandens lygis – tai atstumas nuo kontakto
iki žemės. Vandeniui pasiekus šį lygį, sužadinamas pavojaus
signalas.
Lygį galima nustatyti intervale nuo 0,4 mm iki 3,2 mm.
Numatytasis lygis yra 0,4 mm.
60
LT
Page 66

0,4–3,2 mm
Pasirinkite įrengimo vietą, pvz., virtuvę, balkoną ar vonios kambarį.
• Padėkite T10 ten, kur gali nutekėti vandens.
• Nedėkite T10 ten, kur vandens jau yra.
• Nedėkite T10 ten, kur daug vaikštoma, nes kas nors gali įrenginį
nuspirti.
• Nedėkite T10 korozinėje aplinkoje arba vietoje, kur veikia intensyvūs
magnetiniai laukai.
• Rekomenduojama naudoti T10 mažesnio nei 200 m2 ploto patalpoje.
Jei patalpa bus per didelė, ryšys tarp T10 ir internetinių pavojaus
signalų centro gali nutrūkti. Jei norite T10 naudoti didesnėje patalpoje,
galite įsigyti kelis internetinių pavojaus signalų centrus.
Pasirinkę vietą, išbandykite T10: įdėkite T10 į vandenį, kad
sužadintumėte pavojaus signalą: T10 15 sekundžių pypsės. Jei
prijungtas internetinių pavojaus signalų centras priima pavojaus signalą
ir ištransliuoja pavojaus signalo balso patvirtinimą, vadinasi, ryšys veikia
tinkamai ir įranga sumontuota.
61
Page 67

Priedas
Išvaizda
Reguliavimo
kontaktas
Maitinimo
elemento dangtelis
Fiksuotieji
kontaktai
Kai vanduo pasiekia reguliavimo kontaktą ir bent vieną iš fiksuotųjų kontaktų, T10
duoda garsinį pavojaus signalą ir išsiunčia pavojaus signalą į prijungtą internetinių
pavojaus signalų centrą.
Funkcija
Naudodamasis vandens laidumo savybe, T10 gali aptikti vandens nuotėkį ir išsiųsti
pavojaus signalą į prijungtą internetinių pavojaus signalų centrą.
62
LT
Page 68

Maitinimo elemento keitimas
Įrenginyje naudojamas CR123A tipo maitinimo elementas, kuris gali veikti iki
24 mėnesių.
Išsekus maitinimo elementui, T10 į prijungtą internetinių pavojaus signalų centrą
išsiunčia senkančio maitinimo elemento signalą, kad primintų jums, jog reikia pakeisti
maitinimo elementą.
1. Atsuktuvu atsukite tris fiksavimo sraigtus, esančius T10 dugne, ir nuimkite
maitinimo elemento dangtelį.
2. Pakeiskite maitinimo elementą.
Nesumaišykite maitinimo elemento teigiamo ir neigiamo polių.
3. Sumontuokite maitinimo elemento dangtelį ir prisukite tris fiksavimo sraigtus
atgal.
Pakeiskite maitinimo elementą.Atlaisvinkite tris fiksavimo sraigtus.
Nejudinkite po maitinimo elemento dangteliu esančio juodo sandarinimo žiedo.
63
Page 69

Trikčių šalinimas
Mėginant įtraukti T10 į internetinių pavojaus signalų centrą, nepavyksta
Kl.
sužadinti pavojaus signalo.
Šlapiomis rankomis ar kitu laidžiu daiktu vienu metu palieskite T10
A.
reguliavimo kontaktą ir bent vieną fiksuotąjį kontaktą.
Atstumas tarp T10 ir internetinių pavojaus signalų centro turi būti iki 50 cm.
Nepavyksta įtraukti T10 į internetinių pavojaus signalų centrą
Kl.
nuskaitant jo QR kodą.
Naudodami programėlę EZVIZ, įtraukite T10 į internetinių pavojaus signalų
A.
centrą. Įsitikinkite, kad jūsų internetinių pavojaus signalų centras veikia tinkamai.
Programėlėje EZVIZ, rodoma, kad detektorius neprijungtas.
Kl.
Prineškite T10 arčiau prie internetinių pavojaus signalų centro (iki 50 cm
A.
atstumu) ir rankiniu būdu sužadinkite T10 pavojaus signalą.
•Jei prijungtas internetinių pavojaus signalų centras praneša apie pavojaus
signalą, vadinasi, ryšys veikia. Padėkite T10 kaip įmanoma arčiau
internetinių pavojaus signalų centro, kad ryšys nebūtų pertrauktas.
•Galbūt išseko maitinimo elementas. Pakeiskite maitinimo elementą.
Papildomos informacijos rasite www.ezvizlife.com.
64
LT
Page 70

Specifications
Battery Model CR123A
Battery Voltage 3V
Battery Life 24 Months
Ingress Protection Rating IP 67
Communication Range Within 200m
Detection Target Water Leak
Working Temperature -10°C to 55°C (14°F to 131°F)
Working Humidity 0% to 100%RH
Weight (With Battery) 97g
Dimension (Diameter*Height)
2
φ
103.4mm*31.4mm (φ4.1"*1.2")
65
Page 71

Thank you for purchasing EZVIZ products. This limited warranty gives you, the original purchaser of the EZVIZ product,
specific legal rights. You may also have other legal rights that vary by state, province or jurisdiction. The disclaimers,
exclusions, and limitations of liability under this limited warranty will not apply to the extent prohibited by applicable law.
No distributor, reseller, agent, or employee is authorized to make any medication, extension, or addition to this limited
warranty.
Your EZVIZ product is warranted for a period of one (1) year from the date of purchase against defects in materials and
workmanship, or such longer period as may be required by law in the country or state where this product is sold, when used
normally in accordance with user manual.
You can request warranty service by emailing us at support@ezvizlife.com .
For any defective EZVIZ products under warranty, HANGZHOU HIKVISION DIGITAL TECHNOLOGY CO., LTD. (“the Company”)
will, at its option, (i) repair or replace your product free of charge; (ii) exchange your product with a functional equivalent
product; (iii) or refund the original purchase price, provided you provide the original purchase receipt or copy, brief
explanation of the defect, and return the product in its original packaging. At the sole discretion of the Company, repair or
replacement may be made with a new or refurbished product or components. This warranty does not cover the postal cost,
insurance and any other incidental charges incurred by you in returning the product.
Except where prohibited by applicable law, this is your sole and exclusive remedy for breach of this limited warranty. Any
product that has either been repaired or replaced under this limited warranty will be covered by the terms of this limited
warranty for the longer of ninety (90) days from the date of delivery or the remaining original warranty period.
This warranty does not apply and is void:
• If the warranty claim is made outside the warranty period or if the proof of purchase is not provided.
• For any malfunction, defect or failure caused by or resulting from the evidence of impact, mishandling ,tampering, use
contrary to the applicable instruction manual, incorrect power line voltage, accident, loss, theft, fire, flood or other Acts
of God, shipping damage or damage resulting from repairs performed by unauthorized personnel.
• For any consumable parts, such as batteries, where the malfunction is due to the normal aging of the product.
• Cosmetic damage, including but not limited to scratches, dents and broken plastic on ports.
• Any software, even if packaged or sold with EZVIZ hardware.
• For any other damages free from defects in material or workmanship.
• Routine cleaning, normal cosmetic and mechanical wear and tear.
Please do not hesitate to contact your seller, or send e-mails to us support@ezvizlife.com, with any questions.
COPYRIGHT ©2016 HANGZHOU HIKVISION DIGITAL TECHNOLOGY CO., LTD. ALL RIGHTS RESERVED.
LIMITED WARRANTY
Page 72

Vielen Dank für den Kauf eines EZVIZ-Produkts. Diese beschränkte Garantie gibt Ihnen, dem Erstkäufer des EZVIZ-Produkts,
bestimmte gesetzliche Rechte. Je nach Staat, Provinz oder Land können Ihnen weitere gesetzliche Rechte zustehen. Die
Haftungsausschlüsse und -beschränkungen gemäß dieser beschränkten Garantie gelten ausschließlich im gesetzlich zulässigen
Umfang. Kein Händler, Wiederverkäufer, Vertreter oder Mitarbeiter ist befugt, Modifikationen, Erweiterungen oder Ergänzungen an
dieser beschränkten Garantie vorzunehmen.
Ihr EZVIZ-Produkt hat eine Garantie auf Material- und Herstellungsfehler, die ab dem Kaufdatum für ein (1) Jahr oder so
lange gilt, wie dies in dem Staat oder Land, in dem dieses Produkt gekauft wurde, gesetzlich vorgeschrieben ist, sofern es in
Übereinstimmung mit der Bedienungsanleitung normal benutzt wird.
Garantieansprüche richten Sie bitte per E-Mail an support@ezvizlife.com .
Im Fall eines defekten EZVIZ-Produkts mit gültiger Garantie wird HANGZHOU HIKVISION DIGITAL TECHNOLOGY CO., LTD.
("das Unternehmen") nach eigenem Ermessen (i) Ihr Produkt kostenlos reparieren oder ersetzen, (ii) Ihr Produkt gegen ein
funktionsfähiges vergleichbares Produkt austauschen oder (iii) den ursprünglichen Kaufpreis unter der Voraussetzung erstatten,
dass Sie das Produkt in dessen Originalverpackung unter Beigabe des Originalkaufbelegs oder einer Kopie davon sowie einer
kurzen Beschreibung des Defekts zurückschicken. Das Unternehmen wird nach alleinigem Ermessen Produkte oder Komponenten
entweder reparieren oder gegen neue oder generalüberholte Produkte oder Komponenten austauschen. Diese Garantie deckt
keine Versand-, Versicherungs- oder sonstige Nebenkosten, die Ihnen durch die Rücksendung des Produkts entstehen.
Soweit nicht durch geltendes Recht untersagt, ist dies Ihr einziges und ausschließliches Rechtsmittel im Fall einer Verletzung
dieser beschränkten Garantie. Jedes Produkt, das im Rahmen dieser beschränkten Garantie entweder repariert oder ausgetauscht
wurde, wird für maximal neunzig (90) Tage ab Lieferdatum oder für die Restlaufzeit der ursprünglichen Garantie von den
Bestimmungen dieser beschränkten Garantie abgedeckt.
Diese Garantie gilt nicht und ist hinfällig:
• wenn der Garantieanspruch außerhalb der Garantiefrist oder ohne Vorlage des Kaufbelegs geltend gemacht wird.
• bei Fehlfunktionen, Defekten oder Fehlern, die durch Stoßeinwirkung, Fehlbedienung, Sabotage, Benutzung im Widerspruch
zur entsprechenden Bedienungsanleitung, falsche Spannungsversorgung, Unfall, Verlust, Diebstahl, Brand, Überschwemmung
oder andere Naturkatastrophen, Versandschäden oder Beschädigungen infolge von Reparaturen durch unbefugte Personen
verursacht wurden oder darauf zurückzuführen sind.
• für Verbrauchsgüter wie Batterien, bei denen die Fehlfunktion auf normale Produktalterung zurückzuführen ist.
• kosmetische Schäden, einschließlich, aber nicht begrenzt auf Kratzer, Beulen und gebrochene Kunststoffteile an Anschlüssen.
• für jede Software, auch wenn diese zusammen mit der EZVIZ-Hardware verpackt und verkauft wurde.
• für sonstige Schäden, die keine Material- oder Verarbeitungsfehler sind.
• für routinemäßige Reinigungen sowie normalen kosmetischen und mechanischen Verschleiß.
Bei Fragen können Sie sich jederzeit an Ihren Verkäufer oder per E-Mail an support@ezvizlife.com an uns wenden.
COPYRIGHT ©2016 HANGZHOU HIKVISION DIGITAL TECHNOLOGY CO., LTD. ALLE RECHTE VORBEHALTEN.
BESCHRÄNKTE GARANTIE
Page 73

Gracias por adquirir productos EZVIZ. Esta garantía limitada le concede a usted, el comprador original del producto EZVIZ, derechos
legales específicos. Es posible que tenga otros derechos legales en función de su estado, provincia o jurisdicción. Los avisos de
exención de responsabilidad, las exclusiones y las limitaciones de responsabilidad de esta garantía limitada no se aplicarán hasta
el máximo prohibido por la legislación aplicable. Ningún distribuidor, revendedor, representante o empleado tiene autorización para
introducir alteraciones, ampliaciones o incorporaciones en virtud de esta garantía limitada.
Su producto de EZVIZ está cubierto por la garantía por un período de un (1) año desde la fecha de compra frente a defectos de
materiales y mano de obra, o en el plazo más largo que requiera la ley en el país o estado donde se venda este producto, cuando se
usa normalmente de acuerdo con el manual de usuario.
Puede solicitar el servicio de garantía por correo electrónico en support@ezvizlife.com .
Para cualquier producto de EZVIZ defectuoso en garantía, HANGZHOU HIKVISION DIGITAL TECHNOLOGY CO., LTD. ("la Empresa"), a su
discreción, (I) reparará o sustituirá el producto de forma gratuita; (II) cambiará su producto por un producto equivalente funcional;
(III) o reembolsará el precio de compra original, siempre y cuando proporcione el recibo de compra original o una copia, una breve
descripción del defecto y devuelva el producto en su embalaje original. A la entera discreción de la Empresa, la reparación o la
sustitución pueden realizarse por un producto o componentes nuevos o reacondicionados. Esta garantía no cubre el coste postal de
transporte, el seguro ni ningún otro coste incidental en el que incurra durante la devolución del producto.
Excepto si lo prohíbe la legislación vigente, esta es la solución única y exclusiva en caso de incumplimiento de esta garantía
limitada. Cualquier producto que se haya reparado o sustituido en virtud de esta garantía limitada estará cubierto por los términos
de la misma durante el periodo máximo de noventa (90) días a partir de la fecha de entrega o el período de garantía original
restante.
Esta garantía no se aplica y se considerará nula:
• Si la reclamación de garantía se realiza fuera del periodo de garantía o si no se proporciona la prueba de compra.
• En caso de funcionamiento incorrecto, defecto o avería causados por o como resultado de las pruebas de impacto, impericia, manipulación,
uso contrario al manual de instrucciones aplicable, voltaje incorrecto de la línea eléctrica, accidente, pérdida, robo, incendio, inundación u
otros actos de fuerza mayor, daños en el envío o daños ocasionados por reparaciones realizadas por personal no autorizado.
• En el caso de las piezas consumibles, como las baterías, si el funcionamiento incorrecto se debe al desgaste normal del producto.
• Daños cosméticos, incluidos, pero sin limitarse a, arañazos, abolladuras y plástico roto en puertos.
• Cualquier softw are, incluso si se ha incluido y vendido con el hardware de EZVIZ.
• En caso de otros daños libres de defectos en el material o la mano de obra.
• La limpieza rutinaria, cambios cosméticos y el desgaste mecánico natural.
Si tiene alguna pregunta, no dude en ponerse en contacto con su representante comercial, o bien envíenos un mensaje a support@
ezvizlife.com con la pregunta que desee.
COPYRIGHT ©2016 HANGZHOU HIKVISION DIGITAL TECHNOLOGY CO., LTD. RESERVADOS TODOS LOS DERECHOS.
GARANTÍA LIMITADA
Page 74

Merci d'avoir acheté nos produits EZVIZ. En tant qu'acheteur original de produit EZVIZ, cette garantie limitée vous accorde certains
GARANTIE LIMITÉE
droits. Selon le pays, la région ou la juridiction où vous résidez, il est possible que vous bénéficiiez d'autres droits. Les dénis de
responsabilités, exclusions et limitations de responsabilité civile stipulés dans cette garantie limitée s'appliquent uniquement dans
les limites prévues par la loi. Aucun distributeur, revendeur, agent ou employé n'est autorisé à apporter de modification, d'extension
ou d'ajout à cette garantie.
Votre produit EZVIZ est garanti pendant une période de un (1) an à compter de la date d'achat pour tout défaut de pièces et de main
d'œuvre, ou pour une durée supérieure si la législation en vigueur dans le pays ou l'état où ce produit est vendu l'exige, dès lors qu'il
est utilisé conformément aux instructions du manuel de l'utilisateur.
Pour faire valoir la garantie, écrivez-nous à l'adresse suivante: support@ezvizlife.com .
Si un défaut est signalé sur un produit EZVIZ pendant la période de garantie, Hangzhou Hikvision Digital Technology Co., Ltd. (« la
Société ») pourra, à sa discrétion, (i) réparer ou remplacer votre produit gratuitement ; (ii) remplacer votre produit par un produit
équivalent en état de marche ; (iii) rembourser le prix d'achat. Vous devrez toutefois présenter la preuve d'achat et une brève
explication du défaut constaté, et renvoyer le produit dans son emballage d'origine. La Société pourra réparer ou remplacer le
produit ou les composants par un produit ou des composants neufs ou remis en état. Cette garantie ne couvre pas les frais de port,
l'assurance ni les éventuels frais annexes de renvoi du produit.
Sauf si la législation en vigueur l'interdit, cette garantie est votre seul et unique recours. Tout produit réparé ou remplacé en vertu
de la présente garantie limitée sera couvert pendant une durée de quatre-vingt-dix (90) jours à compter de la date de livraison ou
jusqu'à l'échéance de la période garantie originale.
Cette garantie ne s'applique pas et est considérée comme nulle dans les cas suivants :
• si l'utilisateur se prévaut de la garantie hors de la période de couverture ou s'il ne fournit pas de preuve d'achat ;
• en cas de dysfonctionnement, de défaut ou de panne due ou induite par un choc, une mauvaise manipulation, un sabotage, une
utilisation non conforme aux instructions du manuel, une tension d'alimentation incorrecte, un accident, une perte, un vol, un
incendie, une inondation ou toute autre catastrophe naturelle, un préjudice subi pendant le transport ou résultant de réparations
par un personnel non agréé ;
• consommables, tels que les batteries, où le dysfonctionnement est dû au vieillissement normal du produit ;
• dommages superficiels tels que, entre autres, les rayures, les bosses ou les pièces en plastique cassées ;
• logiciels, même fournis ou vendus avec le matériel EZVIZ ;
• préjudices autres que les défauts de pièces ou de main d'œuvre ;
• nettoyage de routine, vieillissement de l'aspect extérieur et usure mécanique normale.
Pour toute question, n'hésitez pas à contacter votre revendeur ou à nous écrire à l'adresse suivante: support@ezvizlife.com.
COPYRIGHT ©2016 HANGZHOU HIKVISION DIGITAL TECHNOLOGY CO., LTD. TOUS DROITS RÉSERVÉS.
Page 75

Grazie per aver acquistato i prodotti EZVIZ. La presente garanzia limitata accorda all'acquirente originale del prodotto EZVIZ,
specifici diritti legali. L'acquirente originale potrebbe godere anche altri diritti legali che variano da stato, provincia o giurisdizione.
Le declinazioni di responsabilità, le esclusioni e le limitazioni di responsabilità ai sensi della presente garanzia limitata non si
applicano ove espressamente vietate dalla legge applicabile. Nessun distributore, rivenditore, agente o dipendente è autorizzato a
fornire rimedi, estensioni o aggiunte alla presente garanzia limitata.
Il prodotto EZVIZ è garantito per un periodo di un (1) anno dalla data di acquisto contro difetti nei materiali e nella lavorazione, o
un periodo più lungo, ove richiesto dalla legge del paese o dello stato in cui il prodotto è stato venduto, se utilizzato normalmente,
in conformità con il manuale utente.
Il servizio di assistenza in garanzia può essere richiesto via email, all'indirizzo support@ezvizlife.com .
Per eventuali prodotti EZVIZ difettosi in garanzia,HANGZHOU HIKVISION DIGITAL TECHNOLOGY CO., Ltd. ("la Società"), avrà
facoltà a sua discrezione di, (i) riparare o sostituire il prodotto a titolo gratuito; (ii) sostituire il vostro prodotto con un prodotto
funzionalmente equivalente; (iii) o rimborsare il prezzo di acquisto originale, a fronte dell'esibizione della ricevuta di acquisto
originale o in copia, una breve spiegazione del difetto e il reso del prodotto nella sua confezione originale. A esclusiva discrezione
della Società, la riparazione o la sostituzione può avvenire con un prodotto o con dei componenti nuovi o ricondizionati. Questa
garanzia non copre spese postali, assicurazione ed eventuali altre spese accessorie sostenute dall'acquirente per la restituzione
del prodotto.
Salvo laddove proibito dalla legge applicabile, ciò costituisce l'unico ed esclusivo rimedio per la violazione della presente garanzia
limitata. Qualsiasi prodotto riparato o sostituito ai sensi della presente garanzia limitata sarà coperto dai termini della presente
garanzia limitata per il periodo di maggiore durata tra novanta (90) giorni dalla data di consegna o il periodo di garanzia originale
residuo.
Questa garanzia non si applica e risulterà nulla:
• Se la richiesta di applicazione della garanzia per viene al di fuori del periodo di garanzia o se la prova di acquisto non viene fornita.
• Per qualsiasi malfunzionamento, difetto o guasto causato da, o confermato da prove di evidenza di, avvenuto impatto, uso improprio,
manomissione, uso contrario alle istruzioni del relativo manuale, tensione di alimentazione errata, incidente, smarrimento, furto,
incendio, inondazione o altre cause di forza maggiore, danni di spedizione o danni causati da riparazioni eseguite da personale non
autorizzato.
• Per eventuali componenti consumabili, quali batterie, do ve il mal funzionamento è dovuto al normale invecchiamento del prodotto.
• Danni estetici, inclusi ma non limitati a graff i, ammaccature e rotture delle plastiche delle porte.
• Qualsiasi softw are, anche se confezionato o venduto con hardware EZVIZ.
• Per eventuali altri danni esenti da difetti nei materiali o nella lavorazione.
• Pulizia ordinaria e il normale deterioramento estetico e meccanico.
Non esitate a contattare il venditore, o a inviarci un e-mail a support@ezvizlife.com, per qualsiasi domanda.
COPYRIGHT ©2016 HANGZHOU HIKVISION DIGITAL TECHNOLOGY CO., LTD. TUTTI I DIRITTI RISERVATI.
GARANZIA LIMITATA
Page 76

Obrigado por comprar produtos EZVIZ. Na qualidade de comprador original do produto EZVIZ, esta garantia limitada confere-lhe
direitos legais específicos. Poderá ter ainda outros direitos legais que variam consoante o estado, a província ou a jurisdição. As
renúncias, exclusões e limitações de responsabilidade expressas nesta garantia limitada não se aplicarão na medida em que tal
seja proibido pela legislação aplicável. Nenhum distribuidor, revendedor, agente ou funcionário está autorizado a realizar qualquer
modificação, extensão ou adição à presente garantia limitada.
O seu produto EZVIZ tem um (1) ano de garantia, a contar da data de compra, contra defeitos de materiais e mão-de-obra, ou
tem um período maior, se tal for exigido pela legislação do país ou estado onde este produto é vendido, desde que utilizado
normalmente de acordo com o Manual do utilizador.
Pode pedir uma assistência coberta pela garantia enviando-nos um e-mail para support@ezvizlife.com .
Para produtos EZVIZ com defeito cobertos pela garantia, a HANGZHOU HIKVISION DIGITAL TECHNOLOGY CO., LTD. ("a Empresa"), por
opção sua, (i) reparará ou substituirá o seu produto gratuitamente; (ii) trocará o seu produto por um produto equivalente funcional;
(iii) ou reembolsará o preço de compra original, desde que forneça o recibo de compra original ou a respetiva cópia, uma breve
explicação do defeito e desde que devolva o produto na sua embalagem original. A reparação ou substituição poderá ser feita
com um produto ou componentes novo(s) ou renovado(s), ficando esta decisão ao critério da Empresa. Esta garantia não cobre as
despesas postais, o seguro e quaisquer outros encargos acessórios incorridos por si ao devolver o produto.
Salvo nos casos em que é proibido pela legislação aplicável, este é o seu único e exclusivo recurso por incumprimento desta
garantia limitada. Qualquer produto que seja reparado ou substituído nos termos desta garantia limitada estará coberto pelos
termos da mesma por um período máximo de noventa (90) dias a partir da data de entrega ou pelo período da garantia original
restante.
A presente garantia não se aplica e será nula:
• Se a reclamação da garantia for feita fora do período da garantia ou se não for fornecida prova de compra.
• No caso de mau funcionamento, defeito ou falha causada(o) ou resultante de provas de impacto, utilização incorreta,
adulteração do produto, utilização contrária ao manual de instruções aplicável, tensão errada da linha de alimentação,
acidente, perda, roubo, incêndio, inundação ou outras catástrofes naturais, danos de transporte ou danos resultantes de
reparações executadas por pessoal não autorizado.
• No caso de consumíveis como, por exemplo, baterias, em que o mau funcionamento se deva ao envelhecimento normal do
produto.
• No caso de danos de cosmética, incluindo, embora sem caráter limitativo, riscos, mossas e plástico partido nas portas.
• Relativamente a qualquer software, mesmo tendo sido embalado ou vendido com hardware EZVIZ.
• No caso de quaisquer outros danos isentos de defeitos de material ou de mão-de-obra.
• Limpeza de rotina, cosmética normal e desgaste mecânico.
Não hesite em contactar o seu revendedor ou enviar-nos um e-mail para support@ezvizlife.com, em caso de dúvidas.
COPYRIGHT ©2016 HANGZHOU HIKVISION DIGITAL TECHNOLOGY CO., LTD. TODOS OS DIREITOS RESERVADOS.
GARANTIA LIMITADA
Page 77

Благодарим Вас за покупку продукции EZVIZ. Эта ограниченная гарантия дает Вам как покупателю продукта EZVIZ
определенные юридические права. Вы также можете иметь другие юридические права, которые определяются
законами государства, провинции или юрисдикцией. Исключения и ограничения ответственности в соответствии с
данной ограниченной гарантией не действительны в случае, если они противоречат действующему законодательству.
Ни дистрибьютор, ни дилер, ни агент или сотрудник не имеет права вносить какие-либо изменения или дополнения к
данной ограниченной гарантии.
На Ваш продукт EZVIZ дается гарантия сроком на один(1) год с момента покупки на дефекты материалов и
изготовления, или на более длительный период, в соответствии с законом государства, где продается этот товар, при
условии правильного использования в соответствии с руководством пользователя.
Вы можете запросить гарантийное обслуживание, обратившись по электронной почте support@ezvizlife.com.
В случае неисправности продуктов EZVIZ по гарантии, HIKVISION DIGITAL TECHNOLOGY CO., LTD. Ханчжоу ("Компания")
произведет, по своему выбору, (I) ремонт или замену изделия бесплатно; (II) обмен продукта на функционально
эквивалентный; (III) возврат первоначальной стоимости, при условии, что Вы предоставите оригинал или копию
квитанции о покупке, краткое объяснение дефекта, а также вернете товар в оригинальной упаковке. На усмотрение
Компании, может производиться ремонт или замена нового или отремонтированного продукта или его компонентов.
Данная гарантия не распространяется на почтовые расходы, страховку и любые другие непредвиденные расходы,
понесенные Вами в связи с возвратом продукта.
За исключением случаев, запрещенных действующим законодательством, этот документ является Вашим
единственным и исключительным средством судебной защиты, в случае нарушения Ваших прав, закрепленных в
ограниченной гарантии. К любому продукту, который уже был отремонтирован или заменен по данной ограниченной
гарантии, применимы условия документа в течение девяноста (90) дней с момента поставки или оставшегося
первоначального гарантийного срока.
Данная гарантия не применяется и является недействительной:
• В случае подачи заявки на гарантийный ремонт по истечении гарантийного срока или отсутствия доказательства
факта покупки.
• В случае неисправностей, дефектов, вызванных неправильным использованием, нарушением инструкций
по эксплуатации, при неправильном напряжении сети, аварии, утере, краже, пожаре, наводнении или иных
стихийных бедствиях, повреждении груза или ущербе, нанесенными в результате ремонта, выполненного не
уполномоченными лицами.
• Для любых расходных частей, таких как батареи, когда неисправность происходит из-за естественного старения
продукта.
• При косметических повреждениях, в том числе, но не только, при царапинах, вмятинах и сломанном пластике на
портах.
• Для любого программного обеспечения, даже если оно было упаковано или продано вместе с оборудованием
EZVIZ.
• Для любых других повреждений, дефектов материала или изготовления.
• Для планового косметического и механического износа.
Чтобы задать вопрос продавцу или отправить нам письмо, пожалуйста, обращайтесь по данному адресу: support@
ezvizlife.com
COPYRIGHT ©2016 HANGZHOU HIKVISION DIGITAL TECHNOLOGY CO., LTD. ALL RIGHTS RESERVED.
ОГРАНИЧЕННАЯ ГАРАНТИЯ
Page 78

Täname teid, et olete ostnud EZVIZ seadmeid. Piiratud tootjagarantii annab Teile, EZVIZ seadme esmasele
ostjale, teatud õigused. Teile võivad kohanduda ka muud seaduslikud õigused, mis erinevad vastavalt riigile
kus seade müüdud on. Garantiist keeldumine, erandid ja piiratud vastutus selle piiratud tootjagarantii
raames rakendub vastavalt kehtivale seadusetele. Ühelgi edasimüüjal, esindajal ega töötajal ei ole õigus teha
parandusi, laiendusi või lisandeid antud piiratud tootjagarantiile, vastasel juhul garantii ei kehti.
Teie EZVIZ tootele kehtib garantii materjalide ja valmistamise vigade suhtes üks (1) aasta alates toote ostmise
kuupäevast, või pikem periood vastavalt riigi seadustele kus seade on müüdud, kui seadet on kasutatud
vastavalt kasutusjuhendile.
Te võite nõuda garantii teenust saates meile e-maili: support@ezvizlife.ee .
Kehtiva garantiiga defektne EZVIZ seade, HANGZHOU HIKVISION DIGITAL TECHNOLOGY CO., LTD. (“Tootja”)
valikul kas, (I) parandatakse või asendatakse lisatasu küsimata; (II) vahetatakse teie toode samasuguse või
võrdväärse toote vastu; (III) või hüvitatakse toote ostuhind, juhul kui te esitate ostuarve või selle koopia,
lühikese vea kirjelduse ja tagastate toote orginaalpakendis.
Tootja valikul sooritatakse parandamine või asendamine uute või parandatud varuosadega või seadmetega.
Garantii raames ei hüvitata postikulu, kindlustust ja muid kulusid mis on teile toote saatmisel tekkinud.
Välja arvatud juhul kui see pole seadustega teisiti sätestatud on see teie ainus võimalus garantiiremondiks.
Kõigile toodetele, mis on parandatud või asendatud piiratud tootjagarantii raames, laienevad piiratud
garantii tingimused üheksakümmend(90) päeva alates kohale toimetamisest või järele jäänud esialgne
garantii periood vastavalt sellele, kumb on pikem periood.
See garantii ei kehti:
• Kui garantii nõue on esitatud peale garantii lõppemist või puudub ostutõend.
• Ühelegi talitlushäirele, defektile või rikkele mis on põhjustatud või tuleneb kukkumisest, väärkäsitlusest,
kasutamisest vastupidiselt kasutusjuhendis soovitatule, valest toitepingest, õnnetusest, kadumisest,
vargusest, tulekahjust, üleujutusest või muu vääramatu jõu poolt tekitatud kahju, transpordi käigus
tekkinud kahjustused või kui toodet on remontinud selleks tootja poolt volitamata isik.
• Erinevatele kulumaterjalidele, nagu akud, mille puhul rikete esinemine on eeldatav toote vananemisel.
• Väliselt nähtavatele kahjustustele (kaasa arvatud, kuid mitte ainult kriimustused, mõlgid ja murdunud
osad).
• Igasuguselee tarkvarale, isegi kui see on pakendatud või müüdud koos EZVIZ seadmega.
• Muudele kahjustustele peale materjalide ja tootmis vigade.
• Puhastamise käigus tekkinud kosmeetilisele ja mehaanilisele kulumine.
Küsimuste puhul võtke ühendust oma edasimüüjaga või meiega e-maili aadressil support@ezvizlife.ee .
COPYRIGHT ©2016 HANGZHOU HIKVISION DIGITAL TECHNOLOGY CO., LTD. ALL RIGHTS RESERVED.
PIIRATUD TOOTJAGARANTII
Page 79

Paldies, ka iegādājāties EZVIZ produktu. Šī garantija piešķir Jums noteiktas tiesības. Jums var būt arī
citas tiesības atkārībā no valsts, pilsētas vai jurisdikcijas. Atrunas, izslēgšana un atbildības ierobežojumi
saskaņā ar garantijas noteikumiem, ir aizliegti saskaņā ar piemērojamiem tiesību aktiem. Izplatītājiem,
tālākpārdevējiem un aģentiem nav tiesību jebkādā veidā grozīt šos garantijas noteikumus.
Jūsu EZVIZ produktam ir vienu (1) gadu ilga garantija kopš pirkuma datuma, kura attiecas uz ražošanas
defektiem un nekvalitatīvu ražošanas materiālu izmantošanu. Jūsu garantijai var būt arī ilgāks laika
periods, ja tas ir noteikts likumos valstī, kurā Jūs pirkāt doto produktu, ar nosacījumu, ka produkts tika
izmantots saskaņā ar lietotāja instrukciju.
Jūs varat pieprasīt garantijas servisu, sazinoties ar mums support@ezvizlife.com.
Ja tiek konstatēts EZVIZ produkta defekts garantijas ietvaros, HANGZHOU HIKVISION DIGITAL
TECHNOLOGY CO., LTD. (“Kompānija”) pēc izvēles, (i) veiks bezmaksas remontu vai apmainīs pret jaunu
produktu; (ii) apmainīs produktu uz ekvivalentu; (iii) vai atgriezīs pirkuma summu, ja tiks saņemts
originals pirkumu apliecinošs dokuments vai tā kopija, defekta apraksts un produkts tiks saņemts
oriģinālajā iepakojumā. Pēc kompanijas ieskatiem, var būt veikts remonts vai detāļu maiņa. Garantija
nesedz pasta izmaksas, apdrošināšanu vai jebkuras citas izmaksas, kas var rasties, atgriežot produktu.
Izņemot gadījumus, kad tas ir aizliegts ar piemērojamiem tiesību aktiem, šis ir Jūsu vienīgais garantijas
dokuments. Jebkuram produktam, kurš tika salabots vai aizvietots ar citu, šīs garantijas ietvaros,
garantijas tērmiņš ir ne ilgāks par deviņdesmit (90) dienām kopš piegādes dienas vai oriģinālo
garantijas termiņu.
Garantijas saistības nav spēkā:
• Ja garantijas tērmiņš ir beidzies, vai nav iesniegti pirkumu apliecinoši dokumenti.
• Ja defekts rādās nepareizas ekspluatācijas dēļ, mehānisko bojājumu gadījumā, nepareizas
izmantošanas rezultātā, kas ir pretrunā ar lietotāja instrukciju, nekorekta barošanas sprieguma,
nelaimes gadījumu rezultātā, ugunsgrēku, plūdu, u.c. nepārvarāmas varas iedarbības rezultātā,
ja netika ievēroti transportēšanas un uzglabāšanas nosacījums un ja klients mēģināja pats veikt
remontu.
• Jebkuriem aizvietojamiem elementiem, piemēram, baterijas, kur bojājumi rodas novecojuma dēļ.
• Ja produkts tiek vizuāli bojāts, piemēram, skrāpēts, ir ar nospiedumiem, korpusa defektiem uz
portiem, u.c.
• Jebkuram programmnodrošinājumam, pat ja pirkts un iepakots ar EZVIZ produktu.
• Jebkuriem defektiem, izņemot ražošanas defektus un defektus, kuri rādās nekvalitatīvu ražošanas
materiālu izmantošanas gadījumā.
• Regulāras tīrīšanas rezultātā, kosmētiska vai mehāniska nodiluma gadījumā.
Problēmu un jautājumu gadījumā, sazinieties ar savu pārdevēju vai rakstiet uz support@ezvizlife.com.
AUTORTIESĪBAS ©2016 HANGZHOU HIKVISION DIGITAL TECHNOLOGY CO., LTD. VISAS TIESĪBAS AIZSARGĀTAS.
GARANTIJAS NOTEIKUMI
Page 80

Sveikiname įsigijus EZVIZ produktą. Perkant originalius produktus, ši ribota garantija pirkėjui suteikia
tam tikras juridines teises. Jūs galite turėti ir kitų teisių, kurios gali skirtis, atsižvelgiant į šalį, kurioje
pirkote įrenginį. Teisės priklauso nuo šalyje galiojančių įstatymų. Atsakomybės ribojimas bei išimtys negali
prieštarauti taikomiems teisės aktams. Joks platintojas, perpardavinėtojas, agentas ar darbuotojas neturi
teisės keisti garantijos sąlygų.
EZVIZ produktui taikomas vienerių ( 1 ) metų garantinio aptarnavimo laikotarpis nuo įsigijimo dienos.
Ribota garantija taikoma esant medžiagų ar pagaminimo defektams, tačiau vartotojas turi tinkamai naudoti
įrenginius pagal vartotojo vadovą. Papildoma garantija suteikiama remiantis šalies, kurioje parduotas
įrenginys, teisės aktais.
Garantinio aptarnavimo užklausos priimamos: support@ezvizlife.lt .
Kiekvienas brokuotas EZVIZ produktas, kuriam taikomas garantinio aptarnavimo laikotarpis, HANGZHOU
HIKVISION DIGITAL TECHNOLOGY CO., LTD. (toliau “Įmonė”) pagal galimybes, (i) nemokamai sutaisys arba
pakeis įrenginį nauju; (ii) pakeis Jūsų įrenginį kitu, funkciškai lygiaverčiu produktu, be papildomos priemokos;
(iii) arba grąžins sumokėtus pinigus, pateikus čekio arba sąskaitos faktūros originalą, kartu pateikiant
gedimo aprašymą bei nesugadintą gamintojo pateiktą pakuotę. Įmonės nuožiūra, remontas arba įrenginio
keitimas galimas naudojant naujus arba prieš tai sutaisytus ir veikiančius komponentus. Į produkto garantiją
neįskaičiuojamos pašto išlaidos, draudimo ir kiti mokesčiai, susiję su Jūsų patirtais nuostoliais dėl gaminio
grąžinimo.
Visais atvejais, išskyrus šalies teisės aktuose numatytose išimtyse, tai vienintelė bei išskirtinė priemonė
garantiniam aptarnavimui. Kiekvienam suremontuotam arba pakeistam produktui, pagal šią garantiją,
taikomas devyniasdešimties (90 ) dienų papildomas garantinis terminas, arba tol, kol galios numatytasis
garantijos laikotarpis.
Ši garantija netaikoma:
• Pasibaigus garantinio aptarnavimo laikotarpiui arba nepateikus gaminio įsigijimą patvirtinančio
dokumento.
• Gedimams, atsiradusiems dėl pirkėjo kaltės (sukratymas, numetimas, neteisingas naudojimas, nesilaikant
vartotojo vadove aprašytais veiksmais), taip pat dėl elektros linijos šuolių, nelaimingų atsitikimų,
praradimo, vagystės, gaisro, potvynių ar kitų stichinių nelaimių atveju, bei pažeidimams, atsiradusiems dėl
neįgaliotų asmenų savarankiško remonto.
• Susidėvinčioms dalims, kaip baterijos, kai gedimas yra sąlygotas įprastinio produkto susidėvėjimo.
• Kosmetiniams pažeidimams, įbrėžimams, įlenkimams bei prievadų plastiko lūžiams.
• Programinei įrangai.
• Visiems kitiems pažeidimams, kurie atsirado ne dėl medžiagų ar surinkimo broko.
• Įrangos valymui bei įprastiniam kosmetiniam ir mechaniniam susidėvėjimui.
Esant neaiškumams ar klausimams galite drąsiai kreiptis į mus support@ezvizlife.lt ,
©2016 HANGZHOU HIKVISION DIGITAL TECHNOLOGY CO., LTD. VISOS TEISĖS SAUGOMOS.
RIBOTOS GARANTIJOS SĄLYGOS
Page 81

 Loading...