

Page 1

INTERNET ALARM HUB
Page 2

Page 3
COPYRIGHT ©2016 Hangzhou Hikvision Digital Technology Co., Ltd. or its subsidiaries. ALL RIGHTS RESERVED.
About this Manual
The Manual includes instructions for using and managing the product. Pictures, charts, images and all other information
hereinafter are for description and explanation only. The information contained in the Manual is subject to change, without
notice, due to firmware updates or other reasons. Please find the latest version in the
ezvizlife.com).
Any and all information, including, among others, wordings, pictures, graphs are the properties of Hangzhou Hikvision Digital
Technology Co., Ltd. or its subsidiaries (hereinafter referred to be “Hikvision”). This user manual (hereinafter referred to
be “the Manual”) cannot be reproduced, changed, translated, or distributed, partially or wholly, by any means, without the
prior written permission of Hikvision. Unless otherwise stipulated, Hikvision does not make any warranties, guarantees or
representations, express or implied, regarding to the Manual.
Trademarks Acknowledgement
™, ™, and other Hikvision’s trademarks and logos are the properties of Hikvision in various jurisdictions.
Other trademarks and logos mentioned below are the properties of their respective owners.
Legal Disclaimer
TO THE MAXIMUM EXTENT PERMITTED BY APPLICABLE LAW, THE PRODUCT DESCRIBED, WITH ITS HARDWARE, SOFTWARE
AND FIRMWARE, IS PROVIDED “AS IS”, WITH ALL FAULTS AND ERRORS, AND HIKVISION MAKES NO WARRANTIES, EXPRESS
OR IMPLIED, INCLUDING WITHOUT LIMITATION, MERCHANTABILITY, SATISFACTORY QUALITY, FITNESS FOR A PARTICULAR
PURPOSE, AND NON-INFRINGEMENT OF THIRD PARTY. IN NO EVENT WILL HIKVISION, ITS DIRECTORS, OFFICERS, EMPLOYEES,
OR AGENTS BE LIABLE TO YOU FOR ANY SPECIAL, CONSEQUENTIAL, INCIDENTAL, OR INDIRECT DAMAGES, INCLUDING, AMONG
OTHERS, DAMAGES FOR LOSS OF BUSINESS PROFITS, BUSINESS INTERRUPTION, OR LOSS OF DATA OR DOCUMENTATION,
IN CONNECTION WITH THE USE OF THIS PRODUCT, EVEN IF HIKVISION HAS BEEN ADVISED OF THE POSSIBILITY OF SUCH
DAMAGES. TO THE MAXIMUM EXTENT PERMITTED BY APPLICABLE LAW, IN NO EVENT SHALL HIKVISION’S TOTAL LIABILITY FOR
ALL DAMAGES EXCEED THE PURCHASE PRICE THE PRODUCT.
HIKVISION does not undertake any liability for personal injury or property damage, as the result of product interruption or
service termination cause by: a) improper installation or usage other than as requested; b) the protection of national or
public interests; c) Force Majeure; d) yourself or the third party, including not limitation, using any third party’s products,
software, applications, and among others.
REGARDING TO THE PRODUCT WITH INTERNET ACCESS, THE USE OF PRODUCT SHALL BE WHOLLY AT YOUR OWN RISKS.
HIKVISION SHALL NOT TAKE ANY RESPONSIBILITES FOR ABNORMAL OPERATION, PRIVACY LEAKAGE OR OTHER DAMAGES
RESULTING FROM CYBER ATTACK, HACKER ATTACK, VIRUS INSPECTION, OR OTHER INTERNET SECURITY RISKS; HOWEVER,
HIKVISION WILL PROVIDE TIMELY TECHNICAL SUPPORT IF REQUIRED.
SURVEILLANCE LAWS VARY BY JURISDICTION. PLEASE CHECK ALL RELEVANT LAWS IN YOUR JURISDICTION BEFORE USING
THIS PRODUCT IN ORDER TO ENSURE THAT YOUR USE CONFORMS TO THE APPLICABLE LAW. YOU FUTHER AGREE THAT THIS
PRODUCT IS ONLY FOR CIVIL USE, AND HIKVISION SHALL NOT BE LIABLE IN THE EVENT THAT THIS PRODUCT IS USED WITH
ILLEGITIMATE PURPOSES, SUCH AS THIRD PARTY RIGHTS INFRINGEMENT, MEDICAL TREATMENT, SAFETY EQUIPMENT OR
OTHER SITUATIONS WHERE THE PRODUCT FAILURE COULD LEAD TO DEATH OR PERSONAL INJURY, OR WEAPON OF MASS
DESTRUCTION, CHEMINCAL AND BIOLOGICAL WEAPON, NUCLEAR EXPLOSION, AND ANY UNSAFE NUCLEAR ENERGY USES OR
ANTI-HUMANITY USAGES. YOU SHOULD UNDERTAKE ALL RESPONSIBILITIES FOR LOSSES OR DAMAGES RESULTING FROM THE
ABOVE USAGES WHATSOEVER.
IN THE EVENT OF ANY CONFLICTS BETWEEN THE ABOVE AND THE APPLICABLE LAW, THE LATER PREVAILS.
™ website (http://www.
Page 4
Regulatory Information
EU Conformity Statement
This product and - if applicable - the supplied accessories too are marked with "CE" and comply therefore
with the applicable harmonized European standards listed under the the Radio Equipment Directive
2014/53/EU, the EMC Directive 2014/30/EU, the RoHS Directive 2011/65/EU.
2012/19/EU (WEEE directive): Products marked with this symbol cannot be disposed of as unsorted
municipal waste in the European Union. For proper recycling, return this product to your local supplier
upon the purchase of equivalent new equipment, or dispose of it at designated collection points. For more
information see: www.recyclethis.info.
2006/66/EC and its amendment 2013/56/EU (battery directive): This product contains a battery that
cannot be disposed of as unsorted municipal waste in the European Union. See the product documentation
for specific battery information. The battery is marked with this symbol, which may include lettering to
indicate cadmium (Cd), lead (Pb), or mercury (Hg). For proper recycling, return the battery to your supplier
or to a designated collection point. For more information see: www.recyclethis.info.
EC DECLARATION OF CONFORMITY
Hereby, Hangzhou Hikvision Digital Technology Co., Ltd. declares that the radio equipment type [CS-A1-32W] is in compliance
with Directive 2014/53/EU.
The full text of the EC DECLARATION OF CONFORMITY is available at the following web link:
http://www.ezvizlife.com/declaration-of-conformity
Due to the product shape and dimension, the name and address of the importer/manufacturer are printed on
the package.
Safety Instruction
CAUTION: THE PRODUCT IS BUILT IN A REPLACEABLE BATTERY. RISK OF EXPLOSION IF BATTERY IS REPLACED
BY AN INCORRECT TYPE. DISPOSE OF USED BATTERIES ACCORDING TO THE INSTRUCTIONS.
SAVE THIS MANUAL FOR FUTURE REFERENCE
Page 5
Operations
Step 1
Preparation
Make sure the environment and the power supply meet the requirements below:
•Power voltage: DC 5V (Micro USB)
•Working temperature: -10°C to 55°C (14°F to 131°F)
•Working humidity: 10% to 90% (non-condensing)
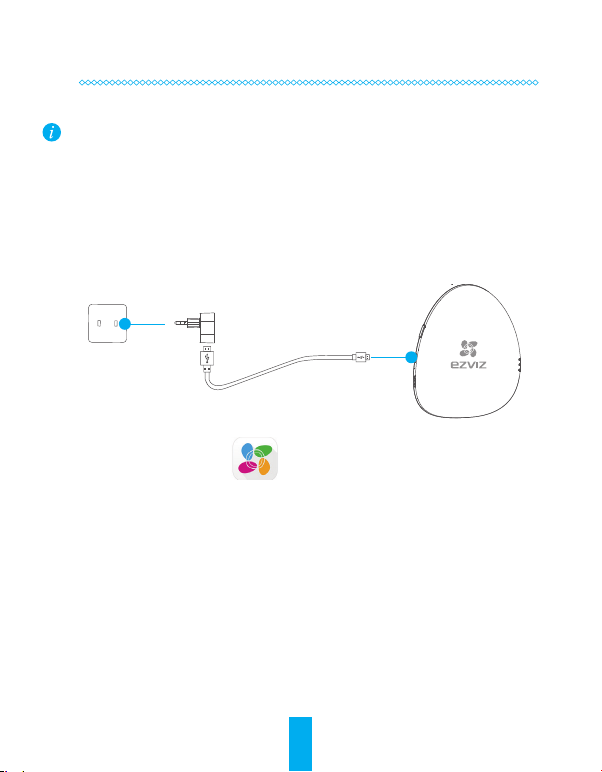
Starting A1
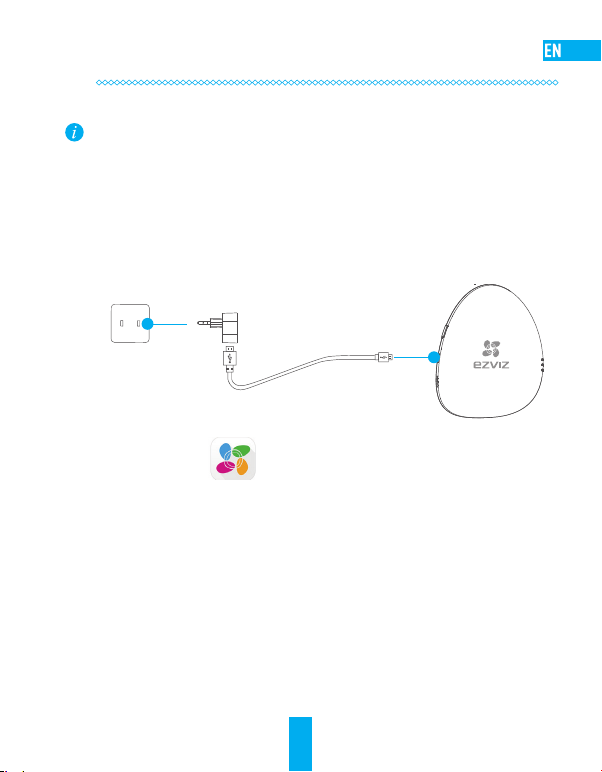
1
Connect the A1 and power adapter with the USB data cable, and then plug the power adapter
into the power socket. The white indicator turns on indicating the A1 is starting, and then the red
indicator turns on when the A1 starts completely.
Power Adapter
Power Socket
USB Data Cable
Installing the EZVIZ App
2
- Connect your mobile phone to Wi-Fi.
Download and install the EZVIZ app by searching the “EZVIZ” in App Store (iOS version) and Google
-
TM
Play
(Android version).
- Start the app and register for an EZVIZ user account following the start-up wizard.
1
Page 6
Step 2
Quick Settings
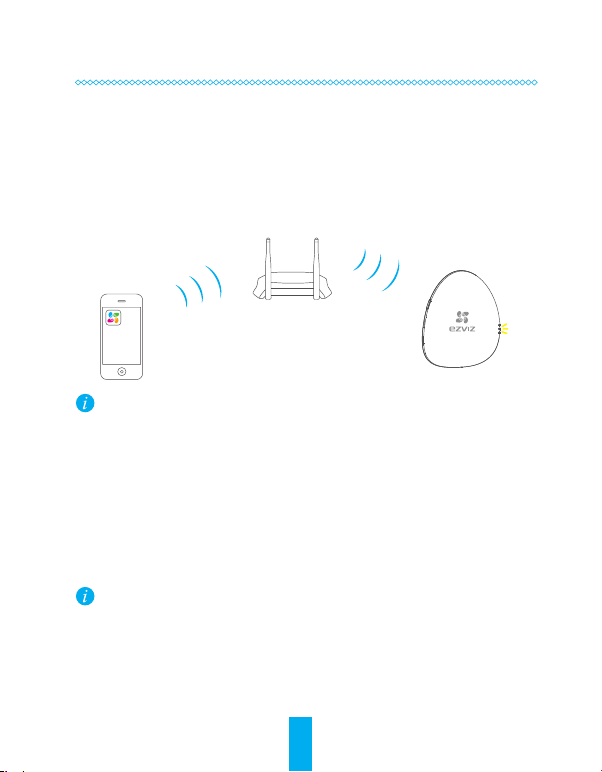
Adding A1
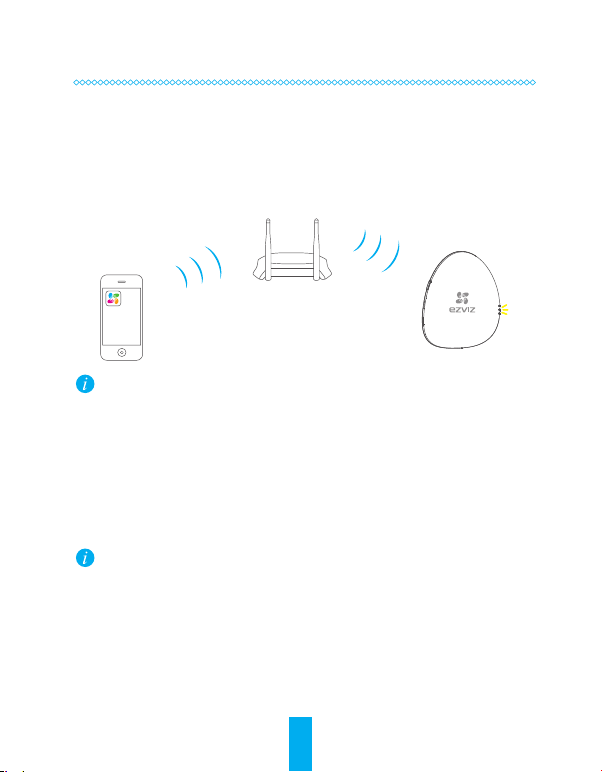
1
- Connect the mobile phone to a Wi-Fi.
- Log in the EZVIZ app and scan the QR code on the A1 to add it to your EZVIZ account.
- Follow the prompts to configure the A1 Wi-Fi connection, such as SSID (Wi-Fi name) and
password.
•Make sure the mobile phone is connected to the Wi-Fi and the A1 has not connect to any
Wi-Fi yet, or the connection will be failed.
•The distance between the A1 and the mobile phone should be no further than 50 cm.
Completing Configuration
2
The LINK indicator flickers in yellow when the A1 has been successfully connected to the Wi-Fi (of
the router).
Hold down the Setting Button if you want to enable the Wi-Fi modification function. For
example: the procedure for connecting A1 to the Wi-Fi (router) is not successful and you have
to repeat the operation; or you want to change the Wi-Fi connection (to connect A1 to another
Wi-Fi network).
2
Page 7
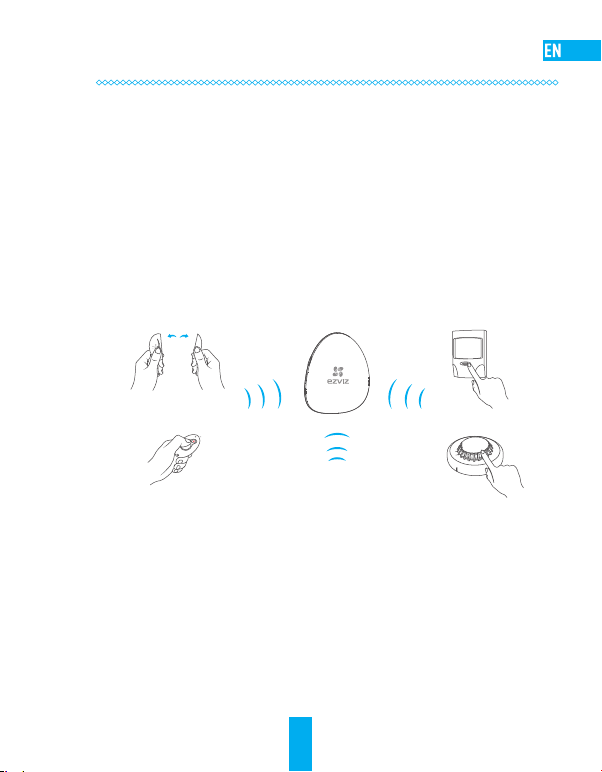
Step 3
Adding Detectors
Enabling the Adding Detectors Mode
1
Press the Setting Button for once and the voice prompt of the adding detectors mode is enable
starts. The yellow and red indicators flicker twice every second indicating the Adding Detectors
Mode is enabled.
Adding Detectors
2
Take the detector close to the A1 (within 50cm) and trigger alarm manually. A voice prompt of the
type and the serial number of the detector starts indicating the corresponding detector is added (up
to 32 detectors are allowed).
E
V
O
M
E
R
O
T
N
R
U
T
……
Disabling the Adding Detectors Mode
3
Press the Setting Button for once to disable the Adding Detectors Mode after all the detectors are
added.
•The Adding Detectors Mode will be disabled if no operation in 3 minutes.
•The Max. effective distance between detectors and the A1 is 100m (no barrier is allowed).
D
O
N
O
T
P
A
I
N
T
3
Page 8
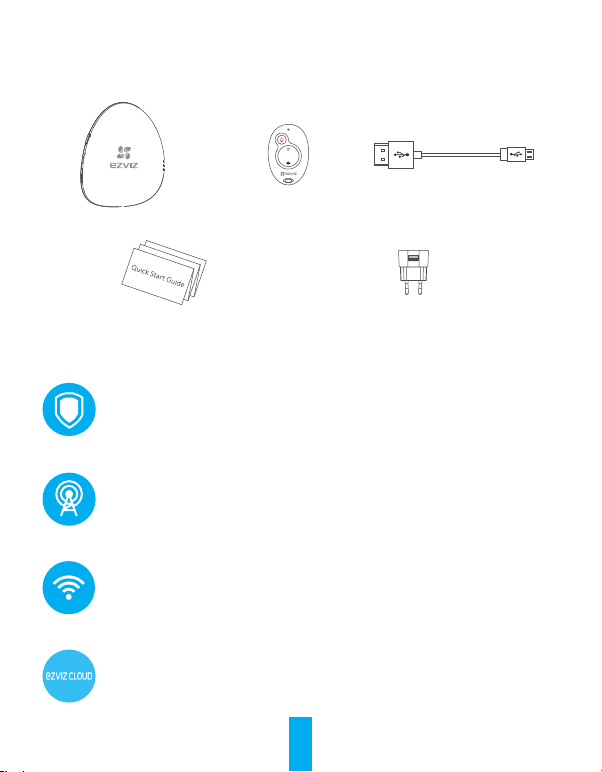
Appendix
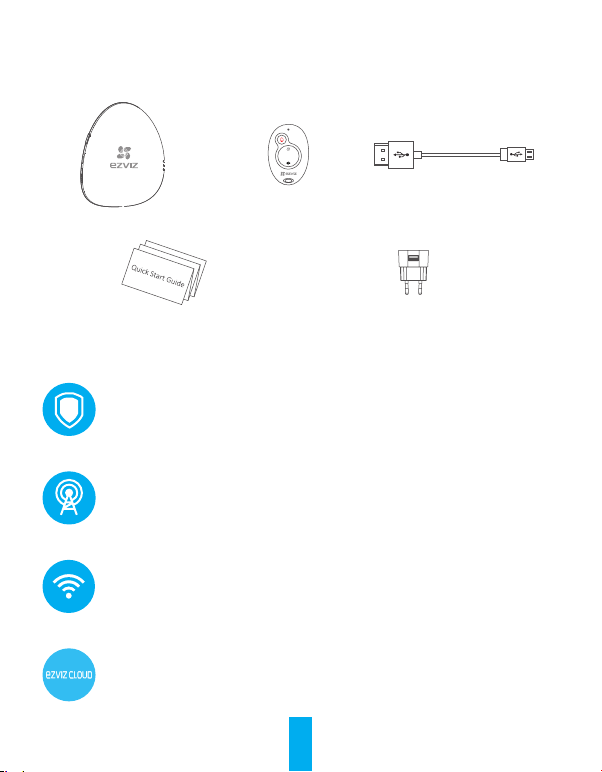
Box Contents
A1 x1 Remote Control x1 USB Data Cable x1
Quick Start Guide x1 Power Adapter x1
Function Introduction
Irreplaceable Home Guard
Accessable to various wireless detectors and provide a comprehensive protection to your
home.
World’s leading Communication Technology
Convenient security deployment with wireless detectors.
Convenient Network Configuration
One-push Wi-Fi connection (not support the 5G Wi-Fi).
EZVIZ Cloud P2P Service
Receiving alarm and remote control on mobile phone and PC.
4
Page 9

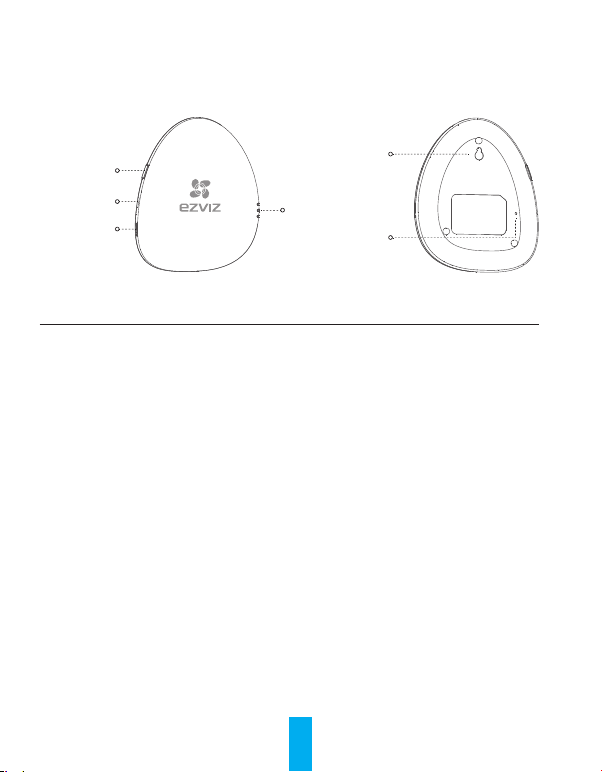
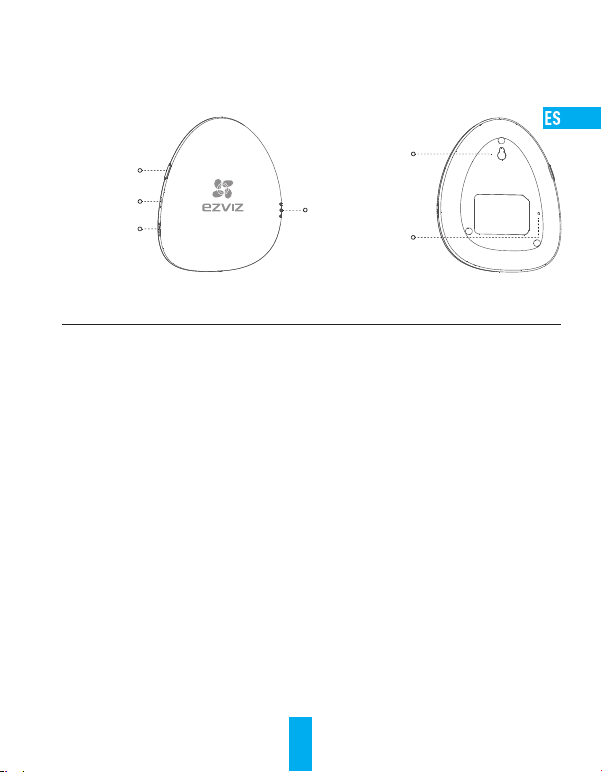
A1 Basics
Setting Button
Power Input
Speaker
Name Description
Power Input
ALARM LED Indicator Steady Red: The A1 is in the normal status.
LINK LED Indicator Yellow Flicker:The Wi-Fi is connected.
READY LED Indicator Steady White: The A1 is powered on (by USB port).
Mounting Hole Hole for hanging the device.
RESET Button Connect the device to the power supply (by USB port). Press and hold the RESET
Power supply for the device (by USB port).
Red Flicker: An alarm occurs.
Unlit: The Wi-Fi is disconnected.
button with a needle and release until the 3 indicators flicker at the same time
for once. The device restarts and all settings are restored except the connected
detectors and remote control.
Mounting Hole
LED Indicators
(ALARM, LINK,and READY)
RESET Button
5
Page 10
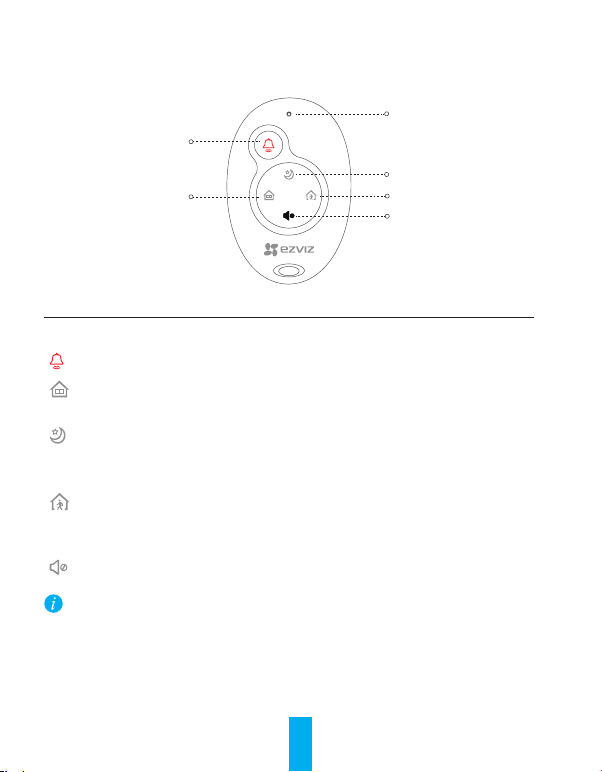
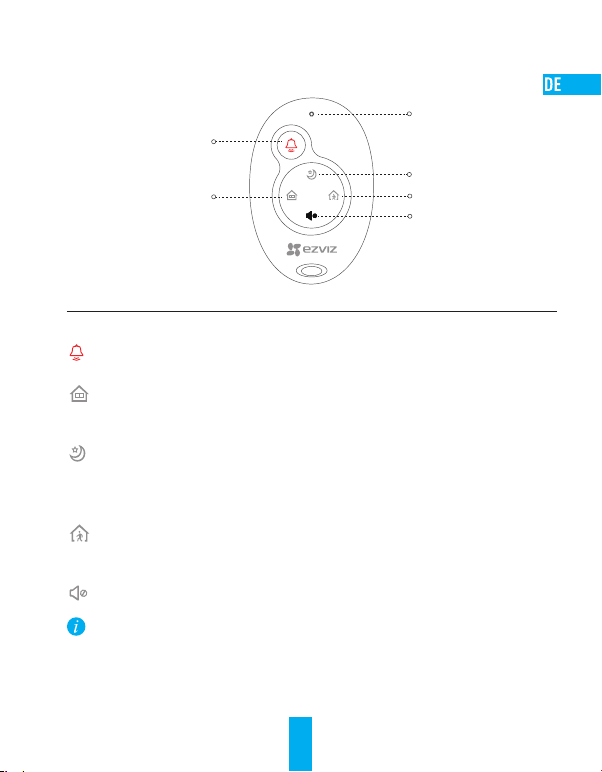
Remote Control Basics
LED Indicator
Emergency Button
Sleeping Mode
At-Home Mode
Name Description
LED Indicator
Flicker when any button is pressed.
Hold down the button for 2 s to send an emergency alarm to the EZVIZ platform.
If anyone stays at home or you are going to get into the house, you need to disarm the
alarm system. Press the button to activate the At-Home mode.
When you are at home and still want to feel protected: only the perimeter parts of the
house (doors and windows) are armed. The Sleeping mode is appropriate during the
day or sleeping time at night. Press the button to activate the Sleeping mode.
If no one stays at home, you need to activate the alarm system to protect it from
intruders. The Leaving-Home mode is appropriate. Press the button to activate the
Leaving-Home mode.
Press to turn off the voice prompts.
•The remote control in the package is connected to the A1 by default. Refer to the step 3 in the
Operation to connect another remote control to A1 if the remote control does not work normally
or you have a new one.
•The above descriptions for arming mode are the default settings. You can customize the
detectors arming status in each arming mode and switch the arming mode by EZVIZ app.
Leaving-Home Mode
Mute
6
Page 11

Troubleshooting
“The device is offline.” or “The device is not registered.” prompts when adding A1 by EZVIZ app.
Q:
1. Check the Wi-Fi is connected with the A1 and make sure it’s working.
A:
2. Check whether the yellow indicator flickers; if not, please restart the A1 and connect to the
Wi-Fi again.
The mobile phone cannot receive alarm when the A1 is online and alarm occurs.
Q:
1. Make sure the EZVIZ app is running on your mobile phone.
A:
2. For Android OS mobile phone, make sure the app is running background; and for the iOS,
enable the message push function in “Settings > Notification”.
The status of the detector is displayed as offline on the EZVIZ app.
Q:
1. Make sure the Wi-Fi status that the A1 connected with is normal.
A:
2. Make sure the distance between the detectors and the A1 is less than 100m and no barrier is
allowed.
3. Make sure the detector’s battery does not run out.
The detector can detect alarm and the A1 works normally, but no voice prompts.
Q:
1. Make sure the distance between the detector and the A1 is less than 100m and no barrier is
A:
allowed.
2. Adjust the installation position of A1. You’re recommended to install the A1 in the center of your
house.
3. Make sure the A1 is not in the Mute mode.
7
Page 12

Betrieb
Schritt 1
Vorbereitung
Achten Sie darauf, dass die Umgebung und die Spannungsversorgung die nachstehenden
Anforderungen erfüllen:
•Versorgungsspannung: 5V DC (Micro USB)
•Temperatur (Betrieb): -10°C bis 55°C
•Luftfeuchtigkeit (Betrieb) 10% bis 90% (nicht kondensierend)
A1 einschalten
1
Schließen Sie den A1 mit dem USB-Datenkabel und am Netzteil und dieses dann an einer Steckdose
an. Die weiße LED leuchtet als Hinweis darauf auf, dass der A1 aktiviert wird. Anschließend leuchtet
die rote LED auf , wenn der A1 vollständig gestartet ist.
Netzteil
Versorgungsbuchse
USB-Datenkabel
EZVIZ App installieren
2
- Smartphone mit dem Wi-Fi-Netz verbinden.
- EZVIZ App herunterladen und installieren, indem Sie „EZVIZ" im App Store (iOS-Version) oder bei
- Die App starten und ein EZVIZ-Anwenderkonto nach Anweisungen des Assistenten erstellen.
Google Play
TM
(Android-Version) suchen.
8
Page 13

Schritt 2
Schnelleinstellungen
A1 hinzufügen
1
- Verbinden Sie Ihr Mobiltelefon mit einem Wi-Fi-Netz.
- Melden Sie sich bei der EZVIZ App an und scannen Sie den QR-Code am A1, um ihn zu Ihrem EZVIZAccount hinzuzufügen.
- Befolgen Sie die Anweisungen, um die A1-Wi-Fi-Verbindung zu konfigurieren (z.B. SSID (Wi-FiName) und Passwort.
•Achten Sie darauf, dass nur das Smartphone eine Wi-Fi-Verbindung hat, der A1 jedoch noch
nicht. Andernfalls kommt keine Verbindung zustande.
•Der Abstand zwischen dem A1 und dem Smartphone darf nicht mehr als 50cm betragen.
Konfiguration abschließen
2
Die LINK-LED blinkt gelb, wenn der A1 erfolgreich mit dem Wi-Fi (des Routers) verbunden ist.
Drücken und halten Sie die Einstelltaste, um die Wi-Fi-Modifikationsfunktion zu aktivieren.
Beispiel: Die Verbindung zwischen A1 und Wi-Fi (Router) konnte nicht hergestellt und der
Vorgang muss wiederholt werden, oder Sie wollen die Wi-Fi-Verbindung wechseln (um den A1
mit einem neuen Wi-Fi-Netz zu verbinden).
9
Page 14

Schritt 3
Melder hinzufügen
"Adding Detectors"-Modus aktivieren
1
Drücken Sie die Einstelltaste einmal. Der Voice Guide bestätigt daraufhin den "Adding Detectors"Modus. Die gelbe und die rote LED blinken zweimal pro Sekunde als Hinweis darauf, dass der
"Adding Detectors"-Modus aktiviert ist.
Melder hinzufügen
2
Bringen Sie den Melder nahe an den A1 (min. 50cm) und lösen Sie manuell Alarm aus. Daraufhin
bestätigt der Voice Guide Typ und Seriennummer des Detektors als Hinweis darauf, dass der
entsprechende Melder hinzugefügt wurde (bis zu 32 Melder sind möglich).
E
V
O
M
E
R
O
T
N
R
U
T
……
"Adding Detectors"-Modus deaktivieren
3
Drücken Sie die Einstelltaste einmal, um den "Adding Detectors"-Verbindungsmodus zu
deaktivieren, nachdem alle Melder hinzugefügt wurden.
•Der "Adding Detectors"-Modus wird nach drei Minuten Inaktivität automatisch deaktiviert.
•Die maximal zulässige Arbeitsdistanz zwischen Meldern und dem A1 beträgt 100m (keine
Hindernisse zulässig).
D
O
N
O
T
P
A
I
N
T
10
Page 15
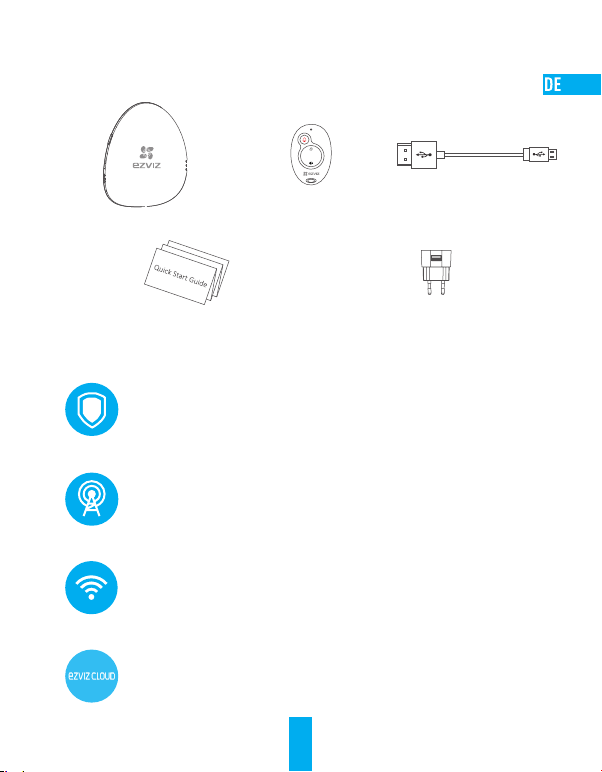
Anhang
Lieferumfang
A1 x1 Fernbedienung x1 USB-Datenkabel x1
Schnellstartanleitung x1 Netzteil x1
Funktionsübersicht
Unersetzlicher Hauswächter
Ermöglicht den Zugriff auf verschiedene drahtlose Melder und bietet einen umfassenden
Schutz für Ihr Zuhause.
Weltweit führende Kommunikationstechnologie
Ein komfortables Sicherheitssystem mit drahtlosen Meldern.
Bequeme Netzwerkkonfiguration
Wi-Fi-Verbindung per Tastendruck
EZVIZ Cloud P2P Service
Alarmierung und Fernbedienung via Smartphone und PC.
11
Page 16
A1 Allgemeines
Einstelltaste
Versorgungs-
eingang
Lautsprecher
Bezeichnung Beschreibung
Versorgungseingang
ALARM LED-Anzeige Durchgehend rot: Der A1 befindet sich im Normalstatus.
LINK LED Blinkt gelb: Das Wi-Fi-Netz ist verbunden.
READY LED Durchgehend weiß: Der A1 ist eingeschaltet (via USB-Port).
Montageöffnung Öffnung zum Aufhängen des Geräts.
RESET-Taste Verbindet das Gerät mit der Spannungsversorgung (via USB-Port). Drücken und
Spannungsversorgung für das Gerät (via USB-Port).
Blinkt rot: Ein Alarm ist aufgetreten.
Aus: Das Wi-Fi-Netz ist nicht verbunden.
halten Sie die RESET-Taste mit einer Nadel und lassen Sie sie los, wenn die
drei LEDs gleichzeitig blinken. Das Gerät wird daraufhin neu gestartet, und alle
Einstellungen bis auf die angeschlossenen Melder und die Fernbedienung werden
zurückgesetzt.
Montageöffnung
LED-Anzeigen
(ALARM, LINK und READY)
RESET-Taste
12
Page 17
Fernbedienungsfunktionen
LED-Anzeige
Notalarmtaste
Nachtzeitmodus
Anwesenheitsmodus
Bezeichnung Beschreibung
LED-Anzeige
Blinkt, wenn eine Taste betätigt wird.
Taste 2 Sekunden lang gedrückt halten, um einen Notalarm an die EZVIZ-Plattform zu
senden.
Wenn jemand zu Hause ist oder Sie das Haus betreten wollen, müssen Sie das
Alarmsystem deaktivieren. Betätigen Sie diese Taste, um den Im-Haus-Modus zu
aktivieren.
Wenn Sie zu Hause sind und dennoch ein Gefühl der Sicherheit haben wollen: nur die
Außenelemente des Hauses (Türen und Fenster) sind aktiviert. Der Schlafen-Modus
ist sowohl bei Tag als auch bei Nacht geeignet. Betätigen Sie diese Taste, um den
Nachtzeitmodus zu aktivieren.
Wenn niemand zu Hause ist, müssen Sie das Alarmsystem aktivieren, um sich vor
Einbrechern zu schützen. Geeignet ist der Abwesenheitsmodus. Betätigen Sie diese
Taste, um den Abwesenheitsmodus zu aktivieren.
Drücken, um den Voice Guide zu deaktivieren.
•Die mitgelieferte Fernbedienung ist standardmäßig mit dem A1 verbunden. Siehe Schritt 3 in
der Bedienungsanleitung, um eine andere Fernbedienung mit dem A1 zu verbinden, falls die
Fernbedienung nicht normal funktioniert oder Sie eine neue Fernbedienung haben.
•Die vorgenannten Beschreibungen für den Aktivierungsmodus beziehen sich auf die
Standardvorgaben. Mit der EZVIZ App können Sie den Aktivierungsstatus der Melder in jedem
Aktivierungsmodus anpassen und den Aktivierungsmodus umschalten.
13
Abwesenheitsmodus
Ton Aus
Page 18

Häufig gestellte Fragen
Beim Hinzufügen des A1 mit der EZVIZ App erscheint die Meldung "The device is offline" oder "The
F:
device is not registered".
1. Überprüfen Sie, ob eine funktionierende Wi-Fi-Verbindung mit dem A1 besteht.
A:
2. Überprüfen Sie, ob die gelbe LED-Anzeige blinkt. Falls nicht, starten Sie den A1 bitte neu und
stellen die Wi-Fi-Verbindung wieder her.
Das Smartphone kann keinen Alarm empfangen, wenn der A1 online ist und ein Alarm ausgelöst
F:
wird.
1. Kontrollieren Sie, ob die EZVIZ App auf Ihrem Smartphone läuft.
A:
2. Achten Sie bei Android-Smartphones darauf, dass die App im Hintergrund läuft. Aktivieren Sie
im iOS die "Message push"-Funktion unter "Einstellungen > Benachrichtigung".
In der EZVIZ App wird der Status des Detektors wird als "offline" angezeigt.
F:
1. Kontrollieren Sie, ob der Wi-Fi-Status der A1-Verbindung normal ist.
A:
2. Kontrollieren Sie, ob die Entfernung zwischen den Melder und dem A1 weniger als 100m beträgt
und keine Hindernisse vorhanden sind.
3. Kontrollieren Sie, ob die Batterie des Detektors in Ordnung ist.
Der Melder kann einen Alarm erkennen und der A1 arbeitet normal, aber der Voice Guide
F:
funktioniert nicht.
1. Kontrollieren Sie, ob die Entfernung zwischen Melder und A1 weniger als 100m beträgt und
A:
keine Hindernisse vorhanden sind.
2. Justieren Sie die Montageposition des A1. Der A1 sollte in der Mitte des Hauses montiert sein.
3. Achten Sie darauf, dass der A1 nicht stummgeschaltet ist.
14
Page 19

Funciones
Paso 1
Preparación
Asegúrese de que el entorno y la fuente de alimentación cumplan los requisitos siguientes:
•Voltaje de fuente de alimentación: DC 5 V (Micro USB)
•Temperatura de trabajo: De -10°C a 55°C (de 14°F a 131°F)
•Humedad de trabajo: De 10% a 90% (sin condensación)
Inicio del A1
1
Conecte el A1 y el adaptador de corriente con el cable de datos USB y, a continuación, enchufe el
adaptador de corriente a la toma de corriente. El indicador blanco se encenderá, lo que indica que el
A1 se está iniciando. Cuando el A1 se haya iniciado completamente, el indicador se volverá rojo.
Adaptador de corriente
Toma de corriente
Cable de datos USB
Instalación de la aplicación EZVIZ
2
- Conecte el teléfono móvil a la red Wi-Fi.
- Descargue la Aplicación Móvil EZVIZ buscando "EZVIZ" en App Store (versión iOS) y Google Play
(versión Android).
- Inicie la aplicación y regístrese para obtener una cuenta de usuario de EZVIZ mediante el asistente
de inicio.
TM
15
Page 20
Paso 2
Configuración rápida
Incorporación del A1
1
- Conecte el teléfono móvil a la red Wi-Fi.
- Inicie sesión en la aplicación EZVIZ y escanee el código QR del A1 para añadirlo a su cuenta de
EZVIZ.
- Siga las indicaciones para configurar la conexión Wi-Fi del A1 como, por ejemplo, el SSID (nombre
de la conexión Wi-Fi) y la contraseña.
•Asegúrese de que el teléfono móvil esté conectado al Wi-Fi y de que el A1 aún no se
haya conectado a ninguna red Wi-Fi, ya que, de no ser así, se puede producir un error de
conexión.
•La distancia entre el A1 y el teléfono móvil no debe ser superior a 50 cm.
Finalización de la configuración
2
El indicador de conexión LINK parpadea en amarillo cuando el A1 se ha conectado correctamente a
la red Wi-Fi (del enrutador).
Mantenga pulsado el botón de configuración si desea habilitar la función de modificación de
Wi-Fi. Por ejemplo, el procedimiento para conectar el dispositivo A1 a la red Wi-Fi (enrutador)
no se realiza correctamente y debe repetir la operación o desea cambiar la conexión Wi-Fi (para
conectar el dispositivo A1 a una nueva red Wi-Fi).
16
Page 21

Paso 3
Habilitación del modo de adición de detectores
Enabling the Adding Detectors Mode
1
Pulse el botón de configuración una vez y se emitirá un aviso de voz que indica el inicio del método
de adición de los detectores. Los indicadores amarillo y rojo parpadearán dos veces cada segundo,
lo que indica que el modo de conexión de adición está habilitado.
Adición de detectores
2
Acerque el detector al A1 (en un área de 50 cm) y dispare la alarma manualmente. Se emitirá un
aviso de voz sobre el tipo y el número de serie del detector, lo que indica que se ha agregado el
indicador correspondiente (se admiten hasta 32 detectores).
E
V
O
M
E
R
O
T
N
R
U
T
……
Deshabilitación del modo de adición de detectores
3
Pulse el botón de configuración una vez para deshabilitar el modo de adición de detectores una vez
que se hayan agregado todos los detectores.
•El modo de adición de detectores se deshabilitará si no funciona durante 3 minutos.
•La distancia de trabajo máxima permitida entre los detectores y el A1 es de 100 m (no puede
haber ninguna barrera).
D
O
N
O
T
P
A
I
N
T
17
Page 22
Apéndice
Contenido del paquete
A1 x1 Mando a distancia x1 Cable de datos USB x1
Guía de inicio rápido x1 Adaptador de corriente x1
Introducción a las funciones
Protección en el hogar imprescindible
Es accesible para varios detectores inalámbricos y brinda protección total en el hogar.
Tecnología de comunicación líder en el mundo
Implementación de seguridad cómoda con detectores inalámbricos.
Configuración de red cómoda
Conexión Wi-Fi con un solo toque.
Servicio P2P en la nube de EZVIZ
Recepción de alarma y mando a distancia en el teléfono móvil y el PC.
18
Page 23
A1 Conceptos básicos
Botón de
configuración
Entrada de
alimentación
Altavoz
Nombre Description
Entrada de
alimentación
Indicador LED de
alarma ALARM
Indicador LED de
alarma ALARM
Indicador LED de
disponibilidad READY
Orificio de montaje Orificio para colgar el dispositivo.
Botón RESET Conecte el dispositivo a la fuente de alimentación (mediante el puerto USB).
Fuente de alimentación del dispositivo (mediante el puerto USB).
Rojo fijo: el A1 se encuentra en estado normal.
Rojo intermitente: se ha producido una alarma.
Amarillo intermitente: el dispositivo está conectado a la red Wi-Fi.
Apagado: el dispositivo no está conectado a la red Wi-Fi.
Blanco fijo: el A1 está encendido (mediante el puerto USB).
Mantenga pulsado el botón RESET con una aguja y suéltelo cuando los tres
indicadores parpadeen al mismo tiempo una vez. El dispositivo se reinicia y se
restablecen todos los ajustes, excepto los de los detectores conectados y el
mando a distancia.
Orificio de montaje
Indicadores LED
(ALARM, LINK,y READY)
Botón RESET
19
Page 24

Introducción al mando a distancia
Indicador LED
Botón de emergencia
Modo Sueño
Modo En casa
Nombre Description
Indicador LED
Parpadea cuando se pulsa cualquier botón.
Mantenga pulsado el botón durante 2 s para enviar una alarma de emergencia a la
plataforma EZVIZ.
Si hay alguien en casa o va a entrar en ella, debe desarmar el sistema de alarma.
Pulse el botón para activar el modo En casa.
Si está en casa y desea sentirse protegido, solo se arman las partes del perímetro de
la casa (puertas y ventanas). El modo Sueño es el adecuado durante el día o en las
horas de sueño durante la noche. Pulse el botón para activar el modo Sueño.
Si no hay nadie en casa, debe activar el sistema de alarma para protegerla frente a
intrusos. El modo Fuera de casa es el adecuado. Pulse el botón para activar el modo
Fuera de casa.
Pulse el botón para desactivar los avisos de voz.
•El mando a distancia incluido en el paquete está conectado al A1 de manera predeterminada.
Consulte el paso 3 de la sección de funcionamiento para conectar otro mando a distancia al A1
si el mando no funciona normalmente o tiene uno nuevo.
•Las descripciones anteriores del modo de armado hacen referencia a la configuración
predeterminada. Puede utilizar la aplicación EZVIZ para personalizar el estado de armado de los
detectores en cada modo de armado y cambiar el modo de armado.
20
Modo Fuera de casa
Silencio
Page 25

Preguntas frecuentes
Los avisos "El dispositivo está desconectado" o "El dispositivo no está registrado" pueden
P:
aparecer cuando se agrega el A1 a la aplicación EZVIZ.
1. Compruebe que la red Wi-Fi esté conectada con el A1 y asegúrese de que funciona.
R:
2. Compruebe si el indicador amarillo parpadea; si no parpadea, reinicie el A1 y vuelva a conectar
la red Wi-Fi.
El teléfono móvil no recibe la señal de alarma cuando el A1 está en línea y se dispara una alarma.
P:
1. Asegúrese de que la Aplicación Móvil EZVIZ se está ejecutando en el teléfono móvil.
R:
2. Si su teléfono móvil tiene el sistema operativo Android, asegúrese de que la aplicación se está
ejecutando en segundo plano; en el caso del sistema iOS, habilite la función de inserción de
mensaje en "Settings (Ajustes) > Notification (Notificación)".
El estado del detector se muestra como desconectado en la aplicación EZVIZ.
P:
1. Asegúrese de que el estado de la red Wi-Fi conectada al A1 es normal.
R:
2. Asegúrese de que la distancia entre los detectores y el A1 es inferior a 100 m y de que no hay
ninguna barrera.
3. Asegúrese de que no se ha acabado la batería del detector.
El detector detecta la alarma y el A1 funciona con normalidad pero no se emiten avisos de voz.
P:
1. Asegúrese de que la distancia entre el detector y el A1 es inferior a 100 m y de que no hay
R:
ninguna barrera.
2. Ajuste la posición de instalación del A1. Se recomienda que instale el A1 en el área central de
su hogar.
3. Asegúrese de que el A1 no esté en modo de silencio.
21
Page 26
Fonctionnement
Étape1
Préparation
Assurez-vous que l'environnement et l'alimentation électrique remplissent les conditions ci-dessous.
•Tension d'alimentation: 5Vcc (Micro USB)
•Température de fonctionnement: -10 °C - 55 °C (14 °F - 131 °F)
•Humidité de fonctionnement: 10% - 90% (sans condensation)
Starting A1
1
Branchez l'A1 et l'adaptateur électrique avec le câble données USB puis branchez l'adaptateur
secteur dans la prise femelle. Le témoin blanc s'allume pour indiquer que l'A1 démarre; lorsque la
séquence de démarrage est terminée, le témoin rouge s'allume.
Adaptateur électrique
Prise d'alimentation
Câble données USB
Installation de l'application EZVIZ
2
- Raccordez votre téléphone portable au réseau Wi-Fi.
- Téléchargez et installez l'application EZVIZ depuis App Store (version iOS) ou Google Play
Android).
- Démarrez l'application et ouvrez un compte d'utilisateur EZVIZ en suivant les instructions de
l'assistant.
TM
(version
22
Page 27

Étape 2
Réglages rapides
Ajout de l'A1
1
- Connectez le téléphone portable à un réseau Wi-Fi.
- Ouvrez une session dans l'application EZVIZ et scannez le code QR de l'A1 pour l'ajouter à votre
compte EZVIZ.
- Suivez les indications pour configurer la connexion Wi-Fi de l'A1, par exemple, le SSID (nom sur le
réseau Wi-Fi) et le mot de passe.
•Assurez-vous que le portable est raccordé au réseau Wi-Fi et que l'A1 n'y est pas encore
connecté, sinon la connexion échouera.
•La distance entre l'A1 et le téléphone portable ne doit pas dépasser 50cm.
Terminer la configuration
2
Le témoin LINK clignote en jaune lorsque la liaison entre l'A1 et le réseau Wi-Fi (ou le routeur) est
établie.
Maintenez le bouton des réglages enfoncé si vous souhaitez activer la fonction de modification
Wi-Fi. Exemple: la connexion de l'A1 au réseau Wi-Fi (routeur) a échoué et vous devez répéter
l'opération; ou bien vous souhaitez changer de connexion Wi-Fi (pour connecter l'A1 à un
autre réseau Wi-Fi).
23
Page 28

Étape 3
Ajout de détecteurs
Activation du mode Ajout de détecteurs
1
Appuyez sur le bouton des réglages; un message vocal indique que le mode Ajout de détecteurs est
activé. Les témoins jaune et rouge clignotent deux fois par seconde, indiquant que le mode Ajout de
détecteurs est activé.
Ajout de détecteurs
2
Approchez le détecteur de l'A1 (moins de 50cm) pour déclencher l'alarme manuellement. Un
message vocal indique le type et le numéro de série du détecteur, indiquant que le détecteur
correspondant a été ajouté (il est possible d'ajouter jusqu'à 32détecteurs).
E
V
O
M
E
R
O
T
N
R
U
T
……
Désactivation du mode Ajout de détecteurs
3
Appuyez sur le bouton des réglages pour désactiver le mode Ajout de détecteurs lorsque l'opération
est terminée.
•Le mode Ajout de détecteur est désactivé au bout de 3minutes d'inactivité.
•La distance maximale de fonctionnement entre les détecteurs et l'A1 est de 100m (sans
obstacle).
D
O
N
O
T
P
A
I
N
T
24
Page 29

Annexe
Contenu de l'emballage
1 A1 1 télécommande 1 câble USB
1 guide de prise en main 1 transformateur électrique
Présentation des fonctions
Un gardien irremplaçable
Accès à divers détecteurs sans fil et protection complète de votre domicile.
Leader mondial dans les technologies de communication
Déploiement pratique d'une solution de sécurité grâce à des détecteurs sans fil.
Facilité de configuration du réseau
Connexion Wi-Fi par simple pression sur un bouton.
Service P2P de cloud EZVIZ
Réception des signaux d'alarme et de télécommande sur un téléphone portable et un PC.
25
Page 30

A1 Notions de base
Touche de régla
Entrée
d'alimentation
Haut-parleur
Nom Description
Entrée d'alimentation
Diode témoin ALARM Rouge fixe: L'A1 est dans l'état normal.
Diode témoin LINK Jaune clignotant: la connexion Wi-Fi est active.
Diode témoin READY Blanc fixe: L'A1 est alimenté (par le port USB).
Orifice pour support Orifice pour accrocher l'appareil.
Bouton RESET Branchez l'appareil à l'alimentation électrique (port USB). Maintenez la touche
Alimentation électrique de l'appareil (port USB).
Rouge clignotant: une alarme est survenue.
Éteint: La connexion Wi-Fi est inactive.
RESET enfoncée à l'aide d'une aiguille puis relâchez-la lorsque les 3témoins
clignotent une fois en même temps. L'appareil redémarre et tous les paramètres
sont restaurés, à l'exception des détecteurs connectés et de la télécommande.
Orifice pour support
Diodes témoins
(ALARM, LINK et READY)
Bouton RESET
26
Page 31

Présentation de la télécommande
Diode témoin
Bouton d’urgence
Mode Sommeil
Mode À domicile
Nom Description
Diode témoin
Clignote lorsque vous appuyez sur un bouton.
Appuyez sur le bouton et maintenez-le enfoncé 2 secondes pour envoyer une alarme
d'urgence à la plate-forme EZVIZ.
Si votre domicile est occupé et que vous vous apprêtez à entrer dans la maison, vous
devez désactiver le système d'alarme. Appuyez sur le bouton pour activer le mode À
domicile.
Si vous êtes chez vous et souhaitez quand même vous sentir protégé: seul le périmètre
de la maison (portes et fenêtres) est armé. Le mode Sommeil est utile pendant la
journée ou la nuit pendant que vous dormez. Appuyez sur le bouton pour activer le
mode Sommeil.
Si votre domicile est inoccupé, vous devez activer le système d'alarme pour le protéger
contre les intrus. Dans ce cas, vous pouvez opter pour le mode Hors domicile. Appuyez
sur le bouton pour activer le mode Hors domicile.
Appuyez pour désactiver les messages vocaux.
•Par défaut, la télécommande fournie est connectée à l'A1. Reportez-vous à l'étape3 de la
section Utilisation pour connecter une autre télécommande à l'A1 si la vôtre ne fonctionne pas
normalement ou si elle est nouvelle.
•Le mode d'armement décrit ci-dessus est le mode par défaut. Vous pouvez personnaliser l'état
d'armement des détecteurs dans chaque mode et activer le mode d'armement dans l'application
EZVIZ.
27
Mode Hors domicile
Son coupé
Page 32

FAQ
Le message «L'appareil est hors ligne» ou «L'appareil n'est pas enregistré» apparaît lorsque
Q:
vous ajoutez l'A1 à partir de l'application EZVIZ.
1. Vérifiez que l'interface Wi-Fi est connectée à l'A1 et qu'elle fonctionne.
R:
2. Vérifiez si l'indicateur jaune clignote; sinon, redémarrez l'A1 et reconnectez-le au réseau Wi-Fi.
Le téléphone portable ne reçoit pas d'alarme lorsque l'A1 est en ligne.
Q:
1. Assurez-vous que l'appli EZVIZ est en cours d'exécution sur votre téléphone portable.
R:
2. Sur un téléphone portable Android, assurez-vous que l'application s'exécute en arrière-plan;
sous iOS, activez les notifications push dans «Paramètres > Notification».
L'état du détecteur affiché est hors ligne dans l'application EZVIZ.
Q:
1. Vérifiez l'état de la connexion Wi-Fi et que l'A1 connecté est dans l'état normal.
R:
2. Assurez-vous que la distance entre les détecteurs et l'A1 ne dépasse pas 100m et qu'il n'y a
aucun obstacle.
3. Vérifiez que la batterie du détecteur n'est pas épuisée.
Le détecteur peut détecter les alarmes et l'A1 fonctionne normalement, mais sans message vocal.
Q:
1. Assurez-vous que la distance entre le détecteur et l'A1 ne dépasse pas 100m et qu'il n'y a
R:
aucun obstacle.
2. Réglez la position d'installation de l'A1. Il est conseillé de l'installer au centre de votre
logement.
3. Assurez-vous que l'A1 n'est pas en mode muet.
28
Page 33

Funzionamento
Punto 1
Preparazione
Assicurarsi che l'ambiente e l'alimentazione soddisfino i requisiti seguenti:
•Tensione di alimentazione: 5 V CC (Micro USB)
•Temperatura di esercizio: da -10 °C a 55 °C
•Umidità di esercizio: da 10% a 90% (non condensante)
Accendere A1
1
Collegare il cavo dati USB tra A1 e l'alimentatore, poi collegare l'alimentatore a una presa elettrica.
L'indicatore bianco si accende ad indicare che A1 si sta accendendo; quando A1 si è avviato
completamente si accende l'indicatore rosso.
Alimentatore
Connettore di
alimentazione
Installare l'app EZVIZ
2
- Collegare il telefono cellulare alla Wi-Fi.
- Scaricare e installare l'app EZVIZ ricercando "EZVIZ" nell'App Store (versione iOS) o in Google
TM
Play
(versione Android).
- Avviare l'app e registrare un account di utente EZVIZ seguendo la procedura guidata.
Cavo dati USB
29
Page 34

Punto 2
Impostazioni rapide
Aggiungere l'A1
1
- Collegare il telefono cellulare alla Wi-Fi.
- Accedere all'app EZVIZ e leggere il QR code sull'A1 per aggiungerlo all'account EZVIZ.
- Seguire le istruzioni per configurare la connessione Wi-Fi dell'A1, tra cui SSID (nome della
connessione Wi-Fi) e password.
•Assicurarsi che il telefono cellulare sia collegato alla Wi-Fi e che A1 non sia ancora
collegato ad alcuna Wi-Fi, altrimenti la connessione non potrà essere stabilita.
•La distanza tra A1 e telefono cellulare non deve superare 50 cm.
Completamento della configurazione
2
L'indicatore di Connessione lampeggia in giallo quando A1 si è collegato correttamente alla Wi-Fi (del
router).
Mantenere premuto il pulsante delle Impostazioni per attivare la funzione di modifica della
Wi-Fi. Esempio: la procedura per collegare il dispositivo A1 alla Wi-Fi (router) non è riuscita
ed è necessario ripetere l'operazione; o si desidera modificare la connessione Wi-Fi (per
collegare il dispositivo A1 a una nuova rete Wi-Fi).
30
Page 35

Punto 3
Aggiungere i rivelatori
Abilitare la modalità di aggiunta rivelatori
1
Premere una volta il pulsante Impostazioni per avviare la procedura di aggiunta dei rivelatori,
assistita da istruzioni vocali. Gli indicatori giallo e rosso lampeggeranno due volte al secondo ad
indicare che la modalità di aggiunta dei rivelatori è abilitata.
Aggiungere i rivelatori
2
Avvicinare il rivelatore all'A1 (entro 50 cm) e far scattare allarme manualmente. Un messaggio
vocale conferma il tipo e il numero di serie del rivelatore indicando che è stato correttamente
aggiunto (è possibile aggiungere fino a 32 rivelatori).
E
V
O
M
E
R
O
T
N
R
U
T
……
Disabilitare la modalità di aggiunta rivelatori
3
Dopo aver aggiunto tutti i rivelatori, premere una volta il pulsante Impostazioni per disattivare la
modalità di aggiunta rivelatori.
•La modalità di aggiunta dei rivelatori verrà disabilitata automaticamente se non viene effettuata
alcuna operazione entro 3 minuti dalla sua attivazione.
•Per funzionare correttamente i rivelatori devono essere posizionati a una distanza massima di 100
m dall'A1 (in assenza di barriere fisiche).
D
O
N
O
T
P
A
I
N
T
31
Page 36

Appendice
Contenuto della confezione
A1 (1) Telecomando (1) Cavo dati USB (1)
Guida rapida (1) Alimentatore (1)
Introduzione alle funzioni
Sorveglianza domestica insostituibile
Possibilità di accedere ai diversi rivelatori wireless per realizzare una protezione completa
della propria casa.
La migliore tecnologia di comunicazione al mondo
Pratica implementazione della sicurezza, con rivelatori senza fili.
Pratica configurazione di rete
Connessione Wi-Fi con un solo tasto.
Servizio EZVIZ Cloud P2P
Ricezione allarmi e controllo remoto da telefono cellulare, PC e tablet.
32
Page 37

A1 Elementi
Pulsante
Impostazioni
Ingresso
alimentazione
Altoparlante
Nome Descrizione
Ingresso alimentazione
LED ALLARME Rosso fisso: L'A1 è nello stato normale.
LED CONNESSIONE Giallo lampeggiante: la Wi-Fi è connessa.
LED PRONTO Bianco fisso: L'A1 è acceso (porta USB).
Foro di montaggio Foro per appendere il dispositivo.
Pulsante RESET Collegare il dispositivo all'alimentazione (porta USB). Mantenere premuto
Alimentazione del dispositivo (da porta USB).
Rosso lampeggiante: Si è verificato un allarme.
Spento: La Wi-Fi è disconnessa.
il pulsante RESET con un ago e rilasciarlo quando i 3 LED lampeggiano
simultaneamente una volta. Il dispositivo si riavvia e tutte le impostazioni
verranno ripristinate, tranne i rilevatori collegati e il telecomando.
Foro di montaggio
LED (ALLARME,
CONNESSIONE e PRONTO)
Pulsante RESET
33
Page 38

Introduzione al telecomando
LED
Tasto di emergenza
Inserito Parziale
Disinserimento
Nome Descrizione
LED
Lampeggia quando viene premuto un tasto.
Tenere premuto il tasto per 2 s per inviare un allarme di emergenza alla piattaforma
EZVIZ.
Se qualcuno rimane a casa o si sta per entrare in casa, è necessario disinserire il
sistema di allarme. Premere il tasto per attivare la modalità di disinserimento.
Per sentirsi protetti in casa: si inseriscono solo gli elementi perimetrali della casa
(porte e finestre). La modalità di inserimento parziale è idonea durante il giorno o le
ore di sonno notturne. Premere il tasto per attivare la modalità di inserito parziale.
Quando in casa non c'è nessuno, è necessario attivare il sistema di allarme per
proteggere l'abitazione dagli intrusi. La modalità di inserimento è appropriata. Premere
il tasto per attivare la modalità di Inserito.
Premere per disattivare le indicazioni vocali.
•Il telecomando incluso nella confezione è già collegato all'A1. Fare riferimento al passaggio 3
in Funzionamento per collegare un altro telecomando all'A1 se il telecomando è nuovo o non
funziona correttamente.
•Le descrizioni elencate sopra per la modalità d'inserimento sono le impostazioni predefinite. È
possibile utilizzare l'app EZVIZ per personalizzare lo stato di inserimento dei rivelatori nelle varie
modalità d'inserimento e per cambiare la modalità di inserimento.
34
Inserito
Muto
Page 39

FAQ
Quando si tenta di aggiungere A1 con l'app EZVIZ viene generato il messaggio vocale "The device
D:
is offline - Il dispositivo è offline" o "The device is not registered - Il dispositivo non è registrato".
1. Verificare se A1 è collegato alla Wi-Fi e accertarsi che funzioni.
R:
2. Verificare se l'indicatore giallo lampeggia; in caso negativo, riavviare A1 e collegarlo
nuovamente alla Wi-Fi.
Il telefono cellulare non riceve alcuna notifica quando A1 è online e si verifica un allarme.
D:
1. Assicurarsi che l'app EZVIZ sia in esecuzione sullo smartphone.
R:
2. Per un telefono Android, accertarsi che l'app sia attiva in background; per iOS, abilitare la
funzione di push dei messaggi in "Impostazioni > Notifiche".
Lo stato del rivelatore viene indicato come offline nell'app EZVIZ.
D:
1. Assicurarsi che la Wi-Fi a cui è collegato A1 funzioni correttamente.
R:
2. Assicurarsi che la distanza tra i rivelatori e A1 sia inferiore a 100 m e che non vi siano ostacoli.
3. Assicurarsi che la batteria del rivelatore non sia scarica.
Il rivelatore rileva l'allarme, A1 funziona normalmente, ma non viene emesso alcun messaggio
D:
vocale.
1. Assicurarsi che la distanza tra rivelatore e A1 sia inferiore a 100 m e che non vi siano ostacoli.
R:
2. Spostare l'A1. Si raccomanda di installare A1 al centro della casa.
3. Accertarsi che A1 non sia in modalità Muto.
35
Page 40

Operações
Passo 1
Preparação
Certifique-se de que o ambiente e a fonte de alimentação cumprem os requisitos indicados a seguir:
•Tensão de alimentação: CC 5V (micro USB)
•Temperatura de funcionamento: -10°C a 55°C (14°F a 131°F)
•Humidade na área de funcionamento: 10% a 90% (sem condensação)
Iniciação do A1
1
Ligue o A1 ao adaptador de alimentação com o cabo de dados USB e, em seguida, ligue o adaptador
de alimentação à tomada de alimentação. O indicador branco acende-se indicando que o A1 está a
iniciar. Em seguida, o indicador vermelho acende-se quando o A1 está completamente iniciado.
Adaptador de alimentação
Tomada de alimentação
Cabo de dados USB
Instalação da aplicação EZVIZ
2
- Ligue o telemóvel à rede Wi-Fi.
- Transfira e instale a aplicação EZVIZ pesquisando por "EZVIZ" na App Store (versão iOS) e na
- Inicie a aplicação e faça o registo para obter uma conta de utilizador EZVIZ seguindo o assistente
Google Play
de arranque.
TM
(versão Android).
36
Page 41

Passo 2
Definições rápidas
Adição do A1
1
Ligue o telemóvel a uma rede Wi-Fi.
-
Inicie sessão na aplicação EZVIZ e leia o código QR no A1 para adicioná-lo à sua conta EZVIZ.
-
Siga os comandos para configurar a ligação do A1 à rede de Wi-Fi. Por exemplo, SSID (nome da
-
rede Wi-Fi) e palavra-passe.
•Certifique-se de que o telemóvel está ligado à rede Wi-Fi e de que o A1 ainda não está
ligado a qualquer rede Wi-Fi, caso contrário a ligação irá falhar.
•A distância entre o A1 e o telemóvel não deve ser superior a 50 cm.
Conclusão da configuração
2
O indicador LIGAÇÃO pisca a amarelo quando o A1 é adicionado com sucesso à rede Wi-Fi (do
router).
Prima sem soltar o botão de definição se quiser ativar a função de modificação de Wi-Fi.
Por exemplo: não conseguiu ligar o dispositivo A1 à rede Wi-Fi (router) e tem de repetir a
operação; ou quer mudar a ligação da rede Wi-Fi (para ligar o dispositivo A1 a uma nova rede
Wi-Fi).
37
Page 42

Passo 3
Adição de detetores
Ativação do Modo de adição de detetores
1
Prima o botão de definição uma vez e é emitido o comando de voz do Modo de adição de detetores.
Os indicadores amarelo e vermelho piscam duas vezes por segundo, indicando que o Modo de adição
de detetores está ativado.
Adição de detetores
2
Aproxime o detetor do A1 (numa distância até 50cm) e acione o alarme manualmente. É emitido um
comando de voz com o tipo e número de série do detetor, indicando que o detetor correspondente foi
adicionado (são permitidos até 32 detetores).
E
V
O
M
E
R
O
T
N
R
U
T
……
Desativação do Modo de adição de detetores
3
Prima o botão de definição uma vez para desativar o Modo de adição de detetores depois de terem
sido adicionados todos os detetores.
•O Modo de adição de detetores será desativado se não ocorrer qualquer operação no espaço de 3
minutos.
•A distância de funcionamento máxima permitida entre os detetores e o A1 é de 100 m (não é
permitido qualquer obstáculo).
D
O
N
O
T
P
A
I
N
T
38
Page 43

Anexo
Conteúdo da caixa
1 A1 1 Controlo remoto 1 Cabo de dados USB
1 Manual de iniciação rápida 1 Adaptador de alimentação
Introdução às funções
Proteção doméstica insubstituível
Dispositivo acessível a vários detetores sem fios e que proporciona uma proteção
abrangente da sua casa.
Líder mundial em Tecnologia de comunicação
Prática implementação de segurança com detetores sem fios.
Prática configuração de rede
Ligação a rede Wi-Fi premindo um botão.
Serviço EZVIZ Cloud P2P
Receção de sinais de alarme e controlo remoto no telemóvel e PC.
39
Page 44

A1 Informações Básicas
Botão de
definição
Entrada de
alimentação
Altifalante
Nome Descrição
Entrada de alimentação
Indicador LED de
ALARME
Indicador LED de
LIGAÇÃO
Indicador LED de
PRONTO
Orifício para instalação Orifício para colocação do dispositivo.
Botão REPOR Ligue o dispositivo à fonte de alimentação (por uma porta USB). Prima sem soltar
Fonte de alimentação para o dispositivo (por uma porta USB).
Vermelho fixo: o A1 está no estado normal.
Vermelho intermitente: é emitido um alarme.
Amarelo intermitente: o Wi-Fi está ligado.
Apagado: o Wi-Fi está desligado.
Branco fixo: o A1 está a receber energia (por uma porta USB).
o botão REPOR com uma agulha e liberte quando os 3 indicadores piscarem
ao mesmo tempo uma vez. O dispositivo é reiniciado e todas as definições são
repostas, exceto os detetores ligados e o controlo remoto.
Orifício para instalação
Indicadores LED (ALARME,
LIGAÇÃO e PRONTO)
Botão REPOR
40
Page 45

Introdução ao controlo remoto
Indicador LED
Botão de emergência
Modo A dormir
Modo Em casa
Nome Descrição
Indicador LED
Pisca quando é premido qualquer botão.
Mantenha premido o botão durante 2 segundos para enviar alarme de emergência para
a plataforma EZVIZ.
Se está gente em casa ou se vai entrar em casa, tem de desarmar o sistema de
alarme. Carregue no botão para ativar o modo "Em casa".
Se estiver em casa e, mesmo assim, quiser continuar protegido: as partes do
perímetro da casa (portas e janelas) serão as únicas armadas. O modo "A dormir" é
adequado durante o dia ou à noite, quando estiver deitado. Carregue no botão para
ativar o modo "A dormir".
Se não estiver ninguém em casa, é necessário ativar o sistema de alarme para
protegê-la dos intrusos. O modo "A sair de casa" é apropriado. Carregue no botão para
ativar o modo "A sair de casa".
Prima para desligar os comandos de voz.
•Por predefinição, o controlo remoto que se encontra na embalagem está ligado ao A1. Consulte
o passo 3 do capítulo Operação para ligar outro controlo remoto ao A1 se o controlo remoto não
funcionar normalmente ou se tiver um novo.
•As descrições acima para o modo de armação são as predefinições. Pode utilizar a aplicação EZVIZ
para personalizar o estado de armação dos detetores em cada modo de armação e comutar o
modo de armação.
41
Modo A sair de casa
Silêncio
Page 46

QUESTÕES FREQUENTES
Comandos "O dispositivo está offline." ou "O dispositivo não está registado." ao adicionar o A1
Q:
através da aplicação EZVIZ.
1. Verifique se a rede Wi-Fi está ligada ao A1 e certifique-se de que está em funcionamento.
R:
2. Verifique se o indicador amarelo está a piscar; se não estiver, reinicie o A1 e ligue-o novamente
à rede Wi-Fi.
Não é possível receber alarmes no telemóvel quando o A1 está online e ocorre um alarme.
Q:
1. Certifique-se de que a aplicação EZVIZ está em execução no seu telemóvel.
R:
2. Em telemóveis com SO Android, certifique-se de que a aplicação está em execução em
segundo plano; em telemóveis com iOS, ative a função de mensagem push em "Definições >
Notificação".
O estado do detetor é apresentado como offline na aplicação EZVIZ.
Q:
1. Certifique-se de que o estado da rede Wi-Fi à qual o A1 está ligado é normal.
R:
2. Certifique-se de que a distância entre os detetores e o A1 é inferior a 100 m e de que não
existem obstáculos entre os mesmos.
3. Certifique-se de que a bateria do detetor não está gasta.
O detetor consegue detetar o alarme e o A1 está a funcionar normalmente, mas os comandos de
Q:
voz não são emitidos.
1. Certifique-se de que a distância entre o detetor e o A1 é inferior a 100 m e de que não existem
R:
obstáculos entre os mesmos.
2. Ajuste a posição de instalação do A1. Recomenda-se a instalação do A1 no centro da casa.
3. Certifique-se de que o A1 não está no modo de silêncio.
42
Page 47

Операции
Шаг 1
Подготовка
Удостоверьтесь в соблюдении приведенных ниже требований в отношении окружающей среды и
электропитания:
• Напряжение питания: 5В пост. тока (Micro USB)
• Рабочая температура: от -10 до +55 °С (от -14 до +131 °F)
• Влажность в рабочем режиме: 10–90% (без конденсации)
Запуск блока A1
1
Соедините блок A1 и адаптер питания с помощью USB-кабеля для передачи данных, а затем
подключите адаптер питания к розетке электросети. В начале запуска A1 загорается белый
индикатор. По завершению периода запуска включается красный индикатор.
Адаптер питания
Розетка электросети
USB-кабель для
передачи данных
Установка приложения EZVIZ
2
- Подключите мобильный телефон к сети Wi-Fi.
- Загрузите и установите приложение EZVIZ. Приложение можно найти, выполнив поиск по
слову «EZVIZ», в App Store (версия для iOS) или в Google Play
- Запустите приложение и зарегистрируйте новый аккаунт пользователя EZVIZ, следуя
инструкциям мастера запуска.
TM
(версия для Android).
43
Page 48

Шаг 2
Процедура быстрой настройки
Добавление блока A1
1
- Подключите мобильный телефон к сети Wi-Fi.
- Войдите в приложение EZVIZ и отсканируйте QR-код на блоке A1, чтобы добавить этот блок к
вашему аккаунту EZVIZ.
- Следуйте инструкциям на экране, чтобы задать параметры подключение блока A1 к сети Wi-Fi,
такие как SSID (имя сети Wi-Fi) и пароль.
Убедитесь, что мобильный телефон подключен к сети Wi-Fi, а блок A1 еще не связан ни с
•
одной сетью Wi-Fi. В противном случае подключение не будет выполнено.
Расстояние между блоком A1 и мобильным телефоном не должно превышать 50см.
•
Завершение настройки
2
Когда блок A1 подключится к сети Wi-Fi (маршрутизатора), индикатор LINK (ПОДКЛЮЧЕНИЕ)
начнет мигать желтым цветом.
Если требуется включить функцию обновления параметров Wi-Fi, нажмите и удерживайте
кнопку Setting (Настройка). Это необходимо, например, когда процедура подключения
блока A1 к сети Wi-Fi (маршрутизатора) завершилась сбоем и требуется повторить ее или
когда вы хотите изменить конфигурацию Wi-Fi (подк лючить блок А1 к другой сети Wi-Fi).
44
Page 49

Шаг 3
Подключение датчиков
Включение режима Adding Detectors Mode (Режим добавления датчиков)
1
Кратковременно нажмите кнопку Setting (Настройка). Голосовое сообщение должно
подтвердить запуск режима добавления датчиков. В режиме добавления датчиков желтый и
красный индикаторы мигают с частотой два раза в секунду.
Подключение датчиков
2
Поднесите датчик к блоку A1 (расстояние должно быть не более 50см) и вручную активируйте
сигнал тревоги. Голосовое сообщение, в котором указывается тип устройства и серийный
номер, подтверждает, что соответствующий датчик подключен (допускается подключение до
32датчиков).
E
V
O
M
E
R
O
T
N
R
U
T
……
Выключение режима Adding Detectors Mode (Режим добавления датчиков)
3
Когда все датчики будут подключены, кратковременно нажмите кнопку Setting (Настройка),
чтобы выключить режим добавления датчиков.
• Режим добавления датчиков выключается автоматически при отсутствии действий
пользователя в течение 3 минут.
• Максимальное эффек тивное расстояние между датчиками и блоком A1 составляет 100 м (при
отсутствии преград).
D
O
N
O
T
P
A
I
N
T
45
Page 50

Приложение
Содержимое упаковочной коробки
Блок А1, 1 шт. Пульт дистанционного
управления, 1 шт.
Краткое руководство пользователя, 1 шт. Адаптер питания, 1 шт.
USB-кабель для передачи
Функциональные возможности
Незаменимое устройство для охраны дома
Возможность подключения различных беспроводных датчиков обеспечивает
комплексную защиту вашего дома.
Использование инновационной технологии связи
Удобное развертывание охранной системы с беспроводными датчиками.
Удобная конфигурация сети
Подключение к сети Wi-Fi нажатием одной кнопки (сети Wi-Fi 5G не поддерживаются).
Служба облака EZVIZ P2P
Получение сигналов тревоги и дистанционное управление на мобильном телефоне и ПК.
46
данных, 1 шт.
Page 51

Основные компоненты блока A1
Кнопка Setting
(Настройка)
Вход питания
Динамик
Наименование Описание
Вход питания
Индикатор ALARM
(СИГНАЛ ТРЕВОГИ)
Индикатор LINK
(ПОДКЛЮЧЕНИЕ)
Индикатор READY
(ГОТОВНОС ТЬ)
Монтажное отверстие О тверстие для установки устройства на вертикальной поверхности.
Кнопка RESET (СБРОС) Подключите устройство к источнику питания (через USB-порт).
Электропитание устройства (через USB-порт).
Горит красным: блок A1 находится в нормальном состоянии.
Мигает красным: указывает, что подается сигнал тревоги.
Мигает желтым: установлено подключение к сети Wi-Fi.
Не горит: подключение к сети Wi-Fi отсутствует.
Горит белым: блок A1 запитан (через USB-порт).
Нажмите и удерживайте с помощью иглы кнопку RESET (СБРОС). Когда
3индикатора мигнут одновременно один раз, отпустите кнопку. Устройство
перезагрузится и все настройки вернутся к заводским значениям, за
исключением тех, которые относятся к подключенным датчикам и к пульту
дистанционного управления.
Монтажное отверстие
Светодиодные индикаторы
[ALARM (СИГНАЛ ТРЕВОГИ),
LINK (ПОДКЛЮЧЕНИЕ) и
READY (ГОТОВНОСТЬ)]
Кнопка RESET (СБРОС)
47
Page 52

Основные компоненты пульта дистанционного управления
Светодиодный индикатор
Кнопка подачи экстренного
сигнала тревоги
Режим «Дома»
Наименование Описание
Светодиодный
индикатор
Этот индикатор мигает при нажатии любой кнопки.
Удерживайте эту кнопку нажатой 2 секунды для отправки экстренного сигнала
тревоги в систему EZVIZ.
Если кто-то находится дома или вы собираетесь попасть в дом, необходимо отключить
систему сигнализации. Нажмите эту кнопку, чтобы активировать режим «Дома».
Когда вы находитесь дома, но хотите чувствовать себя в безопасности, поставьте на охрану
только периметр дома (двери и окна). Режим «Сон» можно использовать как в течение
дня, так и в ночное время. Нажмите эту кнопку, чтобы активировать режим «Сон».
Если никто не остается дома, необходимо активировать систему сигнализации, чтобы
защитить дом от злоумышленников. Для этого предназначен режим «Покидание дома».
Нажмите эту кнопку, чтобы активировать режим «Покидание дома».
Нажмите эту кнопку, чтобы отключить голосовые сообщения.
• Пульт дистанционного управления в комплекте поставки сопряжен с блоком A1 по
умолчанию. Если пульт ДУ не работает должным образом или у вас есть новый пульт, см. шаг
3 в руководстве по эксплуатации, чтобы подключить другой пульт ДУ к блоку A1.
• Описанный выше режим постановки на охрану включен в настройках по умолчанию. Вы
можете изменять состояния датчиков в каждом режиме охраны и переключать эти режимы
в приложении EZVIZ.
48
Режим «Сон»
Режим «Покидание дома»
Выключение звука
Page 53

Устранение неисправностей
При добавлении блока A1 с помощью приложения EZVIZ появляется сообщение The device
В:
is offline (Устройство не подключено к сети) или The device is not registered (Устройство не
зарегистрировано).
1. Убедитесь, что блок A1 подключен к сети Wi-Fi и функционирует нормально.
О:
2. Проверьте, мигает ли желтый индикатор. Если нет, перезагрузите блок A1 и снова
подключите его к сети Wi-Fi.
Мобильный телефон не может принимать сигналы тревоги, когда блок A1 находится в
В:
сетевом режиме и срабатывает сигнализация.
1. Убедитесь в том, что приложение EZVIZ работает на мобильном телефоне.
О:
2. Для телефонов на базе Android убедитесь, что приложение работает в фоновом режиме, а
для телефонов с системой iOS активируйте функцию передачи сообщений в меню Settings
(Настройки) > Notication (Уведомления).
В приложении EZVIZ отображается, что датчик находится в автономном режиме.
В:
1. Убедитесь, что сеть Wi-Fi, к которой подключен блок A1, работает в нормальном режиме.
О:
2. Удостоверьтесь, что расстояние между датчиками и блоком A1 не превышает 100м, а
преграды для распространения сигналов отсутствуют.
3. Убедитесь, что батарея датчика не разряжена.
Датчик подает сигналы тревоги и блок A1 работает нормально, но отсутствуют голосовые
В:
сообщения.
1. Удостоверьтесь, что расстояние между датчиком и блоком A1 не превышает 100м, а
О:
преграды для распространения сигналов отсутствуют.
2. Выберите оптимальное положение для установки блока A1. Рекомендуется установить блок
A1 в центре дома.
3. Убедитесь, что блок A1 не находится в режиме отключения звука.
49
Page 54

Kasutamine
1. toiming
Ettevalmistus
Veendu, et keskkond ja toiteallikas vastavad allpool toodud nõuetele.
•Toitepinge: alalisvool 5 V (mikro-USB)
•Töötemperatuur: -10–55 °C (14–131 °F)
•Tööniiskus: 10–90% (mittekondenseeruv)
A1 käivitamine
1
Ühenda A1 ja toiteadapter USB-andmekaabliga ning seejärel ühenda toiteadapter pistikupesaga.
Süttib valge näidik, mis näitab, et A1 käivitub, ning A1 täielikul käivitumisel süttib punane näidik.
Toiteadapter
Pistikupesa
USB-andmekaabel
EZVIZi rakenduse paigaldamine
2
- Ühenda enda mobiiltelefon traadita võrguga.
- Otsi poes App Store (iOSi versioon) või Google Play
alla EZVIZi rakendus ja paigalda see.
- Käivita rakendus ja registreeri see vastavalt käivitusviisardile EZVIZi kasutajakontole.
TM
(Androidi versioon) märksõna „EZVIZ“, laadi
50
Page 55

2. toiming
Kiirseadistamine
A1 lisamine
1
- Loo mobiiltelefonil ühendus traadita võrguga.
- Logi sisse EZVIZi kontole ja skanni A1 peal olev QR-kood, et lisada seade EZVIZi kontole.
- Järgi A1 traadita võrgus konfigureerimiseks viipasid, näiteks SSID (traadita ühenduse nimi) ja
salasõna.
•Veendu, et mobiiltelefon traadita võrku ühendatud ja A1 ei ole veel traadita võrku ühendatud
või ühendamine ebaõnnestub.
•A1 ja mobiiltelefoni vaheline kaugus ei tohi olla rohkem kui 50 cm.
Konfigureerimise lõpetamine
2
Kui A1 on edukalt traadita võrku (ruuteri abil) ühendatud, siis hakkab näidik LINK (LINGI) kollaselt
vilkuma.
Kui soovid traadita võrgu modifitseerimisfunktsiooni lubada, siis hoia all seadistamise nuppu.
Näiteks: A1 traadita võrguga (ruuteriga) ühendamine ebaõnnestub ja pead toimingut kordama
või soovid traadita ühendust muuta (ühendada A1 muu traadita võrguga).
51
Page 56

3. toiming
Andurite lisamine
Andurite lisamise režiimi lubamine
1
Vajuta üks kord seadistamise nupule ja andurite lubamise režiimi lisamiseks käivitub häälviipamine.
Kollane ja punane näidik vilguvad kaks korda igas sekundis, mis näitab andurite lisamise režiimi
lubamist.
Andurite lisamine
2
Vii andur A1 lähedale (50 cm raadiuses) ja lülita häire käsitsi sisse. Käivitub häälviip, öeldes anduri
tüübi ja seerianumbri, viidates sellele, et vastav andur on lisatud (kokku on lubatud kuni 32 andurit).
E
V
O
M
E
R
O
T
N
R
U
T
……
Andurite lisamise režiimi keelamine
3
Kui kõik andurid on lisatud, siis vajuta üks kord seadistamise nupule, et andurite lisamise režiim
keelata.
•Andurite lisamise režiim on keelatud, kui kolme minuti jooksul mingit tegevust ei toimu.
•Andurite ja A1 vaheline maksimaalne tõhus kaugus on 100 m (tõkked on keelatud).
D
O
N
O
T
P
A
I
N
T
52
Page 57

Lisa
Karbi sisu
A1 × 1 Pult × 1 USB-andmekaabel × 1
Lühijuhend × 1 Toiteadapter × 1
Funktsiooni tutvustus
Asendamatu kodukaitse
Erinevatele juhtmevabadele anduritele ligipääsetav ja tagab sinu kodu täieliku kaitse.
Maailma juhtiv kommunikatsioonitehnoloogia
Mugav turvalisuse tagamine juhtmevabade andurite abil.
Mugav võrgus konfigureerimine
Ühe vajutusega traadita võrguga ühenduse loomine (ei toeta 5G traadita ühendust).
EZVIZi pilve P2P teenus
Häire vastuvõtmine ja kaugjuhtimine mobiiltelefoni ja personaalarvuti abil.
53
Page 58

A1 põhiandmed
Seadistamise
nupp
Sisendvõimsus
Kõlar
Nimi Kirjeldus
Sisendvõimsus Seadme toiteallikas (USB-pordi kaudu)
Häire valgusdioodnäidik Püsiv punane: A1 olek on normaalne.
Valgusdioodnäidik LINK
(LINGI)
Valgusdioodnäidik READY
(VALMIS)
Monteerimisava Ava seadme riputamiseks
LÄHTESTAMISE nupp Ühenda seade toiteallikaga (USB-pordi kaudu). Vajuta nõelaga LÄHTESTAMISE
Vilkuv punane: toimunud on häire.
Vilkuv kollane: traadita võrguga on ühendus loodud.
Ei põle: traadita võrguga ühendus puudub.
Püsiv valge: A1 on toiteallikaga ühendatud (USB-pordi kaudu).
nupule ja hoia seda all ning vabasta, kui kolm näidikut on samal ajal üks
kord vilkunud. Seade taaskäivitub ning kõik seadistused taastatakse, välja
arvatud ühendatud andurid ja kaugjuhtimine.
Monteerimisava
Valgusdioodnäidikud
ALARM, LINK ja READY
(HÄIRE, LINGI ja VALMIS)
LÄHTESTAMISE nupp
54
Page 59

Kaugjuhtimise põhiandmed
Valgusdioodnäidik
Hädaolukorra nupp
Unerežiim
Kodusoleku režiim
Nimi Kirjeldus
Valgusdioodnäidik
•Paketis sisalduv kaugjuhtimispult on vaikimis A1-ga ühendatud. Vaata juhendist 3. toimingut muu
kaugjuhtimispuldi A1-ga ühendamiseks, kui kaugjuhtimispult ei tööta või kui oled saanud uue puldi.
•Eespool kirjeldatud häiresüsteemi sisselülitamise režiim on vaikimisi seadistatud. Andurite
häiresüsteemi olekut saab igas režiimis muuta ning häiresüsteemi režiimi saab EZVIZi rakenduse
abil sisse-välja lülitada.
Vilgub mis tahes nupu vajutamisel.
Hoia EZVIZi platvormile häireolukorra teate saatmiseks nuppu 2 sekundit all.
Kui keegi on kodus või kui kavatsed majja siseneda, siis tuleb häiresüsteem välja
lülitada. Kodusoleku režiimi aktiveerimiseks vajuta nupule.
Kui oled kodus, kuid soovid ikkagi kaitset, siis tuleb häirerežiimi lülitada ainult
maja väljapoole jäävad osad (uksed ja aknad). Päevaseks ajaks ja öiseks uneajaks
sobib unerežiim. Unerežiimi käivitamiseks vajuta nupule.
Kui kedagi kodus ei ole, pead häiresüsteemi sisse lülitama, et kaitsta kodu
sissetungijate eest. Sobib kasutada kodust-väljas režiimi. Kodust-väljas režiimi
käivitamiseks vajuta nupule.
Häälviipade väljalülitamiseks vajuta nupule.
55
Kodust-väljas režiim
Vaigistatud
Page 60

Tõrkeotsing
A1 lisamisel EZVIZi rakenduse viibad: „The device is offline.” (Seade ei ole võrgus) või „The device
K:
is not registered.” (Seade ei ole registreeritud).
1. Kontrolli, kas A1 on traadita võrku ühendatud ja veendu, et ühendus toimib.
V:
2. Kontrolli, kas kollane näidik vilgub; kui mitte, siis lähtesta A1 ja loo uuesti ühendus traadita
võrguga.
Mobiiltelefon ei saa häiret vastu võtta, kui A1 on võrgus ja esineb häire.
K:
1. Kontrolli, kas EZVIZi rakendus töötab mobiiltelefonis.
V:
2. Androidi OSiga mobiiltelefoni puhul veendu, et rakendus töötab taustal; iOSi puhul luba kohas
„Settings > Notification” (Sätted > Teavitused) sõnumite tõukamise funktsioon.
EZVIZi rakenduses kuvatakse anduri olekuna väljalülitatud.
K:
1. Veendu, et traadita võrk, millesse A1 on ühendatud, töötab normaalselt.
V:
2. Veendu, et andurite ja A1 vaheline kaugus on vähem kui 100 m ja et ei oleks tõkkeid.
3. Veendu, et anduri patarei ei oleks tühi.
Andur tuvastab häire ja A1 töötab normaalselt, kuid häälviipasid ei ole.
K:
1. Veendu, et andurite ja A1 vaheline kaugus on vähem kui 100 m ja et ei oleks tõkkeid.
V:
2. Kohenda A1 paigaldusasendit. Soovitatav on A1 paigaldada maja keskele.
3. Veendu, et A1 ei oleks vaigistatud režiimis.
56
Page 61

Darbības
1.solis
Sagatavošana
Pārliecinieties, ka apkārtējā vide un strāvas padeve atbilst šādām prasībām.
Strāvas spriegums: 5V līdzstrāva (MicroUSB)
•
Darba temperatūra: no -10°C līdz 55°C (no 14°F līdz 131°F)
•
Darba vides mitruma līmenis: no 10% līdz 90% (nekondensējošs)
•
A1 ierīces startēšana
1
Savienojiet A1 ierīci un strāvas adapteri ar USB datu kabeli un tad iespraudiet strāvas adapteri
kontaktligzdā. Iedegsies baltais indikators, norādot, ka A1 ierīce tiek startēta, bet pēc pilnīgas A1
startēšanas iedegsies sarkanais indikators.
Strāvas adapteris
Strāvas kontaktligzda
USB datu kabelis
Lietotnes EZVIZ instalēšana
2
- Pievienojiet savu viedtālruni Wi-Fi tīklam.
- Lejupielādējiet un instalējiet lietotni EZVIZ, meklējot „EZVIZ” veikalā App Store (iOS versija) vai Google
TM
Play
(Android versija).
- Palaidiet lietotni un reģistrējiet EZVIZ lietotāja kontu, ievērojot startēšanas vedņa norādījumus.
57
Page 62

2.solis
Ātrie iestatījumi
A1 ierīces pievienošana
1
- Pievienojiet viedtālruni Wi-Fi tīklam.
- Piesakieties lietotnē EZVIZ un noskenējiet QR kodu uz A1 ierīces, lai pievienotu ierīci savam EZVIZ
kontam.
- Ievērojiet uzvedņu norādījumus, lai kongurētu A1 ierīces Wi-Fi savienojumu, piemēram SSID (Wi-Fi
nosaukumu) un paroli.
• Pārliecinieties, ka mobilais tālrunis ir pievienots Wi-Fi tīklam un A1 ierīce vēl nav savienota ar
kādu no Wi-Fi tīkliem, pretējā gadījumā savienojums neizdosies.
• Attālums starp A1 ierīci un mobilo tālruni nedrīkst pārsniegt 50cm.
Kongurācijas pabeigšana
2
Kad A1 ierīce ir sekmīgi savienota ar (maršrutētāja) Wi-Fi tīklu, indikators „SAVIENOJUMS” mirgo
dzeltenā krāsā.
Ja vēlaties iespējot Wi-Fi modicēšanas funkciju, turiet nospiestu iestatīšanas pogu. Piemēram,
šādos gadījumos: A1 ierīces un (maršrutētāja) Wi-Fi tīkla savienošana nav sekmīga, un jums
procedūra jāatkārto, vai arī jūs vēlaties mainīt savienojumu (savienot A1 ierīci ar citu Wi-Fi tīklu).
58
Page 63

3.solis
Detektoru pievienošana
Detektoru pievienošanas režīma iespējošana
1
Vienreiz nospiediet iestatīšanas pogu, un tiks startēta detektoru pievienošanas režīma balss
uzvedne. Dzeltenais un sarkanais indikators mirgo divreiz sekundē, norādot, ka ir iespējots detektoru
pievienošanas režīms.
Detektoru pievienošana
2
Novietojiet detektoru A1 ierīces tuvumā (ne tālāk kā 50cm) un manuāli izraisiet signalizāciju. Tiek
atskaņota balss uzvedne par detektora tipu un sērijas numuru, kas norāda, ka attiecīgais detektors ir
pievienots (atļauts pievienot līdz 32detektoriem).
E
V
O
M
E
R
O
T
N
R
U
T
……
Detektoru pievienošanas režīma atspējošana.
3
Vienreiz nospiediet iestatīšanas pogu, lai pēc detektoru pievienošanas atspējotu detektoru
pievienošanas režīmu.
Detektoru pievienošanas režīms tiks atspējots, ja 3 minūtes netiks veiktas nekādas darbības.
•
Maksimālais efektīvais attālums starp detektoriem un A1 ierīci drīkst būt 100m (nedrīkst būt
•
šķēršļu).
D
O
N
O
T
P
A
I
N
T
59
Page 64

Pielikums
Komplekta saturs
A1 ierīcex1 Tālvadības pultsx1 USB datu kabelisx1
Ātrā starta rokasgrāmatax1 Strāvas adapterisx1
Funkciju apraksts
Neaizvietojams mājas sargs
Pieejams dažādiem bezvadu detektoriem un nodrošina visaptverošu jūsu mājas aizsardzību.
Pasaulē vadošā sakaru tehnoloģija
Ērta drošības garantēšana ar bezvadu detektoriem.
Ērta tīkla kongurācija
Wi-Fi savienojums ar vienu pogas spiedienu (neatbalsta 5G Wi-Fi tīklu).
EZVIZ mākoņa P2P pakalpojums
Trauksmes signāla saņemšana un tālvadība ar viedtālruni un datoru.
60
Page 65

A1 ierīces pamatinformācija
Iestatīšanas
poga
Jaudas ievade
Skaļrunis
Nosaukums Apraksts
Jaudas ievade Strāvas padeve ierīcei (izmantojot USB portu).
LED indikators „TRAUKSME” Nepārtraukti deg sarkanā krāsā: A1 ierīce darbojas normāli.
LED indikators „SAVIENOJUMS” Mirgo dzeltenā krāsā: Wi-Fi tīkls ir pievienots.
LED indikators „GATAVA” Nepārtraukti deg baltā krāsā: A1 ierīce ir ieslēgta (izmantojot USB portu).
Uzstādīšanas atvere Atvere ierīces piekarināšanai.
Poga „RESET (ATIESTATĪT)” Pievienojiet ierīci strāvas padevei (izmantojot USB portu). Ar adatu
Mirgo sarkanā krāsā: atskan signalizācija.
Nedeg: Wi-Fi tīkls ir atvienots.
nospiediet un turiet nospiestu pogu „RESET (ATIESTATĪT)”, līdz visi trīs
indikatori vienlaicīgi vienreiz iemirgojas. Ierīce tiks restartēta, kā arī visi
iestatījumi tiks atjaunoti, izņemot pievienotos detektorus un tālvadību.
Uzstādīšanas atvere
LED indikatori („TRAUKSME”,
„SAVIENOJUMS” un „GATAVS”)
Poga „RESET (ATIESTATĪT)”
61
Page 66

Tālvadības pamatinformācija
LEDindikators
Ārkārtas poga
Režīms „Gulēšana”
Režīms „Esmu mājās”
Nosaukums Apraksts
LEDindikators
Mirgo, nospiežot jebkuru pogu.
Turiet nospiestu pogu 2sekundes, lai uz EZVIZ platformu nosūtītu ārkārtas trauksmes signālu.
Ja kāds atrodas mājā vai arī ja gatavojaties iekļūt mājā, jums jāatspējo signalizācijas
sistēma. Nospiediet pogu, lai aktivizētu režīmu „Esmu mājās”.
Ja esat mājās un joprojām vēlaties tikt aizsargāts: aizsargātas tiek tikai mājas perimetra
daļas (logi un durvis). Režīms „Gulēšana” ir piemērots izmantošanai dienas laikā vai
gulēšanas laikā naktī. Nospiediet pogu, lai aktivizētu režīmu „Gulēšana”.
Ja neviena nav mājās, jums jāaktivizē signalizācijas sistēma, lai aizsargātu māju pret
ielaušanos. Šādai situācijai ir piemērots režīms „Dodos prom no mājām”. Nospiediet pogu,
lai aktivizētu režīmu „Dodos prom no mājām”.
Nospiediet, lai izslēgtu balss uzvednes.
Pēc noklusējuma komplekta tālvadības pults ir savienota ar A1 ierīci. Skatiet 3.soli sadaļā
•
„Darbības”, lai pievienotu A1 ierīcei citu tālvadības pulti, ja esošā tālvadības pults nedarbojas pareizi
vai arī jums ir cita pults.
Iepriekš aprakstītie aizsardzības režīmi ir noklusējuma iestatījumi. Jūs varat pielāgot detektoru
•
aizsardzības statusu katrā aizsardzības režīmā un pārslēgt aizsardzības režīmu ar lietotnes EZVIZ
palīdzību.
62
Režīms „D odos prom no mājām”
Izslēgt skaņu
Page 67

Problēmu novēršana
Pievienojot A1 ierīci ar lietotnes EZVIZ palīdzību, parādās uzvednes „The device is oine. (Ierīce ir
J:
bezsaistē.)” vai „The device is not registered. (Ierīce nav reģistrēta.)”.
1. Pārliecinieties, vai A1 ierīce ir pievienota Wi-Fi tīklam un vai šis savienojums darbojas.
A:
2. Pārbaudiet,vai mirgo dzeltenais indikators. Ja nemirgo, tad restartējiet A1 ierīci un vēlreiz
pievienojiet to Wi-Fi tīklam.
Mobilais tālrunis nevar saņemt trauksmes signālu, kad A1 ierīce ir tiešsaistē un iedarbojas
J:
signalizācija.
1. Pārliecinieties, ka jūsu mobilajā tālrunī darbojas lietotne EZVIZ.
A:
2. Ja lietojat mobilo tālruni ar operētājsistēmu Android, pārliecinieties, ka lietotne darbojas fonā.
Savukārt, ja lietojat mobilo tālruni ar operētājsistēmu iOS, iespējojiet „push” ziņojumu funkciju,
atlasot „Settings (Iestatījumi) > Notication (Paziņošana)”.
Lietotnē EZVIZ detektora statuss tiek parādīts kā bezsaistē.
J:
1. Pārliecinieties, ka A1 ierīcei pievienotā Wi-Fi tīkla statuss ir normāls.
A:
2. Pārliecinieties, ka attālums starp detektoriem un A1 ierīci nepārsniedz 100m un starp tiem nav
šķēršļu.
3. Pārliecinieties, ka detektora baterija nav izlādējusies.
Detektors spēj noteikt signālu un A1 ierīce darbojas normāli, taču netiek atskaņotas balss uzvednes.
J:
1. Pārliecinieties, ka attālums starp detektoru un A1 ierīci nepārsniedz 100m un starp tiem nav
A:
šķēršļu.
2. Pielāgojiet A1 ierīces uzstādīšanas pozīciju. A1 ierīci ieteicams uzstādīt jūsu mājas centrā.
3. Pārliecinieties, ka A1 ierīcei nav izslēgta skaņa.
63
Page 68

Operacijos
1 žingsnis
Pasiruošimas
Įsitikinkite, kad aplinka ir maitinimo lizdas atitinka šiuos reikalavimus:
Maitinimo įtampa: 5V (NS) („micro USB“)
•
Veikimo temperatūra: Nuo -10°C iki 55°C (nuo 14°F iki 131°F)
•
Veikimo drėgnumas: 10–90% (be kondensacijos)
•
A1 paleidimas
1
Sujunkite A1 ir maitinimo adapterį USB duomenų kabeliu, tada prijunkite maitinimo adapterį prie
maitinimo lizdo. Įsijungia baltasis indikatorius, informuodamas, kad A1 paleidžiamas. Kai A1 būna
visiškai paleistas, ima šviesti raudonas indikatorius.
Maitinimo adapteris
Maitinimo lizdas
USB duomenų kabelis
Programėlės EZVIZ įdiegimas
2
- Prijunkite savo mobilųjį telefoną prie „Wi-Fi“.
- Atsisiųskite ir įdiekite programėlę EZVIZ, atlikdami paiešką EZVIZ „App Store“ („iOS“ versija) arba
„Google Play“
- Paleiskite programėlę ir užregistruokite EZVIZ naudotojo paskyrą, vadovaudamiesi paleisties vediklio
nurodymais.
TM
(„Android“ versija).
64
Page 69

2 žingsnis
Sparčiosios nuostatos
A1 įtraukimas
1
- Prijunkite mobilųjį telefoną prie „Wi-Fi“.
- Prisijunkite prie programėlės EZVIZ ir nuskaitykite QR kodą, pateiktą ant A1, kad įtrauktumėte jį į savo
EZVIZ paskyrą.
- Vykdykite nurodymus, kad sukongūruotumėte A1 „Wi-Fi“ ryšį, pvz., SSID („Wi-Fi“ pavadinimas) ir
slaptažodį.
Užtikrinkite, kad mobilusis telefonas būtų prijungtas prie „Wi-Fi“ tinklo, o A1 dar nebūtų
•
prijungtas prie jokio „Wi-Fi“ tinklo, nes kitaip ryšio užmegzti nepavyks.
Atstumas tarp A1 ir mobiliojo telefono turi neviršyti 50cm.
•
Kongūracijos užbaigimas
2
Sėkmingai prijungus A1 prie „Wi-Fi“ (kelvedžio), indikatorius LINK (ryšys) ima mirksėti geltona spalva.
Laikykite nuspaustą nustatymo mygtuką, jei norite įjungti „Wi-Fi“ modifikavimo funkciją.
Pavyzdžiui: jei A1 prijungimo prie „Wi-Fi“ (kelvedžio) procedūra atliekama nesėkmingai ir reikia
pakartoti operaciją arba jei norite pakeisti „Wi-Fi“ ryšį (prijungti A1 prie kito „Wi-Fi“ tinklo).
65
Page 70

3 žingsnis
Detektorių įtraukimas
Detektorių įtraukimo režimo įjungimas
1
Vieną kartą paspauskite nustatymo mygtuką: pasigirsta balso sueris, kad detektorių įtraukimo režimas
įjungtas. Apie įjungtą detektorių įtraukimo režimą informuoja kas sekundę du kartus mirksintys
geltonas ir raudonas indikatoriai.
Detektorių įtraukimas
2
Prineškite detektorių artyn prie A1 (iki 50cm atstumu) ir sužadinkite pavojaus signalą rankiniu būdu.
Pasigirsta balso sufleris, nurodantis detektoriaus tipą ir serijos numerį: tai reiškia, kad atitinkamas
detektorius įtrauktas (galima įtraukti iki 32detektorių).
E
V
O
M
E
R
O
T
N
R
U
T
……
Detektorių įtraukimo režimo išjungimas
3
Įtraukę visus detektorius, vieną kartą paspauskite nustatymo mygtuką, kad išjungtumėte detektorių
įtraukimo režimą.
Neatliekant jokių veiksmų 3minutes, detektorių įtraukimo režimas išjungiamas automatiškai.
•
Maks. efektyvusis atstumas tarp detektorių ir A1 yra 100m (be jokių kliūčių).
•
D
O
N
O
T
P
A
I
N
T
66
Page 71

Priedas
Pakuotės turinys
A1 (x1) Nuotolinio valdymo pultelis (x1) USB duomenų kabelis (x1)
Sparčiosios paleisties vadovas (x1) Maitinimo adapteris (x1)
Funkcijų apžvalga
Nepakeičiama namų apsauga
Naudodama įvairius belaidžius detektorius, užtikrina visapusišką jūsų namų apsaugą.
Pirmaujanti pasaulyje belaidžio ryšio technologija
Patogiai įrengiama apsaugos sistema su belaidžiais jutikliais.
Lengva sukongūruoti tinklą
Prie „Wi-Fi“ prisijungiama vienu mygtuko paspaudimu (nedera su 5G „Wi-Fi“).
EZVIZ debesų P2P tarnyba
Pavojaus signalų gavimas į mobilųjį telefoną ir kompiuterį bei nuotolinis valdymas.
67
Page 72

A1 pagrindai
Nustatymo
mygtukas
Maitinimo
įvadas
Garsiakalbis
Pavadinimas Aprašas
Maitinimo įvadas
Šviesos diodo indikatorius
ALARM (pavojaus signalas)
Šviesos diodo indikatorius
LINK (ryšys)
Šviesos diodo indikatorius
READY (parengtis)
Montavimo anga Anga įrenginiui pakabinti.
Mygtukas RESET (nustatyti iš
naujo)
Įrenginio maitinimas (per USB prievadą).
Šviečia raudona spalva: A1 veikia įprastai.
Mirksi raudona spalva: užregistruotas pavojaus signalas.
Mirksi geltona spalva: prisijungta prie „Wi-Fi“ ryšio.
Nešviečia: „Wi-Fi“ ryšys atjungtas.
Šviečia balta spalva: A1 maitinamas (per USB prievadą).
Prijunkite įrenginį prie maitinimo (per USB prievadą). Adata paspauskite
mygtuką RESET (nustatyti iš naujo) ir palaikykite, kol vieną kartą vienu metu
sumirksės 3indikatoriai. Įrenginys bus paleistas iš naujo ir bus atkurtos visos
nuostatos, išskyrus prijungtus detektorius ir nuotolinio valdymo pultelį.
Šviesos diodų indikatoriai
(pavojaus signalo, ryšio
ir parengties)
Montavimo anga
Mygtukas RESET
(nustatyti iš naujo)
68
Page 73

Nuotolinio valdymo pultelio pagrindai
Šviesos diodo indikatorius
Avarinis mygtukas
Miego režimas
Buvimo namie režimas
Pavadinimas Aprašas
Šviesos diodo
indikatorius
Paspaudus bet kurį mygtuką, ima mirksėti.
Paspauskite ir palaikykite 2sekundes, kad išsiųstumėte avarinį pavojaus signalą į EZVIZ platformą.
Jei kas nors lieka namie arba jūs norite įeiti į namą, turite išjungti signalizaciją. Paspauskite
mygtuką, kad aktyvintumėte buvimo namie režimą.
Jei esate namie, tačiau vis tiek norite apsaugos, įjungiamos tik perimetrinės namo dalys
(durys ir langai). Miego režimas tinka dienos metu arba miegant naktį. Paspauskite
mygtuką, kad aktyvintumėte miego režimą.
Jei namie niekas nelieka, turite aktyvinti signalizacijos sistemą, kad apsaugotumėte
namą nuo įsibrovėlių. Tinka naudoti išvykimo iš namų režimą. Paspauskite mygtuką, kad
aktyvintumėte išvykimo iš namų režimą.
Paspauskite, kad išjungtumėte balso suerius.
Pakuotėje esantis nuotolinio valdymo pultelis pagal numatytąją parinktį būna prijungtas prie A1.
•
Žr. skirsnio „Operacijos“ 3žingsnį, kad prijungtumėte kitą nuotolinio valdymo pultelį prie A1 (jei
dabartinis neveikia tinkamai arba įsigijote naują).
Pirmiau pateikti aktyvinimo režimo aprašai– tai numatytosios nuostatos. Naudodamiesi
•
programėle EZVIZ, kiekvienu aktyvinimo režimu galite tinkinti detektorių aktyvinimo būseną ir
perjungti aktyvinimo režimą.
69
Išvykimo iš namų režimas
Nutildymas
Page 74

Trikčių šalinimas
Įtraukiant A1 į programėlę EZVIZ, pateikiamas sueris „The device is oine.“ (įrenginys atjungtas) arba
Kl.
„The device is not registered.“ (įrenginys neužregistruotas).
1. Patikrinkite, ar A1 prijungtas prie „Wi-Fi“ tinklo ir ar šis veikia tinkamai.
A.
2. Patikrinkite, ar mirksi geltonas indikatorius. Jei ne, paleiskite A1 iš naujo ir vėl prijunkite prie „Wi-Fi“.
Kai A1 prijungtas prie tinklo ir suveikia signalizacija, mobilusis telefonas negauna pavojaus signalo.
Kl.
1. Užtikrinkite, kad mobiliajame telefone veiktų programėlė EZVIZ.
A.
2. Jei naudojate mobilųjį telefoną, kuriame veikia OS „Android“, pasirūpinkite, kad programėlė
veiktų foniniu režimu. Jei turite mobilųjį telefoną su „iOS“, įjunkite žinučių siuntimo funkciją PUSH:
„Settings > Notication“ (nuostatos> pranešimas).
Programėlėje EZVIZ rodoma atjungtinė detektoriaus būsena.
Kl.
1. Įsitikinkite, kad „Wi-Fi“ tinklas, prie kurio prijungtas A1, veikia normaliai.
A.
2. Užtikrinkite, kad atstumas tarp detektorių ir A1 nesiektų 100m (be jokių kliūčių).
3. Patikrinkite, ar neišseko detektoriaus maitinimo elementas.
Detektorius aptinka pavojaus signalą ir A1 veikia normaliai, tačiau nepateikiama jokių balso suerių.
Kl.
1. Užtikrinkite, kad atstumas tarp detektoriaus ir A1 nesiektų 100m (be jokių kliūčių).
A.
2. Pakeiskite A1 įrengimo vietą. A1 rekomenduojama įrengti namo centre.
3. Įsitikinkite, kad A1 neveikia nutildymo režimu.
70
Page 75

Thank you for purchasing EZVIZ products. This limited warranty gives you, the original purchaser of the EZVIZ product,
specific legal rights. You may also have other legal rights that vary by state, province or jurisdiction. The disclaimers,
exclusions, and limitations of liability under this limited warranty will not apply to the extent prohibited by applicable law.
No distributor, reseller, agent, or employee is authorized to make any medication, extension, or addition to this limited
warranty.
Your EZVIZ product is warranted for a period of one (1) year from the date of purchase against defects in materials and
workmanship, or such longer period as may be required by law in the country or state where this product is sold, when used
normally in accordance with user manual.
You can request warranty service by emailing us at support@ezvizlife.com .
For any defective EZVIZ products under warranty, HANGZHOU HIKVISION DIGITAL TECHNOLOGY CO., LTD. (“the Company”)
will, at its option, (i) repair or replace your product free of charge; (ii) exchange your product with a functional equivalent
product; (iii) or refund the original purchase price, provided you provide the original purchase receipt or copy, brief
explanation of the defect, and return the product in its original packaging. At the sole discretion of the Company, repair or
replacement may be made with a new or refurbished product or components. This warranty does not cover the postal cost,
insurance and any other incidental charges incurred by you in returning the product.
Except where prohibited by applicable law, this is your sole and exclusive remedy for breach of this limited warranty. Any
product that has either been repaired or replaced under this limited warranty will be covered by the terms of this limited
warranty for the longer of ninety (90) days from the date of delivery or the remaining original warranty period.
This warranty does not apply and is void:
• If the warranty claim is made outside the warranty period or if the proof of purchase is not provided.
• For any malfunction, defect or failure caused by or resulting from the evidence of impact, mishandling ,tampering, use
contrary to the applicable instruction manual, incorrect power line voltage, accident, loss, theft, fire, flood or other Acts
of God, shipping damage or damage resulting from repairs performed by unauthorized personnel.
• For any consumable parts, such as batteries, where the malfunction is due to the normal aging of the product.
• Cosmetic damage, including but not limited to scratches, dents and broken plastic on ports.
• Any software, even if packaged or sold with EZVIZ hardware.
• For any other damages free from defects in material or workmanship.
• Routine cleaning, normal cosmetic and mechanical wear and tear.
Please do not hesitate to contact your seller, or send e-mails to us support@ezvizlife.com, with any questions.
COPYRIGHT ©2016 HANGZHOU HIKVISION DIGITAL TECHNOLOGY CO., LTD. ALL RIGHTS RESERVED.
LIMITED WARRANTY
Vielen Dank für den Kauf eines EZVIZ-Produkts. Diese beschränkte Garantie gibt Ihnen, dem Erstkäufer des EZVIZ-Produkts,
bestimmte gesetzliche Rechte. Je nach Staat, Provinz oder Land können Ihnen weitere gesetzliche Rechte zustehen. Die
Haftungsausschlüsse und -beschränkungen gemäß dieser beschränkten Garantie gelten ausschließlich im gesetzlich
zulässigen Umfang. Kein Händler, Wiederverkäufer, Vertreter oder Mitarbeiter ist befugt, Modifikationen, Erweiterungen oder
Ergänzungen an dieser beschränkten Garantie vorzunehmen.
Ihr EZVIZ-Produkt hat eine Garantie auf Material- und Herstellungsfehler, die ab dem Kaufdatum für ein (1) Jahr oder so
lange gilt, wie dies in dem Staat oder Land, in dem dieses Produkt gekauft wurde, gesetzlich vorgeschrieben ist, sofern es
in Übereinstimmung mit der Bedienungsanleitung normal benutzt wird.
Garantieansprüche richten Sie bitte per E-Mail an support@ezvizlife.com .
Page 76

Im Fall eines defekten EZVIZ-Produkts mit gültiger Garantie wird HANGZHOU HIKVISION DIGITAL TECHNOLOGY CO., LTD.
("das Unternehmen") nach eigenem Ermessen (i) Ihr Produkt kostenlos reparieren oder ersetzen, (ii) Ihr Produkt gegen
ein funktionsfähiges vergleichbares Produkt austauschen oder (iii) den ursprünglichen Kaufpreis unter der Voraussetzung
erstatten, dass Sie das Produkt in dessen Originalverpackung unter Beigabe des Originalkaufbelegs oder einer Kopie davon
sowie einer kurzen Beschreibung des Defekts zurückschicken. Das Unternehmen wird nach alleinigem Ermessen Produkte
oder Komponenten entweder reparieren oder gegen neue oder generalüberholte Produkte oder Komponenten austauschen.
Diese Garantie deckt keine Versand-, Versicherungs- oder sonstige Nebenkosten, die Ihnen durch die Rücksendung des
Produkts entstehen.
Soweit nicht durch geltendes Recht untersagt, ist dies Ihr einziges und ausschließliches Rechtsmittel im Fall einer
Verletzung dieser beschränkten Garantie. Jedes Produkt, das im Rahmen dieser beschränkten Garantie entweder repariert
oder ausgetauscht wurde, wird für maximal neunzig (90) Tage ab Lieferdatum oder für die Restlaufzeit der ursprünglichen
Garantie von den Bestimmungen dieser beschränkten Garantie abgedeckt.
Diese Garantie gilt nicht und ist hinfällig:
• wenn der Garantieanspruch außerhalb der Garantiefrist oder ohne Vorlage des Kaufbelegs geltend gemacht wird.
• bei Fehlfunktionen, Defekten oder Fehlern, die durch Stoßeinwirkung, Fehlbedienung, Sabotage, Benutzung im
Widerspruch zur entsprechenden Bedienungsanleitung, falsche Spannungsversorgung, Unfall, Verlust, Diebstahl, Brand,
Überschwemmung oder andere Naturkatastrophen, Versandschäden oder Beschädigungen infolge von Reparaturen durch
unbefugte Personen verursacht wurden oder darauf zurückzuführen sind.
• für Verbrauchsgüter wie Batterien, bei denen die Fehlfunktion auf normale Produktalterung zurückzuführen ist.
• kosmetische Schäden, einschließlich, aber nicht begrenzt auf Kratzer, Beulen und gebrochene Kunststoffteile an
Anschlüssen.
• für jede Software, auch wenn diese zusammen mit der EZVIZ-Hardware verpackt und verkauft wurde.
• für sonstige Schäden, die keine Material- oder Verarbeitungsfehler sind.
• für routinemäßige Reinigungen sowie normalen kosmetischen und mechanischen Verschleiß.
Bei Fragen können Sie sich jederzeit an Ihren Verkäufer oder per E-Mail an support@ezvizlife.com an uns wenden.
COPYRIGHT ©2016 HANGZHOU HIKVISION DIGITAL TECHNOLOGY CO., LTD. ALLE RECHTE VORBEHALTEN.
BESCHRÄNKTE GARANTIE
Gracias por adquirir productos EZVIZ. Esta garantía limitada le concede a usted, el comprador original del producto EZVIZ,
derechos legales específicos. Es posible que tenga otros derechos legales en función de su estado, provincia o jurisdicción.
Los avisos de exención de responsabilidad, las exclusiones y las limitaciones de responsabilidad de esta garantía limitada
no se aplicarán hasta el máximo prohibido por la legislación aplicable. Ningún distribuidor, revendedor, representante
o empleado tiene autorización para introducir alteraciones, ampliaciones o incorporaciones en virtud de esta garantía
limitada.
Su producto de EZVIZ está cubierto por la garantía por un período de un (1) año desde la fecha de compra frente a defectos
de materiales y mano de obra, o en el plazo más largo que requiera la ley en el país o estado donde se venda este producto,
cuando se usa normalmente de acuerdo con el manual de usuario.
Puede solicitar el servicio de garantía por correo electrónico en support@ezvizlife.com .
Page 77

Para cualquier producto de EZVIZ defectuoso en garantía, HANGZHOU HIKVISION DIGITAL TECHNOLOGY CO., LTD. ("la
Empresa"), a su discreción, (I) reparará o sustituirá el producto de forma gratuita; (II) cambiará su producto por un
producto equivalente funcional; (III) o reembolsará el precio de compra original, siempre y cuando proporcione el recibo
de compra original o una copia, una breve descripción del defecto y devuelva el producto en su embalaje original. A la
entera discreción de la Empresa, la reparación o la sustitución pueden realizarse por un producto o componentes nuevos o
reacondicionados. Esta garantía no cubre el coste postal de transporte, el seguro ni ningún otro coste incidental en el que
incurra durante la devolución del producto.
Excepto si lo prohíbe la legislación vigente, esta es la solución única y exclusiva en caso de incumplimiento de esta
garantía limitada. Cualquier producto que se haya reparado o sustituido en virtud de esta garantía limitada estará cubierto
por los términos de la misma durante el periodo máximo de noventa (90) días a partir de la fecha de entrega o el período
de garantía original restante.
Esta garantía no se aplica y se considerará nula:
• Si la reclamación de garantía se realiza fuera del periodo de garantía o si no se proporciona la prueba de compra.
• En caso de funcionamiento incorrecto, defecto o avería causados por o como resultado de las pruebas de impacto,
impericia, manipulación, uso contrario al manual de instrucciones aplicable, voltaje incorrecto de la línea eléctrica,
accidente, pérdida, robo, incendio, inundación u otros actos de fuerza mayor, daños en el envío o daños ocasionados por
reparaciones realizadas por personal no autorizado.
• En el caso de las piezas consumibles, como las baterías, si el funcionamiento incorrecto se debe al desgaste normal del
producto.
• Daños cosméticos, incluidos, pero sin limitarse a, arañazos, abolladuras y plástico roto en puertos.
• Cualquier software, incluso si se ha incluido y vendido con el hardware de EZVIZ.
• En caso de otros daños libres de defectos en el material o la mano de obra.
• La limpieza rutinaria, cambios cosméticos y el desgaste mecánico natural.
Si tiene alguna pregunta, no dude en ponerse en contacto con su representante comercial, o bien envíenos un mensaje a
support@ezvizlife.com con la pregunta que desee.
COPYRIGHT ©2016 HANGZHOU HIKVISION DIGITAL TECHNOLOGY CO., LTD. RESERVADOS TODOS LOS DERECHOS.
GARANTÍA LIMITADA
Merci d'avoir acheté nos produits EZVIZ. En tant qu'acheteur original de produit EZVIZ, cette garantie limitée vous accorde
certains droits. Selon le pays, la région ou la juridiction où vous résidez, il est possible que vous bénéficiiez d'autres
droits. Les dénis de responsabilités, exclusions et limitations de responsabilité civile stipulés dans cette garantie limitée
s'appliquent uniquement dans les limites prévues par la loi. Aucun distributeur, revendeur, agent ou employé n'est autorisé
à apporter de modification, d'extension ou d'ajout à cette garantie.
Votre produit EZVIZ est garanti pendant une période de un (1) an à compter de la date d'achat pour tout défaut de pièces et
de main d'œuvre, ou pour une durée supérieure si la législation en vigueur dans le pays ou l'état où ce produit est vendu
l'exige, dès lors qu'il est utilisé conformément aux instructions du manuel de l'utilisateur.
Pour faire valoir la garantie, écrivez-nous à l'adresse suivante: support@ezvizlife.com .
Page 78

Si un défaut est signalé sur un produit EZVIZ pendant la période de garantie, Hangzhou Hikvision Digital Technology Co.,
Ltd. (« la Société ») pourra, à sa discrétion, (i) réparer ou remplacer votre produit gratuitement ; (ii) remplacer votre produit
par un produit équivalent en état de marche ; (iii) rembourser le prix d'achat. Vous devrez toutefois présenter la preuve d'achat
et une brève explication du défaut constaté, et renvoyer le produit dans son emballage d'origine. La Société pourra réparer
ou remplacer le produit ou les composants par un produit ou des composants neufs ou remis en état. Cette garantie ne
couvre pas les frais de port, l'assurance ni les éventuels frais annexes de renvoi du produit.
Sauf si la législation en vigueur l'interdit, cette garantie est votre seul et unique recours. Tout produit réparé ou remplacé
en vertu de la présente garantie limitée sera couvert pendant une durée de quatre-vingt-dix (90) jours à compter de la date
de livraison ou jusqu'à l'échéance de la période garantie originale.
Cette garantie ne s'applique pas et est considérée comme nulle dans les cas suivants :
• si l'utilisateur se prévaut de la garantie hors de la période de couverture ou s'il ne fournit pas de preuve d'achat ;
• en cas de dysfonctionnement, de défaut ou de panne due ou induite par un choc, une mauvaise manipulation, un
sabotage, une utilisation non conforme aux instructions du manuel, une tension d'alimentation incorrecte, un accident,
une perte, un vol, un incendie, une inondation ou toute autre catastrophe naturelle, un préjudice subi pendant le
transport ou résultant de réparations par un personnel non agréé ;
• consommables, tels que les batteries, où le dysfonctionnement est dû au vieillissement normal du produit ;
• dommages superficiels tels que, entre autres, les rayures, les bosses ou les pièces en plastique cassées ;
• logiciels, même fournis ou vendus avec le matériel EZVIZ ;
• préjudices autres que les défauts de pièces ou de main d'œuvre ;
• nettoyage de routine, vieillissement de l'aspect extérieur et usure mécanique normale.
Pour toute question, n'hésitez pas à contacter votre revendeur ou à nous écrire à l'adresse suivante: support@ezvizlife.com.
COPYRIGHT ©2016 HANGZHOU HIKVISION DIGITAL TECHNOLOGY CO., LTD. TOUS DROITS RÉSERVÉS.
GARANTIE LIMITÉE
Grazie per aver acquistato i prodotti EZVIZ. La presente garanzia limitata accorda all'acquirente originale del prodotto
EZVIZ, specifici diritti legali. L'acquirente originale potrebbe godere anche altri diritti legali che variano da stato, provincia
o giurisdizione. Le declinazioni di responsabilità, le esclusioni e le limitazioni di responsabilità ai sensi della presente
garanzia limitata non si applicano ove espressamente vietate dalla legge applicabile. Nessun distributore, rivenditore,
agente o dipendente è autorizzato a fornire rimedi, estensioni o aggiunte alla presente garanzia limitata.
Il prodotto EZVIZ è garantito per un periodo di un (1) anno dalla data di acquisto contro difetti nei materiali e nella
lavorazione, o un periodo più lungo, ove richiesto dalla legge del paese o dello stato in cui il prodotto è stato venduto, se
utilizzato normalmente, in conformità con il manuale utente.
Il servizio di assistenza in garanzia può essere richiesto via email, all'indirizzo support@ezvizlife.com .
Page 79

Per eventuali prodotti EZVIZ difettosi in garanzia,HANGZHOU HIKVISION DIGITAL TECHNOLOGY CO., Ltd. ("la Società"), avrà
facoltà a sua discrezione di, (i) riparare o sostituire il prodotto a titolo gratuito; (ii) sostituire il vostro prodotto con un
prodotto funzionalmente equivalente; (iii) o rimborsare il prezzo di acquisto originale, a fronte dell'esibizione della ricevuta
di acquisto originale o in copia, una breve spiegazione del difetto e il reso del prodotto nella sua confezione originale. A
esclusiva discrezione della Società, la riparazione o la sostituzione può avvenire con un prodotto o con dei componenti nuovi
o ricondizionati. Questa garanzia non copre spese postali, assicurazione ed eventuali altre spese accessorie sostenute
dall'acquirente per la restituzione del prodotto.
Salvo laddove proibito dalla legge applicabile, ciò costituisce l'unico ed esclusivo rimedio per la violazione della presente
garanzia limitata. Qualsiasi prodotto riparato o sostituito ai sensi della presente garanzia limitata sarà coperto dai termini
della presente garanzia limitata per il periodo di maggiore durata tra novanta (90) giorni dalla data di consegna o il periodo
di garanzia originale residuo.
Questa garanzia non si applica e risulterà nulla:
• Se la richiesta di applicazione della garanzia perviene al di fuori del periodo di garanzia o se la prova di acquisto non
viene fornita.
• Per qualsiasi malfunzionamento, difetto o guasto causato da, o confermato da prove di evidenza di, avvenuto impatto,
uso improprio, manomissione, uso contrario alle istruzioni del relativo manuale, tensione di alimentazione errata,
incidente, smarrimento, furto, incendio, inondazione o altre cause di forza maggiore, danni di spedizione o danni causati
da riparazioni eseguite da personale non autorizzato.
• Per eventuali componenti consumabili, quali batterie, dove il mal funzionamento è dovuto al normale invecchiamento del
prodotto.
• Danni estetici, inclusi ma non limitati a graffi, ammaccature e rotture delle plastiche delle porte.
• Qualsiasi software, anche se confezionato o venduto con hardware EZVIZ.
• Per eventuali altri danni esenti da difetti nei materiali o nella lavorazione.
• Pulizia ordinaria e il normale deterioramento estetico e meccanico.
Non esitate a contattare il venditore, o a inviarci un e-mail a support@ezvizlife.com, per qualsiasi domanda.
COPYRIGHT ©2016 HANGZHOU HIKVISION DIGITAL TECHNOLOGY CO., LTD. TUTTI I DIRITTI RISERVATI.
GARANZIA LIMITATA
Obrigado por comprar produtos EZVIZ. Na qualidade de comprador original do produto EZVIZ, esta garantia limitada conferelhe direitos legais específicos. Poderá ter ainda outros direitos legais que variam consoante o estado, a província ou a
jurisdição. As renúncias, exclusões e limitações de responsabilidade expressas nesta garantia limitada não se aplicarão
na medida em que tal seja proibido pela legislação aplicável. Nenhum distribuidor, revendedor, agente ou funcionário está
autorizado a realizar qualquer modificação, extensão ou adição à presente garantia limitada.
O seu produto EZVIZ tem um (1) ano de garantia, a contar da data de compra, contra defeitos de materiais e mão-de-obra,
ou tem um período maior, se tal for exigido pela legislação do país ou estado onde este produto é vendido, desde que
utilizado normalmente de acordo com o Manual do utilizador.
Pode pedir uma assistência coberta pela garantia enviando-nos um e-mail para support@ezvizlife.com .
Page 80

Para produtos EZVIZ com defeito cobertos pela garantia, a HANGZHOU HIKVISION DIGITAL TECHNOLOGY CO., LTD. ("a
Empresa"), por opção sua, (i) reparará ou substituirá o seu produto gratuitamente; (ii) trocará o seu produto por um produto
equivalente funcional; (iii) ou reembolsará o preço de compra original, desde que forneça o recibo de compra original ou a
respetiva cópia, uma breve explicação do defeito e desde que devolva o produto na sua embalagem original. A reparação ou
substituição poderá ser feita com um produto ou componentes novo(s) ou renovado(s), ficando esta decisão ao critério da
Empresa. Esta garantia não cobre as despesas postais, o seguro e quaisquer outros encargos acessórios incorridos por si
ao devolver o produto.
Salvo nos casos em que é proibido pela legislação aplicável, este é o seu único e exclusivo recurso por incumprimento
desta garantia limitada. Qualquer produto que seja reparado ou substituído nos termos desta garantia limitada estará
coberto pelos termos da mesma por um período máximo de noventa (90) dias a partir da data de entrega ou pelo período da
garantia original restante.
A presente garantia não se aplica e será nula:
• Se a reclamação da garantia for feita fora do período da garantia ou se não for fornecida prova de compra.
• No caso de mau funcionamento, defeito ou falha causada(o) ou resultante de provas de impacto, utilização incorreta,
adulteração do produto, utilização contrária ao manual de instruções aplicável, tensão errada da linha de alimentação,
acidente, perda, roubo, incêndio, inundação ou outras catástrofes naturais, danos de transporte ou danos resultantes de
reparações executadas por pessoal não autorizado.
• No caso de consumíveis como, por exemplo, baterias, em que o mau funcionamento se deva ao envelhecimento normal
do produto.
• No caso de danos de cosmética, incluindo, embora sem caráter limitativo, riscos, mossas e plástico partido nas portas.
• Relativamente a qualquer software, mesmo tendo sido embalado ou vendido com hardware EZVIZ.
• No caso de quaisquer outros danos isentos de defeitos de material ou de mão-de-obra.
• Limpeza de rotina, cosmética normal e desgaste mecânico.
Não hesite em contactar o seu revendedor ou enviar-nos um e-mail para support@ezvizlife.com, em caso de dúvidas.
COPYRIGHT ©2016 HANGZHOU HIKVISION DIGITAL TECHNOLOGY CO., LTD. TODOS OS DIREITOS RESERVADOS.
GARANTIA LIMITADA
Page 81

Благодарим Вас за покупку продукции EZVIZ. Эта ограниченная гарантия дает Вам как покупателю продукта EZVIZ
определенные юридические права. Вы также можете иметь другие юридические права, которые определяются
законами государства, провинции или юрисдикцией. Исключения и ограничения ответственности в соответствии с
данной ограниченной гарантией не действительны в случае, если они противоречат действующему законодательству.
Ни дистрибьютор, ни дилер, ни агент или сотрудник не имеет права вносить какие-либо изменения или дополнения к
данной ограниченной гарантии.
На Ваш продукт EZVIZ дается гарантия сроком на один(1) год с момента покупки на дефекты материалов и
изготовления, или на более длительный период, в соответствии с законом государства, где продается этот товар, при
условии правильного использования в соответствии с руководством пользователя.
Вы можете запросить гарантийное обслуживание, обратившись по электронной почте support@ezvizlife.com.
В случае неисправности продуктов EZVIZ по гарантии, HIKVISION DIGITAL TECHNOLOGY CO., LTD. Ханчжоу ("Компания")
произведет, по своему выбору, (I) ремонт или замену изделия бесплатно; (II) обмен продукта на функционально
эквивалентный; (III) возврат первоначальной стоимости, при условии, что Вы предоставите оригинал или копию
квитанции о покупке, краткое объяснение дефекта, а также вернете товар в оригинальной упаковке. На усмотрение
Компании, может производиться ремонт или замена нового или отремонтированного продукта или его компонентов.
Данная гарантия не распространяется на почтовые расходы, страховку и любые другие непредвиденные расходы,
понесенные Вами в связи с возвратом продукта.
За исключением случаев, запрещенных действующим законодательством, этот документ является Вашим
единственным и исключительным средством судебной защиты, в случае нарушения Ваших прав, закрепленных в
ограниченной гарантии. К любому продукту, который уже был отремонтирован или заменен по данной ограниченной
гарантии, применимы условия документа в течение девяноста (90) дней с момента поставки или оставшегося
первоначального гарантийного срока.
Данная гарантия не применяется и является недействительной:
• В случае подачи заявки на гарантийный ремонт по истечении гарантийного срока или отсутствия доказательства
факта покупки.
• В случае неисправностей, дефектов, вызванных неправильным использованием, нарушением инструкций
по эксплуатации, при неправильном напряжении сети, аварии, утере, краже, пожаре, наводнении или иных
стихийных бедствиях, повреждении груза или ущербе, нанесенными в результате ремонта, выполненного не
уполномоченными лицами.
• Для любых расходных частей, таких как батареи, когда неисправность происходит из-за естественного старения
продукта.
• При косметических повреждениях, в том числе, но не только, при царапинах, вмятинах и сломанном пластике на
портах.
• Для любого программного обеспечения, даже если оно было упаковано или продано вместе с оборудованием EZVIZ.
• Для любых других повреждений, дефектов материала или изготовления.
• Для планового косметического и механического износа.
Чтобы задать вопрос продавцу или отправить нам письмо, пожалуйста, обращайтесь по данному адресу: support@
ezvizlife.com
COPYRIGHT ©2016 HANGZHOU HIKVISION DIGITAL TECHNOLOGY CO., LTD. ALL RIGHTS RESERVED.
ОГРАНИЧЕННАЯ ГАРАНТИЯ
Täname teid, et olete ostnud EZVIZ seadmeid. Piiratud tootjagarantii annab Teile, EZVIZ seadme esmasele ostjale, teatud
õigused. Teile võivad kohanduda ka muud seaduslikud õigused, mis erinevad vastavalt riigile kus seade müüdud on. Garantiist
keeldumine, erandid ja piiratud vastutus selle piiratud tootjagarantii raames rakendub vastavalt kehtivale seadusetele. Ühelgi
edasimüüjal, esindajal ega töötajal ei ole õigus teha parandusi, laiendusi või lisandeid antud piiratud tootjagarantiile, vastasel
juhul garantii ei kehti.
Teie EZVIZ tootele kehtib garantii materjalide ja valmistamise vigade suhtes üks (1) aasta alates toote ostmise kuupäevast, või
pikem periood vastavalt riigi seadustele kus seade on müüdud, kui seadet on kasutatud vastavalt kasutusjuhendile.
Te võite nõuda garantii teenust saates meile e-maili: support@ezvizlife.ee .
Page 82

Kehtiva garantiiga defektne EZVIZ seade, HANGZHOU HIKVISION DIGITAL TECHNOLOGY CO., LTD. (“Tootja”) valikul kas,
(I) parandatakse või asendatakse lisatasu küsimata; (II) vahetatakse teie toode samasuguse või võrdväärse toote vastu;
(III) või hüvitatakse toote ostuhind, juhul kui te esitate ostuarve või selle koopia, lühikese vea kirjelduse ja tagastate toote
orginaalpakendis.
Tootja valikul sooritatakse parandamine või asendamine uute või parandatud varuosadega või seadmetega. Garantii raames ei
hüvitata postikulu, kindlustust ja muid kulusid mis on teile toote saatmisel tekkinud.
Välja arvatud juhul kui see pole seadustega teisiti sätestatud on see teie ainus võimalus garantiiremondiks. Kõigile toodetele,
mis on parandatud või asendatud piiratud tootjagarantii raames, laienevad piiratud garantii tingimused üheksakümmend(90)
päeva alates kohale toimetamisest või järele jäänud esialgne garantii periood vastavalt sellele, kumb on pikem periood.
See garantii ei kehti:
• Kui garantii nõue on esitatud peale garantii lõppemist või puudub ostutõend.
• Ühelegi talitlushäirele, defektile või rikkele mis on põhjustatud või tuleneb kukkumisest, väärkäsitlusest, kasutamisest
vastupidiselt kasutusjuhendis soovitatule, valest toitepingest, õnnetusest, kadumisest, vargusest, tulekahjust, üleujutusest
või muu vääramatu jõu poolt tekitatud kahju, transpordi käigus tekkinud kahjustused või kui toodet on remontinud selleks
tootja poolt volitamata isik.
• Erinevatele kulumaterjalidele, nagu akud, mille puhul rikete esinemine on eeldatav toote vananemisel.
• Väliselt nähtavatele kahjustustele (kaasa arvatud, kuid mitte ainult kriimustused, mõlgid ja murdunud osad).
• Igasuguselee tarkvarale, isegi kui see on pakendatud või müüdud koos EZVIZ seadmega.
• Muudele kahjustustele peale materjalide ja tootmis vigade.
• Puhastamise käigus tekkinud kosmeetilisele ja mehaanilisele kulumine.
Küsimuste puhul võtke ühendust oma edasimüüjaga või meiega e-maili aadressil support@ezvizlife.ee .
COPYRIGHT ©2016 HANGZHOU HIKVISION DIGITAL TECHNOLOGY CO., LTD. ALL RIGHTS RESERVED.
PIIRATUD TOOTJAGARANTII
Paldies, ka iegādājāties EZVIZ produktu. Šī garantija piešķir Jums noteiktas tiesības. Jums var būt arī citas tiesības atkārībā no
valsts, pilsētas vai jurisdikcijas. Atrunas, izslēgšana un atbildības ierobežojumi saskaņā ar garantijas noteikumiem, ir aizliegti
saskaņā ar piemērojamiem tiesību aktiem. Izplatītājiem, tālākpārdevējiem un aģentiem nav tiesību jebkādā veidā grozīt šos
garantijas noteikumus.
Jūsu EZVIZ produktam ir vienu (1) gadu ilga garantija kopš pirkuma datuma, kura attiecas uz ražošanas defektiem un
nekvalitatīvu ražošanas materiālu izmantošanu. Jūsu garantijai var būt arī ilgāks laika periods, ja tas ir noteikts likumos valstī,
kurā Jūs pirkāt doto produktu, ar nosacījumu, ka produkts tika izmantots saskaņā ar lietotāja instrukciju.
Jūs varat pieprasīt garantijas servisu, sazinoties ar mums support@ezvizlife.com.
Page 83

Ja tiek konstatēts EZVIZ produkta defekts garantijas ietvaros, HANGZHOU HIKVISION DIGITAL TECHNOLOGY CO., LTD.
(“Kompānija”) pēc izvēles, (i) veiks bezmaksas remontu vai apmainīs pret jaunu produktu; (ii) apmainīs produktu uz
ekvivalentu; (iii) vai atgriezīs pirkuma summu, ja tiks saņemts originals pirkumu apliecinošs dokuments vai tā kopija, defekta
apraksts un produkts tiks saņemts oriģinālajā iepakojumā. Pēc kompanijas ieskatiem, var būt veikts remonts vai detāļu maiņa.
Garantija nesedz pasta izmaksas, apdrošināšanu vai jebkuras citas izmaksas, kas var rasties, atgriežot produktu.
Izņemot gadījumus, kad tas ir aizliegts ar piemērojamiem tiesību aktiem, šis ir Jūsu vienīgais garantijas dokuments. Jebkuram
produktam, kurš tika salabots vai aizvietots ar citu, šīs garantijas ietvaros, garantijas tērmiņš ir ne ilgāks par deviņdesmit (90)
dienām kopš piegādes dienas vai oriģinālo garantijas termiņu.
Garantijas saistības nav spēkā:
• Ja garantijas tērmiņš ir beidzies, vai nav iesniegti pirkumu apliecinoši dokumenti.
• Ja defekts rādās nepareizas ekspluatācijas dēļ, mehānisko bojājumu gadījumā, nepareizas izmantošanas rezultātā, kas ir
pretrunā ar lietotāja instrukciju, nekorekta barošanas sprieguma, nelaimes gadījumu rezultātā, ugunsgrēku, plūdu, u.c.
nepārvarāmas varas iedarbības rezultātā, ja netika ievēroti transportēšanas un uzglabāšanas nosacījums un ja klients
mēģināja pats veikt remontu.
• Jebkuriem aizvietojamiem elementiem, piemēram, baterijas, kur bojājumi rodas novecojuma dēļ.
• Ja produkts tiek vizuāli bojāts, piemēram, skrāpēts, ir ar nospiedumiem, korpusa defektiem uz portiem, u.c.
• Jebkuram programmnodrošinājumam, pat ja pirkts un iepakots ar EZVIZ produktu.
• Jebkuriem defektiem, izņemot ražošanas defektus un defektus, kuri rādās nekvalitatīvu ražošanas materiālu izmantošanas
gadījumā.
• Regulāras tīrīšanas rezultātā, kosmētiska vai mehāniska nodiluma gadījumā.
Problēmu un jautājumu gadījumā, sazinieties ar savu pārdevēju vai rakstiet uz support@ezvizlife.com.
AUTORTIESĪBAS ©2016 HANGZHOU HIKVISION DIGITAL TECHNOLOGY CO., LTD. VISAS TIESĪBAS AIZSARGĀTAS.
GARANTIJAS NOTEIKUMI
Sveikiname įsigijus EZVIZ produktą. Perkant originalius produktus, ši ribota garantija pirkėjui suteikia tam tikras juridines teises.
Jūs galite turėti ir kitų teisių, kurios gali skirtis, atsižvelgiant į šalį, kurioje pirkote įrenginį. Teisės priklauso nuo šalyje galiojančių
įstatymų. Atsakomybės ribojimas bei išimtys negali prieštarauti taikomiems teisės aktams. Joks platintojas, perpardavinėtojas,
agentas ar darbuotojas neturi teisės keisti garantijos sąlygų.
EZVIZ produktui taikomas vienerių ( 1 ) metų garantinio aptarnavimo laikotarpis nuo įsigijimo dienos.
Ribota garantija taikoma esant medžiagų ar pagaminimo defektams, tačiau vartotojas turi tinkamai naudoti įrenginius pagal
vartotojo vadovą. Papildoma garantija suteikiama remiantis šalies, kurioje parduotas įrenginys, teisės aktais.
Garantinio aptarnavimo užklausos priimamos: support@ezvizlife.lt .
Page 84

Kiekvienas brokuotas EZVIZ produktas, kuriam taikomas garantinio aptarnavimo laikotarpis, HANGZHOU HIKVISION DIGITAL
TECHNOLOGY CO., LTD. (toliau “Įmonė”) pagal galimybes, (i) nemokamai sutaisys arba pakeis įrenginį nauju; (ii) pakeis Jūsų
įrenginį kitu, funkciškai lygiaverčiu produktu, be papildomos priemokos; (iii) arba grąžins sumokėtus pinigus, pateikus čekio
arba sąskaitos faktūros originalą, kartu pateikiant gedimo aprašymą bei nesugadintą gamintojo pateiktą pakuotę. Įmonės
nuožiūra, remontas arba įrenginio keitimas galimas naudojant naujus arba prieš tai sutaisytus ir veikiančius komponentus. Į
produkto garantiją neįskaičiuojamos pašto išlaidos, draudimo ir kiti mokesčiai, susiję su Jūsų patirtais nuostoliais dėl gaminio
grąžinimo.
Visais atvejais, išskyrus šalies teisės aktuose numatytose išimtyse, tai vienintelė bei išskirtinė priemonė garantiniam
aptarnavimui. Kiekvienam suremontuotam arba pakeistam produktui, pagal šią garantiją, taikomas devyniasdešimties (90 )
dienų papildomas garantinis terminas, arba tol, kol galios numatytasis garantijos laikotarpis.
Ši garantija netaikoma:
• Pasibaigus garantinio aptarnavimo laikotarpiui arba nepateikus gaminio įsigijimą patvirtinančio dokumento.
• Gedimams, atsiradusiems dėl pirkėjo kaltės (sukratymas, numetimas, neteisingas naudojimas, nesilaikant vartotojo vadove
aprašytais veiksmais), taip pat dėl elektros linijos šuolių, nelaimingų atsitikimų, praradimo, vagystės, gaisro, potvynių ar kitų
stichinių nelaimių atveju, bei pažeidimams, atsiradusiems dėl neįgaliotų asmenų savarankiško remonto.
• Susidėvinčioms dalims, kaip baterijos, kai gedimas yra sąlygotas įprastinio produkto susidėvėjimo.
• Kosmetiniams pažeidimams, įbrėžimams, įlenkimams bei prievadų plastiko lūžiams.
• Programinei įrangai.
• Visiems kitiems pažeidimams, kurie atsirado ne dėl medžiagų ar surinkimo broko.
• Įrangos valymui bei įprastiniam kosmetiniam ir mechaniniam susidėvėjimui.
Esant neaiškumams ar klausimams galite drąsiai kreiptis į mus support@ezvizlife.lt ,
©2016 HANGZHOU HIKVISION DIGITAL TECHNOLOGY CO., LTD. VISOS TEISĖS SAUGOMOS.
RIBOTOS GARANTIJOS SĄLYGOS
Page 85

UD01469B-B
 Loading...