

Ezviz X3 Quick Start Manual
UD01633B

COPYRIGHT ©2016 Hangzhou Hikvision Digital Technology Co., Ltd. or its subsidiaries. ALL RIGHTS
RESERVED.
About this Manual
The Manual includes instructions for using and managing the product. Pictures, charts, images and all
other information hereinafter are for description and explanation only. The information contained in the
Manual is subject to change, without notice, due to firmware updates or other reasons. Please find the
latest version in the ™ website (http://www.ezvizlife.com).
Any and all information, including, among others, wordings, pictures, graphs are the properties of
Hangzhou Hikvision Digital Technology Co., Ltd. or its subsidiaries (hereinafter referred to be “Hikvision”).
This user manual (hereinafter referred to be “the Manual”) cannot be reproduced, changed, translated,
or distributed, partially or wholly, by any means, without the prior written permission of Hikvision. Unless
otherwise stipulated, Hikvision does not make any warranties, guarantees or representations, express or
implied, regarding to the Manual.
Trademarks Acknowledgement
™, ™, and other Hikvision’s trademarks and logos are the properties of Hikvision in
various jurisdictions. Other trademarks and logos mentioned below are the properties of their respective
owners.
Legal Disclaimer
TO THE MAXIMUM EXTENT PERMITTED BY APPLICABLE LAW, THE PRODUCT DESCRIBED, WITH ITS
HARDWARE, SOFTWARE AND FIRMWARE, IS PROVIDED “AS IS”, WITH ALL FAULTS AND ERRORS,
AND HIKVISION MAKES NO WARRANTIES, EXPRESS OR IMPLIED, INCLUDING WITHOUT LIMITATION,
MERCHANTABILITY, SATISFACTORY QUALITY, FITNESS FOR A PARTICULAR PURPOSE, AND NONINFRINGEMENT OF THIRD PARTY. IN NO EVENT WILL HIKVISION, ITS DIRECTORS, OFFICERS, EMPLOYEES,
OR AGENTS BE LIABLE TO YOU FOR ANY SPECIAL, CONSEQUENTIAL, INCIDENTAL, OR INDIRECT DAMAGES,
INCLUDING, AMONG OTHERS, DAMAGES FOR LOSS OF BUSINESS PROFITS, BUSINESS INTERRUPTION,
OR LOSS OF DATA OR DOCUMENTATION, IN CONNECTION WITH THE USE OF THIS PRODUCT, EVEN IF
HIKVISION HAS BEEN ADVISED OF THE POSSIBILITY OF SUCH DAMAGES. TO THE MAXIMUM EXTENT
PERMITTED BY APPLICABLE LAW, IN NO EVENT SHALL HIKVISION’S TOTAL LIABILITY FOR ALL DAMAGES
EXCEED THE PURCHASE PRICE THE PRODUCT.
HIKVISION does not undertake any liability for personal injury or property damage, as the result of
product interruption or service termination cause by: a) improper installation or usage other than as
requested; b) the protection of national or public interests; c) Force Majeure; d) yourself or the third
party, including not limitation, using any third party’s products, software, applications, and among
others.
REGARDING TO THE PRODUCT WITH INTERNET ACCESS, THE USE OF PRODUCT SHALL BE WHOLLY AT

YOUR OWN RISKS. HIKVISION SHALL NOT TAKE ANY RESPONSIBILITES FOR ABNORMAL OPERATION,
PRIVACY LEAKAGE OR OTHER DAMAGES RESULTING FROM CYBER ATTACK, HACKER ATTACK, VIRUS
INSPECTION, OR OTHER INTERNET SECURITY RISKS; HOWEVER, HIKVISION WILL PROVIDE TIMELY
TECHNICAL SUPPORT IF REQUIRED.
SURVEILLANCE LAWS VARY BY JURISDICTION. PLEASE CHECK ALL RELEVANT LAWS IN YOUR
JURISDICTION BEFORE USING THIS PRODUCT IN ORDER TO ENSURE THAT YOUR USE CONFORMS TO
THE APPLICABLE LAW. YOU FUTHER AGREE THAT THIS PRODUCT IS ONLY FOR CIVIL USE, AND HIKVISION
SHALL NOT BE LIABLE IN THE EVENT THAT THIS PRODUCT IS USED WITH ILLEGITIMATE PURPOSES,
SUCH AS THIRD PARTY RIGHTS INFRINGEMENT, MEDICAL TREATMENT, SAFETY EQUIPMENT OR OTHER
SITUATIONS WHERE THE PRODUCT FAILURE COULD LEAD TO DEATH OR PERSONAL INJURY, OR WEAPON
OF MASS DESTRUCTION, CHEMINCAL AND BIOLOGICAL WEAPON, NUCLEAR EXPLOSION, AND ANY UNSAFE
NUCLEAR ENERGY USES OR ANTI-HUMANITY USAGES. YOU SHOULD UNDERTAKE ALL RESPONSIBILITIES
FOR LOSSES OR DAMAGES RESULTING FROM THE ABOVE USAGES WHATSOEVER.
IN THE EVENT OF ANY CONFLICTS BETWEEN THE ABOVE AND THE APPLICABLE LAW, THE LATER
PREVAILS.
Regulatory Information
FCC Information
Please take attention that changes or modification not expressly approved by the party responsible
for compliance could void the user’s authority to operate the equipment.
FCC compliance: This equipment has been tested and found to comply with the limits for a
Class B digital device, pursuant to part 15 of the FCC Rules. These limits are designed to provide
reasonable protection against harmful interference in a residential installation. This equipment
generates, uses and can radiate radio frequency energy and, if not installed and used in accordance
with the instructions, may cause harmful interference to radio communications. However, there is
no guarantee that interference will not occur in a particular installation. If this equipment does
cause harmful interference to radio or television reception, which can be determined by turning the
equipment off and on, the user is encouraged to try to correct the interference by one or more of
the following measures:
—Reorient or relocate the receiving antenna.
—Increase the separation between the equipment and receiver.
—Connect the equipment into an outlet on a circuit different from that to which the receiver is
connected.
—Consult the dealer or an experienced radio/TV technician for help
FCC Conditions
This device complies with part 15 of the FCC Rules. Operation is subject to the following two
conditions:
1. This device may not cause harmful interference.
2. This device must accept any interference received, including interference that may cause
undesired operation.
EU Conformity Statement
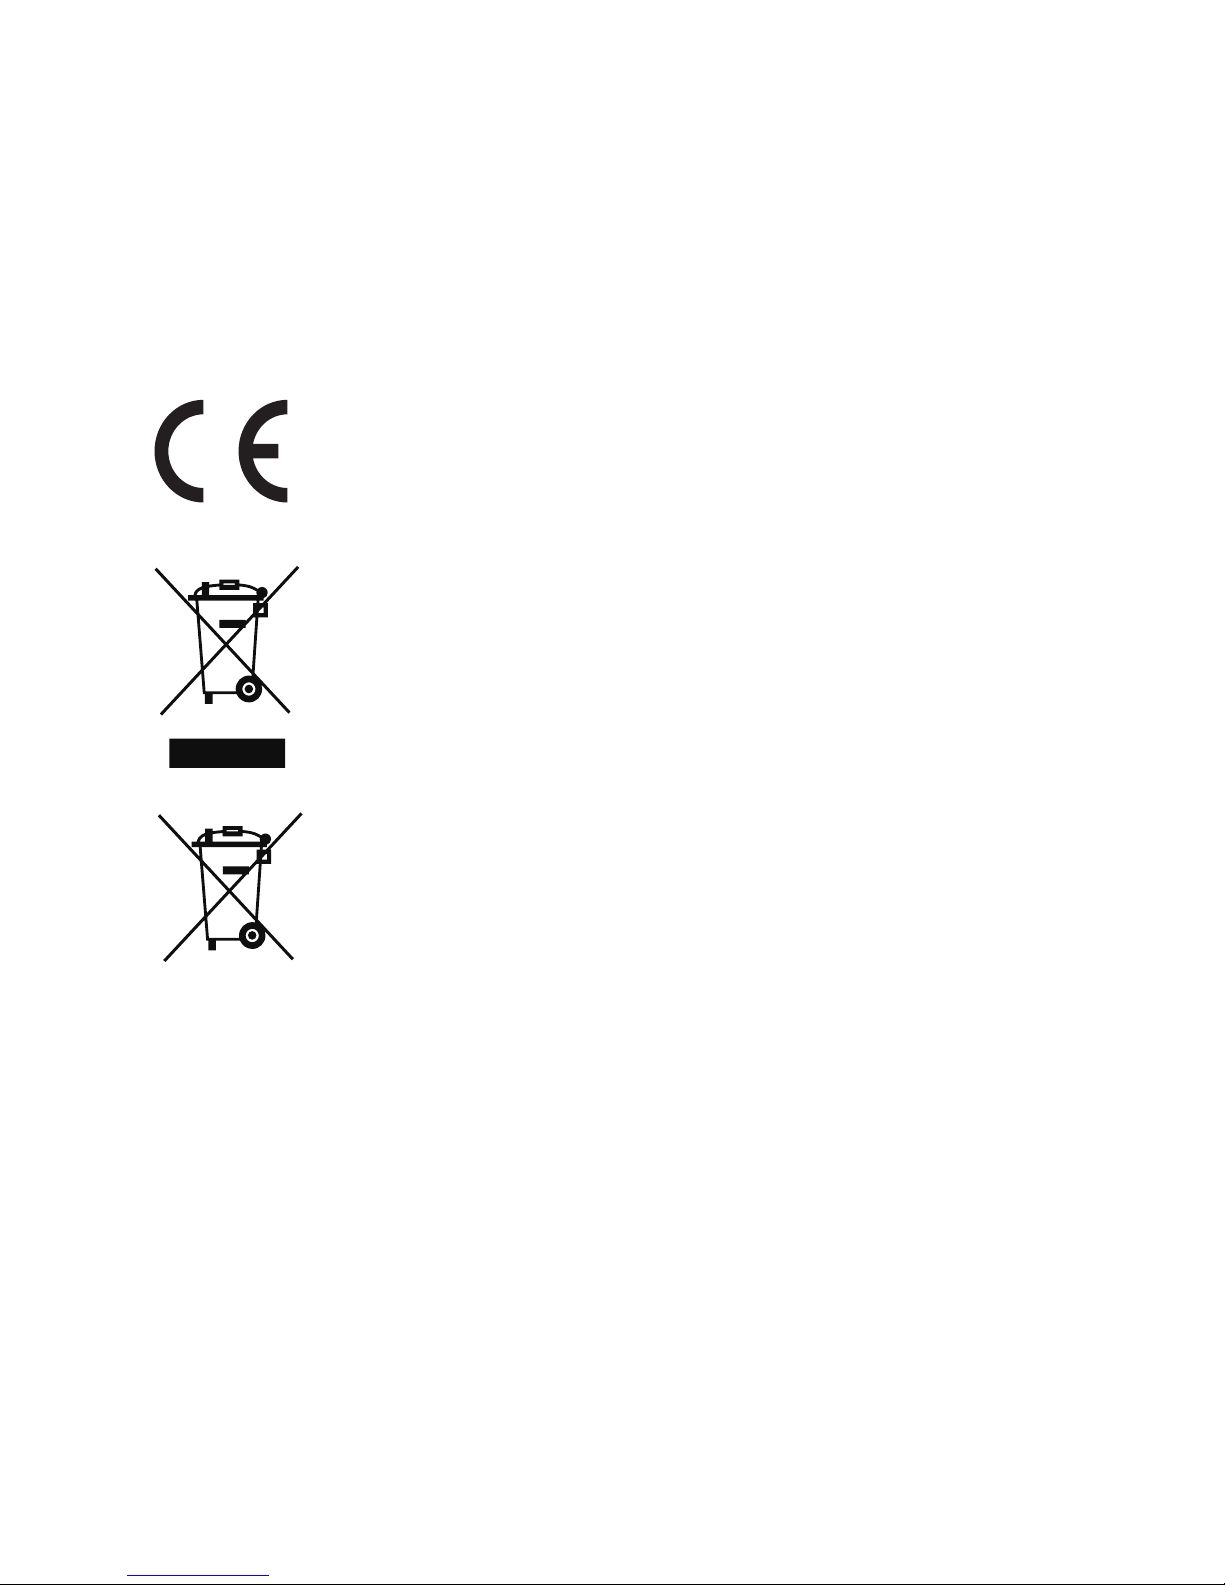
This product and - if applicable - the supplied accessories too are marked with "CE"
and comply therefore with the applicable harmonized European standards listed under
the EMC Directive 2014/30/EU, the RoHS Directive 2011/65/EU.
2012/19/EU (WEEE directive): Products marked with this symbol cannot be disposed
of as unsorted municipal waste in the European Union. For proper recycling, return
this product to your local supplier upon the purchase of equivalent new equipment,
or dispose of it at designated collection points. For more information see: www.
recyclethis.info.
2006/66/EC (battery directive): This product contains a battery that cannot be
disposed of as unsorted municipal waste in the European Union. See the product
documentation for specific battery information. The battery is marked with this
symbol, which may include lettering to indicate cadmium (Cd), lead (Pb), or mercury
(Hg). For proper recycling, return the battery to your supplier or to a designated
collection point. For more information see: www.recyclethis.info.
Industry Canada ICES-003 Compliance
This device meets the CAN ICES-3 (B)/NMB-3(B) standards requirements.
1
Operations
Step 1
Installing 2.5-inch HDD
If the product you purchases has a built-in HDD, skip this step.
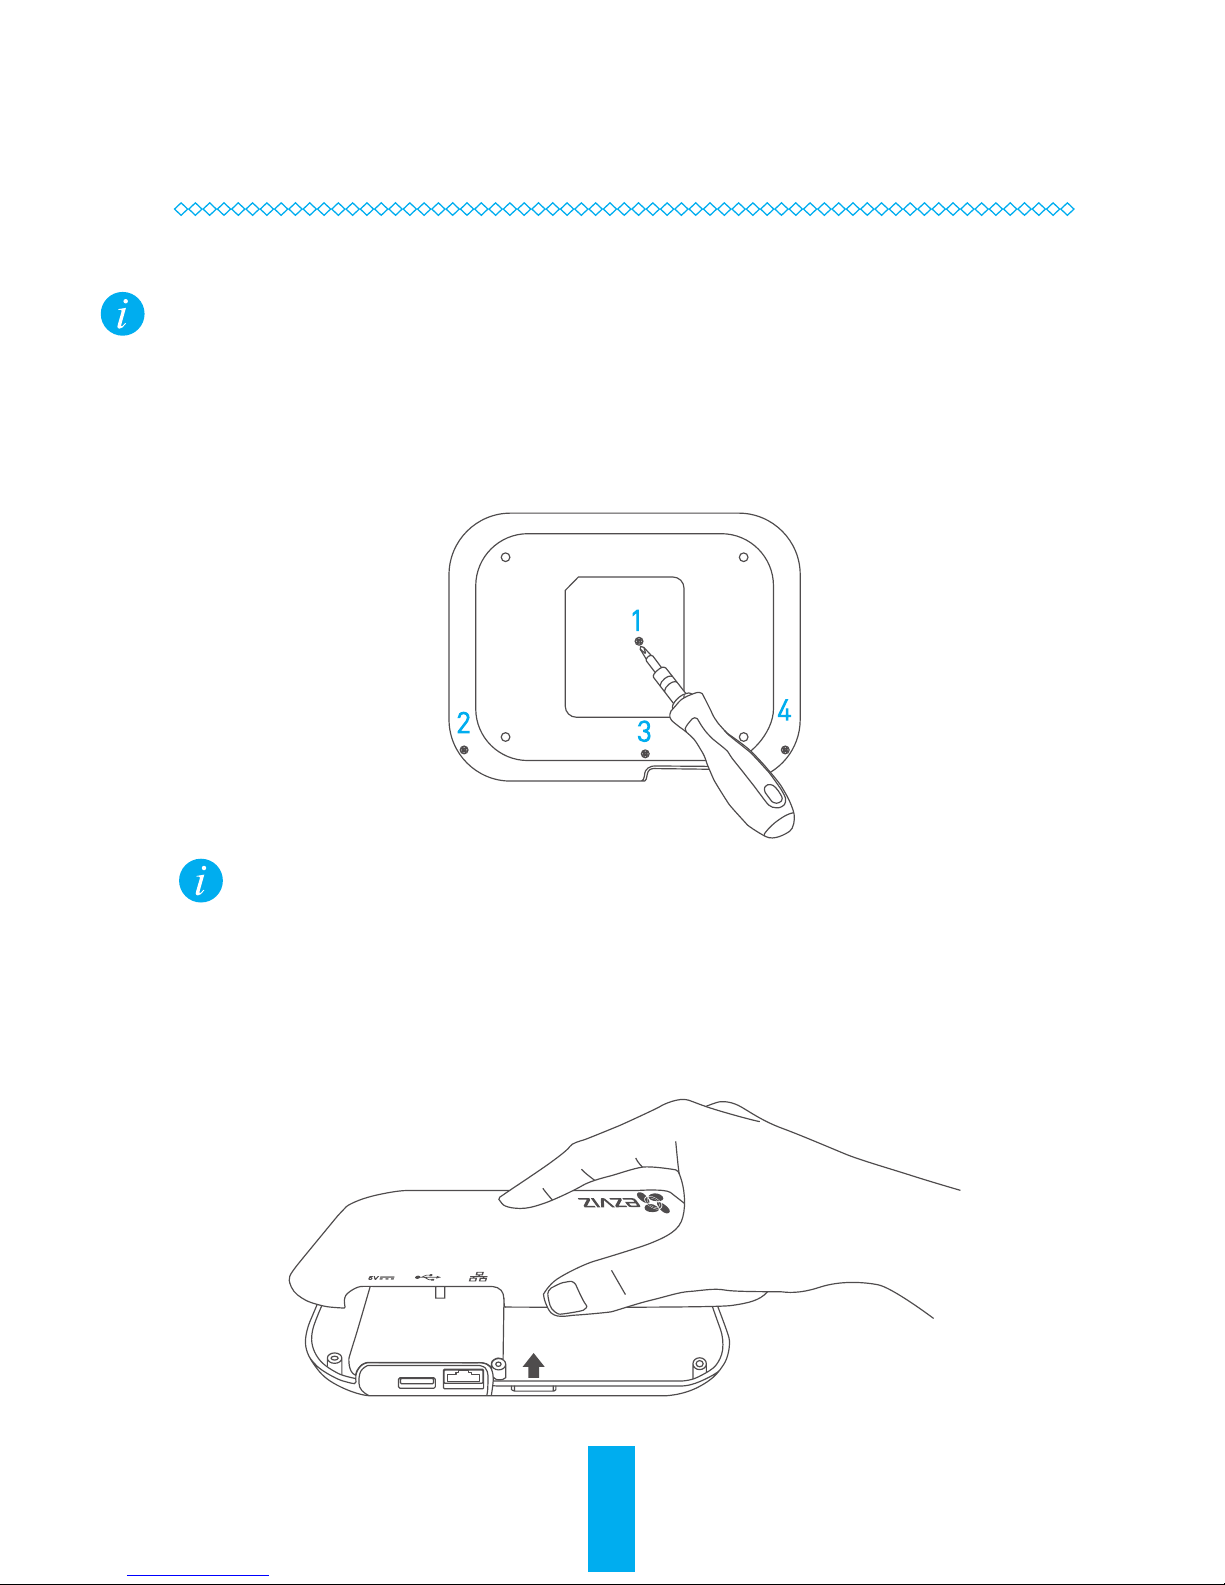
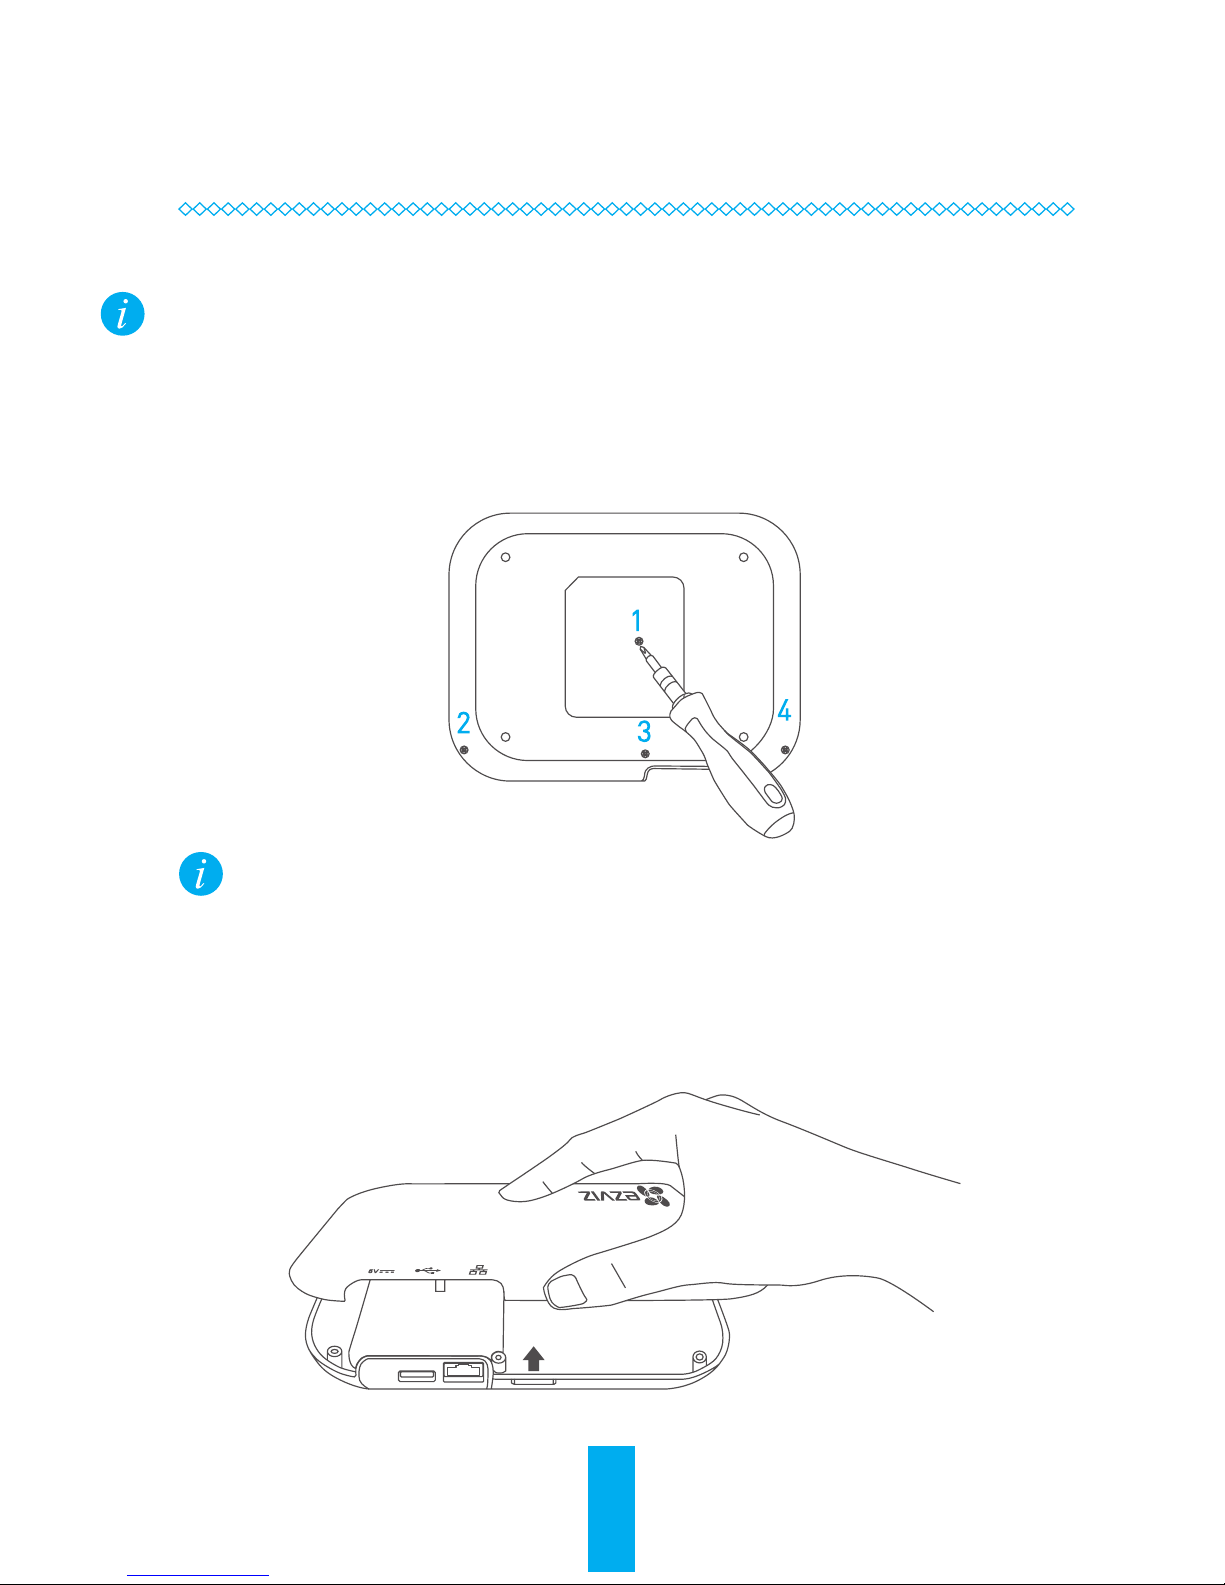
1
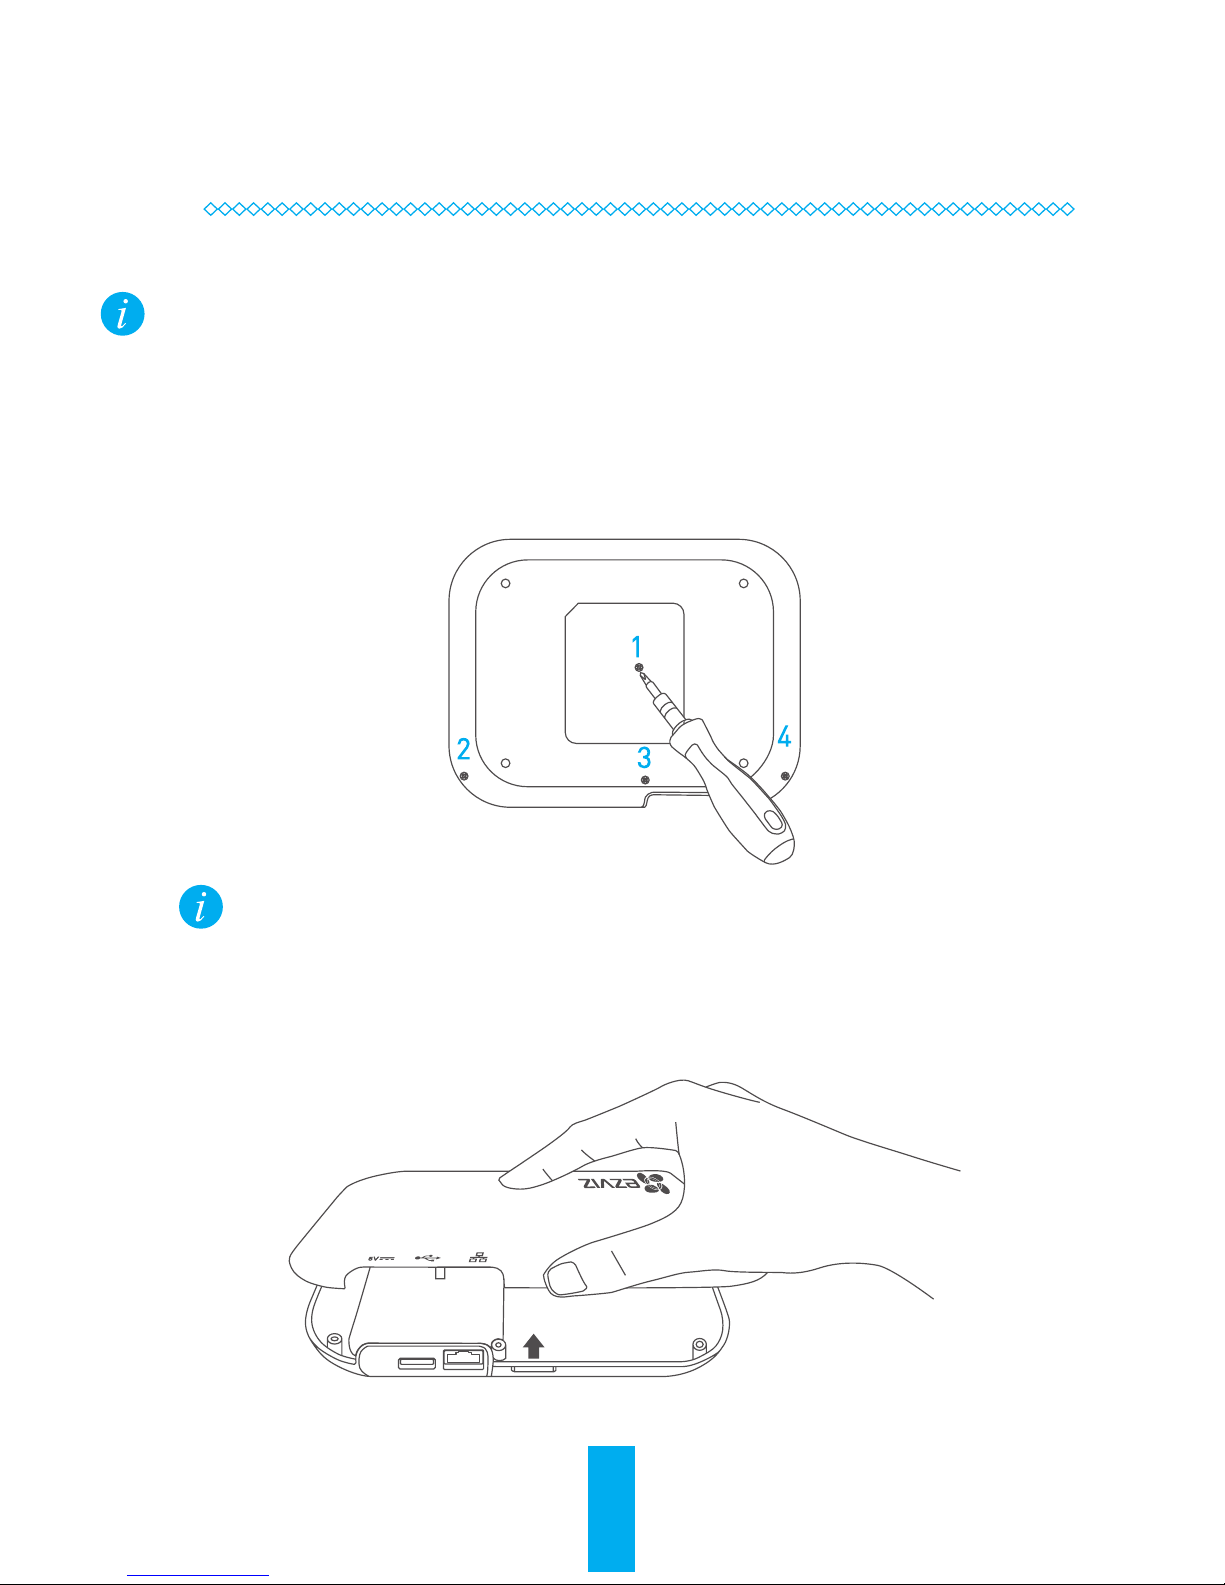
Loosening the Screws
Loosen the 4 screws on the base of the X3 with a screwdriver, as shown in the
figure below:
The No.1 screw is behind the label. Tear off the lable, you can see the No. 1
screw.
2
Opening the Cover
Open the cover at the groove according to the direction of arrow, as shown in the
figure below:
2
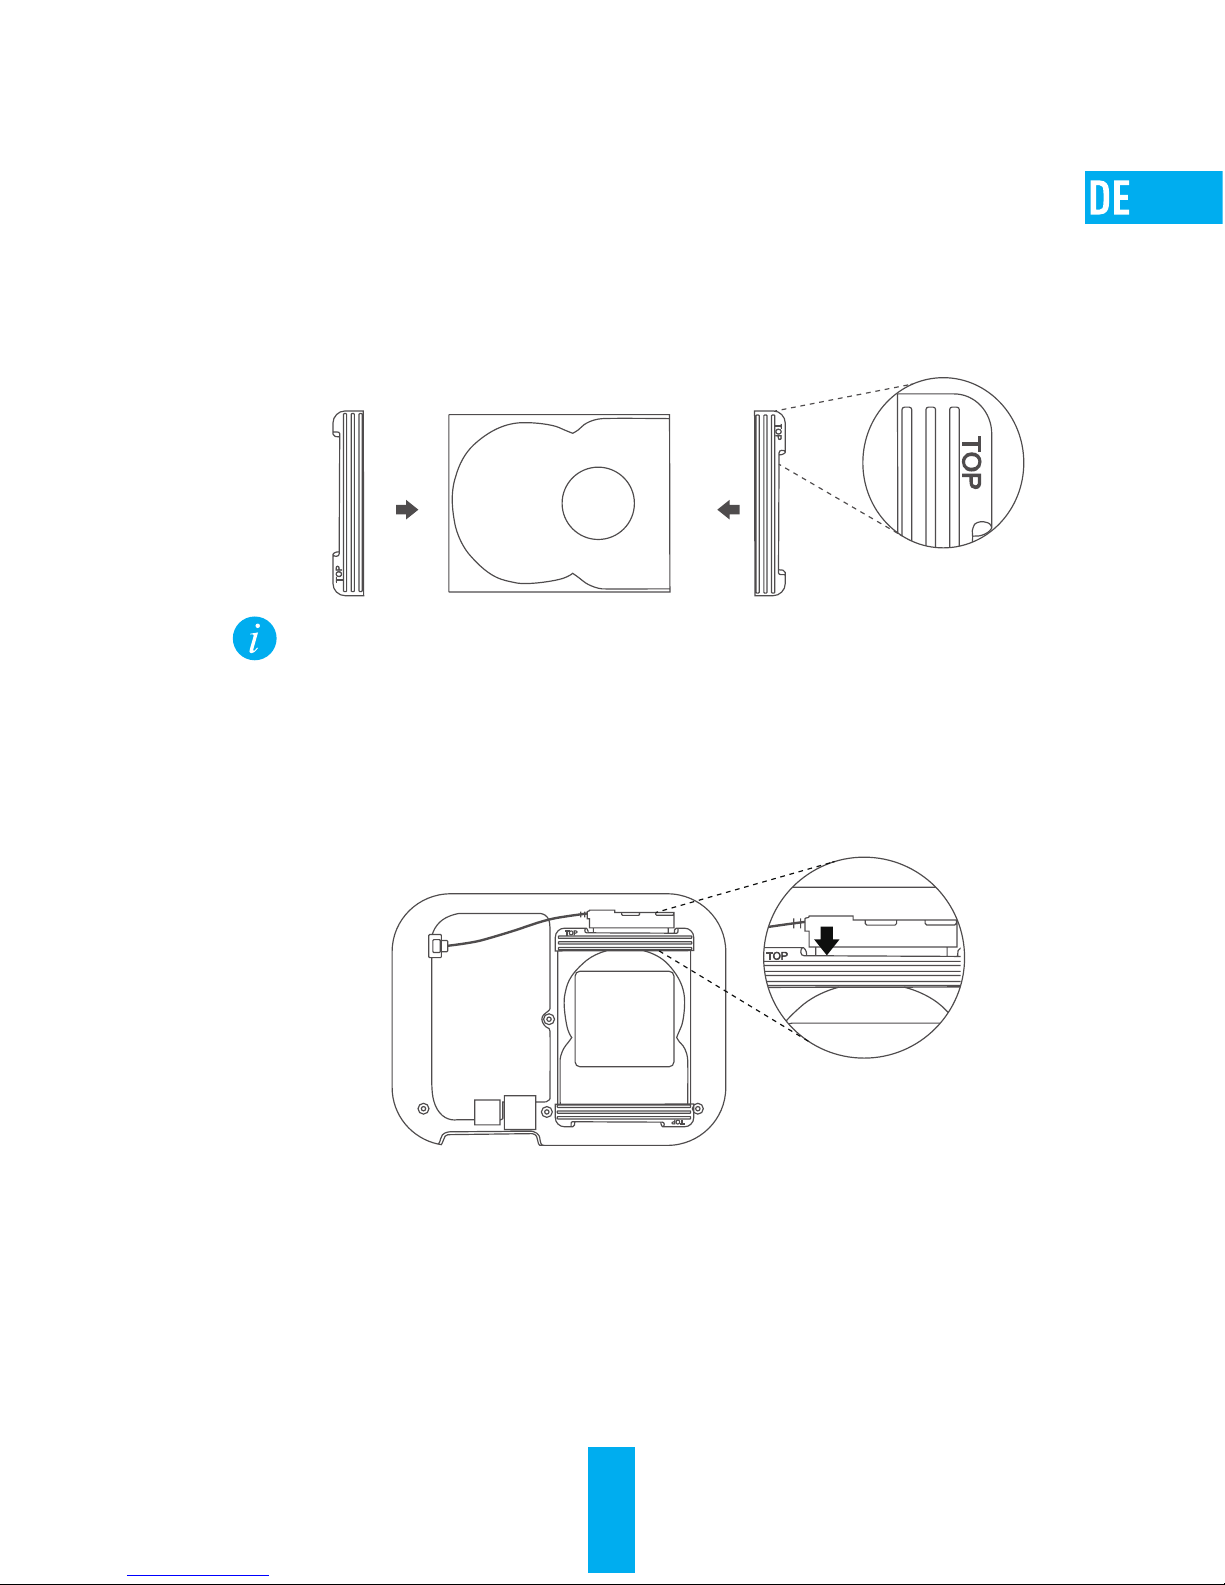
3
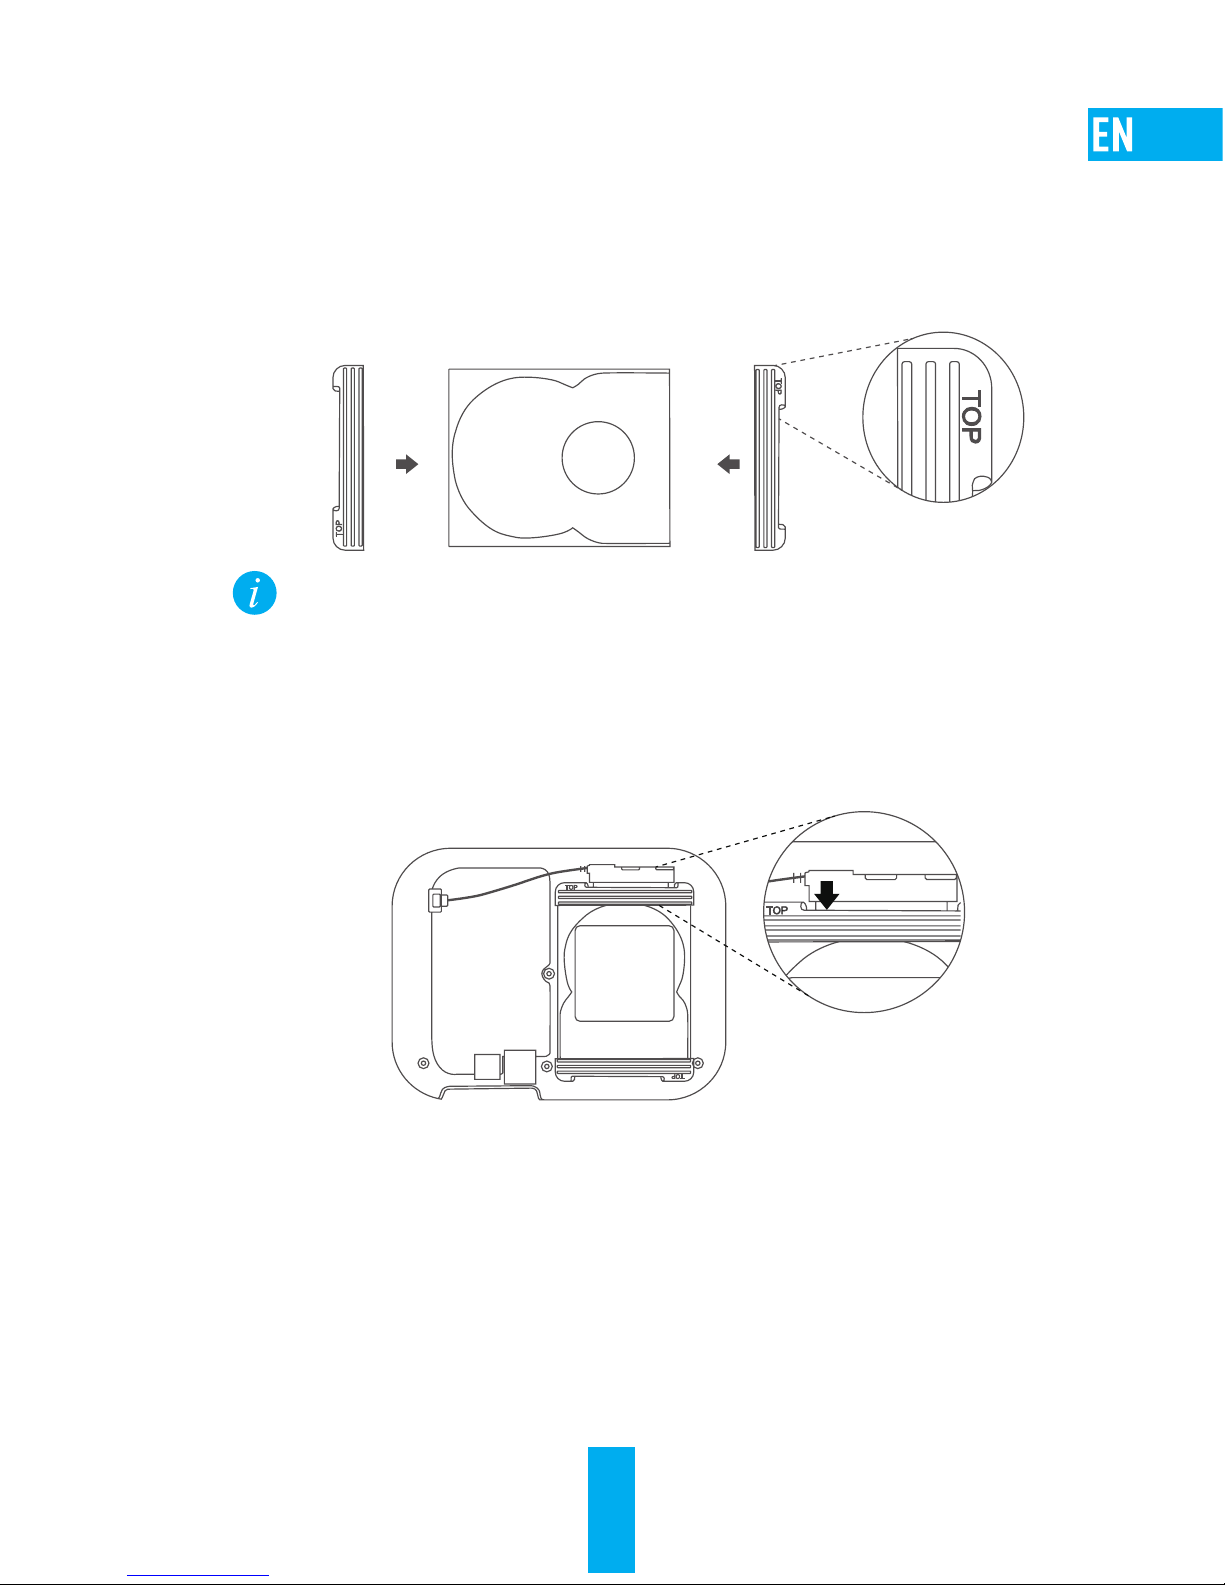
Installing the HDD Rubber Case
Pick an appropriate rubber case according to the HDD thick, and cover the rubber
case on the two sides of the HDD, as shown in the figure below.
If the HDD is 9mm thick, the TOP mark of the rubber case should be facing
upward when installing .
4
Installing the HDD
Connect the HDD cable to the HDD and place the HDD in the designated position,
as shown in the figure below.
5
Completing Installation
Replace the cover and fasten the 4 screws in the step 1 and complete the
installation.

3
Step 2
Starting up the X3
1
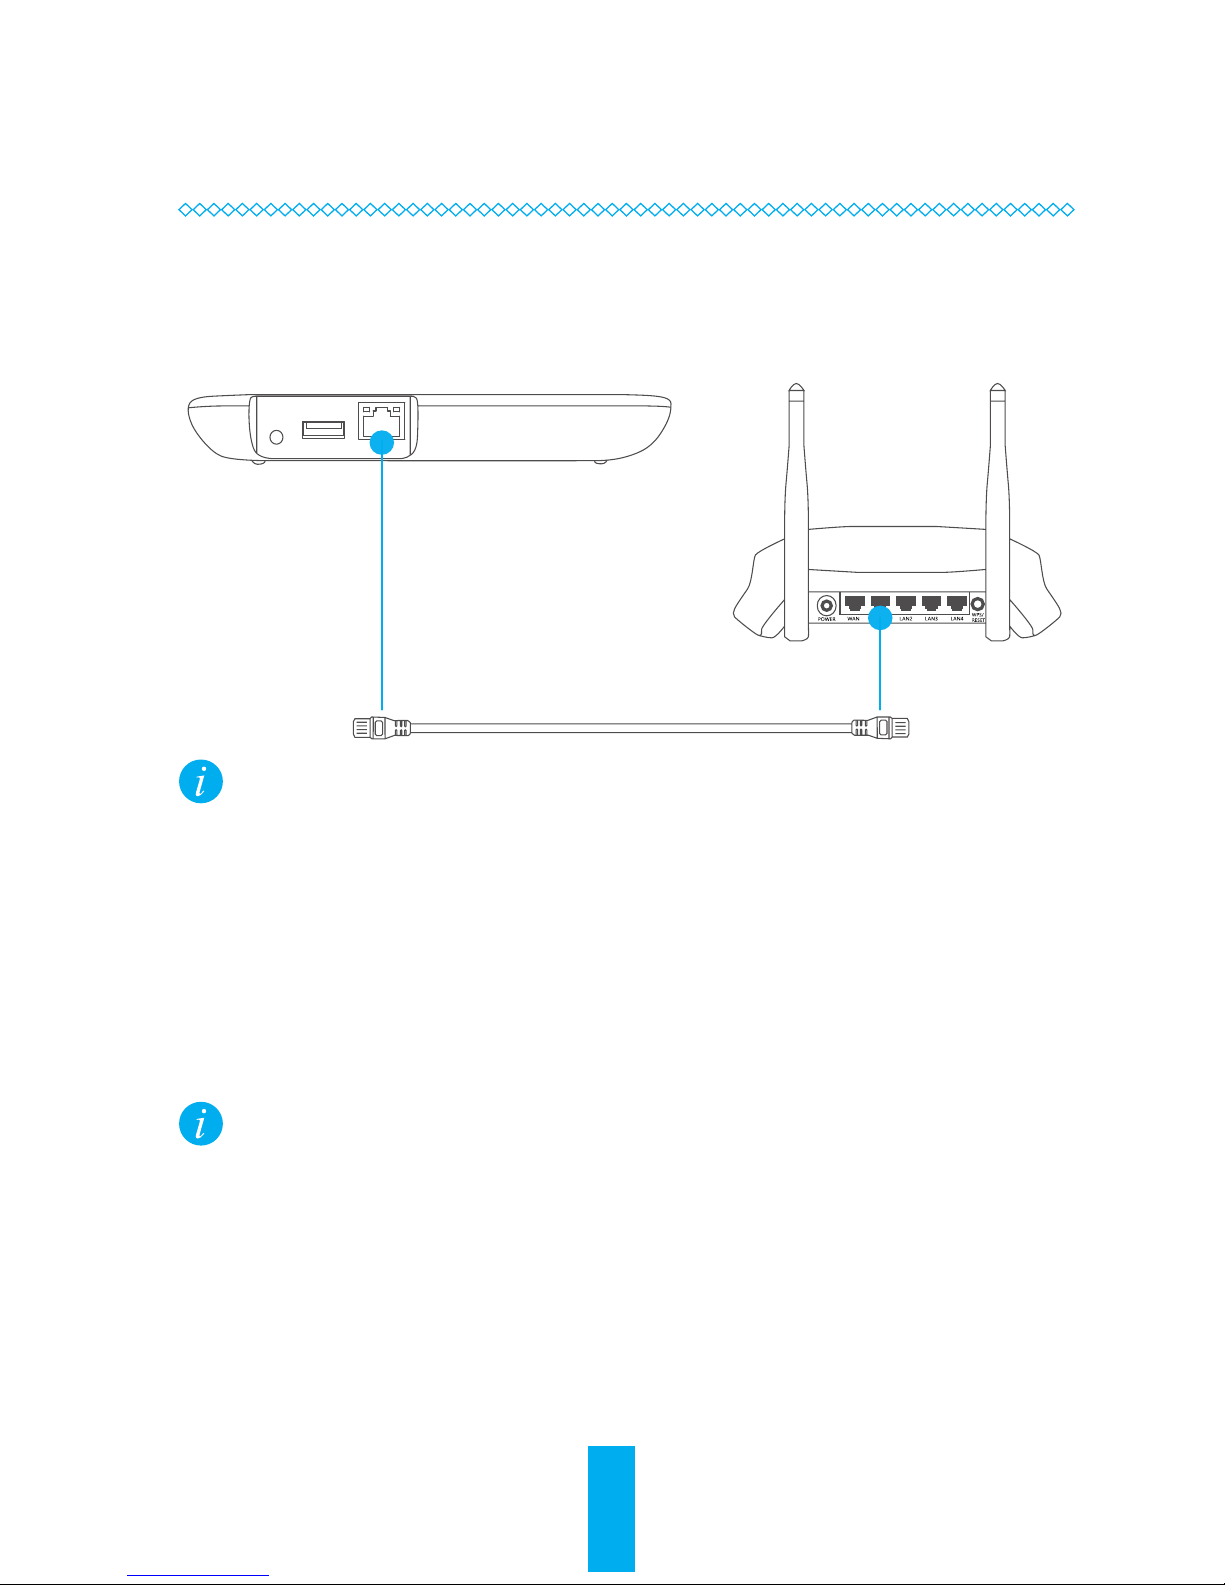
Connecting to the Network
Connect X3 to the router with a network cable.
X3 does not support the Wi-Fi network connection.
2
Power-on
Connect the X3 to the power adapter with a power cable, and connect to the
power socket. The LED indicator turns solid blue when the X3 starts completely.
The indicator turns solid yellow in the following cases:
- No installed HDD
- HDD error
- Device exceptions
4
Step 3
Adding Devices to EZVIZ
1
Installing the EZVIZ App
- Download and install the EZVIZ app by searching the “EZVIZ” in App Store or
Google PlayTM.
- Launch the app and register for an EZVIZ user account.
2
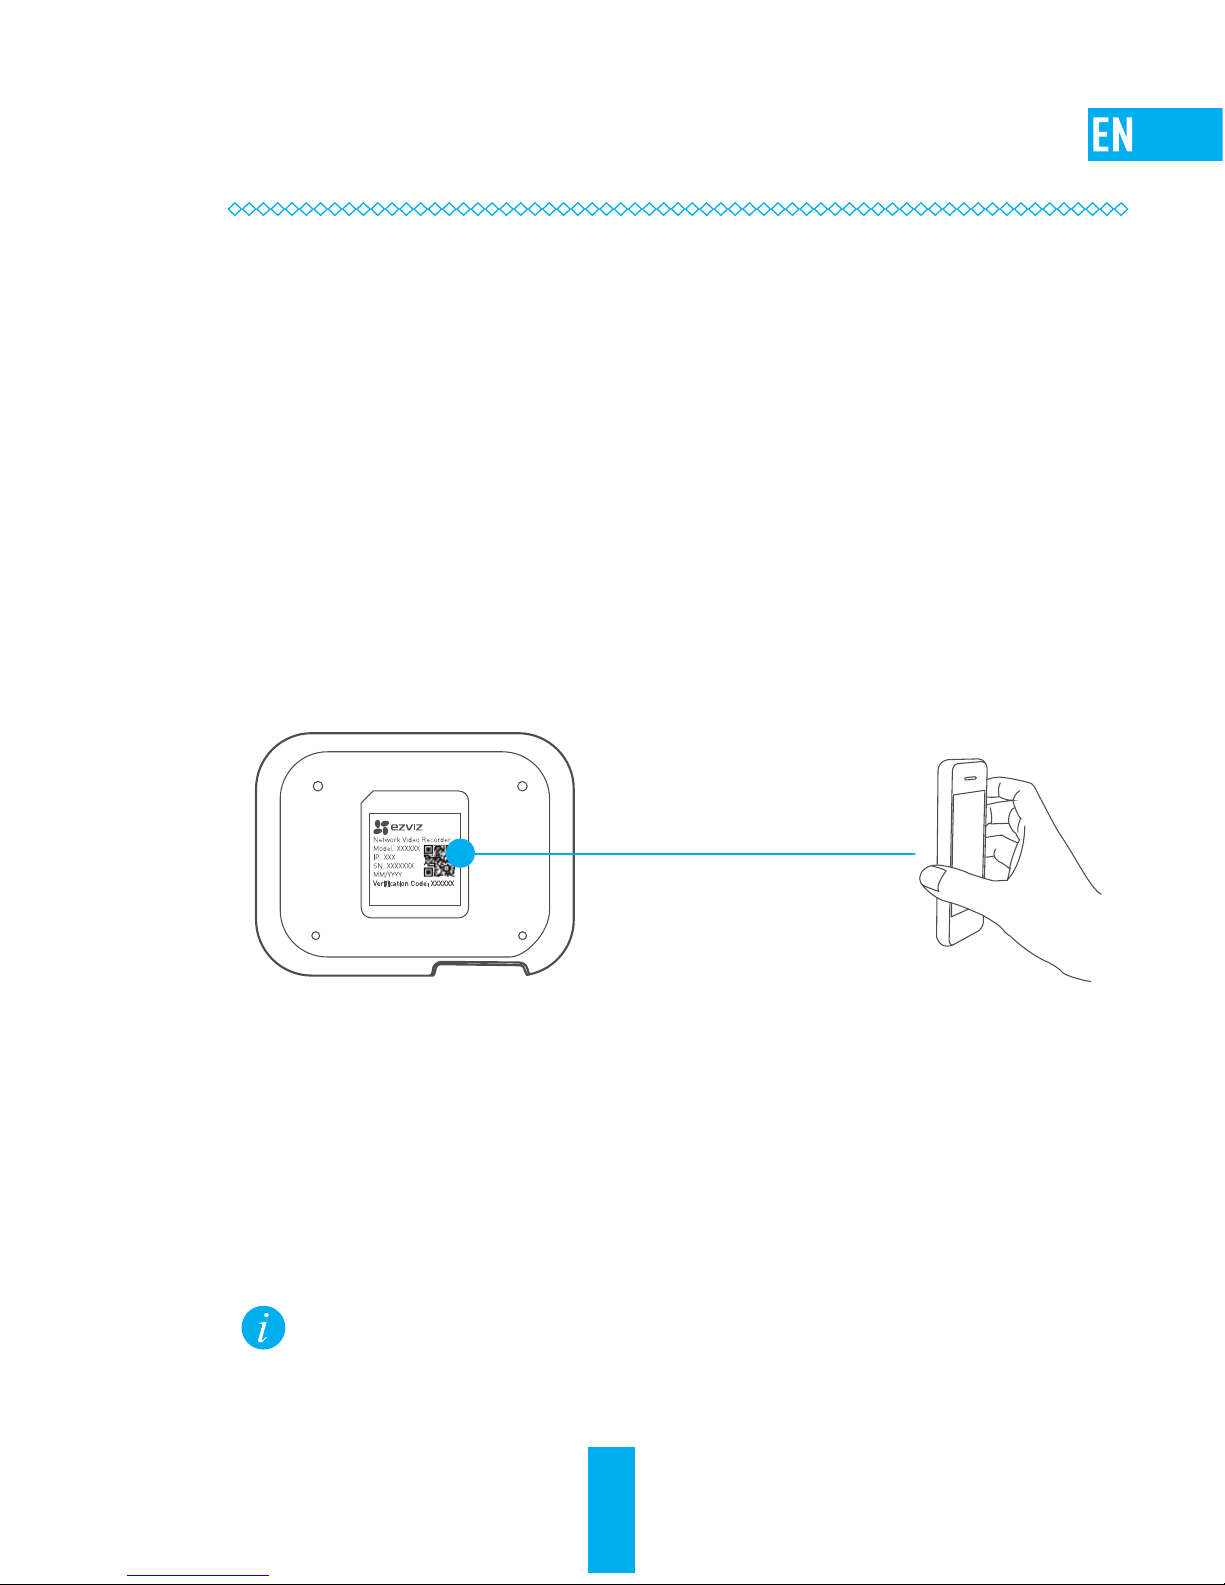
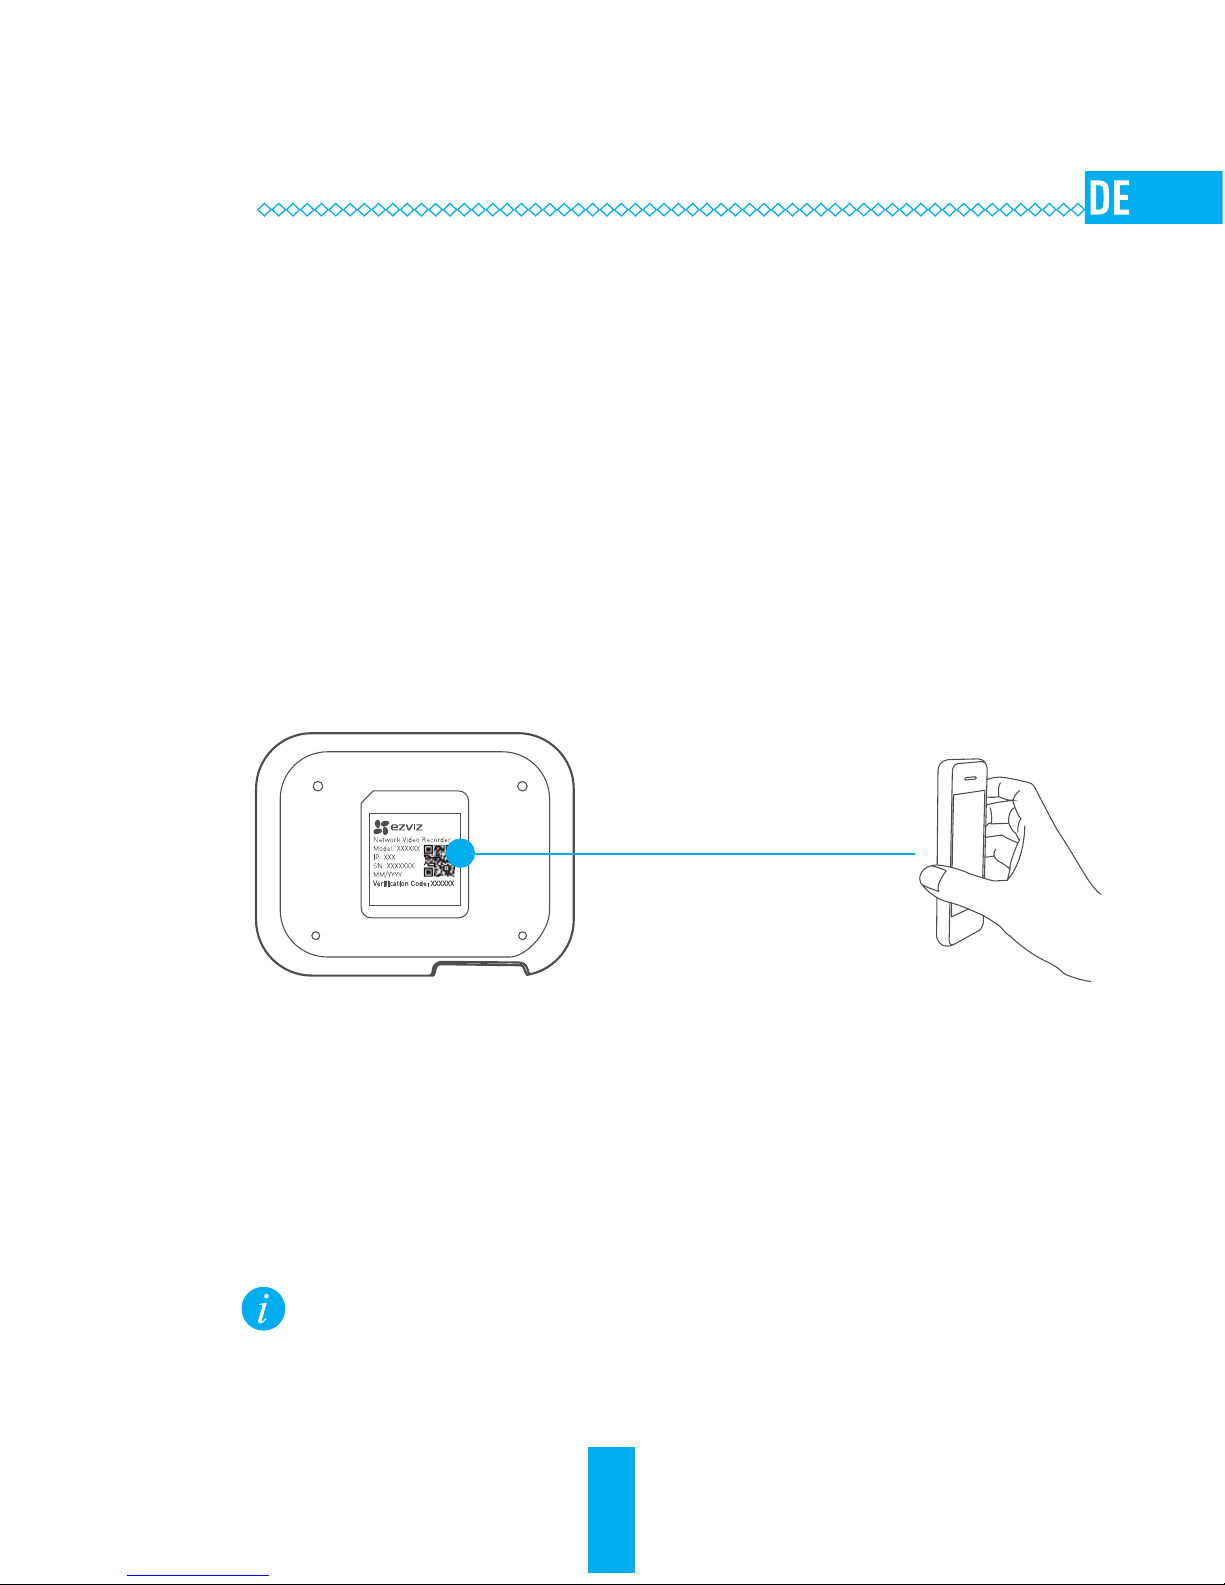
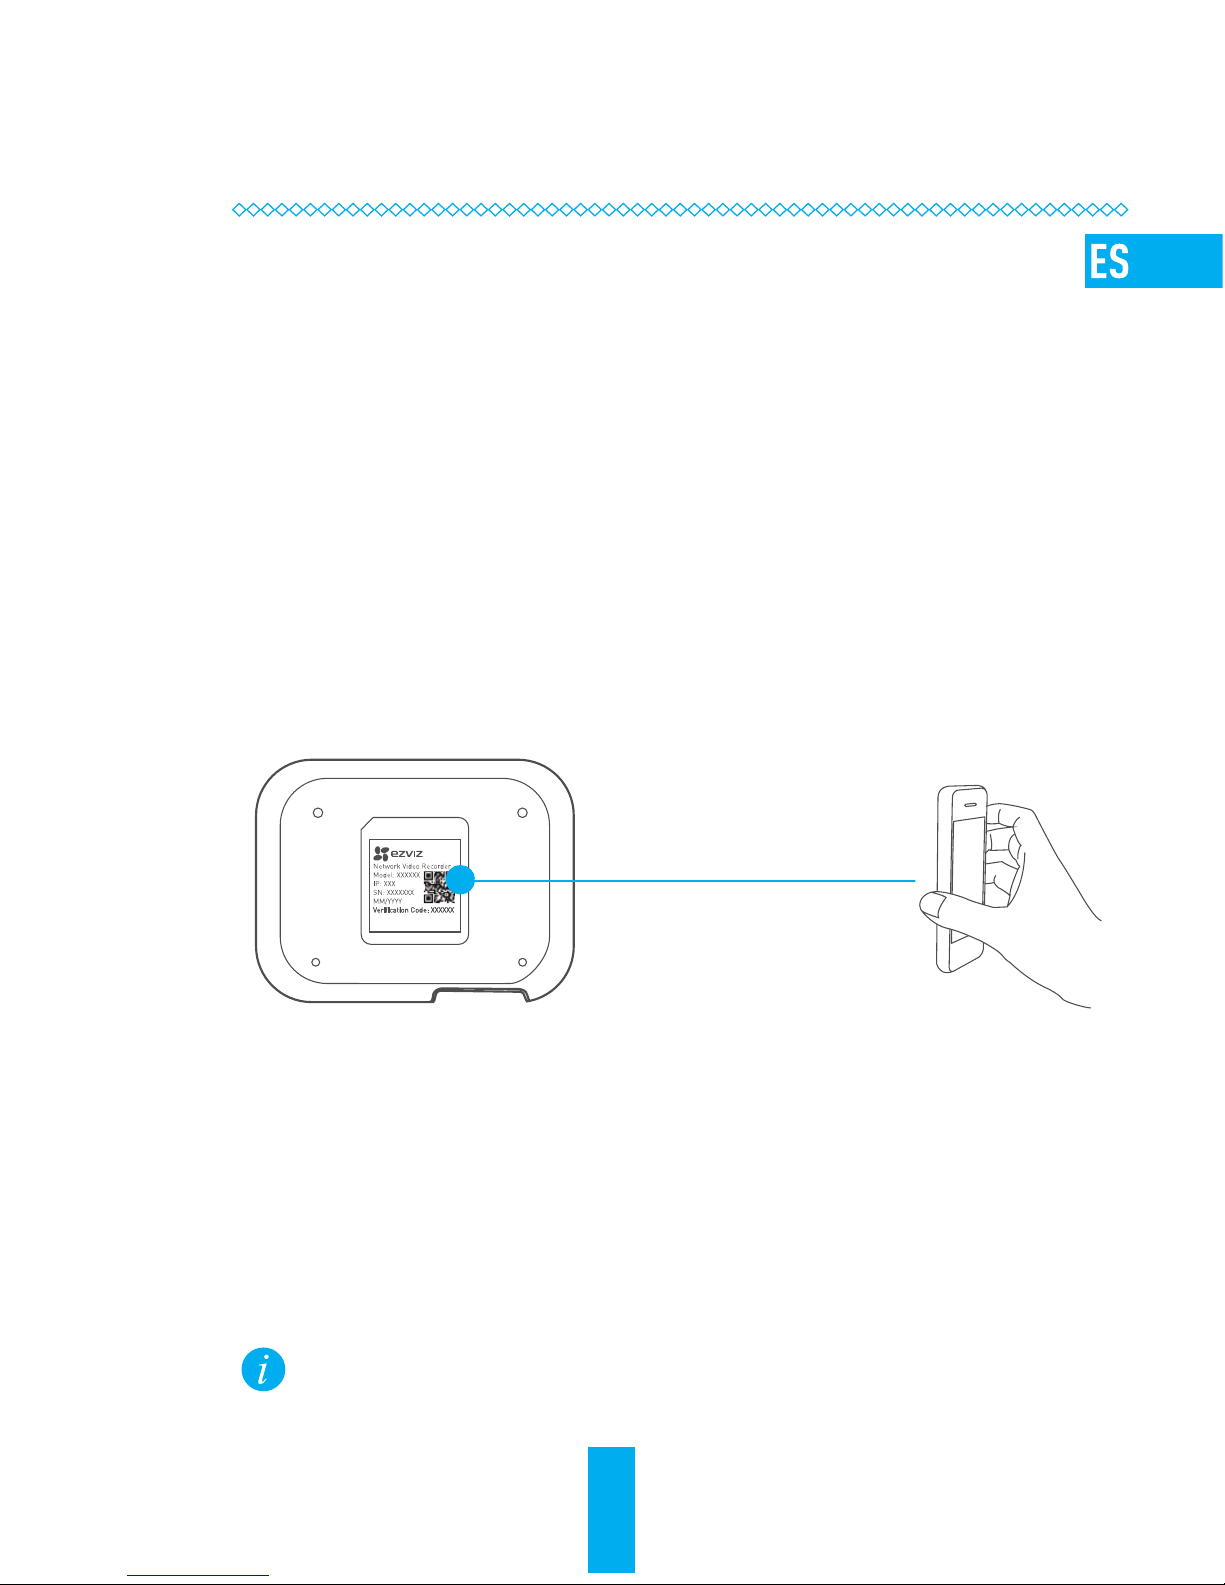
Adding X3 to EZVIZ
- Log into the EZVIZ app.
- Click the “+” on the upper-right hand corner to add a device.
- Scan the QR Code on the bottom of X3.
3
Adding Camera to EZVIZ
- The procedure of adding a camera is the same as the adding X3. Refer to the
step 2 to add a camera to your EZVIZ account.
- Enter the Settings page of the camera, tap Storage Status and select X3 in the
storage list to start X3 recording of the camera.
The X3 supports up to 8 cameras recording and only connects to cameras
that are on the same network.
Adding by Scanning QR Code
5
Appendix
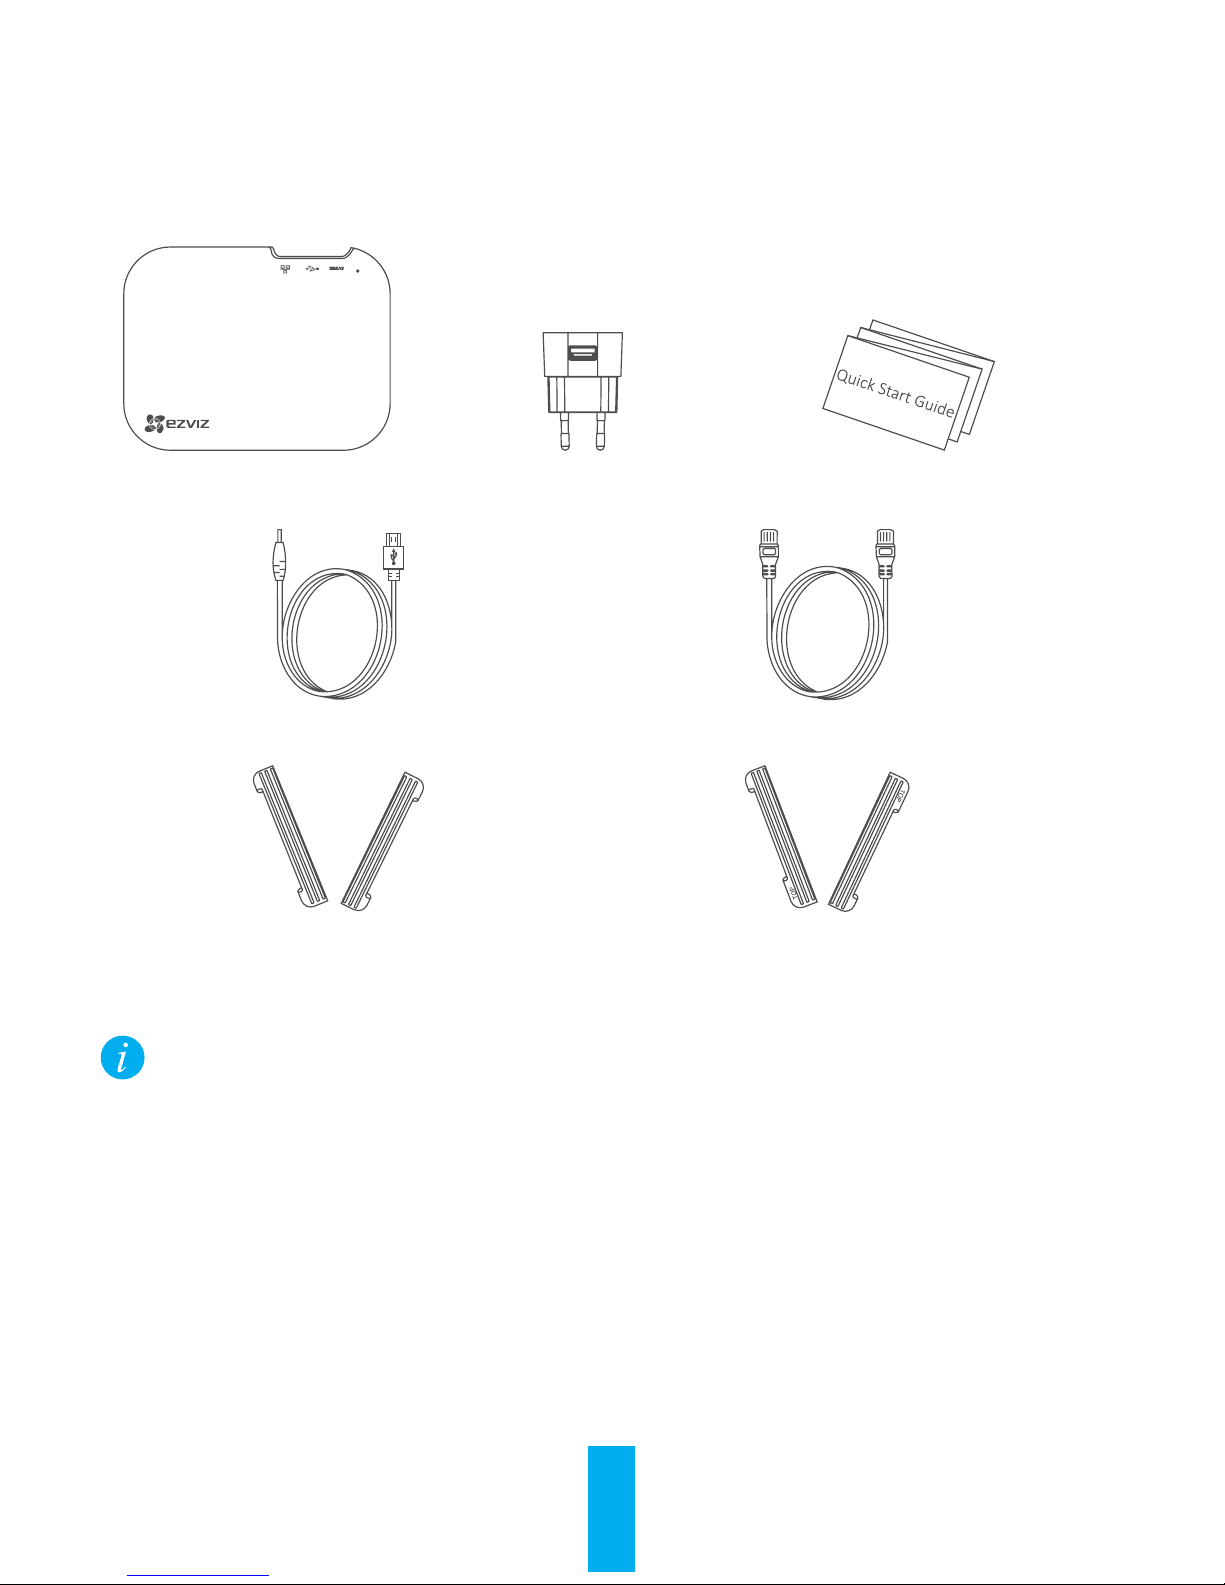
Box Contents
X3 (x1) Power Adapter (x1) Quick Start Guide (x1)
Power Cable (x1) Network Cable (x1)
HDD Rubber Case 1 (Optional) (x2)
(For 7mm thick HDD)
HDD Rubber Case 2 (Optional) (x2)
(For 9mm thick HDD)
The HDD rubber case will not be included if the product is equipped with a HDD by
default.
6
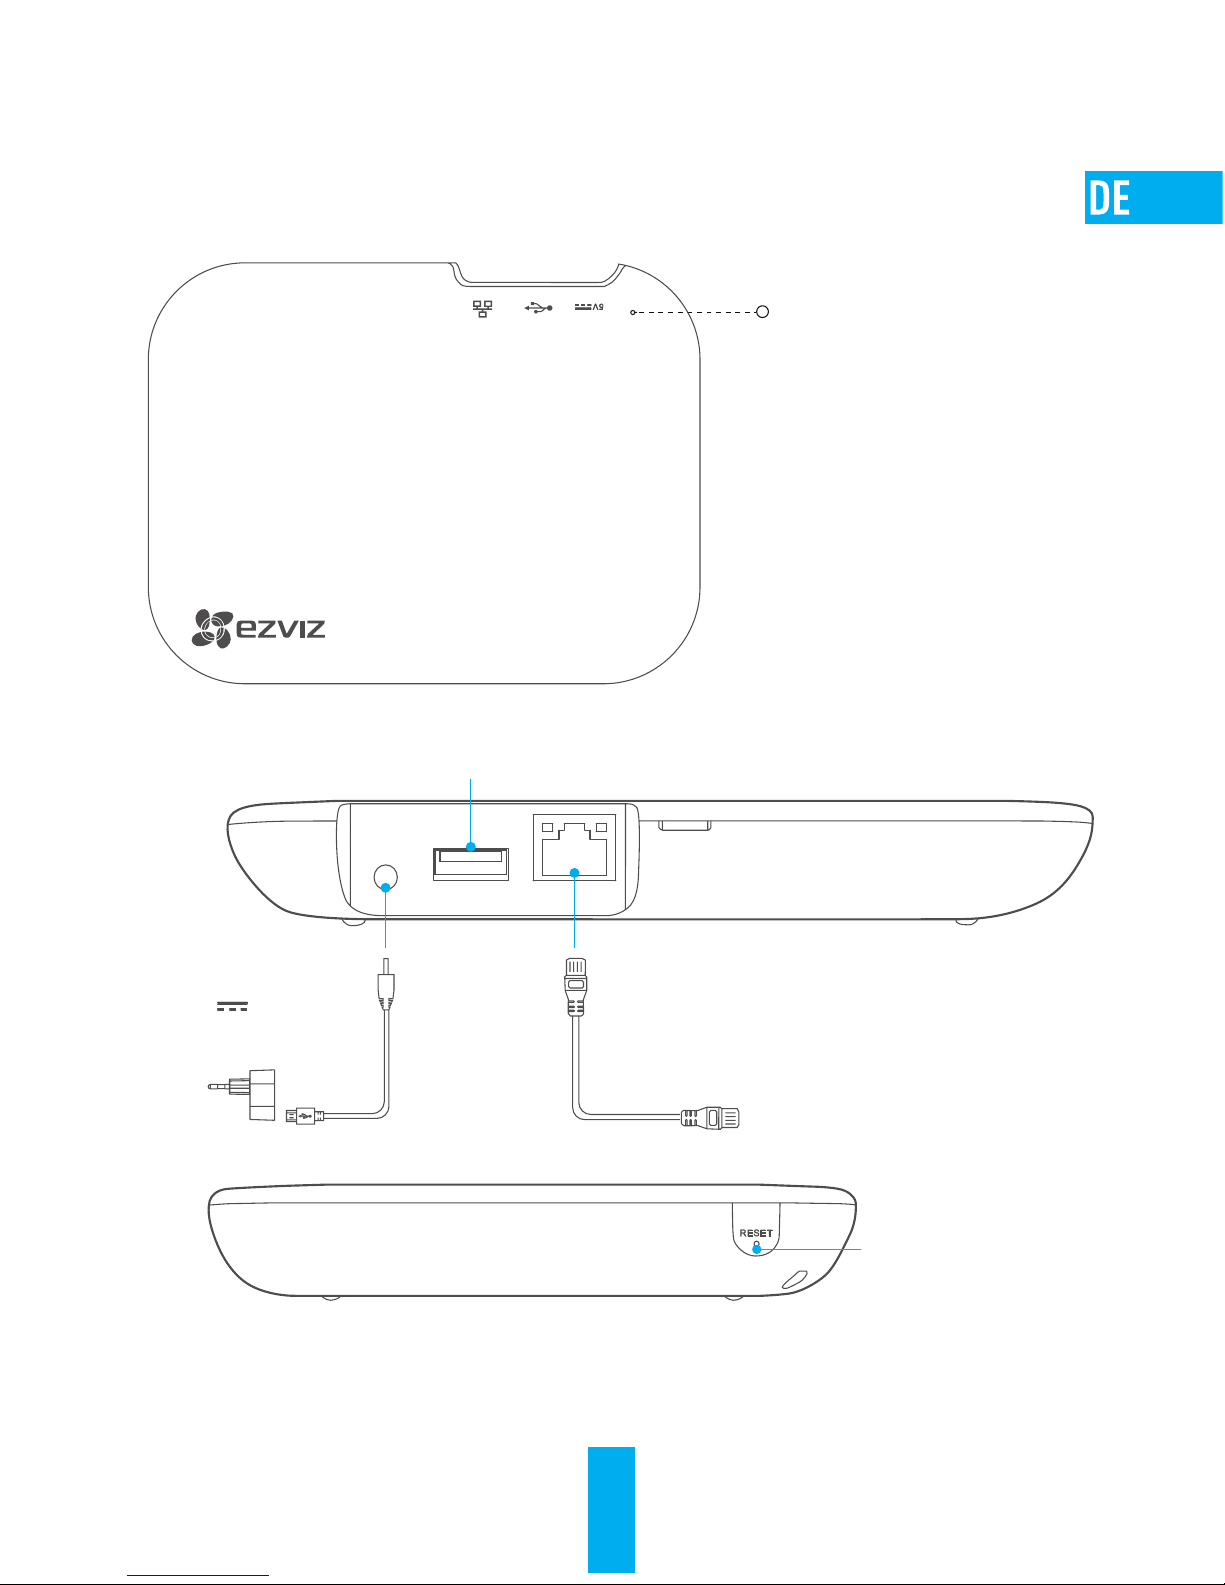
Basics
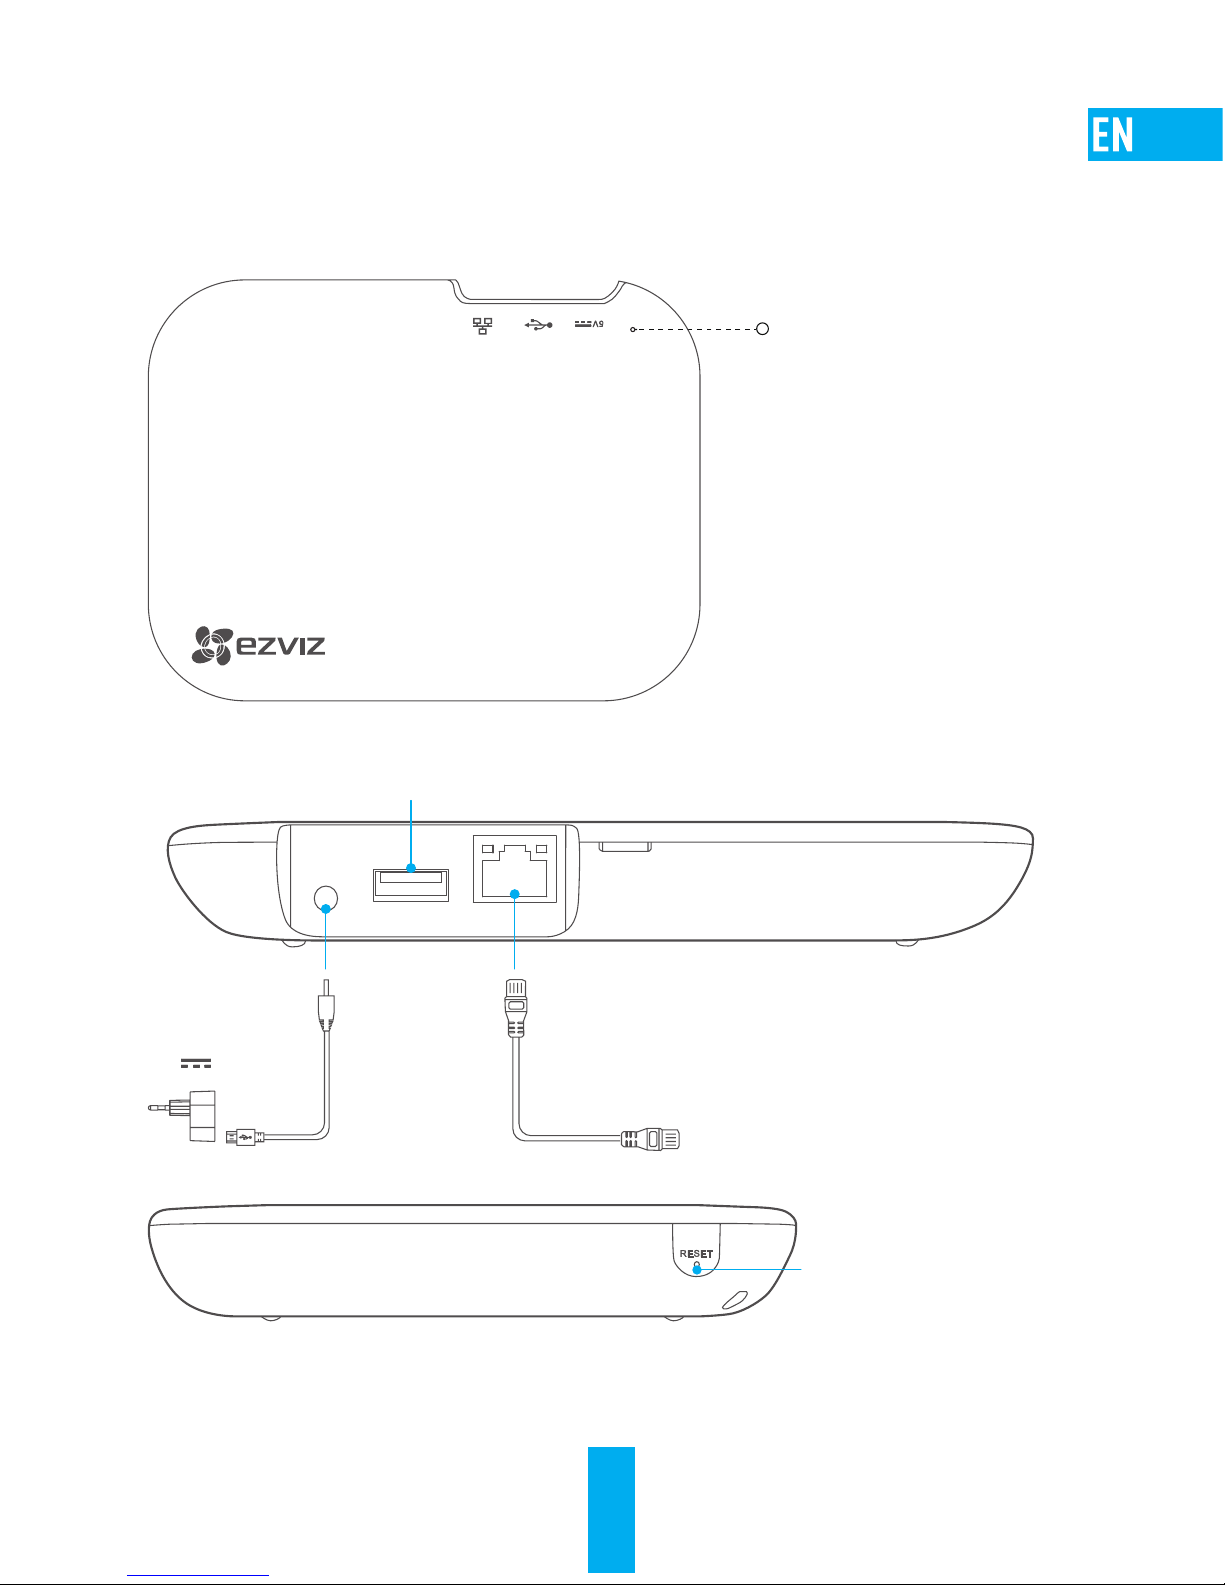
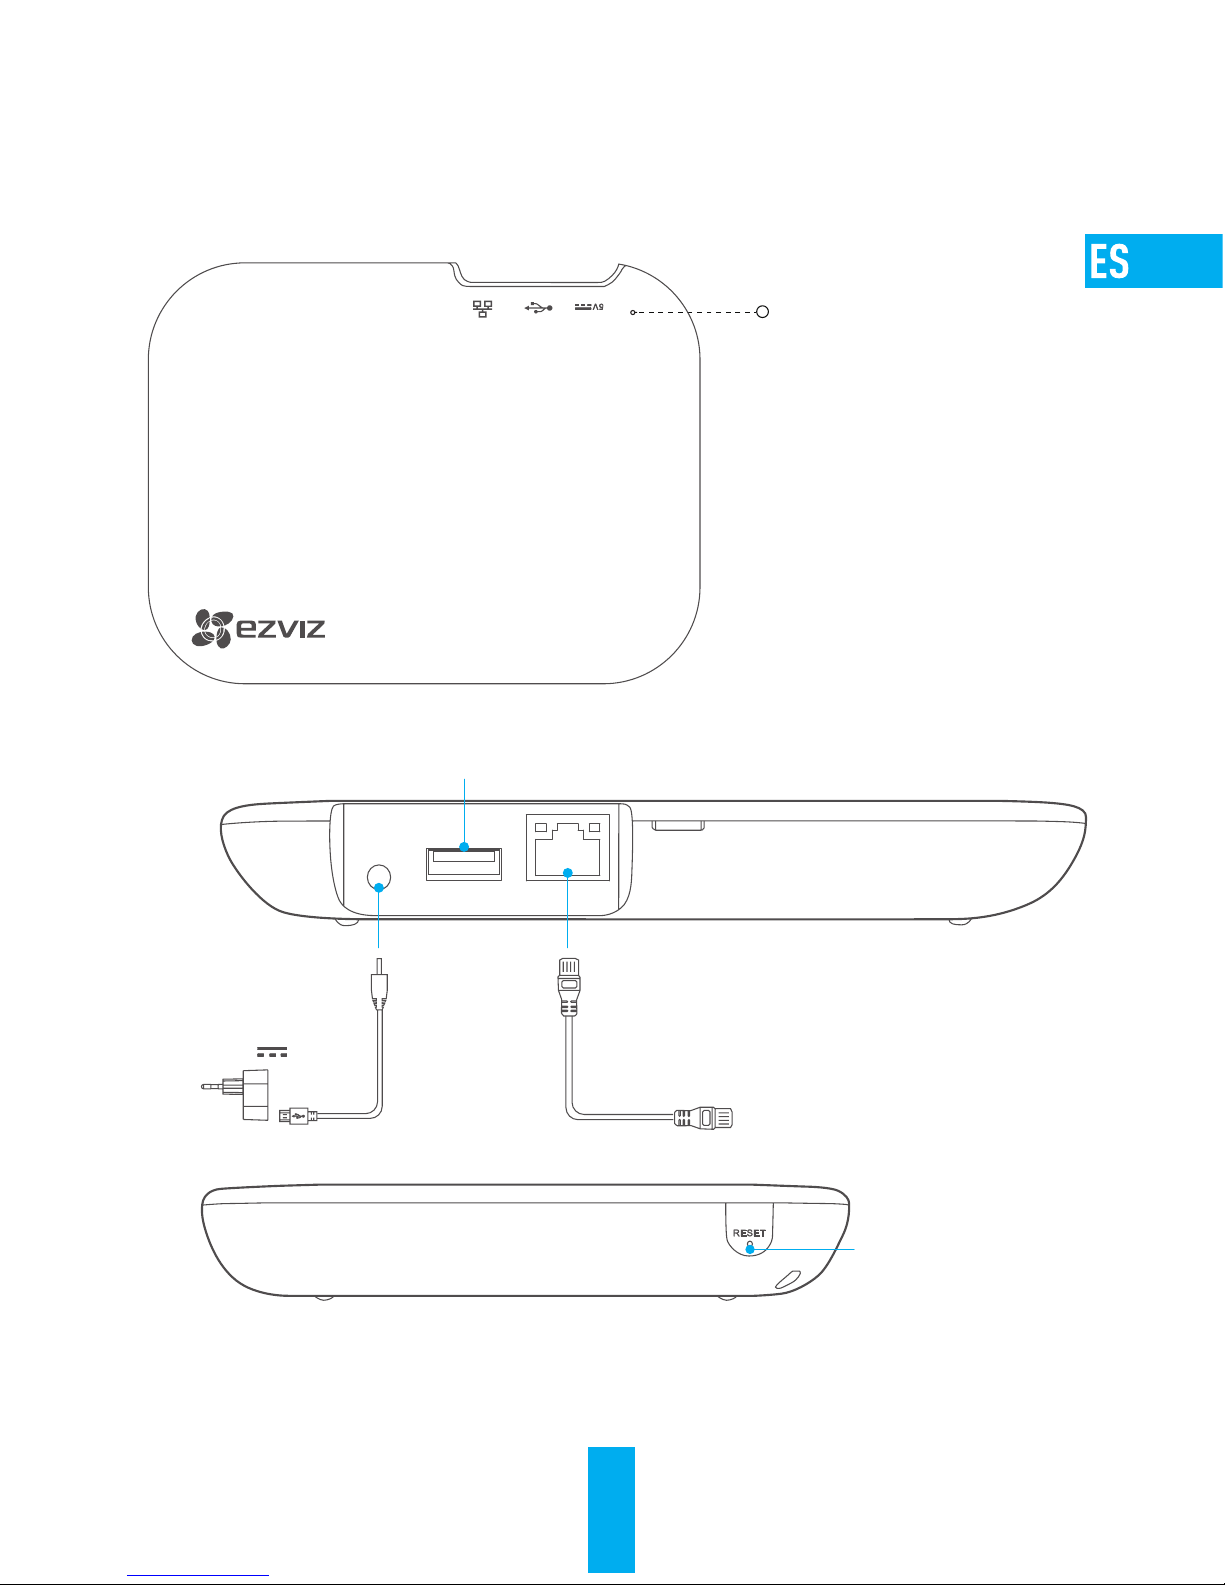
To reset the settings: Hold down the RESET button with a needle for as least 3 seconds
when the device is power-on, and release until the LED indicator flickers quickly.
LED Indicator
Blue: Normal
Yellow: Exception
RESET
Network Interface
Connect to a Router
Power Input
5V
USB Interface
7
Bedienung
Schritt 1
2,5-Zoll-Festplatte einbauen
Wenn das von Ihnen erworbene Produkt über eine eingebaute Festplatte verfügt,
können Sie diesen Schritt überspringen.
1
Die Schrauben lösen
Lösen Sie die vier Schrauben an der Unterseite des X3 mit einem Schraubendreher,
wie in der folgenden Abbildung dargestellt:
Schraube 1 befindet sich hinter dem Aufkleber. Wenn Sie den Aufkleber
ablösen, sehen Sie Schraube 1.
2
Die Gehäuseoberseite abnehmen
Nehmen Sie die Gehäuseoberseite in Pfeilrichtung wie unten dargestellt ab:
8
3
Die Festplattengummirahmen montieren
Wählen Sie einen für die Höhe der Festplatte geeigneten Gummirahmen und
ziehen Sie an jedem Ende der Festplatte jeweils einen Rahmen wie unten
dargestellt auf die Festplatte.
Wenn die Festplatte eine Höhe von 9 mm hat, muss die Beschriftung „TOP“
am Gummirahmen beim Einbau nach oben weisen.
4
Die Festplatte einbauen
Schließen Sie das Festplattenkabel an die Festplatte an und legen Sie die
Festplatte wie unten dargestellt in das X3-Gehäuse ein.
5
Den Einbau abschließen
Setzen Sie die Gehäuseoberseite wieder auf und ziehen Sie zum Abschluss des
Einbaus die vier Schrauben aus Schritt 1 wieder fest.

9
Schritt 2
X3 Starten
1
An das Netzwerk anschließen
Schließen Sie den X3 mit einem Netzwerkkabel an den Router an.
Der X3 unterstützt keine WLAN-Verbindung.
2
Einschalten
Schließen Sie den X3 mit dem Stromkabel an das Netzteil an und stecken Sie
das Netzteil in eine Steckdose. Die LED-Betriebsanzeige leuchtet ununterbrochen
in Blau, wenn der X3 vollständig hochfährt.
Die Anzeige leuchtet in den folgenden Fällen ununterbrochen in Gelb:
- Keine Festplatte installiert
- Festplattenfehler
- Geräteausnahmen
10
Schritt 3
Geräte zu EZVIZ hinzufügen
1
EZVIZ-App installieren
- Laden Sie die EZVIZ-App herunter, indem Sie im App Store und in Google PlayTM
nach „EZVIZ“ suchen, und installieren Sie sie.
- Starten Sie die App und registrieren Sie sich für ein EZVIZ-Benutzerkonto.
2
X3 zu EZVIZ hinzufügen
- Melden Sie sich an der EZVIZ-App an.
- Klicken Sie oben rechts auf „+“, um ein Gerät hinzuzufügen.
- Scannen Sie den QR-Code auf der Unterseite des X3.
Hinzufügen durch Scannen
des QR-Codes
3
Eine Kamera zu EZVIZ hinzufügen
- Eine Kamera wird genauso hinzugefügt wie der X3. Siehe Schritt 2 „Eine Kamera
zu Ihrem EZVIZ-Konto hinzufügen“.
- Rufen Sie die Seite „Einstellungen“ der Kamera auf, tippen Sie auf Speicherstatus
und wählen Sie „X3“ in der Speicherliste, um Bilder von der Kamera aufzunehmen.
Der X3 unterstützt Aufnahmen von bis zu acht Kameras. Eine Verbindung
ist nur zu Kameras möglich, die sich im selben Netzwerk befinden.

11
Anhang
Lieferumfang
1x X3 1x Netzteil 1x Kurzanleitung
1x Stromkabel 1x Netzwerkkabel
2x Gummirahmen 1 für Festplatte
(optional) (für 7-mm-Festplatte)
2x Gummirahmen 2 für Festplatte
(optional) (für 9-mm-Festplatte)
Die Gummirahmen gehören nicht zum Lieferumfang, wenn das Gerät standardmäßig
mit einer Festplatte ausgerüstet ist.
12
Aufbau des Geräts
LED-Betriebsanzeige
Blau: Normal
Gelb: Ausnahme
ZURÜCKSETZEN
Netzwerkanschluss
An einen Router anschließen
5-V-
Stromanschluss
USB-Anschluss (reserviert)
Einstellungen zurücksetzen: Bei eingeschaltetem Gerät die ZURÜCKSETZENTaste mindestens 10 Sekunden mit einer Nadel drücken, dann loslassen; die LEDBetriebsanzeige beginnt jetzt, schnell zu blinken.
13
Operaciones
Paso 1
Instalación del HDD de 2,5 pulgadas
Si el producto que ha adquirido tiene un HDD integrado, omita este paso.
1
Aflojar los tornillos
Afloje los 4 tornillos de la base del X3 con un destornillador, como se muestra
en la siguiente figura:
El tornillo n.º 1 está detrás de la etiqueta. Separe la etiqueta y verá el
tornillo n.º 1.
2
Abrir la tapa
Abra la tapa situada en el ranura siguiendo el sentido de la flecha, como se
muestra en la siguiente figura:

14
3
Montaje de la funda de goma del HDD
Seleccione una funda de goma según el grosor del HDD y coloque la funda
de goma a ambos lados del HDD, como se muestra en la siguiente figura.
Si el HDD tiene 9 mm de grosor, la marca SUPERIOR de la funda de goma
debe mirar hacia arriba cuando se monte.
4
Instalación del HDD
Conecte el cable HDD al HDD y coloque el HDD en la posición correspondiente,
como se muestra en la siguiente figura.
5
Finalizar la instalación
Vuelva a colocar la funda y apriete los 4 tornillos extraídos en el paso 1 y finalice
la instalación.
15
Paso 2
Arranque del X3
1
Conexión a la red
Conecte el X3 al router con un cable de red.
X3 no soporta la conexión con red Wi-Fi.
2
Encendido
Conecte el X3 al adaptador de corriente con un cable de alimentación y enchúfelo
a una toma de corriente. El indicador LED se iluminará con una luz azul fija
cuando el X3 finalice el proceso de arranque.
El indicador se iluminará con una luz amarilla fija en los siguientes casos:
- HDD no instalado
- Error en el HDD
- Excepciones con el dispositivo
16
Paso 3
Agregar dispositivos a EZVIZ
1
Instalación de la aplicación EZVIZ
- Descargue e instale la aplicación EZVIZ buscando “EZVIZ” en el App Store o
Google PlayTM.
- Abra la aplicación y registre una cuenta de usuario de EZVIZ.
2
Agregar X3 a EZVIZ
- Inicie sesión en la aplicación EZVIZ.
- Haga clic en el símbolo “+” situado en la esquina superior derecha para
agregar un dispositivo.
- Escanee el código QR situado en la parte inferior del X3.
Agregar escaneando código QR
3
Agregar una cámara a EZVIZ
- El procedimiento para agregar una cámara es el mismo que para agregar el X3.
Consulte el paso 2 para agregar una cámara a su cuenta en EZVIZ.
- Vaya a la página de Ajustes de la cámara, toque la opción Estado del almacenamiento
y seleccione X3 en la lista de almacenamiento para que X3 empiece a grabar con la
cámara.
El X3 soporta hasta 8 cámaras grabando y solo se conecta a cámaras que
estén en la misma red.

17
Anexo
Contenido de la caja
X3 (x1) Adaptador de corriente (x1) Guía de inicio rápido x1
Cable de alimentación (x1) Cable de red (x1)
1 Funda de goma HDD (Opcional) (x2)
(para HDD de 7 mm de grosor)
2 Funda de goma HDD (Opcional) (x2)
(para HDD de 9 mm de grosor)
La funda de goma del HDD no irá incluida si el producto está equipado con un HDD
de serie.
18
Elementos básicos
Indicador LED
Azul: Normal
Amarillo: Excepción
REINCIAR
Interfaz de red
Conexión a un router
Alimentación de
entrada
5V
Interfaz USB (Reservada)
Para reiniciar los ajustes: Mantenga pulsado el botón de REINICIO con una aguja durante
10 segundos como mínimo cuando el dispositivo esté encendido y suéltelo cuando el
indicador LED parpadee rápidamente.
 Loading...