

Page 1
Multi-Band Wireless Gigabit Router
Page 2

Page 3

About the Documents
The documents include instructions for using and managing the product. Pictures, charts, images and all other information hereinafter are for
description and explanation only. The information contained in the documents is subject to change, without notice, due to firmware updates or
other reasons. Please find the latest version in the website (http://www.ezvizlife.com).
Any and all information, including, among others, wordings, pictures, graphs are the properties of EZVIZ Inc. or its subsidiaries (hereinafter
referred to be “EZVIZ”). The documents cannot be reproduced, changed, translated, or distributed, partially or wholly, by any means, without the
prior written permission of EZVIZ. Unless otherwise stipulated, EZVIZ does not make any warranties, guarantees or representations, express or
implied, regarding to the documents.
Trademarks Acknowledgement
™, ™, and other EZVIZ’s trademarks and logos are the properties of EZVIZ in various jurisdictions. Other trademarks and logos
mentioned in the documents are the properties of their respective owners.
Legal Disclaimer
TO THE MAXIMUM EXTENT PERMITTED BY APPLICABLE LAW, THE PRODUCT DESCRIBED, WITH ITS HARDWARE, SOFTWARE AND FIRMWARE, IS
PROVIDED “AS IS”, WITH ALL FAULTS AND ERRORS, AND EZVIZ MAKES NO WARRANTIES, EXPRESS OR IMPLIED, INCLUDING WITHOUT LIMITATION,
MERCHANTABILITY, SATISFACTORY QUALITY, FITNESS FOR A PARTICULAR PURPOSE, AND NON-INFRINGEMENT OF THIRD PARTY. IN NO EVENT
WILL EZVIZ, ITS DIRECTORS, OFFICERS, EMPLOYEES, OR AGENTS BE LIABLE TO YOU FOR ANY SPECIAL, CONSEQUENTIAL, INCIDENTAL, OR
INDIRECT DAMAGES, INCLUDING, AMONG OTHERS, DAMAGES FOR LOSS OF BUSINESS PROFITS, BUSINESS INTERRUPTION, OR LOSS OF DATA OR
DOCUMENTATION, IN CONNECTION WITH THE USE OF THIS PRODUCT, EVEN IF EZVIZ HAS BEEN ADVISED OF THE POSSIBILITY OF SUCH DAMAGES.
TO THE MAXIMUM EXTENT PERMITTED BY APPLICABLE LAW, IN NO EVENT SHALL EZVIZ’S TOTAL LIABILITY FOR ALL DAMAGES EXCEED THE
PURCHASE PRICE THE PRODUCT.
EZVIZ does not undertake any liability for personal injury or property damage, as the result of product interruption or service termination cause by: a)
improper installation or usage other than as requested; b) the protection of national or public interests; c) Force Majeure; d) yourself or the third
party, including not limitation, using any third party’s products, software, applications, and among others.
REGARDING TO THE PRODUCT WITH INTERNET ACCESS, THE USE OF PRODUCT SHALL BE WHOLLY AT YOUR OWN RISKS. EZVIZ SHALL NOT TAKE
ANY RESPONSIBILITES FOR ABNORMAL OPERATION, PRIVACY LEAKAGE OR OTHER DAMAGES RESULTING FROM CYBER ATTACK, HACKER ATTACK,
VIRUS INSPECTION, OR OTHER INTERNET SECURITY RISKS; HOWEVER, EZVIZ WILL PROVIDE TIMELY TECHNICAL SUPPORT IF REQUIRED.
Regulatory Information
FCC Information
FCC compliance: This device complies with Part 15 of the FCC Rules. Operation is subject to the following two conditions:
(1) This device may not cause harmful interference, and
(2) This device must accept any interference received, including interference that may cause undesired operation.
Note: This product has been tested and found to comply with the limits for a Class B digital device, pursuant to Part 15 of the FCC Rules. These
limits are designed to provide reasonable protection against harmful interference in a residential installation. This product generates, uses, and
can radiate radio frequency energy and, if not installed and used in accordance with the instructions, may cause harmful interference to radio
communications. However, there is no guarantee that interference will not occur in a particular installation. If this product does cause harmful
interference to radio or television reception, which can be determined by turning the equipment off and on, the user is encouraged to try to
correct the interference by one or more of the following measures:
—Reorient or relocate the receiving antenna.
—Increase the separation between the equipment and receiver.
—Connect the equipment into an outlet on a circuit different from that to which the receiver is connected.
—Consult the dealer or an experienced radio/TV technician for help.
Please take attention that changes or modification not expressly approved by the party responsible for compliance could void the user’s authority
to operate the equipment.
This equipment should be installed and operated with a minimum distance 20cm between the radiator and your body
This device complies with Industry Canada licence-exempt RSS standard(s). Operation is subject to the following two conditions:
(1) this device may not cause interference, and
(2) this device must accept any interference, including interference that may cause undesired operation of the device.
Under Industry Canada regulations, this radio transmitter may only operate using an antenna of a type and maximum (or lesser) gain approved
for the transmitter by Industry Canada. To reduce potential radio interference to other users, the antenna type and its gain should be so chosen
that the equivalent isotropically radiated power (e.i.r.p.) is not more than that necessary for successful communication.
Page 4
EU Conformity Statement
This product and - if applicable - the supplied accessories too are marked with "CE" and comply therefore with the
applicable harmonized European standards listed under the Radio Equipment Directive 2014/53/EU, the EMC Directive
2014/30/EU, the RoHS Directive 2011/65/EU.
2012/19/EU (WEEE directive): Products marked with this symbol cannot be disposed of as unsorted municipal waste in the European
Union. For proper recycling, return this product to your local supplier upon the purchase of equivalent new equipment, or dispose of it
at designated collection points. For more information see: www.recyclethis.info.
2006/66/EC and its amendment 2013/56/EU (battery directive): This product contains a battery that cannot be disposed of as unsorted
municipal waste in the European Union. See the product documentation for specific battery information. The battery is marked with
this symbol, which may include lettering to indicate cadmium (Cd), lead (Pb), or mercury (Hg). For proper recycling, return the battery
to your supplier or to a designated collection point. For more information see: www.recyclethis.info.
Г
арантийный срок-1 год
Срок службы-3 года
Производитель:Ханджоу Хиквижн Диджитал Технолоджи(Китай)
Импортер-поставщик в России: ЗАО ''Хиквижн''
Импортер-поставщик в Республике Беларусь:ООО ''Торговый Дом ''АВАНТ-ТЕХНО''
Сайт:www.ezviz.ru
Industry Canada ICES-003 Compliance
This device meets the CAN ICES-3 (B)/NMB-3(B) standards requirements.
This device complies with Industry Canada licence-exempt RSS standard(s). Operation is subject to the following two conditions:
(1) this device may not cause interference, and
(2) this device must accept any interference, including interference that may cause undesired operation of the device.
Le présent appareil est conforme aux CNR d'Industrie Canada applicables aux appareils radioexempts de licence. L'exploitation est
autorisée aux deux conditions suivantes :
(1) l'appareil ne doit pas produire de brouillage, et
(2) l'utilisateur de l'appareil doit accepter tout brouillage radioélectrique subi, même si le brouillage est susceptible d'en
compromettre le fonctionnement.
This equipment should be installed and operated with a minimum distance 20cm between the radiator and your body
Cet équipement doit être installé et utilisé à une distance minimale de 20 cm entre le radiateur et votre corps
Under Industry Canada regulations, this radio transmitter may only operate using an antenna of a type and maximum (or lesser) gain approved
for the transmitter by Industry Canada. To reduce potential radio interference to other users, the antenna type and its gain should be so chosen
that the equivalent isotropically radiated power (e.i.r.p.) is not more than that necessary for successful communication.
Conformément à la réglementation d'Industrie Canada, le présent émetteur radio peut
fonctionner avec une antenne d'un type et d'un gain maximal (ou inférieur) approuvé pour l'émetteur par Industrie Canada. Dans le but de
réduire les risques de brouillage radioélectrique à l'intention des autres utilisateurs, il faut choisir le type d'antenne et son gain de sorte que la
puissance isotrope rayonnée équivalente (p.i.r.e.) ne dépasse pas l'intensité nécessaire à l'établissement d'une communication satisfaisante.
Safety Instruction
CAUTION: THE PRODUCT IS BUILT IN A REPLACEABLE BATTERY. RISK OF EXPLOSION IF BATTERY IS REPLACED BY AN INCORRECT TYPE. DISPOSE
OF USED BATTERIES ACCORDING TO THE INSTRUCTIONS.
Due to the product shape and dimension, the name and address of the importer/manufacturer are printed on the package.
EC DECLARATION OF CONFORMITY
Hereby, Hangzhou Hikvision Digital Technology Co., Ltd. declares that the radio equipment type [CS-W3-WD1200G, CS-W3-WD1200GR, CS-W3WD2600G, CS-W3-WD2600GR is in compliance with Directive 2014/53/EU.
The full text of the EC DECLARATION OF CONFORMITY is available at the following web link:
http://www.ezvizlife.com/declaration-of-conformity.
For more information, please visit www.ezvizlife.com
Need help? Contact us:
Phone:
USA/CAN: +1-855-693-9849
MX: +52-55-8526-1060
Email:
USA/CAN/MX: service@ezvizlife.com
Other countries: support@ezvizlife.com
Page 5
Basic Information
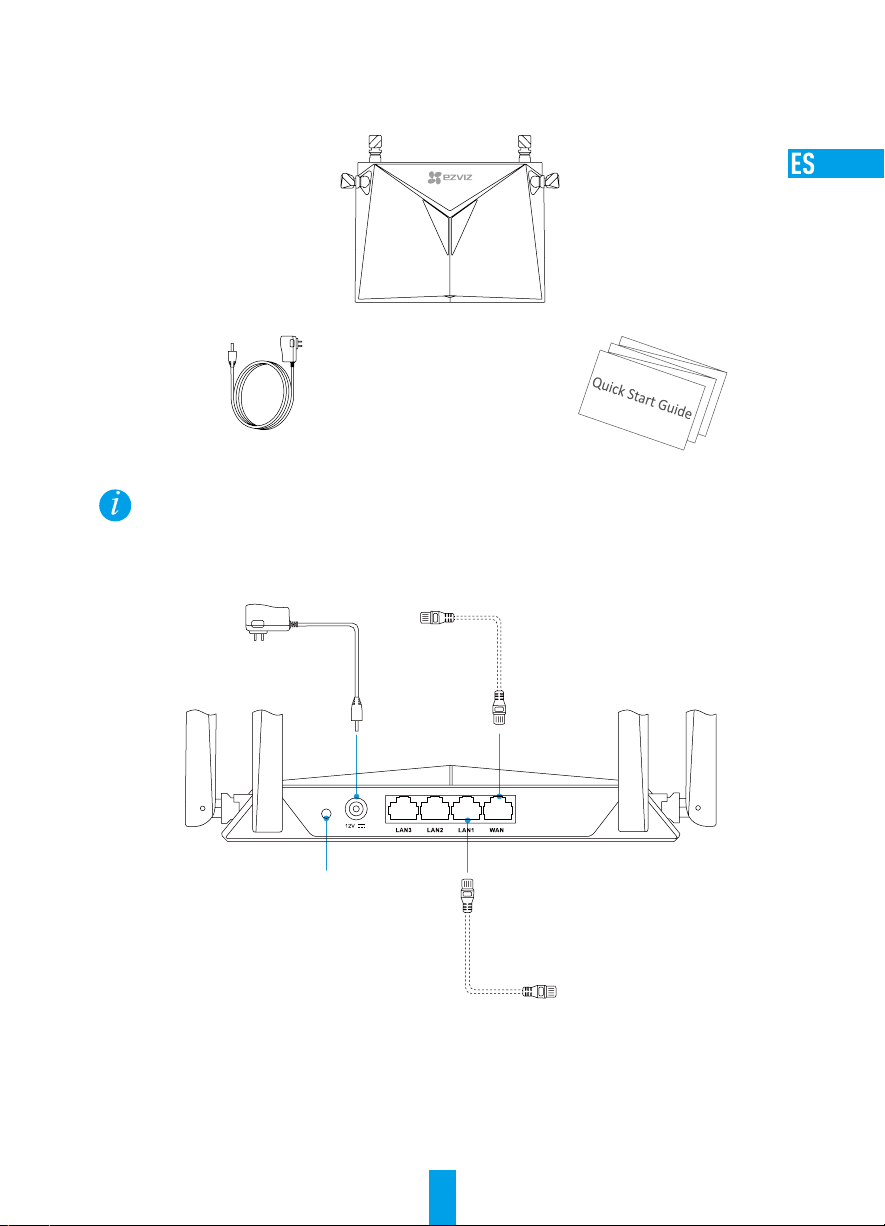
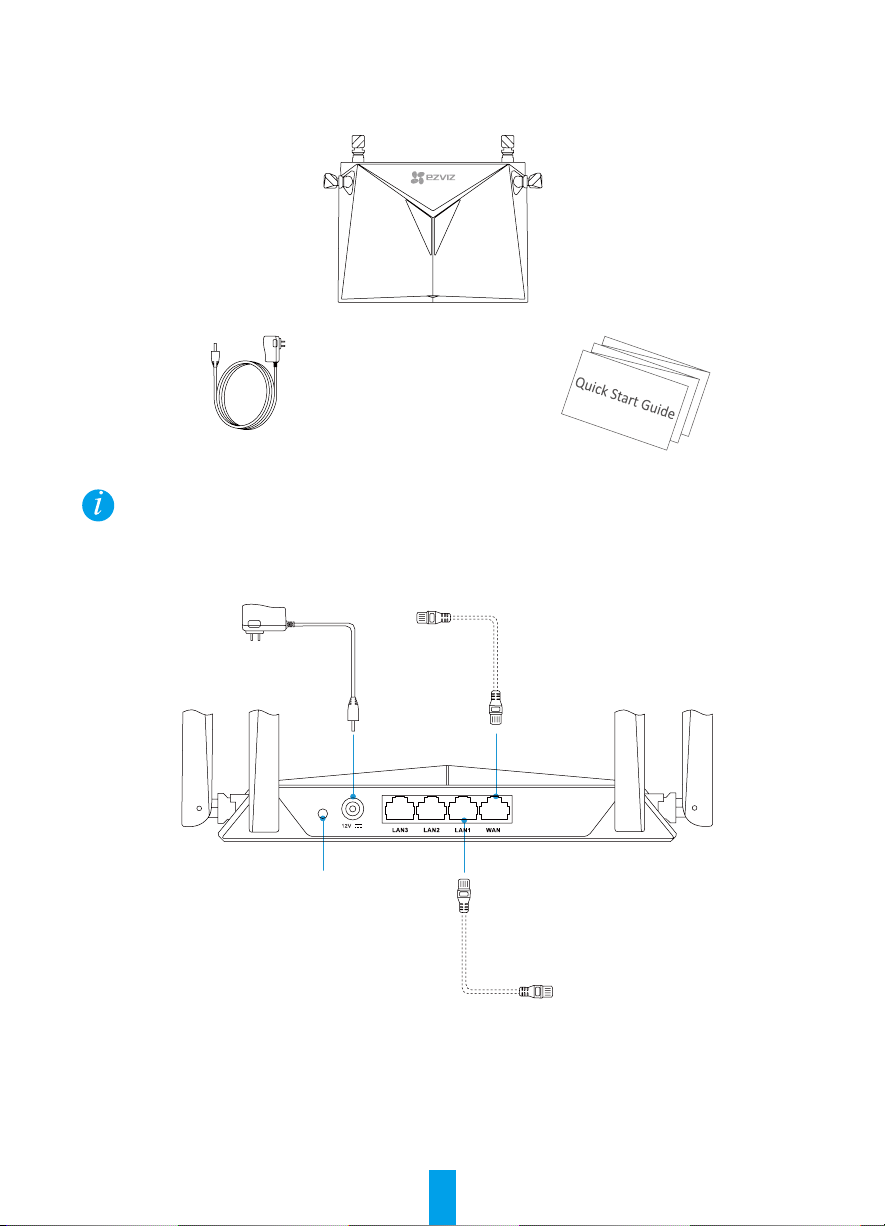
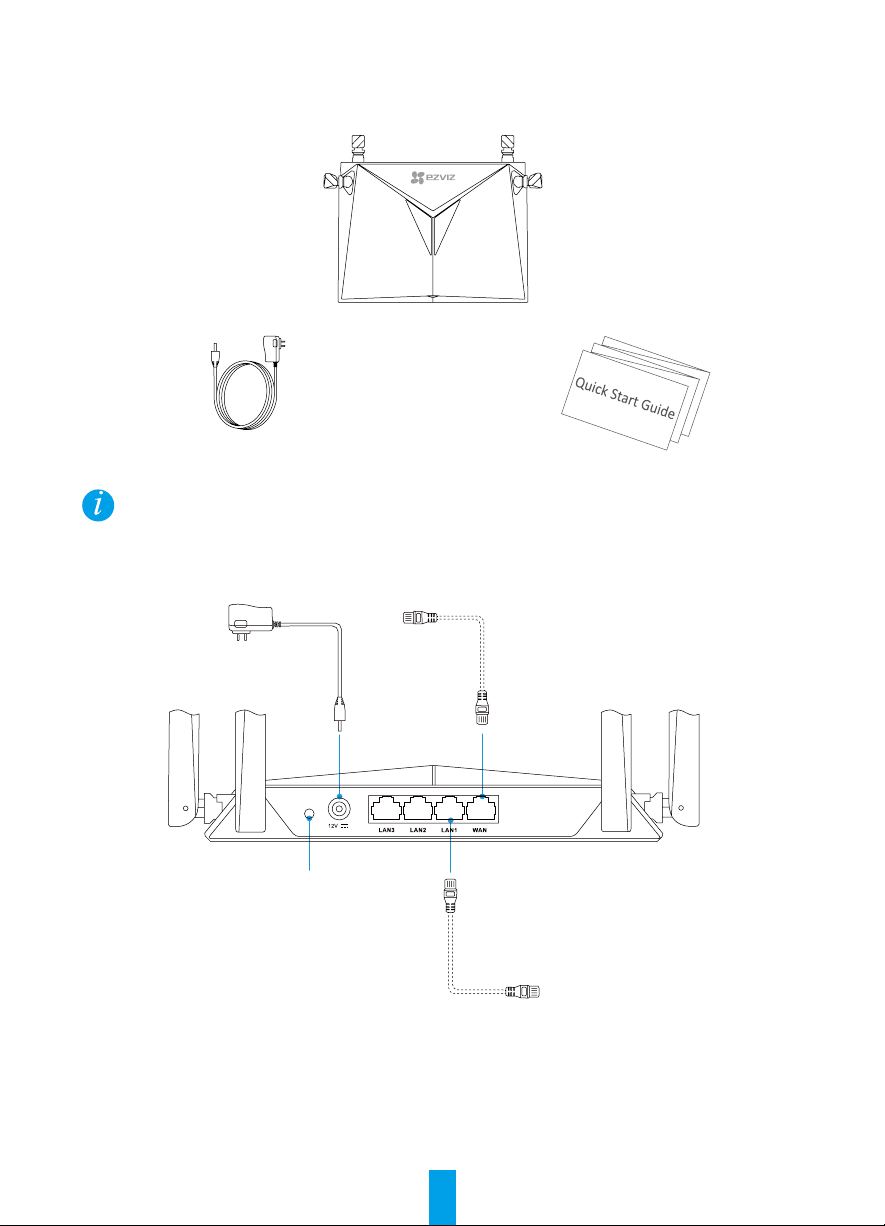
Box Contents
Power Adapter (x1) Quick Start Guide (x1)
The contents are subject to actural products.
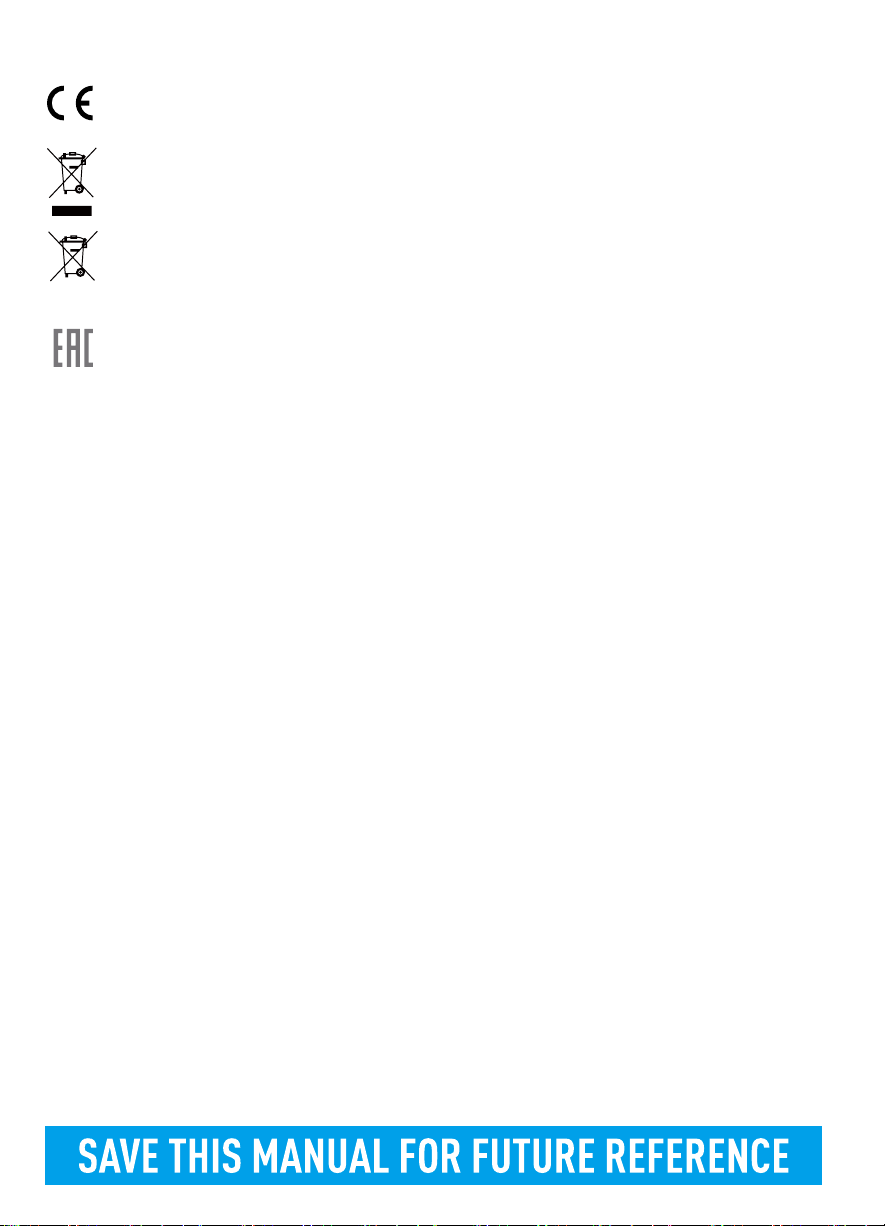
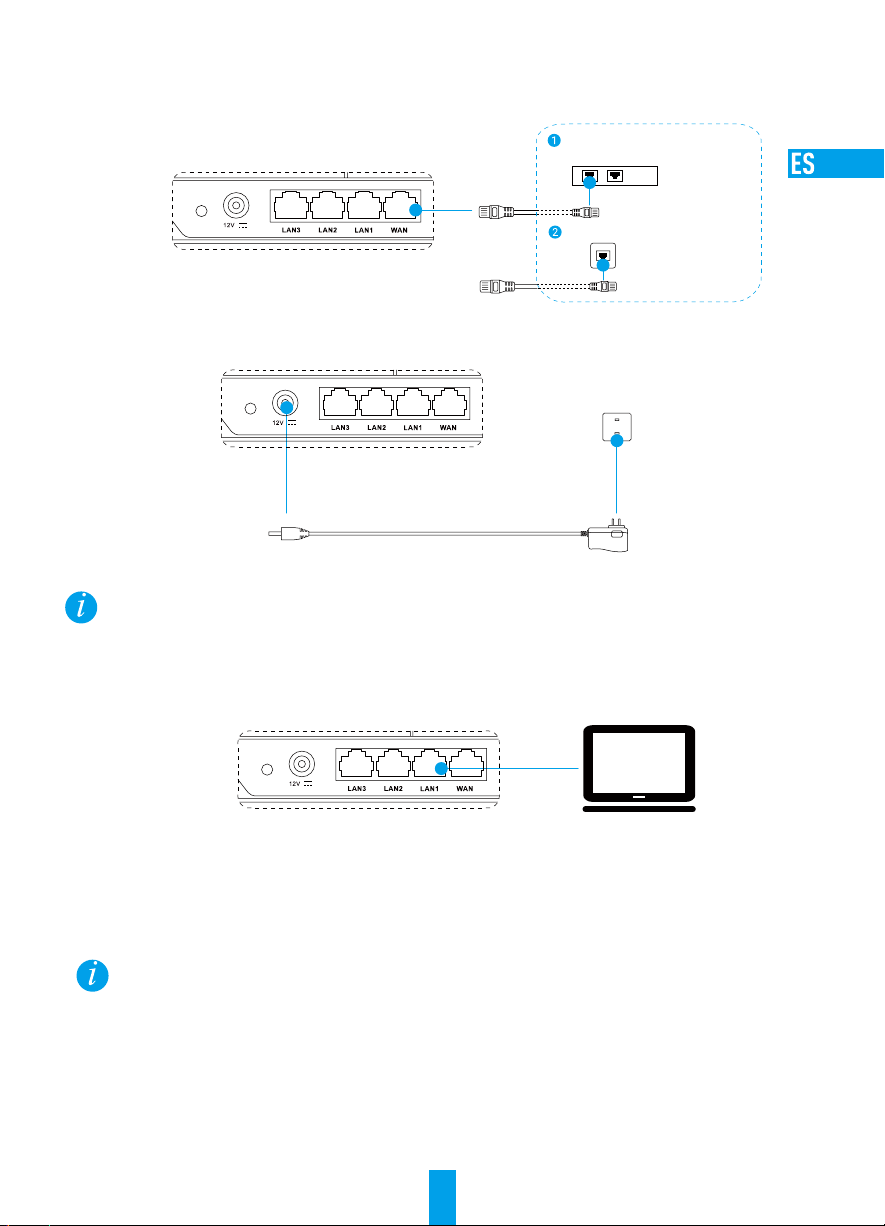
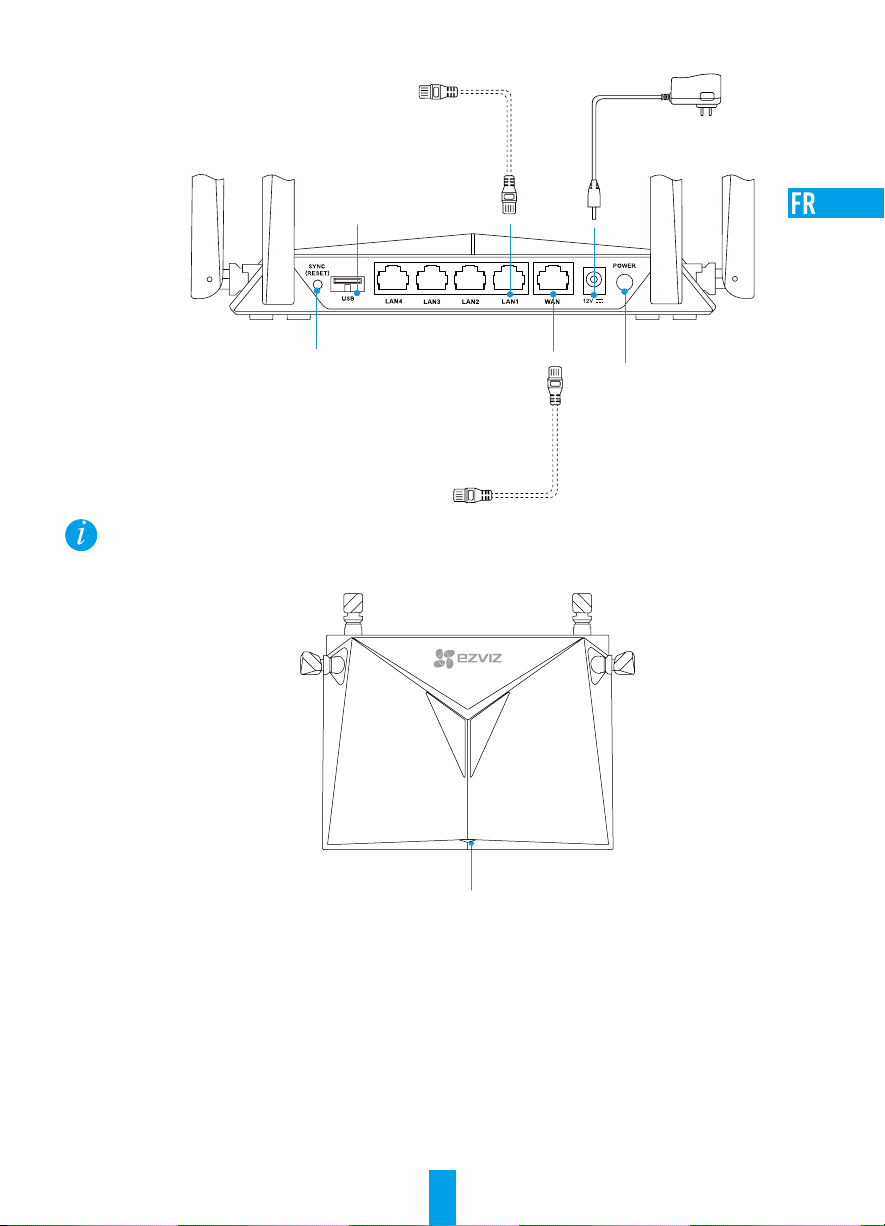
Rear Panel Overview
Router (x1)
Version A
Power Input
12V 1A
IPC
ACCESS
One Key Access/RESET Button
Hold for 1s: Enable One Key Access.
Hold for 6s: Restore to Default Settings.
WAN Port
For Internet Access
LAN Port
For Computer or Other Device
1
Page 6
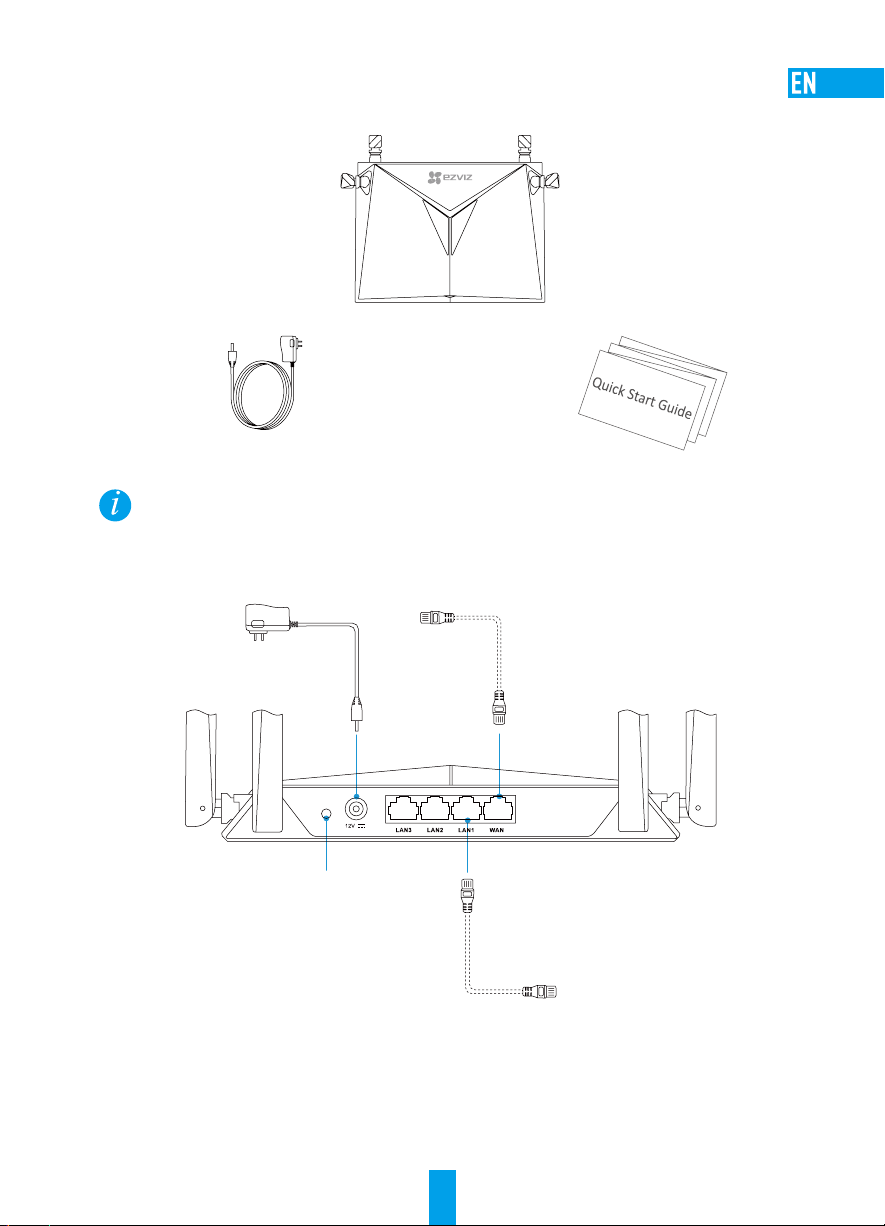
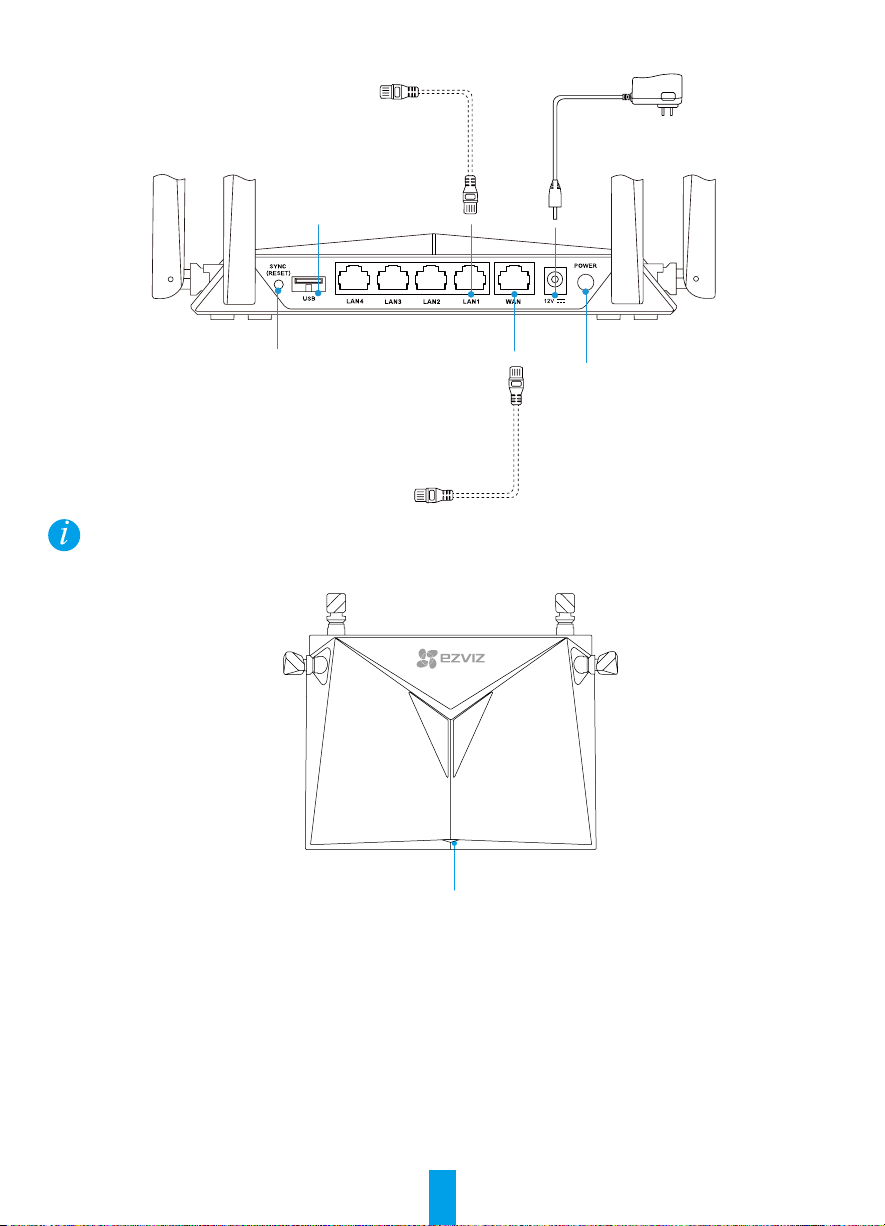
Version B
LAN Port
For Computer or
Other Device
Power Input
12V 1.5A
*USB Port
For USB Disk or Mobile HDD, etc.
One Key Access/RESET Button
Hold for 1s: Enable One Key Access
Hold for 6s: Restore to Default Settings
Power on/off
WAN Port
For Internet Access
* Devices connected to the Wi-Fi from the router can share the files in the USB disk or mobile HDD that is inserted to the
USB port of the router.
LED Indicator Status
Steady Green Working properly.
Steady Blue Internet disconnected..
Flashing Blue One Key Access is enabled.
2
Page 7
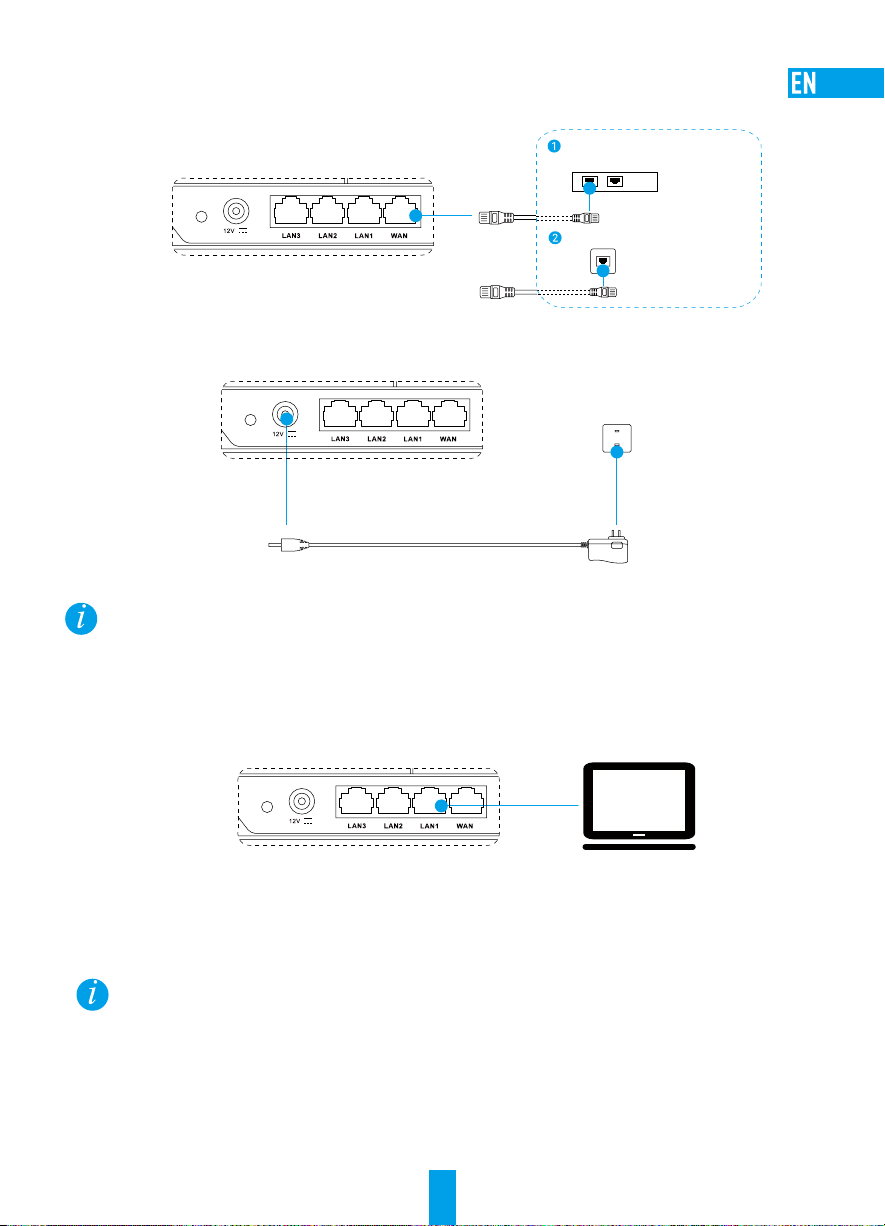
Wiring
IPC
ACCESS
IPC
ACCESS
IPC
ACCESS
1. Connect the WAN port to the Internet via network cable.
ADSL Modem/Optical Modem/Optical
Network Unit/Cable Modem
OR
Network Port
2. Connect your router to power outlet via power adaptor and wait for 90 seconds.
Power Outlet
Power Adaptor
Configuring
You can configure the parameters through the computer or the mobile phone. We take the computer configuration as an
example.
3. Connet the LAN port and the computer via network cable. The computer will get the IP address of the
router automatically.
4. Open the Internet broswer (Internet Explorer 8.0 and above is recommeded) and input 192.168.7.1 or
wifi.ezvizlife.com. Press Enter to go to the configuring page.
5. Set the parameters such as router password, Wi-Fi name and password, etc.
You can also connect your mobile phone to Wi-Fi from the router, open the broswer in the mobile phone, and follow Step 4
and Step 5.
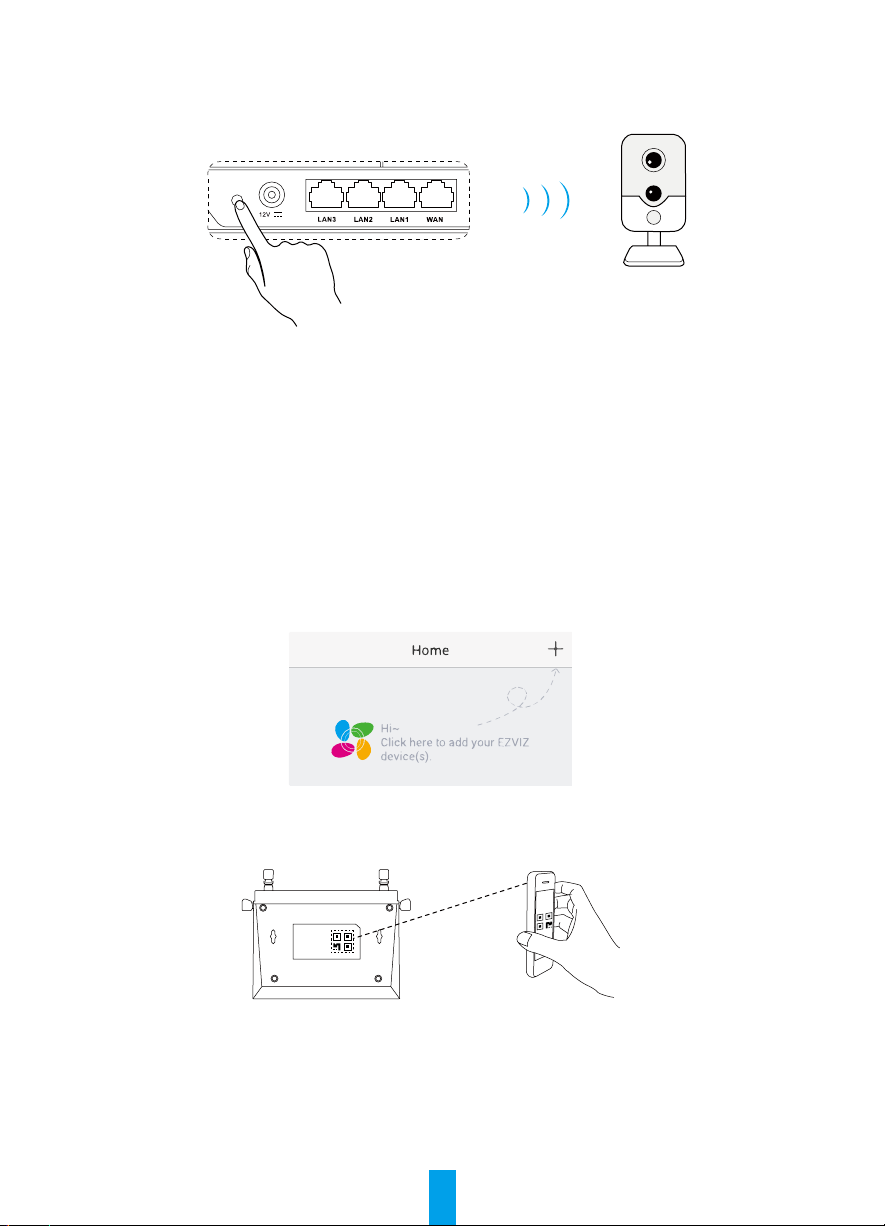
Wi-Fi Connecting
A. EZVIZ Wi-Fi Camera(s)
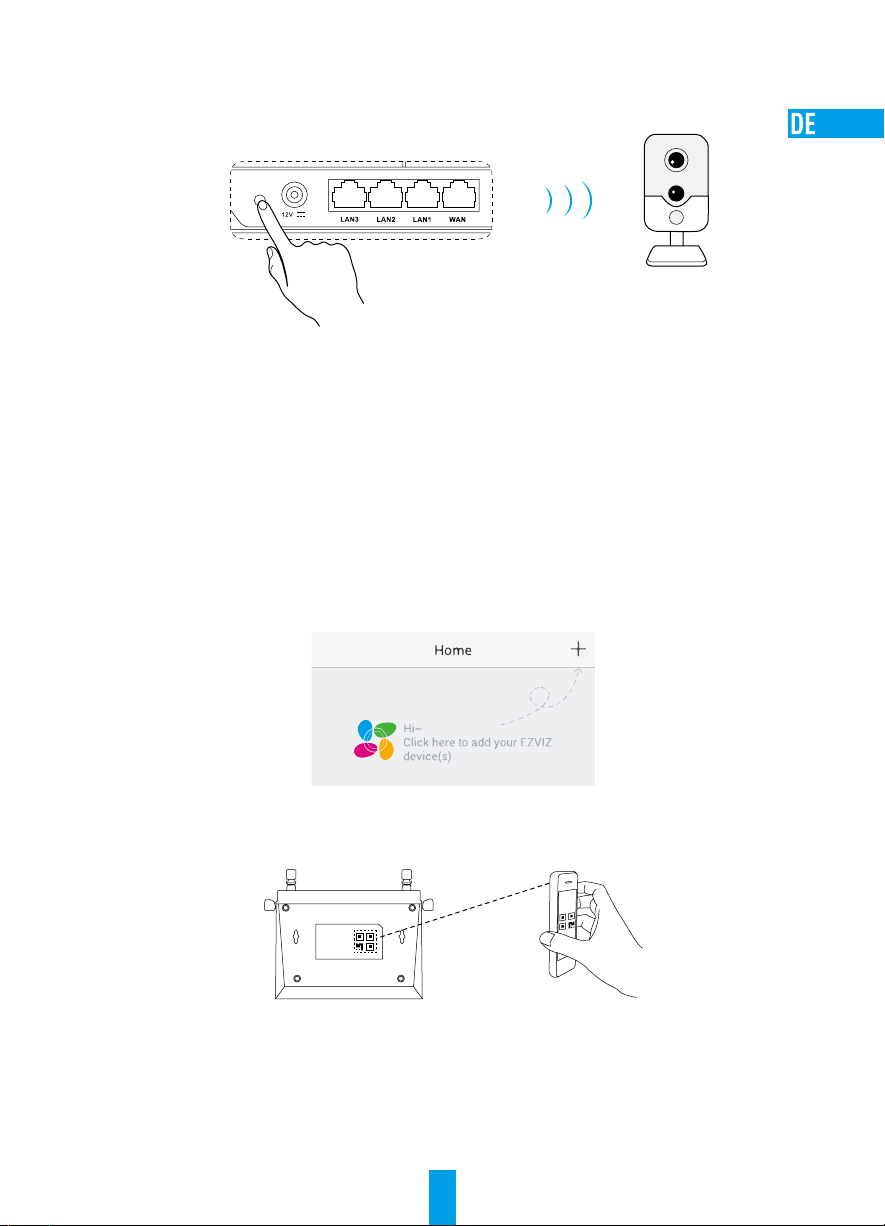
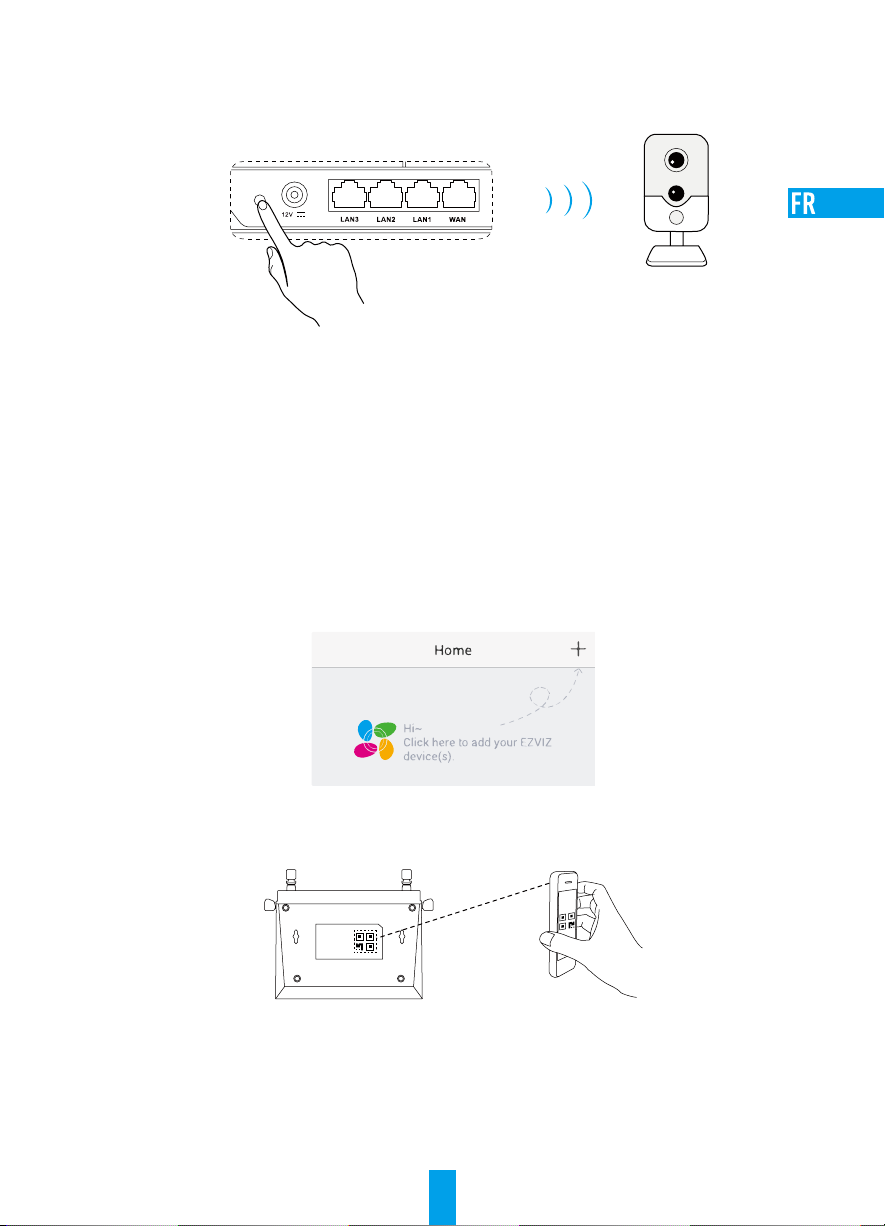
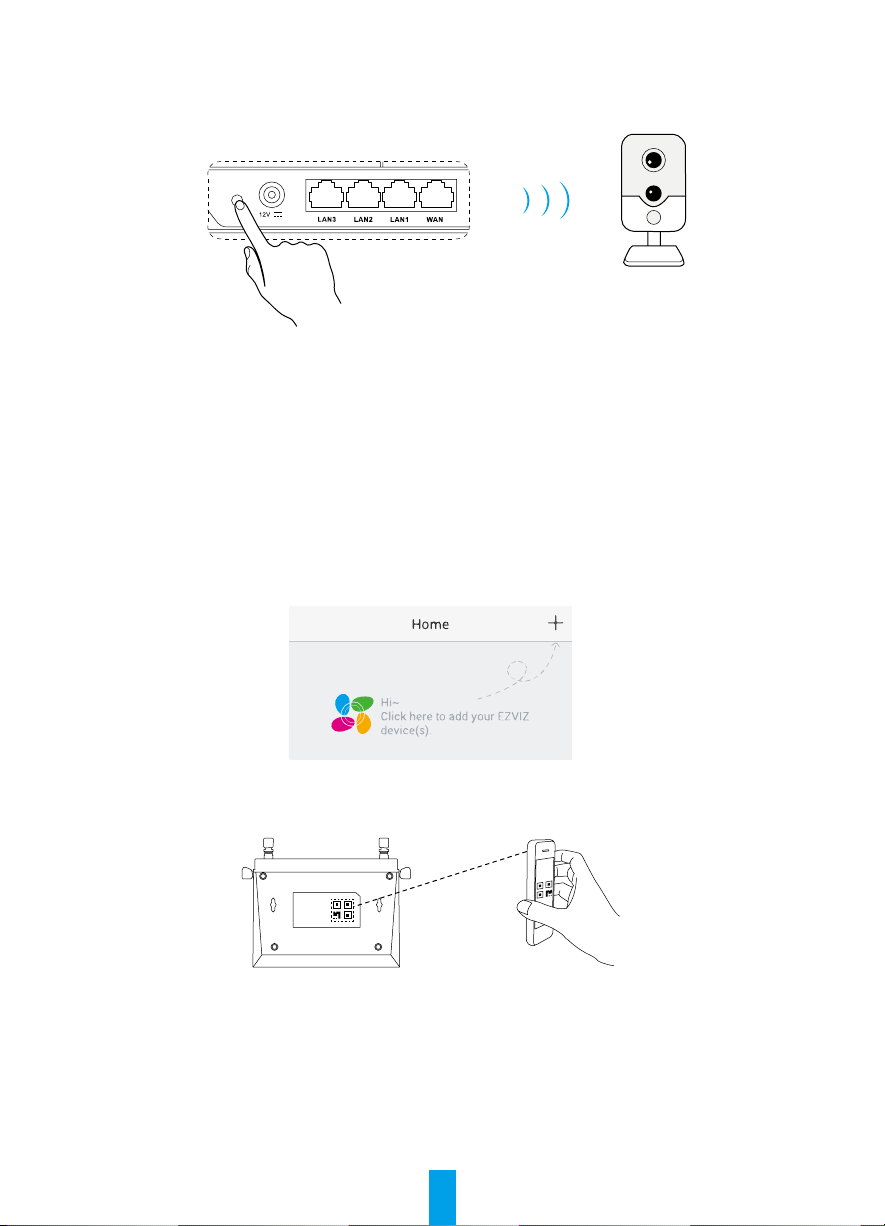
6. Power on the camera. Wait until camera status light blinks alternating Blue and Red or wait for 2 mins.
3
Page 8

7. Press the IPC ACCESS/SYNC button for 1 second to start detecting your camera(s). Once connected,
IPC
ACCESS
camera status light will start flashing blue. The router will exit One Key Access after 2 mins.
B. Other Wi-Fi Device
8. Find the Wi-Fi from the router and connect it by entering the Wi-Fi password that you have set in Step 5.
Adding to EZVIZ Account
9. For first time users, download the EZVIZ App in your Android phone or iPhone. Register an EZVIZ account.
For existing users, open the EZVIZ App and log in.
10. Add the camera by tapping the (+) sign in the HOME screen then scan the QR code on the camera or
type in its serial number.
11. Add the router by tapping the (+) sign in the HOME screen then scan the QR code on the router or type
in its serial number.
12. Once added to the EZVIZ account, tap the router in the EZVIZ App Home screen to verify the camera(s)
linked to it.
4
Page 9
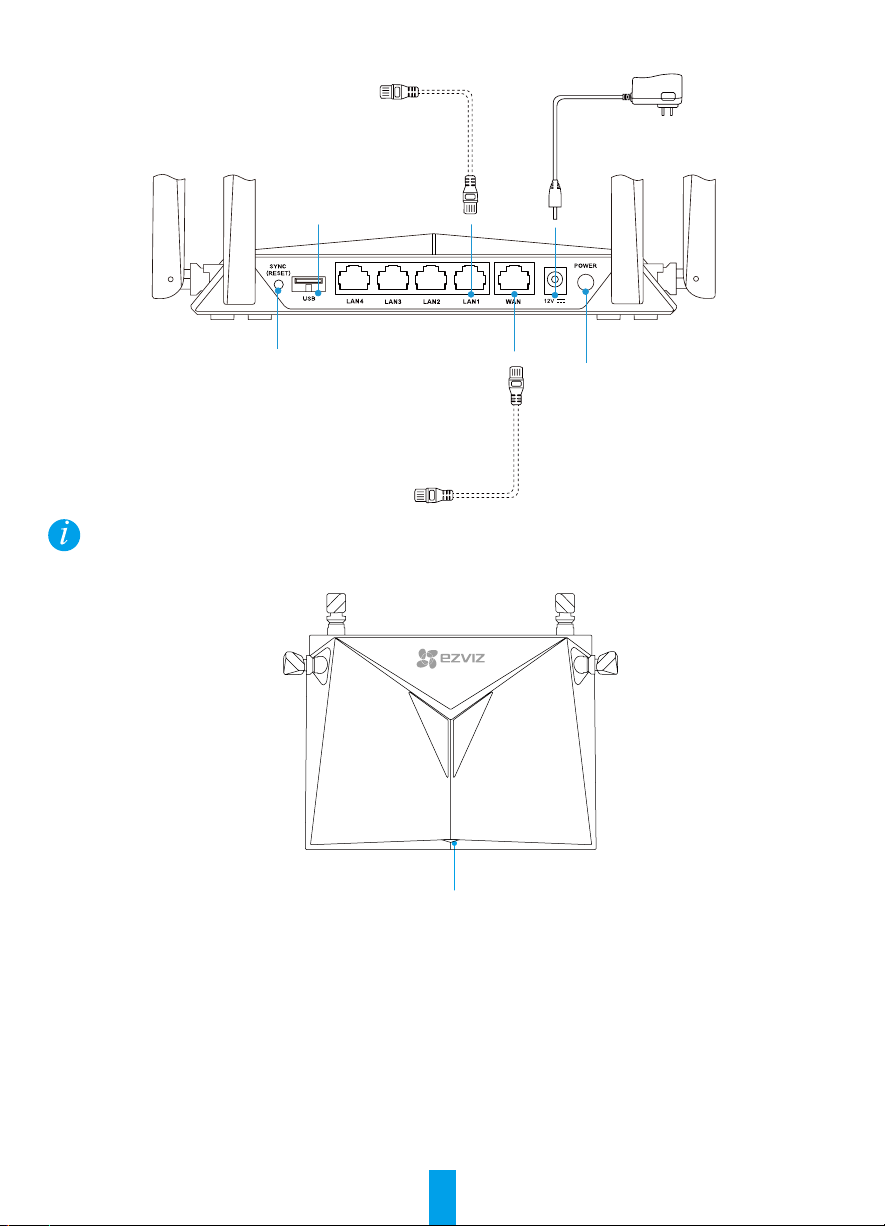
Appendix
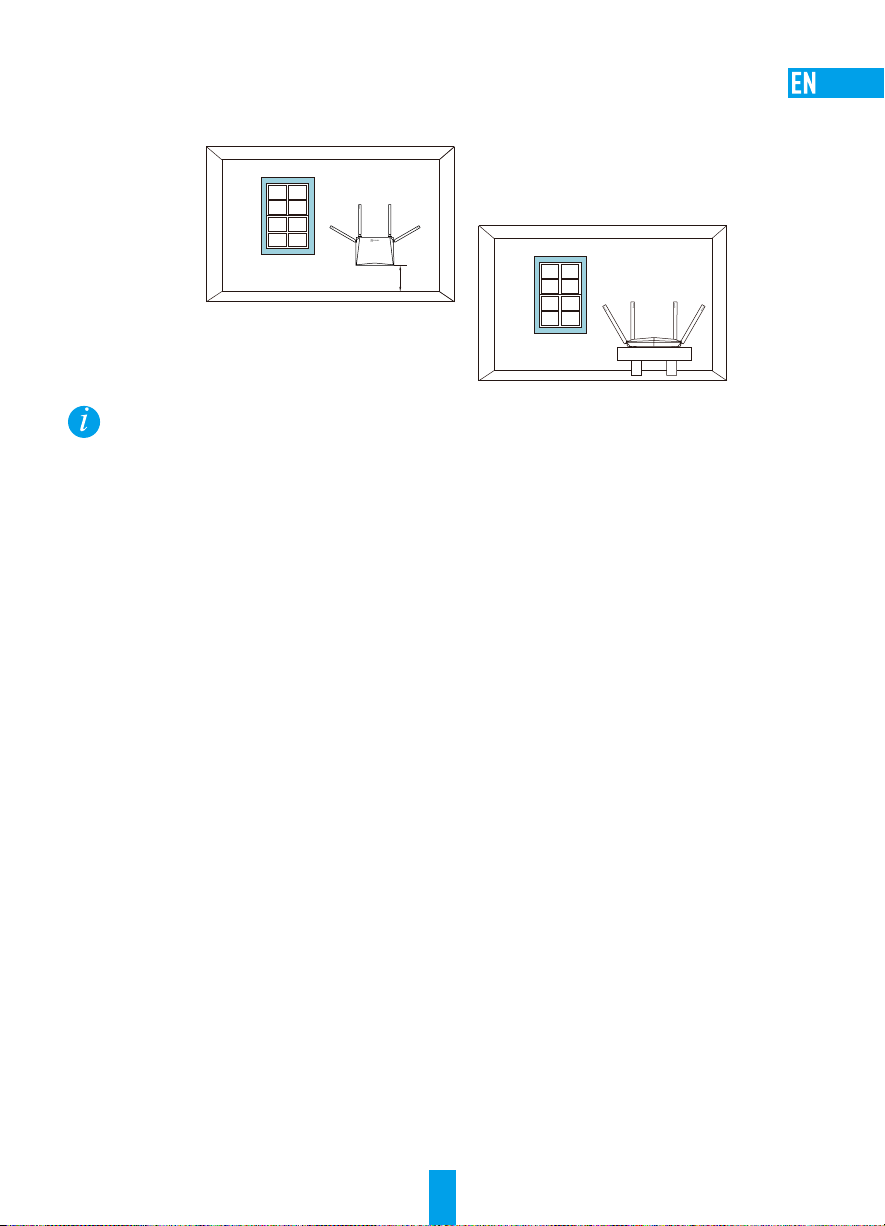
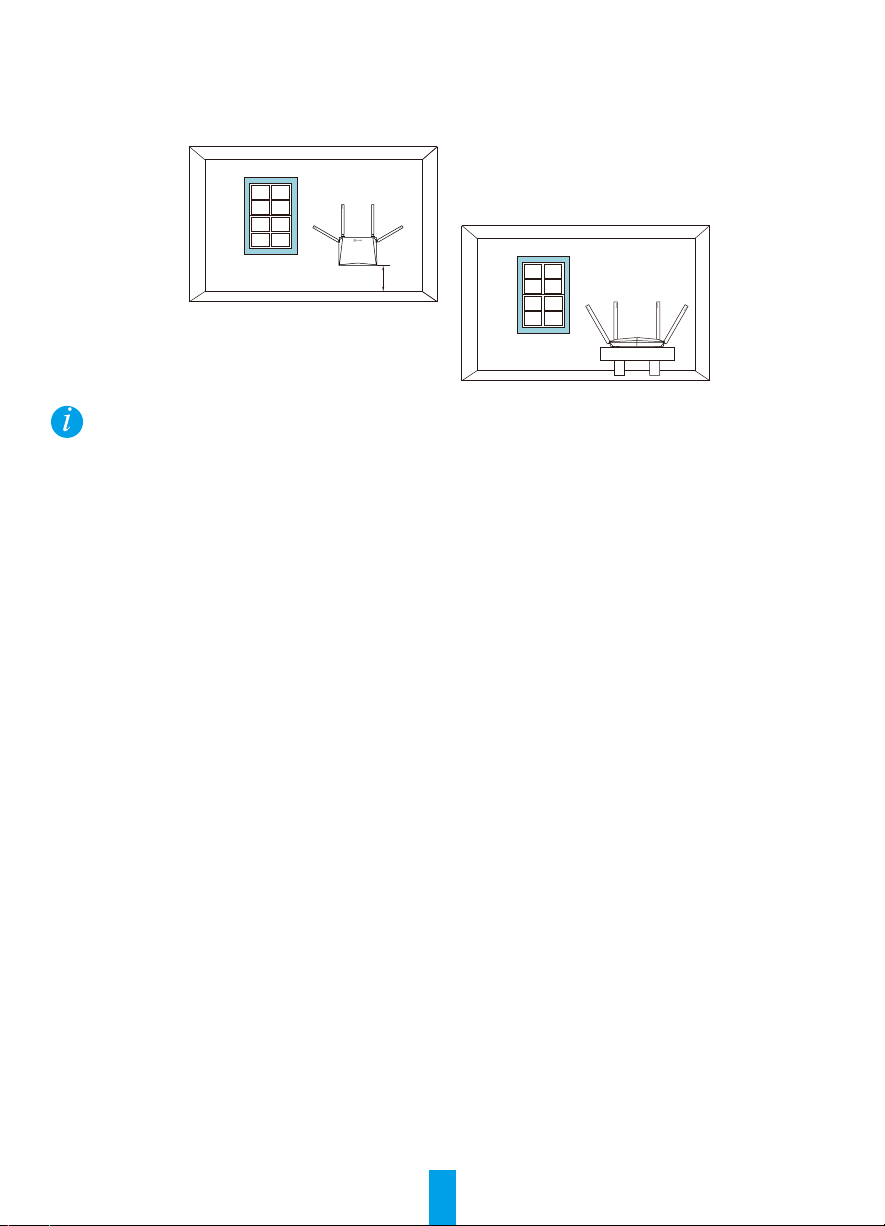
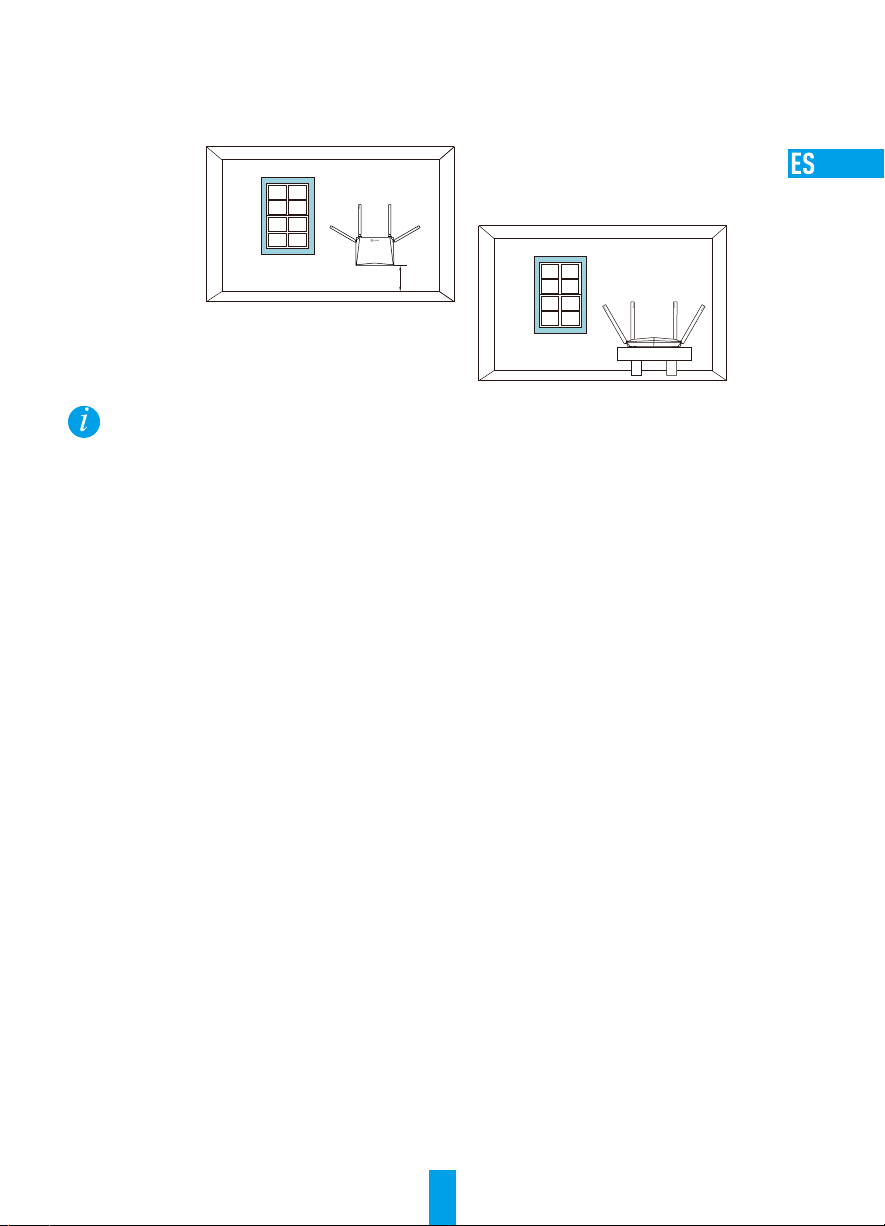
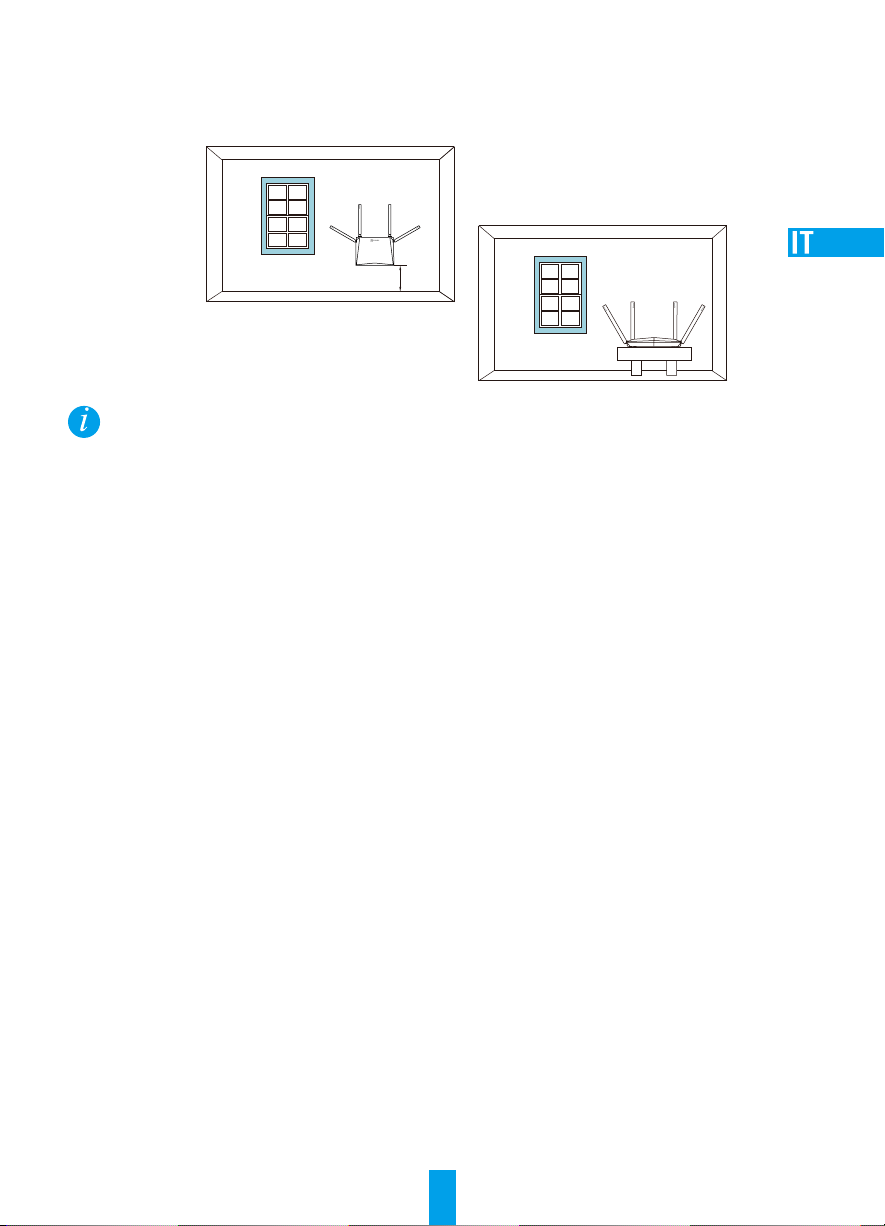
Recommended Router's Position
For the router's best performance, you can place the router as bellow.
≥1.5m
• The distance between each antenna should be larger than 6 cm.
• Keep the router away from household appliance as far as possible.
Wi-Fi Guard
Go to Settings > Advanced Settings > Wi-Fi Guard to enable it.
Enable Wi-Fi Guard to ensure your Wi-Fi security. Once enabled, you can only connect devices to Wi-Fi within
2 mins after pressing the IPC ACCESS/SYNC button.
One Key Access
• For EZVIZ cameras, refer to Step 6 and Step 7.
• For the devices supporting WPS function:
1. Search the Wi-Fi, click or press the WPS button in the device interface or in the device body.
2. Press IPC ACCESS/SYNC button in the router for 1 second to connect Wi-Fi.
5
Page 10

Allgemeine Informationen
Lieferumfang
1x Netzteil 1x Kurzanleitung
Der Inhalt kann je nach aktuellem Gerät abweichen.
Übersicht Geräterückseite
1x Router
Version A
Stromanschluss
12 V, 1 A
ACCESS
IPC
WAN-Anschluss
Für den
Internetzugang
Zugriff per Tastendruck/ZURÜCKSETZEN-Taste
Für 1 Sekunde gedrückt halten: Zugriff per
Tastendruck aktivieren.
Für 6 Sekunden gedrückt halten:
Werkseinstellungen wiederherstellen.
LAN-Anschluss
Für Computer oder andere Geräte
6
Page 11
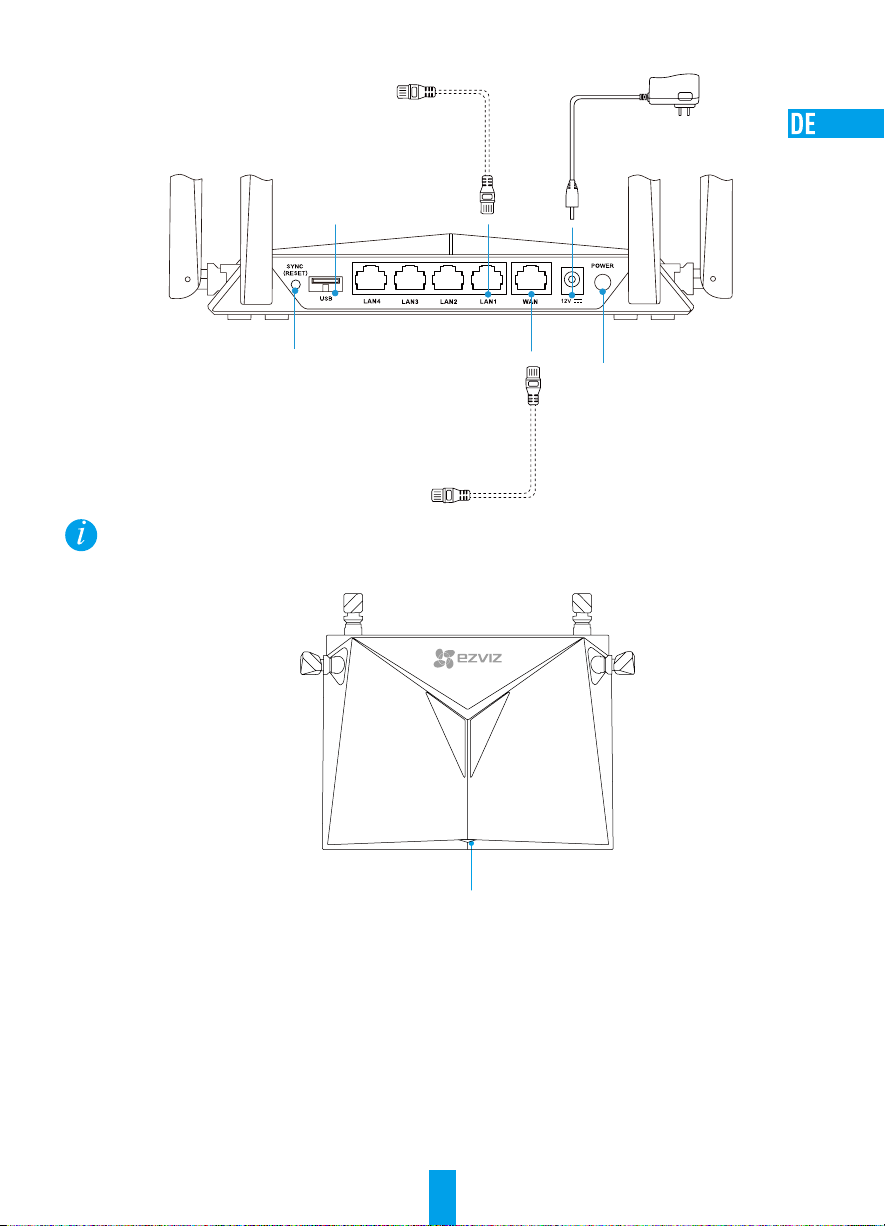
Version B
LAN-Anschluss
Für Computer oder
andere Geräte
Stromanschluss
12 V, 1,5A
*USB-Schnittstelle
Für USB-Laufwerk, mobile Festplatte usw.
Zugriff per Tastendruck/ZURÜCKSETZEN-Taste
Für 1 Sekunde gedrückt halten: Zugriff per
Tastendruck aktivieren
Für 6 Sekunden gedrückt halten:
Werkseinstellungen wiederherstellen
WAN-Anschluss
Für den Internetzugang
Ein/Aus-Schalter
* Geräte, die mit dem WLAN des Routers verbunden sind, können auf Dateien auf dem USB-Laufwerk oder der mobilen
Festplatte, das bzw. die an den USB-Anschluss des Routers angeschlossen ist, zugreifen.
LED-Statusanzeige
Leuchtet grün Ordnungsgemäße Funktion.
Blaues Leuchten Internet getrennt.
Blinken in blauer Farbe Zugriff per Tastendruck ist aktiviert.
7
Page 12
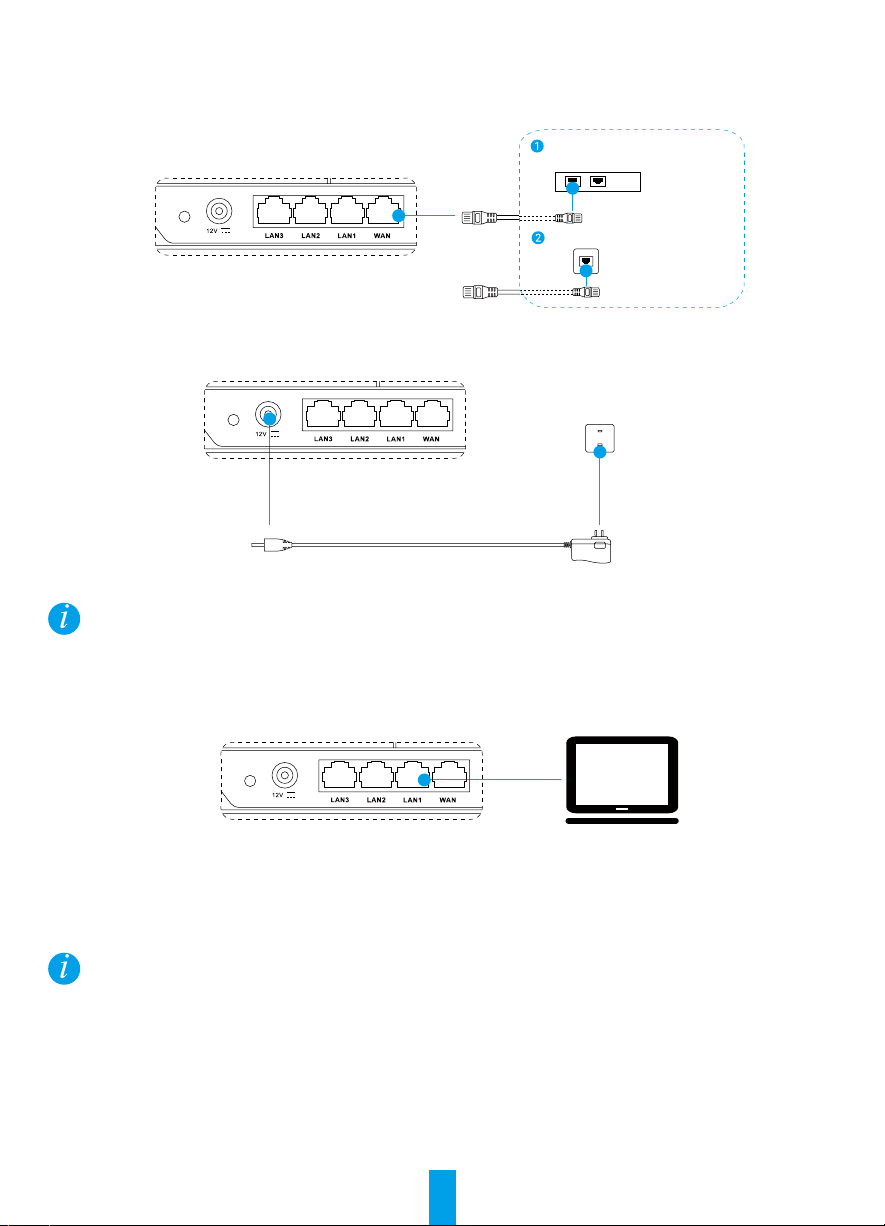
Verkabelung
IPC
ACCESS
IPC
ACCESS
IPC
ACCESS
1. Verbinden Sie den WAN-Anschluss per Netzwerkkabel mit dem Internet.
ADSL-Modem/Glasfasermodem/
Glasfasernetzwerkgerät/Kabelmodem
ODER
Netzwerkanschluss
2. Schließen Sie den Router mit dem Netzteil an die Steckdose an und warten Sie 90 Sekunden.
Steckdose
Netzteil
Konfigurieren
Sie können die Einstellungen über einen Computer oder ein Mobiltelefon konfigurieren. Als Beispiel dient hier die
Konfiguration per Computer.
3. Verbinden Sie den LAN-Anschluss und den Computer mit einem Netzwerkkabel. Der Computer bezieht
die IP-Adresse automatisch vom Router.
4. Öffnen Sie einen Internet-Browser (Internet Explorer 8.0 oder höher empfohlen) und geben Sie 192.168.7.1
oder wifi.ezvizlife.com ein. Drücken Sie die Eingabetaste, um die Konfigurationsseite aufzurufen.
5. Konfigurieren Sie Einstellungen wie Router-Passwort, WLAN-Name, Passwort usw.
Sie können auch Ihr Mobiltelefon mit dem WLAN des Routers verbinden, den Browser des Mobiltelefons öffnen und die Schritte
4 und 5 ausführen.
Mit dem WLAN verbinden
A. EZVIZ-WLAN-Kamera(s)
6. Schalten Sie die Kamera ein. Warten Sie, bis die Statusanzeige der Kamera abwechselnd in Rot und Blau
blinkt oder warten Sie 2 Minuten.
8
Page 13
7. Halten Sie die IPC-Zugriff/Sync -Taste für 1 Sekunde gedrückt, um die Kamerasuche zu starten. Sobald
IPC
ACCESS
die Verbindung hergestellt ist, blinkt die Status-LED der Kamera in Blau. Der Router beendet den Zugriff per
Tastendruck nach 2 Minuten.
B. Anderes WLAN-Gerät
8. Suchen Sie das WLAN des Routers und stellen Sie eine Verbindung mit ihm her, indem Sie das WLANPasswort eingeben, das Sie in Schritt 5 festgelegt haben.
Zu einem EZVIZ-Konto hinzufügen
9. Für Erstnutzer, laden Sie die EZVIZ-App auf Ihr Android-Telefon oder iPhone herunter. Legen Sie ein EZVIZKonto an. Bestehende Benutzer öffnen die EZVIZ-App und melden sich an.
10. Fügen Sie die Kamera durch Antippen des (+)-Zeichens auf dem Startbildschirm hinzu, scannen Sie dann
den QR-Code auf der Kamera oder geben Sie die Seriennummer ein.
11. Fügen Sie den Router hinzu, indem Sie auf das Pluszeichen (+) tippen, melden Sie sich am Startbildschirm
an und scannen Sie den QR-Code auf dem Router oder geben Sie dessen Seriennummer ein.
12. Sobald Sie den Router dem EZVIZ-Konto hinzugefügt haben, tippen Sie auf dem Home-Bildschirm der
EZVIZ-App auf den Router, um zu überprüfen, welche Kameras mit ihm verknüpft sind.
9
Page 14
Anhang
Empfohlene Position des Routers
Für eine optimale Leistung können Sie den Router wie unten dargestellt aufstellen.
≥1,5 m
• Der Abstand zwischen den Antennen sollte mindestens 6 cm betragen.
• Stellen Sie den Router so weit wie möglich von Haushaltsgeräten entfernt auf.
WLAN-Wächter
Gehen Sie zu Settings (Einstellungen) > Advanced Settings (Erweiterte Einstellungen) > Wi-Fi-Guard
(WLAN-Wächter), um den WLAN-Wächter zu aktivieren.
Aktivieren Sie den WLAN-Wächter, um die Sicherheit Ihres WLAN zu gewährleisten. Wenn er aktiviert ist,
können Sie Geräte nur innerhalb von 2 Minuten nach dem Drücken der IPC-Zugriff/Sync -Taste mit dem
WLAN verbinden.
Zugriff per Tastendruck
• Für EZVIZ-Kameras siehe Schritte 6 und 7.
• Für Geräte, die die WPS-Funktion unterstützen:
1. Suchen Sie das WLAN und klicken oder drücken Sie die WPS-Taste auf der Geräteschnittstelle
oder am Gerät.
2. Halten Sie die IPC-Zugriff/Sync -Taste am Router für 1 Sekunde gedrückt, um eine Verbindung
mit dem WLAN herzustellen.
10
Page 15
Información básica
Contenido de la caja
1 Adaptador de corriente 1 guía de inicio rápido
El contenido está sujeto a los productos reales.
Vista general del panel trasero
1 enrutador
Versión A
Potencia de entrada
12 V,. 1 A
IPC
ACCESS
Puerto WAN
Para acceder a
Internet
Acceso con una tecla/botón RESTAURAR
Mantenga pulsado durante 1 segundo:
Habilitar acceso con una tecla.
Mantener pulsado durante 6 segundos:
Restauración de la configuración predeterminada.
Puerto LAN
Para el ordenador u otros dispositivos
11
Page 16
Versión B
Puerto LAN
Para el ordenador u
otros dispositivos
Potencia de entrada
12 V; 1,5 A
*Puerto USB
Para discos USB o discos
duros portátiles, etc.
Acceso con una tecla/botón RESTAURAR
Mantenga pulsado durante 1 segundo:
Habilitar acceso con una tecla
Mantener pulsado durante 6 segundos:
Restauración de la configuración
predeterminada
Puerto WAN
Para acceder a
Internet
Encendido/apagado
* Los dispositivos conectados a la red Wi-Fi a través del enrutador pueden compartir los archivos con el disco USB o el disco
duro portátil conectados al puerto USB del enrutador.
Indicador de estado LED
Verde fijo Funciona correctamente.
Azul fijo Internet desconectado.
Azul intermitente Acceso con una tecla habilitado.
12
Page 17
Cableado
IPC
ACCESS
IPC
ACCESS
IPC
ACCESS
1. Conecte el puerto WAN a Internet a través del cable de red.
Módem ADSL/módem óptico/unidad
de red óptica/módem por cable
O
Puerto de red
2. Conecte su enrutador a la toma de corriente a través del adaptador de corriente y espere 90 segundos.
Toma de corriente
Adaptador de corriente
Configuración
Puede configurar los parámetros a través del ordenador o del teléfono móvil. Tomemos la configuración del ordenador como ejemplo.
3. Conecte el puerto LAN al ordenador a través del cable de red. El ordenador obtendrá automáticamente
la dirección IP del enrutador.
4. Abra el navegador de Internet (se recomienda Internet Explorer 8.0 y superior) e introduzca 192.168.7.1
o wifi.ezvizlife.com. Presione Intro para acceder a la página de configuración.
5. Establezca los parámetros, como la contraseña del enrutador, el nombre y la contraseña de la conexión
Wi-Fi, etc.
También puede conectar su teléfono móvil a la Wi-Fi desde el enrutador, abrir el navegador en el teléfono móvil y seguir los
pasos 4 y 5.
Conexión Wi-Fi
A. Cámara Wi-Fi EZVIZ
6. Encienda la cámara. Espere hasta que la luz de estado de la cámara parpadee alternando azul y rojo o
espere 2 minutos.
13
Page 18
7. Pulse el botón ACCESO IPC/SINC durante 1 segundo para comenzar la detección de su cámara. Una vez
IPC
ACCESS
conectada, la luz de estado de la cámara empezará a parpadear en azul. El enrutador saldrá del acceso
con una tecla al cabo de 2 minutos.
B. Otros dispositivos Wi-Fi
8. Encuentre la conexión Wi-Fi del enrutador y conéctelo introduciendo la contraseña Wi-Fi que haya
configurado en el paso 5.
Agregar una cuenta EZVIZ
9. Si es un usuario nuevo, descargue la aplicación EZVIZ en su teléfono Android o iPhone. Registre una
cuenta de usuario EZVIZ. Si ya tiene una cuenta, abra la aplicación EZVIZ e inicie la sesión.
10. Agregue la cámara tocando sobre el signo (+) en la pantalla de INICIO y, a continuación, escanee el
código QR de la cámara o escriba su número de serie.
11. Agregue el enrutador tocando sobre el signo (+) en la pantalla de INICIO y, a continuación, escanee el
código QR del enrutador o escriba su número de serie.
12. Una vez se haya agregado la cuenta EZVIZ, toque sobre el enrutador en la pantalla de inicio de la
aplicación EZVIZ para verificar las cámaras vinculadas al mismo.
14
Page 19
Apéndice
Posición recomendada del enrutador
Para obtener el mejor rendimiento del enrutador, colóquelo de la siguiente manera.
≥1,5 m
• La distancia entre cada antena debe ser mayor a 6 cm.
• Mantenga el enrutador tan alejado como sea posible de los electrodomésticos.
Protección Wi-Fi
Acceda a Settings (Configuración) > Advanced Settings (Configuración avanzada) > Wi-Fi Guard
(Protección Wi-Fi) para habilitarla.
Habilite la protección Wi-Fi para garantizar la seguridad de su conexión Wi-Fi. Una vez que esté habilitada,
solo podrá conectar dispositivos a la Wi-Fi en los 2 minutos después de pulsar el botón ACCESO IPC/SINC.
Acceso con una tecla
• Para cámaras EZVIZ, consulte los pasos 6 y 7.
• Para dispositivos que admitan la función WPS:
1. Busque la conexión Wi-Fi, haga clic o pulse el botón WPS en la pantalla o el cuerpo del dispositivo.
2. Pulse el botón ACCESO IPC/SINC del enrutador durante 1 segundo para conectarse a la red Wi-Fi.
15
Page 20
Informations de base
Contenu du carton
Adaptateur d’alimentation (x1) Guide de démarrage rapide (x1)
Les contenus font référence aux produits.
Présentation du panneau arrière
Routeur (x1)
Version A
Entrée d’alimentation
12 V 1 A
ACCESS
Port WAN
Pour l’accès à Internet
IPC
Fonction One-Key Access (Accès via une seule
touche) / Bouton RÉINITIALISER
Maintenez enfoncé pendant 1 s : Activez la fonction
One-Key Access (Accès via une seule touche).
Maintenez enfoncé pendant 6 s : Restaurez aux
paramètres par défaut
Port LAN
Pour ordinateur ou autre appareil
16
Page 21
Version B
Port LAN
Pour ordinateur ou
autre appareil
Entrée d’alimentation
12 V 1,5A
*Port USB
Pour disque USB ou disque dur mobile, etc.
Fonction One-Key Access (Accès via une seule
touche) / Bouton RÉINITIALISER
Maintenez enfoncé pendant 1 s : Activez la fonction
One-Key Access (Accès via une seule touche).
Maintenez enfoncé pendant 6 s : Restaurez aux
paramètres par défaut
Port WAN
Pour l’accès à
Internet
Marche/Arrêt
* Les appareils connectés au Wi-Fi à partir du routeur peuvent partager des fichiers dans le disque USB ou le disque dur
mobile qui est inséré dans le port USB du routeur.
État de l’indicateur LED
Vert fixe Fonctionne correctement.
Bleu continu Internet déconnecté.
Clignotement en bleu
La fonction One Key Access (Accès
via une seule touche) est activée.
17
Page 22

Câblage
IPC
ACCESS
IPC
ACCESS
IPC
ACCESS
1. Connectez le port WAN à Internet via le câble réseau.
Modem ADSL/Modem optique/Unité
de réseau optique/Modem câble
OU
Port réseau
2. Branchez votre routeur à la prise électrique via un adaptateur électrique et patientez pendant
90 secondes.
Prise électrique
Adaptateur d’alimentation
Configuration
Vous pouvez configurer les paramètres sur votre ordinateur ou sur votre téléphone mobile. Prenons par exemple la
configuration sur ordinateur.
3. Connectez le port LAN et l’ordinateur via le câble réseau. L’ordinateur récupère automatiquement l’adresse IP
du routeur.
4. Ouvrez le navigateur Internet (Internet Explorer 8.0 et la version ultérieure sont recommandés) et saisissez
192.168.7.1 ou l’adresse wifi.ezvizlife.com. Appuyez sur Entrer pour aller à la page de configuration.
5. Réglez les paramètres tels que le mot de passe du routeur, le nom d’utilisateur et le mot de passe du
réseau Wi-Fi, etc.
Vous pouvez également connecter votre téléphone mobile au Wi-Fi du routeur. Ouvrez le navigateur dans le téléphone
mobile, et suivez les étapes 4 et 5.
Connexion au réseau Wi-Fi
A. Caméra(s) Wi-Fi EZVIZ
6. Allumer la caméra. Patientez jusqu’à ce que le voyant d’état de la caméra clignote en alternance entre
le bleu et le rouge ou patientez pendant 2 minutes.
18
Page 23
7. Appuyez sur le bouton ACCÈS IPC/SYNC pendant 1 seconde pour démarrer la détection de vos caméras.
IPC
ACCESS
Une fois la connexion établie, le voyant d’état de la caméra commence à clignoter en bleu. Le routeur va
quitter la fonction One Key Access (Accès via une seule touche) après 2 minutes.
B. Autre appareil Wi-Fi
8. Trouvez le Wi-Fi à partir du routeur et connectez-le en saisissant le mot de passe du réseau Wi-Fi que
vous avez configuré à l’étape 5.
Ajout à un compte EZVIZ
9. Les nouveaux utilisateurs doivent télécharger l’application EZVIZ sur leur téléphone Android ou iPhone.
Créez un compte EZVIZ. Pour les utilisateurs existants, ouvrez l’application EZVIZ et connectez-vous.
10. Ajoutez la caméra en appuyant sur le signe (+) de l’écran d’accueil, puis scannez le code QR de la caméra
ou saisissez son numéro de série.
11. Ajoutez le routeur en appuyant sur le signe (+) de l’écran d’accueil, puis scannez le code QR du routeur
ou saisissez son numéro de série.
12. Une fois le compte EZVIZ ajouté, appuyez sur le routeur à l’écran d’accueil de l’application EZVIZ pour
vérifier le nombre de caméras qui lui sont associées.
19
Page 24

Annexe
Position recommandée du routeur
Pour une performance optimale du routeur, respectez les emplacements suivants.
≥1,5 m
• La distance entre chaque antenne devrait être supérieure à 6 cm.
• Tenez le routeur le plus loin possible des appareils électroménagers.
Wi-Fi Guard
Allez à Settings (Paramètres) > Advanced Settings (Paramètres avancés) > Wi-Fi Guard pour l’activer.
Activez Wi-Fi Guard pour garantir la sécurité de votre réseau Wi-Fi. Une fois activé, vous avez seulement
2 minutes pour connecter les appareils au réseau Wi-Fi après avoir appuyé sur le bouton ACCÈS IPC/SYNC.
One-Key Access (Accès via une seule touche).
• Pour les caméras EZVIZ, reportez-vous aux étapes 6 et 7.
• Pour les appareils qui prennent en charge la fonction WPS :
1. Recherchez le Wi-Fi, cliquez ou appuyez sur le bouton WPS dans l’interface de l’appareil ou sur le
corps de l’appareil.
2. Appuyez sur le bouton ACCÈS IPC/SYNC IPC sur le routeur pendant 1 seconde pour connecter le
Wi-Fi.
20
Page 25
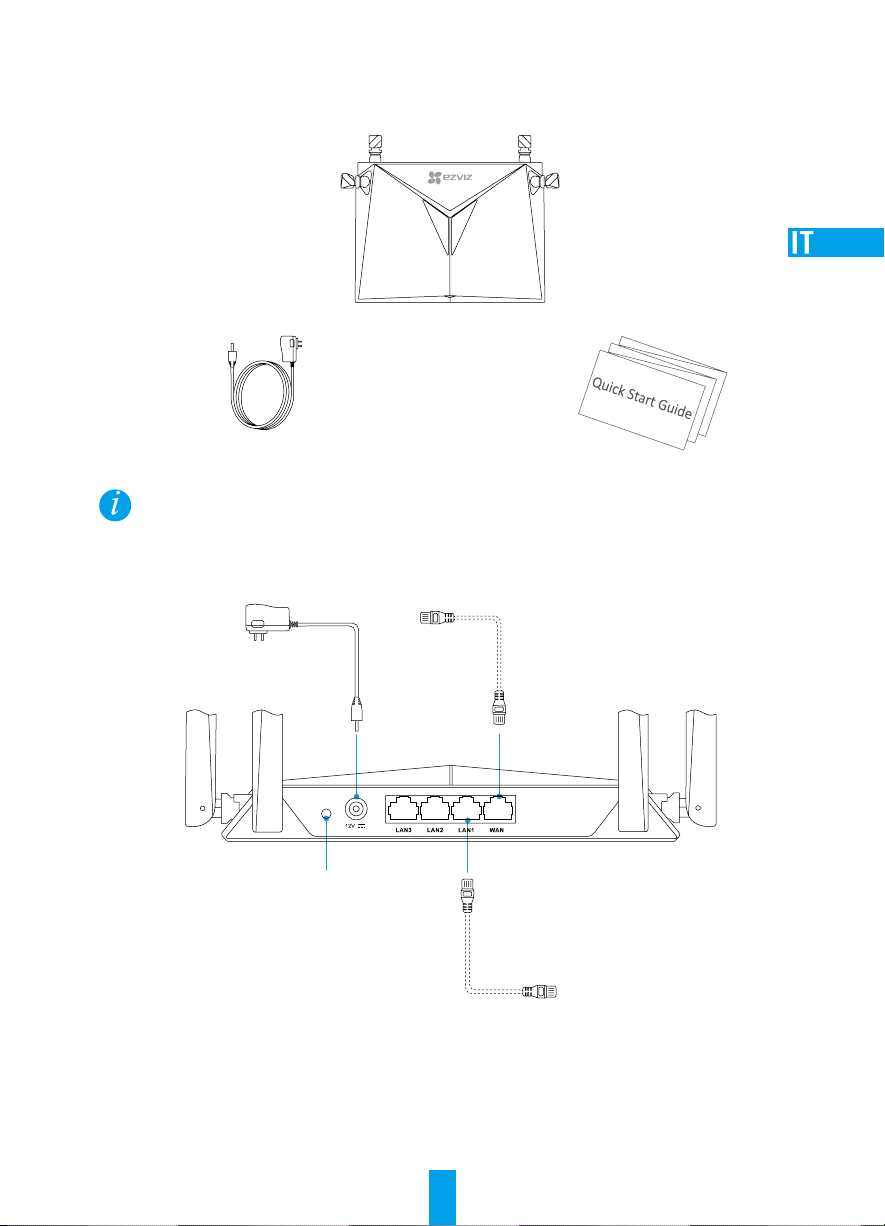
Informazioni di base
Contenuto della confezione
Alimentatore (x1) Guida rapida (x1)
Il contenuto dipende dal prodotto effettivo.
Vista del pannello posteriore
Router (x1)
Versione A
Ingresso alimentazione
12 V 1 A
ACCESS
IPC
Porta WAN
Per l'accesso a
Internet
Pulsante IPC Access/RESET
Tenere premuto 1 secondo: abilita l'accesso
con un tasto.
Tenere premuto 6 secondi: ripristina le
impostazioni predefinite.
Porta LAN
Per computer o altri
dispositivi
21
Page 26

Versione B
Porta LAN
Per computer o
altri dispositivi
Ingresso alimentazione
12 V 1,5A
*Porta USB
Per disco USB o HDD portatile, ecc.
Pulsante IPC Access/RESET
Tenere premuto 1 secondo: abilita
l'accesso con un tasto
Tenere premuto 6 secondi: ripristina le
impostazioni predefinite
Porta WAN
Per l'accesso
a Internet
Accensione/Spegnimento
* I dispositivi connessi al Wi-Fi tramite router possono condividere i file presenti su disco USB o HDD portatile inseriti nella
porta USB del router.
Stato indicatori LED
Verde fisso Funzionamento corretto.
Blu fisso Internet non collegato.
Blu lampeggiante Accesso con un tasto abilitato.
22
Page 27
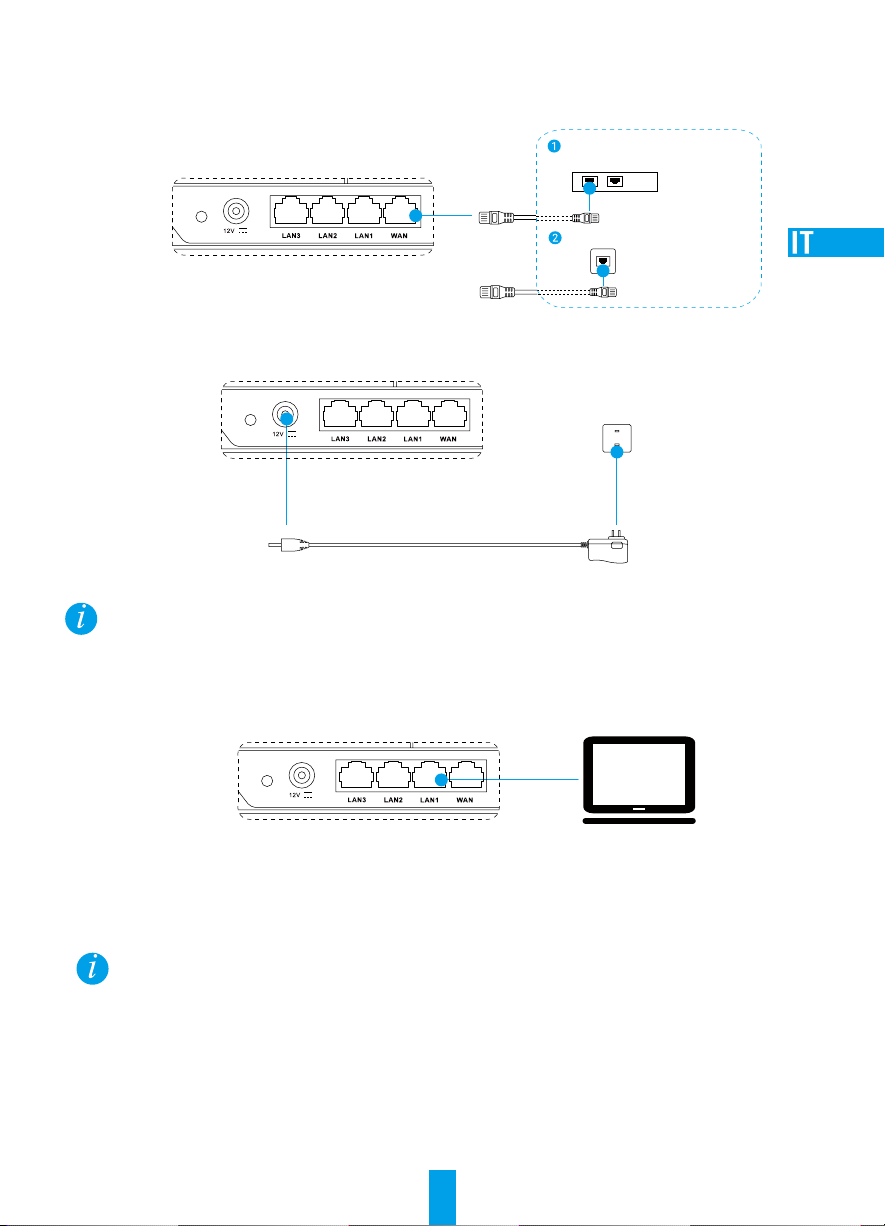
Cablaggio
IPC
ACCESS
IPC
ACCESS
IPC
ACCESS
1. Collegare la porta WAN a internet tramite cavo di rete.
Modem ADSL/Modem ottico/Unità
di rete ottica/Modem cablato
OPPURE
Porta di rete
2. Collegare il router alla presa di corrente tramite l'adattatore di corrente e attendere 90 secondi.
Presa di corrente
Adattatore di corrente
Configurazione
È possibile configurare i parametri attraverso il computer o lo smartphone. Di seguito viene illustrata la configurazione su
computer a titolo esemplificativo.
3. Collegare la porta LAN e il computer tramite cavo di rete. Il computer otterrà automaticamente l’indirizzo
IP del router.
4. Aprire il browser web (si consiglia di utilizzare Internet Explorer 8.0 o versioni più recenti) e inserire
192.168.7.1 o wifi.ezvizlife.com. Premere Invio per accedere alla pagina di configurazione.
5. Impostare i parametri come la password del router, il nome e la password del Wi-Fi e così via.
È inoltre possibile collegare il telefono cellulare al Wi-Fi tramite router aprendo il browser sul cellulare e attenendosi ai
passaggi 4 e 5.
Connessione del Wi-Fi
A. Telecamere Wi-Fi EZVIZ
6. Accendere la telecamera. Attendere finché la spia di stato della telecamera lampeggerà alternando blu
e rosso, o attendere 2 minuti.
23
Page 28
7. Premere il pulsante IPC Access/Reset per 1 secondo, per avviare il rilevamento delle telecamere
IPC
ACCESS
(accesso con un tasto). Una volta effettuata la connessione, la spia di stato della telecamera inizierà a
lampeggiare di blu. Il router uscirà dall’accesso con un tasto dopo 2 minuti.
B. Altri dispositivi Wi-Fi
8. Cercare il Wi-Fi con il router e connettersi inserendo la password del Wi-Fi impostata nel passaggio 5.
Registrazione di un account EZVIZ
9. Per i nuovi utenti, scaricare l'app EZVIZ sul telefono Android o iPhone. Registrare un account su EZVIZ.
Per gli utenti esistenti, aprire l'app EZVIZ ed effettuare l'accesso.
10. Aggiungere la videocamera toccando il simbolo (+) nella pagina Home, quindi eseguire la scansione del
QR code stampato sull'etichetta della videocamera o scrivere il suo numero seriale (SN).
11. Aggiungere il router toccando il simbolo (+) nella schermata principale, quindi eseguire la scansione del
codice QR sul router o digitarne il numero di serie.
12. Una volta aggiunto l'account EZVIZ, toccare il router nella schermata principale dell’app EZVIZ per
verificare le telecamere collegate.
24
Page 29
Appendice
Posizione consigliata del router
Per ottenere le prestazioni migliori del router, è possibile collocare il router come indicato di seguito.
≥1,5 m
• La distanza tra ogni antenna deve essere maggiore di 6 cm.
• Tenere il router il più distante possibile dagli elettrodomestici.
Protezione del Wi-Fi (da browser web)
Accedere a Settings (Impostazioni) > Advanced Settings (Impostazioni avanzate) > Wi-Fi Guard (Protezione
del Wi-Fi) per abilitarla.
Abilitare la protezione del Wi-Fi per garantire la sicurezza della rete Wi-Fi. Una volta abilitata, è unicamente
possibile connettere dispositivi al Wi-Fi entro 2 minuti, dopo aver premuto il pulsante IPC Access/Reset.
Accesso con un tasto
• Per le telecamere EZVIZ, fare riferimento ai passaggi 6 e 7.
• Per i dispositivi che supportano la funzione WPS:
1. cercare la rete Wi-Fi, fare clic o premere il pulsante WPS nell’interfaccia del dispositivo o sul corpo
del dispositivo.
2. Premere il pulsante IPC Access/Reset sul router per 1 secondo per connettersi al Wi-Fi.
25
Page 30
Basisinformatie
Doosinhoud
Netadapter (x1) Snelstartgids (x1)
De inhoud kan verschillen per product.
Overzicht achterkant
Router (x1)
Versie A
Voeding
12V 1A
ACCESS
IPC
WAN-poort
Voor toegang tot
internet
Toegang met één toets/RESET-toets
1 sec ingedrukt houden: Toegang met één
toets inschakelen.
6 sec ingedrukt houden: Terugzetten naar
standaardinstellingen.
LAN-poort
Voor computer of ander apparaat
26
Page 31

Versie B
LAN-poort
Voor computer of
ander apparaat
Voeding
12V 1,5A
*USB-poort
Voor USB-stick of mobiele
harde schijf, enz.
Toegang met één toets/RESET-toets
1 sec ingedrukt houden: Toegang met
één toets inschakelen
6 sec ingedrukt houden: Terugzetten
naar standaardinstellingen.
WAN-poort
Voor toegang tot
internet
Aan-/uitzetten
* De router is voorzien van een USB-poort voor opslagmedia. Hiermee kun je de bestanden op een USB-stick of mobiele harde
schijf delen met apparaten die via de router op het wifinetwerk zijn aangesloten.
Status LED-lampje
Stabiel groen Werkt correct.
Stabiel blauw Verbinding met internet verbroken.
Knippert blauw Toegang met één toets is ingeschakeld.
27
Page 32

Bedrading
IPC
ACCESS
IPC
ACCESS
IPC
ACCESS
1. Sluit de WAN-poort met behulp van een netwerkkabel aan op het internet.
ADSL-modem/optisch modem/optische
netwerkeenheid/kabelmodem
OF
Netwerkpoort
2. Steek de adapter van uw router in het stopcontact en wacht 90 seconden.
Stopcontact
Voedingsadapter
Configureren
U kunt de parameters configureren via de computer of mobiele telefoon. Wij gebruiken de computerconfiguratie als voorbeeld.
3. Sluit de LAN-poort en de computer aan met behulp van een netwerkkabel. De computer zal automatisch
het IP-adres van de router verkrijgen.
4. Open de internetbrowser (Internet Explorer 8.0 of nieuwer is aanbevolen) en voer 192.168.7.1 of
wifi.ezvizlife.com in de adresbalk in. Druk op Enter om naar de configuratiepagina te gaan.
5. Stel de parameters in, zoals wachtwoord router, Wi-Fi-naam en -wachtwoord, enz.
U kunt ook uw mobiele telefoon vanaf de router verbinden met Wi-Fi, de browser openen in de mobiele telefoon en stap 4
en stap 5 volgen.
Wi-Fi verbinden
A. EZVIZ Wi-Fi-camera('s)
6. Schakel de camera in. Wacht tot het statuslampje van de camera afwisselend blauw en rood knippert
of wacht 2 minuten.
28
Page 33

7. Druk 1 seconde op de IPC ACCESS/SYNC-toets om de detectie van uw camera(‘s) te starten. Bij
IPC
ACCESS
verbinding zal het camerastatuslampje blauw knipperen. De router zal de modus 'Toegang met één toets'
na 2 minuten verlaten.
B. Overige Wi-Fi-apparaten
8. Selecteer het Wi-Fi-netwerk van de router en maak verbinding door het Wi-Fi-wachtwoord in te voeren
dat u heeft ingesteld in Stap 5.
Aan EZVIZ-account toevoegen
9. Download bij het eerste gebruik de EZVIZ-app op uw Android-telefoon of iPhone. Maak een EZVIZ-account
aan. Bestaande gebruikers openen de EZVIZ-app en loggen in.
10. Voeg de camera toe door op (+) te tikken in het startscherm en vervolgens de QR-code op de camera te
scannen of het serienummer in te voeren.
11. Voeg de router toe door op (+) te tikken in het startscherm en vervolgens de QR-code op de router te
scannen of het serienummer in te voeren.
12. Zodra toegevoegd aan het EZVIZ-account, tikt u op de router in het startscherm van de EZVIZ-app om de
camera('s) die eraan gekoppeld zijn te verifiëren.
29
Page 34

Bijlage
Aanbevolen positie van de router
Voor de beste prestaties van de router, plaatst u de router zoals hieronder weergegeven.
≥1,5 m
• De afstand tussen de antennes moet groter zijn dan 6 cm.
• Houd de router zo ver mogelijk uit de buurt van huishoudelijke apparaten.
Wi-Fi-bewaker
Ga naar Settings (Instellingen) > Advanced Settings (Geavanceerde instellingen) > Wi-Fi Guard (Wi-Fi-bewaker)
om deze in te schakelen.
Schakel Wi-Fi-bewaker in om de veiligheid van uw Wi-Fi te waarborgen. Eenmaal ingeschakeld, moet u
binnen 2 minuten nadat u op de IPC ACCESS/SYNC-toets heeft gedrukt apparaten verbinden met Wi-Fi.
Toegang met één toets
• Raadpleeg voor EZVIZ-camera’s Stap 6 en Stap 7.
• Voor apparaten die WPS-functie ondersteunen:
1. Zoek de Wi-Fi op, klik of druk op de WPS-toets in de interface of op de behuizing van het apparaat.
2. Druk 1 seconde op de IPC ACCESS/SYNC-toets op de router om verbinding te maken met Wi-Fi.
30
Page 35

Podstawowe informacje
Zawartość opakowania
Router (x1)
Zasilacz (x1) Skrócona instrukcja obsługi (x1)
Zawartość jest zależna od produktu.
Przegląd tylnego panelu
Wersja A
Wejście zasilania
12 V 1 A
IPC
ACCESS
Złącze WAN
Dostęp do
Internetu
Przycisk dostępu za jednym
naciśnięciem klawisza/RESET
Naciśnij i przytrzymaj przez 1 s:
włączenie funkcji dostępu za jednym
naciśnięciem klawisza.
Naciśnij i przytrzymaj przez 6 s:
przywrócenie ustawień domyślnych.
31
Złącze LAN
Podłączanie komputera
lub innego urządzenia
Page 36

Wersja B
Złącze LAN
Podłączanie komputera
lub innego urządzenia
Wejście zasilania
12 V 1,5A
Port USB*
Podłączenie dysku USB lub
zewnętrznego dysku twardego itp.
Przycisk dostępu za jednym
naciśnięciem klawisza/RESET
Naciśnij i przytrzymaj przez 1 s:
włączenie funkcji dostępu za jednym
naciśnięciem klawisza.
Naciśnij i przytrzymaj przez 6 s:
przywrócenie ustawień domyślnych.
Złącze WAN
Dostęp do
Internetu
Włączanie/
wyłączanie
* Urządzenia podłączone do sieci Wi-Fi za pośrednictwem routera mogą wspólnie korzystać
z plików zapisanych na dysku USB lub zewnętrznym dysku twardym podłączonym do
portu USB routera.
Stan wskaźnika
Świeci na zielono Działa prawidłowo.
Włączony niebieski Odłączony Internet.
Miga na niebiesko
Funkcja dostępu za jednym
naciśnięciem klawisza jest włączona.
32
Page 37

Okablowanie
IPC
ACCESS
IPC
ACCESS
IPC
ACCESS
1. Podłącz złącze WAN do Internetu przy użyciu kabla sieciowego.
Modem ADSL/Modem optyczny/
Sieciowe urządzenie optyczne/
Modem kablowy
LUB
Złącze sieciowe
2. Podłącz router do gniazda sieci elektrycznej za pomocą zasilacza i
odczekaj 90 sekund.
Gniazdo sieci elektrycznej
Zasilacz
Konguracja
Parametry można skongurować za pośrednictwem komputera lub telefonu komórkowego.
Jako przykład przedstawimy kongurację za pomocą komputera.
3. Podłącz komputer do złącza LAN przewodem sieciowym. Komputer otrzyma
automatycznie adres IP routera.
4. Otwórz przeglądarkę internetową (zaleca się korzystanie z przeglądarki
Internet Explorer 8.0 lub nowszej) i wpisz 192.168.7.1 lub wi.ezvizlife.
com. Naciśnij przycisk Enter, aby wyświetlić stronę konguracji.
5. Ustaw parametry takie jak hasło routera, nazwę i hasło sieci Wi-Fi itp.
Można też połączyć telefon komórkowy z siecią Wi-Fi routera, otworzyć przeglądarkę
internetową na telefonie komórkowym i wykonać kroki 4 i 5.
Połączenie z siecią Wi-Fi
A. Kamery EZVIZ Wi-Fi
6. Włącz zasilanie kamery. Zaczekaj, aż kontrolka stanu kamery zacznie migać
na przemian na niebiesko i czerwono, lub odczekaj 2 minuty.
33
Page 38

7. Naciśnij przycisk IPC ACCESS/SYNC i przytrzymaj go przez 1 sekundę, aby
IPC
ACCESS
rozpocząć wykrywanie kamer. Po nawiązaniu połączenia kontrolka stanu
kamery zacznie migać na niebiesko. Po upływie 2 minut router zakończy
tryb dostępu za jednym naciśnięciem klawisza.
B. Inne urządzenie Wi-Fi
8. Znajdź sieć Wi-Fi routera i ustanów połączenie z tą siecią, wpisując hasło
dostępu ustawione w kroku 5.
Dodawanie konta EZVIZ
9. Jeżeli po raz pierwszy korzystasz z tej funkcji , pobierz aplikację EZVIZ do telefonu
z systemem Android lub telefonu iPhone. Zarejestruj konto EZVIZ. Jeżeli masz
już konto użytkownika, otwórz aplikację EZVIZ i zaloguj się.
10. Aby dodać kamerę, naciśnij symbol (+) na ekranie głównym, a następnie
zeskanuj kod QR na kamerze lub wpisz jej numer seryjny.
11. Dodaj router, dotykając symbolu (+) na ekranie GŁÓWNYM, a następnie
zeskanuj kod QR na routerze lub wpisz jego numer seryjny.
12. Po dodaniu do konta EZVIZ dotknij symbolu routera na ekranie głównym
aplikacji EZVIZ, aby sprawdzić, czy kamery są z nim powiązane.
34
Page 39

Dodatek
Zalecana lokalizacja routera
W celu zapewnienia optymalnego działania routera można go ustawić zgodnie z
poniższym opisem.
≥1,5 m
• Odległość między antenami powinna być większa niż 6 cm.
• Router powinien się znajdować możliwie jak najdalej od urządzeń AGD.
Ochrona Wi-Fi
Przejdź do pozycji Sengs (Ustawienia) > Advanced Sengs (Ustawienia
zaawansowane) > Wi-Fi Guard (Ochrona Wi-Fi), aby włączyć tę funkcję.
Włącz funkcję Ochrona Wi-Fi, aby chronić swoją sieć Wi-Fi. Po włączeniu tej funkcji
można łączyć urzadzenia z siecią Wi-Fi tylko w ciągu 2 minut po naciśnięciu
przycisku IPC ACCESS/SYNC.
Dostęp za jednym naciśnięciem klawisza
• W przypadku kamer EZVIZ postępuj zgodnie z krokami 6 i 7.
• W przypadku urządzeń obsługujących funkcję WPS:
1. Wyszukaj sieć Wi-Fi, kliknij lub nacisnij przycisk WPS w interfejsie
urządzenia lub na jego obudowie.
2. Naciśnij przycisk IPC ACCESS/SYNC na routerze i przytrzymaj go przez 1
sekundę, aby ustanowić połączenie z siecią Wi-Fi.
35
Page 40

Основная информация
Содержимое упаковочной коробки
Маршрутизатор, 1 шт.
Адаптер питания, 1 шт. Краткое руководство пользователя, 1 шт.
Содержимое комплекта поставки зависит от конкретной модели.
Внешний вид задней панели
Версия А
Вход питания
12 В, 1 А
ACCESS
IPC
Порт WAN
для доступа к
Интернету
Кнопка «Доступ одной
кнопкой/СБРОС»
Нажатие в течение 1 сек.:
активирует быстрое подключение
для камеры.Нажатие в течение
6 сек.: активирует настройки по
умолчанию.
Порт LAN
для подключения к
компьютеру или другому
устройству
36
Page 41

Версия B
Порт LAN
для подключения к компьютеру
или другому устройству
* Порт USB
для подключения
USB-диска, внешнего
жесткого диска и т. д.
Вход питания
12 В, 1,5 A
Кнопка «Доступ одной
кнопкой/СБРОС»
Нажатие в течение 1 сек.:
активирует быстрое подключение
для камеры
Нажатие в течение 6 сек.:
активирует настройки по умолчанию
Порт WAN
для доступа к
Интернету
Включение/
выключение
* Устройства, подключенные по Wi-Fi к маршрутизатору, могут совместно
использовать файлы, хранящиеся на USB-диске или на внешнем жестком диске,
подключенном к USB-порту маршрутизатора.
Состояния светодиодного индикатора
Непрерывно горит зеленым цветом Устройство работает нормально.
Непрерывно горит синим цветом Нет подключения к Интернету.
Мигает синим
Активирован бвгдежз подключение
для камеры.
37
Page 42

Схема подключения
IPC
ACCESS
IPC
ACCESS
IPC
ACCESS
1. Подключитесь к Интернету, подсоединив сетевой кабель к порту WAN.
Модем ADSL/оптический модем/
модуль оптической сети/модем
кабельной сети
ЛИБО
Сетевой порт
2. Подключите маршрутизатор к розетке электросети через адаптер питания
и подождите 90 сек.
Сетевая розетка
Адаптер питания
Настройки
Параметры можно настроить с помощью компьютера или мобильного телефона. В
качестве примера мы выбрали вариант с компьютером.
3. Подключите порт LAN к компьютеру с помощью сетевого кабеля.
Компьютер определит IP-адрес маршрутизатора автоматически.
4. Откройте интернет-браузер (рекомендуется использовать Internet
Explorer версии 8.0 и выше) и введите адрес 192.168.7.1 или wi.
ezvizlife.com. Нажмите Enter, чтобы перейти на страницу настройки.
5. Введите данные, такие как пароль маршрутизатора, имя/пароль сети
Wi-Fi и т. д.
Вы также можете подключить мобильный телефон к сети Wi-Fi маршрутизатора,
открыть браузер на телефоне и выполнить шаги 4 и 5.
Подключение к сети Wi-Fi
A. Wi-Fi-камеры EZVIZ
6. Включите камеру. Подождите, пока индикатор состояния камеры не
начнет мигать попеременно синим и красным цветом (примерно 2 мин.).
38
Page 43

7. Нажмите кнопку ДОСТУП IPC/СИНХРОНИЗАЦИЯ и удерживайте ее 1 сек.,
IPC
ACCESS
чтобы запустить поиск камер. После подключения индикатор состояния
камеры начнет мигать синим цветом. Маршрутизатор выйдет из режима
бвгдежз подключение для камеры через 2 мин.
B. Другие устройства Wi-Fi
8. Найдите сеть Wi-Fi маршрутизатора и подключитесь к ней, введя
пароль, который вы установили в шаге 5.
Добавление аккаунта EZVIZ
9. Если вы только начинаете использовать систему, скачайте приложение
EZVIZ в ваш телефон или iPhone. Зарегистрируйте аккаунт EZVIZ. Если вы уже
зарегистрировали аккунт, откройте приложение EZVIZ и войдите в систему.
10. Добавьте камеру, нажав значок (+) на главном экране, а затем
отсканируйте QR-код на камере или введите ее серийный номер.
11. Добавьте маршрутизатор, нажав значок (+) на главном экране, а затем
отсканируйте QR-код на маршрутизаторе или введите его серийный
номер.
12. После добавления аккаунта EZVIZ выберите маршрутизатор на главном
экране приложения EZVIZ, чтобы проверить камеры, присоединенные
к этому устройству.
39
Page 44

Приложение
Рекомендуемое место установки маршрутизатора
Для эффективной работы маршрутизатора рекомендуется установить его в
соответствии с приведенными ниже рисунками.
≥ 1,5 м
• Расстояние между антеннами должно быть больше 6 см.
• Располагайте маршрутизатор как можно дальше от бытовых приборов.
Защита Wi-Fi
Чтобы включить эту функцию, используйте следующие пункты меню:
Настройки > Дополнительные настройки > Защита Wi-Fi.
Функция защиты Wi-Fi обеспечивает безопасность сети Wi-Fi. После включения
этой функции подключение устройств к сети Wi-Fi возможно только в течение
2-х минут после нажатия кнопки ДОСТУП IPC/СИНХРОНИЗАЦИЯ.
Быстрое подключение для камеры
• Для камер EZVIZ см. шаги 6 и 7.
• Для устройств, поддерживающих функцию WPS:
1. Найдите сеть Wi-Fi, нажмите кнопку WPS в интерфейсе устройства
или на его корпусе.
2. Нажмите кнопку ДОСТУП IPC/СИНХРОНИЗАЦИЯ на маршрутизаторе
и удерживайте ее 1 сек. для подключения к сети Wi-Fi.
40
Page 45

Βασικές πληροφορίες
Περιεχόμενα Συσκευασίας
Τροφοδοτικό (x1) Οδηγός γρήγορης εκκίνησης (x1)
Τα περιεχόμενα ενδέχεται να διαφέρουν.
Επισκόπηση πίσω πλευράς
Ρούτερ (x1)
Έκδοση Α
Είσοδος ισχύος
12V 1A
IPC
ACCESS
Θύρα WAN
Για πρόσβαση
στο Διαδίκτυο
Πρόσβαση με ένα πλήκτρο/Κουμπί
RESET (Επαναφορά)
Κρατήστε για 1 δευτ.: Ενεργοποίηση της
Πρόσβασης με ένα πλήκτρο.
Κρατήστε για 6 δευτ.: Επαναφορά
προεπιλεγμένων ρυθμίσεων.
41
Θύρα LAN
Για υπολογιστή ή
άλλη συσκευή
Page 46

Έκδοση Β
Θύρα LAN
Για υπολογιστή ή
άλλη συσκευή
Είσοδος ισχύος
12V 1,5A
*Θύρα USB
Για USB δίσκο ή φορητό
σκληρό δίσκο κ.λπ.
Πρόσβαση με ένα πλήκτρο/
Κουμπί RESET (Επαναφορά)
Κρατήστε για 1 δευτ.: Ενεργοποίηση
της Πρόσβασης με ένα πλήκτρο
Κρατήστε για 6 δευτ.: Επαναφορά
προεπιλεγμένων ρυθμίσεων
Θύρα WAN
Για πρόσβαση
στο Διαδίκτυο
Ενεργοποίηση/
Απενεργοποίηση
* Οι συσκευές που συνδέονται στο Wi-Fi μέσω του Ρούτερ μπορούν να μοιράζονται τα
αρχεία στον δίσκο USB ή τον φορητό σκληρό δίσκο που συνδέεται στη θύρα USB του
Ρούτερ.
Κατάσταση ένδειξης LED
Πράσινο συνεχώς αναμμένο φως Λειτουργεί σωστά.
Μπλε συνεχώς αναμμένο φως Αποσύνδεση από το Internet.
Αναβοσβήνει μπλε
Η πρόσβαση με ένα πλήκτρο
ενεργοποιήθηκε.
42
Page 47

Καλωδίωση
IPC
ACCESS
IPC
ACCESS
IPC
ACCESS
1. Συνδέστε τη θύρα WAN στο Internet με ένα καλώδιο δικτύου.
Μόντεμ ADSL/Οπτικό μόντεμ/Οπτική
μονάδα δικτύου/Καλωδιακό μόντεμ
Ή
Θύρα δικτύου
2. Συνδέστε τον Ρούτερ σας στην παροχή σε πρίζα ρεύματος, μέσω τροφοδοτικού
και περιμένετε 90 δευτερόλεπτα.
Πρίζα ρεύματος
Τροφοδοτικό
Ρύθμιση παραμέτρων
Μπορείτε να ρυθμίσετε τις παραμέτρους μέσω του υπολογιστή ή του κινητού τηλεφώνου.
Θα χρησιμοποιήσουμε τη ρύθμιση παραμέτρων μέσω υπολογιστή ως παράδειγμα.
3. Συνδέστε τη θύρα LAN με τον υπολογιστή με ένα καλώδιο δικτύου. Ο
υπολογιστής θα λάβει τη διεύθυνση IP του Ρούτερ αυτόματα.
4. Ανοίξτε ένα πρόγραμμα περιήγησης στο Internet (προτείνεται Internet
Explorer 8.0 ή νεότερο) και πληκτρολογήστε 192.168.7.1 ή wi.ezvizlife.
com. Πατήστε Enter για να μεταβείτε στη σελίδα ρύθμισης παραμέτρων.
5. Ορίστε τις παραμέτρους, όπως κωδικό πρόσβασης Ρούτερ, όνομα και
κωδικό πρόσβασης Wi-Fi κ.λπ.
Μπορείτε επίσης να συνδέσετε το κινητό σας τηλέφωνο στο Wi-Fi μέσω του Ρούτερ, να
ανοίξετε το πρόγραμμα περιήγησης στο κινητό τηλέφωνο και να ακολουθήσετε το Βήμα
4 και το Βήμα 5.
Σύνδεση Wi-Fi
A. Κάμερα (-ες) Wi-Fi EZVIZ
6. Ενεργοποίηση της κάμερας. Περιμένετε μέχρι η φωτεινή ένδειξη κατάστασης
της κάμερας να αναβοσβήνει με μπλε και κόκκινο χρώμα ή περιμένετε 2 λεπτά.
43
Page 48

7. Πατήστε το κουμπί ΠΡΟΣΒΑΣΗ IPC/ΣΥΓΧΡΟΝΙΣΜΟΣ για 1 δευτερόλεπτο
IPC
ACCESS
για να αρχίσει η ανίχνευση για την/τις κάμερα (-ές) σας. Μετά τη σύνδεση,
η ενδεικτική λυχνία κατάστασης της κάμερας αρχίζει να αναβοσβήνει με
μπλε χρώμα. Το Ρούτερ απενεργοποιεί την Πρόσβαση με ένα πλήκτρο
μετά από 2 λεπτά.
B. Άλλες συσκευές Wi-Fi
8. Βρείτε το Wi-Fi του Ρούτερ και συνδεθείτε σε αυτό πληκτρολογώντας τον
κωδικό Wi-Fi που ορίσατε στο Βήμα 5.
Προσθήκη στον λογαριασμό EZVIZ
9. Εάν είστε νέοι χρήστες, κατεβάστε την Εφαρμογή EZVIZ στο τηλέφωνο
Android ή το iPhone σας. Δημιουργήστε έναν λογαριασμό EZVIZ. Εάν είστε
παλαιότεροι χρήστες, ανοίξτε την Εφαρμογή EZVIZ και συνδεθείτε.
10. Προσθέστε την κάμερα πατώντας το σύμβολο (+) στην οθόνη Αρχική σελίδα
και, στη συνέχεια, σαρώστε τον κωδικό QR στην κάμερα ή πληκτρολογήστε
τον σειριακό αριθμό της.
11. Προσθέστε το Ρούτερ πατώντας το σύμβολο (+) στην οθόνη Αρχική σελίδα
και, στη συνέχεια, σαρώστε τον κωδικό QR στο Ρούτερ ή πληκτρολογήστε
τον σειριακό αριθμό του.
12. Μετά την προσθήκη στον λογαριασμό EZVIZ, αγγίξτε το Ρούτερ στην αρχική
οθόνη της Εφαρμογής EZVIZ για να επαληθεύσετε την/τις κάμερα (-ες) που
έχουν συνδεθεί.
44
Page 49

Παράρτημα
Προτεινόμενη θέση Ρούτερ
Για καλύτερη απόδοση του Ρούτερ, μπορείτε να το τοποθετήσετε όπως φαίνεται
παρακάτω.
≥1,5 μέτρα
• Η απόσταση ανάμεσα σε κάθε κεραία πρέπει να είναι μεγαλύτερη από 6 εκ.
• Διατηρείτε το Ρούτερ όσο γίνεται περισσότερο μακριά από οικιακές συσκευές.
Wi-Fi Guard (Προστασία Wi-Fi)
Μεταβείτε στην επιλογή Sengs (Ρυθμίσεις) > Advanced Sengs (Σύνθετες
ρυθμίσεις) > Wi-Fi Guard (Προστασία Wi-Fi) για να το ενεργοποιήσετε.
Ενεργοποιήστε το Wi-Fi Guard (Προστασία Wi-Fi) για να διατηρήσετε την
ασφάλεια στο Wi-Fi σας. Μετά την ενεργοποίηση, μπορείτε να συνδέσετε
συσκευές στο Wi-Fi μόνο εντός 2 λεπτών αφού πατήσετε το κουμπί ΠΡΟΣΒΑΣΗ
IPC/ΣΥΓΧΡΟΝΙΣΜΟΣ.
Πρόσβαση με ένα πλήκτρο
• Για τις κάμερες EZVIZ, ανατρέξτε στα Βήματα 6 και 7.
• Για τις συσκευές που υποστηρίζουν τη λειτουργία WPS:
1. Αναζητήστε το Wi-Fi, κάντε κλικ ή πατήστε το κουμπί WPS στο μενού
της συσκευής ή στο σώμα της συσκευής.
2. Πατήστε το κουμπί ΠΡΟΣΒΑΣΗ IPC/ΣΥΓΧΡΟΝΙΣΜΟΣ στο Ρούτερ για 1 δευτ.
για να συνδεθείτε στο Wi-Fi.
45
Page 50

Základní informace
Obsah balení
Napájecí adaptér (×1) Průvodce rychlým spuštěním (×1)
Obsah balení závisí na konkrétních produktech.
Přehled zadního panelu
Směrovač (×1)
Verze A
Vstup napájení
12 V, 1 A
IPC
ACCESS
Přístup jedním tlačítkem/
tlačítko RESET
Držte po dobu 1 s: Povolení
přístupu jedním tlačítkem.
Držte po dobu 6 s: Obnovení
výchozího nastavení.
Port WAN
pro přístup
k internetu
Port LAN
pro počítač nebo
jiné zařízení
46
Page 51

Verze B
Port LAN
pro počítač nebo
jiné zařízení
Vstup napájení
12 V, 1,5A
*USB Port
pro disk USB nebo
přenosný HDD atd.
Přístup jedním tlačítkem/
tlačítko RESET
Držte po dobu 1 s: Povolení
přístupu jedním tlačítkem
Držte po dobu 6 s: Obnovení
výchozího nastavení
Port WAN
pro přístup
k internetu
Zapnu/vypnu
* Zařízení připojená k sí Wi-Fi ze směrovače mohou sdílet soubory na disku USB nebo
přenosném HDD, který je vložen do portu USB směrovače.
Stav indikátoru LED
Trvalé zelené svícení Pracuje správně.
Trvalé modré svícení Bez připojení k internetu.
Blikající modrá Povolen přístup jedním tlačítkem.
47
Page 52

Zapojení
IPC
ACCESS
IPC
ACCESS
IPC
ACCESS
1. Připojte port WAN síťovým kabelem k internetu.
Modem ADSL / opcký modem / opcká
síťová jednotka / kabelový modem
NEBO
Síťový port
2. Připojte směrovač k elektrické zásuvce pomocí napájecího adaptéru a vyčkejte
90 sekund.
Elektrická zásuvka
Napájecí adaptér
Nastavení
Parametry můžete nakongurovat prostřednictvím počítače nebo mobilního telefonu. Jako
příklad uvedeme konguraci pomocí počítače.
3. Připojte port LAN síťovým kabelem k počítači. Počítač automacky získá
adresu IP směrovače.
4. Otevřete internetový prohlížeč (doporučujeme Internet Explorer 8.0 a novější)
a zadejte 192.168.7.1 nebo wi.ezvizlife.com. Ssknum klávesy Enter
přejděte na stránku kongurace.
5. Nastavte parametry, jako jsou heslo směrovače, název a heslo sítě Wi-Fi atd.
K sí Wi-Fi můžete rovněž ze směrovače připojit mobilní telefon, spust prohlížeč
v mobilním telefonu a postupovat podle kroků 4 a 5.
Připojování sítě Wi-Fi
A. Wi-Fi kamery EZVIZ
6. Zapněte kameru. Vyčkejte, dokud indikátor stavu kamery nebude blikat
střídavě modře a červeně, nebo vyčkejte po dobu 2 minut.
48
Page 53

7. Zahajte detekci kamery ssknum tlačítka PŘÍSTUP IPC / SYNCHRONIZACE
IPC
ACCESS
po dobu 1 sekundy. Po připojení začne indikátor stavu kamery blikat modře.
Směrovač ukončí přístup jedním tlačítkem po uplynu dvou minut.
B. Jiné zařízení sítě Wi-Fi
8. Najděte síť Wi-Fi ze směrovače a připojte se k ní zadáním hesla sítě Wi-Fi,
které jste nastavili v kroku 5.
Přidání k účtu EZVIZ
9. Chystáte-li se použít aplikaci EZVIZ poprvé, stáhněte si ji do svého telefonu
se systémem Android nebo do zařízení iPhone. Zaregistrujte svůj účet EZVIZ.
Pokud již naše produkty užíváte, otevřete aplikaci EZVIZ a přihlaste se.
10. Klepnum na znaménko (+) na domovské stránce přidejte kameru. Poté
naskenujte kód QR z kamery nebo zadejte její sériové číslo.
11. Přidejte směrovač klepnum na symbol (+) na obrazovce Domovské obrazovce,
poté naskenujte kód QR na směrovači nebo zadejte jeho sériové číslo.
12. Po přidání do účtu EZVIZ klepnum na směrovač na obrazovce Home (Domovské
obrazovce) aplikace EZVIZ potvrďte kamery, které jsou k němu připojeny.
49
Page 54

Příloha
Doporučená poloha směrovače
Pro nejlepší výkon směrovače můžete směrovač umíst tak, jak je uvedeno níže.
≥1,5 m
• Vzdálenost mezi jednotlivými anténami by měla být větší než 6 cm.
• Umístěte směrovač co nejdále od domácích spotřebičů.
Ochrana sítě Wi-Fi
Přejděte do nabídky Sengs (Nastavení) > Advanced Sengs (Pokročilá
nastavení) > Wi-Fi Guard (Ochrana sítě Wi-Fi) a možnost povolte.
Povolte ochranu sítě Wi-Fi pro zajištění její bezpečnos. Po jejím povolení
můžete připojit zařízení k sí Wi-Fi pouze během 2 minut po ssknu tlačítka
PŘÍSTUP IPC / SYNCHRONIZACE.
Přístup jedním tlačítkem
• V případě kamer EZVIZ viz krok 6 a krok 7.
• V případě zařízení podporujících funkci WPS:
1. Vyhledejte síť Wi-Fi, klepněte na tlačítko WPS v rozhraní zařízení nebo
jej sskněte na těle zařízení.
2. Pro připojení k sí Wi-Fi sskněte tlačítko PŘÍSTUP IPC / SYNCHRONIZACE
na směrovači po dobu 1 sekundy.
50
Page 55

Základné informácie
Obsah balenia
Sieťový adaptér (1 x) Príručka so stručným návodom (1 x)
Obsah je viazaný k aktuálnym produktom.
Prehľad zadného panela
Smerovač (1 x)
Verzia A
Vstup napájania
12 V 1 A
IPC
ACCESS
Port WAN
Pre prístup na
internet
Tlačidlo Prístup jedným
tlačidlom/VYNULOVANIE
Podržanie na 1 s: Zapnue prístupu
jedným tlačidlom.
Podržanie na 6 s: Obnovenie
predvolených nastavení.
Port LAN
Pre počítač alebo iné
zariadenie
51
Page 56

Verzia B
Port LAN
Pre počítač alebo
iné zariadenie
Vstup napájania
12 V 1,5A
*Port USB
Pre disk USB alebo prenosný
pevný disk atď.
Tlačidlo Prístup jedným
tlačidlom/VYNULOVANIE
Podržanie na 1 s: Zapnue
prístupu jedným tlačidlom
Podržanie na 6 s: Obnovenie
predvolených nastavení
Port WAN
Pre prístup na
internet
Zapnúť/vypnúť
napájanie
* Zariadenia pripojené smerovačom k sie Wi-Fi môžu zdieľať súbory z disku USB alebo
prenosného pevného disku vloženého do portu USB smerovača.
Stav indikátora LED
Neprerušovaná zelená Správna činnosť.
Neprerušovaná modrá Odpojené pripojenie na internet.
Blikanie namodro Zapnutý prístup jedným tlačidlom.
52
Page 57

Zapojenie
IPC
ACCESS
IPC
ACCESS
IPC
ACCESS
1. Pomocou sieťového kábla pripojte port WAN k internetu.
Modem ADSL/opcký modem/opcká
sieťová jednotka/káblový modem
ALEBO
Sieťový port
2. Pomocou sieťového adaptéra pripojte smerovač k sieťovej zásuvke a počkajte
90 sekúnd.
Sieťová zásuvka
Sieťový adaptér
Kongurovanie
Parametre môžete kongurovať prostredníctvom počítača alebo mobilného telefónu.
Uvádzame príklad kongurácie prostredníctvom počítača.
3. Pomocou sieťového kábla pripojte port LAN k počítaču. Počítač automacky
získa adresu IP smerovača.
4. Otvorte webový prehliadač (odporúča sa Internet Explorer 8.0 alebo vyššia
verzia) a zadajte 192.168.7.1 alebo wi.ezvizlife.com. Stlačením klávesu
Enter prejdite na stránku kongurácie.
5. Nastavte parametre ako heslo smerovača, názov siete Wi-Fi a heslo atď.
Môžete ež pripojiť svoj mobilný telefón k sie Wi-Fi smerovača, otvoriť prehliadač v
mobilnom telefóne a postupovať podľa krokov 4 a 5.
Pripojenie k sie Wi-Fi
A. Kamery aplikácie EZVIZ v sie Wi-Fi
6. Zapnite kameru. Počkajte 2 minúty alebo pokým kontrolka stavu kamery
nebude striedavo blikať namodro a načerveno.
53
Page 58

7. Stlačte tlačidlo PRÍSTUP K IP KAMERE/SYNCHRONIZÁCIA na 1 sekundu,
IPC
ACCESS
čím sa spus detekcia kamery (kamier). Po pripojení začne kontrolka stavu
kamery blikať namodro. Po 2 minútach opus smerovač režim prístupu
jedným tlačidlom.
B. Iné zariadenie v sie Wi-Fi
8. Nájdite sieť Wi-Fi na smerovači a pripojte sa k nej zadaním hesla siete Wi-Fi,
ktoré ste nastavili v kroku 5.
Pridanie do konta EZVIZ
9. Ak ste nový používateľ, sahnite si aplikáciu EZVIZ do telefónu Android
alebo iPhone. Zaregistrujte si konto EZVIZ. Ak ste existujúci používateľ,
otvorte aplikáciu EZVIZ a prihláste sa.
10. Pridajte kameru ťuknum na symbol (+) na obrazovke DOMOV a potom
naskenujte kód QR na kamere alebo zadajte jej sériové číslo.
11. Pridajte smerovač ťuknum na symbol (+) na obrazovke DOMOV a potom
naskenujte kód QR na smerovači alebo zadajte jeho sériové číslo.
12. Po pridaní do konta EZVIZ ťuknite na smerovač na domovskej obrazovke
aplikácie EZVIZ a overte si kameru (kamery) prepojené s kontom.
54
Page 59

Dodatok
Odporúčaná poloha smerovača
Najlepší výkon smerovača dosiahnete pri umiestnení znázornenom nižšie.
≥ 1,5 m
• Vzdialenosť medzi každou z antén by mala byť väčšia ako 6 cm.
• Umiestnite smerovač čo najďalej od domácich spotrebičov.
Ochrana siete Wi-Fi
Môžete ju zapnúť v ponuke Sengs > Advanced Sengs > Wi-Fi Guard
(Nastavenia > Rozšírené nastavenia > Ochrana siete Wi-Fi).
Zapnite ochranu siete Wi-Fi na zaistenie bezpečnos vašej siete Wi-Fi. Po
zapnu môžete pripájať zariadenia k sie Wi-Fi len do 2 minút po stlačení
tlačidla PRÍSTUP K IP KAMERE/SYNCHRONIZÁCIA.
Prístup jedným tlačidlom
• V prípade kamier EZVIZ postupujte podľa krokov 6 a 7.
• V prípade zariadení podporujúcich funkciu WPS:
1. Vyhľadajte sieť Wi-Fi, kliknite na tlačidlo WPS v rozhraní zariadenia
alebo stlačte tlačidlo WPS na jeho tele.
2. Stlačením tlačidla PRÍSTUP K IP KAMERE/SYNCHRONIZÁCIA na
smerovači na 1 sekundu sa pripojte k sie Wi-Fi.
55
Page 60

Informaţii de bază
Conţinutul cuei
Alimentator (x1) Ghid rapid de pornire (x1)
Conţinutul face obiectul unor produse reale.
Imagine generală a panoului din spate
Ruter (x1)
Versiunea A
Intrare alimentare
12 V 1A
IPC
ACCESS
Port WAN
Pentru acces
la internet
Buton Accesul cu o tastă/RESETARE
ţineţi apăsat pentru 1 secundă: Acvaţi
Accesul cu o tastă.
ţineţi apăsat pentru 6 secunde: Reveniţi
la Setările implicite.
Port LAN
Pentru computer sau alte
dispozive
56
Page 61

Versiunea B
Port LAN
Pentru computer
sau alte dispozive
Intrare alimentare
12 V 1,5A
*Port USB
Pentru disk USB sau HDD
mobil etc.
Buton Accesul cu o tastă/
RESETARE
ţineţi apăsat pentru 1 secundă:
Acvaţi Accesul cu o tastă
ţineţi apăsat pentru 6 secunde:
Reveniţi la Setările implicite
Port WAN
Pentru acces
la internet
Pornire/Oprire
* Dispozivele conectate la Wi-Fi de la router pot partaja şierele de pe discul USB
sau HDD-ul mobil introdus în portul USB al routerului.
Stare indicator LED
Verde connuu Funcţionează corect.
Albastru connuu Deconectat de la internet...
Albastru intermitent Accesul cu o tastă este acvat.
57
Page 62

Cablarea
IPC
ACCESS
IPC
ACCESS
IPC
ACCESS
1. Conectaţi portul WAN la Internet prin intermediul cablului de reţea.
Modem ADSL/Modem Opc/Unitate
de reţea opcă/Modem cu cablu
SAU
Port reţea
2. Conectaţi ruterul la priza de alimentare prin adaptorul de alimentare şi
aşteptaţi 90 de secunde.
Priză electrică
Adaptor de curent
Congurare
Puteţi congura parametrii prin intermediul computerului sau al telefonului mobil. Luăm
conguraţia computerului ca exemplu.
3. Conectaţi portul LAN şi calculatorul prin intermediul cablului de reţea.
Computerul va primi automat adresa IP a ruterului.
4. Deschideţi broswer-ul Internet (Internet Explorer 8.0 şi versiuni mai
recente) şi introduceţi 192.168.7.1 sau wi.ezvizlife.com. Apăsaţi Enter
pentru a accesa pagina de congurare.
5. Setaţi parametrii, cum ar parola ruterului, numele WiFi şi parola etc.
De asemenea, puteţi conecta telefonul mobil la WiFi de la router, deschideţi browserul
telefonului mobil şi urmaţi paşii 4 şi 5.
Conectarea la WiFi
A. Camera (camerele) EZVIZ Wi-Fi
6. Porniţi camera. Aşteptaţi până când indicatorul luminos de stare al camerei
clipeşte alternând culorile albastru şi roşu sau aşteptaţi 2 minute.
58
Page 63

7. Apăsaţi butonul ACCES IPC/SINCRONIZARE mp de o secundă pentru a
IPC
ACCESS
începe detectarea camerei(lor). După conectare, indicatorul de stare al
camerei va începe să clipească albastru. Ruterul va ieşi din Accesul cu o
tastă după 2 minute.
B. Alt dispoziv Wi-Fi
8. Găsiţi WiFi-ul de la router şi conectaţi-l prin introducerea parolei WiFi pe
care aţi setat-o în Pasul 5.
Adăugarea în contul EZVIZ
9. Pentru ulizatorii începători, descărcaţi aplicaţia EZVIZ pe telefonul dvs.
Android sau iPhone. Înregistraţi un cont pe EZVIZ. Pentru ulizatorii
existenţi, deschideţi aplicaţia EZVIZ şi conectaţi-vă.
10. Adăugaţi camera apăsând semnul (+) în ecranul Pornire, apoi scanaţi codul
QR de pe cameră sau tastaţi numărul de serie.
11. Adăugaţi routerul angând semnul (+) în ecranul Pornire, apoi scanaţi codul
QR de pe router sau introduceţi numărul său de serie.
12. Odată ce aţi fost adăugat la contul EZVIZ, angeţi ruterul din ecranul iniţial al
aplicaţiei EZVIZ pentru a verica camera(camerele) conectată(e) la acesta.
59
Page 64

Anexă
Poziţia recomandată a ruterului
Pentru cea mai bună performanţă a ruterului, puteţi plasa ruterul cum se indică
mai jos.
≥1,5 m
• Distanţa dintre ecare antenă trebuie să e mai mare de 6 cm.
• Păstraţi ruterul departe de aparatul de uz casnic cât mai mult posibil.
Protecţia Wi-Fi
Mergeţi la Sengs (Setări) > Advanced Sengs (Setări avansate) > Wi-Fi
Guard (Protecţie WiFi) pentru a o acva.
Acvaţi Protecţia WiFi pentru a vă asigura securitatea WiFi. După acvare,
puteţi conecta dispozivele la WiFi în decurs de 2 minute după ce apăsaţi
butonul ACCES IPC/SINCRONIZARE.
Accesul cu o tastă
• Pentru camerele EZVIZ, consultaţi Pasul 6 şi Pasul 7.
• Pentru dispozivele care acceptă funcţia WPS:
1. Căutaţi WiFi, faceţi clic sau apăsaţi pe butonul WPS din interfaţa
dispozivului sau din corpul dispozivului.
2. Apăsaţi butonul ACCES IPC/SINCRONIZARE de pe ruter mp de
1 secundă pentru a conecta reţeaua WiFi.
60
Page 65

Általános információ
A doboz tartalma
Hálóza adapter (1 db) Gyors használatba vételi útmutató (1 db)
A csomag tartalma a tényleges terméktől függ.
Hátsó panel
Útválasztó (1 db)
A változat
Tápbemenet
12 V / 1 A
WAN-port
Internetkapcsolat
IPC
ACCESS
Egygombos csatlakozás/
VISSZAÁLLÍTÁS gomb
1 másodpercen keresztül nyomva tartva:
Egygombos csatlakozás engedélyezése.
6 másodpercen keresztül nyomva tartva:
Alapértelmeze beállítások visszaállítása.
61
LAN-port
Számítógép vagy más eszköz
csatlakoztatásához
Page 66

B változat
LAN-port
Számítógép vagy más eszköz
csatlakoztatásához
Tápbemenet
12 V / 1,5 A
*USB-csatlakozó
USB-lemezmeghajtó, vagy mobil
HDD-meghajtó stb. számára.
Egygombos csatlakozás/
VISSZAÁLLÍTÁS gomb
1 másodpercen keresztül nyomva tartva:
Egygombos csatlakozás engedélyezése
6 másodpercen keresztül nyomva tartva:
Alapértelmeze beállítások visszaállítása
WAN-port
Internetkapcsolat
Tápellátás be/ki
* Az útválasztó USB-portjához csatlakoztato USB-lemezmeghajtón vagy mobil
HDD-meghajtón tárolt fájlok megoszthatók az útválasztó által biztosíto wi-hálózatra
csatlakozó eszközökkel.
A LED kijelző állapota
Folyamatos zöld Megfelelő működés.
Folyamatos kék Nincs internetkapcsolat..
Villogó kék Az egygombos csatlakozás engedélyezve van.
62
Page 67

Kábelek
IPC
ACCESS
IPC
ACCESS
IPC
ACCESS
1. Egy hálóza kábelen keresztül csatlakoztassa a WAN-portot az internethez.
ADSL-modem/opkai modem/
opkai hálóza egység/kábelmodem
VAGY
Hálóza port
2. Csatlakoztassa az útválasztót a tápfeszültséghez a hálóza adapteren
keresztül, majd várjon 90 másodpercet.
Konnektor
Hálóza adapter
Beállítás
Az egyes paramétereket számítógépen keresztül vagy mobiltelefonon állíthatja be. A
példában a számítógépen keresztüli beállítás szerepel.
3. Egy hálóza kábelen keresztül csatlakoztassa a LAN-portot a számítógéphez.
Az útválasztó automakusan ad IP-címet a számítógépnek.
4. Nyissa ki az internetböngészőt (Internet Explorer 8.0 vagy újabb használata
javasolt), és írja be a 192.168.7.1 vagy wi.ezvizlife.com címet. Nyomja
meg az Enter billentyűt a beállító oldal megnyitásához.
5. Állítsa be a paramétereket, például az útválasztó jelszavát, a wi-nevet és
jelszót stb.
Mobiltelefonját is csatlakoztathatja az útválasztó wi-hálózatára. Nyissa meg a böngészőt
a mobiltelefonon, majd kövesse a 4 és 5. lépéseket.
Wi csatlakoztatása
A. EZVIZ wi kamera(-ák)
6. Kapcsolja be a kamerát. Várja meg, amíg a kamera állapotjelző fénye kékpiros váltakozó színnel villog, vagy várjon 2 percet.
63
Page 68

7. Tartsa nyomva az IPC-HOZZÁFÉRÉS/SZINKRONIZÁLÁS gombot 1 másodpere
IPC
ACCESS
a kamera(-ák) keresésének megkezdéséhez. A csatlakozást követően a
kamera állapotjelző fénye kéken kezd villogni. Az útválasztó 2 perc elteltével
kilép az egygombos csatlakozás módból.
B. Egyéb wi-eszköz
8. Keresse meg az útválasztó wi-hálózatát, majd csatlakozzon az 5. lépésnél
beállíto wi-jelszó megadásával.
Felvétel az EZVIZ-ókba
9. A rendszert először használó felhasználók töltsék le az EZVIZ alkalmazást
Android vagy iPhone telefonjukra. Regisztráljon egy EZVIZ-ókot. A meglévő
felhasználók nyissák meg az EZVIZ alkalmazást, majd jelentkezzenek be.
10. A kamera felvételéhez érintse meg a Kezdőképernyőn található (+) jelet,
majd olvassa be a kamerán található QR-kódot, vagy írja be a kamera
sorozatszámát.
11. Az útválasztó felvételéhez érintse meg a Kezdőképernyőn található (+) jelet,
majd olvassa be az útválasztón található QR-kódot, vagy írja be az útválasztó
sorozatszámát.
12. Az EZVIZ-ókba történő felvételt követően az EZVIZ alkalmazás Kezdőképernyőjén
az útválasztót megérintve ellenőrizze a kamera kapcsolódását.
64
Page 69

Függelék
Az útválasztó javasolt elhelyezése
A legopmálisabb teljesítmény érdekében az alábbi módon helyezze el az
útválasztót.
≥1,5 m
• Az egyes antennák közö távolságnak 6 cm-nél nagyobbnak kell lennie.
• Tartsa az útválasztót a háztartási készülékektől a lehető legtávolabb.
Wi-védelem
A funkció bekapcsolásához nyissa meg a Sengs (Beállítások) >
Advanced Sengs (Speciális beállítások) > Wi-Fi Guard (Wi-védelem)
elemet.
A wi-kapcsolat biztonságának garantálásához kapcsolja be a Wi-védelem
funkciót. A funkció bekapcsolása után az eszközöket csak a IPC-HOZZÁFÉRÉS/
SZINKRONIZÁLÁS gomb megnyomását követő 2 percen belül lehet csatlakoztatni.
Egygombos csatlakozás
• EZVIZ kamerák esetén lásd a 6 és 7. lépést.
• WPS funkciót támogató eszközök esetén:
1. Keresse meg a wi-hálózatot, az eszköz kezelőfelületén kantson a
WPS elemre, vagy nyomja meg a WPS gombot az eszközön.
2. A wi csatlakoztatásához nyomja meg az útválasztón található
IPC-HOZZÁFÉRÉS/SZINKRONIZÁLÁS gombot.
65
Page 70

Informação básica
Conteúdo da Caixa
Adaptador de alimentação (x 1) Guia de Início Rápido (x 1)
O conteúdo está sujeito ao produto real.
Visualização do painel traseiro
Router (x 1)
Versão A
ACCESS
IPC
Porta WAN
Para acesso à Internet
Entrada de alimentação
12 V 1 A
Acesso com um só botão/botão REINICIALIZAÇÃO
Manter premido durante 1 s: Ativa o Acesso com um
só botão.
Manter premido durante 6 s: Repõe as predefinições.
Porta LAN
Para computador ou outro dispositivo
66
Page 71

Versão B
Porta LAN
Para computador
ou outro dispositivo
Entrada de alimentação
12 V 1,5 A
*Porta USB
Para disco USB ou HDD móvel, etc.
Acesso com um só botão/botão
REINICIALIZAÇÃO
Manter premido durante 1 s: Ativar o
Acesso com um só botão
Manter premido durante 6 s: Repõe as
predefinições
Porta WAN
Para acesso à
Internet
Ligar/desligar
* Os dispositivos ligados à rede Wi-Fi do router podem partilhar ficheiros no disco USB ou no HDD móvel que está inserido na
porta USB do router.
Estado do Indicador LED
Verde fixo A funcionar corretamente.
Azul fixo Internet desligada.
Azul intermitente O acesso com uma tecla está ativado.
67
Page 72

Cablagem
IPC
ACCESS
IPC
ACCESS
IPC
ACCESS
1. Ligue a porta WAN à Internet através do cabo de rede.
Modem ADSL/Modem ótico/Unidade de
rede ótica/Modem de cabo
OU
Porta de rede
2. Ligue o seu router à tomada através do adaptador de alimentação e aguarde 90 segundos.
Tomada Elétrica
Adaptador de Energia
Configurar
Pode configurar os parâmetros através do computador ou do telemóvel. O exemplo apresentado refere-seà
configuração por computador.
3. Ligue a porta LAN ao computador através do cabo de rede. O computador irá obter automaticamente o
endereço de IP do router.
4. Abra o browser de Internet (recomenda-se o Internet Explorer 8.0 e superior) e escreva 192.168.7.1 ou
wifi.ezvizlife.com. Prima na tecla Enter para aceder à página de configuração.
5. Defina os parâmetros tais como a palavra-passe do router, o nome e a palavra-passe da rede Wi-Fi, etc.
Pode também ligar o seu telemóvel à rede Wi-Fi do router, abra o browser no telemóvel e siga os Passos 4 e 5.
Ligação à rede Wi-Fi
A. Câmara(s) Wi-Fi EZVIZ
6. Ligue a câmara. Aguarde que a luz de estado da câmara fique intermitente a azul e vermelho ou aguarde
2 minutos.
68
Page 73

7. Prima o botão ACESSO/SINC IPC durante 1 segundo para começar a detetar a(s) sua(s) câmara(s).
IPC
ACCESS
Assim que ligado, a luz de estado da câmara irá ficar azul intermitente. O router irá sair do Acesso com
uma só botão após 2 minutos.
B. Outro dispositivo Wi-Fi
8. Localize a rede Wi-Fi do router e ligue-se à mesma introduzindo a palavra-passe da rede Wi-Fi que
definiu no Passo 5.
Adicionar uma conta EZVIZ
9. Para a primeira utilização, transfira a Aplicação EZVIZ para o seu telefone Android ou iPhone. Crie uma
conta EZVIZ. Para utilizadores existentes, abra a Aplicação EZVIZ e inicie sessão.
10. Adicione a câmara tocando no sinal (+) no ecrã de INÍCIO e faça a leitura do código QR na
câmara ou insira o número de série da mesma.
11. Adicione o router tocando no sinal (+) no ecrã de INÍCIO e faça a leitura do código QR no router ou insira
o número de série da mesma.
12. Assim que adicionado à conta EZVIZ, toque no router no ecrã de Início da Aplicação EZVIZ para validar
a(s) câmara(s) ligadas à conta.
69
Page 74

Anexo
Posição recomendada do router
Para obter o melhor desempenho do router, pode colocá-lo conforme demonstrado abaixo.
≥1,5 m
• A distância entre cada antena deve ser superior a 6 cm.
• Mantenha o router o mais afastado possível de aparelhos domésticos.
Wi-Fi Guard
Vá a Settings (Definições) > Advanced Settings (Definições Avançadas) > Wi-Fi Guard para ativar.
Ative o Wi-Fi Guard para garantir a segurança da sua rede Wi-Fi. Assim que ativado, apenas poderá ligar
dispositivos à rede Wi-Fi 2 minutos após premir o botão ACESSO/SINC IPC.
Acesso com um só botão
• Para câmaras EZVIZ, consulte os Passos 6 e 7.
• Para dispositivos que suportam a função WPS:
1. Localize a rede Wi-Fi, clique no botão WPS na interface do dispositivo ou no corpo do dispositivo.
2. Prima o botão ACESSO/SINC IPC no router durante 1 segundo para ligar à rede Wi-Fi.
70
Page 75

Grunnleggende informasjon
Innhold i pakken
Strømadapter (x1) Hurtigstartveiledning (x1)
Innholdet kan variere, avhengig av det faktiske produktet.
Bakpanel
Ruter (x1)
Versjon A
Strøminngang
12 V 1 A
WAN-port
For internettforbindelse
IPC
ACCESS
Engangsknapp-tilgang / TILBAKESTILL-knapp
Hold inne i 1 sekund: Aktiver One Key(engangsknapp)tilgang.
Hold inne i 6 sekunder: Tilbakestill til
standardinnstillingene.
LAN-port
For datamaskin eller annen enhet
71
Page 76

Versjon B
LAN-port
For datamaskin
eller annen enhet
Strøminngang
12 V 1,5 A
*USB-port
For USB-disk, mobil harddisk e.l.
Engangsknapp-tilgang / TILBAKESTILL-knapp
Hold inne i 1 sekund: Aktiver Engangsknapp-tilgang
Hold inne i 6 sekunder: Tilbakestill til
standardinnstillingene
WAN-port
For internettforbindelse
Skru av/på
* Enheter som er tilkoblet Wi-Fi via ruteren, kan dele filene i USB-disken eller den mobile harddisken som er satt inn i USB-
porten på ruteren.
Status, LED-indikator
Lyser grønt Fungerer som det skal.
Lyser blått Ikke tilkoblet Internett.
Blinker blått Engangsknapp-tilgang er aktivert.
72
Page 77

Tilkobling
IPC
ACCESS
IPC
ACCESS
IPC
ACCESS
1. Koble WAN-porten til Internett med en nettverkskabel.
ADSL-modem / optisk modem / optisk
nettverksenhet / kabelmodem
ELLER
Nettverksport
2. Koble ruteren til stikkontakten via strømadapteren, og vent i 90 sekunder.
Stikkontakt
Strømadapter
Konfigurering
Du kan konfigurere parametrene med en datamaskin eller mobiltelefon. Vi bruker konfigurasjon med datamaskin som
eksempel.
3. Koble datamaskinen til LAN-porten med en nettverkskabel. Datamaskinen henter automatisk ruterens
IP-adressen.
4. Åpne nettleseren (vi anbefaler å bruke Internet Explorer 8.0 eller nyere) og skriv inn 192.168.7.1 eller
wifi.ezvizlife.com. Trykk på Enter for å gå til konfigurasjonssiden.
5. Angi parametrene, f.eks. ruterens passord, Wi-Fi-nettverkets navn og passord, osv.
Du kan også koble mobiltelefonen til Wi-Fi via ruteren. Åpne nettleseren på mobiltelefonen og følg trinn 4 og 5.
Koble til Wi-Fi
A. EZVIZ Wi-Fi-kamera(er)
6. Skru på kameraet. Vent til kameraets statuslys blinker rødt og blått, og vent i to minutter.
73
Page 78

7. Hold inne knappen IPC TILGANG/SYNKRONISERING i ett sekund for å starte registrering av kameraet/
IPC
ACCESS
kameraene. Etter tilkobling begynner kameraets statuslys å blinke blått. Ruteren avslutter One
Key(engangsknapp)-tilgang etter 2 minutter.
B. Annen Wi-Fi-enhet
8. Finn Wi-Fi-nettverket via ruteren og koble til ved å oppgi Wi-Fi-passordet som du konfigurerte i trinn 5.
Legge til EZVIZ-konto
9. Førstegangsbrukere må laste ned EZVIZ-appen på sin Android-telefon eller iPhone. Registrer en
EZVIZ-konto. Eksisterende brukere trenger bare å åpne EZVIZ-appen og logge inn.
10. Legg til kameraet ved å trykke på (+) på HOME-skjermen (Start-skjermen), og skann så QR-koden på
kameraet eller skriv inn serienummeret.
11. Legg til ruteren ved å trykke på (+) på HOME-skjermen (Start-skjermen), og skann så QR-koden på
ruteren eller skriv inn serienummeret.
12. Når du har lagt til på EZVIZ-kontoen, trykker du på ruteren på startskjermen i EZVIZ-appen for å bekrefte
de tilknyttede kameraene.
74
Page 79

Appendiks
Anbefalt plassering av ruteren
Plasser ruteren som vist nedenfor, for å få best mulig ytelse.
≥ 1,5 m
• Avstanden mellom hver antenne må være større enn 6 cm.
• Hold ruteren så langt unna husholdningsapparater som mulig.
Wi-Fi Guard
Gå til Settings > Advanced Settings > Wi-Fi Guard (Innstillinger > Avanserte innstillinger > Wi-Fi
Guard) for å aktivere dette.
Aktiver Wi-Fi Guard for tryggere bruk av Wi-Fi. Når dette er aktivert, kan du kun koble enheter til Wi-Fi innen
2 minutter etter at du trykker på knappen IP TILGANG/SYNKRONISERING.
One Key-tilgang
• For EZVIZ-kameraer: les trinn 6 og 7.
• For enheter som støtter WPS-funksjonalitet:
1. Søk etter Wi-Fi-nettverket, og klikk på WPS-knappen i enhetens menygrensesnitt eller trykk på
knappen på den fysiske enheten.
2. Trykk på IP TILGANG/SYNKRONISERING på ruteren i 1 sekund for å koble til Wi-Fi.
75
Page 80

Grundläggande information
Förpackningens innehåll
Strömadapter (x 1) Snabbstartsguide (x 1)
Innehållet kan variera beroende på aktuell produkt.
Översikt baksida
Router (x1)
Version A
Strömförsörjning
12 V 1 A
WAN-port
För internetuppkoppling
IPC
ACCESS
Knapp för One Key Access (WPS)/
ÅTERSTÄLLNING
Håll in 1 sek: Aktivera One Key Access (WPS).
Håll in 6 sek: Återställ till standardinställningar.
LAN-port
För dator eller annan enhet
76
Page 81

Version B
LAN-port
För dator eller
annan enhet
Strömförsörjning
12 V 1,5 A
*USB-port
För USB-minne eller extern
hårddisk, etc.
Knapp för One Key Access (WPS)/ÅTERSTÄLLNING
Håll in 1 sek: Aktivera One Key Access (WPS)
Håll in 6 sek: Återställ till standardinställningar.
Ström av/på
WAN-port
För internetuppkoppling
* Enheter anslutna till routerns Wi-Fi-nätverk kan dela filer på USB-minne eller extern hårddisk som anslutits till routerns
USB-port.
LED-indikeringens status
Fast grönt Fungerar korrekt.
Fast blått Internet frånkopplat.
Blinkar blått One Key Access (WPS) aktiverad.
77
Page 82

Inkoppling
IPC
ACCESS
IPC
ACCESS
IPC
ACCESS
1. Anslut WAN-porten till internet med nätverkskabeln.
ADSL-modem/optiskt modem/optisk
nätverksenhet/kabelmodem
eller
Nätverksport
2. Anslut routern till eluttaget med strömadaptern och vänta i 90 sekunder.
Eluttag
Strömadapter
Konfigurering
Du kan konfigurera parametrarna via datorn eller mobiltelefonen. Vi visar konfiguration via datorn som ett exempel.
3. Anslut datorn till LAN-porten med nätverkskabeln. Datorn kommer automatiskt att få en
IP-adress av routern.
4. Öppna webbläsaren (Internet Explorer 8.0 och senare rekommenderas) och skriv in 192.168.7.1 eller wifi.
ezvizlife.com. Tryck på Enter för att gå till konfigurationssidan.
5. Ställ in parametrarna routerlösenord, Wi-Fi-nätverksnamn och lösenord, etc.
Du kan också ansluta din mobiltelefon till routerns Wi-Fi-nätverk, öppna mobiltelefonens webbläsare och följa steg 4 och
steg 5.
Anslutning till Wi-Fi-nätverk
A. EZVIZ Wi-Fi-kamera
6. Slå på kameran. Vänta tills kamerans statuslampa blinkar blått och rött eller vänta i 2 minuter.
78
Page 83

7. Tryck på knappen IPC TILLGÅNG/SYNK i 1 sekund för att börja söka efter och upptäcka kameran.
IPC
ACCESS
Kamerans statuslampa blinkar blått när den är ansluten. Routern avslutar One Key Access (WPS) efter
2 minuter.
B. Annan Wi-Fi-enhet
8. Sök efter routerns Wi-Fi-nätverk och anslut genom att ange Wi-Fi-lösenordet som du har angett i steg 5.
Lägg till på EZVIZ-konto
9. För nya användare, ladda ner EZVIZ-appen till din Android-telefon eller iPhone. Registrera ett EZVIZkonto. För befintliga användare, öppna EZVIZ-appen och logga in.
10. Lägg till kameran genom att trycka på (+)-tecknet på HEM-skärmen. Skanna sedan QR-koden på
kameran eller skriv in serienumret.
11. Lägg till routern genom att trycka på (+)-tecknet på HEM-skärmen och skanna QR-koden på routern
eller skriv in serienumret.
12. När denna har lagts till på EZVIZ-kontot trycker du på routern på EZVIZ-appens Home (Hem)-skärm för
att verifiera den eller de kameror som är anslutna.
79
Page 84

Bilaga
Rekommenderad placering av routern
För att få bästa prestanda bör du placera routern enligt nedan.
≥ 1,5 m
• Avståndet mellan varje antenn bör vara större än 6 cm.
• Placera routern så långt som möjligt från hushållsapparater.
Wi-Fi Guard (Skydd för Wi-Fi-nätverket)
Gå till ”Settings > Advanced Settings > Wi-Fi Guard” (Inställningar > Avancerade inställningar >
Wi-Fi Guard) för att aktivera funktionen.
Aktivera Wi-Fi Guard för att säkerställa säkerheten i ditt Wi-Fi-nätverk. När funktionen har aktiverats kan
enheter endast anslutas till Wi-Fi-nätverket inom 2 minuter efter att du tryckt på knappen IPC TILLGÅNG/
SYNK.
One Key Access (WPS)
• För EZVIZ-kameror, se steg 6 och steg 7.
• För enheter med stöd för WPS-funktion:
1. Sök efter Wi-Fi-nätverket, klicka eller tryck på enhetens WPS-knapp.
2. Tryck på knappen IPC TILLGÅNG/SYNK på routern i 1 sekund för att ansluta enheten till
Wi-Fi-nätverket.
80
Page 85

Basisoplysninger
Kassens indhold
Strømadapter (x1) Startvejledning (x1)
Pakkens indhold afhænger af det faktiske produkt.
Oversigt over bagpanelet
Router (x 1)
Version A
Strømstik
12 V 1 A
IPC
ACCESS
WAN-port
Til internetadgang
Knappen Adgang med én knap/NULSTIL
Hold nede i 1 sek.: Aktiverer Adgang med én knap.
Hold nede i 6 sek.: Gendanner standardindstillinger.
81
LAN-port
Til computer eller en anden enhed
Page 86

Version B
LAN-port
Til computer eller
en anden enhed
Strømstik
12 V 1,5 A
*USB-port
Til USB-disk eller ekstern harddisk osv.
Knappen Adgang med én knap/NULSTIL
Hold nede i 1 sek.: Aktiverer Adgang med
én knap
Hold nede i 6 sek.: Gendanner
standardindstillinger
WAN-port
Til internetadgang
Tænd/sluk
* Enheder, der er sluttet til wi-fi-netværket fra routeren, kan dele filer på USB-disken eller en ekstern harddisk, der er sat i
USB-porten på routeren.
LED-statusindikator
Lyser konstant grønt Fungerer korrekt.
Lyser konstant blåt Internetforbindelse afbrudt.
Blinker blåt Adgang med én knap.
82
Page 87

Ledningssystem
IPC
ACCESS
IPC
ACCESS
IPC
ACCESS
1. Slut WAN-porten til internettet via et netværkskabel.
ADSL-modem/optisk modem/optisk
netværksenhed/kabelmodem
ELLER
Netværksport
2. Slut routeren til stikkontakten via strømadapteren, og vent i 90 sekunder.
Stikkontakt
Strømadapter
Konfiguration
Du kan konfigurere parametrene via computeren eller mobiltelefonen. Her bruger vi konfigurationen med computer som
eksempel.
3. Forbind LAN-porten og computeren via et netværkskabel. Computeren henter IP-adressen for routeren
automatisk.
4. Åbn internetbrowseren (Internet Explorer 8.0 og højere anbefales), og indtast 192.168.7.1 eller wifi.
ezvizlife.com. Tryk på Enter for at gå til konfigurationssiden.
5. Indstil parametrene, fx adgangskode til router, navn og adgangskode til wi-fi-netværk osv.
Du kan også slutte mobiltelefonen til wi-fi-netværket fra routeren. Åbn browseren på mobiltelefonen, og følg trin 4 og 5.
Tilslutning til wi-fi-netværk
A. EZVIZ-wi-fi-kamera(er)
6. Tænd for kameraet. Vent, indtil statuslyset for kameraet blinker blåt og rødt skiftevis, eller vent i 2 min.
83
Page 88

7. Tryk på og hold knappen IPC-ADGANG/-SYNKRONISERING nede i 1 sekund for at starte med at
IPC
ACCESS
registrere dine kameraer. Når et kamera er tilsluttet, blinker statuslyset for kameraet blåt. Routeren
afslutter Adgang med én knap efter 2 min.
B. Anden wi-fi-enhed
8. Find wi-fi-netværket fra routeren, og opret forbindelse til wi-fi-netværket ved at indtaste den
adgangskode til wi-fi-netværk, som du har indstillet i trin 5.
Tilføjelse til EZVIZ-konto
9. Hvis du bruger EZVIZ for første gang, skal du hente appen EZVIZ til din Android-telefon eller iPhone. Opret
en EZVIZ-konto. Hvis du allerede er bruger, skal du åbne appen EZVIZ og logge ind.
10. Tilføj kameraet ved at trykke på tegnet (+) på skærmen START, og scan derefter QR-koden på kameraet.
Du kan også indtaste kameraets serienummer.
11. Tilføj routeren ved at trykke på tegnet (+) på skærmen START, og scan derefter QR-koden på routeren.
Du kan også indtaste routerens serienummer.
12. Når den er føjet til EZVIZ-kontoen, skal du trykke på routeren på startsiden i appen EZVIZ for at bekræfte,
at kameraet er tilknyttet.
84
Page 89

Bilag
Anbefalet position for routeren
For at opnå bedste routerydelse skal du anbringe routeren som beskrevet herunder.
≥ 1,5 m
• Afstanden mellem hver antenne skal være større end 6 cm.
• Hold routeren så langt væk som muligt fra husholdningsapparater.
Wi-Fi Guard (Wi-fi-beskyttelse)
Gå ind i Settings > Advanced Settings > Wi-Fi Guard (Indstillinger > Avancerede indstillinger > Wifi-beskyttelse) for at aktivere funktionen.
Aktivér Wi-Fi Guard (Wi-fi-beskyttelse) for at sikre dit wi-fi-netværk. Når funktionen er aktiveret, kan du
kun slutte enheder til wi-fi-netværket inden for 2 min., når du har trykket på knappen IPC-ADGANG/-
SYNKRONISERING.
Adgang med én knap
• For EZVIZ-kameraer skal du henvise til trin 6 og 7.
• For enhederne, der understøtter funktionen WPS:
1. Søg efter wi-fi-netværket, klik eller tryk på knappen WPS på enhedens grænseflade eller enhedens
hus.
2. Tryk på og hold knappen IPC-ADGANG/-SYNKRONISERING nede i 1 sekund for at oprette
forbindelse til wi-fi-netværket.
85
Page 90

Perustiedot
Pakkauksen sisältö
Sisältö riippuu varsinaisesta tuotteesta.
Takapaneelin yleiskatsaus
Reititin (x1)
Verkkolaite (x1) Pika-aloitusopas (x1)
Versio A
Virtaliitäntä
12 V, 1 A
ACCESS
IPC
WAN-portti
Internet-yhteyttä
varten
Yhden näppäimen yhdistäminen /
NOLLAUS-painike
1 s:n painallus: ota yhden näppäimen
yhdistäminen käyttöön.
6 s:n painallus: palauta oletusasetukset.
LAN-portti
Tietokonetta tai muuta laitetta varten
86
Page 91

Versio B
LAN-portti
Tietokonetta tai muuta
laitetta varten
Virtaliitäntä
12 V, 1,5 A
*USB-portti
USB-levylle, kannettavalle
kiintolevylle jne.
Yhden näppäimen yhdistäminen /
NOLLAUS-painike
1 s:n painallus: ota yhden näppäimen
yhdistäminen käyttöön
6 s:n painallus: palauta
oletusasetukset
WAN-portti
Internet-yhteyttä varten
Virtanäppäin
* Reitittimen kautta Wi-Fi-verkkoon liitetyt laitteet voivat jakaa reitittimen USB-porttiin liitetyn USB-levyn tai kannettavan
kiintolevyn sisältämiä tiedostoja.
LED-merkkivalon tilat
Tasainen vihreä Toimii oikein.
Tasainen sininen Internet-yhteys katkennut.
Vilkkuva sininen Yhden näppäimen yhdistäminen on käytössä.
87
Page 92

Liitännät
IPC
ACCESS
IPC
ACCESS
IPC
ACCESS
1. Yhdistä WAN-portti Internetiin verkkokaapelilla.
ADSL-modeemi / optinen modeemi /
optinen verkkolaite / kaapelimodeemi
TAI
Verkkoportti
2. Yhdistä reititin verkkolaitteen kautta pistorasiaan ja odota 90 sekuntia.
Virtaliitäntä
Verkkolaite
Määrittäminen
Voit määrittää parametrit tietokoneella tai matkapuhelimella. Esimerkissä määrittäminen tehdään tietokoneella.
3. Yhdistä LAN-portti ja tietokone verkkokaapelilla. Tietokone saa IP-osoitteen reitittimeltä automaattisesti.
4. Avaa verkkoselain (Internet Explorer 8.0 tai sitä uudempi on suositeltava) ja kirjoita osoiteriville
192.168.7.1 tai wifi.ezvizlife.com. Siirry määrityssivulle painamalla Enter-näppäintä.
5. Määritä parametrit, kuten reitittimen salasana, Wi-Fi-nimi ja salasana.
Voit myös yhdistää matkapuhelimesi reitittimen Wi-Fi-verkkoon, avata matkapuhelimen selaimen ja noudattaa vaiheiden 4
ja 5 ohjeita.
Wi-Fi-verkkoon yhdistäminen
A. EZVIZ Wi-Fi -kamera(t)
6. Kytke kameraan virta. Odota, kunnes kameran tilan merkkivalo vilkkuu vuorotellen sinisenä ja
punaisena, tai odota 2 minuuttia.
88
Page 93

7. Paina IPC-YHTEYS/SYNKRONOINTI-painiketta 1 sekunnin ajan, jolloin kameroiden tunnistus käynnistyy.
IPC
ACCESS
Kun yhteys on muodostettu, kameran tilan merkkivalo alkaa vilkkua sinisenä. Reititin poistuu yhden
näppäimen yhdistämistilasta 2 minuutin jälkeen.
B. Muu Wi-Fi-laite
8. Etsi reitittimen Wi-Fi-verkko ja muodosta siihen yhteys antamalla vaiheessa 5 määrittämäsi
Wi-Fi-salasana.
EZVIZ-tilin lisääminen
9. Jos käytät tuotteita ensimmäistä kertaa, lataa EZVIZ-sovellus Android- tai iPhone-puhelimeesi.
Rekisteröi EZVIZ-tili. Jos sinulla on jo tili, avaa EZVIZ-sovellus ja kirjaudu sisään.
10. Lisää kamera napauttamalla (+)-symbolia aloitusnäytössä ja skannaamalla kameran QR-koodi tai
kirjoittamalla sen sarjanumero.
11. Lisää reititin napauttamalla (+)-symbolia aloitusnäytössä ja skannaamalla reitittimen QR-koodi tai
kirjoittamalla sen sarjanumero.
12. Kun se on lisätty EZVIZ-tiliin, napauta reititintä EZVIZ-sovelluksen aloitusnäytössä vahvistaaksesi siihen
liitetyt kamerat.
89
Page 94

Liite
Suositeltu reitittimen sijainti
Reititin toimii parhaiten, kun sijoitat sen seuraavassa kuvattuun paikkaan.
≥1,5 m
• Kunkin antennin välisen etäisyyden tulisi olla yli 6 cm.
• Pidä reititin niin etäällä kodinkoneista kuin mahdollista.
Wi-Fi Guard
Ota se käyttöön valitsemalla Settings (asetukset) > Advanced Settings (lisäasetukset) > Wi-Fi Guard.
Varmista Wi-Fi-verkon turvallisuus ottamalla Wi-Fi Guard käyttöön. Kun se on käytössä, voit yhdistää
laitteita Wi-Fi-verkkoon vain 2 minuutin ajan IPC-YHTEYS/SYNKRONOINTI-painikkeen painamisen jälkeen.
Yhden näppäimen yhdistäminen
• Jos käytössä on EZVIZ-kamera, katso vaiheet 6 ja 7.
• Jos käytössä on WPS-toimintoa tukeva laite:
1. Etsi Wi-Fi-verkko, napsauta tai paina laitteen käyttöliittymässä tai rungossa olevaa
WPS-painiketta.
2. Yhdistä Wi-Fi-verkkoon painamalla reitittimen IPC-YHTEYS/SYNKRONOINTI-painiketta
1 sekunnin ajan.
90
Page 95

Thank you for purchasing EZVIZ products. This limited warranty gives you, the original purchaser of the EZVIZ product, specific legal rights. You may also have other legal
rights that vary by state, province or jurisdiction. The disclaimers, exclusions, and limitations of liability under this limited warranty will not apply to the extent prohibited
by applicable law. No distributor, reseller, agent, or employee is authorized to make any medication, extension, or addition to this limited warranty.
Your EZVIZ product is warranted for a period of two (2) years from the date of purchase against defects in materials and workmanship, or such longer period as may be
required by law in the country or state where this product is sold, when used normally in accordance with user manual.
You can request warranty service by emailing us at support.eu@ezvizlife.com.
For any defective EZVIZ products under warranty, HANGZHOU HIKVISION DIGITAL TECHNOLOGY CO., LTD. (“the Company”) will, at its option, (i) repair or replace your product
free of charge; (ii) exchange your product with a functional equivalent product; (iii) or refund the original purchase price, provided you provide the original purchase receipt
or copy, brief explanation of the defect, and return the product in its original packaging. At the sole discretion of the Company, repair or replacement may be made with
a new or refurbished product or components. This warranty does not cover the postal cost, insurance and any other incidental charges incurred by you in returning the
product.
Except where prohibited by applicable law, this is your sole and exclusive remedy for breach of this limited warranty. Any product that has either been repaired or replaced
under this limited warranty will be covered by the terms of this limited warranty for the longer of ninety (90) days from the date of delivery or the remaining original
warranty period.
This warranty does not apply and is void:
•If the warranty claim is made outside the warranty period or if the proof of purchase is not provided.
•For any malfunction, defect or failure caused by or resulting from the evidence of impact, mishandling ,tampering, use contrary to the applicable instruction manual,
incorrect power line voltage, accident, loss, theft, fire, flood or other Acts of God, shipping damage or damage resulting from repairs performed by unauthorized
personnel.
•For any consumable parts, such as batteries, where the malfunction is due to the normal aging of the product.
•Cosmetic damage, including but not limited to scratches, dents and broken plastic on ports.
•Any software, even if packaged or sold with EZVIZ hardware.
•For any other damages free from defects in material or workmanship.
•Routine cleaning, normal cosmetic and mechanical wear and tear.
Please do not hesitate to contact your seller, or send e-mails to us support.eu@ezvizlife.com, with any questions.
COPYRIGHT ©2018 HANGZHOU HIKVISION DIGITAL TECHNOLOGY CO., LTD. ALL RIGHTS RESERVED.
LIMITED WARRANTY
Vielen Dank für den Kauf eines EZVIZ-Produkts. Diese beschränkte Garantie gibt Ihnen, dem Erstkäufer des EZVIZ-Produkts, bestimmte gesetzliche Rechte. Je nach
Staat, Provinz oder Land können Ihnen weitere gesetzliche Rechte zustehen. Die Haftungsausschlüsse und -beschränkungen gemäß dieser beschränkten Garantie gelten
ausschließlich im gesetzlich zulässigen Umfang. Kein Händler, Wiederverkäufer, Vertreter oder Mitarbeiter ist befugt, Modifikationen, Erweiterungen oder Ergänzungen an
dieser beschränkten Garantie vorzunehmen.
Ihr EZVIZ-Produkt wird für einen Zeitraum von zwei (2) Jahren ab Kaufdatum gegen Material- und Verarbeitungsfehler oder für einen längeren Zeitraum garantiert, der in
dem Land, in dem dieses Produkt verkauft wird, gesetzlich vorgeschrieben ist, wenn es bestimmungsgemäß und gemäß der Bedienungsanleitung verwendet wird.
Garantieansprüche richten Sie bitte per E-Mail an support.eu@ezvizlife.com.
Im Fall eines defekten EZVIZ-Produkts mit gültiger Garantie wird HANGZHOU HIKVISION DIGITAL TECHNOLOGY CO., LTD. ("das Unternehmen") nach eigenem Ermessen (i)
Ihr Produkt kostenlos reparieren oder ersetzen, (ii) Ihr Produkt gegen ein funktionsfähiges vergleichbares Produkt austauschen oder (iii) den ursprünglichen Kaufpreis
unter der Voraussetzung erstatten, dass Sie das Produkt in dessen Originalverpackung unter Beigabe des Originalkaufbelegs oder einer Kopie davon sowie einer kurzen
Beschreibung des Defekts zurückschicken. Das Unternehmen wird nach alleinigem Ermessen Produkte oder Komponenten entweder reparieren oder gegen neue oder
generalüberholte Produkte oder Komponenten austauschen. Diese Garantie deckt keine Versand-, Versicherungs- oder sonstige Nebenkosten, die Ihnen durch die
Rücksendung des Produkts entstehen.
Soweit nicht durch geltendes Recht untersagt, ist dies Ihr einziges und ausschließliches Rechtsmittel im Fall einer Verletzung dieser beschränkten Garantie. Jedes
Produkt, das im Rahmen dieser beschränkten Garantie entweder repariert oder ausgetauscht wurde, wird für maximal neunzig (90) Tage ab Lieferdatum oder für die
Restlaufzeit der ursprünglichen Garantie von den Bestimmungen dieser beschränkten Garantie abgedeckt.
Diese Garantie gilt nicht und ist hinfällig:
•wenn der Garantieanspruch außerhalb der Garantiefrist oder ohne Vorlage des Kaufbelegs geltend gemacht wird.
•bei Fehlfunktionen, Defekten oder Fehlern, die durch Stoßeinwirkung, Fehlbedienung, Sabotage, Benutzung im Widerspruch zur entsprechenden Bedienungsanleitung,
falsche Spannungsversorgung, Unfall, Verlust, Diebstahl, Brand, Überschwemmung oder andere Naturkatastrophen, Versandschäden oder Beschädigungen infolge von
Reparaturen durch unbefugte Personen verursacht wurden oder darauf zurückzuführen sind.
•für Verbrauchsgüter wie Batterien, bei denen die Fehlfunktion auf normale Produktalterung zurückzuführen ist.
•kosmetische Schäden, einschließlich, aber nicht begrenzt auf Kratzer, Beulen und gebrochene Kunststoffteile an Anschlüssen.
•für jede Software, auch wenn diese zusammen mit der EZVIZ-Hardware verpackt und verkauft wurde.
•für sonstige Schäden, die keine Material- oder Verarbeitungsfehler sind.
•für routinemäßige Reinigungen sowie normalen kosmetischen und mechanischen Verschleiß.
Bei Fragen können Sie sich jederzeit an Ihren Verkäufer oder per E-Mail an support.eu@ezvizlife.com an uns wenden.
COPYRIGHT ©2018 HANGZHOU HIKVISION DIGITAL TECHNOLOGY CO., LTD. ALLE RECHTE VORBEHALTEN.
BESCHRÄNKTE GARANTIE
Page 96

Gracias por adquirir productos EZVIZ. Esta garantía limitada le concede a usted, el comprador original del producto EZVIZ, derechos legales específicos. Es posible
que tenga otros derechos legales en función de su estado, provincia o jurisdicción. Los avisos de exención de responsabilidad, las exclusiones y las limitaciones de
responsabilidad de esta garantía limitada no se aplicarán hasta el máximo prohibido por la legislación aplicable. Ningún distribuidor, revendedor, representante o empleado
tiene autorización para introducir alteraciones, ampliaciones o incorporaciones en virtud de esta garantía limitada.
Su producto EZVIZ dispone de un periodo de garantía de dos (2) años a partir de la fecha de compra por defectos de material y fabricación, o de un periodo más largo si así
lo exige la ley del país o el estado donde se vende el producto, en condiciones normales de uso según el manual del usuario.
Puede solicitar el servicio de garantía por correo electrónico en support.eu@ezvizlife.com.
Para cualquier producto de EZVIZ defectuoso en garantía, HANGZHOU HIKVISION DIGITAL TECHNOLOGY CO., LTD. ("la Empresa"), a su discreción, (I) reparará o sustituirá el
producto de forma gratuita; (II) cambiará su producto por un producto equivalente funcional; (III) o reembolsará el precio de compra original, siempre y cuando proporcione
el recibo de compra original o una copia, una breve descripción del defecto y devuelva el producto en su embalaje original. A la entera discreción de la Empresa, la
reparación o la sustitución pueden realizarse por un producto o componentes nuevos o reacondicionados. Esta garantía no cubre el coste postal de transporte, el seguro ni
ningún otro coste incidental en el que incurra durante la devolución del producto.
Excepto si lo prohíbe la legislación vigente, esta es la solución única y exclusiva en caso de incumplimiento de esta garantía limitada. Cualquier producto que se haya
reparado o sustituido en virtud de esta garantía limitada estará cubierto por los términos de la misma durante el periodo máximo de noventa (90) días a partir de la fecha
de entrega o el período de garantía original restante.
Esta garantía no se aplica y se considerará nula:
•Si la reclamación de garantía se realiza fuera del periodo de garantía o si no se proporciona la prueba de compra.
•En caso de funcionamiento incorrecto, defecto o avería causados por o como resultado de las pruebas de impacto, impericia, manipulación, uso contrario al manual de
instrucciones aplicable, voltaje incorrecto de la línea eléctrica, accidente, pérdida, robo, incendio, inundación u otros actos de fuerza mayor, daños en el envío o daños
ocasionados por reparaciones realizadas por personal no autorizado.
•En el caso de las piezas consumibles, como las baterías, si el funcionamiento incorrecto se debe al desgaste normal del producto.
•Daños cosméticos, incluidos, pero sin limitarse a, arañazos, abolladuras y plástico roto en puertos.
•Cualquier software, incluso si se ha incluido y vendido con el hardware de EZVIZ.
•En caso de otros daños libres de defectos en el material o la mano de obra.
•La limpieza rutinaria, cambios cosméticos y el desgaste mecánico natural.
Si tiene alguna pregunta, no dude en ponerse en contacto con su representante comercial, o bien envíenos un mensaje a support.eu@ezvizlife.com con la pregunta que
desee.
COPYRIGHT ©2018 HANGZHOU HIKVISION DIGITAL TECHNOLOGY CO., LTD. RESERVADOS TODOS LOS DERECHOS.
GARANTÍA LIMITADA
Merci d'avoir acheté nos produits EZVIZ. En tant qu'acheteur original de produit EZVIZ, cette garantie limitée vous accorde certains droits. Selon le pays, la région ou la
juridiction où vous résidez, il est possible que vous bénéficiiez d'autres droits. Les dénis de responsabilités, exclusions et limitations de responsabilité civile stipulés
dans cette garantie limitée s'appliquent uniquement dans les limites prévues par la loi. Aucun distributeur, revendeur, agent ou employé n'est autorisé à apporter de
modification, d'extension ou d'ajout à cette garantie.
Votre produit EZVIZ est garanti pour une période de deux (2) ans à compter de la date d'achat, contre les défauts de matériaux et de fabrication, ou tout autre délai plus
long prévu par la législation du pays ou de l'état où est vendu ce produit, à condition d'être utilisé de manière normale et conforme au manuel de l'utilisateur.
Pour faire valoir la garantie, écrivez-nous à l'adresse suivante: support.eu@ezvizlife.com.
Si un défaut est signalé sur un produit EZVIZ pendant la période de garantie, Hangzhou Hikvision Digital Technology Co., Ltd. (« la Société ») pourra, à sa discrétion, (i)
réparer ou remplacer votre produit gratuitement ; (ii) remplacer votre produit par un produit équivalent en état de marche ; (iii) rembourser le prix d'achat. Vous devrez
toutefois présenter la preuve d'achat et une brève explication du défaut constaté, et renvoyer le produit dans son emballage d'origine. La Société pourra réparer ou
remplacer le produit ou les composants par un produit ou des composants neufs ou remis en état. Cette garantie ne couvre pas les frais de port, l'assurance ni les
éventuels frais annexes de renvoi du produit.
Sauf si la législation en vigueur l'interdit, cette garantie est votre seul et unique recours. Tout produit réparé ou remplacé en vertu de la présente garantie limitée sera
couvert pendant une durée de quatre-vingt-dix (90) jours à compter de la date de livraison ou jusqu'à l'échéance de la période garantie originale.
Cette garantie ne s'applique pas et est considérée comme nulle dans les cas suivants :
•si l'utilisateur se prévaut de la garantie hors de la période de couverture ou s'il ne fournit pas de preuve d'achat.
•en cas de dysfonctionnement, de défaut ou de panne due ou induite par un choc, une mauvaise manipulation, un sabotage, une utilisation non conforme aux instructions
du manuel, une tension d'alimentation incorrecte, un accident, une perte, un vol, un incendie, une inondation ou toute autre catastrophe naturelle, un préjudice subi
pendant le transport ou résultant de réparations par un personnel non agréé ;
•consommables, tels que les batteries, où le dysfonctionnement est dû au vieillissement normal du produit ;
•dommages superficiels tels que, entre autres, les rayures, les bosses ou les pièces en plastique cassées ;
•logiciels, même fournis ou vendus avec le matériel EZVIZ ;
•préjudices autres que les défauts de pièces ou de main d'œuvre ;
•nettoyage de routine, vieillissement de l'aspect extérieur et usure mécanique normale.
Pour toute question, n'hésitez pas à contacter votre revendeur ou à nous écrire à l'adresse suivante: support.eu@ezvizlife.com.
COPYRIGHT ©2018 HANGZHOU HIKVISION DIGITAL TECHNOLOGY CO., LTD. TOUS DROITS RÉSERVÉS.
GARANTIE LIMITÉE
Page 97

Grazie per aver acquistato i prodotti EZVIZ. La presente garanzia limitata accorda all'acquirente originale del prodotto EZVIZ, specifici diritti legali. L'acquirente originale
potrebbe godere anche altri diritti legali che variano da stato, provincia o giurisdizione. Le declinazioni di responsabilità, le esclusioni e le limitazioni di responsabilità
ai sensi della presente garanzia limitata non si applicano ove espressamente vietate dalla legge applicabile. Nessun distributore, rivenditore, agente o dipendente è
autorizzato a fornire rimedi, estensioni o aggiunte alla presente garanzia limitata.
Questo prodotto EZVIZ è coperto da garanzia contro difetti di materiali e lavorazione per un periodo di due (2) anni a partire dalla data di acquisto o per un periodo più
lungo, ove richiesto dalla legge nel Paese o Stato in cui il prodotto è venduto, se usato normalmente attenendosi alle istruzioni contenute nel manuale dell’utente.
Il servizio di assistenza in garanzia può essere richiesto via email, all'indirizzo support.eu@ezvizlife.com.
Per eventuali prodotti EZVIZ difettosi in garanzia,HANGZHOU HIKVISION DIGITAL TECHNOLOGY CO., Ltd. ("la Società"), avrà facoltà a sua discrezione di, (i) riparare o
sostituire il prodotto a titolo gratuito; (ii) sostituire il vostro prodotto con un prodotto funzionalmente equivalente; (iii) o rimborsare il prezzo di acquisto originale, a fronte
dell'esibizione della ricevuta di acquisto originale o in copia, una breve spiegazione del difetto e il reso del prodotto nella sua confezione originale. A esclusiva discrezione
della Società, la riparazione o la sostituzione può avvenire con un prodotto o con dei componenti nuovi o ricondizionati. Questa garanzia non copre spese postali,
assicurazione ed eventuali altre spese accessorie sostenute dall'acquirente per la restituzione del prodotto.
Salvo laddove proibito dalla legge applicabile, ciò costituisce l'unico ed esclusivo rimedio per la violazione della presente garanzia limitata. Qualsiasi prodotto riparato o
sostituito ai sensi della presente garanzia limitata sarà coperto dai termini della presente garanzia limitata per il periodo di maggiore durata tra novanta (90) giorni dalla
data di consegna o il periodo di garanzia originale residuo.
Questa garanzia non si applica e risulterà nulla:
•Se la richiesta di applicazione della garanzia perviene al di fuori del periodo di garanzia o se la prova di acquisto non viene fornita.
•Per qualsiasi malfunzionamento, difetto o guasto causato da, o confermato da prove di evidenza di, avvenuto impatto, uso improprio, manomissione, uso contrario alle
istruzioni del relativo manuale, tensione di alimentazione errata, incidente, smarrimento, furto, incendio, inondazione o altre cause di forza maggiore, danni di spedizione
o danni causati da riparazioni eseguite da personale non autorizzato.
•Per eventuali componenti consumabili, quali batterie, dove il mal funzionamento è dovuto al normale invecchiamento del prodotto.
•Danni estetici, inclusi ma non limitati a graffi, ammaccature e rotture delle plastiche delle porte.
•Qualsiasi software, anche se confezionato o venduto con hardware EZVIZ.
•Per eventuali altri danni esenti da difetti nei materiali o nella lavorazione.
•Pulizia ordinaria e il normale deterioramento estetico e meccanico.
Non esitate a contattare il venditore, o a inviarci un e-mail a support.eu@ezvizlife.com, per qualsiasi domanda.
COPYRIGHT ©2018 HANGZHOU HIKVISION DIGITAL TECHNOLOGY CO., LTD. TUTTI I DIRITTI RISERVATI.
GARANZIA LIMITATA
Bedankt voor de aankoop van EZVIZ-producten. Met deze beperkte garantie worden u, de oorspronkelijke koper van het EZVIZ-product, specifieke juridische rechten
verleend. Mogelijk heeft u ook andere rechten die verschillen per staat, provincie of rechtsgebied. De vrijwaringen, uitsluitingen en beperkingen van aansprakelijkheid
in deze beperkte garantie zijn niet van toepassing voor zover dit is verboden door het toepasselijk recht. Geen enkele distributeur, wederverkoper, agent of werknemer is
gemachtigd om deze beperkte garantie aan te passen, te verlengen of uit te breiden.
Uw EZVIZ-product is gegarandeerd tegen materiaal- en fabricagefouten voor een periode van twee (2) jaar vanaf de aankoopdatum, of een langere periode die wettelijk
vereist is in het land of de staat waar dit product wordt verkocht, mits normaal gebruikt volgens de gebruikershandleiding.
U kunt garantieservice aanvragen door een e-mail te sturen naar support.eu@ezvizlife.com.
Voor defecte EZVIZ-producten die onder de garantie vallen, zal HANGZHOU HIKVISION DIGITAL TECHNOLOGY CO., LTD. (”het Bedrijf”) naar eigen inzicht (i) het product gratis
repareren of vervangen; (ii) het product omruilen voor een functioneel vergelijkbaar product; of (iii) de oorspronkelijke aankoopprijs restitueren nadat het oorspronkelijke
aankoopbewijs of een kopie hiervan en een korte uitleg van het defect is aangeleverd, en het product is geretourneerd in de oorspronkelijke verpakking. Naar eigen inzicht
van het Bedrijf zal de reparatie of vervanging plaatsvinden door nieuwe of gereviseerde producten of onderdelen te leveren. Deze garantie biedt geen dekking voor de
verzendkosten, verzekeringskosten en andere incidentele kosten die u hebt moeten betalen voor het retourneren van het product.
Tenzij dit verboden is door het toepasselijk recht, is dit uw enige en exclusieve middel voor het verbreken van deze beperkte garantie. Producten die zijn gerepareerd of
vervangen onder deze beperkte garantie, zijn gedekt onder de voorwaarden van deze beperkte garantie voor een periode van negentig (90) dagen) vanaf de datum van
levering of voor de resterende duur van de oorspronkelijke garantie, waarbij de langste van deze twee perioden wordt aangehouden.
Deze garantie is niet van toepassing en wordt ongeldig verklaard:
•Als de garantieclaim buiten de garantieperiode wordt gedaan of als het aankoopbewijs niet wordt aangeleverd.
•In het geval van onjuist functioneren, defecten of fouten die aantoonbaar het gevolg zijn van stoten, onjuist gebruik, manipulatie, gebruik dat niet in lijn is met de
instructies in de handleiding, een onjuiste voedingspanning, ongevallen, verlies, diefstal, brand, overstromingen of andere overmacht, verzendschade of schade die het
gevolg is van reparaties die zijn uitgevoerd door niet-geautoriseerd personeel.
•Voor verbruiksonderdelen, zoals batterijen, waarbij het onjuist functioneren het gevolg is van normale veroudering van het product.
•Bij cosmetische schade, inclusief, maar niet beperkt tot krassen, deuken en gebroken plastic op de poorten.
•Voor software, zelfs wanneer deze is meegeleverd of verkocht bij de EZVIZ-hardware.
•Voor andere schade dan materiaal- en fabricagedefecten.
•Voor vervuiling door normaal gebruik, en normale cosmetische en mechanische slijtage.
Neem voor vragen contact op met de verkopende partij, of neem contact met ons op via support.eu@ezvizlife.com.
COPYRIGHT ©2018 HANGZHOU HIKVISION DIGITAL TECHNOLOGY CO., LTD. ALLE RECHTEN VOORBEHOUDEN.
BEPERKTE GARANTIE
Page 98

Dziękujemy za zakup produktów EZVIZ. Niniejsza ograniczona gwarancja daje użytkownikowi, czyli oryginalnemu nabywcy produktu
EZVIZ, określone prawa. Użytkownikowi mogą też przysługiwać inne prawa, które zależą od danego państwa, obszaru terytorialnego
lub jurysdykcji. Zastrzeżenia, wyłączenia i ograniczenia odpowiedzialności wynikające z niniejszej ograniczonej gwarancji nie będą
miały zastosowania w zakresie zabronionym przez obowiązujące prawo. Żaden dystrybutor, sprzedawca, przedstawiciel ani pracownik
nie jest uprawniony do dokonywania jakichkolwiek zmian, rozszerzeń lub uzupełnień niniejszej ograniczonej gwarancji.
Gwarancja dotycząca produktu EZVIZ, obejmująca wady materiałów iwykonania, obowiązuje przez dwa (2) lata oddaty zakupu lub
dłuższy okres zależnie odprzepisów obowiązujących wkraju lub regionie, wktórym produkt jest sprzedawany, pod warunkiem, że
produkt jest użytkowany zgodnie zpodręcznikiem użytkownika.
Można wysłać do nas zgłoszenie gwarancyjne pocztą elektroniczną na adres support.eu@ezvizlife.com.
Dla wszelkich produktów EZVIZ objętych gwarancją, HANGZHOU HIKVISION DIGITAL TECHNOLOGY CO., LTD. („Firma”), według
własnego uznania, (i) bezpłatnie naprawi lub wymieni produkt; (ii) zamieni produkt na inny o porównywalnej funkcjonalności; (iii)
zwróci użytkownikowi pierwotną cenę zakupu pod warunkiem przedstawienia oryginału lub kopii dowodu zakupu, krótkiego opisu
usterki oraz zwrotu produktu w oryginalnym opakowaniu. Według wyłącznego uznania Firmy, naprawa lub wymiana może zostać
przeprowadzona z wykorzystaniem nowego lub regenerowanego produktu lub części. Niniejsza gwarancja nie obejmuje kosztu
przesyłki, ubezpieczenia i innych dodatkowych opłat poniesionych przez użytkownika w związku ze zwrotem produktu.
Z wyjątkiem przypadków zabronionych przez obowiązujące prawo, powyższe warunki stanowią jedyny i wyłączny środek rekompensaty
za naruszenie niniejszej ograniczonej gwarancji. Każdy produkt naprawiony lub wymieniony na podstawie niniejszej ograniczonej
gwarancji będzie objęty jej warunkami przez czas pozostały do wygaśnięcia okresu pierwotnej gwarancji lub przez dziewięćdziesiąt (90)
dni, zależnie od tego, który okres będzie dłuższy.
Niniejsza gwarancja nie obowiązuje i zostaje unieważniona:
• Jeśli zgłoszenie z tytułu gwarancji zostanie wniesione po upływie okresu gwarancji lub jeśli użytkownik nie dostarczy dowodu zakupu.
• W przypadku jakiejkolwiek awarii lub usterki spowodowanej przez lub wynikającej z wyraźnie widocznego uderzenia, nieprawidłowej
obsługi, próby manipulacji, stosowania niezgodnie z instrukcją, nieprawidłowego napięcia zasilania, wypadku, zgubienia, kradzieży,
pożaru, powodzi lub innych klęsk żywiołowych, szkód transportowych lub spowodowanych naprawą przez nieupoważniony personel.
• W przypadku wszelkich części eksploatacyjnych, takich jak baterie, których usterka wynika z normalnego starzenia się produktu.
• W przypadku szkód kosmetycznych, m.in. zarysowań, wgięć i pękniętych plastikowych części portów.
• W przypadku jakiegokolwiek oprogramowania, nawet jeśli jest ono dołączone lub sprzedawane ze sprzętem EZVIZ.
• W przypadku innych szkód niewynikających z wad materiałowych lub wykonawstwa.
• W przypadku standardowego czyszczenia, oraz typowego zużycia kosmetycznego i mechanicznego.
Jeśli mają Państwo jakiekolwiek pytania, prosimy o kontakt ze sprzedawcą lub przesłanie ich do nas pocztą elektroniczną na adres
support.eu@ezvizlife.com.
COPYRIGHT ©2018 HANGZHOU HIKVISION DIGITAL TECHNOLOGY CO., LTD. WSZELKIE PRAWA ZASTRZEŻONE.
OGRANICZONA GWARANCJA
Благодарим Вас за покупку продукции EZVIZ. Эта ограниченная гарантия дает Вам как покупателю продукта EZVIZ определенные
юридические права. Вы также можете иметь другие юридические права, которые определяются законами государства, провинции
или юрисдикцией. Исключения и ограничения ответственности в соответствии с данной ограниченной гарантией не действительны в
случае, если они противоречат действующему законодательству. Ни дистрибьютор, ни дилер, ни агент или сотрудник не имеет права
вносить какие-либо изменения или дополнения к данной ограниченной гарантии.
Компания EZVIZ гарантирует, что приобретенный вами продукт не будет иметь дефектов материалов и изготовления при нормальной
эксплуатации согласно руководству пользователя в течение двух (2) лет с даты покупки или в течение более длительного периода
времени, если это требуется по закону той страны или штата, где данный продукт был продан.
Вы можете запросить гарантийное обслуживание, обратившись по электронной почте support.eu@ezvizlife.com.
В случае неисправности продуктов EZVIZ по гарантии, HIKVISION DIGITAL TECHNOLOGY CO., LTD. Ханчжоу ("Компания") произведет,
по своему выбору, (I) ремонт или замену изделия бесплатно; (II) обмен продукта на функционально эквивалентный; (III) возврат
первоначальной стоимости, при условии, что Вы предоставите оригинал или копию квитанции о покупке, краткое объяснение
дефекта, а также вернете товар в оригинальной упаковке. На усмотрение Компании, может производиться ремонт или замена нового
или отремонтированного продукта или его компонентов. Данная гарантия не распространяется на почтовые расходы, страховку и
любые другие непредвиденные расходы, понесенные Вами в связи с возвратом продукта.
За исключением случаев, запрещенных действующим законодательством, этот документ является Вашим единственным и
исключительным средством судебной защиты, в случае нарушения Ваших прав, закрепленных в ограниченной гарантии. К любому
продукту, который уже был отремонтирован или заменен по данной ограниченной гарантии, применимы условия документа в
течение девяноста (90) дней с момента поставки или оставшегося первоначального гарантийного срока.
Данная гарантия не применяется и является недействительной:
• В случае подачи заявки на гарантийный ремонт по истечении гарантийного срока или отсутствия доказательства факта покупки.
• В случае неисправностей, дефектов, вызванных неправильным использованием, нарушением инструкций по эксплуатации, при
неправильном напряжении сети, аварии, утере, краже, пожаре, наводнении или иных стихийных бедствиях, повреждении груза или
ущербе, нанесенными в результате ремонта, выполненного не уполномоченными лицами.
• Для любых расходных частей, таких как батареи, когда неисправность происходит из-за естественного старения продукта.
• При косметических повреждениях, в том числе, но не только, при царапинах, вмятинах и сломанном пластике на портах.
• Для любого программного обеспечения, даже если оно было упаковано или продано вместе с оборудованием EZVIZ.
• Для любых других повреждений, дефектов материала или изготовления.
• Для планового косметического и механического износа.
Чтобы задать вопрос продавцу или отправить нам письмо, пожалуйста, обращайтесь по данному адресу: support.eu@ezvizlife.com
COPYRIGHT ©2018 HANGZHOU HIKVISION DIGITAL TECHNOLOGY CO., LTD. ALL RIGHTS RESERVED.
ОГРАНИЧЕННАЯ ГАРАНТИЯ
Page 99

Σας ευχαριστούμε για την αγορά των προϊόντων EZVIZ. Η παρούσα περιορισμένη ευθύνη παρέχει σε εσάς, τον αρχικό αγοραστή του προϊόντος EZVIZ, ειδικά νομικά δικαιώματα.
Ενδέχεται να έχετε κι άλλα νομικά δικαιώματα που ποικίλλουν ανάλογα με το κράτος, την περιοχή ή τη δικαιοδοσία σας. Οι αποποιήσεις, εξαιρέσεις και περιορισμοί ευθύνης βάσει
της παρούσας περιορισμένης εγγύησης δεν ισχύουν στον βαθμό που απαγορεύεται από το εφαρμοστέο δίκαιο. Κανένας διανομέας, μεταπωλητής, αντιπρόσωπος ή εργαζόμενος
δεν είναι εξουσιοδοτημένος να προβεί σε οποιαδήποτε τροποποίηση, επέκταση ή προσθήκη στην παρούσα περιορισμένη εγγύηση.
Το προϊόν EZVIZ σας διαθέτει εγγύηση για περίοδο δύο (2) ετών από την ημερομηνία αγοράς, σχετικά με ατέλειες στα υλικά και την κατασκευή ή για μεγαλύτερο χρονικό
διάστημα, όπως απαιτείται βάσει του νόμου στη χώρα ή το κράτος όπου αγοράστηκε το προϊόν, εφόσον το προϊόν χρησιμοποιείται κανονικά, σύμφωνα με το εγχειρίδιο χρήσης.
Μπορείτε να υποβάλετε αίτηση για επισκευή στο πλαίσιο της παρούσας εγγύησης, στέλνοντάς μας e-mail στη διεύθυνση support.eu@ezvizlife.com.
Για τυχόν ελαττωματικά προϊόντα EZVIZ που καλύπτονται από εγγύηση, η εταιρεία HANGZHOU HIKVISION DIGITAL TECHNOLOGY CO., LTD. (“η Εταιρεία”), κατά την προαίρεσή
της, (i) θα επισκευάσει ή αντικαταστήσει το προϊόν σας δωρεάν, (ii) θα ανταλλάξει το προϊόν σας με ένα αντίστοιχο λειτουργικό προϊόν ή (iii) θα επιστρέψει το αντίτιμο της
αρχικής τιμής αγοράς, με την προϋπόθεση ότι θα προσκομίσετε την πρωτότυπη απόδειξη αγοράς ή αντίγραφο αυτής με σύντομη επεξήγηση του ελαττώματος του προϊόντος και
ότι θα επιστρέψετε το προϊόν στην αρχική του συσκευασία. Κατά τη διακριτική ευχέρεια της Εταιρείας, η επισκευή ή η αντικατάσταση ενδέχεται να πραγματοποιηθεί με νέο ή
επισκευασμένο προϊόν ή εξαρτήματα. Η παρούσα εγγύηση δεν καλύπτει ταχυδρομικά έξοδα, ασφάλιση ή άλλες παρεπόμενες δαπάνες, με τις οποίες θα επιβαρυνθείτε κατά την
επιστροφή τους προϊόντος.
Εκτός αν απαγορεύεται από το εφαρμοστέο δίκαιο, αυτό είναι το μόνο και αποκλειστικό σας ένδικο μέσο σε περίπτωση παραβίασης της παρούσας περιορισμένης εγγύησης.
Οποιοδήποτε προϊόν έχει επισκευαστεί ή αντικατασταθεί δυνάμει της παρούσας περιορισμένης ευθύνης καλύπτεται από τους όρους αυτής της περιορισμένης εγγύησης είτε για
διάστημα ενενήντα (90) ημερών από την ημερομηνία παράδοσης, είτε για την εναποµένουσα αρχική περίοδο εγγύησης, όποιο είναι μεγαλύτερο.
Η παρούσα εγγύηση δεν ισχύει ή θεωρείται άκυρη:
• Εάν η αξίωση εγγύησης εγερθεί εκτός της περιόδου εγγύησης ή σε περίπτωση μη προσκόμισης του αποδεικτικού αγοράς.
• Για οποιαδήποτε δυσλειτουργία, ελάττωμα ή βλάβη που προκληθεί από ή οφείλεται σε εμφανή πρόσκρουση, κακό χειρισμό, παραποίηση, χρήση αντίθετη με το σχετικό
εγχειρίδιο οδηγιών, εσφαλμένη τάση τροφοδοσίας, ατύχημα, απώλεια, κλοπή, πυρκαγιά, πλημμύρα ή λοιπές θεομηνίες, βλάβη κατά την αποστολή ή ζημιά που απορρέει από
επισκευές που πραγματοποιήθηκαν από μη εξουσιοδοτημένο προσωπικό.
• Για οποιαδήποτε αναλώσιμα εξαρτήματα, όπως οι μπαταρίες, η δυσλειτουργία των οποίων οφείλεται στη κανονική χρήση του προϊόντος με την πάροδο του χρόνου.
• Για αισθητικές ζημιές, συμπεριλαμβανομένων, μεταξύ άλλων, γρατζουνιών, βαθουλωμάτων και σπασμένων πλαστικών στις θύρες.
• Για οποιοδήποτε λογισμικό, ακόμη κι αν συσκευάστηκε ή πωλήθηκε μαζί με το υλισμικό της EZVIZ.
• Για οποιαδήποτε άλλη βλάβη που δεν οφείλεται σε ελαττώματα σε υλικά και στην ποιότητα κατασκευής.
• Για συνήθη καθαρισμό, φυσιολογική αισθητική και μηχανική φθορά.
Για τυχόν ερωτήσεις, μη διστάσετε να επικοινωνήσετε με το κατάστημα πώλησης ή να μας στείλετε e-mail στη διεύθυνση support.eu@ezvizlife.com.
ΠΝΕΥΜΑΤΙΚΑ ΔΙΚ ΑΙΩΜΑΤΑ ©2018 HANGZHOU HIKVISION DIGITAL TECHNOLOGY CO., LTD. ΜΕ ΤΗΝ ΕΠΙΦΥΛΑΞΗ ΠΑΝΤΟΣ ΔΙΚΑΙΩΜΑΤΟΣ.
ΠΕΡΙΟΡΙΣΜΕΝΗ ΕΓΓΥΗΣΗ
Děkujeme, že jste zakoupili výrobek EZVIZ. Tato omezená záruka vám, původnímu kupujícímu výrobku EZVIZ, dává specická zákonná práva. Můžete mít i další práva, která
se liší podle státu, provincie nebo jurisdikce. Odmítnutí, výjimky a omezení odpovědnosti v rámci této omezené záruky platí jen v rozsahu daném příslušným zákonem. Žádný
distributor, prodejce, zástupce nebo zaměstnanec není oprávněn provádět žádné úpravy, rozšíření nebo dodatky k této omezené záruce.
Produkt EZVIZ je po dobu dvou (2) let od data zakoupení (nebo po delší období, které může být vyžadováno zákonem v dané zemi nebo ve státě, kde je tento produkt prodáván)
kryt zárukou na vady materiálu a zpracování při běžném používání vsouladu snávodem kpoužití.
O záruční servis můžete požádat na této e-mailové adrese support.eu@ezvizlife.com.
V případě jakéhokoliv vadného produktu EZVIZ v záruce, společnost HANGZHOU HIKVISION DIGITAL TECHNOLOGY CO., LTD. (dále jen „společnost“) podle svého uvážení, (i) opraví
nebo vymění výrobek zdarma; (ii) nahradí výrobek za ekvivalentní funkční výrobek; (iii) nebo vrátí původní kupní cenu, pokud poskytnete originální doklad o koupi nebo jeho
kopii, stručný popis závady a výrobek vrátíte v původním balení.
Na základě vlastního uvážení společnosti výrobek může být opraven nebo nahrazen novým nebo modernizovaným výrobkem nebo komponenty. Tato záruka se nevztahuje na
poštovní náklady, pojištění a další dodatečné poplatky, které vám vznikly při vrácení výrobku.
Kromě případů daných příslušným zákonem je toto vaší jedinou a výhradní náhradou za porušení závazků této omezené záruky. Na každý výrobek, který byl buď opraven nebo
vyměněn v rámci této omezené záruky se vztahuje tato omezená záruka po dobu devadesáti (90) dnů ode dne doručení nebo po dobu zbývající původní záruční doby.
Tato záruka neplatí a nevztahuje se:
• Je-li záruční reklamace uskutečněna mimo záruční dobu, nebo v případě, že není poskytnut doklad o koupi.
• Na jakékoliv poruchy, závady nebo selhání způsobené nárazem, nesprávnou manipulací, narušením, používáním výrobku v rozporu s platným návodem, nesprávným
elektrickým napětím, nehodou, ztrátou, odcizením, požárem, povodní nebo jinými zásahy vyšší moci, poškozením při přepravě nebo poškozením v důsledku oprav
prováděných neoprávněnými osobami.
• Na jakékoliv spotřební díly, jako jsou baterie, kde závada je způsobena normálním stárnutím produktu.
• Kosmetické poškození, mimo jiné na poškrábání, promáčknutí a zlomené plasty na portech.
• Jakýkoliv software a to i v případě, že byl součástí produktu nebo prodáván spolu s hardwarem EZVIZ.
• Na jakékoliv jiné poškození bez vad na materiálu nebo zpracování.
• Normální kosmetické a mechanické opotřebení, opotřebení v důsledku pravidelného čištění.
S případnými dotazy se prosím obraťte se na svého prodejce nebo pošlete e-mail na adresu support.eu@ezvizlife.com.
COPYRIGHT ©2018 HANGZHOU HIKVISION DIGITAL TECHNOLOGY CO., LTD. VŠECHNA PRÁVA VYHRAZENA.
OMEZENÁ ZÁRUKAOMEZENÁ ZÁRUKA
Page 100

Ďakujeme za zakúpenie produktov EZVIZ. Táto obmedzená záruka vám ako originálnemu kupujúcemu produktu EZVIZ zaručuje špecické zákonné práva. Môžete mať aj
iné zákonné práva, ktoré sa líšia v závislosti od štátu, kraja alebo jurisdikcie. Zrieknutie sa zodpovednosti, vylúčenie a obmedzenie zodpovednosti v rámci tejto obmedzenej
záruky sa nevzťahuje na rozsah, ktorý je zakázaný platnými zákonmi. Žiaden distribútor, predajca, zástupca ani zamestnanec nie je oprávnený robiť žiadne úpravy, rozšírenie,
ani doplnenie tejto obmedzenej záruky.
Váš produkt EZVIZ je v záručnej lehote po dobu dvoch (2) rokov od dátumu zakúpenia v prípade chyby materiálu a spracovania alebo dlhšieho obdobia, ktoré môžu
požadovať zákony v krajine alebo štáte, kde sa tento produkt predáva, keď sa používa bežne v súlade s návodom na použitie.
O záručný servis môžete požiadať odoslaním e-mailu na adresu support.eu@ezvizlife.com.
V prípade akýchkoľvek chybných produktov EZVIZ v záruke spoločnosť HANGZHOU HIKVISION DIGITAL TECHNOLOGY CO., LTD. („spoločnosť“) podľa vlastného
uváženia vykoná (i) bezplatnú opravu alebo výmenu produktu; (ii) výmenu produktu za funkčný ekvivalentný produkt; (iii) prípadne vráti pôvodnú kúpnu cenu za predpokladu,
že poskytnete pôvodný doklad o kúpe alebo jeho kópiu, stručné vysvetlenie poruchy a vrátite produkt v pôvodnom balení. Na základe vlastného uváženia spoločnosti môže
byť oprava alebo výmena vykonaná použitím nového alebo renovovaného produktu alebo komponentov. Táto záruka sa nevzťahuje na poštovné, poistenie a akékoľvek
ďalšie vedľajšie náklady, ktoré vznikli pri vrátení produktu.
S výnimkou prípadov, keď to príslušné zákony zakazujú, je to váš výlučný a výhradný opravný prostriedok v prípade porušenia tejto obmedzenej záruky. Na každý produkt,
ktorý bol opravený alebo vymenený v rámci tejto obmedzenej záruky, sa budú vzťahovať podmienky tejto obmedzenej záruky počas deväťdesiatich (90) dní od dátumu
doručenia alebo počas zostávajúcej pôvodnej záručnej doby podľa toho, ktorá obdobie je dlhšie.
Táto záruka neplatí a nevzťahuje sa na nasledujúce prípady:
• Ak sa nárok na záruku uskutočňuje mimo záručnej doby alebo ak nie je predložený dôkaz o zakúpení.
• V prípade akejkoľvek nefunkčnosti, chyby alebo poruchy spôsobenými nárazom, nesprávnym používaním, neoprávneným zasahovaním, používaním v rozpore
s príslušným návodom na používanie, nesprávnym napätím elektrickej siete, nehodou, stratou, krádežou, požiarom, záplavou, alebo inými neočakávanými udalosťami,
poškodením pri preprave, alebo poškodením spôsobeným opravami vykonanými neoprávneným personálom, alebo ich v prípade ich dôsledkov.
• V prípade spotrebných súčastí, ako sú napr. batérie, pri ktorých je nefunkčnosť spôsobená bežným starnutím produktu.
• Vizuálne poškodenie vrátane, avšak bez obmedzenia na škrabance, zárezy a zlomené plastové časti portov.
• Akýkoľvek softvér, aj keď sa dodáva alebo predáva s hardvérom EZVIZ.
• V prípade akýchkoľvek iných škôd bez poškodenia materiálu alebo spracovania.
• Rutinné čistenie, bežné vizuálne a mechanické opotrebovanie.
Ak máte akékoľvek otázky, neváhajte a obráťte sa na predajcu alebo nám odošlite e-mail na adresu support.eu@ezvizlife.com.
AUTORSKÉ PRÁVA ©2018 HANGZHOU HIKVISION DIGITAL TECHNOLOGY CO., LTD. VŠETKY PRÁVA VYHRADENÉ.
OBMEDZENÁ ZÁRUKA
Vă mulțumim pentru achiziționarea produselor EZVIZ. Această garanție limitată vă conferă dumneavoastră, cumpărătorul original al produsului EZVIZ, drepturi legale
specice. Este posibil să aveți și alte drepturi legale care variază în funcție de stat, provincie sau jurisdicție. Negările, excluderile și limitările răspunderii în temeiul acestei
garanții limitate nu se vor aplica în măsura în care sunt interzise de legea aplicabilă. Niciun distribuitor, re-vânzător, agent sau angajat nu este autorizat să facă nicio modicare,
extensie, sau adăugire la această garanție limitată.
Produsul EZVIZ este garantat pentru o perioadă de doi (2) ani de la data achiziţiei pentru defecte de materiale şi manoperă sau pentru o perioadă mai lungă, dacă aceasta
este impusă de legea din ţara sau statul în care este comercializat produsul, când este utilizat normal în conformitate cu manualul de utilizare.
Puteți solicita lucrări de service în garanție prin e-mail la support.eu@ezvizlife.com .
Pentru orice produse EZVIZ defecte aate în garanție, HANGZHOU HIKVISION DIGITAL TECHNOLOGY CO., LTD. („Societatea”) va (i) repara sau înlocui produsul
gratuit; (ii) schimba produsul cu un produs echivalent funcțional; (iii) sau rambursa prețul de achiziție inițial, cu condiția să furnizați chitanța în original sau în copie, o scurtă
explicație a defectului, și să returnați produsul în ambalajul original. La discreția exclusivă a Societății, repararea sau înlocuirea se poate face cu un produs sau componente
noi sau reparate. Această garanție nu acoperă taxele poștale, costul asigurării și orice alte costuri suplimentare suportate de către dumneavoastră în legătură cu returnarea
produsului.
Cu excepția cazului în care este interzis de legislația în vigoare, acesta este remediul dumneavoastră unic și exclusiv pentru încălcarea acestei garanții limitate. Orice produs
care a fost reparat sau înlocuit în conformitate cu această garanție limitată va acoperit de termenii acestei garanții limitate pentru o perioadă de nouăzeci (90) de zile de la
data de livrare sau perioada rămasă din garanția inițială, oricare este mai lungă.
Această garanție nu se aplică și este nulă în următoarele cazuri:
• Dacă cererea de garanție se face în afara perioadei de garanție sau dacă nu se furnizează dovada de cumpărare.
• Pentru orice defecțiune, defect sau stricăciune cauzate de sau care sunt rezultatul evident al unui impact, manipulări necorespunzătoare, modicări, utilizări contrar
manualului de instrucțiuni aplicabil, alimentări inadecvate, al unui accident, unei pierderi, unui furt, incendiu, inundații sau altor evenimente de forță majoră, daune la
transport sau daune rezultate din reparații efectuate de către persoane neautorizate.
• Pentru orice piese consumabile, cum ar bateriile, în cazul în care defecțiunea se datorează uzurii normale a produsului.
• Daune estetice, inclusiv, dar fără a se limita la zgârieturi, urme de lovituri plastic rupt pe porturi.
• Orice software, chiar dacă este vândut la pachet cu echipamente EZVIZ.
• Pentru orice alte daune care nu se datorează unor defecte de material sau de manoperă.
• Curățarea de rutină, uzură normală cosmetică și mecanică.
Nu ezitați să contactați vânzătorul sau trimiteți-ne un e-mail la support.eu@ezvizlife.com dacă aveți orice întrebări.
COPYRIGHT ©2018 HANGZHOU HIKVISION DIGITAL TECHNOLOGY CO., LTD. TOATE DREPTURILE REZERVATE.
GARANȚIE LIMITATĂ
 Loading...