

Page 1
Vault
Page 2
Setup
Step 1
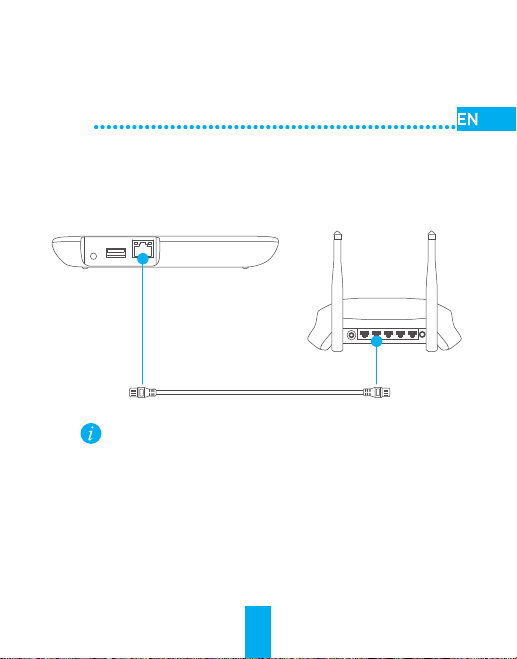
Connecting to the Network
1
Plug the network cable into the vault and then into a router as
shown in the following picture.
WAN LAN2 LAN4LAN1 LAN3
POWER
Network Cable
Vault does not support the Wi-Fi network connection.
Power-on
2
Plug the power cable into the vault and then into a power outlet.
The LED indicator will turn from solid amber to sold blue when it
is ready. This will take about 20 seconds.
1
WPS/
RESET
Page 3
Step 2
Adding Devices to EZVIZ
Installing the EZVIZ App
1
- From your mobile device, download and install EZVIZ app by
searching for “EZVIZ” from App Store or Google Play
- Launch the app and register for an EZVIZ user account.
Adding Vault to EZVIZ
2
- Start the EZVIZ app and log into your account
- From the home screen, tap “ + “ to add Vault.
- Scan the QR code located on the bottom of Vault.
- Enter the verification code located on the bottom of Vault.
- Enter the correct time zone and DST information and tap
“Finish”.
TM
.
Network Video Recorder
Model: XXXXXX
IP: XXX
SN: XXXXXXX
MM/YYYY
Verification Code: XXXXXX
Adding by Scanning QR Code
Adding Cloud Camera to EZVIZ
3
- From the home screen, tap “ + “ to add the cloud camera.
- Scan the QR code located on the bottom of the camera.
- Enter the Settings page of the camera, tap Storage Status and
select Vault in the storage list to start Vault recording of the
camera.
Vault supports up to 8 EZVIZ cloud camera recording and only
connects to cameras that are on the same network.
2
Page 4
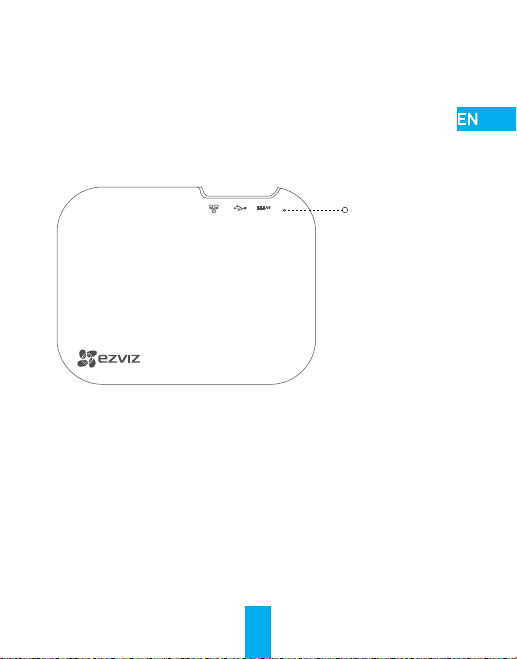
Product View
Front Panel
LED Indicator
Blue: Normal
Amber: Starting
and Error
3
Page 5
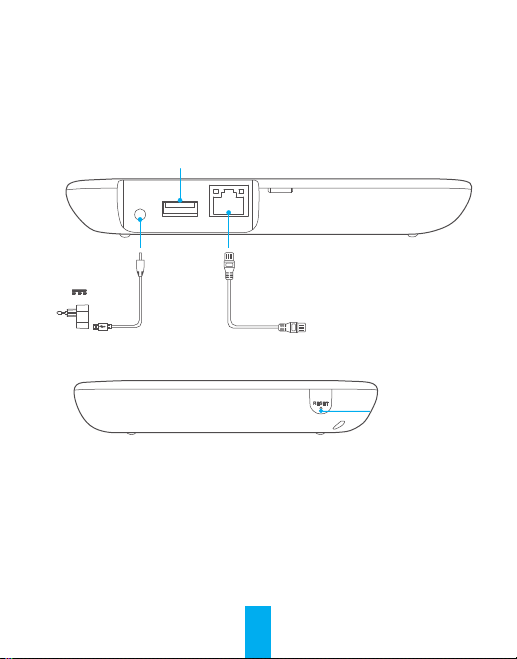
Ports
USB Interface (Reserved)
Power Input
5V
To reset, press and hold the reset button with a needle for at least 3
seconds while the power is on. The LED indicator will flash in
amber while the device is resetting.
Network Interface
Connect to a Router
RESET Hole
4
Page 6
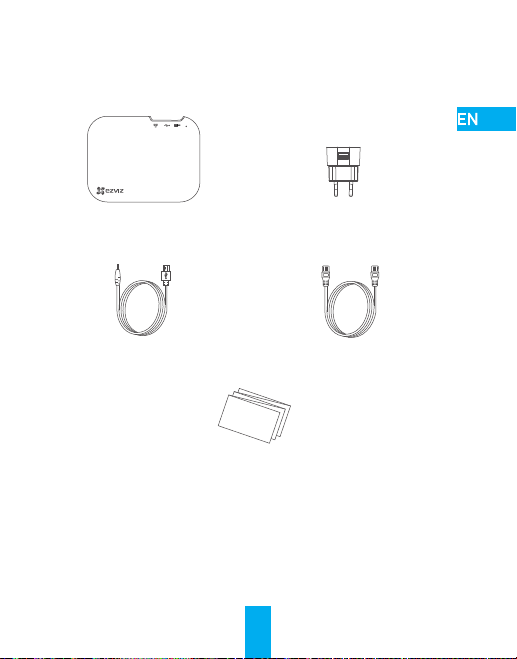
Box Content
Vault (x1)
Power Cable (x1)
Power Adapter (x1)
Network Cable (x1)
Quick Start Guide
Quick Start Guide (x1)
5
Page 7

Configuración
Paso 1
Conexión a la red
1
Conecte el cable de red al dispositivo de almacenamiento (Vault)
y luego a un enrutador, como se ilustra en la siguiente imagen.
WAN LAN2 LAN4LAN1 LAN3
POWER
Cable de red
El dispositivo de almacenamiento no es compatible con la
conexión de red Wi-Fi.
Encendido
2
Conecte el cable de alimentación al dispositivo de
almacenamiento y luego a un enchufe.
El indicador LED cambiará de ámbar continuo a azul continuo
cuando esté listo. Esto tomará unos 20 segundos.
6
WPS/
RESET
Page 8

Paso 2
Agregado de dispositivos a EZVIZ
Instalación de la aplicación EZVIZ
- Desde su dispositivo móvil, descargue e instale la aplicación
1
EZVIZ buscando “EZVIZ” en el App Store o Google PlayTM.
- Inicie la aplicación y regístrese para obtener una cuenta de
usuario EZVIZ.
Agregado del dispositivo de almacenamiento a EZVIZ
2
- Inicie la aplicación EZVIZ e inicie sesión con su cuenta
- Desde la pantalla de inicio, toque "+" para agregar el
dispositivo de almacenamiento.
- Escanee el código QR ubicado en la parte inferior del
dispositivo de almacenamiento.
- Ingrese el código de verificación ubicado en la parte inferior del
dispositivo de almacenamiento.
- Ingrese la zona horaria correcta y la información de DST y
toque "Terminar".
Agregado mediante escaneo
Network Video Recorder
Model: XXXXXX
IP: XXX
SN: XXXXXXX
MM/YYYY
Verification Code: XXXXXX
Agregado de cámara de nube a EZVIZ
- Desde la pantalla de inicio toque "+" para agregar la cámara de nube.
3
- Escanee el código QR ubicado en la parte inferior de la cámara.
- Ingrese a la página Configuración de la cámara, toque Estado
de almacenamiento y seleccione Dispositivo de almacenamiento
en la lista de almacenamiento para que el dispositivo de
almacenamiento inicie la grabación de la cámara.
El dispositivo de almacenamiento es compatible con hasta
8 grabaciones de cámara de nube EZVIZ y solo se conecta a
las cámaras que están en la misma red.
de código QR
7
Page 9

Vista del producto
Panel delantero
Indicador LED
Azul: Normal
Ámbar: Inicio y
error
8
Page 10

Puertos
Interfaz USB (Reservada)
Entrada de
potencia
5V
Para reiniciar, mantenga presionado el botón de reinicio con una
aguja durante por lo menos 3 segundos mientras está encendido.
El indicador LED parpadeará en ámbar mientras se reinicia el
dispositivo.
Interfaz de red
Conecte a un enrutador
Orificio de
REINICIO
9
Page 11

Contenido de la caja
1 dispositivo de
almacenamiento
1 cable de alimentación
1 guía de inicio rápido
1 adaptador de
alimentación
1 cable de red
Quick Start Guide
10
Page 12

Installation
Étape 1
Connexion au réseau
1
Raccordez le Vault à un routeur à l’aide du câble réseau,
comme illustré ci-dessous.
WAN LAN2 LAN4LAN1 LAN3
POWER
Câble réseau
Le Vault ne prend pas en charge la connexion au réseau
Wi-Fi.
Mise en marche
2
Branchez le câble d’alimentation dans le Vault et dans une
prise électrique.
Lorsque l’appareil est prêt, le voyant DEL passe de l’orange
fixe au bleu fixe. Cela prend environ 20 secondes.
11
WPS/
RESET
Page 13

Étape 2
Ajouter des périphériques dans EZVIZ
Installer l’application EZVIZ
1
- Depuis votre appareil mobile, téléchargez et installez
l’application EZVIZ en cherchant le terme « EZVIZ » dans l’App
Store ou Google PlayTM.
- Lancez l’application et créez un compte utilisateur EZVIZ.
Ajouter le Vault dans EZVIZ
2
- Démarrez l’application EZVIZ et connectez-vous à votre compte
- Depuis l’écran d’accueil, touchez l’icône « + » pour ajouter le Vault.
- Scannez le code QR situé sous le Vault.
- Saisissez le code de vérification situé sous le Vault.
- Saisissez le fuseau horaire et les informations relatives à
l’heure d’été, puis appuyez sur « Terminer ».
Network Video Recorder
Model: XXXXXX
IP: XXX
SN: XXXXXXX
MM/YYYY
Verification Code: XXXXXX
Ajouter une caméra Cloud dans EZVIZ
3
- Depuis l’écran d’accueil, touchez l’icône « + » pour ajouter la
caméra Cloud.
- Scannez le code QR situé sous la caméra.
- Ouvrez la page Réglages de la caméra, appuyez sur État du
stockage, puis sélectionnez Vault dans la liste de stockage afin
de démarrer l’enregistrement de la caméra sur le Vault.
Le Vault prend en charge l’enregistrement de 8 caméras
Cloud EZVIZ au maximum, et peut seulement se connecter aux
caméras qui se trouvent sur le même réseau.
Ajout en scannant le code QR
12
Page 14

Description du produit
Face avant
13
Voyant DEL
Bleu : Normal
Orange :
Démarrage et
erreur
Page 15

Ports
Interface USB (réservé)
Alimentation
5 V
Pour réinitialiser l’appareil, maintenez le bouton de réinitialisation
enfoncé pendant au moins 3 secondes à l’aide d’une aiguille,
pendant que l’appareil est sous tension. Le voyant DEL clignotera
en orange le temps que l’appareil se réinitialise.
Interface réseau
Connexion au routeur
Trou de
réinitialisation
14
Page 16

Contenu de la boîte
Vault (1)
Câble d’alimentation (1)
Guide de démarrage rapide (1)
Adaptateur électrique (1)
Câble réseau (1)
Quick Start Guide
15
Page 17

UD01054B
 Loading...