Ezviz UD18135B Quick Start Guide

Scan the QR code with the EZVIZ App to add the device to your account. Please keep it for further reference.

COPYRIGHT © Hangzhou EZVIZ Software Co., Ltd.. ALL RIGHTS RESERVED. Any and all information, including, among others, wordings, pictures, graphs are the properties of Hangzhou EZVIZ Software Co., Ltd. (hereinafter referred to as “EZVIZ”). This user manual (hereinafter referred to as “the Manual”) cannot be reproduced, changed, translated, or distributed, partially or wholly, by any means, without the prior written permission of EZVIZ. Unless otherwise stipulated, EZVIZ does not make any warranties, guarantees or representations, express or implied, regarding to the Manual.

About this Manual

The Manual includes instructions for using and managing the product. Pictures, charts, images and all other information hereinafter are for description and explanation only. The information contained in the Manual is subject to change, without notice, due to firmware updates or other reasons. Please find the latest version in the ™ website (http://www.ezvizlife. com).

Revision Record

New release – January, 2019

Trademarks Acknowledgement

™, ™, and other EZVIZ’s trademarks and logos are the properties

of EZVIZ in various jurisdictions. Other trademarks and logos mentioned below are the properties of their respective owners.

Legal Disclaimer

TO THE MAXIMUM EXTENT PERMITTED BY APPLICABLE LAW, THE PRODUCT DESCRIBED, WITH ITS HARDWARE, SOFTWARE AND FIRMWARE, IS PROVIDED “AS IS”, WITH ALL FAULTS AND ERRORS, AND EZVIZ MAKES NO WARRANTIES, EXPRESS OR IMPLIED, INCLUDING WITHOUT LIMITATION, MERCHANTABILITY, SATISFACTORY QUALITY, FITNESS FOR A PARTICULAR PURPOSE, AND NON-INFRINGEMENT OF THIRD PARTY. IN NO EVENT WILL EZVIZ, ITS DIRECTORS, OFFICERS, EMPLOYEES, OR AGENTS BE LIABLE TO YOU FOR ANY SPECIAL, CONSEQUENTIAL, INCIDENTAL, OR INDIRECT DAMAGES, INCLUDING, AMONG OTHERS, DAMAGES FOR LOSS OF BUSINESS PROFITS, BUSINESS INTERRUPTION, OR LOSS OF DATA OR DOCUMENTATION, IN CONNECTION WITH THE USE OF THIS PRODUCT, EVEN IF EZVIZ HAS BEEN ADVISED OF THE POSSIBILITY OF SUCH DAMAGES.

TO THE MAXIMUM EXTENT PERMITTED BY APPLICABLE LAW, IN NO EVENT SHALL EZVIZ’S TOTAL LIABILITY FOR ALL DAMAGES EXCEED THE ORIGINAL PURCHASE PRICE OF THE PRODUCT.

EZVIZ DOES NOT UNDERTAKE ANY LIABILITY FOR PERSONAL INJURY

OR PROPERTY DAMAGE AS THE RESULT OF PRODUCT INTERRUPTION OR SERVICE TERMINATION CAUSED BY: A) IMPROPER INSTALLATION OR USAGE OTHER THAN AS REQUESTED; B) THE PROTECTION OF NATIONAL OR PUBLIC INTERESTS; C) FORCE MAJEURE; D) YOURSELF OR THE THIRD PARTY, INCLUDING WITHOUT LIMITATION, USING ANY THIRD PARTY’S PRODUCTS, SOFTWARE, APPLICATIONS, AND AMONG OTHERS. REGARDING TO THE PRODUCT WITH INTERNET ACCESS, THE USE OF PRODUCT SHALL BE WHOLLY AT YOUR OWN RISKS. EZVIZ SHALL NOT TAKE ANY RESPONSIBILITES FOR ABNORMAL OPERATION, PRIVACY LEAKAGE OR OTHER DAMAGES RESULTING FROM CYBER ATTACK, HACKER ATTACK, VIRUS INSPECTION, OR OTHER INTERNET SECURITY RISKS; HOWEVER, EZVIZ WILL PROVIDE TIMELY TECHNICAL SUPPORT IF REQUIRED.SURVEILLANCE LAWS AND DATA PROTECTION LAWS VARY BY JURISDICTION. PLEASE CHECK ALL RELEVANT LAWS IN YOUR JURISDICTION BEFORE USING THIS PRODUCT IN ORDER TO ENSURE THAT YOUR USE CONFORMS TO THE APPLICABLE LAW. EZVIZ SHALL NOT BE LIABLE IN THE EVENT THAT THIS PRODUCT IS USED WITH ILLEGITIMATE PURPOSES.

IN THE EVENT OF ANY CONFLICTS BETWEEN THE ABOVE AND THE APPLICABLE LAW, THE LATTER PREVAILS.

Regulatory Information

FCC Information

This Camera complies with Part 15 of the FCC Rules. Operation is subject to the following two conditions:

(1)This Camera may not cause harmful interference, and

(2)This Camera must accept any interference received, including interference that may cause undesired operation.

Note: This product has been tested and found to comply with the limits for a Class B digital Camera, pursuant to Part 15 of the FCC Rules. These limits are designed to provide reasonable protection against harmful interference in a residential installation. This product generates, uses, and can radiate radio frequency energy and, if not installed and used in accordance with the instructions, may cause harmful interference to radio communications. However, there is no guarantee that interference will not occur in a particular installation. If this product does cause harmful interference to radio or television reception, which can be determined by turning the equipment off and on, the user is encouraged to try to correct the interference by one or more of the following measures:

—Reorient or relocate the receiving antenna.

—Increase the separation between the equipment and receiver.

—Connect the equipment into an outlet on a circuit different from that to

which the receiver is connected.

—Consult the dealer or an experienced radio/TV technician for help.

Please take attention that changes or modification not expressly approved by the party responsible for compliance could void the user’s authority to operate the equipment.

This equipment should be installed and operated with a minimum distance 20cm between the radiator and your body.

This Camera complies with Industry Canada licence-exempt RSS standard(s). Operation is subject to the following two conditions:

(1)this Camera may not cause interference, and

(2)this Camera must accept any interference, including interference that may cause undesired operation of the Camera.

Under Industry Canada regulations, this radio transmitter may only operate using an antenna of a type and maximum (or lesser) gain approved for the transmitter by Industry Canada. To reduce potential radio interference to other users, the antenna type and its gain should be so chosen that the equivalent isotropically radiated power (e.i.r.p.) is not more than that necessary for successful communication.

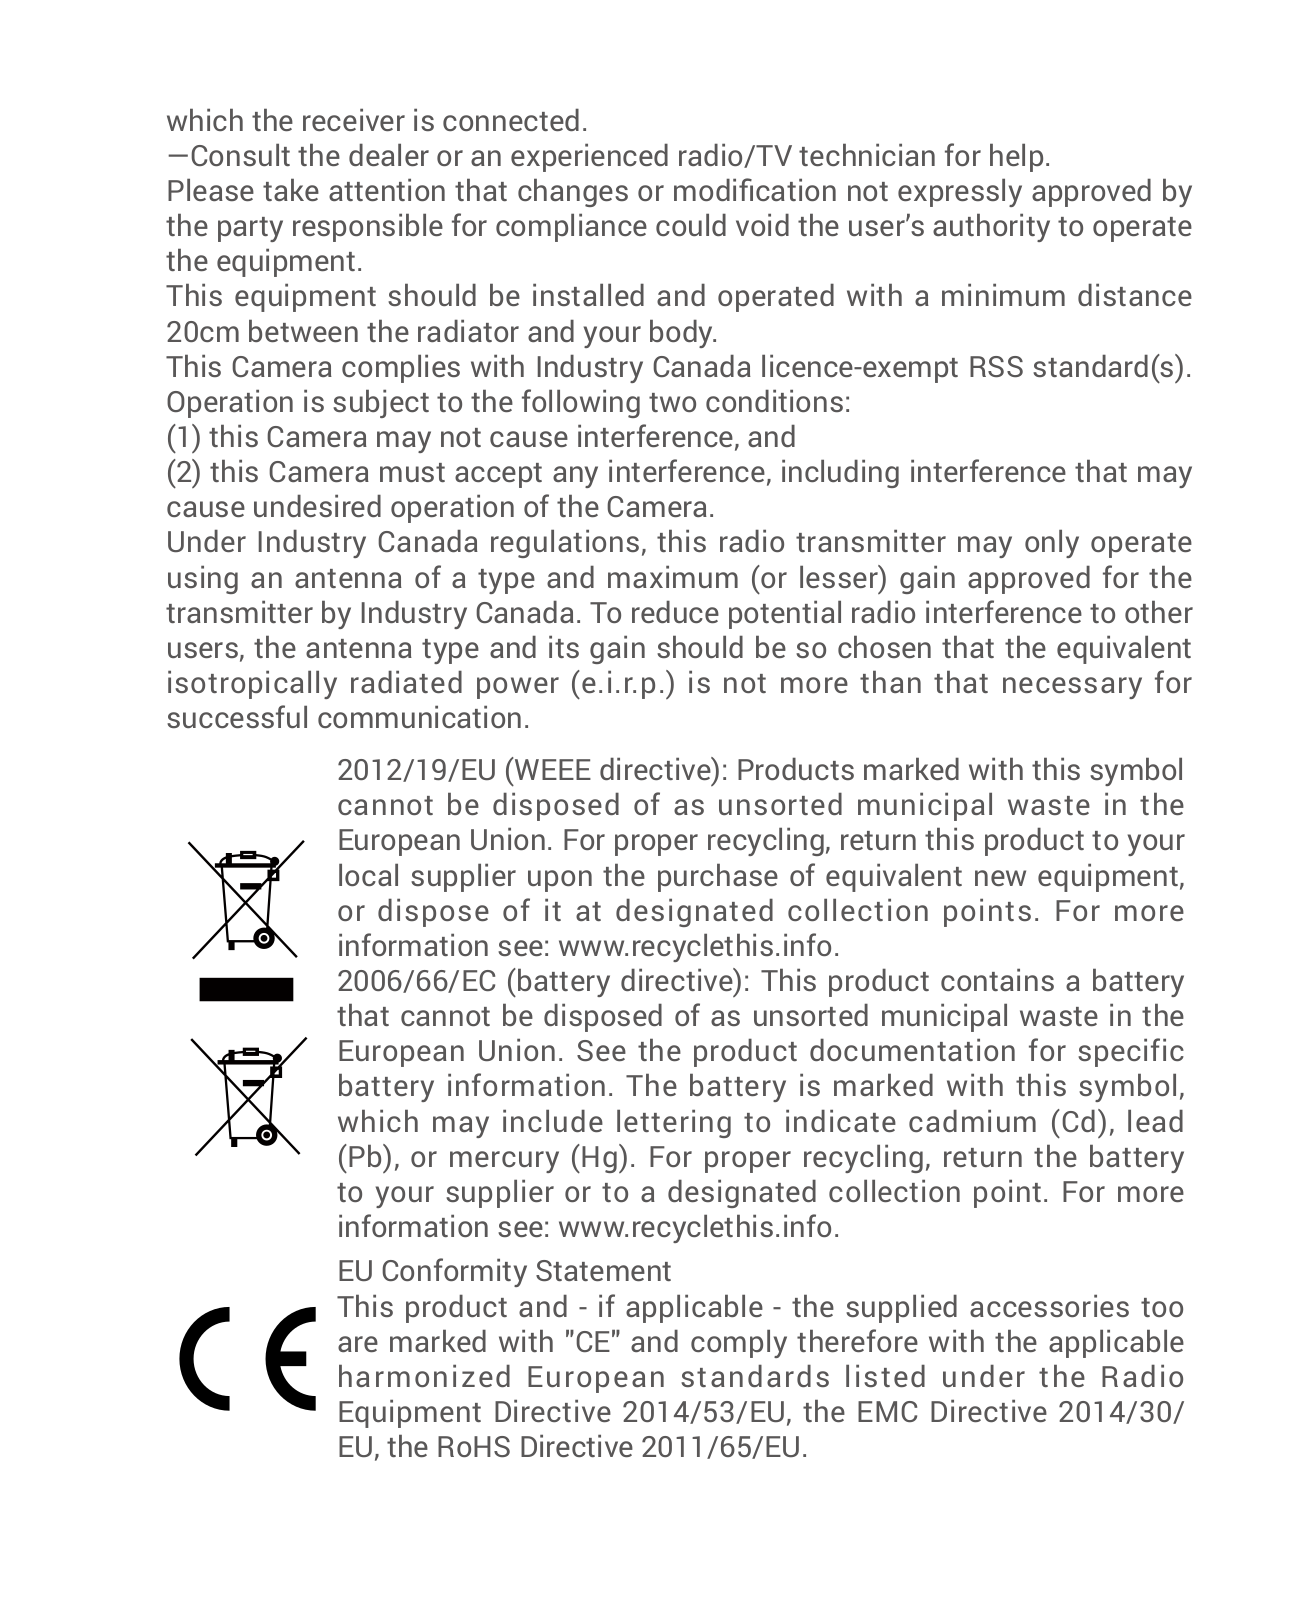
2012/19/EU (WEEE directive): Products marked with this symbol cannot be disposed of as unsorted municipal waste in the European Union. For proper recycling, return this product to your local supplier upon the purchase of equivalent new equipment, or dispose of it at designated collection points. For more information see: www.recyclethis.info.

2006/66/EC (battery directive): This product contains a battery that cannot be disposed of as unsorted municipal waste in the European Union. See the product documentation for specific battery information. The battery is marked with this symbol, which may include lettering to indicate cadmium (Cd), lead (Pb), or mercury (Hg). For proper recycling, return the battery to your supplier or to a designated collection point. For more information see: www.recyclethis.info.

EU Conformity Statement

This product and - if applicable - the supplied accessories too are marked with "CE" and comply therefore with the applicable harmonized European standards listed under the Radio Equipment Directive 2014/53/EU, the EMC Directive 2014/30/ EU, the RoHS Directive 2011/65/EU.

Гарантийный срок-1 год Срок службы-3 года

Производитель:Ханджоу Хиквижн Диджитал Технолоджи(Китай) Импортер-поставщик в России: ЗАО ''Хиквижн'' Импортер-поставщик в Республике Беларусь:ООО ''Торговый Дом ''АВАНТ-ТЕХНО''

Сайт:www.ezviz.ru

EC DECLARATION OF CONFORMITY

Hereby, Hangzhou EZVIZ Software Co., Ltd . declares that the radio equipment type [CS-CV206] is in compliance with Directive 2014/53/EU.

The full text of the EC DECLARATION OF CONFORMITY is available at the following web link:

http://www.ezvizlife.com/declaration-of-conformity.

Safety Instruction

Due to the product shape and dimension, the name and address of the importer/manufacturer are printed on the package.

Customer Service

For more information, please visit www.ezvizlife.com.

Need help? Please visit “www.ezvizlife.com/inter/page/contact-us” for our local contact details.

SAVE THIS MANUAL FOR FUTURE REFERENCE

Setup

Step 1 Power-on

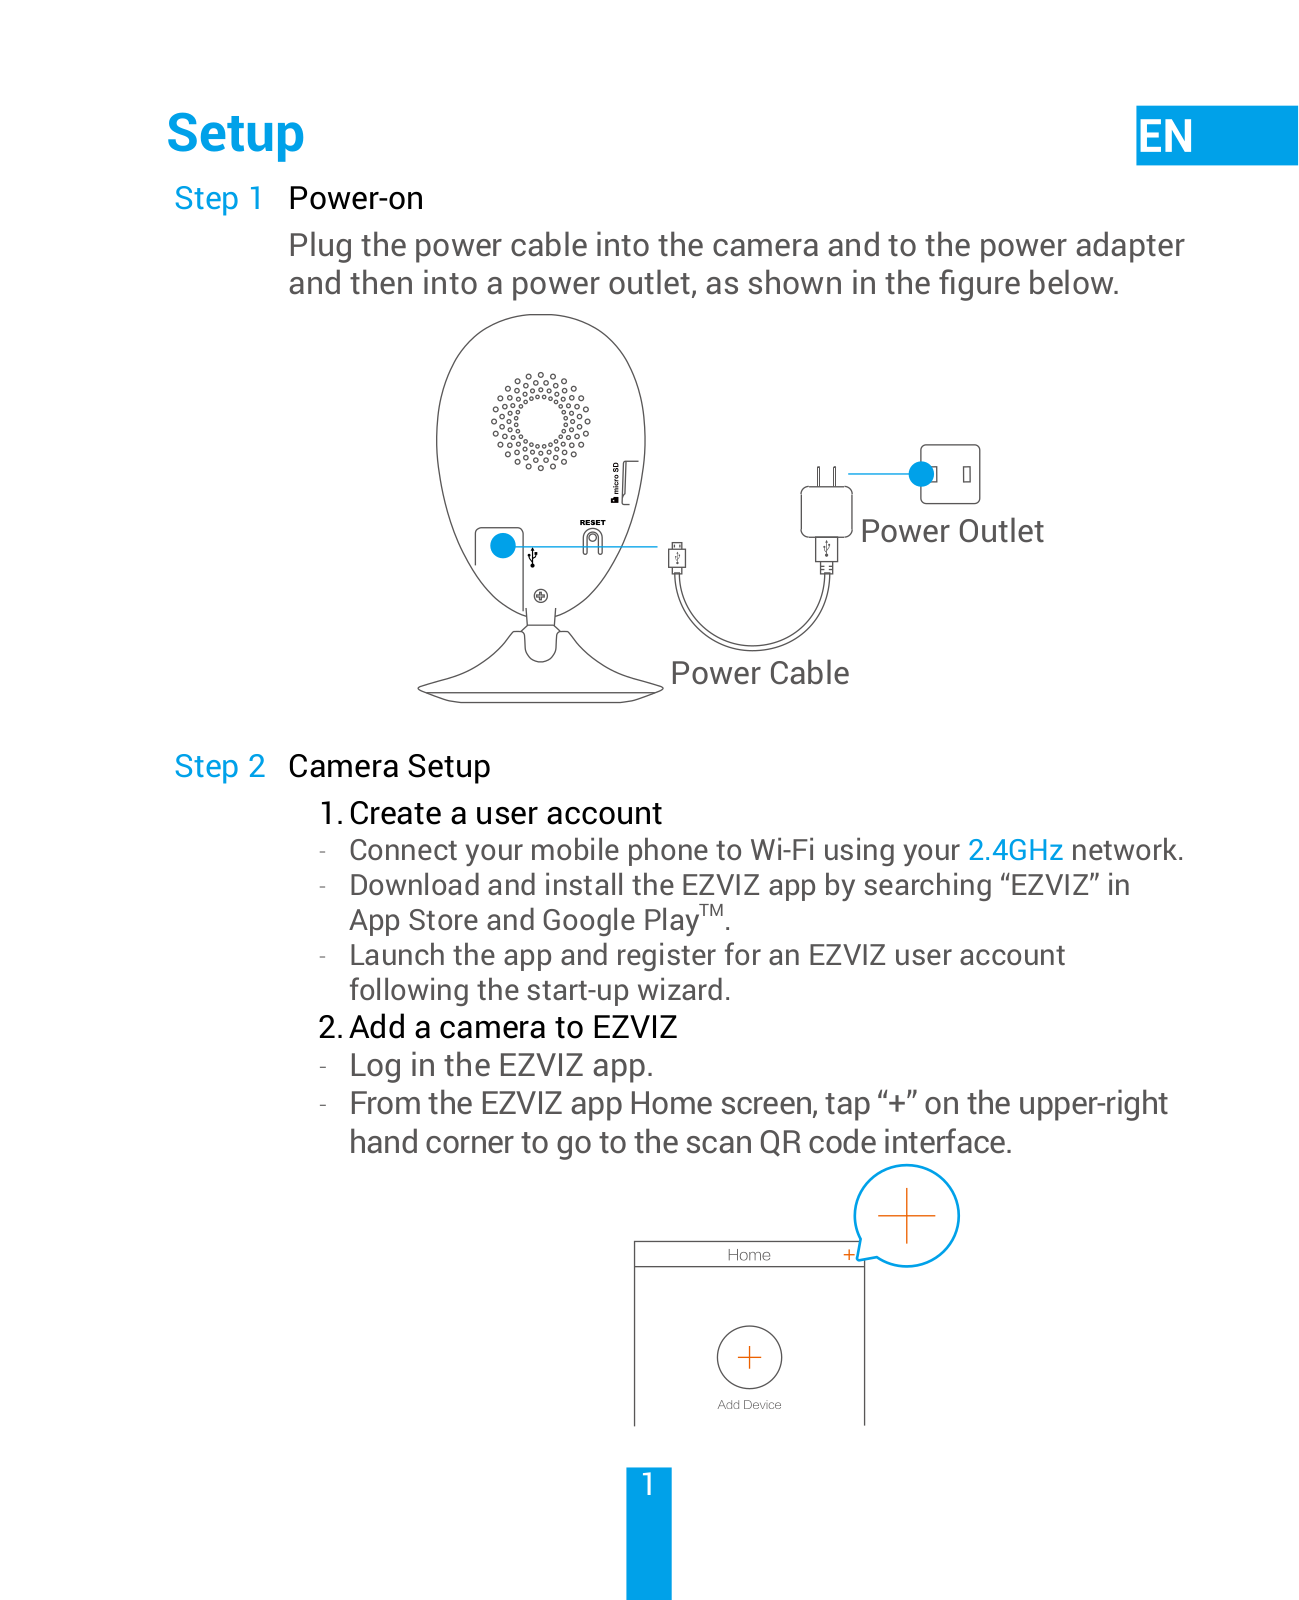
Plug the power cable into the camera and to the power adapter and then into a power outlet, as shown in the figure below.

Power Outlet

Power Cable

Step 2 Camera Setup

1.Create a user account

-- Connect your mobile phone to Wi-Fi using your 2.4GHz network. -- Download and install the EZVIZ app by searching “EZVIZ” in

App Store and Google PlayTM.

-- Launch the app and register for an EZVIZ user account following the start-up wizard.

2.Add a camera to EZVIZ -- Log in the EZVIZ app.

-- From the EZVIZ app Home screen, tap “+” on the upper-right hand corner to go to the scan QR code interface.

1

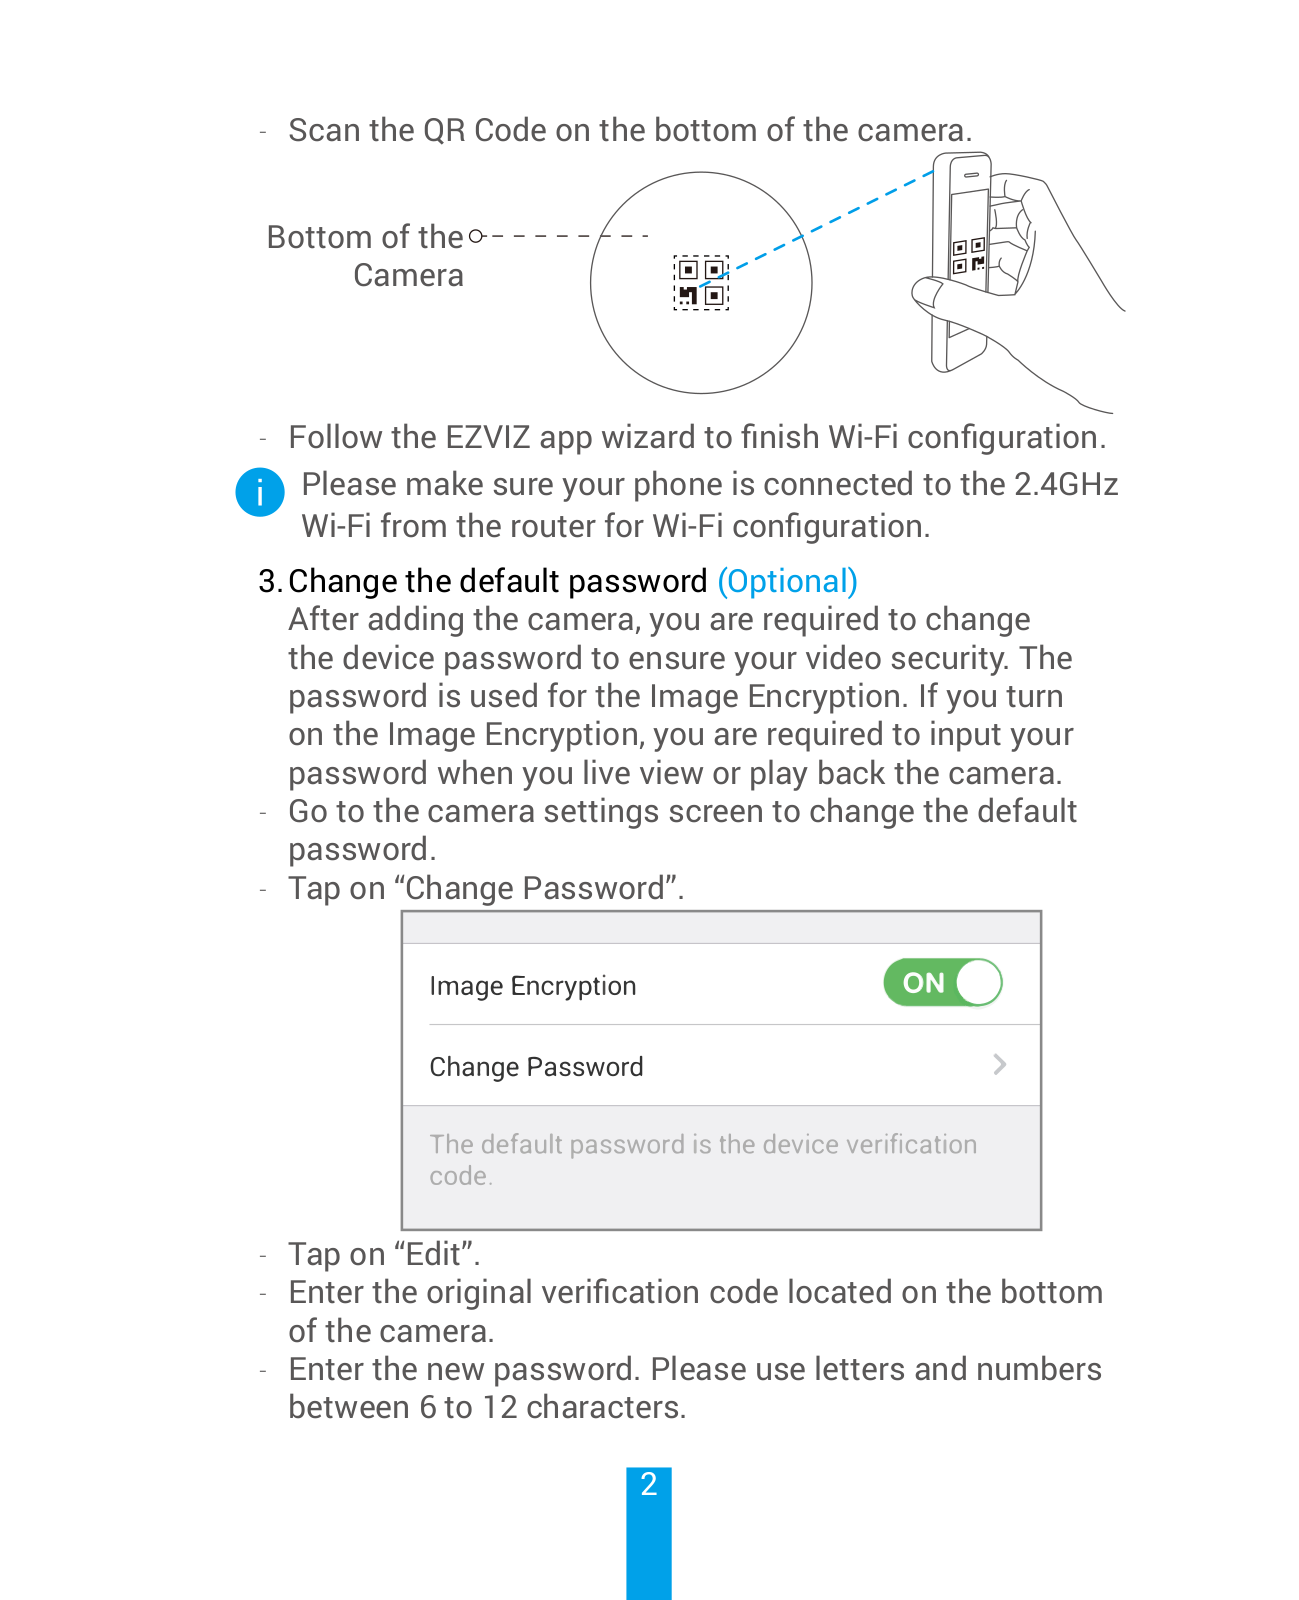
-- Scan the QR Code on the bottom of the camera.

Bottom of the

Camera

-- Follow the EZVIZ app wizard to finish Wi-Fi configuration.

Please make sure your phone is connected to the 2.4GHz

Wi-Fi from the router for Wi-Fi configuration.

3.Change the default password (Optional)

After adding the camera, you are required to change the device password to ensure your video security. The

password is used for the Image Encryption. If you turn on the Image Encryption, you are required to input your password when you live view or play back the camera.

-- Go to the camera settings screen to change the default password.

-- Tap on “Change Password”.

-- Tap on “Edit”.

-- Enter the original verification code located on the bottom of the camera.

-- Enter the new password. Please use letters and numbers between 6 to 12 characters.

2

Installation

Step 1 Install the Metal Plate (Optional)

Pick a clean and flat surface and secure the metal plate to the desired position with the foam stickers or screws (not included).

There’s a magnet piece inside the camera. You can skip this step if the surface is made of metal.

Step 2 Install the Camera

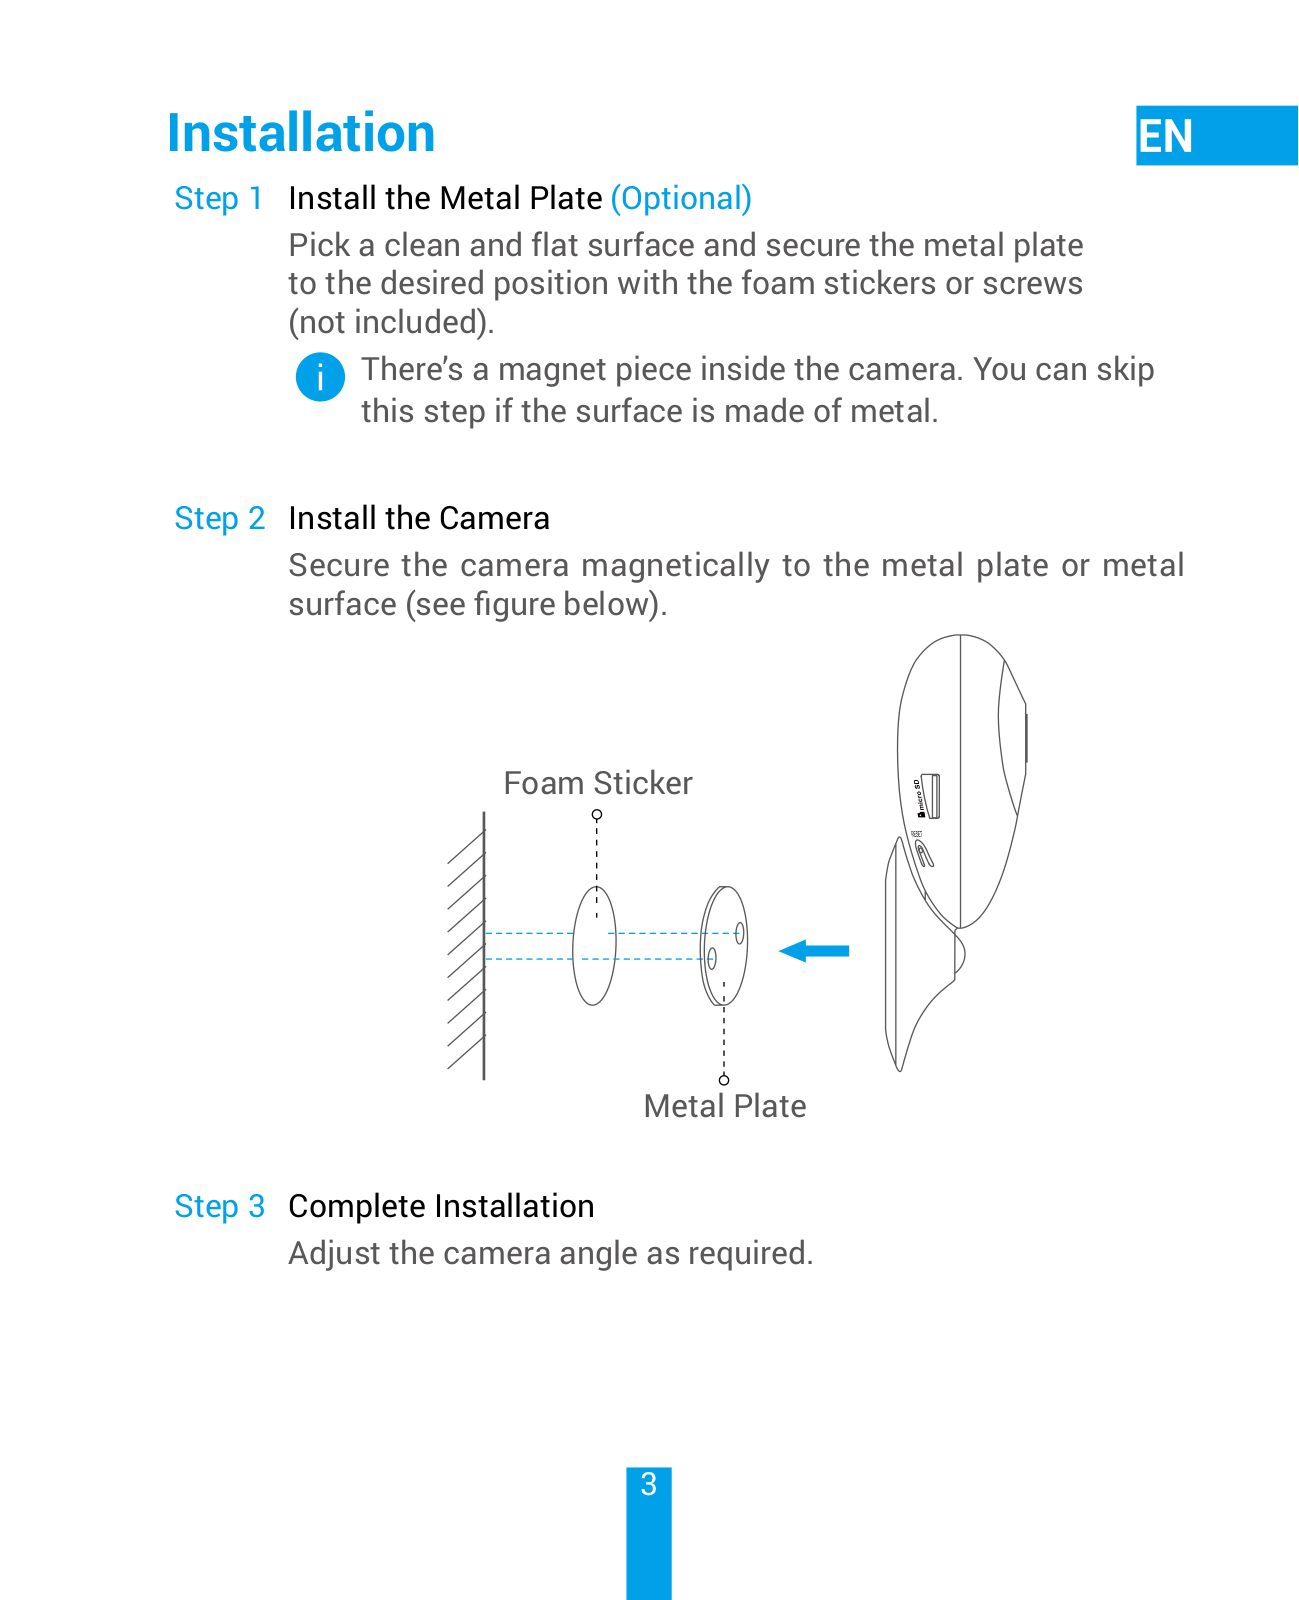
Secure the camera magnetically to the metal plate or metal surface (see figure below).

Foam Sticker

Metal Plate

Step 3 Complete Installation

Adjust the camera angle as required.

3

Appendix

Basics

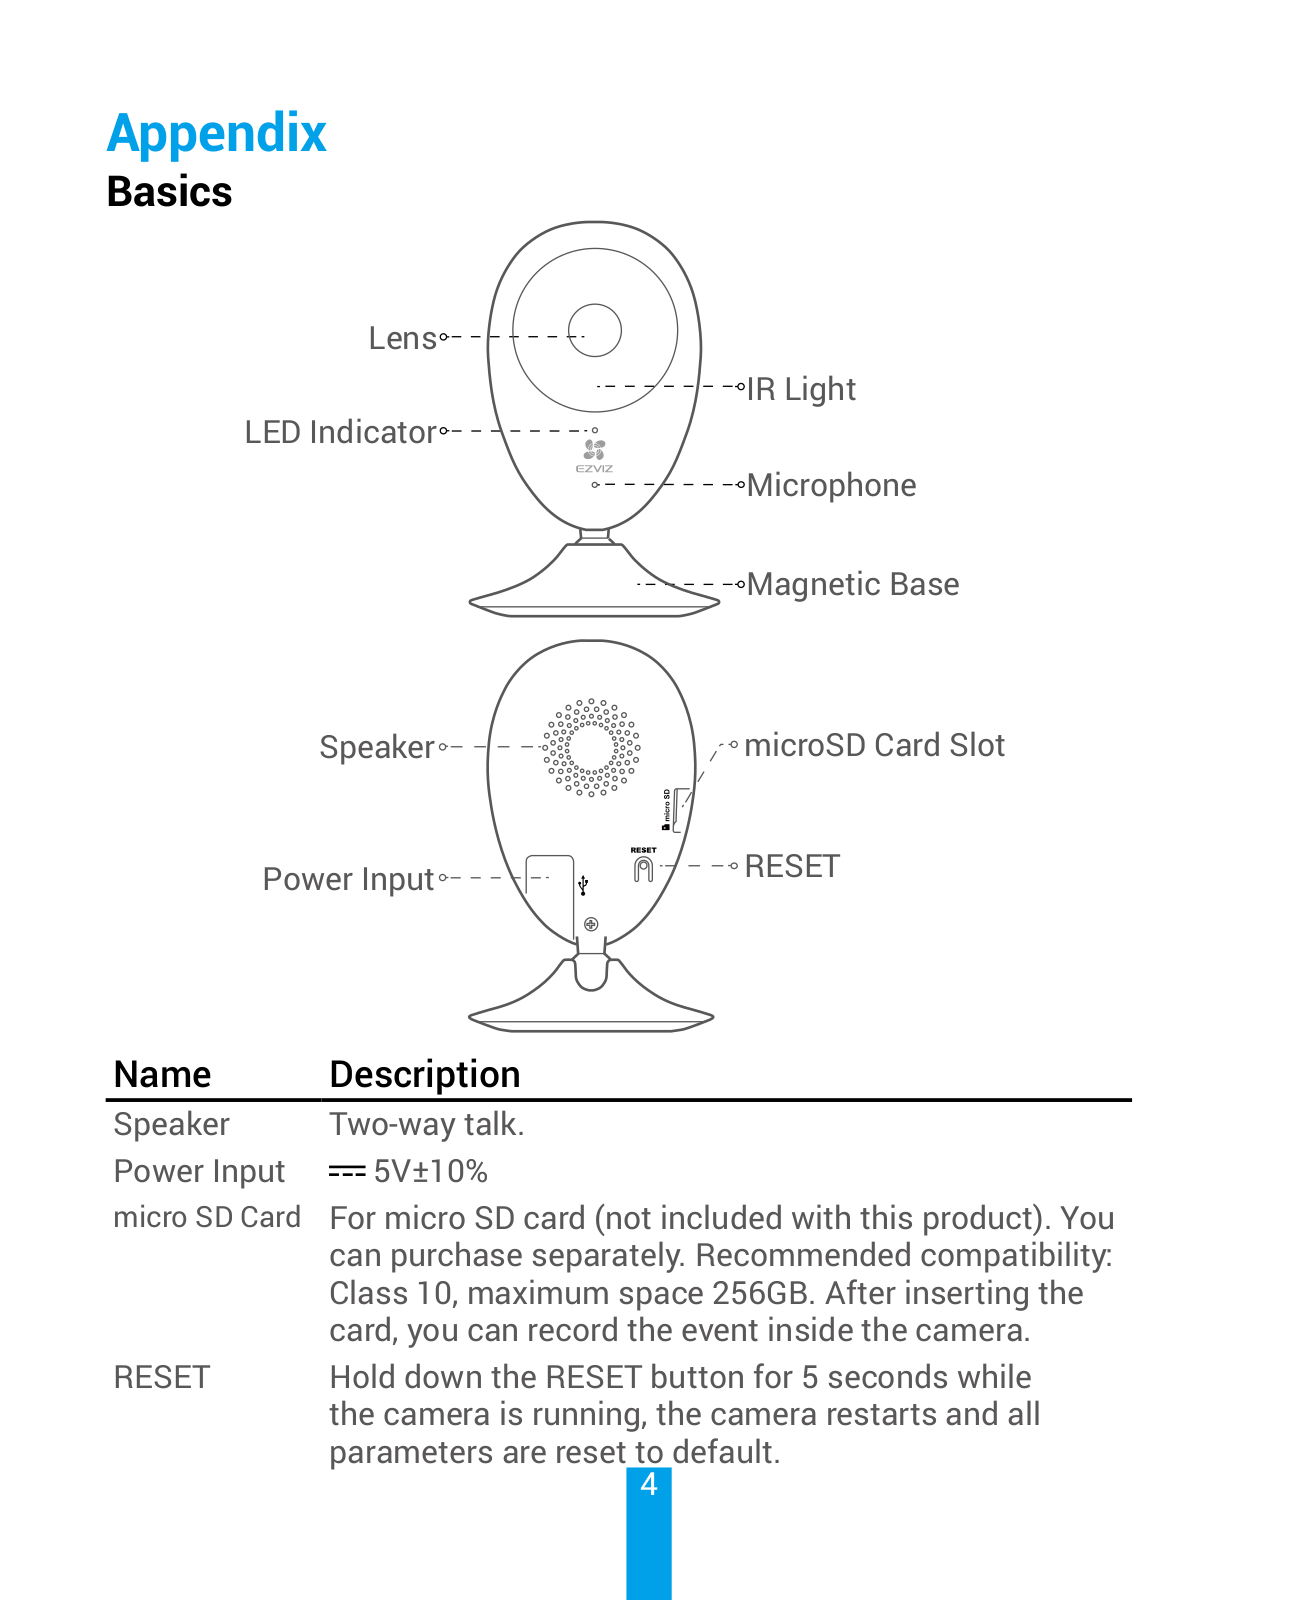
Lens

IR Light

LED Indicator

Microphone

Magnetic Base

Speaker microSD Card Slot

Power Input RESET

Name

Description

Speaker

Two-way talk.

Power Input


5V±10%


micro SD Card For micro SD card (not included with this product). You can purchase separately. Recommended compatibility: Class 10, maximum space 256GB. After inserting the card, you can record the event inside the camera.

RESET

Hold down the RESET button for 5 seconds while


the camera is running, the camera restarts and all


parameters are reset to default.


4


Name Description

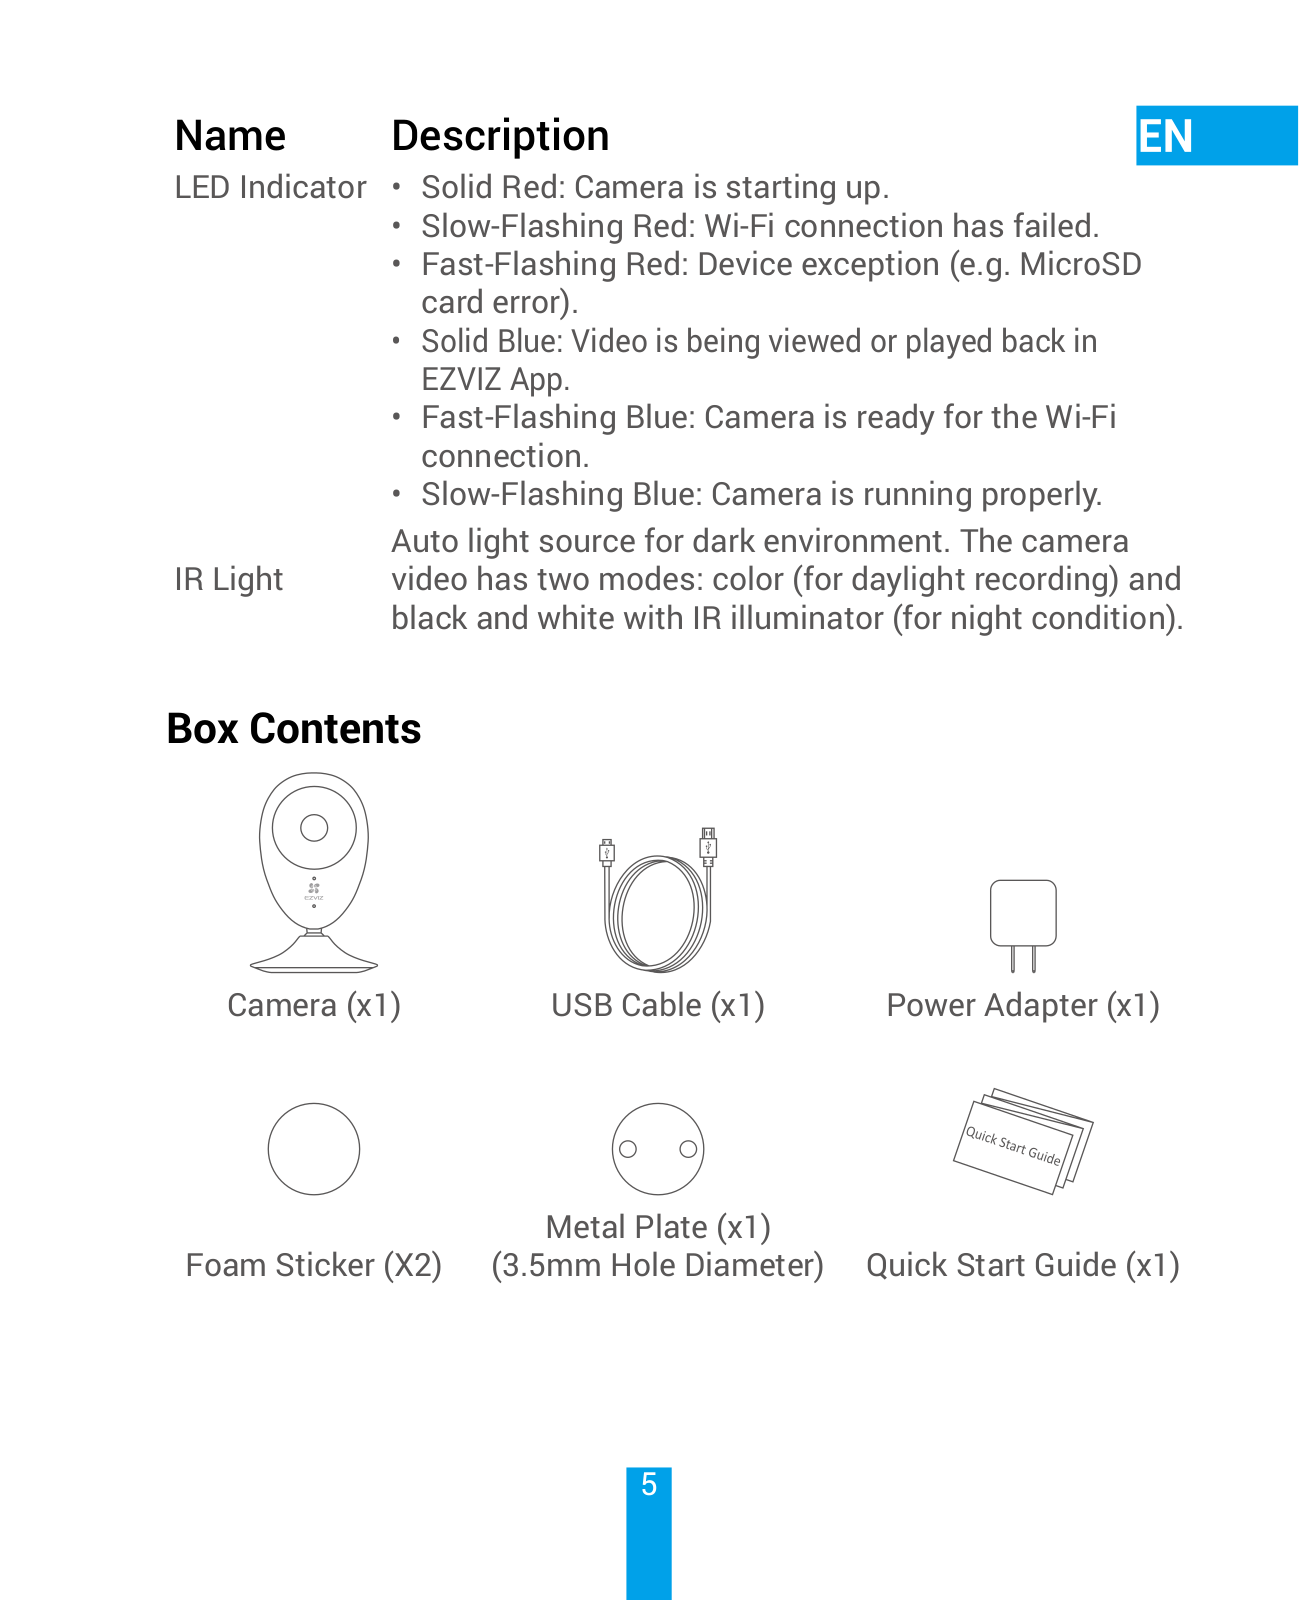
LED Indicator • Solid Red: Camera is starting up.

Slow-Flashing Red: Wi-Fi connection has failed.

Fast-Flashing Red: Device exception (e.g. MicroSD card error).

Solid Blue: Video is being viewed or played back in EZVIZ App.

Fast-Flashing Blue: Camera is ready for the Wi-Fi connection.

Slow-Flashing Blue: Camera is running properly.

Auto light source for dark environment. The camera

IR Light video has two modes: color (for daylight recording) and black and white with IR illuminator (for night condition).

Box Contents

Camera (x1)

USB Cable (x1)

Power Adapter (x1)


Metal Plate (x1)


Foam Sticker (X2)

(3.5mm Hole Diameter)

Quick Start Guide (x1)

5

Install Memory Card

Insert a micro SD card into the slot until a click.

Initialize Memory Card

1.In the EZVIZ app, check the memory card status by tapping on the Storage Status in the Device Settings interface.

2.If the memory card status displays as Uninitialized, tap to initialize it. The status will then change to Normal. You can then start recording any event triggered video in the camera such as motion detection.

6

Troubleshooting

Q:“The device is offline.” or “The device is not registered.” prompts appear when adding the camera using the EZVIZ App.

A:1.Make sure the network, which the camera is connected to, is working properly and the router’s DHCP is enabled.

2.Hold down the RESET button for 5s to reset the settings if you change the network parameters.

Q:The mobile phone cannot receive alarm prompts when the camera is online.

A:1.Make sure the EZVIZ app is running on your mobile phone.

2.For Android OS mobile phone, make sure the app is running in the background; and for iOS mobile phones, enable the message push function in “Settings > Notification”.

Q:Does the camera support power via USB devices or a portable battery?

A:It’s advised to use the EZVIZ standard power adapter to provide a stable voltage supply.

For detailed information, please visit www.ezvizlife.com.

7

Configuration

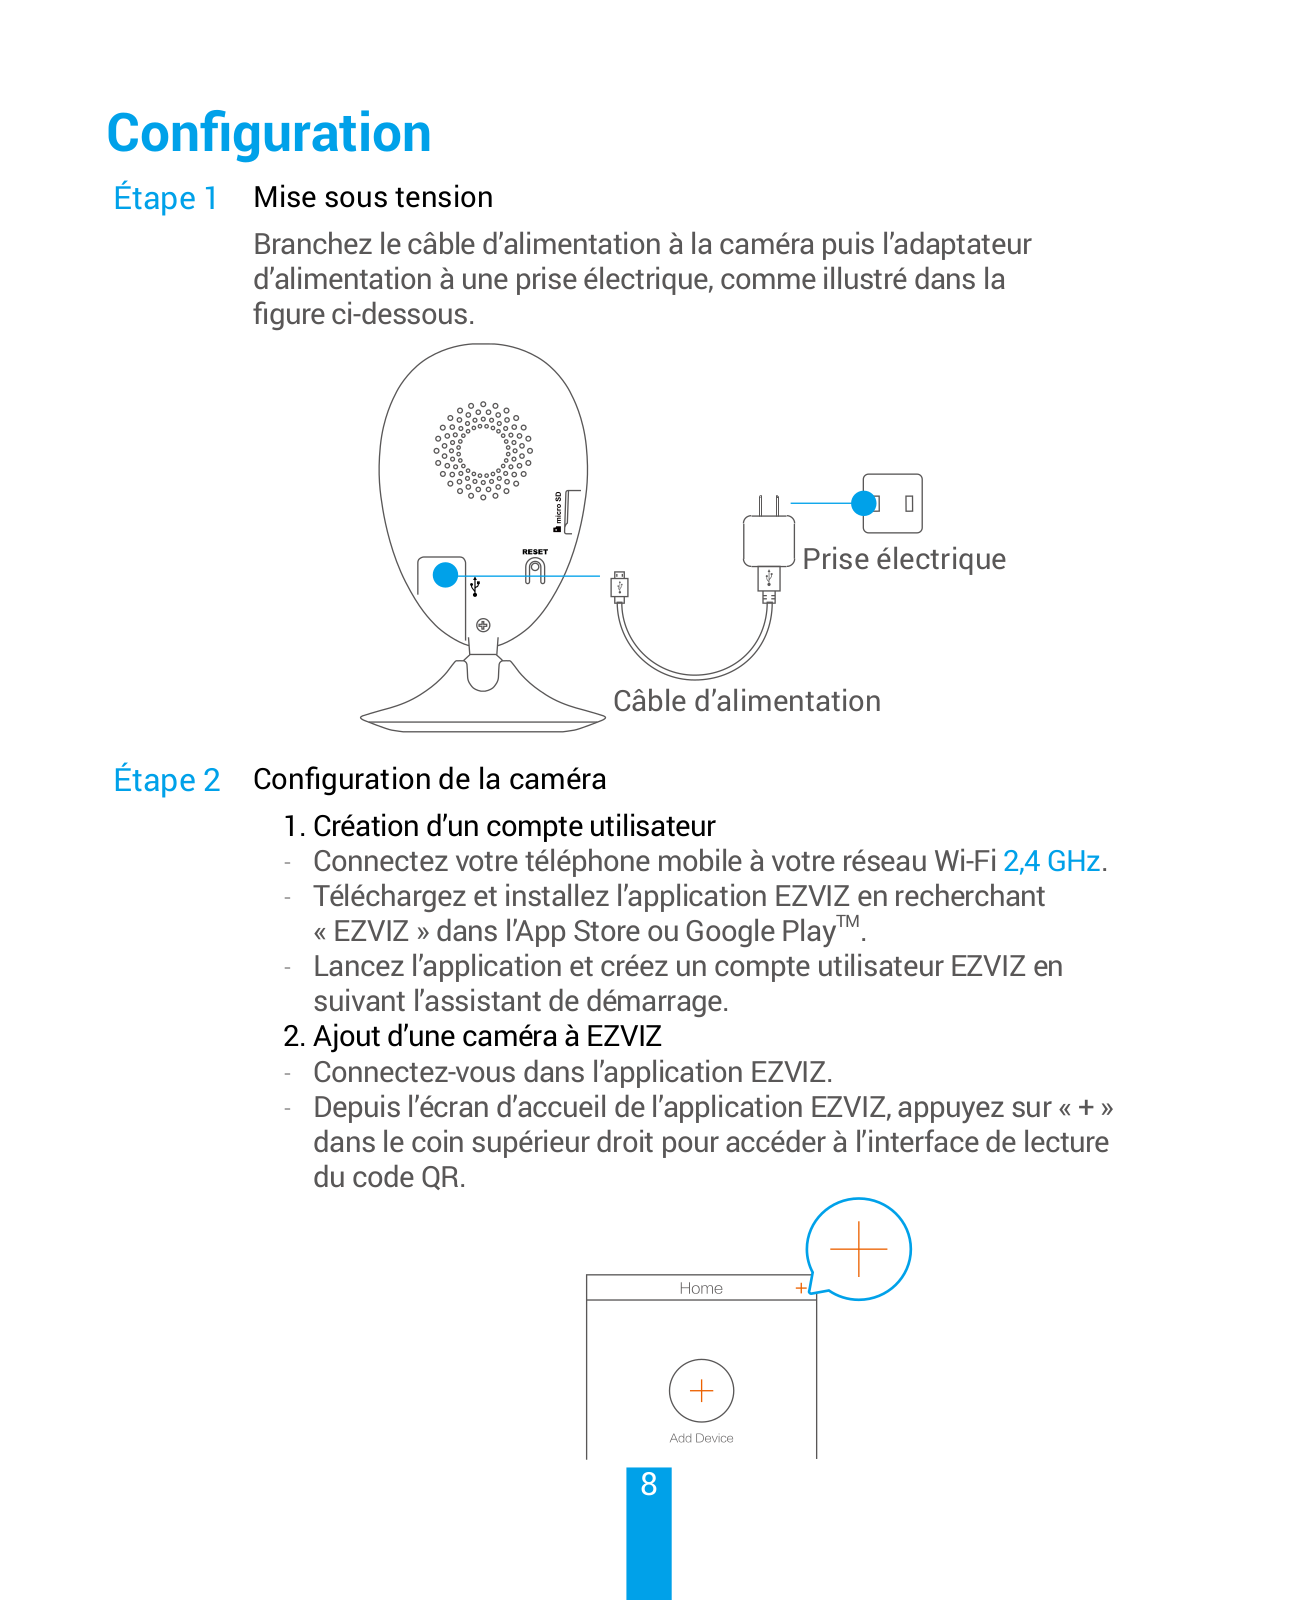
Étape 1 Mise sous tension

Branchez le câble d’alimentation à la caméra puis l’adaptateur d’alimentation à une prise électrique, comme illustré dans la figure ci-dessous.

Prise électrique

Câble d’alimentation

Étape 2 Configuration de la caméra

1. Création d’un compte utilisateur

-- Connectez votre téléphone mobile à votre réseau Wi-Fi 2,4 GHz. -- Téléchargez et installez l’application EZVIZ en recherchant

« EZVIZ » dans l’App Store ou Google PlayTM.

-- Lancez l’application et créez un compte utilisateur EZVIZ en suivant l’assistant de démarrage.

2. Ajout d’une caméra à EZVIZ

-- Connectez-vous dans l’application EZVIZ.

-- Depuis l’écran d’accueil de l’application EZVIZ, appuyez sur « + » dans le coin supérieur droit pour accéder à l’interface de lecture du code QR.

8

Ezviz UD18135B Quick Start Guide

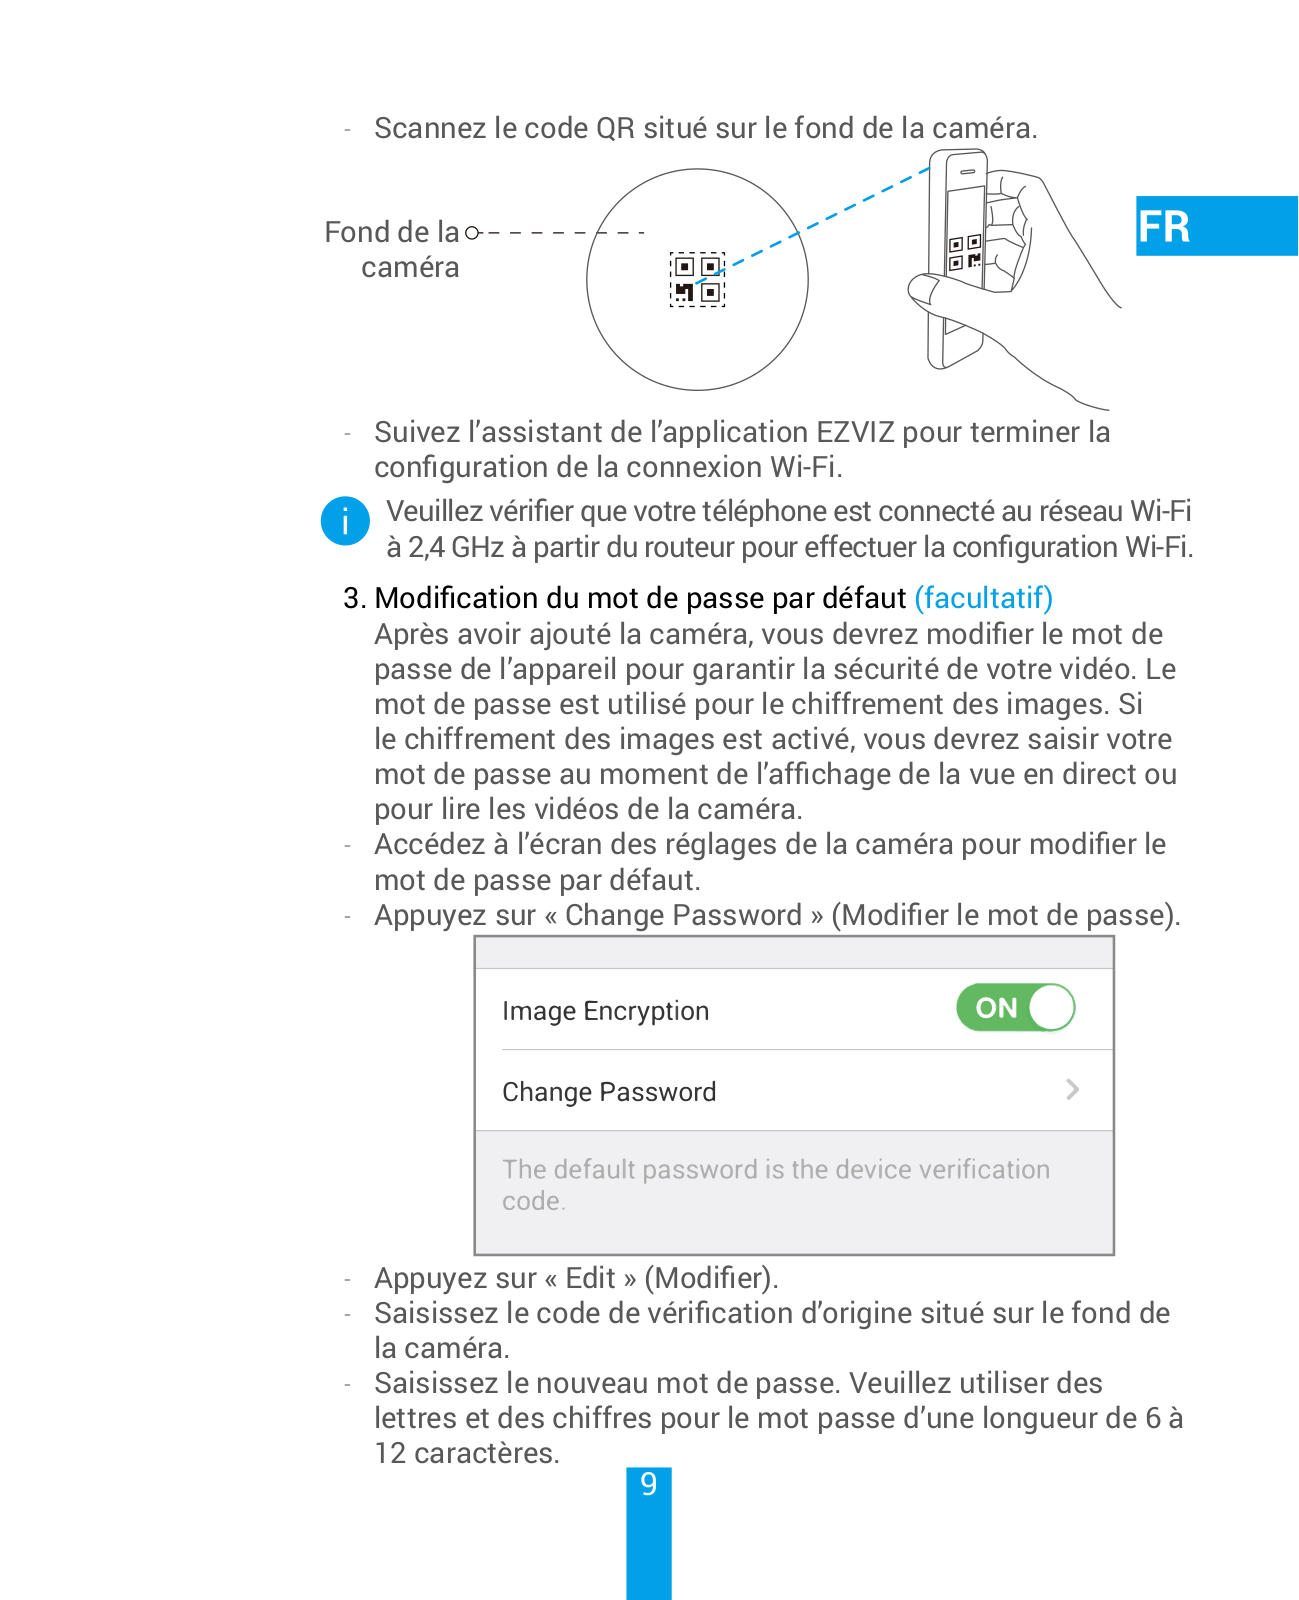
-- Scannez le code QR situé sur le fond de la caméra.

Fond de la caméra

-- Suivez l’assistant de l’application EZVIZ pour terminer la configuration de la connexion Wi-Fi.

Veuillez vérifier que votre téléphone est connecté au réseauWi-Fi

à2,4GHz à partir du routeur pour effectuer la configurationWi-Fi.

3.Modification du mot de passe par défaut (facultatif)

Après avoir ajouté la caméra, vous devrez modifier le mot de passe de l’appareil pour garantir la sécurité de votre vidéo. Le mot de passe est utilisé pour le chiffrement des images. Si le chiffrement des images est activé, vous devrez saisir votre mot de passe au moment de l’affichage de la vue en direct ou pour lire les vidéos de la caméra.

-- Accédez à l’écran des réglages de la caméra pour modifier le mot de passe par défaut.

-- Appuyez sur « Change Password » (Modifier le mot de passe).

-- Appuyez sur « Edit » (Modifier).

-- Saisissez le code de vérification d’origine situé sur le fond de la caméra.

-- Saisissez le nouveau mot de passe. Veuillez utiliser des lettres et des chiffres pour le mot passe d’une longueur de 6 à

12 caractères.

9

Installation

Étape 1 Installation de la plaque métallique (facultatif)

Choisissez une surface plane et propre, puis fixez la plaque métallique à la position souhaitée à l’aide des autocollants expansés ou des vis (non fournies).

La caméra dispose d’un élément magnétique interne. Ignorez cette étape si la surface est métallique.

Étape 2 Installation de la caméra

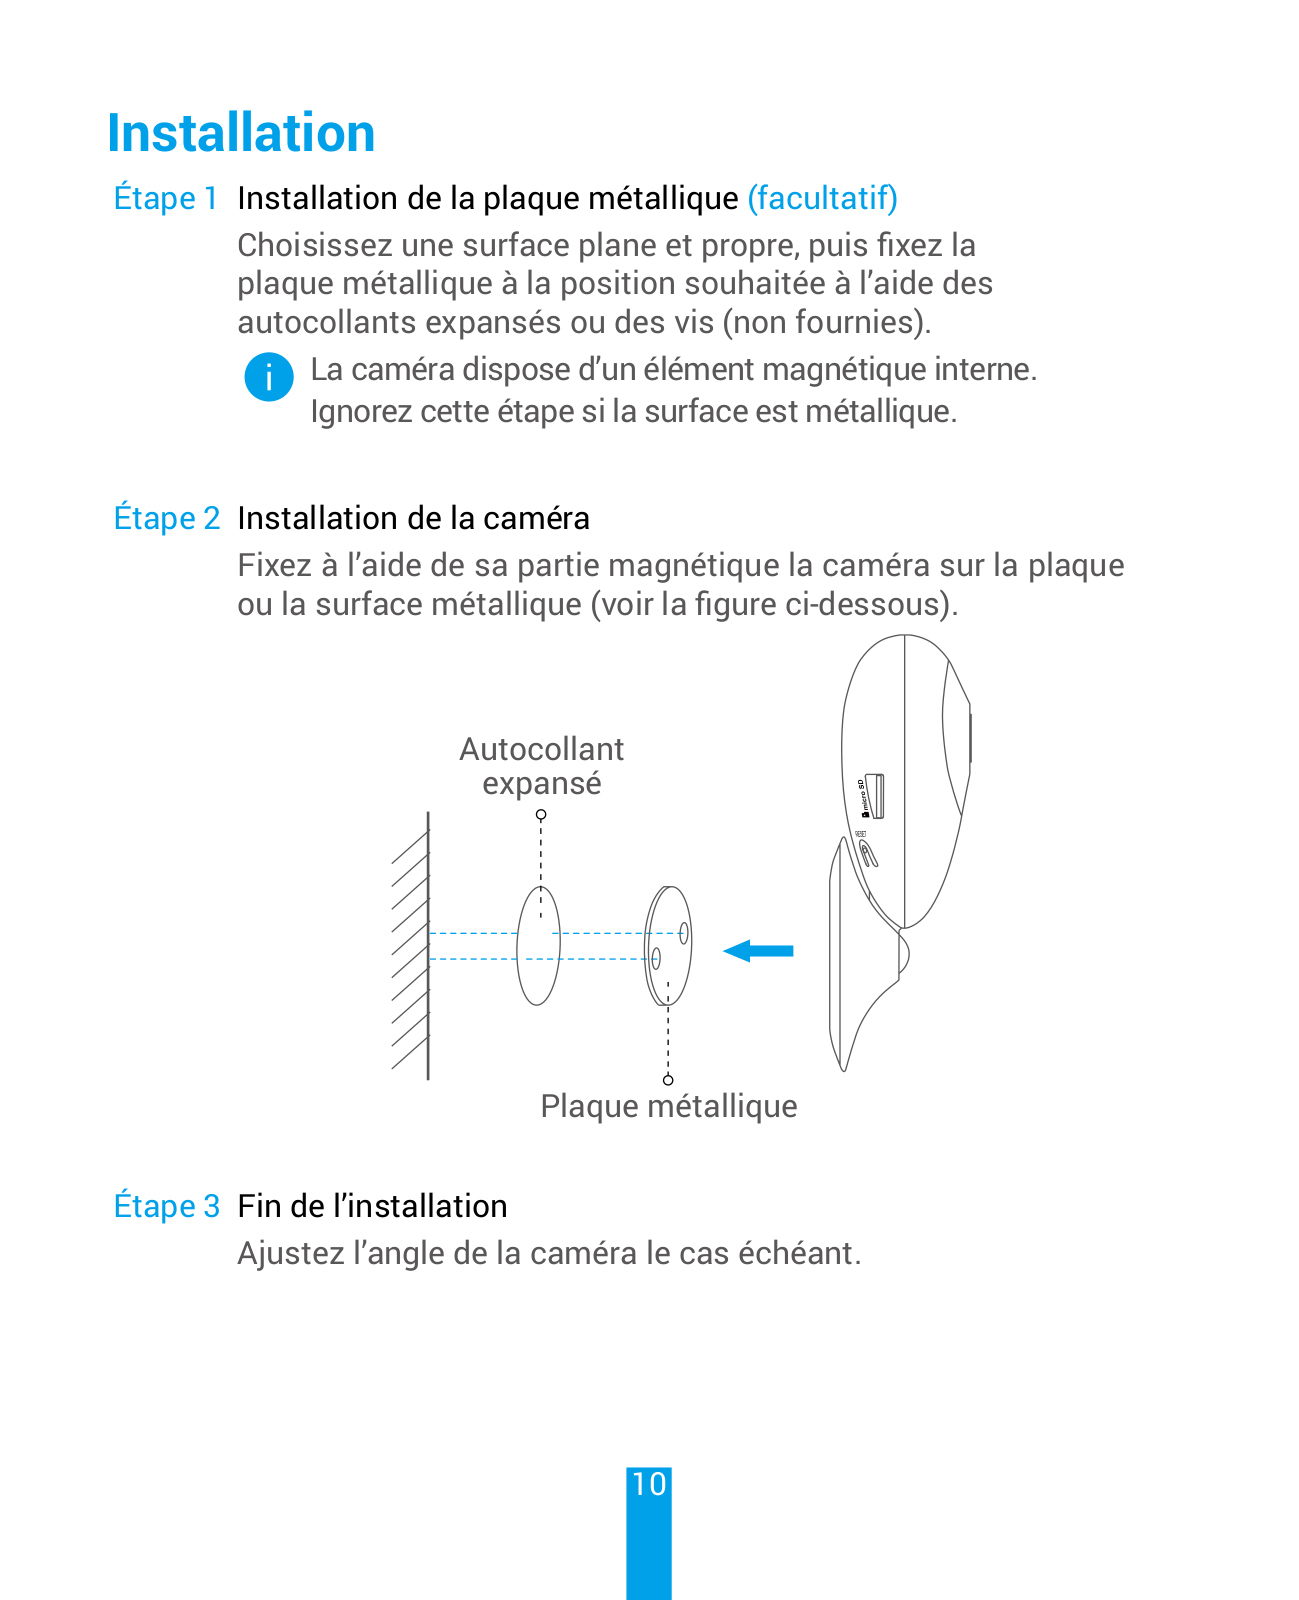
Fixez à l’aide de sa partie magnétique la caméra sur la plaque ou la surface métallique (voir la figure ci-dessous).

Autocollant

expansé

Plaque métallique

Étape 3 Fin de l’installation

Ajustez l’angle de la caméra le cas échéant.

10

Annexe

Notions de base

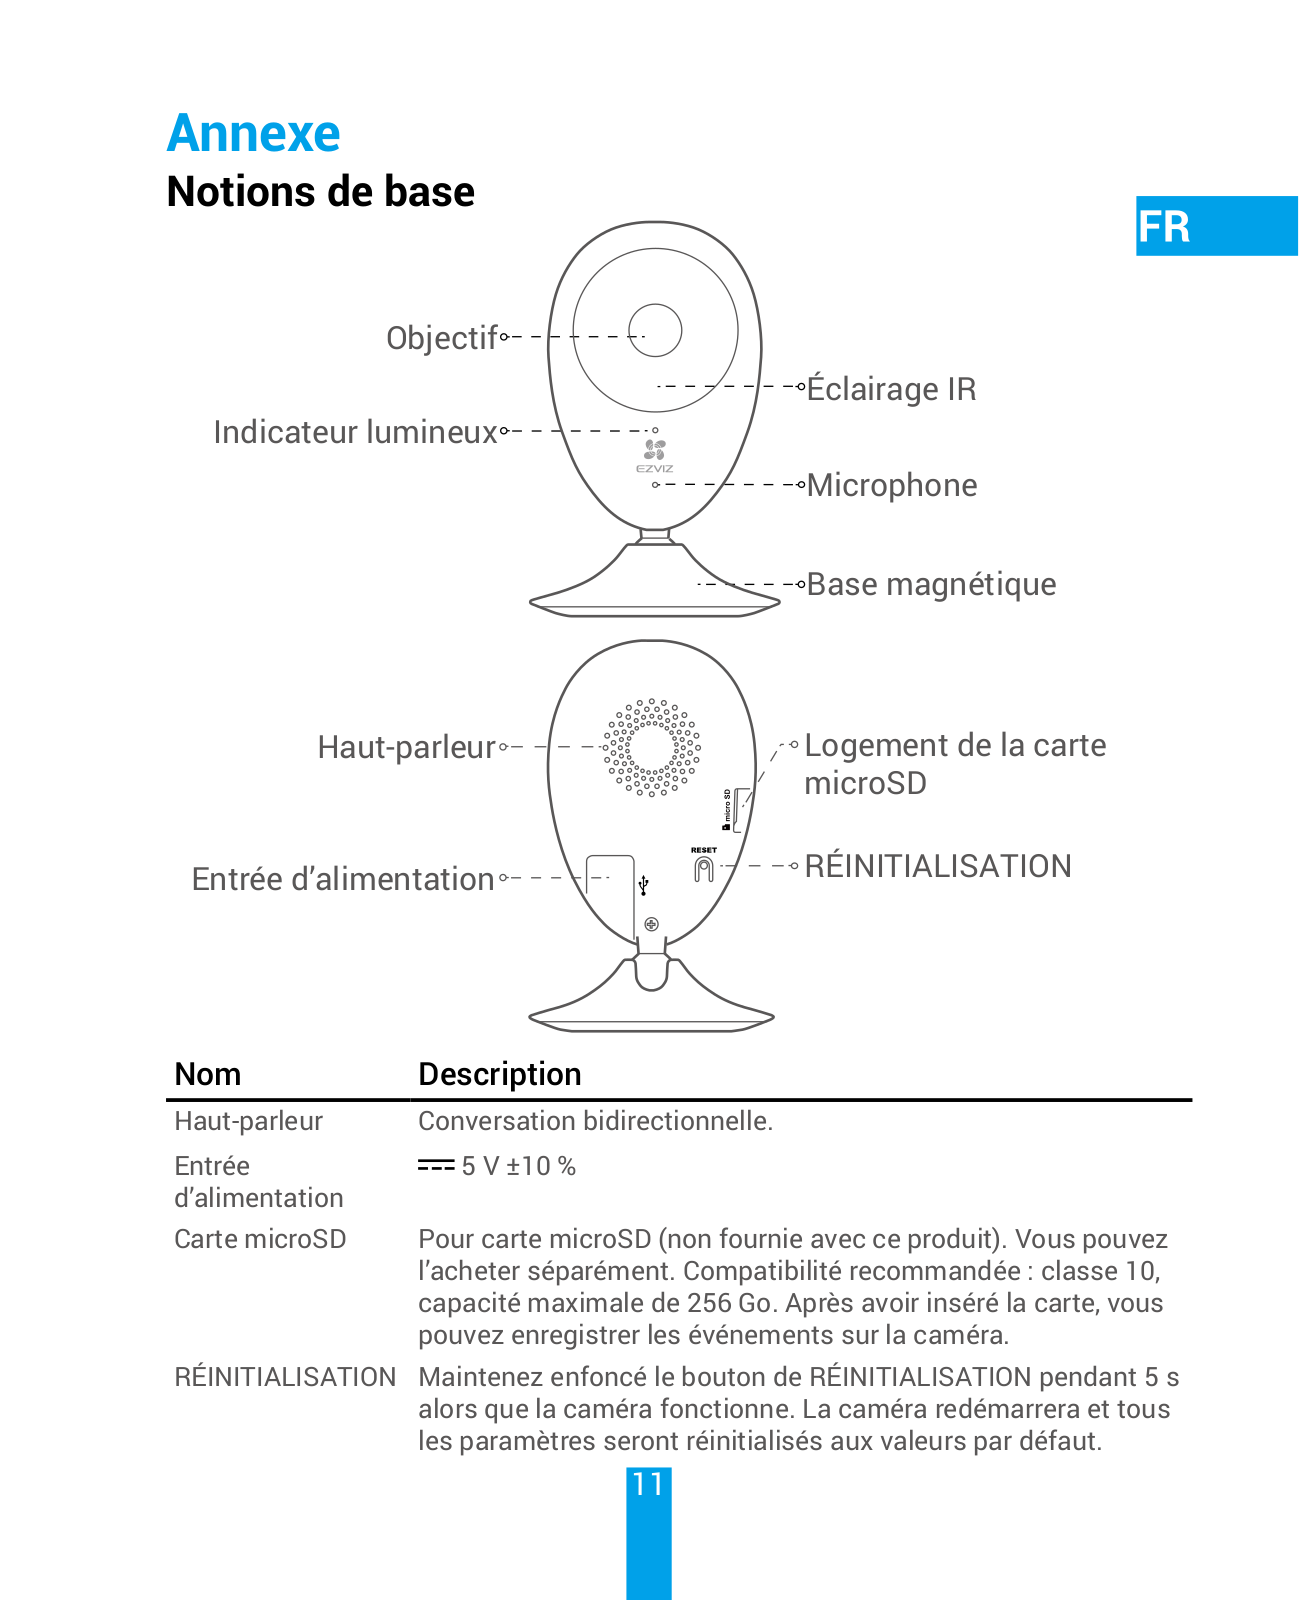
Objectif

Éclairage IR

Indicateur lumineux


Microphone


Base magnétique

Haut-parleur

Logement de la carte


microSD

Entrée d’alimentation

RÉINITIALISATION


Nom

Description


Haut-parleur

Conversation bidirectionnelle.


Entrée

5 V ±10 %


d’alimentation


Carte microSD

Pour carte microSD (non fournie avec ce produit). Vous pouvez


l’acheter séparément. Compatibilité recommandée : classe 10,


capacité maximale de 256 Go. Après avoir inséré la carte, vous


pouvez enregistrer les événements sur la caméra.

RÉINITIALISATION

Maintenez enfoncé le bouton de RÉINITIALISATION pendant 5 s


alors que la caméra fonctionne. La caméra redémarrera et tous


les paramètres seront réinitialisés aux valeurs par défaut.

11

Loading...
+ 38 hidden pages