

Page 1
UD01155B
EN
ES
FR
Page 2
Setup
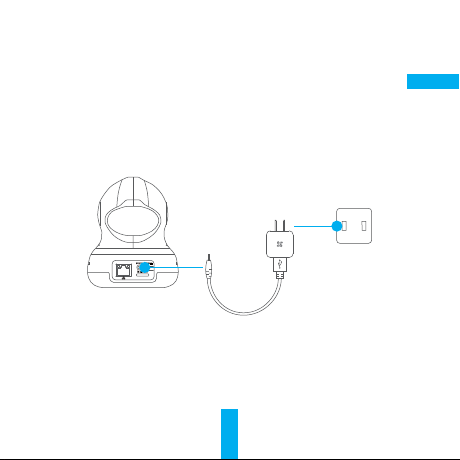
Step 1 Power-on
Plug the power cable into the Camera and to the power adapter and then into a power
outlet, as shown in the figure below. The LED indicator will flash red and blue when
the camera is ready for setup.
Power Outlet
Power Cable
1
EN
Page 3
Step 2 Camera Setup
1. Create an user account
- Connect your mobile phone to Wi-Fi.
- Download and install the EZVIZ app by searching “EZVIZ” in App Store and Google
PlayTM.
- Launch the app and register for an EZVIZ user account following the start-up
wizard.
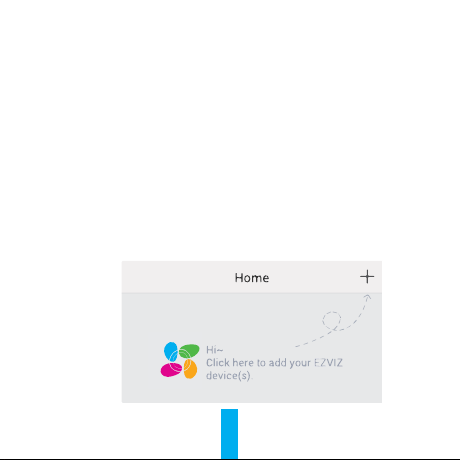
2. Adding a camera to EZVIZ
- Log in the EZVIZ app.
- From the EZVIZ app Home screen, tap “+” on the upper-right hand corner to go to
the scan QR code interface.
2
Page 4
- Enter the verification code located on the bottom of the camera.
- Enter the correct time zone and DST information and tap “Finish” to finish setup.
Bottom of the Camera
3. To Change the Default Password
The camera uses the verification code as the default camera password. After
adding the camera, you are required to change the device password to ensure your
video security. The password is used for the Image Encryption. If you turn on the
Image Encryption, you are required to input your password when you live view or
play back the camera.
- Go to the camera settings screen to change the default password.
3
EN- Scan the QR Code on the bottom of the camera.
Page 5
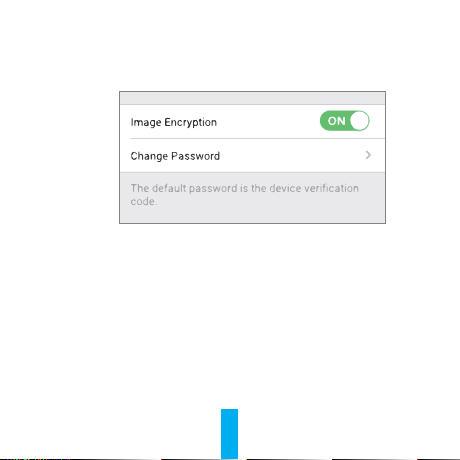
- Tap on “Change Password”.
- Tap on “Edit”.
- Enter the original verification code located on the bottom of the camera.
- Enter the new password. Please use letters and numbers between 6 to 12
characters.
4
Page 6
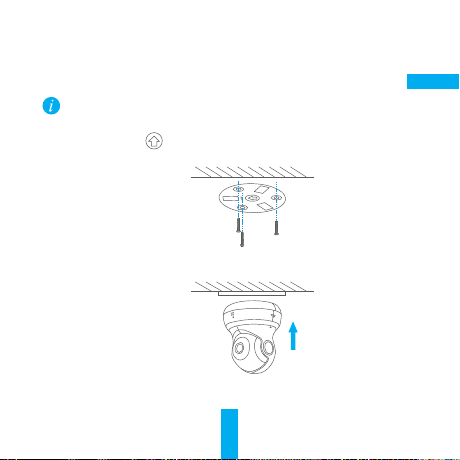
Wall Mounting (Optional)
• Make sure the wall is strong enough to withstand three times the camera's weight.
• The installation surface should be clean and flat.
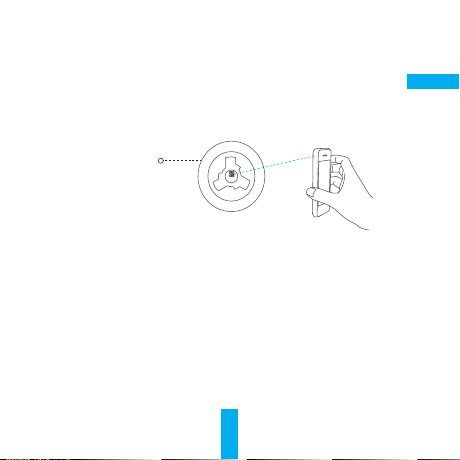
1. Make sure the on the base towards you and fix the base to the wall with three
screws.
2. Align the camera to the base, and rotate the camera clockwise 15° to secure it
with the base.
3. Connect the power cable to the camera. If the camera was previously connected to
the Wi-Fi network, it will automatically connect back to the same Wi-Fi network.
5
ENThe camera can be mounted on the wall or ceiling.
Page 7
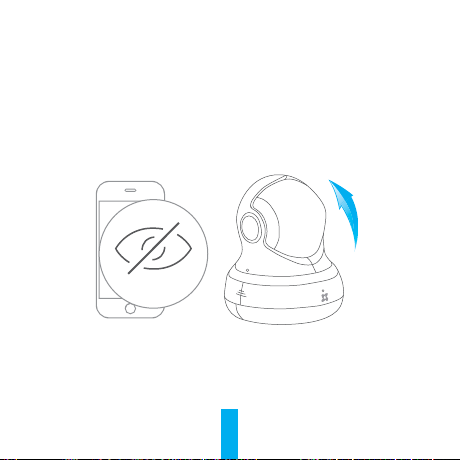
Turning on Smart Mask
- Log into the EZVIZ app.
- Select the camera in the home screen.
- Tap on the “Smart Mask” icon.
- The camera lens will rotate up and hide under the lens cover.
Smart Mask
Lens will rotate up under the lens cover
6
Page 8

Appendix
Box Content
Mini 360 (x1) Base (x1)
Power Cable (x1) Network Cable (x1) Screws (x3)
EN
Power Adapter (x1) Quick Start Guide x(1)
7
Page 9
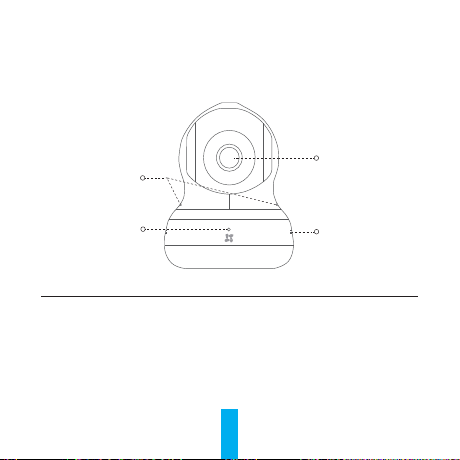
Basics
Lens
Dual MIC
LED Indicator
Speaker
Name Description
LED Indicator Red and Blue Alternately: Camera is ready for Wi-Fi setup.
Steady Blue: The camera is connected by a user.
Slowly Flicker in Blue: The camera is running properly.
Steady Red: The camera is starting.
Slowly Flicker in Red: The Wi-Fi connection has failed.
Fast Flicker in Red: The microSD card error.
8
Page 10

EN
Power Input
Network Interface
RESET Button
MicroSD Card Slot
Name Description
Power Input 5V±10%
Network Interface 10M/100M Self-adaptive Ethernet Interface
Reset Button Hold down the reset button for 10 seconds to restore default settings.
MicroSD Card
Slot
Insert microSD card for local storage.
9
Page 11

Troubleshooting
“The device is offline.” or “The device is not registered.” prompts appear when adding
Q:
the camera using the EZVIZ app.
1. Make sure the network, which the camera is connected to, is working properly and
A:
the router’s DHCP is enabled.
2. Hold down the RESET button for 3 s to reset the settings and set the network again.
How to use the microSD for local sotrage?
Q:
Insert a microSD card into the card slot and add the camera to your EZVIZ account. Log
A:
in the EZVIZ app and enter the “Device Details” interface, if the “Initialize Storage Card”
button appears, you need to initialize the microSD card first.
The microSD card storage for the motion detection recording is enabled by default.
The mobile phone cannot receive alarm prompts when the camera is online.
Q:
1. Make sure the EZVIZ app is running on your mobile phone.
A:
2. For Android OS mobile phone, make sure the app is running in the background; and for
iOS mobile phones, enable the message push function in “Settings > Notification”.
Live view or playback failed.
Q:
Make sure your network is well connected. Viewing live video requires a good bandwidth.
A:
You can refresh the video, or change a network and try again.
10
Page 12

Configuración
Paso 1 Encendido
Conecte el cable de alimentación a la cámara y al adaptador de alimentación y
luego al toma de corriente, como se muestra en la siguiente figura. El indicador LED
parpadeará en rojo y azul cuando la cámara esté lista para la configuración.
Toma de corriente
Cable de
alimentación
11
ES
Page 13

Paso 2 Configuración de la cámara
1. Cree una cuenta de usuario
- Conecte su teléfono móvil al Wi-Fi.
- Descargue e instale la aplicación EZVIZ buscando “EZVIZ” en App Store y Google
PlayTM.
- Inicie la aplicación y regístrese para obtener una cuenta de usuario de EZVIZ
siguiendo el asistente de inicio.
2. Agregue una cámara a EZVIZ
- Inicie sesión en la aplicación EZVIZ.
- Desde la pantalla de Inicio de la aplicación EZVIZ, pulse “+” en el extremo
superior derecho y diríjase a la interfaz de escaneo de código QR.
12
Page 14

- Escanee el código QR que aparece en la parte inferior de la cámara.
- Ingrese el código de verificación ubicado en la parte inferior de la cámara.
- Ingrese la zona horaria correcta y la información de DST y pulse “Finalizar” (Finish)
para terminar la configuración.
Parte inferior de la
cámara
3. Cambiar la contraseña predeterminada
La cámara utiliza el código de verificación como la contraseña predeterminada
de la cámara. Después de agregar la cámara, debe cambiar la contraseña del
dispositivo para garantizar la seguridad de su video. La contraseña se utiliza para
la Encriptación de imagen. Si activa la Encriptación de imagen, debe ingresar la
contraseña para la visualización en vivo o la reproducción de la cámara.
- Diríjase a la pantalla de configuración de la cámara para cambiar la contraseña
predeterminada.
13
ES
Page 15

- Pulse “Cambiar contraseña” (Change Password).
- Pulse “Editar” (Edit).
- Ingrese el código de verificación original ubicado en la parte inferior de la cámara.
- Ingrese la nueva contraseña. Utilice letras y números y entre 6 y 12 caracteres.
14
Page 16

Montaje en pared (Opcional)
La cámara puede montarse en la pared o en el techo.
• Asegúrese de que la pared sea lo suficientemente fuerte para soportar tres veces el
peso de la cámara.
• La superficie de instalación debe estar limpia y plana.
1. Asegúrese que la
2. Alinee la cámara con la base y gire la cámara 15° en el sentido de las agujas del reloj
para asegurarla a la base.
3. Conecte el cable de alimentación a la cámara. Si la cámara fue conectada anteriormente
a la red Wi-Fi, se conectará automáticamente a la misma red.
en la base mire hacia usted y fije la base a la pared con tres tornillos.
15
ES
Page 17

Encendido de máscara inteligente
- Inicie sesión en la aplicación EZVIZ.
- Seleccione la cámara en la pantalla de inicio.
- Pulse el icono “Máscara inteligente” (Smart Mask).
- El lente de la cámara girará hacia arriba y se ocultará debajo de la tapa del lente.
Máscara inteligente
El lente girará hacia arriba debajo de la tapa del lente
16
Page 18

Anexo
Contenido de la caja
Mini 360 (x1) Base (x1)
Cable de alimentación (x1) Cable de red (x1) Tornillos (x3)
Adaptador de alimentación (x1) Guía de inicio rápido x (1)
17
ES
Page 19

Partes básicas
MIC dual
Indicador LED
Lente
Altavoz
Nombre Descripción
Indicador LED Rojo y azul alternativamente: La cámara está lista para la configuración
de Wi-Fi.
Azul estable: La cámara es conectada por un usuario.
Parpadeo lento en azul: La cámara funciona correctamente.
Rojo estable: La cámara se está iniciando.
Parpadeo lento en rojo: Error de conexión de Wi-Fi.
Parpadeo rápido en rojo: Error de tarjeta microSD.
18
Page 20

ES
Entrada de alimentación
Interfaz de red
Botón de REINICIO
Ranura para tarjeta
MicroSD
Nombre Descripción
Entrada de alimentación
Interfaz de red Interfaz Ethernet autoadaptativa de 10M/100M
Botón de reinicio Mantenga presionado el botón de reinicio durante 10 segundos
Ranura para tarjeta MicroSD Inserte la tarjeta microSD para el almacenamiento local.
5V±10%
para restablecer la configuración predeterminada.
19
Page 21

Solución de fallas
Aparece el mensaje “El dispositivo está fuera de línea” (The device is offline.) o “El
P:
dispositivo no está registrado” (The device is not registered.) cuando agrego la cámara
usando la aplicación EZVIZ.
1. Asegúrese de que la red a la cual está conectada la cámara funcione correctamente y
R:
que el DHCP del enrutador esté activado.
2. Mantenga presionado el botón REINICIAR durante 3 segundos para reiniciar la configuración
y configurar la red nuevamente.
¿Cómo uso la tarjeta microSD para el almacenamiento local?
P:
Inserte una tarjeta microSD en la ranura de la tarjeta y agregue la cámara a su cuenta
R:
EZVIZ. Inicie sesión en la aplicación EZVIZ e ingrese a la interfaz “Detalles del dispositivo”
(Device Details), si aparece el botón “Inicializar tarjeta de almacenamiento” (Initialize
Storage Card) debe inicializar primero la tarjeta microSD.
El almacenamiento de la tarjeta microSD para la grabación de la detección de movimiento
se activa por defecto.
20
Page 22

El teléfono móvil no puede recibir avisos de alarma cuando la cámara está en línea.
P:
1. Asegúrese de que la aplicación EZVIZ esté activa en su dispositivo móvil.
R:
2. Para los teléfonos móviles con sistema operativo Android, asegúrese de que la aplicación
esté activa en segundo plano; y para los dispositivos móviles con iOS, active la función
del botón de comando de mensajes en “Configuración (Settings)> “Notificación”
(Notification).
La visualización en vivo o la reproducción falla.
P:
Asegúrese que la red esté bien conectada. La visualización de video en vivo requiere un buen
R:
ancho de banda. Puede actualizar el video o cambiar la red e intentarlo nuevamente.
21
ES
Page 23

Installation
Étape 1 Mise en marche
Connectez le câble d’alimentation dans la caméra et à l’adaptateur électrique, puis
dans une prise électrique, comme présenté sur la figure ci-dessous. Le témoin DEL
clignotera en rouge et bleu lorsque la caméra est prête à être configurée.
Câble
d’alimentation
22
Prise électrique
Page 24

Étape 2 Configuration de la caméra
1. Créer un compte d’utilisateur
- Connectez votre téléphone mobile à votre réseau Wi-Fi.
- Téléchargez et installez l’application EZVIZ en cherchant «EZVIZ» dans l’App
Store ou sur Google PlayTM.
- Lancez l’application et enregistrez un compte utilisateur EZVIZ en suivant
l’assistant de configuration.
2. Ajouter une caméra à EZVIZ
- Connectez-vous à l’application EZVIZ.
- Depuis l’écran d’accueil de l’application EZVIZ, tapez sur le «+» dans le coin
supérieur droit pour accéder à l’interface de lecture du code QR.
23
FR
Page 25

- Scannez le code QR au bas de la caméra.
- Entrez le code de vérification situé au bas de la caméra.
- Entrez le bon fuseau horaire et les informations d’heure avancée puis tapez sur
«terminer» (Finish) pour terminer la configuration.
Bas de la caméra
3. Pour changer le mot de passe par défaut
La caméra utilise le code de vérification comme mot de passe par défaut. Après
avoir ajouté la caméra, vous devrez changer le mot de passe de l’appareil pour
assurer votre sécurité vidéo. Le mot de passe est utilisé pour le cryptage de
l’image. Si vous activez le cryptage de l’image, vous devrez fournir votre mot de
passe lors de l’affichage en temps réel ou pour la visualisation de la vidéo.
- Accédez à la fenêtre des paramètres de la caméra pour changer le mot de passe
par défaut.
24
Page 26

- Tapez sur «Changer le mot de passe» (Change Password).
FR
- Tapez sur «Éditer» (Edit).
- Entrez le code de vérification original situé au bas de la caméra.
- Entrez le nouveau mot de passe. Veuillez utiliser des chiffres et des lettres
entre 6 et 12 caractères.
25
Page 27

Montage au mur (optionnel)
La caméra peut être fixée au mur ou au plafond.
• Assurez-vous que le mur est assez solide pour supporter trois fois le poids de la caméra.
• La surface d’installation doit être propre et plane.
1. Assurez-vous que le symbole sur la base pointe vers vous et fixez la base au
mur avec trois vis.
2. Alignez la caméra et la base, puis tournez la caméra dans le sens des aiguilles d’une
montre de 15° pour la fixer à la base.
3. Connectez le câble d’alimentation à la caméra. Si la caméra était déjà connectée
au réseau Wi-Fi, elle se reconnectera automatiquement au même réseau Wi-Fi.
26
Page 28

Activer le cache intelligent (Smart Mask)
- Connectez-vous à l’application EZVIZ.
- Sélectionnez la caméra sur l’écran d’accueil.
- Tapez sur l’icône «Cache intelligent» (Smart Mask).
- L’objectif de la caméra pivotera vers le haut pour se loger sous le couvercle de l’objectif.
Cache intelligent
L’objectif pivotera vers le haut sous le couvercle de l’objectif
27
FR
Page 29

Annexe
Contenu de la boîte
1 Mini 360 1 base
1 câble d’alimentation 1 câble réseau 3 vis
1 adaptateur électrique 1 guide de démarrage rapide
28
Page 30

Notions de base
FR
MICRO double
Voyant DEL
Objectif
Haut-parleur
Nom Description
Voyant DEL Rouge et bleu en alternance: la caméra est prête à la configuration Wi-Fi.
Bleu continu: la caméra est connectée par un utilisateur.
Clignote lentement en bleu: la caméra fonctionne correctement.
Rouge continu: la caméra est en démarrage.
Clignote lentement en rouge: la connexion Wi-Fi a échoué.
Clignote rapidement en rouge: problème avec la carte microSD.
29
Page 31

Entrée d’alimentation
Bouton de
RÉINITIALISATION
Interface réseau
Emplacement pour carte
microSD
Nom Description
5V ± 10%
Entrée d’alimentation
Interface réseau Interface Ethernet à adaptation automatique 10M/100M
Bouton de réinitialisation Maintenir enfoncé le bouton de réinitialisation pendant
Emplacement pour carte microSD Insérer une carte microSD pour un stockage local.
10secondes pour rétablir les paramètres par défaut.
30
Page 32

Dépannage
Le message «L’appareil est hors ligne.» (The device is offline.) ou «L’appareil n’est
Q:
pas enregistré.» (The device is not registered.) apparait lorsque vous ajoutez la
caméra en utilisant l’application EZVIZ.
1. Assurez-vous que le réseau auquel la caméra est connectée fonctionne correctement
R:
et que le serveur DHCP du routeur est activé.
2. Appuyez sur le bouton de RÉINITIALISATION pendant 3secondes pour réinitialiser les
paramètres et régler le réseau de nouveau.
Comment utiliser la carte microSD pour le stockage local?
Q:
Insérez une carte microSD dans son logement, puis ajoutez la caméra à votre compte
R:
EZVIZ. Connectez-vous à l’application EZVIZ et accédez à la page «Détails de l’appareil»
(Device Details), si le bouton «Initialisez la carte de stockage» (Initialize Storage Card)
apparait, vous devrez d’abord initialiser la carte microSD.
Le stockage sur la carte microSD pour l’enregistrement de la détection de mouvement
est activé par défaut.
31
FR
Page 33

Le téléphone mobile ne peut pas recevoir les messages d’alerte lorsque la caméra est
Q:
en ligne.
1. Assurez-vous que l’application EZVIZ est en cours d’exécution sur votre téléphone
R:
mobile.
2. Pour les téléphones mobiles Android, assurez-vous que l’application s’exécute en
arrière-plan; et pour les téléphones mobiles sous iOS, autorisez les notifications
push sous «Réglages > Notifications» (Settings > Notification).
La visualisation en temps réel ou la lecture a échoué.
Q:
Assurez-vous que votre réseau est bien connecté. La visualisation vidéo en temps réel
R:
requiert une bonne bande passante. Vous pouvez rafraichir la vidéo ou changer de réseau,
puis essayer de nouveau.
32
Page 34

 Loading...