

Page 1

Husky Air
www.ezvizlife.com
NL
Page 2

Page 3

COPYRIGHT ©2017 Hangzhou Hikvision Digital Technology Co., Ltd. or its subsidiaries. ALL RIGHTS
RESERVED.
About this Manual
The Manual includes instructions for using and managing the product. Pictures, charts, images and all
other information hereinafter are for description and explanation only. The information contained in the
Manual is subject to change, without notice, due to firmware updates or other reasons. Please find the
latest version in the ™ website (http://www.ezvizlife.com).
Any and all information, including, among others, wordings, pictures, graphs are the properties
of Hangzhou Hikvision Digital Technology Co., Ltd. or its subsidiaries (hereinafter referred to be
“Hikvision”). This user manual (hereinafter referred to be “the Manual”) cannot be reproduced,
changed, translated, or distributed, partially or wholly, by any means, without the prior written
permission of Hikvision. Unless otherwise stipulated, Hikvision does not make any warranties,
guarantees or representations, express or implied, regarding to the Manual.
Trademarks Acknowledgement
™, ™, and other Hikvision’s trademarks and logos are the properties of Hikvision
in various jurisdictions. Other trademarks and logos mentioned below are the properties of their
respective owners.
Legal Disclaimer
TO THE MAXIMUM EXTENT PERMITTED BY APPLICABLE LAW, THE PRODUCT DESCRIBED, WITH ITS
HARDWARE, SOFTWARE AND FIRMWARE, IS PROVIDED “AS IS”, WITH ALL FAULTS AND ERRORS,
AND HIKVISION MAKES NO WARRANTIES, EXPRESS OR IMPLIED, INCLUDING WITHOUT LIMITATION,
MERCHANTABILITY, SATISFACTORY QUALITY, FITNESS FOR A PARTICULAR PURPOSE, AND NONINFRINGEMENT OF THIRD PARTY. IN NO EVENT WILL HIKVISION, ITS DIRECTORS, OFFICERS,
EMPLOYEES, OR AGENTS BE LIABLE TO YOU FOR ANY SPECIAL, CONSEQUENTIAL, INCIDENTAL, OR
INDIRECT DAMAGES, INCLUDING, AMONG OTHERS, DAMAGES FOR LOSS OF BUSINESS PROFITS,
BUSINESS INTERRUPTION, OR LOSS OF DATA OR DOCUMENTATION, IN CONNECTION WITH THE USE OF
THIS PRODUCT, EVEN IF HIKVISION HAS BEEN ADVISED OF THE POSSIBILITY OF SUCH DAMAGES.
TO THE MAXIMUM EXTENT PERMITTED BY APPLICABLE LAW, IN NO EVENT SHALL HIKVISION’S TOTAL
LIABILITY FOR ALL DAMAGES EXCEED THE PURCHASE PRICE THE PRODUCT.
HIKVISION does not undertake any liability for personal injury or property damage, as the result of
product interruption or service termination cause by: a) improper installation or usage other than as
requested; b) the protection of national or public interests; c) Force Majeure; d) yourself or the third
party, including not limitation, using any third party’s products, software, applications, and among
others.
REGARDING TO THE PRODUCT WITH INTERNET ACCESS, THE USE OF PRODUCT SHALL BE WHOLLY AT
YOUR OWN RISKS. HIKVISION SHALL NOT TAKE ANY RESPONSIBILITES FOR ABNORMAL OPERATION,
PRIVACY LEAKAGE OR OTHER DAMAGES RESULTING FROM CYBER ATTACK, HACKER ATTACK, VIRUS
INSPECTION, OR OTHER INTERNET SECURITY RISKS; HOWEVER, HIKVISION WILL PROVIDE TIMELY
TECHNICAL SUPPORT IF REQUIRED.
The purpose of the Products is to provide an adequate warning in the event of illegal encroachment in
certain area; however, the proper installation of the Products will not eliminate, but only reduce, that
accidents will not occur or that there will be no personal injury or property loss as a result. You are
highly recommended to raise your vigilance and strengthen the safety awareness in the daily life.
Page 4

SURVEILLANCE LAWS VARY BY JURISDICTION. PLEASE CHECK ALL RELEVANT LAWS IN YOUR
JURISDICTION BEFORE USING THIS PRODUCT IN ORDER TO ENSURE THAT YOUR USE CONFORMS
TO THE APPLICABLE LAW. YOU FUTHER AGREE THAT THIS PRODUCT IS ONLY FOR CIVIL USE, AND
HIKVISION SHALL NOT BE LIABLE IN THE EVENT THAT THIS PRODUCT IS USED WITH ILLEGITIMATE
PURPOSES, SUCH AS THIRD PARTY RIGHTS INFRINGEMENT, MEDICAL TREATMENT, SAFETY EQUIPMENT
OR OTHER SITUATIONS WHERE THE PRODUCT FAILURE COULD LEAD TO DEATH OR PERSONAL INJURY,
OR WEAPON OF MASS DESTRUCTION, CHEMINCAL AND BIOLOGICAL WEAPON, NUCLEAR EXPLOSION,
AND ANY UNSAFE NUCLEAR ENERGY USES OR ANTI-HUMANITY USAGES. YOU SHOULD UNDERTAKE ALL
RESPONSIBILITIES FOR LOSSES OR DAMAGES RESULTING FROM THE ABOVE USAGES WHATSOEVER.
IN THE EVENT OF ANY CONFLICTS BETWEEN THE ABOVE AND THE APPLICABLE LAW, THE LATER
PREVAILS.
Regulatory Information
FCC Information
This device complies with Part 15 of the FCC Rules. Operation is subject to the following two
conditions:
(1) This device may not cause harmful interference, and
(2) This device must accept any interference received, including interference that may cause undesired
operation.
Note: This product has been tested and found to comply with the limits for a Class B digital device,
pursuant to Part 15 of the FCC Rules. These limits are designed to provide reasonable protection
against harmful interference in a residential installation. This product generates, uses, and can
radiate radio frequency energy and, if not installed and used in accordance with the instructions, may
cause harmful interference to radio communications. However, there is no guarantee that interference
will not occur in a particular installation. If this product does cause harmful interference to radio
or television reception, which can be determined by turning the equipment off and on, the user is
encouraged to try to correct the interference by one or more of the following measures:
—Reorient or relocate the receiving antenna.
—Increase the separation between the equipment and receiver.
—Connect the equipment into an outlet on a circuit different from that to which the receiver is
connected.
—Consult the dealer or an experienced radio/TV technician for help.
Please take attention that changes or modification not expressly approved by the party responsible for
compliance could void the user’s authority to operate the equipment.
This equipment should be installed and operated with a minimum distance 20cm between the radiator
and your body.
This device complies with Industry Canada licence-exempt RSS standard(s). Operation is subject to
the following two conditions:
(1) this device may not cause interference, and
(2) this device must accept any interference, including interference that may cause undesired
operation of the device.
Under Industry Canada regulations, this radio transmitter may only operate using an antenna of a type
and maximum (or
Page 5
lesser) gain approved for the transmitter by Industry Canada. To reduce potential radio interference
to other users, the antenna type and its gain should be so chosen that the equivalent isotropically
radiated power (e.i.r.p.) is not more than that necessary for successful communication.
EU Conformity Statement
This product and - if applicable - the supplied accessories too are marked with "CE" and comply
therefore with the applicable harmonized European standards listed under the Radio Equipment
Directive 2014/53/EU, the EMC Directive 2014/30/EU, the RoHS Directive 2011/65/EU.
2012/19/EU (WEEE directive): Products marked with this symbol cannot be disposed of as unsorted
municipal waste in the European Union. For proper recycling, return this product to your local
supplier upon the purchase of equivalent new equipment, or dispose of it at designated collection
points. For more information see: www.recyclethis.info.
2006/66/EC (battery directive): This product contains a battery that cannot be disposed of as
unsorted municipal waste in the European Union. See the product documentation for specific
battery information. The battery is marked with this symbol, which may include lettering to indicate
cadmium (Cd), lead (Pb), or mercury (Hg). For proper recycling, return the battery to your supplier or
to a designated collection point. For more information see: www.recyclethis.info.
Гарантийный срок-1 год
Срок службы-3 года
Производитель:Ханджоу Хиквижн Диджитал Технолоджи(Китай)
Импортер-поставщик в России: ЗАО ''Хиквижн''
Импортер-поставщик в Республике Беларусь:ООО ''Торговый Дом
''АВАНТ-ТЕХНО''
Сайт:www.ezviz.ru
EC DECLARATION OF CONFORMITY
Hereby, Hangzhou Hikvision Digital Technology Co., Ltd. declares that the radio equipment type [CS-CV310] is in
compliance with Directive 2014/53/EU.
The full text of the EC DECLARATION OF CONFORMITY is available at the following web link:
http://www.ezvizlife.com/declaration-of-conformity
Safety Instruction
Due to the product shape and dimension, the name and address of the importer/manufacturer are printed
on the packa
ge.
.
SAVE THIS MANUAL FOR FUTURE REFERENCE
Page 6
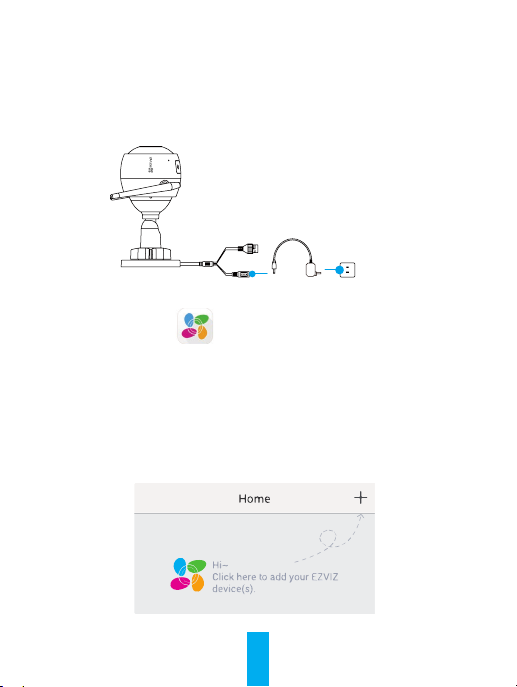
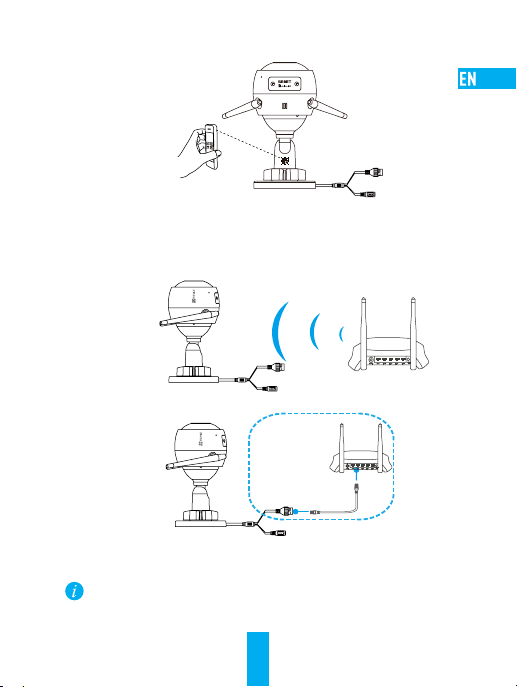
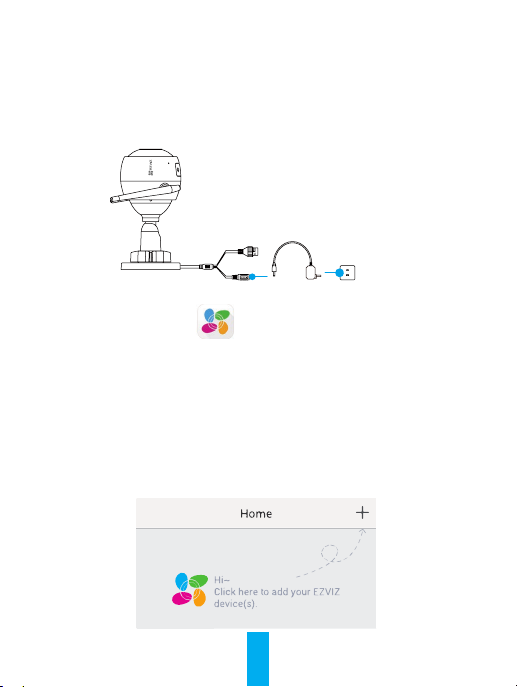
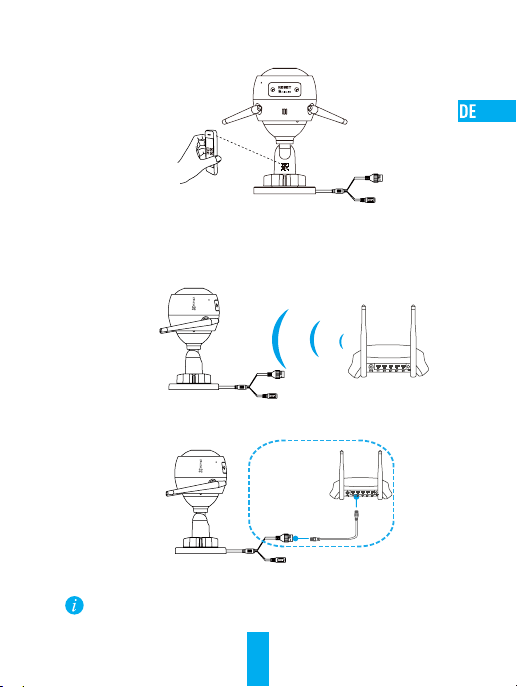
Operations
Step 1
Power-on
Connect the camera and power socket to power on the camera.
Power Cable
Power Socket
Step 2
Camera Setup
Create an user account.
1
- Connect your mobile phone to Wi-Fi.
- Download and install the EZVIZ app by searching “EZVIZ” in App Store and Google PlayTM.
- Launch the app and register an EZVIZ user account following the start-up wizard.
Add a camera to EZVIZ.
2
- Log in the EZVIZ app.
- On the Home screen, tap “+” on the upper-right corner to go to the scan QR code
page.
1
Page 7
- Scan the QR code on the body of the camera.
Choose network connection.
3
- Choose Wi-Fi (2.4GHz Wi-Fi Only) or wired connection.
(Recommended) For Wi-Fi connection, enter Wi-Fi name and password to
configure Wi-Fi for the camera.
Router
N3
For wired connection, connect the camera to the router with a network cable.
N3
Network Cable
- Enter the correct time zone and date format.
Hold the RESET button for 10 seconds when camera is running if either adding cameras or
Wi-Fi connection fails.
2
Page 8
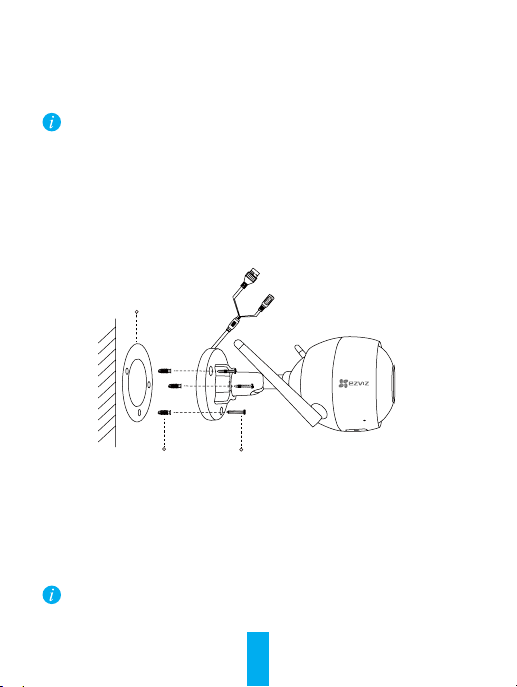
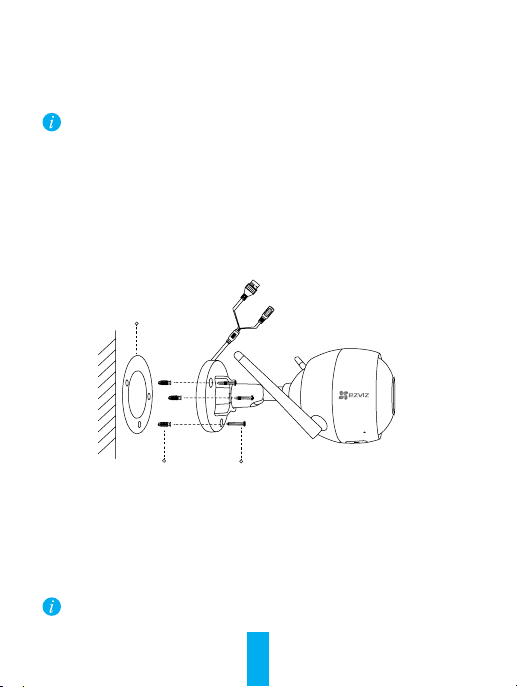
Step 3
Camera Installation
You can install the camera on the wall or ceiling.
Make sure the wall is strong enough to withstand three times the weight of the
camera.
1
Installing the Camera
- Place drill template onto the surface you have chosen to mount the camera.
- (For the cement wall/ceiling only) Drill screw holes according to the template, and
insert three expansion screws.
- Use three metal screws to fix the camera base according to the template.
Mounting
Template
Expansion Screws
Adjusting the Surveillance Angle
2
- Loosen the adjusting screw.
- Adjust the surveillance angle as your desired place.
- Tighten the adjusting screw.
Make sure the microSD card slot facing downward.
Metal Screws
3
Page 9
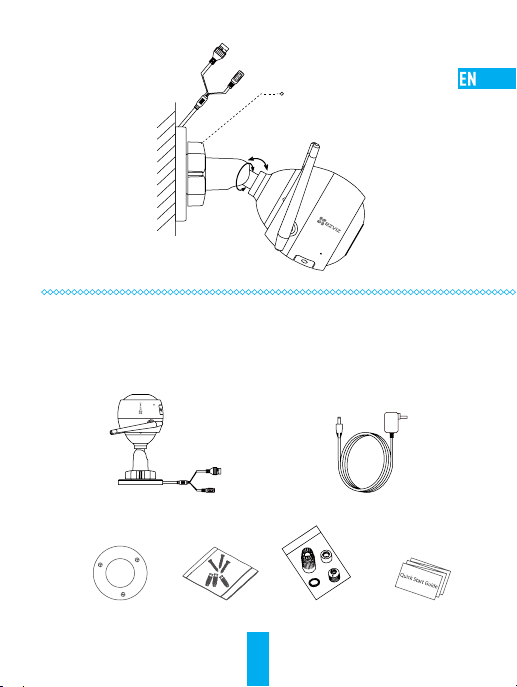
Adjusting Screw
0°-90°
0°-360°
Appendix
Box Content
Internet Camera x1 Power Adapter x1
Mounting Template x1 Screw Kit x1 Waterproof Kit x1 Quick Start Guide x1
4
Page 10

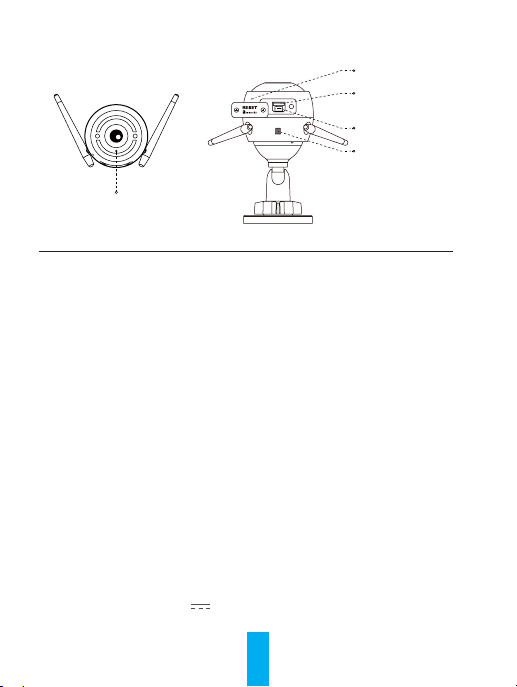
Basics
LED Indicator
Name Description
MIC For audio in.
Speaker For audio out.
LED Indicator •Steady Red: Camera is starting up.
MicroSD Card Slot MicroSD card not included in the Box Contents. Recommended
RESET Hold the RESET button for 10 seconds when the camera is running.
Power Input 1A
•Steady Blue: Video is being viewed or played back in EZVIZ App.
•Slowly Flashing Blue: Camera is running properly.
•Slowly Flashing Red: Wi-Fi connection has failed.
•Fastly Flashing Red: MicroSD card error.
•Flashing Red and Blue: Camera is ready for the Wi-Fi connection.
compatibility: Class 10, Max.128GB. After inserting the microSD
card, initialize it in the EZVIZ app, and then video files can be stored
in the SD card.
The camera restarts, and resets all parameters to default.
12V
MIC
MicroSD
Card Slot
RESET
Speaker
5
Page 11

Troubleshooting
Q: “The device is offline.” or “The device is not registered.” prompts when adding
the camera by EZVIZ app.
A: 1. Make sure the network, that the camera is connceted to, is normal and the DHCP
of router is enabled.
2. Hold down the RESET button for 10 seconds to reset the parameters if you
manually changed the network parameters.
Q: How to use the microSD card for local storage?
A: 1. Make sure there is a microSD card inserted and the camera is added to your
EZVIZ account. Log in the EZVIZ app and enter the “Device Details” interface, if
the “Initialize Storage Card” button appears, you need to initialize the microSD
card first.
2. The microSD card recording for the motion detection is enabled by default.
Q: The mobile phone cannot receive alarm prompts when the camera is online.
A: 1. Make sure the EZVIZ app is running on your mobile phone and the Motion
Detection Notification is enabled.
2. For Android system, make sure the app is running in background; and for iOS,
enable the message push function in “Settings > Notification”.
3. If still no alarm prompts, hold down the RESET button for 10 seconds restore
the camera settings.
Q: Live view or playback failed.
A: Make sure your network is well connected. Viewing live video needs a good
bandwidth. You can refresh the video, or change a network and try again.
Q: How to connect to another Wi-Fi?
A: Hold the RESET button on the camera for 10 seconds to reset and restart the camera
and reconnect the Wi-Fi about 1 minute later.
6
Page 12
Funktion
Schritt 1
Einschalten
Um sie einschalten zu können, schließen Sie die Kamera mit dem Stromkabel an eine
Steckdose an.
Stromkabel
Steckdose
Schritt 2
Kamera einrichten
Ein Benutzerkonto erstellen.
1
- Verbinden Sie Ihr Mobiltelefon mit einem WLAN.
- Laden Sie die EZVIZ-App herunter, indem Sie im App Store oder bei Google PlayTM
nach „EZVIZ“ suchen, und installieren Sie sie.
- Starten Sie die App und registrieren Sie sich für ein EZVIZ-Benutzerkonto gemäß den
Anweisungen im Startassistenten.
Eine Kamera zu EZVIZ hinzufügen.
2
- Melden Sie sich bei der EZVIZ-App an.
- Tippen Sie im Startbildschirm in der oberen rechten Ecke auf „+“, um auf die Seite
zum Scannen des QR-Codes zu gelangen.
7
Page 13
- Scannen Sie den QR-Code auf dem Kameragehäuse.
Wählen Sie die Netzwerkverbindung.
3
- Wählen Sie WLAN- (nur 2,4 GHz WLAN) oder Kabelverbindung.
(Empfohlen) Geben Sie für die WLAN-Verbindung den WLAN-Namen und das
Passwort zum Konfigurieren des WLAN für die Kamera ein.
Router
N3
Schließen Sie für die kabelgebundene Verbindung die Kamera mit Hilfe eines
Netzwerkkabels an den Router an.
N3
Netzwerkkabel
- Geben Sie die korrekte Zeitzone und das Datenformat ein.
Sollten das Hinzufügen von Kameras oder die WLAN-Verbindung nicht erfolgreich sein, halten
Sie die Taste RESET für 10 Sekunden gedrückt, während die Kamera läuft.
8
Page 14
Schritt 3
Montage der Kamera
Sie können die Kamera an der Wand oder an der Decke installieren.
Stellen Sie sicher, dass die Wand das Dreifache des Kameragewichts aushalten
kann.
Installation der Kamera
1
- Legen Sie die Bohrschablone auf den Montageort der Kamera.
- (Nur für gemauerte/gegossene Decken und Wände) Bohren Sie Löcher gemäß der
Schablone zur Aufnahme von drei Dübeln.
- Befestigen Sie die Schablone der Kamera mit drei Schrauben.
Montageschablone
Dübel
Einstellen des Überwachungswinkels
2
- Lösen Sie die Einstellschraube.
- Stellen Sie den Überwachungswinkel nach Ihren Wünschen ein.
- Ziehen Sie die Einstellschraube fest.
Stellen Sie sicher, dass der microSD-Kartensteckplatz nach unten zeigt.
Metallschrauben
9
Page 15

Einstellschraube
0° - 90°
0° - 360°
Anhang
Lieferumfang
1x Internetkamera 1x Netzteil
1x Montageschablone 1x Schraubensatz 1x Wasserdichtsatz 1x Kurzanleitung
10
Page 16
Aufbau des Geräts
LED-Betriebsanzeige
Bezeichnung Beschreibung
Mikrofon Tonaufnahme.
Lautsprecher Audioausgabe.
LED-Betriebsanzeige •Leuchtet rot: Kamera fährt hoch.
microSD-Kartensteckplatz microSD-Karte gehört nicht zum Lieferumfang. Empfohlene
ZURÜCKSETZEN Halten Sie die Taste RESET für 10 Sekunden gedrückt,
Stromanschluss 1 A
•Leuchtet blau: Video wird angezeigt oder in EZVIZ-App
wiedergegeben.
•Blinkt langsam blau: Kamera läuft ordnungsgemäß.
•Blinkt langsam rot: WLAN-Verbindung fehlgeschlagen.
•Blinkt schnell rot: Fehler bei der microSD-Karte.
•Blinkt rot und blau: Kamera ist zur WLAN-Verbindung
bereit.
Kompatibilität: Klasse 10, max. 128 GB. Nachdem Sie die
microSD-Karte eingesetzt haben, initialisieren Sie diese
in der EZVIZ-App. Danach können die Videodateien auf der
microSD-Karte gespeichert werden.
während die Kamera läuft. Die Kamera startet neu und setzt
alle Parameter auf die Werkseinstellungen zurück.
12 V
11
Mikrofon
microSD-
Kartensteckplatz
ZURÜCKSETZEN
Lautsprecher
Page 17

Fehlersuche
F: Wird die Kamera in der EZVIZ-App hinzugefügt, erscheinen die Anzeigen
„The device is offline.“ („Das Gerät ist offline.“) oder „The device is not
registered.“ („Das Gerät ist nicht registriert.“).
A: 1. Stellen Sie sicher, dass das Netzwerk, mit dem die Kamera verbunden ist,
normal arbeitet und das DHCP des Routers aktiviert ist.
2. Halten Sie Taste RESET für 10 Sekunden gedrückt, um die Parameter
zurückzusetzen, falls Sie die Netzwerkparameter manuell geändert haben.
F: Wie benutze ich die microSD-Karte als lokalen Speicher?
A: 1. Stellen Sie sicher, dass eine microSD-Karte in die Kamera eingesetzt und die
Kamera zu Ihrem EZVIZ-Benutzerkonto hinzugefügt ist. Melden Sie sich an der
EZVIZ App an und rufen Sie den Bildschirm „Device Details“ (Geräteeigenschaften)
auf. Wenn die Schaltfläche „Initialize Storage Card“ (Speicherkarte initialisieren)
angezeigt wird, müssen Sie die Speicherkarte zuerst initialisieren.
2. Die microSD-Karte für die Bewegungserkennung wird standardmäßig aktiviert.
F: Das Mobiltelefon kann keinen Alarm empfangen, wenn die Kamera online ist.
A: 1. Stellen Sie sicher, dass die EZVIZ-App auf Ihrem Mobiltelefon läuft und die
Benachrichtigung für die Bewegungserkennung aktiviert ist.
2. Stellen Sie bei einem Androidsystem sicher, dass die App im Hintergrund läuft
und aktivieren Sie für iOS die Push-Benachrichtigung zum Übertragen der
Nachricht in „Settings > Notification“ („Einstellungen > Benachrichtigung“).
3. Wird immer noch kein Alarm empfangen, halten Sie die Taste RESET für
10 Sekunden gedrückt, um die Kameraeinstellungen wiederherzustellen.
F: Fehler bei Livebild oder Wiedergabe.
A: Stellen Sie sicher, dass die Kamera korrekt mit dem Netzwerk verbunden ist. Das
Anschauen eines Live-Videos erfordert eine gute Bandbreite. Sie können das Video
aktualisieren oder ein anderes Netzwerk wählen und es erneut versuchen.
F: Wie kann ich die Kamera mit einem anderen WLAN verbinden?
A: Halten Sie die Taste RESET an der Kamera für 10 Sekunden gedrückt, starten Sie die
Kamera neu und verbinden Sie das WLAN ungefähr eine Minute später.
12
Page 18

Operaciones
Paso 1
Encendido
Conecte la cámara a la toma eléctrica para alimentarla.
Cable de alimentación
Toma de corriente
Paso 2
Configuración de la cámara
Cree una cuenta de usuario.
1
- Conecte su teléfono móvil a la red Wi-Fi.
- Descargue e instale la app EZVIZ buscando “EZVIZ” en el App Store y Google PlayTM.
- Abra la app y registre una cuenta de usuario de EZVIZ siguiendo las instrucciones
del asistente de instalación.
Agregue una cámara a EZVIZ.
2
- Inicie sesión en la app EZVIZ.
- En la pantalla de inicio, toque “+” en la esquina superior derecha para ir a la página
de escaneo de códigos QR.
13
Page 19

- Escanee el código QR de la cámara.
Elija la conexión de red.
3
- Elija conexión Wi-Fi (solo 2,4 GHz) o por cable
(Recomendado) Para conectarla por Wi-Fi, introduzca el nombre y la contraseña
de la red Wi-Fi para configurar la conexión de la cámara.
Enrutador
N3
Para conectarla por cable, conecte la cámara al enrutador con un cable de red.
N3
Cable de red
- Introduzca la zona horaria correcta y el formato de fecha.
Si ocurre un fallo al añadir cámaras o al conectarse a una red Wi-Fi, mantenga pulsado el botón
RESET (Restablecer) durante 10 segundos con la cámara en funcionamiento.
14
Page 20
Paso 3
Instalación de la cámara
Puede instalar la cámara en la pared o en el techo.
Asegúrese de que la pared sea lo suficientemente resistente para soportar un peso
tres veces mayor que el de la cámara.
Instalación de la cámara
1
- Coloque la plantilla de perforación sobre la superficie escogida para el montaje
de la cámara.
- (Solo para montaje en paredes de cemento/techos) Taladre orificios para tornillos
usando la plantilla e inserte tres tornillos de expansión.
- Utilice 3 tornillos de metal para fijar la base de la cámara, según la plantilla.
Plantilla de
montaje
Tornillos de expansión
Ajuste del ángulo de vigilancia
2
- Afloje el tornillo de ajuste.
- Ajuste el ángulo de la cámara en el punto deseado.
- Apriete el tornillo de ajuste.
Asegúrese de que la ranura para tarjetas microSD esté orientada hacia abajo.
Tornillos metálicos
15
Page 21

Tornillo de ajuste
0°-90°
0°-360°
Apéndice
Contenido de la caja
1 Cámara de Internet 1 Adaptador de corriente
1 Plantilla
de montaje
1 Juego de
tornillos
16
1 Conjunto
impermeable
1 Guía de inicio
rápido
Page 22

Elementos básicos
Indicador LED
Nombre Descripción
Micrófono Entrada de audio.
Altavoz Salida de audio.
Indicador LED •Rojo fijo: la cámara se está iniciando.
Ranura para
tarjeta microSD
REINICIAR Mantenga pulsado el botón RESET (Restablecer) durante 10
Alimentación 1 A
•Azul fijo: el vídeo se está reproduciendo en la aplicación EZVIZ.
•Parpadeando lentamente en azul: la cámara está funcionando
correctamente.
•Parpadeando lentamente en rojo: fallo en la conexión wifi.
•Parpadeando rápidamente en rojo: Error de tarjeta MicroSD.
•Parpadeando en rojo y azul: la cámara está preparada para
conectarse al wifi.
No se incluye la tarjeta microSD como parte del contenido de la
caja. Compatibilidad recomendada: Clase 10, 128 GB máx. Una vez
insertada la tarjeta microSD, inicialícela en la aplicación EZVIZ y
podrá almacenar los archivos de vídeo en la tarjeta SD.
segundos con la cámara en funcionamiento. La cámara se reiniciará
y restablecerá todos los parámetros a sus ajustes predeterminados.
12 V
Micrófono
Ranura para
tarjeta microSD
REINICIAR
Altavoz
17
Page 23

Resolución de problemas
P: Al añadir la cámara con la aplicación EZVIZ aparece el mensaje “The device is
offline.” (El dispositivo está sin conexión.) o “The device is not registered.”
(El dispositivo no está registrado.).
R: 1. Asegúrese de que la red a la que está conectada la cámara funcione con
normalidad y que el DHCP del enrutador esté activado.
2. Si ha cambiado manualmente los parámetros de red, mantenga pulsado el botón
RESET (Restablecer) durante 10 segundos para restablecer los parámetros.
P: ¿Cómo se puede utilizar la tarjeta microSD como almacenamiento local?
R: 1. Asegúrese de que haya una tarjeta microSD insertada y de haber añadido la
cámara a su cuenta EZVIZ. Inicie sesión en la aplicación EZVIZ y entre en la
interfaz “Device Details” (Detalles del dispositivo), Si aparece el botón “Initialize
Storage Card” (Iniciar tarjeta de almacenamiento), primero deberá iniciar la
tarjeta microSD.
2. La grabación de detección de movimiento en la tarjeta microSD está activada de
forma predeterminada.
P: El teléfono móvil no recibe mensajes de alarma cuando la cámara está en línea.
R: 1. Asegúrese de que la aplicación EZVIZ esté funcionando en el teléfono móvil y
que la notificación de detección de movimiento esté activada.
2. En sistemas Android, asegúrese de que la aplicación funcione en segundo
plano. Con iOS, active la función de mensajes de notificación en “Settings >
Notification” (Ajustes > Notificación).
3. Si no hay ninguna alarma, mantenga pulsado el botón RESET (Restablecer)
durante 10 segundos para restaurar los ajustes de la cámara.
P: Error en la Vista en directo o reproducción.
R: Asegúrese de que la red está bien conectada. Para ver el vídeo en directo es
necesario un buen ancho de banda. Puede actualizar el vídeo o cambiar de red e
intentarlo de nuevo.
P: ¿Cómo se puede conectar a otra red Wi-Fi?
R: Mantenga pulsado el botón RESET (Restablecer) de la cámara durante 10
segundos para restablecer y reiniciar la cámara y volver a conectarla a la red Wi-Fi
en aproximadamente 1 minuto.
18
Page 24

Opérations
Étape 1
Alimentation
Raccordez la caméra à la prise de courant pour alimenter la caméra.
Câble d’alimentation
Prise d’alimentation
Étape 2
Mise en place de la caméra
Créer un compte utilisateur.
1
- Connectez votre téléphone mobile au réseau Wi-Fi.
- Téléchargez et installez l’application EZVIZ en recherchant « EZVIZ » dans l’App Store
ou Google PlayTM.
- Lancez l’application et créez un compte utilisateur EZVIZ en suivant l’assistant de démarrage.
Ajouter une caméra à EZVIZ
2
- Connectez-vous dans l’application EZVIZ.
- Sur l’écran d’accueil, touchez le bouton « + » situé dans le coin supérieur droit pour
accéder à la page de numérisation du code QR.
19
Page 25

- Scannez le code QR sur le corps de la caméra.
Choisissez la connexion réseau.
3
- Choisissez le Wi-Fi (Wi-Fi à 2,4 GHz uniquement) ou la connexion filaire
(Recommandé) Pour la connexion Wi-Fi, saisissez le nom et le mot de passe du
réseau Wi-Fi afin de configurer la connexion Wi-Fi de la caméra.
Routeur
N3
Pour la connexion par câble, connectez la caméra au routeur à l’aide d’un
câble réseau.
N3
Câble réseau
- Entrez le fuseau horaire et la date en utilisant le format adéquat.
Maintenez le bouton RESET (RÉINITIALISER) enfoncé pendant 10 secondes lorsque la caméra
fonctionne en cas d’échec de l’installation de caméras ou de la connexion Wi-Fi.
20
Page 26

Étape 3
Installation de la caméra
Vous pouvez installer la caméra sur le mur ou le plafond.
Assurez-vous que le mur est suffisamment solide pour supporter trois fois le poids
de la caméra.
Installation de la caméra
1
- Placez le gabarit de perçage sur la surface d’installation de la caméra.
- (Installation uniquement sur un mur en ciment ou un plafond) Percez des trous
correspondant au gabarit de perçage et vissez-y trois vis à expansion.
- Utilisez les vis métalliques pour fixer la base de la caméra, comme illustré
ci-dessous.
Gabarit de
montage
Vis à expansion
Réglage de l’angle de surveillance
2
- Desserrez la vis de réglage.
- Ajustez l’angle de surveillance à l’emplacement désiré.
- Serrez la vis de réglage.
Assurez-vous que le logement de la carte microSD est orienté vers le bas.
Vis métallique
21
Page 27

Vis de réglage
0° à 90°
0° à 360°
Annexe
Contenu du carton
1 caméra Internet 1 adaptateur d’alimentation
1 gabarit de montage 1 kit de visserie 1 kit étanche 1 guide de démarrage rapide
22
Page 28

Notions de base
Indicateur LED
Nom Description
Microphone Pour l’entrée audio.
Haut-parleur Pour la sortie audio.
Indicateur LED •Rouge fixe : la caméra est en cours de démarrage.
Logement de
carte microSD
RÉINITIALISATION Maintenez le bouton RESET (RÉINITIALISER) enfoncé pendant
Entrée d’alimentation 1 A
•Bleu continu : la vidéo est en cours de visionnage ou de lecture
dans l’application EZVIZ.
•Clignotement lent en bleu : la caméra fonctionne normalement.
•Clignotement lent en rouge : la connexion Wi-Fi a échoué.
•Clignotement rapide en rouge : erreur de carte microSD.
•Clignotement en rouge et bleu : la caméra est prête à établir
la connexion Wi-Fi.
La carte microSD n’est pas fournie. Compatibilité recommandée :
carte microSD de classe 10, 128 Go max. Après avoir inséré la
carte microSD, initialisez-la dans l’application EZVIZ, puis stockez
vos fichiers vidéo dans la carte SD.
10 secondes lorsque la caméra fonctionne. La caméra redémarre,
réinitialise tous les paramètres aux valeurs par défaut.
12 V
Microphone
Logement de
carte microSD
RÉINITIALISATION
Haut-parleur
23
Page 29

Résolution des problèmes
Q : Les invites « The device is offline. » (L’appareil est en mode Hors connexion) ou
« The device is not registered. » (L’appareil n’est pas enregistré) s’affichent lorsque
vous installez la caméra via l’application EZVIZ.
R : 1. Assurez-vous que le réseau sur lequel la caméra est connectée est normal et
que le DHCP du routeur est activé.
2. Maintenez le bouton RESET (RÉINITIALISER) enfoncé pendant 10 secondes
pour réinitialiser les paramètres si vous avez changé manuellement les
paramètres du réseau.
Q : Comment utiliser la carte microSD pour le stockage local ?
R : 1. Assurez-vous que la carte microSD est insérée et que la caméra est ajoutée
à votre compte EZVIZ. Connectez-vous dans l’application EZVIZ, puis accédez
à l’interface « Device Details » (Détails de l’appareil). Si le bouton « Initialize
Storage Card » (Initialiser la carte de stockage) apparaît, vous devez d’abord
initialiser la carte.
2. L’enregistrement sur la carte microSD destiné à la détection de mouvements est
activé par défaut.
Q : Le téléphone mobile ne reçoit pas les messages d’alarme lorsque la caméra est hors ligne.
R : 1. Assurez-vous que l’application EZVIZ s’exécute sur votre téléphone portable et
que la Notification de détection de mouvements est activée.
2. Pour les systèmes Android, assurez-vous que l’application est exécutée en
arrière-plan ; et pour le système iOS, activez la fonction d’émission de message
dans « Settings > Notification » (Réglages > Notification).
3. Si aucun message d’alarme ne s’affiche, maintenez le bouton RESET (RÉINITIALISER)
enfoncé pendant 10 secondes pour restaurer les réglages de la caméra.
Q : Échec vue en direct ou lecture.
R : Vérifiez que votre réseau est bien connecté. Visionner les vidéos en direct
nécessite une bonne bande passante. Vous pouvez actualiser la vidéo ou changer
de réseau, puis réessayer.
Q : Comment se connecter à un autre réseau Wi-Fi ?
R : Maintenez le bouton RESET (RÉINITIALISER) de la caméra enfoncé pendant
10 secondes pour réinitialiser et redémarrer la caméra, puis reconnectez-la au
réseau Wi-Fi environ une minute plus tard.
24
Page 30

Operazioni
Passaggio 1
Accensione
Collegare la telecamera alla presa di corrente per accenderla.
Cavo di alimentazione
Passaggio 2
Configurazione telecamera
Creare un account utente.
1
- Connettere il cellulare alla rete Wi-Fi.
- Scaricare e installare l'app EZVIZ cercando "EZVIZ" in App Store o Google PlayTM.
- Avviare l'app e registrare un account utente di EZVIZ seguendo le istruzioni della
procedura guidata all'avvio.
Aggiungere una telecamera a EZVIZ.
2
- Accedere all'app EZVIZ.
- Nella schermata iniziale, toccare "+" nell'angolo superiore destro per passare alla
pagina di scansione del QR code.
25
Connettore di
alimentazione
Page 31

- Scansionare il QR code sul corpo della telecamera.
Scegliere la connessione di rete.
3
- Selezionare la connessione Wi-Fi (solo Wi-Fi a 2.4 GHz) oppure cablata
(Opzione consigliata) Per le connessioni Wi-Fi, inserire il nome e la password
della rete per configurare la telecamera.
Router
N3
Per le connessioni cablate, collegare la telecamera al router con un cavo di
rete.
N3
Cavo di rete
- Inserire il fuso orario e il formato della data.
Se non si riesce ad aggiungere la telecamera alla connessione Wi-Fi, tenere premuto il pulsante
RESET per 10 secondi mentre la telecamera è in funzione.
26
Page 32

Passaggio 3
Installazione della telecamera
È possibile installare la telecamera a parete o sul soffitto.
Verificare che la parete sia abbastanza resistente da reggere un peso triplo rispetto
a quello della telecamera.
Installare la telecamera
1
- Posizionare la dima di foratura sulla superficie prescelta per fissare la telecamera.
- (Solo per pareti/soffitti in cemento) Praticare i fori per le viti usando la dima e
inserire tre tasselli.
- Utilizzare tre viti metalliche per fissare la base della telecamera, usando la dima.
Dima di foratura
Tasselli
Regolare l'angolazione per la sorveglianza
2
- Allentare la vite di regolazione.
- Regolare l'angolazione come desiderato.
- Serrare la vite di regolazione.
Verificare che lo slot della scheda microSD sia rivolto verso il basso.
Viti metalliche
27
Page 33

Vite di regolazione
0°-90°
0°-360°
Appendice
Contenuto della confezione
Internet Camera (x1) Alimentatore (x1)
Dima di foratura (x1) Kit di tasselli (x1) Kit impermeabilizzante (x1) Guida rapida (x1)
28
Page 34

Panoramica
Indicatore LED
Nome Descrizione
Microfono Microfono interno
Altoparlante Altoparlante interno
Indicatore LED •Rosso fisso: la telecamera si sta avviando.
Slot per scheda microSD La scheda microSD non è inclusa nella confezione.
RESET Tenere premuto il pulsante RESET per 10 secondi mentre la
Ingresso alimentazione 1 A
•Blu fisso: il video viene tramesso o riprodotto dall'app EZVIZ.
• Intermittente lento in blu: la telecamera funziona correttamente.
•Intermittente lento in rosso: impossibile connettersi alla
rete Wi-Fi.
•Intermittente veloce in rosso: errore della scheda microSD.
•Intermittente in rosso e blu: la telecamera è pronta per la
connessione Wi-Fi.
Caratteristiche consigliate per la compatibilità: Classe 10,
max 128 GB. Dopo aver inserito la scheda microSD,
inizializzarla nell'app EZVIZ; a quel punto i file video possono
essere memorizzati nella scheda.
telecamera è in funzione. La telecamera si riavvia e ripristina
tutti i parametri ai valori predefiniti.
12 V
29
Microfono
Slot per scheda
microSD
RESET
Altoparlante
Page 35

Risoluzione dei problemi
D: Quando si aggiunge la telecamera all'app EZVIZ, viene visualizzato il messaggio “The
device is offline” (Il dispositivo non è in linea) o il messaggio “The device is not
registered” (Il dispositivo non è registrato).
R: 1. Verificare che la rete alla quale è connessa la telecamera sia attiva e che il DHCP
del router sia abilitato.
2. Se si modificano manualmente i parametri di rete, tenere premuto il
pulsante RESET per 10 secondi per ripristinarli.
D: Come utilizzare la scheda microSD per l'archiviazione locale?
R: 1. Verificare che sia inserita una scheda microSD e che la telecamera sia stata
aggiunta al proprio account EZVIZ. Accedere all'app EZVIZ e specificare nella
telecamera Impostazioni (Stato Archivio); se compare il pulsante “Initialize
Storage Card” (Inizializza scheda di archiviazione) sarà necessario inizializzare
prima la scheda microSD.
2. La registrazione sulla scheda microSD per la funzione di rilevamento del
movimento è abilitata per impostazione predefinita.
D: Lo smartphone non riceve notifiche di allarme quando la telecamera è online.
R: 1. Verificare che l'app EZVIZ sia in esecuzione sul cellulare e che le notifiche di rilevamento
del movimento siano abilitate (Impostazioni > Notifica Allarme > In Funzione).
2. Su Android, verificare che l'app sia in esecuzione in background; su iOS, abilitare
la funzione di messaggistica push accedendo a “(Impostazioni > Notifiche >
Ezviz > Consenti Notifiche).”
3. Se anche così non viene segnalato alcun allarme, tenere premuto il pulsante
RESET per 10 secondi per ripristinare le impostazioni della telecamera.
D: Visualizzazione live o riproduzione non riuscita.
R: Verificare che la rete sia attiva. Per visualizzare i video in diretta serve una buona
larghezza di banda. È possibile aggiornare il video o cambiare la rete e riprovare.
D: Come connettersi a un'altra rete Wi-Fi?
R: Tenere premuto il pulsante RESET della telecamera per 10 secondi per ripristinare
e riavviare la telecamera, quindi riconnetterla alla rete Wi-Fi dopo circa un minuto.
30
Page 36

Handelingen
Stap 1
Inschakelen
Sluit de camera aan op een stopcontact om deze van stroom te voorzien.
Netsnoer
Stopcontact
Stap 2
Instellen camera
Een gebruikersaccount aanmaken.
1
- Verbind uw mobiele telefoon met de wifi.
- Download en installeer de EZVIZ-app door te zoeken naar “EZVIZ” in de App Store
of Google PlayTM.
- Start de app en registreer een EZVIZ-gebruikersaccount via de opstartwizard.
Een camera toevoegen aan EZVIZ.
2
- Meld u aan op de EZVIZ-app.
- Tik in het startscherm op "+" in de rechter bovenhoek om de pagina voor het
scannen van de QR-code te openen.
31
Page 37

- Scan de QR-code op de behuizing van de camera.
Netwerkverbinding kiezen
3
- Kies Wi-Fi (alleen Wi-Fi 2,4 GHz) of bekabelde verbinding
(Aanbevolen) Voer bij een wifi-verbinding de wifi naam en het wachtwoord
in om wifi voor de camera te configureren.
Router
N3
Sluit de camera voor een bekabelde verbinding aan op de router met een
netwerkkabel.
N3
Netwerkkabel
- Voer de juiste tijdzone en het juiste datumformaat in.
Als u camera's toevoegt of de wifi-verbinding mislukt, houd dan de toets HERSTELLEN
gedurende 10 seconden ingedrukt wanneer de camera draait.
32
NL
Page 38

Stap 3
Camera installatie
U kunt de camera aan de wand of het plafond installeren.
Verzeker u ervan dat de wand sterk genoeg is om ten minste drie keer het gewicht
van de camera te kunnen dragen.
Het installeren van de camera
1
- Plaats het boorsjabloon op het oppervlak waarop u de camera wilt monteren.
- (Uitsluitend voor cementen muur/plafond) Boor schroefgaten overeenkomstig het
sjabloon en steek er drie expansieschroeven in.
- Gebruik drie metalen schroeven om de onderkant van de camera vast te zetten
overeenkomstig met het sjabloon.
Montagemal
Uitbreidingsschroeven
De bewakingshoek aanpassen
2
- Draai de stelschroef los.
- Stel de bewakingshoek naar wens in.
- Draai de stelschroef vast.
Zorg ervoor dat de sleuf voor de micro-SD-kaart naar beneden wijst.
Metalen schroeven
33
Page 39

Stelschroef
0° - 90°
0° - 360°
Bijlage
Inhoud van de doos
Internetcamera x1 Netadapter x1
Montagesjabloon x1 Set schroeven x1 Waterdicht pakket x1 Snelstartgids x1
34
NL
Page 40

Basisprincipes
LED-indicator
Naam Beschrijving
MIC Voor audio-in.
Luidspreker Voor audio-uit.
LED-indicator •Stabiel rood: Camera wordt opgestart.
MicroSD-kaartslot MicroSD-kaart niet meegeleverd in de inhoud van de doos.
HERSTELLEN Houd de toets HERSTELLEN gedurende 10 seconden ingedrukt
Voeding 1A
•Stabiel blauw: Video wordt bekeken of afgespeeld in de
EZVIZ-app.
•Knippert langzaam blauw: Camera werkt correct.
•Knippert langzaam rood: Wi-Fi-verbinding is mislukt.
•Knippert snel rood: Fout micro-SD-kaart.
•Knippert rood en blauw: Camera is gereed voor Wi-Fi-verbinding.
Aanbevolen compatibiliteit: Klasse 10, max. 128 GB. Initialiseer
de micro-SD-kaart na het plaatsen in de EZVIZ app, waarna er
videobestanden op de SD-kaart kunnen worden opgeslagen.
wanneer de camera draait. De camera herstart en herstelt alle
parameters naar standaard.
12V
MIC
MicroSD-kaartslot
HERSTELLEN
Luidspreker
35
Page 41

Probleemoplossing
V: “The device is offline. (Het apparaat is offline.)” of “The device is not registered.
(Het apparaat is niet geregistreerd.)” wordt weergegeven wanneer de camera aan
de EZVIZ-app wordt toegevoegd.
A: 1. Zorg dat het netwerk waarop de camera is aangesloten normaal is en de DHCP
van de router is ingeschakeld.
2. Houd de RESET-knop 10 seconden lang ingedrukt om de parameters te resetten
als u de netwerkparameters handmatig hebt gewijzigd.
V: Hoe gebruik ik de microSD-kaart voor lokale opslag?
A: 1. Zorg dat er een microSD-kaart is geplaatst en dat de camera is toegevoegd
aan uw EZVIZ-account. Meld u aan bij de EZVIZ-app en ga naar de interface
“Device Details (Apparaatgegevens)”. Als de knop “Initialize Storage Card
(Opslagkaart initialiseren)” wordt weergegeven, moet u eerst de microSD-kaart
initialiseren.
2. Het opnemen op de microSD-kaart voor de bewegingsdetectie is standaard
ingeschakeld.
V: De mobiele telefoon kan geen alarmeringen ontvangen wanneer de camera online is.
A: 1. Zorg dat de EZVIZ-app op uw mobiele telefoon draait en de
Bewegingsdetectiemelding is ingeschakeld.
2. Voor een Android-systeem, zorg dat de app op de achtergrond draait; en voor
iOS, activeer de functie pushberichten in “Settings > Notification (Instellingen>
Berichtgeving)”.
3. Als er nog steeds geen alarm wordt weergegeven, houdt u de RESET-knop
10 seconden lang ingedrukt om de instellingen van uw camera terug te zetten.
V: Live beeld of afspelen mislukt.
A: Zorg dat uw netwerk goed verbonden is. Voor het bekijken van een live-video
heeft u een goede bandbreedte nodig. U kunt de video vernieuwen of een netwerk
wijzigen, en opnieuw proberen.
V: Hoe kan ik verbinding maken met een ander wifi-netwerk?
A: Houd de RESET-knop op de camera 10 seconden lang ingedrukt, zodat de camera
wordt gereset en opnieuw opgestart en 1 minuut later opnieuw verbinding maakt
met de wifi.
36
NL
Page 42

Konguracja
Krok 1
Podłączenie zasilania
Podłącz kamerę do gniazda zasilania, aby zasilić kamerę.
Przewód zasilający
Krok 2
Konguracja kamery
Utwórz konto użytkownika.
1
-Połącz telefon komórkowy z siecią Wi-Fi.
-W App Store lub Google PlayTM wyszukaj „EZVIZ”, pobierz i zainstaluj aplikację EZVIZ.
-Uruchom aplikację i zarejestruj swoje konto użytkownika EZVIZ przy użyciu kreatora
startowego.
Dodaj kamerę do aplikacji EZVIZ.
2
-Zaloguj się w aplikacji EZVIZ.
-Na ekranie głównym wybierz przycisk „+” znajdując y się w prawym górnym rogu, aby
przejść do strony skanowania kodów QR.
37
Gniazdo sieci
elektrycznej
Page 43

-Zeskanuj kod QR znajdujący się na korpusie kamery.
Wybierz sposób łączenia się z siecią.
3
-Wybierz połączenie z siecią Wi-Fi (dostępna jest tylko sieć Wi-Fi o częstotliwości 2,4 GHz)
lub połączenie przewodowe
(Zalecane) Jeśli chcesz korzystać z sieci Wi-Fi, wprowadź nazwę sieci Wi-Fi i
hasło w celu skongurowania sieci Wi-Fi kamery.
Router
N3
Jeśli chcesz korzystać z łącza przewodowego, podłącz kamerę do routera za
pomocą przewodu sieciowego.
N3
Przewód sieciowy
-Wprowadź prawidłową strefę czasową i format daty.
Jeśli dodawanie kamer lub ustanawianie połączenia z siecią Wi-Fi nie powiedzie się, podczas
działania kamery naciśnij i przytrzymaj przez 10 sekund przycisk RESET.
38
Page 44

Krok 3
Instalacja kamery
Kamerę można zamontować na ścianie lub na sucie.
Należy upewnić się, że powierzchnia montażowa jest w stanie udźwignąć trzykrotny
ciężar kamery.
Instalowanie kamery
1
-Umieść szablon otworów w miejscu, w którym kamera zostanie zainstalowana.
-(Tylko ściany/suty cementowe) Należy wywiercić otwory zgodnie z szablonem
i umieścić w nich trzy kołki rozporowe na wkręty.
-Przymocuj podstawę kamery tr zema metalowymi wkrętami zgodnie z szablonem.
Szablon
montażowy
Kołki rozporowe
Regulacja kąta obserwacji
2
-Poluzuj śrubę regulacyjną.
-Dostosuj kąt monitorowania tak, aby objąć docelowy obszar.
-Dokręć śrubę regulacyjną.
Upewnij się, że gniazdo karty microSD jest skierowane ku dołowi.
Wkręty metalowe
39
Page 45

0°-90°
0°-360°
Załącznik
Zawartość opakowania
Kamera internetowa x1 Zasilacz x1
Śruba regulacyjna
Szablon
montażowy x1
Zestaw
śrub x1
Zestaw dławików
wodoszczelnych x1
40
Skrócona instrukcja
obsługi x1
Page 46

Informacje podstawowe
Wskaźnik LED
Nazwa Opis
Wskaźnik LED •Świeci na czerwono: kamera jest uruchamiana.
Gniazdo karty
micro SD
RESET Podczas działania kamery naciśnij i przytrzymaj przez 10 sekund
Wejście zasilania 1A
•Świeci na niebiesko: przeglądanie lub odtwarzanie nagrań wideo
w aplikacji EZVIZ.
•Powoli migający niebieski: kamera działa prawidłowo.
•Powoli migający czerwony: ustanowienie połączenia Wi-Fi nie
powiodło się.
•Szybko migający czerwony: błąd kart y micro SD.
•Migający czerwony i niebieski: kamera jest gotowa do ustanowienia
połączenia Wi-Fi.
Karta micro SD nie znajduje się w zestawie. Zalecana karta: klasa
10; maks.128 GB. Po włożeniu karty microSD zainicjuj ją za pomocą
aplikacji EZVIZ, aby móc zapisywać pliki wideo na karcie microSD.
przycisk RESET. Spowoduje to ponowne uruchomienie kamery i
przywrócenie wszystkich domyślnych parametrów kamery.
12V
Mikrofon
Gniazdo karty
micro SD
RESET
Głośnik
41
Page 47

Rozwiązywanie problemów
P: Komunikat „The device is oine” (Urządzenie w trybie oine) lub „The device is
not registered” (Urządzenie nie jest zarejestrowane) pojawia się po dodaniu kamery
przy użyciu aplikacji EZVIZ.
O: 1. Upewnij się, że kamera jest podłączona do sieci i że protokół DHCP na routerze jest
włączony.
2. Przytrzymaj wciśnięty przycisk RESET przez 10 sekund, aby zresetować ustawienia
po ręcznej zmianie parametrów sieci.
P: Jak użyć karty microSD jako pamięci lokalnej?
O: 1. Upewnij się, że karta microSD jest włożona, a kamera dodana do twojego konta
EZVIZ. Zaloguj się w aplikacji EZVIZ, przejdź do interfejsu „D evice Details”
(Szczegóły urządzenia), jeśli dostępna będzie ikona „Initialize Storage Card”
(Aktywuj kartę pamięci), musisz aktywować kartę microSD.
2. Domyślnie włączone jest nagrywanie detekcji ruchu na kartę microSD.
P: Telefon komórkowy nie otrzymuje monitów alarmowych, gdy kamera jest w trybie
online.
O: 1. Upewnij się, że aplikacja EZVIZ jest włączona na telefonie i powiadomienia o
detekcji ruchu są włączone.
2. W przypadku systemu Android upewnij się, że aplikacja jest uruchomiona w tle,
a w przypadku telefonów z systemem iOS włącz obsługę wiadomości typu push
w menu „Settings > Notication” (Ustawienia > Powiadamianie).
3. Jeśli powiadomienia wciąż nie przychodzą, przytrzymaj przycisk RESET przez
10 sekund i przywróć ustawienia kamery.
P: Uzyskanie podglądu na żywo lub otworzenie nagrania nie powiodło się.
O: Upewnij się, że masz dobre połączenie z siecią. Oglądanie nagrań wymaga wysokiej
przepustowości. Odśwież wideo albo zmień sieć i spróbuj ponownie.
P: Jak mogę połączyć się z innym Wi-Fi?
O: Przytrzymaj przycisk RESET kamery przez 10 sekund, aby zresetować i uruchomić
ponownie kamerę. Połącz się ponownie z WI-FI za około minutę.
42
Page 48

Операции
Шаг 1.
Подключение к сети питания
Подключите камеру к розетке электропитания с помощью шнура питания.
Кабель питания
Шаг 2.
Настройка камеры
Создание аккаунта пользователя.
1
-Подключите мобильный телефон к сети Wi-Fi.
-Загрузите и установите приложение EZVIZ, выполнив поиск по слову «EZVIZ» в
App Store или Google PlayTM.
-Запустите приложение и зарегистрируйте новый аккаунт пользователя EZVIZ,
следуя инструкциям мастера запуска.
Добавление камеры в систему EZVIZ.
2
-Войдите в приложение EZVIZ.
-На главном экране нажмите «+» в правом верхнем углу, чтобы перейти к
сканированию QR-кода.
43
Розетка
электросети
Page 49

-Отсканируйте QR-код на корпусе камеры.
Выберите подключение к сети.
3
-Выберите Wi-Fi (только Wi-Fi 2,4 ГГц) или проводное соединение
Важная информация. При подключении к сети Wi-Fi введите имя и пароль
сети, чтобы выполнить настройку Wi-Fi на камере.
Маршрутизатор
N3
При использовании проводного подключения подключите камеру к
маршрутизатору с помощью сетевого кабеля.
N3
Сетевой кабель
-Введите часовой пояс и выберите формат даты.
Если не удается добавить камеру или подключить ее к сети Wi-Fi, нажмите и удерживайте
кнопку «Сброс» в течение 10 секунд.
44
Page 50

Шаг 3.
Установка камеры
Камеру можно установить на стену или потолок.
Перед установкой убедитесь, что выбранная поверхность может выдержать вес,
в три раза превышающий вес камеры.
Установка камеры
1
-Поместите шаблон для сверления отверстий на выбранную для установки
камеры поверхность.
-(При установке на цементную стену или потолок.) Просверлите отверстия для
винтов с помощью шаблона и установите в отверстия три расширительных болта.
-Прикрепите основание камеры в соответствии с шаблоном, используя три
металлических винта.
Монтажный
шаблон
Расширительные болты
Регулировка угла обзора
2
-Ослабьте регулировочный винт.
-Отрегулируйте угол обзора камеры, как вам необходимо.
-Затяните регулировочный винт.
Проверьте, что разъем карты microSD обращен вниз.
Металлические винты
45
Page 51

Регулировочный винт
0°–90°
0°–360°
Приложение
Комплектация
Интернет-камера, 1 шт. Адаптер питания, 1 шт.
Монтажный
шаблон,
1 ш т.
Комплект
винтового
крепления, 1 шт.
Набор аксессуаров
для защиты
от воды, 1 шт.
46
Краткое
руководство
пользователя, 1 шт.
Page 52

Основные компоненты
Светодиодный индикатор
Наименование Описание
Микрофон Служит в качестве аудиовхода.
Динамик Служит в качестве аудиовыхода.
Светодиодный
индикатор
Гнездо для карты
microSD
Кнопка «Сброс» Нажмите и удерживайте кнопку «Сброс» в течение 10 секунд,
Вход питания
•Непрерывно горит красным цветом: камера запускается.
•Непрерывно горит синим цветом: видео просматривается или
воспроизводится в приложении EZVIZ.
•Медленно мигает синим цветом: камера работает в
нормальном режиме.
•Медленно мигает красным цветом: сбой подключения к сети
Wi-Fi.
•Быстро мигает красным цветом: ошибка карты microSD.
•Мигает красным и синим цветами: камера готова для
подключения к сети Wi-Fi.
Карта microSD не входит в комплект поставки. Рекомендуется
использовать следующие карты: класс 10, емкость до 128 ГБ.
После установки карту microSD необходимо инициализировать
в приложении EZVIZ, после чего ее можно использовать для
хранения видеозаписей.
когда камера включена. Камера перезагрузится, и все настройки
будут сброшены до значений по умолчанию.
12 В
1 А
47
Микрофон
Гнездо для карты
microSD
Кнопка «Сброс»
Динамик
Page 53

Устранение неисправностей
В: Во время добавления камеры в приложении EZVIZ отображается
сообщение «Устройство не в сети» или «Устройство не зарегистрировано».
О: 1. Проверьте состояние сети, к которой подключена камера, и убедитесь, что
DHCP-протокол маршрутизатора включен.
2. Если вы изменяли параметры сети вручную, нажмите и удерживайте кнопку
«Сброс» в течение 10 секунд, чтобы сбросить настройки.
В: Как использовать карту microSD в качестве локального хранилища?
О: 1. Вставьте карту microSD в камеру и добавьте ее к вашему аккаунту EZVIZ.
Затем в приложение EZVIZ перейдите к экрану «Сведения об устройстве».
Если на экране появится кнопка «Инициализировать карту памяти», перед
использованием карту microSD необходимо инициализировать.
2. Запись видео на карту microSD во время обнаружения движения включена
по умолчанию.
В: Мобильный телефон не принимает уведомления о сигналах тревоги, когда
камера в сети.
О: 1. Убедитесь, что приложение EZVIZ запущено на мобильном телефоне и
функция оповещения при обнаружении движения включена.
2. Для телефонов с ОС Android убедитесь, что приложение работает в фоновом
режиме; для телефонов с ОС iOS включите уведомления в меню «Настройки» >
«Уведомления».
3. Если уведомления не приходят, выполните сброс настроек камеры, нажав и
удерживая кнопку «Сброс» в течение 10 секунд.
В: Не удается просмотреть видео с камеры в реальном времени или видеозапись.
О: Убедитесь в надежности сетевого подключения. Просмотр видео в режиме
реального времени требует хорошей пропускной способности. Вы можете
переключить режим просмотра видео или подключиться к другой сети и
повторить попытку.
В: Как подключить устройс тво к другой сети Wi-Fi?
О: Сбросьте настройки камеры до параметров по умолчанию, нажав и удерживая
кнопку «Сброс» в течение 10 секунд. Подождите 1 минуту после перезагрузки
камеры и подключите ее к другой сети Wi-Fi.
48
Page 54

Λειτουργίες
Βήμα 1
Ενεργοποίηση
Συνδέστε την κάμερα στην πρίζα για να ενεργοποιηθεί.
Καλώδιο τροφοδοσίας
Πρίζα
Βήμα 2
Ρύθμιση κάμερας
Δημιουργήστε έναν λογαριασμό χρήστη.
1
- Συνδέστε το κινητό σας τηλέφωνο στο Wi-Fi.
- Κατεβάστε και εγκαταστήστε την εφαρμογή EZVIZ αναζητώντας τον όρο "EZVIZ" στο
App Store και το Google PlayTM.
- Εκκινήστε την εφαρμογή και δημιουργήστε έναν λογαριασμό χρήστη EZVIZ
ακολουθώντας τον οδηγό εκκίνησης.
Προσθέστε μια κάμερα στο EZVIZ.
2
- Συνδεθείτε στην εφαρμογή EZVIZ.
- Στην αρχική οθόνη, πατήστε «+» στην πάνω δεξιά γωνία για να μεταβείτε στη σελίδα
σάρωσης κωδικού QR.
49
Page 55

- Σαρώστε τον κωδικό QR στο σώμα της κάμερας.
Επιλέξτε σύνδεση δικτύου.
3
- Επιλέξτε Wi-Fi (2.4GHz Wi-Fi μόνο) ή ενσύρματη σύνδεση.
(Προτείνεται) Για σύνδεση Wi-Fi, πληκτρολογήστε το όνομα και τον κωδικό
πρόσβασης του Wi-Fi για να ρυθμίσετε το Wi-Fi για την κάμερα.
Δρομολογητής
N3
Για ενσύρματη σύνδεση, συνδέστε την κάμερα στο δρομολογητή με ένα καλώδιο
δικτύου.
N3
Καλώδιο δικτύου
- Επιλέξτε τη σωστή ζώνη ώρας και μορφή ημερομηνίας.
Κρατήστε παρατεταμένα το κουμπί RESET (Επαναφοράς) για 10 δευτερόλεπτα ενώ λειτουργεί η
κάμερα, εάν η προσθήκη καμερών ή η σύνδεση Wi-Fi δεν λειτουργεί.
50
Page 56

Βήμα 3
Εγκατάσταση κάμερας
Μπορείτε να τοποθετήσετε την κάμερα στον τοίχο ή στην οροφή.
Βεβαιωθείτε ότι ο τοίχος είναι αρκετά ανθεκτικός για βάρος τριπλάσιο αυτού της
κάμερας.
Εγκατάσταση της κάμερας
1
- Τοποθετήστε το πρότυπο διάτρησης επάνω στην επιφάνεια που έχετε επιλέξει να
τοποθετήσετε την κάμερα.
- (Μόνο για τοίχους/οροφές από τσιμέντο) Ανοίξτε τρεις οπές σύμφωνα με το πρότυπο
διάτρησης και τοποθετήστε ούπα.
- Χρησιμοποιήστε τρεις μεταλλικές βίδες για να στερεώσετε τη βάση της κάμερας
σύμφωνα με το πρότυπο.
Πρότυπο
τοποθέτησης
Ούπα
Ρύθμιση της γωνίας παρακολούθησης
2
- Ξεβιδώστε τη βίδα προσαρμογής.
- Προσαρμόστε τη γωνία παρακολούθησης όπως επιθυμείτε.
- Βιδώστε τη βίδα προσαρμογής.
Βεβαιωθείτε ότι η υποδοχή κάρτας microSD κοιτάζει προς τα κάτω.
Μεταλλικές βίδες
51
Page 57

Βίδα ρύθμισης
0°-90°
0°-360°
Παράρτημα
Περιεχόμενα συσκευασίας
Διαδικτυακή κάμερα x1 Τροφοδοτικό x1
Πρότυπο
τοποθέτησης x1
Σετ
βιδών x1
Αδιάβροχο
σετ x1
52
Οδηγός γρήγορης
εκκίνησης x1
Page 58

Βασικά
Ενδεικτική λυχνία LED
Όνομα Περιγραφή
MIC Για είσοδο ήχου.
Ηχείο Για έξοδο ήχου.
Ενδεικτική λυχνία
LED
Υποδοχή κάρτας
microSD
ΕΠΑΝΑΦΟΡΑ Κρατήστε παρατεταμένα το κουμπί RESET (Επαναφορά) για
Τροφοδοσία 1 A
•Κόκκινο συνεχώς αναμμένο φως: Η κάμερα πραγματοποιεί
εκκίνηση.
•Μπλε συνεχώς αναμμένο: Προβολή ή αναπαραγωγή βίντεο στην
εφαρμογή EZVIZ.
•Αναβοσβήνει αργά με μπλε χρώμα: Η κάμερα λειτουργεί σωστά.
•Αναβοσβήνει αργά με κόκκινο χρώμα: Αποτυχία σύνδεσης Wi-Fi.
•Αναβοσβήνει γρήγορα με κόκκινο χρώμα: Σφάλμα κάρτας MicroSD.
•Κόκκινο και μπλε που αναβοσβήνει: Η κάμερα είναι έτοιμη για τη
σύνδεση Wi-Fi.
Η κάρτα MicroSD δεν περιλαμβάνεται στη συσκευασία. Προτεινόμενη
συμβατότητα: Κατηγορία 10, έως 128GB. Αφού τοποθετήσετε την
κάρτα microSD, ενεργοποιήστε την στην εφαρμογή EZVIZ και στη
συνέχεια θα μπορείτε να αποθηκεύετε αρχεία βίντεο στην κάρτα SD.
10 δευτερόλεπτα ενώ η κάμερα λειτουργεί. Η κάμερα πραγματοποιεί
επανεκκίνηση και γίνεται επαναφορά όλων των ρυθμίσεων στις
προεπιλεγμένες.
12 V
53
MIC
Υποδοχή κάρτας
microSD
ΕΠΑΝΑΦΟΡΑ
Ηχείο
Page 59

Αντιμετώπιση προβλημάτων
Ερ.: Εμφανίζεται το μήνυμα "The device is oine." (Η συσκευή είναι εκτός σύνδεσης.)
ή "The device is not registered." (Η συσκευή δεν έχει δηλωθεί.) όταν προσθέτω την
κάμερα στην εφαρμογή EZVIZ.
Απ.: 1. Βεβαιωθείτε ότι το δίκτυο στο οποίο έχει συνδεθεί η κάμερα λειτουργεί κανονικά και
ότι έχει ενεργοποιηθεί το DHCP του ρούτερ.
2. Πιέστε παρατεταμένα το κουμπί ΕΠΑΝΑΦΟΡΑ για 10 δευτερόλεπτα για επαναφορά
των παραμέτρων, αν αλλάξατε χειροκίνητα τις παραμέτρους δικτύου.
Ερ.: Πώς μπορώ να χρησιμοποιήσω την κάρτα microSD για τοπική αποθήκευση;
Απ.: 1. Βεβαιωθείτε ότι έχει τοποθετηθεί κάρτα microSD και η κάμερα έχει προστεθεί στον
λογαριασμό EZVIZ σας. Συνδεθείτε στην εφαρμογή EZVIZ και ανοίξτε τη διεπαφή
"Device Details" (Λεπτομέρειες συσκευής). Αν εμφανιστεί το κουμπί "Initialize
Storage Card" (Ενεργοποίηση κάρτας αποθήκευσης), θα πρέπει να ενεργοποιήσετε
αρχικά την κάρτα microSD.
2. Η εγγραφή ανίχνευσης κίνησης στην κάρτα microSD είναι ενεργοποιημένη από προεπιλογή.
Ερ.: Το κινητό τηλέφωνο δεν μπορεί να λάβει ειδοποιήσεις συναγερμού όταν η
κάμερα είναι online.
Απ.: 1. Βεβαιωθείτε ότι η εφαρμογή EZVIZ εκτελείται στο κινητό σας τηλέφωνο και ότι έχει
ενεργοποιηθεί η Ειδοποίηση ανίχνευσης κίνησης.
2. Για το σύστημα Android, βεβαιωθείτε ότι η εφαρμογή εκτελείται στο παρασκήνιο.
Για το σύστημα iOS, ενεργοποιήστε τη λειτουργία προώθησης μηνυμάτων από την
επιλογή "Settings > Notication" (Ρυθμίσεις > Ειδοποίηση).
3. Αν εξακολουθούν να μην λαμβάνονται ειδοποιήσεις συναγερμού, πιέστε παρατεταμένα
το κουμπί ΕΠΑΝΑΦΟΡΑ για 10 δευτερόλεπτα για επαναφορά των ρυθμίσεων κάμερας.
Ερ.: Δ εν είναι δυνατή η ζωντανή προβολή ή η αναπαραγωγή.
Απ.: Βεβαιωθείτε ότι το σήμα του δικτύου σύνδεσης είναι καλό. Για την προβολή ζωντανού
βίντεο απαιτείται καλό εύρος ζώνης. Μπορείτε να ανανεώσετε το βίντεο ή να αλλάξετε
δίκτυο και να προσπαθήσετε ξανά.
Ερ.: Πώς μπορώ να συνδεθώ σε ένα άλλο Wi-Fi;
Απ.: Πιέστε παρατεταμένα το κουμπί ΕΠΑΝΑΦΟΡΑ της κάμερας για 10 δευτερόλεπτα για
επαναφορά, επανεκκινήστε την κάμερα και επανασυνδέστε το Wi-Fi μετά από περίπου
1 λεπτό.
54
Page 60

Operace
Krok 1
Zapnutí
Připojte kameru a síťovou zástrčku k napájení kamery.
Napájecí kabel
Elektrická zásuvka
Krok 2
Nastavení kamery
Vytvořte si uživatelský účet.
1
-Připojte mobilní telefon k síti Wi-Fi.
-Stáhněte si a nainstalujte aplikaci EZVIZ tak, že vyhledáte „EZVIZ“ v obchodech App
Store a Google PlayTM.
-Spusťte aplikaci. Postupujte podle pokynů průvodce prvním spuštěním a zaregistrujte
svůj uživatelský účet EZVIZ.
Přidejte kameru do aplikace EZVIZ.
2
-Přihlaste se do aplikace EZVIZ.
-Na domovské obrazovce přejděte klepnutím v pravém horním rohu na tlačítko „+“ na
stránku skenování kódu QR.
55
Page 61

-Naskenujte kód QR na těle kamery.
Vyberte síťové připojení.
3
-Vyberte připojení Wi-Fi (jen Wi-Fi 2,4 GHz) nebo kabelové připojení
(Doporučeno) Pro připojení sítě Wi-Fi pro konguraci Wi-Fi pro kameru zadejte
název sítě Wi-Fi a heslo.
Směrovač
N3
Pro kabelové připojení připojte kameru ke směrovači prostřednictvím síťového
kabelu.
N3
Síťový kabel
-Zadejte správné časové pásmo a formát data.
Pokud se přidávání kamer nebo připojení k síti Wi-Fi nezdařilo, při zapnuté kameře přidržte tlačítko
RESET na dobu 10 sekund.
56
Page 62

Krok 3
Instalace kamery
Kameru lze nainstalovat na zeď nebo na strop.
Ujistěte se, zda je zeď dostatečně pevná na to, aby unesla trojnásobnou hmotnost
kamery.
Montáž kamery
1
-Na místo vybrané k montáži kamery umístěte vrtací šablonu.
-(Pouze pro betonové stěny nebo stropy) Vyvrtejte podle šablony otvory pro šrouby
a vložte tři hmoždinky.
-Podle šablony připevněte pomocí tří kovových šroubů základnu kamery.
Montážní šablona
Expanzní šrouby
Nastavení úhlu sledování
2
-Uvolněte stavěcí šroub.
-Nastavte úhel sledování na požadované místo.
-Utáhněte stavěcí šroub.
Přesvědčte se, zda slot pro kartu microSD směřuje dolů.
Kovové šrouby
57
Page 63

Stavěcí šroub
0–90°
0–360°
Dodatek
Obsah balení
Internetová kamera 1× Napájecí adaptér 1×
Montážní
šablona 1×
Sada
šroubů 1×
Vodotěsná
sada 1×
58
Průvodce rychlým
spuštěním 1×
Page 64

Popis
Indikátor LED
Název Popis
MIKROFON Slouží ke vstupu zvuku.
Reproduktor Slouží k v ýstupu zvuku.
Indikátor LED • Trvalé červené svícení: Kamera se spouští.
Slot karty MicroSD Kar ta MicroSD není součástí obsahu balení. Doporučená kompatibilita:
RESETOVAT Při zapnuté kameře přidržte tlačítko RESETOVAT na dobu 10 sekund.
Napájecí vstup 1 A
•Trvalé modré svícení: Zobrazuje se video nebo dochází k přehrávání
v aplikaci EZVIZ.
•Pomalé modré blikání: Kamera je v provozu a funguje správně.
•Pomalé červené blikání: Připojení k síti Wi-Fi se nezdařilo.
•Rychlé červené blikání: Došlo k chybě karty microSD.
•Červené a modré blikání: Kamera je připravena k připojení k síti
Wi-Fi.
Třída 10, max.128 GB. Po vložení karty microSD ji inicializujte v aplikaci
EZVIZ. Poté lze videosoubory ukládat na kartě SD.
Kamera se restartuje a všechny parametry se obnoví na výchozí
hodnoty.
12 V
MIKROFON
Slot karty
MicroSD
RESETOVAT
Reproduktor
59
Page 65

Řešení potíží
Ot.: Při přidání kamery prostřednictvím aplikace EZVIZ se objevuje zpráva „The device is
oine. (Zařízení je v režimu o-line.)“ nebo „The device is not registered. (Zařízení
není registrováno.)“.
Odp.: 1. Zkontrolujte, zda síť, ke které je kamera připojena, funguje normálně, a zda je
povolen DHCP routeru.
2. Podržte stisknuté tlačítko RESETOVAT po dobu 10 sekund pro obnovení
parametrů, pokud jste manuálně změnili parametry sítě.
Ot.: Jak používat kartu microSD pro místní úložiště?
Odp.: 1. Zkontrolujte, zda je vložena karta microSD a kamera je přidána do vašeho účtu
EZVIZ. Přihlaste se do aplikace EZVIZ a přejděte do rozhraní „Device Details
(Podrobnosti o zařízení)“, pokud se zobrazí tlačítko „Initialize Storage Card
(Inicializovat paměťovou kartu)“, musíte nejprve inicializovat kartu microSD.
2. Nahrávání na kartu microSD v případě detekce pohybu je ve výchozím nastavení
povoleno.
Ot.: Kamera je online a mobilní telefon nepřijímá signály o alarmu.
Odp.: 1. Zkontrolujte, zda je ve vašem mobilním telefonu spuštěna aplikace EZVIZ a zda
je povoleno oznámení o detekci pohybu.
2. U operačního systému Android zkontrolujte, zda aplikace běží na pozadí.
U operačního systému iOS povolte v nabídce „Settings > Notication (Nastavení >
Upozornění)“ funkci odesílání zpráv.
3. Pokud se stále nezobrazuje žádný alarm, podržte tlačítko RESETOVAT po dobu
10 sekund pro obnovení nastavení kamery.
Ot.: Živé zobrazení nebo přehrávání se nezdařilo.
Odp.: Zkontrolujte, zda je síť dobře připojená. Prohlížení živého videa vyžaduje dobrou
šířku pásma. Můžete obnovit video nebo změnit síť a zkusit to znovu.
Ot.: Jak se připojit k jiné Wi-Fi?
Odp.: Podržte stisknuté tlačítko RESETOVAT na kameře po dobu 10 sekund, pro obnovení
a restartování kamery a po uplynutí 1 minuty opět připojte Wi-Fi.
60
Page 66

Thank you for purchasing EZVIZ products. This limited warranty gives you, the original purchaser of the EZVIZ
product, specific legal rights. You may also have other legal rights that vary by state, province or jurisdiction.
The disclaimers, exclusions, and limitations of liability under this limited warranty will not apply to the extent
prohibited by applicable law. No distributor, reseller, agent, or employee is authorized to make any medication,
extension, or addition to this limited warranty.
Your EZVIZ product is warranted for a period of one (1) year from the date of purchase against defects in
materials and workmanship, or such longer period as may be required by law in the country or state where this
product is sold, when used normally in accordance with user manual.
You can request warranty service by emailing us at support@ezvizlife.com.
For any defective EZVIZ products under warranty, HANGZHOU HIKVISION DIGITAL TECHNOLOGY CO., LTD. (“the
Company”) will, at its option, (i) repair or replace your product free of charge; (ii) exchange your product with
a functional equivalent product; (iii) or refund the original purchase price, provided you provide the original
purchase receipt or copy, brief explanation of the defect, and return the product in its original packaging. At
the sole discretion of the Company, repair or replacement may be made with a new or refurbished product or
components. This warranty does not cover the postal cost, insurance and any other incidental charges incurred
by you in returning the product.
Except where prohibited by applicable law, this is your sole and exclusive remedy for breach of this limited
warranty. Any product that has either been repaired or replaced under this limited warranty will be covered by
the terms of this limited warranty for the longer of ninety (90) days from the date of delivery or the remaining
original warranty period.
This warranty does not apply and is void:
• If the w arranty claim is made outside the warranty period or if the proof of purchase is not provided.
• For any malfunction, defect or failure caused by or resulting from the evidence of impact, mishandling
,tampering, use contrary to the applicable instruction manual, incorrect power line voltage, accident, loss,
theft, fire, flood or other Acts of God, shipping damage or damage resulting from repairs performed by
unauthorized personnel.
• For any consumable parts, such as batteries, where the malfunction is due to the normal aging of the
product.
• Cosmetic damage, including but not limited to scratches, dents and broken plastic on ports.
• Any softw are, even if packaged or sold with EZVIZ hardware.
• For any other damages free from defects in material or workmanship.
• Routine cleaning, normal cosmetic and mechanical wear and tear.
Please do not hesitate to contact your seller, or send e-mails to us support@ezvizlife.com, with any questions.
COPYRIGHT ©2017 HANGZHOU HIKVISION DIGITAL TECHNOLOGY CO., LTD. ALL RIGHTS RESERVED.
LIMITED WARRANTY
Vielen Dank für den Kauf eines EZVIZ-Produkts. Diese beschränkte Garantie gibt Ihnen, dem Erstkäufer
des EZVIZ-Produkts, bestimmte gesetzliche Rechte. Je nach Staat, Provinz oder Land können Ihnen weitere
gesetzliche Rechte zustehen. Die Haftungsausschlüsse und -beschränkungen gemäß dieser beschränkten
Garantie gelten ausschließlich im gesetzlich zulässigen Umfang. Kein Händler, Wiederverkäufer, Vertreter
oder Mitarbeiter ist befugt, Modifikationen, Erweiterungen oder Ergänzungen an dieser beschränkten Garantie
vorzunehmen.
Ihr EZVIZ-Produkt hat eine Garantie auf Material- und Herstellungsfehler, die ab dem Kaufdatum für ein (1)
Jahr oder so lange gilt, wie dies in dem Staat oder Land, in dem dieses Produkt gekauft wurde, gesetzlich
vorgeschrieben ist, sofern es in Übereinstimmung mit der Bedienungsanleitung normal benutzt wird.
Garantieansprüche richten Sie bitte per E-Mail an support@ezvizlife.com.
Im Fall eines defekten EZVIZ-Produkts mit gültiger Garantie wird HANGZHOU HIKVISION DIGITAL TECHNOLOGY
CO., LTD. ("das Unternehmen") nach eigenem Ermessen (i) Ihr Produkt kostenlos reparieren oder ersetzen,
(ii) Ihr Produkt gegen ein funktionsfähiges vergleichbares Produkt austauschen oder (iii) den ursprünglichen
Kaufpreis unter der Voraussetzung erstatten, dass Sie das Produkt in dessen Originalverpackung unter Beigabe
des Originalkaufbelegs oder einer Kopie davon sowie einer kurzen Beschreibung des Defekts zurückschicken.
Das Unternehmen wird nach alleinigem Ermessen Produkte oder Komponenten entweder reparieren oder gegen
neue oder generalüberholte Produkte oder Komponenten austauschen. Diese Garantie deckt keine Versand-,
Versicherungs- oder sonstige Nebenkosten, die Ihnen durch die Rücksendung des Produkts entstehen.
Soweit nicht durch geltendes Recht untersagt, ist dies Ihr einziges und ausschließliches Rechtsmittel im Fall
einer Verletzung dieser beschränkten Garantie. Jedes Produkt, das im Rahmen dieser beschränkten Garantie
entweder repariert oder ausgetauscht wurde, wird für maximal neunzig (90) Tage ab Lieferdatum oder für die
Restlaufzeit der ursprünglichen Garantie von den Bestimmungen dieser beschränkten Garantie abgedeckt.
Diese Garantie gilt nicht und ist hinfällig:
Page 67

• wenn der Garantieanspruch außerhalb der Garantiefrist oder ohne Vorlage des Kaufbelegs geltend gemacht
wird.
• bei Fehlfunktionen, Defekten oder Fehlern, die durch Stoßeinwirkung, Fehlbedienung, Sabotage, Benutzung
im Widerspruch zur entsprechenden Bedienungsanleitung, falsche Spannungsversorgung, Unfall, Verlust,
Diebstahl, Brand, Überschwemmung oder andere Naturkatastrophen, Versandschäden oder Beschädigungen
infolge von Reparaturen durch unbefugte Personen verursacht wurden oder darauf zurückzuführen sind.
• für Verbrauchsgüter wie Batterien, bei denen die Fehlfunktion auf normale Produktalterung zurückzuführen
ist.
• kosmetische Schäden, einschließlich, aber nicht begrenzt auf Kratzer, Beulen und gebrochene Kunststoffteile
an Anschlüssen.
• für jede Softw are, auch wenn diese zusammen mit der EZVIZ-Hardware verpackt und verkauft wurde.
• für sonstige Schäden, die keine Material- oder Verarbeitungsfehler sind.
• für routinemäßige Reinigungen sowie normalen kosmetischen und mechanischen Verschleiß.
Bei Fragen können Sie sich jederzeit an Ihren Verkäufer oder per E-Mail an support@ezvizlife.com an uns
wenden.
COPYRIGHT ©2017 HANGZHOU HIKVISION DIGITAL TECHNOLOGY CO., LTD. ALLE RECHTE VORBEHALTEN.
BESCHRÄNKTE GARANTIE
Gracias por adquirir productos EZVIZ. Esta garantía limitada le concede a usted, el comprador original del
producto EZVIZ, derechos legales específicos. Es posible que tenga otros derechos legales en función de su
estado, provincia o jurisdicción. Los avisos de exención de responsabilidad, las exclusiones y las limitaciones de
responsabilidad de esta garantía limitada no se aplicarán hasta el máximo prohibido por la legislación aplicable.
Ningún distribuidor, revendedor, representante o empleado tiene autorización para introducir alteraciones,
ampliaciones o incorporaciones en virtud de esta garantía limitada.
Su producto de EZVIZ está cubierto por la garantía por un período de un (1) año desde la fecha de compra frente
a defectos de materiales y mano de obra, o en el plazo más largo que requiera la ley en el país o estado donde
se venda este producto, cuando se usa normalmente de acuerdo con el manual de usuario.
Puede solicitar el servicio de garantía por correo electrónico en support@ezvizlife.com.
Para cualquier producto de EZVIZ defectuoso en garantía, HANGZHOU HIKVISION DIGITAL TECHNOLOGY CO.,
LTD. ("la Empresa"), a su discreción, (I) reparará o sustituirá el producto de forma gratuita; (II) cambiará su
producto por un producto equivalente funcional; (III) o reembolsará el precio de compra original, siempre y
cuando proporcione el recibo de compra original o una copia, una breve descripción del defecto y devuelva el
producto en su embalaje original. A la entera discreción de la Empresa, la reparación o la sustitución pueden
realizarse por un producto o componentes nuevos o reacondicionados. Esta garantía no cubre el coste postal de
transporte, el seguro ni ningún otro coste incidental en el que incurra durante la devolución del producto.
Excepto si lo prohíbe la legislación vigente, esta es la solución única y exclusiva en caso de incumplimiento de
esta garantía limitada. Cualquier producto que se haya reparado o sustituido en virtud de esta garantía limitada
estará cubierto por los términos de la misma durante el periodo máximo de noventa (90) días a partir de la
fecha de entrega o el período de garantía original restante.
Esta garantía no se aplica y se considerará nula:
Page 68

• Si la reclamación de garantía se realiza fuera del periodo de garantía o si no se proporciona la prueba de
compra.
• En caso de funcionamiento incorrecto, defecto o avería causados por o como resultado de las pruebas de
impacto, impericia, manipulación, uso contrario al manual de instrucciones aplicable, voltaje incorrecto de
la línea eléctrica, accidente, pérdida, robo, incendio, inundación u otros actos de fuerza mayor, daños en el
envío o daños ocasionados por reparaciones realizadas por personal no autorizado.
• En el caso de las piezas consumibles, como las baterías, si el funcionamiento incorrecto se debe al desgaste
normal del producto.
• Daños cosméticos, incluidos, pero sin limitarse a, arañazos, abolladuras y plástico roto en puertos.
• Cualquier softw are, incluso si se ha incluido y vendido con el hardware de EZVIZ.
• En caso de otros daños libres de defectos en el material o la mano de obra.
• La limpieza rutinaria, cambios cosméticos y el desgaste mecánico natural.
Si tiene alguna pregunta, no dude en ponerse en contacto con su representante comercial, o bien envíenos un
mensaje a support@ezvizlife.com con la pregunta que desee.
COPYRIGHT ©2017 HANGZHOU HIKVISION DIGITAL TECHNOLOGY CO., LTD. RESERVADOS TODOS LOS DERECHOS.
GARANTÍA LIMITADA
Merci d'avoir acheté nos produits EZVIZ. En tant qu'acheteur original de produit EZVIZ, cette garantie limitée
vous accorde certains droits. Selon le pays, la région ou la juridiction où vous résidez, il est possible que
vous bénéficiiez d'autres droits. Les dénis de responsabilités, exclusions et limitations de responsabilité
civile stipulés dans cette garantie limitée s'appliquent uniquement dans les limites prévues par la loi. Aucun
distributeur, revendeur, agent ou employé n'est autorisé à apporter de modification, d'extension ou d'ajout à
cette garantie.
Votre produit EZVIZ est garanti pendant une période de un (1) an à compter de la date d'achat pour tout défaut
de pièces et de main d'œuvre, ou pour une durée supérieure si la législation en vigueur dans le pays ou l'état où
ce produit est vendu l'exige, dès lors qu'il est utilisé conformément aux instructions du manuel de l'utilisateur.
Pour faire valoir la garantie, écrivez-nous à l'adresse suivante: support@ezvizlife.com.
Si un défaut est signalé sur un produit EZVIZ pendant la période de garantie, Hangzhou Hikvision Digital
Technology Co., Ltd. (« la Société ») pourra, à sa discrétion, (i) réparer ou remplacer votre produit gratuitement
; (ii) remplacer votre produit par un produit équivalent en état de marche ; (iii) rembourser le prix d'achat. Vous
devrez toutefois présenter la preuve d'achat et une brève explication du défaut constaté, et renvoyer le produit
dans son emballage d'origine. La Société pourra réparer ou remplacer le produit ou les composants par un
produit ou des composants neufs ou remis en état. Cette garantie ne couvre pas les frais de port, l'assurance ni
les éventuels frais annexes de renvoi du produit.
Sauf si la législation en vigueur l'interdit, cette garantie est votre seul et unique recours. Tout produit réparé ou
remplacé en vertu de la présente garantie limitée sera couvert pendant une durée de quatre-vingt-dix (90) jours
à compter de la date de livraison ou jusqu'à l'échéance de la période garantie originale.
Cette garantie ne s'applique pas et est considérée comme nulle dans les cas suivants :
Page 69

• si l'utilisateur se prévaut de la garantie hors de la période de couverture ou s'il ne fournit pas de preuve
d'achat.
• en cas de dy sfonctionnement, de défaut ou de panne due ou induite par un choc, une mauvaise manipulation,
un sabotage, une utilisation non conforme aux instructions du manuel, une tension d'alimentation incorrecte,
un accident, une perte, un vol, un incendie, une inondation ou toute autre catastrophe naturelle, un préjudice
subi pendant le transport ou résultant de réparations par un personnel non agréé ;
• consommables, tels que les batteries, où le dy sfonctionnement est dû au vieillissement normal du produit ;
• dommages superf iciels tels que, entre autres, les rayures, les bosses ou les pièces en plastique cassées ;
• logiciels, même fournis ou vendus av ec le matériel EZVIZ ;
• préjudices autres que les défauts de pièces ou de main d'œuvre ;
• netto yage de routine, vieillissement de l'aspect extérieur et usure mécanique normale.
Pour toute question, n'hésitez pas à contacter votre revendeur ou à nous écrire à l'adresse suivante:
support@ezvizlife.com.
COPYRIGHT ©2017 HANGZHOU HIKVISION DIGITAL TECHNOLOGY CO., LTD. TOUS DROITS RÉSERVÉS.
GARANTIE LIMITÉE
Grazie per aver acquistato i prodotti EZVIZ. La presente garanzia limitata accorda all'acquirente originale del
prodotto EZVIZ, specifici diritti legali. L'acquirente originale potrebbe godere anche altri diritti legali che
variano da stato, provincia o giurisdizione. Le declinazioni di responsabilità, le esclusioni e le limitazioni di
responsabilità ai sensi della presente garanzia limitata non si applicano ove espressamente vietate dalla legge
applicabile. Nessun distributore, rivenditore, agente o dipendente è autorizzato a fornire rimedi, estensioni o
aggiunte alla presente garanzia limitata.
Il prodotto EZVIZ è garantito per un periodo di un (1) anno dalla data di acquisto contro difetti nei materiali e
nella lavorazione, o un periodo più lungo, ove richiesto dalla legge del paese o dello stato in cui il prodotto è
stato venduto, se utilizzato normalmente, in conformità con il manuale utente.
Il servizio di assistenza in garanzia può essere richiesto via email, all'indirizzo support@ezvizlife.com.
Per eventuali prodotti EZVIZ difettosi in garanzia,HANGZHOU HIKVISION DIGITAL TECHNOLOGY CO., Ltd. ("la
Società"), avrà facoltà a sua discrezione di, (i) riparare o sostituire il prodotto a titolo gratuito; (ii) sostituire il
vostro prodotto con un prodotto funzionalmente equivalente; (iii) o rimborsare il prezzo di acquisto originale, a
fronte dell'esibizione della ricevuta di acquisto originale o in copia, una breve spiegazione del difetto e il reso
del prodotto nella sua confezione originale. A esclusiva discrezione della Società, la riparazione o la sostituzione
può avvenire con un prodotto o con dei componenti nuovi o ricondizionati. Questa garanzia non copre spese
postali, assicurazione ed eventuali altre spese accessorie sostenute dall'acquirente per la restituzione del
prodotto.
Salvo laddove proibito dalla legge applicabile, ciò costituisce l'unico ed esclusivo rimedio per la violazione della
presente garanzia limitata. Qualsiasi prodotto riparato o sostituito ai sensi della presente garanzia limitata sarà
coperto dai termini della presente garanzia limitata per il periodo di maggiore durata tra novanta (90) giorni
dalla data di consegna o il periodo di garanzia originale residuo.
Questa garanzia non si applica e risulterà nulla:
Page 70

• Se la richiesta di applicazione della garanzia perviene al di fuori del periodo di garanzia o se la prova di
acquisto non viene fornita.
• Per qualsiasi malfunzionamento, difetto o guasto causato da, o confermato da prove di evidenza di, avvenuto
impatto, uso improprio, manomissione, uso contrario alle istruzioni del relativo manuale, tensione di
alimentazione errata, incidente, smarrimento, furto, incendio, inondazione o altre cause di forza maggiore,
danni di spedizione o danni causati da riparazioni eseguite da personale non autorizzato.
• Per eventuali componenti consumabili, quali batterie, dove il mal funzionamento è dovuto al normale
invecchiamento del prodotto.
• Danni estetici, inclusi ma non limitati a graff i, ammaccature e rotture delle plastiche delle porte.
• Qualsiasi softw are, anche se confezionato o venduto con hardware EZVIZ.
• Per eventuali altri danni esenti da difetti nei materiali o nella lavorazione.
• Pulizia ordinaria e il normale deterioramento estetico e meccanico.
Non esitate a contattare il venditore, o a inviarci un e-mail a support@ezvizlife.com, per qualsiasi domanda.
COPYRIGHT ©2017 HANGZHOU HIKVISION DIGITAL TECHNOLOGY CO., LTD. TUTTI I DIRITTI RISERVATI.
GARANZIA LIMITATA
Page 71

Bedankt voor de aankoop van EZVIZ-producten. Met deze beperkte garantie worden u, de oorspronkelijke koper
van het EZVIZ-product, specifieke juridische rechten verleend. Mogelijk heeft u ook andere rechten die verschillen
per staat, provincie of rechtsgebied. De vrijwaringen, uitsluitingen en beperkingen van aansprakelijkheid in deze
beperkte garantie zijn niet van toepassing voor zover dit is verboden door het toepasselijk recht. Geen enkele
distributeur, wederverkoper, agent of werknemer is gemachtigd om deze beperkte garantie aan te passen, te
verlengen of uit te breiden.
Voor dit EZVIZ-product geldt een garantieperiode van één (1) jaar vanaf de aankoopdatum voor materiaal- en
fabricagedefecten, of voor een langere periode als dit wettelijk is vereist in het land of de staat waarin dit
product wordt verkocht. De garantieperiode geldt alleen voor normaal gebruik in overeenstemming met deze
gebruikershandleiding
U kunt garantieservice aanvragen door een e-mail te sturen naar support@ezvizlife.com.
Voor defecte EZVIZ-producten die onder de garantie vallen, zal HANGZHOU HIKVISION DIGITAL TECHNOLOGY CO.,
LTD. (”het Bedrijf”) naar eigen inzicht (i) het product gratis repareren of vervangen; (ii) het product omruilen
voor een functioneel vergelijkbaar product; of (iii) de oorspronkelijke aankoopprijs restitueren nadat het
oorspronkelijke aankoopbewijs of een kopie hiervan en een korte uitleg van het defect is aangeleverd, en het
product is geretourneerd in de oorspronkelijke verpakking. Naar eigen inzicht van het Bedrijf zal de reparatie of
vervanging plaatsvinden door nieuwe of gereviseerde producten of onderdelen te leveren. Deze garantie biedt geen
dekking voor de verzendkosten, verzekeringskosten en andere incidentele kosten die u hebt moeten betalen voor
het retourneren van het product.
Tenzij dit verboden is door het toepasselijk recht, is dit uw enige en exclusieve middel voor het verbreken van
deze beperkte garantie. Producten die zijn gerepareerd of vervangen onder deze beperkte garantie, zijn gedekt
onder de voorwaarden van deze beperkte garantie voor een periode van negentig (90) dagen) vanaf de datum van
levering of voor de resterende duur van de oorspronkelijke garantie, waarbij de langste van deze twee perioden
wordt aangehouden.
Deze garantie is niet van toepassing en wordt ongeldig verklaard:
• Als de garantieclaim buiten de garantieperiode wordt gedaan of als het aankoopbewijs niet wordt aangeleverd.
• In het geval van onjuist functioneren, defecten of fouten die aantoonbaar het gevolg zijn van stoten,
onjuist gebruik, manipulatie, gebruik dat niet in lijn is met de instructies in de handleiding, een onjuiste
voedingspanning, ongevallen, verlies, diefstal, brand, overstromingen of andere overmacht, verzendschade of
schade die het gevolg is van reparaties die zijn uitgevoerd door niet-geautoriseerd personeel.
• Voor verbruiksonderdelen, zoals batterijen, waarbij het onjuist functioneren het gevolg is van normale
veroudering van het product.
• Bij cosmetische schade, inclusief, maar niet beperkt tot krassen, deuken en gebroken plastic op de poorten.
• Voor software, zelfs wanneer deze is meegeleverd of verkocht bij de EZVIZ-hardware.
• Voor andere schade dan materiaal- en fabricagedefecten.
• Voor vervuiling door normaal gebruik, en normale cosmetische en mechanische slijtage.
Neem voor vragen contact op met de verkopende partij, of neem contact met ons op via support@ezvizlife.com.
COPYRIGHT ©2017 HANGZHOU HIKVISION DIGITAL TECHNOLOGY CO., LTD. ALLE RECHTEN VOORBEHOUDEN.
BEPERKTE GARANTIE
Page 72

Dziękujemy za zakup produktów EZVIZ. Niniejsza ograniczona gwarancja daje użytkownikowi, czyli
oryginalnemu nabywcy produktu EZVIZ, określone prawa. Użytkownikowi mogą też przysługiwać
inne prawa, które zależą od danego państwa, obszaru terytorialnego lub jurysdykcji. Zastrzeżenia,
wyłączenia i ograniczenia odpowiedzialności wynikające z niniejszej ograniczonej gwarancji nie
będą miały zastosowania w zakresie zabronionym przez obowiązujące prawo. Żaden dystrybutor,
sprzedawca, przedstawiciel ani pracownik nie jest uprawniony do dokonywania jakichkolwiek zmian,
rozszerzeń lub uzupełnień niniejszej ograniczonej gwarancji.
Udzielamy gwarancji na produkt EZVIZ na okres jednego (1) roku od daty nabycia, obejmującej wady
materiałowe i wykonawstwa, pod warunkiem normalnego używania produktu zgodnie z instrukcją
obsługi. Wskazany okres może być dłuższy, jeśli wymaga tego prawo w kraju, w którym ten produkt
jest sprzedawany.
Można wysłać do nas zgłoszenie gwarancyjne pocztą elektroniczną na adres support@ezvizlife.com.
Dla wszelkich produktów EZVIZ objętych gwarancją, HANGZHOU HIKVISION DIGITAL TECHNOLOGY
CO., LTD. („Firma”), według własnego uznania, (i) bezpłatnie naprawi lub wymieni produkt; (ii) zamieni
produkt na inny o porównywalnej funkcjonalności; (iii) zwróci użytkownikowi pierwotną cenę zakupu
pod warunkiem przedstawienia oryginału lub kopii dowodu zakupu, krótkiego opisu usterki oraz
zwrotu produktu w oryginalnym opakowaniu. Według wyłącznego uznania Firmy, naprawa lub
wymiana może zostać przeprowadzona z wykorzystaniem nowego lub regenerowanego produktu
lub części. Niniejsza gwarancja nie obejmuje kosztu przesyłki, ubezpieczenia i innych dodatkowych
opłat poniesionych przez użytkownika w związku ze zwrotem produktu.
Z wyjątkiem przypadków zabronionych przez obowiązujące prawo, powyższe warunki stanowią
jedyny i wyłączny środek rekompensaty za naruszenie niniejszej ograniczonej gwarancji. Każdy
produkt naprawiony lub wymieniony na podstawie niniejszej ograniczonej gwarancji będzie
objęty jej warunkami przez czas pozostały do wygaśnięcia okresu pierwotnej gwarancji lub przez
dziewięćdziesiąt (90) dni, zależnie od tego, który okres będzie dłuższy.
Niniejsza gwarancja nie obowiązuje i zostaje unieważniona:
• Jeśli zgłoszenie z tytułu gwarancji zostanie wniesione po upływie okresu gwarancji lub jeśli
użytkownik nie dostarczy dowodu zakupu.
• W przypadku jakiejkolwiek awarii lub usterki spowodowanej przez lub wynikającej z wyraźnie
widocznego uderzenia, nieprawidłowej obsługi, próby manipulacji, stosowania niezgodnie z
instrukcją, nieprawidłowego napięcia zasilania, wypadku, zgubienia, kradzieży, pożaru, powodzi
lub innych klęsk żywiołowych, szkód transportowych lub spowodowanych naprawą przez
nieupoważniony personel.
• W przypadku wszelkich części eksploatacyjnych, takich jak baterie, których usterka wynika z
normalnego starzenia się produktu.
• W przypadku szkód kosmetycznych, m.in. zarysowań, wgięć i pękniętych plastikowych części
portów.
• W przypadku jakiegokolwiek oprogramowania, nawet jeśli jest ono dołączone lub sprzedawane ze
sprzętem EZVIZ.
• W przypadku innych szkód niewynikających z wad materiałowych lub wykonawstwa.
• W przypadku standardowego czyszczenia, oraz typowego zużycia kosmetycznego i
mechanicznego.
Jeśli mają Państwo jakiekolwiek pytania, prosimy o kontakt ze sprzedawcą lub przesłanie ich do nas
pocztą elektroniczną na adres support@ezvizlife.com.
COPYRIGHT ©2017 HANGZHOU HIKVISION DIGITAL TECHNOLOGY CO., LTD. WSZELKIE PRAWA
ZASTRZEŻONE.
OGRANICZONA GWARANCJA
Page 73

Благодарим Вас за покупку продукции EZVIZ. Эта ограниченная гарантия дает Вам как
покупателю продукта EZVIZ определенные юридические права. Вы также можете иметь
другие юридические права, которые определяются законами государства, провинции
или юрисдикцией. Исключения и ограничения ответственности в соответствии с
данной ограниченной гарантией не действительны в случае, если они противоречат
действующему законодательству. Ни дистрибьютор, ни дилер, ни агент или сотрудник
не имеет права вносить какие-либо изменения или дополнения к данной ограниченной
гарантии.
На Ваш продукт EZVIZ дается гарантия сроком на один(1) год с момента покупки на
дефекты материалов и изготовления, или на более длительный период, в соответствии с
законом государства, где продается этот товар, при условии правильного использования в
соответствии с руководством пользователя.
Вы можете запросить гарантийное обслуживание, обратившись по электронной почте
support@ezvizlife.com.
В случае неисправности продуктов EZVIZ по гарантии, HIKVISION DIGITAL TECHNOLOGY
CO., LTD. Ханчжоу ("Компания") произведет, по своему выбору, (I) ремонт или замену
изделия бесплатно; (II) обмен продукта на функционально эквивалентный; (III) возврат
первоначальной стоимости, при условии, что Вы предоставите оригинал или копию
квитанции о покупке, краткое объяснение дефекта, а также вернете товар в оригинальной
упаковке. На усмотрение Компании, может производиться ремонт или замена
нового или отремонтированного продукта или его компонентов. Данная гарантия не
распространяется на почтовые расходы, страховку и любые другие непредвиденные
расходы, понесенные Вами в связи с возвратом продукта.
За исключением случаев, запрещенных действующим законодательством, этот документ
является Вашим единственным и исключительным средством судебной защиты, в случае
нарушения Ваших прав, закрепленных в ограниченной гарантии. К любому продукту,
который уже был отремонтирован или заменен по данной ограниченной гарантии,
применимы условия документа в течение девяноста (90) дней с момента поставки или
оставшегося первоначального гарантийного срока.
Данная гарантия не применяется и является недействительной:
• В случае подачи заявки на гарантийный ремонт по истечении гарантийного срока или
отсутствия доказательства факта покупки.
• В случае неисправностей, дефектов, вызванных неправильным использованием,
нарушением инструкций по эксплуатации, при неправильном напряжении сети, аварии,
утере, краже, пожаре, наводнении или иных стихийных бедствиях, повреждении груза
или ущербе, нанесенными в результате ремонта, выполненного не уполномоченными
лицами.
• Для любых расходных частей, таких как батареи, когда неисправность происходит из-за
естественного старения продукта.
• При косметических повреждениях, в том числе, но не только, при царапинах, вмятинах и
сломанном пластике на портах.
• Для любого программного обеспечения, даже если оно было упаковано или продано
вместе с оборудованием EZVIZ.
• Для любых других повреждений, дефектов материала или изготовления.
• Для планового косметического и механического износа.
Чтобы задать вопрос продавцу или отправить нам письмо, пожалуйста, обращайтесь по
данному адресу: support@ezvizlife.com
COPYRIGHT ©2017 HANGZHOU HIKVISION DIGITAL TECHNOLOGY CO., LTD. ALL RIGHTS
RESERVED.
ОГРАНИЧЕННАЯ ГАРАНТИЯ
Page 74

Σας ευχαριστούμε για την αγορά των προϊόντων EZVIZ. Η παρούσα περιορισμένη ευθύνη παρέχει σε εσάς, τον αρχικό
αγοραστή του προϊόντος EZVIZ, ειδικά νομικά δικαιώματα. Ενδέχεται να έχετε κι άλλα νομικά δικαιώματα που ποικίλλουν
ανάλογα με το κράτος, την περιοχή ή τη δικαιοδοσία σας. Οι αποποιήσεις, εξαιρέσεις και περιορισμοί ευθύνης βάσει της
παρούσας περιορισμένης εγγύησης δεν ισχύουν στον βαθμό που απαγορεύεται από το εφαρμοστέο δίκαιο. Κανένας διανομέας,
μεταπωλητής, αντιπρόσωπος ή εργαζόμενος δεν είναι εξουσιοδοτημένος να προβεί σε οποιαδήποτε τροποποίηση, επέκταση ή
προσθήκη στην παρούσα περιορισμένη εγγύηση.
Το προϊόν σας EZVIZ καλύπτεται με εγγύηση ενός (1) έτους από την ημερομηνία αγοράς του έναντι ελαττωμάτων σε υλικά και
στην ποιότητα κατασκευής ή για μεγαλύτερη χρονική περίοδο, όπως ενδεχομένως απαιτείται από τη νομοθεσία στη χώρα ή
στο κράτος πώλησης αυτού του προϊόντος, εφόσον χρησιμοποιείται υπό κανονικές συνθήκες σύμφωνα με το εγχειρίδιο χρήστη.
Μπορείτε να υποβάλετε αίτηση για επισκευή στο πλαίσιο της παρούσας εγγύησης, στέλνοντάς μας e-mail στη διεύθυνση
support@ezvizlife.com.
Για τυχόν ελαττωματικά προϊόντα EZVIZ που καλύπτονται από εγγύηση, η εταιρεία HANGZHOU HIKVISION DIGITAL
TECHNOLOGY CO., LTD. (“η Εταιρεία”), κατά την προαίρεσή της, (i) θα επισκευάσει ή αντικαταστήσει το προϊόν σας δωρεάν,
(ii) θα ανταλλάξει το προϊόν σας με ένα αντίστοιχο λειτουργικό προϊόν ή (iii) θα επιστρέψει το αντίτιμο της αρχικής τιμής
αγοράς, με την προϋπόθεση ότι θα προσκομίσετε την πρωτότυπη απόδειξη αγοράς ή αντίγραφο αυτής με σύντομη επεξήγηση
του ελαττώματος του προϊόντος και ότι θα επιστρέψετε το προϊόν στην αρχική του συσκευασία. Κατά τη διακριτική ευχέρεια
της Εταιρείας, η επισκευή ή η αντικατάσταση ενδέχεται να πραγματοποιηθεί με νέο ή επισκευασμένο προϊόν ή εξαρτήματα. Η
παρούσα εγγύηση δεν καλύπτει ταχυδρομικά έξοδα, ασφάλιση ή άλλες παρεπόμενες δαπάνες, με τις οποίες θα επιβαρυνθείτε
κατά την επιστροφή τους προϊόντος.
Εκτός αν απαγορεύεται από το εφαρμοστέο δίκαιο, αυτό είναι το μόνο και αποκλειστικό σας ένδικο μέσο σε περίπτωση
παραβίασης της παρούσας περιορισμένης εγγύησης. Οποιοδήποτε προϊόν έχει επισκευαστεί ή αντικατασταθεί δυνάμει της
παρούσας περιορισμένης ευθύνης καλύπτεται από τους όρους αυτής της περιορισμένης εγγύησης είτε για διάστημα ενενήντα
(90) ημερών από την ημερομηνία παράδοσης, είτε για την εναποµένουσα αρχική περίοδο εγγύησης, όποιο είναι μεγαλύτερο.
Η παρούσα εγγύηση δεν ισχύει ή θεωρείται άκυρη:
• Εάν η αξίωση εγγύησης εγερθεί εκτός της περιόδου εγγύησης ή σε περίπτωση μη προσκόμισης του αποδεικτικού αγοράς.
• Για οποιαδήποτε δυσλειτουργία, ελάττωμα ή βλάβη που προκληθεί από ή οφείλεται σε εμφανή πρόσκρουση, κακό
χειρισμό, παραποίηση, χρήση αντίθετη με το σχετικό εγχειρίδιο οδηγιών, εσφαλμένη τάση τροφοδοσίας, ατύχημα, απώλεια,
κλοπή, πυρκαγιά, πλημμύρα ή λοιπές θεομηνίες, βλάβη κατά την αποστολή ή ζημιά που απορρέει από επισκευές που
πραγματοποιήθηκαν από μη εξουσιοδοτημένο προσωπικό.
• Για οποιαδήποτε αναλώσιμα εξαρτήματα, όπως οι μπαταρίες, η δυσλειτουργία των οποίων οφείλεται στη κανονική χρήση
του προϊόντος με την πάροδο του χρόνου.
• Για αισθητικές ζημιές, συμπεριλαμβανομένων, μεταξύ άλλων, γρατζουνιών, βαθουλωμάτων και σπασμένων πλαστικών στις
θύρες.
• Για οποιοδήποτε λογισμικό, ακόμη κι αν συσκευάστηκε ή πωλήθηκε μαζί με το υλισμικό της EZVIZ.
• Για οποιαδήποτε άλλη βλάβη που δεν οφείλεται σε ελαττώματα σε υλικά και στην ποιότητα κατασκευής.
• Για συνήθη καθαρισμό, φυσιολογική αισθητική και μηχανική φθορά.
Για τυχόν ερωτήσεις, μη διστάσετε να επικοινωνήσετε με το κατάστημα πώλησης ή να μας στείλετε e-mail στη διεύθυνση
support@ezvizlife.com.
ΠΝΕΥΜΑΤΙΚΑ ΔΙΚΑΙΩΜΑΤΑ ©2017 HANGZHOU HIKVISION DIGITAL TECHNOLOGY CO., LTD. ΜΕ ΤΗΝ ΕΠΙΦΥΛΑΞΗ ΠΑΝΤΟΣ
ΔΙΚΑΙΩΜΑΤΟΣ.
ΠΕΡΙΟΡΙΣΜΕΝΗ ΕΓΓΥΗΣΗ
Page 75

Děkujeme, že jste zakoupili výrobek EZVIZ. Tato omezená záruka vám, původnímu kupujícímu výrobku
EZVIZ, dává specická zákonná práva. Můžete mít i další práva, která se liší podle státu, provincie nebo
jurisdikce. Odmítnutí, výjimky a omezení odpovědnosti v rámci této omezené záruky platí jen v rozsahu
daném příslušným zákonem. Žádný distributor, prodejce, zástupce nebo zaměstnanec není oprávněn
provádět žádné úpravy, rozšíření nebo dodatky k této omezené záruce.
Na váš produkt EZVIZ je za předpokladu běžného používání v souladu s uživatelskou příručkou poskytována
záruka na vady materiálu a zpracování po dobu jednoho (1) roku od data nákupu nebo delší dobu, pokud je
tak požadováno zákonem v zemi či státu, kde je tento výrobek prodáván.
O záruční servis můžete požádat na této e-mailové adrese support@ezvizlife.com.
V případě jakéhokoliv vadného produktu EZVIZ v záruce, společnost HANGZHOU HIKVISION DIGITAL
TECHNOLOGY CO., LTD. (dále jen „společnost“) podle svého uvážení, (i) opraví nebo vymění výrobek
zdarma; (ii) nahradí výrobek za ekvivalentní funkční výrobek; (iii) nebo vrátí původní kupní cenu, pokud
poskytnete originální doklad o koupi nebo jeho kopii, stručný popis závady a výrobek vrátíte v původním
balení.
Na základě vlastního uvážení společnosti výrobek může být opraven nebo nahrazen novým nebo
modernizovaným výrobkem nebo komponenty. Tato záruka se nevztahuje na poštovní náklady, pojištění a
další dodatečné poplatky, které vám vznikly při vrácení výrobku.
Kromě případů daných příslušným zákonem je toto vaší jedinou a výhradní náhradou za porušení závazků
této omezené záruky. Na každý výrobek, který byl buď opraven nebo vyměněn v rámci této omezené záruky
se vztahuje tato omezená záruka po dobu devadesáti (90) dnů ode dne doručení nebo po dobu zbývající
původní záruční doby.
Tato záruka neplatí a nevztahuje se:
• Je-li záruční reklamace uskutečněna mimo záruční dobu, nebo v případě, že není poskytnut doklad o
koupi.
• Na jakékoliv poruchy, závady nebo selhání způsobené nárazem, nesprávnou manipulací, narušením,
používáním výrobku v rozporu s platným návodem, nesprávným elektrickým napětím, nehodou, ztrátou,
odcizením, požárem, povodní nebo jinými zásahy vyšší moci, poškozením při přepravě nebo poškozením
v důsledku oprav prováděných neoprávněnými osobami.
• Na jakékoliv spotřební díly, jako jsou baterie, kde závada je způsobena normálním stárnutím produktu.
• Kosmetické poškození, mimo jiné na poškrábání, promáčknutí a zlomené plasty na portech.
• Jakýkoliv software a to i v případě, že byl součástí produktu nebo prodáván spolu s hardwarem EZVIZ.
• Na jakékoliv jiné poškození bez vad na materiálu nebo zpracování.
• Normální kosmetické a mechanické opotřebení, opotřebení v důsledku pravidelného čištění.
S případnými dotazy se prosím obraťte se na svého prodejce nebo pošlete e-mail na adresu
support@ezvizlife.com.
COPYRIGHT ©2017 HANGZHOU HIKVISION DIGITAL TECHNOLOGY CO., LTD. VŠECHNA PRÁVA VYHRAZENA.
OMEZENÁ ZÁRUKAOMEZENÁ ZÁRUKA
Page 76

UD07538B
 Loading...