

Page 1

Device QR Code
Page 2
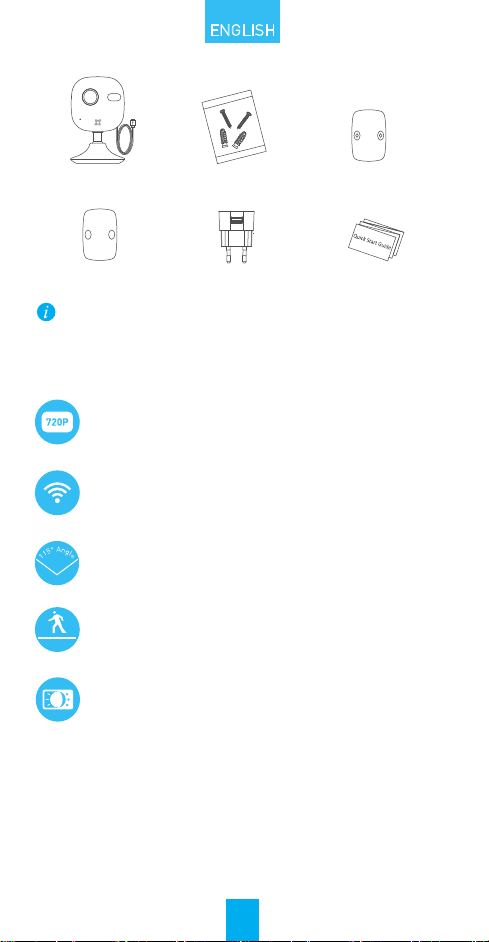
Contents
ENGLISH
Cloud Camera (x1)
Foam Sticker (x1)
The icons in this manual are for reference only and may differ
from the actual product.
Screw Kit Metal plate (x1)
Power Adaptor (x1)
Quick Start Guide (x1)
Functions
HD 720P Live Video
Wi-Fi Connection
115° Horizontal View Angle
Motion Detection: Send instant alert to mobile device if
motion detection is triggered.
Moon Detecon
Auto Light Supplement
EZVIZ Cloud
Certain functions of this product (including but not limited to live
view, recording, and remote playback) depend upon the Internet
connection. To learn more about these functions, visit the EZVIZ
website ezvizlife.com and register for a new account.
1
Page 3

Overview
Lens
Microphone
IR Light
LED Indicator
Power Cable
RESET
microSD Card Slot
Magnetic Base
Name Description
IR Light
LED
Indicator
USB Port
microSD Slot
RESET Button
To connect to a different Wi-Fi network, press the RESET button for
3 seconds to restart the camera then reconnect to Wi-Fi when the
red and blue light flashes.
Auto light source for night vision. The video mode has
two functions: color (for daylight recording) and black
and white with IR illuminator (for night recording).
Flashing red and blue: The camera is on; you can
configure the Wi-Fi connection.
Steady blue: The camera is connected.
Slow blue flicker: The camera is running properly.
Steady red: The camera is starting up.
Slow red flicker: The Wi-Fi connection has failed.
Fast red flicker: MicroSD card error.
5V±10%
Recommended compatibility: Class 10, maximum space
64GB. If a SD card is used, video files will be stored in
the SD card. You would need to initialize it in the EZVIZ
International app.
Press and hold the RESET button for 3 seconds while the
camera is running. The camera will restart and reset to
default settings.
2
Page 4
Operations
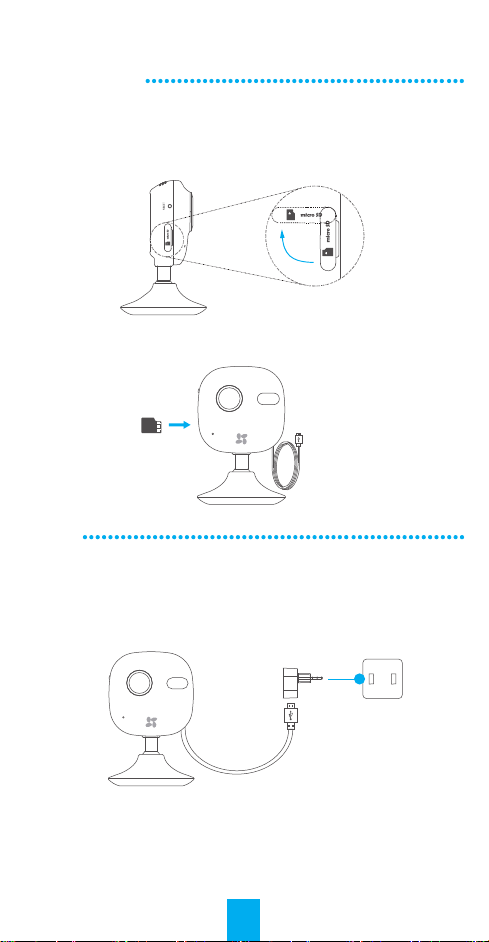
Step 1 (Optional)
Installing the microSD Card
To open the MicroSD card slot cover, flip it clockwise.
1
Insert a microSD card into the slot.
2
Step 2
Starting the Camera
Connect the camera to the power adapter. When the red and blue light
flashes, that means the camera is powered on.
Power Cable (1.5m)
3
Power Socket
Page 5
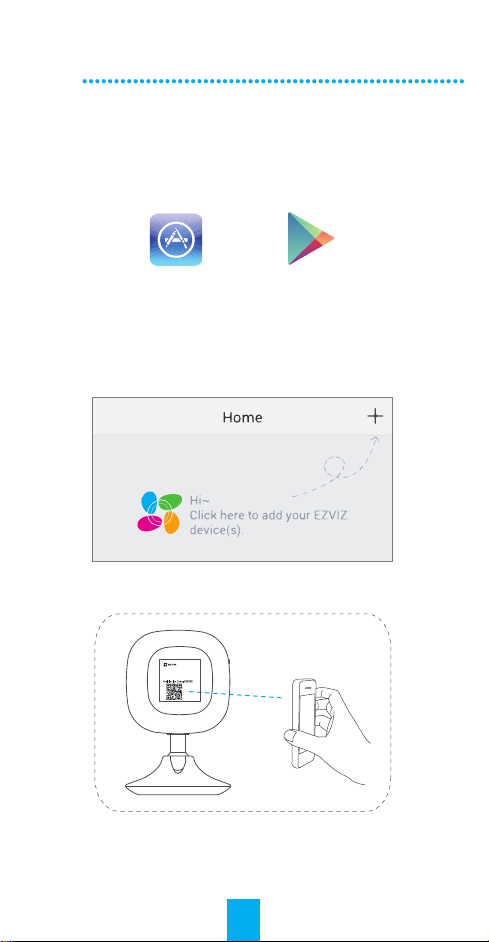
Step 3
EZVIZ Cloud Setup
To Register an EZVIZ Account
1
- Connect your mobile device to Wi-Fi.
- Download and install the EZVIZ International app by
searching the “EZVIZ” in App Store or Google Play
OR
- Launch the app and register for an EZVIZ user account.
To Add a Camera
2
- Log into the EZVIZ International app.
- Click the “+” on the upper-right hand corner to add a camera.
- Scan the QR Code on the back of the camera or on the Quick
Start Guide cover.
TM
.
Model: XXXXXX
Power Consumption: XXX
FCC ID:XXXXXXX IC:XXXXXX
SN: XXXXXXX MM/YYYY
Verification Code: XXXXXX
- Follow the prompts to set up the Wi-Fi. (Locate the camera
within 3 meters from the router when setting up the Wi-Fi.)
- Configure the time settings and complete the process.
4
Page 6
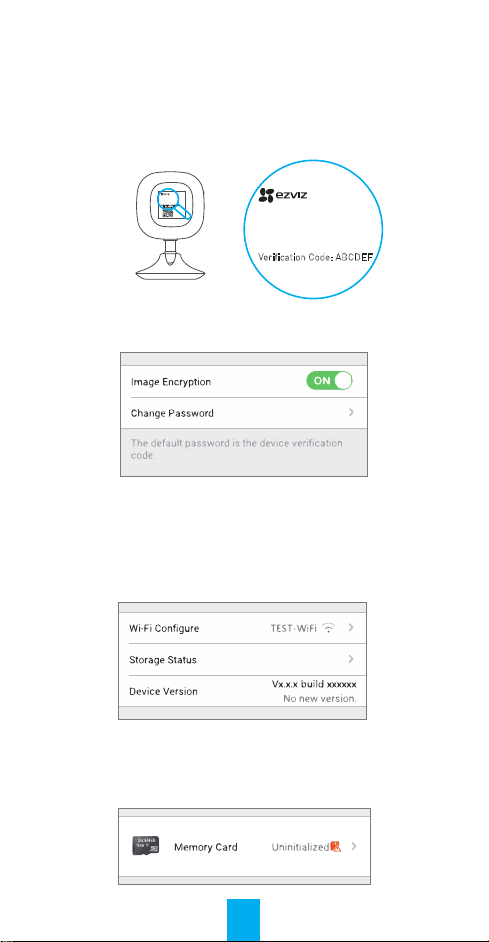
To Change the Default Password
3
After adding the camera, you are required to change the device
password to ensure your video security.
- Locate the verification code as your default password on the
label at the back of the camera.
Model: XXXXXX
Power Consumption: XXX
FCC ID:XXXXXXX IC:XXXXXX
SN: XXXXXXX MM/YYYY
Verification Code: XXXXXX
Model: XXXXXX
Power Consumption: XXX
FCC ID:XXXXXXX IC:XXXXXX
SN: XXXXXXX MM/YYYY
Verification Code: ABCDEF
- Go in the Device Settings interface in the app and tap on the
Change Password.
- Enter the verification code as the old password, and type a
new password.
To Initialize the microSD Card
4
- Check the microSD card status by tapping on the Storage
Status in the Device Settings interface.
- If the microSD card status displays as Uninitialized, tap to
initialize it. The status will then change to Normal. You can
then start recording any event triggered video in the camera
such as motion detection.
5
Page 7

Installation
Installing the Metal Plate (Optional)
1
Pick a clean and flat surface and secure the metal plate to the
desired position with the foam stickers or screws (not included.)
There’s a magnet piece inside the camera. You can skip this step
if the surface is made of metal.
Installing the Camera
2
Secure the camera magnetically to the metal plate or metal
surface (see figure below).
Completing Installation
3
Adjust the camera angle as required.
Troubleshooting
“The device is offline.” or “The device is not registered.” prompts
Q:
appear when adding the camera using the EZVIZ International
app.
1. Make sure the network is connected properly and the router’s
A:
DHCP is enabled.
2. Press and hold the RESET button for 3 seconds to reset the
settings anytime you have changed the network settings.
The mobile device is not receiving instant alerts when the
Q:
camera is online.
1. Make sure the EZVIZ International app is running on your
A:
mobile device.
2. For Android devices, make sure the app is running in the
background; and for iOS devices, enable the push
notifications in “Settings > Notification”.
Does the camera run on batteries or other USB-powered
Q:
devices?
Best used with the EZVIZ standard power adapter to provide a
A:
stable voltage supply.
6
Page 8

Índice
ESPAÑOL
Cámara en la nube (x1)
Adhesivo de
espuma (x1)
Los iconos de este manual solo se incluyen a modo de
referencia y pueden no ser idénticos al producto real.
Kit de tornillos
Adaptador de
corriente (x1)
Placa metálica (x1)
Guía de inicio
rápido (x1)
Funciones
Vídeo en directo HD 720P.
Conexión Wi-Fi
Ángulo de visualización horizontal de 115°
Detección de movimiento: Envía una alerta instantánea al
Detección de
dispositivo móvil si se activa la detección de movimiento.
movimiento
Luz suplementaria automática
Cloud EZVIZ
Algunas de las funciones de este producto (entre otras, la
visualización en directo, la grabación y la reproducción remota)
dependen de la conexión a Internet. Para obtener más información
sobre estas funciones, visite el sitio web de EZVIZ ezvizlife.com y
regístrese para obtener una cuenta.
7
Page 9

Información general
Lentes
Micrófono
Luz IR
Indicador LED
Cable de alimentación
RESET
Ranura para tarjeta
microSD
Base magnética
Nombre Descripción
Luz IR
Indicador
LED
Puerto USB
Ranura para
tarjeta
microSD
Botón RESET
Para conectarse a otra red Wi-Fi, pulse el botón RESET durante 3
segundos para reiniciar la cámara y, a continuación, vuelva a
conectarse a la red Wi-Fi cuando la luz roja y azul parpadee.
Fuente de luz automática para visión nocturna. El modo
de vídeo tiene dos funciones: color (para grabación
diurna) y blanco y negro con iluminador IR (para
grabación nocturna).
Rojo y azul parpadeante: La cámara está activa; puede
configurar la conexión Wi-Fi.
Azul fijo: La cámara está conectada.
Azul con intermitencia lenta: La cámara funciona correctamente.
Rojo fijo: La cámara se está iniciando.
Rojo con intermitencia lenta: Fallo de conexión Wi-Fi.
Rojo con intermitencia rápida: Error en tarjeta microSD.
5V±10%
Compatibilidad recomendada: Clase 10, espacio máximo
de 64 GB Si se utiliza una tarjeta SD, los archivos de
vídeo se almacenarán en ella. Debe inicializarla en la
aplicación EZVIZ International.
Mantenga pulsado el botón RESET durante 3 segundos
mientras la cámara se está ejecutando. La cámara se
reiniciará y se restablecerá a los ajustes por defecto.
8
Page 10

Funciones
Paso 1 (opcional)
Instalación de la tarjeta microSD.
Para abrir la tapa de la ranura de la tarjeta microSD, gírela en el
1
sentido de las agujas del reloj.
Inserte una tarjeta microSD en la ranura.
2
Paso 2
Inicio de la cámara
Conecte la cámara al adaptador de corriente. Cuando la luz roja y azul
parpadee, significará que la cámara está encendida.
Toma de corriente
Cable de alimentación (1,5 m)
9
Page 11

Paso 3
Configuración de EZVIZ Cloud
Para registrar una cuenta de EZVIZ
1
- Conecte el dispositivo móvil a la red Wi-Fi.
- Descargue e instale la aplicación EZVIZ International
buscando "EZVIZ" en App Store o Google Play™.
O
- Inicie la aplicación y regístrese para obtener una cuenta de
usuario de EZVIZ.
Para añadir una cámara
2
- Inicie sesión en la aplicación EZVIZ International.
- Haga clic en el símbolo “+” que aparece en la parte superior
derecha para añadir una cámara.
- Escanee el código QR de la parte posterior de la cámara o de
la portada de la Guía de inicio rápido.
Model: XXXXXX
Power Consumption: XXX
FCC ID:XXXXXXX IC:XXXXXX
SN: XXXXXXX MM/YYYY
Verification Code: XXXXXX
- Siga las instrucciones para configurar la conexión Wi-Fi
(coloque la cámara en un radio de 3 metros del router al
configurar la conexión Wi-Fi).
- Configure los ajustes de hora y complete el proceso.
10
Page 12

Para cambiar la contraseña predeterminada
3
Al añadir la cámara, deberá cambiar la contraseña del
dispositivo para garantizar la seguridad del vídeo.
- Localice el código de verificación, que es la contraseña
predeterminada y se encuentra en la etiqueta de la parte
posterior de la cámara.
Model: XXXXXX
Power Consumption: XXX
FCC ID:XXXXXXX IC:XXXXXX
SN: XXXXXXX MM/YYYY
Verification Code: XXXXXX
Model: XXXXXX
Power Consumption: XXX
FCC ID:XXXXXXX IC:XXXXXX
SN: XXXXXXX MM/YYYY
Verification Code: ABCDEF
- Vaya a la interfaz Configuración del dispositivo en la
aplicación y toque Cambiar contraseña.
- Introduzca el código de verificación como la contraseña
anterior y escriba una contraseña nueva.
Para inicializar la tarjeta microSD
4
- Compruebe el estado de la tarjeta microSD tocando el Estado
de almacenamiento en la interfaz Configuración del
dispositivo.
- Si el estado de la tarjeta microSD aparece como No
inicializada, toque para inicializarla. A continuación, el estado
cambiará a Normal. Después podrá iniciar la grabación de
cualquier evento activado en la cámara, como la detección de
movimiento.
11
Page 13

Instalación
Instalación de la placa metálica (opcional)
1
Elija una pared limpia y lisa, y fije la placa metálica en la posición
que desee con los adhesivos de espuma o con tornillos (estos
últimos no se incluyen).
Hay una pieza magnética dentro de la cámara. Puede omitir este
paso si la superficie es de metal.
Instalación de la cámara
2
Fije la cámara magnéticamente a la placa o superficie metálica
(ver figura a continuación).
Finalización de la instalación
3
Ajuste el ángulo de la cámara según sea preciso.
Solución de problemas
Pueden aparecer mensajes como "El dispositivo está desconect-
P:
ado" o "El dispositivo no está registrado" al añadir la cámara
mediante la aplicación EZVIZ International.
1. Asegúrese de que la red está conectada correctamente y de
R:
que el servidor DHCP del router está habilitado.
2. Mantenga pulsado el botón RESET durante 3 segundos para
restablecer la configuración en cualquier momento si ha
cambiado los parámetros de red.
El dispositivo móvil no recibe alertas instantáneas cuando la
P:
cámara está en línea.
1. Asegúrese de que la aplicación EZVIZ International se está
R:
ejecutando en el dispositivo móvil.
2. Para dispositivos Android, asegúrese de que la aplicación se
está ejecutando en segundo plano; para dispositivos iOS,
habilite las notificaciones de inserción en "Ajustes > Notificaciones".
¿La cámara se ejecuta con baterías u otros dispositivos alimen-
P:
tados por USB?
Se recomienda utilizar el adaptador de corriente estándar de
R:
EZVIZ para proporcionar un suministro de corriente estable.
12
Page 14

Français
Table des matières
1 caméra Cloud
1 patin adhésif
en mousse
Les icônes figurant dans ce manuel sont fournies uniquement
à titre indicatif et peuvent différer ce celles de votre produit.
Jeu de vis
1 transformateur
électrique
1 plaque métallique
1 guide de prise
en main
Fonctions
Vidéo en direct HD 720p
Connexion Wi-Fi
Angle horizontal de visualisation de 115°
Détection de mouvement: alerte instantanément le
terminal mobile si la détection de mouvement est
Détecon de mouvement
déclenchée.
Éclairage automatique supplémentaire
Cloud EZVIZ
Certaines fonctions de ce produit (y compris, entre autres, l'affichage
en direct, l'enregistrement et la lecture à distance) dépendent de la
connexion Internet. Pour en savoir plus, rendez-vous sur le site
Internet d'EZVIZ, ezvizlife.com, et ouvrez un nouveau compte.
13
Page 15

Présentation
Objectif
Microphone
Lampe IR
Diode témoin
Câble d'alimentation
Orifice de réinitialisation
Emplacement pour carte
Micro SD
Support magnétique
Nom Description
Lampe IR
Diode
Indicateur
Port USB
Emplacement
microSD
Touche de
réinitialisation
Pour vous connecter à un réseau Wi-Fi différent, appuyez sur RESET
pendant 3secondes pour redémarrer la caméra. Reconnectez-vous
au réseau Wi-Fi lors que les voyants rouge et bleu clignotent.
Éclairage automatique pour vision nocturne Le mode
vidéo comprend deux fonctions: couleur
(enregistrement de jour) et monochrome avec lampe IR
(enregistrement de nuit).
Rouge et bleu clignotant: La caméra est allumée; vous
pouvez configurer la connexion Wi-Fi.
Bleu fixe: La caméra est connectée.
Bleu clignotant lentement : La caméra fonctionne
correctement.
Rouge fixe: La caméra démarre.
Rouge clignotant lentement : La connexion Wi-Fi a
échoué.
Rouge clignotant rapidement: Erreur de carte microSD.
5V ±10%
Compatibilité recommandée: classe 10, capacité maxi
de 64Go. Si vous utilisez une carte SD, les fichiers vidéo
seront enregistrés sur celle-ci. Il peut être nécessaire de
l'initialiser dans l'application EZVIZ International.
Appuyez sur le bouton RESET et maintenez-le enfoncé
pendant 3 secondes pendant que la caméra est en
marche. La caméra redémarre et restaure la
configuration par défaut.
14
Page 16

Fonctionnement
Étape 1 (facultatif)
Installation de la carte microSD
Pour ouvrir le couvercle de l'emplacement de la carte microSD,
1
retournez-le dans le sens des aiguilles d'une montre.
Insérez une carte microSD.
2
Étape2
Démarrage de la caméra
Branchez la caméra au transformateur électrique. Lorsque les voyants
rouge et bleu clignotent, cela indique que la caméra est allumée.
Prise d'alimentation
Câble d'alimentation (1,5m)
15
Page 17

Étape3
Configuration d'EZVIZ Cloud
Ouverture d'un compte EZVIZ
1
- Raccordez votre terminal mobile au réseau Wi-Fi.
- Téléchargez et installez l'application EZVIZ International
depuis App Store ou Google Play
TM
.
OU
- Lancez l'application et ouvrez un compte d'utilisateur EZVIZ.
Ajout d'une caméra
2
- Connectez-vous à l'application EZVIZ International.
- Cliquez sur le signe «+» dans l'angle supérieur droit pour
ajouter une caméra.
- Lisez le code QR au dos de la caméra ou sur la couverture du
guide de prise en main.
Model: XXXXXX
Power Consumption: XXX
FCC ID:XXXXXXX IC:XXXXXX
SN: XXXXXXX MM/YYYY
Verification Code: XXXXXX
- Suivez les instructions pour configurer la connexion Wi-Fi.
(Placez la caméra à moins de 3mètres du routeur lors de
cette opération.)
- Configurez la date et l'heure puis continuez.
16
Page 18

Changer de mot de passe par défaut
3
Après avoir ajouté la caméra, vous êtes invité à changer de mot
de passe pour sécuriser la vidéo.
- Vous pouvez utiliser le code de vérification qui se trouve sur
l'étiquette au dos de la caméra comme mot de passe par
défaut.
Model: XXXXXX
Power Consumption: XXX
FCC ID:XXXXXXX IC:XXXXXX
SN: XXXXXXX MM/YYYY
Verification Code: XXXXXX
Model: XXXXXX
Power Consumption: XXX
FCC ID:XXXXXXX IC:XXXXXX
SN: XXXXXXX MM/YYYY
Verification Code: ABCDEF
- Ouvrez la fenêtre Configuration du périphérique dans l'appli
puis appuyez sur Changer de mot de passe.
- Saisissez l'ancien code de vérification comme ancien mot de
passe puis le nouveau mot de passe.
Initialisation de la carte microSD
4
- Pour consulter l'état de la carte microSD, appuyez sur État
du stockage dans la fenêtre Configuration du périphérique.
- Si l'état de la carte microSD est Non initialisé, appuyez sur
l'écran pour l'initialiser. L'état passe alors à Normal. Vous
pouvez ensuite filmer les images déclenchées par un
événement tel que la détection de mouvement.
17
Page 19

Installation
Installation de la plaque métallique (facultatif)
1
Fixez la plaque métallique à une surface propre et plate, dans la
position souhaitée, à l'aide des patins adhésifs en mousse ou de
vis (non fournies).
La caméra renferme une pièce aimantée. Vous pouvez sauter
cette étape si sa surface est métallique.
Installation de la caméra
2
Fixez la caméra à la plaque métallique ou à une surface
métallique grâce à l'aimant (figure ci-dessous).
Fin de l'installation
3
Réglez l'angle de la caméra.
Résolution des problèmes
Le message «L'appareil est hors ligne» ou «L'appareil n'est
Q:
pas enregistré» apparaît lorsque vous ajoutez la caméra à partir
de l'application EZVIZ International.
1. Vérifiez que vous êtes bien connecté au réseau et que le
R:
protocole DHCP du routeur est activé.
2. Maintenez le bouton RESET enfoncé pendant 3secondes pour
remettre tous les réglages à zéro à chaque fois que vous
modifiez la configuration réseau.
Le terminal mobile ne reçoit pas les alertes instantanées
Q:
lorsque la caméra est en ligne.
1. Vérifiez que l'application EZVIZ International est active sur
R:
votre terminal mobile.
2. Si vous utilisez un terminal Android, vérifiez que l'application
s'exécute en arrière-plan; sur un terminal iOS, activez les
notifications push dans «Paramètres > Notification».
La caméra est-elle alimentée par batterie ou par un matériel
Q:
équipé d'un port USB?
Pour bénéficier d'une tension stable, il est préférable d'utiliser
R:
le transformateur électrique standard EZVIZ.
18
Page 20

UD.6L0208B0031A01
 Loading...