

Page 1
UD04616B-A
C6T
Page 2

Page 3
COPYRIGHT ©2017 Hangzhou Hikvision Digital Technology Co., Ltd. or its subsidiaries. ALL RIGHTS RESERVED.
About this Manual
The Manual includes instructions for using and managing the product. Pictures, charts, images and all other information
hereinafter are for description and explanation only. The information contained in the Manual is subject to change,
without notice, due to firmware updates or other reasons. Please find the latest version in the ™ website
(http://www.ezvizlife.com).
Any and all information, including, among others, wordings, pictures, graphs are the properties of Hangzhou Hikvision
Digital Technology Co., Ltd. or its subsidiaries (hereinafter referred to be “Hikvision”). This user manual (hereinafter
referred to be “the Manual”) cannot be reproduced, changed, translated, or distributed, partially or wholly, by any means,
without the prior written permission of Hikvision. Unless otherwise stipulated, Hikvision does not make any warranties,
guarantees or representations, express or implied, regarding to the Manual.
Trademarks Acknowledgement
™, ™, and other Hikvision’s trademarks and logos are the properties of Hikvision in various jurisdictions.
Other trademarks and logos mentioned below are the properties of their respective owners.
Legal Disclaimer
TO THE MAXIMUM EXTENT PERMITTED BY APPLICABLE LAW, THE PRODUCT DESCRIBED, WITH ITS HARDWARE, SOFTWARE
AND FIRMWARE, IS PROVIDED “AS IS”, WITH ALL FAULTS AND ERRORS, AND HIKVISION MAKES NO WARRANTIES, EXPRESS
OR IMPLIED, INCLUDING WITHOUT LIMITATION, MERCHANTABILITY, SATISFACTORY QUALITY, FITNESS FOR A PARTICULAR
PURPOSE, AND NON-INFRINGEMENT OF THIRD PARTY. IN NO EVENT WILL HIKVISION, ITS DIRECTORS, OFFICERS,
EMPLOYEES, OR AGENTS BE LIABLE TO YOU FOR ANY SPECIAL, CONSEQUENTIAL, INCIDENTAL, OR INDIRECT DAMAGES,
INCLUDING, AMONG OTHERS, DAMAGES FOR LOSS OF BUSINESS PROFITS, BUSINESS INTERRUPTION, OR LOSS OF DATA
OR DOCUMENTATION, IN CONNECTION WITH THE USE OF THIS PRODUCT, EVEN IF HIKVISION HAS BEEN ADVISED OF THE
POSSIBILITY OF SUCH DAMAGES.
TO THE MAXIMUM EXTENT PERMITTED BY APPLICABLE LAW, IN NO EVENT SHALL HIKVISION’S TOTAL LIABILITY FOR ALL
DAMAGES EXCEED THE PURCHASE PRICE THE PRODUCT.
HIKVISION does not undertake any liability for personal injury or property damage, as the result of product interruption or
service termination cause by: a) improper installation or usage other than as requested; b) the protection of national or
public interests; c) Force Majeure; d) yourself or the third party, including not limitation, using any third party’s products,
software, applications, and among others.
REGARDING TO THE PRODUCT WITH INTERNET ACCESS, THE USE OF PRODUCT SHALL BE WHOLLY AT YOUR OWN RISKS.
HIKVISION SHALL NOT TAKE ANY RESPONSIBILITES FOR ABNORMAL OPERATION, PRIVACY LEAKAGE OR OTHER DAMAGES
RESULTING FROM CYBER ATTACK, HACKER ATTACK, VIRUS INSPECTION, OR OTHER INTERNET SECURITY RISKS; HOWEVER,
HIKVISION WILL PROVIDE TIMELY TECHNICAL SUPPORT IF REQUIRED.
The purpose of the Products is to provide an adequate warning in the event of illegal encroachment in certain area;
however, the proper installation of the Products will not eliminate, but only reduce, that accidents will not occur or that
Page 4

there will be no personal injury or property loss as a result. You are highly recommended to raise your vigilance and
strengthen the safety awareness in the daily life.
SURVEILLANCE LAWS VARY BY JURISDICTION. PLEASE CHECK ALL RELEVANT LAW S IN YOUR JURISDICTION BEFORE USING
THIS PRODUCT IN ORDER TO ENSURE THAT YOUR USE CONFORMS TO THE APPLICABLE LAW. YOU FUTHER AGREE THAT
THIS PRODUCT IS ONLY FOR CIVIL USE, AND HIKVISION SHALL NOT BE LIABLE IN THE EVENT THAT THIS PRODUCT IS USED
WITH ILLEGITIMATE PURPOSES, SUCH AS THIRD PARTY RIGHTS INFRINGEMENT, MEDICAL TREATMENT, SAFETY EQUIPMENT
OR OTHER SITUATIONS WHERE THE PRODUCT FAILURE COULD LEAD TO DEATH OR PERSONAL INJURY, OR WEAPON
OF MASS DESTRUCTION, CHEMINCAL AND BIOLOGICAL WEAPON, NUCLEAR EXPLOSION, AND ANY UNSAFE NUCLEAR
ENERGY USES OR ANTI-HUMANITY USAGES. YOU SHOULD UNDERTAKE ALL RESPONSIBILITIES FOR LOSSES OR DAMAGES
RESULTING FROM THE ABOVE USAGES WHATSOEVER.
IN THE EVENT OF ANY CONFLICTS BETWEEN THE ABOVE AND THE APPLICABLE LAW, THE LATER PREVAILS.
Regulatory Information
FCC Information
This device complies with Part 15 of the FCC Rules. Operation is subject to the following two conditions:
(1) This device may not cause harmful interference, and
(2) This device must accept any interference received, including interference that may cause undesired operation.
Note: This product has been tested and found to comply with the limits for a Class B digital device, pursuant to Part
15 of the FCC Rules. These limits are designed to provide reasonable protection against harmful interference in a
residential installation. This product generates, uses, and can radiate radio frequency energy and, if not installed and
used in accordance with the instructions, may cause harmful interference to radio communications. However, there is no
guarantee that interference will not occur in a particular installation. If this product does cause harmful interference to
radio or television reception, which can be determined by turning the equipment off and on, the user is encouraged to try
to correct the interference by one or more of the following measures:
—Reorient or relocate the receiving antenna.
—Increase the separation between the equipment and receiver.
—Connect the equipment into an outlet on a circuit different from that to which the receiver is connected.
—Consult the dealer or an experienced radio/TV technician for help.
Please take attention that changes or modification not expressly approved by the party responsible for compliance could
void the user’s authority to operate the equipment.
This equipment should be installed and operated with a minimum distance 20cm between the radiator and your body.
This device complies with Industry Canada licence-exempt RSS standard(s). Operation is subject to the following two
conditions:
(1) this device may not cause interference, and
(2) this device must accept any interference, including interference that may cause undesired operation of the device.
Under Industry Canada regulations, this radio transmitter may only operate using an antenna of a type and maximum (or
Page 5

lesser) gain approved for the transmitter by Industry Canada. To reduce potential radio interference to other users, the
antenna type and its gain should be so chosen that the equivalent isotropically radiated power (e.i.r.p.) is not more than
that necessary for successful communication.
EU Conformity Statement
This product and - if applicable - the supplied accessories too are marked with "CE" and comply
therefore with the applicable harmonized European standards listed under the Radio Equipment
Directive 2014/53/EU, the EMC Directive 2014/30/EU, the RoHS Directive 2011/65/EU.
2012/19/EU (WEEE directive): Products marked with this symbol cannot be disposed of as unsorted
municipal waste in the European Union. For proper recycling, return this product to your local supplier
upon the purchase of equivalent new equipment, or dispose of it at designated collection points. For
more information see: www.recyclethis.info.
2006/66/EC (battery directive): This product contains a battery that cannot be disposed of as
unsorted municipal waste in the European Union. See the product documentation for specific battery
information. The battery is marked with this symbol, which may include lettering to indicate cadmium
(Cd), lead (Pb), or mercury (Hg). For proper recycling, return the battery to your supplier or to a
designated collection point. For more information see: www.recyclethis.info.
EC DECLARATION OF CONFORMITY
Hereby, Hangzhou Hikvision Digital Technology Co., Ltd. declares that the radio equipment type [CS-CV240
(B0-21WFR)] is in compliance with Directive 2014/53/EU.
The full text of the EC DECLARATION OF CONFORMITY is available at the following web link:
http://www.ezvizlife.com/declaration-of-conformity
.
Safety Instruction
CAUTION: THE PRODUCT IS BUILT IN A REPLACEABLE BATTERY. RISK OF EXPLOSION IF BATTERY IS
REPLACED BY AN INCORRECT TYPE. DISPOSE OF USED BATTERIES ACCORDING TO THE INSTRUCTIONS.
Due to the product shape and dimension, the name and address of the importer/
manufacturer are printed on the package.
SAVE THIS MANUAL FOR FUTURE REFERENCE
Page 6
Setup
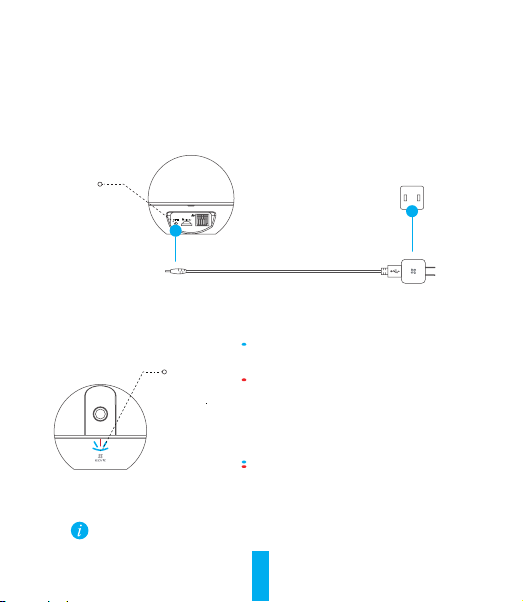
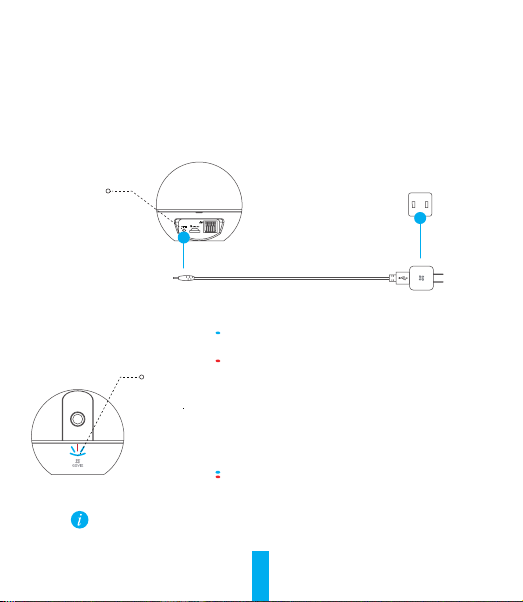
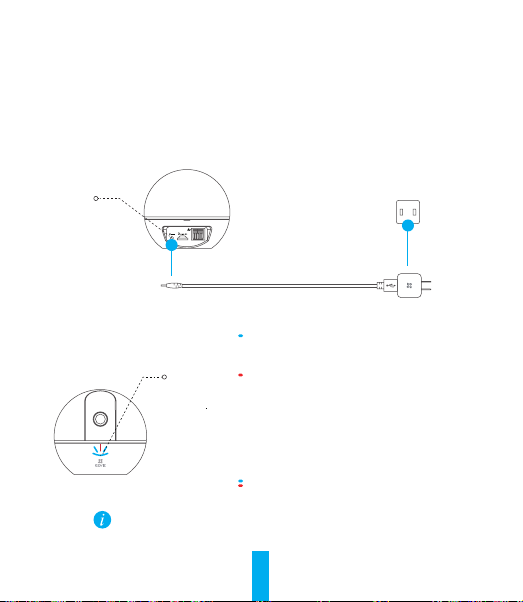
Step 1 Power-on
Plug the power cable into the camera, and then plug the power adapter into an outlet as shown
in the figure below. The LED indicator will flash red and blue when the camera is ready for
setup.
Power Interface
Power Outlet
Power Cable
LED Indicator Status
Blue Flicker: The network is properly
LED Indicator
Turn on the C6T and let it power up. The camera will completely rotate side-to-side
and tilt up-and-down once.
connected.
Solid Red: The device is activating.
Slow Red Flicker: Invalid network connection.
Fast Red Flicker: MicroSD card or other error
occurred.
Alternating Blue and Red Flicker: Camera is
ready for Wi-Fi setup.
1
Page 7
Step 2 Camera Setup
1. Create a user account
- Connect your mobile phone to Wi-Fi using your 2.4GHz network.
- Search for "EZVIZ" in the App Store or Google Play
- Download and install the EZVIZ app.
- Launch the app.
- Create, and register an EZVIZ user account by following the startup wizard.
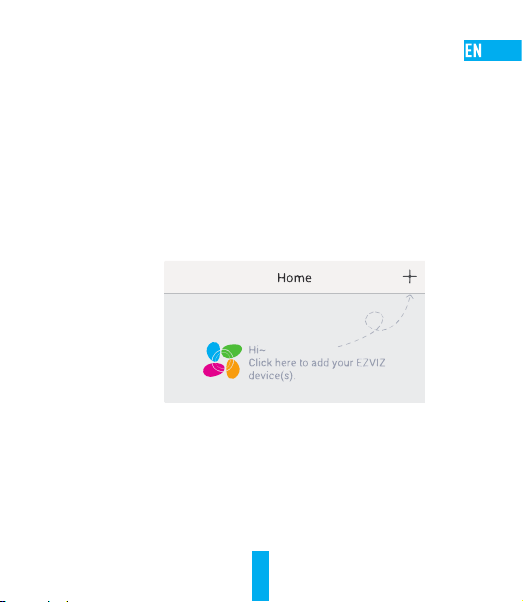
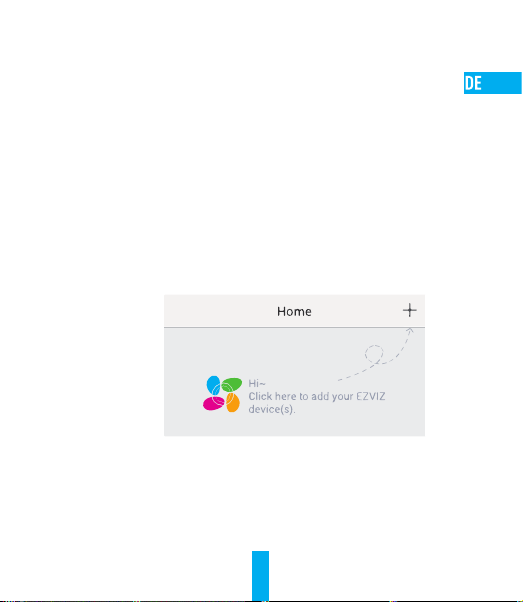
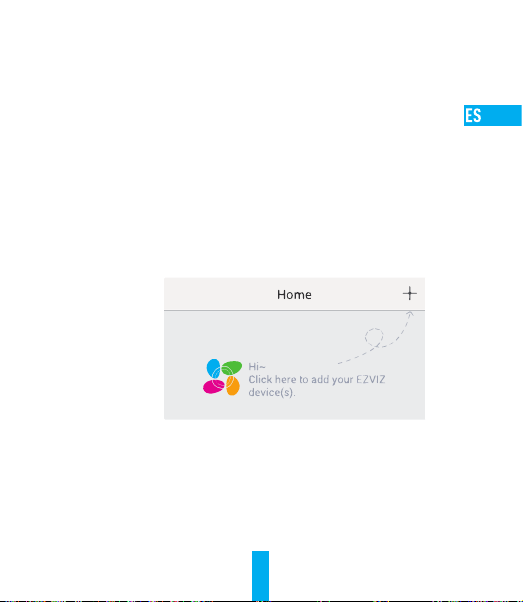
2. Adding a camera to EZVIZ
- Log in to your account using the EZVIZ app.
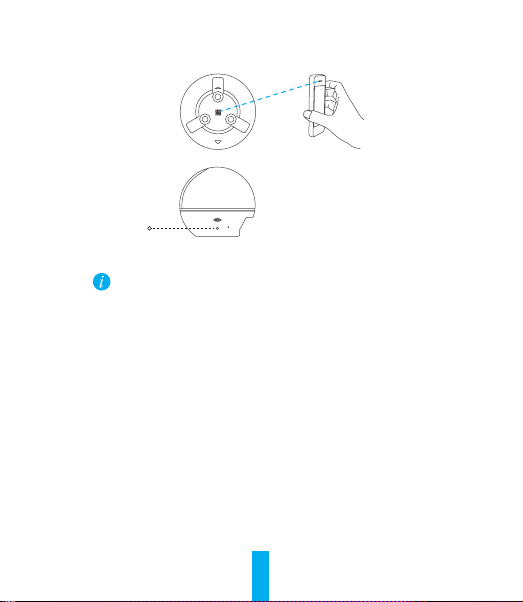
- Tap "+" on the Home page to go to the Scan QR Code interface.
- Scan the QR Code on the bottom of the camera or the front cover of the Quick Start Guide.
- Enter the password for your Wi-Fi network.
- Select the correct time zone and DST information.
- Tap "Finish" to finish setup.
2
(TM)
.
Page 8

• If the camera fails to connect to your Wi-Fi network, press and hold the RST button
for 3s and repeat Step 2.2.
• To select another Wi-Fi network, press and hold the RST button for 3s to reboot the
device. When the LED indicator flickers red and blue, you can choose a new Wi-Fi
network.
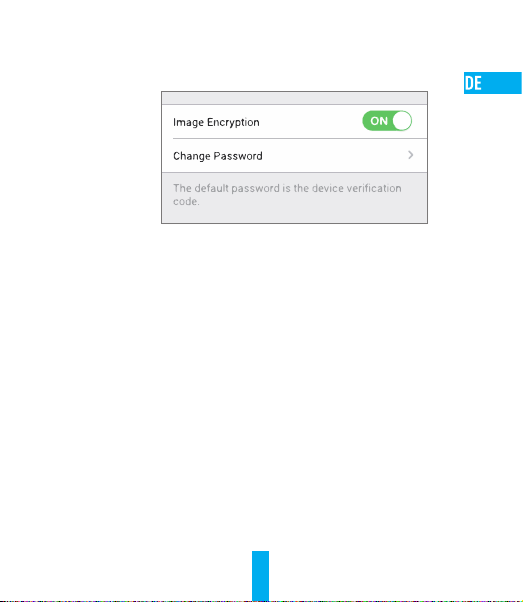
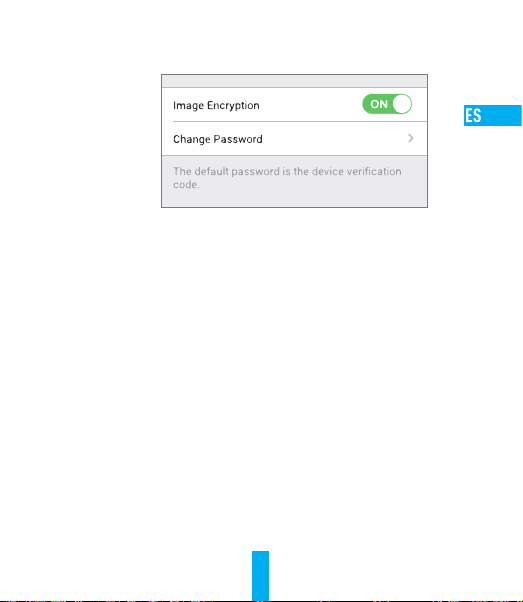
3. To Change the Default Password
The camera uses the verification code found on the bottom of the camera as the default
password. After adding the camera to your network, you will be required to change the device
password to ensure video security. The password is used for Image Encryption, too. If you
turn on the Image Encryption, you will be required to input your password when you view live
video or playback stored video from the camera.
r- Go to the camera settings screen to change the default password.
- Tap on “Change Password”.
3
Page 9

- Tap on “Edit”.
- Enter the original verification code located on the bottom of the camera.
- Enter the new password. Please use letters and numbers to make a password anywhere from
6 to 12 characters in length.
4. Angle Adjustment
You can adjust the camera via the EZVIZ app to get an optimum angle. The panning angle
ranges from 0° to 340°, and the tilting angle ranges from -10° to 80°.
4
Page 10

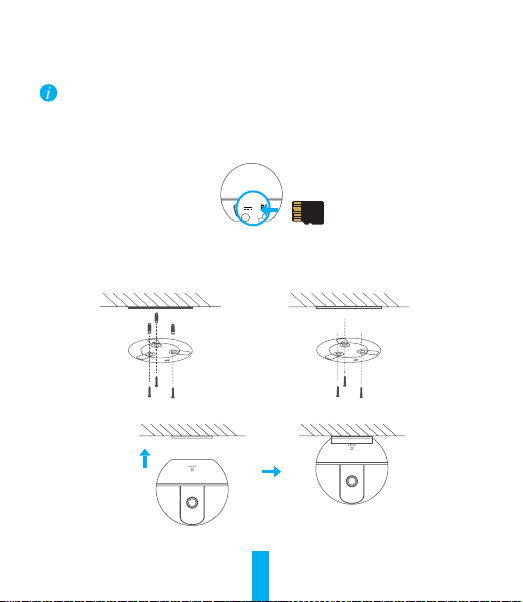
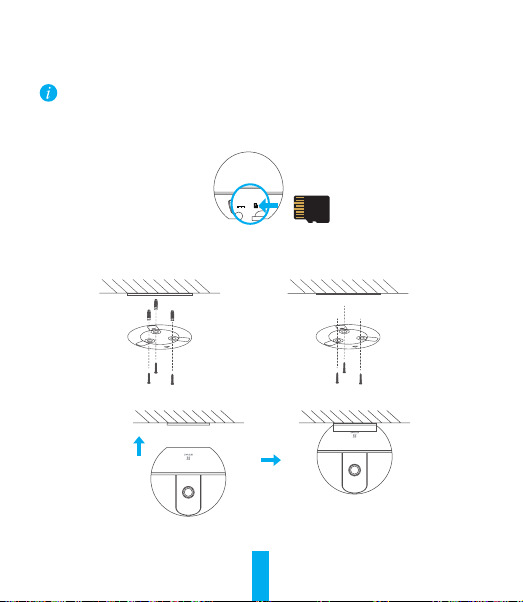
Wall Mounting (Optional)
The camera can be mounted on the wall or ceiling.
• Make sure the wall is strong enough to withstand three times the camera's weight.
• The installation surface should be clean and flat.
1. (Optional) If you want to install the microSD card, insert the microSD card into the
microSD card slot on the rear side of the camera. Otherwise, you can skip this step.
2. Attach the supplied drill template to the place where you want to affix the camera.
3. (Optional) If the wall is solid, drill and insert three expansion screw s.
4. Affix the camera base onto the template using the three metal screw s.
Solid Wall
5. Install the camera on the base, and turn it 15° to secure it.
6. Connect the power cable to the camera. If the camera was previously connected to the
Wi-Fi network, it will automatically connect to the same Wi-Fi network.
5
Wooden Wall
Page 11
Appendix
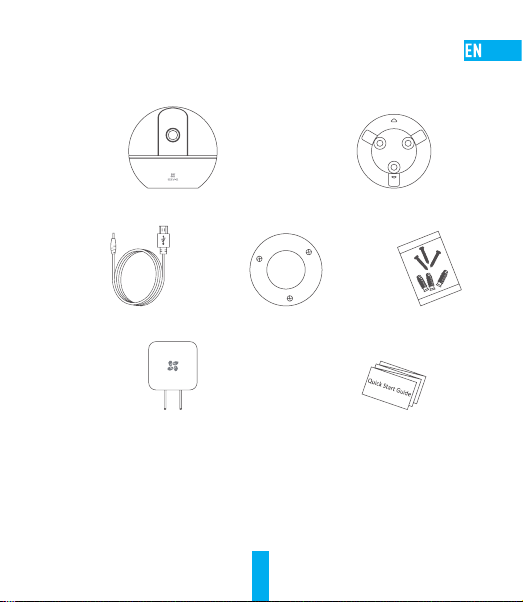
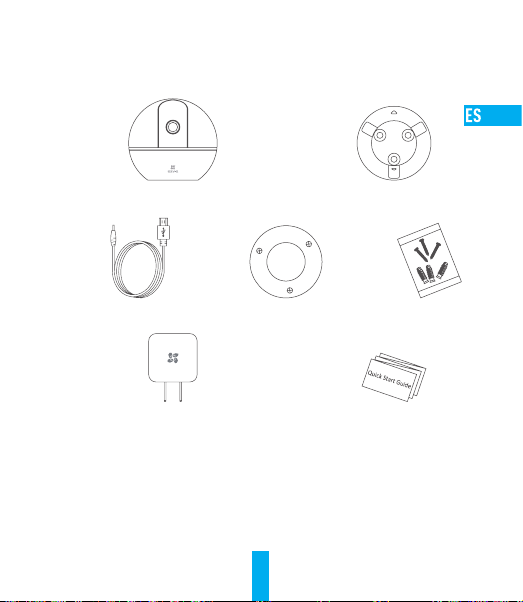
Box Content
C6T (x1) Base (x1)
Power Cable (x1) Drill Template (x1) Screw Kit (x1)
Power Adapter (x1) Quick Start Guide x(1)
6
Page 12
Einrichten
Schritt 1 Hochfahren
Schließen Sie das Stromkabel an die Kamera an und stecken Sie das Netzteil dann in eine
Steckdose, wie unten dargestellt. Wenn die Kamera zum Einrichten bereit ist, blinkt die
LED-Betriebsanzeige in Rot und Blau.
Stromanschluss
Stromkabel
Steckdose
LED-Anzeigestatus
LEDBetriebsanzeige
Schalten Sie die C6T ein und warten Sie, bis sie hochgefahren ist. Die Kamera dreht sich
komplett von einer Seite zur anderen und neigt sich einmal vor und zurück.
Blaues Blinken: Das Netzwerk ist richtig verbunden.
Ununterbrochenes rotes Leuchten: Das Gerät wird
aktiviert.
Langsames rotes Blinken: Fehlerhafte
Netzwerkverbindung.
Schnelles rotes Blinken: Ein Fehler ist aufgetreten
(z.B. bei der microSD-Karte).
Abwechselnd blaues und rotes Blinken: Kamera ist
zur Einrichtung bereit.
7
Page 13
Schritt 2 Kamera einrichten
1. Ein Benutzerkonto erstellen
- Verbinden Sie Ihr Mobiltelefon mit einem 2,4-GHz-WLAN.
- Suchen Sie im App Store oder auf Google Play
- Laden Sie die EZVIZ-App herunter und installieren Sie sie.
- Starten Sie die App.
- Erstellen und registrieren Sie ein EZVIZ-Benutzerkonto mithilfe des
Einrichtungsassistenten.
2. Eine Kamera zu EZVIZ hinzufügen
- Melden Sie sich mithilfe der EZVIZ-App bei Ihrem Konto an.
- Tippen Sie auf der Homepage auf „+“, um den Bildschirm „Scan QR Code“ (QR-Code
scannen) aufzurufen.
- Scannen Sie den QR-Code auf der Unterseite der Kamera oder auf dem Titelblatt der
Kurzanleitung.
- Geben Sie das Passwort für Ihr WLAN ein.
- Wählen Sie die richtige Zeitzone und die Sommerzeitinformationen aus.
- Tippen Sie auf „Finish“ (Fertig stellen), um die Einrichtung zu beenden.
(TM)
nach „EZVIZ“.
8
Page 14
QR-Code scannen
Zurücksetzen-Taste
• Wenn die Kamera keine Verbindung zu Ihrem WLAN herstellen kann, drücken Sie 3
Sekunden lang die Zurücksetzen-Taste und wiederholen Sie Schritt 2.2.
• Um ein anderes WLAN zu wählen, drücken Sie 3 Sekunden die Zurücksetzen-Taste,
um das Gerät neu zu starten. Wenn die LED-Anzeigeleuchte rot und blau blinkt,
können Sie ein neues WLAN wählen.
3. Das Standardpasswort ändern
Die Kamera verwendet den Verifizierungscode an der Unterseite der Kamera als
Standardpasswort. Nachdem Sie die Kamera zu Ihrem Netzwerk hinzugefügt haben, müssen
Sie das Gerätepasswort ändern, um die Videosicherheit zu gewährleisten. Das Passwort dient
auch zur Bildverschlüsselung. Wenn Sie Image Encryption (Bildverschlüsselung) aktivieren,
müssen Sie Ihr Passwort eingeben, um Livevideo oder gespeicherte Videos von der Kamera
wiederzugeben.
- Rufen Sie den Bildschirm mit den Kameraeinstellungen auf, um das Standardpasswort zu
ändern.
- Tippen Sie auf „Change Password“ (Passwort ändern).
9
Page 15
- Tippen Sie auf „Edit“ (Bearbeiten).
- Geben Sie den originalen Prüfcode ein, der sich an der Unterseite der Kamera befindet.
- Geben Sie das neue Passwort ein. Verwenden Sie Buchstaben und Ziffern zur Erstellung
eines Passworts von 6 bis 12 Zeichen Länge.
4. Blickwinkel einstellen
Sie können die Kamera mit der EZVIZ-App auf einen optimalen Winkel einstellen. Dabei
können Sie sie um 0 ° bis 340 ° schwenken und um -10 ° bis 80 ° neigen.
10
Page 16
Wandmontage (optional)
Die Kamera kann an einer Wand oder Decke montiert werden.
• Stellen Sie sicher, dass die Wand stabil genug ist, das Dreifache des Kameragewichts zu tragen.
• Die Montagefläche sollte sauber und flach sein.
1. (Optional) Wenn Sie eine microSD-Karte einsetzen möchten, setzen Sie sie in den microSDKartensteckplatz auf der Rückseite der Kamera ein. Andernfalls können Sie diesen Schritt
überspringen.
2. Bringen Sie die mitgelieferte Bohrschablone an der Position an, an der Sie die Kamera montieren
möchten.
3. (Optional) Wenn die Wand aus Stein ist, bohren Sie drei Löcher und setzen Sie Dübel ein.
4. Befestigen Sie den Montagefuß mit drei Schrauben auf der Schablone.
Steinwand Holzwand
5. Setzen Sie die Kamera auf den Montagefuß und drehen Sie sie um 15°, um sie zu sichern.
6. Schließen Sie das Stromkabel an der Kamera an. Wenn die Kamera bereits mit dem WLAN
verbunden war, verbindet sie sich automatisch wieder mit diesem WLAN.
11
Page 17

Anhang
Lieferumfang
1x C6T 1x Montagefuß
1x Stromkabel 1x Bohrschablone 1x Schraubensatz
1x Netzteil 1x Kurzanleitung
12
Page 18
Configuración
Paso 1 Encendido
Conecte el cable de alimentación a la cámara y después enchufe el adaptador de corriente a
una toma como se muestra en la siguiente figura. Cuando la cámara esté preparada para la
configuración, el indicador LED se iluminará en rojo y azul.
Interfaz de
alimentación
Toma de alimentación
Cable de alimentación
Indicador de estado LED
Indicador LED
Encienda el C6T y espere a que arranque. La cámara girará completamente de lado
a lado y se inclinará hacia arriba y abajo una vez.
Luz azul: La red está conectada correctamente.
Luz roja fija: El dispositivo se está activando.
Parpadeo rojo lento: Error de conexión en la
red.
Parpadeo rojo rápido: Se ha producido un error
en la tarjeta MicroSD o cualquier otro error.
Luz intermitente azul y roja: La cámara está
preparada para la configuración Wi-Fi.
13
Page 19
Paso 2 Configuración de la cámara
1. Cree una cuenta de usuario
- Conecte el teléfono móvil a una red Wi-Fi usando su red de 2.4 GHz.
- Busque "EZVIZ" en el App Store o Google Play
- Descargue e instale la aplicación EZVIZ.
- Abra la aplicación.
- Cree y registre una cuenta de usuario de EZVIZ siguiendo las instrucciones del asistente de
inicio.
2. Agregar una cámara a EZVIZ
- Inicie sesión en su cuenta con la aplicación EZVIZ.
- Toque el signo "+" de la página de Inicio y vaya a la interfaz para Escanear el código QR.
- Escanee el código QR situado en la parte inferior de la cámara o en la portada de la Guía
de inicio rápido.
- Introduzca la contraseña de su red Wi-Fi.
- Seleccione la zona horaria correcta y la información DST.
- Toque "Finish" (Finalizar) para finalizar la configuración.
(TM)
.
14
Page 20

Escanee el código QR
Botón Reset (Reinicio)
• Si la cámara no se conecta a su red Wi-Fi, mantenga pulsado el botón RST
durante 3 s y repita el paso2.2.
• Para seleccionar otra red Wi-Fi, mantenga pulsado el botón RST durante 3 s y
reinicie el dispositivo. Cuando el indicador LED emita un parpadeo rojo y azul,
podrá seleccionar una red Wi-Fi nueva.
3. Para cambiar la contraseña predefinida
La cámara usa el código de verificación que figura en la parte inferior de la misma como
contraseña predefinida. Una vez agregada la cámara a su red, se le solicitará que cambie la
contraseña del dispositivo para garantizar la seguridad del vídeo. La contraseña también se
usa para el cifrado de imagen. Si activa el cifrado de imagen, deberá introducir la contraseña
cuando vea vídeos en directo o reproduzca vídeos almacenados desde la cámara.
- Vaya a los ajustes de la cámara para cambiar la contraseña predefinida.
- Toque “Change Password” (Cambiar contraseña).
15
Page 21
- Toque “Edit” (Editar).
- Introduzca el código de verificación original situado en la parte inferior de la cámara.
- Introduzca la contraseña nueva. Cree una combinación alfanumérica para definir una
contraseña con una longitud de 6 a 12 caracteres.
4. Ajuste de ángulo
Puede ajustar la cámara con la aplicación EZVIZ para encontrar el ángulo adecuado. El
ángulo de panorámica va de 0° a 340°, y el ángulo de inclinación de -10° a 80°.
16
Page 22
Montaje en pared (opcional)
La cámara puede montarse en la pared o en el techo.
• Asegúrese de que la pared tenga suficiente solidez para soportar tres veces el peso de la cámara.
• La superficie de montaje debe ser lisa y estar limpia.
1. (Opcional) Si desea instalar la tarjeta microSD, inserte la tarjeta microSD en la ranura de la tarjeta
microSD situada en la parte trasera de la cámara. En caso contrario, puede omitir este paso.
2. Coloque la plantilla de perforación que se suministra en la superficie donde quiera fijar la cámara.
3. (Opcional) Si la pared es dura, haga un agujero e inserte tres tacos de expansión.
4. Coloque la base de la cámara en la plantilla con los tres tornillos metálicos.
Pared dura Pared de madera
5. Monte la cámara en la base y gírela 15º para fijarla.
6. Conecte el cable de alimentación a la cámara. Si la cámara se ha conectado previamente a
la red Wi-Fi, se conectará automáticamente a la misma red Wi-Fi.
17
Page 23
Anexo
Contenido de la caja
C6T (x1) Base (x1)
Cable de alimentación (x1) Plantilla de perforación (x1) Juego de tornillos (x1)
Adaptador de corriente (x1) Guía de inicio rápido (x1)
18
Page 24

Mise en place
Étape 1 Mise sous tension
Branchez le câble d’alimentation à la caméra puis l’adaptateur d’alimentation à une prise
électrique, comme illustré dans la figure ci-dessous. L’indicateur LED clignotera en rouge et
bleu quand la caméra est prête à être configurée.
Interface
d’alimentation
Prise électrique
Câble d’alimentation
État de l’indicateur LED
Indicateur LED
Mettez le C6T sous tension et laissez-le s’allumer. La caméra pivotera
entièrement de chaque côté et de haut en bas une fois.
Clignotement en bleu: la connexion au réseau
est correcte.
Rouge fixe: l’appareil est en cours d’activation.
Clignotement lent en rouge: connexion au
réseau non valide.
Clignotement rapide en rouge: erreur carte
microSD ou autre.
Clignotement alterné bleu et rouge: la caméra
est prête pour la configuration Wi-Fi.
19
Page 25

Étape 2 Configuration de la caméra
1. Créer un compte utilisateur
- Connectez votre téléphone mobile à votre réseau Wi-Fi 2,4GHz.
- Recherchez «EZVIZ» dans l’App Store ou Google Play
- Téléchargez et installez l’application EZVIZ.
- Lancez l’application.
- Créez et enregistrez un compte utilisateur EZVIZ en suivant l’assistant de démarrage.
2. Ajouter une caméra à EZVIZ
- Connectez-vous à votre compte à l’aide de l’application EZVIZ.
- Appuyez sur l’icône «+» de la page d’accueil pour accéder à l’interface de lecture du
code QR.
- Scannez le code QR au bas de la caméra ou sur la première de couverture du guide de
démarrage rapide.
- Saisissez le mot de passe de votre réseau Wi-Fi.
- Sélectionnez le bon fuseau horaire et les informations d’heure légale.
20
(TM)
.
Page 26

- Appuyez sur «Finish» (Terminer) pour compléter la configuration.
Scannez le code QR
Bouton de réinitialisation
• Si la connexion de la caméra à votre réseau Wi-Fi échoue, maintenez enfoncé le
bouton de réinitialisation (RST) pendant 3s et répétez l’étape2.2.
• Pour sélectionner un autre réseau Wi-Fi, maintenez enfoncé le bouton de
réinitialisation (RST) pendant 3s pour redémarrer l’appareil. Une fois que
l’indicateur LED clignote en bleu et rouge, il sera possible de choisir un nouveau
réseau Wi-Fi.
3. Pour modifier le mot de passe par défaut
Le code de vérification situé sur le fond de la caméra est utilisé comme mot de passe par
défaut. Après avoir ajouté la caméra à votre réseau, vous devrez modifier le mot de passe de
l’appareil pour garantir la sécurité de votre vidéo. Le mot de passe est également utilisé pour
le cryptage des images. Si le cryptage des images est activé, vous devrez saisir votre mot de
passe au moment de l’affichage de la vue en direct ou pour lire les vidéos enregistrées par
la caméra.
- Accédez à l’écran des réglages de la caméra pour modifier le mot de passe par défaut.
21
Page 27

- Appuyez sur «Change Password» (Modifier le mot de passe).
- Appuyez sur «Edit» (Modifier).
- Saisissez le code de vérification d’origine situé sur le fond de la caméra.
- Saisir le nouveau mot de passe. Veuillez mélanger des lettres et des chiffres pour créer un
mot de passe d’une longueur de 6 à 12caractères.
4. Réglage de l’angle
Vous pouvez régler la caméra via l’application EZVIZ pour obtenir un angle optimal. L’angle
de panoramique varie de 0° à 340°, et l’angle d’inclinaison verticale varie de -10° à 80°.
22
Page 28

Montage mural (facultatif)
Il est possible de monter la caméra sur un mur ou au plafond.
• Assurez-vous que le mur soit suffisamment solide pour supporter au moins trois fois le poids de la caméra.
• La surface d’installation doit être propre et plane.
1. (Facultatif) Si vous souhaitez installer une carte microSD, insérez-la dans son logement
situé à l’arrière et à l’intérieur de la caméra. Sinon, vous pouvez ignorer cette étape.
2. Fixez le gabarit de perçage à l’endroit où vous souhaitez apposer la caméra.
3. (Facultatif) Si le mur est solide, percez les trois trous et insérez les trois vis à expansion.
4. Fixez le socle de la caméra sur le gabarit en utilisant les trois vis métalliques.
Mur solide Mur en bois
5. Installez la caméra sur le socle et tournez-la de 15° pour la serrer.
6. Connectez le câble d’alimentation à la caméra. Si la caméra a été précédemment connectée
à un réseau Wi-Fi, elle se reconnectera automatiquement au même réseau Wi-Fi.
23
Page 29

Annexe
Contenu du carton
1 C6T 1base
1câble d’alimentation 1gabarit de perçage 1kit de visserie
1adaptateur d’alimentation 1guide de démarrage rapide
24
Page 30

Configurazione
Passo 1 Accensione
Collegare il cavo di alimentazione alla videocamera e quindi collegare l'alimentatore alla presa
di corrente (figura sotto). Quando la videocamera è pronta per la configurazione, l'indicatore
LED lampeggia di colore rosso e blu.
Interfaccia di
alimentazione
Presa di corrente
Cavo di alimentazione
Stato indicatore LED
Blu lampeggiante: la rete è connessa
Indicatore LED
Accendere C6T e attendere. La videocamera ruoterà completamente da lato a lato e si
inclinerà in alto e in basso una volta.
correttamente.
Rosso fisso: il dispositivo si sta attivando.
Rosso lampeggiante lentamente: connessione di
rete non valida.
Rosso lampeggiante velocemente: si è verificato
un errore sulla scheda MicroSD o di altro genere.
Blu e rosso lampeggianti alternativamente: la
videocamera è pronta per la configurazione del WiFi.
25
Page 31

Passo 2 Configurazione della videocamera
1. Creare un account utente
- Connettere il cellulare alla rete Wi-Fi 2,4GHz.
- Cercare "EZVIZ" in App Store o Google Play
- Scaricare e installare l'app EZVIZ.
- Avviare l'app.
- Creare e registrare un account utente EZVIZ seguendo la procedura guidata all'avvio.
2. Aggiunta di una videocamera a EZVIZ
- Effettuare l'accesso nell'app EZVIZ utilizzando l'account creato.
- Toccare "+" nella pagina iniziale per passare all'interfaccia di acquisizione del QR Code.
- Acquisire il QR code riportato sotto la videocamera o sulla copertina della Guida
introduttiva.
- Immettere la password della rete Wi-Fi.
- Selezionare il fuso orario corretto e le informazioni sull'ora legale.
- Clicca Vedi Dispositivo per completare la configurazione.
(TM)
.
26
Page 32

Eseguire la scansione
del codice QR
Pulsante di RESET (RST)
• Se la videocamera non si connette alla rete Wi-Fi, tenere premuto il tasto RST per
3secondi e ripetere il passo2.2.
• Per selezionare un'altra rete Wi-Fi, tenere premuto il tasto RST per 3 secondi per
riavviare il dispositivo. Quando l'indicatore LED lampeggia nei colori blu e rosso, è
possibile scegliere una nuova rete Wi-Fi.
3. Per cambiare la password predefinita (Opzionale)
La password predefinita utilizzata dalla videocamera è rappresentata dal Verification Code
riportato sulla sua etichetta. Dopo aver aggiunto la videocamera alla rete, sarà possibile
cambiare la password del dispositivo per garantire la sicurezza dei video. La password è
utilizzata anche per Image Encryption (Crittografia immagini). Se si attiva Image Encryption
(Crittografia immagini) sarà richiesta l'immissione della password quando si visualizzano
video live o si riproducono video archiviati dalla videocamera.
- Passare alla schermata delle impostazioni della videocamera per cambiare la password
predefinita.
- Toccare "Change Password" (Cambia password).
27
Page 33

- Toccare "Edit" (Modifica).
- Inserire come vecchia password il Verification Code (VC) riportato sulla videocamera.
- Inserire la nuova password. Immettere una password di lunghezza compresa tra 6 e
12caratteri e composta da lettere e numeri.
4. Regolazione dell'angolazione
È possibile regolare la videocamera tramite l'app EZVIZ per ottenere un'angolazione ottimale.
L'angolo della panoramica va da 0° a 340° e l'angolo dell'inclinazione va da -10° a 80°.
28
Page 34

Montaggio a parete (facoltativo)
La videocamera può essere montata a parete o a soffitto.
• Assicurarsi che la parete sia sufficientemente solida da sostenere un peso pari a tre volte quello della
videocamera.
• La superficie d'installazione dev'essere pulita e piana.
1. (Facoltativo) Se si desidera installare la scheda microSD, inserire la scheda microSD
nell'apposito slot situato dietro la videocamera. Altrimenti saltare questo passaggio.
2. Fissare la mascherina per la perforazione in dotazione nel punto dove si desidera fissare la
videocamera.
3. (Facoltativo) Se la parete è solida, praticare tre fori con il trapano e inserirvi altrettanti
tasselli.
4. Fissare la base della videocamera sulla dima utilizzando tre viti metalliche.
Parete solida Parete di legno
5. Installare la videocamera sulla base e ruotarla di 15° per fissarla in modo sicuro.
6. Collegare il cavo di alimentazione alla videocamera. Se la videocamera è stata
precedentemente connessa alla rete Wi-Fi, si connetterà automaticamente alla stessa rete
Wi-Fi.
29
Page 35

Appendice
Contenuto della confezione
C6T (x1) Base (x1)
Cavo di alimentazione (x1)
Alimentatore (x1) Guida introduttiva (x1)
Dima dei fori
d'installazione (x1) Kit di tasselli (x1)
30
Page 36

Configuração
Passo 1 Ligar
Ligue o cabo de alimentação à câmara e de seguida ligue o adaptador de alimentação à saída,
conforme indicado na figura abaixo. O indicador LED irá piscar a luz vermelha e azul quando a
câmara estiver pronta para a configuração.
Interface de
alimentação
Tomada elétrica
Cabo de alimentação
Estado da luz indicadora LED
Piscar a cor azul: A rede está ligada
normalmente.
Luz indicadora
LED
Ligue o C6T e permita que este conclua o arranque. A câmara irá girar completamente de
um lado ao outro, e irá inclinar-se para cima e para baixo uma vez.
Luz vermelha: O dispositivo está a ativar.
A piscar vermelho lento: Ligação à rede inválida.
A piscar vermelho rápido: Ocorreu um erro com o
cartão microSD ou outro.
Piscar alternado a cor azul e vermelha: A câmara
está pronta para a configuração da rede Wi-Fi.
31
Page 37

Passo 2 Configuração da câmara
1. Criar uma conta de utilizador
- Ligue o seu telemóvel a uma rede Wi-Fi usando a sua rede de 2.4 GHz.
- Pesquise "EZVIZ" na App Store ou Google Play
- Transfira e instale a app EZVIZ.
- Inicie a app.
- Crie e registe uma conta de utilizador EZVIZ seguindo o assistente de arranque.
2. Adicionar uma câmara ao EZVIZ
- Inicie sessão na sua conta usando a app EZVIZ.
- Toque em "+" na página inicial para ir para a interface de Leitura do Código QR.
- Faça a leitura do Código QR na parte inferior da câmara ou na capa do Guia de iniciação
rápida.
- Insira a palavra-passe da sua rede Wi-Fi.
- Selecione o fuso horário correto e a informação sobre DST.
- Toque em "Finish" (Concluir) para concluir a configuração.
(TM)
.
32
Page 38

Faça a leitura
do código QR
Botão de reinicialização
• Se a câmara não conseguir ligar à sua rede Wi-Fi, prima e mantenha premido o
botão RST durante 3 seg. e repita o Passo2.2.
• Para selecionar outra rede Wi-Fi, prima e mantenha premido o botão RST durante
3 seg. para reiniciar o dispositivo. Quando o indicador LED piscar a cor vermelha e
azul poderá escolher uma nova rede Wi-Fi.
3. Alterar a palavra-passe predefinida
A câmara usa um código de verificação situado na parte inferior da câmara como palavrapasse predefinida. Depois de adicionar a câmara à sua rede, ser-lhe-á solicitado que altere
a palavra-passe do dispositivo a fim de garantir a segurança dos vídeos. A palavra-passe
também é utilizada para a Encriptação de imagem. Se ligar a função Image Encryption
(Encriptação de imagem), ser-lhe-á pedido que insira a sua palavra-passe quando visualiza
vídeo ao vivo ou vídeos de reprodução armazenados por parte da câmara.
- Vá para o ecrã de definições da câmara para alterar a palavra-passe predefinida.
- Toque em “Change Password” (Alterar palavra-passe).
33
Page 39

- Toque em “Edit” (Editar).
- Insira o código de verificação original situado na parte inferior da câmara.
- Insira a palavra-passe nova. Para criar a palavra-passe use letras e números (com uma
extensão entre 6 e 12 caracteres).
4. Ajuste de ângulo
Pode ajustar a câmara através da app EZVIZ para conseguir um ângulo ótimo. O ângulo de
deslocamento panorâmico vai de 0° a 340°, e o ângulo de inclinação vai de -10° a 80°.
34
Page 40

Montagem em parede (Opcional)
A câmara pode ser montada na parede ou no teto.
• Certifique-se de que a parede é suficientemente forte para suportar três vezes o peso da câmara.
• A superfície de instalação deve estar limpa e ser lisa.
1. (Opcional) Se deseja instalar o cartão microSD, insira o mesmo na ranhura para cartões
microSD no lado inferior da câmara. Caso contrário poderá ignorar este passo.
2. Fixe o modelo de perfuração fornecido no local onde deseja instalar a câmara.
3. (Opcional) Se a parede for sólida, perfure e insira três parafusos de expansão.
4. Fixe a base da câmara no modelo usando os três parafusos metálicos.
Parede sólida Parede de madeira
5. Instale a câmara na base e vire-a 15° para a fixar.
6. Ligue o cabo de alimentação à câmara. Se a câmara tiver sido ligada a uma rede Wi-Fi
anteriormente, esta irá ligar-se automaticamente à mesma rede Wi-Fi.
35
Page 41

Apêndice
Conteúdo da caixa
C6T (x 1) Base (x 1)
Cabo de alimentação (x 1) Modelo de perfuração (x 1) Kit de parafusos (x 1)
Adaptador de energia (x 1) Guia de iniciação rápida (x 1)
36
Page 42

Настройка
Шаг 1 Подача питания
Подключите кабель питания к камере, а затем вставьте адаптер в розетку электросети, как
показано на рисунке ниже. Камера готова для настройки, когда светодиодный индикатор
мигает красным и синим цветом.
Гнездо питания
Сетевая розетка
Кабель питания
Состояния светодиодного индикатора
Мигает синим: нормальное сетевое
подключение.
Светодиодный
индикатор
Включите камеру C6T и подождите, пока инициализируется. Камера должна
совершить полный поворот по горизонтали и наклониться вверх и вниз один раз.
Постоянно светится красным: устройство
запускается.
Медленно мигает красным: сбой сетевого
подключения.
Быстро мигает красным: отказ карты microSD
или другая ошибка.
Поочередно мигает синим и красным: камера
готова для настройки подключения к сети Wi-Fi.
37
Page 43

Шаг 2 Настройка камеры
1. Создание аккаунта пользователя
- Подключите мобильный телефон к сети Wi-Fi, работающей на частоте 2,4 ГГц.
- Найдите приложение EZVIZ в App Store или Google Play
- Загрузите и установите приложение EZVIZ.
- Запустите приложение.
- Создайте и зарегистрируйте аккаунт пользователя EZVIZ с помощью мастера
запуска.
2. Добавление камеры в систему EZVIZ
- Войдите свой аккаунт, используя приложение EZVIZ.
- Нажмите «+» на главной странице, чтобы открыть интерфейс сканирования QRкода.
- Отсканируйте QR-код, расположенный в нижней части камеры или на передней
обложке Краткого руководства пользователя.
- Введите пароль для сети Wi-Fi.
38
(TM)
.
Page 44

- Выберите нужный часовой пояс и информацию о переходе на летнее время.
- Нажмите Finish (Готово) для завершения настройки.
Отсканировать QR-код
Кнопка Reset (Сброс)
Если камеру не удается подключить к сети Wi-Fi, нажмите кнопку RESET (СБРОС)
•
и удерживайте ее 3сек., а затем повторите шаг 2.2.
Чтобы выбрать другую сеть Wi-Fi, удерживайте кнопку RESET (СБРОС) в течение
•
3сек. для перезагрузки устройства. Когда светодиодный индикатор начнет
мигать красным и синим цветом, вы сможете выбрать новую сеть Wi-Fi.
3. Изменение пароля по умолчанию
В качестве пароля по умолчанию используется код верификации, который находится
на нижней части камеры. После добавления камеры к сети необходимо изменить
пароль устройства для защиты ваших видеоданных. Пароль также используется для
шифрования изображений. Если функция шифрования включена, вы должны ввести
пароль как для просмотра изображений с камеры в реальном времени, так и для
просмотра видеозаписей.
- Чтобы изменить пароль по умолчанию, перейдите на экран настроек камеры.
39
Page 45

- Нажмите Change Password (Изменить пароль).
- Нажмите Edit (Изменить).
- Введите оригинальный код верификации, указанный на нижней панели камеры.
- Введите новый пароль. Пароль должен содержать от 6 до 12 букв и цифр.
4. Регулировка угла обзора
Чтобы установить оптимальный угол обзора камеры, можно использовать приложение
EZVIZ. Камера может поворачиваться по горизонтали в диапазоне от 0° до 340° и
наклоняться по вертикали в диапазоне от -10° до 80°.
40
Page 46

Установка на стене (дополнительно)
Камера может устанавливаться на стене или потолке.
Убедитесь, что стена достаточно прочная, чтобы выдержать тройной вес камеры.
•
Поверхность установки должна быть чистой и плоской.
•
1. (Дополнительно) Если вы хотите использовать карту microSD, вставьте ее гнездо для
карты памяти на задней стороне камеры. Если карта не нужна, вы можете пропустить
этот шаг.
2. Прикрепите прилагаемый шаблон для сверления отверстий к месту, где требуется
установить камеру.
3. (Дополнительно) Если стена кирпичная или цементная, необходимо просверлить
три отверстия и вставить в них дюбели.
4. Установите основание камеры по шаблону, используя три винта.
Каменная стена Деревянная стена
5. Установите камеру на основание и поверните ее на 15°, чтобы зафиксировать.
6. Подключите кабель питания к камере. Если камера была ранее подключена к сети Wi-Fi,
она автоматически подключится к этой же сети Wi-Fi.
41
Page 47

Приложение
Содержимое упаковочной коробки
Камера C6T, 1 шт. Основание, 1 шт.
Кабель питания, 1 шт. Шаблон для сверления
отверстий, 1 шт.
Адаптер питания, 1 шт. Краткое руководство пользователя, 1 шт.
42
Комплект винтового
крепления, 1 шт.
Page 48

Seadistamine
1. toiming Vooluvõrguga ühendamine
Ühendage toitekaabli pistik kaamerasse ja seejärel ühendage toiteadapter pistikupessa, nagu
allpool oleval joonisel näidatud. Kui kaamera on seadistamiseks valmis, hakkab LED-märgutuli
vilkuma punaselt ja siniselt.
Toiteliitmik
Pistikupesa
Toitejuhe
LED-märgutule olekud
Vilkuv sinine: võrk on nõuetekohaselt ühendatud.
LED-märgutuli
Lülitage C6T sisse ja laske kaameral käivituda. Kaamera pöördub täielikult ühelt
küljelt teisele ja kallutab end üles-alla ühe korra.
Püsiv punane: toimub seadme sisselülitumine.
Aeglaselt vilkuv punane: võrguühendus on puudulik.
Kiirelt vilkuv punane: mikro-SD-kaardi või muu rike.
Sinine ja punane vilguvad vahelduvalt: kaamera on
valmis Wi-Fi-võrgu häälestamiseks.
43
Page 49

2. toiming Kaamera seadistamine
1. Kasutajakonto loomine
- Ühendage oma mobiiltelefon Wi-Fi-võrku, mille sagedus on 2,4 GHz.
- Otsige poest App Store või Google Play™ rakendus „EZVIZ“.
- Laadige EZVIZ alla ja installige.
- Käivitage rakendus.
- Looge ja registreerige EZVIZ-i kasutajakonto käivitusviisardit järgides.
2. Kaamera lisamine rakendusse EZVIZ
- Logige EZVIZ-i kaudu oma kontosse sisse.
- Koputage avakuval „+“, et avada QR-koodi skannimisliides.
- Skannige QR-koodi, mis asub kaamera põhjal või kiirjuhendi esikaanel.
- Sisestage oma Wi-Fi-võrgu parool.
- Valige sobiv ajavöönd ja suveaja määrang.
- Seadistamise lõpetamiseks koputage „Finish“ (Lõpeta).
44
Page 50

Skannige QR-koodi
Nupp Lähtestamine
• Kui kaamera ühendamine Wi-Fi-võrku ebaõnnestus, hoidke RST nuppu all
3sekundit ja korrake toimingut 2.2.
• Mõne muu Wi-Fi-võrgu valimiseks hoidke RST nuppu all 3 sekundit, et seade
taaskäivitada. Kui LED-märgutuli vilgub punaselt ja siniselt, saate valida uue
Wi-Fi-võrgu.
3. Vaikeparooli muutmine
Vaikeparoolina on kasutusel kaamera põhjal olev kontrollkood. Video turvamiseks pärast
kaamera võrku ühendamist tuleb seadme parool ära muuta. Peale selle on parool vajalik
ka pildi krüptimiseks. Kui funktsioon Image Encryption (Pildi krüptimine) on sisse
lülitatud, saate salvestatud videot vaadata otse või taasesitada pärast parooli sisestamist.
- Vaikeparooli muutmiseks minge kaamera sätete aknale.
- Koputage „Change Password“ (Parooli muutmine).
45
Page 51

- Koputage „Edit“ (Redigeerimine).
- Sisestage kaamera põhjal olev algne kontrollkood.
- Sisestage uus parool. Kasutage tähtedest ja numbritest koosnevat parooli pikkusega 6
kuni 12 tähemärki.
4. Nurga reguleerimine
Rakenduse EZVIZ kaudu saate kaamerat seadistada, et leida optimaalne töönurk.
Panoraami nurk on vahemikus 0° kuni 340° ja kallutusnurk -10° kuni 80°.
46
Page 52

Kinnitamine seinale (valikvariant)
Kaamera saab paigaldada seinale või lakke.
• Veenduge, et sein on piisavalt tugev kolmekordse kaamera kaalu talumiseks.
• Paigalduskoha pind peab olema puhas ja tasane.
1. (Valikvariant) Kui soovite paigaldada mikro-SD-kaardi, pange mikro-SD-kaart kaamera
tagaküljel asuvasse mikro-SD-kaardi pessa. Muidu jätke see toiming tegemata.
2. Kinnitage komplektis olev puurimisšabloon kaamera kinnituskohale.
3. (Valikvariant) Kiviseina puhul puurige eelnevalt kolm ava ja pange neisse tüüblid.
4. Kinnitage kaamera alusplaat šablooni peale kolme metallkruviga.
Kivisein Puitsein
5. Paigaldage kaamera alusplaadile ja pöörake seda kinnitamiseks 15°.
6. Ühendage kaamerale toitejuhe. Kui kaamera oli varem Wi-Fi-võrku ühendatud, ühendub see
automaatselt samasse Wi-Fi-võrku.
47
Page 53

Lisa
Karbi sisu
C6T (1 tk) Alusplaat (1 tk)
Toitejuhe (1 tk) Puurimisšabloon (1 tk) Kruvide komplekt (1 tk)
Toiteadapter (1 tk) Kiirjuhend (1 tk)
48
Page 54

Iestatīšana
1.solis Ieslēgšana
Pievienojiet strāvas kabeli kamerai un pēc tam iespraudiet strāvas adapteri kontaktligzdā, kā
redzams attēlā zemāk. Kad kamera ir gatava iestatīšanai, LEDindikators mirgo sarkanā un zilā
krāsā.
Barošanas bloka
saskarne
Strāvas kontaktligzda
Strāvas kabelis
LED indikatora statuss
LEDindikators
Ieslēdziet C6T kameru un uzgaidiet, līdz tā ir iedarbināta. Kamera vienreiz pilnībā
pagriezīsies no viena sāna līdz otram un salieksies augšup un lejup.
Mirgo zilā krāsā: ierīce ir pareizi pievienota
tīklam.
Nepārtraukti spīd sarkanā krāsā: ierīce tiek
aktivizēta.
Lēnām mirgo sarkanā krāsā: nederīgs savienojums ar
tīklu.
Ātri mirgo sarkanā krāsā: radusies microSD kartes
vai cita kļūda.
Pārmaiņus mirgo zilā un sarkanā krāsā: kamera ir
gatava Wi-Fi tīkla iestatīšanai.
49
Page 55

2.solis Kameras iestatīšana
1. Izveidojiet lietotāja kontu.
- Pievienojiet mobilo tālruni Wi-Fi tīklam, izmantojot 2,4GHz tīklu.
- Meklējiet „EZVIZ” pakalpojumā App Store un veikalā Google Play
- Lejupielādējiet un instalējiet lietotni EZVIZ.
- Palaidiet lietotni.
- Izveidojiet un reģistrējiet EZVIZ lietotāja kontu, ievērojot startēšanas vedņa norādījumus.
2. Pievienojiet kameru lietotnē EZVIZ.
- Piesakieties savā kontā, izmantojot lietotni EZVIZ.
- Pieskarieties simbolam „+” sākuma ekrānā, lai dotos uz QRkodu skenēšanas saskarni.
- Noskenējiet QRkodu kameras apakšpusē vai uz ātrā starta rokasgrāmatas priekšējā vāka.
- Ievadiet jūsu Wi-Fi tīkla paroli.
- Atlasiet pareizo laika joslu un informāciju par ziemas/vasaras laiku (DST).
- Pieskarieties vienumam „Finish” (Pabeigt), lai pabeigtu iestatīšanu.
50
(TM)
.
Page 56

Noskenējiet QR kodu
Poga „Atiestatīt”
Ja neizdodas pievienot kameru Wi-Fi tīklam, nospiediet un 3sekundes turiet
•
nospiestu pogu „ATIESTATĪT”, un atkārtojiet 2.2.soli.
Lai izvēlētos citu Wi-Fi tīklu, atsāknējiet ierīci, nospiežot un 3sekundes turot
•
nospiestu pogu „ATIESTATĪT”. Kad LEDindikators mirgo sarkanā un zilā krāsā, jūs
varat izvēlēties jaunu Wi-Fi tīklu.
3. Nomainiet noklusējuma paroli.
Kamerā kā noklusējuma parole tiek izmantots verifikācijas kods, kas atrodams kameras
apakšpusē. Pēc kameras pievienošanas tīklam jums jānomaina ierīces parole, lai garantētu video
drošību. Parole tiek izmantota arī attēlu šifrēšanai. Ja opcija „Image Encr yption” (Attēlu šifrēšana)
ir ieslēgta, jums būs jāievada parole ikreiz, kad vēlēsieties skatīties video tiešraidi vai atskaņot
kamerā saglabātu video.
- Lai nomainītu noklusējuma paroli, dodieties uz kameras iestatījumu ekrānu.
- Pieskarieties vienumam „Change Password” (Mainīt paroli).
51
Page 57

- Pieskarieties vienumam „Edit” (Rediģēt).
- Ievadiet oriģinālo verikācijas kodu, kas atrodas kameras apakšpusē.
- Ievadiet jauno paroli. Lūdzu, izmantojiet burtu un ciparu kombināciju, lai izveidotu 6 līdz
12rakstzīmes garu paroli.
4. Pielāgojiet leņķi.
Jūs varat pielāgot kameras pozīciju, izmantojot lietotni EZVIZ, lai iegūtu optimālu leņķi.
Panorāmas leņķa diapazons ir no 0° līdz 340°, bet nolieces leņķa diapazons— no -10° līdz
80°.
52
Page 58

Uzstādīšana pie sienas (pēc izvēles)
Kameru var uzstādīt pie sienas vai griestiem.
Pārliecinieties, ka siena ir pietiekami stipra, lai izturētu trīskāršu kameras svaru.
•
Uzstādīšanas virsmai jābūt tīrai un plakanai.
•
1. Ja vēlaties ievietot microSD karti, ievadiet to microSD kartes slotā kameras aizmugurē (pēc
izvēles). Pretējā gadījumā jūs varat izlaist šo soli.
2. Piestipriniet komplektācijā iekļauto urbšanas šablonu vietā, kur vēlaties uzstādīt kameru.
3. Ja siena ir izgatavota no cieta materiāla, izurbiet trīs skrūvju caurumus un ievietojiet tajos
justēšanas skrūves (pēc izvēles).
4. Piestipriniet kameras pamatni šablonam ar trīs metāla skrūvēm.
Cieta siena Koka siena
5. Uzstādiet kameru uz pamatnes un pagrieziet par 15°, lai nostiprinātu.
6. Pievienojiet kamerai strāvas vadu. Ja kamera ir bijusi pievienota Wi-Fitīklam iepriekš, tā
automātiski savienosies ar to pašu Wi-Fi tīklu.
53
Page 59

Pielikums
Komplekta saturs
C6Tx1 Pamatnex1
Strāvas kabelisx1 Urbšanas šablonsx1 Skrūvju komplektsx1
Strāvas adapterisx1 Ātrā starta rokasgrāmatax1
54
Page 60

Sąranka
1žingsnis Įjungimas
Prijunkite maitinimo kabelį prie kameros ir prijunkite maitinimo adapterį prie maitinimo lizdo,
kaip parodyta tolesnėje iliustracijoje. Paruošus kamerą sąrankai, šviesos diodo indikatorius pradės
mirksėti raudona ir mėlyna spalvomis.
Maitinimo sąsaja
Maitinimo lizdas
Maitinimo kabelis
Šviesos diodų indikatoriaus būsena
Mirksintis mėlynas: tinklas prijungtas įprastai.
Šviesos diodų
indikatorius
Įjunkite C6T ir palaukite, kol įrenginys bus paleistas. Kamera iki galo pasisuks iš vieno šono į
kitą ir vieną kartą pasikreips aukštyn-žemyn.
Šviečiantis raudonas: įrenginys aktyvinamas.
Lėtai mirksintis raudonas: negaliojantysis
tinklo ryšys.
Greitai mirksintis raudonas: „microSD“ kortelės
arba kita klaida.
Pakaitomis mirksintis mėlynas ir raudonas:
kamera parengta „Wi-Fi“ sąrankai.
55
Page 61

2žingsnis Kameros sąranka
1. Naudotojo paskyros kūrimas
- Prijunkite savo mobilųjį telefoną prie „Wi-Fi“ 2,4GHz tinklo.
- „App Store“ arba „Google Play
- Atsisiųskite ir įdiekite EZVIZ programėlę.
- Paleiskite programėlę.
- Sukurkite ir užregistruokite EZVIZ naudotojo paskyrą, sekdami sąrankos vediklio nurodymus.
2. Kameros įtraukimas į EZVIZ
- Naudodamiesi EZVIZ programėle, prisijunkite prie savo paskyros.
- Pradžios puslapyje palieskite „+“, kad pereitumėte į QR kodo nuskaitymo sąsają.
- Nuskaitykite kameros apačioje arba sparčiosios paleisties vadovo priekiniame viršelyje esantį
QR kodą.
- Įveskite savo „Wi-Fi“ tinklo slaptažodį.
- Pasirinkite tinkamą laiko juostą ir DST informaciją.
- Palieskite „Finnish“ (Baigti), kad užbaigtumėte sąranką.
(TM)
“ suraskite EZVIZ.
56
Page 62

Nuskaitykite QR kodą
Nustatymo iš
naujo mygtukas
Jei kamera neprisijungia prie jūsų „Wi-Fi“ tinklo, paspauskite mygtuką RST ir
•
palaikykite 3sek., tada pakartokite 2.2veiksmą.
Norėdami pasirinkti kitą „Wi-Fi“ tinklą, paspauskite ir palaikykite mygtuką RST
•
3sekundes, kad paleistumėte įrenginį iš naujo. Šviesos diodų indikatoriui pradėjus
mirksėti raudona ir mėlyna spalvomis, galima pasirinkti naują „Wi-Fi“ tinklą.
3. Numatytojo slaptažodžio keitimas
Kamera kaip numatytąjį slaptažodį naudoja patvirtinimo kodą, pateikiamą kameros apačioje.
Įtraukus kamerą į savo tinklą, reikia pakeisti įrenginio slaptažodį, kad būtų užtikrintas vaizdo
įrašų saugumas. Slaptažodis naudojamas ir vaizdui šifruoti. Jei įjungsite vaizdo šifravimo
funkciją, turėsite įvesti savo slaptažodį, kai norėsite žiūrėti tiesioginę kameros transliaciją ar
atkurti kameroje įrašytą medžiagą.
- Eikite į kameros nuostatų ekraną, kad pakeistumėte numatytąjį slaptažodį.
- Palieskite „Change Password“ (keisti slaptažodį).
57
Page 63

- Palieskite „Edit“ (redaguoti).
- Įveskite kameros dugne esantį originalų patvirtinimo kodą.
- Įveskite naują slaptažodį. Slaptažodį gali sudaryti raidės ir skaitmenys, jis gali būti
6–12ženklų ilgio.
4. Kampo reguliavimas
Galima sureguliuoti kamerą naudojantis EZVIZ programėle, siekiant nustatyti optimalų
kampą. Kamera į šonus sukasi intervale nuo 0° iki 340°, o pakreipimo aukštyn-žemyn
intervalas yra nuo -10° iki 80°.
58
Page 64

Sieninis laikiklis (pasirinktinis)
Kamerą galima montuoti ant sienos arba ant lubų.
Įsitikinkite, kad siena pakankamai tvirta išlaikyti triskart didesnį svorį nei kameros.
•
Įrengimo paviršius turi būti švarus ir plokščias.
•
1. (Pasirinktinai) „microSD“ kortelę galima įdėti į „microSD“ kortelės lizdą, įrengtą kameros galinėje
dalyje. Šį žingsnį galima praleisti.
2. Prijunkite pateiktą gręžimo šabloną prie vietos, kurioje norite tvirtinti kamerą.
3. (Pasirinktinai) Jei siena betoninė ar mūrinė, išgręžkite skyles ir įsukite į nailoninius įvarus tris
sraigtus.
4. Trimis metaliniais sraigtais prisukite kameros pagrindą prie šablono.
Betoninė/
mūrinė siena
5. Sumontuokite kamerą ant pagrindo ir pasukite 15° kampu, kad užksuotumėte.
6. Prijunkite prie kameros maitinimo kabelį. Jei kamera anksčiau buvo prijungta prie „Wi-Fi“ tinklo,
ji automatiškai prie jo jungsis.
59
Medinė siena
Page 65

Priedas
Dėžutės turinys
C6T (1vnt.) Pagrindas (1vnt.)
Maitinimo kabelis (1vnt.) Gręžimo šablonas (1) Sraigtų komplektas (1vnt.)
Maitinimo adapteris (1vnt.) Sparčiosios paleisties vadovas (1vnt.)
60
Page 66

Thank you for purchasing EZVIZ products. This limited warranty gives you, the original purchaser of the EZVIZ product,
specific legal rights. You may also have other legal rights that vary by state, province or jurisdiction. The disclaimers,
exclusions, and limitations of liability under this limited warranty will not apply to the extent prohibited by applicable
law. No distributor, reseller, agent, or employee is authorized to make any medication, extension, or addition to this
limited warranty.
Your EZVIZ product is warranted for a period of one (1) year from the date of purchase against defects in materials and
workmanship, or such longer period as may be required by law in the country or state where this product is sold, when
used normally in accordance with user manual.
You can request warranty service by emailing us at support@ezvizlife.com .
For any defective EZVIZ products under warranty, HANGZHOU HIKVISION DIGITAL TECHNOLOGY CO., LTD. (“the
Company”) will, at its option, (i) repair or replace your product free of charge; (ii) exchange your product with a
functional equivalent product; (iii) or refund the original purchase price, provided you provide the original purchase
receipt or copy, brief explanation of the defect, and return the product in its original packaging. At the sole discretion
of the Company, repair or replacement may be made with a new or refurbished product or components. This warranty
does not cover the postal cost, insurance and any other incidental charges incurred by you in returning the product.
Except where prohibited by applicable law, this is your sole and exclusive remedy for breach of this limited warranty.
Any product that has either been repaired or replaced under this limited warranty will be covered by the terms of this
limited warranty for the longer of ninety (90) days from the date of delivery or the remaining original warranty period.
This warranty does not apply and is void:
• If the warranty claim is made outside the warranty period or if the proof of purchase is not provided.
• For any malfunction, defect or failure caused by or resulting from the evidence of impact, mishandling ,tampering,
use contrary to the applicable instruction manual, incorrect power line voltage, accident, loss, theft, fire, flood or
other Acts of God, shipping damage or damage resulting from repairs performed by unauthorized personnel.
• For any consumable parts, such as batteries, where the malfunction is due to the normal aging of the product.
• Cosmetic damage, including but not limited to scratches, dents and broken plastic on ports.
• Any software, even if packaged or sold with EZVIZ hardware.
• For any other damages free from defects in material or workmanship.
• Routine cleaning, normal cosmetic and mechanical wear and tear.
Please do not hesitate to contact your seller, or send e-mails to us support@ezvizlife.com, with any questions.
COPYRIGHT ©2016 HANGZHOU HIKVISION DIGITAL TECHNOLOGY CO., LTD. ALL RIGHTS RESERVED.
LIMITED WARRANTY
Page 67

Vielen Dank für den Kauf eines EZVIZ-Produkts. Diese beschränkte Garantie gibt Ihnen, dem Erstkäufer des EZVIZ-Produkts,
bestimmte gesetzliche Rechte. Je nach Staat, Provinz oder Land können Ihnen weitere gesetzliche Rechte zustehen. Die
Haftungsausschlüsse und -beschränkungen gemäß dieser beschränkten Garantie gelten ausschließlich im gesetzlich zulässigen
Umfang. Kein Händler, Wiederverkäufer, Vertreter oder Mitarbeiter ist befugt, Modifikationen, Erweiterungen oder Ergänzungen an
dieser beschränkten Garantie vorzunehmen.
Ihr EZVIZ-Produkt hat eine Garantie auf Material- und Herstellungsfehler, die ab dem Kaufdatum für ein (1) Jahr oder so
lange gilt, wie dies in dem Staat oder Land, in dem dieses Produkt gekauft wurde, gesetzlich vorgeschrieben ist, sofern es in
Übereinstimmung mit der Bedienungsanleitung normal benutzt wird.
Garantieansprüche richten Sie bitte per E-Mail an support@ezvizlife.com .
Im Fall eines defekten EZVIZ-Produkts mit gültiger Garantie wird HANGZHOU HIKVISION DIGITAL TECHNOLOGY CO., LTD.
("das Unternehmen") nach eigenem Ermessen (i) Ihr Produkt kostenlos reparieren oder ersetzen, (ii) Ihr Produkt gegen ein
funktionsfähiges vergleichbares Produkt austauschen oder (iii) den ursprünglichen Kaufpreis unter der Voraussetzung erstatten,
dass Sie das Produkt in dessen Originalverpackung unter Beigabe des Originalkaufbelegs oder einer Kopie davon sowie einer
kurzen Beschreibung des Defekts zurückschicken. Das Unternehmen wird nach alleinigem Ermessen Produkte oder Komponenten
entweder reparieren oder gegen neue oder generalüberholte Produkte oder Komponenten austauschen. Diese Garantie deckt keine
Versand-, Versicherungs- oder sonstige Nebenkosten, die Ihnen durch die Rücksendung des Produkts entstehen.
Soweit nicht durch geltendes Recht untersagt, ist dies Ihr einziges und ausschließliches Rechtsmittel im Fall einer Verletzung
dieser beschränkten Garantie. Jedes Produkt, das im Rahmen dieser beschränkten Garantie entweder repariert oder ausgetauscht
wurde, wird für maximal neunzig (90) Tage ab Lieferdatum oder für die Restlaufzeit der ursprünglichen Garantie von den
Bestimmungen dieser beschränkten Garantie abgedeckt.
Diese Garantie gilt nicht und ist hinfällig:
• w enn der Garantieanspruch außerhalb der Garantiefrist oder ohne Vorlage des Kaufbelegs geltend gemacht wird.
• bei Fehlfunktionen, Defekten oder Fehlern, die durch Stoßeinwirkung, Fehlbedienung, Sabotage, Benutzung im Widerspruch
zur entsprechenden Bedienungsanleitung, falsche Spannungsversorgung, Unfall, Verlust, Diebstahl, Brand, Überschwemmung
oder andere Naturkatastrophen, Versandschäden oder Beschädigungen infolge von Reparaturen durch unbefugte Personen
verursacht wurden oder darauf zurückzuführen sind.
• für Verbrauchsgüter wie Batterien, bei denen die Fehlfunktion auf normale Produktalterung zurückzuführen ist.
• kosmetische Schäden, einschließlich, aber nicht begrenzt auf Kratzer, Beulen und gebrochene Kunststoffteile an Anschlüssen.
• für jede Softw are, auch wenn diese zusammen mit der EZVIZ-Hardware verpackt und verkauft wurde.
• für sonstige Schäden, die keine Material- oder Verarbeitungsfehler sind.
• für routinemäßige Reinigungen sowie normalen kosmetischen und mechanischen Verschleiß.
Bei Fragen können Sie sich jederzeit an Ihren Verkäufer oder per E-Mail an support@ezvizlife.com an uns wenden.
COPYRIGHT ©2016 HANGZHOU HIKVISION DIGITAL TECHNOLOGY CO., LTD. ALLE RECHTE VORBEHALTEN.
BESCHRÄNKTE GARANTIE
Page 68

Gracias por adquirir productos EZVIZ. Esta garantía limitada le concede a usted, el comprador original del producto EZVIZ, derechos
legales específicos. Es posible que tenga otros derechos legales en función de su estado, provincia o jurisdicción. Los avisos de
exención de responsabilidad, las exclusiones y las limitaciones de responsabilidad de esta garantía limitada no se aplicarán hasta
el máximo prohibido por la legislación aplicable. Ningún distribuidor, revendedor, representante o empleado tiene autorización para
introducir alteraciones, ampliaciones o incorporaciones en virtud de esta garantía limitada.
Su producto de EZVIZ está cubierto por la garantía por un período de un (1) año desde la fecha de compra frente a defectos de
materiales y mano de obra, o en el plazo más largo que requiera la ley en el país o estado donde se venda este producto, cuando
se usa normalmente de acuerdo con el manual de usuario.
Puede solicitar el servicio de garantía por correo electrónico en support@ezvizlife.com .
Para cualquier producto de EZVIZ defectuoso en garantía, HANGZHOU HIKVISION DIGITAL TECHNOLOGY CO., LTD. ("la Empresa"), a su
discreción, (I) reparará o sustituirá el producto de forma gratuita; (II) cambiará su producto por un producto equivalente funcional;
(III) o reembolsará el precio de compra original, siempre y cuando proporcione el recibo de compra original o una copia, una breve
descripción del defecto y devuelva el producto en su embalaje original. A la entera discreción de la Empresa, la reparación o la
sustitución pueden realizarse por un producto o componentes nuevos o reacondicionados. Esta garantía no cubre el coste postal
de transporte, el seguro ni ningún otro coste incidental en el que incurra durante la devolución del producto.
Excepto si lo prohíbe la legislación vigente, esta es la solución única y exclusiva en caso de incumplimiento de esta garantía
limitada. Cualquier producto que se haya reparado o sustituido en virtud de esta garantía limitada estará cubierto por los términos
de la misma durante el periodo máximo de noventa (90) días a partir de la fecha de entrega o el período de garantía original
restante.
Esta garantía no se aplica y se considerará nula:
• Si la reclamación de garantía se realiza fuera del periodo de garantía o si no se proporciona la prueba de compra.
• En caso de funcionamiento incorrecto, defecto o avería causados por o como resultado de las pruebas de impacto, impericia,
manipulación, uso contrario al manual de instrucciones aplicable, voltaje incorrecto de la línea eléctrica, accidente, pérdida, robo,
incendio, inundación u otros actos de fuerza mayor, daños en el envío o daños ocasionados por reparaciones realizadas por personal no
autorizado.
• En el caso de las piezas consumibles, como las baterías, si el funcionamiento incorrecto se debe al desgaste normal del producto.
• Daños cosméticos, incluidos, pero sin limitarse a, arañazos, abolladuras y plástico roto en puertos.
• Cualquier software, incluso si se ha incluido y vendido con el hardware de EZVIZ.
• En caso de otros daños libres de defectos en el material o la mano de obra.
• La limpieza rutinaria, cambios cosméticos y el desgaste mecánico natural.
Si tiene alguna pregunta, no dude en ponerse en contacto con su representante comercial, o bien envíenos un mensaje a support@
ezvizlife.com con la pregunta que desee.
COPYRIGHT ©2016 HANGZHOU HIKVISION DIGITAL TECHNOLOGY CO., LTD. RESERVADOS TODOS LOS DERECHOS.
GARANTÍA LIMITADA
Page 69

Merci d'avoir acheté nos produits EZVIZ. En tant qu'acheteur original de produit EZVIZ, cette garantie limitée vous accorde
certains droits. Selon le pays, la région ou la juridiction où vous résidez, il est possible que vous bénéficiiez d'autres
droits. Les dénis de responsabilités, exclusions et limitations de responsabilité civile stipulés dans cette garantie limitée
s'appliquent uniquement dans les limites prévues par la loi. Aucun distributeur, revendeur, agent ou employé n'est
autorisé à apporter de modification, d'extension ou d'ajout à cette garantie.
Votre produit EZVIZ est garanti pendant une période de un (1) an à compter de la date d'achat pour tout défaut de pièces
et de main d'œuvre, ou pour une durée supérieure si la législation en vigueur dans le pays ou l'état où ce produit est
vendu l'exige, dès lors qu'il est utilisé conformément aux instructions du manuel de l'utilisateur.
Pour faire valoir la garantie, écrivez-nous à l'adresse suivante: support@ezvizlife.com .
Si un défaut est signalé sur un produit EZVIZ pendant la période de garantie, Hangzhou Hikvision Digital Technology
Co., Ltd. (« la Société ») pourra, à sa discrétion, (i) réparer ou remplacer votre produit gratuitement ; (ii) remplacer votre
produit par un produit équivalent en état de marche ; (iii) rembourser le prix d'achat. Vous devrez toutefois présenter
la preuve d'achat et une brève explication du défaut constaté, et renvoyer le produit dans son emballage d'origine. La
Société pourra réparer ou remplacer le produit ou les composants par un produit ou des composants neufs ou remis en
état. Cette garantie ne couvre pas les frais de port, l'assurance ni les éventuels frais annexes de renvoi du produit.
Sauf si la législation en vigueur l'interdit, cette garantie est votre seul et unique recours. Tout produit réparé ou remplacé
en vertu de la présente garantie limitée sera couvert pendant une durée de quatre-vingt-dix (90) jours à compter de la
date de livraison ou jusqu'à l'échéance de la période garantie originale.
Cette garantie ne s'applique pas et est considérée comme nulle dans les cas suivants :
• si l'utilisateur se prévaut de la garantie hors de la période de couverture ou s'il ne fournit pas de preuve d'achat ;
• en cas de dysfonctionnement, de défaut ou de panne due ou induite par un choc, une mauvaise manipulation, un
sabotage, une utilisation non conforme aux instructions du manuel, une tension d'alimentation incorrecte, un accident,
une perte, un vol, un incendie, une inondation ou toute autre catastrophe naturelle, un préjudice subi pendant le
transport ou résultant de réparations par un personnel non agréé ;
• consommables, tels que les batteries, où le dysfonctionnement est dû au vieillissement normal du produit ;
• dommages superficiels tels que, entre autres, les rayures, les bosses ou les pièces en plastique cassées ;
• logiciels, même fournis ou vendus avec le matériel EZVIZ ;
• préjudices autres que les défauts de pièces ou de main d'œuvre ;
• nettoyage de routine, vieillissement de l'aspect extérieur et usure mécanique normale.
Pour toute question, n'hésitez pas à contacter votre revendeur ou à nous écrire à l'adresse suivante: support@ezvizlife.
com.
COPYRIGHT ©2016 HANGZHOU HIKVISION DIGITAL TECHNOLOGY CO., LTD. TOUS DROITS RÉSERVÉS.
GARANTIE LIMITÉE
Page 70

Grazie per aver acquistato i prodotti EZVIZ. La presente garanzia limitata accorda all'acquirente originale del prodotto
EZVIZ, specifici diritti legali. L'acquirente originale potrebbe godere anche altri diritti legali che variano da stato, provincia
o giurisdizione. Le declinazioni di responsabilità, le esclusioni e le limitazioni di responsabilità ai sensi della presente
garanzia limitata non si applicano ove espressamente vietate dalla legge applicabile. Nessun distributore, rivenditore,
agente o dipendente è autorizzato a fornire rimedi, estensioni o aggiunte alla presente garanzia limitata.
Il prodotto EZVIZ è garantito per un periodo di un (1) anno dalla data di acquisto contro difetti nei materiali e nella
lavorazione, o un periodo più lungo, ove richiesto dalla legge del paese o dello stato in cui il prodotto è stato venduto, se
utilizzato normalmente, in conformità con il manuale utente.
Il servizio di assistenza in garanzia può essere richiesto via email, all'indirizzo support@ezvizlife.com .
Per eventuali prodotti EZVIZ difettosi in garanzia,HANGZHOU HIKVISION DIGITAL TECHNOLOGY CO., Ltd. ("la Società"), avrà
facoltà a sua discrezione di, (i) riparare o sostituire il prodotto a titolo gratuito; (ii) sostituire il vostro prodotto con un
prodotto funzionalmente equivalente; (iii) o rimborsare il prezzo di acquisto originale, a fronte dell'esibizione della ricevuta
di acquisto originale o in copia, una breve spiegazione del difetto e il reso del prodotto nella sua confezione originale. A
esclusiva discrezione della Società, la riparazione o la sostituzione può avvenire con un prodotto o con dei componenti
nuovi o ricondizionati. Questa garanzia non copre spese postali, assicurazione ed eventuali altre spese accessorie
sostenute dall'acquirente per la restituzione del prodotto.
Salvo laddove proibito dalla legge applicabile, ciò costituisce l'unico ed esclusivo rimedio per la violazione della presente
garanzia limitata. Qualsiasi prodotto riparato o sostituito ai sensi della presente garanzia limitata sarà coperto dai termini
della presente garanzia limitata per il periodo di maggiore durata tra novanta (90) giorni dalla data di consegna o il
periodo di garanzia originale residuo.
Questa garanzia non si applica e risulterà nulla:
• Se la richiesta di applicazione della garanzia perviene al di fuori del periodo di garanzia o se la prova di acquisto non
viene fornita.
• Per qualsiasi malfunzionamento, difetto o guasto causato da, o confermato da prove di evidenza di, avvenuto impatto,
uso improprio, manomissione, uso contrario alle istruzioni del relativo manuale, tensione di alimentazione errata,
incidente, smarrimento, furto, incendio, inondazione o altre cause di forza maggiore, danni di spedizione o danni
causati da riparazioni eseguite da personale non autorizzato.
• Per eventuali componenti consumabili, quali batterie, dove il mal funzionamento è dovuto al normale invecchiamento
del prodotto.
• Danni estetici, inclusi ma non limitati a graffi, ammaccature e rotture delle plastiche delle porte.
• Qualsiasi software, anche se confezionato o venduto con hardware EZVIZ.
• Per eventuali altri danni esenti da difetti nei materiali o nella lavorazione.
• Pulizia ordinaria e il normale deterioramento estetico e meccanico.
Non esitate a contattare il venditore, o a inviarci un e-mail a support@ezvizlife.com, per qualsiasi domanda.
COPYRIGHT ©2016 HANGZHOU HIKVISION DIGITAL TECHNOLOGY CO., LTD. TUTTI I DIRITTI RISERVATI.
GARANZIA LIMITATA
Page 71

Obrigado por comprar produtos EZVIZ. Na qualidade de comprador original do produto EZVIZ, esta garantia limitada
confere-lhe direitos legais específicos. Poderá ter ainda outros direitos legais que variam consoante o estado, a província
ou a jurisdição. As renúncias, exclusões e limitações de responsabilidade expressas nesta garantia limitada não se
aplicarão na medida em que tal seja proibido pela legislação aplicável. Nenhum distribuidor, revendedor, agente ou
funcionário está autorizado a realizar qualquer modificação, extensão ou adição à presente garantia limitada.
O seu produto EZVIZ tem um (1) ano de garantia, a contar da data de compra, contra defeitos de materiais e mão-de-obra,
ou tem um período maior, se tal for exigido pela legislação do país ou estado onde este produto é vendido, desde que
utilizado normalmente de acordo com o Manual do utilizador.
Pode pedir uma assistência coberta pela garantia enviando-nos um e-mail para support@ezvizlife.com .
Para produtos EZVIZ com defeito cobertos pela garantia, a HANGZHOU HIKVISION DIGITAL TECHNOLOGY CO., LTD. ("a
Empresa"), por opção sua, (i) reparará ou substituirá o seu produto gratuitamente; (ii) trocará o seu produto por um
produto equivalente funcional; (iii) ou reembolsará o preço de compra original, desde que forneça o recibo de compra
original ou a respetiva cópia, uma breve explicação do defeito e desde que devolva o produto na sua embalagem original.
A reparação ou substituição poderá ser feita com um produto ou componentes novo(s) ou renovado(s), ficando esta
decisão ao critério da Empresa. Esta garantia não cobre as despesas postais, o seguro e quaisquer outros encargos
acessórios incorridos por si ao devolver o produto.
Salvo nos casos em que é proibido pela legislação aplicável, este é o seu único e exclusivo recurso por incumprimento
desta garantia limitada. Qualquer produto que seja reparado ou substituído nos termos desta garantia limitada estará
coberto pelos termos da mesma por um período máximo de noventa (90) dias a partir da data de entrega ou pelo período
da garantia original restante.
A presente garantia não se aplica e será nula:
• Se a reclamação da garantia for feita fora do período da garantia ou se não for fornecida prova de compra.
• No caso de mau funcionamento, defeito ou falha causada(o) ou resultante de provas de impacto, utilização incorreta,
adulteração do produto, utilização contrária ao manual de instruções aplicável, tensão errada da linha de alimentação,
acidente, perda, roubo, incêndio, inundação ou outras catástrofes naturais, danos de transporte ou danos resultantes
de reparações executadas por pessoal não autorizado.
• No caso de consumíveis como, por exemplo, baterias, em que o mau funcionamento se deva ao envelhecimento
normal do produto.
• No caso de danos de cosmética, incluindo, embora sem caráter limitativo, riscos, mossas e plástico partido nas portas.
• Relativamente a qualquer software, mesmo tendo sido embalado ou vendido com hardware EZVIZ.
• No caso de quaisquer outros danos isentos de defeitos de material ou de mão-de-obra.
• Limpeza de rotina, cosmética normal e desgaste mecânico.
Não hesite em contactar o seu revendedor ou enviar-nos um e-mail para support@ezvizlife.com, em caso de dúvidas.
COPYRIGHT ©2016 HANGZHOU HIKVISION DIGITAL TECHNOLOGY CO., LTD. TODOS OS DIREITOS RESERVADOS.
GARANTIA LIMITADA
Page 72

Благодарим Вас за покупку продукции EZVIZ. Эта ограниченная гарантия дает Вам как покупателю
продукта EZVIZ определенные юридические права. Вы также можете иметь другие юридические права,
которые определяются законами государства, провинции или юрисдикцией. Исключения и ограничения
ответственности в соответствии с данной ограниченной гарантией не действительны в случае, если они
противоречат действующему законодательству. Ни дистрибьютор, ни дилер, ни агент или сотрудник не
имеет права вносить какие-либо изменения или дополнения к данной ограниченной гарантии.
На Ваш продукт EZVIZ дается гарантия сроком на один(1) год с момента покупки на дефекты материалов
и изготовления, или на более длительный период, в соответствии с законом государства, где продается
этот товар, при условии правильного использования в соответствии с руководством пользователя.
Вы можете запросить гарантийное обслуживание, обратившись по электронной почте support@ezvizlife.
com.
В случае неисправности продуктов EZVIZ по гарантии, HIKVISION DIGITAL TECHNOLOGY CO., LTD. Ханчжоу
("Компания") произведет, по своему выбору, (I) ремонт или замену изделия бесплатно; (II) обмен
продукта на функционально эквивалентный; (III) возврат первоначальной стоимости, при условии, что Вы
предоставите оригинал или копию квитанции о покупке, краткое объяснение дефекта, а также вернете
товар в оригинальной упаковке. На усмотрение Компании, может производиться ремонт или замена
нового или отремонтированного продукта или его компонентов. Данная гарантия не распространяется
на почтовые расходы, страховку и любые другие непредвиденные расходы, понесенные Вами в связи с
возвратом продукта.
За исключением случаев, запрещенных действующим законодательством, этот документ является
Вашим единственным и исключительным средством судебной защиты, в случае нарушения Ваших прав,
закрепленных в ограниченной гарантии. К любому продукту, который уже был отремонтирован или
заменен по данной ограниченной гарантии, применимы условия документа в течение девяноста (90)
дней с момента поставки или оставшегося первоначального гарантийного срока.
Данная гарантия не применяется и является недействительной:
• В случае подачи заявки на гарантийный ремонт по истечении гарантийного срока или отсутствия
доказательства факта покупки.
• В случае неисправностей, дефектов, вызванных неправильным использованием, нарушением
инструкций по эксплуатации, при неправильном напряжении сети, аварии, утере, краже, пожаре,
наводнении или иных стихийных бедствиях, повреждении груза или ущербе, нанесенными в
результате ремонта, выполненного не уполномоченными лицами.
• Для любых расходных частей, таких как батареи, когда неисправность происходит из-за естественного
старения продукта.
• При косметических повреждениях, в том числе, но не только, при царапинах, вмятинах и сломанном
пластике на портах.
• Для любого программного обеспечения, даже если оно было упаковано или продано вместе с
оборудованием EZVIZ.
• Для любых других повреждений, дефектов материала или изготовления.
• Для планового косметического и механического износа.
Чтобы задать вопрос продавцу или отправить нам письмо, пожалуйста, обращайтесь по данному адресу:
support@ezvizlife.com
COPYRIGHT ©2016 HANGZHOU HIKVISION DIGITAL TECHNOLOGY CO., LTD. ALL RIGHTS RESERVED.
ОГРАНИЧЕННАЯ ГАРАНТИЯ
Page 73

Täname teid, et olete ostnud EZVIZ seadmeid. Piiratud tootjagarantii annab Teile, EZVIZ seadme
esmasele ostjale, teatud õigused. Teile võivad kohanduda ka muud seaduslikud õigused, mis
erinevad vastavalt riigile kus seade müüdud on. Garantiist keeldumine, erandid ja piiratud
vastutus selle piiratud tootjagarantii raames rakendub vastavalt kehtivale seadusetele. Ühelgi
edasimüüjal, esindajal ega töötajal ei ole õigus teha parandusi, laiendusi või lisandeid antud
piiratud tootjagarantiile, vastasel juhul garantii ei kehti.
Teie EZVIZ tootele kehtib garantii materjalide ja valmistamise vigade suhtes üks (1) aasta alates
toote ostmise kuupäevast, või pikem periood vastavalt riigi seadustele kus seade on müüdud, kui
seadet on kasutatud vastavalt kasutusjuhendile.
Te võite nõuda garantii teenust saates meile e-maili: support@ezvizlife.ee .
Kehtiva garantiiga defektne EZVIZ seade, HANGZHOU HIKVISION DIGITAL TECHNOLOGY CO.,
LTD. (“Tootja”) valikul kas, (I) parandatakse või asendatakse lisatasu küsimata; (II) vahetatakse teie
toode samasuguse või võrdväärse toote vastu; (III) või hüvitatakse toote ostuhind, juhul kui te
esitate ostuarve või selle koopia, lühikese vea kirjelduse ja tagastate toote orginaalpakendis.
Tootja valikul sooritatakse parandamine või asendamine uute või parandatud varuosadega või
seadmetega. Garantii raames ei hüvitata postikulu, kindlustust ja muid kulusid mis on teile toote
saatmisel tekkinud.
Välja arvatud juhul kui see pole seadustega teisiti sätestatud on see teie ainus võimalus
garantiiremondiks. Kõigile toodetele, mis on parandatud või asendatud piiratud tootjagarantii
raames, laienevad piiratud garantii tingimused üheksakümmend(90) päeva alates kohale
toimetamisest või järele jäänud esialgne garantii periood vastavalt sellele, kumb on pikem
periood.
See garantii ei kehti:
• Kui garantii nõue on esitatud peale garantii lõppemist või puudub ostutõend.
• Ühelegi talitlushäirele, defektile või rikkele mis on põhjustatud või tuleneb kukkumisest,
väärkäsitlusest, kasutamisest vastupidiselt kasutusjuhendis soovitatule, valest toitepingest,
õnnetusest, kadumisest, vargusest, tulekahjust, üleujutusest või muu vääramatu jõu poolt
tekitatud kahju, transpordi käigus tekkinud kahjustused või kui toodet on remontinud selleks
tootja poolt volitamata isik.
• Erinevatele kulumaterjalidele, nagu akud, mille puhul rikete esinemine on eeldatav toote
vananemisel.
• Väliselt nähtavatele kahjustustele (kaasa arvatud, kuid mitte ainult kriimustused, mõlgid ja
murdunud osad).
• Igasuguselee tarkvarale, isegi kui see on pakendatud või müüdud koos EZVIZ seadmega.
• Muudele kahjustustele peale materjalide ja tootmis vigade.
• Puhastamise käigus tekkinud kosmeetilisele ja mehaanilisele kulumine.
Küsimuste puhul võtke ühendust oma edasimüüjaga või meiega e-maili aadressil support@
ezvizlife.ee .
COPYRIGHT ©2016 HANGZHOU HIKVISION DIGITAL TECHNOLOGY CO., LTD. ALL RIGHTS RESERVED.
PIIRATUD TOOTJAGARANTII
Page 74

GARANTIJAS NOTEIKUMI
Paldies, ka iegādājāties EZVIZ produktu. Šī garantija piešķir Jums noteiktas tiesības. Jums var
būt arī citas tiesības atkārībā no valsts, pilsētas vai jurisdikcijas. Atrunas, izslēgšana un atbildības
ierobežojumi saskaņā ar garantijas noteikumiem, ir aizliegti saskaņā ar piemērojamiem tiesību
aktiem. Izplatītājiem, tālākpārdevējiem un aģentiem nav tiesību jebkādā veidā grozīt šos garantijas
noteikumus.
Jūsu EZVIZ produktam ir vienu (1) gadu ilga garantija kopš pirkuma datuma, kura attiecas uz
ražošanas defektiem un nekvalitatīvu ražošanas materiālu izmantošanu. Jūsu garantijai var būt arī
ilgāks laika periods, ja tas ir noteikts likumos valstī, kurā Jūs pirkāt doto produktu, ar nosacījumu,
ka produkts tika izmantots saskaņā ar lietotāja instrukciju.
Jūs varat pieprasīt garantijas servisu, sazinoties ar mums support@ezvizlife.com.
Ja tiek konstatēts EZVIZ produkta defekts garantijas ietvaros, HANGZHOU HIKVISION DIGITAL
TECHNOLOGY CO., LTD. (“Kompānija”) pēc izvēles, (i) veiks bezmaksas remontu vai apmainīs
pret jaunu produktu; (ii) apmainīs produktu uz ekvivalentu; (iii) vai atgriezīs pirkuma summu, ja
tiks saņemts originals pirkumu apliecinošs dokuments vai tā kopija, defekta apraksts un produkts
tiks saņemts oriģinālajā iepakojumā. Pēc kompanijas ieskatiem, var būt veikts remonts vai detāļu
maiņa. Garantija nesedz pasta izmaksas, apdrošināšanu vai jebkuras citas izmaksas, kas var rasties,
atgriežot produktu.
Izņemot gadījumus, kad tas ir aizliegts ar piemērojamiem tiesību aktiem, šis ir Jūsu vienīgais
garantijas dokuments. Jebkuram produktam, kurš tika salabots vai aizvietots ar citu, šīs garantijas
ietvaros, garantijas tērmiņš ir ne ilgāks par deviņdesmit (90) dienām kopš piegādes dienas vai
oriģinālo garantijas termiņu.
Garantijas saistības nav spēkā:
• Ja garantijas tērmiņš ir beidzies, vai nav iesniegti pirkumu apliecinoši dokumenti.
• Ja defekts rādās nepareizas ekspluatācijas dēļ, mehānisko bojājumu gadījumā, nepareizas
izmantošanas rezultātā, kas ir pretrunā ar lietotāja instrukciju, nekorekta barošanas sprieguma,
nelaimes gadījumu rezultātā, ugunsgrēku, plūdu, u.c. nepārvarāmas varas iedarbības rezultātā,
ja netika ievēroti transportēšanas un uzglabāšanas nosacījums un ja klients mēģināja pats veikt
remontu.
• Jebkuriem aizvietojamiem elementiem, piemēram, baterijas, kur bojājumi rodas novecojuma dēļ.
• Ja produkts tiek vizuāli bojāts, piemēram, skrāpēts, ir ar nospiedumiem, korpusa defektiem uz
portiem, u.c.
• Jebkuram programmnodrošinājumam, pat ja pirkts un iepakots ar EZVIZ produktu.
• Jebkuriem defektiem, izņemot ražošanas defektus un defektus, kuri rādās nekvalitatīvu
ražošanas materiālu izmantošanas gadījumā.
• Regulāras tīrīšanas rezultātā, kosmētiska vai mehāniska nodiluma gadījumā.
Problēmu un jautājumu gadījumā, sazinieties ar savu pārdevēju vai rakstiet uz support@ezvizlife.
com.
AUTORTIESĪBAS ©2016 HANGZHOU HIKVISION DIGITAL TECHNOLOGY CO., LTD. VISAS TIESĪBAS
AIZSARGĀTAS.
Page 75

Sveikiname įsigijus EZVIZ produktą. Perkant originalius produktus, ši ribota garantija pirkėjui
suteikia tam tikras juridines teises. Jūs galite turėti ir kitų teisių, kurios gali skirtis, atsižvelgiant
į šalį, kurioje pirkote įrenginį. Teisės priklauso nuo šalyje galiojančių įstatymų. Atsakomybės
ribojimas bei išimtys negali prieštarauti taikomiems teisės aktams. Joks platintojas,
perpardavinėtojas, agentas ar darbuotojas neturi teisės keisti garantijos sąlygų.
EZVIZ produktui taikomas vienerių ( 1 ) metų garantinio aptarnavimo laikotarpis nuo įsigijimo
dienos.
Ribota garantija taikoma esant medžiagų ar pagaminimo defektams, tačiau vartotojas turi
tinkamai naudoti įrenginius pagal vartotojo vadovą. Papildoma garantija suteikiama remiantis
šalies, kurioje parduotas įrenginys, teisės aktais.
Garantinio aptarnavimo užklausos priimamos: support@ezvizlife.lt .
Kiekvienas brokuotas EZVIZ produktas, kuriam taikomas garantinio aptarnavimo laikotarpis,
HANGZHOU HIKVISION DIGITAL TECHNOLOGY CO., LTD. (toliau “Įmonė”) pagal galimybes,
(i) nemokamai sutaisys arba pakeis įrenginį nauju; (ii) pakeis Jūsų įrenginį kitu, funkciškai
lygiaverčiu produktu, be papildomos priemokos; (iii) arba grąžins sumokėtus pinigus, pateikus
čekio arba sąskaitos faktūros originalą, kartu pateikiant gedimo aprašymą bei nesugadintą
gamintojo pateiktą pakuotę. Įmonės nuožiūra, remontas arba įrenginio keitimas galimas
naudojant naujus arba prieš tai sutaisytus ir veikiančius komponentus. Į produkto garantiją
neįskaičiuojamos pašto išlaidos, draudimo ir kiti mokesčiai, susiję su Jūsų patirtais nuostoliais
dėl gaminio grąžinimo.
Visais atvejais, išskyrus šalies teisės aktuose numatytose išimtyse, tai vienintelė bei išskirtinė
priemonė garantiniam aptarnavimui. Kiekvienam suremontuotam arba pakeistam produktui,
pagal šią garantiją, taikomas devyniasdešimties (90 ) dienų papildomas garantinis terminas,
arba tol, kol galios numatytasis garantijos laikotarpis.
Ši garantija netaikoma:
• Pasibaigus garantinio aptarnavimo laikotarpiui arba nepateikus gaminio įsigijimą
patvirtinančio dokumento.
• Gedimams, atsiradusiems dėl pirkėjo kaltės (sukratymas, numetimas, neteisingas
naudojimas, nesilaikant vartotojo vadove aprašytais veiksmais), taip pat dėl elektros
linijos šuolių, nelaimingų atsitikimų, praradimo, vagystės, gaisro, potvynių ar kitų stichinių
nelaimių atveju, bei pažeidimams, atsiradusiems dėl neįgaliotų asmenų savarankiško
remonto.
• Susidėvinčioms dalims, kaip baterijos, kai gedimas yra sąlygotas įprastinio produkto
susidėvėjimo.
• Kosmetiniams pažeidimams, įbrėžimams, įlenkimams bei prievadų plastiko lūžiams.
• Programinei įrangai.
• Visiems kitiems pažeidimams, kurie atsirado ne dėl medžiagų ar surinkimo broko.
• Įrangos valymui bei įprastiniam kosmetiniam ir mechaniniam susidėvėjimui.
Esant neaiškumams ar klausimams galite drąsiai kreiptis į mus support@ezvizlife.lt ,
©2016 HANGZHOU HIKVISION DIGITAL TECHNOLOGY CO., LTD. VISOS TEISĖS SAUGOMOS.
RIBOTOS GARANTIJOS SĄLYGOS
Page 76

 Loading...