

Page 1

Page 2

Page 3

COPYRIGHT ©2017 Hangzhou Hikvision Digital Technology Co., Ltd. or its subsidiaries. ALL RIGHTS
RESERVED.
About this Manual
The Manual includes instructions for using and managing the product. Pictures, charts, images and all
other information hereinafter are for description and explanation only. The information contained in the
Manual is subject to change, without notice, due to firmware updates or other reasons. Please find the
latest version in the
Any and all information, including, among others, wordings, pictures, graphs are the properties of
Hangzhou Hikvision Digital Technology Co., Ltd. or its subsidiaries (hereinafter referred to be “Hikvision”).
This user manual (hereinafter referred to be “the Manual”) cannot be reproduced, changed, translated,
or distributed, partially or wholly, by any means, without the prior written permission of Hikvision.
Unless otherwise stipulated, Hikvision does not make any warranties, guarantees or representations,
express or implied, regarding to the Manual.
Trademarks Acknowledgement
™, ™, and other Hikvision’s trademarks and logos are the properties of Hikvision
in various jurisdictions. Other trademarks and logos mentioned below are the properties of their
respective owners.
Legal Disclaimer
TO THE MAXIMUM EXTENT PERMITTED BY APPLICABLE LAW, THE PRODUCT DESCRIBED, WITH ITS
HARDWARE, SOFTWARE AND FIRMWARE, IS PROVIDED “AS IS”, WITH ALL FAULTS AND ERRORS,
AND HIKVISION MAKES NO WARRANTIES, EXPRESS OR IMPLIED, INCLUDING WITHOUT LIMITATION,
MERCHANTABILITY, SATISFACTORY QUALITY, FITNESS FOR A PARTICULAR PURPOSE, AND NONINFRINGEMENT OF THIRD PARTY. IN NO EVENT WILL HIKVISION, ITS DIRECTORS, OFFICERS, EMPLOYEES,
OR AGENTS BE LIABLE TO YOU FOR ANY SPECIAL, CONSEQUENTIAL, INCIDENTAL, OR INDIRECT DAMAGES,
INCLUDING, AMONG OTHERS, DAMAGES FOR LOSS OF BUSINESS PROFITS, BUSINESS INTERRUPTION,
OR LOSS OF DATA OR DOCUMENTATION, IN CONNECTION WITH THE USE OF THIS PRODUCT, EVEN IF
HIKVISION HAS BEEN ADVISED OF THE POSSIBILITY OF SUCH DAMAGES.
TO THE MAXIMUM EXTENT PERMITTED BY APPLICABLE LAW, IN NO EVENT SHALL HIKVISION’S TOTAL
LIABILITY FOR ALL DAMAGES EXCEED THE PURCHASE PRICE THE PRODUCT.
HIKVISION does not undertake any liability for personal injury or property damage, as the result of
product interruption or service termination cause by: a) improper installation or usage other than as
requested; b) the protection of national or public interests; c) Force Majeure; d) yourself or the third
party, including not limitation, using any third party’s products, software, applications, and among
others.
REGARDING TO THE PRODUCT WITH INTERNET ACCESS, THE USE OF PRODUCT SHALL BE WHOLLY AT
YOUR OWN RISKS. HIKVISION SHALL NOT TAKE ANY RESPONSIBILITES FOR ABNORMAL OPERATION,
PRIVACY LEAKAGE OR OTHER DAMAGES RESULTING FROM CYBER ATTACK, HACKER ATTACK, VIRUS
INSPECTION, OR OTHER INTERNET SECURITY RISKS; HOWEVER, HIKVISION WILL PROVIDE TIMELY
TECHNICAL SUPPORT IF REQUIRED.
The purpose of the Products is to provide an adequate warning in the event of illegal encroachment in
certain area; however, the proper installation of the Products will not eliminate, but only reduce, that
accidents will not occur or that there will be no personal injury or property loss as a result. You are
highly recommended to raise your vigilance and strengthen the safety awareness in the daily life.
SURVEILLANCE LAWS VARY BY JURISDICTION. PLEASE CHECK ALL RELEVANT LAWS IN YOUR
JURISDICTION BEFORE USING THIS PRODUCT IN ORDER TO ENSURE THAT YOUR USE CONFORMS
TO THE APPLICABLE LAW. YOU FUTHER AGREE THAT THIS PRODUCT IS ONLY FOR CIVIL USE, AND
HIKVISION SHALL NOT BE LIABLE IN THE EVENT THAT THIS PRODUCT IS USED WITH ILLEGITIMATE
PURPOSES, SUCH AS THIRD PARTY RIGHTS INFRINGEMENT, MEDICAL TREATMENT, SAFETY EQUIPMENT
OR OTHER SITUATIONS WHERE THE PRODUCT FAILURE COULD LEAD TO DEATH OR PERSONAL INJURY,
OR WEAPON OF MASS DESTRUCTION, CHEMINCAL AND BIOLOGICAL WEAPON, NUCLEAR EXPLOSION,
AND ANY UNSAFE NUCLEAR ENERGY USES OR ANTI-HUMANITY USAGES. YOU SHOULD UNDERTAKE ALL
™ website (http://www.ezvizlife.com).
Page 4

RESPONSIBILITIES FOR LOSSES OR DAMAGES RESULTING FROM THE ABOVE USAGES WHATSOEVER.
IN THE EVENT OF ANY CONFLICTS BETWEEN THE ABOVE AND THE APPLICABLE LAW, THE LATER
PREVAILS.
Regulatory Information
FCC Information
FCC compliance: This device complies with Part 15 of the FCC Rules. Operation is subject to the following two
conditions:
(1) This device may not cause harmful interference, and
(2) This device must accept any interference received, including interference that may cause undesired
operation.
Note: This product has been tested and found to comply with the limits for a Class B digital device, pursuant
to Part 15 of the FCC Rules. These limits are designed to provide reasonable protection against harmful
interference in a residential installation. This product generates, uses, and can radiate radio frequency energy
and, if not installed and used in accordance with the instructions, may cause harmful interference to radio
communications. However, there is no guarantee that interference will not occur in a particular installation.
If this product does cause harmful interference to radio or television reception, which can be determined by
turning the equipment off and on, the user is encouraged to try to correct the interference by one or more of
the following measures:
—Reorient or relocate the receiving antenna.
—Increase the separation between the equipment and receiver.
—Connect the equipment into an outlet on a circuit different from that to which the receiver is connected.
—Consult the dealer or an experienced radio/TV technician for help.
Please take attention that changes or modification not expressly approved by the party responsible for
compliance could void the user’s authority to operate the equipment.
This equipment should be installed and operated with a minimum distance 20cm between the radiator and
your body
This device complies with Industry Canada licence-exempt RSS standard(s). Operation is subject to the
following two conditions:
(1) this device may not cause interference, and
(2) this device must accept any interference, including interference that may cause undesired operation of the
device.
Under Industry Canada regulations, this radio transmitter may only operate using an antenna of a type
and maximum (or lesser) gain approved for the transmitter by Industry Canada. To reduce potential radio
interference to other users, the antenna type and its gain should be so chosen that the equivalent isotropically
radiated power (e.i.r.p.) is not more than that necessary for successful communication.
EU Conformity Statement
This product and - if applicable - the supplied accessories too are marked with "CE" and
comply therefore with the applicable harmonized European standards listed under the Radio
Equipment Directive 2014/53/EU, the EMC Directive 2014/30/EU, the RoHS Directive 2011/65/
EU.
2012/19/EU (WEEE directive): Products marked with this symbol cannot be disposed of as
unsorted municipal waste in the European Union. For proper recycling, return this product
to your local supplier upon the purchase of equivalent new equipment, or dispose of it at
designated collection points. For more information see: www.recyclethis.info.
2006/66/EC and its amendment 2013/56/EU (battery directive): This product contains a
battery that cannot be disposed of as unsorted municipal waste in the European Union. See
the product documentation for specific battery information. The battery is marked with this
symbol, which may include lettering to indicate cadmium (Cd), lead (Pb), or mercury (Hg). For
proper recycling, return the battery to your supplier or to a designated collection point. For
more information see: www.recyclethis.info.
Page 5

EC DECLARATION OF CONFORMITY
Hereby, Hangzhou Hikvision Digital Technology Co., Ltd. declares that the radio equipment type
[CS-CV200] is in compliance with Directive 2014/53/EU.
The full text of the EC DECLARATION OF CONFORMITY is available at the following web link:
http://www.ezvizlife.com/declaration-of-conformity.
Due to the product shape and dimension, the name and address of
the importer/manufacturer are printed on the package.
Гарантийный срок-1 год
Срок службы-3 года
Производитель:Ханджоу Хиквижн Диджитал Технолоджи(Китай)
Импортер-поставщик в России: ЗАО ''Хиквижн''
Импортер-поставщик в Республике Беларусь:ООО ''Торговый Дом
''АВАНТ-ТЕХНО''
Сайт:www.ezviz.ru
SAVE THIS MANUAL FOR FUTURE REFERENCE
Page 6

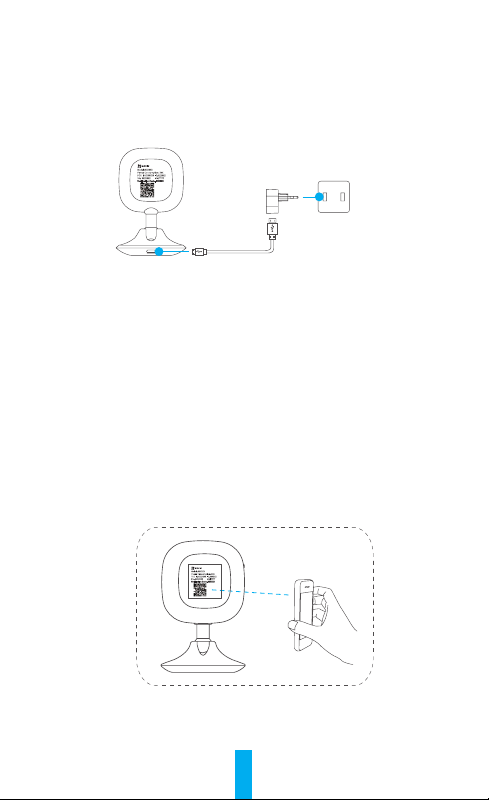
Setup
Step 1 Power-on
Plug the power cable into the camera and to the power adapter and then
into a power outlet. When the indicator flickers red and blue, the power is
ready for setup.
Power Cable
Power Outlet
Step 2 Quick Settings
1. Connect your mobile phone to Wi-Fi.
2. Download and install the EZVIZ app by searching “EZVIZ” in App Store (iOS
7.0 or later) and Google Play
TM
(Android 4.0 or later).
3. Launch the app and register for an EZVIZ user account following the startup wizard.
4. Log in the app and in the Home screen, tap "+" on the upper-right corner
to enter the adding device interface.
5. Scan the QR code of the device with your mobile phone. Or you can
manually input the 9-digit serial number to add the camera. The QR code
and the serial number are located on the label on the back of the camera.
6. Follow the procedure to set the Wi-Fi connection of the camera.
7. Set the correct time zone, DST information and Date Format to finish setup.
6
Page 7

Installation
Step 1 Installing the Metal Plate (Optional)
Pick a clean and flat surface and secure the metal plate to the desired
position with the foam stickers or screws.
There’s a magnet piece inside the camera. You can skip this step if the
surface is made of metal.
Step 2 Installing the Camera
Secure the camera magnetically to the metal plate or metal surface.
Step 3 Completing Installation
Adjust the camera angle as required.
Recording on the Memory Card
Step 1 Installing the Memory Card
1. Flip the memory card slot cover clockwise to open it, see the following
left figure.
2. Insert a microSD card into the slot until a click, see the following right
figure.
3. Replace the cover.
Step 2 Initializing the Memory Card
1. From the EZVIZ app, check the memory card status by tapping on the
Storage Status in the Device Settings.
2. If the memory card status displays as Not Initialized, tap the Initialize
button to initialize it. You can then record event triggered video in the
camera after the initialization completed.
7
Page 8

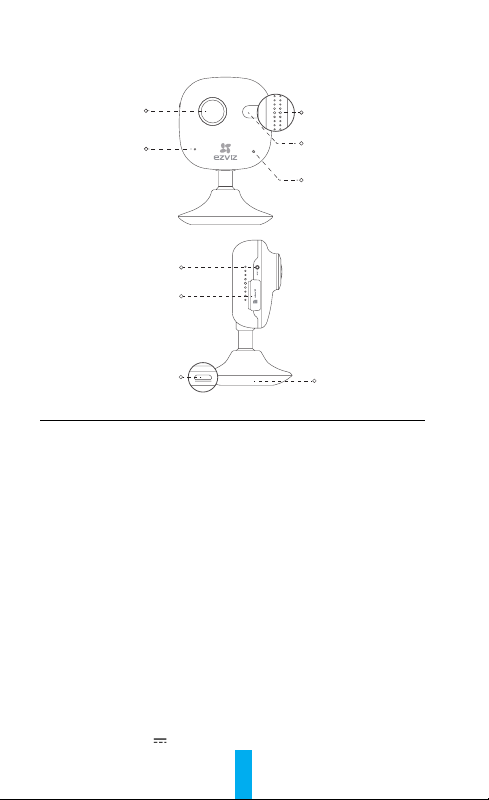
Basics
Lens
Microphone
RESET
Memory Card Slot
Power Input
Speaker
IR Light
LED Indicator
Magnetic Base
Name Description
IR Light Auto light source for dark environment. The camera video has two
modes: color (for daylight recording) and black and white with IR
illuminator (for night condition).
LED Indicator •Blinking Red and Blue: The camera is on; you can configure the
Wi-Fi connection.
•Steady Blue: The camera is being connected and operated by
user(s).
•Slow Blue Flicker: The camera is running properly.
•Steady Red: The camera is starting up.
•Slow Red Flicker: The Wi-Fi connection has failed.
•Fast Red Flicker: MicroSD card error.
Memory Card
Slot
For microSD card (not included with this product). You can purchase
separately. Recommended compatibility: Class 10, maximum space
128GB. After inserting the card, you can record the event inside the
camera. You need to initialize it on the EZVIZ App.
RESET
Hold down the RESET button for 10 seconds while the camera is
running, the camera restarts and all parameters are reset to default.
Power Input
5V±10%
8
Page 9

Troubleshooting
“The device is offline.” or “The device is not registered.” prompts appear when
Q:
adding the camera using the EZVIZ App.
1. Make sure the network, which the camera is connected to, is working
A:
properly and the router’s DHCP is enabled.
2. Hold down the RESET button for 10 seconds to reset the settings if you
change the network parameters.
The mobile phone cannot receive alarm prompts when the camera is online.
Q:
1. Make sure the EZVIZ app is running on your mobile phone.
A:
2. For Android OS mobile phone, make sure the app is running in the
background; and for iOS mobile phones, enable the message push function
in “Settings > Notification”.
Does the camera support power via USB devices or a portable battery.
Q:
It’s advised to use the EZVIZ standard power adapter to provide a stable
A:
voltage supply.
For more information, please visit www.ezvizlife.com.
9
Page 10

Einrichten
Schritt 1 Einschalten
Schließen Sie das Stromkabel an die Kamera und das Netzteil an und stecken
Sie das Netzteil in eine Steckdose. Wenn die Kamera zum Einrichten bereit
ist, blinkt die Betriebsanzeige in Rot und Blau.
Stromkabel
Schritt 2 Schnelleinstellung
1. Verbinden Sie Ihr Mobiltelefon mit einem WLAN.
2. Laden Sie die EZVIZ App herunter, indem Sie im App Store (iOS 7.0 oder
höher) oder in Google PlayTM (Android 4.0 oder höher) nach „EZVIZ“ suchen,
und installieren Sie sie.
3. Starten Sie die App und registrieren Sie sich für ein EZVIZ-Benutzerkonto
gemäß den Anweisungen im Startassistenten.
4. Melden Sie sich bei der App an und tippen Sie auf dem Startbildschirm
oben rechts auf „+“, um den „Gerät hinzufügen“-Bildschirm aufzurufen.
5. Scannen Sie den QR-Code mit Ihrem Mobiltelefon. Sie können die
9-stellige Seriennummer auch manuell eingeben, um die Kamera
hinzufügen. Der QR-Code und die Seriennummer befinden sich auf dem
Etikett auf der Rückseite der Kamera.
6. Folgen Sie der Anleitung, um die WLAN-Verbindung der Kamera einzustellen.
7. Stellen Sie die richtige Zeitzone, die Angaben zur Sommerzeit und das
Datumsformat ein, um die Einrichtung abzuschließen.
10
Steckdose
Page 11

Installation
Schritt 1 Montage der Metallplatte (optional)
Wählen Sie eine saubere und ebene Oberfläche und befestigen Sie die
Metallplatte mit Klebepads oder Schrauben an der gewünschten Position.
In der Kamera befindet sich ein Magnet. Sie können diesen Schritt
überspringen, wenn die Oberfläche aus Metall besteht.
Schritt 2 Installation der Kamera
Befestigen Sie die Kamera magnetisch an der Metallplatte oder an einer
Metalloberfläche.
Schritt 3 Den Einbau abschließen
Passen Sie die Ausrichtung der Kamera nach Wunsch an.
Auf die Speicherkarte aufzeichnen
Schritt 1 Die Speicherkarte einsetzen
1. Drehen Sie die Abdeckung des Speicherkarteneinschubs zum Öffnen im
Uhrzeigersinn (siehe Abbildung unten).
2. Schieben Sie eine microSD-Karte in den Einschub, bis sie mit einem
Klick einrastet (siehe Abbildung unten).
3. Schließen Sie die Abdeckung wieder.
Schritt 2 Die Speicherkarte initialisieren
1. Prüfen Sie in der EZVIZ App den Status der Speicherkarte, indem Sie
auf dem Bildschirm „Geräteeinstellungen“ auf „Speicherstatus“ tippen.
2. Wenn für die Speicherkarte der Status „Not Initialized“ (Nicht initialisiert)
angezeigt wird, tippen Sie auf die Schaltfläche „Initialize“ (Initialisieren), um
sie zu initialisieren. Wenn die Initialisierung abgeschlossen ist, können Sie
ereignisausgelöste Videoaufnahmen in der Kamera aufzeichnen.
11
Page 12
Aufbau des Geräts
Objektiv
Mikrofon
ZURÜCKSETZEN
Speicherkarteneinschub
Stromanschluss
Lautsprecher
IR-Licht
LED-Betriebsanzeige
Magnetischer
Standfuß
Bezeichnung Beschreibung
IR-Licht Automatische Lichtquelle für Dunkelheit. Die Kamera kann in zwei
LED-Betriebsanzeige • Rotes und blaues Blinken: Die Kamera ist an; Sie können die
Speicherkarteneinschub Für microSD-Karte (nicht im Lieferumfang enthalten). Kann separat
ZURÜCKSETZEN Halten Sie bei eingeschalteter Kamera 10 Sekunden lang die
Stromanschluss
Modi Video aufzeichnen: Farbe (für Tageslichtaufnahmen) und
Schwarzweiß mit IR-Beleuchtung (für Aufnahmen bei Dunkelheit).
WLAN-Verbindung konfigurieren.
• Ununterbrochen blau: Die Kamera ist angeschlossen und wird
von Benutzer(n) bedient.
• Langsames blaues Blinken: Die Kamera funktioniert ordnungsgemäß.
• Leuchtet rot: Die Kamera fährt hoch.
• Langsames rotes Blinken: Die WL AN-Verbindung ist fehlgeschlagen.
• Schnelles rotes Blinken: Fehler bei der microSD-Karte.
gekauft werden. Empfohlene Kompatibilität: Klasse 10, maximaler
Speicher 128 GB. Nach Einschieben der Karte lässt sich das Ereignis in
der Kamera aufzeichnen. Sie müssen sie in der EZVIZ App initialisieren.
ZURÜCKSETZEN-Taste gedrückt. Die Kamera wird dann neu gestartet,
und alle Einstellungen werden auf die Standardwerte zurückgesetzt.
5 V ± 10 %
12
Page 13

Fehlersuche
Die Meldung „The device is offline.“ (Das Gerät ist offline.) oder „The
F:
device is not registered.“ (Das Gerät ist nicht registriert.) wird angezeigt,
wenn die Kamera mithilfe der EZVIZ App hinzugefügt wird.
1. Stellen Sie sicher, dass das Netzwerk, mit dem die Kamera verbunden
A:
ist, ordnungsgemäß funktioniert und dass der DHCP-Server des Routers
aktiviert ist.
2. Drücken Sie etwa 10 Sekunden die ZURÜCKSETZEN-Taste, um die
Einstellungen zurückzusetzen, wenn Sie die Netzwerkeinstellungen ändern.
Das Mobiltelefon kann keinen Alarm empfangen, wenn die Kamera online ist.
F:
1. Stellen Sie sicher, dass die EZVIZ App auf Ihrem Mobiltelefon ausgeführt
A:
wird.
2. Stellen Sie bei einem Android-Mobiltelefon sicher, dass die App im Hintergrund
ausgeführt wird, und aktivieren Sie bei einem iOS-Mobiltelefon die
Nachrichten-Push-Funktion unter „Settings > Notification“ (Einstellungen >
Benachrichtigung).
Unterstützt die Kamera Stromversorgung durch USB-Geräte oder einen
F:
portablen Akku?
Es wird empfohlen, das standardmäßige EZVIZ-Netzteil zu verwenden, um eine
A:
stabile Stromversorgung zu gewährleisten.
Weitere Informationen erhalten Sie auf www.ezvizlife.com.
13
Page 14
Configuración
Paso 1 Encendido
Conecte el cable de alimentación a la cámara y al adaptador de corriente y
después a una toma de corriente. Cuando el indicador parpadee en rojo y azul,
habrá energía suficiente para la configuración.
Cable de
alimentación
Toma de corriente
Paso 2 Ajustes rápidos
1. Conecte su teléfono móvil a la red Wi-Fi.
2. Descargue e instale la aplicación EZVIZ buscando “EZVIZ” en el App Store
(iOS 7.0 o posterior) o Google Play
TM
(Android 4.0 o posterior).
3. Abra la aplicación y registre una cuenta de usuario de EZVIZ siguiendo las
instrucciones del asistente de instalación.
4. Inicie sesión en la aplicación y en la pantalla de inicio toque el símbolo
"+" situado en la esquina superior derecha para entrar en la interfaz para
agregar dispositivos.
5. Escanee el código QR del dispositivo con su teléfono móvil. También puede
introducir manualmente el número de serie de 9 dígitos para agregar la
cámara. El código QR y el número de serie se encuentran en la etiqueta
de detrás de la cámara.
6. Siga el procedimiento para configurar la conexión Wi-Fi de la cámara.
7. Defina la zona horaria correcta, la información sobre el horario de verano y
el formato de fecha para finalizar la configuración.
14
Page 15

Instalación
Paso 1 Instalación de la placa metálica (Opcional)
Seleccione una superficie limpia y plana y fije la placa metálica en la posición
deseada con adhesivos de espuma o tornillos.
En el interior de la cámara hay un imán. Si la superficie de instalación
es metálica, puede omitir este paso.
Paso 2 Instalación de la cámara
Utilice el imán de la cámara para fijarla a la placa de metal o superficie
metálica.
Paso 3 Finalizar la instalación
Ajuste el ángulo de la cámara según sea necesario.
Grabación en la tarjeta de memoria
Paso 1 Instalación de la tarjeta de memoria
1. Gire la tapa de la ranura de la tarjeta de memoria en sentido horario para
abrirla. Fíjese en la figura de la izquierda.
2. Inserte una tarjeta microSD en la ranura hasta que haga clic. Fíjese en
la figura de la derecha.
3. Vuelva a poner la tapa.
Paso 2 Inicializar la tarjeta de memoria
1. Desde la aplicación EZVIZ, compruebe el estado de la tarjeta de memoria. Para
ello, seleccione Estado de almacenamiento en los Ajustes del dispositivo.
2. Si el estado de la tarjeta de memoria es No inicializada, pulse el botón
inicializar para ello. A continuación, una vez finalizada la inicialización
podrá grabar en la cámara un vídeo activado por un evento.
15
Page 16

Elementos básicos
Lente
Micrófono
REINCIAR
Ranura de la
tarjeta de memoria
Entrada de alimentación
Altavoz
Luz IR
Indicador LED
Base magnética
Nombre Descripción
Luz IR Luz automática para ambientes oscuros. La videocámara tiene
dos modos: color (para grabación durante el día) y blanco y negro
con luz IR (para ambiente nocturno).
Indicador LED •Parpadeo rojo y azul: La cámara está encendida; puede
configurar la conexión Wi-Fi.
• Azul fijo: La cámara está siendo conectada y manejada por el usuario.
•Parpadeo azul lento: La cámara funciona correctamente.
•Rojo fijo: La cámara se está iniciando.
•Parpadeo rojo lento: Fallo en la conexión Wi-Fi.
•Parpadeo rojo rápido: Error de tarjeta MicroSD.
Ranura de
la tarjeta de
memoria
REINCIAR
Para la tarjeta microSD (no incluida con este producto). Puede
adquirirla por separado. Compatibilidad recomendada: Clase 10,
espacio máximo de 128 GB. Tras insertar la tarjeta SD, puede grabar
con la cámara. Tiene que inicializar la tarjeta con la aplicación EZVIZ.
Mantenga pulsado el botón de REINICIO durante 10 segundos
con la cámara en funcionamiento. La cámara se reiniciará y
recuperará los parámetros predefinidos de fábrica.
Entrada de
alimentación
5 V ± 10 %
16
Page 17

Solución de problemas
Al agregar la cámara usando la aplicación EZVIZ se muestra el mensaje
P:
“The device is offline.” (El dispositivo está sin conexión.) o “The device
is not registered.” (El dispositivo no está registrado).
1. Compruebe si funciona correctamente la red a la que está conectada
R:
la cámara y si está activado el DHCP del enrutador.
2. Mantenga pulsado el botón de REINICIO durante 10 segundos para
restablecer los ajustes si cambió los parámetros de la red.
El teléfono móvil no recibe mensajes de alarma cuando la cámara está en
P:
línea.
1. Asegúrese de que la aplicación EZVIZ esté funcionando en su teléfono.
R:
2. En teléfonos móviles con sistema operativo Android, la aplicación funciona en
segundo plano; y en teléfonos móviles con iOS, active la función de notificación
automática desde “Settings > Notification” (Ajustes > Notificación).
¿Puede la cámara recibir alimentación desde dispositivos USB o desde una
P:
batería portátil?
Se recomienda utilizar el adaptador de corriente estándar de EZVIZ para
R:
garantizar una alimentación eléctrica estable.
Para obtener más información, visite www.ezvizlife.com.
17
Page 18

Mise en place
Étape 1 Alimentation
Branchez la caméra au transformateur électrique puis branchez le transformateur
dans la prise secteur. Lorsque le témoin clignote en rouge et bleu, cela indique
que l’appareil est sous tension.
Câble
d’alimentation
Prise électrique
Étape 2 Réglages rapides
1. Connectez votre téléphone mobile au réseau Wi-Fi.
2. Recherchez l’application EZVIZ dans APP Store (iOS 7.0 et versions plus
récentes) ou dans Google Play
TM
(Android 4.0 et versions plus récentes) ;
téléchargez et installez l’application.
3. Lancez l’application et créez un compte utilisateur EZVIZ en suivant
l’assistant de démarrage.
4. Connectez-vous sur l’application dans la page d’accueil. Touchez le signe
« + » dans le coin supérieur droit de l’écran pour accéder à l’interface
d’ajout de l’appareil.
5. Scannez le code QR de l’appareil à l’aide de votre portable. Vous pouvez également
ajouter la caméra en saisissant le numéro de série à 9 chiffres. Le code QR et le
numéro de série figurent sur l’étiquette collée à l’arrière de la caméra.
6. Suivez les étapes de configuration de la connexion Wi-Fi de la caméra.
7. Terminez les réglages en définissant le fuseau horaire, les informations sur
le changement saisonnier d’heure et le format de la date qui conviennent.
18
Page 19

Installation
Étape 1 Installation du support métallique (facultatif)
Sur une surface propre et plate, fixez le support métallique dans la position
de votre choix à l’aide de la mousse autocollante ou des vis.
La caméra dispose d’un élément magnétique interne. Ignorez
cette étape si la surface est métallique.
Étape 2 Installation de la caméra
Fixez la caméra sur le support ou la surface métallique grâce à la force magnétique.
Étape 3 Fin de l’installation
Ajustez l’angle de la caméra le cas échéant.
Enregistrement sur la carte mémoire
Étape 1 Installation de la carte mémoire
1. Tournez le couvercle de la fente pour carte mémoire dans le sens horaire
pour l’ouvrir (voir illustration à gauche).
2. Insérez la carte microSD dans la fente et appuyez jusqu’au déclic (voir
illustration à droite).
3. Refermez le couvercle.
Étape 2 Initialisation de la carte mémoire
1. Dans l’application EZVIZ, touchez « Storage Status » (état de stockage)
dans « Device Settings » (paramètres de l’appareil) pour vérifier l’état
de la carte mémoire.
2. Si l’état affiché est « Not Initialized » (non initialisé), touchez la touche
« Initialize » pour l’initialiser. Une fois l’initialisation achevée, vous pouvez
désormais enregistrer sur la caméra des vidéos déclenchées par un évènement.
19
Page 20

Notions de base
Objectif
Microphone
Réinitialisation
Fente pour carte mémoire
Entrée d’alimentation
Haut-parleur
Éclairage IR
Indicateur LED
Base magnétique
Nom Description
Éclairage IR Source lumineuse automatique pour les lieux sombres. La caméra dispose
Indicateur LED • Clignotement en rouge et bleu : la caméra est allumée ; vous
Fente pour carte
mémoire
Réinitialisation Maintenez enfoncé le bouton de RÉINITIALISATION pendant 10 s
Entrée d’alimentation
de deux modes vidéo : couleur (pour l’enregistrement en lumière du jour) et
noir et blanc avec l’éclairage IR (fonctionnement de nuit).
pouvez configurer la connexion Wi-Fi.
• Solide bleu : la caméra est en cours de connexion et est manipulée
par un ou des utilisateurs.
• Clignotement lent en bleu : la caméra fonctionne correctement.
• Solide rouge : la caméra est en cours de démarrage.
• Clignotement lent en rouge : la connexion Wi-Fi a échoué.
• Clignotement rapide en rouge : erreur de carte microSD.
Pour carte microSD (non fournie avec ce produit). Vous pouvez
l’acheter séparément. Compatibilité recommandée : classe 10,
capacité maximale de 128 Go. Après avoir inséré la carte, vous pouvez
enregistrer l’évènement sur la caméra. Vous devez l’initialiser depuis
l’application EZVIZ.
alors que la caméra fonctionne. La caméra redémarrera et tous les
paramètres seront réinitialisés aux valeurs par défaut.
5 V ± 10 %
20
Page 21

Résolution des problèmes
Le message « The device is offline » (l’appareil est hors ligne) ou « The device
Q :
is not registered » (L’appareil n’est pas inscrit) apparaît au moment de l’ajout
de la caméra dans l’application EZVIZ.
1. Vérifiez que le réseau, auquel la caméra est connectée, fonctionne
R :
correctement et que le service DHCP du routeur est activé.
2. Maintenez enfoncé le bouton de RÉINITIALISATION pendant 10 s pour
restaurer la configuration usine si vous avez modifié les paramètres
de réseau.
Le téléphone mobile ne reçoit pas les messages d’alarme lorsque la caméra
Q :
est hors ligne.
1. Vérifiez que l’application EZVIZ est en exécution sur votre téléphone mobile.
R :
2. Pour un téléphone mobile sous système Android, vérifiez que l’application
s’exécute en arrière-plan. Pour un téléphone mobile sous système
iOS, activez la fonction de message direct (push) dans « Settings >
Notification » (Réglages > Notification).
La caméra peut-elle être alimentée via des ports USB ou une batterie portable ?
Q :
Il est conseillé d’utiliser l’adaptateur d’alimentation EZVIZ standard pour
R :
fournir une tension électrique stable.
Pour plus d’informations, veuillez visiter le site Web www.ezvizlife.com.
21
Page 22

Configurazione
Passo 1 Accensione
Inserire il cavo di alimentazione nella videocamera e nell'adattatore di
corrente e quindi collegare la presa di corrente. Quando l'indicatore luminoso
lampeggia in rosso e blu, è possibile procedere con le Impostazioni rapide.
Cavo di
alimentazione
Presa di corrente
Passo 2 Impostazioni rapide
1. Connettere il cellulare alla rete Wi-Fi.
2. Scaricare e installare l'app EZVIZ cercando "EZVIZ" nell'App Store (iOS 7.0
o superiore) e su Google Play
TM
(Android 4.0 o superiore).
3. Avviare l'app e registrare un account utente di EZVIZ seguendo le istruzioni
della procedura guidata di avvio.
4. Accedere all'app e, nella schermata principale Home, toccare "+" nell'angolo in
alto a destra per accedere all'interfaccia del dispositivo da aggiungere.
5. Eseguire la scansione del QR code del dispositivo con il telefono cellulare.
In alternativa, per aggiungere la videocamera, è possibile inserire
manualmente il numero di serie da 9 cifre. Il QR code e il numero di serie
sono riportati sull'etichetta presente sul retro della videocamera.
6. Attenersi alla procedura per impostare la connessione Wi-Fi della videocamera.
7. Impostare il fuso orario, le informazioni DST e il formato della data per
terminare la configurazione.
22
Page 23

Installazione
Passo 1 Installazione della piastra metallica (opzionale)
Scegliere una superficie piatta e pulita e fissare la piastra metallica nella
posizione desiderata utilizzando gli adesivi in schiuma o le apposite viti.
All'interno della videocamera è presente una calamita. Se la superficie
è metallica, questo passaggio può essere ignorato.
Passo 2 Installare la videocamera
Fissare la videocamera magneticamente sulla piastra metallica o su
una superficie metallica.
Passo 3 Completamento dell'installazione
Regolare l'angolazione della videocamera secondo le necessità.
Registrazione su scheda di memoria
Passo 1 Installazione della scheda di memoria
1. Ruotare il coperchio dello slot della scheda di memoria in senso orario per
aprirlo, facendo riferimento all'immagine a sinistra di seguito riportata.
2. Inserire una scheda micro SD nello slot finché non scatta in posizione con un
clic, facendo riferimento all'immagine a destra di seguito riportata.
3. Riposizionare il coperchio.
Passo 2 Inizializzazione della scheda di memoria
1. Dall'app EZVIZ, controllare lo stato della scheda di memoria toccando
Stato Archivio in Impostazioni dispositivo.
2. Se lo Stato Archivio riporta Non Inizializzato, toccare il pulsante Inizializza.
Dopo l'inizializzazione sarà possibile registrare sulla scheda di memoria gli
eventi di Rilevamento del Movimento della videocamera.
23
Page 24

Informazioni di base
Obiettivo
Microfono
RESET
Slot della scheda
di memoria
Ingresso alimentazione
Altoparlante
Luce a infrarossi
Indicatore LED
Base magnetica
Nome Descrizione
Luce a infrarossi Sorgente di luce automatica per ambienti bui. Sono disponibili due modalità
Indicatore LED • Rosso e blu lampeggiante: la videocamera è accesa; è possibile
Slot della scheda
di memoria
RESET Tenere premuto il pulsante RESET per 10 secondi mentre la
Ingresso
alimentazione
video della videocamera: a colori (per la registrazione in luce diurna) e in
bianco e nero con illuminatore a infrarosso (per la condizione notturna).
configurare la connessione Wi-Fi.
• Blu fisso: la videocamera è in connessione ed è utilizzata dall'utente.
• Blu lampeggiante lentamente: la videocamera è operativa e funzionante.
• Rosso fisso: la videocamera si sta avviando.
• Rosso lampeggiante lentamente: la connessione Wi-Fi non è riuscita.
• Rosso lampeggiante velocemente: errore della scheda Micro SD.
Per una scheda micro SD (non inclusa con il prodotto). È possibile acquistarla
separatamente. Caratteristiche di compatibilità raccomandate: Classe 10,
capacità massima 128 GB. Dopo aver inserito la scheda, è possibile registrare
gli eventi nella videocamera. Occorre inizializzarla con l'app EZVIZ.
videocamera è accesa. La videocamera viene riavviata e tutti i parametri
vengono reimpostati ai valori predefiniti.
5V ±10%
24
Page 25

Risoluzione dei problemi
Quando si tenta di aggiungere la videocamera con l'app EZVIZ, compare il
D:
messaggio "The device is offline" (Il dispositivo è disconnesso) o "The device
is not registered" (Il dispositivo non è registrato).
1. Assicurarsi che la rete alla quale è connessa la videocamera funzioni
R:
correttamente e che nel router sia abilitato il DHCP.
2. Tenere premuto il pulsante RESET per 10 secondi per reimpostare i
parametri qualora siano state apportate modifiche alla configurazione
della rete.
Lo smartphone non riceve alcuna notifica di allarme una volta collegata la
D:
videocamera.
1. Assicurarsi che l'app EZVIZ sia in esecuzione sullo smartphone.
R:
2. Nel caso di uno smartphone con sistema operativo Android, accertarsi che l'app
sia attiva in background; nel caso di uno smartphone iOS, abilitare la funzione
push dei messaggi in “Settings > Notification” (Impostazioni > Notifiche).
La videocamera può essere alimentata tramite dispositivi USB o batterie
D:
portatili?
Si consiglia di utilizzare l'alimentatore standard EZVIZ per assicurare una
R:
tensione di alimentazione stabile.
Per ulteriori informazioni, consultare il sito www.ezvizlife.com.
25
Page 26

Installatie
Stap 1 Inschakelen
Sluit het snoer voor de stroomvoorziening aan op de camera en op de
lichtnetadapter en dan op een stopcontact. Wanneer het indicatielampje rood
en blauw knippert, is de stroomvoorziening gereed voor installatie.
Netsnoer
Stopcontact
Stap 2 Snelle instellingen
1. Verbind uw mobiele telefoon met Wi-Fi.
2. Download en installeer de EZVIZ-app door te zoeken naar "EZVIZ" in de App
Store (iOS 7.0 of later) en Google Play
TM
(Android 4.0 of later).
3. Start de app en registreer een EZVIZ-gebruikersaccount door de
opstartwizard te volgen.
4. Meld u aan bij de app en tik in het startscherm op "+" in de rechter
bovenhoek om de interface voor het toevoegen van apparaten te openen.
5. Scan de QR-code van het apparaat met uw mobiele telefoon. U kunt ook
handmatig het 9-cijferige serienummer invoeren om de camera toe te
voegen. De QR-code en het serienummer bevinden zich op het label op de
achterkant van het apparaat.
6. Volg de procedure voor het instellen van de Wi-Fi-verbinding van de camera.
7. Stel de juiste tijdzone, DST-informatie en datumweergave in om de
installatie te voltooien.
26
Page 27

Installatie
Stap 1 Installatie van de metalen plaat (optioneel)
Kies een schoon en vlak oppervlak en bevestig de metalen plaat met de
schuimstickers of schroeven op de gewenste plaats.
Er zit een magnetisch onderdeel in de camera. U kunt deze stap
overslaan als het oppervlak van metaal is gemaakt.
Stap 2 Het installeren van de camera
Bevestig de camera magnetisch aan de metalen plaat of een metalen
oppervlak.
Stap 3 Installatie voltooien
Pas de camerahoek indien nodig aan.
Opnemen op de geheugenkaart
Stap 1 Installatie van de geheugenkaart
1. Klap de afdekking van de sleuf voor de geheugenkaart met de klok mee
open, zoals in de volgende afbeelding links wordt getoond.
2. Steek een micro-SD-kaart in de sleuf totdat deze vastklikt, zoals in de
volgende afbeelding recht wordt getoond.
3. Plaats het deksel terug.
Stap 2 Initialiseren van de geheugenkaart
1. Controleer de status van de geheugenkaart in de EZVIZ-app, door in
Instellingen apparaat op de Opslagstatus te tikken.
2. Als de status van de geheugenkaart niet als geïnitialiseerd wordt weergegeven,
tik dan op Initialiseren om hem te initialiseren. Nadat de initialisatie van de
camera is voltooid, kunt u een door gebeurtenis geactiveerde video opnemen.
27
Page 28

Grondbeginselen
Lens
Microfoon
HERSTELLEN
Sleuf voor geheugenkaart
Invoer voeding
Luidspreker
IR-verlichting
LED-indicator
Magnetisch voetstuk
Naam Omschrijving
IR-verlichting Automatische lichtbron voor donkere omgeving. De video van de camera
LED-indicator • Rood en blauw knipperen: De camera is aan; u kunt de Wi-Fi-verbinding
Sleuf voor
geheugenkaart
HERSTELLEN Houd bij draaiende camera de toets HERSTELLEN gedurende 10 seconden
Invoer voeding
heeft twee modi: kleur (voor daglichtopnamen) en zwart-wit met IRverlichting (voor nachtomstandigheden).
configureren.
• Stabiel blauw: De camera wordt door gebruiker(s) aangesloten en
bediend.
• Traag blauw knipperen: De camera draait goed.
• Stabiel rood: De camera start op.
• Traag rood knipperen: De Wi-Fi-verbinding is mislukt.
• Snel rood knipperen: Fout micro-SD-kaart.
Voor micro-SD-kaart (niet bij dit product inbegrepen) U kunt deze
afzonderlijk aanschaffen. Aanbevolen compatibiliteit: Klasse 10, maximale
ruimte 128 GB. U kunt na het plaatsen van de kaart de gebeurtenis in de
camera opnemen. U dient dit in de EZVIZ-app te initialiseren.
ingedrukt; de camera herstart en alle parameters worden hersteld naar
de standaard.
5 V ± 10%
28
Page 29

Probleemoplossing
Tijdens het toevoegen van de camera met de EZVIZ-app verschijnen de
V:
prompts "The device is offline (Het apparaat is offline)" of "The device is not
registered (Het apparaat is niet geregistreerd)".
1. Zorg ervoor dat het netwerk waarop de camera is aangesloten juist werkt en
A:
dat DHCP van de router is ingeschakeld.
2. Houd de toets HERSTELLEN gedurende 10 seconden ingedrukt om de
instellingen te herstellen als u de netwerkparameters wijzigt.
De mobiele telefoon kan geen alarmprompts ontvangen wanneer de
V:
camera online is.
1. Zorg ervoor dat de EZVIZ-app op uw mobiele telefoon draait.
A:
2. Zorg er bij mobiele telefoons met Android besturingssysteem voor dat de app
op de achtergrond draait; schakel bij mobiele telefoons met iOS, in "Settings
(Instellingen) > Notification (Meldingen)" de functie pushberichten in.
Ondersteunt de camera stroomvoorziening via USB-apparaten of een
V:
draagbare batterij?
Het wordt aanbevolen om de standaard EZVIZ-lichtnetadapter te gebruiken om
A:
in stabiele stroomvoorziening te voorzien.
Ga voor meer informatie naar www.ezvizlife.com.
29
Page 30

Konguracja
Krok 1 Podłączenie zasilania
Podłącz przewód zasilający do kamery i zasilacza, a następnie do gniazda sieci
elektrycznej. Migający czerwony i niebieski wskaźnik sygnalizuje podłączenie
zasilania i gotowość do konfiguracji.
przewód
zasilający
gniazdo sieci
elektrycznej
Krok 2 Szybkie ustawienia
1. Połącz telefon komórkowy z siecią Wi-Fi.
2. Pobierz i zainstaluj aplikację EZVIZ, wyszukując „EZVIZ” w sklepie App
Store (system iOS w wersji 7.0 lub nowszej) i sklepie Google Play
Android w wersji 4.0 lub nowszej).
3. Uruchom aplikację i zarejestruj swoje konto użytkownika EZVIZ przy użyciu
kreatora startowego.
4. Zaloguj się do aplikacji i na ekranie głównym naciśnij przycisk „+”
w prawym górnym rogu, aby wyświetlić interfejs dodawania urządzenia.
5. Zekanuj kod QR urządzenia telefonem komórkowym. Możesz również
ręcznie wprowadzić 9-cyfrowy numer seryjny, aby dodać kamerę. Kod QR
i numer seryjny znajdują się na etykiecie na tylnym panelu kamery.
6. Wykonaj procedurę konfigurowania połączenia Wi-Fi kamery.
7. Ustaw poprawną strefę czasową, informacje związane z czasem letnim
i format daty, aby ukończyć konfigurację.
30
TM
(system
Page 31

Instalacja
Krok 1 Mocowanie płyty metalowej (opcjonalne)
Wybierz czystą i płaską powierzchnię i przymocuj na niej płytę metalową
w odpowiednim położeniu piankowymi elementami mocującymi lub śrubami.
Wewnątrz kamery znajduje się magnes. Jeżeli powierzchnia montażowa
jest wykonana z metalu, można pominąć ten krok.
Krok 2 Instalowanie kamery
Przymocuj kamerę magnetycznie do płyty lub powierzchni metalowej.
Krok 3 Zakończenie instalacji
Dostosuj kąt ustawienia kamery zgodnie z wymaganiami.
Nagrywanie na karcie pamięci
Krok 1 Instalowanie karty pamięci
1. Odwróć pokrywę gniazda karty pamięci zgodnie z kierunkiem ruchu
wskazówek zegara, aby ją otworzyć (rysunek po lewej stronie).
2. Włóż kartę microSD do gniazda tak, aby została zablokowana w odpowiednim
położeniu (rysunek po prawej stronie).
3. Załóż pokrywę.
Krok 2 Inicjowanie karty pamięci
1. W aplikacji EZVIZ sprawdź stan karty pamięci, naciskając pozycję Storage
Status (Stan magazynu) w menu Device Settings (Ustawienia urządzenia).
2. Jeżeli wyświetlany jest stan karty pamięci Not Initialized
(Niezainicjowana), naciśnij przycisk Initialize (Inicjuj). Po zainicjowaniu
kamery można wykonywać nagrania wideo wyzwalane zdarzeniami.
31
Page 32

Informacje podstawowe
obiektyw
mikrofon
RESET
gniazdo karty pamięci
wejście zasilania
głośnik
źródło podczerwieni
wskaźnik LED
podstawa magnetyczna
Nazwa Opis
Źródło podczerwieni Automatyczne źródło światła używane przy niedostatecznym oświetleniu
Wskaźnik LED • Migający czerwony i niebieski: kamera jest włączona; można
Gniazdo karty
pamięci
RESET Naciśnij i przytrzymaj przycisk RESETUJ przez 10 sekund, gdy kamera
Wejście zasilania
w otoczeniu. Kamera generuje dwa sygnały wideo dla obrazu kolorowego
(nagrania dzienne) i monochromatycznego w podczerwieni (warunki nocne).
konfigurować połączenie Wi-Fi.
• Włączony niebieski: kamera jest podłączana i obsługiwana przez użytkownika.
• Powoli migający niebieski: kamera funkcjonuje prawidłowo.
• Włączony czerwony: trwa uruchamianie kamery.
• Powoli migający czerwony: ustanowienie połączenia Wi-Fi nie powiodło się.
• Szybko migający czerwony: błąd karty microSD.
Obsługuje karty microSD (niedostarczone razem z tym produktem). Można
zakupić ją oddzielnie. Zalecana kompatybilność: klasa 10; maksymalna
pojemność 128 GB. Po zainstalowaniu karty można rejestrować zdarzenia
w kamerze. Należy zainicjować ją w aplikacji EZVIZ.
jest uruchomiona. Kamera zostanie ponownie uruchomiona i zostaną
przywrócone wartości domyślne wszystkich parametrów.
5 V ±10%
32
Page 33

Rozwiązywanie problemów
Komunikat „The device is offline” (Urządzenie w trybie offline) lub „The device
P:
is not registered” (Urządzenie nie jest zarejestrowane) pojawia się po dodaniu
kamery przy użyciu aplikacji EZVIZ.
1. Upewnij się, że sieć, do której kamera jest podłączona, funkcjonuje
O:
prawidłowo, a obsługa protokołu DHCP w routerze jest włączona.
2. Jeżeli parametry sieci zostaną zmienione, naciśnij i przytrzymaj przycisk
RESETUJ przez 10 sekund, aby zresetować ustawienia.
Telefon komórkowy nie otrzymuje monitów alarmowych, gdy kamera jest
P:
przełączona do trybu online.
1. Upewnij się, że aplikacja EZVIZ jest uruchomiona w telefonie
O:
komórkowym.
2. W przypadku telefonu komórkowego z systemem operacyjnym Android
upewnij się, że aplikacja jest uruchomiona w tle, a w przypadku telefonów
z systemem iOS włącz obsługę wiadomości typu push w menu „Settings >
Notification” (Ustawienia > Powiadamianie).
Czy kamerę można zasilać za pośrednictwem urządzeń USB lub baterii
P:
przenośnej?
Zalecane jest korzystanie ze standardowego zasilacza EZVIZ zapewniającego
O:
stabilne napięcie.
Aby uzyskać więcej informacji, skorzystaj z witryny www.ezvizlife.com.
33
Page 34

Настройка
Шаг 1. Подключение к сети питания
Подключите кабель питания к камере и блоку питания и затем
подключите блок питания к сетевой розетке. Система готова к настройке,
когда индикатор начинает мигать красным и синим.
Кабель
питания
Шаг 2. Процедура быстрой настройки
1. Подключите мобильный телефон к сети Wi-Fi.
2. Установите на мобильный телефон приложение EZVIZ. Для этого в
магазине приложений App Store (iOS 7.0 или более поздняя версия) или
Google PlayTM (Android 4.0 или более поздняя версия) в строке поиска
введите «EZVIZ» и загрузите приложение.
3. Запустите приложение и зарегистрируйте новую учетную запись
пользователя EZVIZ, следуя инструкциям мастера запуска.
4. Войдите в учетную запись и нажмите на «+» в правом верхнем углу
главной страницы, чтобы перейти к экрану добавления устройства.
5. Чтобы добавить камеру, отсканируйте QR-код с помощью мобильного
телефона или вручную введите 9-значный серийный номер устройства. QRкод и серийный номер находятся на этикетке на задней панели устройства.
6. Для подключения камеры к сети Wi-Fi с ледуйте инструкциям в приложении.
7. Задайте часовой пояс, параметры перехода на летнее время и формат
даты, чтобы завершить настройку.
Сетевая розетка
34
Page 35

Установка
Шаг 1. Установка металлической пластины (дополнительно)
Выберите чистую и плоскую поверхность для установки камеры и закрепите
металлическую пластину с помощью монтажной клейкой ленты или винтов.
Внутри камеры находится магнит. Этот шаг можно пропустить, если
поверхность для установки камеры металлическая.
Шаг 2. Установка камеры
Закрепите камеру на металлической пластине или поверхности с
помощью магнита внутри камеры.
Шаг 3. Завершение установки
Отрегулируйте угол наклона камеры.
Запись на карту памяти
Шаг 1. Установка карты памяти
1. Откройте крышку разъема для карты памяти, повернув ее по
часовой стрелке, как изображено на рисунке слева.
2. Установите карту microSD в разъем до щелчка, как изображено на
рисунке справа.
3. Закройте разъем.
Шаг 2. Инициализация карты памяти
1. Проверьте состоянии карты памяти в приложении EZVIZ. Для этого
в меню «Параметры устройства» выберите «Состояние хранилища».
2. Если состояние карты отображается как «Не инициализирована», нажмите
на кнопку «Инициализировать». Как только инициализация выполнена,
камеру можно использовать для активируемой событиями записи видео.
35
Page 36

Основные компоненты
Объектив
Микрофон
Кнопка RESET (СБРОС)
Разъем карты памяти
Вход питания
Динамик
ИК-лампа
Светодиодный индикатор
Магнитное основание
Наименование Описание
ИК-лампа Автоматический источник инфракрасных лучей для работы ночью.
Светодиодный
индикатор
Разъем карты
памяти
Кнопка RESET
(СБРОС)
Вход питания
Видеокамера имеет два режима: цветной (для записи при дневном
свете) и черно-белый с ИК-подсветкой (для работы ночью).
• Мигает красным и синим: камера включена и готова к настройке
подключения Wi-Fi.
• Горит синим: камера подключена к сети и используется пользователем.
• Медленно мигает синим: камера работает в обычном режиме.
• Постоянно светится красным цветом: камера запускается.
• Медленно мигает красным: сбой подключения к сети Wi-Fi.
• Быстро мигает красным: ошибка карты microSD.
Гнездо для карты памяти. Карта не входит в комплект поставки, вы
можете приобрести ее отдельно. Рекомендуется использовать карты
класса 10 емкостью до 128 ГБ. После установки карты на нее можно
записывать видеосигналы камеры. Выполните инициализацию карты
памяти перед использованием с помощью приложения EZVIZ.
Если во время работы камеры удерживать кнопку сброса нажатой
10 секунд, произойдет перезагрузка и все параметры вернутся к
значениям по умолчанию.
5 В ± 10 %
36
Page 37

Устранение неисправностей
При добавлении камеры с помощью приложения EZVIZ появляется сообщение
В:
Устройство не подключено к сети или Устройство не зарегистрировано.
1. Убедитесь, что сеть, к которой подключена камера, работает должным
О:
образом, а на маршрутизаторе включен режим DHCP.
2. Если вы изменили параметры сети, нажмите кнопку сброса и
удерживайте ее 10 секунд, чтобы сбросить настройки.
Мобильный телефон не принимает оповещения о сигналах тревоги, когда
В:
камера подключена к сети.
1. Убедитесь в том, что на мобильном телефоне запущено
О:
приложение EZVIZ.
2. Для телефонов на базе Android убедитесь, что приложение работает
в фоновом режиме; а для телефонов с системой iOS активируйте
функцию передачи сообщений в меню Настройки > Уведомления.
Может ли камера получать электропитание от USB-устройств или от
В:
портативного аккумулятора?
Для обеспечения стабильного напряжения питания рекомендуется
О:
использовать стандартный сетевой адаптер EZVIZ.
Для получения более подробной информации посетите веб-сайт
www.ezvizlife.com.
37
Page 38

Ρύθμιση
Βήμα 1 Ενεργοποίηση
Συνδέστε το καλώδιο τροφοδοσίας στην κάμερα και στο τροφοδοτικό και στη
συνέχεια σε μια πρίζα. Όταν η ενδεικτική λυχνία αναβοσβήνει με κόκκινο και
μπλε χρώμα, μπορείτε να προχωρήσετε στις ρυθμίσεις.
Καλώδιο
τροφοδοσίας
Πρίζα
Βήμα 2 Γρήγορες ρυθμίσεις
1. Συνδέστε το κινητό σας τηλέφωνο στο Wi-Fi.
2. Πραγματοποιήστε λήψη και εγκατάσταση της εφαρμογής EZVIZ αναζητώντας
τον όρο «EZVIZ» στο App Store (iOS 7.0 ή νεότερη έκδοση) και το Google
TM
Play
(Android 4.0 ή νεότερη έκδοση).
3. Εκκινήστε την εφαρμογή και δημιουργήστε έναν λογαριασμό χρήστη EZVIZ
ακολουθώντας τον οδηγό εκκίνησης.
4. Συνδεθείτε στην εφαρμογή και πατήστε «+» στην επάνω δεξιά γωνία στην
αρχική οθόνη για να εισέλθετε στη διεπαφή προσθήκης συσκευής.
5. Σαρώστε τον κωδικό QR της συσκευής με το κινητό σας τηλέφωνο.
Εναλλακτικά, μπορείτε να πληκτρολογήσετε τον 9-ψήφιο αριθμό σειράς για
να προσθέσετε την κάμερα. Ο κωδικός QR και ο αριθμός σειράς βρίσκονται
στην ετικέτα στο πίσω μέρος της κάμερας.
6. Ακολουθήστε τη διαδικασία για να ρυθμίσετε τη σύνδεση Wi-Fi της κάμερας.
7. Ρυθμίστε τη σωστή ζώνη ώρας, τις πληροφορίες θερινής ώρας και τη μορφή
ημερομηνίας για να ολοκληρώσετε τις ρυθμίσεις.
38
Page 39

Εγκατάσταση
Βήμα 1 Εγκατάσταση της μεταλλικής πλάκας (προαιρετικά)
Επιλέξτε μια καθαρή και επίπεδη επιφάνεια και τοποθετήστε σταθερά τη
μεταλλική πλάκα στην επιθυμητή θέση με τα αυτοκόλλητα αφρού ή βίδες.
Υπάρχει ένας μαγνήτης στο εσωτερικό της κάμερας. Μπορείτε να παραλείψετε
αυτό το βήμα, αν η επιφάνεια είναι κατασκευασμένη από μέταλλο.
Βήμα 2 Εγκατάσταση της κάμερας
Τοποθετήστε σταθερά την κάμερα στη μεταλλική πλάκα ή τη μεταλλική
επιφάνεια με τη βοήθεια του μαγνήτη.
Βήμα 3 Ολοκλήρωση της εγκατάστασης
Ρυθμίστε τη γωνία της κάμερας όπως απαιτείται.
Εγγραφή στην κάρτα μνήμης
Βήμα 1 Εγκατάσταση της κάρτας μνήμης
1. Στρέψτε το κάλυμμα της υποδοχής της κάρτας μνήμης προς τα δεξιά για να
το ανοίξετε, δείτε το παρακάτω σχήμα αριστερά.
2. Τοποθετήστε μια κάρτα microSD στην υποδοχή μέχρι να ακουσ τεί ένα κλικ,
δείτε το παρακάτω σχήμα δεξιά.
3. Τοποθετήστε ξανά το κάλυμμα.
Βήμα 2 Ενεργοποίηση της Κάρτα Μνήμης
1. Από την εφαρμογή EZVIZ, ελέγξτε την κατάσταση της κάρτας μνήμης,
πατώντας την επιλογή Κατάσταση μνήμης στις Ρυθμίσεις συσκευής.
2. Αν η κατάσταση της κάρτας μνήμης εμφανίζεται ως Μη Ενεργοποιημένη,
πατήστε το πλήκτρο Ενεργοποίηση για να την ενεργοποιήσετε. Μετά την
ολοκλήρωση της ενεργοποίησης μπορείτε να καταγράφετε βίντεο που
προκαλούνται από συμβάντα.
39
Page 40

Βασικά
Φακός
Μικρόφωνο
ΕΠΑΝΑΦΟΡΑ
Υποδοχή κάρτας μνήμης
Τροφοδοσία
Ηχείο
Υπέρυθρη λυχνία
Ενδεικτική λυχνία LED
Μαγνητική βάση
Όνομα Περιγραφή
Υπέρυθρη λυχνία Αυτόματη πηγή φωτός για σκοτεινό περιβάλλον. Η κάμερα διαθέτει δύο
Ενδεικτική λυχνία LED • Κόκκινο και μπλε που αναβοσβήνει: Η κάμερα είναι ενεργοποιημένη.
Υποδοχή κάρτας
μνήμης
ΕΠΑΝΑΦΟΡΑ Πατήστε παρατεταμένα το κουμπί ΕΠΑΝΑΦΟΡΑ για 10 δευτερόλεπτα,
Τροφοδοσία
τρόπους εγγραφής: έγχρωμη (για εγγραφή με το φως της ημέρας) και
ασπρόμαυρη με τον φωτισμό υπερύθρων (για νυχτερινές συνθήκες).
Μπορείτε να ρυθμίσετε τη σύνδεση Wi-Fi.
• Μπλε συνεχώς αναμμένο: Η κάμερα είναι συνδεδεμένη και χρησιμοποιείται
από τον χρήστη(ες).
• Μπλε που αναβοσβήνει αργά: Η κάμερα λειτουργεί σωστά.
• Κόκκινο συνεχώς αναμμένο: Η κάμερα πραγματοποιεί εκκίνηση.
• Κόκκινο που αναβοσβήνει αργά: Αποτυχία σύνδεσης Wi-Fi.
• Κόκκινο που αναβοσβήνει γρήγορα: Σφάλμα κάρτας MicroSD.
Για κάρτα microSD (δεν περιλαμβάνεται με το προϊόν). Μπορείτε να
την προμηθευτείτε ξεχωριστά. Προτεινόμενη συμβατότητα: Κατηγορία
10, μέγιστη χωρητικότητα 128GB. Μετά την τοποθέτηση της κάρτας,
μπορείτε να καταγράψετε το συμβάν στην κάμερα. Πρέπει να την
αρχικοποιήσετε στην εφαρμογή EZVIZ.
ενώ η κάμερα βρίσκεται σε λειτουργία. Γίνεται επανεκκίνηση της
κάμερας και όλες οι παράμετροι επανέρχονται στις προεπιλεγμένες.
5V±10%
40
Page 41

Αντιμετώπιση προβλημάτων
Εμφανίζεται το μήνυμα «The device is offline» (Η συσκευή είναι εκτός
Ερ.:
σύνδεσης) ή «The device is not registered» (Η συσκευή δεν έχει καταχωρηθεί)
κατά την προσθήκη της κάμερας με χρήση της εφαρμογής EZVIZ.
1. Βεβαιωθείτε ότι το δίκτυο, στο οποίο είναι συνδεδεμένη η κάμερα, λειτουργεί
Απ.:
κανονικά και ότι είναι ενεργοποιημένο το DHCP του δρομολογητή.
2. Πατήστε παρατεταμένα το κουμπί ΕΠΑΝΑΦΟΡΑ για 10 δευτερόλεπτα για
να επαναφέρετε τις ρυθμίσεις, αν αλλάξατε τις παραμέτρους του δικτύου.
Το κινητό τηλέφωνο δεν μπορεί να λάβει ειδοποιήσεις συναγερμού όταν η
Ερ.:
κάμερα είναι online.
1. Βεβαιωθείτε ότι η εφαρμογή EZVIZ τρέχει στο κινητό σας τηλέφωνο.
Απ.:
2. Στα κινητά με λειτουργικό σύστημα Android, βεβαιωθείτε ότι
η εφαρμογή τρέχει στο παρασκήνιο. Στα κινητά με λειτουργικό
σύστημα iOS, ενεργοποιήστε τη λειτουργία προώθησης μηνυμάτων
από το μενού «Settings (Ρυθμίσεις) > Notification (Ειδοποίηση)».
Υποστηρίζει η κάμερα τροφοδοσία μέσω συσκευών USB ή φορητής μπαταρίας;
Ερ.:
Συνιστάται η χρήση του τροφοδοτικού EZVIZ για την παροχή σταθερής τάσης
Απ.:
τροφοδοσίας.
Για περισσότερες πληροφορίες, επισκεφτείτε το www.ezvizlife.com.
41
Page 42

Instalace
Krok 1 Zapnutí
Připojte napájecí kabel ke kameře a k napájecímu adaptéru a poté jej zapojte do
elektrické zásuvky. Jakmile bude indikátor červeně a modře blikat, je napájení
připojeno a zařízení je připraveno k instalaci.
Napájecí kabel
Elektrická zásuvka
Krok 2 Rychlé nastavení
1. Připojte mobilní telefon k síti Wi-Fi.
2. V obchodech App Store (pro verze systému iOS 7.0 nebo novější) a Google
TM
Play
(pro verze systému Android 4.0 nebo novější) vyhledejte zadáním
termínu „EZVIZ“ aplikaci EZVIZ. Stáhněte ji a nainstalujte.
3. Spusťte aplikaci. Postupujte podle pokynů průvodce prvním spuštěním a
zaregistrujte svůj uživatelský účet EZVIZ.
4. Přihlaste se do aplikace a na domovské stránce klepněte v pravém horním
rohu na symbol „+“. Otevře se okno pro přidání zařízení.
5. Pomocí mobilního telefonu naskenujte kód QR zařízení. Kameru lze přidat
také ručním zadáním 9místného sériového čísla. Kód QR a sériové číslo jsou
uvedeny na štítku na zadní části kamery.
6. Postupujte podle pokynů k nastavení připojení Wi-Fi kamery.
7. Nastavením správného časového pásma, informací o letním čase a formátu
data dokončete instalaci.
42
Page 43

Montáž
Krok 1 Montáž kovové destičky (volitelná)
Vyberte čistý a rovný povrch a pomocí pěnových samolepek nebo šroubů
připevněte kovovou destičku do požadované polohy.
Uvnitř kamery se nachází magnetický díl. Pokud je povrch z kovového
materiálu, můžete tento krok přeskočit.
Krok 2 Montáž kamery
Připevněte kameru magneticky ke kovové destičce nebo kovovému povrchu.
Krok 3 Dokončení montáže
Nastavte požadovaný úhel kamery.
Nahrávání na paměťovou kartu
Krok 1 Vložení paměťové karty
1. Otevřete kryt slotu paměťové karty jeho otočením ve směru hodinových
ručiček. Viz níže uvedený obrázek vlevo.
2. Vložte do slotu kartu microSD, dokud nezapadne. Viz níže uvedený obrázek
vpravo.
3. Vraťte kryt na své místo.
Krok 2 Inicializace paměťové karty
1. V aplikaci EZVIZ klepněte v nabídce Device Settings (Nastavení zařízení) na
možnost Storage Status (Stav úložiště) a zkontrolujte stav paměťové karty.
2. Pokud se zobrazuje stav paměťové karty Not Initialized (Neinicializováno),
klepnutím na tlačítko Initialize (Inicializovat) ji inicializujte. Po dokončení
inicializace bude možné nahrávat z kamery video spuštěné událostí.
43
Page 44

Popis
Objektiv
Mikrofon
RESETOVAT
Slot pro paměťovou kartu
Napájecí vstup
Reproduktor
Osvětlení IR
Indikátor LED
Magnetická základna
Název Popis
Osvětlení IR Jedná se o automatický zdroj světla pro zhoršené světelné podmínky.
K dispozici jsou dva režimy videa kamery: barevný režim (pro
nahrávání za denního světla) a černobílý režim s osvětlením IR (pro
noční podmínky).
Indikátor LED •Blikání červeně a modře: Kamera je zapnutá a lze nakonfigurovat
připojení Wi-Fi.
•Trvalé modré svícení: Kamera se připojuje a je ovládána uživateli.
•Pomalé modré blikání: Kamera je v provozu a funguje správně.
•Trvalé červené svícení: Kamera se spouští.
•Pomalé červené blikání: Připojení Wi-Fi se nezdařilo.
•Rychlé červené blikání: Došlo k chybě karty microSD.
Slot pro
paměťovou
kartu
RESETOVAT
Je určen pro kartu microSD (není součástí balení tohoto výrobku).
Lze ji zakoupit samostatně. Doporučená kompatibilita: třída 10,
maximální kapacita 128 GB. Po vložení karty lze nahrávat události
z kamery. Kartu je třeba v aplikaci EZVIZ inicializovat.
Stisknutím a podržením tlačítka RESETOVAT po dobu 10 sekund
během provozu kamery se kamera restartuje a obnoví se výchozí
nastavení všech parametrů kamery.
Napájecí vstup
5 V ±10 %
44
Page 45

Řešení potíží
Při přidání kamery prostřednictvím aplikace EZVIZ se zobrazí zprávy „The
Ot.:
device is offline. (Zařízení je offline.)“ nebo „The device is not registered.
(Zařízení není registrováno.)“.
1. Zkontrolujte, zda správně funguje síť, ke které je kamera připojena, a zda je
Odp.:
povolen směrovač DHCP.
2. Pokud změníte síťové parametry, stisknutím tlačítko RESETOVAT a jeho
podržením po dobu 10 sekund resetujte nastavení.
Kamera je online a mobilní telefon nepřijímá signály o alarmu.
Ot.:
1. Zkontrolujte, zda je v mobilním telefonu spuštěna aplikace EZVIZ.
Odp.:
2. U mobilních telefonů s operačním systémem Android zkontrolujte, zda
aplikace běží na pozadí. U mobilních telefonů s operačním systémem iOS
povolte v nabídce „Settings > Notification (Nastavení > Upozornění)“
funkci odesílání zpráv.
Podporuje kamera napájení prostřednictvím zařízení USB nebo
Ot.:
přenosných baterií?
K zajištění stabilního napájecího napětí se doporučuje používat
Odp.:
standardní napájecí adaptér EZVIZ.
Více informací naleznete na webu www.ezvizlife.com.
45
Page 46

Thank you for purchasing EZVIZ products. This limited warranty gives you, the original purchaser of the
EZVIZ product, specific legal rights. You may also have other legal rights that vary by state, province or
jurisdiction. The disclaimers, exclusions, and limitations of liability under this limited warranty will not
apply to the extent prohibited by applicable law. No distributor, reseller, agent, or employee is authorized
to make any medication, extension, or addition to this limited warranty.
Your EZVIZ product is warranted for a period of one (1) year from the date of purchase against defects
in materials and workmanship, or such longer period as may be required by law in the country or state
where this product is sold, when used normally in accordance with user manual.
You can request warranty service by emailing us at support@ezvizlife.com .
For any defective EZVIZ products under warranty, HANGZHOU HIKVISION DIGITAL TECHNOLOGY CO., LTD.
(“the Company”) will, at its option, (i) repair or replace your product free of charge; (ii) exchange your
product with a functional equivalent product; (iii) or refund the original purchase price, provided you
provide the original purchase receipt or copy, brief explanation of the defect, and return the product in
its original packaging. At the sole discretion of the Company, repair or replacement may be made with a
new or refurbished product or components. This warranty does not cover the postal cost, insurance and
any other incidental charges incurred by you in returning the product.
Except where prohibited by applicable law, this is your sole and exclusive remedy for breach of this
limited warranty. Any product that has either been repaired or replaced under this limited warranty will
be covered by the terms of this limited warranty for the longer of ninety (90) days from the date of
delivery or the remaining original warranty period.
This warranty does not apply and is void:
• If the warranty claim is made outside the warranty period or if the proof of purchase is not provided.
• For any malfunction, defect or failure caused by or resulting from the evidence of impact,
mishandling ,tampering, use contrary to the applicable instruction manual, incorrect power line
voltage, accident, loss, theft, fire, flood or other Acts of God, shipping damage or damage resulting
from repairs performed by unauthorized personnel.
• For any consumable parts, such as batteries, where the malfunction is due to the normal aging of the
product.
• Cosmetic damage, including but not limited to scratches, dents and broken plastic on ports.
• Any software, even if packaged or sold with EZVIZ hardware.
• For any other damages free from defects in material or workmanship.
• Routine cleaning, normal cosmetic and mechanical wear and tear.
Please do not hesitate to contact your seller, or send e-mails to us support@ezvizlife.com, with any
questions.
COPYRIGHT ©2017 HANGZHOU HIKVISION DIGITAL TECHNOLOGY CO., LTD. ALL RIGHTS RESERVED.
LIMITED WARRANTY
Vielen Dank für den Kauf eines EZVIZ-Produkts. Diese beschränkte Garantie gibt Ihnen, dem Erstkäufer
des EZVIZ-Produkts, bestimmte gesetzliche Rechte. Je nach Staat, Provinz oder Land können
Ihnen weitere gesetzliche Rechte zustehen. Die Haftungsausschlüsse und -beschränkungen gemäß
dieser beschränkten Garantie gelten ausschließlich im gesetzlich zulässigen Umfang. Kein Händler,
Wiederverkäufer, Vertreter oder Mitarbeiter ist befugt, Modifikationen, Erweiterungen oder Ergänzungen
an dieser beschränkten Garantie vorzunehmen.
Ihr EZVIZ-Produkt hat eine Garantie auf Material- und Herstellungsfehler, die ab dem Kaufdatum für
ein (1) Jahr oder so lange gilt, wie dies in dem Staat oder Land, in dem dieses Produkt gekauft wurde,
gesetzlich vorgeschrieben ist, sofern es in Übereinstimmung mit der Bedienungsanleitung normal
benutzt wird.
Garantieansprüche richten Sie bitte per E-Mail an support@ezvizlife.com .
Page 47

Im Fall eines defekten EZVIZ-Produkts mit gültiger Garantie wird HANGZHOU HIKVISION DIGITAL
TECHNOLOGY CO., LTD. ("das Unternehmen") nach eigenem Ermessen (i) Ihr Produkt kostenlos
reparieren oder ersetzen, (ii) Ihr Produkt gegen ein funktionsfähiges vergleichbares Produkt austauschen
oder (iii) den ursprünglichen Kaufpreis unter der Voraussetzung erstatten, dass Sie das Produkt in
dessen Originalverpackung unter Beigabe des Originalkaufbelegs oder einer Kopie davon sowie einer
kurzen Beschreibung des Defekts zurückschicken. Das Unternehmen wird nach alleinigem Ermessen
Produkte oder Komponenten entweder reparieren oder gegen neue oder generalüberholte Produkte
oder Komponenten austauschen. Diese Garantie deckt keine Versand-, Versicherungs- oder sonstige
Nebenkosten, die Ihnen durch die Rücksendung des Produkts entstehen.
Soweit nicht durch geltendes Recht untersagt, ist dies Ihr einziges und ausschließliches Rechtsmittel im
Fall einer Verletzung dieser beschränkten Garantie. Jedes Produkt, das im Rahmen dieser beschränkten
Garantie entweder repariert oder ausgetauscht wurde, wird für maximal neunzig (90) Tage ab Lieferdatum
oder für die Restlaufzeit der ursprünglichen Garantie von den Bestimmungen dieser beschränkten
Garantie abgedeckt.
Diese Garantie gilt nicht und ist hinfällig:
• wenn der Garantieanspruch außerhalb der Garantiefrist oder ohne Vorlage des Kaufbelegs geltend
gemacht wird.
• bei Fehlfunktionen, Defekten oder Fehlern, die durch Stoßeinwirkung, Fehlbedienung, Sabotage,
Benutzung im Widerspruch zur entsprechenden Bedienungsanleitung, falsche Spannungsversorgung,
Unfall, Verlust, Diebstahl, Brand, Überschwemmung oder andere Naturkatastrophen, Versandschäden
oder Beschädigungen infolge von Reparaturen durch unbefugte Personen verursacht wurden oder
darauf zurückzuführen sind.
• für Verbrauchsgüter wie Batterien, bei denen die Fehlfunktion auf normale Produktalterung
zurückzuführen ist.
• kosmetische Schäden, einschließlich, aber nicht begrenzt auf Kratzer, Beulen und gebrochene
Kunststoffteile an Anschlüssen.
• für jede Software, auch wenn diese zusammen mit der EZVIZ-Hardware verpackt und verk auft wurde.
• für sonstige Schäden, die keine Material- oder Verarbeitungsfehler sind.
• für routinemäßige Reinigungen sowie normalen kosmetischen und mechanischen Verschleiß.
Bei Fragen können Sie sich jederzeit an Ihren Verkäufer oder per E-Mail an support@ezvizlife.com an uns
wenden.
COPYRIGHT ©2017 HANGZHOU HIKVISION DIGITAL TECHNOLOGY CO., LTD. ALLE RECHTE VORBEHALTEN.
BESCHRÄNKTE GARANTIE
Gracias por adquirir productos EZVIZ. Esta garantía limitada le concede a usted, el comprador original del
producto EZVIZ, derechos legales específicos. Es posible que tenga otros derechos legales en función
de su estado, provincia o jurisdicción. Los avisos de exención de responsabilidad, las exclusiones y las
limitaciones de responsabilidad de esta garantía limitada no se aplicarán hasta el máximo prohibido por
la legislación aplicable. Ningún distribuidor, revendedor, representante o empleado tiene autorización
para introducir alteraciones, ampliaciones o incorporaciones en virtud de esta garantía limitada.
Su producto de EZVIZ está cubierto por la garantía por un período de un (1) año desde la fecha de
compra frente a defectos de materiales y mano de obra, o en el plazo más largo que requiera la ley en el
país o estado donde se venda este producto, cuando se usa normalmente de acuerdo con el manual de
usuario.
Puede solicitar el servicio de garantía por correo electrónico en support@ezvizlife.com .
Page 48

Para cualquier producto de EZVIZ defectuoso en garantía, HANGZHOU HIKVISION DIGITAL TECHNOLOGY
CO., LTD. ("la Empresa"), a su discreción, (I) reparará o sustituirá el producto de forma gratuita; (II)
cambiará su producto por un producto equivalente funcional; (III) o reembolsará el precio de compra
original, siempre y cuando proporcione el recibo de compra original o una copia, una breve descripción
del defecto y devuelva el producto en su embalaje original. A la entera discreción de la Empresa, la
reparación o la sustitución pueden realizarse por un producto o componentes nuevos o reacondicionados.
Esta garantía no cubre el coste postal de transporte, el seguro ni ningún otro coste incidental en el que
incurra durante la devolución del producto.
Excepto si lo prohíbe la legislación vigente, esta es la solución única y exclusiva en caso de
incumplimiento de esta garantía limitada. Cualquier producto que se haya reparado o sustituido en
virtud de esta garantía limitada estará cubierto por los términos de la misma durante el periodo máximo
de noventa (90) días a partir de la fecha de entrega o el período de garantía original restante.
Esta garantía no se aplica y se considerará nula:
• Si la reclamación de garantía se realiza fuera del periodo de garantía o si no se proporciona la prueba
de compra.
• En caso de funcionamiento incorrecto, defecto o avería causados por o como resultado de las pruebas
de impacto, impericia, manipulación, uso contrario al manual de instrucciones aplicable, voltaje
incorrecto de la línea eléctrica, accidente, pérdida, robo, incendio, inundación u otros actos de fuerza
mayor, daños en el envío o daños ocasionados por reparaciones realizadas por personal no autorizado.
• En el caso de las piezas consumibles, como las baterías, si el funcionamiento incorrecto se debe al
desgaste normal del producto.
• Daños cosméticos, incluidos, pero sin limitarse a, arañazos, abolladuras y plástico roto en puertos.
• Cualquier software, incluso si se ha incluido y vendido con el hardware de EZVIZ.
• En caso de otros daños libres de defectos en el material o la mano de obra.
• La limpieza rutinaria, cambios cosméticos y el desgaste mecánico natural.
Si tiene alguna pregunta, no dude en ponerse en contacto con su representante comercial, o bien
envíenos un mensaje a support@ezvizlife.com con la pregunta que desee.
COPYRIGHT ©2017 HANGZHOU HIKVISION DIGITAL TECHNOLOGY CO., LTD. RESERVADOS TODOS LOS
DERECHOS.
GARANTÍA LIMITADA
Merci d'avoir acheté nos produits EZVIZ. En tant qu'acheteur original de produit EZVIZ, cette garantie
limitée vous accorde certains droits. Selon le pays, la région ou la juridiction où vous résidez, il est
possible que vous bénéficiiez d'autres droits. Les dénis de responsabilités, exclusions et limitations
de responsabilité civile stipulés dans cette garantie limitée s'appliquent uniquement dans les limites
prévues par la loi. Aucun distributeur, revendeur, agent ou employé n'est autorisé à apporter de
modification, d'extension ou d'ajout à cette garantie.
Votre produit EZVIZ est garanti pendant une période de un (1) an à compter de la date d'achat pour tout
défaut de pièces et de main d'œuvre, ou pour une durée supérieure si la législation en vigueur dans le
pays ou l'état où ce produit est vendu l'exige, dès lors qu'il est utilisé conformément aux instructions
du manuel de l'utilisateur.
Pour faire valoir la garantie, écrivez-nous à l'adresse suivante: support@ezvizlife.com .
Page 49

Si un défaut est signalé sur un produit EZVIZ pendant la période de garantie, Hangzhou Hikvision Digital
Technology Co., Ltd. (« la Société ») pourra, à sa discrétion, (i) réparer ou remplacer votre produit
gratuitement ; (ii) remplacer votre produit par un produit équivalent en état de marche ; (iii) rembourser
le prix d'achat. Vous devrez toutefois présenter la preuve d'achat et une brève explication du défaut
constaté, et renvoyer le produit dans son emballage d'origine. La Société pourra réparer ou remplacer le
produit ou les composants par un produit ou des composants neufs ou remis en état. Cette garantie ne
couvre pas les frais de port, l'assurance ni les éventuels frais annexes de renvoi du produit.
Sauf si la législation en vigueur l'interdit, cette garantie est votre seul et unique recours. Tout produit
réparé ou remplacé en vertu de la présente garantie limitée sera couvert pendant une durée de quatrevingt-dix (90) jours à compter de la date de livraison ou jusqu'à l'échéance de la période garantie
originale.
Cette garantie ne s'applique pas et est considérée comme nulle dans les cas suivants :
• si l'utilisateur se prévaut de la garantie hors de la période de couverture ou s'il ne fournit pas de
preuve d'achat ;
• en cas de dysfonctionnement, de défaut ou de panne due ou induite par un choc, une mauvaise
manipulation, un sabotage, une utilisation non conforme aux instructions du manuel, une tension
d'alimentation incorrecte, un accident, une perte, un vol, un incendie, une inondation ou toute autre
catastrophe naturelle, un préjudice subi pendant le transport ou résultant de réparations par un
personnel non agréé ;
• consommables, tels que les batteries, où le dysfonctionnement est dû au vieillissement normal du
produit ;
• dommages superficiels tels que, entre autres, les rayures, les bosses ou les pièces en plastique
cassées ;
• logiciels, même fournis ou vendus avec le matériel EZVIZ ;
• préjudices autres que les défauts de pièces ou de main d'œuvre ;
• nettoyage de routine, vieillissement de l'aspect extérieur et usure mécanique normale.
Pour toute question, n'hésitez pas à contacter votre revendeur ou à nous écrire à l'adresse suivante:
support@ezvizlife.com.
COPYRIGHT ©2017 HANGZHOU HIKVISION DIGITAL TECHNOLOGY CO., LTD. TOUS DROITS RÉSERVÉS.
GARANTIE LIMITÉE
Grazie per aver acquistato i prodotti EZVIZ. La presente garanzia limitata accorda all'acquirente originale
del prodotto EZVIZ, specifici diritti legali. L'acquirente originale potrebbe godere anche altri diritti
legali che variano da stato, provincia o giurisdizione. Le declinazioni di responsabilità, le esclusioni e le
limitazioni di responsabilità ai sensi della presente garanzia limitata non si applicano ove espressamente
vietate dalla legge applicabile. Nessun distributore, rivenditore, agente o dipendente è autorizzato a
fornire rimedi, estensioni o aggiunte alla presente garanzia limitata.
Il prodotto EZVIZ è garantito per un periodo di un (1) anno dalla data di acquisto contro difetti nei
materiali e nella lavorazione, o un periodo più lungo, ove richiesto dalla legge del paese o dello stato in
cui il prodotto è stato venduto, se utilizzato normalmente, in conformità con il manuale utente.
Il servizio di assistenza in garanzia può essere richiesto via email, all'indirizzo support@ezvizlife.com .
Page 50

Per eventuali prodotti EZVIZ difettosi in garanzia,HANGZHOU HIKVISION DIGITAL TECHNOLOGY CO., Ltd.
("la Società"), avrà facoltà a sua discrezione di, (i) riparare o sostituire il prodotto a titolo gratuito;
(ii) sostituire il vostro prodotto con un prodotto funzionalmente equivalente; (iii) o rimborsare il prezzo
di acquisto originale, a fronte dell'esibizione della ricevuta di acquisto originale o in copia, una breve
spiegazione del difetto e il reso del prodotto nella sua confezione originale. A esclusiva discrezione
della Società, la riparazione o la sostituzione può avvenire con un prodotto o con dei componenti nuovi
o ricondizionati. Questa garanzia non copre spese postali, assicurazione ed eventuali altre spese
accessorie sostenute dall'acquirente per la restituzione del prodotto.
Salvo laddove proibito dalla legge applicabile, ciò costituisce l'unico ed esclusivo rimedio per la
violazione della presente garanzia limitata. Qualsiasi prodotto riparato o sostituito ai sensi della
presente garanzia limitata sarà coperto dai termini della presente garanzia limitata per il periodo di
maggiore durata tra novanta (90) giorni dalla data di consegna o il periodo di garanzia originale residuo.
Questa garanzia non si applica e risulterà nulla:
• Se la richiesta di applicazione della garanzia perviene al di fuori del periodo di garanzia o se la prova
di acquisto non viene fornita.
• Per qualsiasi malfunzionamento, difetto o guasto causato da, o confermato da prove di evidenza di,
avvenuto impatto, uso improprio, manomissione, uso contrario alle istruzioni del relativo manuale,
tensione di alimentazione errata, incidente, smarrimento, furto, incendio, inondazione o altre cause
di forza maggiore, danni di spedizione o danni causati da riparazioni eseguite da personale non
autorizzato.
• Per eventuali componenti consumabili, quali batterie, dove il mal funzionamento è dovuto al normale
invecchiamento del prodotto.
• Danni estetici, inclusi ma non limitati a graffi, ammaccature e rotture delle plastiche delle porte.
• Qualsiasi software, anche se confezionato o venduto con hardware EZVIZ.
• Per eventuali altri danni esenti da difetti nei materiali o nella lavorazione.
• Pulizia ordinaria e il normale deterioramento estetico e meccanico.
Non esitate a contattare il venditore, o a inviarci un e-mail a support@ezvizlife.com, per qualsiasi
domanda.
COPYRIGHT ©2017 HANGZHOU HIKVISION DIGITAL TECHNOLOGY CO., LTD. TUTTI I DIRITTI RISERVATI.
GARANZIA LIMITATA
Page 51

Bedankt voor de aankoop van EZVIZ-producten. Met deze beperkte garantie worden u, de oorspronkelijke
koper van het EZVIZ-product, specifieke juridische rechten verleend. Mogelijk heeft u ook andere rechten
die verschillen per staat, provincie of rechtsgebied. De vrijwaringen, uitsluitingen en beperkingen van
aansprakelijkheid in deze beperkte garantie zijn niet van toepassing voor zover dit is verboden door het
toepasselijk recht. Geen enkele distributeur, wederverkoper, agent of werknemer is gemachtigd om deze
beperkte garantie aan te passen, te verlengen of uit te breiden.
Voor dit EZVIZ-product geldt een garantieperiode van één (1) jaar vanaf de aankoopdatum voor materiaalen fabricagedefecten, of voor een langere periode als dit wettelijk is vereist in het land of de staat waarin
dit product wordt verkocht. De garantieperiode geldt alleen voor normaal gebruik in overeenstemming met
deze gebruikershandleiding
U kunt garantieservice aanvragen door een e-mail te sturen naar
support@ezvizlife.com .
Voor defecte EZVIZ-producten die onder de garantie vallen, zal HANGZHOU HIKVISION DIGITAL TECHNOLOGY
CO., LTD. (”het Bedrijf”) naar eigen inzicht (i) het product gratis repareren of vervangen; (ii) het product
omruilen voor een functioneel vergelijkbaar product; of (iii) de oorspronkelijke aankoopprijs restitueren
nadat het oorspronkelijke aankoopbewijs of een kopie hiervan en een korte uitleg van het defect is
aangeleverd, en het product is geretourneerd in de oorspronkelijke verpakking. Naar eigen inzicht van het
Bedrijf zal de reparatie of vervanging plaatsvinden door nieuwe of gereviseerde producten of onderdelen
te leveren. Deze garantie biedt geen dekking voor de verzendkosten, verzekeringskosten en andere
incidentele kosten die u hebt moeten betalen voor het retourneren van het product.
Tenzij dit verboden is door het toepasselijk recht, is dit uw enige en exclusieve middel voor het verbreken
van deze beperkte garantie. Producten die zijn gerepareerd of vervangen onder deze beperkte garantie, zijn
gedekt onder de voorwaarden van deze beperkte garantie voor een periode van negentig (90) dagen) vanaf
de datum van levering of voor de resterende duur van de oorspronkelijke garantie, waarbij de langste van
deze twee perioden wordt aangehouden.
Deze garantie is niet van toepassing en wordt ongeldig verklaard:
• Alsdegarantieclaimbuitendegarantieperiodewordtgedaanofalshetaankoopbewijs
niet wordt aangeleverd.
• Inhet gevalvan onjuistfunctioneren, defectenof foutendie aantoonbaarhet
gevolg zijn van stoten, onjuist gebruik, manipulatie, gebruik dat niet in lijn is met de instructies in de
handleiding, een onjuiste voedingspanning, ongevallen, verlies, diefstal, brand, overstromingen of andere
overmacht, verzendschade of schade die het gevolg is van reparaties die zijn uitgevoerd door nietgeautoriseerd personeel.
• Voorverbruiksonderdelen,zoalsbatterijen,waarbijhet onjuistfunctionerenhetgevolg
is van normale veroudering van het product.
• Bijcosmetischeschade,inclusief,maarnietbeperkttotkrassen,deukenengebroken
plastic op de poorten.
• Voorsoftware,zelfswanneerdezeismeegeleverdofverkochtbijdeEZVIZ-hardware.
• Voorandereschadedanmateriaal-enfabricagedefecten.
• Voorver vuilingdoor normaalgebruik, ennormale cosmetischeenmechanische
slijtage.
Neem voor vragen contact op met de verkopende partij, of neem contact met ons op via support@ezvizlife.
com.
COPYRIGHT ©2017 HANGZHOU HIKVISION DIGITAL TECHNOLOGY CO., LTD. ALLE RECHTEN VOORBEHOUDEN.
BEPERKTE GARANTIE
Page 52

Dziękujemy za zakup produktów EZVIZ. Niniejsza ograniczona gwarancja daje
użytkownikowi, czyli oryginalnemu nabywcy produktu EZVIZ, określone prawa.
Użytkownikowi mogą też przysługiwać inne prawa, które zależą od danego państwa,
obszaru terytorialnego lub jurysdykcji. Zastrzeżenia, wyłączenia i ograniczenia
odpowiedzialności wynikające z niniejszej ograniczonej gwarancji nie będą miały
zastosowania w zakresie zabronionym przez obowiązujące prawo. Żaden dystrybutor,
sprzedawca, przedstawiciel ani pracownik nie jest uprawniony do dokonywania
jakichkolwiek zmian, rozszerzeń lub uzupełnień niniejszej ograniczonej gwarancji.
Udzielamy gwarancji na produkt EZVIZ na okres jednego (1) roku od daty nabycia,
obejmującej wady materiałowe i wykonawstwa, pod warunkiem normalnego
używania produktu zgodnie z instrukcją obsługi. Wskazany okres może być dłuższy,
jeśli wymaga tego prawo w kraju, w którym ten produkt jest sprzedawany.
Można wysłać do nas zgłoszenie gwarancyjne pocztą elektroniczną na adres
support@ezvizlife.com .
Dla wszelkich produktów EZVIZ objętych gwarancją, HANGZHOU HIKVISION
DIGITAL TECHNOLOGY CO., LTD. („Firma”), według własnego uznania, (i) bezpłatnie
naprawi lub wymieni produkt; (ii) zamieni produkt na inny o porównywalnej
funkcjonalności; (iii) zwróci użytkownikowi pierwotną cenę zakupu pod warunkiem
przedstawienia oryginału lub kopii dowodu zakupu, krótkiego opisu usterki oraz
zwrotu produktu w oryginalnym opakowaniu. Według wyłącznego uznania Firmy,
naprawa lub wymiana może zostać przeprowadzona z wykorzystaniem nowego
lub regenerowanego produktu lub części. Niniejsza gwarancja nie obejmuje kosztu
przesyłki, ubezpieczenia i innych dodatkowych opłat poniesionych przez użytkownika
w związku ze zwrotem produktu.
Z wyjątkiem przypadków zabronionych przez obowiązujące prawo, powyższe
warunki stanowią jedyny i wyłączny środek rekompensaty za naruszenie niniejszej
ograniczonej gwarancji. Każdy produkt naprawiony lub wymieniony na podstawie
niniejszej ograniczonej gwarancji będzie objęty jej warunkami przez czas pozostały
do wygaśnięcia okresu pierwotnej gwarancji lub przez dziewięćdziesiąt (90) dni,
zależnie od tego, który okres będzie dłuższy.
Niniejsza gwarancja nie obowiązuje i zostaje unieważniona:
• Jeślizgłoszenie ztytuługwarancji zostaniewniesionepo upływie
okresu gwarancji lub jeśli użytkownik nie dostarczy dowodu zakupu.
• Wprzypadku jakiejkolwiekawarii lubusterki spowodowanejprzez
lub wynikającej z wyraźnie widocznego uderzenia, nieprawidłowej obsługi, próby
manipulacji, stosowania niezgodnie z instrukcją, nieprawidłowego napięcia zasilania,
wypadku, zgubienia, kradzieży, pożaru, powodzi lub innych klęsk żywiołowych, szkód
transportowych lub spowodowanych naprawą przez nieupoważniony personel.
• Wprzypadku wszelkichczęści eksploatacyjnych,takich jakbaterie,
których usterka wynika z normalnego starzenia się produktu.
• W przypadkuszkód kosmetycznych,m.in. zarysowań,wgięći
pękniętych plastikowych części portów.
• Wprz ypadkujakiegokolwiek oprogramowania,nawetjeśli jestono
dołączone lub sprzedawane ze sprzętem EZVIZ.
• Wprzypadkuinnychszkód niewynikającychzwadmateriałowychlub
wykonawstwa.
• Wprzypadku standardowegoczyszczenia, oraztypowego zużycia
kosmetycznego i mechanicznego.
Jeśli mają Państwo jakiekolwiek pytania, prosimy o kontakt ze sprzedawcą lub
przesłanie ich do nas pocztą elektroniczną na adres support@ezvizlife.com.
COPYRIGHT ©2017 HANGZHOU HIKVISION DIGITAL TECHNOLOGY CO., LTD. WSZELKIE
PRAWA ZASTRZEŻONE.
OGRANICZONA GWARANCJA
Page 53

Благодарим Вас за покупку продукции EZVIZ. Эта ограниченная гарантия
дает Вам как покупателю продукта EZVIZ определенные юридические права.
Вы также можете иметь другие юридические права, которые определяются
законами государства, провинции или юрисдикцией. Исключения и
ограничения ответственности в соответствии с данной ограниченной
гарантией не действительны в случае, если они противоречат действующему
законодательству. Ни дистрибьютор, ни дилер, ни агент или сотрудник
не имеет права вносить какие-либо изменения или дополнения к данной
ограниченной гарантии.
На Ваш продукт EZVIZ дается гарантия сроком на один(1) год с момента
покупки на дефекты материалов и изготовления, или на более длительный
период, в соответствии с законом государства, где продается этот товар,
при условии правильного использования в соответствии с руководством
пользователя.
Вы можете запросить гарантийное обслуживание, обратившись по
электронной почте support@ezvizlife.com.
В случае неисправности продуктов EZVIZ по гарантии, HIKVISION DIGITAL
TECHNOLOGY CO., LTD. Ханчжоу ("Компания") произведет, по своему выбору, (I)
ремонт или замену изделия бесплатно; (II) обмен продукта на функционально
эквивалентный; (III) возврат первоначальной стоимости, при условии,
что Вы предоставите оригинал или копию квитанции о покупке, краткое
объяснение дефекта, а также вернете товар в оригинальной упаковке. На
усмотрение Компании, может производиться ремонт или замена нового
или отремонтированного продукта или его компонентов. Данная гарантия
не распространяется на почтовые расходы, страховку и любые другие
непредвиденные расходы, понесенные Вами в связи с возвратом продукта.
За исключением случаев, запрещенных действующим законодательством,
этот документ является Вашим единственным и исключительным
средством судебной защиты, в случае нарушения Ваших прав,
закрепленных в ограниченной гарантии. К любому продукту, который уже
был отремонтирован или заменен по данной ограниченной гарантии,
применимы условия документа в течение девяноста (90) дней с момента
поставки или оставшегося первоначального гарантийного срока.
Данная гарантия не применяется и является недействительной:
• Вслучае подачизаявки нагарантийныйремонт поистечении
гарантийного срока или отсутствия доказательства факта покупки.
• Вслучае неисправностей,дефектов,вызванных
неправильным использованием, нарушением инструкций по эксплуатации,
при неправильном напряжении сети, аварии, утере, краже, пожаре,
наводнении или иных стихийных бедствиях, повреждении груза или ущербе,
нанесенными в результате ремонта, выполненного не уполномоченными
лицами.
• Для любыхрасходных частей,такихкак батареи,когда
неисправность происходит из-за естественного старения продукта.
• Прикосметических повреждениях,в томчисле, ноне только,
при царапинах, вмятинах и сломанном пластике на портах.
• Длялюбого программногообеспечения,даже еслионо было
упаковано или продано вместе с оборудованием EZVIZ.
• Д лялюбыхдругихповреждений,дефек товматериалаили
изготовления.
• Дляплановогокосметическогоимеханическогоизноса.
Чтобы задать вопрос продавцу или отправить нам письмо, пожалуйста,
обращайтесь по данному адресу: support@ezvizlife.com
COPYRIGHT ©2017 HANGZHOU HIKVISION DIGITAL TECHNOLOGY CO., LTD. ALL
RIGHTS RESERVED.
ОГРАНИЧЕННАЯ ГАРАНТИЯ
Page 54

ΠΕΡΙΟΡΙΣΜΕΝΗ ΕΓΓΥΗΣΗ
Σας ευχαριστούμε για την αγορά των προϊόντων EZVIZ. Η παρούσα περιορισμένη ευθύνη παρέχει σε εσάς,
τον αρχικό αγοραστή του προϊόντος EZVIZ, ειδικά νομικά δικαιώματα. Ενδέχεται να έχετε κι άλλα νομικά
δικαιώματα που ποικίλλουν ανάλογα με το κράτος, την περιοχή ή τη δικαιοδοσία σας. Οι αποποιήσεις,
εξαιρέσεις και περιορισμοί ευθύνης βάσει της παρούσας περιορισμένης εγγύησης δεν ισχύουν στον
βαθμό που απαγορεύεται από το εφαρμοστέο δίκαιο. Κανένας διανομέας, μεταπωλητής, αντιπρόσωπος ή
εργαζόμενος δεν είναι εξουσιοδοτημένος να προβεί σε οποιαδήποτε τροποποίηση, επέκταση ή προσθήκη
στην παρούσα περιορισμένη εγγύηση.
Το προϊόν σας EZVIZ καλύπτεται με εγγύηση ενός (1) έτους από την ημερομηνία αγοράς του έναντι
ελαττωμάτων σε υλικά και στην ποιότητα κατασκευής ή για μεγαλύτερη χρονική περίοδο, όπως
ενδεχομένως απαιτείται από τη νομοθεσία στη χώρα ή στο κράτος πώλησης αυτού του προϊόντος, εφόσον
χρησιμοποιείται υπό κανονικές συνθήκες σύμφωνα με το εγχειρίδιο χρήστη.
Μπορείτε να υποβάλετε αίτηση για επισκευή στο πλαίσιο της παρούσας εγγύησης, στέλνοντάς μας e-mail
στη διεύθυνση support@ezvizlife.com .
Για τυχόν ελαττωματικά προϊόντα EZVIZ που καλύπτονται από εγγύηση, η εταιρεία HANGZHOU HIKVISION
DIGITAL TECHNOLOGY CO., LTD. (“η Εταιρεία”), κατά την προαίρεσή της, (i) θα επισκευάσει ή αντικαταστήσει
το προϊόν σας δωρεάν, (ii) θα ανταλλάξει το προϊόν σας με ένα αντίστοιχο λειτουργικό προϊόν ή (iii) θα
επιστρέψει το αντίτιμο της αρχικής τιμής αγοράς, με την προϋπόθεση ότι θα προσκομίσετε την πρωτότυπη
απόδειξη αγοράς ή αντίγραφο αυτής με σύντομη επεξήγηση του ελαττώματος του προϊόντος και ότι θα
επιστρέψετε το προϊόν στην αρχική του συσκευασία. Κατά τη διακριτική ευχέρεια της Εταιρείας, η επισκευή
ή η αντικατάσταση ενδέχεται να πραγματοποιηθεί με νέο ή επισκευασμένο προϊόν ή εξαρτήματα. Η
παρούσα εγγύηση δεν καλύπτει ταχυδρομικά έξοδα, ασφάλιση ή άλλες παρεπόμενες δαπάνες, με τις οποίες
θα επιβαρυνθείτε κατά την επιστροφή τους προϊόντος.
Εκτός αν απαγορεύεται από το εφαρμοστέο δίκαιο, αυτό είναι το μόνο και αποκλειστικό σας ένδικο μέσο
σε περίπτωση παραβίασης της παρούσας περιορισμένης εγγύησης. Οποιοδήποτε προϊόν έχει επισκευαστεί
ή αντικατασταθεί δυνάμει της παρούσας περιορισμένης ευθύνης καλύπτεται από τους όρους αυτής της
περιορισμένης εγγύησης είτε για διάστημα ενενήντα (90) ημερών από την ημερομηνία παράδοσης, είτε για
την εναποµένουσα αρχική περίοδο εγγύησης, όποιο είναι μεγαλύτερο.
Η παρούσα εγγύηση δεν ισχύει ή θεωρείται άκυρη:
• Εάνη αξίωσηεγγύησης εγερθείεκτόςτηςπεριόδου εγγύησηςή σεπερίπτωσημη
προσκόμισης του αποδεικτικού αγοράς.
• Γιαοποιαδήποτεδυσλειτουργία, ελάττωμαή βλάβηπουπροκληθεί απόήοφείλεται
σε εμφανή πρόσκρουση, κακό χειρισμό, παραποίηση, χρήση αντίθετη με το σχετικό εγχειρίδιο οδηγιών,
εσφαλμένη τάση τροφοδοσίας, ατύχημα, απώλεια, κλοπή, πυρκαγιά, πλημμύρα ή λοιπές θεομηνίες, βλάβη
κατά την αποστολή ή ζημιά που απορρέει από επισκευές που πραγματοποιήθηκαν από μη εξουσιοδοτημένο
προσωπικό.
• Γιαοποιαδήποτεαναλώσιμα εξαρτήματα,όπωςοι μπαταρίες,ηδυσλειτουργίατων
οποίων οφείλεται στη κανονική χρήση του προϊόντος με την πάροδο του χρόνου.
• Γιααισθητικέςζημιές,συμπεριλαμβανομένων,μεταξύ άλλων,γρατζουνιών,
βαθουλωμάτων και σπασμένων πλαστικών στις θύρες.
• Γιαοποιοδήποτελογισμικό,ακόμηκιαν συσκευάστηκεήπωλήθηκεμαζίμετο υλισμικό
της EZVIZ.
• Γιαοποιαδήποτεάλλη βλάβηπουδεν οφείλεταισεελατ τώματασευλικάκαι στην
ποιότητα κατασκευής.
• Γιασυνήθηκαθαρισμό,φυσιολογικήαισθητικήκαιμηχανικήφθορά.
Για τυχόν ερωτήσεις, μη διστάσετε να επικοινωνήσετε με το κατάστημα πώλησης ή να μας στείλετε e-mail
στη διεύθυνση support@ezvizlife.com.
ΠΝΕΥΜΑΤΙΚΑ ΔΙΚΑΙΩΜΑΤΑ ©2015 HANGZHOU HIKVISION DIGITAL TECHNOLOGY CO., LTD. ΜΕ ΤΗΝ
ΕΠΙΦΥΛΑΞΗ ΠΑΝΤΟΣ ΔΙΚΑΙΩΜΑΤΟΣ.
Page 55

Děkujeme, že jste zakoupili výrobek EZVIZ. Tato omezená záruka vám,
původnímu kupujícímu výrobku EZVIZ, dává specická zákonná práva. Můžete
mít i další práva, která se liší podle státu, provincie nebo jurisdikce. Odmítnutí,
výjimky a omezení odpovědnosti v rámci této omezené záruky platí jen v
rozsahu daném příslušným zákonem. Žádný distributor, prodejce, zástupce
nebo zaměstnanec není oprávněn provádět žádné úpravy, rozšíření nebo
dodatky k této omezené záruce.
Na váš produkt EZVIZ je za předpokladu běžného používání v souladu s
uživatelskou příručkou poskytována záruka na vady materiálu a zpracování
po dobu jednoho (1) roku od data nákupu nebo delší dobu, pokud je tak
požadováno zákonem v zemi či státu, kde je tento výrobek prodáván.
O záruční servis můžete požádat na této e-mailové adrese
support@ezvizlife.com .
V případě jakéhokoliv vadného produktu EZVIZ v záruce, společnost
HANGZHOU HIKVISION DIGITAL TECHNOLOGY CO., LTD. (dále jen „společnost“)
podle svého uvážení, (i) opraví nebo vymění výrobek zdarma; (ii) nahradí
výrobek za ekvivalentní funkční výrobek; (iii) nebo vrátí původní kupní cenu,
pokud poskytnete originální doklad o koupi nebo jeho kopii, stručný popis
závady a výrobek vrátíte v původním balení.
Na základě vlastního uvážení společnosti výrobek může být opraven nebo
nahrazen novým nebo modernizovaným výrobkem nebo komponenty.
Tato záruka se nevztahuje na poštovní náklady, pojištění a další dodatečné
poplatky, které vám vznikly při vrácení výrobku.
Kromě případů daných příslušným zákonem je toto vaší jedinou a výhradní
náhradou za porušení závazků této omezené záruky. Na každý výrobek, který
byl buď opraven nebo vyměněn v rámci této omezené záruky se vztahuje
tato omezená záruka po dobu devadesáti (90) dnů ode dne doručení nebo po
dobu zbývající původní záruční doby.
Tato záruka neplatí a nevztahuje se:
• Je-lizáručníreklamaceuskutečněnamimozáručnídobu,nebov
případě, že není poskytnut doklad o koupi.
• Najakékolivporuchy,závadyneboselhání způsobenénárazem,
nesprávnou manipulací, narušením, používáním výrobku v rozporu s platným
návodem, nesprávným elektrickým napětím, nehodou, ztrátou, odcizením,
požárem, povodní nebo jinými zásahy vyšší moci, poškozením při přepravě
nebo poškozením v důsledku oprav prováděných neoprávněnými osobami.
• Na jakékolivspotřební díly,jako jsoubaterie,kde závadaje
způsobena normálním stárnutím produktu.
• Kosmeticképoškození,mimojinénapoškrábání,promáčknutía
zlomené plasty na portech.
• Jakýkolivsoftware atoi vpřípadě, žebyl součástíproduktu
nebo prodáván spolu s hardwarem EZVIZ.
• Najakékoliv jinépoškození bezvadnamateriálunebo
zpracování.
• Normálníkosmetické amechanické opotřebení,opotřebenív
důsledku pravidelného čištění.
S případnými dotazy se prosím obraťte se na svého prodejce nebo pošlete
e-mail na adresu support@ezvizlife.com.
COPYRIGHT ©2017 HANGZHOU HIKVISION DIGITAL TECHNOLOGY CO., LTD.
VŠECHNA PRÁVA VYHRAZENA.
OMEZENÁ ZÁRUKAOMEZENÁ ZÁRUKA
Page 56

UD05481B
 Loading...