

Ezviz C6N Service Manual

Scan the QR code with the EZVIZ App
to add the device to your account.
Please keep it for further reference.


COPYRIGHT © Hangzhou EZVIZ Software Co., Ltd.. ALL RIGHTS RESERVED.
Any and all information, including, among others, wordings, pictures, graphs are the properties
of Hangzhou EZVIZ Software Co., Ltd. (hereinafter referred to as “EZVIZ”). This user manual
(hereinafter referred to as “the Manual”) cannot be reproduced, changed, translated,
or distributed, partially or wholly, by any means, without the prior written permission of
EZVIZ. Unless otherwise stipulated, EZVIZ does not make any warranties, guarantees or
representations, express or implied, regarding to the Manual.
About this Manual
The Manual includes instructions for using and managing the product. Pictures, charts,
images and all other information hereinafter are for description and explanation only. The
information contained in the Manual is subject to change, without notice, due to rmware
updates or other reasons. Please nd the latest version in the ™ website (http://
www.ezvizlife.com).
Revision Record
New release – January, 2019
Trademarks Acknowledgement
™, ™, and other EZVIZ’s trademarks and logos are the properties of EZVIZ in
various jurisdictions. Other trademarks and logos mentioned below are the properties of their
respective owners.
Legal Disclaimer
TO THE MAXIMUM EXTENT PERMITTED BY APPLICABLE LAW, THE PRODUCT DESCRIBED,
WITH ITS HARDWARE, SOFTWARE AND FIRMWARE, IS PROVIDED “AS IS”, WITH ALL FAULTS
AND ERRORS, AND EZVIZ MAKES NO WARRANTIES, EXPRESS OR IMPLIED, INCLUDING
WITHOUT LIMITATION, MERCHANTABILITY, SATISFACTORY QUALITY, FITNESS FOR A
PARTICULAR PURPOSE, AND NON-INFRINGEMENT OF THIRD PARTY. IN NO EVENT WILL
EZVIZ, ITS DIRECTORS, OFFICERS, EMPLOYEES, OR AGENTS BE LIABLE TO YOU FOR ANY
SPECIAL, CONSEQUENTIAL, INCIDENTAL, OR INDIRECT DAMAGES, INCLUDING, AMONG
OTHERS, DAMAGES FOR LOSS OF BUSINESS PROFITS, BUSINESS INTERRUPTION, OR LOSS
OF DATA OR DOCUMENTATION, IN CONNECTION WITH THE USE OF THIS PRODUCT, EVEN IF
EZVIZ HAS BEEN ADVISED OF THE POSSIBILITY OF SUCH DAMAGES.
TO THE MAXIMUM EXTENT PERMITTED BY APPLICABLE LAW, IN NO EVENT SHALL EZVIZ’S
TOTAL LIABILITY FOR ALL DAMAGES EXCEED THE ORIGINAL PURCHASE PRICE OF THE
PRODUCT.
EZVIZ DOES NOT UNDERTAKE ANY LIABILITY FOR PERSONAL INJURY OR PROPERTY
DAMAGE AS THE RESULT OF PRODUCT INTERRUPTION OR SERVICE TERMINATION
CAUSED BY: A) IMPROPER INSTALLATION OR USAGE OTHER THAN AS REQUESTED; B) THE
PROTECTION OF NATIONAL OR PUBLIC INTERESTS; C) FORCE MAJEURE; D) YOURSELF OR
THE THIRD PARTY, INCLUDING WITHOUT LIMITATION, USING ANY THIRD PARTY’S PRODUCTS,
SOFTWARE, APPLICATIONS, AND AMONG OTHERS. REGARDING TO THE PRODUCT WITH
INTERNET ACCESS, THE USE OF PRODUCT SHALL BE WHOLLY AT YOUR OWN RISKS.
EZVIZ SHALL NOT TAKE ANY RESPONSIBILITES FOR ABNORMAL OPERATION, PRIVACY
LEAKAGE OR OTHER DAMAGES RESULTING FROM CYBER ATTACK, HACKER ATTACK, VIRUS
INSPECTION, OR OTHER INTERNET SECURITY RISKS; HOWEVER, EZVIZ WILL PROVIDE TIMELY

TECHNICAL SUPPORT IF REQUIRED.SURVEILLANCE LAWS AND DATA PROTECTION LAWS
VARY BY JURISDICTION. PLEASE CHECK ALL RELEVANT LAWS IN YOUR JURISDICTION
BEFORE USING THIS PRODUCT IN ORDER TO ENSURE THAT YOUR USE CONFORMS TO THE
APPLICABLE LAW. EZVIZ SHALL NOT BE LIABLE IN THE EVENT THAT THIS PRODUCT IS USED
WITH ILLEGITIMATE PURPOSES.
IN THE EVENT OF ANY CONFLICTS BETWEEN THE ABOVE AND THE APPLICABLE LAW, THE
LATTER PREVAILS.
Regulatory Information
FCC Information
This Camera complies with Part 15 of the FCC Rules. Operation is subject to the following two
conditions:
(1) This Camera may not cause harmful interference, and
(2) This Camera must accept any interference received, including interference that may cause
undesired operation.
Note: This product has been tested and found to comply with the limits for a Class B digital
Camera, pursuant to Part 15 of the FCC Rules. These limits are designed to provide reasonable
protection against harmful interference in a residential installation. This product generates,
uses, and can radiate radio frequency energy and, if not installed and used in accordance with
the instructions, may cause harmful interference to radio communications. However, there is
no guarantee that interference will not occur in a particular installation. If this product does
cause harmful interference to radio or television reception, which can be determined by turning
the equipment off and on, the user is encouraged to try to correct the interference by one or
more of the following measures:
—Reorient or relocate the receiving antenna.
—Increase the separation between the equipment and receiver.
—Connect the equipment into an outlet on a circuit different from that to which the receiver is
connected.
—Consult the dealer or an experienced radio/TV technician for help.
Please take attention that changes or modification not expressly approved by the party
responsible for compliance could void the user’s authority to operate the equipment.
This equipment should be installed and operated with a minimum distance 20cm between the
radiator and your body.
This Camera complies with Industry Canada licence-exempt RSS standard(s). Operation is
subject to the following two conditions:
(1) this Camera may not cause interference, and
(2) this Camera must accept any interference, including interference that may cause undesired
operation of the Camera.
Under Industry Canada regulations, this radio transmitter may only operate using an antenna
of a type and maximum (or lesser) gain approved for the transmitter by Industry Canada. To
reduce potential radio interference to other users, the antenna type and its gain should be
so
chosen that the equivalent isotropically radiated power (e.i.r.p.) is not more than that
necessary for successful communication.
EU Conformity Statement
This product and - if applicable - the supplied accessories too are marked with
"CE" and comply therefore with the applicable harmonized European standards
listed under the Radio Equipment Directive 2014/53/EU, the EMC Directive
2014/30/EU, the RoHS Directive 2011/65/EU.
2012/19/EU (WEEE directive): Products marked with this symbol cannot be
disposed of as unsorted municipal waste in the European Union. For proper
recycling, return this product to your local supplier upon the purchase of
equivalent new equipment, or dispose of it at designated collection points. For
more information see: www.recyclethis.info.
2006/66/EC (battery directive): This product contains a battery that cannot
be disposed of as unsorted municipal waste in the European Union. See the
product documentation for specic battery information. The battery is marked
with this symbol, which may include lettering to indicate cadmium (Cd), lead
(Pb), or mercury (Hg). For proper recycling, return the battery to your supplier
or to a designated collection point. For more information see: www.recyclethis.
EC DECLARATION OF CONFORMITY
Hereby, Hangzhou EZVIZ Software Co., Ltd . declares that the radio equipment type [CS-C6N,
CS-C6HN, CS-CTQ6N, CS-C6CN] is in compliance with Directive 2014/53/EU.
The full text of the EC DECLARATION OF CONFORMITY is available at the following web link:
http://www.ezvizlife.com/declaration-of-conformity.
Safety Instruction
*90: THE EQUIPMENT FOR RESTRICTED ACCESS LOCATIONS, AND OUTER SURFACE OF
PRODUCT HAVE
Due to the product shape and dimension, the name and address of the importer/manufacturer
are printed on the package.
Customer Service
For more information, please visit www.ezvizlife.com.
Need help? Contact us:
Telephone: +31 20 204 0128
Technical Inquires Email: support.eu@ezvizlife.com
info.
WARNING
HOT SURFACE
OR
DO NOT TOUCH
MARKING.
SAVE THIS MANUAL FOR FUTURE REFERENCE
COPYRIGHT © Hangzhou EZVIZ Software Co., Ltd. ALLE RECHTE VORBEHALTEN.
Alle Informationen, einschließlich Wortlaute, Bilder und Grafiken, jedoch nicht darauf
beschränkt, sind das Eigentum von Hangzhou EZVIZ Software Co., Ltd. (nachstehend als
„EZVIZ“ bezeichnet). Dieses Benutzerhandbuch (nachstehend als „das Handbuch“ bezeichnet)
darf ohne vorherige schriftliche Genehmigung von EZVIZ weder ganz noch teilweise
reproduziert, geändert, übersetzt oder verbreitet werden. Sofern nicht anderweitig vereinbart,
bietet EZVIZ keine ausdrückliche oder implizierte Gewährleistung oder Garantie bezüglich der
Bedienungsanleitung.
Hinweise zu dieser Bedienungsanleitung
Die Bedienungsanleitung beinhaltet Anleitungen zur Verwendung und Verwaltung des
Produkts. Bilder, Diagramme, Abbildungen und alle sonstigen Informationen dienen nur der
Beschreibung und Erklärung. Die Änderung der in der Bedienungsanleitung enthaltenen
Informationen ist aufgrund von Firmware-Updates oder aus anderen Gründen vorbehalten.
Die aktuelle Version nden Sie auf der ™ Website (http://www.ezvizlife.com).
Überarbeitungsdatensatz
Neuerscheinung – Januar, 2019
Marken
™, ™ und andere Marken und Logos von EZVIZ sind das Eigentum von EZVIZ in
verschiedenen Ländern. Andere nachstehend erwähnte Marken und Logos stehen im Besitz
der entsprechenden Eigentümer.
Haftungsausschluss
SOWEIT GESETZLICH ZULÄSSIG WIRD DAS BESCHRIEBENE PRODUKT MIT SEINER
HARDWARE, SOFTWARE UND FIRMWARE OHNE MÄNGELGEWÄHR, MIT ALLEN FEHLERN
UND FEHLFUNKTIONEN GELIEFERT, UND EZVIZ GIBT KEINE AUSDRÜCKLICHEN ODER
IMPLIZIERTEN GARANTIEN, EINSCHLIEßLICH UND OHNE EINSCHRÄNKUNG, DER
MARKTFÄHIGKEIT, ZUFRIEDENSTELLENDEN QUALITÄT, EIGNUNG FÜR EINEN BESTIMMTEN
ZWECK UND NICHTVERLETZUNG DER RECHTE DRITTER. AUF KEINEN FALL HAFTEN EZVIZ,
SEINE GESCHÄFTSFÜHRER, ANGESTELLTEN, MITARBEITER ODER PARTNER FÜR BESONDERE,
ZUFÄLLIGE, DIREKTE ODER INDIREKTE SCHÄDEN, EINSCHLIEßLICH, JEDOCH NICHT DARAUF
BESCHRÄNKT, VERLUST VON GESCHÄFTSGEWINNEN, GESCHÄFTSUNTERBRECHUNG ODER
VERLUST VON DATEN ODER DOKUMENTATIONEN IN VERBINDUNG MIT DER VERWENDUNG
DIESES PRODUKTS, SELBST WENN EZVIZ ÜBER DIE MÖGLICHKEIT DERARTIGER SCHÄDEN
INFORMIERT WAR.
IN DEM NACH GELTENDEM RECHT MAXIMAL ZULÄSSIGEN UMFANG IST DIE
GESAMTHAFTUNG VON EZVIZ FÜR ALLE SCHÄDEN IN KEINEM FALL HÖHER ALS DER
URSPRÜNGLICHE KAUFPREIS DES PRODUKTS.
EZVIZ ÜBERNIMMT KEINE HAFTUNG FÜR PERSONEN- ODER SACHSCHÄDEN INFOLGE
VON PRODUKTAUSFALL ODER SERVICEEINSTELLUNG, DIE DURCH: A) UNSACHGEMÄßE
INSTALLATION ODER NUTZUNG, DIE NICHT DEN ANFORDERUNGEN ENTSPRICHT, B) SCHUTZ
NATIONALER ODER ÖFFENTLICHER INTERESSEN, C) HÖHERE GEWALT, D) SIE SELBST ODER
DRITTE, EINSCHLIEßLICH, ABER NICHT DARAUF BESCHRÄNKT, DIE
SOFTWARE, ANWENDUNGEN UND ANDEREN PRODUKTEN DRITTER VERURSACHT WERDEN.
BEZÜGLICH PRODUKTEN MIT INTERNETZUGANG ERFOLGT DIE VERWENDUNG DER
VON PRODUKTEN,

PRODUKTE AUSSCHLIEßLICH AUF EIGENES RISIKO. EZVIZ IST NICHT FÜR
ANORMALEN BETRIEB, DATENSCHUTZVERSTÖßE ODER ANDERE SCHÄDEN
AUFGRUND VON CYBERATTACKEN, HACKERANGRIFFEN, VIREN ODER ANDEREN
INTERNET-SICHERHEITSRISIKEN VERANTWORTLICH; EZVIZ BIETET JEDOCH AUF
ANFRAGE ZEITGERECHTE TECHNISCHE UNTERSTÜTZUNG. ÜBERWACHUNGS- UND
DATENSCHUTZGESETZE VARIIEREN JE NACH GERICHTSBARKEIT. ÜBERPRÜFEN SIE VOR DER
VERWENDUNG DIESES PRODUKTS ALLE RELEVANTEN GESETZE IN IHRER GERICHTSBARKEIT,
UM SICHERZUSTELLEN, DASS IHRE VERWENDUNG GEGEN KEINE GELTENDEN GESETZE
VERSTÖßT. EZVIZ HAFTET NICHT, FALLS DIESES PRODUKT FÜR UNGESETZLICHE ZWECKE
VERWENDET WIRD.
FÜR DEN FALL VON WIDERSPRÜCHEN ZWISCHEN DEM VORSTEHENDEN UND DEM
GELTENDEN RECHT GILT DAS LETZTERE.
Behördliche Informationen
FCC-Hinweise
Dieses Gerät entspricht Abschnitt 15 der FCC- Bestimmungen. Der Betrieb ist unter den
folgenden beiden Bedingungen gestattet:
(1) Dieses Gerät darf keine schädlichen Interferenzen verursachen, und
(2) Dieses Gerät muss jegliche Interferenzen zulassen, einschließlich jener, die zu einem
unerwünschten Betrieb führen.
Hinweis: Dieses Produkt wurde getestet und entspricht den Grenzwerten eines Digitalgeräts
der Klasse B, gemäß Abschnitt 15 der FCC-Bestimmungen. Diese Grenzwerte sollen einen
angemessenen Schutz vor schädlichen Störungen in einer Wohnumgebung bieten. Dieses
Produkt erzeugt, verwendet und strahlt Hochfrequenzenergie aus. Falls es nicht entsprechend
den Anweisungen installiert und verwendet wird, so kann es störende Interferenzen der
Funkkommunikation verursachen. Es gibt jedoch keine Garantie dafür, dass bei einer
bestimmten Installation keine Störungen auftreten können. Wenn dieses Produkt schädliche
Störungen des Radio- oder Fernsehempfangs verursacht, was durch Aus- und Einschalten des
Geräts festgestellt werden kann, wird dem Benutzer empfohlen, die Störungen durch eine oder
mehrere der folgenden Maßnahmen zu beheben:
- Richten Sie die Empfangsantenne neu aus oder setzen Sie sie um.
- Vergrößern Sie den Abstand zwischen Gerät und Empfänger.
- Schließen Sie das Gerät an die Steckdose eines anderen Stromkreises als den des
Empfängers an.
- Wenden Sie sich an Ihren Fachhändler oder einen erfahrenen Radio-/Fernsehtechniker.
Bitte beachten Sie, dass Änderungen oder Modifikationen an diesem Gerät, die nicht
ausdrücklich vom Hersteller zugelassen sind, zum Verlust der allgemeinen Betriebserlaubnis
führen können.
Dieses Gerät muss mit einem Mindestabstand von 20 cm zwischen der Antenne und Personen
aufgebaut und betrieben werden.
Dieses Gerät erfüllt die Vorschriften der Industry Canada Lizenz mit Ausnahme des/r RSSNorm(en). Der Betrieb ist unter den folgenden beiden Bedingungen gestattet:
(1) Dieses Gerät darf keine Störungen verursachen, und
(2) dieses Gerät muss jegliche Interferenz hinnehmen, einschließlich Störungen, die einen
unerwünschten Betrieb des Geräts verursachen.
Gemäß den Vorschriften von Industry Canada darf dieser Funksender nur mit einer Antenne
betrieben werden, die vom Typ und der maximalen (oder geringeren) Verstärkung ist, die von
Industry Canada für den Sender zugelassen wurde. Um mögliche Funkstörungen anderer
Benutzer zu reduzieren, müssen Antennentyp und Verstärkung so gewählt werden, dass die
äquivalente isotrope Strahlungsleistung (EIRP) nicht höher ist, als die für eine erfolgreiche
Kommunikation erforderliche.
EG-KONFORMITÄTSERKLÄRUNG
Hiermit erklärt Hangzhou EZVIZ Software Co., Ltd., dass der Funkgerätetyp [CS-C6N,
CS-C6HN, CS-CTQ6N, CS-C6CN] mit der Richtlinie 2014/53/EU übereinstimmt.
Der vollständige Text der EU-Konformitätserklärung ist unter folgendem Weblink verfügbar:
http://www.ezvizlife.com/declaration-of-conformity.
Sicherheitshinweis
Aufgrund der Produktform und -abmessungen sind Name und Anschrift des Importeurs/
Herstellers auf der Verpackung vermerkt.
Kundendienst
Weitere Informationen erhalten Sie auf www.ezvizlife.com
Benötigen Sie Hilfe? Setzen Sie sich mit uns in Verbindung:
Telefon: (+49) 0 696 640 4321
Technische Anfragen E-Mail: support.eu@ezvizlife.com
EU-Konformitätserklärung
Dieses Produkt und – ggf. – auch das mitgelieferte Zubehör sind mit „CE“
gekennzeichnet und entsprechen somit den geltenden harmonisierten
europäischen Normen, die unter der Funkgeräterichtlinie 2014/53/EU, der EMVRichtlinie 2014/30/EU und der RoHS-Richtlinie 2011/65/EU aufgeführt sind.
2012/19/EU (Elektroaltgeräte-Richtlinie): Produkte, die mit diesem Symbol
gekennzeichnet sind, dürfen innerhalb der Europäischen Union nicht mit dem
Hausmüll entsorgt werden. Für korrektes Recycling geben Sie dieses Produkt
an Ihren örtlichen Fachhändler zurück oder entsorgen Sie es an einer der
Sammelstellen. Weitere Informationen nden Sie unter: www.recyclethis.info.
2006/66/EG und deren Änderung 2013/56/EU (Batterie-Richtlinie): Dieses
Produkt enthält eine Batterie, die innerhalb der Europäischen Union nicht
mit dem Hausmüll entsorgt werden darf. Siehe Produktdokumentation
für spezifische Hinweise zu Batterien. Die Batterie ist mit diesem Symbol
gekennzeichnet, das zusätzlich die Buchstaben Cd für Cadmium, Pb für Blei
oder Hg für Quecksilber enthalten kann. Für korrektes Recycling geben Sie die
Batterie an Ihren örtlichen Fachhändler zurück oder entsorgen Sie sie an einer
der Sammelstellen. Weitere Informationen nden Sie unter: www.recyclethis.
info.
BEWAHREN SIE DIESES HANDBUCH FÜR SPÄTERES NACHSCHLAGEN AUF

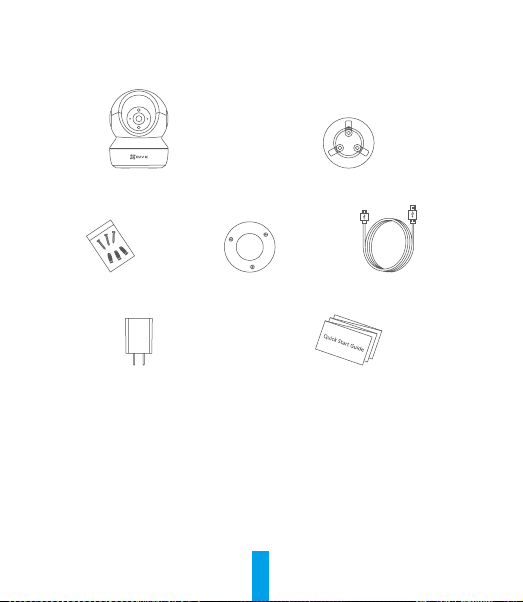
Package Contents
Camera Base
Screw Kit Drill Template Power Cable
Power Adapter Quick Start Guide
1

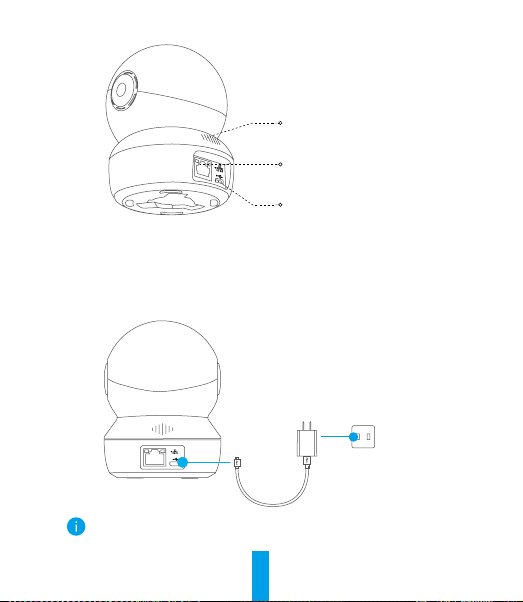
Basics
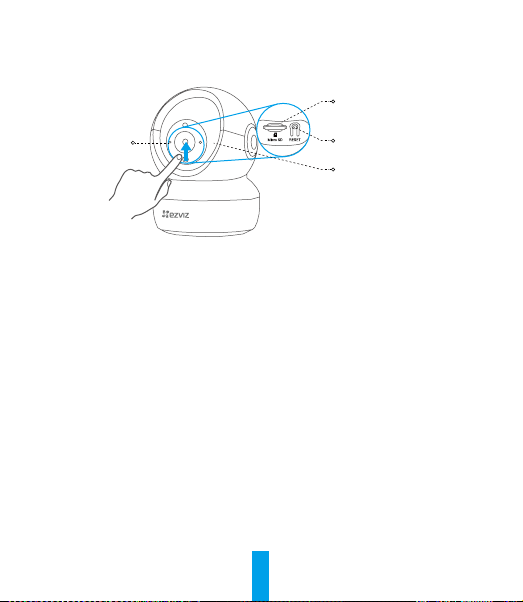
Micro SD Card Slot
LED Indicator
Reset Button
MIC
Name Description
LED Indicator • Solid Red: Camera starting up.
Micro SD Card
(sold separately)
Reset Button Hold for 5 seconds to restart and set all parameters to
MIC For audio in.
Speaker For audio out.
• Slow-ashing Red: Wi-Fi connection failed.
• Fast-ashing Red: Camera exception (e.g. Micro SD
card error).
• Fast-ashing Blue: Camera ready for Wi-Fi connection.
• Slow-ashing Blue: Camera running properly.
Initialize the card in the EZVIZ app before using it.
default.
2
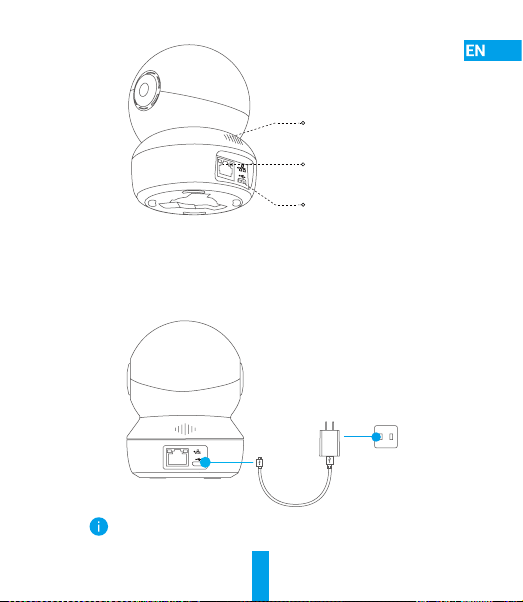
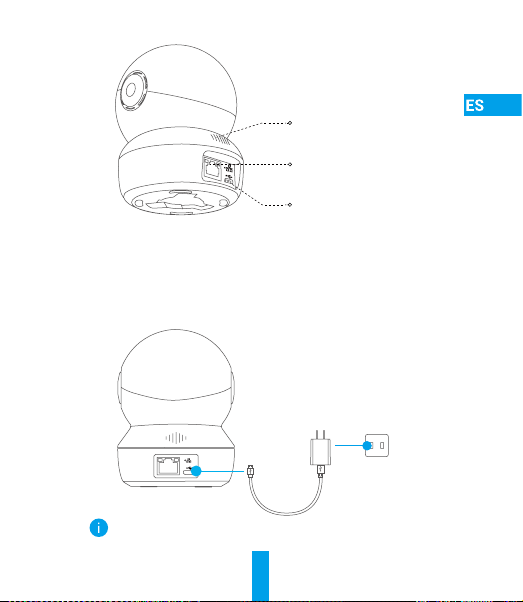
Speaker
Ethernet Port
Power Port
Setup
Power-on
1
Plug the power cable into the camera, and then plug the power adapter
into an outlet as shown in the gure below.
Power Outlet
The LED turning fast-ashing blue indicates that the camera is
powered on and ready for Wi-Fi conguration.
3
Power Cable
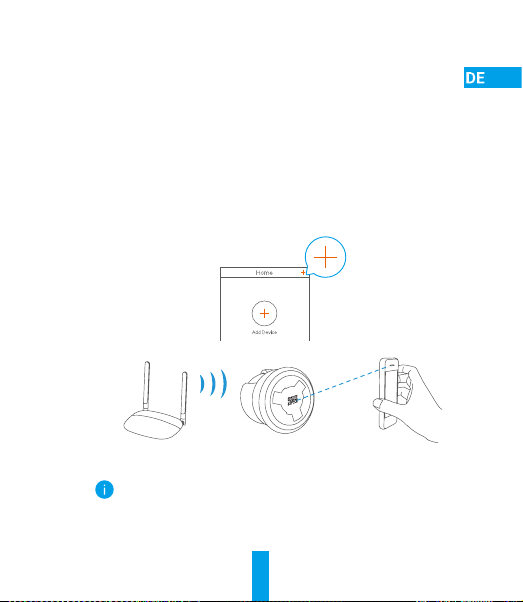
Camera Setup
2
1. Create a user account
- Connect your mobile phone to Wi-Fi using your 2.4GHz network.
- Search for "EZVIZ" in the App Store or Google Play
- Download and install the EZVIZ app.
- Launch the app.
- Create and register an EZVIZ user account by following the start-up
wizard.
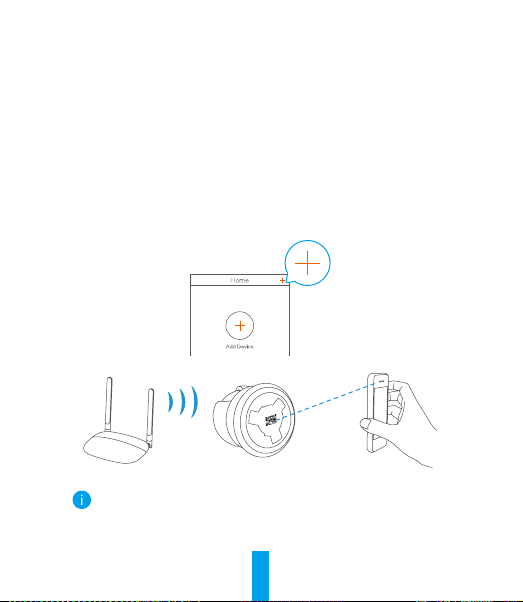
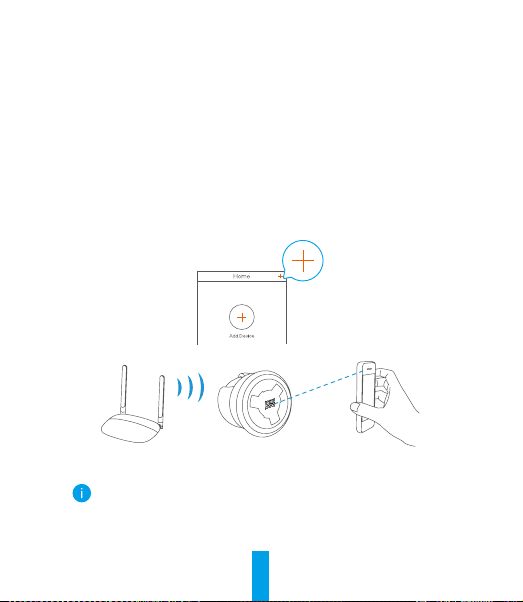
2. Add a camera to EZVIZ
- Log in to your account using the EZVIZ app.
- On the Home screen, tap “+” on the upper-right corner to go to the Scan
QR Code interface.
- Scan the QR code on the bottom of the camera.
- Follow the EZVIZ app wizard to nish Wi-Fi conguration.
Hold the Reset button for 5s in any of the following cases:
• The camera fails to connect to your Wi-Fi network.
• You want to select another Wi-Fi network.
4
(TM)
.
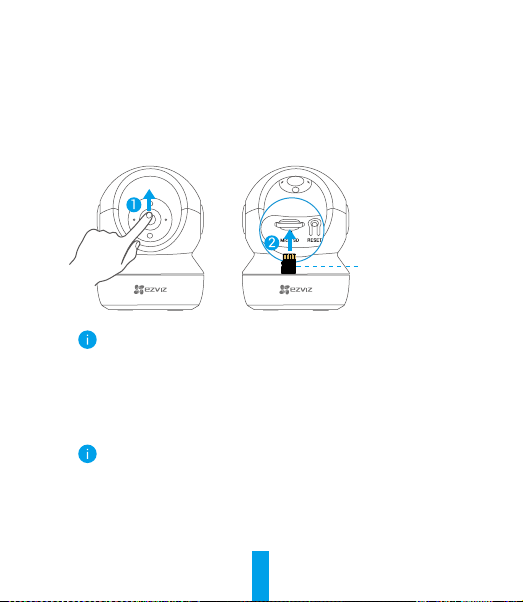
Installation (Optional)
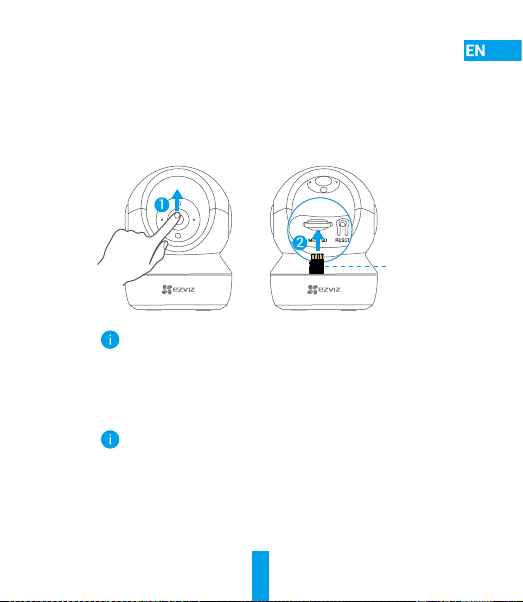
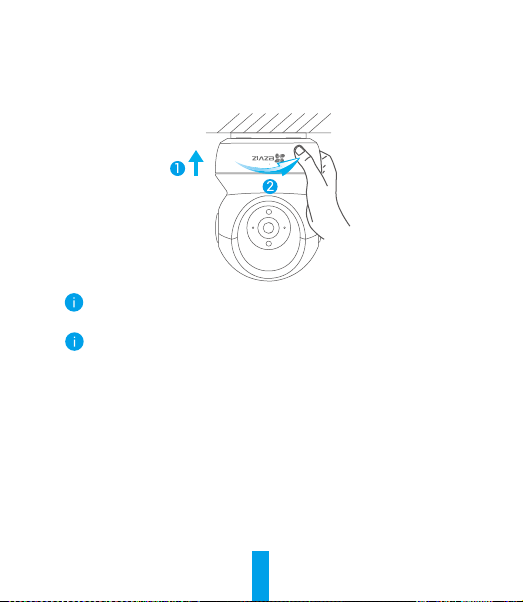
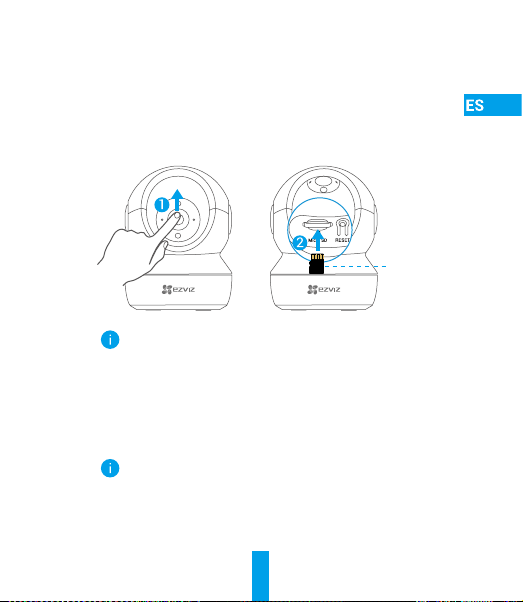
Install the Micro SD Card (Optional)
1
1. Rotate the sphere upwards until you see the card slot.
2. Insert the Micro SD card (sold separately) into the card slot as shown
in the gure below.
This Side Up
After installing the Micro SD card, you should initialize the card in
the EZVIZ app before using it.
3. In the EZVIZ app, tap the Storage Status in the Device Settings
interface to check the SD card status.
4. If the memory card status displays as Uninitialized, tap to initialize it.
The status will then change to Normal and it can store videos and/
or pictures.
5

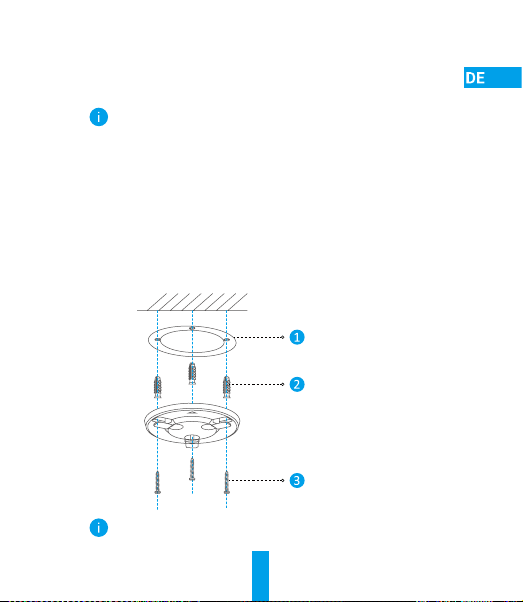
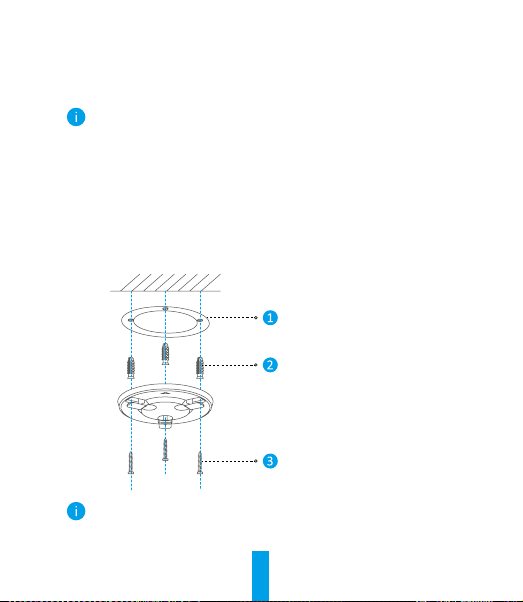
Install the Base
2
The camera can be placed horizontally or mounted on the ceiling. Here we
take ceiling mounting as an example.
• Make sure the ceiling is strong enough to withstand three times
the weight of the camera.
• Avoid positioning the camera in an area that gets a lot of light
shining directly into the camera lens.
- Place the drill template onto the surface you have chosen to mount
the camera.
- (For cement wall/ceiling only) Drill screw holes according to the
template, and insert three anchors.
- Use three metal screws to x the camera base according to the
template.
Drill Template
Anchors
Metal Screws
Please tear up the drill template after installing the base if needed.
6
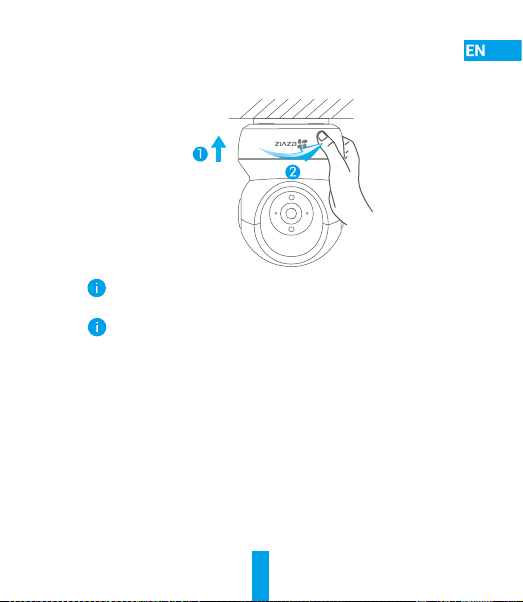
Install the Camera
3
Mount the camera to the base, and turn it clockwise until it is xed.
After installing the camera, please go to the EZVIZ app to ip the
camera image.
For detailed information, please visit www.ezvizlife.com.
7

Lieferumfang
Kamera Grundplatte
Schraubensatz Bohrschablone Stromkabel
Netzteil Kurzanleitung
8
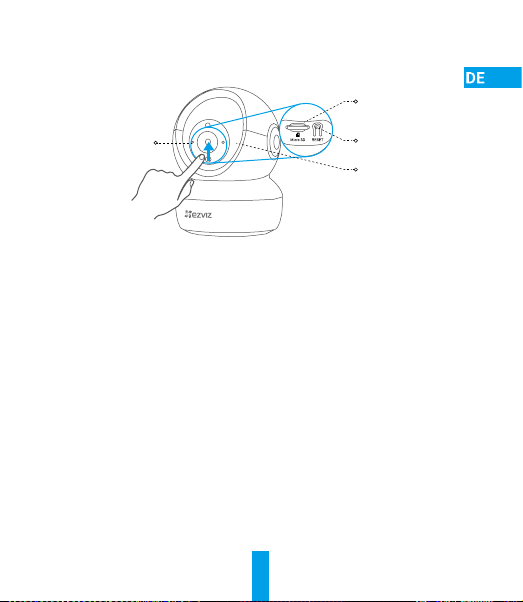
Grundlagen
microSDKartensteckplatz
Betriebsanzeige
LED-
Name Beschreibung
LED-Betriebsanzeige • Stetiges Rot: Kamera fährt hoch.
microSD-Karte
(separat erhältlich)
Rücksetztaste Halten Sie die Taste für 5 Sekunden gedrückt,
Mikrofon Tonaufnahme.
Lautsprecher Audioausgabe.
• Blinkt langsam Rot: WLAN-Verbindung
fehlgeschlagen.
• Blinkt schnell Rot: Kameraausnahme
(z.B. microSD-Karte Fehler).
• Blinkt schnell Blau: Kamera ist zur
WLAN-Verbindung bereit.
• Blinkt langsam Blau: Kamera läuft einwandfrei.
Formatieren Sie die Karte für den Gebrauch mit der
EZVIZ-App.
um neu zu starten und alle Parameter auf die
Standardwerte zurückzusetzen.
9
Rücksetztaste
Mikrofon
Lautsprecher
Ethernet-Anschluss
Netzanschluss
Einrichtung
Einschalten
1
Schließen Sie das Stromkabel an die Kamera an und stecken Sie das
Netzteil dann in eine Steckdose, wie unten dargestellt.
Steckdose
Die blau blinkende LED zeigt an, dass die Kamera eingeschaltet und
zur WLAN-Konguration bereit ist.
Stromkabel
10
Kamera einrichten
2
1. Ein Benutzerkonto erstellen
- Verbinden Sie Ihr Mobiltelefon über Ihr 2,4-GHz-Netzwerk mit dem WLAN.
- Suchen Sie im App Store oder auf Google Play
- Laden Sie die EZVIZ-App herunter und installieren Sie sie.
- Starten Sie die App.
- Erstellen und registrieren Sie ein EZVIZ-Benutzerkonto, indem Sie dem
Startassistenten folgen.
2. Eine Kamera zu EZVIZ hinzufügen
- Melden Sie sich mit der EZVIZ-App bei Ihrem Konto an.
- Tippen Sie auf der Startseite auf „+“ oben rechts, um das Menü „QR-Code
scannen“ aufzurufen.
- Scannen Sie den QR-code auf der Unterseite der Kamera.
- Befolgen Sie die Anweisungen des EZVIZ-App-Assistenten zum
Abschließen der WLAN-Konguration.
Halten Sie die Rücksetztaste in einem der folgenden Fälle für
5 Sekunden gedrückt:
• Die Kamera kann keine Verbindung mit Ihrem WLAN-Netzwerk
aufbauen.
• Sie möchten ein anderes WLAN-Netzwerk wählen.
11
(TM)
nach „EZVIZ“.
Installation (optional)
microSD-Karte installieren (optional)
1
1. Drehen Sie die Kugel nach oben, bis Sie den Kartenschacht sehen.
2. Setzen Sie die micro-SD-Karte (separat erhältlich) im Kartenschacht
ein, wie in der Abbildung unten dargestellt.
Diese Seite oben
Nach der Installation der microSD-Karte müssen Sie die Karte in
der EZVIZ-App initialisieren, bevor Sie sie verwenden.
3. Tippen Sie in der EZVIZ-App in den Geräteeinstellungen auf Storage
Status (Speicherstatus), um den Status der SD-Karte zu überprüfen.
4. Wenn der Status der Speicherkarte als Uninitialized (Nicht formatiert)
angezeigt wird, tippen Sie darauf, um sie zu formatieren.
Der Status ändert sich dann zu Normal und Videos und/oder Bilder
können gespeichert werden.
12
Bohrschablone installieren
2
Die Kamera kann horizontal oder an der Decke montiert werden.
Hier nehmen wir als Beispiel die Deckenmontage.
• Vergewissern Sie sich, dass die Decke stark genug ist, um das
dreifache Gewicht der Kamera zu tragen.
• Montieren Sie die Kamera nicht in einem Bereich, in dem viel
Licht direkt auf das Objektiv fällt.
- Befestigen Sie die Bohrschablone auf der Oberäche, die Sie für die
Montage der Kamera gewählt haben.
- (Nur Betonwand/-decke) Bohren Sie die Löcher gemäß der Schablone
und setzen Sie drei Dübel ein.
- Befestigen Sie den Montagefuß der Kamera mit drei Schrauben an der
Montageäche.
Bohrschablone
Dübel
Metallschrauben
Entsorgen Sie die Bohrschablone nach der Montage.
13
Kamera installieren
3
Montieren Sie die Kamera am Montagefuß und drehen Sie sie im
Uhrzeigersinn, bis sie xiert ist.
Nach der Installation der Kamera gehen Sie zur EZVIZ-App, um das
Kamerabild zu spiegeln.
Weitere Informationen erhalten Sie auf www.ezvizlife.com.
14

Contenido del paquete
Cámara Base
Juego de tornillos Plantilla de perforación Cable de alimentación
Adaptador de corriente Guía de inicio rápido
15
Información básica
Ranura para tarjeta
microSD
Indicador led
Nombre Descripción
Indicador led • Rojo jo: la cámara se está iniciando.
Tarjeta microSD
(vendida por
separado)
Botón Reiniciar Manténgalo pulsado durante 5 segundos para
Micrófono Entrada de audio.
Altavoz Salida de audio.
• Rojo parpadeando lentamente: error al conectarse a
la red wi.
• Rojo parpadeando rápidamente: excepción de la
cámara (p. ej., error de la tarjeta microSD).
• Azul parpadeando rápidamente: la cámara está
preparada para conectarse a la red wi.
• Azul parpadeando lentamente: la cámara está
funcionando correctamente.
Inicialice la tarjeta en la aplicación EZVIZ antes de usarla.
reiniciar y restaurar todos los parámetros a los valores
predeterminados.
16
Botón Reiniciar
Micrófono
Altavoz
Puerto Ethernet
Puerto de alimentación
Instalación
Encendido
1
Conecte el cable de alimentación a la cámara y, después, enchufe el
adaptador de corriente a una toma de corriente como se muestra en la
siguiente gura.
Toma de corriente
El led parpadeando rápidamente en azul indica que la cámara está
encendida y preparada para la conguración de la red wi.
17
Cable de alimentación
Conguración de la cámara
2
1. Cree una cuenta de usuario
- Conecte el teléfono móvil a una red wi usando su red de 2,4 GHz.
- Busque "EZVIZ" en App Store o Google Play
- Descargue e instale la aplicación EZVIZ.
- Ejecute la aplicación.
- Cree y registre una cuenta de usuario EZVIZ siguiendo las instrucciones
del asistente de inicio.
2. Añada una cámara a EZVIZ
- Inicie sesión en su cuenta con la aplicación EZVIZ.
- En la pantalla de inicio, pulse «+» en la esquina superior derecha para
acceder a la interfaz de escaneo de códigos QR.
- Escanee el código QR que gura en la parte inferior de la cámara.
- Siga las indicaciones del asistente de la aplicación EZVIZ para nalizar
la conguración de la conexión wi.
Mantenga pulsado el botón Reiniciar durante 5 s en cualquiera de
los casos siguientes:
• La cámara no puede conectarse a su red wi.
• Desea seleccionar otra red wi.
(TM)
.
18
Instalación (opcional)
Inserción de la tarjeta microSD (opcional)
1
1. Gire la esfera hacia arriba hasta ver la ranura para la tarjeta.
2. Inserte la tarjeta microSD (vendida por separado) en la ranura para
tarjetas como se muestra en la gura siguiente.
Este lado
hacia arriba
Una vez insertada la tarjeta microSD, inicialícela en la aplicación
EZVIZ antes de usarla.
3. En la aplicación EZVIZ, pulse «Storage Status» (estado del
almacenamiento) que se encuentra en la interfaz conguración del
dispositivo para comprobar el estado de la tarjeta SD.
4. Si el estado de la tarjeta de memoria aparece como «Uninitialized»
(no inicializada), pulse para inicializarla.
Entonces, el estado cambiará a Normal y se podrán almacenar
vídeos y/o imágenes.
19
Instalación de la base
2
Es posible colocar la cámara horizontalmente o instalarla en el techo.
Aquí, nos referimos a la instalación en el techo como ejemplo.
• Asegúrese de que el techo sea lo sucientemente resistente para
soportar un peso tres veces mayor que el de la cámara.
• Evite colocar la cámara en un área en la que la lente reciba
directamente demasiada luz.
- Coloque la plantilla de perforación sobre la supercie escogida para el
montaje de la cámara.
- (Solo para el montaje en paredes/techos de cemento). Taladre los
oricios para los tornillos según la plantilla e inserte los tres tacos.
- Utilice tres tornillos de metal para jar la base de la cámara conforme
a la plantilla.
Plantilla de perforación
Tacos
Tornillos metálicos
Una vez instalada la base, despegue la plantilla de perforación si
fuera necesario.
20

Instalación de la cámara
3
Monte la cámara en la base y gírela en sentido horario hasta que quede
asegurada.
Una vez instalada la cámara, acceda a la aplicación EZVIZ para
voltear la imagen de la cámara.
Para obtener información detallada, visite www.ezvizlife.com.
21
Contenu de l’emballage
Caméra Base
Kit de vis Gabarit de perçage Câble d’alimentation
Adaptateur d’alimentation Guide de démarrage rapide
22
 Loading...