

Page 1
Page 2

Page 3

COPYRIGHT © Hangzhou EZVIZ Software Co., Ltd.. ALL RIGHTS RESERVED.
Any and all information, including, among others, wordings, pictures, graphs are the properties of Hangzhou EZVIZ
Software Co., Ltd. (hereinafter referred to as “EZVIZ”). This user manual (hereinafter referred to as “the Manual”) cannot
be reproduced, changed, translated, or distributed, partially or wholly, by any means, without the prior written permission
of EZVIZ. Unless otherwise stipulated, EZVIZ does not make any warranties, guarantees or representations, express or
implied, regarding to the Manual.
About this Manual
The Manual includes instructions for using and managing the product. Pictures, charts, images and all other information
hereinafter are for description and explanation only. The information contained in the Manual is subject to change,
without notice, due to firmware updates or other reasons. Please find the latest version in the ™ website
(http://www.ezvizlife.com).
Revision Record
New release – January, 2019
Trademarks Acknowledgement
™, ™, and other EZVIZ’s trademarks and logos are the properties of EZVIZ in various jurisdictions.
Other trademarks and logos mentioned below are the properties of their respective owners.
Legal Disclaimer
TO THE MAXIMUM EXTENT PERMITTED BY APPLICABLE LAW, THE PRODUCT DESCRIBED, WITH ITS HARDWARE,
SOFTWARE AND FIRMWARE, IS PROVIDED “AS IS”, WITH ALL FAULTS AND ERRORS, AND EZVIZ MAKES NO WARRANTIES,
EXPRESS OR IMPLIED, INCLUDING WITHOUT LIMITATION, MERCHANTABILITY, SATISFACTORY QUALITY, FITNESS FOR A
PARTICULAR PURPOSE, AND NON-INFRINGEMENT OF THIRD PARTY. IN NO EVENT WILL EZVIZ, ITS DIRECTORS, OFFICERS,
EMPLOYEES, OR AGENTS BE LIABLE TO YOU FOR ANY SPECIAL, CONSEQUENTIAL, INCIDENTAL, OR INDIRECT DAMAGES,
INCLUDING, AMONG OTHERS, DAMAGES FOR LOSS OF BUSINESS PROFITS, BUSINESS INTERRUPTION, OR LOSS OF DATA
OR DOCUMENTATION, IN CONNECTION WITH THE USE OF THIS PRODUCT, EVEN IF EZVIZ HAS BEEN ADVISED OF THE
POSSIBILITY OF SUCH DAMAGES.
TO THE MAXIMUM EXTENT PERMITTED BY APPLICABLE LAW, IN NO EVENT SHALL EZVIZ’S TOTAL LIABILITY FOR ALL
DAMAGES EXCEED THE ORIGINAL PURCHASE PRICE OF THE PRODUCT.
EZVIZ DOES NOT UNDERTAKE ANY LIABILITY FOR PERSONAL INJURY OR PROPERTY DAMAGE AS THE RESULT OF PRODUCT
INTERRUPTION OR SERVICE TERMINATION CAUSED BY: A) IMPROPER INSTALLATION OR USAGE OTHER THAN AS
REQUESTED; B) THE PROTECTION OF NATIONAL OR PUBLIC INTERESTS; C) FORCE MAJEURE; D) YOURSELF OR THE THIRD
PARTY, INCLUDING WITHOUT LIMITATION, USING ANY THIRD PARTY’S PRODUCTS, SOFTWARE, APPLICATIONS, AND AMONG
OTHERS.
REGARDING TO THE PRODUCT WITH INTERNET ACCESS, THE USE OF PRODUCT SHALL BE WHOLLY AT YOUR OWN RISKS.
EZVIZ SHALL NOT TAKE ANY RESPONSIBILITES FOR ABNORMAL OPERATION, PRIVACY LEAKAGE OR OTHER DAMAGES
RESULTING FROM CYBER ATTACK, HACKER ATTACK, VIRUS INSPECTION, OR OTHER INTERNET SECURITY RISKS; HOWEVER,
Page 4

EZVIZ WILL PROVIDE TIMELY TECHNICAL SUPPORT IF REQUIRED. SURVEILLANCE LAWS AND DATA PROTECTION LAWS VARY
BY JURISDICTION. PLEASE CHECK ALL RELEVANT LAWS IN YOUR JURISDICTION BEFORE USING THIS PRODUCT IN ORDER
TO ENSURE THAT YOUR USE CONFORMS TO THE APPLICABLE LAW. EZVIZ SHALL NOT BE LIABLE IN THE EVENT THAT THIS
PRODUCT IS USED WITH ILLEGITIMATE PURPOSES.
IN THE EVENT OF ANY CONFLICTS BETWEEN THE ABOVE AND THE APPLICABLE LAW, THE LATTER PREVAILS.
Regulatory Information
FCC Information
This device complies with Part 15 of the FCC Rules. Operation is subject to the following two conditions:
(1) This device may not cause harmful interference, and
(2) This device must accept any interference received, including interference that may cause undesired operation.
Note: This product has been tested and found to comply with the limits for a Class B digital device, pursuant to Part
15 of the FCC Rules. These limits are designed to provide reasonable protection against harmful interference in a
residential installation. This product generates, uses, and can radiate radio frequency energy and, if not installed and
used in accordance with the instructions, may cause harmful interference to radio communications. However, there is no
guarantee that interference will not occur in a particular installation. If this product does cause harmful interference to
radio or television reception, which can be determined by turning the equipment off and on, the user is encouraged to try
to correct the interference by one or more of the following measures:
—Reorient or relocate the receiving antenna.
—Increase the separation between the equipment and receiver.
—Connect the equipment into an outlet on a circuit different from that to which the receiver is connected.
—Consult the dealer or an experienced radio/TV technician for help.
Please take attention that changes or modification not expressly approved by the party responsible for compliance could
void the user’s authority to operate the equipment.
This equipment should be installed and operated with a minimum distance 20cm between the radiator and your body.
This device complies with Industry Canada licence-exempt RSS standard(s). Operation is subject to the following two
conditions:
(1) this device may not cause interference, and
(2) this device must accept any interference, including interference that may cause undesired operation of the device.
Under Industry Canada regulations, this radio transmitter may only operate using an antenna of a type and maximum (or
lesser) gain approved for the transmitter by Industry Canada. To reduce potential radio interference to other users, the
antenna type and its gain should be so chosen that the equivalent isotropically radiated power (e.i.r.p.) is not more than
that necessary for successful communication.
Page 5
EU Conformity Statement
This product and - if applicable - the supplied accessories too are marked with "CE" and comply
therefore with the applicable harmonized European standards listed under the Radio Equipment
Directive 2014/53/EU, the EMC Directive 2014/30/EU, the RoHS Directive 2011/65/EU.
2012/19/EU (WEEE directive): Products marked with this symbol cannot be disposed of as unsorted
municipal waste in the European Union. For proper recycling, return this product to your local supplier
upon the purchase of equivalent new equipment, or dispose of it at designated collection points. For
more information see: www.recyclethis.info.
2006/66/EC and its amendment 2013/56/EU (battery directive): This product contains a battery
that cannot be disposed of as unsorted municipal waste in the European Union. See the product
documentation for specific battery information. The battery is marked with this symbol, which may
include lettering to indicate cadmium (Cd), lead (Pb), or mercury (Hg). For proper recycling, return the
battery to your supplier or to a designated collection point. For more information see: www.recyclethis.
Industry Canada ICES-003 Compliance
This device meets the CAN ICES-3 (B)/NMB-3(B) standards requirements.
EC DECLARATION OF CONFORMITY
Hereby, Hangzhou EZVIZ Software Co., Ltd. declares that the radio equipment type [CS-CV246] is in compliance with
Directive 2014/53/EU.
The full text of the EC DECLARATION OF CONFORMITY is available at the following web link:
http://www.ezvizlife.com/declaration-of-conformity.
Safety Instruction
CAUTION: THE PRODUCT IS BUILT IN A REPLACEABLE BATTERY. RISK OF EXPLOSION IF BATTERY IS REPLACED BY AN
INCORRECT TYPE. DISPOSE OF USED BATTERIES ACCORDING TO THE INSTRUCTIONS.
Due to the product shape and dimension, the name and address of the importer/manufacturer are printed
on the package.
Customer Service
For more information, please visit www.ezvizlife.com
Need help? Contact us:
Telephone: +31 20 204 0128
Technical Inquires Email: support.eu@ezvizlife.com
info.
SAVE THIS MANUAL FOR FUTURE REFERENCE
Page 6
Setup
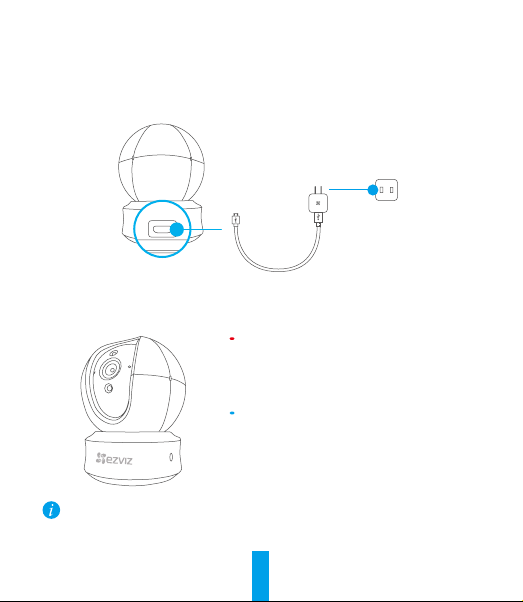
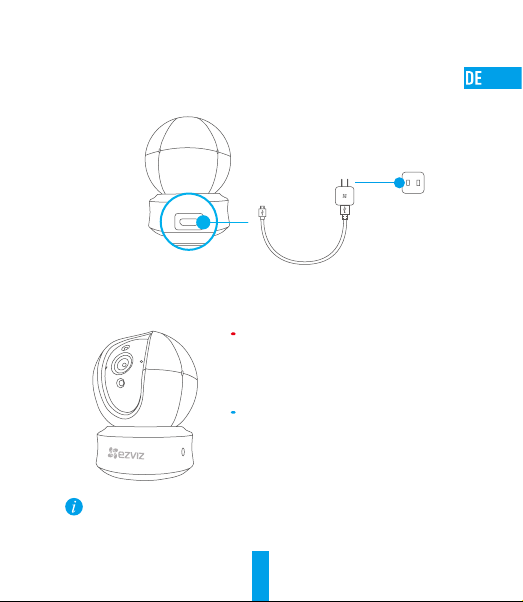
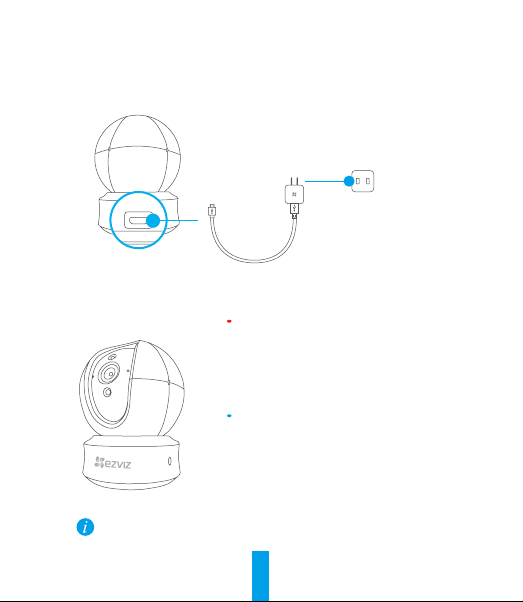
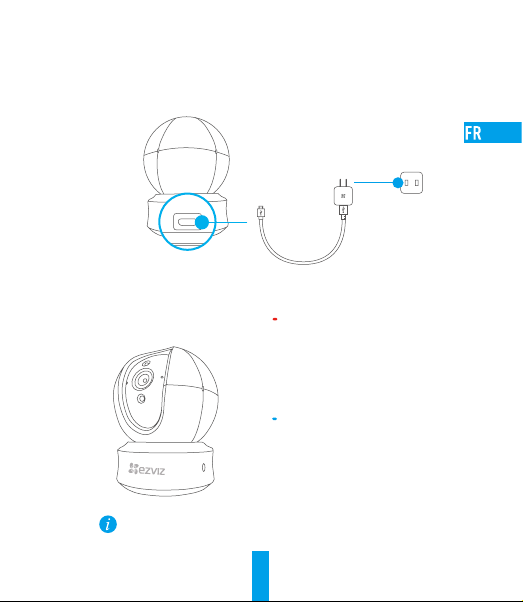
Step 1 Power-on
Plug the power cable into the camera, and then plug the power adapter into an outlet as shown
in the figure below.
Power Outlet
Power Cable
Power Interface
LED Indicator Status
Solid Red: Camera is starting up.
Slowly Flashing Red: Wi-Fi connection has failed.
Fastly Flashing Red: Device exception (e.g. MicroSD
card error).
Solid Blue: Video is being viewed or played back in
EZVIZ App.
Fastly Flashing Blue: Camera is ready for the Wi-Fi
connection.
Slowly Flashing Blue: Camera is running properly.
Turn on the camera and let it power up. The camera will completely rotate side-to-side and
tilt up-and-down once.
1
Page 7

Step 2 Camera -Setup
1. Create a user account
- Connect your mobile phone to Wi-Fi using your 2.4GHz network.
- Search for "EZVIZ" in the App Store or Google Play
- Download and install the EZVIZ app.
- Launch the app.
- Create, and register an EZVIZ user account by following the startup wizard.
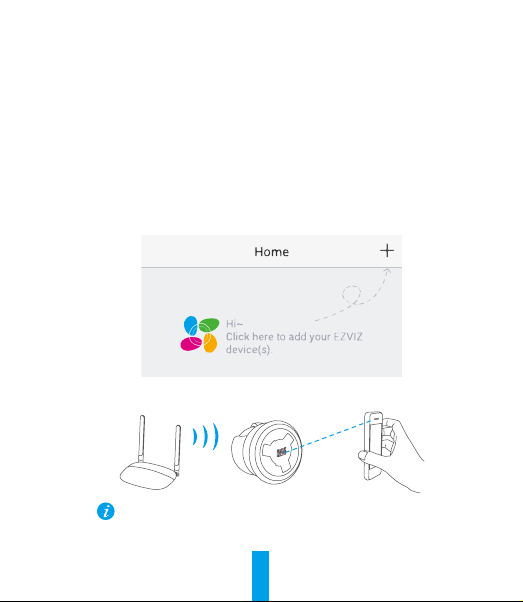
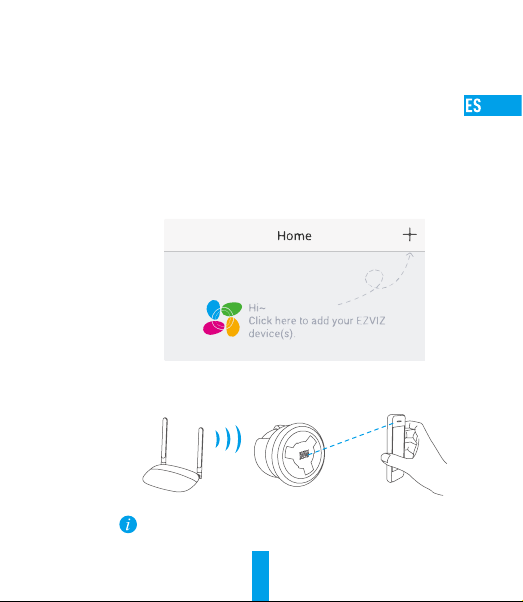
2. Adding a camera to EZVIZ
- Log in to your account using the EZVIZ app.
- Tap "+" on the Home page to go to the Scan QR Code interface.
- Scan the QR Code on the camera.
- Follow the EZVIZ app wizard to finish Wi-Fi configuration.
If your product is 2.4GHz only, we kindly recommend you switch off router’s 5GHz
first to proceed adding process.
2
(TM)
.
Page 8

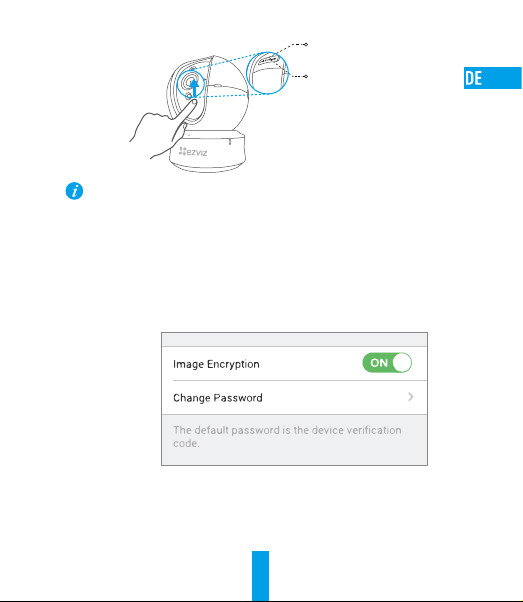
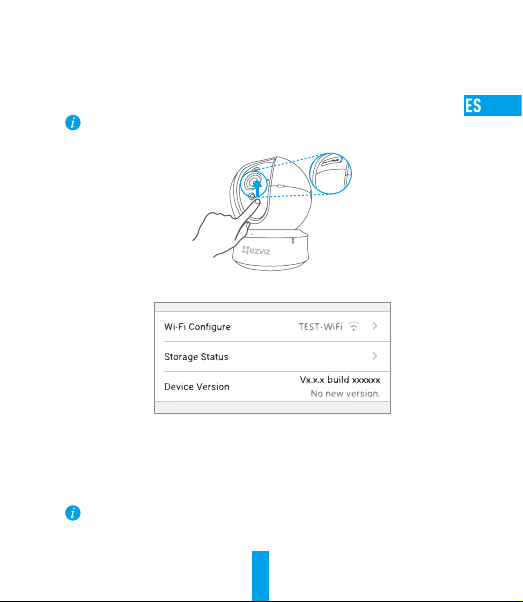
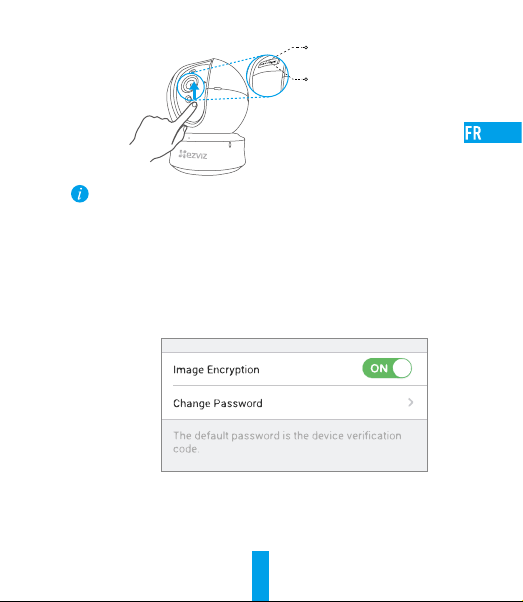
microSD Card Slot
Reset Button
• If the camera fails to connect to your Wi-Fi network, press and hold the Reset button for 5s
and repeat Step 2.2.
• To select another Wi-Fi network, press and hold the Reset button for 5s to reboot the device.
3. Enable the Image Encryption
After enabling it, your video and image can be encrypted in transmission.
You can also change the default password.
- Go to the camera settings.
- Tap “Change Password”.
- Tap “Edit”.
- Enter the original verification code located on the label of the camera.
- Enter new password (6 to 12 characters and numbers).
4. Angle Adjustment
You can adjust the camera via the EZVIZ app to get an optimum angle.
The panning angle ranges from 0° to 340°, and the tilting angle ranges from -15° to 105°.
3
Page 9
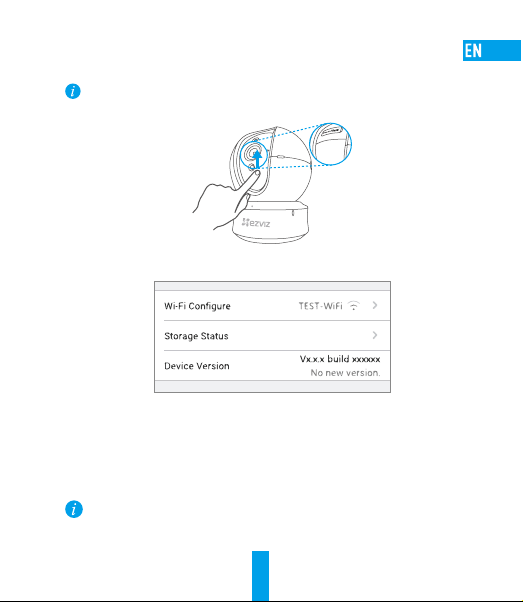
SD Card Management
•InsertaMicroSDcardintotheslotbeforemounting.
•MicroSD card not included in the Box Contents. Recommended compatibility: Class10,
Max.128GB.
1. In the EZVIZ app, tap the Storage Status in the Device Settings interface to check the SD card
status.
2. If the memor y card status displays as Uninitialized, tap to initialize it.
The status will then change to Normal and it can store videos and/or pictures.
Mounting (Optional)
The camera can be mounted on the wall or ceiling.
• Make sure the wall/ceiling is strong enough to withstand three times the weight of the
camera and the mounting.
• Camera should stay away from any reflective objects such as mirrors.
4
Page 10

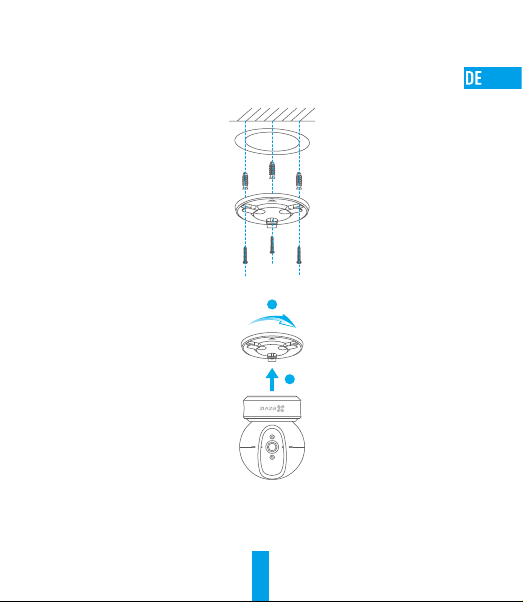
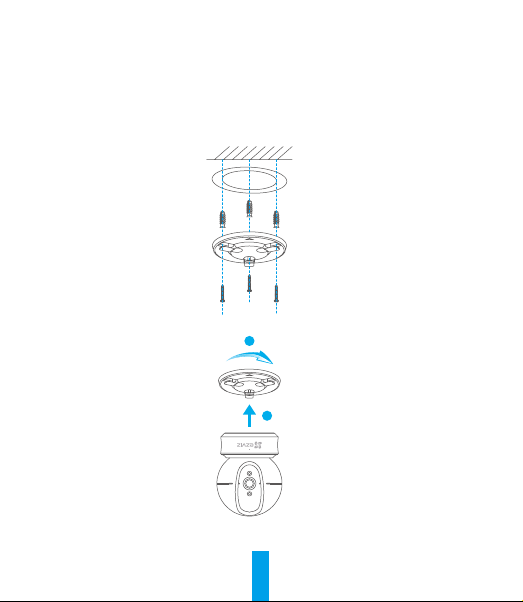
1. Place drill template onto the surface you have chosen to mount the camera.
2. (For cement wall/ceiling only) Drill screw holes according to the template and insert three expansion
screws.
3. Use three metal screws to fix the camera base according to the template.
4. Install the camera on the base, and turn it 15° to secure it.
2
1
5. Connect the power cable to the camera. If the camera was previously connected to the Wi-Fi
network, it will automatically connect to the same Wi-Fi network.
5
Page 11

Appendix
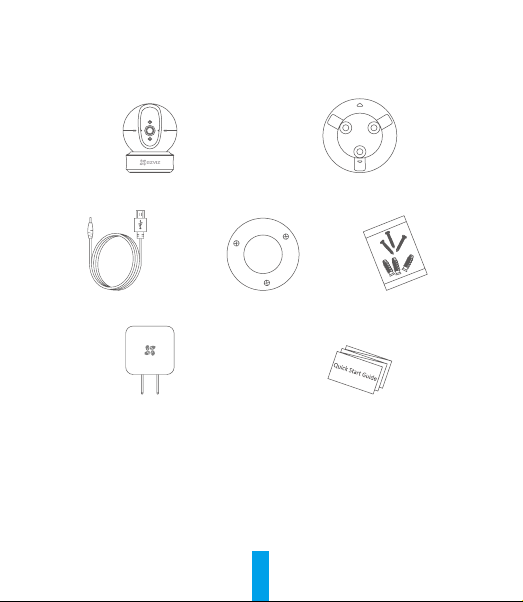
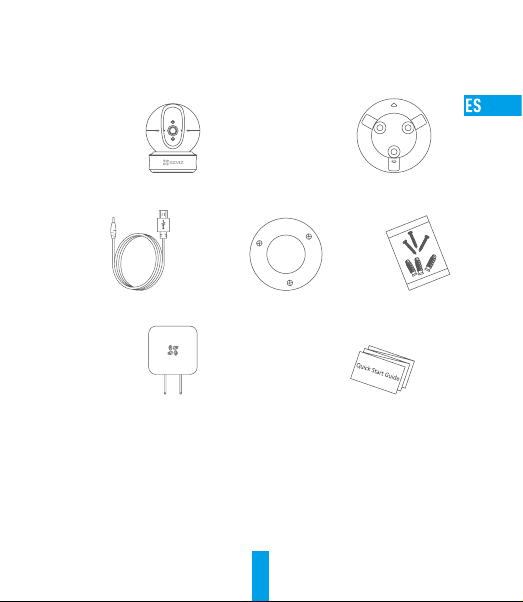
Box Content
Camera (x1) Base (x1)
Power Cable (x1) Drill Template (x1) Screw Kit (x1)
Power Adapter (x1) Quick Start Guide x(1)
6
Page 12
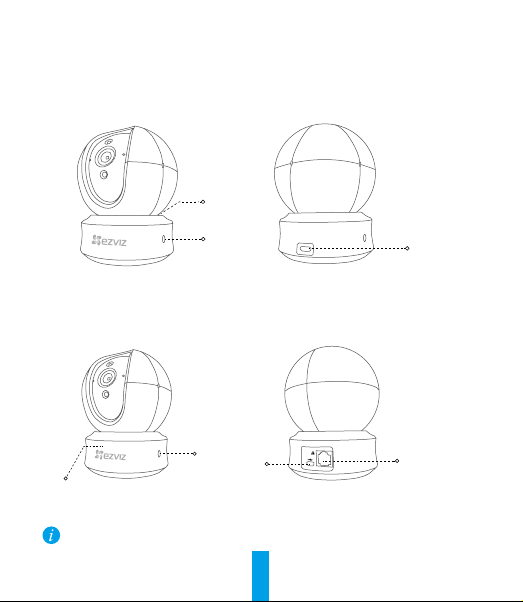
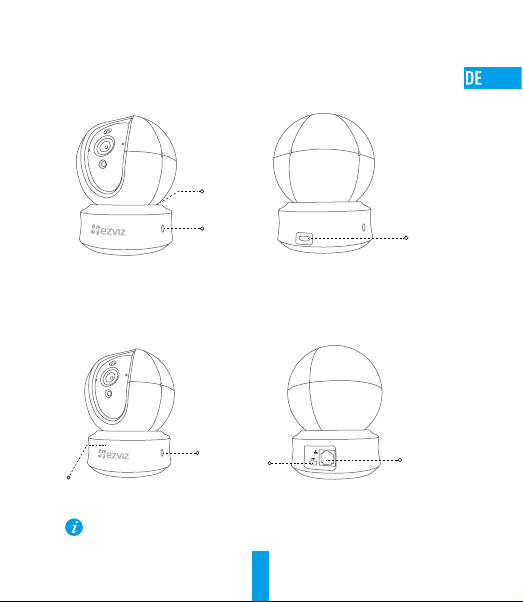
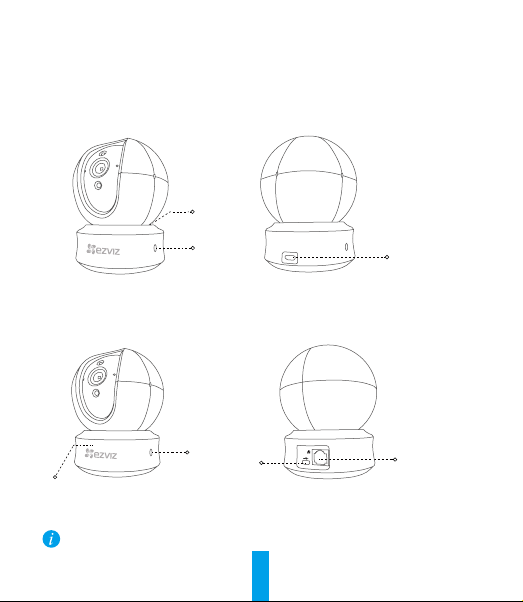
Type
Type A
LED Indicator
Louderspeaker
Type B
Louderspeaker
LED Indicator
For detailed information, please visit www.ezvizlife.com.
Power Interface
7
Power
Interface
Network
Interface
Page 13
Einrichten
Schritt 1 Hochfahren
Schließen Sie das Stromkabel an die Kamera an und stecken Sie das Netzteil dann in
eine Steckdose, wie unten dargestellt.
Steckdose
Stromanschluss
Stromkabel
LED-Anzeigestatus
Leuchtet rot: Kamera fährt hoch.
Blinkt langsam rot: WLAN-Verbindung ist fehlgeschlagen.
Blinkt schnell rot: Geräteausnahme (z.B. microSD-Karte
Fehler).
Leuchtet blau: Video wird in der EZVIZ-App wiedergegeben.
Blinkt schnell blau: Kamera ist bereit für WLANVerbindung.
Blinkt langsam blau: Kamera arbeitet einwandfrei.
Schalten Sie die
komplett von einer Seite zur anderen und neigt sich einmal vor und zurück.
ein und warten Sie, bis sie hochgefahren ist. Die Kamera dreht sich
Kamera
8
Page 14
Schritt 2 Kamera einrichten
1. Ein Benutzerkonto erstellen
- Verbinden Sie Ihr Mobiltelefon mit einem 2,4-GHz-WLAN.
- Suchen Sie im App Store oder auf Google Play
- Laden Sie die EZVIZ-App herunter und installieren Sie sie.
- Starten Sie die App.
- Erstellen und registrieren Sie ein EZVIZ-Benutzerkonto mithilfe des
Einrichtungsassistenten.
2. Eine Kamera zu EZVIZ hinzufügen
- Melden Sie sich mithilfe der EZVIZ-App bei Ihrem Konto an.
- Tippen Sie auf der Homepage auf „+“, um den Bildschirm „Scan QR Code“ (QR-Code
scannen) aufzurufen.
- Scannen Sie den QR-Code auf der Unterseite der Kamera.
- Folgen Sie dem EZVIZ-App-Assistenten, um die WLAN-Konfiguration abzuschließen.
Falls Ihr Produkt nur 2,4 GHz ist, empfehlen wir, zunächst die 5 GHz des
Routers auszuschalten, um mit dem Hinzufügen fortzufahren.
9
(TM)
nach „EZVIZ“.
Page 15
microSD-Kartensteckplatz
ZURÜCKSETZEN
• Wenn die Kamera keine Verbindung zu Ihrem WLAN herstellen kann, drücken Sie 5Sekunden
lang die Zurücksetzen-Taste und wiederholen Sie Schritt 2.2.
• Um ein anderes WLAN zu wählen, drücken Sie 5 Sekunden die Zurücksetzen-Taste, um das
Gerät neu zu starten.
3. Aktivieren Sie die Bildverschlüsselung (optional)
Nach der Aktivierung können Ihre Videos und Bilder während der Übertragung verschlüsselt werden.
Sie können ebenfalls das Standard-Passwort ändern.
- Navigieren Sie zu den Kameraeinstellungen.
- Tippen Sie auf „Change Password“ (Passwort ändern).
- Tippen Sie auf „Edit“ (Bearbeiten).
- Geben Sie den Original-Verifizierungscode ein, der sich auf dem Aufkleber auf der
Kamera befindet.
- Geben Sie das neue Passwort ein (6 bis 12Buchstaben/Ziffern).
4. Blickwinkel einstellen
10
Page 16

Sie können die Kamera mit der EZVIZ-App auf einen optimalen Winkel einstellen. Dabei
können Sie sie um 0 ° bis 340 ° schwenken und um -15 ° bis 105 ° neigen.
SD-Kartenverwaltung
•SetzenSievorderMontageeinemicroSD-KarteimKartenschachtein.
•microSD-Karte gehört nicht zum Lieferumfang. Empfohlene Kompatibilität: Klasse10, max. 128 GB.
1. Tippen Sie in der EZVIZ-App in den Geräteeinstellungen auf Storage Status (Speicherstatus), um den
Status der SD-Karte zu überprüfen.
2. Wenn für die Speicherkarte der Status „Uninitialized“ (Nicht initialisiert) angezeigt wird, tippen Sie
darauf, um sie zu initialisieren.
Der Status ändert sich dann zu Normal und Videos und/oder Bilder können gespeichert werden.
Wandmontage (optional)
Die Kamera kann an einer Wand oder Decke montiert werden.
• Die Wand/Decke muss stark genug sein, um das dreifache Gewicht von Kamera und Halterung
aufzunehmen.
• Schützen Sie die Kamera vor reflektierenden Gegenständen wie Spiegeln.
11
Page 17
1. Legen Sie die Bohrschablone auf den Montageort der Kamera.
2. (Nur für gemauerte/gegossene Decken und Wände) Bohren Sie Löcher gemäß der
Schablone zur Aufnahme von drei Dübeln.
3. Befestigen Sie die Schablone der Kamera mit drei Schrauben.
4. Setzen Sie die Kamera auf den Montagefuß und drehen Sie sie um 15°, um sie zu sichern.
5. Schließen Sie das Stromkabel an der Kamera an. Wenn die Kamera bereits mit dem WLAN
verbunden war, verbindet sie sich automatisch wieder mit diesem WLAN.
2
1
12
Page 18
Anhang
Lieferumfang
1x Kamera 1x Montagefuß
1x Stromkabel 1x Bohrschablone 1x Schraubensatz
1x Netzteil 1x Kurzanleitung
13
Page 19
Typ
Typ A
Typ B
LEDBetriebsanzeige
Lautsprecher
Stromanschluss
Lautsprecher
LED-Betriebsanzeige
Nähere Informationen finden Sie auf www.ezvizlife.com.
Stromanschluss
LANAnschluss
14
Page 20
Configuración
Paso 1 Encendido
Conecte el cable de alimentación a la cámara y después enchufe el adaptador de corriente a
una toma como se muestra en la siguiente figura.
Toma de alimentación
Interfaz de alimentación
Cable de alimentación
Indicador de estado LED
Luz roja fija: La cámara se está iniciando.
Luz roja que parpadea lentamente: La conexión de
Wi-Fi ha fallado.
Luz roja que parpadea rápidamente: Excepción del
dispositivo (por ejemplo: error de tarjeta MicroSD).
Luz azul fija: El video se está visualizando o
reproduciendo en la aplicación EZVIZ.
Luz azul que parpadea rápidamente: La cámara está
lista para la conexión Wi-Fi.
Luz azul que parpadea lentamente: La cámara
funciona correctamente.
Encienda el cámara y espere a que arranque. La cámara girará completamente de lado a
lado y se inclinará hacia arriba y abajo una vez.
15
Page 21
Paso 2 Configuración de la cámara
1. Cree una cuenta de usuario
- Conecte el teléfono móvil a una red Wi-Fi usando su red de 2.4 GHz.
- Busque "EZVIZ" en el App Store o Google Play
- Descargue e instale la aplicación EZVIZ.
- Abra la aplicación.
- Cree y registre una cuenta de usuario de EZVIZ siguiendo las instrucciones del asistente de
inicio.
2. Agregar una cámara a EZVIZ
- Inicie sesión en su cuenta con la aplicación EZVIZ.
- Toque el signo "+" de la página de Inicio y vaya a la interfaz para Escanear el código QR.
- Escanee el código QR situado en la parte inferior de la cámara.
- Siga las indicaciones del asistente de la aplicación EZVIZ para terminar la configuración
Wi-Fi.
Si su producto es solo de 2,4 GHz, le recomendamos que primero
desactive la banda de 5 GHz del enrutador para seguir con el proceso de
conexión.
(TM)
.
16
Page 22

Ranura para tarjeta microSD
REINICIAR(Reset)
• Si la cámara no se conecta a su red Wi-Fi, mantenga pulsado el botón Reset durante 5 s
y repita el paso2.2.
• Para seleccionar otra red Wi-Fi, mantenga pulsado el botón Reset durante 5 s y reinicie
el dispositivo.
3. Habilite el cifrado de imagen
Tras la habilitación, será posible cifrar sus vídeos e imágenes durante la transmisión.
También es posible cambiar la contraseña predeterminada.
- Acceda a la configuración de la cámara.
- Pulse "Change Password" (cambiar contraseña).
- Pulse "Edit" (editar).
- Introduzca el código de verificación original que aparece en la etiqueta de la cámara.
- Introduzca la nueva contraseña (de 6 a 12 caracteres [letras y números]).
4. Ajuste de ángulo
17
Page 23
Puede ajustar la cámara con la aplicación EZVIZ para encontrar el ángulo adecuado. El
ángulo de panorámica va de 0° a 340°, y el ángulo de inclinación de -15° a 105°.
Gestión de la tarjeta SD
• Inserte la tarjeta microSD en la ranura antes de proceder al montaje.
• No se incluye la tarjeta microSD como parte del contenido de la caja. Compatibilidad
recomendada: Clase 10, 128 GB máx.
1. En la aplicación EZVIZ, pulse "Storage Status" (estado del almacenamiento) que se encuentra en
la interfaz "Device Settings" (configuración del dispositivo) para verificar el estado de la tarjeta SD.
2. Si el estado de la tarjeta de memoria es Uninitialized (No inicializada), tóquelo para inicializarla.
El estado cambiará entonces a normal y se podrán almacenar vídeos y/o imágenes.
Montaje en pared (opcional)
La cámara puede montarse en la pared o en el techo.
• Asegúrese de que la pared o el techo sean lo suficientemente resistentes para soportar un
peso tres veces superior al de la cámara y el soporte de montaje.
• La cámara deberá estar alejada de objetos reflectantes como los espejos.
18
Page 24
1. Coloque la plantilla de perforación sobre la superficie escogida para el montaje de la cámara.
2. Taladre los agujeros para los tornillos según la plantilla e inserte 3 tornillos de expansión (solo para
pared/techo de cemento).
3. Utilice 3 tornillos de metal para fijar la base de la cámara, según la plantilla.
4. Monte la cámara en la base y gírela 15º para fijarla.
2
1
5. Conecte el cable de alimentación a la cámara. Si la cámara se ha conectado previamente a la red
Wi-Fi, se conectará automáticamente a la misma red Wi-Fi.
19
Page 25
Anexo
Contenido de la caja
Cámara (x1) Base (x1)
Cable de alimentación (x1) Plantilla de perforación (x1) Juego de tornillos (x1)
Adaptador de corriente (x1) Guía de inicio rápido (x1)
20
Page 26
Tipo
Tipo A
Indicador LED
El altavoz
Tipo B
El altavoz
Interfaz de
Indicador LED
Para obtener información detallada, visite www.ezvizlife.com.
alimentación
Interfaz de
alimentación
Interfaz de
LAN
21
Page 27
Mise en place
Étape 1 Mise sous tension
Branchez le câble d’alimentation à la caméra puis l’adaptateur d’alimentation à une prise
électrique, comme illustré dans la figure ci-dessous.
Prise électrique
Interface d’alimentation
État de l’indicateur LED
Mettez le
de chaque côté et de haut en bas une fois.
sous tension et laissez-le s’allumer. La caméra pivotera entièrement
caméra
Câble d’alimentation
Rouge fixe : Démarrage de la caméra.
Lent clignotement rouge : Échec de la connexion
Wi-Fi.
Rapide clignotement rouge : Exception de
périphérique (par ex. erreur de carte MicroSD).
Bleue fixe : La vidéo est en cours de lecture ou
diffusée sur l’application EZVIZ.
Rapide clignotement bleu : La caméra est prêt à
se connecter au Wi-Fi.
Lent clignotement bleu : La caméra fonctionne
correctement.
22
Page 28

Étape 2 Configuration de la caméra
1. Créer un compte utilisateur
- Connectez votre téléphone mobile à votre réseau Wi-Fi 2,4GHz.
- Recherchez «EZVIZ» dans l’App Store ou Google Play
- Téléchargez et installez l’application EZVIZ.
- Lancez l’application.
- Créez et enregistrez un compte utilisateur EZVIZ en suivant l’assistant de démarrage.
2. Ajouter une caméra à EZVIZ
- Connectez-vous à votre compte à l’aide de l’application EZVIZ.
- Appuyez sur l’icône «+» de la page d’accueil pour accéder à l’interface de lecture du
code QR.
- Scannez le code QR au bas de la caméra.
- Suivez l’assistant de l’application EZVIZ pour terminer la configuration Wi-Fi.
Si votre produit fonctionne en bande de fréquence de 2,4GHz, nous vous
recommandons de bien vouloir désactiver en premier la bande de fréquence de
5GHz pour procéder à l’ajout.
(TM)
.
23
Page 29
Logement
de carte microSD
RÉINITIALISATION(Reset)
• Si la connexion de la caméra à votre réseau Wi-Fi échoue, maintenez enfoncé le bouton de
réinitialisation (Reset) pendant 5s et répétez l’étape2.2.
• Pour sélectionner un autre réseau Wi-Fi, maintenez enfoncé le bouton de réinitialisation (Reset)
pendant 5s pour redémarrer l’appareil.
3. Activer «Image Encryption» (Cryptage d’image)
Une fois le cryptage d’image activé, vos vidéos et vos images peuvent être cryptées lors de
leur transmission.
Vous pouvez également modifier le mot de passe par défaut.
- Pour cela, allez dans les paramètres de la caméra.
- Touchez «Change Password» (Modifier mot de passe).
- Touchez «Edit» (Modifier).
- Entrez le code de vérification d’origine figurant sur l’étiquette de la caméra.
- Entrez un nouveau mot de passe (6 à 12caractères et chiffres).
4. Réglage de l’angle
24
Page 30

Vous pouvez régler la caméra via l’application EZVIZ pour obtenir un angle optimal. L’angle
de panoramique varie de 0° à 340°, et l’angle d’inclinaison verticale varie de -15° à 105°.
Gestion de la carteSD
• Insérez une carte microSD dans le logement dédié avant d’installer l’appareil.
• La carte microSD n’est pas fournie. Compatibilité recommandée: carte microSD de classe10,
128Go max.
1. Dans l’application EZVIZ, touchez « Storage Status » (État du stockage) dans l’interface « Device Settings »
(Réglages de l’appareil) pour vérifier l’état de la carte microSD.
2. Si l’état de la carte mémoire affiché est « Uninitialized » (Non initialisé), appuyez sur la commande
pour l’initialiser.
L’état sera changé en Normal pour vous permettre d’enregistrer des vidéos et/ou des images.
Montage mural (facultatif)
Il est possible de monter la caméra sur un mur ou au plafond.
• Assurez-vous que le mur ou le plafond est assez solide pour supporter trois fois le poids de
la caméra et du support.
• Tenez la caméra loin de tout objet réfléchissant comme un miroir.
25
Page 31

1. Placez le gabarit de perçage sur la surface d’installation de la caméra.
2. (Installation uniquement sur un mur en ciment ou un plafond) Percez des trous correspondant au
gabarit de perçage et vissez-y trois vis à expansion.
3. Utilisez les vis métalliques pour fixer la base de la caméra, comme illustré ci-dessous.
4. Installez la caméra sur le socle et tournez-la de 15° pour la serrer.
2
1
5. Connectez le câble d’alimentation à la caméra. Si la caméra a été précédemment connectée à un
réseau Wi-Fi, elle se reconnectera automatiquement au même réseau Wi-Fi.
26
Page 32

Annexe
Contenu du carton
1 Caméra 1base
1câble d’alimentation 1gabarit de perçage 1kit de visserie
1adaptateur d’alimentation 1guide de démarrage rapide
27
Page 33

Type
Type A
Indicateur LED
Haut-parleur
Type B
Haut-parleur
Indicateur LED
Pour des informations détaillées, veuillez visiter www.ezvizlife.com.
Interface
d’alimentation
28
Interface
d’alimentation
Interface de
réseau
local (LAN)
Page 34

Configurazione
Passo 1 Accensione
Collegare il cavo di alimentazione alla videocamera e quindi collegare l'alimentatore alla presa
di corrente (figura sotto).
Presa di corrente
Interfaccia di alimentazione
Cavo di alimentazione
Stato indicatore LED
Rosso fisso: la telecamera si sta avviando.
Rosso lampeggiante lento: impossibile
connettersi alla rete Wi-Fi.
Rosso lampeggiante veloce: eccezione dispositivo
(es. errore scheda microSD.
Blu fisso: il video viene tramesso o riprodotto
dall'app EZVIZ.Blu lampeggiante veloce: la telecamera è pronta
per la connessione Wi-Fi.
Blu lampeggiante lento: la telecamera funziona
correttamente.
Accendere la videocamera e attendere. La videocamera ruoterà completamente da lato a lato e
si inclinerà in alto e in basso una volta.
29
Page 35

Passo 2 Configurazione della videocamera
1. Creare un account utente
- Connettere il cellulare alla rete Wi-Fi 2,4GHz.
- Cercare "EZVIZ" in App Store o Google Play
- Scaricare e installare l'app EZVIZ.
- Avviare l'app.
- Creare e registrare un account utente EZVIZ seguendo la procedura guidata all'avvio.
2. Aggiunta di una videocamera a EZVIZ
- Effettuare l'accesso nell'app EZVIZ utilizzando l'account creato.
- Toccare "+" nella pagina iniziale per passare all'interfaccia di acquisizione del QR Code.
- Acquisire il QR code riportato sotto la videocamera o sulla copertina della Guida
introduttiva.
- Seguire le istruzioni della procedura guidata dell’app EZVIV per terminare la configurazione
della rete Wi-Fi.
Se il prodotto acquistato supporta solo la banda dei 2.4GHz, si consiglia di
disattivare la banda dei 5GHz sul router, prima di iniziare la procedura di
connessione.
(TM)
.
30
Page 36

Slot per scheda microSD
Reset
• Se la videocamera non si connette alla rete Wi-Fi, tenere premuto il tasto Reset per 5secondi
e ripetere il passo2.2.
• Per selezionare un'altra rete Wi-Fi, tenere premuto il tasto RST per 5 secondi per riavviare il
dispositivo.
3. Facoltativo: abilitare la crittografia dell'immagine (Opzionale)
Una volta abilitata, video e immagini possono essere crittografati durante la trasmissione.
È inoltre possibile modificare la password predefinita.
- Accedere alle impostazioni della telecamera.
- Toccare "Change Password" (Modifica password).
- Toccare "Edit" (Modifica).
- Inserire il codice di verifica originale situato sull'etichetta della telecamera.
- Inserire la nuova password (da 6 a 12 caratteri alfanumerici).
4. Regolazione dell'angolazione
31
Page 37

È possibile regolare la videocamera tramite l'app EZVIZ per ottenere un'angolazione ottimale.
L'angolo della panoramica va da 0° a 340° e l'angolo dell'inclinazione va da -15° a 105°.
Gestione della scheda SD
•InserireunaschedaMicroSDnelloslotprimadelmontaggio.
•La scheda MicroSD non è inclusa nella confezione. Caratteristiche di compatibilità
raccomandate: Classe10, Max.128GB.
1. Nell'app EZVIZ, nell'interfaccia Device Settings (Impostazioni dispositivo) toccare Storage Status
(Stato Archivio) per controllare lo stato della scheda SD.
2. Se in corrispondenza della scheda di memoria viene visualizzato lo stato Uninitialized (riformatta),
toccare per inizializzare la scheda.
Lo stato verrà modificato a Normal (Normale) e sarà possibile archiviare video e/o immagini.
Montaggio a parete (facoltativo)
La videocamera può essere montata a parete o a soffitto.
• Accertarsi che la parete o il soffitto siano sufficientemente robusti per sopportare tre volte il
peso di videocamera e supporto.
• La videocamera deve trovarsi lontana da superfici riflettenti quali specchi.
32
Page 38

1. Posizionare la dima di foratura sulla superficie prescelta per fissare la videocamera.
2. (Solo per pareti/soffitti in cemento) Eseguire dei fori per viti secondo la dima e inserire tre viti di
espansione.
3. Utilizzare tre viti metalliche per fissare la base della videocamera secondo la dima.
4. Installare la videocamera sulla base e ruotarla di 15° per fissarla in modo sicuro.
2
1
5. Collegare il cavo di alimentazione alla videocamera. Se la videocamera è stata precedentemente
connessa alla rete Wi-Fi, si connetterà automaticamente alla stessa rete Wi-Fi.
33
Page 39

Appendice
Contenuto della confezione
Videocamera (x1) Base (x1)
Cavo di alimentazione (x1)
Alimentatore (x1) Guida introduttiva (x1)
Dima dei fori
d'installazione (x1) Kit di tasselli (x1)
34
Page 40

Tipo
Tipo A
Indicatore LED
Altoparlante
Tipo B
Altoparlante
Indicatore LED
Per informazioni dettagliate, visitare www.ezvizlife.com.
Interfaccia di
alimentazione
35
Interfaccia di
alimentazione
Interfaccia
LAN
Page 41

Installatie
Stap 1 Inschakelen
Sluit de voedingskabel aan op de camera en steek de netadapter in een stopcontact om de
camera in te schakelen.
Stopcontact
Power Interface
Netsnoer
LED-indicator status
Rood brandend: Camera wordt opgestart.
Knippert langzaam rood: Wifi-verbinding is mislukt.
Knippert snel rood: Apparaatuitzondering (bijv. fout
microSD-kaart).
Blauw brandend: Video wordt bekeken of afgespeeld in
de EZVIZ-app.
Knippert snel blauw: Camera is gereed voor verbinding
met wifi.
Knippert langzaam blauw: Camera werkt correct.
Schakel de camera in en laat het opstarten. De camera draait volledig van de ene kant
naar de andere kant en kantelt een keer omhoog en omlaag.
36
Page 42

Stap 2 Instellen camera
1. Een gebruikersaccount aanmaken
- Verbind uw mobiele telefoon met de wifi via uw 2,4 GHz-netwerk.
- Zoek in de App Store of Google Play
- Download en installeer de EZVIZ-app.
- Start de app.
- Maak een EZVIZ gebruikersaccount aan en registreer deze via de opstartwizard.
2. Een camera aan EZVIZ toevoegen
- Meld u aan op uw account met de EZVIZ-app.
- Klik “+” op de startpagina om naar de interface QR-code scannen te gaan.
- Scan de QR-code aan de onderzijde van de camera.
- Volg de wizard van de EZVIZ-app om wifi-configuratie te voltooien.
Als uw product alleen gebruik maakt van 2,4 GHz, raden we u aan eerst de 5 GHz van
de router uit te zetten voordat u verdergaat met het verbindingsproces.
(TM)
naar “EZVIZ”.
37
Page 43

MicroSD-kaart slot
HERSTELLEN(Reset)
• Als de camera geen verbinding maakt met uw wifi-netwerk, houdt u de Reset-knop
5seconden lang ingedrukt en herhaalt u stap 2.2.
• Als u een ander Wi-Fi-netwerk wilt selecteren, houdt u de Reset-knop 5 seconden lang
ingedrukt om het apparaat opnieuw te starten.
3. Schakel de beeldcodering in
Na het inschakelen kunnen uw video's en afbeeldingen gecodeerd worden in de verzending.
U kunt tevens het standaard wachtwoord wijzigen.
- Ga naar de camera-instellingen.
- Tik op “Change Password (Wachtwoord wijzigen)”.
- Tik op “Edit (Bewerken)”.
- Voer de originele verificatiecode in die zich bevindt op het label van de camera.
- Voer een nieuw wachtwoord in (6 tot 12 tekens en cijfers).
4. Aanpassen van de hoek
U kunt de camera via de EZVIZ-app afstellen om een optimale hoek te krijgen. De draaihoek
varieert van 0° tot 340°, en de kantelhoek varieert van -15° tot 105°.
38
Page 44

Beheer SD-kaart
• Steek een MicroSD-kaart in de sleuf voor het monteren.
• MicroSD-kaart niet meegeleverd in de inhoud van de doos. Aanbevolen compatibiliteit:
Klasse10, max. 128 GB.
1. Tik in de EZVIZ-app op Storage Status (Opslagstatus) in de interface Apparaatinstellingen om de
status van de SD-kaart te controleren.
2. Als de status van de geheugenkaart als Uninitialized (Niet geïnitialiseerd) wordt weergegeven, tikt
u om hem te initialiseren.
De status zal vervolgens wijzigen naar Normal (Normaal) en video's en/of afbeeldingen opslaan.
Wandmontage (optioneel)
De camera kan op de muur of het plafond worden gemonteerd.
• Zorg ervoor dat de muur of het plafond stevig genoeg is om drie keer het gewicht van de
camera en het montuur te dragen.
• De camera dient uit de buurt van reflecterende voorwerpen, zoals spiegels, te blijven.
39
Page 45

1. Plaats het boorsjabloon op het opper vlak waarop u de camera wilt monteren.
2. (Uitsluitend voor cementen muur/plafond) Boor schroefgaten overeenkomstig het sjabloon en steek
er drie expansieschroeven in.
3. Gebruik drie metalen schroeven om de onderkant van de camera vast te zetten overeenkomstig
met het sjabloon.
4. Monteer de camera op de grondplaat en draai het 15° om het vast te zetten.
2
1
5. Sluit het netsnoer aan op de camera. Als de camera al eens eerder op een wifi-netwerk was
aangesloten, dan maakt het automatisch verbinding met hetzelfde wifi-netwerk.
40
Page 46

Bijlage
Inhoud van de doos
Camera (x1) Grondplaat (x1)
Netsnoer (x1) Boorsjabloon (x1) Set schroeven (x1)
Netadapter (x1) Snelstartgids (x1)
41
Page 47

A
LED-indicator
B
LED-indicator
Bezoek voor meer informatie www.ezvizlife.com.
Luidspreker
Luidspreker
Power Interface
Power Interface
Interfaccia
LAN
42
Page 48

Konguracja
Krok 1 Podłączenie zasilania
Podłącz przewód zasilający do kamery, następnie podłącz zasilacz do kontaktu, jak na ilustracji.
Gniazdo sieci elektrycznej
Złącze zasilania
Stan diody LED
Włącz
pełen ruch góra-dół.
Przewód zasilający
Włączony (czerwony): Trwa uruchamianie kamery.
Miga powoli (czerwony): Połączenie zsiecią Wi-Fi
niepowiodło się.
Miga szybko (czerwony): Wyjątek urządzenia
(np.błąd karty microSD).
Włączony (niebieski): Trwa wyświetlanie wideo
lubodtwarzanie wideo waplikacji EZVIZ.
Miga szybko (niebieski): Kamera jest gotowa
dopołączenia zsiecią Wi-Fi.
Miga powoli (niebieski): Kamera funkcjonuje
prawidłowo.
i poczekaj, aż się uruchomi. Kamera wykona pełen obrót w poziomie i
kamery
43
Page 49

Krok 2 Konguracja kamer y
1. Stwórz konto użytkownika
- Połącz telefon z Wi-Fi przez sieć 2,4GHz.
- Znajdź aplikację EZVIZ w App Store lub sklepie Google Play
- Pobierz i zainstaluj aplikację EZVIZ.
- Uruchom ją.-
- Stwórz i zarejestruj konto użytkownika EZVIZ za pomocą kreatora.
2. Dodawanie kamery do EZVIZ
- Używając aplikacji EZVIZ, zaloguj się na swoje konto.
- Na stronie głównej dotknij „+”, aby przejść do interfejsu skanowania kodów QR.
- Zeskanuj kod QR znajdujący się na spodzie kamery.
- Postępuj zgodnie zinstrukcjami aystenta aplikacji EZVIZ w celuzakończenia konguracji WiFi.
Jeżeli Twoje urządzenie korzysta zczęstotliwości 2,4GHz, zdecydowanie
zalecam y wyłączenie obsługi częstotliwości 5GHz w routerze przed
kontynuacją procesu dodawania urządzenia.
44
(TM)
.
Page 50

Gniazdo karty micro SD
Reset
Jeśli kamera nie połączy się z siecią Wi-Fi, naciśnij i przytrzymaj przez 5 sekundy przycisk Reset i
•
powtórz krok 2.2.
Przytrzymaj przycisk Reset przez 5 sekundy aby uruchomić urządzenie ponownie i wybrać inną
•
sieć Wi-Fi.
3. Włącz funkcję szyfrowania obrazu
Po włączeniu tej funkcji można szyfrować przesyłany obraz.
Można również zmienić hasło domyślne.
- Przejdź do ustawień kamery.
- Naciśnij przycisk Change Password (Zmień hasło).
- Naciśnij przycisk Edit (Edytuj).
- Wprowadź oryginalny kod werykacyjny podany na etykiecie kamery.
- Wprowadź nowe hasło (6–12 znaków alfanumerycznych i cyfr).
4. Regulacja kąta
Możesz zmienić ustawienie kamery z poziomu aplikacji EZVIZ, aby uzyskać optymalny kąt. Kąt
obrotu w pionie wynosi 0° - 340°, a obrotu w poziomie: -15° - 105°.
45
Page 51

Korzystanie zkarty SD
Włóż kartę micro SD wgniazdo przed zamocowaniem kamery.
•
Karta micro SD nie znajduje się wzestawie. Zalecana karta: klasa 10; maks.128GB.
•
1. W aplikacji EZVIZ naciśnij opcję Storage Status (Stan magazynu) w oknie Device Settings (Ustawienia
urządzenia), aby sprawdzić stan karty SD.
2. Jeżeli wyświetlany jest stan karty pamięci Uninitialized (Niezainicjowana), naciśnij przycisk, aby ją zainicjować.
Stan zostanie zmieniony na Normal (Normalny) i możliwa będzie rejestracja lmów wideo i/lub zdjęć.
Montaż naścienny (opcja)
Kamerę można zainstalować naścianie lub sucie.
Upewnij się, żeścianę/sut przystosowano doobciążenia trzykrotnie większego niż waga kamery
•
ielementów mocujących.
Kamera nie powinna znajdować się wpobliżu przedmiotów odbijających światło, takich jak lustra.
•
46
Page 52

1. Umieść szablon otworów w miejscu, w którym kamera zostanie zainstalowana.
2. (Tylko ściany/sut y cementowe) Należy wywiercić otwory zgodnie z szablonem i umieścić w nich trzy
kołki rozporowe na wkręt y.
3. Przymocuj podstawę kamery trzema metalowymi wkrętami zgodnie z szablonem.
4. Zamontuj kamerę na podstawie, następnie obróć ją o 15°, aby ją zabezpieczyć.
2
1
5. Podłącz przewód zasilający kamerę. Jeśli kamera było połączona z siecią Wi-Fi, automatycznie
ponownie połączy się z tą samą siecią.
47
Page 53

Załącznik
Zawartość opakowania
Kamery (x1) Podstawa (x1)
Przewód zasilający (x1) Szablon odwiertów (x1) Zestaw śrub (x1)
Zasilacz (x1) Skrócona instrukcja obsługi (x1)
48
Page 54

Typu
Typu A
Wskaźnik LED
Głośnik
Typu B
Głośnik
Wskaźnik LED
Abyuzyskać więcej informacji, skorzystaj zwitryny www.ezvizlife.com.
Złącze zasilania
Złącze
zasilania
złącze
LAN
49
Page 55

Ρύθμιση
Βήμα 1Ενεργοποίηση
Συνδέστε το καλώδιο τροφοδοσίας στην κάμερα και, στη συνέχεια, συνδέστε τον τροφοδοτικό σε
μια πρίζα σύμφωνα με την παρακάτω εικόνα.
Πρίζα
Διεπαφή ισχύος
Καλώδιο τροφοδοσίας
Κατάσταση ένδειξης LED
Σταθερό κόκκινο: Γίνεται εκκίνηση της κάμερας.
Κόκκινο που αναβοσβήνει αργά: Αποτυχία σύνδεσης Wi-Fi.
Κόκκινο που αναβοσβήνει γρήγορα: Εξαίρεση συσκευής (π.χ.
σφάλμα κάρτας MicroSD).
Σταθερό μπλε: Γίνεται προβολή ή αναπαραγωγή βίντεο στην
Εφαρμογή EZVIZ.
Μπλε που αναβοσβήνει γρήγορα: Η κάμερα είναι έτοιμη για
τη σύνδεση Wi-Fi.
Μπλε που αναβοσβήνει αργά: Η κάμερα λειτουργεί κανονικά.
Ενεργοποιήστε την κάμερα και περιμένετε να ολοκληρωθεί η εκκίνηση. Η κάμερα
ολοκληρώνει μία ολόκληρη περιστροφή από άκρη σε άκρη και κλίνει προς τα πάνω και
προς τα κάτω μία φορά.
50
.
Page 56

Βήμα 2 Ρύθμισ η κάμερας
1. Δημιουργήστε έναν λογαριασμό χρήστη
- Συνδέστε το κινητό σας τηλέφωνο στο Wi-Fi χρησιμοποιώντας το δίκτυο 2,4 GHz.
- Αναζητήστε τον όρο "EZVIZ" στο App Store ή το Google Play
- Κατεβάστε και εγκαταστήστε την εφαρμογή EZVIZ.
- Εκκινήστε την εφαρμογή.
- Δημιουργήστε και δηλώστε έναν λογαριασμό χρήστη EZVIZ σύμφωνα με τον οδηγό εκκίνησης.
2. Προσθέστε μια κάμερα στην εφαρμογή EZVIZ
- Συνδεθείτε στον λογαριασμό σας από την εφαρμογή EZVIZ.
- Πατήστε το "+" στην Αρχική σελίδα για να ανοίξει η διεπαφή σάρωσης κωδικού QR.
- Σαρώστε τον κωδικό QR στο κάτω μέρος της κάμερας.
- Ακολουθήστε τον οδηγό εφαρμογής EZVIZ για να ολοκληρώσετε τη ρύθμιση παραμέτρων WiFi.
Εάν το προϊόν σας λειτουργεί μόνο στα 2.4GHz, σας προτείνουμε να
απενεργοποιήσετε πρώτα τη λειτουργία 5GHz του δρομολογητή σας, προτού
συνδεθείτε στο ασύρματο δίκτυο.
51
(TM)
.
Page 57

Υποδοχή κάρτας microSD
ΕΠΑΝΑΦΟΡΑ
•
Σε περίπτωση αποτυχίας σύνδεσης της κάμερας στο δίκτυο Wi-Fi, πιέστε παρατεταμένα το κουμπί
ΕΠΑΝΑΦΟΡΑ για 5 δευτερόλεπτα και επαναλάβετε το Βήμα 2.2.
•
Για να επιλέξετε ένα άλλο δίκτυο Wi-Fi, πιέστε παρατεταμένα το κουμπί ΕΠΑΝΑΦΟΡΑ για
5 δευτερόλεπτα για επανεκκίνηση της συσκευής.
3. Ενεργοποιήστε την κρυπτογράφηση εικόνας
Αφού την ενεργοποιήσετε, το βίντεο και η εικόνα σας μπορούν να κρυπτογραφηθούν κατά τη μετάδοση.
Μπορείτε, επίσης, να αλλάξετε τον προεπιλεγμένο κωδικό πρόσβασης.
- Μεταβείτε στην οθόνη ρυθμίσεων κάμερας.
- Πατήστε "Change Password" (Αλλαγή κωδικού πρόσβασης).
- Πατήστε "Edit" (Επεξεργασία).
- Πληκτρολογήστε τον αρχικό κωδικό επαλήθευσης που βρίσκεται στην ετικέτα της κάμερας.
- Πληκτρολογήστε τον νέο κωδικό πρόσβασης (6 έως 12 χαρακτήρες και αριθμοί).
4. Ρυθμίστε τη γωνία
52
Page 58

Μπορείτε να ρυθμίσετε την κάμερα στην ιδανική γωνία μέσω της εφαρμογής EZVIZ.
Υποστηρίζεται γωνία μετατόπισης από 0° έως 340° και γωνία κλίσης από -15° έως 105°
Διαχείριση κάρτας SD
• Πριν από την εγκατάσταση, τοποθετήστε μια κάρτα microSD στην υποδοχή.
• Η κάρτα MicroSD δεν περιλαμβάνεται σ τη συσκευασία. Προτεινόμενη συμβατότητα: Κατηγορία10,
έως 128GB.
1. Από την εφαρμογή EZVIZ, πατήστε "Storage Status" (Κατάσταση μνήμης) στη διεπαφή
"Device Settings" (Ρυθμίσεις συσκευής) για να ελέγξετε την κατάσταση της κάρτας SD.
2. Αν η κατάσταση της κάρτας μνήμης είναι "Uninitialized" (Απενεργοποιημένη), πατήστε για ενεργοποίηση.
Η κατάσταση θα αλλάξει σε Normal (Κανονική) και η κάρτα θα μπορεί να αποθηκεύει βίντεο ή/και εικόνες.
Τοποθέτηση στον τοίχο (προαιρετικά)
Η κάμερα μπορεί να τοποθετηθεί στον τοίχο ή στην οροφή.
•
Βεβαιωθείτε ότι ο τοίχος/η οροφή διαθέτει επαρκή φέρουσα ικανότητα, ώστε να αντέχει τρεις
φορές το βάρος της κάμερας και της βάσης.
•
Η κάμερα πρέπει να παραμένει μακριά από οποιαδήποτε αντικείμενα που αντανακλούν, όπως καθρέφτες.
53
Page 59

1. Τοποθετήστε το πρότυπο διάτρησης επάνω στην επιφάνεια που έχετε επιλέξει να τοποθετήσετε την κάμερα.
2. (Μόνο για τοίχους/οροφές από τσιμέντο) Ανοίξτε τρεις οπές σύμφωνα με το πρότυπο διάτρησης και
τοποθετήστε ούπα.
3. Χρησιμοποιήστε τρεις μεταλλικές βίδες για να στερεώσετε τη βάση της κάμερας σύμφωνα με το πρότυπο
4. Τοποθετήστε την κάμερα στη βάση και περιστρέψτε την κατά 15° για να την ασφαλίσετε.
2
1
5. Συνδέστε το καλώδιο τροφοδοσίας στην κάμερα. Αν η κάμερα συνδέθηκε προηγουμένως σε κάποιο
δίκτυο Wi-Fi, θα συνδεθεί αυτόματα στο ίδιο δίκτυο Wi-Fi.
54
Page 60

Παράρτημα
Περιεχόμενα συσκευασίας
Κάμερα (x1) Βάση (x1)
Καλώδιο τροφοδοσίας (x1) Πρότυπο διάτρησης (x1) Σετ βιδών (x1)
Τροφοδοτικό (x1) Οδηγός γρήγορης εκκίνησης (x1)
55
Page 61

Τύπος
Τύπος A
Τύπος B
Ενδεικτική λυχνία
LED
Ηχείο
Διεπαφή
ισχύος
Ηχείο
Ενδεικτική λυχνία LED
Για λεπτομερείς πληροφορίες, επισκεφτείτε τη διεύθυνση www.ezvizlife.com.
Διεπαφή ισχύος
56
Θύρα LAN
Page 62

Instalace
Krok1 Zapnutí
Zapojte napájecí kabel do kamery apotom zapojte napájecí adaptér do zásuvky tak, jak je
znázorněno na obrázku uvedeném níže.
Elektrická zásuvka
Rozhraní napájení
Napájecí kabel
Stav indikátoru LED
Trvalé červené svícení: Kamera se spouští.
Pomalé červené blikání: Připojení ksíti Wi-Fi se
nezdařilo.
Rychlé červené blikání: Došlo kvýjimce zařízení (např.
kchybě karty microSD).
Trvalé modré svícení: Zobrazuje se video nebo dochází
kpřehrávání vaplikaci EZVIZ.
Rychlé modré blikání: Kamera je připravena kpřipojení
ksíti Wi-Fi.
Pomalé modré blikání: Kamera je vprovozu a funguje
správně.
Zapněte zařízení kamery anechte ho rozběhnout. Kamera se jedenkrát zcela otočí ze strany
na stranu anakloní se nahoru adolů.
57
Page 63

Krok2 Nastavení kamer y
1. Vytvořte si uživatelský účet
- Připojte mobilní telefon kWi-Fi pomocí sítě 2,4 GHz.
- V obchodech App Store/Google Play
- Stáhněte si anainstalujte aplikaci EZVIZ.
- Spusťte aplikaci.
- Vytvořte si azaregistrujte uživatelský účet EZVIZ podle průvodce spuštěním.
2. Přidání kamery do aplikace EZVIZ
- Přihlaste se do svého účtu pomocí aplikace EZVIZ.
- Klepnutím na tlačítko „+“ na domovské stránce přejděte na rozhraní skenování kódu QR.
- Naskenujte kód QR vdolní části kamery.
- Postupujte podle průvodce aplikace EZVIZ adokončete konguraci sítě Wi-Fi.
Pokud je výrobek vybaven pouze pásmem 2,4GHz, před pokračováním
vpřipojování doporučujeme ve směrovači možnost pásma 5GHz vypnout.
(TM)
vyhledejte „EZVIZ“.
58
Page 64

karty MicroSD
Slot
RESET
RESETOVAT
(
)
• Pokud se kamera nepřipojí ksíti Wi-Fi, stiskněte apodržte tlačítko Reset po dobu 5 sekunda
zopakujte krok 2.2.
• Pro výběr jiné sítě Wi-Fi stiskněte apodržte tlačítko Reset po dobu 5 sekund pro restartování
zařízení.
3. Povolte funkci „Image Encr yption (Šifrování obrazu)“
Jakmile ji povolíte, bude možné videa i snímky kpřenosu šifrovat.
Lze také změnit výchozí heslo.
- Přejděte k nastavení kamery.
- Klepněte na možnost „Change Password (Změnit heslo)“.
- Klepněte na tlačítko „Edit (Upravit)“.
- Zadejte původní ověřovací kód uvedený na štítku kamery.
- Zadejte nové heslo (6 až 12 znaků – písmen a číslic).
4. Nastavení úhlu
Kameru můžete nastavit pomocí aplikace EZVIZ tak, abyste dosáhli optimálního úhlu.
59
Page 65

Úhel otáčení se pohybuje od 0° do 340° aúhel sklonu se pohybuje od -15° do 105°.
Správa kartySD
• Před montáží kamery vložte do slotu kartu MicroSD.
• Karta MicroSD není součástí obsahu balení. Doporučená kompatibilita: Třída10, max.128GB.
1. V aplikaci EZVIZ zkontrolujte stav kar ty SD – v okně „Device Settings (Nastavení zařízení)“ klepněte na
možnost „Storage Status (Stav úložiště)“.
2. Pokud se stav paměťové karty zobrazí jako „Uninitialized (Neinicializovaný)“, klepnutím kartu
inicializujte.
Stav se poté změní na hodnotu „Normal (Normální)“ a na kartu bude možné ukládat videa i snímky.
Montáž na stěnu (volitelné)
Kameru lze namontovat na stěnu nebo strop.
Ujistěte se, že jsou strop nebo stěna dostatečně pevné, aby udržely třikrát vyšší váhu, než je
•
hmotnost kamery a montážního materiálu.
Kamera by měla být umístěna mimo dosah všech odrazivých předmětů, jako jsou zrcadla.
•
60
Page 66

1. Na místo vybrané k montáži kamery umístěte vrtací šablonu.
2. (Pouze pro betonové stěny nebo stropy:) Vyvrtejte podle šablony otvory pro šrouby a vložte tři
hmoždinky.
3. Podle šablony připevněte pomocí tří kovových šroubů základnu kamery.
4. Nainstalujte kameru na základnu azajistěte ji otočením o15°.
2
1
5. Připojte napájecí kabel ke kameře. Pokud byla kamera dříve připojena ksíti Wi-Fi, automaticky se
připojí ktéže síti Wi-Fi.
61
Page 67

Příloha
Obsah balení
kamery (1×) Základna (1×)
Napájecí kabel (1×) Vrtací šablona (1×) Sada šroubů (1×)
Napájecí adaptér (1×) Průvodce rychlým spuštěním (1×)
62
Page 68

Typ
Typ A
IndikátorLED
Reproduktor
Typ B
Reproduktor
IndikátorLED
Podrobné informace naleznete na webu www.ez vizlife.com.
Rozhraní napájení
Rozhraní
napájení
Konektor
LAN
63
Page 69

Nastavenie
Krok 1 Zapnutie
Pripojte napájací kábel ku kamere a potom pripojte napájací adaptér do zásuvky
podľa zobrazenia na obrázku nižšie.
zásuvka
Elektrická
Rozhranie napájania
Napájací
kábel
Stav indikátora LED
Svieti červená: kamera sa spúšťa.
Pomaly bliká červená: pripojenie Wi-Fi
zlyhalo.
Rýchlo bliká červená: výnimka zariadenia
(napr. chyba karty MicroSD).
Svieti modrá: sleduje sa video alebo sa
prehráva v aplikácii EZVIZ.
Rýchlo bliká modrá: kamera je
pripravená na pripojenie Wi-Fi.
Pomaly bliká modrá: kamera pracuje
správne.
Zapnite kameru a nechajte ju zapnutú. Kamera sa raz úplne otočí z jednej
strany na druhú a nakloní nahor a nadol.
64
Page 70

Krok 2 Nastavenie kamery
1. Vytvorenie používateľského účtu
-Pripojte mobilný telefón k sieti Wi-Fi pomocou 2,4 GHz siete.
-Vyhľadajte názov „EZVIZ“ v obchode App Store alebo Google Play
-Stiahnite a nainštalujte aplikáciu EZVIZ.
-Spustite aplikáciu.
-Vytvorte a zaregistrujte používateľský účet EZVIZ podľa sprievodcu pri
spustení.
2. Pridanie kamery do účtu EZVIZ
-Prihláste sa do svojho účtu pomocou aplikácie EZVIZ.
-Klepnite na znamienko „+“ na stránke Home (Domov) a prejdete do
rozhrania skenovania QR kódu.
-Naskenujte QR kód na kamere.
-Pomocou sprievodcu aplikáciou EZVIZ dokončite konfiguráciu pripojenia Wi-
Fi.
Ak produkt podporuje iba 2,4 GHz pásmo a chcete pokračovať
v pridávaní, odporúčame najprv vypnúť 5 GHz pásmo smerovača.
65
(TM)
.
Page 71

Slot karty MicroSD
Vynulovať
• Ak zlyhá pripojenie kamery k sieti Wi-Fi, stlačte a 5 s podržte tlačidlo Reset
a zopakujte krok 2.2.
• Ak chcete vybrať inú sieť Wi-Fi, stlačte a 5 s podržte tlačidlo Reset, aby sa
zariadenie reštartovalo.
3. Zapnutie šifrovania obrazu
Po zapnutí bude možné video a obraz pri prenose šifrovať.
Môžete zmeniť aj predvolené heslo.
- Prejdite do nastavení kamery.
- Klepnite na položku „Change Password“ (Zmeniť heslo).
- Klepnite na položku „Edit“ (Upraviť).
- Zadajte pôvodný overovací kód umiestnený na štku kamery.
- Zadajte nové heslo (6 až 12 znakov a čísel).
4. Nastavenie uhla
Pomocou aplikácie EZVIZ môžete nastaviť kameru tak, aby ste získali optimálny
uhol.
Panoramatický uhol je v rozsahu 0° až 340° a uhol naklonenia je v rozsahu
-15° až 105°.
66
Page 72

Správa kariet SD
• Pred montážou vložte kartu MicroSD do slotu.
• Karta MicroSD sa nedodáva v rámci obsahu balenia. Odporúčaná kompatibilita:
Trieda 10, max.128 GB.
1. V aplikácii EZVIZ klepnite na položku Storage Status (Stav úložiska) v rozhraní Device
Sengs (Nastavenia zariadenia), aby ste skontrolovali stav karty SD.
2. Ak sa stav pamäťovej karty zobrazuje ako Uninialized (Neinicializovaný), klepnite
naň, aby sa stav inicializoval.
Stav sa zmení na Normal (Normálny) a bude možné ukladať videá alebo obrázky.
Montáž (voliteľná)
Kameru je možné namontovať na stenu alebo na strop.
• Uistite sa, že sú stena alebo strop dosť pevné, aby udržali trojnásobnú
hmotnosť kamery a upevnenia.
• Kameru je potrebné umiestniť mimo akýchkoľvek reflexných objektov, ako sú
napr. zrkadlá.
67
Page 73

1. Umiestnite šablónu na vŕtanie na povrch, ktorý ste zvoli na montáž kamery.
2. (Len pre betónové steny/stropy) Vyvŕtajte otvory na skrutky podľa šablóny a vložte
do nich tri rozpínacie skrutky.
3. Na xáciu základne kamery podľa šablóny použite tri kovové skrutky.
4. Nainštalujte kameru do základne a otočte ju o 15°, aby sa zaistila.
2
1
5. Pripojte napájací kábel ku kamere. Ak bola kamera predtým pripojená k sieti Wi-Fi,
automaticky sa k tejto sieti Wi-Fi pripojí.
68
Page 74

Príloha
Obsah balenia
Kamera (1 x) Základňa (1 x)
Napájací kábel (1 x) Šablóna na vŕtanie (1 x) Súprava skrutiek (1 x)
Napájací adaptér (1 x) Stručná príručka (1 x)
69
Page 75

Typ
Typ A
Indikátor
LED
Reproduktor
Typ B
Reproduktor
napájania
Rozhranie
Indikátor
LED
Podrobné informácie nájdete na stránke www.ezvizlife.com.
70
Rozhranie
napájania
Sieťové
rozhranie
Page 76

Oppsett
Trinn 1 Slå på
Koble strømledningen til kameraet, og deretter sett strømadapteren i en stikkontakt som vist
på figuren under.
Strømforsyning
Strømforsyning
Strømledning
Status LED-indikator
Jevnt rød: Kameraet starter opp.
Blinker sakte rødt: Wi-Fi-forbindelsen har sviktet.
Blinker raskt i rødt: Enhetsunntak (f.eks. MicroSDkortfeil).
Jevnt blått: Video vises eller spilles av i EZVIZ-appen.
Blinker raskt i blått: Kameraet er klart for Wi-Fiforbindelsen.
Blinker sakte i blått: Kameraet fungerer som det skal.
Slå på kamerat, og la det starte opp. Kameraet vil fullføre en rotasjon fra side-til-side
og opp-og-ned én gang.
71
Page 77

Trinn 2 Oppsett av kamera
1. Opprette en brukerkonto
- Koble mobiltelefonen til et Wi-Fi-nettverk med 2,4 GHz.
- Søk etter “EZVIZ” i App Store eller Google Play
- Last ned, og installer EZVIZ-appen.
- Start appen.
- Opprett en EZVIZ-brukerkonto ved å følge oppstartsveiviseren.
2. Legge til et kamera til EZVIZ
- Logg inn på brukerkontoen din på EZVIZ-appen.
- Trykk på “+” på startsiden for å gå til siden for hvor du kan skanne QR-koden.
- Skann QR-koden på kameraet.
- Følg veiviseren i EZVIZ-appen for å fullføre konfigureringen av Wi-Fi.
Hvis produktet ditt kun har 2,4 GHz, anbefaler vi at du slår av ruterens
5 GHz-funksjonalitet før du starter tilkoblingsprosessen.
(TM)
.
72
Page 78

Port for microSD-kort
Tilbakestill
• Hvis kameraet ikke kobler seg til Wi-Fi-nettverket, trykk og hold inne Reset-knappen i
5sekunder og gjenta trinn 2.2.
• For å velge et annet Wi-Fi-nettverk, trykk og hold inne Reset-knappen i 5 sekunder for å starte
enheten på nytt.
3. Aktivere kryptering av bilde
Etter at det er aktivert vil overføring av video og bilde være kryptert.
Du kan også endre standardpassordet.
- Gå til kamerainnstillinger.
- Trykk på “Change Password” (Bytt passord).
- Trykk på “Edit” (Endre).
- Skriv inn den originale verifikasjonskoden som du finner på etiketten på kameraet.
- Skriv inn et nytt passord (6 til 12 tegn og tall).
4. Justere kameravinkel
73
Page 79

Du kan justere kameravinkelen via EZVIZ-appen for å få en optimal vinkel.
Panoreringsvinkelen kan justeres fra 0° til 340°, og hellingsvinkelen fra -15° til 105°.
Bruk av SD-kort
• Sett inn et microSD-kort i sporet før montering.
• MicroSD-kortet er ikke inkludert i pakken. Anbefalt kompatibilitet: Klasse 10, maks. 128 GB.
1. For å sjekke status på SD-kortet, trykk på “Storage Status” (Lagringsstatus) i menyen for “Device
Settings” (enhetsinnstillinger) i EZVIZ-appen.
2. Hvis statusen for minnekortet vises som “Uninitialized” (ikke initialisert), trykk for å initialisere det.
Statusen vil endres til “Normal”, og det kan lagre videoer og/eller bilder.
Montering (valgfri)
Kameraet kan monteres på veggen eller i taket.
• Forsikre deg om at veggen/taket er sterk/sterkt nok til å tåle tre ganger vekten av kameraet
og basen.
• Kameraet må ikke rettes mot noen reflekterende objekter, som f.eks. speil.
74
Page 80

1. Plasser monteringsmalen på overflaten du har valgt for å montere kameraet.
2. (Kun for vegger/tak i sement) Bor skruehull i samsvar med monteringsmalen, og sett inn tre
ekspansjonsskruer.
3. Bruk tre metallskruer for å feste kamerabasen i samsvar med monteringsmalen.
4. Monter kameraet på basen, og vri det 15° for å feste det.
2
1
5. Koble strømledningen til kameraet. Hvis kameraet allerede har vært koblet til Wi-Fi-nettverket, vil
det automatisk koble seg til det samme Wi-Fi-nettverket.
75
Page 81

Appendiks
Innhold i pakken
Kamera (x 1) Base (x 1)
Strømledning (x 1) Monteringsmal (x 1) Skruesett (x 1)
Strømadapter (x 1) Hurtigstartveiledning (x 1)
76
Page 82

Type
Type A
LED-indikator
Type B
LED-indikator
For mer informasjon, besøk www.ezvizlife.com.
Høyttaler
Høyttaler
Strømforsyning
77
Strømforsyning
Nettverkskontakt
Page 83

Installation
Steg 1 Slå på strömmen
Anslut strömkabeln i kameran, och anslut sedan adaptern till ett vägguttag enligt vad som
visas på bilden nedan.
Eluttag
Strömanslutning
Strömkabel
LED-indikeringens status
Lyser rött: Kameran startar.
Blinkar sakta rött: Wi-Fi-anslutningen har slutat att
fungera.
Blinkar snabbt rött: Enhetsundantag (t.ex. fel på
MicroSD-kort).
Lyser blått: Video visas eller spelas upp i appen EZVIZ.
Blinkar snabbt blått: Kameran är redo för Wi-Fi-anslutning.
Blinkar sakta blått: Kameran fungerar korrekt.
Slå på kameran och låt den starta. Kameran kommer att rotera från sida till sida och
lutas uppåt och nedåt en gång.
78
Page 84

Steg 2 Installation av kamera
1. Skapa ett användarkonto
- Anslut din mobiltelefon till Wi-Fi med hjälp av ditt 2,4 GHz nätverk.
- Sök efter ”EZVIZ” på App Store eller Google Play
- Ladda ned och installera appen EZVIZ.
- Starta appen.
- Skapa och registrera ett användarkonto för EZVIZ genom att följa startguiden.
2. Lägga till en kamera i EZVIZ
- Logga in på ditt konto med hjälp av appen EZVIZ.
- Tryck på ”+” på startsidan för att gå till gränssnittet Scan QR Code (Skanna QR-kod).
- Skanna kamerans QR-kod.
- Följ guiden i EZVIZ-appen för att slutföra Wi-Fi-konfigurationen.
Om din produkt endast har 2,4GHz rekommenderar vi att du först
stänger av routerns 5GHz och sedan fortsätter med processen att lägga
till.
(TM)
.
79
Page 85

Fack för microSD-kort
återställning
• Om kameran misslyckas att ansluta till ditt Wi-Fi-nätverk trycker du på och håller in Resetknappen i 5 sekunder och upprepar steg 2.2.
• För att välja ett annat Wi-Fi-nätverk, trycker du på och håller in Reset-knappen i 5 sekunder
för att starta om enheten.
3. Aktivera bildkrypteringen
När du har aktiverat den, kommer din video och dina bilder att krypteras vid överföringen.
Du kan även ändra standardlösenordet.
- Gå till kamerans inställningar.
- Tryck på ”Change Password” (Ändra lösenord).
- Tryck på ”Edit” (Redigera).
- Ange den ursprungliga verifieringskoden som står på kamerans etikett.
- Ange det nya lösenordet (6 till 12 bokstäver eller siffror).
4. Vinkeljustering
Du kan justera kameran via appen EZVIZ för att få en optimal vinkel.
80
Page 86

Panoreringsvinkeln har ett område från 0° till 340°, och lutningsvinkeln ett område
från -15° till 105°.
Administration av SD-kort
• Sätt i ett microSD-kort i facket innan du monterar.
• MicroSD-kortet är inte inkluderat i förpackningen. Rekommenderad kompatibilitet: Klass10,
Max.128 GB.
1. I appen EZVIZ trycker du på Storage Status (Lagringsstatus) i gränssnittet Device Settings
(Enhetsinställningar) för att kontrollera SD-kortets status.
2. Om minneskortets status visas som Uninitialized (inte initialiserad), trycker du för att initialisera det.
Statusen kommer att ändras till Normal så att videor och/eller bilder kan lagras.
Montering (Valfritt)
Kameran kan monteras på väggen eller i taket.
81
Page 87

• Kontrollera att väggen/taket är starkt nog att tåla tre gånger kamerans och fästets vikt.
• Kameran bör inte monteras i närheten av reflekterande ytor som t.ex. speglar.
1. Placera borrmallen på den yta där du har valt att montera kameran.
2. (Endast för cementväggar/tak) Borra skruvhål enligt mallen och sätt i tre expanderande skruvar.
3. Använd tre metallskruvar för att montera kamerans fäste i enlighet med mallen.
4. Installera kameran på sockeln och vrid den 15° för att låsa fast den.
2
1
5. Anslut kamerans strömkabel. Om kameran tidigare har varit ansluten till Wi-Fi-nätverket kommer
den automatiskt att ansluta till samma Wi-Fi-nätverk.
82
Page 88

Bilaga
Förpackningens innehåll
Kamera (x 1) Sockel (x 1)
Strömkabel (x 1) Borrmall (x 1) Skruvsats (x 1)
Strömadapter (x 1) Snabbstartsguide x (1)
83
Page 89

Typ
Typ A
LED-indikering
Typ B
LED-indikering
Besök www.ezvizlife.com för mer information.
Högtalare
Högtalare
Strömanslutning
Strömanslutning
Nätverksanslutning
84
Page 90

Installation
Trin 1 Tænd for strømmen
Sæt strømledningen i kameraet, og sæt derefter strømadapteren i en stikkontakt som vist i
figuren nedenfor.
Stikkontakt
Strømkabel
Strømstik
Status for LED-kontrollampe
Lyser konstant rødt: Kamera starter op.
Langsomme røde blink: Wi-fi-forbindelsen er
afbrudt.
Hurtige røde blink: Undtagelse på enhed (fx fejl i
microSD-kort).
Lyser konstant blåt: En video vises eller afspilles
i appen EZVIZ.
Hurtige blå blink: Kameraet er klar til wi-fiforbindelsen.
Langsomme blå blink: Kameraet fungerer
korrekt.
Tænd kameraet, og lad det starte op. Kameraet drejer helt rundt og vipper én gang op og ned.
85
Page 91

Trin 2 Konfiguration af kamera
1. Opret en brugerkonto
- Slut din mobiltelefon til dit wi-fi-netværk på 2,4 GHz.
- Søg efter "EZVIZ" i App Store eller Google Play
- Hent og installér appen EZVIZ.
- Start appen.
- Opret og registrér en EZVIZ-brugerkonto ved at følge opstartsguiden.
2. Tilføj et kamera til EZVIZ
- Log ind på din konto med appen EZVIZ.
- Tryk på "+" på startsiden for at gå til skærmen til scanning af QR-koden.
- Scan QR-koden på kameraet.
- Følg guiden til appen EZVIZ for at afslutte konfigurationen af wi-fi.
Hvis dit produkt udelukkende tilbyder 2,4 GHz, anbefaler vi, at du slår 5 GHz fra i
din router, inden du fortsætter tilslutningen.
(TM)
.
86
Page 92

Holder til microSD-kort
Nulstil
• Hvis kameraet ikke kan oprette forbindelse til wi-fi-netværket, skal du trykke på og holde
knappen Reset nede i 5 sekunder og gentage trin 2.2.
• Tryk på og hold knappen Reset nede i 5 sekunder for at genstarte enheden og vælge et andet
wi-fi-netværk.
3. Aktivér kryptering af billede
Når du har aktiveret funktionen, kan dine videoer og billeder krypteres under overførslen.
Du kan også ændre standardadgangskoden.
- Gå til indstillingerne for kameraet.
- Tryk på “Change Password” (Skift adgangskode).
- Tryk på “Edit” (Redigér).
- Indtast den oprindelige kontrolkode, der findes på kameraets mærkat.
- Indtast ny adgangskode (6-12 bogstaver og tal).
87
Page 93

4. Justering af vinkel
Du kan justere kameraet til den bedst mulige vinkel med appen EZVIZ.
Panoreringsvinklen kan indstilles fra 0°-340° og hældningsvinklen fra -15° til 105°.
Administration af SD-kort
• Sæt et microSD-kort i holderen før monteringen.
• microSD-kort er ikke inkluderet i æskens indhold. Anbefalet kompatibilitet: Klasse10, maks. 128 GB.
1. I appen EZVIZ skal du trykke på Storage Status (Lagerstatus)på skærmen Device Settings
(Enhedsindstillinger) for at kontrollere status for SD-kortet.
2. Hvis hukommelseskortets status vises som Uninitialized (Ikke initialiseret), skal du trykke for at
initialisere kortet.
Status ændres derefter til Normal, og kortet kan bruges til at lagre videoer og/eller billeder.
Montering (valgfrit)
Kameraet kan monteres på en væg eller i loftet.
88
Page 94

• Kontrollér, at væggen/loftet er stærkt nok til at holde tre gange kameraets og beslagets vægt.
• Kameraet skal holdes på afstand af reflekterende genstande som fx spejle.
1. Placér boreskabelonen på overfladen, hvor kameraet skal installeres.
2. (Gælder kun for cementvæg/-loft) Bor skruehuller i henhold til skabelonen, og sæt tre ekspansionsskruer i.
3. Brug tre metalskruer til at fastgøre kamerafoden i henhold til skabelonen.
4. Installér kameraet på foden, og drej det 15° for at fastgøre det.
2
1
5. Slut strømkablet til kameraet. Hvis kameraet tidligere har været sluttet til wi-fi-netværket, slutter
det automatisk til samme wi-fi-netværk.
89
Page 95

Bilag
Kassens indhold
Kamera (x 1) Fod (x 1)
Strømkabel (x 1) Boreskabelon (x 1) Skruesæt (x 1)
Strømadapter (x 1) Lynvejledning (x 1)
90
Page 96

Type
Type A
LED-kontrollampe
Højttaler
Type B
Højttaler
LED-kontrollampe
Besøg www.ezvizlife.com for detaljerede oplysninger.
Strømstik
91
Strømstik
Netværksgrænseflade
Page 97

Määritys
1. vaihe Virran kytkeminen
Kytke virtajohto kameraan ja kytke sitten verkkolaite pistorasiaan alla olevassa kuvassa
esitetyllä tavalla.
Virtaliitäntä
Virtaliitäntä
Virtajohto
LED-merkkivalon tila
Kiinteä punainen: Kamera käynnistyy.
Hitaasti vilkkuva punainen: Wi-Fi-yhteys
epäonnistui.
Nopeasti vilkkuva punainen: Laitevika (esim.
MicroSD-kortin vika).
Kiinteä sininen: Videota katsellaan tai toistetaan
EZVIZ-sovelluksella.
Nopeasti vilkkuva sininen: Kamera on valmis WiFi-yhteyteen.
Hitaasti vilkkuva sininen: Kamera toimii oikein.
Kytke kameraan virta ja anna sen käynnistyä. Kamera kiertää kokonaan sivulta
toiselle ja kallistuu ylhäältä alas yhden kerran.
92
Page 98

2. vaihe Kameran määritys
1. Luo käyttäjätili
- Yhdistä matkapuhelimesi 2,4GHz:n Wi-Fi-verkkoon.
- Etsi hakusanalla ”EZVIZ” App Storesta tai Google Play
- Lataa ja asenna EZVIZ-sovellus.
- Käynnistä sovellus.
- Luo ja rekisteröi EZVIZ-käyttäjätili ohjatun käyttöönoton ohjeita noudattamalla.
2. Kameran lisääminen EZVIZ-tiliin
- Kirjaudu tiliisi EZVIZ-sovelluksella.
- Siirry QR-koodin skannaussivulle napauttamalla aloitusnäytössä olevaa ”+”-symbolia.
- Skannaa kameran QR-koodi.
- Noudata EZVIZ-sovelluksen ohjattua asennusta Wi-Fi-yhteyden määrittämisessä.
Jos tuotteessa on vain 2,4GHz:n tuki, suosittelemme poistamaan
reitittimen 5GHz:n taajuuden käytöstä ennen jatkamista.
(TM)
-kaupasta.
93
Page 99

MicroSD-korttipaikka
Reset (nollaus)
• Jos kamera ei muodosta yhteyttä Wi-Fi-verkkoosi, pidä Reset (nollaus) -painiketta painettuna
5s ja toista vaihe2.2.
• Voit valita toisen Wi-Fi-verkon pitämällä Reset (nollaus) -painiketta painettuna 5s, mikä
käynnistää laitteen uudelleen.
3. Ota kuvan salaus käyttöön
Kun se on käytössä, lähetettävät videosi ja kuvasi voidaan salata.
Voit myös vaihtaa oletussalasanan.
- Siirry kameran asetuksiin.
- Valitse ”Change Password” (vaihda salasana).
- Valitse ”Edit” (muokkaa).
- Anna kameran rungon tarrassa oleva alkuperäinen vahvistuskoodi.
- Anna uusi salasana (6–12 merkkiä ja numeroa).
4. Kulman säätäminen
Voit säätää kameran kulman sopivaksi EZVIZ-sovelluksella.
Panorointikulmaa voidaan säätää välillä 0–340° ja kallistuskulmaa välillä -15–105°.
94
Page 100

SD-kortin hallinta
• Aseta microSD-kortti korttipaikkaan ennen laitteen kiinnittämistä.
• MicroSD-kortti ei sisälly toimitukseen. Suositeltava korttityyppi: luokka10, enint. 128Gt.
1. Valitse EZVIZ-sovelluksessa Storage Status (tallennustilan tila) Device Settings (laiteasetukset)
-näytössä tarkistaaksesi SD-kortin tilan.
2. Jos muistikortin tilana näkyy Uninitialized (alustamaton), alusta se.
Tilaksi tulee tämän jälkeen Normal (normaali), ja sille voi tallentaa videoita ja kuvia.
Asennus (valinnainen)
Kamera voidaan asentaa seinään tai kattoon.
• Varmista, että seinä/katto on riittävän vahva kestämään kameran ja asennustelineen painon
kolminkertaisesti.
• Pidä kamera etäällä heijastavista pinnoista, kuten peileistä.
95
 Loading...