

Page 1
www.ezvizlife.com
NL
Page 2

Page 3
COPYRIGHT © 2019 Hangzhou EZVIZ Software Co., Ltd.. ALL RIGHTS RESERVED.
Any and all information, including, among others, wordings, pictures, graphs are the properties of Hangzhou
EZVIZ Software Co., Ltd. (hereinafter referred to as “EZVIZ”). This user manual (hereinafter referred to
as “the Manual”) cannot be reproduced, changed, translated, or distributed, partially or wholly, by any
means, without the prior written permission of EZVIZ. Unless otherwise stipulated, EZVIZ does not make any
warranties, guarantees or representations, express or implied, regarding to the Manual.
About this Manual
The Manual includes instructions for using and managing the product. Pictures, charts, images and all
other information hereinafter are for description and explanation only. The information contained in the
Manual is subject to change, without notice, due to firmware updates or other reasons. Please find the
latest version in the ™ website (http://www.ezvizlife.com).
Revision Record
New release – January, 2019
Trademarks Acknowledgement
™, ™, and other EZVIZ’s trademarks and logos are the properties of EZVIZ in various
jurisdictions. Other trademarks and logos mentioned below are the properties of their respective owners.
Legal Disclaimer
TO THE MAXIMUM EXTENT PERMITTED BY APPLICABLE LAW, THE PRODUCT DESCRIBED, WITH ITS
HARDWARE, SOFTWARE AND FIRMWARE, IS PROVIDED “AS IS”, WITH ALL FAULTS AND ERRORS, AND EZVIZ
MAKES NO WARRANTIES, EXPRESS OR IMPLIED, INCLUDING WITHOUT LIMITATION, MERCHANTABILITY,
SATISFACTORY QUALITY, FITNESS FOR A PARTICULAR PURPOSE, AND NON-INFRINGEMENT OF THIRD PARTY.
IN NO EVENT WILL EZVIZ, ITS DIRECTORS, OFFICERS, EMPLOYEES, OR AGENTS BE LIABLE TO YOU FOR ANY
SPECIAL, CONSEQUENTIAL, INCIDENTAL, OR INDIRECT DAMAGES, INCLUDING, AMONG OTHERS, DAMAGES
FOR LOSS OF BUSINESS PROFITS, BUSINESS INTERRUPTION, OR LOSS OF DATA OR DOCUMENTATION, IN
CONNECTION WITH THE USE OF THIS PRODUCT, EVEN IF EZVIZ HAS BEEN ADVISED OF THE POSSIBILITY OF
SUCH DAMAGES.
TO THE MAXIMUM EXTENT PERMITTED BY APPLICABLE LAW, IN NO EVENT SHALL EZVIZ’S TOTAL LIABILITY
FOR ALL DAMAGES EXCEED THE ORIGINAL PURCHASE PRICE OF THE PRODUCT.
EZVIZ DOES NOT UNDERTAKE ANY LIABILITY FOR PERSONAL INJURY OR PROPERTY DAMAGE AS THE RESULT
OF PRODUCT INTERRUPTION OR SERVICE TERMINATION CAUSED BY: A) IMPROPER INSTALLATION OR
USAGE OTHER THAN AS REQUESTED; B) THE PROTECTION OF NATIONAL OR PUBLIC INTERESTS; C) FORCE
MAJEURE; D) YOURSELF OR THE THIRD PARTY, INCLUDING WITHOUT LIMITATION, USING ANY THIRD PARTY’S
PRODUCTS, SOFTWARE, APPLICATIONS, AND AMONG OTHERS.
REGARDING TO THE PRODUCT WITH INTERNET ACCESS, THE USE OF PRODUCT SHALL BE WHOLLY AT YOUR
OWN RISKS. EZVIZ SHALL NOT TAKE ANY RESPONSIBILITES FOR ABNORMAL OPERATION, PRIVACY LEAKAGE
OR OTHER DAMAGES RESULTING FROM CYBER ATTACK, HACKER ATTACK, VIRUS INSPECTION, OR OTHER
INTERNET SECURITY RISKS; HOWEVER, EZVIZ WILL PROVIDE TIMELY TECHNICAL SUPPORT IF REQUIRED.
Page 4

SURVEILLANCE LAWS AND DATA PROTECTION LAWS VARY BY JURISDICTION. PLEASE CHECK ALL RELEVANT
LAWS IN YOUR JURISDICTION BEFORE USING THIS PRODUCT IN ORDER TO ENSURE THAT YOUR USE
CONFORMS TO THE APPLICABLE LAW. EZVIZ SHALL NOT BE LIABLE IN THE EVENT THAT THIS PRODUCT IS
USED WITH ILLEGITIMATE PURPOSES.
IN THE EVENT OF ANY CONFLICTS BETWEEN THE ABOVE AND THE APPLICABLE LAW, THE LATTER PREVAILS.
Regulatory Information
FCC Information
This device complies with Part 15 of the FCC Rules. Operation is subject to the following two conditions:
(1) This device may not cause harmful interference, and
(2) This device must accept any interference received, including interference that may cause undesired
operation.
Note: This product has been tested and found to comply with the limits for a Class B digital device,
pursuant to Part 15 of the FCC Rules. These limits are designed to provide reasonable protection against
harmful interference in a residential installation. This product generates, uses, and can radiate radio
frequency energy and, if not installed and used in accordance with the instructions, may cause harmful
interference to radio communications. However, there is no guarantee that interference will not occur in
a particular installation. If this product does cause harmful interference to radio or television reception,
which can be determined by turning the equipment off and on, the user is encouraged to try to correct the
interference by one or more of the following measures:
—Reorient or relocate the receiving antenna.
—Increase the separation between the equipment and receiver.
—Connect the equipment into an outlet on a circuit different from that to which the receiver is connected.
—Consult the dealer or an experienced radio/TV technician for help.
Please take attention that changes or modification not expressly approved by the party responsible for
compliance could void the user’s authority to operate the equipment.
This equipment should be installed and operated with a minimum distance 20cm between the radiator
and your body.
This device complies with Industry Canada licence-exempt RSS standard(s). Operation is subject to the
following two conditions:
(1) this device may not cause interference, and
(2) this device must accept any interference, including interference that may cause undesired operation
of the device.
Under Industry Canada regulations, this radio transmitter may only operate using an antenna of a type
and maximum (or lesser) gain approved for the transmitter by Industry Canada. To reduce potential
radio interference to other users, the antenna type and its gain should be so chosen that the equivalent
isotropically radiated power (e.i.r.p.) is not more than that necessary for successful communication.
Page 5
EU Conformity Statement
This product and - if applicable - the supplied accessories too are marked with "CE" and
comply therefore with the applicable harmonized European standards listed under the Radio
Equipment Directive 2014/53/EU, the EMC Directive 2014/30/EU, the RoHS Directive 2011/65/
EU.
2012/19/EU (WEEE directive): Products marked with this symbol cannot be disposed of as
unsorted municipal waste in the European Union. For proper recycling, return this product
to your local supplier upon the purchase of equivalent new equipment, or dispose of it at
designated collection points. For more information see: www.recyclethis.info.
2006/66/EC (battery directive): This product contains a battery that cannot be disposed of as
unsorted municipal waste in the European Union. See the product documentation for specific
battery information. The battery is marked with this symbol, which may include lettering to
indicate cadmium (Cd), lead (Pb), or mercury (Hg). For proper recycling, return the battery to
your supplier or to a designated collection point. For more information see: www.recyclethis.
info.
Industry Canada ICES-003 Compliance
This device meets the CAN ICES-3 (B)/NMB-3(B) standards requirements.
EC DECLARATION OF CONFORMITY
Hereby, Hangzhou EZVIZ Software Co., Ltd . declares that the radio equipment type [CS-CV310] is in
compliance with Directive 2014/53/EU.
The full text of the EC DECLARATION OF CONFORMITY is available at the following web link:
http://www.ezvizlife.com/declaration-of-conformity.
Safety Instruction
Due to the product shape and dimension, the name and address of the importer/manufacturer are printed
on the package.
Customer Service
For more information, please visit www.ezvizlife.com
Need help? Contact us:
Telephone: +31 20 204 0128
Technical Inquires Email: support.eu@ezvizlife.com
SAVE THIS MANUAL FOR FUTURE REFERENCE
Page 6
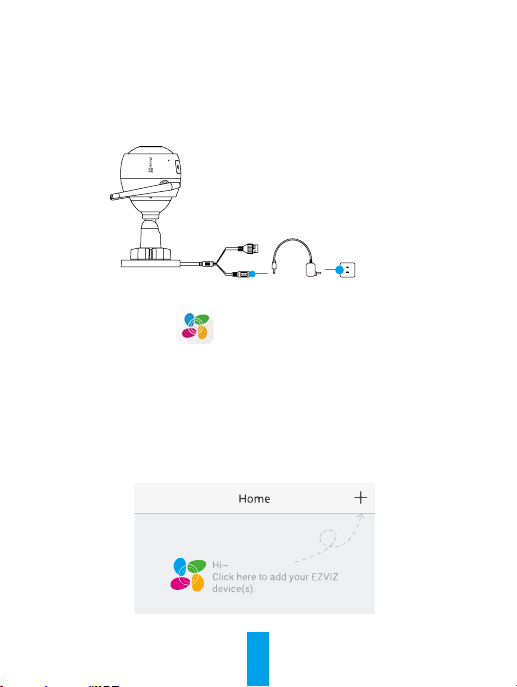
Operations
Step 1
Power-on
Connect the camera and power socket to power on the camera.
Power Cable
Power Socket
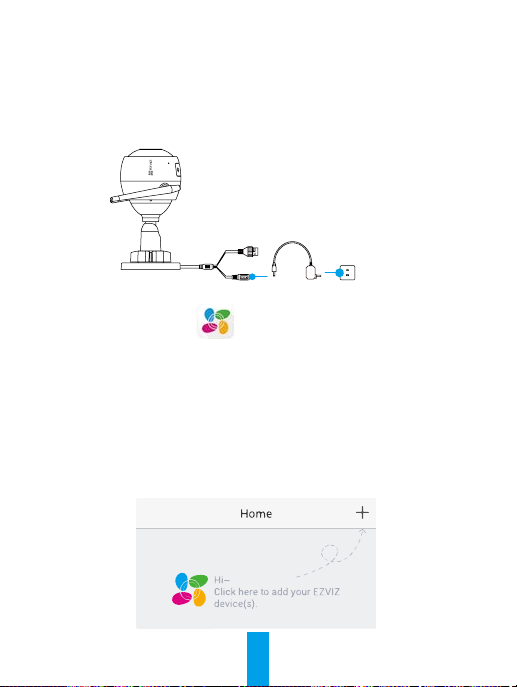
Step 2
Camera Setup
Create an user account.
1
- Connect your mobile phone to Wi-Fi.
- Download and install the EZVIZ app by searching “EZVIZ” in App Store and Google PlayTM.
- Launch the app and register an EZVIZ user account following the start-up wizard.
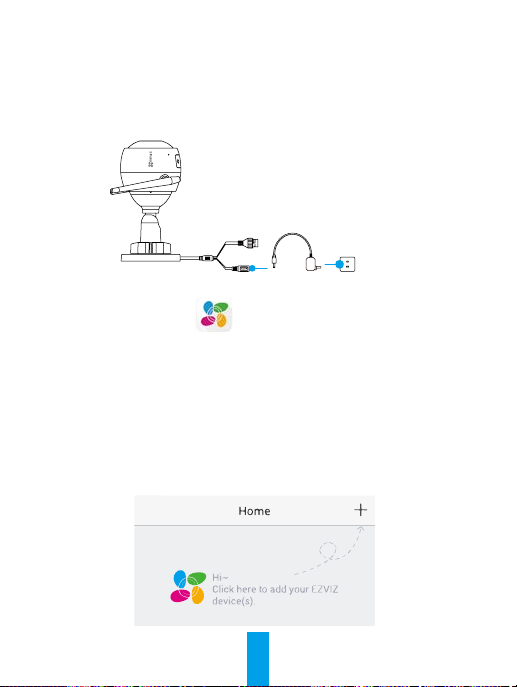
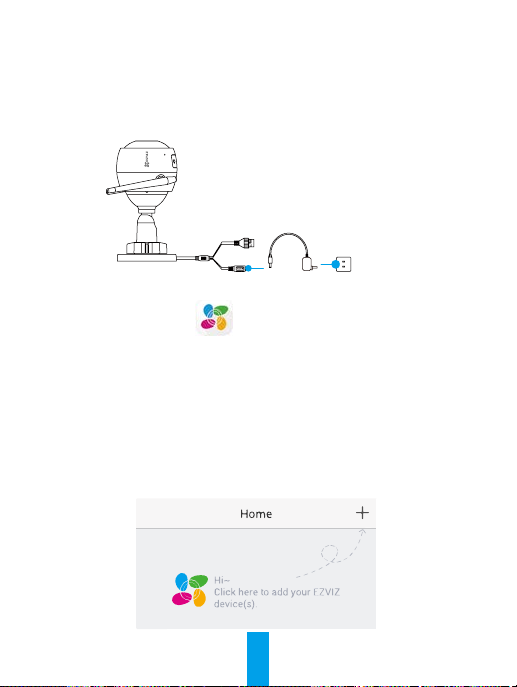
Add a camera to EZVIZ.
2
- Log in the EZVIZ app.
- On the Home screen, tap “+” on the upper-right corner to go to the scan QR code
page.
1
Page 7
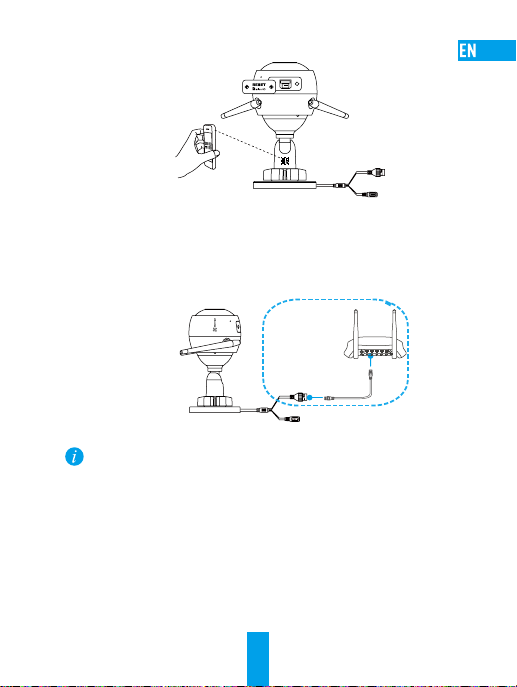
- Scan the QR code on the body of the camera.
- Follow the EZVIZ app wizard to finish Wi-Fi configuration.
You can also select wired connection.
Step 1: connect the camera to the router with a network cable.
Step 2: add the camera to EZVIZ app by scanning its QR code.
N3
Network Cable
•Hold the RESET button for 5 seconds when camera is running if either adding cameras or Wi-Fi
connection fails.
•If your product is 2.4GHz only, we kindly recommend you switch off router’s 5GHz first to
proceed adding process.
2
Page 8

Step 3
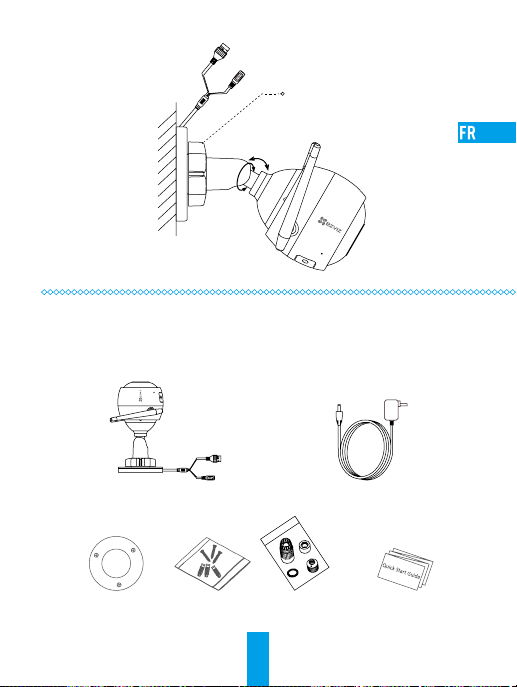
Camera Installation
You can install the camera on the wall or ceiling.
Make sure the wall is strong enough to withstand three times the weight of the
camera.
1
Installing the Camera
- Place drill template onto the surface you have chosen to mount the camera.
- (For the cement wall/ceiling only) Drill screw holes according to the template, and
insert three expansion screws.
- Use three metal screws to fix the camera base according to the template.
Mounting
Template
Expansion Screws
Adjusting the Surveillance Angle
2
- Loosen the adjusting screw.
- Adjust the surveillance angle as your desired place.
- Tighten the adjusting screw.
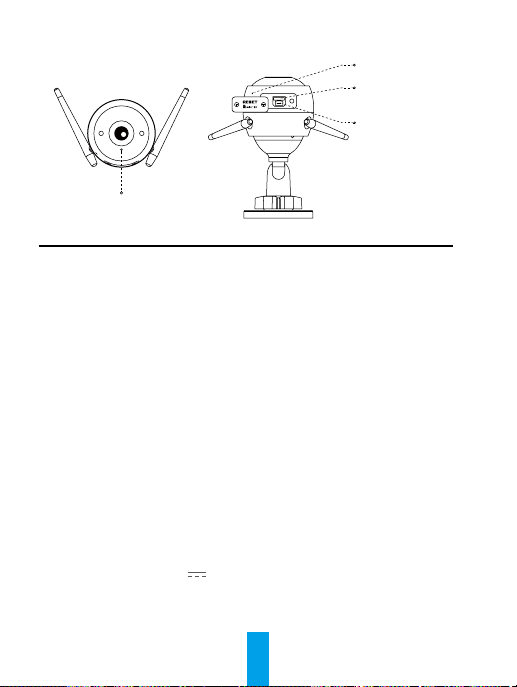
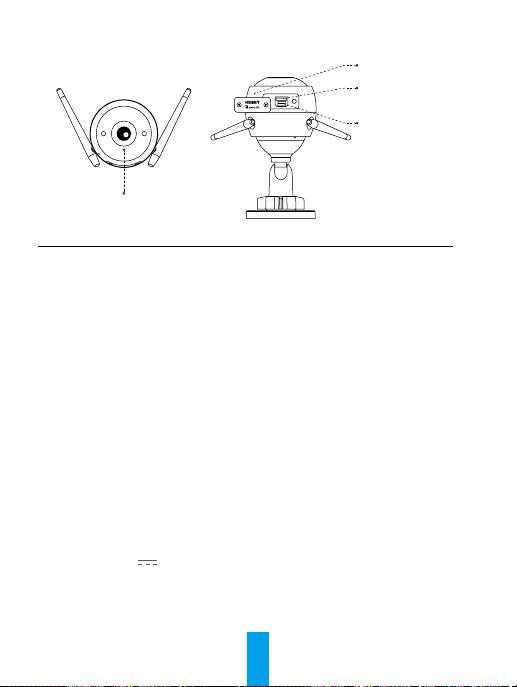
Make sure the microSD card slot facing downward.
Metal Screws
3
Page 9
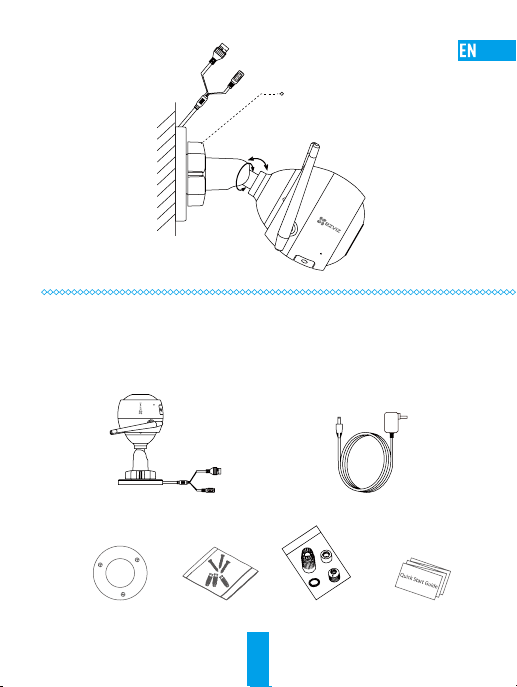
Adjusting Screw
0°-90°
0°-360°
Appendix
Box Content
Internet Camera x1 Power Adapter x1
Mounting Template x1 Screw Kit x1 Waterproof Kit x1 Quick Start Guide x1
4
Page 10

Basics
LED Indicator
Name Description
MIC For audio in.
LED Indicator •Solid Red: Camera is starting up.
MicroSD Card Slot MicroSD card not included in the Box Contents. After inserting the
RESET Hold the RESET button for 5 seconds when the camera is running.
Power Input 1A
•Slowly Flashing Red: Wi-Fi connection has failed.
•Fastly Flashing Red: Device exception (e.g. MicroSD card error).
•Solid Blue: Video is being viewed or played back in EZVIZ App.
•Flastly Flashing Blue: Camera is ready for the Wi-Fi connection.
•Slowly Flashing Blue: Camera is running properly.
microSD card, initialize it in the EZVIZ app, and then video files can
be stored in the SD card.
The camera restarts, and resets all parameters to default.
12V
MIC
MicroSD
Card Slot
RESET
5
Page 11

Troubleshooting
Q: “The device is offline.” or “The device is not registered.” prompts when adding
the camera by EZVIZ app.
A: 1. Make sure the network, that the camera is connceted to, is normal and the DHCP
of router is enabled.
2. Hold down the RESET button for 5 seconds to reset the parameters if you
manually changed the network parameters.
Q: How to use the microSD card for local storage?
A: 1. Make sure there is a microSD card inserted and the camera is added to your
EZVIZ account. Log in the EZVIZ app and enter the “Device Details” interface, if
the “Initialize Storage Card” button appears, you need to initialize the microSD
card first.
2. The microSD card recording for the motion detection is enabled by default.
Q: The mobile phone cannot receive alarm prompts when the camera is online.
A: 1. Make sure the EZVIZ app is running on your mobile phone and the Motion
Detection Notification is enabled.
2. For Android system, make sure the app is running in background; and for iOS,
enable the message push function in “Settings > Notification”.
3. If still no alarm prompts, hold down the RESET button for 5 seconds restore the
camera settings.
Q: Live view or playback failed.
A: Make sure your network is well connected. Viewing live video needs a good
bandwidth. You can refresh the video, or change a network and try again.
Q: How to connect to another Wi-Fi?
A: Hold the RESET button on the camera for 5 seconds to reset and restart the camera
and reconnect the Wi-Fi about 1 minute later.
For detailed information, please visit www.ezvizlife.com.
6
Page 12
Funktion
Schritt 1
Einschalten
Um sie einschalten zu können, schließen Sie die Kamera mit dem Stromkabel an eine
Steckdose an.
Stromkabel
Steckdose
Schritt 2
Kamera einrichten
Ein Benutzerkonto erstellen.
1
- Verbinden Sie Ihr Mobiltelefon mit einem WLAN.
- Laden Sie die EZVIZ-App herunter, indem Sie im App Store oder bei Google PlayTM
nach „EZVIZ“ suchen, und installieren Sie sie.
- Starten Sie die App und registrieren Sie sich für ein EZVIZ-Benutzerkonto gemäß den
Anweisungen im Startassistenten.
Eine Kamera zu EZVIZ hinzufügen.
2
- Melden Sie sich bei der EZVIZ-App an.
- Tippen Sie im Startbildschirm in der oberen rechten Ecke auf „+“, um auf die Seite
zum Scannen des QR-Codes zu gelangen.
7
Page 13
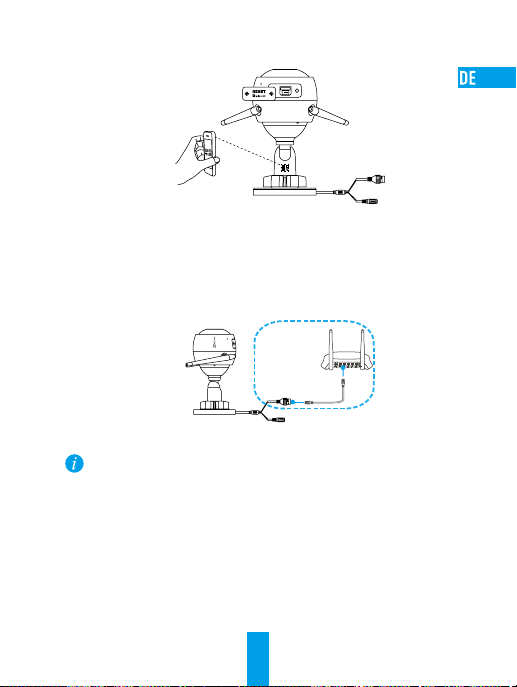
- Scannen Sie den QR-Code auf dem Kameragehäuse.
- Folgen Sie dem EZVIZ-App-Assistenten, um die WLAN-Konfiguration abzuschließen.
Sie können auch eine kabelgebundene Verbindung wählen.
Schritt 1: Schließen Sie die Kamera über Netzwerkkabel am Router an.
Schritt 2: Fügen Sie die Kamera zur EZVIZ-App hinzu, indem Sie ihren QR-Code
scannen.
N3
Netzwerkkabel
•Sollten das Hinzufügen von Kameras oder die WLAN-Verbindung nicht erfolgreich sein, halten
Sie die Taste RESET für 5 Sekunden gedrückt, während die Kamera läuft.
•Falls Ihr Produkt nur 2,4 GHz ist, empfehlen wir, zunächst die 5 GHz des Routers auszuschalten,
um mit dem Hinzufügen fortzufahren.
8
Page 14

Schritt 3
Montage der Kamera
Sie können die Kamera an der Wand oder an der Decke installieren.
Stellen Sie sicher, dass die Wand das Dreifache des Kameragewichts aushalten
kann.
Installation der Kamera
1
- Legen Sie die Bohrschablone auf den Montageort der Kamera.
- (Nur für gemauerte/gegossene Decken und Wände) Bohren Sie Löcher gemäß der
Schablone zur Aufnahme von drei Dübeln.
- Befestigen Sie die Schablone der Kamera mit drei Schrauben.
Montageschablone
Dübel
Einstellen des Überwachungswinkels
2
- Lösen Sie die Einstellschraube.
- Stellen Sie den Überwachungswinkel nach Ihren Wünschen ein.
- Ziehen Sie die Einstellschraube fest.
Stellen Sie sicher, dass der microSD-Kartensteckplatz nach unten zeigt.
Metallschrauben
9
Page 15

Einstellschraube
0° - 90°
0° - 360°
Anhang
Lieferumfang
1x Internetkamera 1x Netzteil
1x Montageschablone 1x Schraubensatz 1x Wasserdichtsatz 1x Kurzanleitung
10
Page 16
Aufbau des Geräts
LED-Betriebsanzeige
Bezeichnung Beschreibung
Mikrofon Tonaufnahme.
LED-Betriebsanzeige •Leuchtet rot: Kamera fährt hoch.
microSD-Kartensteckplatz microSD-Karte gehört nicht zum Lieferumfang. Nachdem Sie
ZURÜCKSETZEN Halten Sie die Taste RESET für 5 Sekunden gedrückt,
Stromanschluss 1 A
•Blinkt langsam rot: WLAN-Verbindung ist fehlgeschlagen.
•Blinkt schnell rot: Geräteausnahme (z.B. microSD-Karte
Fehler).
•Leuchtet blau: Video wird in der EZVIZ-App wiedergegeben.
•Blinkt schnell blau: Kamera ist bereit für WLAN-
Verbindung.
•Blinkt langsam blau: Kamera arbeitet einwandfrei.
die microSD-Karte eingesetzt haben, initialisieren Sie diese
in der EZVIZ-App. Danach können die Videodateien auf der
microSD-Karte gespeichert werden.
während die Kamera läuft. Die Kamera startet neu und setzt
alle Parameter auf die Werkseinstellungen zurück.
12 V
Mikrofon
microSDKartensteckplatz
ZURÜCKSETZEN
11
Page 17

Fehlersuche
F: Wird die Kamera in der EZVIZ-App hinzugefügt, erscheinen die Anzeigen
„The device is offline.“ („Das Gerät ist offline.“) oder „The device is not
registered.“ („Das Gerät ist nicht registriert.“).
A: 1. Stellen Sie sicher, dass das Netzwerk, mit dem die Kamera verbunden ist,
normal arbeitet und das DHCP des Routers aktiviert ist.
2. Halten Sie Taste RESET für 5 Sekunden gedrückt, um die Parameter
zurückzusetzen, falls Sie die Netzwerkparameter manuell geändert haben.
F: Wie benutze ich die microSD-Karte als lokalen Speicher?
A: 1. Stellen Sie sicher, dass eine microSD-Karte in die Kamera eingesetzt und die
Kamera zu Ihrem EZVIZ-Benutzerkonto hinzugefügt ist. Melden Sie sich an der
EZVIZ App an und rufen Sie den Bildschirm „Device Details“ (Geräteeigenschaften)
auf. Wenn die Schaltfläche „Initialize Storage Card“ (Speicherkarte initialisieren)
angezeigt wird, müssen Sie die Speicherkarte zuerst initialisieren.
2. Die microSD-Karte für die Bewegungserkennung wird standardmäßig aktiviert.
F: Das Mobiltelefon kann keinen Alarm empfangen, wenn die Kamera online ist.
A: 1. Stellen Sie sicher, dass die EZVIZ-App auf Ihrem Mobiltelefon läuft und die
Benachrichtigung für die Bewegungserkennung aktiviert ist.
2. Stellen Sie bei einem Androidsystem sicher, dass die App im Hintergrund läuft
und aktivieren Sie für iOS die Push-Benachrichtigung zum Übertragen der
Nachricht in „Settings > Notification“ („Einstellungen > Benachrichtigung“).
3. Wird immer noch kein Alarm empfangen, halten Sie die Taste RESET für
5 Sekunden gedrückt, um die Kameraeinstellungen wiederherzustellen.
F: Fehler bei Livebild oder Wiedergabe.
A: Stellen Sie sicher, dass die Kamera korrekt mit dem Netzwerk verbunden ist. Das
Anschauen eines Live-Videos erfordert eine gute Bandbreite. Sie können das Video
aktualisieren oder ein anderes Netzwerk wählen und es erneut versuchen.
F: Wie kann ich die Kamera mit einem anderen WLAN verbinden?
A: Halten Sie die Taste RESET an der Kamera für 5 Sekunden gedrückt, starten Sie die
Kamera neu und verbinden Sie das WLAN ungefähr eine Minute später.
Nähere Informationen finden Sie auf www.ezvizlife.com.
12
Page 18
Operaciones
Paso 1
Encendido
Conecte la cámara a la toma eléctrica para alimentarla.
Cable de alimentación
Toma de corriente
Paso 2
Configuración de la cámara
Cree una cuenta de usuario.
1
- Conecte su teléfono móvil a la red Wi-Fi.
- Descargue e instale la app EZVIZ buscando “EZVIZ” en el App Store y Google PlayTM.
- Abra la app y registre una cuenta de usuario de EZVIZ siguiendo las instrucciones
del asistente de instalación.
Agregue una cámara a EZVIZ.
2
- Inicie sesión en la app EZVIZ.
- En la pantalla de inicio, toque “+” en la esquina superior derecha para ir a la página
de escaneo de códigos QR.
11
Page 19

- Escanee el código QR de la cámara.
- Siga las indicaciones del asistente de la aplicación EZVIZ para terminar la
configuración Wi-Fi.
También puede seleccionar la conexión por cable.
Paso 1: conecte la cámara al router con un cable de red.
Paso 2: agregue la cámara a la aplicación EZVIZ escaneando el código QR.
N3
Cable de red
•Si ocurre un fallo al añadir cámaras o al conectarse a una red Wi-Fi, mantenga pulsado el botón
RESET (Restablecer) durante 5 segundos con la cámara en funcionamiento.
•Si su producto es solo de 2,4 GHz, le recomendamos que primero desactive la banda de 5 GHz
del enrutador para seguir con el proceso de conexión.
12
Page 20

Paso 3
Instalación de la cámara
Puede instalar la cámara en la pared o en el techo.
Asegúrese de que la pared sea lo suficientemente resistente para soportar un peso
tres veces mayor que el de la cámara.
Instalación de la cámara
1
- Coloque la plantilla de perforación sobre la superficie escogida para el montaje
de la cámara.
- (Solo para montaje en paredes de cemento/techos) Taladre orificios para tornillos
usando la plantilla e inserte tres tornillos de expansión.
- Utilice 3 tornillos de metal para fijar la base de la cámara, según la plantilla.
Plantilla de
montaje
Tornillos de expansión
Ajuste del ángulo de vigilancia
2
- Afloje el tornillo de ajuste.
- Ajuste el ángulo de la cámara en el punto deseado.
- Apriete el tornillo de ajuste.
Asegúrese de que la ranura para tarjetas microSD esté orientada hacia abajo.
Tornillos metálicos
13
Page 21

Tornillo de ajuste
0°-90°
0°-360°
Apéndice
Contenido de la caja
1 Cámara de Internet 1 Adaptador de corriente
1 Plantilla
de montaje
1 Juego de
tornillos
14
1 Conjunto
impermeable
1 Guía de inicio
rápido
Page 22
Elementos básicos
Indicador LED
Nombre Descripción
Micrófono Entrada de audio.
Indicador LED •Luz roja fija: La cámara se está iniciando.
Ranura para
tarjeta microSD
REINICIAR Mantenga pulsado el botón RESET (Restablecer) durante 5 segundos
Alimentación 1 A
•Luz roja que parpadea lentamente: La conexión de Wi-Fi ha fallado.
•Luz roja que parpadea rápidamente: Excepción del dispositivo (por
ejemplo: error de tarjeta MicroSD).
•Luz azul fija: El video se está visualizando o reproduciendo en la
aplicación EZVIZ.
•Luz azul que parpadea rápidamente: La cámara está lista para la
conexión Wi-Fi.
•Luz azul que parpadea lentamente: La cámara funciona correctamente.
No se incluye la tarjeta microSD como parte del contenido de la caja.
Una vez insertada la tarjeta microSD, inicialícela en la aplicación EZVIZ y
podrá almacenar los archivos de vídeo en la tarjeta SD.
con la cámara en funcionamiento. La cámara se reiniciará y restablecerá
todos los parámetros a sus ajustes predeterminados.
12 V
Micrófono
Ranura para
tarjeta microSD
REINICIAR
15
Page 23

Resolución de problemas
P: Al añadir la cámara con la aplicación EZVIZ aparece el mensaje “The device is offline.”
(El dispositivo está sin conexión.) o “The device is not registered.”
(El dispositivo no está registrado.).
R: 1. Asegúrese de que la red a la que está conectada la cámara funcione con
normalidad y que el DHCP del enrutador esté activado.
2. Si ha cambiado manualmente los parámetros de red, mantenga pulsado el botón
RESET (Restablecer) durante 5 segundos para restablecer los parámetros.
P: ¿Cómo se puede utilizar la tarjeta microSD como almacenamiento local?
R: 1. Asegúrese de que haya una tarjeta microSD insertada y de haber añadido la cámara
a su cuenta EZVIZ. Inicie sesión en la aplicación EZVIZ y entre en la interfaz “Device
Details” (Detalles del dispositivo), Si aparece el botón “Initialize Storage Card”
(Iniciar tarjeta de almacenamiento), primero deberá iniciar la tarjeta microSD.
2. La grabación de detección de movimiento en la tarjeta microSD está activada de
forma predeterminada.
P: El teléfono móvil no recibe mensajes de alarma cuando la cámara está en línea.
R: 1. Asegúrese de que la aplicación EZVIZ esté funcionando en el teléfono móvil y que la
notificación de detección de movimiento esté activada.
2. En sistemas Android, asegúrese de que la aplicación funcione en segundo plano.
Con iOS, active la función de mensajes de notificación en “Settings > Notification”
(Ajustes > Notificación).
3. Si no hay ninguna alarma, mantenga pulsado el botón RESET (Restablecer) durante
5 segundos para restaurar los ajustes de la cámara.
P: Error en la Vista en directo o reproducción.
R: Asegúrese de que la red está bien conectada. Para ver el vídeo en directo es necesario
un buen ancho de banda. Puede actualizar el vídeo o cambiar de red e intentarlo de
nuevo.
P: ¿Cómo se puede conectar a otra red Wi-Fi?
R: Mantenga pulsado el botón RESET (Restablecer) de la cámara durante 5 segundos
para restablecer y reiniciar la cámara y volver a conectarla a la red Wi-Fi en
aproximadamente 1 minuto.
Para obtener información detallada, visite www.ezvizlife.com.
16
Page 24
Opérations
Étape 1
Alimentation
Raccordez la caméra à la prise de courant pour alimenter la caméra.
Câble d’alimentation
Prise d’alimentation
Étape 2
Mise en place de la caméra
Créer un compte utilisateur.
1
- Connectez votre téléphone mobile au réseau Wi-Fi.
- Téléchargez et installez l’application EZVIZ en recherchant « EZVIZ » dans l’App Store
ou Google PlayTM.
- Lancez l’application et créez un compte utilisateur EZVIZ en suivant l’assistant de démarrage.
Ajouter une caméra à EZVIZ
2
- Connectez-vous dans l’application EZVIZ.
- Sur l’écran d’accueil, touchez le bouton « + » situé dans le coin supérieur droit pour
accéder à la page de numérisation du code QR.
15
Page 25

- Scannez le code QR sur le corps de la caméra.
- Suivez l'assistant de l'application EZVIZ pour terminer la configuration Wi-Fi.
Vous pouvez aussi sélectionner une connexion filaire.
Étape 1 : branchez la caméra au routeur avec un câble réseau.
Étape 2 : ajoutez la caméra à l’application EZVIZ en balayant son QR code.
N3
Câble réseau
•Maintenez le bouton RESET (RÉINITIALISER) enfoncé pendant 5 secondes lorsque la
caméra fonctionne en cas d’échec de l’installation de caméras ou de la connexion Wi-Fi.
•Si votre produit fonctionne en bande de fréquence de 2,4 GHz, nous vous recommandons
de bien vouloir désactiver en premier la bande de fréquence de 5 GHz pour procéder à
l’ajout.
16
Page 26

Étape 3
Installation de la caméra
Vous pouvez installer la caméra sur le mur ou le plafond.
Assurez-vous que le mur est suffisamment solide pour supporter trois fois le poids
de la caméra.
Installation de la caméra
1
- Placez le gabarit de perçage sur la surface d’installation de la caméra.
- (Installation uniquement sur un mur en ciment ou un plafond) Percez des trous
correspondant au gabarit de perçage et vissez-y trois vis à expansion.
- Utilisez les vis métalliques pour fixer la base de la caméra, comme illustré
ci-dessous.
Gabarit de
montage
Vis à expansion
Réglage de l’angle de surveillance
2
- Desserrez la vis de réglage.
- Ajustez l’angle de surveillance à l’emplacement désiré.
- Serrez la vis de réglage.
Assurez-vous que le logement de la carte microSD est orienté vers le bas.
Vis métallique
17
Page 27
Vis de réglage
0° à 90°
0° à 360°
Annexe
Contenu du carton
1 caméra Internet 1 adaptateur d’alimentation
1 gabarit de montage 1 kit de visserie 1 kit étanche 1 guide de démarrage rapide
18
Page 28

Notions de base
Indicateur LED
Nom Description
Microphone Pour l’entrée audio.
Indicateur LED
Logement de
carte microSD
RÉINITIALISATION Maintenez le bouton RESET (RÉINITIALISER) enfoncé pendant
Entrée d’alimentation 1 A
•Rouge fixe : Démarrage de la caméra.
•Lent clignotement rouge : Échec de la connexion Wi-Fi.
•Rapide clignotement rouge : Exception de périphérique (par ex.
erreur de carte MicroSD).
•Bleue fixe : La vidéo est en cours de lecture ou diffusée sur
l’application EZVIZ.
•Rapide clignotement bleu : La caméra est prêt à se connecter
au Wi-Fi.
•Lent clignotement bleu : La caméra fonctionne correctement.
La carte microSD n’est pas fournie. Après avoir inséré la carte
microSD, initialisez-la dans l’application EZVIZ, puis stockez vos
fichiers vidéo dans la carte SD.
5 secondes lorsque la caméra fonctionne. La caméra redémarre,
réinitialise tous les paramètres aux valeurs par défaut.
12 V
Microphone
Logement de
carte microSD
RÉINITIALISATION
19
Page 29

Résolution des problèmes
Q : Les invites « The device is offline. » (L’appareil est en mode Hors connexion) ou « The device
is not registered. » (L’appareil n’est pas enregistré) s’affichent lorsque vous installez la caméra
via l’application EZVIZ.
R : 1. Assurez-vous que le réseau sur lequel la caméra est connectée est normal et que le DHCP
du routeur est activé.
2. Maintenez le bouton RESET (RÉINITIALISER) enfoncé pendant 5 secondes
pour réinitialiser les paramètres si vous avez changé manuellement les paramètres du
réseau.
Q : Comment utiliser la carte microSD pour le stockage local ?
R : 1. Assurez-vous que la carte microSD est insérée et que la caméra est ajoutée à votre compte
EZVIZ. Connectez-vous dans l’application EZVIZ, puis accédez à l’interface « Device Details »
(Détails de l’appareil). Si le bouton « Initialize Storage Card » (Initialiser la carte de
stockage) apparaît, vous devez d’abord initialiser la carte.
2. L’enregistrement sur la carte microSD destiné à la détection de mouvements est activé
par défaut.
Q : Le téléphone mobile ne reçoit pas les messages d’alarme lorsque la caméra est hors ligne.
R : 1. Assurez-vous que l’application EZVIZ s’exécute sur votre téléphone portable et que la
Notification de détection de mouvements est activée.
2. Pour les systèmes Android, assurez-vous que l’application est exécutée en arrière-plan ;
et pour le système iOS, activez la fonction d’émission de message dans « Settings >
Notification » (Réglages > Notification).
3. Si aucun message d’alarme ne s’affiche, maintenez le bouton RESET (RÉINITIALISER) enfoncé
pendant 5 secondes pour restaurer les réglages de la caméra.
Q : Échec vue en direct ou lecture.
R : Vérifiez que votre réseau est bien connecté. Visionner les vidéos en direct nécessite une bonne
bande passante. Vous pouvez actualiser la vidéo ou changer de réseau, puis réessayer.
Q : Comment se connecter à un autre réseau Wi-Fi ?
R : Maintenez le bouton RESET (RÉINITIALISER) de la caméra enfoncé pendant 5 secondes pour
réinitialiser et redémarrer la caméra, puis reconnectez-la au réseau Wi-Fi environ une minute
plus tard.
Pour des informations détaillées, veuillez visiter www.ezvizlife.com.
20
Page 30

Operazioni
Passaggio 1
Accensione
Collegare la telecamera alla presa di corrente per accenderla.
Cavo di alimentazione
Passaggio 2
Configurazione telecamera
Creare un account utente.
1
- Connettere il cellulare alla rete Wi-Fi.
- Scaricare e installare l'app EZVIZ cercando "EZVIZ" in App Store o Google PlayTM.
- Avviare l'app e registrare un account utente di EZVIZ seguendo le istruzioni della
procedura guidata all'avvio.
Aggiungere una telecamera a EZVIZ.
2
- Accedere all'app EZVIZ.
- Nella schermata iniziale, toccare "+" nell'angolo superiore destro per passare alla
pagina di scansione del QR code.
19
Connettore di
alimentazione
Page 31

- Scansionare il QR code sul corpo della telecamera.
- Seguire le istruzioni della procedura guidata dell’app EZVIV per terminare la
configurazione della rete Wi-Fi.
È anche possibile selezionare una connessione cablata.
1: collegare la telecamera al router con un cavo di rete.
2: aggiungere la telecamera all’app EZVIZ eseguendo la scansione del suo codice QR.
N3
Cavo di rete
•Se non si riesce ad aggiungere la telecamera alla connessione Wi-Fi, tenere
premuto il pulsante RESET per 5 secondi mentre la telecamera è in funzione.
•Se il prodotto acquistato supporta solo la banda dei 2.4 GHz, si consiglia
di disattivare la banda dei 5 GHz sul router, prima di iniziare la procedura di
connessione.
20
Page 32

Passaggio 3
Installazione della telecamera
È possibile installare la telecamera a parete o sul soffitto.
Verificare che la parete sia abbastanza resistente da reggere un peso triplo rispetto
a quello della telecamera.
Installare la telecamera
1
- Posizionare la dima di foratura sulla superficie prescelta per fissare la telecamera.
- (Solo per pareti/soffitti in cemento) Praticare i fori per le viti usando la dima e
inserire tre tasselli.
- Utilizzare tre viti metalliche per fissare la base della telecamera, usando la dima.
Dima di foratura
Tasselli
Regolare l'angolazione per la sorveglianza
2
- Allentare la vite di regolazione.
- Regolare l'angolazione come desiderato.
- Serrare la vite di regolazione.
Verificare che lo slot della scheda microSD sia rivolto verso il basso.
Viti metalliche
21
Page 33

Vite di regolazione
0°-90°
0°-360°
Appendice
Contenuto della confezione
Internet Camera (x1) Alimentatore (x1)
Dima di foratura (x1) Kit di tasselli (x1) Kit impermeabilizzante (x1) Guida rapida (x1)
22
Page 34

Panoramica
Indicatore LED
Nome Descrizione
Microfono Microfono interno
Indicatore LED •Rosso fisso: la telecamera si sta avviando.
Slot per scheda
microSD
RESET Tenere premuto il pulsante RESET per 5 secondi mentre la
Ingresso
alimentazione
•Rosso lampeggiante lento: impossibile connettersi alla rete
Wi-Fi.
• Rosso lampeggiante veloce: eccezione dispositivo (es. errore scheda
microSD.
•Blu fisso: il video viene tramesso o riprodotto dall'app EZVIZ.
• Blu lampeggiante veloce: la telecamera è pronta per la connessione
Wi-Fi.
•Blu lampeggiante lento: la telecamera funziona correttamente.
La scheda microSD non è inclusa nella confezione. Dopo aver
inserito la scheda microSD, inizializzarla nell'app EZVIZ; a quel
punto i file video possono essere memorizzati nella scheda.
telecamera è in funzione. La telecamera si riavvia e ripristina tutti
i parametri ai valori predefiniti.
1 A
12 V
Microfono
Slot per scheda
microSD
RESET
23
Page 35

Risoluzione dei problemi
D: Quando si aggiunge la telecamera all'app EZVIZ, viene visualizzato il messaggio “The
device is offline” (Il dispositivo non è in linea) o il messaggio “The device is not
registered” (Il dispositivo non è registrato).
R: 1. Verificare che la rete alla quale è connessa la telecamera sia attiva e che il DHCP
del router sia abilitato.
2. Se si modificano manualmente i parametri di rete, tenere premuto il
pulsante RESET per 5 secondi per ripristinarli.
D: Come utilizzare la scheda microSD per l'archiviazione locale?
R: 1. Verificare che sia inserita una scheda microSD e che la telecamera sia stata
aggiunta al proprio account EZVIZ. Accedere all'app EZVIZ e specificare nella
telecamera Impostazioni (Stato Archivio); se compare il pulsante “Initialize
Storage Card” (Inizializza scheda di archiviazione) sarà necessario inizializzare
prima la scheda microSD.
2. La registrazione sulla scheda microSD per la funzione di rilevamento del
movimento è abilitata per impostazione predefinita.
D: Lo smartphone non riceve notifiche di allarme quando la telecamera è online.
R: 1. Verificare che l'app EZVIZ sia in esecuzione sul cellulare e che le notifiche di rilevamento
del movimento siano abilitate (Impostazioni > Notifica Allarme > In Funzione).
2. Su Android, verificare che l'app sia in esecuzione in background; su iOS, abilitare
la funzione di messaggistica push accedendo a “(Impostazioni > Notifiche >
Ezviz > Consenti Notifiche).”
3. Se anche così non viene segnalato alcun allarme, tenere premuto il pulsante
RESET per 5 secondi per ripristinare le impostazioni della telecamera.
D: Visualizzazione live o riproduzione non riuscita.
R: Verificare che la rete sia attiva. Per visualizzare i video in diretta serve una buona
larghezza di banda. È possibile aggiornare il video o cambiare la rete e riprovare.
D: Come connettersi a un'altra rete Wi-Fi?
R: Tenere premuto il pulsante RESET della telecamera per 5 secondi per ripristinare e
riavviare la telecamera, quindi riconnetterla alla rete Wi-Fi dopo circa un minuto.
Per informazioni dettagliate, visitare www.ezvizlife.com.
24
Page 36

Handelingen
Stap 1
Inschakelen
Sluit de camera aan op een stopcontact om deze van stroom te voorzien.
Netsnoer
Stopcontact
Stap 2
Instellen camera
Een gebruikersaccount aanmaken.
1
- Verbind uw mobiele telefoon met de wifi.
- Download en installeer de EZVIZ-app door te zoeken naar “EZVIZ” in de App Store
of Google PlayTM.
- Start de app en registreer een EZVIZ-gebruikersaccount via de opstartwizard.
Een camera toevoegen aan EZVIZ.
2
- Meld u aan op de EZVIZ-app.
- Tik in het startscherm op "+" in de rechter bovenhoek om de pagina voor het
scannen van de QR-code te openen.
23
Page 37

- Scan de QR-code op de behuizing van de camera.
- Volg de wizard van de EZVIZ-app om wifi-configuratie te voltooien.
U kunt ook de bedrade verbinding selecteren.
Stap 1: Sluit de camera aan op de router met behulp van een netwerkkabel.
Stap 2: Voeg de camera toe aan EZVIZ-app door de QR-code te scannen.
N3
Netwerkkabel
•Als u camera's toevoegt of de wi-verbinding mislukt, houd dan de toets HERSTELLEN
gedurende 5 seconden ingedrukt wanneer de camera draait.
•Als uw product alleen gebruik maakt van 2,4 GHz, raden we u aan eerst de 5 GHz van de
router uit te zetten voordat u verdergaat met het verbindingsproces.
24
NL
Page 38

Stap 3
Camera installatie
U kunt de camera aan de wand of het plafond installeren.
Verzeker u ervan dat de wand sterk genoeg is om ten minste drie keer het gewicht
van de camera te kunnen dragen.
Het installeren van de camera
1
- Plaats het boorsjabloon op het oppervlak waarop u de camera wilt monteren.
- (Uitsluitend voor cementen muur/plafond) Boor schroefgaten overeenkomstig het
sjabloon en steek er drie expansieschroeven in.
- Gebruik drie metalen schroeven om de onderkant van de camera vast te zetten
overeenkomstig met het sjabloon.
Montagemal
Uitbreidingsschroeven
De bewakingshoek aanpassen
2
- Draai de stelschroef los.
- Stel de bewakingshoek naar wens in.
- Draai de stelschroef vast.
Zorg ervoor dat de sleuf voor de micro-SD-kaart naar beneden wijst.
Metalen schroeven
25
Page 39

0° - 90°
Stelschroef
0° - 360°
Bijlage
Inhoud van de doos
Internetcamera x1 Netadapter x1
Montagesjabloon x1 Set schroeven x1 Waterdicht pakket x1 Snelstartgids x1
26
NL
Page 40

Basisprincipes
LED-indicator
Naam Beschrijving
MIC Voor audio-in.
LED-indicator
MicroSD-kaartslot MicroSD-kaart niet meegeleverd in de inhoud van de doos. Initialiseer
HERSTELLEN Houd de toets HERSTELLEN gedurende 5 seconden ingedrukt
Voeding 1A
•Rood brandend: Camera wordt opgestart.
•Knippert langzaam rood: Wifi-verbinding is mislukt.
•Knippert snel rood: Apparaatuitzondering (bijv. fout microSD-
kaart).
•Blauw brandend: Video wordt bekeken of afgespeeld in de EZVIZapp.
•Knippert snel blauw: Camera is gereed voor verbinding met wifi
•Knippert langzaam blauw: Camera werkt correct.
de micro-SD-kaart na het plaatsen in de EZVIZ app, waarna er
videobestanden op de SD-kaart kunnen worden opgeslagen.
wanneer de camera draait. De camera herstart en herstelt alle
parameters naar standaard.
12V
MIC
MicroSD-kaartslot
HERSTELLEN
27
Page 41

Probleemoplossing
V: “The device is offline. (Het apparaat is offline.)” of “The device is not registered. (Het
apparaat is niet geregistreerd.)” wordt weergegeven wanneer de camera aan de EZVIZapp wordt toegevoegd.
A: 1. Zorg dat het netwerk waarop de camera is aangesloten normaal is en de DHCP van de
router is ingeschakeld.
2. Houd de RESET-knop 5 seconden lang ingedrukt om de parameters te resetten als u
de netwerkparameters handmatig hebt gewijzigd.
V: Hoe gebruik ik de microSD-kaart voor lokale opslag?
A: 1. Zorg dat er een microSD-kaart is geplaatst en dat de camera is toegevoegd
aan uw EZVIZ-account. Meld u aan bij de EZVIZ-app en ga naar de interface
“Device Details (Apparaatgegevens)”. Als de knop “Initialize Storage Card
(Opslagkaart initialiseren)” wordt weergegeven, moet u eerst de microSD-kaart
initialiseren.
2. Het opnemen op de microSD-kaart voor de bewegingsdetectie is standaard
ingeschakeld.
V: De mobiele telefoon kan geen alarmeringen ontvangen wanneer de camera online is.
A: 1. Zorg dat de EZVIZ-app op uw mobiele telefoon draait en de Bewegingsdetectiemelding
is ingeschakeld.
2. Voor een Android-systeem, zorg dat de app op de achtergrond draait; en voor
iOS, activeer de functie pushberichten in “Settings > Notification (Instellingen>
Berichtgeving)”.
3. Als er nog steeds geen alarm wordt weergegeven, houdt u de RESET-knop 5 seconden
lang ingedrukt om de instellingen van uw camera terug te zetten.
V: Live beeld of afspelen mislukt.
A: Zorg dat uw netwerk goed verbonden is. Voor het bekijken van een live-video heeft u
een goede bandbreedte nodig. U kunt de video vernieuwen of een netwerk wijzigen, en
opnieuw proberen.
V: Hoe kan ik verbinding maken met een ander wifi-netwerk?
A: Houd de RESET-knop op de camera 5 seconden lang ingedrukt, zodat de camera wordt
gereset en opnieuw opgestart en 1 minuut later opnieuw verbinding maakt met de wifi.
Bezoek voor meer informatie www.ezvizlife.com.
28
NL
Page 42

Konguracja
Krok 1
Podłączenie zasilania
Podłącz kamerę do gniazda zasilania, aby zasilić kamerę.
Przewód zasilający
Krok 2
Konguracja kamery
Utwórz konto użytkownika.
1
-Połącz telefon komórkowy z siecią Wi-Fi.
-W App Store lub Google PlayTM wyszukaj „EZVIZ”, pobierz i zainstaluj aplikację EZVIZ.
-Uruchom aplikację i zarejestruj swoje konto użytkownika EZVIZ przy użyciu kreatora
startowego.
Dodaj kamerę do aplikacji EZVIZ.
2
-Zaloguj się w aplikacji EZVIZ.
-Na ekranie głównym wybierz przycisk „+” znajdujący się w prawym górnym rogu, aby
przejść do strony skanowania kodów QR.
29
Gniazdo sieci
elektrycznej
Page 43

-Zeskanuj kod QR znajdujący się na korpusie kamery.
-Postępuj zgodnie z instrukcjami aystenta aplikacji EZVIZ w celu zakończenia
konguracji Wi-Fi.
Można też wybrać połączenie przewodowe.
3
Krok 1: podłącz kamerę do routera przewodem sieciowym.
Krok 2: zeskanuj kod QR kamery, aby dodać ją do aplikacji EZVIZ.
N3
Przewód sieciowy
•Jeśli dodawanie kamer lub ustanawianie połączenia z siecią Wi-Fi nie
powiedzie się, podczas działania kamery naci nij i przytrzymaj przez 5 sekund
przycisk RESET.
•Jeżeli Twoje urządzenie korzysta z częstotliwości 2,4 GHz, zdecydowanie
zalecamy wyłączenie obsługi częstotliwości 5 GHz w routerze przed
kontynuacją procesu dodawania urządzenia.
30
Page 44

Krok 3
Instalacja kamery
Kamerę można zamontować na ścianie lub na sucie.
Należy upewnić się, że powierzchnia montażowa jest w stanie udźwignąć trzykrotny
ciężar kamery.
Instalowanie kamery
1
-Umieść szablon otworów w miejscu, w którym kamera zostanie zainstalowana.
-(Tylko ściany/suty cementowe) Należy wywiercić otwory zgodnie z szablonem
i umieścić w nich trzy kołki rozporowe na wkręty.
-Przymocuj podstawę kamery trzema metalowymi wkrętami zgodnie z szablonem.
Szablon
montażowy
Kołki rozporowe
Regulacja kąta obserwacji
2
-Poluzuj śrubę regulacyjną.
-Dostosuj kąt monitorowania tak, aby objąć docelowy obszar.
-Dokręć śrubę regulacyjną.
Upewnij się, że gniazdo karty microSD jest skierowane ku dołowi.
Wkręty metalowe
31
Page 45

0°-90°
0°-360°
Załącznik
Zawartość opakowania
Kamera internetowa x1 Zasilacz x1
Śruba regulacyjna
Szablon
montażowy x1
Zestaw
śrub x1
Zestaw dławików
wodoszczelnych x1
32
Skrócona instrukcja
obsługi x1
Page 46

Informacje podstawowe
Wskaźnik LED
Nazwa Opis
Wskaźnik LED
Gniazdo karty
micro SD
RESET Podczas działania kamery naciśnij i przytrzymaj przez 5 sekund
Wejście zasilania 1A
•Włączony (czerwony): Trwa uruchamianie kamery.
•Miga powoli (czerwony): Połączenie z siecią Wi-Fi nie powiodło się.
•Miga szybko (czerwony): Wyjątek urządzenia (np. błąd karty
microSD).
•Włączony (niebieski): Trwa wyświetlanie wideo lub odtwarzanie
wideo w aplikacji EZVIZ.
•Miga szybko (niebieski): Kamera jest gotowa do połączenia z siecią
Wi-Fi.
•Miga powoli (niebieski): Kamera funkcjonuje prawidłowo.
Karta micro SD nie znajduje się w zestawie. Po włożeniu karty microSD
zainicjuj ją za pomocą aplikacji EZVIZ, aby móc zapisywać pliki wideo
na karcie microSD.
przycisk RESET. Spowoduje to ponowne uruchomienie kamery i
przywrócenie wszystkich domyślnych parametrów kamery.
12V
Mikrofon
Gniazdo karty
micro SD
RESET
33
Page 47

Rozwiązywanie problemów
P: Komunikat „The device is oine” (Urządzenie w trybie oine) lub „The device is
not registered” (Urządzenie nie jest zarejestrowane) pojawia się po dodaniu kamery
przy użyciu aplikacji EZVIZ.
O: 1. Upewnij się, że kamera jest podłączona do sieci i że protokół DHCP na routerze jest
włączony.
2. Przytrzymaj wciśnięty prz ycisk RESET przez 5 sekund, aby zresetować ustawienia po
ręcznej zmianie parametrów sieci.
P: Jak użyć karty microSD jako pamięci lokalnej?
O: 1. Upewnij się, że karta microSD jest włożona, a kamera dodana do twojego konta
EZVIZ. Zaloguj się w aplikacji EZVIZ, przejdź do interfejsu „D evice Details”
(Szczegóły urządzenia), jeśli dostępna będzie ikona „Initialize Storage Card”
(Aktywuj kartę pamięci), musisz aktywować kartę microSD.
2. Domyślnie włączone jest nagrywanie detekcji ruchu na kartę microSD.
P: Telefon komórkowy nie otrzymuje monitów alarmowych, gdy kamera jest w trybie
online.
O: 1. Upewnij się, że aplikacja EZVIZ jest włączona na telefonie i powiadomienia o
detekcji ruchu są włączone.
2. W przypadku systemu Android upewnij się, że aplikacja jest uruchomiona w tle,
a w przypadku telefonów z systemem iOS włącz obsługę wiadomości typu push
w menu „Settings > Notication” (Ustawienia > Powiadamianie).
3. Jeśli powiadomienia wciąż nie przychodzą, przytrzymaj przycisk RESET przez
5 sekund i przywróć ustawienia kamery.
P: Uzyskanie podglądu na żywo lub otworzenie nagrania nie powiodło się.
O: Upewnij się, że masz dobre połączenie z siecią. Oglądanie nagrań wymaga wysokiej
przepustowości. Odśwież wideo albo zmień sieć i spróbuj ponownie.
P: Jak mogę połączyć się z innym Wi-Fi?
O: Przytrzymaj przycisk RESET kamery przez 5 sekund, aby zresetować i uruchomić
ponownie kamerę. Połącz się ponownie z WI-FI za około minutę.
Aby uzyskać więcej informacji, skorzystaj z witryny www.ezvizlife.com.
34
Page 48

Λειτουργίες
Βήμα 1
Ενεργοποίηση
Συνδέστε την κάμερα στην πρίζα για να ενεργοποιηθεί.
Καλώδιο τροφοδοσίας
Πρίζα
Βήμα 2
Ρύθμιση κάμερας
Δημιουργήστε έναν λογαριασμό χρήστη.
1
- Συνδέστε το κινητό σας τηλέφωνο στο Wi-Fi.
- Κατεβάστε και εγκαταστήστε την εφαρμογή EZVIZ αναζητώντας τον όρο "EZVIZ" στο
App Store και το Google PlayTM.
- Εκκινήστε την εφαρμογή και δημιουργήστε έναν λογαριασμό χρήστη EZVIZ
ακολουθώντας τον οδηγό εκκίνησης.
Προσθέστε μια κάμερα στο EZVIZ.
2
- Συνδεθείτε στην εφαρμογή EZVIZ.
- Στην αρχική οθόνη, πατήστε «+» στην πάνω δεξιά γωνία για να μεταβείτε στη σελίδα
σάρωσης κωδικού QR.
35
Page 49

- Σαρώστε τον κωδικό QR στο σώμα της κάμερας.
- Ακολουθήστε τον οδηγό εφαρμογής EZVIZ για να ολοκληρώσετε τη ρύθμιση
παραμέτρων Wi-Fi.
Μπορείτε επίσης να επιλέξτε ενσύρματη σύνδεση.
Βήμα 1: Συνδέστε την κάμερα στον δρομολογητή με καλώδιο δικτύου.
Βήμα 2: Προσθέστε την κάμερα στην εφαρμογή EZVIZ, σαρώνοντας τον κωδικό QR της.
N3
Καλώδιο δικτύου
•Κρατήστε παρατεταμένα το κουμπί RESET (Επαναφοράς) για 5 δευτερόλεπτα
ενώ λειτουργεί η κάμερα, εάν η προσθήκη καμερών ή η σύνδεση Wi-Fi δεν
λειτουργεί.
•Εάν το προϊόν σας λειτουργεί μόνο στα 2.4GHz, σας προτείνουμε να
απενεργοποιήσετε πρώτα τη λειτουργία 5GHz του δρομολογητή σας, προτού
συνδεθείτε στο ασύρματο δίκτυο.
36
Page 50

Βήμα 3
Εγκατάσταση κάμερας
Μπορείτε να τοποθετήσετε την κάμερα στον τοίχο ή στην οροφή.
Βεβαιωθείτε ότι ο τοίχος είναι αρκετά ανθεκτικός για βάρος τριπλάσιο αυτού της
κάμερας.
Εγκατάσταση της κάμερας
1
- Τοποθετήστε το πρότυπο διάτρησης επάνω στην επιφάνεια που έχετε επιλέξει να
τοποθετήσετε την κάμερα.
- (Μόνο για τοίχους/οροφές από τσιμέντο) Ανοίξτε τρεις οπές σύμφωνα με το πρότυπο
διάτρησης και τοποθετήστε ούπα.
- Χρησιμοποιήστε τρεις μεταλλικές βίδες για να στερεώσετε τη βάση της κάμερας
σύμφωνα με το πρότυπο.
Πρότυπο
τοποθέτησης
Ούπα
Ρύθμιση της γωνίας παρακολούθησης
2
- Ξεβιδώστε τη βίδα προσαρμογής.
- Προσαρμόστε τη γωνία παρακολούθησης όπως επιθυμείτε.
- Βιδώστε τη βίδα προσαρμογής.
Βεβαιωθείτε ότι η υποδοχή κάρτας microSD κοιτάζει προς τα κάτω.
Μεταλλικές βίδες
37
Page 51

Βίδα ρύθμισης
0°-90°
0°-360°
Παράρτημα
Περιεχόμενα συσκευασίας
Διαδικτυακή κάμερα x1 Τροφοδοτικό x1
Πρότυπο
τοποθέτησης x1
Σετ
βιδών x1
Αδιάβροχο
σετ x1
38
Οδηγός γρήγορης
εκκίνησης x1
Page 52

Βασικά
Ενδεικτική λυχνία LED
Όνομα Περιγραφή
MIC Για είσοδο ήχου.
Ενδεικτική λυχνία
LED
Υποδοχή κάρτας
microSD
ΕΠΑΝΑΦΟΡΑ Κρατήστε παρατεταμένα το κουμπί RESET (Επαναφορά) για
Τροφοδοσία 1 A
•Σταθερό κόκκινο: Γίνεται εκκίνηση της κάμερας.
•Κόκκινο που αναβοσβήνει αργά: Αποτυχία σύνδεσης Wi-Fi.
•Κόκκινο που αναβοσβήνει γρήγορα: Εξαίρεση συσκευής (π.χ.
σφάλμα κάρτας MicroSD).
•Σταθερό μπλε: Γίνεται προβολή ή αναπαραγωγή βίντεο στην
Εφαρμογή EZVIZ.
•Μπλε που αναβοσβήνει γρήγορα: Η κάμερα είναι έτοιμη για τη
σύνδεση Wi-Fi.
•Μπλε που αναβοσβήνει αργά: Η κάμερα λειτουργεί κανονικά.
Η κάρτα MicroSD δεν περιλαμβάνεται στη συσκευασία. Αφού
τοποθετήσετε την κάρτα microSD, ενεργοποιήστε την στην εφαρμογή
EZVIZ και στη συνέχεια θα μπορείτε να αποθηκεύετε αρχεία βίντεο στην
κάρτα SD.
5 δευτερόλεπτα ενώ η κάμερα λειτουργεί. Η κάμερα πραγματοποιεί
επανεκκίνηση και γίνεται επαναφορά όλων των ρυθμίσεων στις
προεπιλεγμένες.
12 V
MIC
Υποδοχή κάρτας
microSD
ΕΠΑΝΑΦΟΡΑ
39
Page 53

Αντιμετώπιση προβλημάτων
Εμφανίζεται το μήνυμα "The device is oine." (Η συσκευή είναι εκτός σύνδεσης.) ή "The device
Ερ.:
is not registered." (Η συσκευή δεν έχει δηλωθεί.) όταν προσθέτω την κάμερα στην εφαρμογή
EZVIZ.
1. Βεβαιωθείτε ότι το δίκτυο στο οποίο έχει συνδεθεί η κάμερα λειτουργεί κανονικά και ότι έχει
Απ.:
ενεργοποιηθεί το DHCP του ρούτερ.
2. Πιέστε παρατεταμένα το κουμπί ΕΠΑΝΑΦΟΡΑ για 5 δευτερόλεπτα για επαναφορά των
παραμέτρων, αν αλλάξατε χειροκίνητα τις παραμέτρους δικτύου.
Ερ.: Πώς μπορώ να χρησιμοποιήσω την κάρτα microSD για τοπική αποθήκευση;
1. Βεβαιωθείτε ότι έχει τοποθετηθεί κάρτα microSD και η κάμερα έχει προστεθεί στον
Απ.:
λογαριασμό EZVIZ σας. Συνδεθείτε στην εφαρμογή EZVIZ και ανοίξτε τη διεπαφή "Device
Details" (Λεπτομέρειες συσκευής). Αν εμφανιστεί το κουμπί "Initialize Storage Card"
(Ενεργοποίηση κάρτας αποθήκευσης), θα πρέπει να ενεργοποιήσετε αρχικά την κάρτα
microSD.
2. Η εγγραφή ανίχνευσης κίνησης στην κάρτα microSD είναι ενεργοποιημένη από
προεπιλογή.
Ερ.: Το κινητό τηλέφωνο δεν μπορεί να λάβει ειδοποιήσεις συναγερμού όταν η
κάμερα είναι online.
1. Βεβαιωθείτε ότι η εφαρμογή EZVIZ εκτελείται στο κινητό σας τηλέφωνο και ότι έχει
Απ.:
ενεργοποιηθεί η Ειδοποίηση ανίχνευσης κίνησης.
2. Για το σύστημα Android, βεβαιωθείτε ότι η εφαρμογή εκτελείται στο παρασκήνιο. Για
το σύστημα iOS, ενεργοποιήστε τη λειτουργία προώθησης μηνυμάτων από την επιλογή
"Settings > Notication" (Ρυθμίσεις > Ειδοποίηση).
3. Αν εξακολουθούν να μην λαμβάνονται ειδοποιήσεις συναγερμού, πιέστε παρατεταμένα το
κουμπί ΕΠΑΝΑΦΟΡΑ για 5 δευτερόλεπτα για επαναφορά των ρυθμίσεων κάμερας.
Ερ.: Δεν είναι δυνατή η ζωντανή προβολή ή η αναπαραγωγή.
Βεβαιωθείτε ότι το σήμα του δικτύου σύνδεσης είναι καλό. Για την προβολή ζωντανού βίντεο
Απ.:
απαιτείται καλό εύρος ζώνης. Μπορείτε να ανανεώσετε το βίντεο ή να αλλάξετε δίκτυο και να
προσπαθήσετε ξανά.
Ερ.: Πώς μπορώ να συνδεθώ σε ένα άλλο Wi-Fi;
Πιέστε παρατεταμένα το κουμπί ΕΠΑΝΑΦΟΡΑ της κάμερας για 5 δευτερόλεπτα για επαναφορά,
Απ.:
επανεκκινήστε την κάμερα και επανασυνδέστε το Wi-Fi μετά από περίπου 1 λεπτό.
Για λεπτομερείς πληροφορίες, επισκεφτείτε τη διεύθυνση www.ezvizlife.com.
40
Page 54

Operace
Krok 1
Zapnutí
Připojte kameru a síťovou zástrčku k napájení kamery.
Napájecí kabel
Elektrická zásuvka
Krok 2
Nastavení kamery
Vytvořte si uživatelský účet.
1
-Připojte mobilní telefon k síti Wi-Fi.
-Stáhněte si a nainstalujte aplikaci EZVIZ tak, že vyhledáte „EZVIZ“ v obchodech App
Store a Google PlayTM.
-Spusťte aplikaci. Postupujte podle pokynů průvodce prvním spuštěním a zaregistrujte
svůj uživatelský účet EZVIZ.
Přidejte kameru do aplikace EZVIZ.
2
-Přihlaste se do aplikace EZVIZ.
-Na domovské obrazovce přejděte klepnutím v pravém horním rohu na tlačítko „+“ na
stránku skenování kódu QR.
41
Page 55

-Naskenujte kód QR na těle kamery.
-Postupujte podle průvodce aplikace EZVIZ a dokončete konguraci sítě Wi-Fi.
Vybrat lze i kabelové připojení.
Krok 1: Připojte kameru ke směrovači prostřednictvím síťového kabelu.
Krok 2: Naskenujte kód QR kamery, a přidejte ji tak do aplikace EZVIZ.
N3
Síťový kabel
•Pokud se přidávání kamer nebo připojení k síti Wi-Fi nezdařilo, při zapnuté
kameře přidržte tlačítko RESET na dobu 5 sekund.
•Pokud je výrobek vybaven pouze pásmem 2,4 GHz, před pokračováním
v připojování doporučujeme ve směrovači možnost pásma 5 GHz vypnout.
42
Page 56

Krok 3
Instalace kamery
Kameru lze nainstalovat na zeď nebo na strop.
Ujistěte se, zda je zeď dostatečně pevná na to, aby unesla trojnásobnou hmotnost
kamery.
Montáž kamery
1
-Na místo vybrané k montáži kamery umístěte vrtací šablonu.
-(Pouze pro betonové stěny nebo stropy) Vyvrtejte podle šablony otvory pro šrouby
a vložte tři hmoždinky.
-Podle šablony připevněte pomocí tří kovových šroubů základnu kamery.
Montážní šablona
Expanzní šrouby
Nastavení úhlu sledování
2
-Uvolněte stavěcí šroub.
-Nastavte úhel sledování na požadované místo.
-Utáhněte stavěcí šroub.
Přesvědčte se, zda slot pro kartu microSD směřuje dolů.
Kovové šrouby
43
Page 57

Stavěcí šroub
0–90°
0–360°
Dodatek
Obsah balení
Internetová kamera 1× Napájecí adaptér 1×
Montážní
šablona 1×
Sada
šroubů 1×
Vodotěsná
sada 1×
44
Průvodce rychlým
spuštěním 1×
Page 58

Popis
Indikátor LED
Název Popis
MIKROFON Slouží ke vstupu zvuku.
Indikátor LED • Trvalé červené svícení: Kamera se spouští.
Slot karty MicroSD Karta MicroSD není součástí obsahu balení. Po vložení karty microSD
RESETOVAT Při zapnuté kameře přidržte tlačítko RESETOVAT na dobu 5 sekund.
Napájecí vstup 1 A
•Pomalé červené blikání: Připojení k síti Wi-Fi se nezdařilo.
•Rychlé červené blikání: Došlo k výjimce zařízení (např. k chybě karty
microSD).
•Trvalé modré svícení: Zobrazuje se video nebo dochází k přehrávání
v aplikaci EZVIZ.
•Rychlé modré blikání: Kamera je připravena k připojení k síti Wi-Fi.
•Pomalé modré blikání: Kamera je v provozu a funguje správně.
ji inicializujte v aplikaci EZVIZ. Poté lze videosoubory ukládat na
kartě SD.
Kamera se restartuje a všechny parametry se obnoví na výchozí
hodnoty.
12 V
MIKROFON
Slot karty
MicroSD
RESETOVAT
45
Page 59

Řešení potíží
Ot.: Při přidání kamery prostřednictvím aplikace EZVIZ se objevuje zpráva „The device is
oine. (Zařízení je v režimu o-line.)“ nebo „The device is not registered. (Zařízení
není registrováno.)“.
Odp.: 1. Zkontrolujte, zda síť, ke které je kamera připojena, funguje normálně, a zda je
povolen DHCP routeru.
2. Podržte stisknuté tlačítko RESETOVAT po dobu 5 sekund pro obnovení parametrů,
pokud jste manuálně změnili parametry sítě.
Ot.: Jak používat kartu microSD pro místní úložiště?
Odp.: 1. Zkontrolujte, zda je vložena karta microSD a kamera je přidána do vašeho účtu
EZVIZ. Přihlaste se do aplikace EZVIZ a přejděte do rozhraní „Device Details
(Podrobnosti o zařízení)“, pokud se zobrazí tlačítko „Initialize Storage Card
(Inicializovat paměťovou kartu)“, musíte nejprve inicializovat kartu microSD.
2. Nahrávání na kartu microSD v případě detekce pohybu je ve výchozím nastavení
povoleno.
Ot.: Kamera je online a mobilní telefon nepřijímá signály o alarmu.
Odp.: 1. Zkontrolujte, zda je ve vašem mobilním telefonu spuštěna aplikace EZVIZ
a zda je povoleno oznámení o detekci pohybu.
2. U operačního systému Android zkontrolujte, zda aplikace běží na pozadí.
U operačního systému iOS povolte v nabídce „Settings > Notication (Nastavení >
Upozornění)“ funkci odesílání zpráv.
3. Pokud se stále nezobrazuje žádný alarm, podržte tlačítko RESETOVAT po dobu
5 sekund pro obnovení nastavení kamery.
Ot.: Živé zobrazení nebo přehrávání se nezdařilo.
Odp.: Zkontrolujte, zda je síť dobře připojená. Prohlížení živého videa vyžaduje dobrou
šířku pásma. Můžete obnovit video nebo změnit síť a zkusit to znovu.
Ot.: Jak se připojit k jiné Wi-Fi?
Odp.: Podržte stisknuté tlačítko RESETOVAT na kameře po dobu 5 sekund, pro obnovení
a restartování kamery a po uplynutí 1 minuty opět připojte Wi-Fi.
Podrobné informace naleznete na webu www.ezvizlife.com.
46
Page 60

Prevádzka
Krok 1
Zapnue
Pripojte kameru do zásuvky sieťového napájania, aby sa zapla.
Napájací kábel
Zásuvka sieťového
napájania
Krok 2
Nastavenie kamery
Vytvorenie používateľského účtu.
1
-Pripojte mobilný telefón k sie Wi-Fi.
-Sahnite a nainštalujte aplikáciu EZVIZ vyhľadaním názvu „EZVIZ“
v obchode App Store a Google PlayTM.
-Spuste aplikáciu a zaregistrujte používateľský účet EZVIZ podľa
sprievodcu pri spustení.
Pridanie kamery do účtu EZVIZ.
2
-Prihláste sa do aplikácie EZVIZ.
-Na obrazovke Home (Domov) klepnite na znamienko „+“ v pravom
hornom rohu, aby ste prešli na stránku skenovania QR kódu.
47
Page 61

-Naskenujte QR kód na kamere.
-Pomocou sprievodcu aplikáciou EZVIZ dokončite konguráciu
pripojenia Wi-Fi.
Môžete ež vybrať drôtové pripojenie.
Krok 1: Pripojte kameru k smerovaču pomocou sieťového kábla.
Krok 2: Pridajte kameru do aplikácie EZVIZ naskenovaním jej QR kódu.
N3
Sieťový kábel
•Ak pridanie kamier alebo pripojenie k sie Wi-Fi zlyhá, podržte
tlačidlo RESET na 5 sekúnd počas spustenia kamery.
•Ak produkt podporuje iba 2,4 GHz pásmo a chcete pokračovať
v pridávaní, odporúčame najprv vypnúť 5 GHz pásmo smerovača.
48
Page 62

Krok 3
Inštalácia kamery
Kameru je možné nainštalovať na stenu alebo na strop.
Uiste sa, že je stena dosť pevná, aby udržala trojnásobnú hmotnosť
kamery.
Inštalácia kamery
1
-Umiestnite šablónu na vŕtanie na povrch, ktorý ste zvoli na montáž
kamery.
-(Len pre betónové steny/stropy) Vyvŕtajte otvory na skrutky podľa
šablóny a vložte do nich tri rozpínacie skrutky.
-Na xáciu základne kamery podľa šablóny použite tri kovové skrutky.
Šablóna montáže
Rozpínacie skrutky
Nastavenie uhla dohľadu
2
-Uvoľnite regulačnú skutku.
-Nastavte uhol dohľadu podľa požadovaného miesta.
-Uahnite regulačnú skrutku.
Uiste sa, že slot karty MicroSD nesmeruje nadol.
Kovové skrutky
49
Page 63

Regulačná skrutka
0° – 90°
0° – 360°
Príloha
Obsah balenia
Internetová kamera (1 x) Napájací adaptér (1 x)
Šablóna
montáže (1 x)
Súprava
skruek (1 x)
50
Vodotesná
súprava (1 x)
Stručná
príručka (1 x)
Page 64

Základné informácie
Mikrofón
Slot karty
MicroSD
VYNULOVAŤ
Indikátor LED
Názov Popis
Mikrofón Na vstup zvuku.
Indikátor LED • Svie červená: kamera sa spúšťa.
Slot karty
MicroSD
VYNULOVAŤ Keď je kamera spustená, podržte tlačidlo RESET na
Vstup napájania
• Pomaly bliká červená: pripojenie Wi-Fi zlyhalo.
• Rýchlo bliká červená: výnimka zariadenia (napr.
chyba karty MicroSD).
• Svie modrá: sleduje sa video alebo sa prehráva
v aplikácii EZVIZ.
• Rýchlo bliká modrá: kamera je pripravená na
pripojenie Wi-Fi.
• Pomaly bliká modrá: kamera pracuje správne.
Karta MicroSD sa nedodáva v rámci obsahu balenia.
Po vložení karty MicroSD ju inicializujte v aplikácii
EZVIZ. Následne bude možné na kartu SD ukladať
súbory videa.
5 sekúnd. Kamera sa reštartuje a všetky parametre
sa obnovia na predvolené.
1 A
12 V
51
Page 65

Riešenie problémov
Otázka: Počas pridávania kamery pomocou aplikácie EZVIZ sa zobrazí
Odpoveď: 1. Uiste sa, že sieť, ku ktorej je kamera pripojená, je normálna
Otázka: Akým spôsobom sa používa karta MicroSD ako lokálne úložisko?
Odpoveď: 1. Uiste sa, že je karta MicroSD vložená a že je kamera pridaná do
Otázka: Mobilný telefón nedokáže prijímať upozornenia alarmov,
Odpoveď: 1. Uiste sa, že máte v mobile spustenú aplikáciu EZVIZ a že
Otázka: Živé zobrazenie alebo prehrávanie zlyhalo.
Odpoveď: Uiste sa, že sieťové pripojenie je správne. Zobrazenie živého
Otázka: Ako sa dá pripojiť sa k inej sie Wi-Fi?
Odpoveď: Podržte tlačidlo RESET na kamere na 5 sekúnd, aby sa kamera
hlásenie „The device is oine.“ (Zariadenie je oine.) alebo „The
device is not registered.“ (Zariadenie nie je registrované.).
a DHCP smerovača je zapnuté.
2. Ak ste manuálne zmenili parametre siete, podržte stlačené
tlačidlo RESET na 5 sekúnd, aby sa parametre resetovali.
účtu EZVIZ. Prihláste sa do aplikácie EZVIZ a prejdite do rozhrania
„Device Details“ (Podrobnos zariadenia). Ak sa zobrazí tlačidlo
„Inialize Storage Card“ (Inicializovať kartu úložiska), najprv
bude potrebné inicializovať kartu MicroSD.
2. Záznam na kartu MicroSD v prípade detekcie pohybu je
predvolene zapnutý.
keď je kamera online.
sú zapnuté upozornenia detekcie pohybu.
2. V prípade systému Android sa uiste, že aplikácia
je spustená v pozadí a v prípade systému iOS zapnite funkciu
hlásení typu push „Sengs > Nocaon“ (Nastavenia >
Upozornenie).
3. Ak sa aj tak nezobrazí žiadny alarm, podržte stlačené tlačidlo RESET
na 5 sekúnd, aby sa obnovili nastavenia kamery.
videa si vyžaduje vhodnú šírku pásma. Môžete obnoviť video alebo
zmeniť sieť a vyskúšať to znova.
resetovala a reštartovala a opätovne sa pripojte k sie Wi-Fi o 1
minútu neskôr.
Podrobné informácie nájdete na stránke www.ezvizlife.com.
52
Page 66

Bruk
Trinn 1
Skrudd på
Slå på kameraet ved å koble det til stikkontakten.
Strømledning
Stikkontakt
Trinn 2
Oppsett av kamera
Opprett en brukerkonto.
1
- Koble mobiltelefonen til et Wi-Fi-nettverk.
- Last ned og installer EZVIZ-appen ved å søke etter “EZVIZ” i App Store eller Google PlayTM.
- Start appen, og opprett en EZVIZ-brukerkonto ved å følge oppstartsveiviseren.
Legg til et kamera til EZVIZ.
2
- Logg inn på EZVIZ-appen.
- Trykk på “+” øverst til høyre på startsiden for å gå til siden hvor du kan skanne
QR-koden.
53
Page 67

- Skann QR-koden som du finner på kameraet.
- Følg veiviseren i EZVIZ-appen for å fullføre konfigureringen av Wi-Fi.
Du kan også velge en kabelforbindelse.
Trinn 1: Koble kameraet til ruteren med nettverkskabelen.
Trinn 2: Legg til kameraet i EZVIZ-appen ved å skanne QR-koden.
N3
Nettverkskabel
•Hvis du ikke kan legge til kamera eller W i-Fi-tilkoblingen mislykkes, hold inne RESET-
knappen i 5 sekunder mens kameraet er på.
•Hvis produktet ditt kun har 2,4 GHz, anbefaler vi at du slår av ruterens 5 GHz-
funksjonalitet før du starter tilkoblingsprosessen.
54
Page 68

Trinn 3
Installasjon av kamera
Du kan installere kameraet på veggen eller i taket.
Forsikre deg om at veggen er sterk nok til å tåle tre ganger vekten av kameraet.
Installere kameraet
1
- Plasser monteringsmalen på overflaten du har valgt for å montere kameraet.
- (Kun for vegger/tak i sement) Bor skruehull i samsvar med monteringsmalen, og
sett inn tre ekspansjonsskruer.
- Bruk tre metallskruer for å feste kamerabasen i samsvar med monteringsmalen.
Monteringsmal
Ekspansjonsskruer
Justere overvåkingsvinkelen
2
- Løsne justeringsskruen.
- Juster overvåkingsvinkelen til ønsket plassering.
- Stram til justeringsskruen.
Forsikre deg om at sporet for microSD-kortet vender nedover.
Metallskruer
55
Page 69

Justeringsskrue
0°–90°
0°–360°
Appendiks
Innhold i pakken
Internettkamera x 1 Strømadapter x 1
Monteringsmal x 1 Skruesett x 1 Sett for vanntett kobling x 1 Hurtigstartveiledning x 1
56
Page 70

Grunnleggende funksjoner
LED-indikator
Navn Beskrivelse
Mikrofon For lyd inn.
LED-indikator •Jevnt rød: Kameraet starter opp.
Spor til
microSD-kort
TILBAKESTILL Hold inne RESET-knappen i 5 sekunder mens kameraet er på.
Strøminngang 1 A
•Blinker sakte rødt: Wi-Fi-forbindelsen har sviktet.
•Blinker raskt i rødt: Enhetsunntak (f.eks. MicroSD-kortfeil).
•Jevnt blått: Video vises eller spilles av i EZVIZ-appen.
•Blinker raskt i blått: Kameraet er klart for Wi-Fi-forbindelsen.
•Blinker sakte i blått: Kameraet fungerer som det skal.
MicroSD-kortet er ikke inkludert i pakken. Før videofiler kan lagres
på SD-kortet, må det initialiseres i EZVIZ-appen etter at det er satt
inn.
Kameraet starter på nytt, og alle parameterne tilbakestilles til
standardverdiene.
12 V
Mikrofon
Spor til
microSD-kort
TILBAKESTILL
57
Page 71

Feilsøking
Spm: “The device is offline.” (enheten er offline) eller “The device is not registered.”
(enheten er ikke registrert) vises når kameraet legges til med EZVIZ-appen.
Sv: 1. Forsikre deg om at nettverket som kameraet er tilkoblet er normalt, og at
ruterens DHCP er aktivert.
2. Hold inne RESET-knappen i 5 sekunder for å resettetilbakestille
nettverksparameterne hvis du har endret disse manuelt.
Spm: Hvordan bruke microSD-kortet for lagring lokalt?
Sv: 1. Forsikre deg om at et microSD-kort er installert, og at kameraet er lagt til
EZVIZ-kontoen din. Logg inn på EZVIZ-appen, og gå til menyen for “Device
Details” (enhetsinformasjon). Hvis knappen “Initialize Storage Card”
(Initialiser lagringskort) vises, må du først initialisere microSD-kortet.
2. Som standard er opptak på microSD-kortet for bevegelsesdeteksjon aktivert.
Spm: Mobiltelefonen kan ikke motta alarmmeldinger når kameraet er online.
Sv: 1. Forsikre deg om at EZVIZ-appen kjører på mobiltelefonen, og at “Motion
Detection Notification” (bevegelsesdeteksjonsmeldinger) er aktivert.
2. For Android-systemer, forsikre deg om at appen kjører i bakgrunnen. For
iOS, aktiver funksjonen for push-meldinger under “Settings > Notification”
(innstillinger > varslinger).
3. Hvis du fremdeles ikke får noen alarmmeldinger, hold inne RESET-knappen i
5 sekunder for å gjenopprette kamerainnstillingene.
Spm: Live-visning eller avspilling mislyktes.
Sv: Forsikre deg om at nettverket er korrekt tilkoblet. Live-visning av video krever god
båndbredde. Du kan oppdatere videoen, eller endre nettverk og prøve på nytt.
Spm: Hvordan bytte til et annet Wi-Fi-nettverk?
Sv: Hold inne RESET-knappen på kameraet i 5 sekunder for å tilbakestille og starte
kameraet på nytt. Etter ca. 1 minutt kan du koble til Wi-Fi-nettverket.
For mer informasjon, besøk www.ezvizlife.com.
58
Page 72

Drift
Steg 1
Strömmen påslagen
Anslut kameran och strömkontakten för att slå på kameran.
Strömkabel
Strömkontakt
Steg 2
Konfiguration av kamera
Skapa ett användarkonto.
1
- Anslut din mobiltelefon till Wi-Fi.
- Ladda ned och installera EZVIZ-appen genom att söka efter ”EZVIZ” på App Store
eller Google PlayTM.
- Starta appen och registrera ett användarkonto för EZVIZ med hjälp av följande startguide.
Lägg till en kamera i EZVIZ.
2
- Logga in i appen EZVIZ.
- Tryck på ”+” i det övre, högra hörnet av startskärmen för att gå till sidan för att
skanna QR-kod.
59
Page 73

- Skanna QR-koden på kamerans kapsling.
- Följ guiden i EZVIZ-appen för att slutföra Wi-Fi-konfigurationen.
Du kan också välja kabelanslutning.
Steg 1: anslut kameran till routern med en nätverkskabel.
Steg 2: lägg till kameran i EZVIZ-appen genom att skanna dess QR-kod.
N3
Nätverkskabel
•Håll in RESET-knappen i 5 sekunder när kameran är igång om du antingen lägger till
kameror eller om Wi-Fi-anslutningen misslyckades.
•Om din produkt endast har 2,4GHz rekommenderar vi att du först stänger av routerns
5GHz och sedan fortsätter med processen att lägga till.
60
Page 74

Steg 3
Installation av kamera
Du kan installera kameran på väggen eller i taket.
Kontrollera att väggen är stark nog att tåla tre gånger kamerans vikt.
Installation av kamera
1
- Placera borrmallen på den yta där du har valt att montera kameran.
- (Endast för cementväggar/tak) Borra skruvhål enligt borrmallen och sätt i tre
expanderande skruvar.
- Använd tre metallskruvar för att montera kamerans fäste i enlighet med mallen.
Monteringsmall
Expansionsskruvar
Justera övervakningsvinkeln
2
- Lossa justerskruven.
- Justera övervakningsvinkeln till önskat läge.
- Dra åt justerskruven.
Kontrollera att facket för microSD-kortet är riktat nedåt.
Metallskruvar
61
Page 75

Justerskruv
0°-90°
0°-360°
Bilaga
Förpackningens innehåll
Internetkamera x 1 Strömadapter x 1
Monteringsmall x 1 Skruvsats x 1 Vattentätningssats x 1 Snabbstartsguide x 1
62
Page 76

Grundläggande
LED-indikering
Namn Beskrivning
Mikrofon För ljud in.
LED-indikering •Lyser rött: Kameran startar.
Fack för
microSD-kort
ÅTERSTÄLLNING Håll in knappen RESET i 5 sekunder när kameran är igång. Kameran
Strömförsörjning 1 A
•Blinkar sakta rött: Wi-Fi-anslutningen har slutat att fungera.
•Blinkar snabbt rött: Enhetsundantag (t.ex. fel på MicroSD-kort).
•Lyser blått: Video visas eller spelas upp i appen EZVIZ.
•Blinkar snabbt blått: Kameran är redo för Wi-Fi-anslutning.
•Blinkar sakta blått: Kameran fungerar korrekt.
MicroSD-kortet är inte inkluderat i förpackningen. När du har satt i microSDkortet initierar du det i appen EZVIZ, och sedan kan videofiler lagras på
SD-kortet.
startar om och återställer alla parametrar till fabriksinställningen.
12 V
Mikrofon
Fack för
microSD-kort
ÅTERSTÄLLNING
63
Page 77

Felsökning
F: ”The device is offline” (Enheten är offline) eller ”The device is not registered”
(Enheten är inte registrerad) visas när du lägger till en kamera i appen EZVIZ.
S: 1. Kontrollera att nätverket som kameran är ansluten till fungerar normalt och att
DHCP är aktiverat i routern.
2. Håll in knappen RESET i 5 sekunder för att återställa parametrarna om du har
ändrat nätverksparametrarna manuellt.
F: Hur använder man microSD-kortet för lokal lagring?
S: 1. Kontrollera att microSD-kortet sitter i ordentligt och att du har lagt till kameran
i ditt EZVIZ-konto. Logga in i appen EZVIZ och ange gränssnittets ”Device Details”
(Enhetsinformation), om knappen ”Initialize Storage Card” (Initiera lagringskort)
visas, måste du initiera microSD-kortet först.
2. Inspelning på microSD-kortet vid rörelsedetektering är aktiverat som standard.
F: Mobiltelefonen kan inte ta emot larmmeddelanden när kameran är online.
S: 1. Kontrollera att appen EZVIZ körs på din mobiltelefon och att Motion Detection
Notification (Meddelande vid rörelsedetektering) är aktiverat.
2. För Android-system, måste du se till att appen körs i bakgrunden, och för iOS,
aktiverar du push-funktionen för meddelanden under ”Settings > Notification”
(Inställningar > Meddelanden).
3. Om du fortfarande inte får några larmmeddelanden, håller du in RESET-knappen
i 5 sekunder för att återställa kamerans inställningar.
F: Realtidsvisning eller uppspelning misslyckades.
S: Kontrollera att nätverket har en bra anslutning. Att visa realtidsvideo kräver en bra
bandbredd. Du kan uppdatera videon, eller ändra nätverk och försöka igen.
F: Hur ansluter man till ett annat Wi-Fi-nätverk?
S: Håll in kamerans RESET-knapp i 5 sekunder för att återställa och starta om
kameran, och för att återansluta till Wi-Fi cirka en minut senare.
Besök www.ezvizlife.com för mer information.
64
Page 78

Handlinger
Trin 1
Tændt
Tilslut kamera og strømstik for at sætte strøm til kameraet.
Strømkabel
Stikkontakt
Trin 2
Konfiguration af kamera
Opret en brugerkonto.
1
- Slut din mobiltelefon til wi-fi-netværket.
- Hent og installér appen EZVIZ ved at søge efter “EZVIZ” i App Store og Google PlayTM.
- Start appen, og registrér en EZVIZ-brugerkonto ved at følge opstartsguiden.
Tilføj et kamera til EZVIZ.
2
- Log ind på appen EZVIZ.
- Tryk på “+” i øverste højre hjørne af startskærmen for at gå til siden til scanning
af QR-koden.
65
Page 79

- Scan QR-koden på kamerahuset.
- Følg guiden til appen EZVIZ for at afslutte konfigurationen af wi-fi.
Du kan også vælge kabeltilsluttet forbindelse.
3
Trin 1: Slut kameraet til routeren med et netværkskabel.
Trin 2: Føj kameraet til appen EZVIZ ved at scanne kameraets QR-kode.
N3
Netværkskabel
•Hold knappen RESET nede i 5 sekunder, mens kameraet er tændt, hvis enten tilføjelse
af kameraer eller wi-fi-forbindelsen fejler.
•Hvis dit produkt udelukkende tilbyder 2,4 GHz, anbefaler vi, at du slår 5 GHz fra i din
router, inden du fortsætter tilslutningen.
66
Page 80

Trin 3
Installation af kamera
Du kan installere kameraet på en væg eller i loftet.
Kontrollér, at væggen er stærk nok til at bære tre gange kameraets vægt.
Installér kameraet
1
- Placér boreskabelonen på overfladen, hvor kameraet skal installeres.
- (Gælder kun for cementvæg/-loft) Bor skruehuller i henhold til skabelonen, og sæt
tre ekspansionsskruer i.
- Brug tre metalskruer til at fastgøre kamerafoden i henhold til skabelonen.
Monteringsskabelon
Ekspansionsskruer
Justering af overvågningsvinklen
2
- Løsn justeringsskruen.
- Justér overvågningsvinklen til den ønskede stilling.
- Stram justeringsskruen.
Kontrollér, at holderen til microSD-kortet vender nedad.
Metalskruer
67
Page 81

Justeringsskrue
0°-90°
0°-360°
Bilag
Kassens indhold
Internetkamera x 1 Strømadapter x 1
Monteringsskabelon x 1 Skruesæt x 1 Sæt til vandsikring x 1 Lynvejledning x 1
68
Page 82

Grundlæggende oplysninger
LED-kontrollampe
Navn Beskrivelse
MIK Lydindgang.
LED-kontrollampe •Lyser konstant rødt: Kamera starter op.
Kortholder til
mikroSD-kort
NULSTIL Hold knappen RESET nede i 5 sekunder, mens kameraet er tændt.
Strømstik 1 A
•Langsomme røde blink: Wi-fi-forbindelsen er afbrudt.
•Hurtige røde blink: Undtagelse på enhed (fx fejl i microSD-kort).
•Lyser konstant blåt: En video vises eller afspilles i appen EZVIZ.
•Hurtige blå blink: Kameraet er klar til wi-fi-forbindelsen.
•Langsomme blå blink: Kameraet fungerer korrekt.
microSD-kort er ikke inkluderet i æskens indhold. Når du har sat
microSD-kortet i, skal du initialisere det i appen EZVIZ. Derefter kan
videofiler gemmes på SD-kortet.
Kameraet genstarter, og alle indstillinger nulstilles til standard.
12 V
MIK
Kortholder til
mikroSD-kort
NULSTIL
69
Page 83

Fejlfinding
Spørgsmål: Når du tilføjer kameraet med appen EZVIZ, vises prompten “The device is
offline.” (Enheden er offline.) eller “The device is not registered.” (Enheden
er ikke registreret.).
Svar: 1. Kontrollér, at netværket, som kameraet er tilsluttet, fungerer normalt, og
at DHCP på routeren er aktiveret.
2. Hold knappen RESET nede i 5 sekunder for at nulstille indstillingerne, hvis
du manuelt har ændret netværksindstillingerne.
Spørgsmål: Hvordan bruges microSD-kortet som lokalt lager?
Svar: 1. Kontrollér, at der er sat et microSD-kort i, og at kameraet er føjet til din
EZVIZ-konto. Log ind på appen EZVIZ, og åbn skærmen “Device Details”
(Enhedsoplysninger). Hvis knappen “Initialize Storage Card” (Initialisér
lagerkort) vises, skal du først initialisere microSD-kortet.
2. Optagelse af detektion af bevægelse på microSD-kortet er aktiveret som
standard.
Spørgsmål: Mobiltelefonen kan ikke modtage alarmmeddelelser, når kameraet er online.
Svar: 1. Kontrollér, at appen EZVIZ kører på din mobiltelefon, og at funktionen til
meddelelse om detektion af bevægelse er aktiveret.
2. For Android-systemer skal du kontrollere, at appen kører i baggrunden.
For iOS-systemet skal du aktivere funktionen til pushmeddelelser i
“Settings > Notification” (Indstillinger > Notifikation).
3. Hvis du fortsat ikke modtager alarmmeddelelser, skal du holde knappen RESET
nede i 5 sekunder for at gendanne kameraets indstillinger.
Spørgsmål: Livevisning eller afspilning fejlede.
Svar: Kontrollér, at netværket er korrekt tilsluttet. Livevisning af video kræver
en stor båndbredde. Du kan opdatere videoen eller skifte netværk og prøve
igen.
Spørgsmål: Hvordan sluttes til et andet wi-fi-netværk?
Svar: Hold knappen RESET på kameraet nede i 5 sekunder for at nulstille
og genstarte kameraet samt slutte til wi-fi-netværket igen efter ca. 1 minut.
Besøg www.ezvizlife.com for detaljerede oplysninger.
70
Page 84

Toiminta
1. vaihe
Virran kytkeminen
Kytke kameraan virta kytkemällä se pistorasiaan.
Virtajohto
Pistorasia
2. vaihe
Kameran määritys
Luo käyttäjätili.
1
- Yhdistä matkapuhelimesi Wi-Fi-verkkoon.
- Lataa ja asenna EZVIZ-sovellus hakemalla se ”EZVIZ”-hakusanalla App Storesta tai
Google PlayTM -kaupasta.
- Käynnistä sovellus ja rekisteröi EZVIZ-käyttäjätili ohjatun käyttöönoton ohjeita
noudattamalla.
Lisää kamera EZVIZ-tiliin.
2
- Kirjaudu EZVIZ-sovellukseen.
- Siirry QR-koodin skannaussivulle napauttamalla aloitusnäytön oikeassa yläkulmassa
olevaa ”+”-symbolia.
71
Page 85

- Skannaa kameran rungossa oleva QR-koodi.
- Noudata EZVIZ-sovelluksen ohjattua asennusta Wi-Fi-yhteyden määrittämisessä.
Voit myös valita langallisen yhteyden.
Vaihe 1: yhdistä kamera reitittimeen verkkokaapelilla.
Vaihe 2: lisää kamera EZVIZ-sovellukseen skannaamalla sen QR-koodi.
N3
Verkkokaapeli
•Pidä RESET (nollaus) -painiketta painettuna 5 sekuntia kameran ollessa päällä,
jos kameroiden lisääminen tai Wi-Fi-yhteyden muodostus epäonnistuu.
•Jos tuotteessa on vain 2,4 GHz:n tuki, suosittelemme poistamaan reitittimen
5 GHz:n taajuuden käytöstä ennen jatkamista.
72
Page 86

3. vaihe
Kameran asentaminen
Kamera voidaan asentaa seinään tai kattoon.
Varmista, että seinä on riittävän vahva kestämään kameran painon kolminkertaisesti.
Kameran asennus
1
- Aseta porauskaavio pinnalle, johon haluat kiinnittää kameran.
- (Vain betoniseinä/-katto.) Poraa ruuvinreiät kaavion mukaisesti ja aseta reikiin
kolme ruuviholkkia.
- Kiinnitä kameran pohja kolmella metalliruuvilla kaavion ohjeiden mukaisesti.
Asennuspohja
Ruuviholkit
Valvontakulman säätäminen
2
- Löysää säätöruuvia.
- Säädä valvontakulma haluamaksesi.
- Kiristä säätöruuvi.
Varmista, että microSD-korttipaikka on alaspäin.
Metalliruuvit
73
Page 87

Säätöruuvi
0°–90°
0°–360°
Liitteet
Pakkauksen sisältö
Internet-kamera x1 Verkkolaite x1
Asennuspohja x1 Ruuvipakkaus x1 Vesitiivistyspakkaus x1 Pika-aloitusopas x1
74
Page 88

Perustiedot
LED-merkkivalo
Nimi Kuvaus
Mikrofoni Äänen tulo.
LED-merkkivalo • Kiinteä punainen: Kamera käynnistyy.
MicroSD
-korttipaikka
RESET (nollaus) Pidä RESET (nollaus) -painiketta painettuna 5 sekuntia kameran
Virtaliitäntä 1 A
•Hitaasti vilkkuva punainen: Wi-Fi-yhteys epäonnistui.
•Nopeasti vilkkuva punainen: Laitevika (esim. MicroSD-kortin
vika).
•Kiinteä sininen: Videota katsellaan tai toistetaan EZVIZsovelluksella.
•Nopeasti vilkkuva sininen: Kamera on valmis Wi-Fi-yhteyteen.
•Hitaasti vilkkuva sininen: Kamera toimii oikein.
MicroSD-kortti ei sisälly toimitukseen. Alusta microSD-kortti
asettamisen jälkeen EZVIZ-sovelluksessa, jotta sinne voidaan
tallentaa videotiedostoja.
ollessa päällä. Kamera käynnistyy uudelleen ja palauttaa kaikkien
parametrien oletusarvot.
12 V
Mikrofoni
MicroSD
-korttipaikka
RESET (nollaus)
75
Page 89

Vianmääritys
K: ”The device is offline.” (laite on offline-tilassa) tai ”The device is not registered.” (laitetta
ei ole rekisteröity) tulee näyttöön, kun kamera lisätään EZVIZ-sovelluksessa.
V: 1. Varmista, että verkko, johon kamera on yhdistetty, toimii oikein ja että reitittimen
DHCP on käytössä.
2. Nollaa parametrit pitämällä RESET (nollaus) -painiketta painettuna 5 sekuntia,
jos muutat verkon parametreja manuaalisesti.
K: Miten microSD-korttia voidaan käyttää paikallisena tallennustilana?
V: 1. Varmista, että microSD-kortti on asetettu laitteeseen ja että kamera on lisätty
EZVIZ-tiliisi. Kirjaudu EZVIZ-sovellukseen ja siirry ”Device Details” (laitteen
tiedot) -näyttöön. Jos ”Initialize Storage Card” (alusta muistikortti) -painike tulee
näkyviin, sinun on alustettava ensin microSD-kortti.
2. MicroSD-kortin liikkeentunnistustallennus on oletusarvoisesti käytössä.
K: Matkapuhelin ei vastaanota hälytysilmoituksia, kun kamera on online-tilassa.
V: 1. Varmista, että EZVIZ-sovellus on käynnissä ja että Motion Detection Notification
(liikkeentunnistusilmoitus) on käytössä.
2. Jos käytössä on Android-järjestelmä, varmista, että sovellus on käynnissä
taustalla. Jos käytössä on iOS, ota push-ilmoitukset käyttöön kohdassa
”Settings > Notification” (Asetukset > Ilmoitukset).
3. Jos hälytysilmoitukset eivät vieläkään näy, palauta kameran asetukset pitämällä
RESET (nollaus) -painiketta painettuna 5 sekuntia.
K: Reaaliaikainen katselu tai toisto epäonnistui.
V: Varmista, että verkkoyhteys on hyvä. Reaaliaikaisen videon katselu vaatii hyvän
kaistanleveyden. Lataa video uudelleen tai vaihda verkkoa ja yritä uudelleen.
K: Miten voin muodostaa Wi-Fi-yhteyden toiseen verkkoon?
V: Nollaa ja käynnistä kamera uudelleen pitämällä RESET (nollaus) -painiketta
painettuna 5 sekuntia ja muodosta Wi-Fi-yhteys uudelleen noin minuutin kuluttua.
Katso lisätietoa osoitteesta www.ezvizlife.com.
76
Page 90

Thank you for purchasing Hangzhou EZVIZ Software Co., Ltd. (“EZVIZ”) products. This limited warranty
LIMITED WARRANTY
(“warranty”) gives you, the original purchaser of the EZVIZ product, specific legal rights. You may also
have other legal rights that vary by state, province or jurisdiction. This warranty applies only to the
original purchaser of the product. “Original purchaser” means any consumer having purchased the
EZVIZ product from an authorized seller. The disclaimers, exclusions, and limitations of liability under
this warranty will not apply to the extent prohibited by applicable law. No distributor, reseller, agent,
or employee is authorized to make any modification, extension, or addition to this warranty.
Your EZVIZ product is warranted for a period of two (2) years from the date of purchase against defects
in materials and workmanship, or such longer period as may be required by law in the country or state
where this product is sold, when used normally in accordance with user manual.
You can request warranty service by contacting our Customer Service.
For any defective EZVIZ products under warranty, EZVIZ will, at its option, (i) repair or replace your
product free of charge; (ii) exchange your product with a functional equivalent product; or (iii)
refund the original purchase price, provided you provide the original purchase receipt or copy, a brief
explanation of the defect, and return the product in its original packaging. At EZVIZ’s sole discretion,
repair or replacement may be made with a new or refurbished product or components. This warranty
does not cover the shipping cost, insurance, or any other incidental charges incurred by you in
returning the product.
Except where prohibited by applicable law, this is your sole and exclusive remedy for breach of this
warranty. Any product that has either been repaired or replaced under this warranty will be covered by
the terms of this warranty for the longer of ninety (90) days from the date of delivery or the remaining
original warranty period.
This warranty does not apply and is void:
• If the warranty claim is made outside the warranty period or if the proof of purchase is not provided;
• For any malfunction, defect, or failure caused by or resulting from the evidence of impact;
mishandling; tampering; use contrary to the applicable instruction manual; incorrect power line
voltage; accident; loss; theft; fire; flood; or other Acts of God; shipping damage; or damage
resulting from repairs performed by unauthorized personnel;
• For any consumable parts, such as batteries, where the malfunction is due to the normal aging of
the product;
• Cosmetic damage, including but not limited to scratches, dents, and broken plastic on ports;
• Any software, even if packaged or sold with EZVIZ hardware;
• For any other damages free from defects in material or workmanship;
• Routine cleaning, normal cosmetic and mechanical wear and tear.
Please do not hesitate to contact your seller or our Customer Service, with any questions.
Page 91

Vielen Dank, dass Sie sich für Produkte der Hangzhou EZVIZ Software Co., Ltd. (EZVIZ) entschieden haben.
EINGESCHRÄNKTE GARANTIE
Diese eingeschränkte Garantie („Garantie“) gibt Ihnen, dem Erstkäufer des EZVIZ-Produkts, spezifische
Rechtsansprüche. Sie können auch andere gesetzliche Rechte haben, die je nach Staat, Provinz oder
Gerichtsbarkeit variieren. Diese Garantie gilt nur für den Erstkäufer des Produkts. „Erstkäufer“ ist jeder
Verbraucher, der das EZVIZ-Produkt bei einem autorisierten Verkäufer gekauft hat. Die Haftungsausschlüsse,
Ausschlüsse und Beschränkungen der Haftung im Rahmen dieser Garantie gelten nicht, soweit sie durch
geltendes Recht verboten sind. Kein Vertriebspartner, Wiederverkäufer, Vertreter oder Mitarbeiter ist berechtigt,
Änderungen, Erweiterungen oder Ergänzungen dieser Garantie vorzunehmen.
Für Ihr EZVIZ-Produkt gilt eine Garantie von zwei (2) Jahren ab Kaufdatum gegen Material- und Verarbeitungsfehler
oder eine längere Zeitspanne, die das Gesetz des Landes oder Bundesstaates, in dem dieses Produkt verkauft wird,
vorschreibt, wenn es normalerweise gemäß der Bedienungsanleitung verwendet wird.
Sie können Garantieleistungen anfordern, indem Sie sich an unseren Kundendienst wenden.
Für defekte EZVIZ-Produkte im Rahmen der Garantie wird EZVIZ nach eigenem Ermessen (i) Ihr Produkt
kostenlos reparieren oder ersetzen, (ii) Ihr Produkt gegen ein funktional gleichwertiges Produkt austauschen,
oder (iii) den ursprünglichen Kaufpreis zurückerstatten, vorausgesetzt, Sie legen die Original-Kaufquittung
oder deren Kopie, eine kurze Erklärung des Defekts und das Produkt in der Originalverpackung vor. Nach
eigenem Ermessen kann EZVIZ eine Reparatur oder einen Austausch mit einem neuen oder überholten Produkt
oder Komponenten durchführen. Diese Garantie deckt nicht die Versandkosten, die Versicherung oder andere
Nebenkosten, die Ihnen bei der Rücksendung des Produkts entstehen.
Sofern nicht durch geltendes Recht verboten, ist dies Ihr einziges und ausschließliches Rechtsmittel bei
Verletzung dieser Garantie. Jedes Produkt, das im Rahmen dieser Garantie repariert oder ersetzt wurde,
unterliegt den Bedingungen dieser Garantie für die Dauer von neunzig (90) Tagen ab Lieferdatum oder der
verbleibenden ursprünglichen Garantiezeit.
Diese Garantie gilt nicht und ist unter folgenden Bedingungen ungültig:
• Wenn der Garantieanspruch außerhalb der Garantiezeit geltend gemacht wird oder wenn der Kaufbeleg nicht
vorgelegt wird;
• Für jede Fehlfunktion, jeden Defekt oder jede Störung, die durch oder infolge von Beweisen für Stöße,
Fehlbedienung, Sabotage, unsachgemäßen Gebrauch, falsche Netzspannung, Unfall, Verlust, Diebstahl, Feuer,
Überschwemmung oder andere höhere Gewalt, Transportschäden oder Schäden, die durch Reparaturen durch
nicht autorisiertes Personal verursacht wurden;
• Für alle Verbrauchsmaterialien, wie beispielsweise Batterien, bei denen die Fehlfunktion auf die normale
Alterung des Produkts zurückzuführen ist;
• Kosmetische Schäden, einschließlich, aber nicht darauf beschränkt, Kratzer, Dellen und Kunststoffbruch an
den Ports;
• Jegliche Software, auch wenn sie mit EZVIZ-Hardware verpackt oder verkauft wird;
• Für alle anderen Schäden, die frei von Material- oder Verarbeitungsfehlern sind;
• Routinemäßige Reinigung, normale kosmetische und mechanische Abnutzung.
BITTE WENDEN SIE SICH MIT FRAGEN AN IHREN VERKÄUFER ODER UNSEREN KUNDENDIENST.
Page 92

Gracias por comprar productos de Hangzhou EZVIZ Software Co., Ltd. ("EZVIZ"). Esta garantía limitada
GARANTÍA LIMITADA
("garantía") le otorga a usted, comprador original del producto EZVIZ, derechos legales específicos. Quizá
disponga de otros derechos legales según la región, provincia o jurisdicción. Esta garantía se aplica
exclusivamente al comprador original del producto. Por "comprador original" se entiende cualquier consumidor
que haya comprado el producto EZVIZ a un vendedor autorizado. Las renuncias, exclusiones o limitaciones de
responsabilidad bajo esta garantía no se aplicarán en la medida prohibida por la legislación vigente. Ningún
distribuidor, vendedor, agente o empleado está autorizado a hacer modificaciones, extensiones o adiciones a
esta garantía.
Su producto EZVIZ tiene garantía, que cubre defectos de materiales y fabricación, por un periodo de (2) años
desde la fecha de la compra o por un periodo mayor según lo requiera la legislación en el país o región donde
se venda este producto, siempre que se utilice tal y como se indica en el manual de usuario.
Puede solicitar el servicio de garantía poniéndose en contacto con nuestro Servicio al Cliente.
Ante cualquier producto EZVIZ defectuoso, EZVIZ decidirá si: (i) reparar o reemplazar su producto sin gasto
alguno; (ii) cambiar su producto por un producto funcional equivalente; o (iii) devolver el dinero original de la
compra, siempre que nos facilite el recibo de compra original, una breve explicación del defecto y devuelva el
producto en su embalaje original. Según considere EZVIZ, la reparación o reemplazo puede realizarse con un
producto o componente nuevo o reacondicionado. Esta garantía no cubre los gastos de envío, seguro ni ningún
otros gastos secundarios en los que usted pueda incurrir al devolver el producto.
A menos que lo prohíba la legislación vigente, este es su recurso único y exclusivo por incumplimiento de esta
garantía. Cualquier producto que haya sido reparado o reemplazado bajo esta garantía quedará cubierto por
los términos de esta garantía por un máximo de (90) días desde el día de envío o por el periodo de garantía
original restante.
Esta garantía no se aplica y quedará anulada:
• Si el derecho a la garantía se ejerce fuera del periodo de la garantía o si no se proporciona ninguna prueba
de compra;
• Por cualquier avería, defecto o fallo provocado o que resulte de algún impacto; uso incorrecto;
manipulación; uso contrario a lo indicado en el manual de instrucciones; tensión de alimentación
incorrecta; accidente; pérdida; robo; incendio; inundación; u otros casos fortuitos; daños de envío; o daños
que resulten de reparaciones realizadas por personal no autorizado;
• Para los elementos consumibles, tales como baterías, ya que el mal funcionamiento se debe al paso del
tiempo del producto;
• Daños superficiales incluyendo, entre otros: rasguños, abolladuras y plásticos rotos en los puertos;
• Cualquier software, aunque esté embalado o se venda junto a hardware de EZVIZ;
• Por cualquier otro daño que no sea por defectos en el material o de su fabricación;
• Limpieza rutinaria, daños superficiales normales y desgastes mecánicos.
No dude en ponerse en contacto con su vendedor o con nuestro Servicio al Cliente si tiene alguna duda.
Page 93

Merci d’avoir acheté ce produit fabriqué par Hangzhou EZVIZ Software Co., Ltd. («EZVIZ»). La présente garantie
GARANTIE LIMITÉE
limitée («garantie» vous octroie, en tant qu’acheteur original du produitEZVIZ, des droits légaux spécifiques.
Vous pouvez également faire valoir d’autres droits légaux, qui varient d’un État, d’une province ou d’une juridiction
à l’autre. La présente garantie couvre uniquement l’acheteur original du produit. «Acheteur original» désigne
tout consommateur ayant acheté le produitEZVIZ auprès d’un distributeur agréé. Les avis de non-responsabilité,
les exclusions et les limitations de responsabilité au titre de la présente garantie ne s’appliquent pas dans la
mesure où les lois en vigueur l’interdisent. Aucun distributeur, revendeur, agent ou employé n’est autorisé à
effectuer des modifications, des extensions ou des ajouts à la présente garantie.
Votre produitEZVIZ est couvert par la garantie pour une période de (2) ans à compter de la date d’achat, contre les
défauts matériels et de main-d’œuvre, ou durant une période plus longue telle que pourrait l’exiger la loi de l’État ou
du pays où le produit est vendu, en cas d’utilisation normale de celui-ci conformément au manuel d’utilisation.
Vous pouvez solliciter le service de garantie en contactant notre service client.
Pour tout produitEZVIZ défectueux couvert par la garantie, EZVIZ pourra, à sa discrétion, (i) le réparer ou le
remplacer gratuitement, (ii) l’échanger contre un autre produit équivalent fonctionnel ou (iii) vous rembourser
son prix d’achat initial, sous réserve de la fourniture de la facture d’achat originale ou d’une copie de celle-ci
accompagnée d’une brève explication du défaut, et du renvoi du produit dans son emballage d’origine. À la totale
discrétion d’EZVIZ, la réparation ou le remplacement d’un produit peut se faire avec un produit ou des composants
neufs ou remis à neuf. La présente garantie ne couvre pas le coût d’expédition, l’assurance ou tous autres frais
accessoires pris en charge par vos soins lors du retour du produit.
Sauf si la loi l’interdit, la mesure ci-dessous constitue votre recours exclusif en cas de violation de la présente
garantie. Tout produit qui a été réparé ou remplacé en vertu de la présente garantie sera couvert par les termes
de la présente garantie pour une période de quatre-vingt-dix (90) jours à compter de la date de livraison au client
ou pour la période de garantie originale restante.
La présente garantie ne s’applique pas et est nulle dans les cas ci-dessous:
• la réclamation au titre de la garantie est faite hors la période de garantie ou si la preuve d’achat n’est pas fournie;
• tout dysfonctionnement, défectuosité ou panne causé par un impact, une mauvaise manipulation, une
altération, une utilisation en violation du manuel d’utilisation en vigueur, une mauvaise tension d’alimentation,
un accident, une perte, un vol, un incendie, une inondation, un cas de force majeure, un dommage lié à
l’expédition ou un dommage lié aux réparations effectuées par un technicien non agréé, ou résultant de l’une
des causes ci-dessous;
• les consommables, par exemple les batteries, dont le dysfonctionnement est dû au vieillissement normal du
produit;
• les dommages cosmétiques, y compris, mais sans s’y limiter, les égratignures, les bosses et le déchirement
des pièces en plastique garnissant les ports;
• les logiciels, y compris ceux emballés ou vendus avec le matérielEZVIZ;
• tout autre dommage que les dommages liés aux défauts matériels ou de main-d’œuvre;
• l’usure liée au nettoyage de routine, l’usure cosmétique normale et l’usure mécanique.
Si vous avez des questions, n’hésitez pas à contacter votre distributeur ou notre service client.
Page 94

Grazie per aver acquistato i prodotti Hangzhou EZVIZ Software Co., Ltd. (“EZVIZ”). Questa garanzia limitata
GARANZIA LIMITATA
(“garanzia”) fornisce all’acquirente originale del prodotto EZVIZ dei diritti legali specifici. È possibile inoltre
avere altri diritti legali che variano a seconda dello stato, della provincia o della giurisdizione. La garanzia
si applica unicamente all'acquirente originale del prodotto. “L'acquirente originale” si riferisce a qualsiasi
consumatore che ha acquistato il prodotto EZVIZ da un rivenditore autorizzato. Le dichiarazioni di esclusione di
responsabilità, le esclusioni e le limitazioni di responsabilità ai sensi della presente garanzia non si applicano
nella misura in cui sono proibite dalle leggi applicabili. Nessun distributore, rivenditore, agente o dipendente è
autorizzato a effettuare modifiche, estensione o aggiunte alla presente garanzia.
Il prodotto EZVIZ è garantito per un periodo di due (2) anni dalla data di acquisto per difetti nei materiali e
nella lavorazione, o per un periodo maggiore che potrebbe essere richiesto dalla legge nel paese o nello stato
in cui questo prodotto viene venduto, se usato normalmente in conformità con il manuale dell'utente.
È possibile richiedere il servizio di garanzia rivolgendosi al nostro Servizio di Assistenza.
Per qualsiasi prodotto EZVIZ difettoso in garanzia, EZVIZ, a sua discrezione, (i) riparerà o sostituirà il prodotto
gratuitamente; (ii) sostituirà il prodotto con uno equivalente funzionante; o (iii) rimborserà il prezzo di
acquisto originale, a condizione che sia presentata la ricevuta dell'acquisto originale o una sua copia, una
breve spiegazione del difetto e il prodotto sia restituito nella sua confezione originale. A discrezione esclusiva
di EZVIZ, la riparazione o la sostituzione possono essere effettuate con un prodotto o componenti nuovi
o ricondizionati. Questa garanzia non copre il costo di spedizione, assicurazione o altre spese accessorie
sostenute nella restituzione del prodotto.
Fatti salvi i casi vietati dalla legge vigente, il presente è l’unico rimedio esclusivo per la violazione della
presente garanzia. Qualsiasi prodotto che sia stato riparato o sostituito in base a questa garanzia sarà coperto
dai termini della presente garanzia per un massimo di novanta (90) giorni dalla data di consegna o dal periodo
di garanzia originale rimanente.
Questa garanzia non si applica ed è nulla:
• Se la richiesta di garanzia viene presentata al di fuori del periodo di garanzia o se la prova di acquisto non
viene fornita;
• Per qualsiasi malfunzionamento, difetto o guasto causato o risultante da impatto; uso improprio;
manomissione; non osservanza di quanto indicato nel manuale di istruzioni applicabile; tensione della linea
elettrica errata; incidente; perdita; furto; incendio; alluvione; o altre catastrofi naturali; danni derivanti da
spedizione; o da riparazioni eseguite da personale non autorizzato;
• Per le parti consumabili, come le batterie, in cui il malfunzionamento è dovuto al normale invecchiamento
del prodotto;
• Danni estetici, compresi a titolo esemplificativo e non esaustivo, ammaccature e rottura delle porte in plastica;
• Qualsiasi software, anche se incluso o venduto con l’hardware EZVIZ;
• Per qualsiasi altro danno esente da difetti in materiali o lavorazione;
• Pulizia di routine, normale estetica e usura meccanica.
In caso di domande, non esitare a contattare il rivenditore o il Servizio Clienti.
Page 95

Dank u voor de aanschaf van de producten van Hangzhou EZVIZ Software Co., Ltd. ("EZVIZ"). Deze beperkte
BEPERKTE GARANTIE
garantie ("garantie") geeft u, de oorspronkelijke koper van het EZVIZ-product, specifieke wettelijke rechten. U
kunt ook andere wettelijke rechten hebben die uiteenlopen per staat, provincie of rechtsgebied. Deze garantie is
uitsluitend van toepassing voor de oorspronkelijke koper van het product. "Oorspronkelijke koper" betekent enige
consument die het EZVIZ-product van een geautoriseerde verkoper heeft aangeschaft. De afwijzingen, uitsluitingen
en beperkingen van aansprakelijkheid onder deze garantie is niet van toepassing voor zover dit door toepasselijke
wetgeving wordt verboden. Geen distributeur, wederverkoper, agent of werknemer is geautoriseerd voor het
aanbrengen van enige wijziging of uitbreiding van of toevoeging aan deze garantie.
Uw EZVIZ-product wordt voor een periode van twee (2) jaar vanaf de aankoopdatum gegarandeerd tegen gebreken
in materialen en vakmanschap of een zodanig langere periode als wettelijk kan worden vereist in het land of de
staat waar dit product wordt verkocht, bij normaal gebruik in overeenstemming met de gebruiksaanwijzing.
U kunt verzoeken om onderhoud onder de garantie door contact op te nemen met onze klantenservice.
Voor enige defecte EZVIZ-producten onder garantie, zal EZVIZ, naar haar oordeel, (i) het product kosteloos
repareren of vervangen; (ii) het product vervangen door een functioneel equivalent product; of (iii) het
oorspronkelijke aankoopbedrag terugbetalen, op voorwaarde dat u het oorspronkelijke betalingsbewijs of
een kopie hiervan, een korte uitleg van het defect verstrekt en het product in de oorspronkelijke verpakking
retourneert. Reparatie of vervanging kan uitsluitend naar eigen goeddunken van EZVIZ worden uitgevoerd met
nieuwe of opgeknapte producten of componenten. Deze garantie dekt geen verzendkosten, verzekering of enige
andere incidentele kosten die u voor het retourneren van het product moet betalen.
Behalve waar dit door toepasselijke wetgeving wordt verboden, is dit uw enige en exclusieve verhaal bij inbreuk
op deze garantie. Enig product dat onder deze garantie is gerepareerd of vervangen, wordt gedekt door de
voorwaarden van deze garantie voor de duur van negentig (90) dagen vanaf de afleverdatum of de resterende
oorspronkelijke garantieperiode.
Deze garantie is niet van toepassing en is ongeldig:
• Als de aanspraak op garantie buiten de garantieperiode wordt gemaakt of als de het aankoopbewijs niet
wordt verschaft;
• Bij enig(e) storing, defect of fout die is veroorzaakt of het gevolg is van bewezen schokken; mishandeling;
manipulatie; gebruik in strijd met de toepasselijke gebruiksaanwijzing; onjuiste netspanning; ongeval;
verlies; diefstal; brand; overstroming; of andere overmacht; verzendschade; of schade als gevolg van
reparaties die door onbevoegd personeel zijn uitgevoerd;
• Voor enige verbruiksartikelen, zoals batterijen, waarbij de storing plaatsvindt vanwege de normale veroudering
van het product;
• Cosmetische schade, inclusief maar niet beperkt tot krassen, deuken en gebroken kunststof op poorten;
• Enige software, zelfs als deze bij EZVIZ-hardware wordt verpakt of verkocht;
• Voor enige andere schade behalve defecten in materiaal of vakmanschap;
• Routinematig reinigen, normale cosmetische en mechanische slijtage.
Als u vragen of verzoeken hebt, aarzel dan niet om contact op te nemen uw verkoper of onze klantenservice.
Page 96

Dziękujemy za zakup produktów Hangzhou EZVIZ Software Co., Ltd. („EZVIZ”) . Niniejsza ograniczona
gwarancja („Gwarancja”) przyznaje Tobie, pierwotnemu nabywcy produktu EZVIZ, konkretne
prawa. Możesz również mieć inne prawa, zależnie od kraju, regionu lub jurysdykcji. Gwarancja
ma zastosowanie jedynie do pierwotnego nabywcy produktu. „Pierwotny nabywca” oznacza
dowolnego klienta, który nabył produkt EZVIZ od autoryzowanego dystrybutora. Zastrzeżenia,
wyjątki i ograniczenia odpowiedzialności objęte niniejszą gwarancją nie będą mieć zastosowania
wykraczającego poza obowiązujące przepisy prawne. Żaden dystrybutor, sprzedawca, agent ani
pracownik nie jest upoważniony do wprowadzania zmian, rozszerzeń, czy dodatkowych zapisów
niniejszej gwarancji.
Produkt EZVIZ objęty jest gwarancją na okres dwóch (2) lat od daty zakupu na wypadek wad
materiałowych i produkcyjnych, lub przez dłuższy okres, jeśli wymaga tego prawodawstwo kraju lub
stanu, w którym produkt został sprzedany, o ile jest użytkowany normalnie i zgodnie z instrukcją.
Możesz zażądać usług gwarancyjnych poprzez kontakt z obsługą klienta.
Dla wszystkich wadliwych produktów EZVIZ objętych gwarancją, EZVIZ, wedle uznania, (i)
bezpłatnie naprawi lub wymieni produkt; (ii) wymieni produkt na jego funkcjonalny ekwiwalent;
lub (iii) zwróci oryginalną cenę zakupu, o ile przedstawisz oryginalny paragon lub jego kopię,
krótki opis defektu, i zwrócisz towar w oryginalnym opakowaniu. Naprawa lub wymiana mogą
być przeprowadzone z wykorzystaniem nowych lub odnowionych produktów lub części wyłącznie
według uznania EZVIZ. Niniejsza gwarancja nie obejmuje kosztów przesyłki, ubezpieczenia ani
dodatkowych opłat poniesionych przez Ciebie w związku ze zwrotem produktu.
Z wyjątkiem sytuacji, w których jest to zabronione prawem, jest to jedyna możliwość naruszenia
postanowień gwarancji. Każdy produkt, który był naprawiany lub wymieniony w ramach niniejszej
gwarancji będzie objęty warunkami tej gwarancji przez okres dłuższy o dziewięćdziesiąt (90) dni od
daty dostarczenia lub pozostałego okresu gwarancji.
Gwarancja nie ma zastosowania i jest nieważna:
• jeśli żądanie gwarancyjne zostało wysunięte po okresie gwarancji lub jeśli nie przedstawiono
dowodu zakupu;
• w przypadku niesprawności, defektu lub niedziałania spowodowanych lub będących wynikiem
ewidentnego uderzenia; nieprawidłowego obchodzenia się; ingerencji; zastosowania sprzecznego
z odpowiednią instrukcją; nieprawidłowego zasilania; wypadku; zagubienia; kradzieży; pożaru;
powodzi; lub skutków działania sił wyższych; uszkodzenia w trakcie transportu; uszkodzenia
wynikającego z napraw przeprowadzanych przez nieautoryzowane osoby;
• odnośnie części będących materiałami eksploatacyjnymi, takich jak baterie, jeśli usterka jest
skutkiem naturalnego procesu ich starzenia;
• w przypadku uszkodzeń kosmetycznych, w tym, nie wyłączając, rys, wgnieceń, ułamanych
plastikowych elementów portów;
• odnośnie jakiegokolwiek oprogramowania, nawet jeśli jest zapakowane i sprzedawane ze
sprzętem EZVIZ;
• w przypadku innych uszkodzeń nie będących następstwem defektów materiałowych lub
produkcyjnych;
• w przypadku rutynowego czyszczenia, normalnych walorów kosmetycznych, zużycia
mechanicznego.
Jeśli masz jakiekolwiek pytania, nie wahaj się skontaktować z obsługą klienta lub sprzedawcą.
OGRANICZONA GWARANCJA
Page 97

Σας ευχαριστούμε για την αγορά προϊόντων της Hangzhou EZVIZ Software Co., Ltd. («EZVIZ»). Η παρούσα
περιορισμένη εγγύηση («εγγύηση») παρέχει σε εσάς, τον αρχικό αγοραστή του προϊόντος EZVIZ, ειδικά
νομικά δικαιώματα. Ενδέχεται να έχετε κι άλλα νομικά δικαιώματα που ποικίλλουν ανάλογα με το
κράτος, την περιοχή ή τη δικαιοδοσία σας. Η παρούσα εγγύηση ισχύει μόνο για τον αρχικό αγοραστή του
προϊόντος. Ως «αρχικός αγοραστής» ορίζεται οποιοσδήποτε καταναλωτής έχει αγοράσει το προϊόν EZVIZ
από εξουσιοδοτημένο πωλητή. Οι αποποιήσεις, εξαιρέσεις και περιορισμοί ευθύνης βάσει της παρούσας
εγγύησης δεν ισχύουν στον βαθμό που απαγορεύεται από το εφαρμοστέο δίκαιο. Κανένας διανομέας,
μεταπωλητής, αντιπρόσωπος ή εργαζόμενος δεν είναι εξουσιοδοτημένος να προβεί σε οποιαδήποτε
τροποποίηση, επέκταση ή προσθήκη στην παρούσα εγγύηση.
Το προϊόν σας EZVIZ καλύπτεται με εγγύηση δύο (2) ετών από την ημερομηνία αγοράς του έναντι
ελαττωμάτων σε υλικά και στην ποιότητα κατασκευής ή για μεγαλύτερη χρονική περίοδο, όπως
ενδεχομένως απαιτείται από τη νομοθεσία στη χώρα ή στο κράτος πώλησης αυτού του προϊόντος,
εφόσον χρησιμοποιείται υπό κανονικές συνθήκες σύμφωνα με το εγχειρίδιο χρήστη.
Μπορείτε να υποβάλετε αίτηση για επισκευή επικοινωνώντας με την Εξυπηρέτηση πελατών.
Για οποιοδήποτε ελαττωματικό προϊόν EZVIZ που καλύπτεται από εγγύηση, η EZVIZ, κατά την
προαίρεσή της, (i) θα επισκευάσει ή αντικαταστήσει το προϊόν σας δωρεάν, (ii) θα ανταλλάξει το
προϊόν σας με ένα αντίστοιχο λειτουργικό προϊόν ή (iii) θα επιστρέψει το αντίτιμο της αρχικής τιμής
αγοράς, με την προϋπόθεση ότι θα προσκομίσετε την πρωτότυπη απόδειξη αγοράς ή αντίγραφο αυτής
με σύντομη επεξήγηση του ελαττώματος του προϊόντος και ότι θα επιστρέψετε το προϊόν στην αρχική
του συσκευασία. Κατά τη διακριτική ευχέρεια της EZVIZ, η επισκευή ή η αντικατάσταση ενδέχεται να
πραγματοποιηθεί με νέο ή επισκευασμένο προϊόν ή εξαρτήματα. Η παρούσα εγγύηση δεν καλύπτει
έξοδα αποστολής, ασφάλιση ή άλλες παρεπόμενες δαπάνες, με τις οποίες θα επιβαρυνθείτε κατά την
επιστροφή τους προϊόντος.
Εκτός αν απαγορεύεται από το εφαρμοστέο δίκαιο, αυτό είναι το μόνο και αποκλειστικό σας ένδικο
μέσο σε περίπτωση παραβίασης της παρούσας εγγύησης. Οποιοδήποτε προϊόν έχει επισκευαστεί ή
αντικατασταθεί δυνάμει της παρούσας εγγύησης καλύπτεται από τους όρους αυτής της εγγύησης είτε
για διάστημα ενενήντα (90) ημερών από την ημερομηνία παράδοσης, είτε για την εναπομένουσα αρχική
περίοδο εγγύησης, όποιο είναι μεγαλύτερο.
Η παρούσα εγγύηση δεν ισχύει ή θεωρείται άκυρη:
• Εάν η αξίωση εγγύησης εγερθεί εκτός της περιόδου εγγύησης ή σε περίπτωση μη προσκόμισης του
αποδεικτικού αγοράς.
• Για οποιαδήποτε δυσλειτουργία, ελάττωμα ή βλάβη που προκληθεί από ή οφείλεται σε εμφανή
πρόσκρουση, κακό χειρισμό, παραποίηση, χρήση αντίθετη με το σχετικό εγχειρίδιο οδηγιών,
εσφαλμένη τάση τροφοδοσίας, ατύχημα, απώλεια, κλοπή, πυρκαγιά, πλημμύρα ή λοιπές θεομηνίες,
βλάβη κατά την αποστολή ή ζημιά που απορρέει από επισκευές που πραγματοποιήθηκαν από μη
εξουσιοδοτημένο προσωπικό.
• Για οποιαδήποτε αναλώσιμα εξαρτήματα, όπως οι μπαταρίες, η δυσλειτουργία των οποίων
οφείλεται στη κανονική χρήση του προϊόντος με την πάροδο του χρόνου.
• Για αισθητικές ζημιές, συμπεριλαμβανομένων, μεταξύ άλλων, γρατζουνιών, βαθουλωμάτων και
σπασμένων πλαστικών στις θύρες.
• Για οποιοδήποτε λογισμικό, ακόμη κι αν συσκευάστηκε ή πωλήθηκε μαζί με το υλισμικό της EZVIZ.
• Για οποιαδήποτε άλλη βλάβη που δεν οφείλεται σε ελαττώματα σε υλικά και στην ποιότητα
κατασκευής.
• Για συνήθη καθαρισμό, φυσιολογική αισθητική και μηχανική φθορά.
Για τυχόν ερωτήσεις, μη διστάσετε να επικοινωνήσετε με το κατάστημα πώλησης ή την Εξυπηρέτηση
πελατών.
ΠΕΡΙΟΡΙΣΜΕΝΗ ΕΓΓΥΗΣΗ
Page 98

Děkujeme vám za zakoupení výrobku společnosti Hangzhou EZVIZ Software Co., Ltd.
(„EZVIZ“). Tato omezená záruka („záruka“) vám, jako osobě, která výrobek EZVIZ původně
zakoupila, uděluje specifická zákonná práva. V závislosti na státu, regionu nebo jurisdikci vám
mohou být zaručena také další zákonná práva. Tato záruka se vztahuje pouze na osobu, která
výrobek původně zakoupila. „Osobou, která výrobek původně zakoupila“ se míní spotřebitel,
který výrobek EZVIZ zakoupil u autorizovaného prodejce. Zřeknutí se práv, vyloučení a
omezení odpovědnosti uvedená v této záruce jsou omezena příslušnými právními předpisy.
Tuto záruku není žádný distributor, prodejce, agent ani zaměstnanec oprávněn jakkoli
upravovat, rozšiřovat ani k ní přidávat dodatky.
Na výrobek EZVIZ se poskytuje záruka o délce dvou (2) let od data zakoupení, která se
vztahuje na vady materiálu a zpracování. Délka záručního období může být delší podle toho,
jak je to vyžadováno zákonem dané země nebo státu, kde se výrobek prodává a používá
normálním způsobem v souladu s tímto návodem k obsluze.
Požadujete-li záruční servis, obraťte se na náš zákaznický servis.
Pokud došlo během záruční doby k jakékoli závadě výrobku EZVIZ, společnost EZVIZ dle
svého uvážení (i) výrobek zdarma opraví nebo vymění; (ii) výrobek vymění za jiný výrobek
s ekvivalentními funkcemi; nebo (iii) vrátí částku původně za výrobek zaplacenou, a to za
předpokladu, že se toto doloží původní účtenkou nebo její kopií, přiloží se stručný popis
závady a výrobek se vrátí v původním balení. Je výhradně na uvážení společnosti EZVIZ, zda
výrobek opraví nebo vymění za nový nebo repasovaný výrobek nebo komponenty. Tato
záruka nepokrývá náklady na přepravu, pojištění ani žádné jiné vedlejší výdaje spojené
s vaším vrácením výrobku.
Kromě případů omezených příslušným zákonem se jedná o vaše výhradní a exkluzivní
nápravné opatření k případě porušení podmínek této záruky. Na všechny výrobky, které byly
v rámci této záruky opraveny nebo vyměněny, se vztahují podmínky této záruky po dobu
devadesáti (90) dní od data dodání nebo po zbývající dobu původní záruční doby.
Tato záruka se nevztahuje na následující případy, ve kterých se ruší její platnost:
• Záruční reklamace neproběhla v záruční době nebo nebyl dodán doklad o zakoupení.
• Jakékoli závady, vady nebo nedostatky průkazně způsobené nebo vzniklé následkem
nárazu, nesprávné manipulace, neoprávněného vniknutí, nedodržením pokynů
v příslušném návodu k obsluze, nesprávným síťovým napětím, nehodou, ztrátou, krádeží,
požárem, záplavou nebo působením vyšší moci, poškození při přepravě nebo poškození
vzniklé následkem oprav prováděných neautorizovanými osobami.
• Jakékoli spotřební součásti, jako jsou baterie, kde k nefunkčnosti dochází běžně v důsledku
stárnutí výrobku.
• Kosmetická poškození včetně, ale nikoli výhradně, poškrábání, promáčknutí nebo
rozlomení plastových dílů v místě portů.
• Jakýkoli software, dokonce ani v případě, že je součástí balení nebo se prodává současně
s hardwarem EZVIZ.
• Jakákoli jiná poškození vzniklá jiným způsobem než vadou materiálu či zpracování.
• Běžné čištění, normální ošetřování a mechanické opotřebení.
Máte-li jakékoli dotazy, neváhejte se obrátit na prodejce nebo náš zákaznický servis.
OMEZENÁ ZÁRUKA
Page 99

Ďakujeme za zakúpenie produktov spoločnosti Hangzhou EZVIZ Software Co., Ltd. („EZVIZ“).
Táto obmedzená záruka („záruka“) vám ako pôvodnému kupujúcemu produktu EZVIZ zaručuje
špecifické zákonné práva. Môžete mať aj iné zákonné práva, ktoré sa líšia v závislosti od štátu,
kraja alebo jurisdikcie. Táto záruka sa vzťahuje iba na pôvodného kupujúceho produktu. „Pôvodný
kupujúci“ predstavuje ľubovoľného kupujúceho, ktorý si zakúpil produkt EZVIZ od autorizovaného
predajcu. Zrieknutie sa zodpovednosti, vylúčenie a obmedzenie zodpovednosti v rámci tejto
záruky sa nevzťahuje na rozsah, ktorý je zakázaný platnými zákonmi. Žiaden distribútor, predajca,
zástupca ani zamestnanec nie je oprávnený robiť žiadne úpravy, rozšírenie ani doplnenie tejto
záruky.
Produkt EZVIZ má záruku s trvaním dvoch (2) rokov od dátumu zakúpenia vzťahujúcu sa na
chyby materiálov a spracovania alebo dlhšiu záruku, ktorú môžu vyžadovať zákony v krajine
alebo štáte, v ktorom sa tento produkt predáva, keď sa používa bežne v súlade s návodom na
používanie.
So žiadosťou o záručný servis sa môžete obrátiť na našu službu zákazníkom.
V prípade akéhokoľvek chybného produktu EZVIZ, na ktorý sa vzťahuje záruka, vykoná
spoločnosť EZVIZ podľa vlastného uváženia (i) bezplatnú opravu alebo výmenu produktu; (ii)
výmenu produktu za funkčný ekvivalentný produkt; (iii) prípadne vráti pôvodnú kúpnu cenu
za predpokladu, že poskytnete pôvodný doklad o kúpe alebo jeho kópiu, stručné vysvetlenie
poruchy a vrátite produkt v pôvodnom balení. Na základe vlastného uváženia spoločnosti EZVIZ
môže byť oprava alebo výmena vykonaná použitím nového alebo renovovaného produktu
alebo komponentov. Táto záruka sa nevzťahuje na prepravné náklady, poistenie alebo akékoľvek
ďalšie vedľajšie náklady, ktoré vznikli pri vrátení produktu.
S výnimkou prípadov, keď to príslušné zákony zakazujú, je to váš výlučný a výhradný opravný
prostriedok v prípade porušenia tejto záruky. Na každý produkt, ktorý bol opravený alebo
vymenený v rámci tejto záruky, sa budú vzťahovať podmienky tejto záruky počas deväťdesiatich
(90) dní od dátumu doručenia alebo počas zostávajúcej pôvodnej záručnej doby podľa toho,
ktoré obdobie je dlhšie.
Táto záruka neplatí a nevzťahuje sa na nasledujúce prípady:
• Ak sa nárok na záruku uskutočňuje mimo záručnej doby alebo ak nie je predložený dôkaz
o zakúpení.
• V prípade akejkoľvek nefunkčnosti, chyby alebo poruchy spôsobenými nárazom, nesprávnym
používaním, neoprávneným zasahovaním, používaním v rozpore s príslušným návodom na
používanie, nesprávnym napätím elektrickej siete, nehodou, stratou, krádežou, požiarom,
záplavou, alebo inými neočakávanými udalosťami, poškodením pri preprave, alebo
poškodením spôsobeným opravami vykonanými neoprávneným personálom, alebo ich
v prípade ich dôsledkov.
• V prípade spotrebných súčastí, ako sú napr. batérie, pri ktorých je nefunkčnosť spôsobená
bežným starnutím produktu.
• Vizuálne poškodenie vrátane, avšak bez obmedzenia na škrabance, zárezy a zlomené
plastové časti portov.
• Akýkoľvek softvér, aj keď sa dodáva alebo predáva s hardvérom EZVIZ.
• V prípade akýchkoľvek iných škôd bez poškodenia materiálu alebo spracovania.
• Rutinné čistenie, bežné vizuálne a mechanické opotrebovanie.
Ak máte akékoľvek otázky, neváhajte a obráťte sa na predajcu alebo služby zákazníkom.
OBMEDZENÁ ZÁRUKA
Page 100

Takk for at du har kjøpt produkter fra Hangzhou EZVIZ Software Co., Ltd. (“EZVIZ”). Denne begrensede
BEGRENSET GARANTI
garantien (“garanti”) gir deg som er den opprinnelige kjøper av EZVIZ-produktet, spesifikke lovfestede
rettigheter. Du kan også ha andre lovfestede rettigheter som varierer med stat, provins eller domsmakt.
Denne garantien gjelder kun for den opprinnelige kjøper av produktet. Med “opprinnelig kjøper”
menes den kunden som har kjøpt EZVIZ-produktet fra en autorisert forhandler. Ansvarsfraskrivelsene,
utelukkelsene og ansvarsbegrensningene i denne garantien gjelder ikke dersom gjeldende lov forbyr
dette. Ingen distributør, forhandler, agent eller ansatt er autorisert til å gjøre endringer, utvidelser eller
tillegg til denne garantien.
Ditt EZVIZ-produkt er garantert for en periode på to (2) år fra kjøpsdatoen mot feil på materialer og
utførelse, eller for en lengre periode som kan kreves av loven i det landet eller den staten hvor dette
produktet selges, når det brukes normalt, og i samsvar med brukerhåndboken.
Du kan be om garantiservice ved å kontakte vår kundeservice.
For ethvert defekt EZVIZ-produkt under garanti vil EZVIZ, etter eget forgodtbefinnende, (i) reparere eller
erstatte produktet kostnadsfritt; (ii) bytte produktet med et funksjonelt ekvivalent produkt; eller (iii)
refundere den opprinnelige kjøpesummen, forutsatt at du kan fremskaffe originalkvitteringen eller en
kopi av denne, gi en kort beskrivelse av feilen og returnere produktet i originalemballasjen. EZVIZ kan,
etter eget skjønn, reparere eller erstatte produktet eller komponenter med nye eller fabrikkoverhalte
produkter eller komponenter. Denne garantien dekker ikke fraktkostnadene, forsikringen eller eventuelle
andre tilleggskostnader som du belastes med ved retur av produktet.
Med unntak av det som er forbudt i henhold til gjeldende lov, er dette ditt eneste rettsmiddel ved
brudd på denne garantien. Ethvert produkt som enten er reparert eller erstattet under denne garantien,
vil bli dekket av vilkårene i denne garantien for en periode på nitti (90) dager fra leveringsdato eller
gjenværende opprinnelige garantiperiode.
Denne garantien gjelder ikke, og er ugyldig:
• Hvis garantikravet er gjort utenfor garantiperioden, eller hvis kjøpsbevis ikke kan fremskaffes.
• For funksjonsfeil, mangler eller feil som forårsakes av, eller skyldes synlige bevis for slag,
mishandling, sabotasje, bruk i strid med gjeldende brukerhåndbok, feil spenning på strømnettet,
ulykke, tap, tyveri, brann, flom eller force majeure, transportskade eller skade som følge av
reparasjoner utført av uautorisert personale.
• For eventuelle forbruksdeler, som f.eks. batterier, der feilen skyldes normal aldring av produktet.
• Kosmetisk skade, inkludert, men ikke begrenset til riper, hakk og ødelagt plast på porter.
• All programvare, selv om den er pakket eller solgt med EZVIZ-maskinvare.
• For eventuelle andre skader som ikke skyldes feil i materiale eller utførelse.
• Rutinemessig rengjøring, normal kosmetisk og mekanisk slitasje.
Hvis du har spørsmål, ikke nøl med å kontakte selgeren eller vår kundeservice.
 Loading...