

Page 1
Scan the QR code with the EZVIZ App
to add the device to your account.
Please keep it for further reference.
Page 2

Page 3

COPYRIGHT © Hangzhou EZVIZ Software Co., Ltd.. ALL RIGHTS RESERVED.
Any and all information, including, among others, wordings, pictures, graphs are the
properties of Hangzhou EZVIZ Software Co., Ltd. (hereinafter referred to as “EZVIZ”).
This user manual (hereinafter referred to as “the Manual”) cannot be reproduced,
changed, translated, or distributed, partially or wholly, by any means, without the
prior written permission of EZVIZ. Unless otherwise stipulated, EZVIZ does not
make any warranties, guarantees or representations, express or implied, regarding
to the Manual.
About this Manual
The Manual includes instructions for using and managing the product. Pictures,
charts, images and all other information hereinafter are for description and
explanation only. The information contained in the Manual is subject to change,
without notice, due to firmware updates or other reasons. Please find the latest
version in the ™ website (http://www.ezvizlife.com).
Revision Record
New release – January, 2019
Trademarks Acknowledgement
™, ™, and other EZVIZ’s trademarks and logos are the properties of
EZVIZ in various jurisdictions. Other trademarks and logos mentioned below are the
properties of their respective owners.
Legal Disclaimer
TO THE MAXIMUM EXTENT PERMITTED BY APPLICABLE LAW, THE PRODUCT
DESCRIBED, WITH ITS HARDWARE, SOFTWARE AND FIRMWARE, IS PROVIDED
“AS IS”, WITH ALL FAULTS AND ERRORS, AND EZVIZ MAKES NO WARRANTIES,
EXPRESS OR IMPLIED, INCLUDING WITHOUT LIMITATION, MERCHANTABILITY,
SATISFACTORY QUALITY, FITNESS FOR A PARTICULAR PURPOSE, AND NONINFRINGEMENT OF THIRD PARTY. IN NO EVENT WILL EZVIZ, ITS DIRECTORS,
OFFICERS, EMPLOYEES, OR AGENTS BE LIABLE TO YOU FOR ANY SPECIAL,
CONSEQUENTIAL, INCIDENTAL, OR INDIRECT DAMAGES, INCLUDING, AMONG
OTHERS, DAMAGES FOR LOSS OF BUSINESS PROFITS, BUSINESS INTERRUPTION,
OR LOSS OF DATA OR DOCUMENTATION, IN CONNECTION WITH THE USE OF THIS
PRODUCT, EVEN IF EZVIZ HAS BEEN ADVISED OF THE POSSIBILITY OF SUCH
DAMAGES.
TO THE MAXIMUM EXTENT PERMITTED BY APPLICABLE LAW, IN NO EVENT SHALL
EZVIZ’S TOTAL LIABILITY FOR ALL DAMAGES EXCEED THE ORIGINAL PURCHASE
PRICE OF THE PRODUCT.
EZVIZ DOES NOT UNDERTAKE ANY LIABILITY FOR PERSONAL INJURY OR
PROPERTY DAMAGE AS THE RESULT OF PRODUCT INTERRUPTION OR SERVICE
TERMINATION CAUSED BY: A) IMPROPER INSTALLATION OR USAGE OTHER THAN
AS REQUESTED; B) THE PROTECTION OF NATIONAL OR PUBLIC INTERESTS; C)
FORCE MAJEURE; D) YOURSELF OR THE THIRD PARTY, INCLUDING WITHOUT
LIMITATION, USING ANY THIRD PARTY’S PRODUCTS, SOFTWARE, APPLICATIONS,
AND AMONG OTHERS. REGARDING TO THE PRODUCT WITH INTERNET ACCESS,
THE USE OF PRODUCT SHALL BE WHOLLY AT YOUR OWN RISKS. EZVIZ SHALL
NOT TAKE ANY RESPONSIBILITES FOR ABNORMAL OPERATION, PRIVACY
Page 4

LEAKAGE OR OTHER DAMAGES RESULTING FROM CYBER ATTACK, HACKER
ATTACK, VIRUS INSPECTION, OR OTHER INTERNET SECURITY RISKS; HOWEVER,
EZVIZ WILL PROVIDE TIMELY TECHNICAL SUPPORT IF REQUIRED.SURVEILLANCE
LAWS AND DATA PROTECTION LAWS VARY BY JURISDICTION. PLEASE CHECK
ALL RELEVANT LAWS IN YOUR JURISDICTION BEFORE USING THIS PRODUCT
IN ORDER TO ENSURE THAT YOUR USE CONFORMS TO THE APPLICABLE LAW.
EZVIZ SHALL NOT BE LIABLE IN THE EVENT THAT THIS PRODUCT IS USED WITH
ILLEGITIMATE PURPOSES.
IN THE EVENT OF ANY CONFLICTS BETWEEN THE ABOVE AND THE APPLICABLE
LAW, THE LATTER PREVAILS.
Regulatory Information
FCC Information
This Camera complies with Part 15 of the FCC Rules. Operation is subject to the
following two conditions:
(1) This Camera may not cause harmful interference, and
(2) This Camera must accept any interference received, including interference that
may cause undesired operation.
Note: This product has been tested and found to comply with the limits for a Class
B digital Camera, pursuant to Part 15 of the FCC Rules. These limits are designed
to provide reasonable protection against harmful interference in a residential
installation. This product generates, uses, and can radiate radio frequency energy
and, if not installed and used in accordance with the instructions, may cause
harmful interference to radio communications. However, there is no guarantee that
interference will not occur in a particular installation. If this product does cause
harmful interference to radio or television reception, which can be determined
by turning the equipment off and on, the user is encouraged to try to correct the
interference by one or more of the following measures:
—Reorient or relocate the receiving antenna.
—Increase the separation between the equipment and receiver.
—Connect the equipment into an outlet on a circuit different from that to which the
receiver is connected.
—Consult the dealer or an experienced radio/TV technician for help.
Please take attention that changes or modication not expressly approved by the
party responsible for compliance could void the user’s authority to operate the
equipment.
This equipment should be installed and operated with a minimum distance 20cm
between the radiator and your body.
This Camera complies with Industry Canada licence-exempt RSS standard(s).
Operation is subject to the following two conditions:
(1) this Camera may not cause interference, and
(2) this Camera must accept any interference, including interference that may cause
undesired operation of the Camera.
Under Industry Canada regulations, this radio transmitter may only operate using
an antenna of a type and maximum (or lesser) gain approved for the transmitter by
Industry Canada. To reduce potential radio interference to other users, the antenna
type and its gain should be so chosen that the equivalent isotropically radiated
Page 5
power (e.i.r.p.) is not more than that necessary for successful communication.
EC DECLARATION OF CONFORMITY
Hereby, Hangzhou EZVIZ Software Co., Ltd . declares that the radio equipment type
[CS-C3N, CS-C3W, CS-C3Wi, CS-C3WN, CS-C3C, CS-C3HC, CS-C3HN, CS-C3HW, CSC3HWi] is in compliance with Directive 2014/53/EU.
The full text of the EC DECLARATION OF CONFORMITY is available at the following
web link:
http://www.ezvizlife.com/declaration-of-conformity.
Safety Instruction
CAUTION: RISK OF EXPLOSION IF BATTERY IS REPLACED BY AN INCORRECT
TYPE. DISPOSE OF USED BATTERIES ACCORDING TO THE INSTRUCTIONS.
BATTERY IS NOT USER REPLACEABLE.
Due to the product shape and dimension, the name and address of the importer/
manufacturer are printed on the package.
Customer Service
For more information, please visit www.ezvizlife.com.
Need help? Contact us:
Telephone: +31 20 204 0128
Technical Inquires Email: support.eu@ezvizlife.com
EU Conformity Statement
This product and - if applicable - the supplied accessories too
are marked with "CE" and comply therefore with the applicable
harmonized European standards listed under the Radio Equipment
Directive 2014/53/EU, the EMC Directive 2014/30/EU, the RoHS
Directive 2011/65/EU.
2012/19/EU (WEEE directive): Products marked with this symbol
cannot be disposed of as unsorted municipal waste in the European
Union. For proper recycling, return this product to your local supplier
upon the purchase of equivalent new equipment, or dispose of
it at designated collection points. For more information see:
www.recyclethis.info.
2006/66/EC (battery directive): This product contains a battery that
cannot be disposed of as unsorted municipal waste in the European
Union. See the product documentation for specic battery information.
The battery is marked with this symbol, which may include lettering
to indicate cadmium (Cd), lead (Pb), or mercury (Hg). For proper
recycling, return the battery to your supplier or to a designated
collection point. For more information see: www.recyclethis.info.
SAVE THIS MANUAL FOR FUTURE REFERENCE
Page 6
COPYRIGHT © Hangzhou EZVIZ Software Co., Ltd. ALLE RECHTE VORBEHALTEN.
Alle Informationen, einschließlich Wortlaute, Bilder und Graken, jedoch nicht darauf
beschränkt, sind das Eigentum von Hangzhou EZVIZ Software Co., Ltd. (nachstehend
als „EZVIZ“ bezeichnet). Dieses Benutzerhandbuch (nachstehend als „das Handbuch“
bezeichnet) darf ohne vorherige schriftliche Genehmigung von EZVIZ weder ganz
noch teilweise reproduziert, geändert, übersetzt oder verbreitet werden. Sofern
nicht anderweitig vereinbart, bietet EZVIZ keine ausdrückliche oder implizierte
Gewährleistung oder Garantie bezüglich der Bedienungsanleitung.
Hinweise zu dieser Bedienungsanleitung
Die Bedienungsanleitung beinhaltet Anleitungen zur Verwendung und Verwaltung des
Produkts. Bilder, Diagramme, Abbildungen und alle sonstigen Informationen dienen
nur der Beschreibung und Erklärung. Die Änderung der in der Bedienungsanleitung
enthaltenen Informationen ist aufgrund von Firmware-Updates oder aus anderen
Gründen vorbehalten. Die aktuelle Version finden Sie auf der ™ Website
(http://www.ezvizlife.com).
Überarbeitungsdatensatz
Neuerscheinung – Januar, 2019
Marken
™, ™ und andere Marken und Logos von EZVIZ sind das Eigentum von
EZVIZ in verschiedenen Ländern. Andere nachstehend erwähnte Marken und Logos
stehen im Besitz der entsprechenden Eigentümer.
Haftungsausschluss
SOWEIT GESETZLICH ZULÄSSIG WIRD DAS BESCHRIEBENE PRODUKT MIT
SEINER HARDWARE, SOFTWARE UND FIRMWARE OHNE MÄNGELGEWÄHR, MIT
ALLEN FEHLERN UND FEHLFUNKTIONEN GELIEFERT, UND EZVIZ GIBT KEINE
AUSDRÜCKLICHEN ODER IMPLIZIERTEN GARANTIEN, EINSCHLIEßLICH UND OHNE
EINSCHRÄNKUNG, DER MARKTFÄHIGKEIT, ZUFRIEDENSTELLENDEN QUALITÄT,
EIGNUNG FÜR EINEN BESTIMMTEN ZWECK UND NICHTVERLETZUNG DER
RECHTE DRITTER. AUF KEINEN FALL HAFTEN EZVIZ, SEINE GESCHÄFTSFÜHRER,
ANGESTELLTEN, MITARBEITER ODER PARTNER FÜR BESONDERE, ZUFÄLLIGE,
DIREKTE ODER INDIREKTE SCHÄDEN, EINSCHLIEßLICH, JEDOCH NICHT DARAUF
BESCHRÄNKT, VERLUST VON GESCHÄFTSGEWINNEN, GESCHÄFTSUNTERBRECHUNG
ODER VERLUST VON DATEN ODER DOKUMENTATIONEN IN VERBINDUNG MIT DER
VERWENDUNG DIESES PRODUKTS, SELBST WENN EZVIZ ÜBER DIE MÖGLICHKEIT
DERARTIGER SCHÄDEN INFORMIERT WAR.
IN DEM NACH GELTENDEM RECHT MAXIMAL ZULÄSSIGEN UMFANG IST DIE
GESAMTHAFTUNG VON EZVIZ FÜR ALLE SCHÄDEN IN KEINEM FALL HÖHER ALS DER
URSPRÜNGLICHE KAUFPREIS DES PRODUKTS.
EZVIZ ÜBERNIMMT KEINE HAFTUNG FÜR PERSONEN- ODER SACHSCHÄDEN
INFOLGE VON PRODUKTAUSFALL ODER SERVICEEINSTELLUNG, DIE DURCH: A)
UNSACHGEMÄßE INSTALLATION ODER NUTZUNG, DIE NICHT DEN ANFORDERUNGEN
ENTSPRICHT, B) SCHUTZ NATIONALER ODER ÖFFENTLICHER INTERESSEN, C)
HÖHERE GEWALT, D) SIE SELBST ODER DRITTE, EINSCHLIEßLICH, ABER NICHT
DARAUF BESCHRÄNKT, DIE VON PRODUKTEN, SOFTWARE, ANWENDUNGEN
UND ANDEREN PRODUKTEN DRITTER VERURSACHT WERDEN.BEZÜGLICH
PRODUKTEN MIT INTERNETZUGANG ERFOLGT DIE VERWENDUNG DER PRODUKTE
Page 7

AUSSCHLIEßLICH AUF EIGENES RISIKO. EZVIZ IST NICHT FÜR ANORMALEN
BETRIEB, DATENSCHUTZVERSTÖßE ODER ANDERE SCHÄDEN AUFGRUND VON
CYBERATTACKEN, HACKERANGRIFFEN, VIREN ODER ANDEREN INTERNETSICHERHEITSRISIKEN VERANTWORTLICH; EZVIZ BIETET JEDOCH AUF ANFRAGE
ZEITGERECHTE TECHNISCHE UNTERSTÜTZUNG. ÜBERWACHUNGS- UND
DATENSCHUTZGESETZE VARIIEREN JE NACH GERICHTSBARKEIT. ÜBERPRÜFEN SIE
VOR DER VERWENDUNG DIESES PRODUKTS ALLE RELEVANTEN GESETZE IN IHRER
GERICHTSBARKEIT, UM SICHERZUSTELLEN, DASS IHRE VERWENDUNG GEGEN KEINE
GELTENDEN GESETZE VERSTÖßT. EZVIZ HAFTET NICHT, FALLS DIESES PRODUKT
FÜR UNGESETZLICHE ZWECKE VERWENDET WIRD.
FÜR DEN FALL VON WIDERSPRÜCHEN ZWISCHEN DEM VORSTEHENDEN UND DEM
GELTENDEN RECHT GILT DAS LETZTERE.
Behördliche Informationen
FCC-Hinweise
Dieses Gerät entspricht Abschnitt 15 der FCC- Bestimmungen. Der Betrieb ist unter den
folgenden beiden Bedingungen gestattet:
(1) Dieses Gerät darf keine schädlichen Interferenzen verursachen, und
(2) Dieses Gerät muss jegliche Interferenzen zulassen, einschließlich jener, die zu
einem unerwünschten Betrieb führen.
Hinweis: Dieses Produkt wurde getestet und entspricht den Grenzwerten eines
Digitalgeräts der Klasse B, gemäß Abschnitt 15 der FCC-Bestimmungen. Diese
Grenzwerte sollen einen angemessenen Schutz vor schädlichen Störungen in
einer Wohnumgebung bieten. Dieses Produkt erzeugt, verwendet und strahlt
Hochfrequenzenergie aus. Falls es nicht entsprechend den Anweisungen installiert
und verwendet wird, so kann es störende Interferenzen der Funkkommunikation
verursachen. Es gibt jedoch keine Garantie dafür, dass bei einer bestimmten Installation
keine Störungen auftreten können. Wenn dieses Produkt schädliche Störungen des
Radio- oder Fernsehempfangs verursacht, was durch Aus- und Einschalten des Geräts
festgestellt werden kann, wird dem Benutzer empfohlen, die Störungen durch eine oder
mehrere der folgenden Maßnahmen zu beheben:
- Richten Sie die Empfangsantenne neu aus oder setzen Sie sie um.
- Vergrößern Sie den Abstand zwischen Gerät und Empfänger.
- Schließen Sie das Gerät an die Steckdose eines anderen Stromkreises als den des
Empfängers an.
- Wenden Sie sich an Ihren Fachhändler oder einen erfahrenen Radio-/Fernsehtechniker.
Bitte beachten Sie, dass Änderungen oder Modifikationen an diesem Gerät, die
nicht ausdrücklich vom Hersteller zugelassen sind, zum Verlust der allgemeinen
Betriebserlaubnis führen können.
Dieses Gerät muss mit einem Mindestabstand von 20 cm zwischen der Antenne und
Personen aufgebaut und betrieben werden.
Dieses Gerät erfüllt die Vorschriften der Industry Canada Lizenz mit Ausnahme des/r
RSS-Norm(en). Der Betrieb ist unter den folgenden beiden Bedingungen gestattet:
(1) Dieses Gerät darf keine Störungen verursachen, und
(2) dieses Gerät muss jegliche Interferenz hinnehmen, einschließlich Störungen, die
einen unerwünschten Betrieb des Geräts verursachen.
Gemäß den Vorschriften von Industry Canada darf dieser Funksender nur mit
einer Antenne betrieben werden, die vom Typ und der maximalen (oder geringeren)
Page 8
Verstärkung ist, die von Industry Canada für den Sender zugelassen wurde. Um
mögliche Funkstörungen anderer Benutzer zu reduzieren, müssen Antennentyp und
Verstärkung so gewählt werden, dass die äquivalente isotrope Strahlungsleistung
(EIRP) nicht höher ist, als die für eine erfolgreiche Kommunikation erforderliche.
EG-KONFORMITÄTSERKLÄRUNG
Hiermit erklärt Hangzhou EZVIZ Software Co., Ltd., dass der Funkgerätetyp [CS-C3N,
CS-C3W, CS-C3Wi, CS-C3WN, CS-C3C, CS-C3HC, CS-C3HN, CS-C3HW, CS-C3HWi] mit der
Richtlinie 2014/53/EU übereinstimmt.
Der vollständige Text der EU-Konformitätserklärung ist unter folgendem Weblink
verfügbar:
http://www.ezvizlife.com/declaration-of-conformity.
Sicherheitshinweis
VORSICHT: EXPLOSIONSGEFAHR, WENN DIE BATTERIE DURCH EINEN FALSCHEN TYP
ERSETZT WIRD. ENTSORGEN SIE GEBRAUCHTE BATTERIEN ENTSPRECHEND DEN
ANWEISUNGEN. DER AKKU IST NICHT VOM BENUTZER AUSTAUSCHBAR.
Aufgrund der Produktform und -abmessungen sind Name und Anschrift des
Importeurs/Herstellers auf der Verpackung vermerkt.
Kundendienst
Weitere Informationen erhalten Sie auf www.ezvizlife.com
Benötigen Sie Hilfe? Setzen Sie sich mit uns in Verbindung:
Telefon: (+49) 0 696 640 4321
Technische Anfragen E-Mail: support.eu@ezvizlife.com
EU-Konformitätserklärung
Dieses Produkt und – ggf. – auch das mitgelieferte Zubehör sind mit „CE“
gekennzeichnet und entsprechen somit den geltenden harmonisierten
europäischen Normen, die unter der Funkgeräterichtlinie 2014/53/EU,
der EMV-Richtlinie 2014/30/EU und der RoHS-Richtlinie 2011/65/EU
aufgeführt sind.
2012/19/EU (Elektroaltgeräte-Richtlinie): Produkte, die mit diesem
Symbol gekennzeichnet sind, dürfen innerhalb der Europäischen Union
nicht mit dem Hausmüll entsorgt werden. Für korrektes Recycling geben
Sie dieses Produkt an Ihren örtlichen Fachhändler zurück oder entsorgen
Sie es an einer der Sammelstellen. Weitere Informationen finden Sie
unter: www.recyclethis.info.
2006/66/EG und deren Änderung 2013/56/EU (Batterie-Richtlinie):
Dieses Produkt enthält eine Batterie, die innerhalb der Europäischen
Union nicht mit dem Hausmüll entsorgt werden darf. Siehe
Produktdokumentation für spezifische Hinweise zu Batterien. Die
Batterie ist mit diesem Symbol gekennzeichnet, das zusätzlich die
Buchstaben Cd für Cadmium, Pb für Blei oder Hg für Quecksilber
enthalten kann. Für korrektes Recycling geben Sie die Batterie
an Ihren örtlichen Fachhändler zurück oder entsorgen Sie sie an
einer der Sammelstellen. Weitere Informationen finden Sie unter:
www.recyclethis.info.
BEWAHREN SIE DIESES HANDBUCH FÜR SPÄTERES NACHSCHLAGEN AUF
Page 9
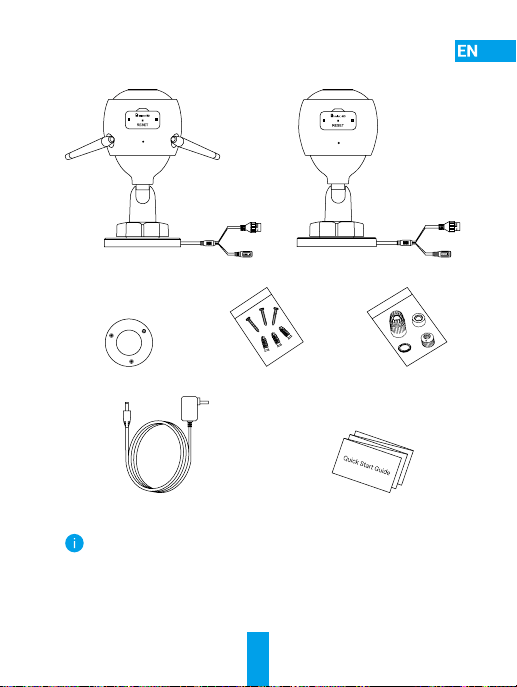
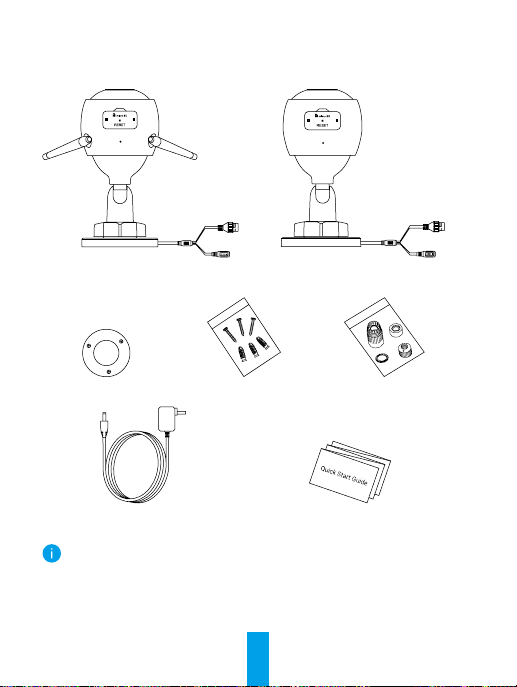
Package Contents
or
Wi-Fi Camera PoE Camera
Drill Template Screw Kit Waterproof Kit
Power Adapter Quick Start Guide
• The camera appearance is subject to the actual model you have
purchased.
• Power adapter is not included with the PoE camera model.
1
Page 10
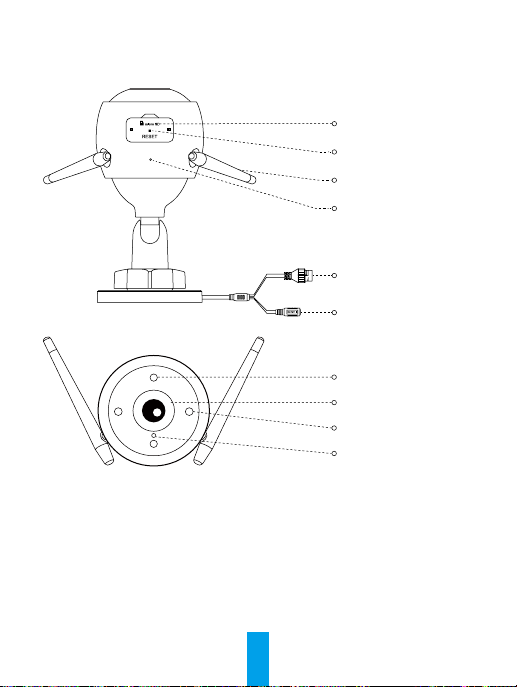
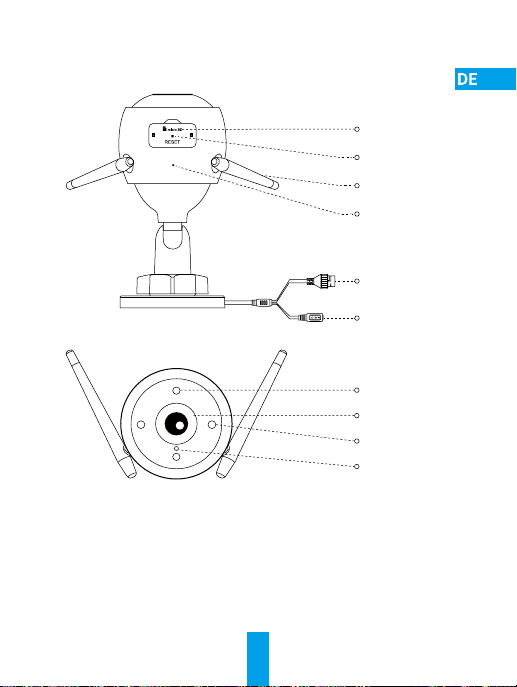
Basics
Wi-Fi Camera
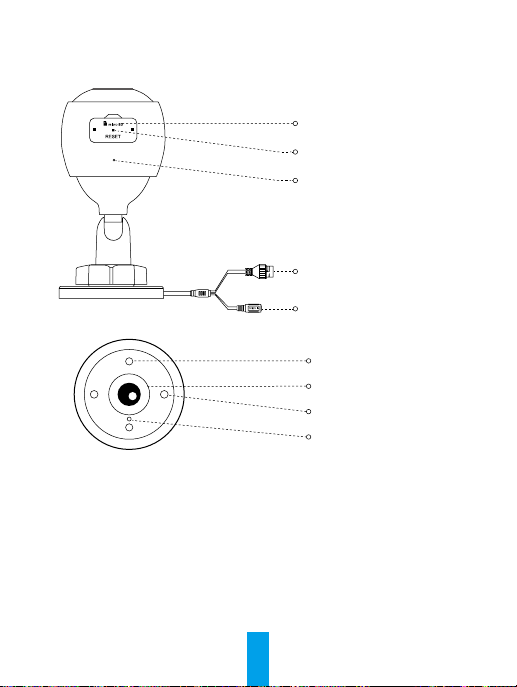
Name Description
LED Indicator • Solid Red: Camera starting up.
• Slow-ashing Red: Wi-Fi connection failed.
• Fast-ashing Red: Camera exception (e.g. Micro SD
card error).
• Solid Blue: Video being viewed in the EZVIZ app.
• Slow-ashing Blue: Camera running properly.
• Fast-ashing Blue: Camera ready for Wi-Fi connection.
Micro SD Card Slot
(Behind the cover)
Reset Button
Antenna
MIC
Ethernet Port
Power Port
Spotlight
Lens
IR Light
LED Indicator
2
Page 11
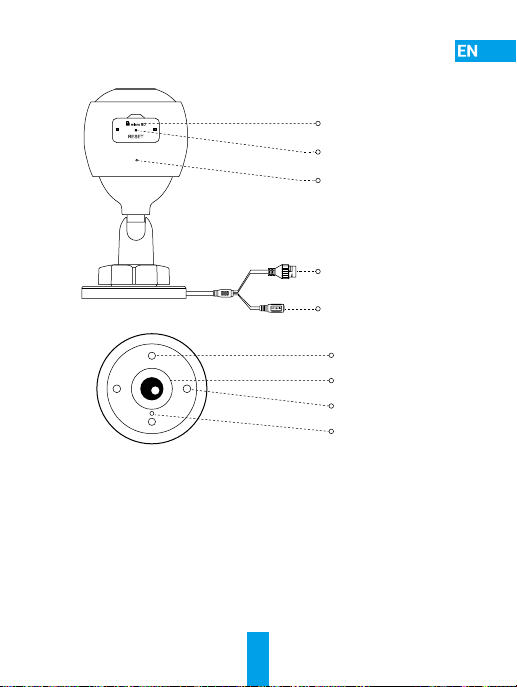
Basics
PoE (Power over Ethernet) Camera
Name Description
LED Indicator • Solid Red: Camera starting up.
• Slow-ashing Red: Network connection failed.
• Fast-ashing Red: Camera exception (e.g. Micro SD
card error).
• Solid Blue: Video being viewed in the EZVIZ app.
• Slow-ashing Blue: Camera running properly.
Micro SD Card Slot
(Behind the cover)
Reset Button
MIC
PoE Port
Power Port
Spotlight
Lens
IR Light
LED Indicator
3
Page 12
Get the EZVIZ App
1. Connect your mobile phone to Wi-Fi using your 2.4GHz network.
2. Search for “EZVIZ” in App Store or Google PlayTM.
3. Download and install the EZVIZ app.
4. Launch the app, and register an EZVIZ user account.
Setup
Follow the steps to set your camera:
1. Power on your camera.
2. Log in to your EZVIZ app user account.
3. Connect your camera to the Internet.
4. Add your camera to your EZVIZ account.
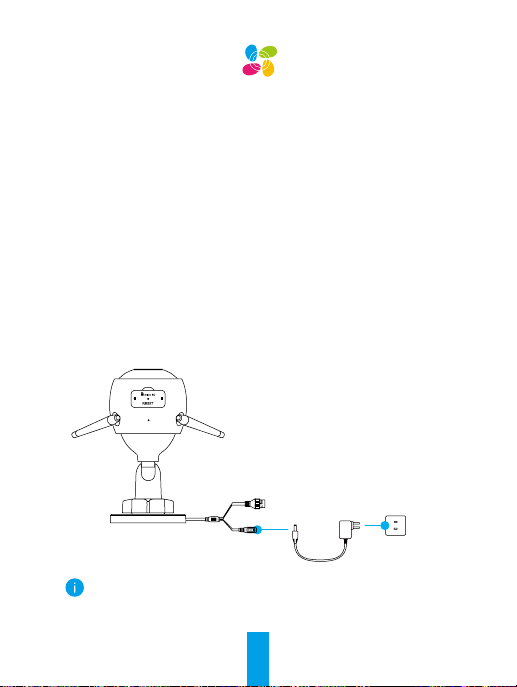
How to Set Your Wi-Fi Camera?
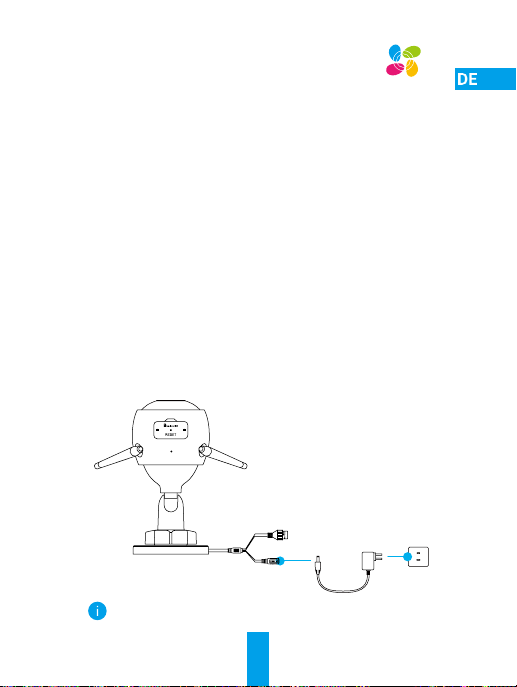
1 Power-on
Steps:
1. Connect the power adapter cable to the camera's power port.
2. Plug the power adapter into an electrical outlet.
Power Adapter
The LED turning fast-ashing blue indicates that the camera is powered
on and ready for network conguration.
4
Power Outlet
Page 13
2 Connect to the Internet
• Wireless Connection: Connect the camera to Wi-Fi. Refer to Option 1.
• Wired Connection: Connect the camera to a router. Refer to Option 2.
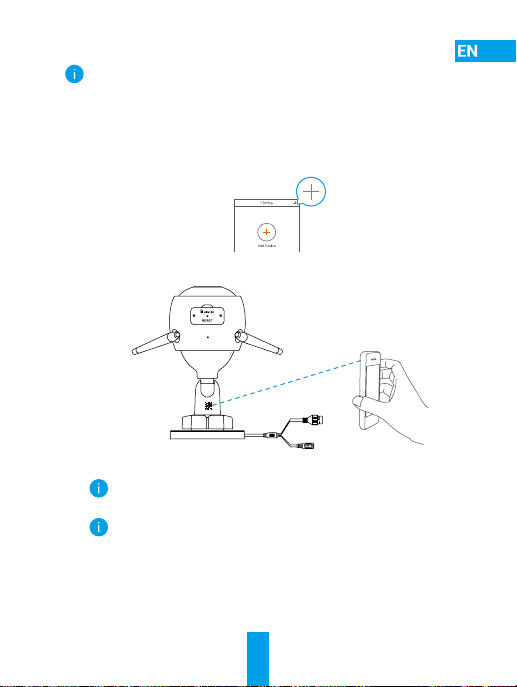
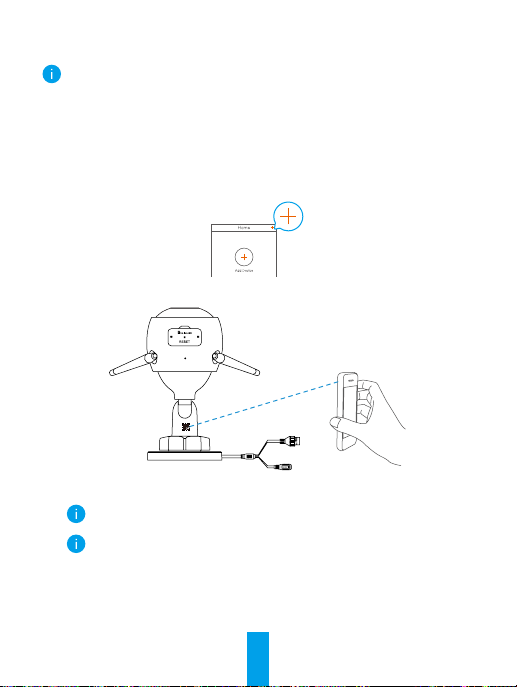
Option 1: Use the EZVIZ app to congure Wi-Fi.
Steps:
1. Log in to your account using the EZVIZ app.
2. On the Home screen, tap “+” on the upper-right corner to go to the
Scan QR Code interface.
3. Scan the QR code on the Quick Start Guide cover or on the body of
the camera.
4. Follow the EZVIZ app wizard to nish Wi-Fi conguration.
Please choose to connect your camera to the Wi-Fi to which your
mobile phone has connected.
Hold the reset button for 5s to restart and set all parameters to
default.
Hold the reset button for 5s in any of the following cases:
• The camera fails to connect to your Wi-Fi network.
• You want to change to another Wi-Fi network.
5
Page 14
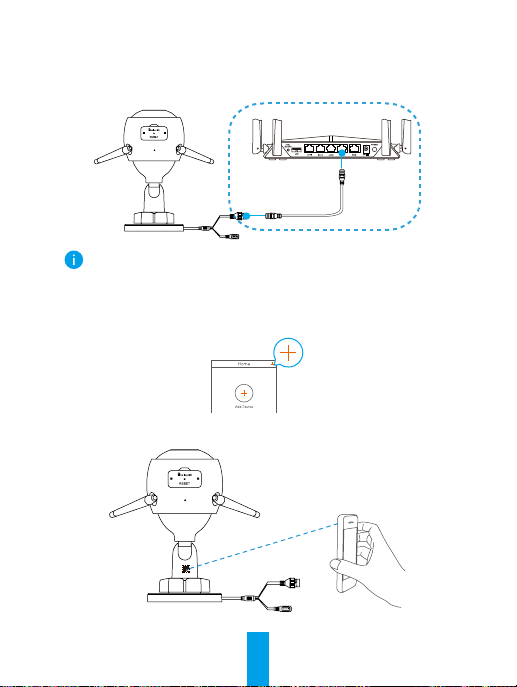
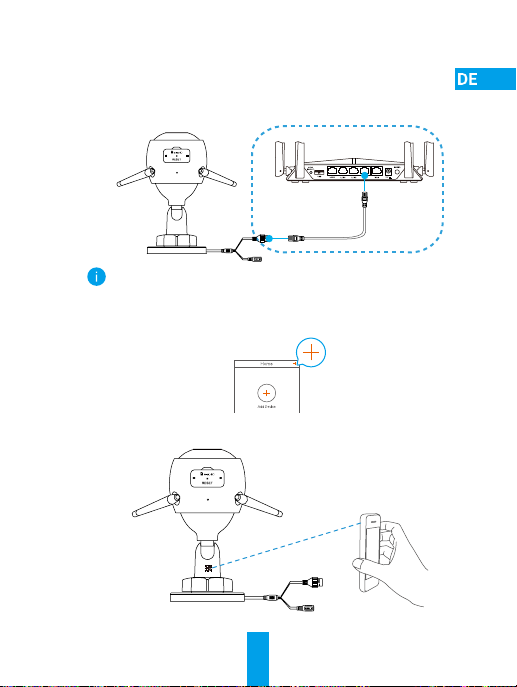
Option 2: Connect your Wi-Fi camera to a router.
Steps:
1. Connect the camera to the LAN port of your router with the
Ethernet cable.
Ethernet Cable
The LED turning slow-ashing blue indicates that the camera is
connected to the Internet.
2. Log in to your account using the EZVIZ app.
3. On the Home screen, tap “+” on the upper-right corner to go to the
Scan QR Code interface.
4. Scan the QR code on the Quick Start Guide cover or on the body of
the camera.
5. Follow the wizard to add the camera to the EZVIZ app.
6
Page 15
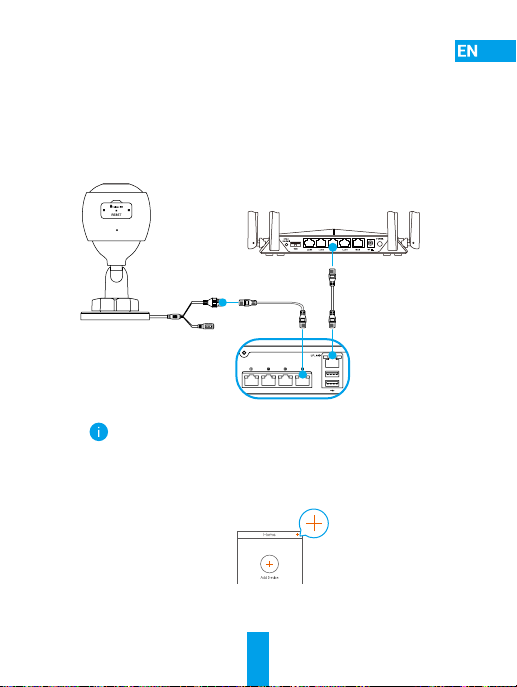
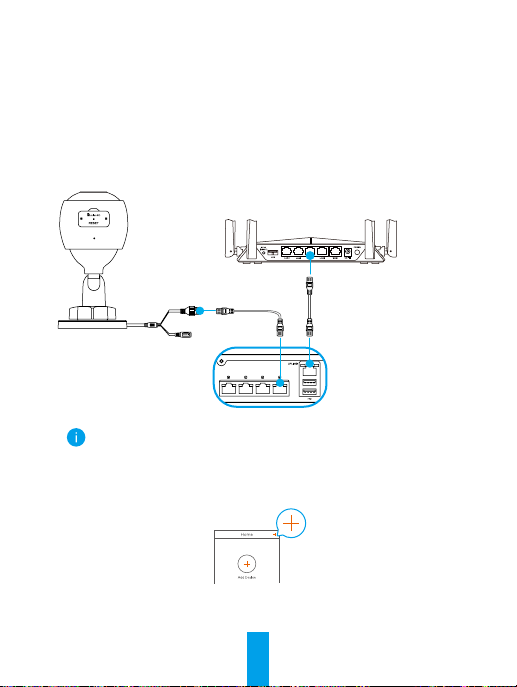
How to Set Your PoE Camera?
Option 1: Connect your PoE camera to a PoE Switch/NVR.
Steps:
1. Connect the Ethernet cable to the PoE port of your camera.
2. Connect the other end of the Ethernet cable to the PoE port of your
PoE switch or NVR.
3. Connect the LAN port of your PoE switch or NVR to the LAN port of
a router via the Ethernat cable.
Router
For LAN Port
For PoE Port For LAN Port
PoE Switch/NVR
• The LED turning slow-ashing blue indicates that the camera is
connected to the Internet.
• The PoE switch, NVR and Ethernet cable are not included in the
package.
4. Log in to your account using the EZVIZ app.
5. On the Home screen, tap “+” on the upper-right corner to go to the
Scan QR Code interface.
6. Scan the QR code on the Quick Start Guide cover or on the body of
the camera.
7. Follow the wizard to add the camera to the EZVIZ app.
7
Page 16
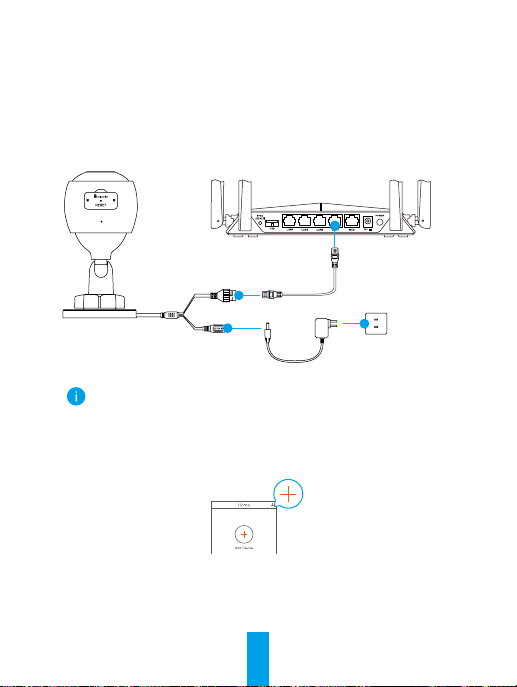
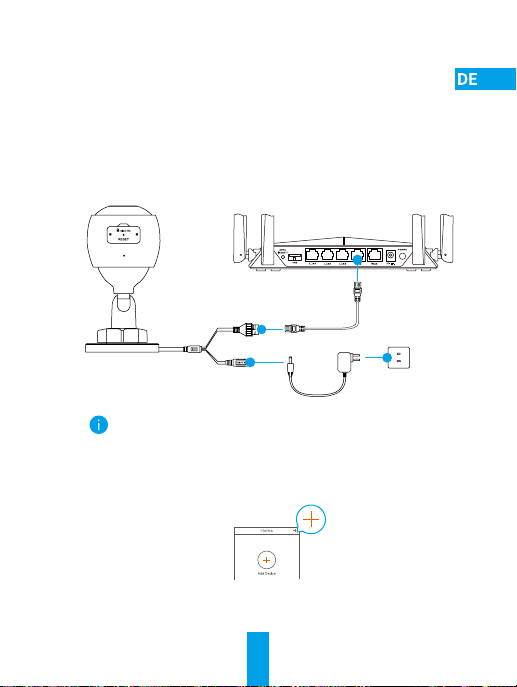
Option 2: Connect your PoE camera to a router.
Steps:
1. Connect the power adapter cable (sold separately) to the camera's
power port.
2. Plug the power adapter into an electrical outlet.
3. Connect the Ethernet cable to the PoE port of your camera.
4. Connect the other end of the Ethernet cable to the LAN port of a
router.
Router
Ethernet Cable
DC12V 1A
Power Adapter
• The LED turning slow-ashing blue indicates that the camera is
connected to the Internet.
• The Ethernet cable is not included in the package.
5. Log in to your account using the EZVIZ app.
6. On the Home screen, tap “+” on the upper-right corner to go to the
Scan QR Code interface.
7. Scan the QR code on the Quick Start Guide cover or on the body of
the camera.
8. Follow the wizard to add the camera to the EZVIZ app.
8
Page 17
Installation (Optional)
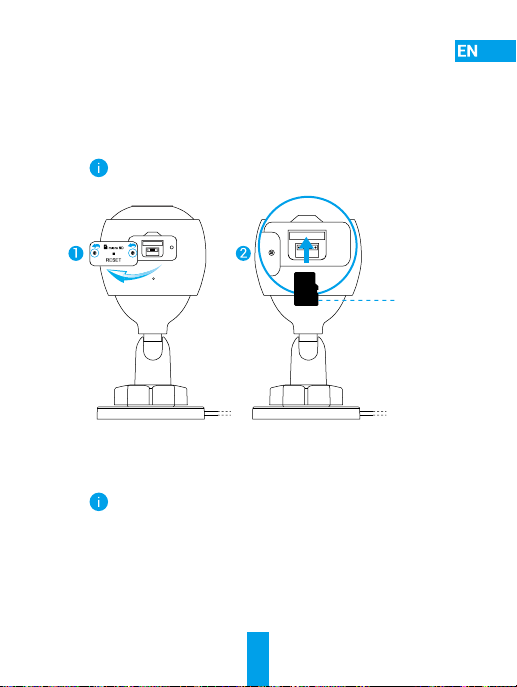
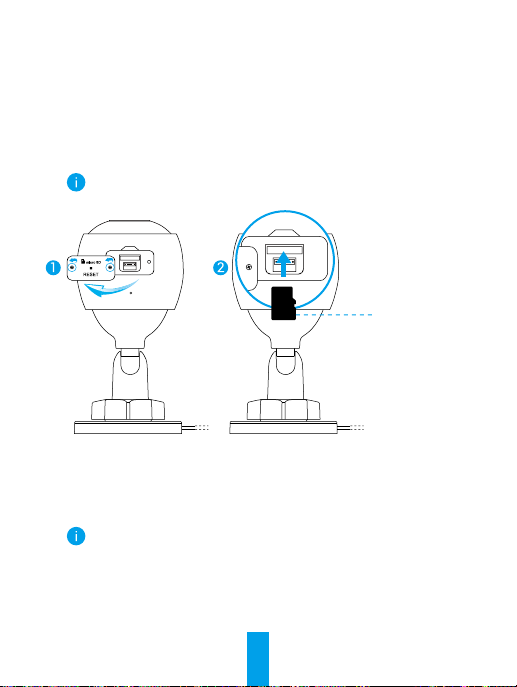
1 Install the Micro SD Card (Optional)
1. Remove the cover on the camera.
2. Insert the micro SD card (sold separately) into the card slot as
shown in the gure below.
3. Place the cover back on.
After installing the micro SD card, you should initialize the card in
the EZVIZ app before using it.
4. In the EZVIZ app, tap the Storage Status in the Device Settings
interface to check the SD card status.
5. If the memory card status displays as Uninitialized, tap to initialize it.
The status will then change to Normal and it can store videos.
This Side Up
9
Page 18
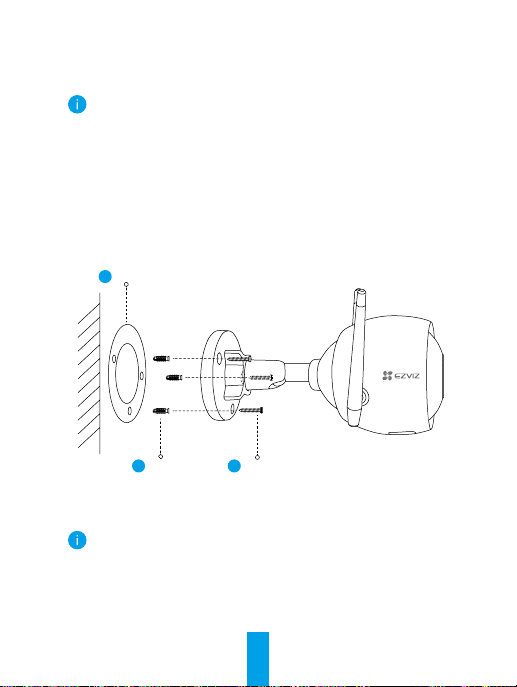
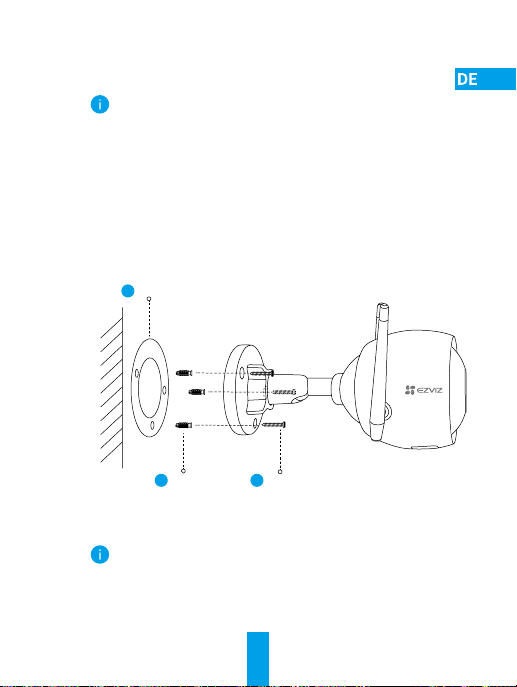
2 Install the Camera
The camera can be mounted on the wall or ceiling. Here we take wall
mounting as an example.
• Recommended installation height: 3m (10ft).
• Make sure the wall/ceiling is strong enough to withstand three
times the weight of the camera.
• Avoid positioning the camera in an area that gets a lot of light
shining directly into the camera lens.
- Place the drill template onto the surface you have chosen to mount
the camera.
- (For cement wall/ceiling only) Drill screw holes according to the
template, and insert three anchors.
- Use three metal screws to x the camera according to the template.
Drill Template
1
2 3
Anchor Metal Screw
Please tear up the drill template after installing the base if needed.
10
Page 19

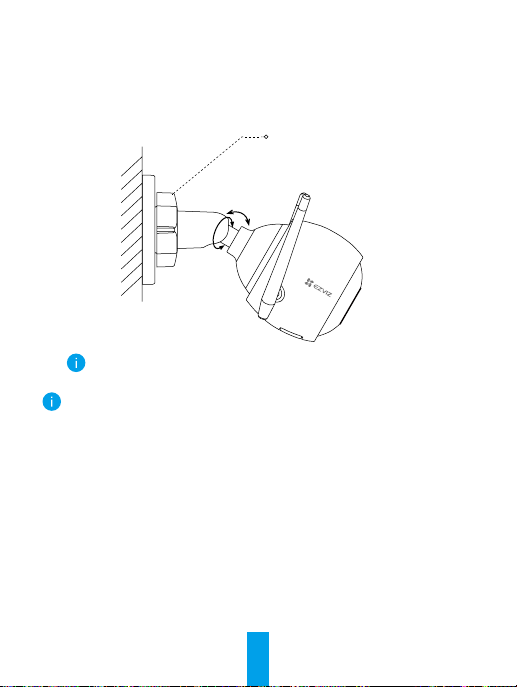
3 Adjust the Surveillance Angle
- Loosen the adjusting knob.
- Adjust the surveillance angle for a best view of your camera.
- Tighten the adjusting knob.
Adjusting Knob
0-90°
0-360°
Make sure the micro SD card slot is facing downward.
For detailed information, please visit www.ezvizlife.com.
11
Page 20
Lieferumfang
oder
WLAN-Kamera PoE-Kamera
Bohrschablone Schraubensatz Wasserdichtigkeitset
Netzteil Kurzanleitung
• Das Erscheinungsbild der Kamera hängt von dem tatsächlich von
Ihnen erworbenen Modell ab.
• Beim PoE-Kameramodell ist kein Netzteil enthalten.
12
Page 21
Grundlagen
WLAN-Kamera
Name Beschreibung
LEDBetriebsanzeige
• Durchgehend Rot: Kamera fährt hoch.
• Blinkt langsam Rot: WLAN-Verbindung fehlgeschlagen.
• Blinkt schnell Rot: Kameraausnahme
(z.B. microSD-Karte Fehler).
• Durchgehend Blau: Ein Video wird in der EZVIZ-App
angezeigt.
• Blinkt langsam Blau: Kamera funktioniert einwandfrei.
• Blinkt schnell Blau: Kamera ist zur WLAN-Verbindung
bereit.
13
MicroSDKartensteckplatz
(hinter der
Abdeckung)
Rücksetztaste
Antenne
Mikrofon
Ethernet-Anschluss
Stromversorgungsanschluss
Scheinwerfer
Objektiv
IR-Licht
LED-Betriebsanzeige
Page 22
Grundlagen
PoE (Power over Ethernet)-Kamera
Name Beschreibung
LEDBetriebsanzeige
• Durchgehend Rot: Kamera fährt hoch.
• Blinkt langsam Rot: Netzwerkverbindung
fehlgeschlagen.
• Blinkt schnell Rot: Kameraausnahme
(z.B. microSD-Karte Fehler).
• Durchgehend Blau: Ein Video wird in der EZVIZ-App
angezeigt.
• Blinkt langsam Blau: Kamera funktioniert einwandfrei.
MicroSDKartensteckplatz (hinter
der Abdeckung)
Rücksetztaste
Mikrofon
PoE-Anschluss
Stromversorgungsanschluss
Scheinwerfer
Objektiv
IR-Licht
LED-Betriebsanzeige
14
Page 23
Herunterladen der EZVIZ-App
1. Verbinden Sie Ihr Mobiltelefon über Ihr 2,4-GHz-Netzwerk mit
dem WLAN.
2. Suchen Sie im App Store oder bei Google PlayTM nach „EZVIZ“.
3. Laden Sie die EZVIZ-App herunter und installieren Sie sie.
4. Starten Sie die App und registrieren Sie ein EZVIZ-Benutzerkonto.
Einrichtung
Führen Sie folgende Schritte aus, um Ihre Kamera zu
kongurieren:
1. Schalten Sie Ihre Kamera ein.
2. Melden Sie sich bei Ihrem EZVIZ-Benutzerkonto an.
3. Verbinden Sie Ihre Kamera mit dem Internet.
4. Fügen Sie Ihre Kamera Ihrem EZVIZ-Konto hinzu.
So richten Sie Ihre WLAN-Kamera ein
1 Einschalten
Schritte:
1. Schließen Sie das Netzteil an den Stromanschluss der Kamera an.
2. Stecken Sie das Netzteil in eine Steckdose.
Netzteil
Steckdose
Wenn die LED schnell blau blinkt, ist die Kamera eingeschaltet und zur
WLAN-Konguration bereit.
15
Page 24
2 Mit dem Internet verbinden
• Kabellose Verbindung: Verbinden Sie die Kamera mit dem WLAN.
Siehe Möglichkeit 1.
• Kabelverbindung: Verbinden Sie die Kamera mit einem Router.
Siehe Möglichkeit 2.
Möglichkeit 1: Kongurieren Sie das WLAN über die EZVIZ-App.
Schritte:
1. Melden Sie sich mit der EZVIZ-App bei Ihrem Konto an.
2. Tippen Sie auf der Startseite auf „+“ oben rechts, um das Menü
„QR-Code scannen“ aufzurufen.
3. Scannen Sie den QR-Code auf dem Einband der
Schnellstartanleitung oder auf dem Kameragehäuse.
4. Befolgen Sie die Anweisungen des EZVIZ-App-Assistenten zum
Abschließen der WLAN-Konguration.
Verbinden Sie Ihre Kamera mit demselben WLAN, mit dem Ihr
Mobiltelefon verbunden ist.
Halten Sie die Rücksetztaste 5 Sekunden gedrückt, um neu zu
starten und alle Parameter auf die Standardwerte zurückzusetzen.
Halten Sie die Rücksetztaste in einem der folgenden Fälle für
5 Sekunden gedrückt:
• Die Kamera kann keine Verbindung mit Ihrem WLAN-Netzwerk
aufbauen.
• Sie möchten zu einem anderen WLAN-Netzwerk wechseln.
16
Page 25
Möglichkeit 2: Verbinden Sie Ihre WLAN-Kamera mit einem
Router.
Schritte:
1. Verbinden Sie die Kamera über das Netzwerkkabel mit dem
LAN-Anschluss Ihres Routers.
Netzwerkkabel
Wenn die LED langsam blau blinkt, ist die Kamera mit dem Internet
verbunden.
2. Melden Sie sich mit der EZVIZ-App bei Ihrem Konto an.
3. Tippen Sie auf der Startseite auf „+“ oben rechts, um das Menü
„QR-Code scannen“ aufzurufen.
4. Scannen Sie den QR-Code auf dem Einband der
Schnellstartanleitung oder auf dem Kameragehäuse.
5. Folgen Sie dem Assistenten zum Hinzufügen der Kamera zur
EZVIZ-App.
17
Page 26
So richten Sie Ihre PoE-Kamera ein
Möglichkeit 1: Verbinden Sie die PoE-Kamera mit einem
PoE-Switch/NVR.
Schritte:
1. Verbinden Sie das Netzwerkkabel mit dem PoE-Anschluss Ihrer Kamera.
2. Verbinden Sie das andere Ende des Netzwerkkabels mit dem
PoE-Anschluss an Ihrem PoE-Switch oder NVR.
3. Verbinden Sie den LAN-Anschluss an Ihrem PoE-Switch oder NVR
über das Netzwerkkabel mit dem LAN-Anschluss eines Routers.
Router
Für LAN-Anschluss
Für PoE-
Anschluss
• Wenn die LED langsam blau blinkt, ist die Kamera mit dem
Internet verbunden.
• PoE-Switch, NVR und Netzwerkkabel sind nicht im Lieferumfang
enthalten.
4. Melden Sie sich mit der EZVIZ-App bei Ihrem Konto an.
5. Tippen Sie auf der Startseite auf „+“ oben rechts, um das Menü
„QR-Code scannen“ aufzurufen.
6. Scannen Sie den QR-Code auf dem Einband der
Schnellstartanleitung oder auf dem Kameragehäuse.
7. Folgen Sie dem Assistenten zum Hinzufügen der Kamera zur EZVIZ-App.
Für LAN-Anschluss
PoE-Switch/NVR
18
Page 27
Möglichkeit 2: Verbinden Sie Ihre PoE-Kamera mit einem
Router.
Schritte:
1. Schließen Sie das Netzteil (separat erhältlich) an den
Stromanschluss der Kamera an.
2. Stecken Sie das Netzteil in eine Steckdose.
3. Verbinden Sie das Netzwerkkabel mit dem PoE-Anschluss Ihrer
Kamera.
4. Verbinden Sie das andere Ende des Netzwerkkabels mit dem
LAN-Anschluss eines Routers.
Router
Netzwerkkabel
12 V Gleichspannung, 1 A
• Wenn die LED langsam blau blinkt, ist die Kamera mit dem
Internet verbunden.
• Das Netzwerkkabel ist nicht im Lieferumfang enthalten.
5. Melden Sie sich mit der EZVIZ-App bei Ihrem Konto an.
6. Tippen Sie auf der Startseite auf „+“ oben rechts, um das Menü
„QR-Code scannen“ aufzurufen.
7. Scannen Sie den QR-Code auf dem Einband der
Schnellstartanleitung oder auf dem Kameragehäuse.
8. Folgen Sie dem Assistenten zum Hinzufügen der Kamera zur
EZVIZ-App.
Netzteil
19
Page 28
Installation (optional)
1 MicroSD-Karte installieren (optional)
1. Entfernen Sie die Abdeckung an der Kamera.
2. Setzen Sie die microSD-Karte (separat erhältlich) in den
Kartensteckplatz ein. Beachten Sie dazu die nachstehende
Abbildung.
3. Bringen Sie die Abdeckung wieder an.
Nach der Installation der microSD-Karte müssen Sie die Karte in der
EZVIZ-App initialisieren, bevor Sie sie verwenden können.
Diese Seite
oben
4. Tippen Sie in der EZVIZ-App in den Geräteeinstellungen auf Storage
Status (Speicherstatus), um den Status der SD-Karte zu überprüfen.
5. Wenn der Status der Speicherkarte als Uninitialized (Nicht
initialisiert) angezeigt wird, tippen Sie darauf, um sie zu formatieren.
Der Status ändert sich dann zu Normal und Videos können
gespeichert werden.
20
Page 29
2 Kamera installieren
Die Kamera kann an einer Wand oder Decke montiert werden. Hier
nehmen wir die Wandmontage als Beispiel.
• Empfohlene Montagehöhe: 3 m.
• Vergewissern Sie sich, dass die Wand/Decke stark genug ist, um
das dreifache Gewicht der Kamera zu tragen.
• Montieren Sie die Kamera nicht in einem Bereich, in dem viel
Licht direkt auf das Objektiv fällt.
- Befestigen Sie die Bohrschablone auf der Oberäche, die Sie für die
Montage der Kamera gewählt haben.
- (Nur Betonwand/-decke) Bohren Sie die Löcher gemäß der Schablone
und setzen Sie drei Dübel ein.
- Befestigen Sie die Kamera entsprechend der Schablone mit drei
Metallschrauben.
Bohrschablone
1
2 3
Dübel Metallschraube
Entsorgen Sie die Bohrschablone nach der Montage.
21
Page 30
3 Betrachtungswinkel einstellen
- Lösen Sie den Einstellknopf.
- Passen Sie den Betrachtungswinkel für eine optimale Sicht Ihrer
Kamera an.
- Ziehen Sie den Einstellknopf fest.
Einstellknopf
0 bis 90°
0 bis 360°
Stellen Sie sicher, dass der Steckplatz der microSD-Karte nach
unten zeigt.
Weitere Informationen erhalten Sie auf www.ezvizlife.com.
22
Page 31

Contenido del paquete
o
Cámara wi Cámara PoE
Plantilla de perforación Juego de tornillos
Adaptador de corriente Guía de inicio rápido
• La apariencia de la cámara depende del modelo que haya adquirido.
• El modelo de cámara PoE no incluye adaptador de corriente.
Equipo de resistencia
al agua
23
Page 32

Información básica
Cámara wi
Nombre Descripción
Indicador led • Rojo jo: la cámara se está iniciando.
• Rojo parpadeando lentamente: error al conectarse a la red wi.
• Rojo parpadeando rápidamente: excepción de la cámara
(p. ej., error de la tarjeta microSD).
• Azul jo: el vídeo se está visionando en la aplicación EZVIZ.
• Azul parpadeando lentamente: la cámara está funcionando
correctamente.
• Azul parpadeando rápidamente: la cámara está preparada
para conectarse a la red wi.
24
Ranura para tarjeta
microSD (detrás de
la tapa)
Botón de reinicio
Antena
Micrófono
Puerto Ethernet
Puerto de
alimentación
Haz de enfoque
Lente
Luz IR
Indicador led
Page 33

Información básica
Cámara con alimentación a través de Ethernet (PoE)
Ranura para tarjeta
microSD (detrás de la
tapa)
Botón de reinicio
Micrófono
Puerto PoE
Puerto de alimentación
Haz de enfoque
Lente
Luz IR
Indicador led
Nombre Descripción
Indicador led • Rojo jo: la cámara se está iniciando.
• Rojo parpadeando lentamente: Error al conectarse a
la red.
• Rojo parpadeando rápidamente: excepción de la cámara
(p. ej., error de la tarjeta microSD).
• Azul jo: el vídeo se está visionando en la aplicación
EZVIZ.
• Azul parpadeando lentamente: la cámara está
funcionando correctamente.
25
Page 34

Obtener la aplicación EZVIZ
1. Conecte su teléfono móvil al wi a través de su red 2,4 GHz.
2. Busque “EZVIZ” en App Store o Google PlayTM.
3. Descargue e instale la aplicación EZVIZ.
4. Inicie la aplicación y registre una cuenta de usuario EZVIZ.
Conguración
Siga estos pasos para congurar la cámara:
1. Encienda la cámara.
2. Inicie sesión en su cuenta de usuario de la aplicación EZVIZ.
3. Conecte la cámara a internet.
4. Añada la cámara a su cuenta de EZVIZ.
¿Cómo congurar la cámara wi?
1 Encendido
Pasos:
1. Conecte el cable del adaptador de corriente al puerto de
alimentación de la cámara.
2. Enchufe el adaptador de corriente a una toma de corriente.
Adaptador de
corriente
El led parpadeando rápidamente en azul indica que la cámara está
encendida y preparada para la conguración de la red.
26
Toma de
corriente
Page 35

2 Conexión a internet
• Conexión inalámbrica: Conectar la cámara a la red wi. Consulte la
opción 1.
• Conexión con cable: Conectar la cámara a un enrutador. Consulte la
opción 2.
Opción 1: Utilizar la aplicación EZVIZ para congurar la red wi.
Pasos:
1. Inicie sesión en su cuenta con la aplicación EZVIZ.
2. En la pantalla de inicio, pulse «+» en la esquina superior derecha
para acceder a la interfaz de escaneo de códigos QR.
3. Escanee el código QR que aparece en la portada de la Guía de inicio
rápido o en la carcasa de la cámara.
4. Siga las indicaciones del asistente de la aplicación EZVIZ para
nalizar la conguración de la conexión wi.
Seleccione conectar la cámara a la red wi a la que se ha
conectado su teléfono móvil.
Mantenga pulsado el botón de reinicio durante 5 s para reiniciar y
restaurar todos los parámetros a los valores predeterminados.
Mantenga pulsado el botón de reinicio durante 5 s en cualquiera de
los casos siguientes:
• La cámara no puede conectarse a su red wi.
• Desea cambiar a otra red wi.
27
Page 36

Opción 2: Conectar la cámara wi a un enrutador.
Pasos:
1. Conecte la cámara al puerto LAN de su enrutador utilizando un
cable Ethernet.
Cable Ethernet
El led parpadeando lentamente en azul indica que la cámara está
conectada a internet.
2. Inicie sesión en su cuenta con la aplicación EZVIZ.
3. En la pantalla de inicio, pulse «+» en la esquina superior derecha
para acceder a la interfaz de escaneo de códigos QR.
4. Escanee el código QR que aparece en la portada de la Guía de inicio
rápido o en la carcasa de la cámara.
5. Siga las indicaciones del asistente para añadir la cámara a la
aplicación EZVIZ.
28
Page 37

¿Cómo congurar la cámara PoE?
Opción 1: Conectar la cámara PoE a un NVR/conmutador PoE.
Pasos:
1. Conecte el cable Ethernet al puerto PoE de la cámara.
2. Conecte el otro extremo del cable Ethernet al puerto PoE del
conmutador PoE o del NVR.
3. Conecte el puerto LAN del conmutador PoE o del NVR al puerto LAN
de un enrutador mediante el cable Ethernet.
Enrutador
Para puerto LAN
Para puerto
PoE
• El led parpadeando lentamente en azul indica que la cámara está
conectada a internet.
• El conmutador PoE, el NVR y el cable Ethernet no se incluyen en
el paquete.
4. Inicie sesión en su cuenta con la aplicación EZVIZ.
5. En la pantalla de inicio, pulse «+» en la esquina superior derecha
para acceder a la interfaz de escaneo de códigos QR.
6. Escanee el código QR que aparece en la portada de la Guía de inicio
rápido o en la carcasa de la cámara.
7. Siga las indicaciones del asistente para añadir la cámara a la
aplicación EZVIZ.
29
Para puerto LAN
Conmutador PoE/
NVR
Page 38

Opción 2: Conectar la cámara PoE a un enrutador.
Pasos:
1. Conecte el cable del adaptador de corriente (vendido por separado)
al puerto de alimentación de la cámara.
2. Enchufe el adaptador de corriente a una toma de corriente.
3. Conecte el cable Ethernet al puerto PoE de la cámara.
4. Conecte el otro extremo del cable Ethernet al puerto LAN de un
enrutador.
Enrutador
Cable Ethernet
12 VCC 1 A
Adaptador de corriente
• El led parpadeando lentamente en azul indica que la cámara está
conectada a internet.
• El cable Ethernet no se incluye en el paquete.
5. Inicie sesión en su cuenta con la aplicación EZVIZ.
6. En la pantalla de inicio, pulse «+» en la esquina superior derecha
para acceder a la interfaz de escaneo de códigos QR.
7. Escanee el código QR que aparece en la portada de la Guía de inicio
rápido o en la carcasa de la cámara.
8. Siga las indicaciones del asistente para añadir la cámara a la
aplicación EZVIZ.
30
Page 39

Instalación (opcional)
1 Inserción de la tarjeta microSD (opcional)
1. Retire la tapa de la cámara.
2. Inserte la tarjeta microSD (vendida por separado) en la ranura
para la tarjeta como se muestra en la gura siguiente.
3. Vuelva a colocar la tapa.
Una vez insertada la tarjeta microSD, inicialícela en la aplicación
EZVIZ antes de usarla.
4. En la aplicación EZVIZ, pulse Storage Status (Estado del
almacenamiento) en la interfaz de conguración del dispositivo
para comprobar el estado de la tarjeta SD.
5. Si el estado de la tarjeta de memoria es Uninitialized
(No inicializada), pulse para inicializarla.
El estado cambiará a Normal y ya puede almacenar vídeos.
Este lado
hacia arriba
31
Page 40

2 Instalación de la cámara
La cámara puede montarse en la pared o en el techo. Aquí, nos
referimos al montaje mural como ejemplo.
• Altura de instalación recomendada: 3 m (10 pies).
• Asegúrese de que la pared/techo sea lo sucientemente
resistente para soportar un peso tres veces superior al de la
cámara.
• Evite colocar la cámara en un área en la que la lente reciba
directamente demasiada luz.
- Coloque la plantilla de perforación sobre la supercie escogida para el
montaje de la cámara.
- (Solo para el montaje en paredes/techos de cemento). Taladre los
oricios para los tornillos según la plantilla e inserte los tres tacos.
- Utilice tres tornillos de metal para jar la cámara conforme a la
plantilla.
Plantilla de perforación
1
2 3
Taco Tornillo metálico
Una vez instalada la base, despegue la plantilla de perforación si
fuera necesario.
32
Page 41

3 Ajuste del ángulo de vigilancia
- Aoje el botón de ajuste.
- Ajuste el ángulo de vigilancia para una mejor vista de su cámara.
- Apriete el botón de ajuste.
Regulador de ajuste
0-90°
0-360°
Asegúrese de que la ranura para la tarjeta microSD esté orientada
hacia abajo.
Para obtener más información, visite www.ezvizlife.com.
33
Page 42

Contenu de l’emballage
ou
Caméra Wi-Fi Caméra PoE
Gabarit de perçage Kit de vis Kit d’étanchéité
Adaptateur d’alimentation Guide de démarrage rapide
• L’apparence réelle du modèle de caméra que vous avez acheté peut
différer.
• L’adaptateur d’alimentation n’est pas inclus avec le modèle de la
caméra PoE.
34
Page 43

Notions de base
Caméra Wi-Fi
Nom Description
Indicateur
lumineux
• Rouge xe : la caméra est en cours de démarrage.
• Clignotement lent en rouge : la connexion Wi-Fi a échoué.
• Clignotement rapide en rouge : anomalie de la caméra (par
ex. erreur de carte microSD).
• Bleu xe : la vidéo est en cours de visionnage dans
l’application EZVIZ.
• Clignotement lent en bleu : la caméra fonctionne
normalement.
• Clignotement rapide en bleu : la caméra est prête à établir la
connexion Wi-Fi.
35
Logement de carte
microSD (derrière
le cache)
Bouton de
réinitialisation
Antenne
Microphone
Port Ethernet
Port d’alimentation
Projecteur de
lumière
Objectif
Éclairage IR
Indicateur lumineux
Page 44

Notions de base
Caméra PoE (Power over Ethernet)
Nom Description
Indicateur
lumineux
• Rouge xe : la caméra est en cours de démarrage.
• Clignotement lent en rouge : la connexion Wi-Fi a
échoué.
• Clignotement rapide en rouge : anomalie de la caméra
(par ex. erreur de carte microSD).
• Bleu xe : la vidéo est en cours de visionnage dans
l’application EZVIZ.
• Clignotement lent en bleu : la caméra fonctionne
normalement.
Logement de carte microSD
(derrière le cache)
Bouton de réinitialisation
Microphone
Port PoE
Port d’alimentation
Projecteur de lumière
Objectif
Éclairage IR
Indicateur lumineux
36
Page 45

Obtenir l’application EZVIZ
1. Connectez votre téléphone mobile à votre réseau Wi-Fi 2,4 GHz.
2. Recherchez l’application « EZVIZ » dans l’App Store ou Google
PlayTM.
3. Téléchargez et installez l’application EZVIZ.
4. Lancez l’application et créez un compte utilisateur EZVIZ.
Installation
Suivez les étapes pour congurer votre caméra :
1. Allumez la caméra.
2. Connectez-vous à votre compte utilisateur dans l’application EZVIZ.
3. Connectez votre caméra à Internet.
4. Ajoutez votre caméra à votre compte EZVIZ.
Comment congurer votre caméra Wi-Fi ?
1 Mise sous tension
Procédures :
1. Connectez le câble de l’adaptateur d’alimentation au port
d’alimentation de la caméra.
2. Branchez l’adaptateur d’alimentation à une prise électrique.
Adaptateur
d’alimentation
Prise électrique
Lorsque l’indicateur lumineux clignote rapidement en bleu, la caméra est
sous tension et prête pour la conguration réseau.
37
Page 46

2 Connexion à Internet
• Connexion sans l : connectez la caméra à un réseau Wi-Fi. Voir Option 1.
• Connexion laire : connectez la caméra à un routeur. Voir Option 2Option 2.
Option 1 : utiliser l’application EZVIZ pour congurer la
connexion Wi-Fi.
Procédures :
1. Connectez-vous à votre compte à l’aide de l’application EZVIZ.
2. Sur l’écran d’accueil, appuyez sur le bouton « + » situé dans le coin
supérieur droit pour accéder à l’interface de numérisation du code QR.
3. Scannez le code QR gurant sur la couverture du guide de
démarrage rapide ou sur le boîtier de la caméra.
4. Suivez l’assistant de l’application EZVIZ pour terminer la
conguration de la connexion Wi-Fi.
Connectez votre caméra au réseau Wi-Fi auquel votre téléphone
portable est connecté.
Maintenez le bouton de réinitialisation enfoncé pendant 5 s pour
redémarrer et rétablir tous les paramètres par défaut.
Maintenez le bouton de réinitialisation enfoncé pendant 5 s dans
l’un des cas suivants :
• La caméra ne parvient pas à se connecter à votre réseau Wi-Fi.
• Vous souhaitez passer à un autre réseau Wi-Fi.
38
Page 47

Option 2 : connecter votre caméra Wi-Fi à un routeur.
Procédures :
1. Connectez la caméra au port LAN de votre routeur à l’aide d’un câble
Ethernet.
Câble Ethernet
Lorsque l’indicateur lumineux clignote lentement en bleu, la caméra
est connectée à Internet.
2. Connectez-vous à votre compte à l’aide de l’application EZVIZ.
3. Sur l’écran d’accueil, appuyez sur le bouton « + » situé dans le coin
supérieur droit pour accéder à l’interface de numérisation du code QR.
4. Scannez le code QR gurant sur la couverture du guide de
démarrage rapide ou sur le boîtier de la caméra.
5. Suivez l’assistant pour ajouter la caméra à l’application EZVIZ.
39
Page 48

Comment congurer votre caméra PoE ?
Option 1 : connecter votre caméra PoE à un enregistreur
(NVR) ou à un commutateur PoE.
Procédures :
1. Connectez une extrémité du câble Ethernet au port PoE de votre caméra.
2. Connectez l’autre extrémité du câble Ethernet au port PoE de votre
enregistreur (NVR) ou commutateur PoE.
3. Connectez le port LAN de votre enregistreur (NVR) ou
commutateur PoE au port LAN d’un routeur via un câble Ethernet.
Routeur
Pour port LAN
Pour port PoE Pour port LAN
Commutateur PoE/
Enregistreur
• Lorsque l’indicateur lumineux clignote lentement en bleu, la
caméra est connectée à Internet.
• Le commutateur PoE, l’enregistreur (NVR) et le câble réseau ne
sont pas inclus dans l’emballage.
4. Connectez-vous à votre compte à l’aide de l’application EZVIZ.
5. Sur l’écran d’accueil, appuyez sur le bouton « + » situé dans le coin
supérieur droit pour accéder à l’interface de numérisation du code QR.
6. Scannez le code QR gurant sur la couverture du guide de
démarrage rapide ou sur le boîtier de la caméra.
7. Suivez l’assistant pour ajouter la caméra à l’application EZVIZ.
40
Page 49

Option 2 : connecter votre caméra PoE à un routeur.
Procédures :
1. Connectez une extrémité du câble d’alimentation de l’adaptateur
d’alimentation (vendu séparément) au port d’alimentation de la
caméra.
2. Branchez l’adaptateur d’alimentation à une prise électrique.
3. Connectez une extrémité du câble Ethernet au port PoE de votre
caméra.
4. Connectez l’autre extrémité du câble Ethernet au port LAN d’un
routeur.
Routeur
Câble Ethernet
12 V CC 1 A
Adaptateur d’alimentation
• Lorsque l’indicateur lumineux clignote lentement en bleu, la
caméra est connectée à Internet.
• Le câble Ethernet n’est pas inclus dans l’emballage.
5. Connectez-vous à votre compte à l’aide de l’application EZVIZ.
6. Sur l’écran d’accueil, appuyez sur le bouton « + » situé dans le coin
supérieur droit pour accéder à l’interface de numérisation du code QR.
7. Scannez le code QR gurant sur la couverture du guide de
démarrage rapide ou sur le boîtier de la caméra.
8. Suivez l’assistant pour ajouter la caméra à l’application EZVIZ.
41
Page 50

Installation (facultatif)
1 Installation de la carte microSD (facultatif)
1. Retirez le cache de la caméra.
2. Insérez la carte microSD (vendue séparément) dans la fente, comme
illustré dans la gure ci-dessous.
3. Remettez le cache en place.
Après avoir installé la carte microSD, vous devez initialiser la carte
dans l’application EZVIZ avant de l’utiliser.
Ce côté vers
le haut
4. Dans l’application EZVIZ, appuyez sur Storage Status (État du
stockage) dans l’interface paramètres de l’appareil pour vérier l’état
de la carte SD.
5. Si l’état de la carte mémoire est Uninitialized (Non initialisée),
appuyez dessus pour l’initialiser.
L’état sera changé en « Normal » pour vous permettre d’enregistrer
des vidéos.
42
Page 51

2 Installation de la caméra
Il est possible de monter la caméra sur un mur ou au plafond. Prenons le
montage mural à titre d’exemple.
• Hauteur d’installation recommandée : 3 m.
• Assurez-vous que le mur/plafond est susamment solide pour
supporter trois fois le poids de la caméra.
• Évitez de positionner la caméra à un endroit où la lumière
brille directement dans l’objectif de la caméra.
- Placez le gabarit de perçage sur la surface où vous avez choisi
d’installer la caméra.
- (Sur un mur ou un plafond en ciment uniquement) Percez les trous
correspondant au gabarit de perçage, puis insérez les trois chevilles.
- Utilisez les vis métalliques pour xer la caméra en fonction du gabarit.
Gabarit de perçage
1
2 3
Cheville Vis métallique
Veuillez déchirer le gabarit de perçage après avoir installé la base,
si nécessaire.
43
Page 52

3 Réglage de l’angle de surveillance
- Desserrez le bouton de réglage.
- Réglez l’angle de surveillance pour obtenir une vue optimale de votre
caméra.
- Serrez le bouton de réglage.
Bouton de réglage
0 à 90°
0 à 360°
Assurez-vous que le logement de la carte microSD est orienté vers
le bas.
Pour obtenir des informations détaillées, visitez le site
www.ezvizlife.com.
44
Page 53

Contenuto della confezione
o
Telecamera Wi-Fi Telecamera PoE
Dima di foratura Kit di tasselli Kit impermeabilizzante
Alimentatore Guida rapida
• L'aspetto effettivo della telecamera dipende dal modello acquistato.
• L'alimentatore non è fornito in dotazione con la telecamera PoE.
45
Page 54

Panoramica
Telecamera Wi-Fi
Nome Descrizione
Indicatore
LED
• Rosso sso: La telecamera si sta avviando.
• Rosso lampeggiante lento: Connessione Wi-Fi non riuscita.
• Rosso lampeggiante veloce: Eccezione della telecamera
(ad esempio, errore della scheda micro SD).
• Blu sso: Il video viene visualizzato nell'app EZVIZ.
• Blu lampeggiante lento: La telecamera funziona
correttamente.
• Blu lampeggiante veloce: La telecamera è pronta per la
connessione Wi-Fi.
46
Slot per scheda
micro SD (dietro il
coperchio)
Pulsante di reset
Antenna
Microfono
Porta Ethernet
Porta di
alimentazione
Faretto
Obiettivo
Luce IR
Indicatore LED
Page 55

Panoramica
Telecamera PoE (Power over Ethernet)
Slot per scheda micro SD
(dietro il coperchio)
Pulsante di reset
Microfono
Porte PoE
Porta di alimentazione
Faretto
Obiettivo
Luce IR
Indicatore LED
Nome Descrizione
Indicatore LED • Rosso sso: La telecamera si sta avviando.
• Rosso lampeggiante lento: Connessione alla rete non
riuscita.
• Rosso lampeggiante veloce: Eccezione della telecamera
(ad esempio, errore della scheda micro SD).
• Blu sso: Il video viene visualizzato nell'app EZVIZ.
• Blu lampeggiante lento: La telecamera funziona
correttamente.
47
Page 56

Scaricare l'app EZVIZ
1. Connettere il telefono alla rete Wi-Fi a 2.4 GHz.
2. Cercare l'app “EZVIZ” nell'App Store o su Google PlayTM.
3. Scaricare e installare l'app EZVIZ.
4. Avviare l'app e creare un account utente EZVIZ.
Congurazione
Impostare la telecamera procedendo nel modo seguente:
1. Accendere la telecamera.
2. Accedere al proprio account utente nell'app EZVIZ.
3. Connettere la telecamera a Internet.
4. Aggiungere la telecamera all'account EZVIZ.
Come congurare la telecamera Wi-Fi?
1 Accensione
Procedura:
1. Collegare il cavo di alimentazione alla porta di alimentazione della
telecamera.
2. Collegare l'alimentatore a una presa elettrica.
Alimentatore
Presa di corrente
Il LED blu che lampeggia velocemente indica che la telecamera è accesa
ed è pronta per la congurazione di rete.
48
Page 57

2 Connessione a Internet
• Connessione wireless: Connettere la telecamera a una rete Wi-Fi. Fare
riferimento all'Opzione 1.
• Connessione con cavo: Connettere la telecamera a un router. Fare
riferimento all'Opzione 2.
Opzione 1: Utilizzare l'app EZVIZ per congurare la
connessione Wi-Fi.
Procedura:
1. Accedere al proprio account utilizzando l'app EZVIZ.
2. Nella schermata iniziale, toccare "+" nell'angolo superiore destro per
passare all'interfaccia di scansione del QR code.
3. Scansionare il QR code sulla copertina della Guida introduttiva
rapida o sul corpo della telecamera.
4. Seguire la procedura guidata dell'app EZVIZ per completare la
congurazione della connessione Wi-Fi.
Si raccomanda di collegare la telecamera alla rete Wi-Fi alla quale è
collegato anche il telefono cellulare.
Tenere premuto il pulsante di ripristino per 5 secondi per riavviare e
riportare tutti i parametri ai valori predeniti.
Tenere premuto il pulsante di ripristino per 5 secondi nei seguenti casi:
• La telecamera non si connette alla rete Wi-Fi.
• Si vuole selezionare un'altra rete Wi-Fi.
49
Page 58

Opzione 2: Connettere la telecamera a un router.
Procedura:
1. Collegare la telecamera alla porta LAN del router tramite un cavo
Ethernet.
Cavo Ethernet
Il LED blu che lampeggia lentamente indica che la telecamera è
collegata a Internet.
2. Accedere al proprio account utilizzando l'app EZVIZ.
3. Nella schermata iniziale, toccare "+" nell'angolo superiore destro per
passare all'interfaccia di scansione del QR code.
4. Scansionare il QR code sulla copertina della Guida introduttiva
rapida o sul corpo della telecamera.
5. Seguire la procedura guidata per aggiungere la telecamera all'app
EZVIZ.
50
Page 59

Come congurare la telecamera PoE?
Opzione 1: Connettere la telecamera a uno switch PoE o a un
videoregistratore di rete.
Procedura:
1. Collegare il cavo Ethernet alla porta PoE della telecamera.
2. Collegare l'altra estremità del cavo Ethernet alla porta PoE dello
switch PoE o del videoregistratore di rete.
3. Collegare la porta LAN dello switch PoE o del videoregistratore
di rete alla porta LAN di un router tramite il cavo Ethernet.
Router
Per la porta LAN
Per la porta
PoE
• Il LED blu che lampeggia lentamente indica che la telecamera è
collegata a Internet.
• Lo switch PoE, il videoregistratore di rete e il cavo Ethernet non
sono inclusi nella confezione.
4. Accedere al proprio account utilizzando l'app EZVIZ.
5. Nella schermata iniziale, toccare "+" nell'angolo superiore destro per
passare all'interfaccia di scansione del QR code.
6. Scansionare il QR code sulla copertina della Guida introduttiva
rapida o sul corpo della telecamera.
7. Seguire la procedura guidata per aggiungere la telecamera all'app
EZVIZ.
51
Per la porta LAN
Switch PoE/
Videoregistratore
di rete
Page 60

Opzione 2: Connettere la telecamera PoE a un router.
Procedura:
1. Collegare il cavo di alimentazione (acquistabile separatamente) alla
porta di alimentazione della telecamera.
2. Collegare l'alimentatore a una presa elettrica.
3. Collegare il cavo Ethernet alla porta PoE della telecamera.
4. Collegare l'altra estremità del cavo Ethernet alla porta LAN di un
router.
Router
Cavo Ethernet
12 VCC, 1 A
Alimentatore
• Il LED blu che lampeggia lentamente indica che la telecamera è
collegata a Internet.
• Il cavo Ethernet non è incluso nella confezione.
5. Accedere al proprio account utilizzando l'app EZVIZ.
6. Nella schermata iniziale, toccare "+" nell'angolo superiore destro per
passare all'interfaccia di scansione del QR code.
7. Scansionare il QR code sulla copertina della Guida introduttiva
rapida o sul corpo della telecamera.
8. Seguire la procedura guidata per aggiungere la telecamera all'app
EZVIZ.
52
Page 61

Installazione (opzionale)
1 Installazione della scheda micro SD (opzionale)
1. Rimuovere il coperchio della telecamera.
2. Inserire la scheda micro SD (acquistabile separatamente) nello slot,
come illustrato nella gura seguente.
3. Riposizionare il coperchio.
Dopo aver inserito la scheda micro SD, inizializzarla con l'app
EZVIZ prima di utilizzarla.
Rivolgere
verso l'alto
4. Nell'app EZVIZ, nell'interfaccia impostazioni dispositivo toccare
Storage Status (Stato Archivio) per controllare lo stato della scheda
SD.
5. Se lo stato della scheda di memoria è Uninitialized
(Non inizializzato), toccare per inizializzarla.
Lo stato passerà a Normal (Normale) e sarà possibile archiviare
contenuti video.
53
Page 62

2 Installazione della telecamera
La telecamera può essere montata a parete o a sotto. In questo caso
prendiamo il montaggio a parete come esempio.
• Altezza consigliata per l'installazione: 3 m (10 piedi).
• Vericare che la parete/il sotto sia abbastanza resistente da
reggere un peso triplo rispetto a quello della telecamera.
• Non posizionare la telecamera in un'area molto illuminata, per
evitare che la luce colpisca direttamente l'obiettivo.
- Posizionare la dima di foratura sulla supercie scelta per il ssaggio
della telecamera.
- (Solo per pareti/sotti in cemento) Realizzare i fori per le viti usando
la dima e inserire tre tasselli.
- Fissare la telecamera con tre viti metalliche, usando la dima.
Dima di foratura
1
2 3
Tassello Vite metallica
Una volta installata la base rimuovere la dima di foratura, se
necessario.
54
Page 63

3 Regolazione dell'angolo dell'area da sorvegliare
- Allentare la manopola di regolazione.
- Regolare l'angolo di sorveglianza per una visione ottimale della
telecamera.
- Stringere la manopola di regolazione.
Ghiera di regolazione
0-90°
0-360°
Vericare che lo slot per schede micro SD sia rivolto verso il basso.
Per informazioni dettagliate, visitare il sito www.ezvizlife.com.
55
Page 64

Inhoud van de verpakking
of
Wi-camera PoE-camera
Boorsjabloon Schroevenset Waterbestendige set
Voedingsadapter Snelstarthandleiding
• Het uiterlijk van de camera is onder voorbehoud van het model dat u
feitelijk hebt gekocht.
• Dit model PoE-camera bevat geen adapter.
56
Page 65

Algemeen
Wi-camera
Micro-SD-kaartsleuf
(achter het klepje)
Resettoets
Antenne
MIC
Ethernetpoort
Stroomaansluiting
Schijnwerper
Lens
IR-verlichting
LED-indicator
Naam Omschrijving
LED-indicator • Constant rood: Camera wordt opgestart.
• Knippert langzaam rood: Wi-verbinding mislukt.
• Knippert snel rood: Camera-uitzondering
(bijv. micro-SD-kaartfout).
• Constant blauw: Video wordt bekeken in de EZVIZ-app.
• Knippert langzaam blauw: Camera werkt correct.
• Knippert snel blauw: Camera gereed voor wi-
verbinding.
57
Page 66

Algemeen
PoE (Power over Ethernet)-camera
Micro-SD-kaartsleuf
(achter het klepje)
Resettoets
MIC
PoE-poort
Stroomaansluiting
Schijnwerper
Lens
IR-verlichting
LED-indicator
Naam Omschrijving
LED-indicator • Constant rood: Camera wordt opgestart.
• Knippert langzaam rood: Netwerkverbinding mislukt.
• Knippert snel rood: Camera-uitzondering
(bijv. micro-SD-kaartfout).
• Constant blauw: Video wordt bekeken in de EZVIZ-app.
• Knippert langzaam blauw: Camera werkt correct.
58
Page 67

Download de EZVIZ-app
1. Verbind uw mobiele telefoon met wi met behulp van uw 2,4 GHznetwerk.
2. Zoek naar “EZVIZ” in App Store of Google PlayTM.
3. Download en installeer de EZVIZ-app.
4. Start de app en maak een EZVIZ-gebruikersaccount aan.
Installatie
Volg de volgende stappen om uw camera in te stellen:
1. Zet de camera aan.
2. Log in op de gebruikersaccount van uw EZVIZ-app.
3. Verbind uw camera met het internet.
4. Voeg uw camera toe aan uw EZVIZ-account.
Uw wi-camera instellen
1 Inschakelen
Stappen:
1. Sluit de adapterkabel aan op de voedingspoort van de camera.
2. Steek de adapter in het stopcontact.
Voedingsadapter
Voedingsuitgang
Als de led snel blauw gaat knipperen, geeft dit aan dat de camera is
ingeschakeld en gereed is voor netwerkconguratie.
59
Page 68

2 Verbinden met internet
• Draadloze verbinding: De camera verbinden met wi. Zie Optie 1.
• Bedrade verbinding: De camera verbinden met een router. Zie Optie 2.
Optie 1: Gebruik de EZVIZ-app om wi te congureren.
Stappen:
1. Log in op uw account met behulp van de EZVIZ-app.
2. Tik in het hoofdscherm op “+” in de rechterbovenhoek om naar de
interface QR-code scannen te gaan.
3. Scan de QR-code op de omslag van de snelstartgids of op de
behuizing van de camera.
4. Volg de wizard van de EZVIZ-app om de wi-conguratie te
voltooien.
Verbind uw camera met de wi waarmee uw mobiele telefoon is
verbonden.
Houd de resetknop 5 seconden ingedrukt om te herstarten en alle
parameters in de standaardwaarden te zetten.
Houd in de volgende gevallen de resetknop 5 seconden ingedrukt:
• De camera kon geen verbinding maken met uw wi-netwerk.
• U wilt een ander wi-netwerk gebruiken.
60
Page 69

Optie 2: Uw wi-camera verbinden met een router.
Stappen:
1. Verbind de camera met de LAN-poort van uw router met behulp van
de ethernetkabel.
Ethernetkabel
Als de led langzaam blauw gaat knipperen, geeft dit aan dat de
camera is verbonden met het internet.
2. Log in op uw account met behulp van de EZVIZ-app.
3. Tik in het hoofdscherm op “+” in de rechterbovenhoek om naar de
interface QR-code scannen te gaan.
4. Scan de QR-code op de omslag van de snelstartgids of op de
behuizing van de camera.
5. Volg het hulpprogramma om de camera toe te voegen aan de
EZVIZ-app.
61
Page 70

Uw PoE-camera instellen
Optie 1: Uw PoE-camera aansluiten op een PoE-switch/NVR.
Stappen:
1. Sluit de ethernetkabel aan op de PoE-poort van uw camera.
2. Sluit het andere uiteinde van de ethernetkabel aan op de PoE-poort
van uw PoE-switch of NVR.
3. Sluit de LAN-poort van uw PoE-switch of NVR met behulp van de
ethernatkabel aan op de LAN-poort van een router.
Router
Voor LAN-poort
Voor PoE-
poort
• Als de led langzaam blauw gaat knipperen, geeft dit aan dat de
camera is verbonden met het internet.
• De PoE-switch, NVR en ethernetkabel zijn niet inbegrepen in het
pakket.
4. Log in op uw account met behulp van de EZVIZ-app.
5. Tik in het hoofdscherm op “+” in de rechterbovenhoek om naar de
interface QR-code scannen te gaan.
6. Scan de QR-code op de omslag van de snelstartgids of op de
behuizing van de camera.
7. Volg het hulpprogramma om de camera toe te voegen aan de
EZVIZ-app.
62
Voor LAN-poort
PoE-switch/NVR
Page 71

Optie 2: Uw PoE-camera verbinden met een router.
Stappen:
1. Sluit de adapterkabel (apart verkrijgbaar) aan op de voedingspoort
van de camera.
2. Steek de adapter in het stopcontact.
3. Sluit de ethernetkabel aan op de PoE-poort van uw camera.
4. Sluit het andere uiteinde van de ethernetkabel aan op de LAN-poort
van een router.
Router
Ethernetkabel
DC 12 V, 1 A
Voedingsadapter
• Als de led langzaam blauw gaat knipperen, geeft dit aan dat de
camera is verbonden met het internet.
• De ethernetkabel is niet inbegrepen in het pakket.
5. Log in op uw account met behulp van de EZVIZ-app.
6. Tik in het hoofdscherm op “+” in de rechterbovenhoek om naar de
interface QR-code scannen te gaan.
7. Scan de QR-code op de omslag van de snelstartgids of op de
behuizing van de camera.
8. Volg het hulpprogramma om de camera toe te voegen aan de
EZVIZ-app.
63
Page 72

Installatie (Optioneel)
1 De micro-SD-kaart plaatsen (optioneel)
1. Verwijder het klepje op de camera.
2. Plaats de micro-SD-kaart (apart verkrijgbaar) in de kaartsleuf, zoals
weergegeven in de onderstaande afbeelding.
3. Plaats het klepje terug.
Nadat u de micro-SD-kaart hebt geplaatst, dient u de kaart voor
gebruik in de EZVIZ-app te initialiseren.
Deze kant
naar boven
4. Tik in de EZVIZ-app op Storage Status (Opslagstatus) in de
interface apparaatinstellingen om de status van de SD-kaart te
controleren.
5. Als de status van de geheugenkaart als Uninitialized (Niet
geïnitialiseerd) wordt weergegeven, tikt u om hem te initialiseren.
De status zal vervolgens wijzigen naar Normal (Normaal) en video's
opslaan.
64
Page 73

2 De camera installeren
De camera kan aan de muur of het plafond worden gemonteerd. Hier
gebruiken we het monteren aan een muur als voorbeeld.
• Aanbevolen installatiehoogte: 3 m.
• Zorg ervoor dat de muur of het plafond stevig genoeg is om drie
keer het gewicht van de camera te houden.
• Plaats de camera niet op een plek waar veel licht rechtstreeks in
de cameralens schijnt.
- Plaats het boorsjabloon op het oppervlak waarop u de camera wilt
monteren.
- (Uitsluitend voor cementen muur/plafond) Boor schroefgaten
overeenkomstig het sjabloon en steek er drie ankers in.
- Gebruik drie metalen schroeven om de camera overeenkomstig het
sjabloon vast te zetten.
Boorsjabloon
1
2 3
Anker Metalen schroef
Verwijder indien nodig de boorsjabloon nadat de basis is
geïnstalleerd.
65
Page 74

3 Pas de bewakingshoek aan
- Draai de instelknop los.
- Pas de bewakingshoek aan voor het beste zicht van uw camera.
- Draai de instelknop vast.
Instelknop
0 - 90°
0 - 360°
Zorg dat de micro-SD-kaartsleuf naar beneden is gericht.
Bezoek voor meer informatie www.ezvizlife.com.
66
Page 75

Zawartość pakietu z produktem
lub
Kamera Wi-Fi Kamera PoE
Szablon otworów Zestaw wkrętów Zestaw uszczelniający
Zasilacz Podręcznik Szybkie wprowadzenie
• Wygląd kamery jest zależny od modelu.
• Zasilacz nie jest dostarczany z kamerą PoE.
67
Page 76

Podstawowe informacje
Kamera Wi-Fi
Gniazdo karty
microSD
(pod pokrywą)
Przycisk
resetowania
Antena
Mikrofon
Złącze Ethernet
Złącze zasilania
Lampa
Obiektyw
Promiennik
podczerwieni
Wskaźnik
Nazwa Opis
Wskaźnik • Włączony (czerwony): uruchamianie kamery.
• Miga powoli (czerwony): połączenie Wi-Fi nie powiodło się.
• Miga szybko (czerwony): błąd kamery (np. błąd karty
microSD).
• Włączony (niebieski): wideo jest wyświetlane w aplikacji
EZVIZ.
• Miga powoli (niebieski): kamera działa prawidłowo.
• Miga szybko (niebieski): kamera jest gotowa do ustanowienia
połączenia Wi-Fi.
68
Page 77

Podstawowe informacje
Kamera PoE (Power over Ethernet)
Gniazdo karty microSD
(pod pokrywą)
Przycisk resetowania
Mikrofon
Złącze PoE
Złącze zasilania
Lampa
Obiektyw
Promiennik podczerwieni
Wskaźnik
Nazwa Opis
Wskaźnik • Włączony (czerwony): uruchamianie kamery.
• Miga powoli (czerwony): połączenie sieciowe
nie powiodło się.
• Miga szybko (czerwony): błąd kamery (np. błąd karty
microSD).
• Włączony (niebieski): wideo jest wyświetlane w aplikacji
EZVIZ.
• Miga powoli (niebieski): kamera działa prawidłowo.
69
Page 78

Pobieranie aplikacji EZVIZ
1. Połącz telefon komórkowy z siecią Wi-Fi 2,4 GHz.
2. Wyszukaj „EZVIZ” w witrynie internetowej App Store lub Google
PlayTM.
3. Pobierz i zainstaluj aplikację EZVIZ.
4. Uruchom aplikację i zarejestruj konto użytkownika EZVIZ.
Konguracja
Wykonaj poniższe kroki, aby skongurować kamerę:
1. Włącz zasilanie kamery.
2. Zaloguj się do konta użytkownika aplikacji EZVIZ.
3. Połącz kamerę z Internetem.
4. Dodaj kamerę do swojego konta EZVIZ.
Kongurowanie kamery Wi-Fi
1 Podłączanie zasilania
Kroki:
1. Podłącz przewód zasilacza do złącza zasilania kamery.
2. Podłącz zasilacz do gniazda sieci elektrycznej.
Zasilacz
Szybkie miganie niebieskiego wskaźnika oznacza, że kamera jest
włączona i gotowa do konguracji sieci.
70
Gniazdo sieci
elektrycznej
Page 79

2 Ustanawianie połączenia z Internetem
• Połączenie bezprzewodowe: Połącz kamerę z siecią Wi-Fi. Zobacz Opcja 1.
• Połączenie przewodowe: Połącz kamerę z routerem. Zobacz Opcja 2.
Opcja 1: skonguruj połączenie Wi-Fi przy użyciu aplikacji EZVIZ.
Kroki:
1. Zaloguj się do swojego konta przy użyciu aplikacji EZVIZ.
2. Na ekranie głównym naciśnij przycisk „+” znajdujący się w prawym
górnym rogu, aby przejść do strony skanowania kodów QR.
3. Zeskanuj kod QR znajdujący się na okładce podręcznika Szybkie
wprowadzenie lub na korpusie kamery.
4. Postępuj zgodnie z instrukcjami wyświetlanymi w kreatorze aplikacji
EZVIZ, aby zakończyć kongurację Wi-Fi.
Wybierz połączenie kamery z siecią Wi-Fi, z którą jest połączony
Twój telefon komórkowy.
Naciśnij przycisk resetowania i przytrzymaj go przez 5 s,
aby ponownie uruchomić urządzenie i ustawić wartości domyślne
wszystkich parametrów.
W następujących sytuacjach naciśnij przycisk resetowania
i przytrzymaj go przez 5 s:
• Nie można połączyć kamery z siecią Wi-Fi.
• Konieczne jest użycie innej sieci Wi-Fi.
71
Page 80

Opcja 2: połącz kamerę Wi-Fi z routerem.
Kroki:
1. Podłącz kamerę do złącza LAN routera przewodem Ethernet.
Przewód Ethernet
Powolne miganie niebieskiego wskaźnika oznacza, że kamera jest
połączona z Internetem.
2. Zaloguj się do swojego konta przy użyciu aplikacji EZVIZ.
3. Na ekranie głównym naciśnij przycisk „+” znajdujący się w prawym
górnym rogu, aby przejść do strony skanowania kodów QR.
4. Zeskanuj kod QR znajdujący się na okładce podręcznika Szybkie
wprowadzenie lub na korpusie kamery.
5. Postępuj zgodnie z instrukcjami kreatora, aby dodać kamerę
do aplikacji EZVIZ.
72
Page 81

Kongurowanie kamery PoE
Opcja 1: podłącz kamerę PoE do przełącznika / rejestratora
NVR PoE.
Kroki:
1. Podłącz przewód Ethernet do złącza PoE kamery.
2. Podłącz drugie zakończenie przewodu Ethernet do złącza PoE
przełącznika lub rejestratora NVR PoE.
3. Podłącz złącze LAN przełącznika lub rejestratora NVR PoE
ze złączem LAN routera przewodem Ethernet.
Router
Do złącza LAN
Do złącza PoE Do złącza LAN
Przełącznik /
rejestrator NVR PoE
• Powolne miganie niebieskiego wskaźnika oznacza, że kamera
jest połączona z Internetem.
• Pakiet nie zawiera przełącznika PoE, rejestratora NVR
ani przewodu Ethernet.
4. Zaloguj się do swojego konta przy użyciu aplikacji EZVIZ.
5. Na ekranie głównym naciśnij przycisk „+” znajdujący się w prawym
górnym rogu, aby przejść do strony skanowania kodów QR.
6. Zeskanuj kod QR znajdujący się na okładce podręcznika Szybkie
wprowadzenie lub na korpusie kamery.
7. Postępuj zgodnie z instrukcjami kreatora, aby dodać kamerę
do aplikacji EZVIZ.
73
Page 82

Opcja 2: połącz kamerę PoE z routerem.
Kroki:
1. Podłącz przewód zasilacza (sprzedawany oddzielnie) do złącza
zasilania kamery.
2. Podłącz zasilacz do gniazda sieci elektrycznej.
3. Podłącz przewód Ethernet do złącza PoE kamery.
4. Podłącz drugie zakończenie przewodu Ethernet do złącza LAN
routera.
Router
Przewód Ethernet
12 V DC, 1 A
Zasilacz
• Powolne miganie niebieskiego wskaźnika oznacza, że kamera
jest połączona z Internetem.
• Pakiet nie zawiera przewodu Ethernet.
5. Zaloguj się do swojego konta przy użyciu aplikacji EZVIZ.
6. Na ekranie głównym naciśnij przycisk „+” znajdujący się w prawym
górnym rogu, aby przejść do strony skanowania kodów QR.
7. Zeskanuj kod QR znajdujący się na okładce podręcznika Szybkie
wprowadzenie lub na korpusie kamery.
8. Postępuj zgodnie z instrukcjami kreatora, aby dodać kamerę
do aplikacji EZVIZ.
74
Page 83

Instalacja (opcjonalna)
1 Instalowanie karty microSD (opcjonalne)
1. Zdejmij pokrywę kamery.
2. Umieść kartę microSD (sprzedawaną oddzielnie) w gnieździe karty,
jak pokazano na poniższym rysunku.
3. Zamocuj pokrywę.
Aby korzystać z zainstalowanej karty microSD, należy
ją zainicjować w aplikacji EZVIZ.
Tą stroną
do góry
4. W aplikacji EZVIZ naciśnij opcję Storage Status (Stan pamięci)
w oknie ustawienia urządzenia, aby sprawdzić stan karty SD.
5. Jeżeli wyświetlany jest stan karty pamięci
Uninitialized(Niezainicjowana), naciśnij przycisk, aby ją zainicjować.
Stan zostanie zmieniony na Normal (Normalny) i możliwy będzie
zapis nagrań wideo.
75
Page 84

2 Instalowanie kamery
Kamerę można zamocować na ścianie lub sucie. W tym przykładzie
wybrano montaż ścienny.
• Zalecana wysokość instalacji: 3 m.
• Należy upewnić się, że powierzchnia montażowa jest
przystosowana do obciążenia trzykrotnie większego niż ciężar
kamery.
• Nie wolno umieszczać kamery w miejscu, w którym intensywne
światło będzie skierowane bezpośrednio na obiektyw kamery.
- Umieść szablon otworów w miejscu, w którym kamera zostanie
zamocowana.
- (Tylko ściany/suty cementowe) Wywierć otwory zgodnie
z szablonem i umieść w nich trzy kołki rozporowe na wkręty.
- Przymocuj kamerę trzema metalowymi wkrętami zgodnie
z szablonem.
Szablon otworów
1
2 3
Kołek
rozporowy
Po przymocowaniu podstawy można usunąć szablon otworów.
Wkręt metalowy
76
Page 85

3 Regulacja kąta monitorowania
- Poluzuj pokrętło regulacyjne.
- Dostosuj kąt monitorowania, aby uzyskać najlepszy obraz z kamery.
- Dokręć pokrętło regulacyjne.
Pokrętło regulacyjne
0–90°
0–360°
Upewnij się, że gniazdo karty microSD jest skierowane w dół.
Aby uzyskać więcej informacji, skorzystaj z witryny internetowej
www.ezvizlife.com.
77
Page 86

Περιεχόμενα συσκευασίας
ή
Κάμερα Wi-Fi Κάμερα PoE
Πρότυπο διάτρησης Σετ βιδών
Τροφοδοτικό Οδηγός γρήγορης εκκίνησης
• Η εμφάνιση της κάμερας εξαρτάται από το μοντέλο που αγοράσατε.
• Το τροφοδοτικό δεν περιλαμβάνεται με το μοντέλο κάμερας PoE.
Στεγανωτικός
δακτύλιος
78
Page 87

Βασικά
Κάμερα Wi-Fi
Όνομα Περιγραφή
Ενδεικτική
λυχνία LED
• Ανάβει σταθερά με κόκκινο χρώμα: Γίνεται εκκίνηση της
κάμερας.
• Αναβοσβήνει αργά με κόκκινο χρώμα: Αποτυχία σύνδεσης Wi-Fi.
• Αναβοσβήνει γρήγορα με κόκκινο χρώμα: Εξαίρεση κάμερας
(π.χ. σφάλμα κάρτας Micro SD).
• Ανάβει σταθερά με μπλε χρώμα: Προβολή βίντεο στην
εφαρμογή EZVIZ.
• Αναβοσβήνει αργά με μπλε χρώμα: Η κάμερα λειτουργεί
κανονικά.
• Αναβοσβήνει γρήγορα με μπλε χρώμα: Η κάμερα είναι
έτοιμη για τη σύνδεση Wi-Fi.
79
Θύρα κάρτας Micro
SD (Πίσω από το
κάλυμμα)
Πλήκτρο
Επαναφοράς
Κεραία
MIC
Θύρα Ethernet
Θύρα τροφοδοσίας
Προβολέας
Φακός
Υπέρυθρη λυχνία
Ενδεικτική λυχνία
LED
Page 88

Βασικά
Κάμερα PoE (Power over Ethernet)
Όνομα Περιγραφή
Ενδεικτική
λυχνία LED
• Ανάβει σταθερά με κόκκινο χρώμα: Γίνεται εκκίνηση
της κάμερας.
• Αναβοσβήνει αργά με κόκκινο χρώμα: Η σύνδεση
δικτύου απέτυχε.
• Αναβοσβήνει γρήγορα με κόκκινο χρώμα: Εξαίρεση
κάμερας (π.χ. σφάλμα κάρτας Micro SD).
• Ανάβει σταθερά με μπλε χρώμα: Προβολή βίντεο στην
εφαρμογή EZVIZ.
• Αναβοσβήνει αργά με μπλε χρώμα: Η κάμερα
λειτουργεί κανονικά.
Θύρα κάρτας Micro SD
(Πίσω από το κάλυμμα)
Πλήκτρο Επαναφοράς
MIC
Θύρα PoE
Θύρα τροφοδοσίας
80
Προβολέας
Φακός
Υπέρυθρη λυχνία
Ενδεικτική λυχνία LED
Page 89

Λήψη της εφαρμογής EZVIZ
1. Συνδέστε το κινητό τηλέφωνό σας στο Wi-Fi χρησιμοποιώντας το
δίκτυο 2.4GHz.
2. Αναζητήστε τον όρο «EZVIZ» στο App Store ή στο Google PlayTM.
3. Κατεβάστε και εγκαταστήστε την εφαρμογή EZVIZ.
4. Εκκινήστε την εφαρμογή και δημιουργήστε έναν λογαριασμό
χρήστη EZVIZ.
Ρύθμιση
Ακολουθήστε τα παρακάτω βήματα για να ρυθμίσετε την
κάμερά σας:
1. Ενεργοποιήστε την κάμερα.
2. Συνδεθείτε στον λογαριασμό χρήστη σας στην εφαρμογή EZVIZ.
3. Συνδέστε την κάμερά σας στο διαδίκτυο.
4. Προσθέστε την κάμερά σας στον λογαριασμό σας EZVIZ.
Πώς μπορείτε να ρυθμίσετε την κάμερα Wi-Fi σας;
1 Ενεργοποίηση
Βήματα:
1. Συνδέστε το καλώδιο του τροφοδοτικού στη θύρα τροφοδοσίας
της κάμερας.
2. Συνδέστε το τροφοδοτικό σε μια πρίζα.
Τροφοδοτικό
Πρίζα
Όταν το LED αναβοσβήνει γρήγορα με μπλε χρώμα, η κάμερα είναι
ενεργοποιημένη και έτοιμη για ρύθμιση παραμέτρων δικτύου.
81
Page 90

2 Σύνδεση στο διαδίκτυο
• Ασύρματη σύνδεση: Συνδέστε την κάμερα στο Wi-Fi. Ανατρέξτε στην
Επιλογή 1.
• Ενσύρματη σύνδεση: Συνδέστε την κάμερα σε δρομολογητή.
Ανατρέξτε στην Επιλογή 2.
Επιλογή 1: Χρησιμοποιήστε την εφαρμογή EZVIZ για να
ρυθμίσετε τις παραμέτρους του Wi-Fi.
Βήματα:
1. Συνδεθείτε στο λογαριασμό σας από την εφαρμογή EZVIZ.
2. Στην αρχική οθόνη, πατήστε «+» στην πάνω δεξιά γωνία για να
μεταβείτε στη σελίδα σάρωσης κωδικού QR.
3. Σαρώστε τον κώδικα QR στο εξώφυλλο του Οδηγού γρήγορης
εκκίνησης ή στο σώμα της κάμερας.
4. Ακολουθήστε τον οδηγό της εφαρμογής EZVIZ για να
ολοκληρώσετε τη ρύθμιση παραμέτρων Wi-Fi.
Επιλέξτε να συνδέσετε την κάμερά σας στο Wi-Fi στο οποίο έχει
συνδεθεί το κινητό σας τηλέφωνο.
Πατήστε παρατεταμένα για 5 δευτερόλεπτα το πλήκτρο
επαναφοράς για επανεκκίνηση και ρύθμιση όλων των
παραμέτρων στις προεπιλογές.
Πατήστε παρατεταμένα το πλήκτρο Επαναφοράς για
5 δευτερόλεπτα σε οποιαδήποτε από τις παρακάτω περιπτώσεις:
• Η κάμερα αδυνατεί να συνδεθεί στο δίκτυο Wi-Fi σας.
• Θέλετε να επιλέξετε άλλο δίκτυο Wi-Fi.
82
Page 91

Επιλογή 2: Συνδέστε την κάμερα Wi-Fi σας σε δρομολογητή.
Βήματα:
1. Συνδέστε την κάμερα στη θύρα LAN του δρομολογητή σας με το
καλώδιο Ethernet.
Καλώδιο Ethernet
Το LED που αρχίζει να αναβοσβήνει αργά με μπλε χρώμα
υποδηλώνει ότι η κάμερα έχει συνδεθεί στο διαδίκτυο.
2. Συνδεθείτε στο λογαριασμό σας από την εφαρμογή EZVIZ.
3. Στην αρχική οθόνη, πατήστε «+» στην πάνω δεξιά γωνία για να
μεταβείτε στη σελίδα σάρωσης κωδικού QR.
4. Σαρώστε τον κώδικα QR στο εξώφυλλο του Οδηγού γρήγορης
εκκίνησης ή στο σώμα της κάμερας.
5. Ακολουθήστε τον οδηγό για να προσθέσετε την κάμερα στην
εφαρμογή EZVIZ.
83
Page 92

Πώς μπορείτε να ρυθμίσετε την κάμερα PoE σας;
Επιλογή 1: Συνδέστε την κάμερα PoE σε έναν διακόπτη/NVR
PoE.
Βήματα:
1. Συνδέστε το καλώδιο Ethernet στη θύρα PoE της κάμεράς σας.
2. Συνδέστε το άλλο άκρο του καλωδίου Ethernet στη θύρα PoE του
διακόπτη ή NVR PoE.
3. Συνδέστε τη θύρα LAN του διακόπτη ή NVR PoE στη θύρα LAN
ενός δρομολογητή, μέσω του καλωδίου Ethernet.
Δρομολογητής
Για θύρα LAN
Για θύρα PoE Για θύρα LAN
Διακόπτης PoE/
NVR
• Το LED που αρχίζει να αναβοσβήνει αργά με μπλε χρώμα
υποδηλώνει ότι η κάμερα έχει συνδεθεί στο διαδίκτυο.
• Ο διακόπτης PoE, το NVR και το καλώδιο Ethernet
περιλαμβάνονται στη συσκευασία.
4. Συνδεθείτε στο λογαριασμό σας από την εφαρμογή EZVIZ.
5. Στην αρχική οθόνη, πατήστε «+» στην πάνω δεξιά γωνία για να
μεταβείτε στη σελίδα σάρωσης κωδικού QR.
6. Σαρώστε τον κώδικα QR στο εξώφυλλο του Οδηγού γρήγορης
εκκίνησης ή στο σώμα της κάμερας.
7. Ακολουθήστε τον οδηγό για να προσθέσετε την κάμερα στην
εφαρμογή EZVIZ.
84
Page 93

Επιλογή 2: Συνδέστε την κάμερα PoE σε έναν δρομολογητή.
Βήματα:
1. Συνδέστε το καλώδιο του τροφοδοτικού (πωλείται ξεχωριστά)
στη θύρα τροφοδοσίας της κάμερας.
2. Συνδέστε το τροφοδοτικό σε μια πρίζα.
3. Συνδέστε το καλώδιο Ethernet στη θύρα PoE της κάμεράς σας.
4. Συνδέστε το άλλο άκρο του καλωδίου Ethernet στη θύρα LAN ενός
δρομολογητή.
Δρομολογητής
Καλώδιο Ethernet
DC12V 1A
Τροφοδοτικό
• Το LED που αρχίζει να αναβοσβήνει αργά με μπλε χρώμα
υποδηλώνει ότι η κάμερα έχει συνδεθεί στο διαδίκτυο.
• Το καλώδιο Ethernet δεν περιλαμβάνεται στη συσκευασία.
5. Συνδεθείτε στο λογαριασμό σας από την εφαρμογή EZVIZ.
6. Στην αρχική οθόνη, πατήστε «+» στην πάνω δεξιά γωνία για να
μεταβείτε στη σελίδα σάρωσης κωδικού QR.
7. Σαρώστε τον κώδικα QR στο εξώφυλλο του Οδηγού γρήγορης
εκκίνησης ή στο σώμα της κάμερας.
8. Ακολουθήστε τον οδηγό για να προσθέσετε την κάμερα στην
εφαρμογή EZVIZ.
85
Page 94

Εγκατάσταση (προαιρετικά)
1 Τοποθετήστε την κάρτα Micro SD (Προαιρετικό)
1. Αφαιρέστε το κάλυμμα από την κάμερα.
2. Τοποθετήστε την κάρτα micro SD (πωλείται ξεχωριστά) στη θύρα
κάρτας, όπως φαίνεται στην παρακάτω εικόνα.
3. Επανατοποθετήστε το κάλυμμα.
Αφού τοποθετήστε την κάρτα micro SD, αρχικοποιήστε την στην
εφαρμογή EZVIZ, πριν τη χρησιμοποιήσετε.
Αυτή η
πλευρά
επάνω
4. Από την εφαρμογή EZVIZ, πατήστε "Storage Status" (Κατάσταση
μνήμης) στο μενού ρυθμίσεις συσκευής για να ελέγξετε την
κατάσταση της κάρτας SD.
5. Αν η κατάσταση της κάρτας μνήμης είναι Uninitialized (Μη
αρχικοποιημένη), πατήστε για να την αρχικοποιήσετε.
Η κατάσταση θα αλλάξει σε «Normal» (Κανονική) και η κάρτα θα
μπορεί να αποθηκεύει βίντεο.
86
Page 95

2 Εγκαταστήστε την κάμερα
Η κάμερα μπορεί να τοποθετηθεί σε τοίχο ή οροφή. Στο συγκεκριμένο
παράδειγμα χρησιμοποιούμε την τοποθέτηση σε τοίχο.
• Προτεινόμενο ύψος εγκατάστασης: 3 m (10 ίντσες).
• Βεβαιωθείτε ότι ο τοίχος/η οροφή είναι αρκετά ανθεκτικός/-ή
για βάρος τριπλάσιο αυτού της κάμερας.
• Αποφύγετε την τοποθέτηση της κάμερας σε περιοχή με έντονο
φως στραμμένο απευθείας στον φακό της.
- Τοποθετήστε το πρότυπο διάτρησης επάνω στην επιφάνεια που
έχετε επιλέξει να τοποθετήσετε την κάμερα.
- (Μόνο για τοίχους/οροφές από τσιμέντο) Ανοίξτε οπές για τις
βίδες, σύμφωνα με το πρότυπο, και τοποθετήστε τρία ούπα.
- Χρησιμοποιήστε τρεις μεταλλικές βίδες για να στερεώσετε την
κάμερα σύμφωνα με το πρότυπο.
Πρότυπο διάτρησης
1
2 3
Ούπα Μεταλλική βίδα
Σκίστε το πρότυπο διάτρησης αφού τοποθετηθεί η βάση, εάν
είναι απαραίτητο.
87
Page 96

3 Προσαρμόστε τη γωνία παρακολούθησης
- Ξεβιδώστε τη βίδα προσαρμογής.
- Προσαρμόστε τη γωνία παρακολούθησης για βέλτιστη γωνία θέασης
της κάμεράς σας.
- Σφίξτε τη βίδα προσαρμογής.
Βίδα προσαρμογής
0-90°
0-360°
Βεβαιωθείτε ότι η θύρα της κάρτας micro SD είναι στραμμένη
προς τα κάτω.
Για λεπτομερείς πληροφορίες, επισκεφτείτε τη διεύθυνση
www.ezvizlife.com.
88
Page 97

Obsah balení
nebo
Kamera Wi-Fi Kamera PoE
Vrtací šablona Sada šroubů Vodotěsná sada
Napájecí adaptér Stručná příručka
• Vzhled kamery závisí na aktuálním zakoupeném modelu.
• Napájecí adaptér není součástí balení modelu kamery PoE.
89
Page 98

Popis
Kamera Wi-Fi
Slot na kartu Micro
SD (pod krytem)
Tlačítko resetování
Anténa
MIKROFON
Ethernetový port
Port napájení
Bodové osvětlení
Objektiv
Osvětlení IR
Indikátor LED
Název Popis
Indikátor LED • Nepřerušovaná červená: Kamera se spouští.
• Pomalu blikající červená: Připojení k síti Wi-Fi se nezdařilo.
• Rychle blikající červená: Došlo k výjimce kamery (např.
chyba karty Micro SD).
• Nepřerušovaná modrá: Video je sledováno v aplikaci EZVIZ.
• Pomalu blikající modrá: Kamera je v provozu a funguje
správně.
• Rychle blikající modrá: Kamera je připravena k připojení
k síti Wi-Fi.
90
Page 99

Popis
Kamera s PoE (napájením přes ethernet)
Slot na kartu Micro SD
(pod krytem)
Tlačítko resetování
MIKROFON
Port PoE
Port napájení
Bodové osvětlení
Objektiv
Osvětlení IR
Indikátor LED
Název Popis
Indikátor LED • Nepřerušovaná červená: Kamera se spouští.
• Pomalu blikající červená: Připojení k síti se nezdařilo.
• Rychle blikající červená: Došlo k výjimce kamery (např.
chyba karty Micro SD).
• Nepřerušovaná modrá: Video je sledováno v aplikaci
EZVIZ.
• Pomalu blikající modrá: Kamera je v provozu a funguje
správně.
91
Page 100

Získání aplikace EZVIZ
1. Připojte mobilní telefon k síti Wi-Fi pomocí 2,4GHz sítě.
2. V obchodech App Store nebo Google PlayTM vyhledejte aplikaci
zadáním textu „EZVIZ“.
3. Stáhněte a nainstalujte aplikaci EZVIZ.
4. Spusťte aplikaci a zaregistrujte svůj uživatelský účet EZVIZ.
Instalace
Postupujte podle pokynů k nastavení kamery:
1. Zapněte kameru.
2. Přihlaste se do svého uživatelského účtu aplikace EZVIZ.
3. Připojte kameru k internetu.
4. Přidejte kameru ke svému účtu EZVIZ.
Jak nastavit kameru Wi-Fi?
1 Zapnutí
Kroky:
1. Připojte kabel napájecího adaptéru k portu napájení kamery.
2. Zapojte napájecí adaptér do elektrické zásuvky.
Napájecí adaptér
Rychle blikající modrý indikátor LED indikuje, že kamera je zapnutá
a připravená ke konguraci sítě.
92
Elektrická
zásuvka
 Loading...