

Ezviz C3A+WLB Service Manual

www.ezvizlife.com
NL


COPYRIGHT © 2019 Hangzhou EZVIZ Software Co., Ltd.. ALL RIGHTS RESERVED.
Any and all information, including, among others, wordings, pictures, graphs are the properties of Hangzhou EZVIZ
Software Co., Ltd. (hereinafter referred to be “EZVIZ”). This user manual (hereinafter referred to be “the Manual”) cannot
be reproduced, changed, translated, or distributed, partially or wholly, by any means, without the prior written permission
of EZVIZ. Unless otherwise stipulated, EZVIZ does not make any warranties, guarantees or representations, express or
implied, regarding to the Manual.
About this Manual
The Manual includes instructions for using and managing the product. Pictures, charts, images and all other information
hereinafter are for description and explanation only. The information contained in the Manual is subject to change,
without notice, due to firmware updates or other reasons. Please find the latest version in the
(http://www.ezvizlife.com).
Revision Record
New release – January, 2019
Trademarks Acknowledgement
™, ™, and other EZVIZ’s trademarks and logos are the properties of EZVIZ in various jurisdictions.
Other trademarks and logos mentioned below are the properties of their respective owners.
Legal Disclaimer
TO THE MAXIMUM EXTENT PERMITTED BY APPLICABLE LAW, THE PRODUCT DESCRIBED, WITH ITS HARDWARE,
SOFTWARE AND FIRMWARE, IS PROVIDED “AS IS”, WITH ALL FAULTS AND ERRORS, AND EZVIZ MAKES NO WARRANTIES,
EXPRESS OR IMPLIED, INCLUDING WITHOUT LIMITATION, MERCHANTABILITY, SATISFACTORY QUALITY, FITNESS FOR A
PARTICULAR PURPOSE, AND NON-INFRINGEMENT OF THIRD PARTY. IN NO EVENT WILL EZVIZ, ITS DIRECTORS, OFFICERS,
EMPLOYEES, OR AGENTS BE LIABLE TO YOU FOR ANY SPECIAL, CONSEQUENTIAL, INCIDENTAL, OR INDIRECT DAMAGES,
INCLUDING, AMONG OTHERS, DAMAGES FOR LOSS OF BUSINESS PROFITS, BUSINESS INTERRUPTION, OR LOSS OF DATA
OR DOCUMENTATION, IN CONNECTION WITH THE USE OF THIS PRODUCT, EVEN IF EZVIZ HAS BEEN ADVISED OF THE
POSSIBILITY OF SUCH DAMAGES.
TO THE MAXIMUM EXTENT PERMITTED BY APPLICABLE LAW, IN NO EVENT SHALL EZVIZ’S TOTAL LIABILITY FOR ALL
DAMAGES EXCEED THE ORIGINAL PURCHASE PRICE OF THE PRODUCT.
EZVIZ DOES NOT UNDERTAKE ANY LIABILITY FOR PERSONAL INJURY OR PROPERTY DAMAGE AS THE RESULT OF PRODUCT
INTERRUPTION OR SERVICE TERMINATION CAUSED BY: A) IMPROPER INSTALLATION OR USAGE OTHER THAN AS
REQUESTED; B) THE PROTECTION OF NATIONAL OR PUBLIC INTERESTS; C) FORCE MAJEURE; D) YOURSELF OR THE THIRD
PARTY, INCLUDING WITHOUT LIMITATION, USING ANY THIRD PARTY’S PRODUCTS, SOFTWARE, APPLICATIONS, AND AMONG
OTHERS.
REGARDING TO THE PRODUCT WITH INTERNET ACCESS, THE USE OF PRODUCT SHALL BE WHOLLY AT YOUR OWN RISKS.
EZVIZ SHALL NOT TAKE ANY RESPONSIBILITES FOR ABNORMAL OPERATION, PRIVACY LEAKAGE OR OTHER DAMAGES
RESULTING FROM CYBER ATTACK, HACKER ATTACK, VIRUS INSPECTION, OR OTHER INTERNET SECURITY RISKS; HOWEVER,
EZVIZ WILL PROVIDE TIMELY TECHNICAL SUPPORT IF REQUIRED.
SURVEILLANCE LAWS AND DATA PROTECTION LAWS VARY BY JURISDICTION. PLEASE CHECK ALL RELEVANT LAW S IN YOUR
™ website

JURISDICTION BEFORE USING THIS PRODUCT IN ORDER TO ENSURE THAT YOUR USE CONFORMS TO THE APPLICABLE LAW.
EZVIZ SHALL NOT BE LIABLE IN THE EVENT THAT THIS PRODUCT IS USED WITH ILLEGITIMATE PURPOSES.
IN THE EVENT OF ANY CONFLICTS BETWEEN THE ABOVE AND THE APPLICABLE LAW, THE LATTER PREVAILS.
Regulatory Information
FCC Information
This device complies with Part 15 of the FCC Rules. Operation is subject to the following two conditions:
(1) This device may not cause harmful interference, and
(2) This device must accept any interference received, including interference that may cause undesired operation.
Note: This product has been tested and found to comply with the limits for a Class B digital device, pursuant to Part
15 of the FCC Rules. These limits are designed to provide reasonable protection against harmful interference in a
residential installation. This product generates, uses, and can radiate radio frequency energy and, if not installed and
used in accordance with the instructions, may cause harmful interference to radio communications. However, there is no
guarantee that interference will not occur in a particular installation. If this product does cause harmful interference to
radio or television reception, which can be determined by turning the equipment off and on, the user is encouraged to try
to correct the interference by one or more of the following measures:
—Reorient or relocate the receiving antenna.
—Increase the separation between the equipment and receiver.
—Connect the equipment into an outlet on a circuit different from that to which the receiver is connected.
—Consult the dealer or an experienced radio/TV technician for help.
Please take attention that changes or modification not expressly approved by the party responsible for compliance could
void the user’s authority to operate the equipment.
This equipment should be installed and operated with a minimum distance 20cm between the radiator and your body.
This device complies with Industry Canada licence-exempt RSS standard(s). Operation is subject to the following two
conditions:
(1) this device may not cause interference, and
(2) this device must accept any interference, including interference that may cause undesired operation of the device.
Under Industry Canada regulations, this radio transmitter may only operate using an antenna of a type and maximum (or
lesser) gain approved for the transmitter by Industry Canada. To reduce potential radio interference to other users, the
antenna type and its gain should be so chosen that the equivalent isotropically radiated power (e.i.r.p.) is not more than
that necessary for successful communication.
EU Conformity Statement
This product and - if applicable - the supplied accessories too are marked with "CE" and comply
therefore with the applicable harmonized European standards listed under the Radio Equipment
Directive 2014/53/EU, the EMC Directive 2014/30/EU, the RoHS Directive 2011/65/EU.

2012/19/EU (WEEE directive): Products marked with this symbol cannot be disposed of as unsorted
municipal waste in the European Union. For proper recycling, return this product to your local supplier
upon the purchase of equivalent new equipment, or dispose of it at designated collection points. For
more information see: www.recyclethis.info.
2006/66/EC (battery directive): This product contains a battery that cannot be disposed of as
unsorted municipal waste in the European Union. See the product documentation for specific battery
information. The battery is marked with this symbol, which may include lettering to indicate cadmium
(Cd), lead (Pb), or mercury (Hg). For proper recycling, return the battery to your supplier or to a
designated collection point. For more information see: www.recyclethis.info.
Гарантийный срок-1 год
Срок службы-3 года
Производитель:Ханджоу Хиквижн Диджитал Технолоджи(Китай)
Импортер-поставщик в России: ЗАО ''Хиквижн''
Импортер-поставщик в Республике Беларусь:ООО ''Торговый Дом
''АВАНТ-ТЕХНО''
Сайт:www.ezviz.ru
Use only power supplies listed in the user instructions.
Power Adapter: MSA-C1500IC12.0-18P-DE.
Made by: Moso Power Supply Technology Co.,Ltd.
EC DECLARATION OF CONFORMITY
Hereby, Hangzhou EZVIZ Software Co., Ltd . declares that the radio equipment type [CS-WLB] is in compliance with Directive
2014/53/EU.
The full text of the EC DECLARATION OF CONFORMITY is available at the following web link:
http://www.ezvizlife.com/declaration-of-conformity
Safety Instruction
CAUTION: THE PRODUCT IS BUILT IN A NON REPLACEABLE BATTERY. KEEP THE BATTERY AWAY FROM FIRE AND DO NOT
DAMAGE IT FOR IT MAY EXPLODE. DO NOT REFIT OR DISASSEMBLE THE BATTERY OR USE IT FOR OTHER PURPOSES. DO NOT
SHORT CIRCUIT THE BATTERY, WHICH MAY CAUSE DAMAGE. WHEN THE BATTERY SWELLS OR LEAKS AND ETC., STOP USING
IT AND CONTACT THE DEALER IMMEDIATELY.
.
Due to the product shape and dimension, the name and address of the importer/
manufacturer are printed on the package.
SAVE THIS MANUAL FOR FUTURE REFERENCE

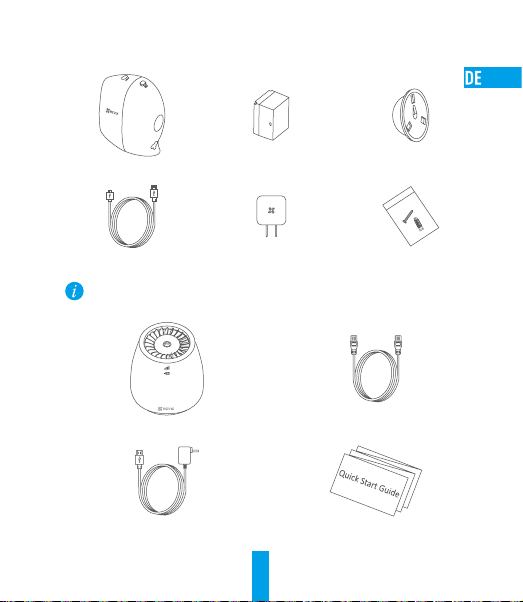
Box Contents
Camera Battery Magnetic Mount
USB Cable Power Adapter Screw Kit
The number of the products above is subject to the actual ones you selected.
Base Station (x1) Network Cable (x1)
Power Adapter (x1) Quick Start Guide (x1)
1

Base Station
Main Button/Main Indicator
Signal Indicator
Battery Indicator
Micro SDMicro SIM
QR Code
Power Button
LAN Interface
WAN Interface
Power Interface
Reset Button
microSIM Card Slot
microSD Card Slot
Name Description
Main Indicator
Main Button
Signal Indicator
Battery Indicator
Power Interface
Power Button
Reset Button
microSD Card
• Solid Green: The system works properly.
• Solid Blue: Device is not connected to internet.
• Flashing Blue: Memory card is Initializing or device starting synchronize with
the camera.
• Off: The base station is turned off.
Press to start synchronize with the camera (The synchronization lasts 2 mins).
• Solid Green: The network is connected.
• Off: The network is disconnected.
• Solid Red: Exception.
• Solid Green: Charged.
• Flashing Green: Charging.
• Solid Amber: Low battery.
For charging the battery or powering up the base station.
Press to connect or cut off power.
Hold for 7 seconds to restart and reset all parameters to default.
• Recommended compatibility: Class 10, Max.128GB.
• Initialize the card in the EZVIZ app before using it..
2

Camera
Microphone
SYNC Button
Lens
LED Indicator
Loudspeaker
PIR
Photoresistor
Power Interface
microSD Card Slot
Name Description
SYNC Button Hold for 5 seconds to get the camera ready for Wi-Fi configuration.
PIR With the PIR (Passive Infrared), the device can detect a human body to determine when
LED Indicator • Solid Red: Camera is starting up.
Photoresistor Detects the environment's light conditions to activate the Day/Night switch function.
microSD Card •Recommended compatibility: Class 10, Max.128GB.
Power Interface For charging the battery or powering up the camera.
there is a possible break in and begins to record footage.
• Solid Blue: Video is being viewed in the EZVIZ app.
• Slow-Flashing Blue: Camera is working.
• Slow-Flashing Red: Camera is charging/Network exception.
• Fast-Flashing Blue: Camera is ready for Wi-Fi configuration.
• Fast-Flashing Red: Exception/Low battery.
• Initialize the card in the EZVIZ app before using it.
3

Setup
Step 1 Insert the Battery into Camera
- Press the button as shown below to open battery cover.
- Insert the battery.
- Close the battery cover.
Please fully charge the battery before the first time use.
Step 2 Charge the Battery
- Connect the camera with power outlet via power adapter (5V 1A).
Use the exclusive charger to charge the battery.
4
Power Adapter
Power Outlet

Step 3 Install microSIM card (Optional)
- Remove the cover at the bottom.
- Insert a microSIM card into the slot until a click.
- Close the cover.
microSIM card
•YoucanusethemicroSIMcard(purchaseseparately)toaccesstotheInternet.
•If your data plan provided by the carrier only includes limited mobile data, communication
duration, etc., please pay attention to the amount of data and/or communication duration when
using this device so as to avoid overuse.
• You can also follow Step 5 to connect it to the Internet via router.
Step 4 Power on the Base Station
- Wait until the main indicator turns to solid green or solid blue.
Power Outlet
12V 1.5A
Power Adapter
Please follow the steps in Access Base Station via the Browser in Page 9 if the Signal indicator
is still unlit after installed a microSIM card and powered on.
Step 5 Connect Base Station to Internet via Network Cable
- Connect the base station to the LAN Interface of your router with the network cable.
5

IPC
ACCESS
Network Cable
Make sure the WAN Interface indicator is on or flashing.
Step 6 Synchronize Base Station with Camera(s)
• Make sure the camera is within 2 feet to 3 feet (0.6 m to 1 m) from the base station.
• Stay away from wireless device or barriers.
• The synchronization process lasts about 2 minutes.
1. Press the main button on the Base Station. The main indicator flashes blue.
2. Press and hold the SYNC button on the camera for 5 seconds. The LED indicator will slowly
flash blue. When flashing blue becomes more rapid and then stops, sync is completed.
Fast-Flashing Blue: Sync completes.
Fast-Flashing Red: Sync failed. Repeat the Sync Process.
You can sync up to 6 cameras to each base station.
6

Step 7 Add the Base Station to Your EZVIZ Account
1. Create an user account.
- Connect your mobile device to the Internet.
- Search “EZVIZ” in App Store or Google PlayTM to download.
- Launch the App and register an EZVIZ user account.
2. Add Base Station to EZVIZ.
- Log in the EZVIZ App.
- At the Home screen, tap “+” on the upper-right corner to go to the scanning QR code interface.
- Scan the QR Code on the base station.
OPEN
- Tap the “Add” button to finish setup. This will take approximately 1 minute.
- Tap “View Camera” to start using and viewing your camera(s) in the mobile app.
7

Camera Installation
Step 1 Pick a clean and flat surface, indoors or outdoors.
• Camera and base station should be within the distance of up to 300 feet (100 m). Stay away
from wireless device or barriers to avoid decreasing the communication distance.
• Your camera provides a 126-degree viewing angle. Position your cameras to make sure the
scene you want to video is in the cameras’ field of view.
• Your camera motion sensor is far more sensitive to side-to-side movement across their
field of view. The best area for motion detection is 5 feet to 25 feet (1.5 to 7.5 m) from the
camera position.
Top View
126°
Step 2 Secure the magnetic mount with the enclosed screw.
Step 3 Mount the camera to the magnetic mount or attach it directly to a magnetic surface.
8

Appendix
Install Memory Card
- Remove the cover at the bottom.
- Insert a microSD card into the microSD card slot until a click.
- Close the cover at the bottom.
microSD Card
Initialize Memory Card
1. In the EZVIZ app, check the memory card status by tapping on the Storage Status in the Device
Settings interface.
2. If the memory card status displays as Uninitialized, tap to initialize it. The status will then change
to Normal.
Access Base Station via the Browser
In your mobile device, look for the Wi-Fi Network named “ezviz_xxxxxx” ,choose the “ezviz_xxxxxx”
network, enter the Wi-Fi password ("Wi-Fi Name"and "Default Password" are listed on the device label)
If the wizard does not pop up, access the web address (wifi.ezvizlife.com) in your Web browser.
For detailed information, please visit www.ezvizlife.com.
9
Lieferumfang
Kamera Akku Magnetfuß
USB-Kabel Netzteil Schraubensatz
Die Anzahl der Artikel oben hängt von Ihrer aktuellen Auswahl ab.
1x Basisstation 1x Netzwerkkabel
1x Netzteil 1x Kurzanleitung
10

Basisstation
Betriebstaste/Betriebsanzeige
Signalanzeige
Akkuanzeige
Name Beschreibung
Betriebsanzeige
Betriebstaste
Signalanzeige
Akkuanzeige
Stromanschluss
Ein/Aus-Taste
Rücksetztaste
microSD-Karte
• Leuchtet Grün: Das System funktioniert ordnungsgemäß.
• Leuchtet Blau: Das Gerät ist nicht mit dem Internet verbunden.
• Blinkt Blau: Die Speicherkarte wird formatiert oder das Gerät startet die
Synchronisation mit der Kamera.
• Aus: Die Basisstation ist ausgeschaltet.
Startet die Synchronisation mit der Kamera (die Synchronisation dauert 2 Minuten).
• Leuchtet Grün: Das Netzwerk ist verbunden.
• Aus: Das Netzwerk ist nicht verbunden.
• Leuchtet Rot: Ausnahme.
• Leuchtet Grün: Aufgeladen.
• Blinkt Grün: Ladezyklus.
• Leuchtet Gelb: Akku schwach.
Aufladen des Akkus oder Versorgen der Basisstation mit Strom.
Ein- oder Ausschalten der Stromversorgung.
Für 7 Sekunden gedrückt halten, um neu zu starten und alle Parameter auf die
Standardwerte zurückzusetzen.
• Empfohlene Kompatibilität: Klasse 10, bis 128 GB.
• Formatieren Sie die Karte vor Gebrauch mit der EZVIZ-App.
QR-Code
Ein/Aus-Taste
LAN-Anschluss
WAN-Anschluss
Stromanschluss
Rücksetztaste
microSIMKartensteckplatz
Micro SDMicro SIM
microSDKartensteckplatz
11

Kamera
Taste „SYNC“
Mikrofon
Objektiv
LEDBetriebsanzeige
Lautsprecher
PIR
Photowiderstand
microSDKartensteckplatz
Stromanschluss
Name Beschreibung
Taste „SYNC“ 5 Sekunden gedrückt halten, dann ist die Kamera zur WLAN-Konfiguration bereit.
PIR Mit der PIR-Funktion (Passiv-Infrarot) kann das Gerät einen menschlichen Körper erkennen, um
LEDBetriebsanzeige
Photowiderstand Erkennt die Lichtverhältnisse der Umgebung zur Aktivierung der Umschaltfunktion für
microSD-Karte • Empfohlene Kompatibilität: Klasse 10, bis 128 GB.
Stromanschluss Zum Laden des Akkus oder zum Einschalten der Kamera.
so einen möglicherweisen Einbruch festzustellen und die Videoaufnahme zu starten.
• Leuchtet Rot: Kamera fährt hoch.
• Leuchtet Blau: Ein Video wird in der EZVIZ-App angezeigt.
• Blinkt langsam Blau: Kamera läuft.
• Blinkt langsam Rot: Kamera wird aufgeladen/Netzwerkfehler.
• Blinkt schnell Blau: Kamera ist zur WLAN-Konfiguration bereit.
• Blinkt schnell Rot: Fehler/Akku schwach.
Tag/Nacht.
• Formatieren Sie die Karte vor Gebrauch mit der EZVIZ-App.
12

Einrichtung
Schritt 1 Akku in die Kamera einsetzen
- Drücken Sie die Taste wie unten dargestellt, um das Akkufach zu öffnen.
- Setzen Sie den Akku ein.
- Schließen Sie das Akkufach.
Laden Sie den Akku vor dem ersten Gebrauch vollständig auf.
Schritt 2 Akku aufladen
- Schließen Sie die Kamera über das Netzteil (5 V, 1 A) an einer Steckdose an.
Verwenden Sie das mitgelieferte Netzteil zum Aufladen des Akkus.
13
Netzteil
Steckdose

Schritt 3 Installieren der microSIM-Karte (optional)
- Entfernen Sie die Abdeckung auf der Unterseite.
- Setzen Sie eine microSIM-Karte im Steckplatz ein, bis sie hörbar einrastet.
- Schließen Sie die Abdeckung.
microSIM-Karte
•Mit einer (separat erhältlichen) microSIM-Karte können Sie auf das Internet zugreifen.
•WennIhrDatentarifnureinbegrenztesMobildatenvolumen,einebeschränkteKommunikationsdauer
usw. umfasst, achten Sie auf die Datenmenge und/oder die Kommunikationsdauer bei der Nutzung
dieses Gerätes, um eine übermäßige Beanspruchung zu vermeiden.
•SiekönnensichauchübereinenRoutermitdemInternetverbinden,sieheSchritt5.
Schritt 4 Einschalten der Basisstation
- Warten Sie, bis die Betriebsanzeige grün oder blau leuchtet.
Steckdose
12 V, 1,5 A.
Netzteil
Wenn die Signalanzeige nicht aufleuchtet, nachdem eine microSIM-Karte installiert und die
Station mit Strom versorgt wurde, beachten Sie die Schritte in „Zugriff auf die Basisstation über
einen Browser“ auf Seite 18.
Schritt 5 Verbinden der Basisstation über ein Netzwerkkabel mit dem Internet
- Verbinden Sie die Basisstation über ein Netzwerkkabel mit dem LAN-Anschluss des Routers.
14

IPC
ACCESS
Netzwerkkabel
Achten Sie darauf, dass die Anzeige des WAN-Anschlusses leuchtet oder blinkt.
Schritt 6 Basisstation mit Kamera (s) synchronisieren
• Stellen Sie sicher, dass sich die Kamera innerhalb von 0,6 m bis 1 m zur Basisstation befindet.
• Halten Sie Abstand zu Drahtlosgeräten oder Hindernissen.
• Der Synchronisierung dauert etwa 2 Minuten.
1. Drücken Sie Betriebstaste auf der Basisstation. Die Betriebsanzeige blinkt blau.
2. Halten Sie die Taste SYNC (Synchronisieren) auf der Kamera für 5 Sekunden gedrückt. Die
LED-Anzeige blinkt langsam blau. Wenn sie schnell blau blinkt und dann erlischt, ist die
Synchronisation abgeschlossen.
Blinkt schnell Blau: Synchronisation abgeschlossen.
Blinkt schnell Rot: Synchronisierung fehlgeschlagen. Wiederholen Sie die Synchronisierung.
Sie können bis zu 6 Kameras mit jeder Basisstation synchronisieren.
15

Schritt 7 Basisstation zu Ihrem EZVIZ-Konto hinzufügen
1. Erstellen Sie ein Benutzerkonto.
- Verbinden Sie Ihr Mobilgerät mit dem Internet.
- Suchen Sie zum Herunterladen „EZVIZ“ im App Store oder bei Google Play
- Starten Sie die App and registrieren Sie ein EZVIZ-Benutzerkonto.
2. Fügen Sie die Basisstation zu EZVIZ hinzu.
- Melden Sie sich bei der EZVIZ-App an.
- Tippen Sie im Startbildschirm oben rechts auf „+“, um in das QR-Code-Scanmenü zu navigieren.
- Scannen Sie den QR-Code auf der Basisstation.
OPEN
- Tippen Sie auf „Add (Hinzufügen)“, um die Einrichtung zu beenden. Dieser Vorgang dauert ca.
1 Minute.
- Tippen Sie auf „View Camera (Kamera anzeigen)“, um Ihre Kamera(s) in der App auf dem
Mobilgerät anzuzeigen.
16
TM
.

Kamera installieren
Schritt 1 Suchen Sie eine saubere und ebene Oberfläche im Innen- oder Außenbereich.
• Kamera und Basisstation müssen sich in einem Abstand von bis zu 100 m zueinander
befinden. Halten Sie Abstand zu Drahtlosgeräten oder Hindernissen, um eine Verringerung des
Kommunikationsabstands zu vermeiden.
• Ihre Kamera bietet einen Betrachtungswinkel von 126°. Richten Sie Ihre Kamera aus, um
sicherzustellen, dass sich die aufzuzeichnende Videoszene im Sichtfeld der Kamera befindet.
• Der Kamera-Bewegungssensor ist bei seitlichen Bewegungen in seinem Sichtfeld viel
empfindlicher. Der beste Bereich für die Bewegungserkennung liegt 1,5 bis 7,5 m von der
Kameraposition.
Draufsicht
126°
Schritt 2 Schrauben Sie den Magnetfuß an.
Schritt 3 Setzen Sie die Kamera auf die Magnethalterung oder befestigen Sie sie direkt an
einer magnetischen Oberfläche.
17

Anhang
Speicherkarte einsetzen
- Entfernen Sie die Abdeckung auf der Unterseite.
- Setzen Sie eine microSD-Karte im microSD-Kartensteckplatz ein, bis sie hörbar einrastet.
- Schließen Sie die Abdeckung auf der Unterseite.
microSD-Karte
Speicherkarte formatieren
1. Prüfen Sie in der EZVIZ-App den Status der Speicherkarte durch Antippen von Storage Status(Speicherstatus)
im Menü Device Settings (Geräteeinstellungen).
2. Wenn der Status der Speicherkarte als Uninitialized (Nicht formatiert) angezeigt wird, tippen Sie
darauf, um sie zu formatieren. Der Status wechselt anschließend zu Normal.
Zugriff auf die Basisstation über einen Browser
Suchen Sie in Ihrem Mobilgerät das WLAN mit dem Namen „ezviz_xxxxxx“, wählen Sie dieses Netzwerk aus, geben
Sie das WLAN-Passwort („WLAN-Name“ und das „Standardpasswort“ ein, wie auf dem Geräteaufkleber angegeben)
Wenn der Assistent sich nicht automatisch öffnet, rufen Sie die Webadresse (wifi.ezvizlife.com)
in Ihrem Webbrowser auf.
Weitere Informationen erhalten Sie auf www.ezvizlife.com.
18

Contenido de la caja
Cámara Batería Soporte magnético
Cable USB Adaptador de corriente Juego de tornillos
El número de los productos anteriores está sujeto a los productos reales que haya adquirido.
1 estación base 1 cable de red
1 adaptador de corriente 1 guía de inicio rápido
19

Estación base
Botón principal/
Indicador principal
Indicador de señal
Indicador de batería
Micro SDMicro SIM
Código QR
Botón de encendido
Conector LAN
Interfaz WAN
Interfaz de alimentación
Botón Reiniciar
Ranura para tarjeta
microSIM
Ranura para tarjeta
microSD
Nombre Descripción
Indicador principal
Botón principal
Indicador de señal
Indicador de batería
Interfaz de alimentación
Botón de encendido
Botón Reiniciar
Tarjeta microSD
• Verde fija: El sistema funciona correctamente.
• Azul fija: El dispositivo no está conectado a Internet.
• Azul intermitente: La tarjeta de memoria se está inicializando o el dispositivo
está iniciando la sincronización con la cámara.
• Apagada: La estación base está apagada.
Púlselo para iniciar la sincronización con la cámara (la sincronización tarda 2 minutos).
• Verde fija: La red está conectada.
• Apagada: La red está desconectada.
• Roja fija: Problema.
• Verde fija: Cargada:
• Verde intermitente: En carga.
• Ámbar fija: Batería baja.
Para cargar la batería o alimentar la estación base.
Púlselo para conectar o interrumpir la alimentación.
Manténgalo pulsado durante 7 segundos para reiniciar y restaurar todos los
parámetros predeterminados.
• Compatibilidad recomendada: clase 10, 128 GB máx.
• Inicialice la tarjeta en la aplicación EZVIZ antes de usarla.
20

Cámara
Botón SINC
Micrófono
Lente
Indicador LED
Altavoz
PIR
Fotorresistencia
Ranura para tarjeta microSD
Interfaz de
alimentación
Nombre Descripción
Botón SINC Mantenga pulsado el botón durante 5 segundos para tener la cámara lista
PIR Con el PIR (infrarrojos pasivos), el aparato puede detectar el cuerpo humano
Indicador LED • Roja fija: la cámara se está iniciando.
Fotorresistencia Detecta las condiciones de luz ambiental para activar la función de luz
Tarjeta microSD • Compatibilidad recomendada: clase 10, 128 GB máx.
Interfaz de alimentación Para cargar la batería o alimentar la cámara.
para la configuración Wi-Fi.
para determinar si hay una posible intrusión y comenzar a grabar imágenes.
• Azul fija: el vídeo se está visionando en la aplicación EZVIZ.
• Azul intermitente lento: la cámara está en funcionamiento.
• Roja intermitente lento: la cámara se está cargando / excepción en la red.
• Azul intermitente rápido: la cámara está lista para la configuración Wi-Fi.
• Rojo intermitente rápido: Excepción / batería baja.
diurna/nocturna.
• Inicialice la tarjeta en la aplicación EZVIZ antes de usarla.
21

Instalación
Paso 1 Insertar la batería en la cámara
- Presione el botón como se indica a continuación para abrir la tapa de la batería.
- Inserte la batería.
- Cierre la tapa de la batería.
Cargue la batería completamente antes de usar la cámara por primera vez.
Paso 2 Cargar la batería
- Conecte la cámara a una toma de corriente mediante el adaptador de corriente (5 V, 1 A).
Use el cargador exclusivo para cargar la batería.
22
Adaptador
de corriente
Toma de
corriente

Paso 3 Inserte la tarjeta microSIM (Opcional)
- Retire la tapa de la parte inferior.
- Inserte la tarjeta microSIM en la ranura hasta encajarla (oirá un chasquido).
- Cierre la tapa.
Tarjeta microSIM
•EsposibleusarlatarjetamicroSIM(alaventaporseparado)paraaccederaInternet.
•Sielplande datosmóvilesdesuproveedorsoloincluyedatos móvileslimitados,duración
limitada de la comunicación, etc., preste atención a la cantidad de datos y/o duración de la
comunicación cuando use este dispositivo para evitar un uso excesivo.
•Tambiénpuedeefectuarelpaso5paraconectarlaaInternetatravésdeunenrutador.
Paso 4 Encienda la estación base
- Espere a que el indicador principal se ilumine en verde fijo o azul fijo.
Toma de
corriente
12 V; 1,5 A
Adaptador de corriente
Siga los pasos indicados en el párrafo Acceder a la estación base mediante el navegador, en la
página 27, en el caso de que el indicador de señal permanezca apagado tras instalar una tarjeta
microSIM y encender el dispositivo.
Paso 5 Conecte la estación base a Internet mediante el cable de red
- Conecte la estación base al conector LAN de su enrutador usando un cable de red.
23

IPC
ACCESS
Cable de red
Asegúrese de que el indicador de la interfaz WAN esté encendido o parpadeando.
Paso 6 Sincronizar la estación base con las cámaras
• Asegúrese de que la cámara esté entre 0,6 m y 1 m (2’ a 3’) de la estación base.
• Permanezca alejado de cualquier dispositivo inalámbrico u obstáculo.
• El proceso de sincronización dura aproximadamente 2 minutos.
1. Pulse el botón principal de la estación base. El indicador principal parpadeará en azul.
2. Mantenga pulsado el botón SINCRONIZAR de la cámara durante 5 segundos. El indicador
LED parpadeará lentamente en azul. Cuando empiece a parpadear más rápidamente y se
detenga, la sincronización habrá finalizado.
Azul intermitente rápido: Sincronización completada.
Rojo intermitente rápido: Error en la sincronización. Repita el proceso de sincronización.
Es posible sincronizar hasta 6 cámaras con cada estación base.
24

Paso 7 Agregar la estación base a su cuenta de EZVIZ
1. Cree una cuenta de usuario.
- Conecte su dispositivo móvil a Internet.
- Busque la aplicación "EZVIZ" en la App Store o en la Google Play Store
- Inicie la aplicación y registre una cuenta de usuario EZVIZ.
2. Agregue la estación base a EZVIZ.
- Inicie sesión en la app EZVIZ.
- En la pantalla de inicio, pulse "+" en la esquina superior derecha para acceder a la
interfaz de escaneo del código QR.
- Escanee el código QR de la estación base.
OPEN
- Toque botón “Add” (Agregar) para finalizar la configuración. Tardará aproximadamente 1 minuto.
- Toque en “View Camera” (Ver cámara) para comenzar a utilizar y ver sus cámaras en la
aplicación móvil.
25
TM
y descárguela.
 Loading...