

Page 1
K P
ELE CTR ONI C DEA DB LT LOCKO
1
2
3
4
5
6
7
8
9
0
USER MANUAL
Product : KEYPAD ELECTRONIC DEADBOLT LOCK
Purchase Date :
Limited Warranty Statements
1. Warranty
Tong Lung Metal Industry Co., Ltd. (hereafter “TL”) warrants the Product to be free
from defects in material and workmanship for a period of 12 months
from the original date of purchase.
If you discover a defect in the Product covered by this warranty, we will repair or
replace the item at our option using new or refurbished components.
2. Exclusions
This warranty covers defects in manufacturing discovered while using the
Products as recommended by TL rather than occurred by the act of God,
and damages caused by misuse, abuse, and unauthorized modification.
3. Limited of Liability
TL will not be held liable for incidental or consequential losses or damages
to any act of God.
4. Reminder
Service requirement shall subject to the presentation of this warrant card
and defective parts to the manufacture TL.
The warranty card will not be reissued if lost.
TONG LUNG METAL INDUSTRY CO., LTD.
62, Chu ng Hsia o 1st Str eet, Hou -Hu-L i, Chia -Yi 600. Taiwan, R .O.C.
TEL : 886 -5-27 70017 FAX : 8 86-5- 27673 92
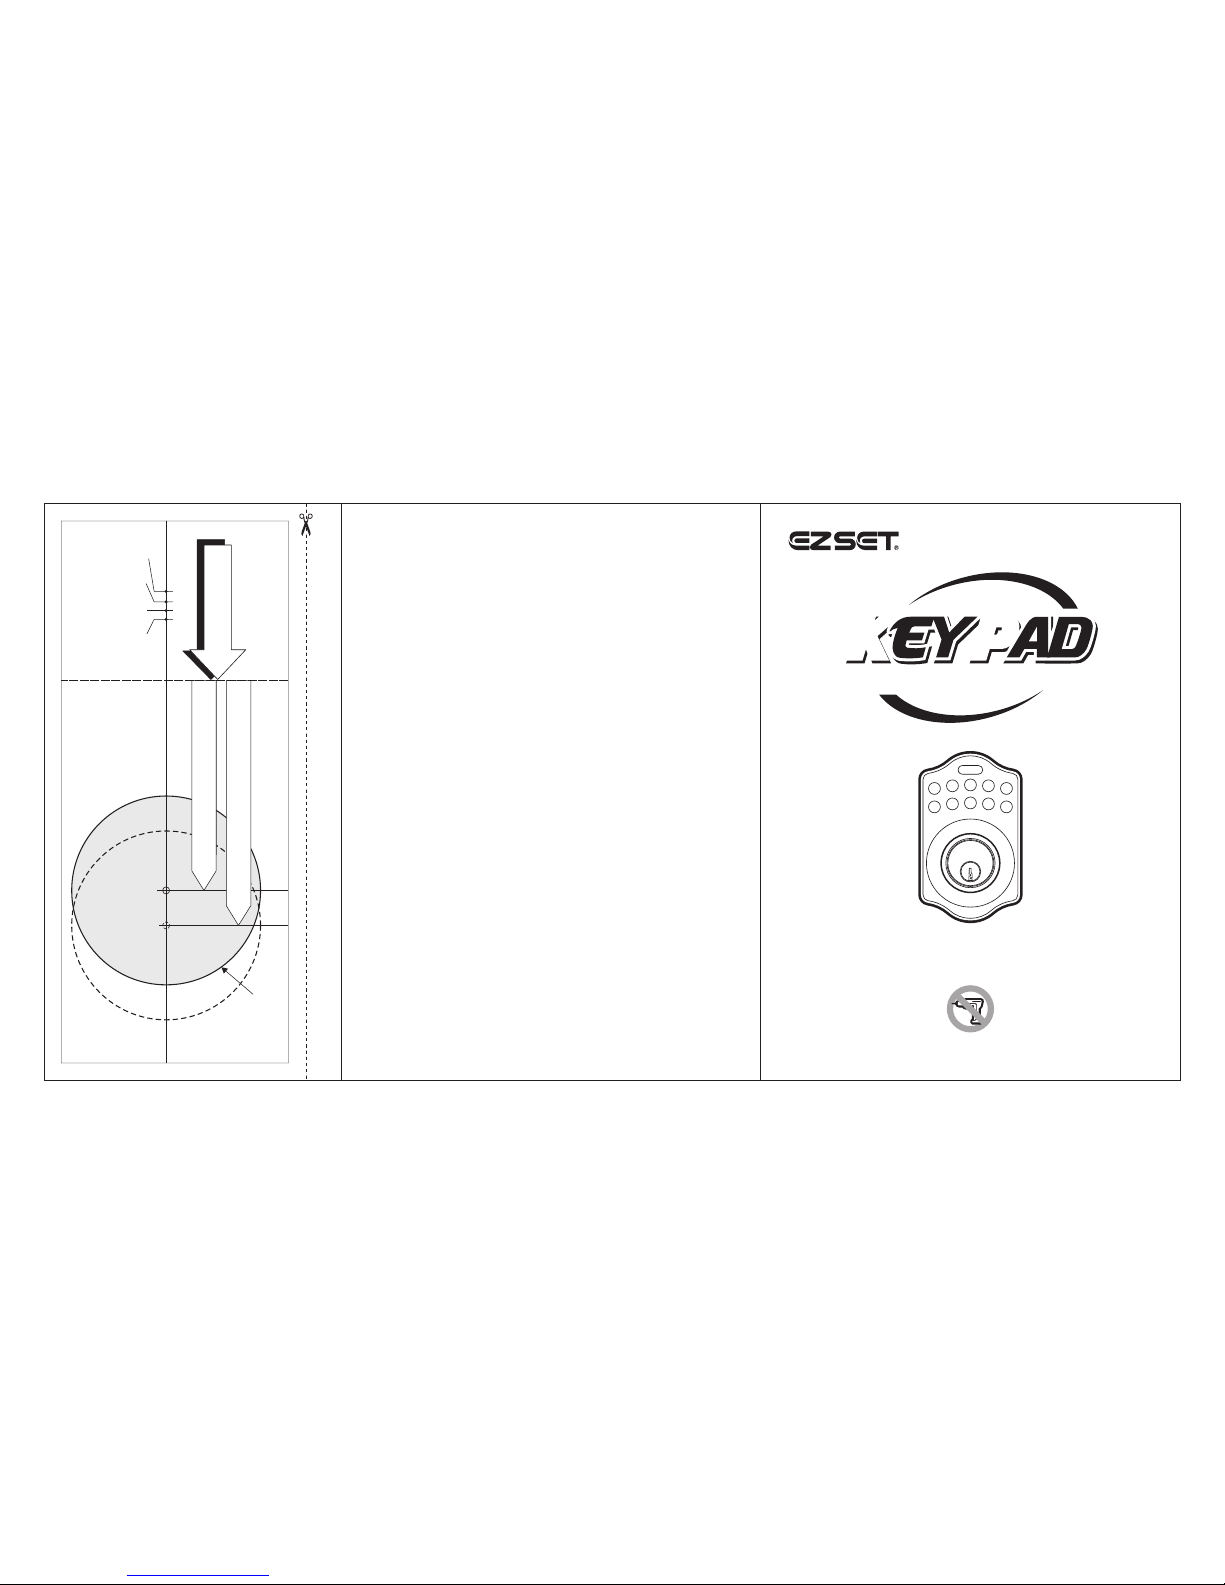
TEMPLATE
45 40 35
1-3/4" 1-9/16" 1-3/8"
Fit here on door edge
FOR BACKSET 70mm (2-3/4”)
FOR BACKSET 60mm (2-3/8”)
51
2"
Mark Ø1" (25.4mm) hole at
center of door edge.
Ø54mm (2-1/8")
Attention : Please do not use the "electronic" screwdriver for installation.
Page 2
1
KEYPAD ELECTRONIC DEADBOLT
INSTALLATION INSTRUCTIONS
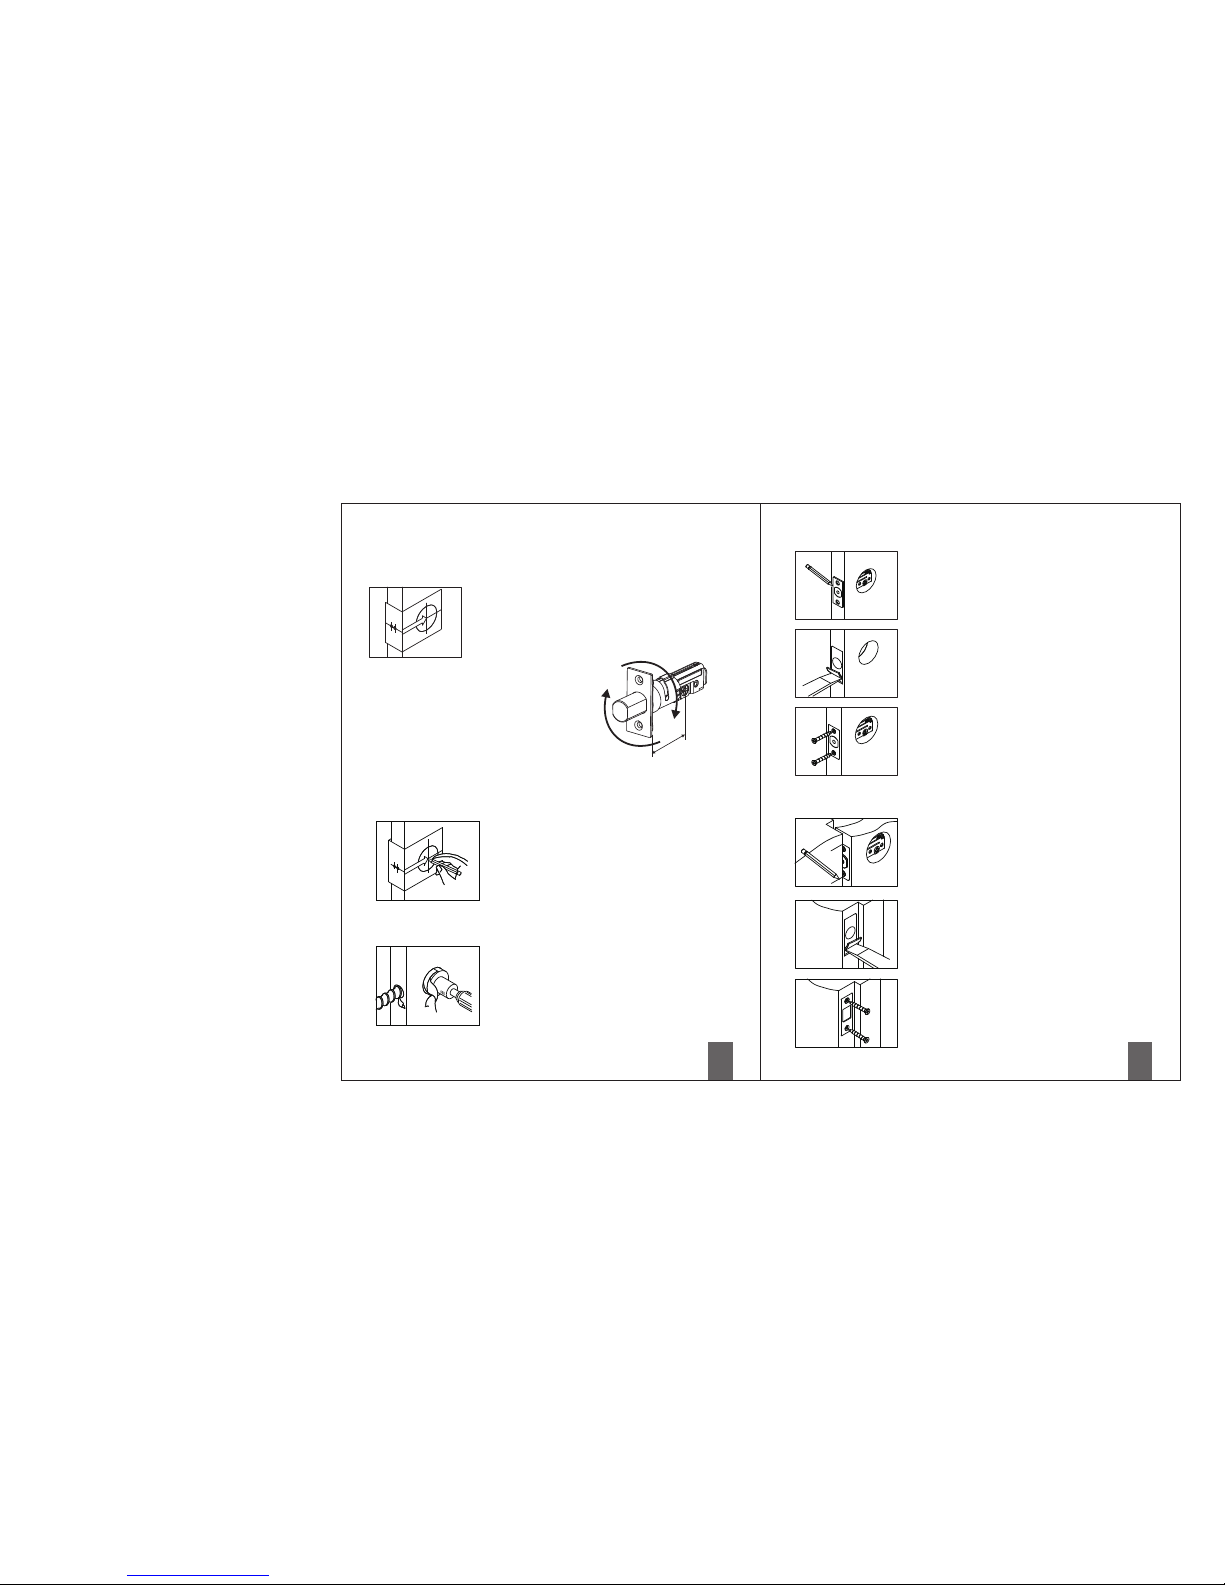
2-3/4" (70mm)
The BACKSET is the distance between the center of
cross bore and edge bore of the door.
Adjustable latch fits both BACKSET of 2-3/8” (60mm)
and 2-3/4” (70mm). Please follow the steps shown
below for BACKSET adjustment.
Latch Backset Adjustment :
Rotate the latch case as diagram on the
right for backset 2-3/4" (70mm) or
reverse direction for 2-3/8" (60mm).
1. Mark The Door With Template
Select the height and backset as desired on the
door face ; use the TEMPLATE as an indication
to mark the center of the circle on the door face
and the center of the door edge.
2. Drill Holes
Using the marks as a guide to drill a hole Ø2-1/8”
(54mm) through the door face for the lockset, then
a hole of Ø1” (25.4mm) for latch.
2
a. Insert the latch and ensure it is paralleled to
the door face.
Mark the outline of the faceplate, then take
out the latch.
b. Chisel 1/8” (3mm) deep along the outline to
allow the faceplate to be aligned with the door
edge.
c. Insert the latch and tighten it with screws.
Note : please use tapping screws for metal
door.
b. Chisel 5/64” (2mm) deep along the strike
outline to allow the strike to be aligned with
the doorframe.
c. Insert the strike and tighten it with screws.
Note : please use ”tapping screws” for metal
door.
4. Install Strike
3. Install Latch
a. To identify the center of strike :
close the door, on the basis of the faceplate
mark horizontal center line of strike.
Ensure the center of faceplate and the center
of strike are aligned.
Use the mark as a guide outlines the strike.
Page 3
3
4
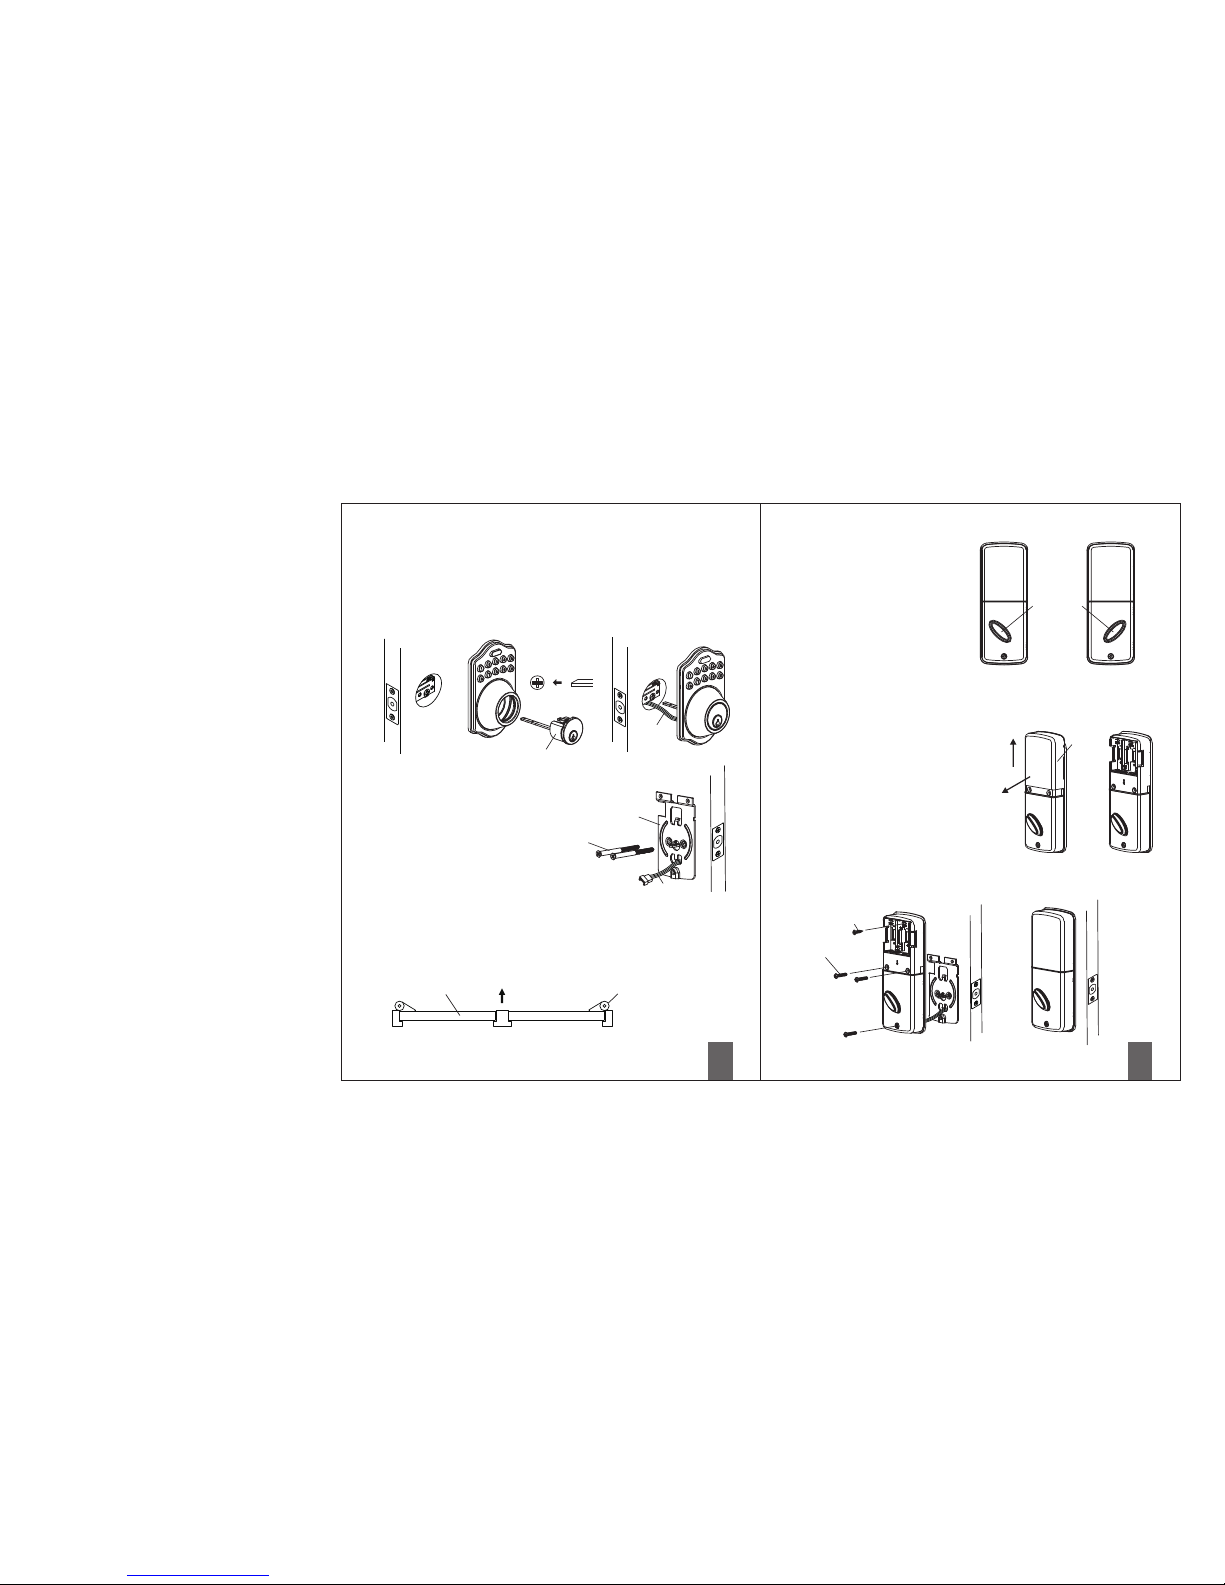
5. Install Keypad Assembly
a. Ensure the latch bolt must be retracted.
b. Please refer to the diagram below for Cylinder Installation.
Place deadbolt against keypad with tailpiece in horizontal
position inserted through hub of the latch.
c. Pass the IC wire under the latch to the interior side of the door.
Cylinder
IC wire
a
b
c
6. Install Inside Mounting Plate
Pass the IC wire through the wire hole of
the mounting plate.
Fix the mounting plate with screws.
If outside lock assembly is lopsided, please
loosen the screws to adjust it's position and
tighten the screws again.
7. Identify Door Handing
Mounting Plate
Screws
IC wire
Face the door from outside, the door is left handed if the hinge is on the
left-hand side of the door, whereas the door is right handed if the hinge
is on the right-hand side of the door.
Interior
Exterior
Door
Hinge
(Left Handed) (Right Handed)
8. Adjusting Turn Piece
Turn the turn piece to left for 45 degrees
when it's right-handed door.
Turn the turn piece to right for 45 degrees
when it's left handed door.
Turn Piece
(For Right Handed door) (For Left Handed door)
9. Install receiver module
a. Remove the battery cover
(push it up and pull it out).
b. Connect the IC wire and ensure the tailpiece
is engaged with turn piece, then attach
receiver module to the door with screws.
It's optional to use wood screws.
(Wood screws only for wood door)
c. Insert 4 (AA) 1.5V alkaline batteries and
put the battery cover back to the receiver
module.
Wood Screws
Screws
Battery
Cover
a
b c
Page 4
5
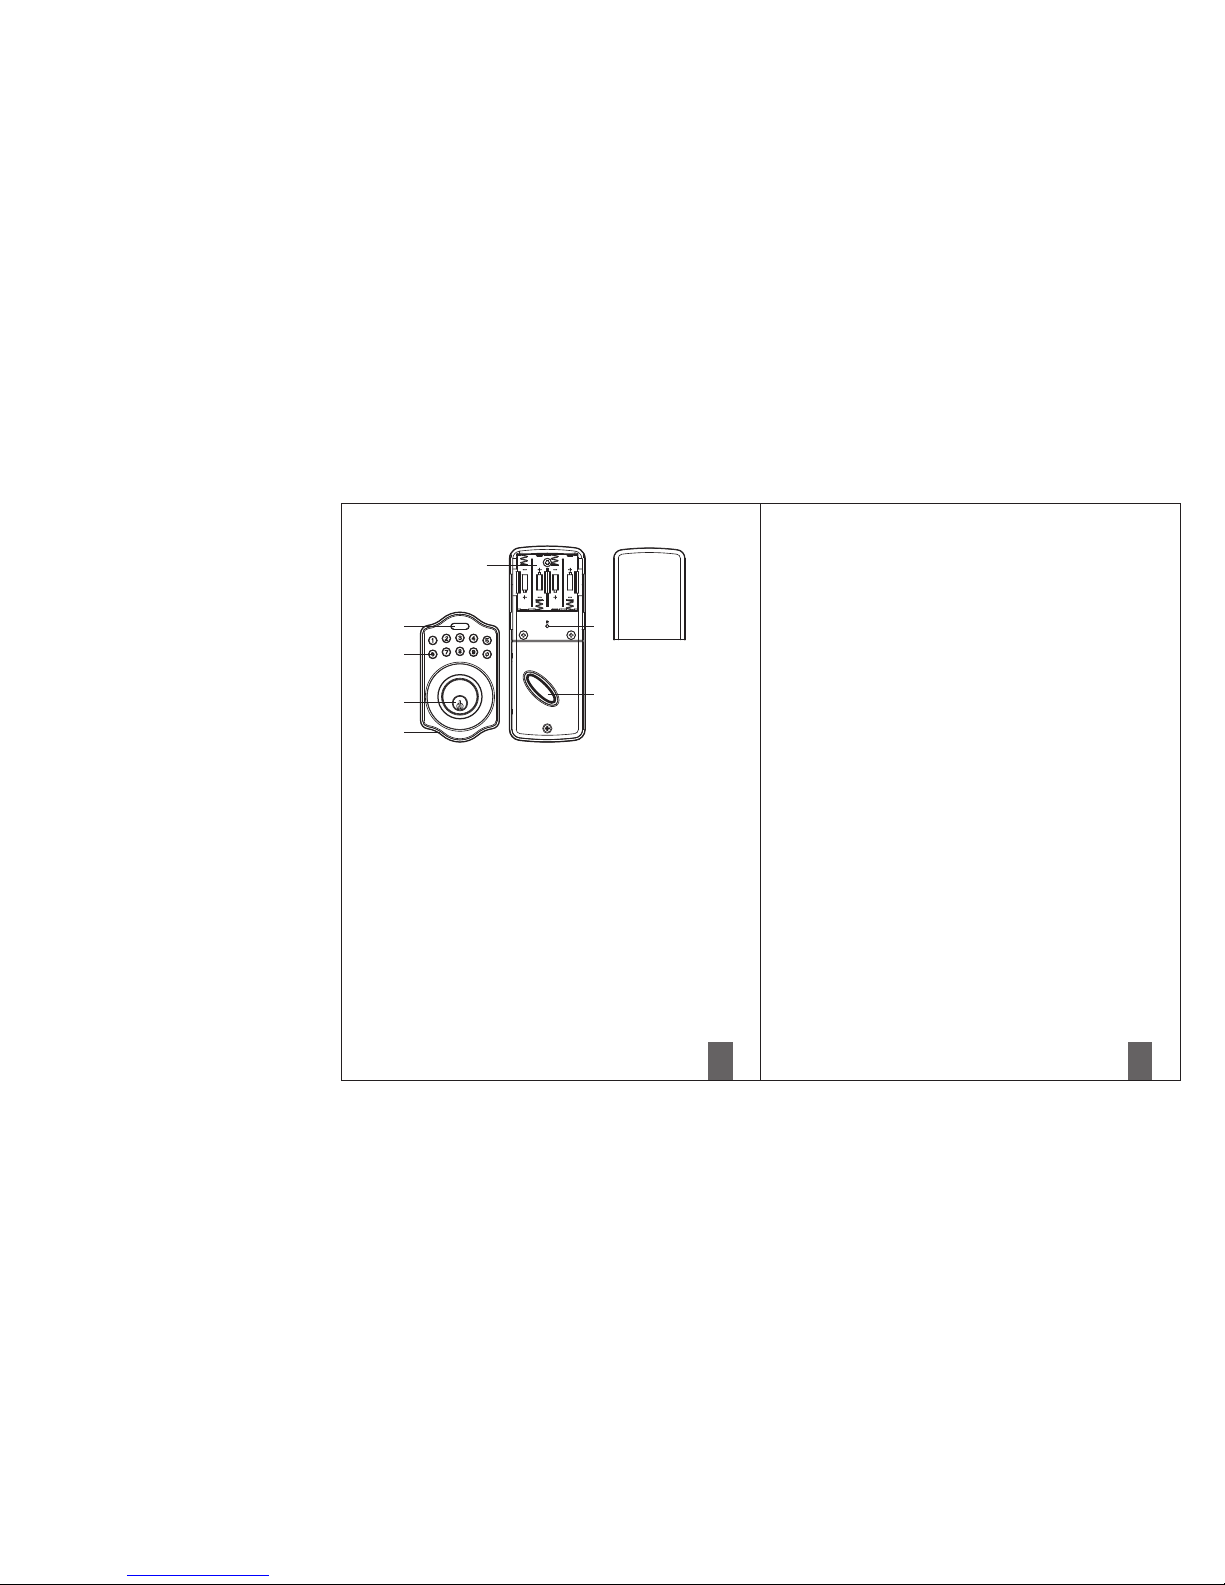
Programming Button
Programming Button is for entering codes, clearing errors and setting function.
It's also lock button.
Number Buttons
Input the pass codes, each pass code is 4-10 digits in length.
Cylinder
Retract / Extend the latch bolt by key from exterior.
Washer
Prevent water permeating into lockset.
Battery Lid
Slide the lid to change the batteries or restore default setting.
Battery Holder
Four AA(1.5V)Alkaline batteries.
R Button (Reset)
Restore default setting.
Turn-Piece
Retract/Extend the latch bolt from interior.
6
■
Specification/Function
1.Battery
Four AA(1.5V)Alkaline batteries.
2.Low Battery
2-1 The batteries should be changed immediately once you see the LED flashes in red
and hear constant beep sounds for about 10 seconds when press programming
button.
2-2 All settings are retained in the memory and will not be affected even if the battery
is completely dead.
2-3 The lock still can be operated by key even there is a power outage.
3.LED Indicator
3-1 LED flashes green once when successful operation.
3-2 LED flashes green twice when successful programming.
3-3 LED flashes red 3 times when there is an operation error.
3-4 LED flashes red 5 times when codes input error, the operation will stop for system
protection (Refer to 17).
3-5 LED flashes orange 3 times when system has been restored to default setting.
3-6 LED flashes orange slowly while in programming mode.
4.Audio Indicator
4-1 1 beep sound indicates a successful operation.
4-2 2 long beeps indicate a successful programming
4-3 3 beeps indicate an operation error.
4-4 3 long beeps indicate that system has been restored to default setting.
4-5 5 beeps when codes input error, the operation will stop for system protection.
(Refer to 17)
4-6 10 rapid beeps indicate the power of battery is low.
5.Programming Code
5-1 The preset Programming Code is 0000. Please delete it and create your personal
code when first time operation.
5-2 Only one set of Programming Code for function setting.
5-3 Programming Code is only for function setting, you can't unlock the door by
pressing Programming Code.
5-4 Programming code is 4-10 digits in length.
5-5 Programming code can be changed anytime if needed.
Page 5
7
8
6.User Code
6-1 The preset User Code is 1234. Please delete it and create your personal code
when first time operation.
6-2 Up to 6 sets of User codes can be saved.
6-3 User Code is only for activating the lock, without programming function.
6-4 User Code is 4-10 digits in length.
6-5 User Code can be deleted or changed anytime if needed.
7.Delete Individual User Code
7-1 User Codes can be deleted individually. You can reset the same number as code
even it's deleted before.
7-2 You should enter Programming code to delete individual User code.
8.Delete All User Codes At Once
8-1 All the User Codes can be deleted at once. You can still reset the same numbers
as codes even they're deleted before.
8-2 Auto-locking and Keypad locking function will be invalid after deleting all
User Codes and the lock can only be operated by key. All the electrical functions
will be restored when recreate new User Codes.
8-3 You need to enter Programming Code to delete all User Codes.
9.Temporarily Disable All User Codes
9-1 Auto-locking and Keypad locking function will be invalid when User Codes are
temporarily disabled. The lock can only be operated by key during the time.
9-2 Repeat the programming steps again to restore the User Codes.
10.Create a Disposable User Code
10-1 Disposable User Code will be no longer valid once being used.
10-2 You can reset same number as Disposal User Code.
10-3 You need to enter Programming Code to create a Disposable User Code.
11.Restore Preset Factory Code
11-1 You can restore Preset Factory Code by pressing “R” button on the interior
receiver module when you forget Programming Code or you want to cancel all
previous setting.
11-2 After restore, the Programming Code would be 0000; the User Code would be
1234 again.
12.Unlock the door
12-1 The door will be unlocked by key or pressing User Code on keypad from outside
or by interior turn-piece.
12-2 To unlock the door on the keypad, enter the User Code and then press the
Programming/Enter button.
13.Lock the door
The door will be locked by key or pressing Programming Button on keypad from
outside or by interior turn-piece.
14.Incomplete Door Closing / Opening
14-1 Once the latch bolt is not extended/retracted completely and causing a not
functional motor operation when it's locked by keypad, you'll see LED flash red 3
times (for twice) and hear 3 beeps (No alarm when it's in mute). You need to
enter User Code to unlock the door for remaining the bolt retracted, and press
Programming Button to lock the door again.
14-2 If the latch bolt gets stuck or can't extend/retract completely all the time, please
check if the strike aligns with the latch bolt perfectly and adjust the strike to
proper position. After long use of the door hinge, the latch bolt might get stuck
easily because the door is deformed or lopsided.
15.To Activate / Deactivate Auto-Locking Function
15-1 The door will automatically lock itself within 10~99 seconds when this function
is programmed.
15-2 This function is not preset at the beginning; it can be set if needed.
15-3 The preset delay-time is 30 seconds; you can adjust the period you want.
15-4 Please repeat the same programming steps to cancel Auto-Locking function
when needed.
15-5 The system will alarm twice if the latch bolt gets stuck or not extended/retracted
completely.
You need to enter User Code to unlock the door for remaining the bolt retracted.
The auto-locking function will be restored then.
16.Toggle Mute On/Off
16-1 You will hear beep sounds when pressing keypad, programming or operating
errors. It can be turned off if needed.
16-2 LED Illumination is still functioning when it's in mute. For there will be no any
warning alarm, we suggest not to mute the beeper if it's not necessary.
16-3 Motor operating sound cannot be muted.
Page 6
9
17.Code Protection Function
The operation will stop if entering unauthorized codes over 5 times.
The System will re-operate again after 45 sec.
18.Illumination
The LED Keypad will light up when pressing any button for ease of operating in
the dark.
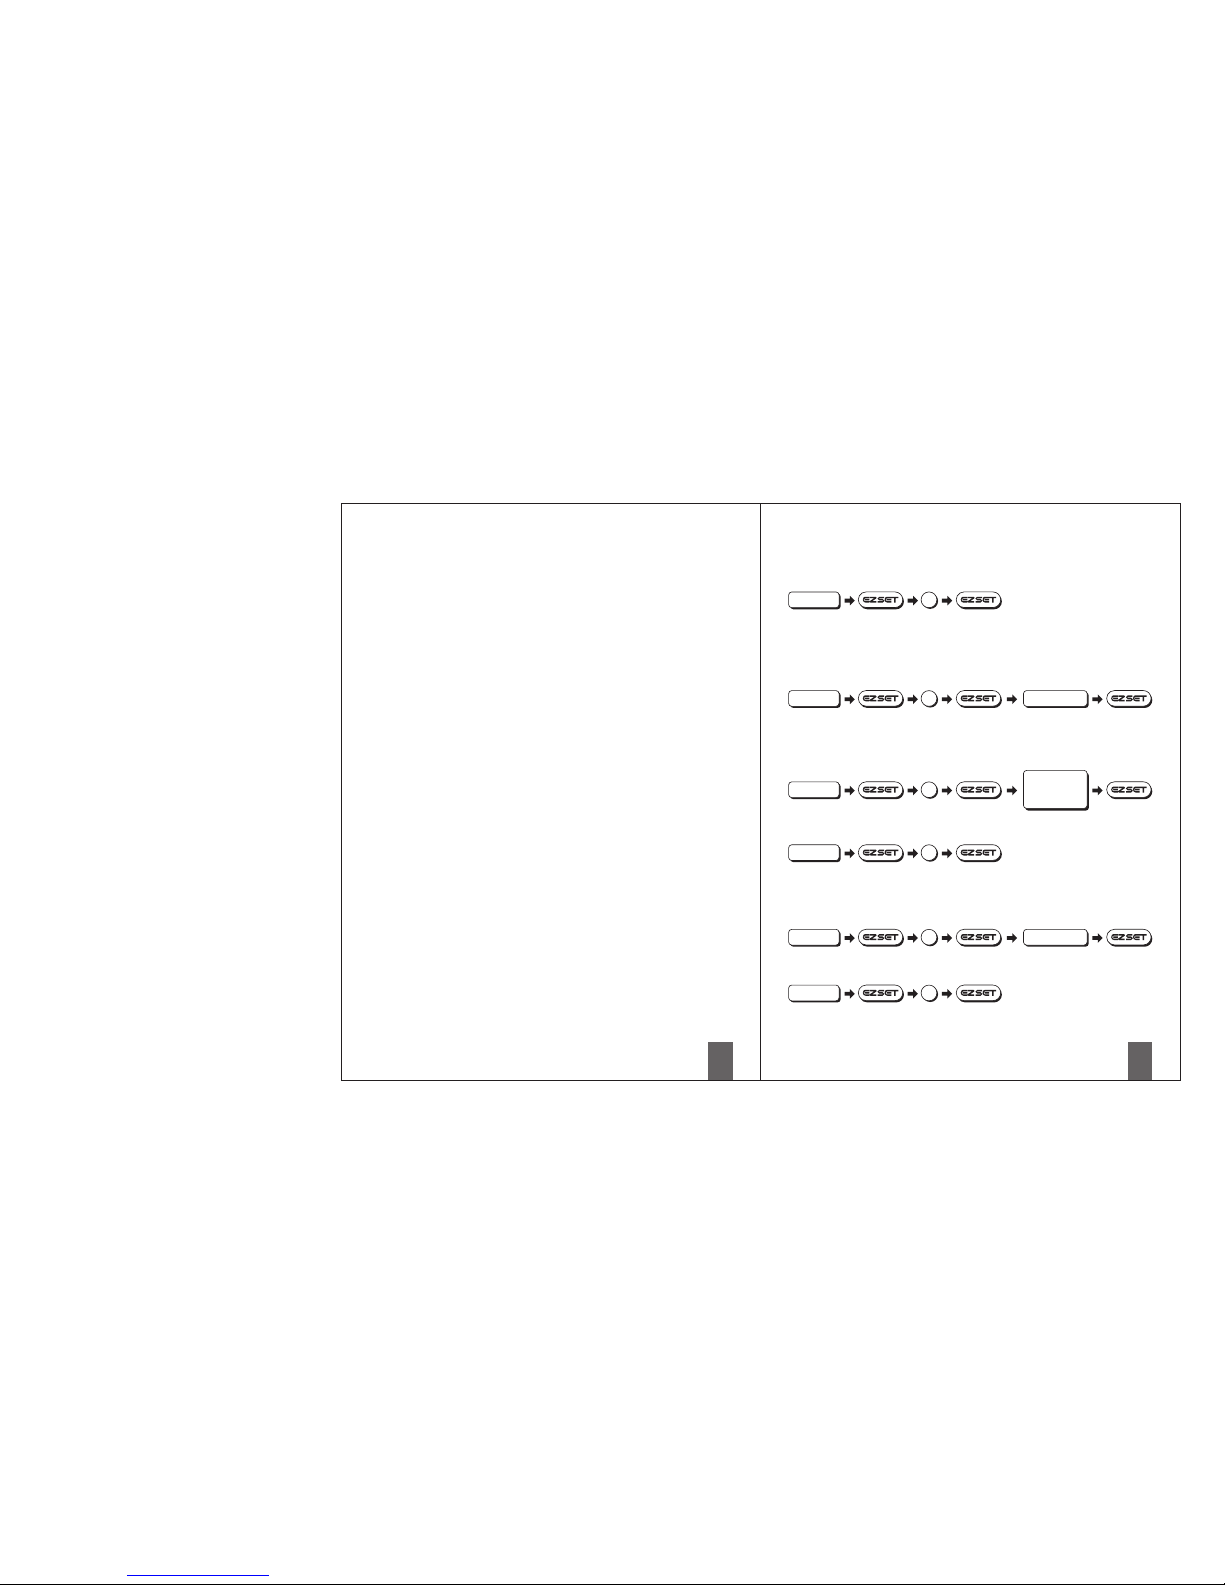
1. It should be remained unlock while programming.
2. Please run the door-handing identifying process (Refer to programming table)
before function set up when first time installation or default setting restore.
3. Please change default Programming Code (0000) and User Code (1234) before
function set up when first time operation.
4. LED flashes orange slowly while programming. LED flashes green twice with 2
long beeps when correct input. LED flashes red 3 times with 3 beeps when
incorrect input. (You need to wait for 6 seconds or press programming button
when incorrect input, then re-program the system again.)
5. Every programming step should be done in 6 seconds.
6. You can lock/unlock this product by either key or pass code. Please refer to the
following programming table for function set up.
Pass Code & Function Set up
■
Remark
■
1. We recommend to use alkaline battery in order to stabilize the power supply.
2. Do not mix alkaline battery with regular zinc-carbon ones or mixed brands.
3. Do not use any chemical liquid or lubricating oil with additives to clean the lock
body, it will damage the surface or even mainboard.
4. If there is any problem of the product, please contact your local retailer and send
back the product to us for repair or replacement.
Programming Code (PC)
10
■
Function Programming
Detect Left / Right Hand Door Installation
Enter PC
0
Remark : Please run the door-handing identifying process before function set up when
first time installation or default setting restore. It should be remained unlock
while programming.
Add New User Code
USER Code (UC)
Enter PC
1
Enter New UC
Remark :
Up to 6 sets of User Code can be saved. User Code should be 4-10 digits in length.
Delete An Existing User Code
Enter PC
2
Enter the UC
you want to
delete
Delete All User Code At once
Enter PC
3
Remark : Auto-locking and Keypad locking function will be invalid when User Codes
are deleted. The lock can only be operated by key during the time.
Change Programming Code
Enter PC
4
Enter New PC
Toggle Autolock On/Off
Enter PC
5
Remark : The preset delay-time is 30 seconds, you can change the time by following
instruction.
Repeat the steps to cancel the Auto-locking function.
Page 7
12
Simple Troubleshooting
■
Situation 1
After the installation of the lockset and batteries, the door cannot
be locked and three short beeps are emitted when you press the
Programming button.
Causes : The door-handing indentifying process is not yet complete.
Solutions : Please execute the door-handing indentifying process as soon as the
installation of the lockset is completed.
Situation 2
After the installation of the lockset and batteries, no responses
when you press any button (no sounds are emitted, and the back
light does not work).
Causes : It could be a problem caused by the batteries or the improper connection of
the cable.
Solutions : Check to see if the battery polarities have been reversed or if the battery is
dead. If so, please re-install or change the battery. If not, please check if
the cable is appropriately connected.
Situation 3
Fail in the first execution of the door-handing indentifying process
(the red light flashes three times, and three short beeps are emitted).
Causes : Wrong door-handing or change of the door-handing in the memory.
Solutions : Press the R button to restore the system to factory default setting and
re-execute door-handing indentifying process.
Situation 4
Although succeeded in the first execution of the door-handing
indentifying process, the latch does not work.
(Feeling that the motor runs powerlessly, the latch bolt is stuck,
and the turn-piece inside cannot be rotated.)
Causes : Low battery.
Solutions : Please replace with new batteries.
11
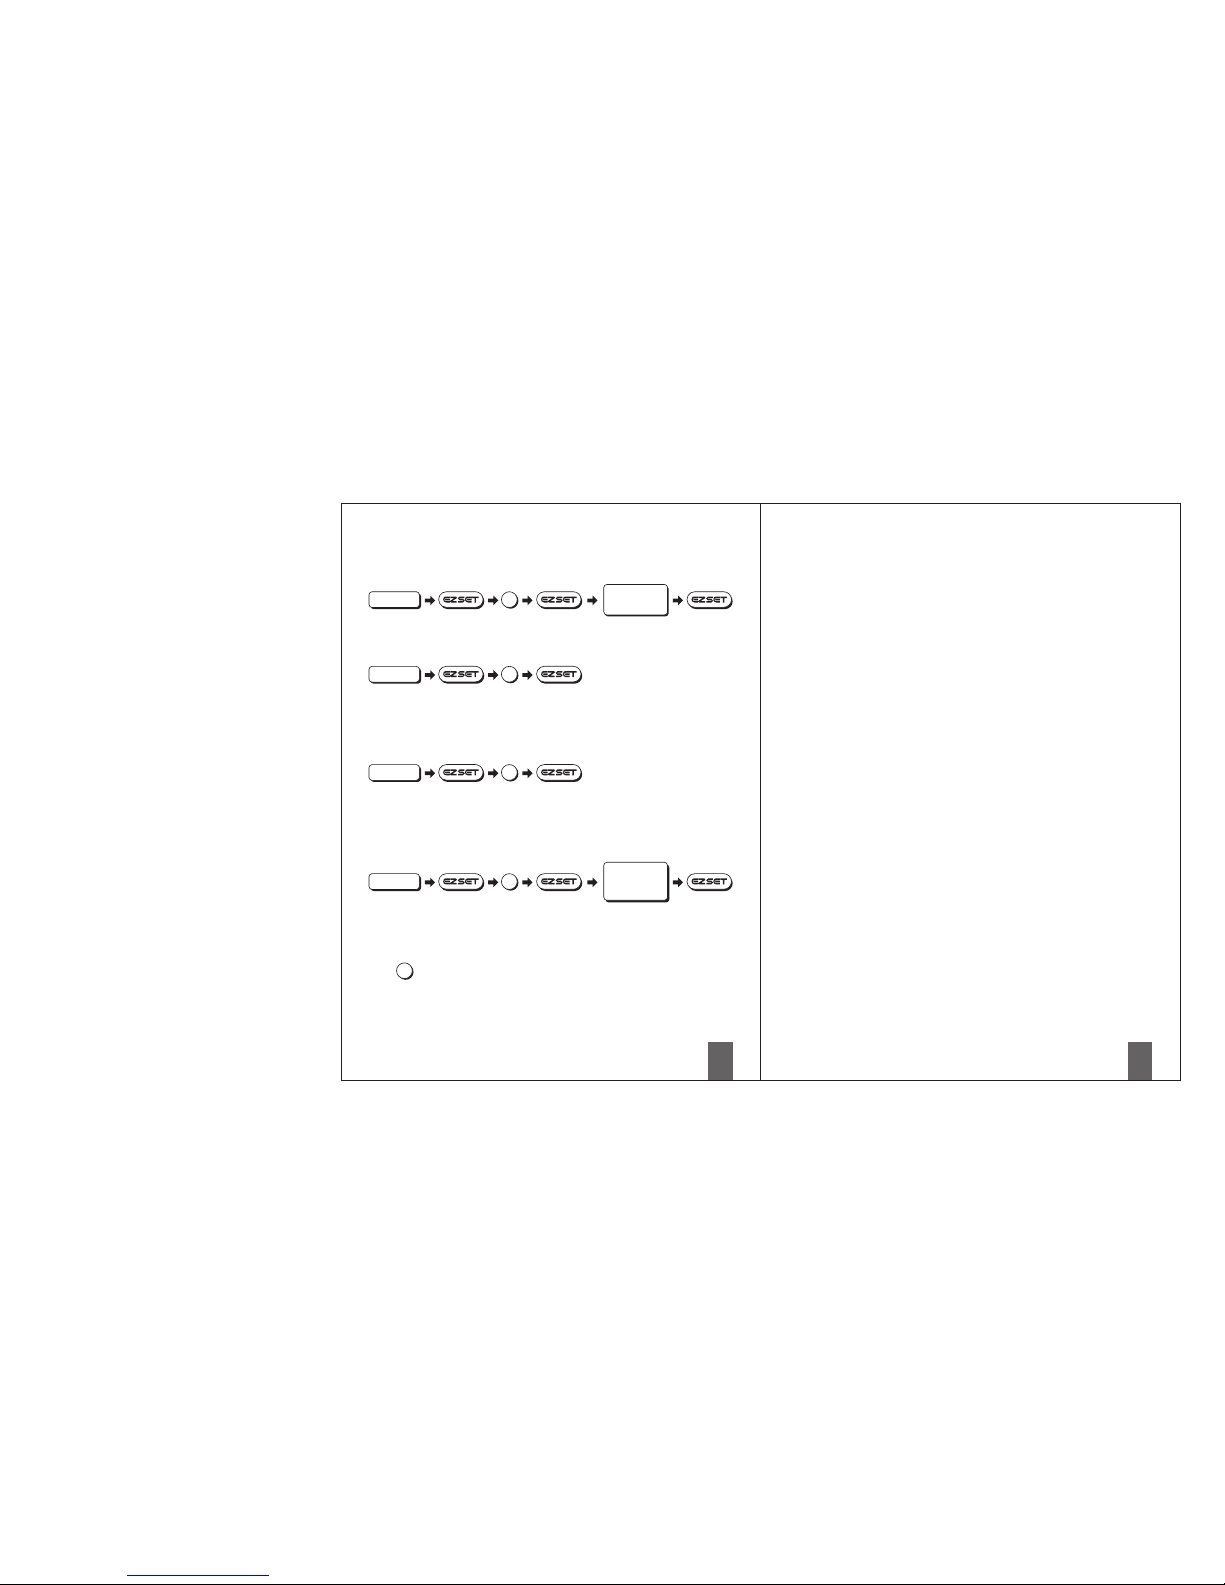
Programming Code (PC)
USER Code (UC)
Enter PC
6
Set Autolock Time Delay
Enter Seconds
(10~99)
Remark : 10-99 seconds delay-time available.
Toggle Mute On/Off
Enter PC
7
Remark : Repeat same steps to turn beeper On/Off.
LED illumination is still functioning when it's in mute.
But there will be no any warning alarm.
Enable/Disable All User Code
Enter PC
8
Create a disposable User Code
Enter PC
9
Enter new
disposable
UC
Remark : Auto-locking and Keypad locking function will be invalid when User Codes
are disabled. The lock can only be operated by key during the time.
Repeat the steps to enable the User Codes again.
Restore all preset lock settings
Press
R
Remark : Press “R” button for over 5 seconds, the programming will complete after
you hear 3 long beeps.
After restore, you need to run the door handing identifying process before
other function setting.
Remark : Disposable code will be no longer valid once being used.
Page 8
13
Situation 5
The functioning has been normal, but suddenly, the latch bolt locks
up, and the turn piece inside cannot be rotated, not even with the
key.
Causes : The detection of latch bolt position is abnormal.
Solutions : Please take out one battery first, then press any button on the front panel
for electric discharge, and put the battery back next. The latch bolt will
automatically re-detect its position subsequently.
Attentions : When the latch gets stuck frequently, please check if the opening of the
strike aims at the central position of the latch bolt, if the latch bolt can
stretch out freely, or if the hinges are deformed or tilted.
Situation 6
The door can be locked normally, but three short
beeps are heard and the door would not unlock when the
user code is entered and the programming button is pressed.
Causes : The functioning of the micro-switch is abnormal.
Solutions : Please unlock the door with the keys first and then contact the distributor
for inspection and maintenance.
Situation 7
While the door is closed, you hear the latch bolt
coming out when you press the programming button to lock
the door; however, three short beeps are emitted.
Conversely, while the door is open, no beeps are emitted
when locking the latch bolt.
Causes : (1)The depth of the latch bolt hole is insufficient.
(2)The latch bolt is not aimed at the opening of the strike.
Solutions : (1)Please dig the latch bolt hole for the strike deeper (min. depth of 2.5 cm).
(2)Please adjust the strike to the appropriate position.
 Loading...