


Introduction to
Microsoft® Windows® XP
Professional
Faculty & Staff Technology Center at Buffalo State College

TABLE OF CONTENTS
INTRODUCTION: WHY MICROSOFT® WINDOWS® XP?..............................................................1
THE WINDOWS DESKTOP...................................................................................................................2
USING THE TASKBAR..........................................................................................................................3
USING CTRL+ALT+DEL ........................................................................................................................6
LOCKING YOUR COMPUTE R.................................................................................................................6
LOGGING OFF YOUR COMPUTER.........................................................................................................6
SHUTTING DOWN YOUR COMPUTER ...................................................................................................6
CHANGING YOUR PASSWORD .............................................................................................................6
WORKING WITH MY COMPUTER......................................................................................................7
CHANGING VIEWS .................................................................................................................................8
ARRANGING YOUR DATA .................................................................................................................... 13
DISPLAYING A PARENT FOLDER ........................................................................................................ 14
SELECTING PREVIOUSLY VIEWED OBJECTS ..................................................................................... 14
USING THE ADDRESS BAR.................................................................................................................14
RENAMING AN OBJECT.....................................................................................................................15
MOVING/COPYING FILES AND FOLDERS....................................................................................16
SELECTING CONTIGUOUS FILES/FOLDERS ....................................................................................... 16
SELECTING NONCONTIGUOUS FILES/FOLDERS................................................................................ 16
MOVING FILES OR FOLDERS .............................................................................................................. 17
COPYING FILES OR FOLDERS ............................................................................................................ 18
WORKING WITH WINDOWS EXPLORER.......................................................................................19
ICONS WITHIN EXPLORER.................................................................................................................. 21
EXPANDING/COLLAPSING ICONS ....................................................................................................... 22
MOVING WITH DRAG & DROP ............................................................................................................. 23
COPYING WITH DRAG & DROP ........................................................................................................... 24
CREATING FOLDERS.........................................................................................................................25
RENAMING FILES/FOLDERS ............................................................................................................26
SETTING EXPLORER FOLDER OPTIONS.....................................................................................27
THE VIEW TAB..................................................................................................................................... 29
THE FILE TYPES TAB .......................................................................................................................... 30
THE OFFLINE FILES TAB ..................................................................................................................... 31
WORKING WITH SHORTCUTS.........................................................................................................33
PLACING A SHORTCUT ON YOUR DESKTOP...................................................................................... 33
PLACING A SHORTCUT IN THE START MENU..................................................................................... 34
MOVING A SHORTCUT........................................................................................................................ 35
DELETING SHORTCUTS ...................................................................................................................... 35

UNDELETING SHORTCUTS ................................................................................................................. 36
CUSTOMIZING THE DESKTOP.........................................................................................................37
ARRANGING ICONS ON THE DESKTOP .............................................................................................. 38
ALIGNING THE ICONS ON YOUR DESKTOP........................................................................................ 39
CHANGING THE DESKTOP APPEARANCE .......................................................................................... 40
CUSTOMIZING THE TASKBAR.........................................................................................................47
RESIZING THE TASKBAR..................................................................................................................... 47
REPOSITIONING THE TASKBAR ..........................................................................................................48
TASKBAR BUTTON GROUPING ........................................................................................................... 48
CUSTOMIZING THE NOTIFICATION AREA........................................................................................... 49
TASKBAR PROPERTIES ...................................................................................................................... 51
TASKBAR OPTIONS ............................................................................................................................. 52
WORKING WITH THE DESKTOP TOOLBARS ....................................................................................... 54
ADDING A TOOLBAR TO THE TASKBAR.............................................................................................. 54
THE ADDRESS TOOLBAR .................................................................................................................... 55
THE LINKS TOOLBAR .......................................................................................................................... 55
THE DESKTOP TOOLBAR.................................................................................................................... 56
THE QUICK LAUNCH TOOLBAR........................................................................................................... 56
MOVING ONE OF THE DESKTOP TOOLBARS...................................................................................... 57
PLACING A SHORTCUT ON THE QUICK LAUNCH TOOLBAR............................................................... 58
DOCKING A TOOLBAR ......................................................................................................................... 59
MODIFYING TOOLBAR PROPERTIES .................................................................................................. 59

INTRODUCTION:
WHY MICROSOFT® WINDOWS® XP?
Microsoft® Windows® XP Professional is the most recent version of
the Windows operating system. Windows XP has been selected to
replace Windows 98 on all computer workstations across the
Buffalo State College campus. It is anticipated that all workst ations
will be converted to Windows XP by the end of 2003.
There are several key benefits to upgrading to Windows XP. First,
Windows XP is much more stable than previous Windows operating
systems.
LESS REBOOT - In most cases, for example, if one program
crashes, the computer will continue running. This eliminates the
need to reboot the system and allows you to continue working
without the risk of losing your work.
MORE EFFICIENT - Windows XP manages the computer’s
memory and processor more efficiently than ever before. This
means the computer will run applications like Word, Excel and
Access faster than before. In addition, Windows XP offers robust
security features to help protect sensitive data.
FEWER VISITS FROM CTS - Windows XP allows all critical
maintenance, including software updates, service packs and disk
defragmentation to be automatically performed at night. This
means that systems are always up to date and running at top
performance with zero disruption during normal work hours. For
this reason, it is critical that you always LOG-OFF the computer at
the end of the day and leave the machine turned ON. Computers
that are shut down and turned off cannot be updated.
This campus-wide upgrade to Windows XP has been undertaken in
order to improve the quality and efficiency of the computers you
work with every day. If you have any questions or concerns about
using your Windows XP workstation, please contact the FAST
Center at 878-4060 or fastcenter@buffalostate.edu. The FAST
Center is located in Butler Library’s CyberQuad Room 315.
Introduction to Windows XP w FAST Development Center w Buffalo State College
1
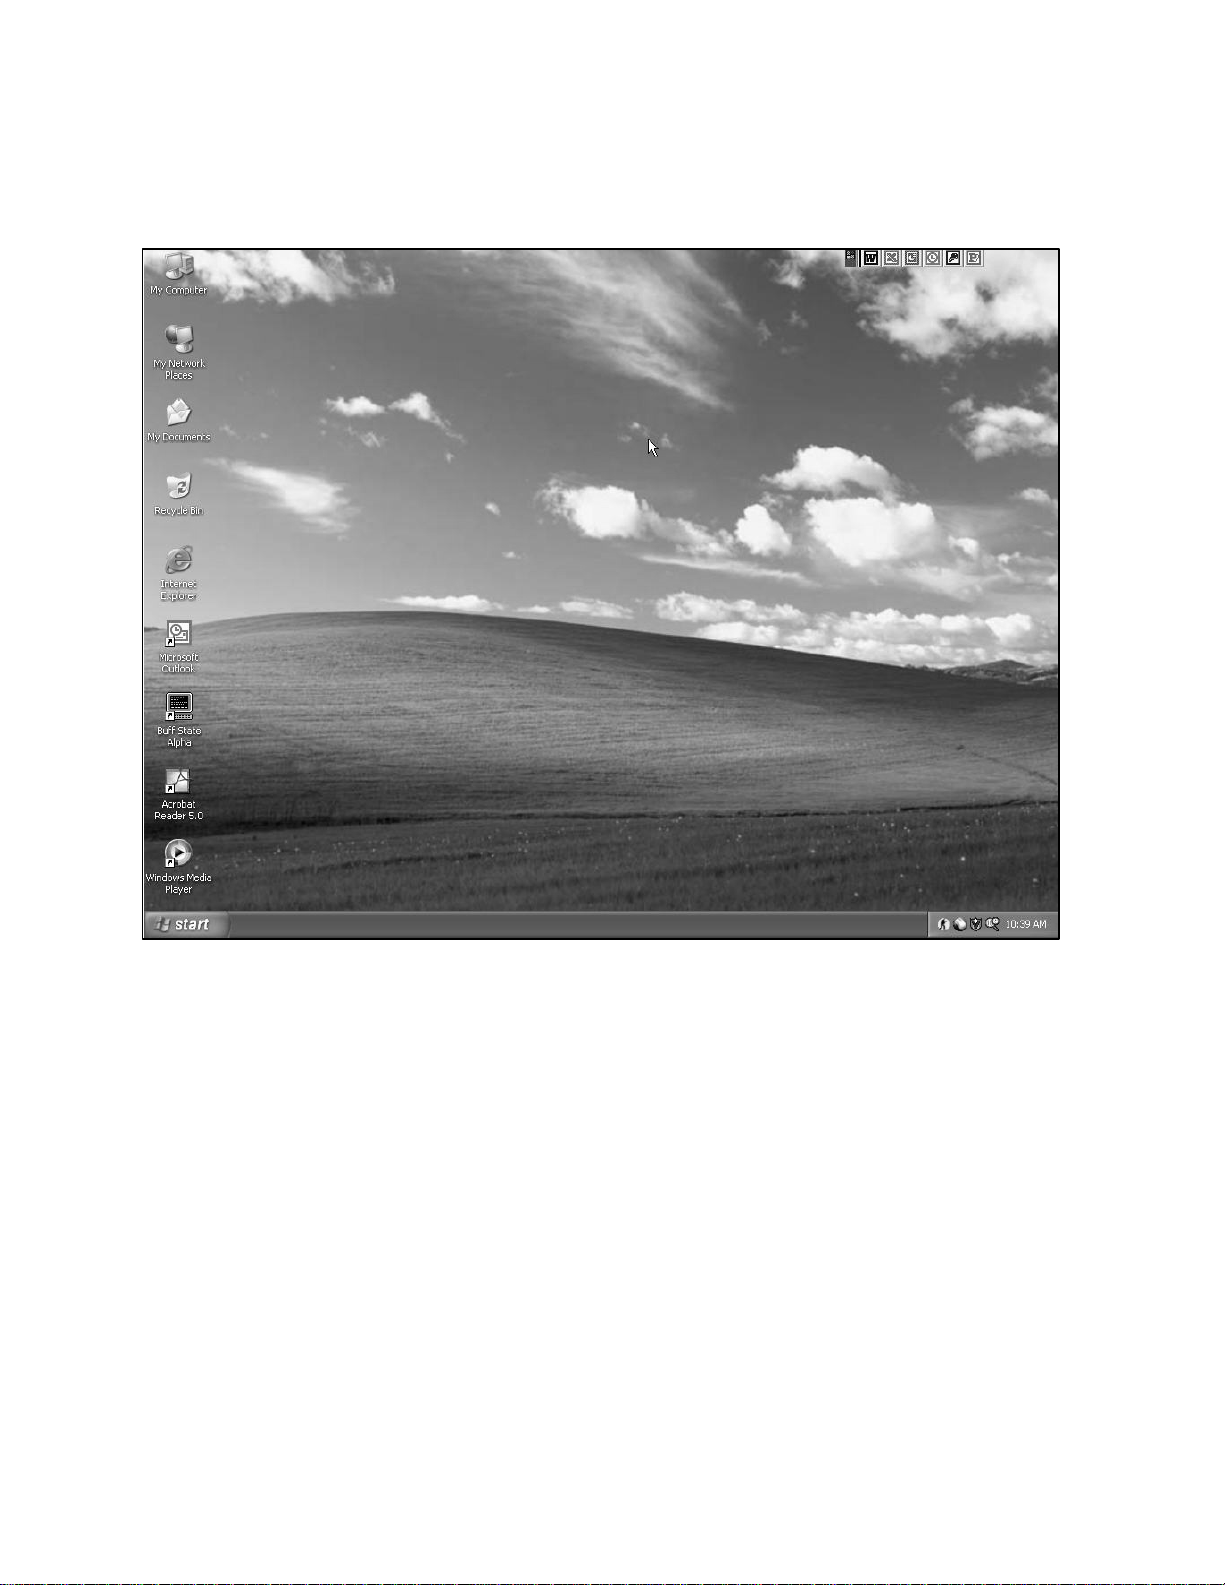
THE WINDOWS DESKTOP
Once you log on, the Windows XP desktop will be displayed, as shown below:
As you continue to work with XP, you will probably want to add icons representing shortcuts to
your applications, utilities, folders, documents, and other often-used objects. Since these
icons are only shortcuts, deleting them from your desktop does not delete the application they
represent. Deleting the icon simply removes the shortcut from your desktop. You can still
access the application/object via the Start menu or My Computer utility.
Along the bottom of the Desktop is the taskbar which contains the Start menu, any opened
applications, and the notification area (where you can take a tour of XP, access and view the
current time).
Introduction to Windows XP w FAST Development Center w Buffalo State College
2
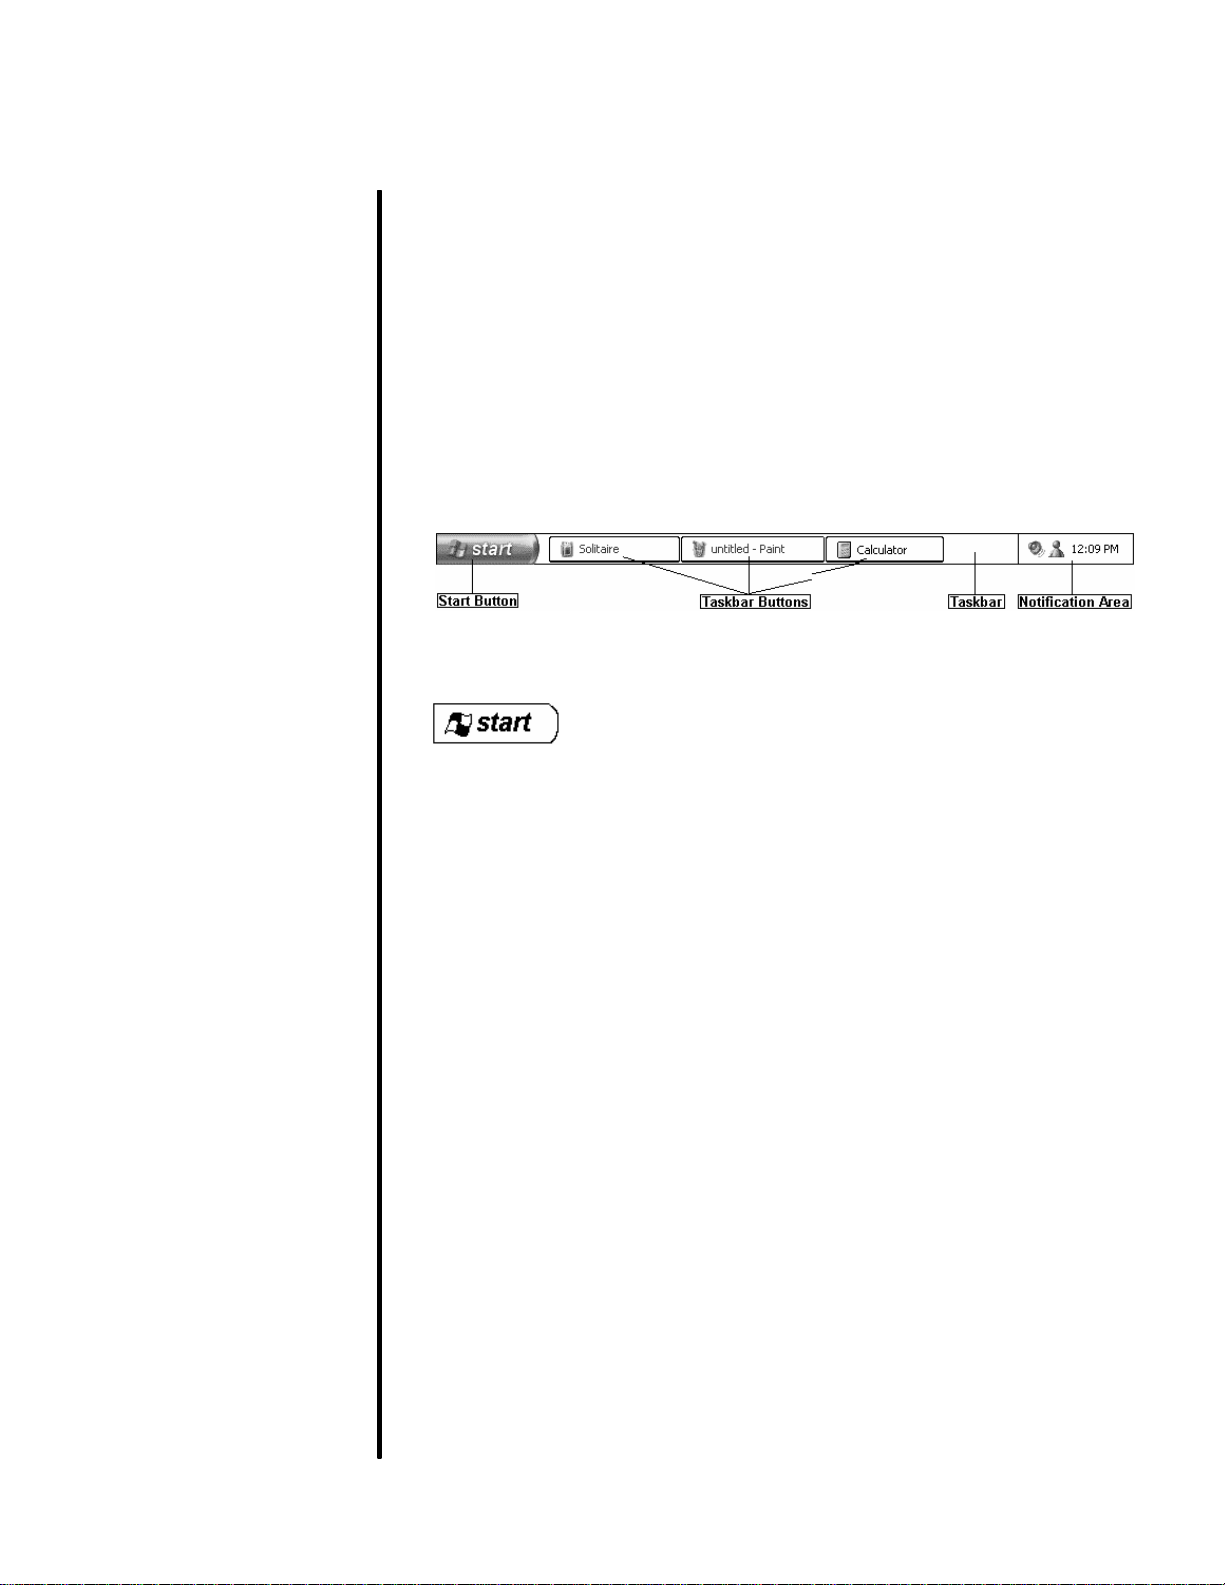
USING THE TASKBAR
USAGE: Along the bottom of the screen is the Taskbar which is used to
quickly access programs, documents, help screens, and Windows
settings with the click of a button.
It is also used to display currently running programs so that you can
quickly switch between opened applications (referred to as multi-
tasking).
The far right side of the bar displays various information and alerts.
The taskbar typically consists of the following parts:
This button is used to access the Start
menu which is where all of your installed
programs are typically listed.
Taskbar Buttons These buttons represent currently
running applications. To quickly switch
to any opened application click on its
corresponding button.
Notification Area This last section is used to display
information and alerts.
Introduction to Windows XP w FAST Development Center w Buffalo State College
3
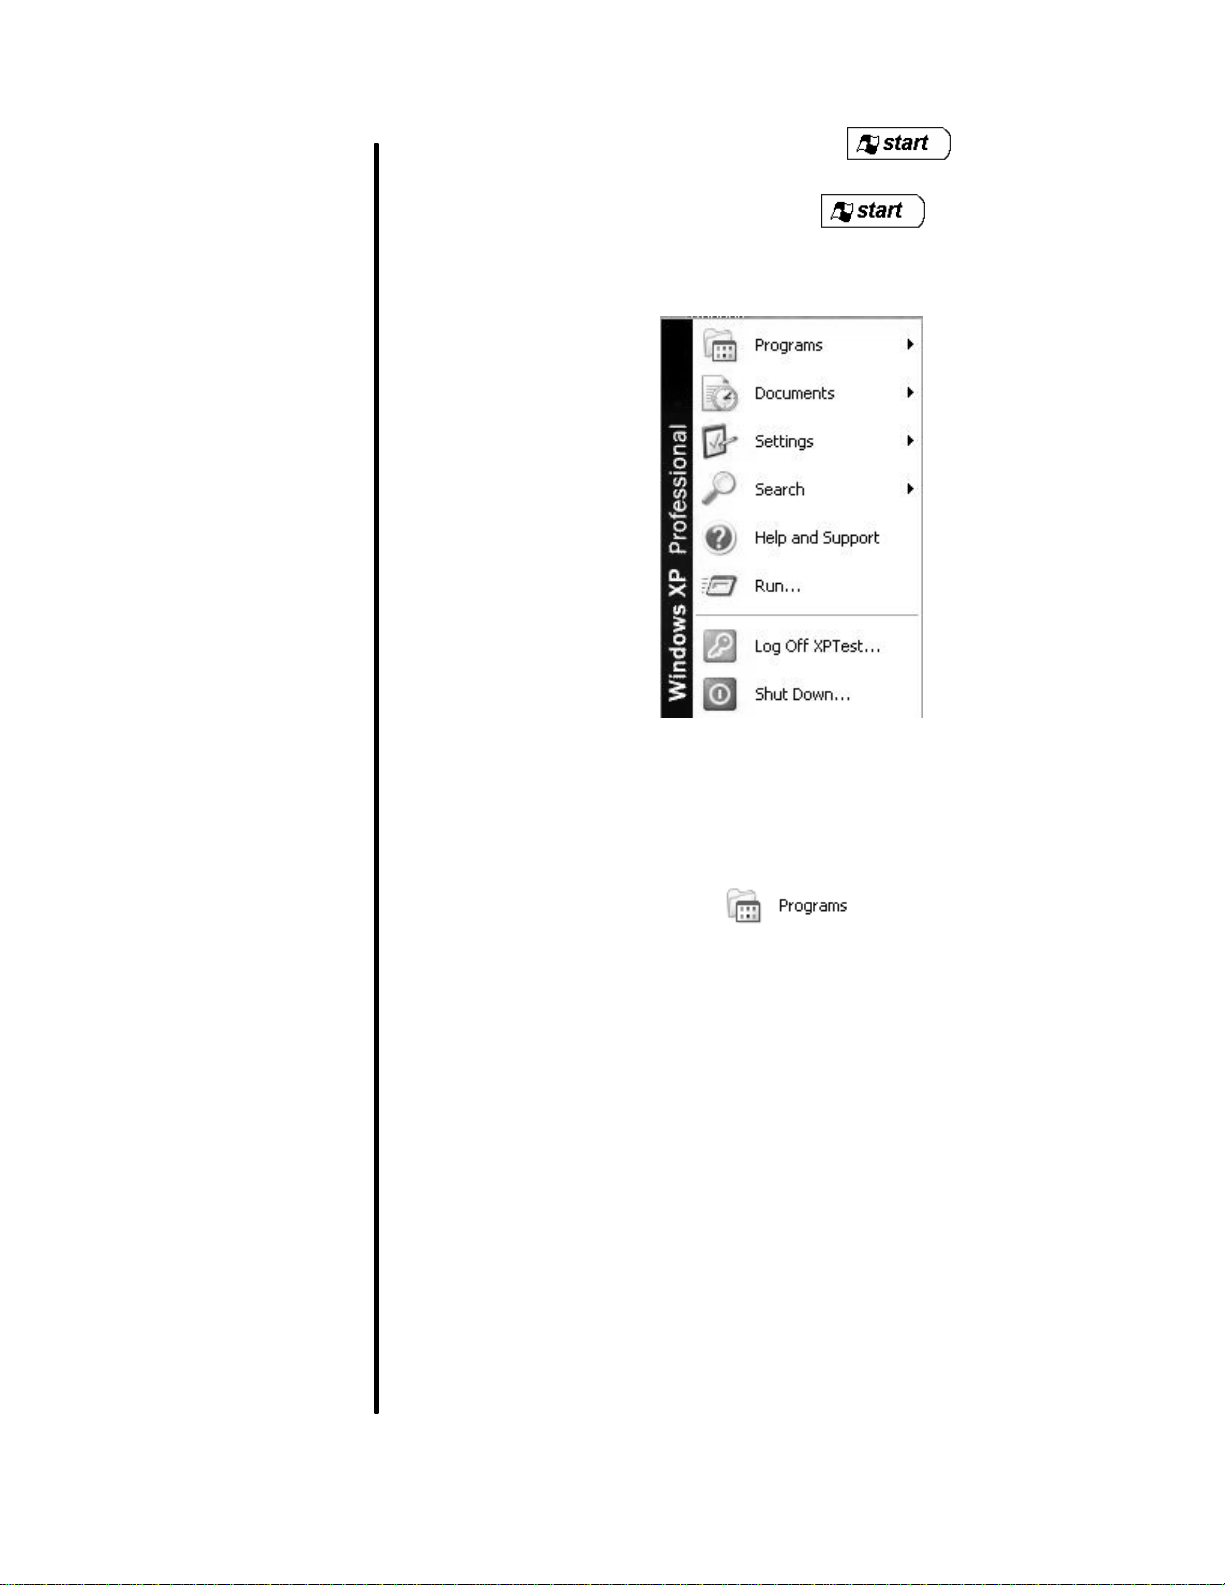
Most of your activity will begin with the button which
displays a menu where you can launch applications, utilities and
accessories. When you click on the button, a pop-up
menu appears, as shown in the diagram below:
Windows displays a list of available items (e.g., programs,
documents, settings) to choose from.
Items containing an arrow indicate additional choices are available.
For example, if you select Windows will provide a
sub-menu displaying all programs installed on your system.
Introduction to Windows XP w FAST Development Center w Buffalo State College
4
The following items are available within the Start menu:
Windows will provide a sub-menu
displaying all programs installed on your
system.
Select this item to view a list of the most
recently used documents you have
created or have been using. When you
select one of the files, Windows
automatically runs the application
associated with the document and loads
the file for you to begin editing.
Displays computer setting options
including the Control Panel.
This option is used to locate files,
folders, and other computers.
This item accesses the help screen.
This option runs DOS commands,
programs that are not included in your
menu or starts installation of a new
application.
This item is used to log off from the
current user and allows you to log back
on using another ID.
This option is used to shut your system
down, switch to standby mode, or restart
your computer.
Introduction to Windows XP w FAST Development Center w Buffalo State College
5

USING CTRL+ALT+DEL
The CTRL+ALT+DEL key sequence is important to remember
when using Windows XP. You can use this key sequence to:
1. Lock your computer
2. Log off your computer
3. Shut down your computer
4. Change your password
LOCKING YOUR COMPUTE R
Whenever you leave your computer for a period of time (signing out
for lunch, attending a meeting) you should get in the habit of locking
your computer. Locking your computer is a convenient way to
prevent access to your computer when you away from your desk
without havi ng to close your applications and log off. To lock your
computer press the key sequence CTRL+ALT+DEL. Then click on
Lock Computer. To unlock your computer press the key sequence
CTRL+ALT+DEL, enter your password and press enter.
LOGGING OFF YOUR COMPUTER
Each night you should log off your computer. After you have closed
any open applications, you can log off your computer, by pressing
the key sequence CTRL+ALT+DEL and clicking on Log off…
(NOTE: You can also log off your computer by clicking on the Start
menu and choosing Log off…)
SHUTTING DOWN YOUR COMPUTER
Your workstation should function properly without shutting down or
frequently rebooting. You should log off your computer at the end of
the day as described above. However, in the event of a Windows
problem, you may need to shut down your computer. To shut down,
first log off completely. Once you are back to the login prompt,
press the key sequence CTRL+ALT+DEL, then click on Shut
Down…
CHANGING YOUR PASSWORD
For security purposes, you should change your password
periodically. To change your password press the key sequence
CTRL+ALT+DEL and click on Change Password...
Type your old (current) password in the first field. Type your new
password in the second field and then confirm this new password in
the third field. To finish, click on OK.
Introduction to Windows XP w FAST Development Center w Buffalo State College
6

WORKING WITH MY COMPUTER
USAGE: My Computer is an easy tool for exploring the contents of your
folders, files, network drives, and printers. In addition, you can use
My Computer to copy, move, rename and delete it ems from your
system. You can also perform various tasks associated with your
system (such as printing, displaying slide shows, and publishing
files to a web site).
To access My Computer, follow the steps outlined below:
ΠDouble click on the My Compu ter icon
on your desktop.
• The following window will be displayed:
There is a menu across the top of the window along with a toolbar.
Down the left side of the window are three collapsible panes.
The System Tasks pane provides a list of tasks for the currently
selected folder or object.
Introduction to Windows XP w FAST Development Center w Buffalo State College
7

The Other Places pane displays a list of folders you can access
through the current folder.
The Details pane displays information about the currently selected
file or folder (such as the file type and date the file was last
modified).
Each pane collapses to a title bar to save space on your screen.
Simply click on the pane’s title bar to collapse it. Once collapsed,
click the title bar a second time to expand the pane.
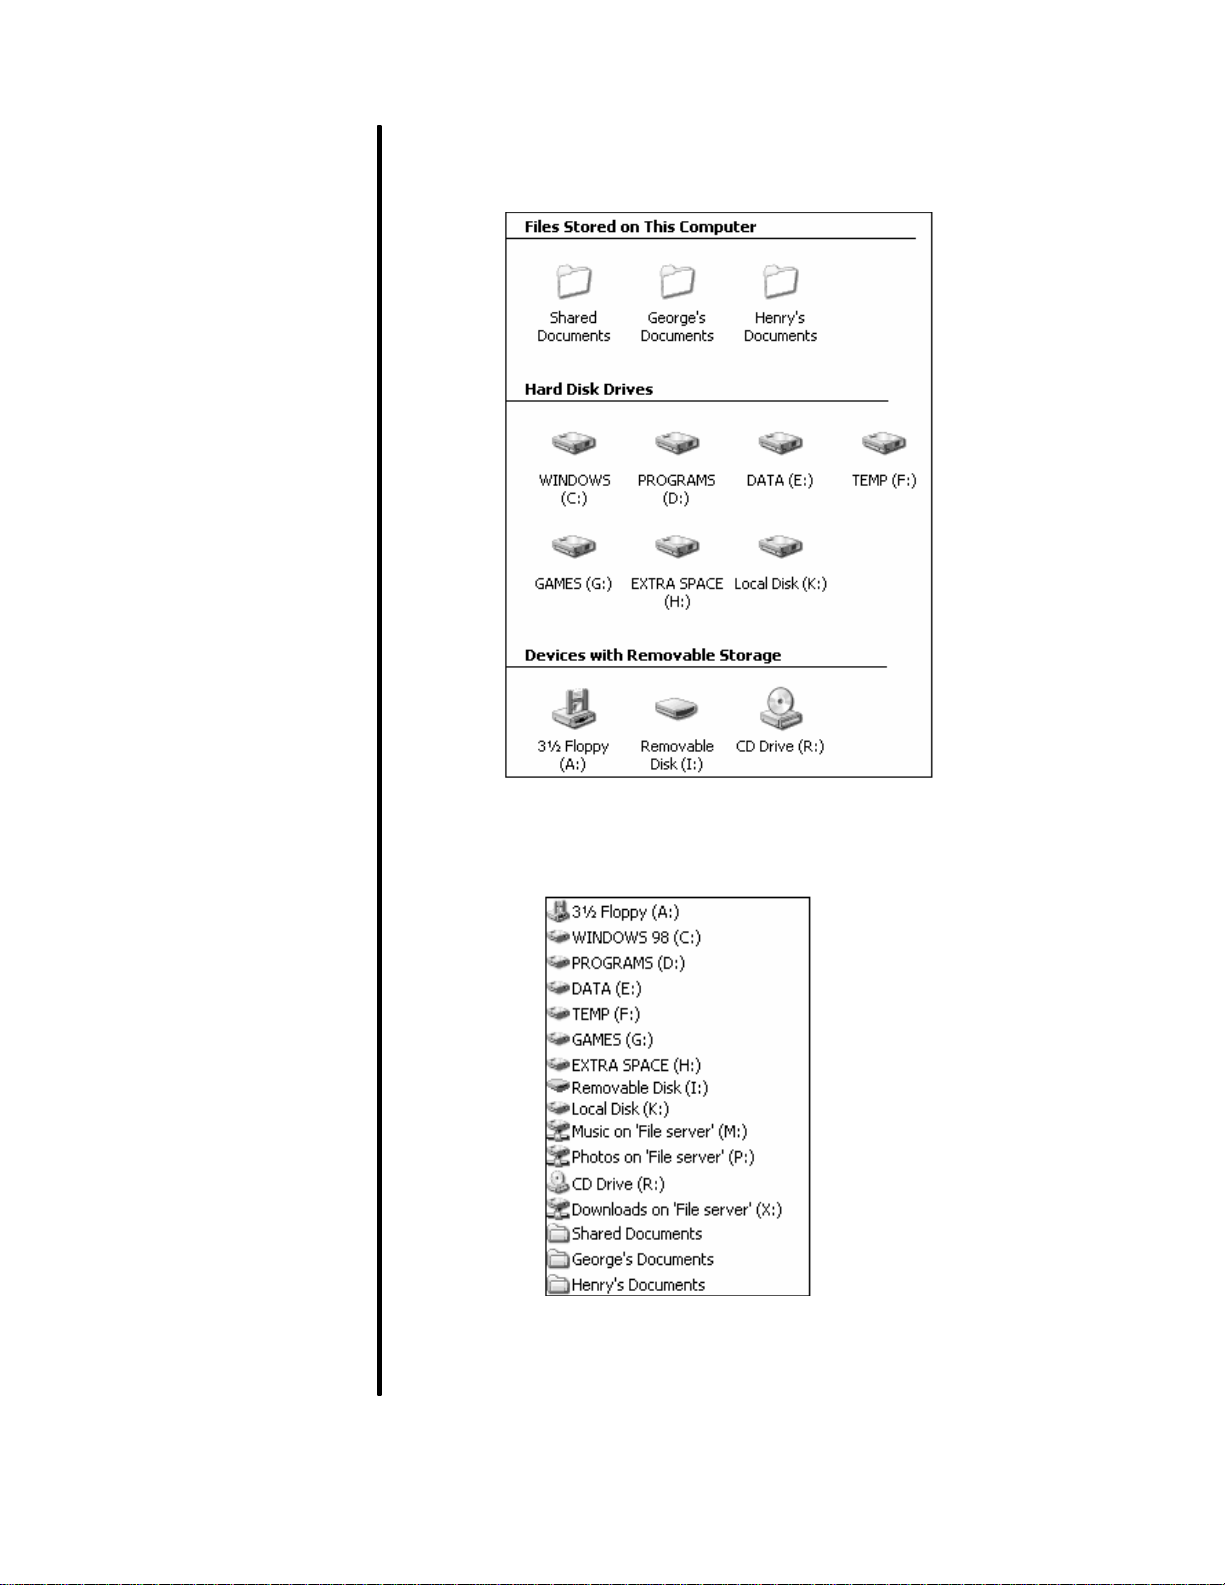
The center of the window contains the following information:
Hard Disk Drives This list displays the hard drives
installed on the computer.
Devices with Removable This list displays all removable
Storage devices (such as floppy disks, CD
drives, and Zip drives).
Network Drives This list displays any network
drives installed on your system to
which you are currently attached.
If you have a camera or scanner connected to your system, they
will be displayed below the list of network drives.
CHANGING VIEWS
Although the objects within a folder default to being shown as Tiles,
there are several other views available while working with My
Computer. Tiles show large icons and sorting information. If you
need to see more information (such as the file type, their size, and
the date they were last modifi ed), you can switch to Details view. If
you are viewing photographs, you might want to switch to
Thumbnail or Filmstrip view to see each photo.
To change the view, you can either access the View menu or use
the toolbar, as shown below:
Click on the down arrow beside this tool
(which is located across the top of the My
Computer window) and then choose the view
you wish to switch to.
Introduction to Windows XP w FAST Development Center w Buffalo State College
8
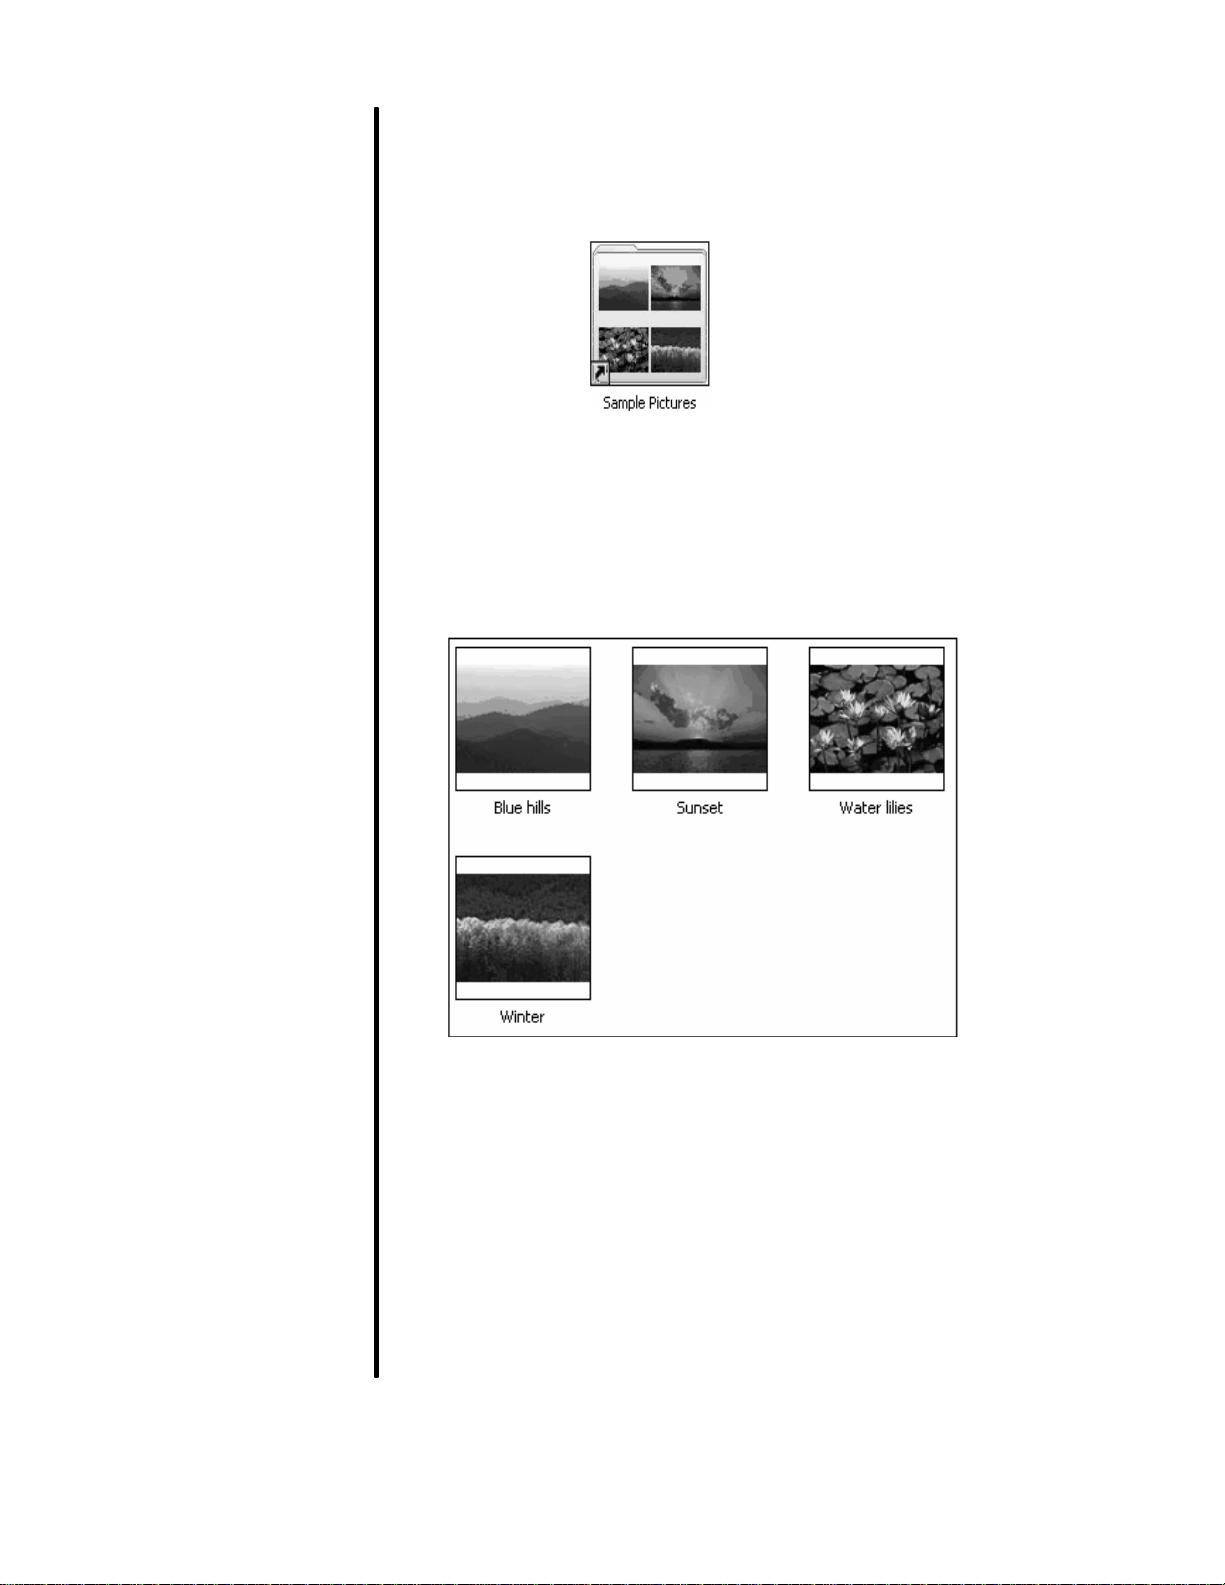
If you are viewing a list of folders that contain pictures and you are
working in Thumbnail view, XP will display four of the photos
contained within the folder on the folder’s icon, as shown below:
If the view contains several photo folders, it may take several
minutes for XP to update the folder’s thumbnail picture.
To actually view the photos within a folder, double-click on the
folder’s icon to display thumbnails of each picture, as shown below:
If you have many pictures in a folder, it may take XP several
minutes to update each thumbnail.
Introduction to Windows XP w FAST Development Center w Buffalo State College
9
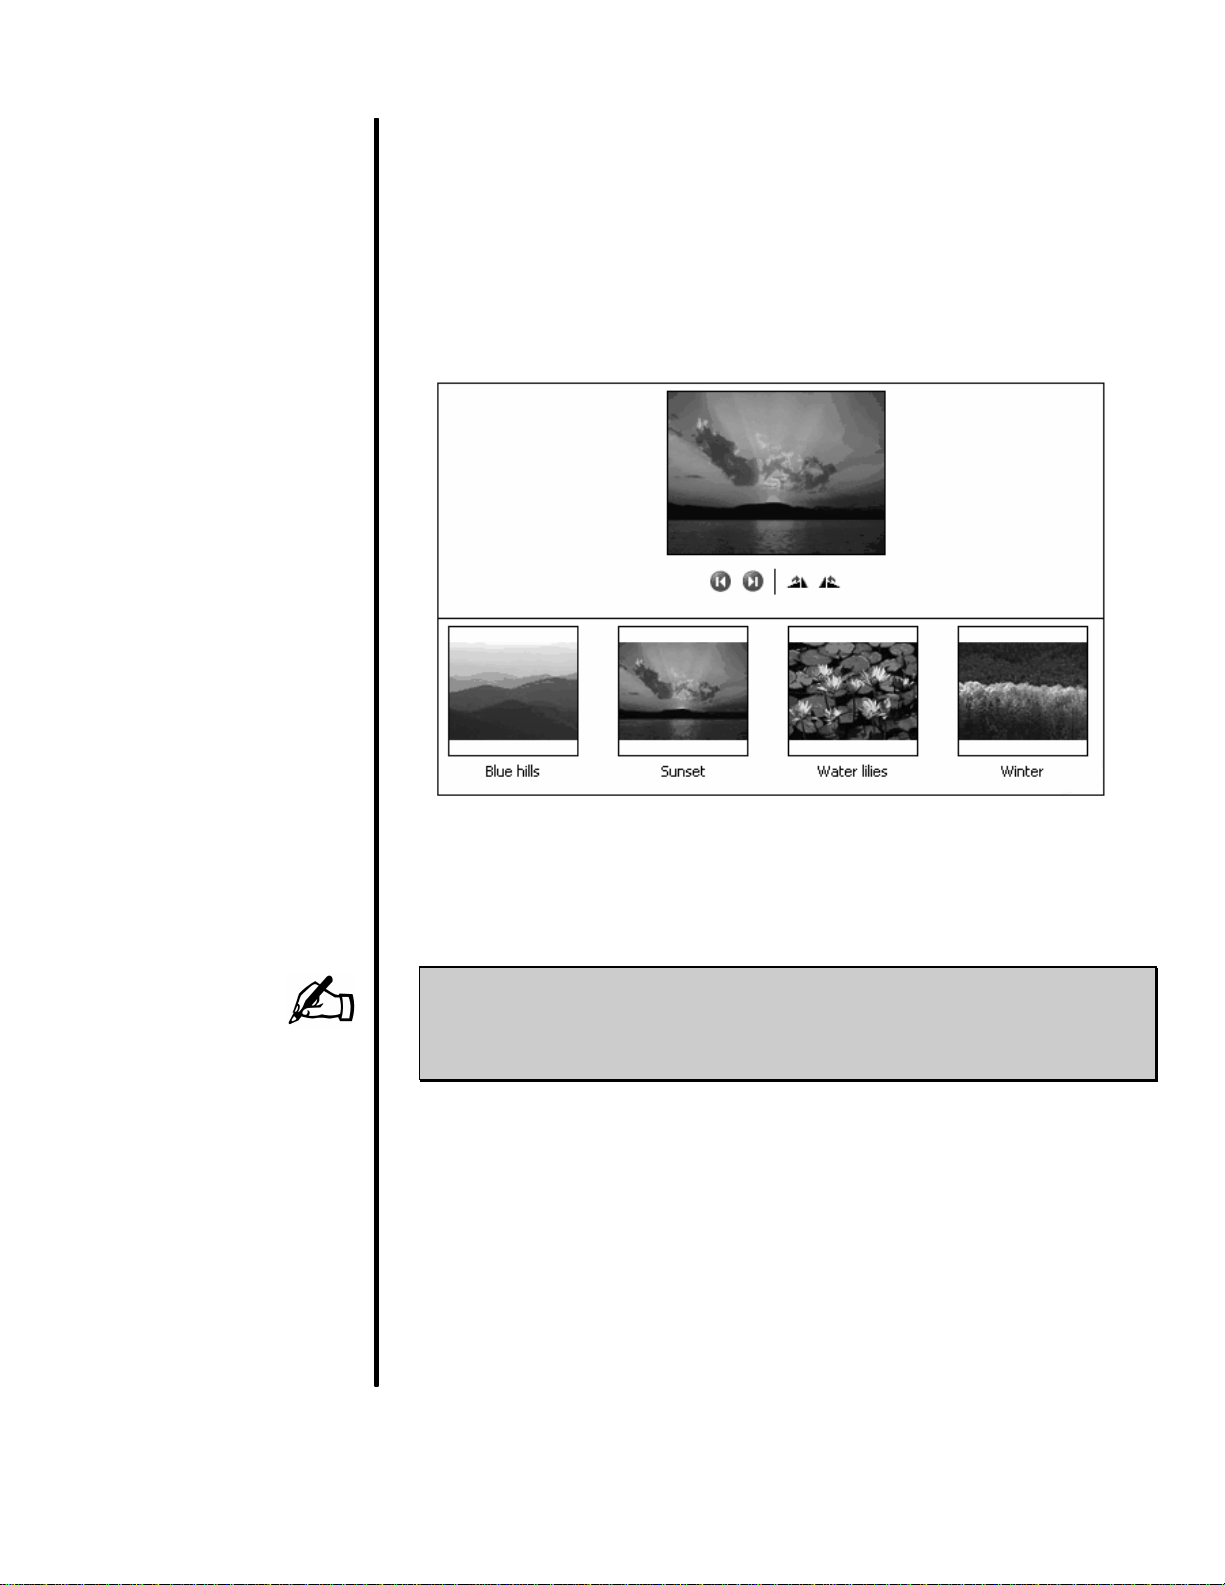
When viewing a folder containing pictures, an additional view option
(called Filmstrip) will be available.
This view allows you to see a larger display of the currently
selected picture in the top portion of the window.
In addition, this view allows you to adjust the window size to
increase/decrease the display size of the current photo.
There are buttons to display the previous and next picture and also
to rotate the currently displayed picture.
NOTE: Be careful when using the rotate option on pictures!
XP will automatically replace the original photo with the
rotated version. You should make a backup copy of
the original picture before choosing to rotate a photo.
Introduction to Windows XP w FAST Development Center w Buffalo State College
10
Icons view is similar to the Tiles view but displays smaller icons
and does not include sorting information:
The List view offers an alphabetiz ed listing of each item name:
Introduction to Windows XP w FAST Development Center w Buffalo State College
11
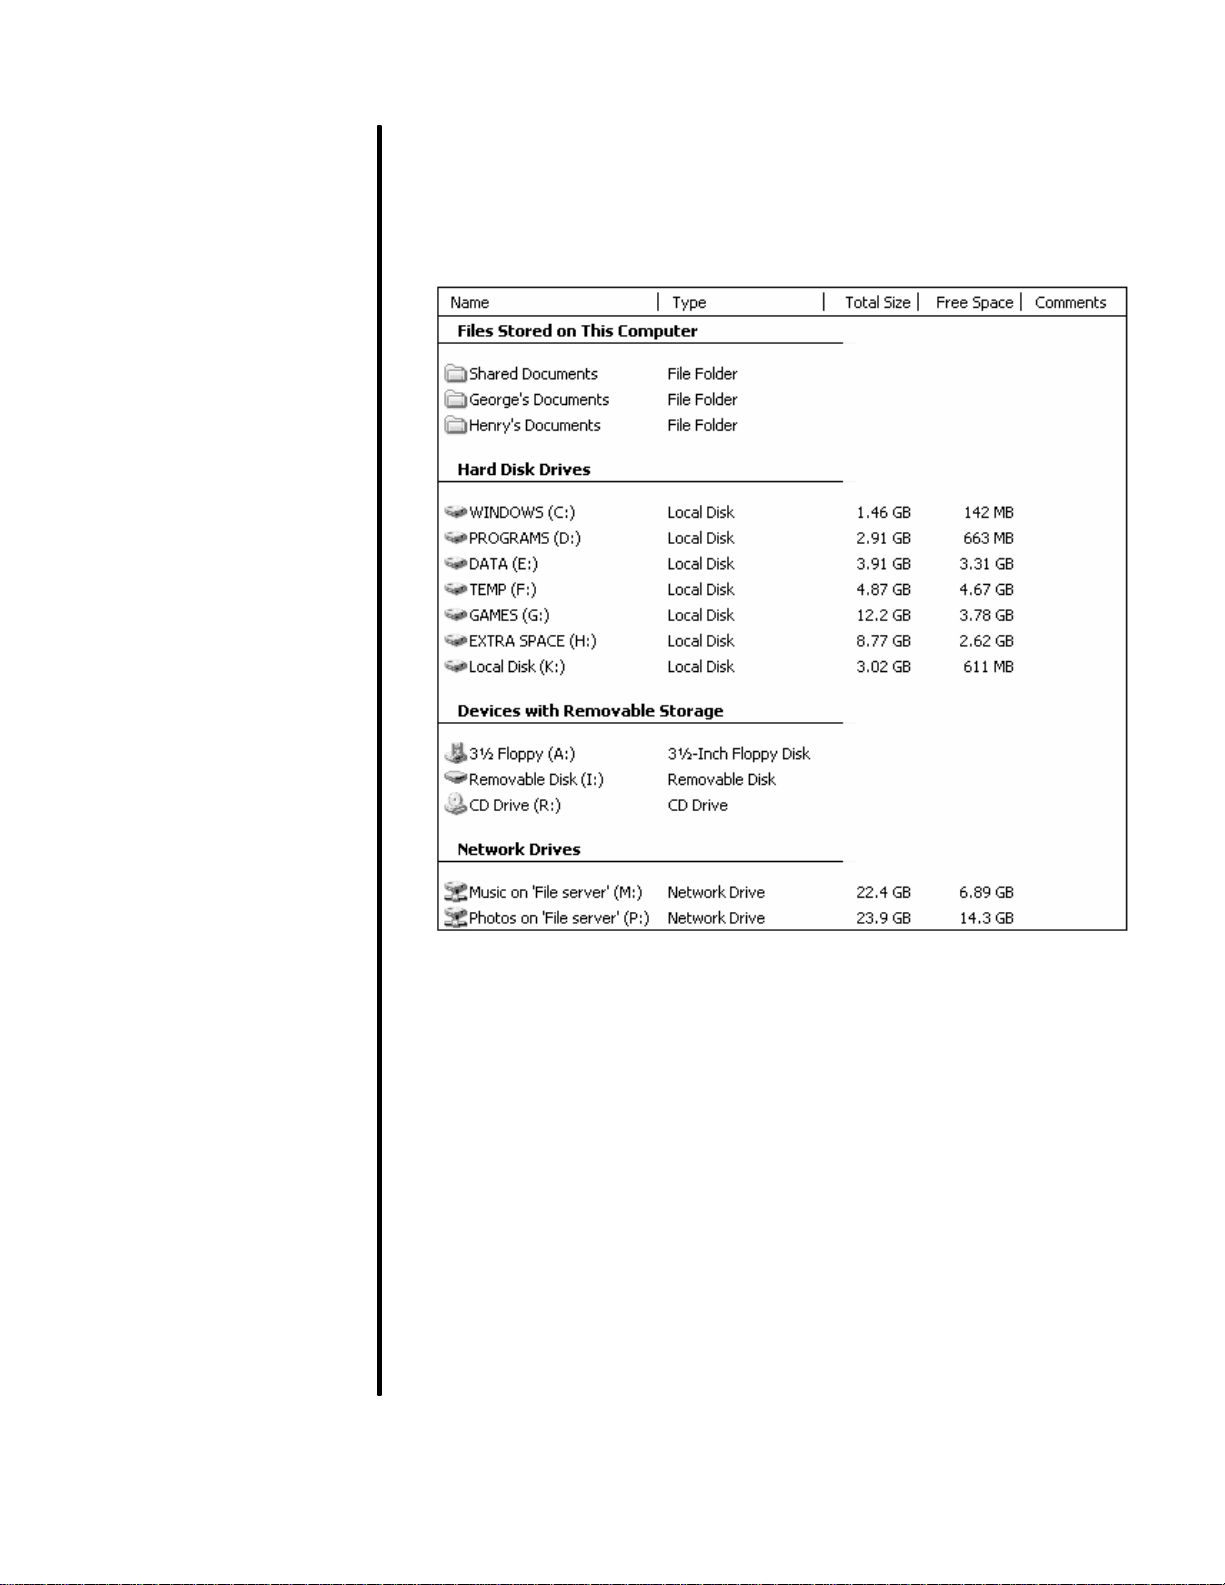
The Details view offers more detailed information about each
object. For example, when viewing the details of storage devices,
you will see the name of the device, the type of storage device, the
capacity (total size) and the amount of free space available.
Introduction to Windows XP w FAST Development Center w Buffalo State College
12
ARRANGING YOUR DATA
If you are working in the ”Details” view and wish to arrange (sort)
the information regarding your files based on one of the column
headings, you can easily do so by clicking on the column header.
When viewing the top level of My Computer (the one listing all of
your drives), clicking on a column header will organize your drives
according to the name, type or size. When viewing the actual
contents of a drive or folder, clicking on a column h eader will sort
that column in ascending (A-Z) or descending (Z -A) order.
Click once to sort in ascending order. Notice that an arrow appears
- indicating the current sort order for the selected column. Click a
second time on the same heading to sort in descending order. The
arrow will change direction to show the new sort order.
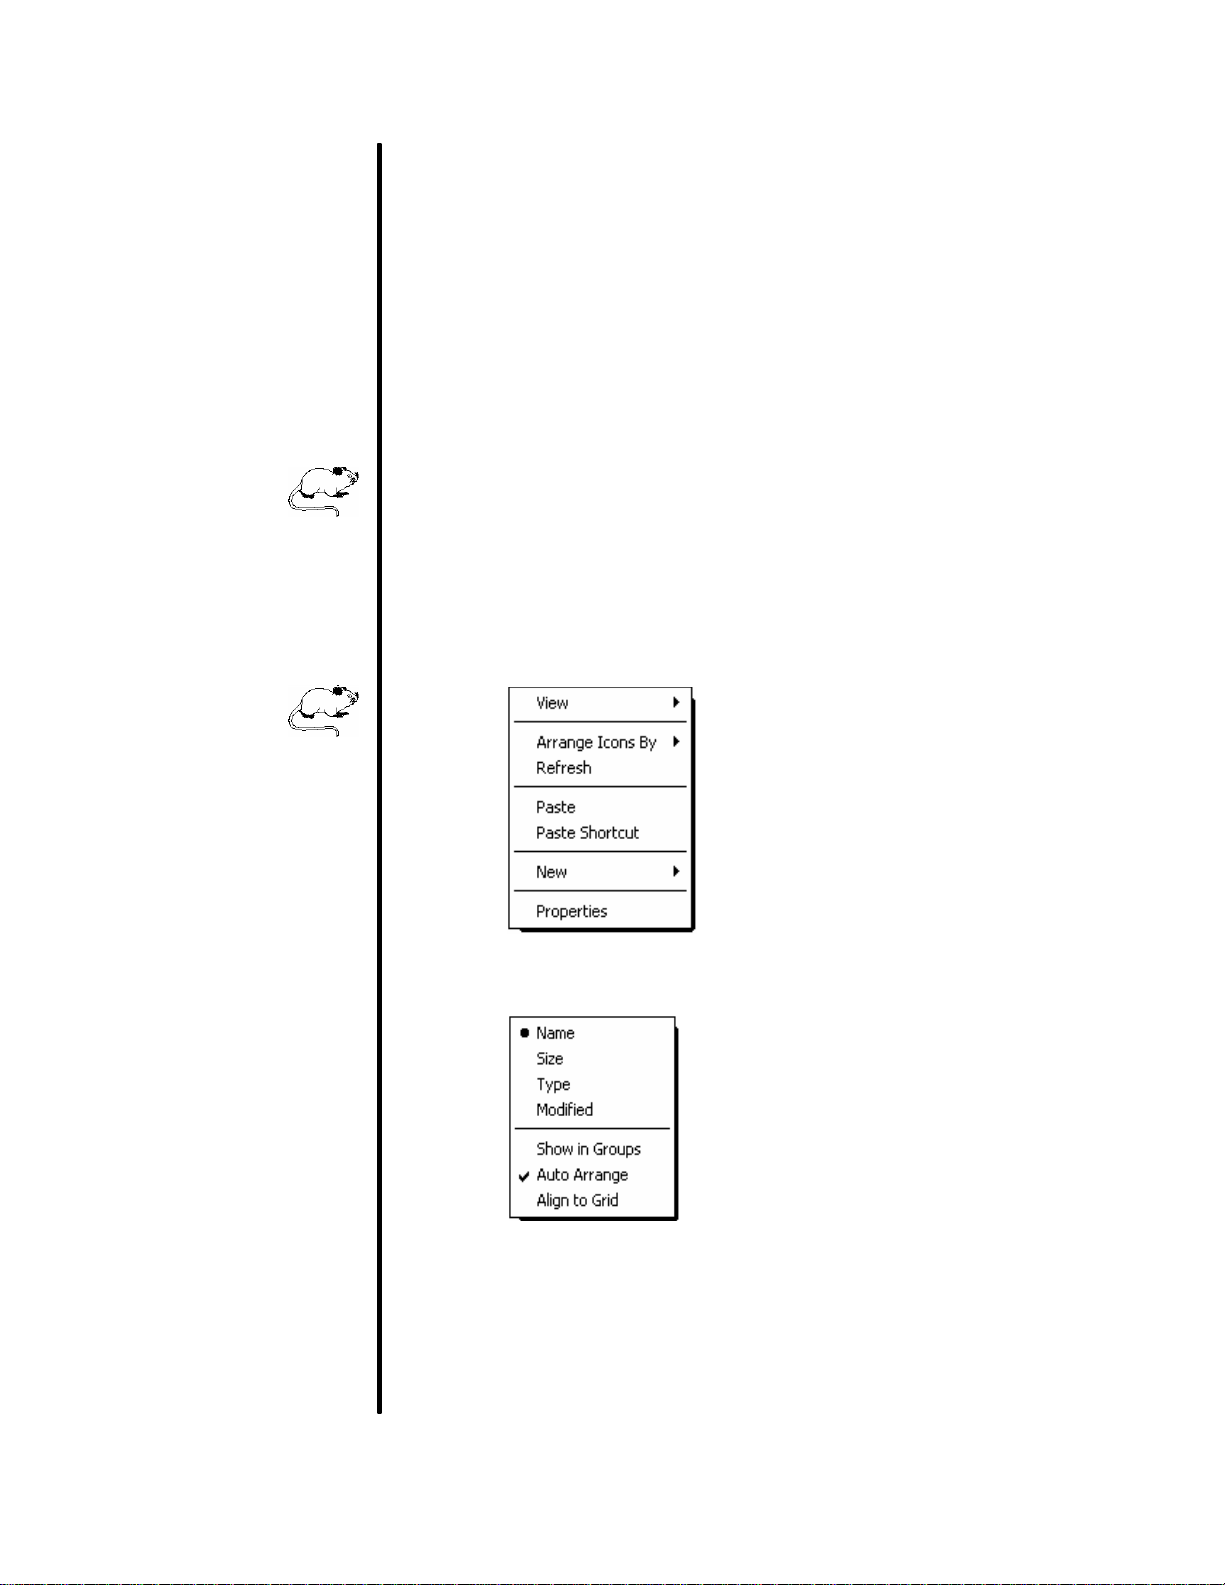
If you’re working in one of the icon views, you can arrange the
icons by following these steps:
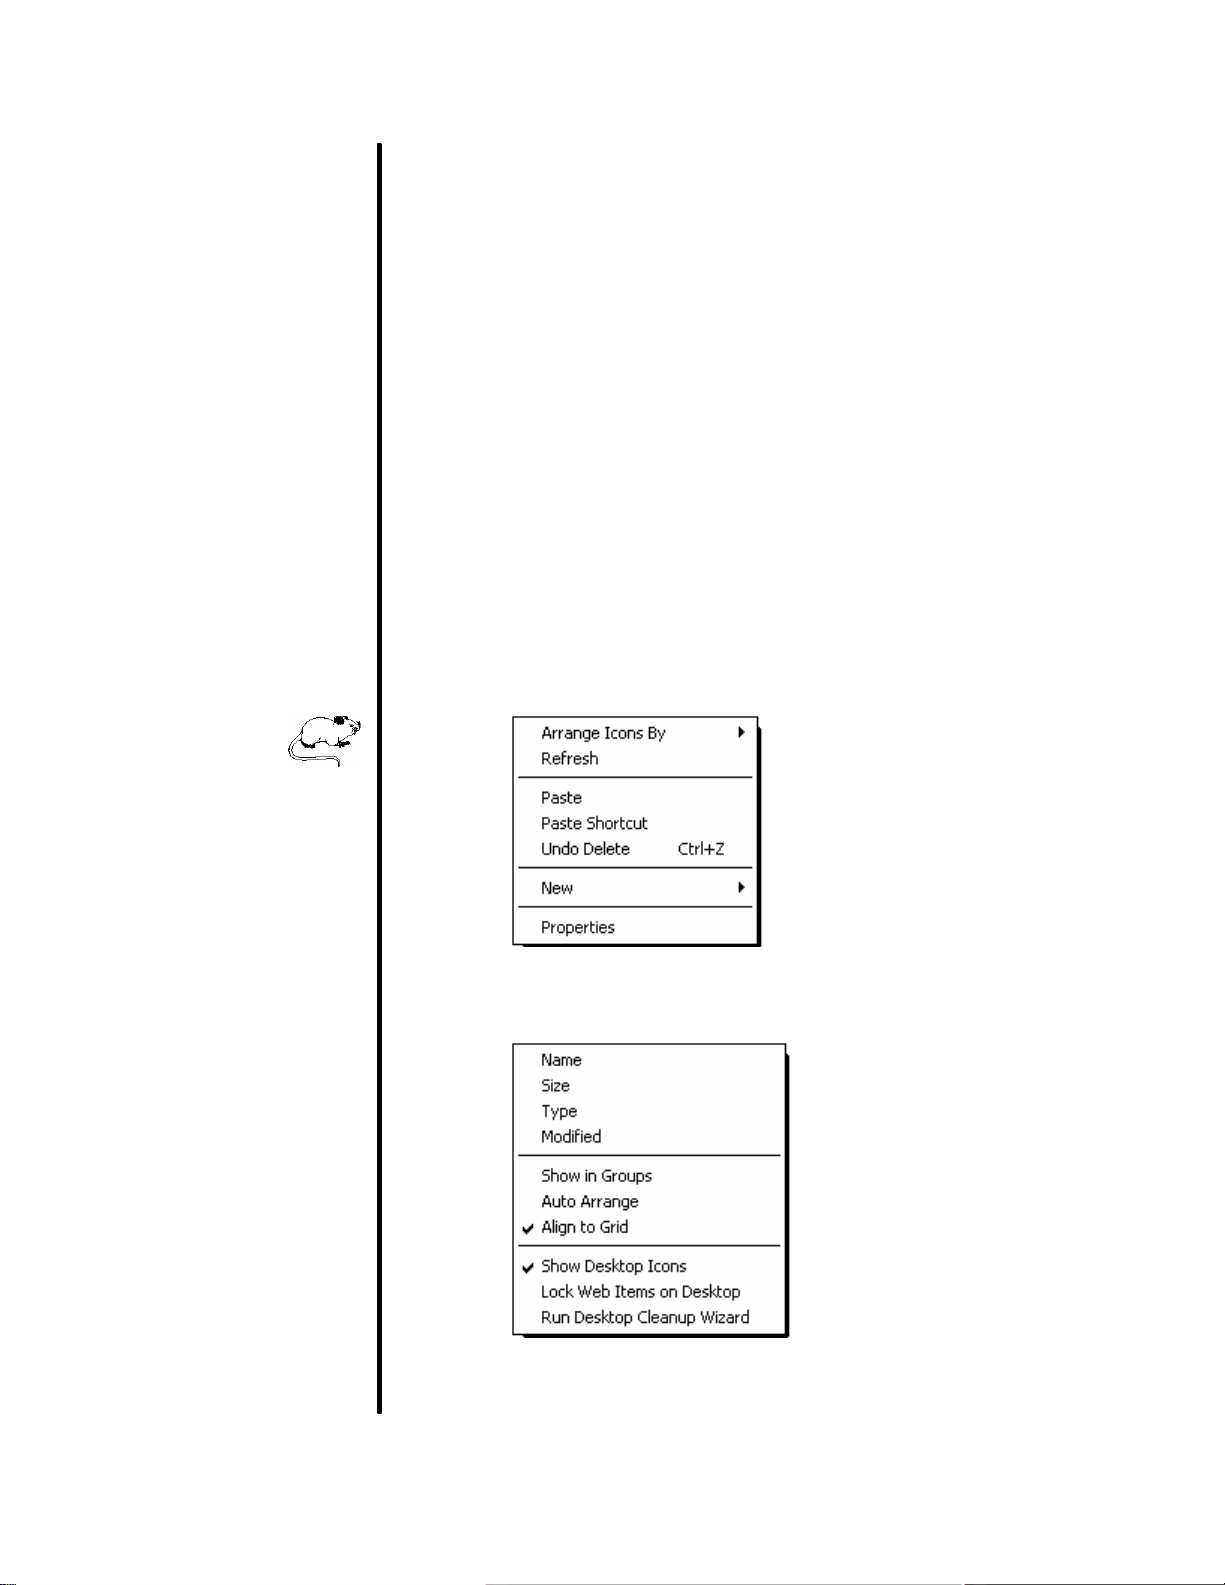
ΠClick your [RIGHT] mouse button
while pointing to a blank area.
• Select Arrange Icons By Ø from the pop-up menu.
Ž From the sub-menu, select the
way in which icons should be
arranged.
In addition to sorting the icons by name, size, type and when they
were last modified, you can break them into groups or have XP
automatically arrange them. The last option (Align to Grid) is used
to align the icons evenly if you are manually arranging them.
Introduction to Windows XP w FAST Development Center w Buffalo State College
13
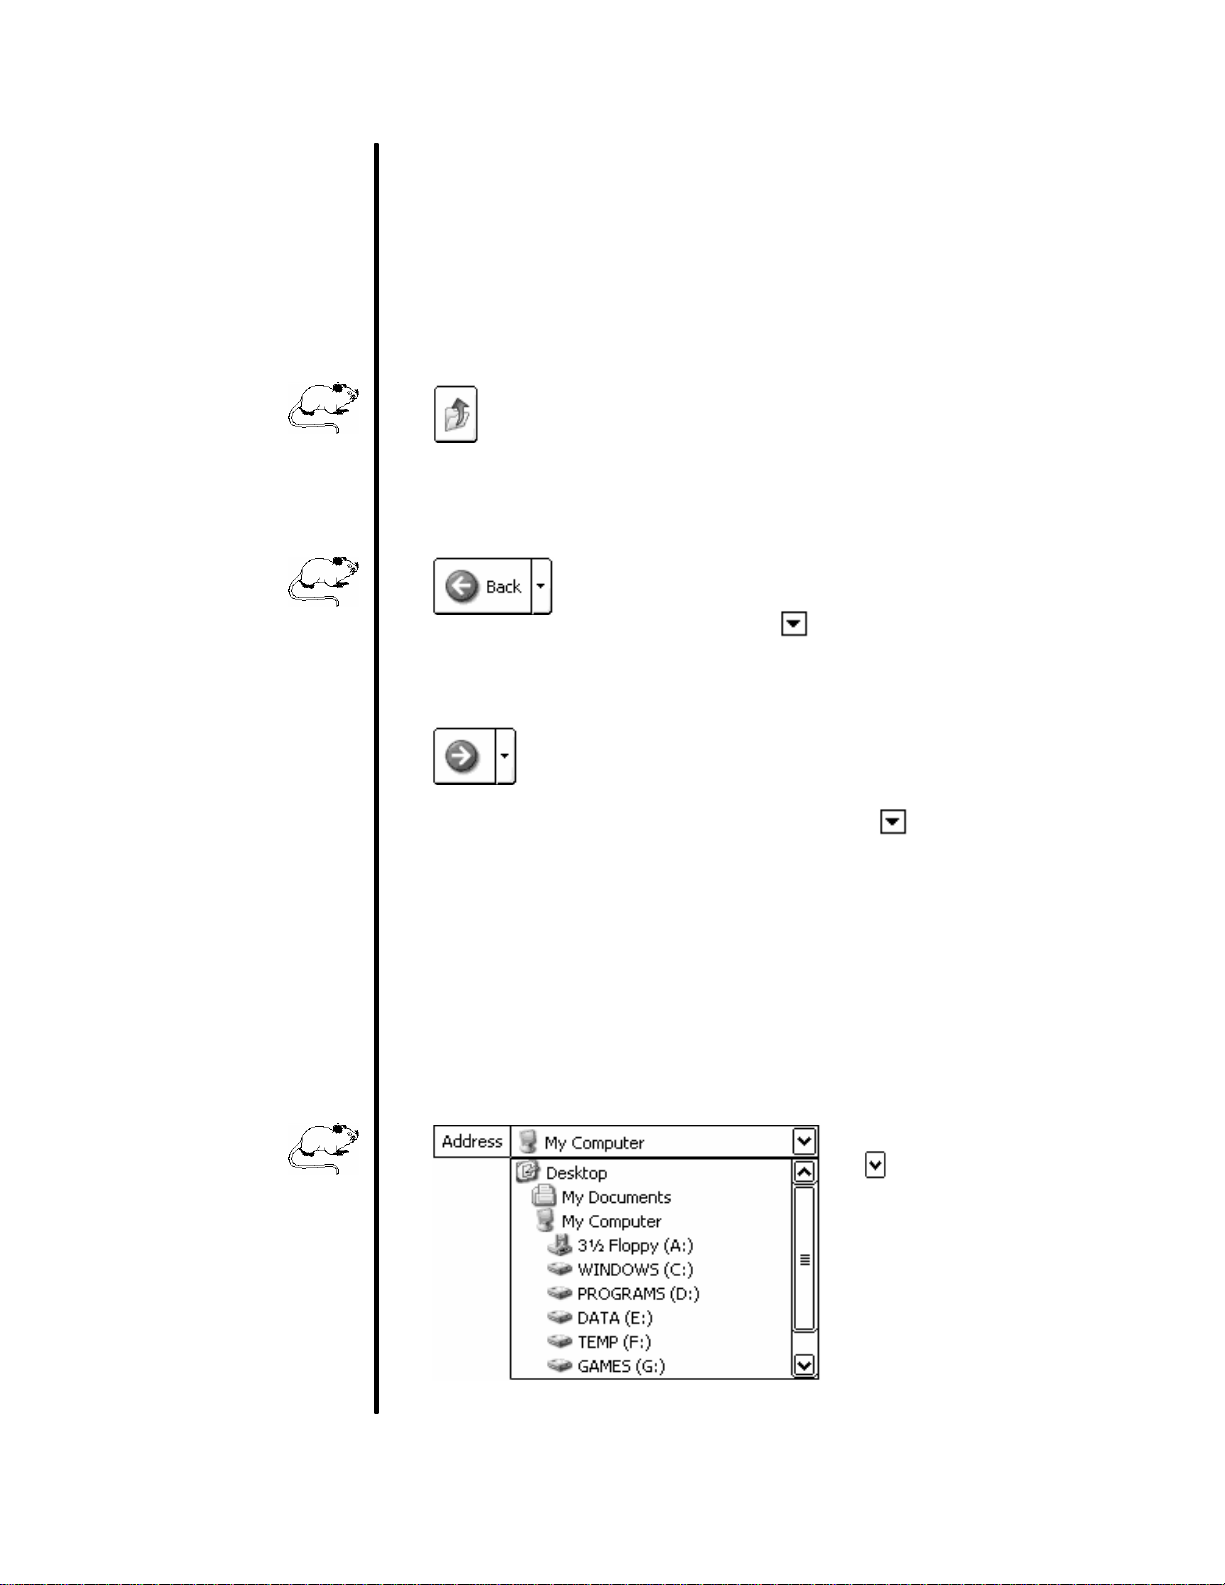
DISPLAYING A PARENT FOLDER
As you view the contents of a drive, you will notice that each folder
you open takes you further down the hierarchy of your system. If
you are working with a computer containing a folder with several
sub-folders, you may want to move up one level at a time. The
folder above the current one is referred to as the “parent” folder.
The fastest way to move up one level at a time is to
click on this button (located on the toolbar).
SELECTING PREVIOUSLY VIEWED OBJECTS
Click on this button to move back through your
previously viewed items - one at a time. If you click
on the down arrow to the right of the button, you
can choose from a pull -down list of previously viewed
objects (e.g., drives or folders).
If you have been cycling back to previously viewed
items, you can click on this button to move forward
through your list of viewed items - one at a time. If
you click on the down arrow to the right of the
button, you can choose from a pull -down list of
previously viewed objects (e.g., drives or folders).
USING THE ADDRESS BAR
To quickly select another drive on your system (without moving
through previously viewed objects), access the Address Bar:
Click on the down arrow
(located to the far right
of the Address Bar) to
access a pull -down list of
available drives. From the
list provided, click on the
drive you wish to access.
Introduction to Windows XP w FAST Development Center w Buffalo State College
14

RENAMING AN OBJECT
USAGE: You might decide after saving a file or creating a folder that you
assigned the wrong name to it or misspelled it. If this occurs, you
can rename the object.
To rename a file or folder, follow the steps outlined below:
ΠSelect the object to be renamed.
• Choose Rename this file from
the “File and Folder Tasks” pane
(located along the left side of the
My Computer window).
The selected object’s name will be highlighted, as illustrated below:
Ž When you see the name highlighted, you may begin entering
a new name. As you start typing, the original name will be
replaced with the new entry.
• When done, press E.
TIP: You can also rename an object by clicking on it twice
(slowly). If you click once on an object, it will become
selected. If you click a second time, you will be able to
rename it. When done, click away. Be careful not to
double-click on the object or you will be running it!
Introduction to Windows XP w FAST Development Center w Buffalo State College
15
MOVING/COPYING FILES AND FOLDERS
USAGE: There will be times when working with Windows XP that files or
folders will need to either be moved to a new location or copied
from one location (disk drive) to another.
SELECTING CONTIGUOUS FILES/FOLDERS
To select a group of contiguous files or folders, follow these steps:
ΠClick on the first file or folder to be selected.
• While holding down the S key, click on the last file or
folder to be selected. All files between the first and last
selected file or folder will be included in the selection.
SELECTING NONCONTIGUOUS FILES/FOLDERS
To select noncontiguous files or folders, follow these two steps:
ΠClick on the first file or folder to be selected.
• While holding down the C key, click on each additional
file or folder to be selected.
TIP: To quickly select all obj ects within the current view,
press C+a or access the Edit à Select All
menu.
TIP: You can also select a group of items by clicking the
[LEFT] mouse button on an empty space and
dragging a boxed outline around the items you wish to
include.
If you use the [RIGHT] button, the shortcut menu will
appear when you release the mouse button.
Introduction to Windows XP w FAST Development Center w Buffalo State College
16

MOVING FILES OR FOLDERS
To move a file or folder, follow the steps outlined below:
ΠSelect the item(s) to be moved.
• Choose Move this file from the
“File and Folder Tasks” pane
(located along the left side of the
My Computer window).
Ž Choose the new location for the selected item(s) from the list
of available drives and folders. You can move the selected
item into a new folder by selecting where the new folder
should be located and then clicking on .
• When done, click on .
Introduction to Windows XP w FAST Development Center w Buffalo State College
17
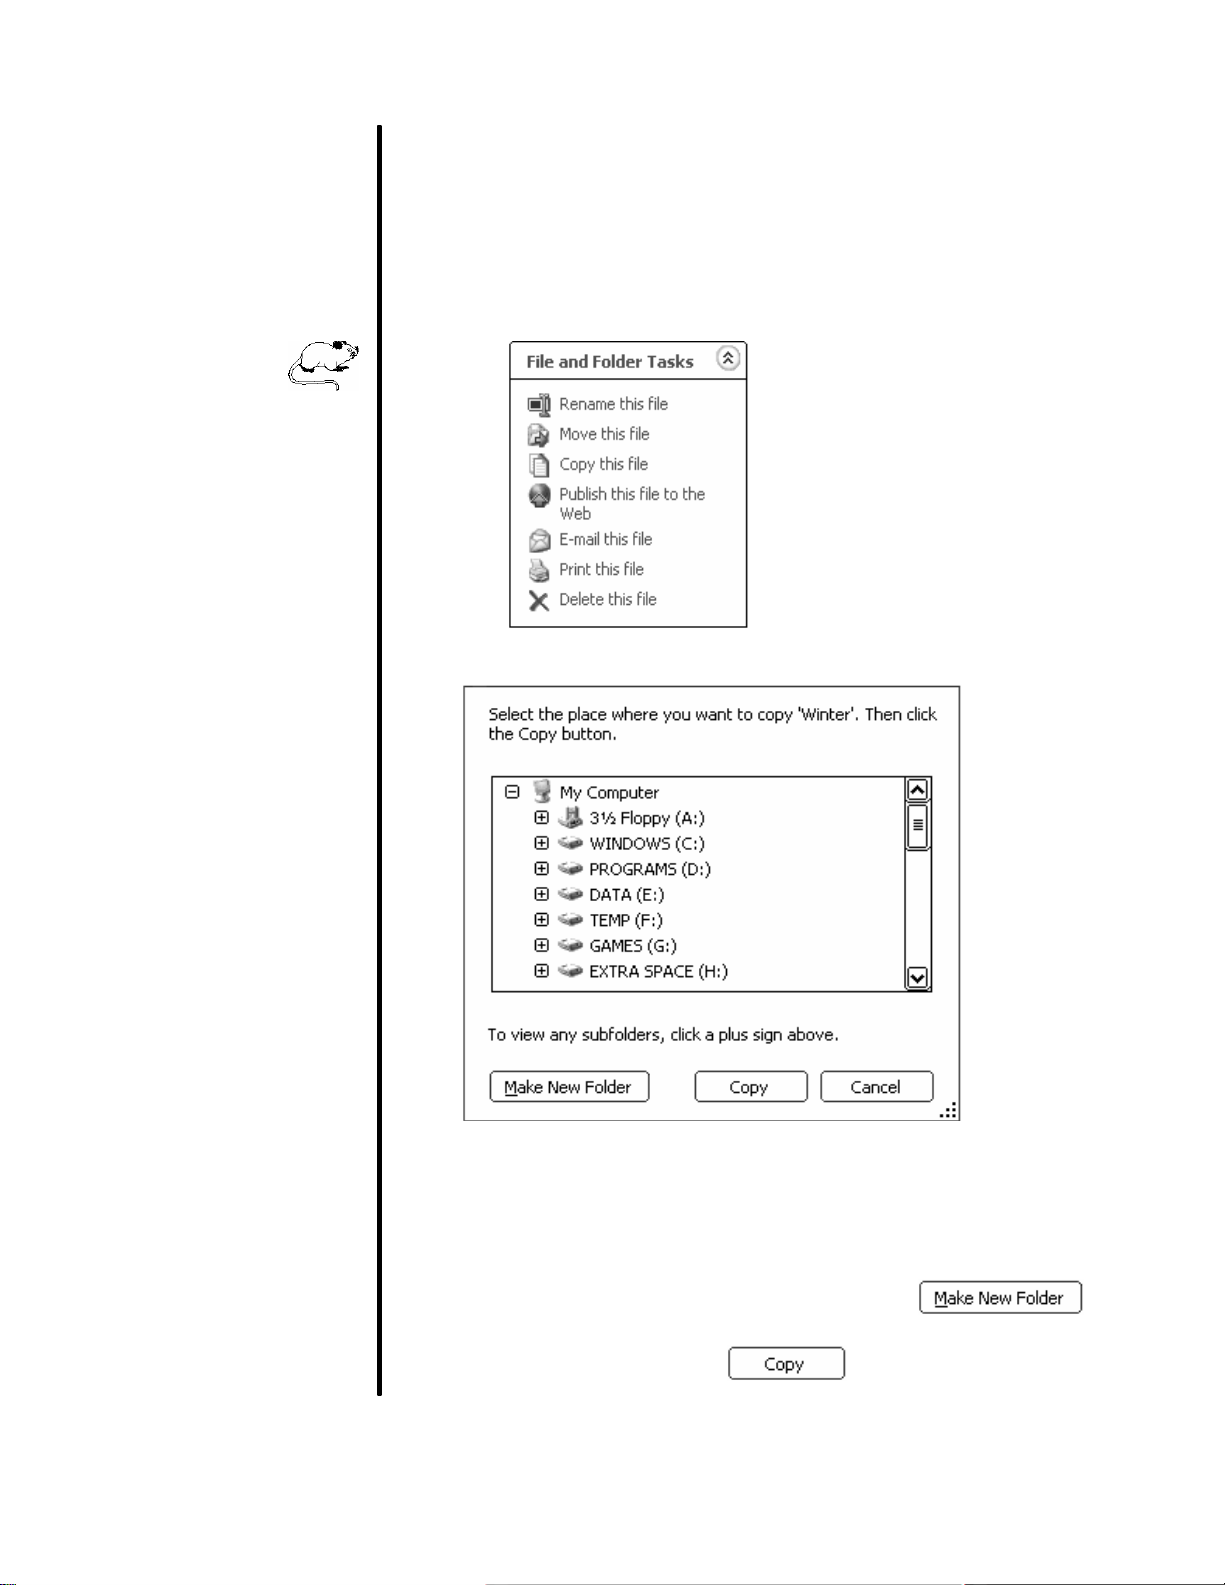
COPYING FILES OR FOLDERS
To copy a file or folder, follow the steps outlined below:
ΠSelect the item(s) to be copied.
• Select Copy this file from the
“File and Folder Tasks” pane
(located along the left side of the
window).
Ž Choose the new location for the selected item(s) from the list
of available drives and folders. You can copy the selected
item into a new folder by selecting where the new folder
should be located and then clicking on .
• When done, click on .
Introduction to Windows XP w FAST Development Center w Buffalo State College
18

WORKING WITH WINDOWS EXPLORER
USAGE: The Windows Explorer is the main interface through which you
interact with Windows XP. You use the Explorer to access your
drives, folders, files, and other system resources.
The Explorer runs the Desktop, taskbar, and all of the other visual
components within Windows XP. However, we typically see the
Explorer only when working within an Explorer window (such as My
Computer, Network Connections, Control Panel, etc.)
The Explorer operates in two modes: Open and Explorer. The
open mode displays a single folder or drive at a time and provides
task panes along the left side of the window for quick and easy
access to your most commonly used functions. When you run My
Computer, you are basically opening the My Computer folder within
the Explorer.
The Explorer mode replaces the task panes with a Folders pane.
This pane displays your drives and folders in a hierarchal format
(referred to as a Directory Tree). If you are used to quickly moving
up and down a directory with your mouse, you will probably prefer
working within the Explorer mode over the Open mode.
To switch from Open mode to Explorer, click on this
button (which is located on the toolbar).
To access Explorer directly from your desktop, follow these steps:
ΠRight click on the Start button; choose
Explore.
Introduction to Windows XP w FAST Development Center w Buffalo State College
19

The Explorer window will appear, as illustrated below:
By having an efficient filing system, you can easily locate a file. On
computers, folders are used to accomplish this task. Each folder
on a disk is used to store a different group of files or additional
folders. Because hard drives have the capacity of storing hundreds
or thousands of files, it is essential to organize these files in a
manner which is as structured as possible so that finding them is
simple.
To display the files for a particular computer, disk drive, or folder
simply select the object you wish to display from the left side of the
window and Explorer will list the contents of the selected object on
the right side of the window.
Introduction to Windows XP w FAST Development Center w Buffalo State College
20

ICONS WITHIN EXPLORER
Along the left side of the window you may see these icons:
The Desktop icon represents your entire desktop,
which includes your computer, drives, folders, and
other computers you have access to.
The My Computer icon represents your computer
system.
The Floppy Drive icon represents floppy drives.
The Hard Drive icon represents installed hard drives.
It is usually named Local Disk (C:)
The Shared Drive icon represents a drive or folder on
your system that has been shared with other users.
The Removable Drive icon represents a drive (such
as a Zip drive or a Compact Flash Reader) that is
removable from your system.
The CD ROM Drive icon represents any CD ROM
drives that may be installed on your system.
The Network Drive icon represents a drive letter that
is connected to another computer.
The Folder icon represents existing folders.
In addition to the icons shown above, Explorer provides quick
access to some of the system objects via the following icons:
The Control Panel folder provides access to various
system settings, such as modems, mouse, network,
passwords, and sound.
The My Documents folder contains frequently used
documents and templates for new files.
Introduction to Windows XP w FAST Development Center w Buffalo State College
21

The My Network Places icon is used to display
additional computers on your network and to provide
access to their resources (e.g., drives or printers).
The Recycle Bin folder contains any deleted items.
EXPANDING/COLLAPSING ICONS
An icon in the left portion of the window containing a
plus sign indicates that the icon may be expanded to
display information stored beneath it.
An icon containing a minus sign indicates that the
icon has been expanded and can now be collapsed to
hide the information stored beneath it.
Introduction to Windows XP w FAST Development Center w Buffalo State College
22

MOVING WITH DRAG & DROP
You learned how to move and copy objects using My Computer but
you can also move or copy items using Drag & Drop within
Explorer. This feature allows mouse users to "drag" an item to a
new location. Once the location is reached, you "drop" the selected
item off.
To move an item or group of items using the drag & drop feature,
follow the steps outlined below:
ΠSelect the file(s) or folder(s) to be moved - from within the
right pane of the Explore window.
• Point to one of the selected items but do not click.
Ž Begin dragging the selected item(s) with your [RIGHT]
mouse button to the location in the directory tree within the
left pane. Do not use the [LEFT] mouse button to drag!
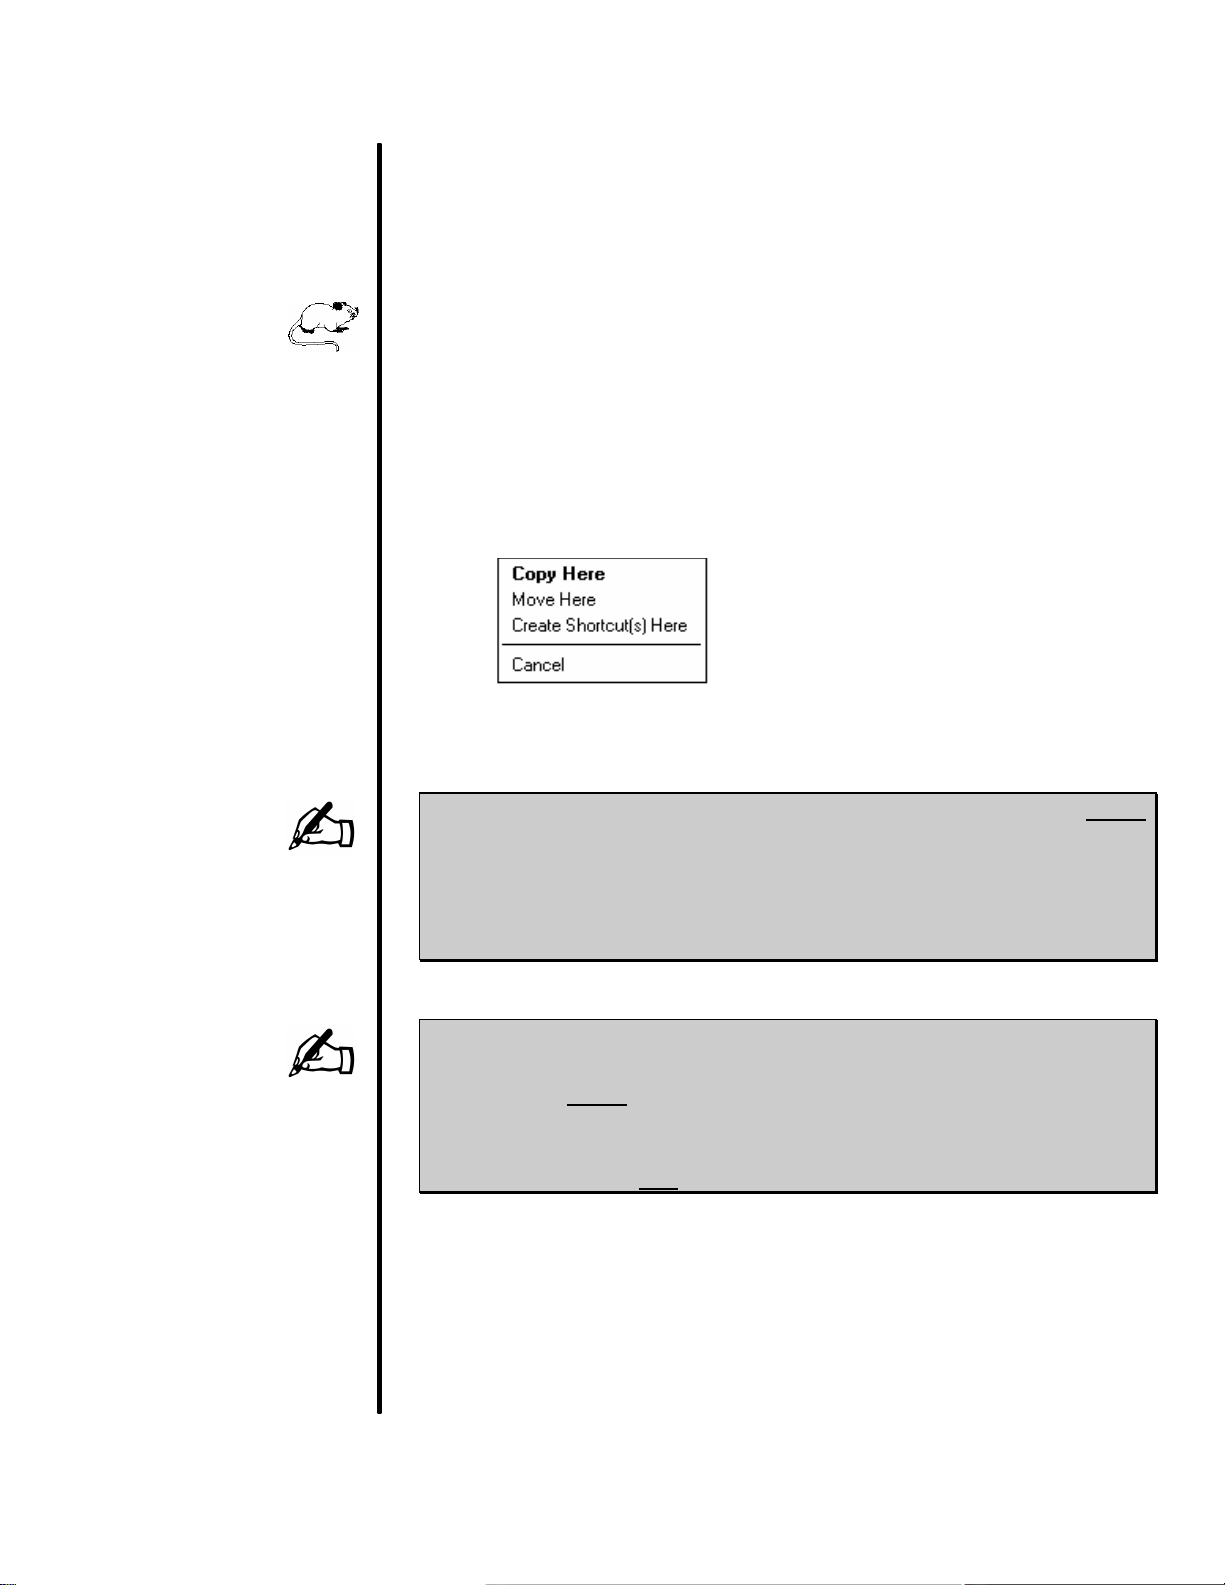
• When you reach the correct location,
release the mouse button. A pop-up
menu will appear asking if you want to
move or copy the selected item(s).
Choose Move Here from the list.
NOTE: If you are dragging an object to a location on the same
drive, Explorer will assume you want to move the item
and will automatically bold that selection in the pop-up
menu. However, if you are dragging the object to
another drive, Explorer will assume you want to copy
the item rather than move it.
NOTE: You can also move an object by dragging it with the
[LEFT] mouse button. However, if you are moving to
a different drive, you will need to hold the S key
while dragging in order to ensure the object is moved
rather than copied. Be sure to let go of the mouse
button first once you reach the destination.
Introduction to Windows XP w FAST Development Center w Buffalo State College
23
COPYING WITH DRAG & DROP
To copy an item or group of items using the drag & drop feature,
follow the steps outlined below:
ΠSelect the fil e(s) or folder(s) to be copied - from within the
right pane of the Explore window.
• Point to one of the selected items but do not click.
Ž Begin dragging the selected item(s) with your [RIGHT]
mouse button. Do not use the [LEFT] mouse button to drag!
• When you reach the correct location,
release the mouse button. A pop-up
menu will appear asking if you want to
move or copy the selected item.
Choose Copy Here from the pop-up list.
NOTE: If you are dragging an object to a location on the same
drive, Explorer will assume you want to move the item
and will automatically bold that selection in the pop-up
menu. However, if you are dragging the object to
another drive, Explorer will assume you want to copy
the item rather than move it.
NOTE: You can also copy an object by dragging it with the
[LEFT] mouse button. However, when copying to the
same drive, you will need to hold down the C key
while dragging in order to ensure the object is copied
rather than moved. Be sure to let go of the mouse
button first once you reach the destination
Introduction to Windows XP w FAST Development Center w Buffalo State College
24

CREATING FOLDERS
USAGE: To define your own levels of organization, you can create a
hierarchy of folders that can be used to organize your documents.
For example, you could have a folder named Documents which
may contain two sub-folders labeled Business and Personal. All
business documents would be stored within the Business folder
while all personal documents would be stored within the Personal
folder. Having the two separate folders would allow you to keep
your business and personal files stored separately.
To create a new folder, follow the steps outlined below:
ΠSelect the drive/folder (from the left side of the Explorer
window) under which the new folder should be placed.
• Access the following menu:
MENU:
file
new Ø
Ž Choose folder from the
sub-menu. Explorer will
add the new folder to the
bottom of your list, as
shown below:
• Enter a name for new folder - up to 255 characters.
• When done, press E.
Introduction to Windows XP w FAST Development Center w Buffalo State College
25

RENAMING FILES/FOLDERS
USAGE: Once a document or folder has been created, you may decide that
its name is not descriptive enough and that you would like to assign
a different name to it.
Follow the steps outlined below to rename a file or folder:
ΠClick once to select the file or f older to be renamed.
• Click a second time to edit the file or folder’s name.
NOTE: Be careful - clicking twice too quickly will open the
file/folder!
Ž A cursor appears indicating that you may now edit the
existing file or folder name.
Use the normal editing keys (e.g., ¢, =, R, and Q)
to edit the name. The file or folder name can contain up to
255 characters - including spaces.
NOTE: If a file name ends with an extension (3 characters
after a period), do not remove that portion from the
filename. Windows uses that extension to identify the
file type and application associated with the file.
• When done, press E.
Introduction to Windows XP w FAST Development Center w Buffalo State College
26

SETTING EXPLORER FOL DER OPTIONS
USAGE: In addition to the standard viewing options (such as displaying large
icons, small icons, list format), you can further customize what will
be displayed and how folders will look within Explorer. You can
customize each folder to look and act differently or you can assign
your customized settings to be used by all folders as the default.
To set folder options, access the following menu:
MENU:
tools
Folder options...
The following dialog box will be displayed:
Introduction to Windows XP w FAST Development Center w Buffalo State College
27

THE GENERAL TAB
The first tab is divided into four sections which allow you to specify
the Desktop style to apply, as discussed below:
Tasks This section is used to define whether the Task
pane (showing common tasks) is displayed
while viewing folders. Selecting the Windows
classic folders option simply removes the left
pane from the view.
Browse folders Use this section to have Explorer open each
folder within the same window (replacing the
last accessed folder’s contents) or in a new
window. Choosing the second option may
cause confusion by having too many folders
opened.
Click items as You can use this section to determine whether
follows you want to single click on items to open or run
them (just as you would to access a link on a
Web page) or if you prefer to double-click to
open or run items (as is typical in previous
Windows environments).
If you choose Single-click, you will be able to
highlight items by simply pointing to them. If
you choose Double-click, you will need to
actually click on an item to highlight it.
If you have made changes and then decide you want to reset the
options within this dialog box, click on .
Introduction to Windows XP w FAST Development Center w Buffalo State College
28
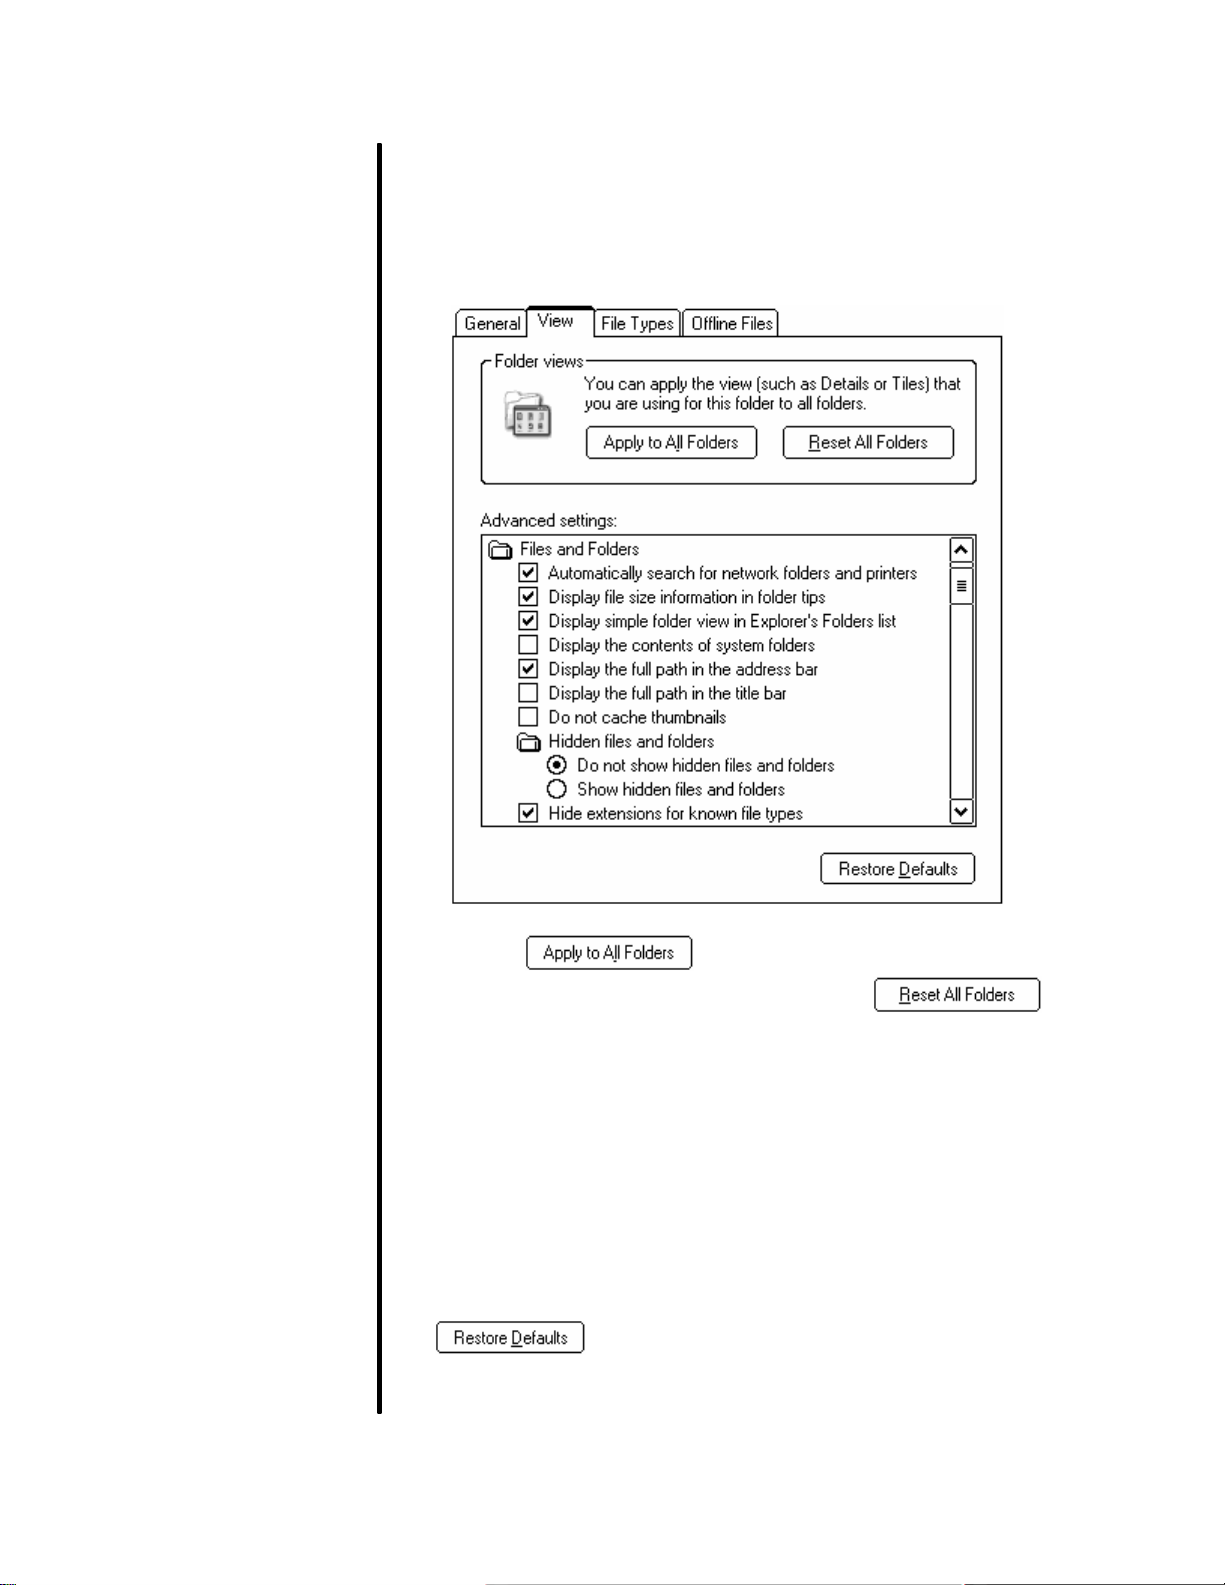
THE VIEW TAB
Use this tab to customize specific settings that affect what
information should be displayed within the folders:
Click on to make all folders use the same settings
as the currently selected folder. Click on to
restore the original settings that were in effect when Windows was
installed.
Use the section labeled Advanced settings to enable or disable
such items as displaying the contents of system folders, showing
hidden files and folders, and hiding file extensions. Check the
applicable box to enable a feature. Remove the checkmark to
disable it. Some options include radio buttons which allow you to
choose one of the items.
If you have made changes but don’t want to keep them, click on
to reset the options to their original settings.
Introduction to Windows XP w FAST Development Center w Buffalo State College
29

THE FILE TYPES TAB
Use this tab to associate files with specific extensions and
applications. This allows you to simply double-click on a file while
in Explorer and have the document automatically opened in the
application associated with it.
Most common types of files have already been associated with
applications and when a new application is installed, its file type will
normally be registered with Windows. You should only need to
make a change or addition if you wish to associate a file type with a
different application than originally specified or if your application’s
file type has not registered or is not being recognized.
If you know the exact location and name of the application, choose
. Click on to remove an association.
Select to modify the current association. Click on
to change settings affecting all selected file types.
Introduction to Windows XP w FAST Development Center w Buffalo State College
30
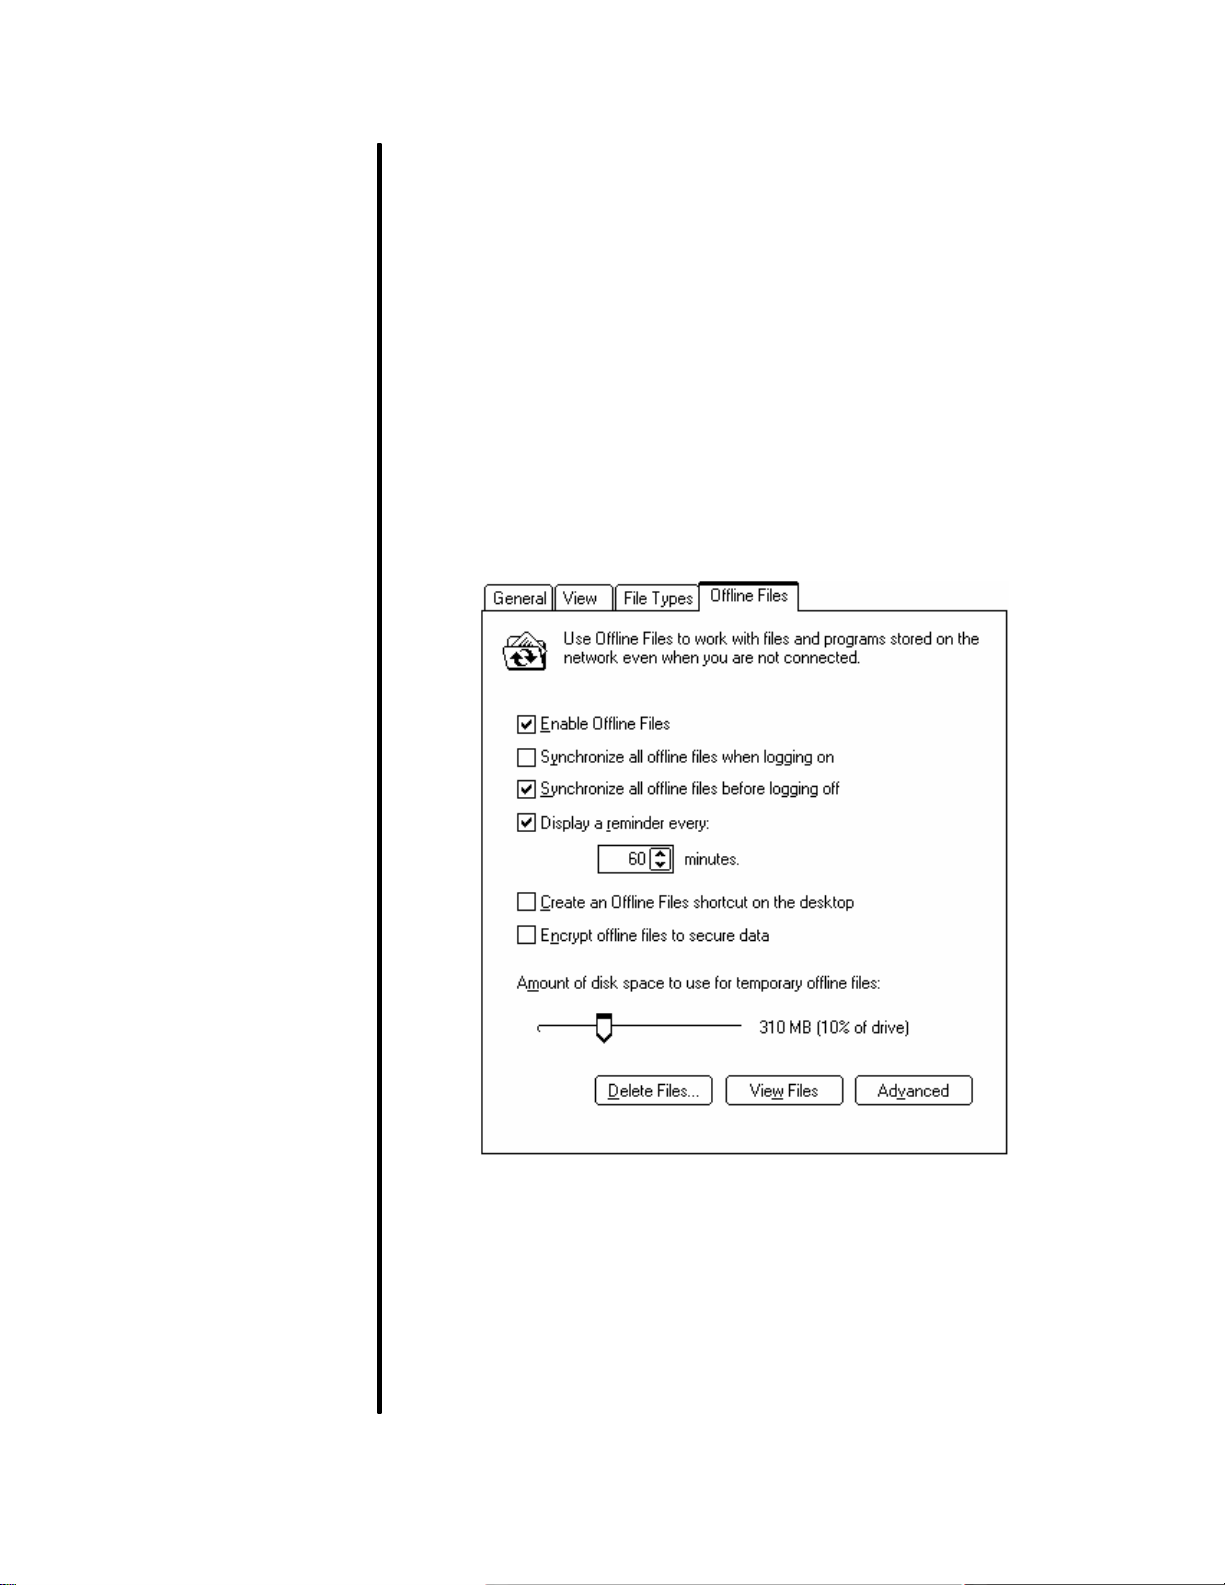
THE OFFLINE FILES TAB
Offline files lets you store copies of files located on a network drive
to your local drive so that you can work with them when your
computer is no longer connected to the network.
This allows you to keep copies of network files that you work on in
a local folder on your computer. This folder is automatically named
Offline Files. This means that you can work on those files even if
you lose the connection to the network. However, keep in mind
that you will need to synchronize the files on a regular basis to
ensure you have the latest versions.
The Offline Files tab contains the following options:
Use this tab to enable/disable the Offline Files option and to define
when offline files should be synchronized. You can choose how
often (if at all) to alert you when a networked computer goes offline.
You can also choose to create a shortcut on your desktop and
encrypt the offline files to keep them more secure.
Introduction to Windows XP w FAST Development Center w Buffalo State College
31

Click on to delete any files stored within your Offline
Files folder. This will not delete the original files on the network.
Click on to view the list of files available offline.
Click on to define how your computer should behave if
you lose a connection to a network computer you are working on.
You can choose to begin working with the offline version of the file
or to quit working.
When done, click on to save all changes made.
Introduction to Windows XP w FAST Development Center w Buffalo State College
32

WORKING WITH SHORTCUTS
USAGE: Shortcuts are icons that provide a quick means of opening a file or
folder or to launch a program. They can be added to the Desktop,
the Quick Launch toolbar or the Start menu. A shortcut is a pointer
to an existing object (e.g., file, folder, disk) but is not a copy of it.
PLACING A SHORTCUT ON YOUR DESKTOP
To place a shortcut on your desktop, follow these steps:
ΠFrom within Explorer or My Computer window, select the
object for which you want to create a shortcut.
• While pointing to the selected
object, click the [RIGHT] mouse
button once and select Send
To Ø from the pop-up menu.
The options within this pop-up
menu will vary depending on the
type of item you have selected.
Ž From the sub-menu,
choose Desktop (create
shortcut).
From the Desktop, check to see that your shortcut has been added.
You can, then, edit the shortcut’s name by clicking on it twice
(slowly) or by highlighting it and pressing F2 @.
Introduction to Windows XP w FAST Development Center w Buffalo State College
33

PLACING A SHORTCUT IN THE START MENU
To place a shortcut in the Start menu, follow these steps:
ΠSelect the object for which you want to create a shortcut.
• Drag the selected object to th e Start
button (which is located along the left
side of the taskbar). Do NOT release
the mouse button!
Ž After a brief delay, the menu will open. Drag the object to
the menu item to be associated with the selected object.
• To place the object in an existing sub-menu, drag the object
on top of the menu item and wait until the menu opens.
Next, drag the object to the desired sub-menu.
A horizontal line appears ( ) as you drag the object indicating where the shortcut will be placed when you
release the mouse button.
Introduction to Windows XP w FAST Development Center w Buffalo State College
34

MOVING A SHORTCUT
Moving a shortcut from the Desktop to a new location is a simple
matter of clicking and dragging.
To move a menu shortcut involves the steps outlined below:
ΠSelect the menu shortcut you wish to move by highlighting it
- without actually clicking on it!
• Once highlighted, click and drag the shortcut to the new
menu location. A horizontal line appears ( ) as you drag
the object - indicating where the object will be placed when
you release the mouse button.
Ž When you reach the desired location, release the mouse
button. The shortcut will have been placed in the new menu.
DELETING SHORTCUTS
You may decide that a shortcut is no longer needed and shoul d be
removed from your desktop.
To remove an unwanted shortcut from the Desktop, follow the two
steps outlined below:
ΠSelect the shortcut you wish to remove.
• Drag the shortcut into the .
NOTE: When you drag a shortcut to the Recycle Bin,
Windows will ask you to confirm the deletion.
Introduction to Windows XP w FAST Development Center w Buffalo State College
35
To remove a shortcut from the Start menu, follow these steps:
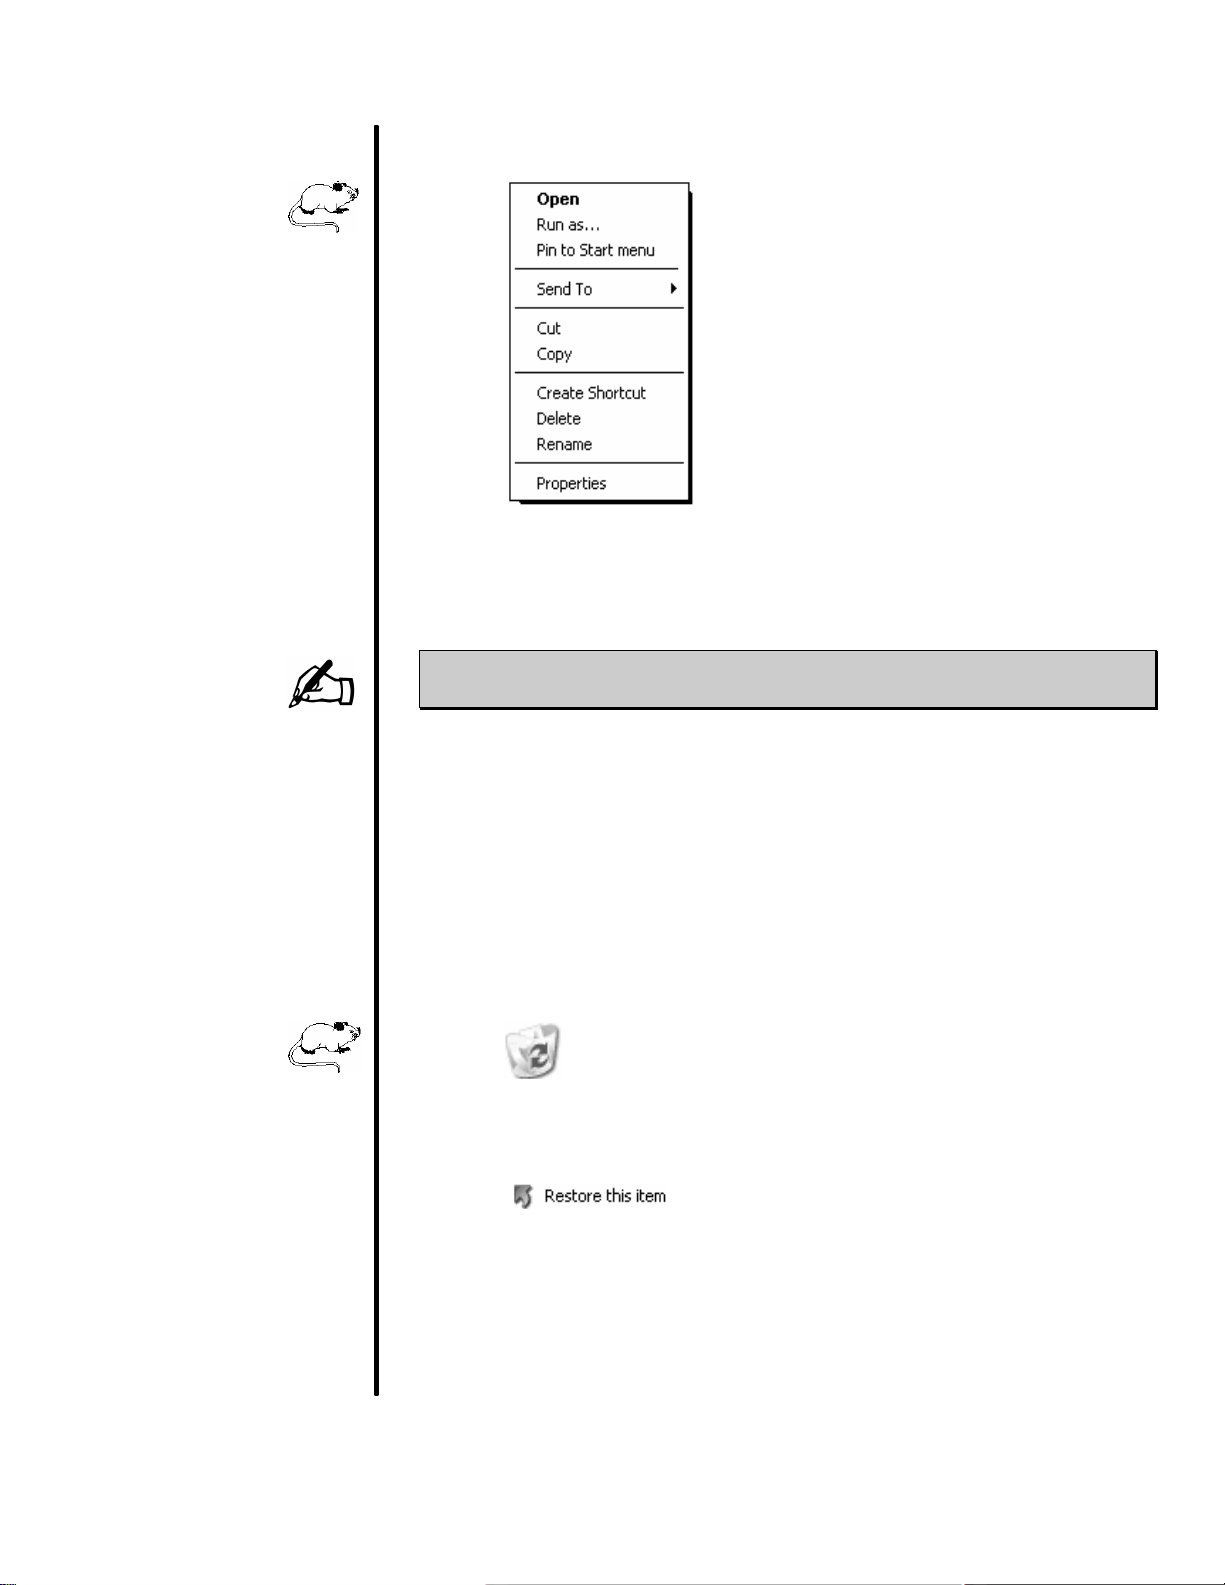
ΠPoint to the unwanted shortcut and then
click the [RIGHT] mouse button once.
• From the pop-up list of options, select Delete.
NOTE: When you delete a shortcut from the Start menu,
Windows will ask you to confirm the deletion.
UNDELETING SHORTCUTS
If you accidentally deleted a shortcut and want to restore it, you can
do so by following the steps outlined below:
ΠDouble-Click on the Recycle Bin (which is
located on the Desktop).
• Select the shortcut to restore from the list of deleted items.
Ž Click on this task - which appears on the
left side of the Recycle Bin window
when an item is selected.
Introduction to Windows XP w FAST Development Center w Buffalo State College
36

CUSTOMIZING THE DESKTOP
USAGE: Since you will access your desktop on a daily (or regular) basis,
you will want to customize it to suit your particular needs/wants.
For example, just as you would decide what colors to have in your
office, you can customize your desktop colors.
Windows XP allows you to customize your desktop in a variety of
ways. You can rearrange your icons, change background colors
and patterns, customize the screen saver, customize Windows
colors, and change video resolution.
Before continuing, be sure that the Desktop is visible.
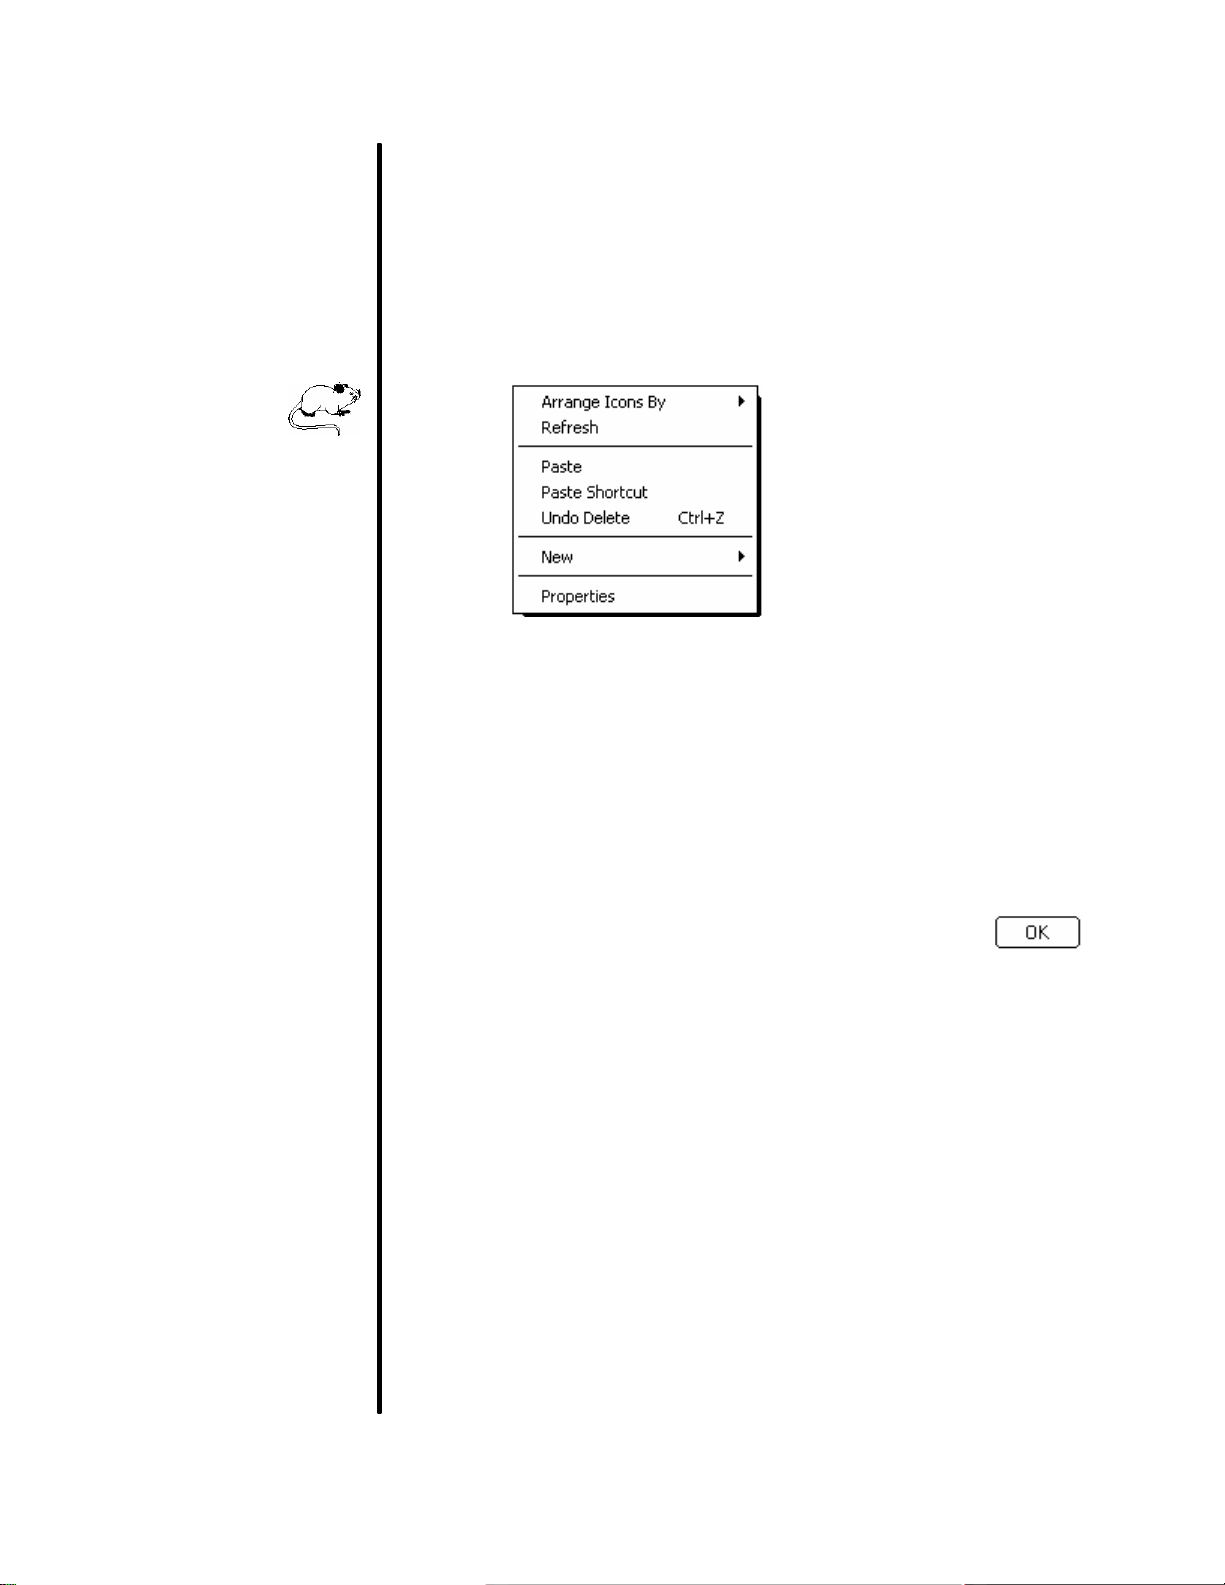
Follow these two steps to customize your desktop:
ΠClick your [RIGHT] mouse button
while pointing to a blank spot on
your desktop.
• Select the desired option to customize from the pop-up
menu.
Introduction to Windows XP w FAST Development Center w Buffalo State College
37
ARRANGING ICONS ON THE DESKTOP
When working with Windows XP, you should know that icons are
used to represent computers, folders, and programs/documents
stored on your computer system.
As you add shortcuts and new icons to your desktop, you may
notice that they are placed randomly on your desktop which can
become messy if you add several icons. You can reorganize your
desktop by rearranging the icons by name, type, size or date.
These are the same choices as arranging icons through the
Explorer window.
Although you can rearrange them manually by clicking and
dragging them to their new location, you can also instruct Windows
to Auto Arrange the icons, which will automatically arrange new
icons.
To arrange icons on your desktop, follow these three steps:
ΠClick your [RIGHT] mouse button
while pointing to a blank spot on
the Desktop.
• Select Arrange Icons By Ø from the pop-up menu.
Ž From the top of the sub-
menu, select the way in
which icons should be
arranged.
Introduction to Windows XP w FAST Development Center w Buffalo State College
38

ALIGNING THE ICONS ON YOUR DESKTOP
If you have a tendency to manually rearrange the icons on your
desktop, you may find that after awhile the icons no longer look
neatly arranged.
If you like the icons to be neatly arranged in rows and columns, you
can have Windows re-align and evenly space your icons.
Before continuing, be sure that the Desktop is visible.
To align the icons on your desktop, follow these steps:
ΠWhile pointing to a blank spot on
your desktop, click your [RIGHT]
mouse button.
• Select Arrange Icons By Ø from the pop-up menu.
Ž Select Align to Grid from
the sub-menu.
Introduction to Windows XP w FAST Development Center w Buffalo State College
39
CHANGING THE DESKTOP APPEARANCE
You can customize the appearance of your desktop by changing
background colors, changing the colors of your windows, or adding
pictures to your background.
To change the Desktop appearance, follow these steps:
ΠClick your [RIGHT] mouse button
while pointing to a blank spot on
the Desktop.
• Select Properties from the resulting pop-up menu.
Ž Using the five tabs (displayed on the next several pages),
set the options you would like to customize your desktop.
• Once you have customized the Desktop, click .
Introduction to Windows XP w FAST Development Center w Buffalo State College
40

The tab labeled Themes is used to quickly change the entire look
of your desktop by selecting one of the built -in themes. Each
theme consists of a custom background, associated colors, font
styles and sizes, sounds, mouse pointers, icons and a screen
saver.
Click on the down arrow beside the section labeled Theme to
specify which theme you would like applied to your desktop. Notice
the sample in the middle of the dialog box offers a preview of the
currently selected theme.
Click on to apply the selected theme to your desktop.
You can create a custom theme by selecting one from the list and
then modifying it. Once you have customized the theme, click on
to save it. You’ll be asked to assign a name to it.
If you have saved a custom theme and now want to remove it from
the list, select it from the pull -down list and then click .
Introduction to Windows XP w FAST Development Center w Buffalo State College
41

By default, Windows XP displays the graphic “Bliss” on your
desktop. However, you can use the tab labeled Desktop to specify
another background pattern or image that will be displayed.
Scroll through the list of available backgrounds or if you prefer
using one of your own pictures, you can click on to
search your system for the file.
Click on the down arrow beside the box labeled Position to
specify how to position the selected image on your screen. You
can choose to tile the picture across the entire screen, place it in
the center of the screen or stretch it to fit the screen.
Click on the down arrow beside the box labeled Color to specify
a background color to apply to your desktop. You can only use this
option if you have not assigned a background picture.
Click on to specify which items should be
displayed on your desktop.
Introduction to Windows XP w FAST Development Center w Buffalo State College
42

The tab labeled Screen Saver displays the following dialog box
that is used to set or change your screen saver:
The computer screen at the top of this dialog box provides a
sample of the currently selected screen saver. To view the current
screen saver, click on .
Click on the down arrow beside the box labeled Screen saver
to specify which screen saver you would like to activate.
You will also be able to specify the time to wait (if there is no mouse
or keyboard activity) before the screen saver is activated. Click on
to increase or decrease the wait time.
To protect your system, you can add a password so that once the
screen saver is activated, that password will be required to access
your computer.
Introduction to Windows XP w FAST Development Center w Buffalo State College
43

Each screen saver has its own unique settings which may be
modified. For example, if you select Marquee as the type of screen
saver, you can add your own personalized message text.
You can also modify the font and colors being applied to the
marquee text and background, the screen position for the text, and
the speed at which the marquee moves across the screen.
Click on to modify the current screen saver.
Notice the bottom section of the dialog box allows you to set energy
saving options for your monitor, such as switching to standby mode
after a set amount of idle time (when the computer is not in use).
Click on to adjust your current computer power settings.
The tab labeled Appearance displays the following box:
The sample across the top displays the currently selected choices.
Windows Click on the down arrow beside this box to
and buttons select either the new XP style buttons or the
classic Windows buttons.
Introduction to Windows XP w FAST Development Center w Buffalo State College
44

Color scheme Click on the down arrow beside this box to
select the color scheme you would like applied.
Font size Click on the down arrow beside this box to
select a font size for text items on the Desktop.
Click on to specify what visual effects (if any) you
would like applied. For example, you can choose to display a fade
effect and/or shadows when using menus.
Click on to further customize the size and color of
desktop items.
Introduction to Windows XP w FAST Development Center w Buffalo State College
45

The tab labeled Settings displays the following box:
This tab defines the screen resolution and the number of colors
your computer can display. The options available will depend on
the video graphics card and monitor installed on your system.
Screen resolution Drag the slider to increase or decrease
the resolution (quality) of your monitor.
Color quality Click on to select the number of
colors that can be displayed on your
screen.
If you are having display problems, click on to display
the Troubleshooting Wizard, which will attempt to determine the
problem and help you to fix it.
Click on to change the video card adapter and other
display settings.
Introduction to Windows XP w FAST Development Center w Buffalo State College
46
CUSTOMIZING THE TASKBAR
USAGE: The taskbar is used to quickly switch between active applications
and is located at the bottom of the screen. Whenever you run an
application, the taskbar appears on top of any other window so that
it is always available. The name of each program that is running is
placed on the taskbar. However, the more applications you have
running, the smaller the icons become.
You can adjust the taskbar to show more than one line of icons.
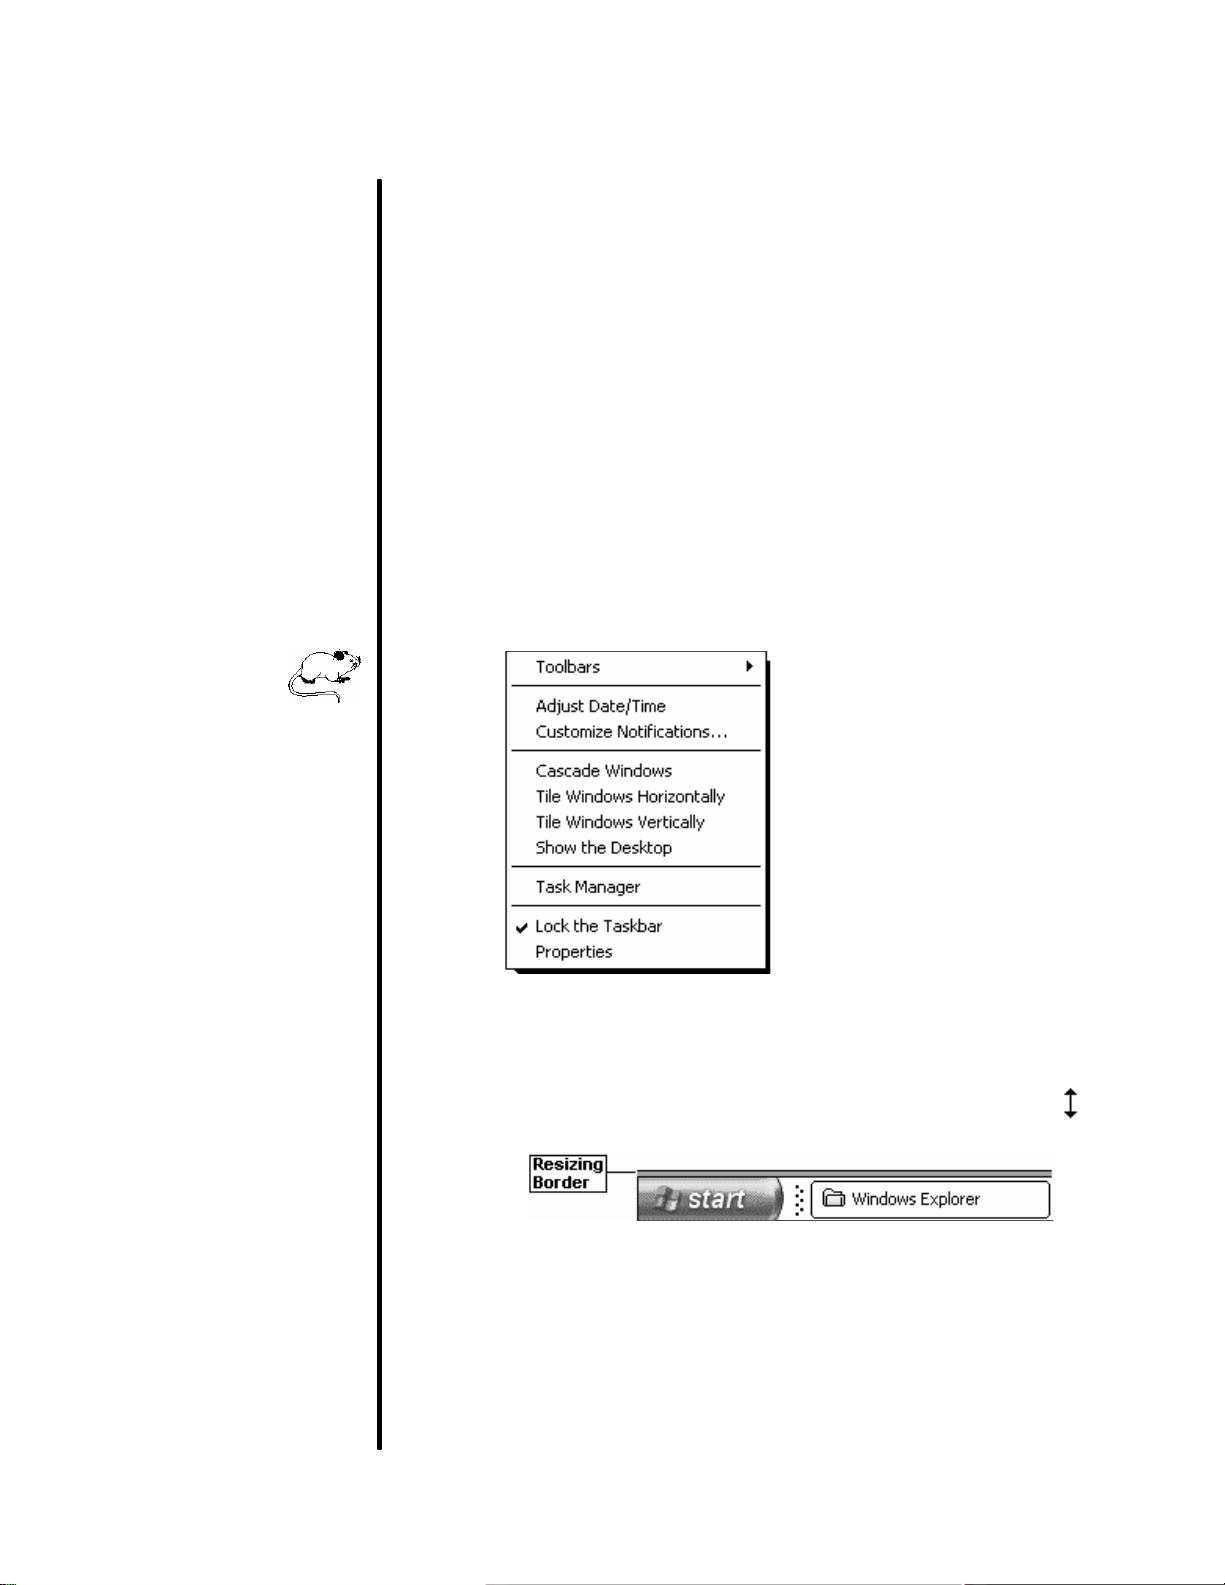
RESIZING THE TASKBAR
To stretch the taskbar out so that you can see more than one line of
icons, follow these three steps:
ΠBy default, the taskbar is locked
and cannot be resized so your
first step will be to unlock it.
While pointing to the taskbar,
click your [RIGHT] mouse button
and choose Lock the Taskbar to
deselect this option.
• Once the taskbar has been unlocked, XP adds a small
border to the top edge of the taskbar (shown below). Point
to this top border until you see a double-sided arrow .
Ž Click and drag the border until the taskbar reaches the
desired size. When done, release the mouse button.
Introduction to Windows XP w FAST Development Center w Buffalo State College
47

REPOSITIONING THE TASKBAR
By default, the taskbar appears across the bottom of your screen
and is locked so that it cannot be moved. However, you can unlock
it and then move it to the top or along the left or right border, as
outlined in the steps below:
ΠBe sure to unlock the taskbar.
If locked, point to the taskbar and
click your [RIGHT] mouse button.
From the pop-up menu that
appears, choose Lock the
Taskbar to deselect this option.
• Once unlocked, point to the clock on the taskbar and begin
dragging the bar to the left, right or top borders. When the
taskbar is in place, release the mouse button.
TASKBAR BUTTON GROUPING
When the taskbar becomes too crowded, XP combines multiple
windows within a single application and groups them together as
one button. For example, if you have four Explorer windows open,
XP might display a single button to represent them all.
Click on the taskbar button representing the program and then
select the actual window you wish to access. To close all of the
windows, point to the taskbar button and click your [RIGHT] mouse
button. Choose Close Group from the pop-up menu.
Introduction to Windows XP w FAST Development Center w Buffalo State College
48

CUSTOMIZING THE NOTIFICATION AREA
The notification area (also referred to as the System Tray) is
located along the far right side of the taskbar and contains the clock
as well as information and alerts when appropriate.
By default, the notification area is collapsed so that only the icons
you have most recently used are displayed.
Click on (which is located along the left side of the n otification
area) to expand it and display all of the other available icons.
Once opened, you can click on the button to collapse it again.
To customize the notification area, follow the steps outlined below:
ΠWhile pointing to the notification
area, click your [RIGHT] mouse
button.
• From the pop-up menu that appears, choose Customize
Notifications...
Ž A dialog box containing options for customizing the
notification area is displayed. Use this box to specify when
an icon should be displayed.
Introduction to Windows XP w FAST Development Center w Buffalo State College
49

The following options are available:
From the list provided, select a notification item and then choose
what behavior that item should have.
For each item listed, you can choose to hide it when it is inactive,
always hide it or always show it.
Click on the button to reset the original options
within this dialog box.
• When done, click on .
Introduction to Windows XP w FAST Development Center w Buffalo State College
50

TASKBAR PROPERTIES
You can cust omize the taskbar to display exactly what you most
often want to see so that working with XP is as easy as possible.
For example, you can choose to automatically hide the taskbar so
that it is not distracting.
To customize the taskbar properties, follow the steps, as outlined
below:
ΠPoint to a blank spot on the
taskbar and click your [RIGHT]
mouse button once.
• From the pop-up menu that appears, choose Properties
Ž A dialog box containing two tabs (displayed on the next few
pages) will appear.
Introduction to Windows XP w FAST Development Center w Buffalo State College
51
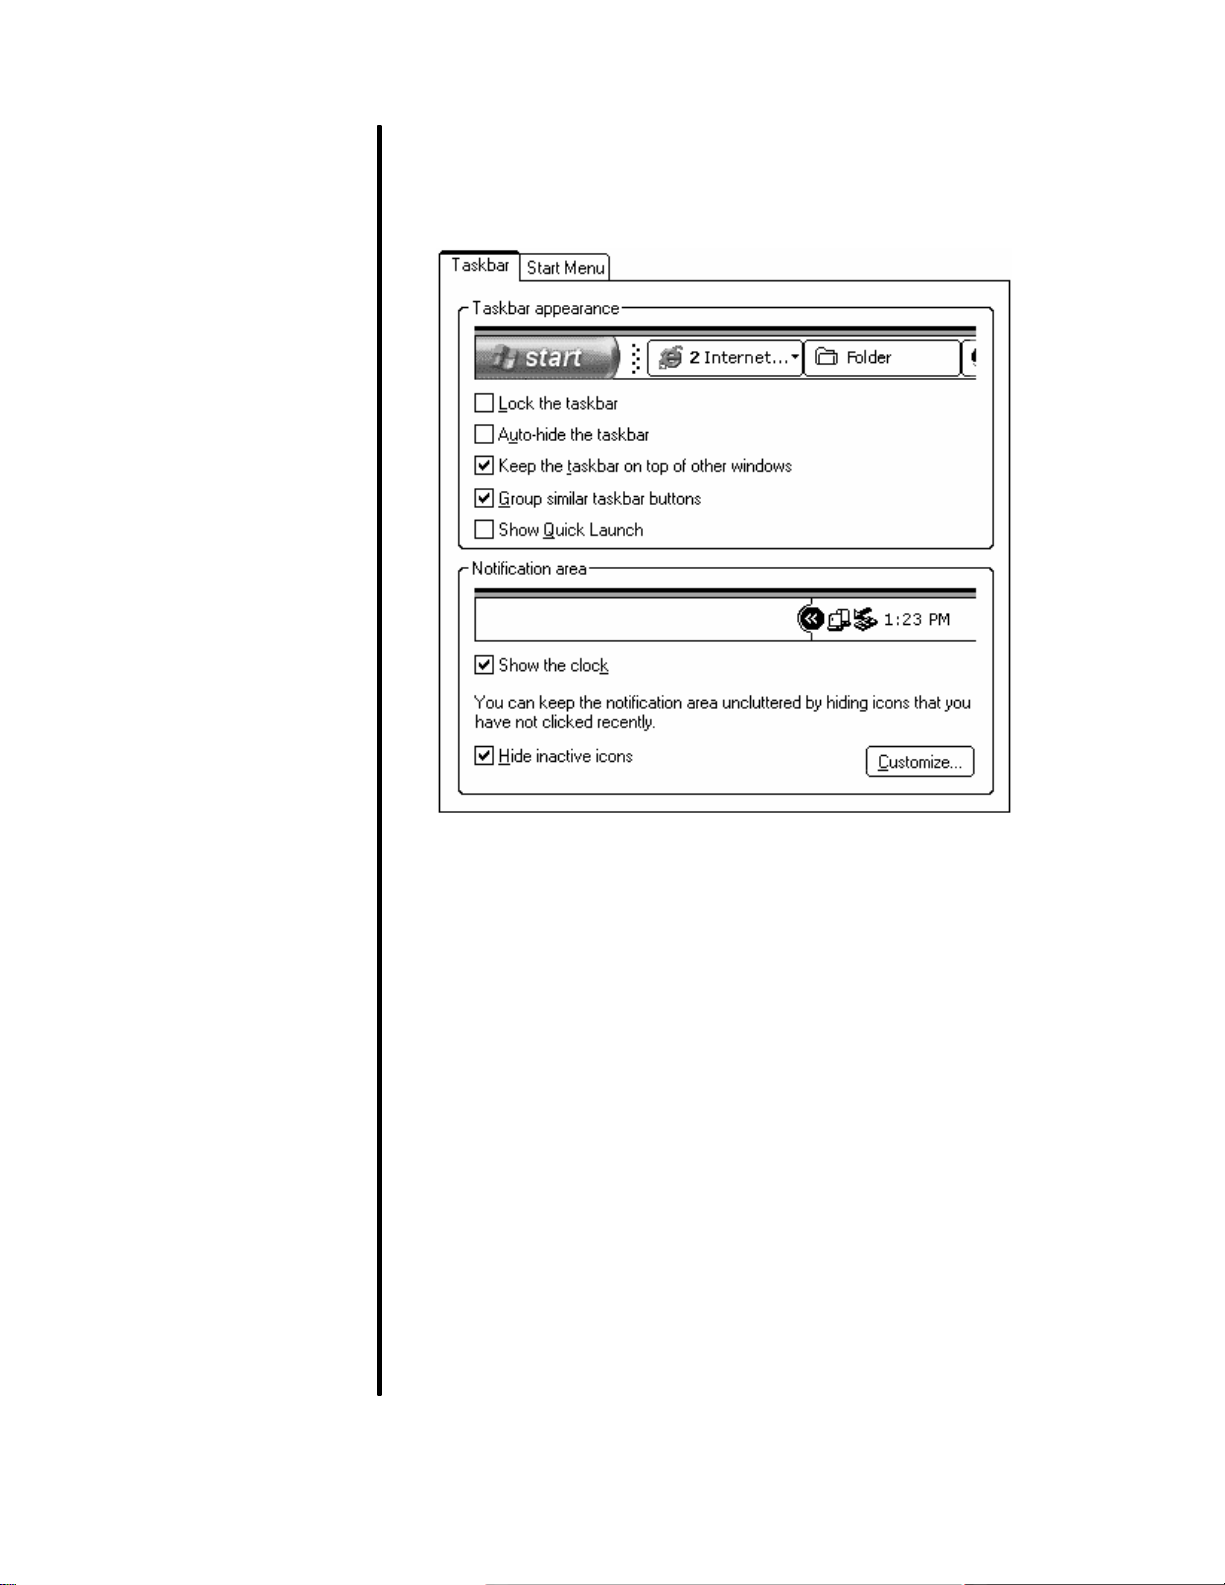
TASKBAR OPTIONS
This tab is used to specify the following options:
Several checkboxes are available, as discussed below:
Lock the taskbar Check this box to ensure that the taskbar
remains locked at its current screen position
and cannot be moved or resized.
Auto-hide Check this box to hide the taskbar from view.
the taskbar It will reappear only when you point to the area
on the screen where the taskbar is located.
This gives you extra room on the screen.
Keep the taskbar Check this box to ensure that the taskbar
on top of other remains visible no matter what other program
windows you may run - even if that program’s window
has been maximized.
Introduction to Windows XP w FAST Development Center w Buffalo State College
52

Group similar Check this box to allow XP to group multiple
taskbar buttons windows of the same application (such as four
or five Internet Explorer windows) under one
taskbar button instead of having four or five
separate taskbar buttons.
If the taskbar becomes too crowded, a single
button will be used to represent all of the
opened files within a single application. For
example, if you are running Explorer and have
four windows opened at the same time, XP
would combine them into a single taskbar
button.
If this occurs, you would click on the taskbar
button representing Explorer to display a list of
the opened windows. From the list, you could
then select the window you wish to access.
Show Quick Check this box to include the Quick Launch
Launch bar on the taskbar. The Quick Launch bar can
be customized to display your most-often
accessed applications so that you can run
them with a single click on the taskbar. This
bar also contains a button for accessing the
Desktop - without having to first minimize the
current window you are working with.
Show the clock Displays the time on the taskbar.
Hide inactive Check this box to hide those icons which have
icons not recently been used. A Show Hidden
Icons button is placed on the taskbar so that
you can access those icons in the future if you
need to.
Click on to customize the behavior of the various icons
within the notification area of the taskbar. For each icon, you can
choose to always show it, always hide it, or hide it when it is
inactive.
Click on to apply the changes you have made.
Introduction to Windows XP w FAST Development Center w Buffalo State College
53

WORKING WITH THE DESKTOP TOOLBARS
USAGE: There are four Windows toolbars that you can place on the taskbar
along the bottom of the screen, as discussed below:
Address This toolbar offers access to Internet Explorer
directly from your Desktop and can be used to
enter the Web addresses you want to visit.
Links This toolbar contains the links from Internet
Explorer. Although the initial links are the
standard ones that come with Internet
Explorer, you can customize the links to
include your most-often accessed web sites.
Desktop This toolbar displays an icon for each Desktop
item as well as the more important Windows
folders (such as My Computer). To work more
efficiently, you can display this bar as a single
button that, when clicked, expands to list the
items on your Desktop.
Quick Launch This toolbar provides quick access to the
programs and documents you most often use.
ADDING A TOOLBAR TO THE TASKBAR
To add one of the four toolbars discussed above to your taskbar,
follow the steps outlined below:
ΠPoint to the taskbar and click the [RIGHT] mouse button
once.
• Point to toolbars and choose the toolbar
you would like to add to your Desktop.
Introduction to Windows XP w FAST Development Center w Buffalo State College
54

THE ADDRESS TOOLBAR
This toolbar is very similar to the Address Bar within Microsoft’s
Internet Explorer browser. Simply enter a Web address in the box
provided to access a web site directly from the Windows Desktop.
The Address Bar can also display local drives and folders.
In the box provided, enter the Web address you want to access and
then click on the button or press E.
Click on the down arrow beside the Address box to display a list
of previously visited web sites.
THE LINKS TOOLBAR
This toolbar displays the standard links that come with Internet
Explorer, as shown below:
You will probably want to customize this toolbar to display the web
sites you most-often access.
Introduction to Windows XP w FAST Development Center w Buffalo State College
55

THE DESKTOP TOOLBAR
This toolbar displays the Desktop icons as well as the key Windows
folders (such as My Computer).
NOTE: This toolbar displays what is currently on your Desktop
so its contents will vary depending on what your
current settings are.
To save space on the taskbar, you can customize this toolbar to
display as a single button that, when clicked, lists the items
contained on it.
THE QUICK LA UNCH TOOLBAR
This toolbar can be used to quickly access your most often-used
programs and documents directly from the taskbar.
Instead of having to open the Start menu or access the Desktop,
you can run a program directly from the taskbar.
You will need to customize the bar to include those programs and
documents that you wish to have quick access to.
Introduction to Windows XP w FAST Development Center w Buffalo State College
56

MOVING ONE OF THE DESKTOP TOOLBARS
To move one of the toolbars, follow the steps outlined below:
ΠPoint to the dotted handle located on the far left side of the
bar you want to move. Your mouse pointer should change
to a double-sided arrow .
• Click and hold the [LEFT] mouse button down to drag the
bar up off the taskbar. The mouse pointer will initially
change to until you drag the toolbar to the Desktop where
the pointer will change to .
Ž Once the toolbar is on the Desktop, release the mouse
button.
When you release the mouse button, the bar will be
displayed in its own window on the Desktop. You can then
drag the window by its title bar to any location desired.
NOTE: To return the toolbar to the taskbar, simply drag it back
on top of the taskbar.
Introduction to Windows XP w FAST Development Center w Buffalo State College
57

PLACING A SHORTCUT ON THE QUICK LAUNCH
TOOLBAR
To place a shortcut on the Quick Launch toolbar, follow these
steps:
ΠSelect the object for which you want to create a shortcut.
• While pointing to the selected object, click and drag the
object down to the Quick Launch toolbar (along the taskbar
at the bottom of your screen).
A vertical line appears ( ) as you drag the object onto the
Quick Launch toolbar - indicating where the shortcut will be
placed when you release the mouse button.
Ž When you reach the desired location, release the mouse
button. The shortcut should have been added to the Quick
Launch toolbar.
• You can now rename the shortcut by pointing to the shortcut
and clicking your [RIGHT] mouse button once. From the
pop-up menu that is displayed, choose Rename.
Introduction to Windows XP w FAST Development Center w Buffalo State College
58
DOCKING A TOOLBAR
In addition to placing a toolbar on your desktop, you can also dock
toolbars along the four sides of the screen. The bottom of your
desktop is already occupied by the default taskbar so if you try to
place a toolbar along this area, it will automatically merge with the
taskbar. However, if you drag a toolbar to one of the sides or top of
the screen, it will attach (dock) itself to that edge.
MODIFYING TOOLBAR PROPERTIES
Each toolbar has a set of properties that can be modified. These
properties include showing larger icons, displaying descriptions,
and auto-hiding.
To access these additional properties, follow the steps below:
ΠClick your [RIGHT] mouse button while
pointing to a blank spot on the toolbar
you wish to modify.
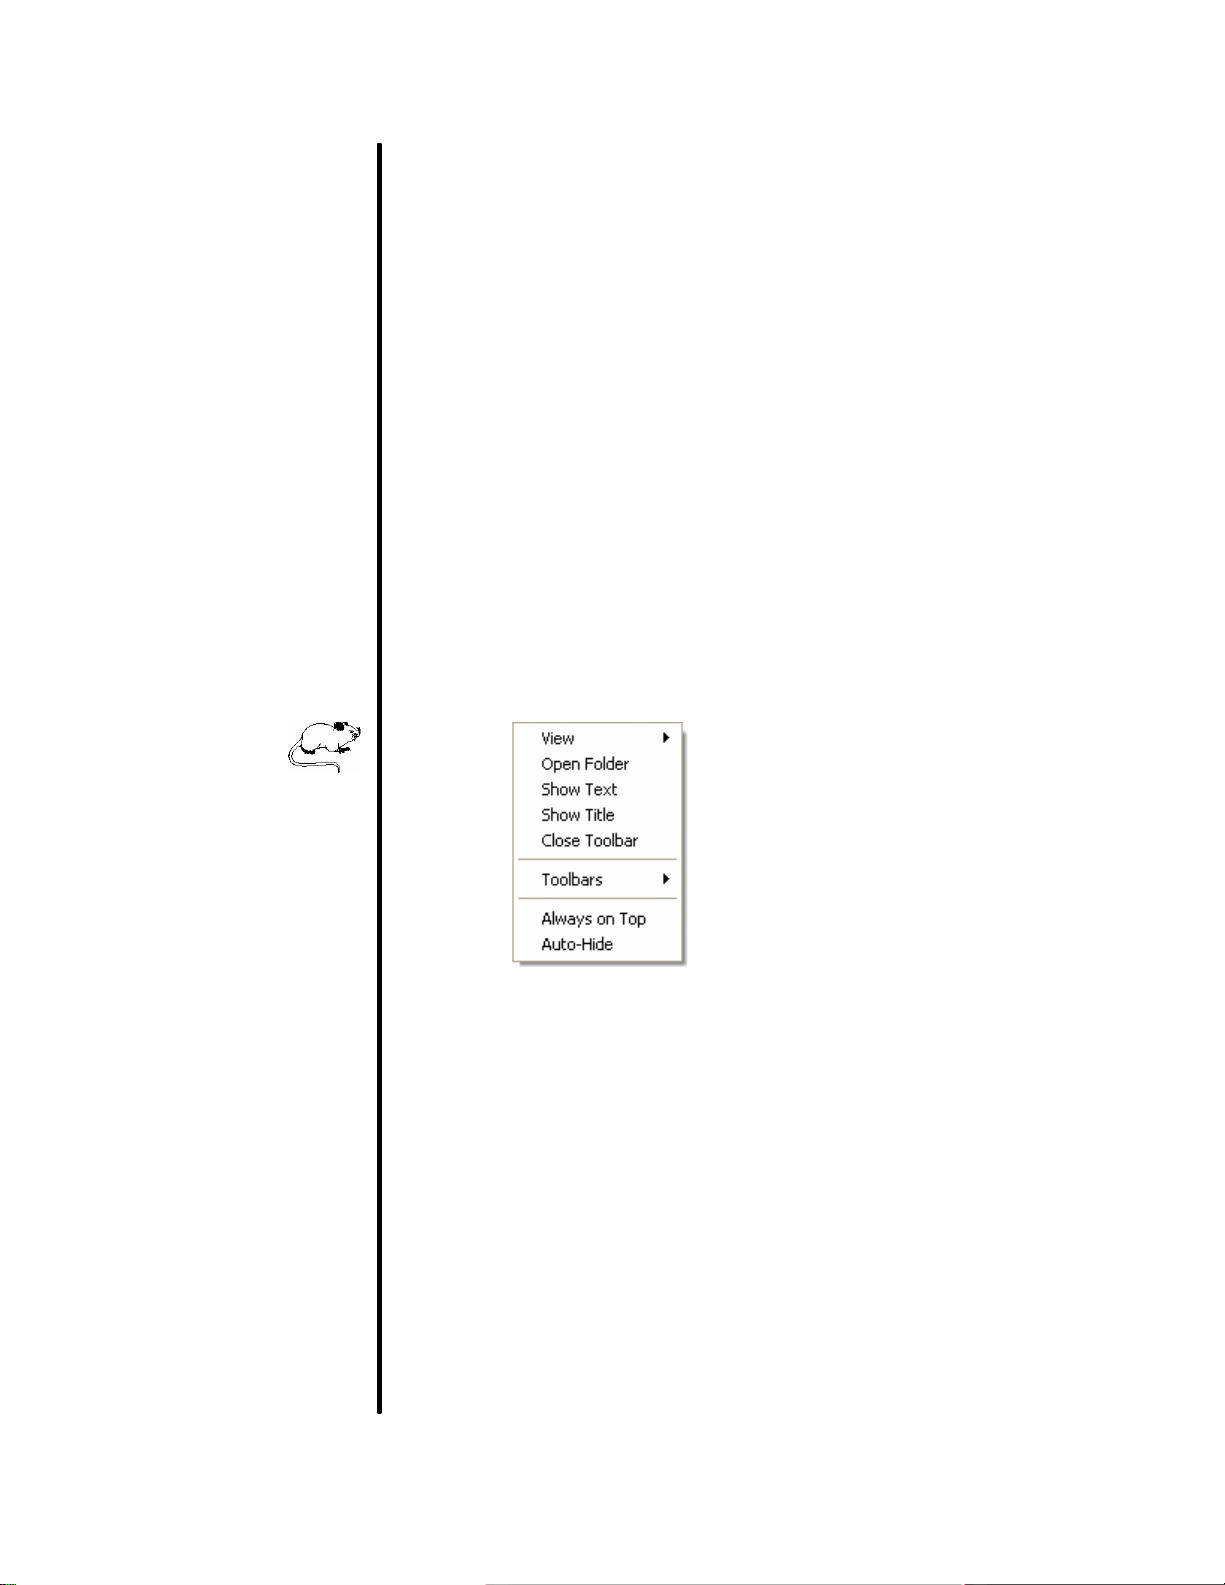
• From the pop-up menu, select one of the following options:
View Select this option to switch between
large and small icons.
Open Folder Select this menu option to open the
folder containing the items on the
selected toolbar. This will allow you to
add or remove toolbar items.
Introduction to Windows XP w FAST Development Center w Buffalo State College
59

MODIFYING TOOLBAR PROPERTIES (CONT’D)
Show Text This option displays/hides the names of
each icon on the toolbar.
Show Title Displays the name of the toolbar beside
the toolbar handle.
Close Toolbar Select this option to close the toolbar.
Toolbars Use this option to display or create
additional toolbars.
Always on Top Select this option to ensure that the
toolbar is always visible on top of any
application that may be running.
Auto-Hide This option causes the toolbar to hide
itself from view when it is not in use. To
access a hidden toolbar simply point to
the edge of the location where the
toolbar is docked and it will reappear.
TIP: If you happen to have closed all of your toolbars,
simply point to a blank spot on the taskbar and click
your [RIGHT] mouse button once. From the resulting
pop-up menu, select Toolbars and then the name of
the toolbar you wish to display.
Introduction to Windows XP w FAST Development Center w Buffalo State College
60

Copyright ©2000 by
EZ-REF Courseware
, Laguna Beach, CA
http://www.ezref.com/ All rights reserved. This publication, including
the student manual, instructor's guide and diskette, or any part
thereof, may not be reproduced or transmitted in any form or by any
means, electronic or mechanical, without prior written permission of
EZ-REF Courseware.
Introduction to Windows XP w FAST Development Center w Buffalo State College
61
 Loading...