

Page 1
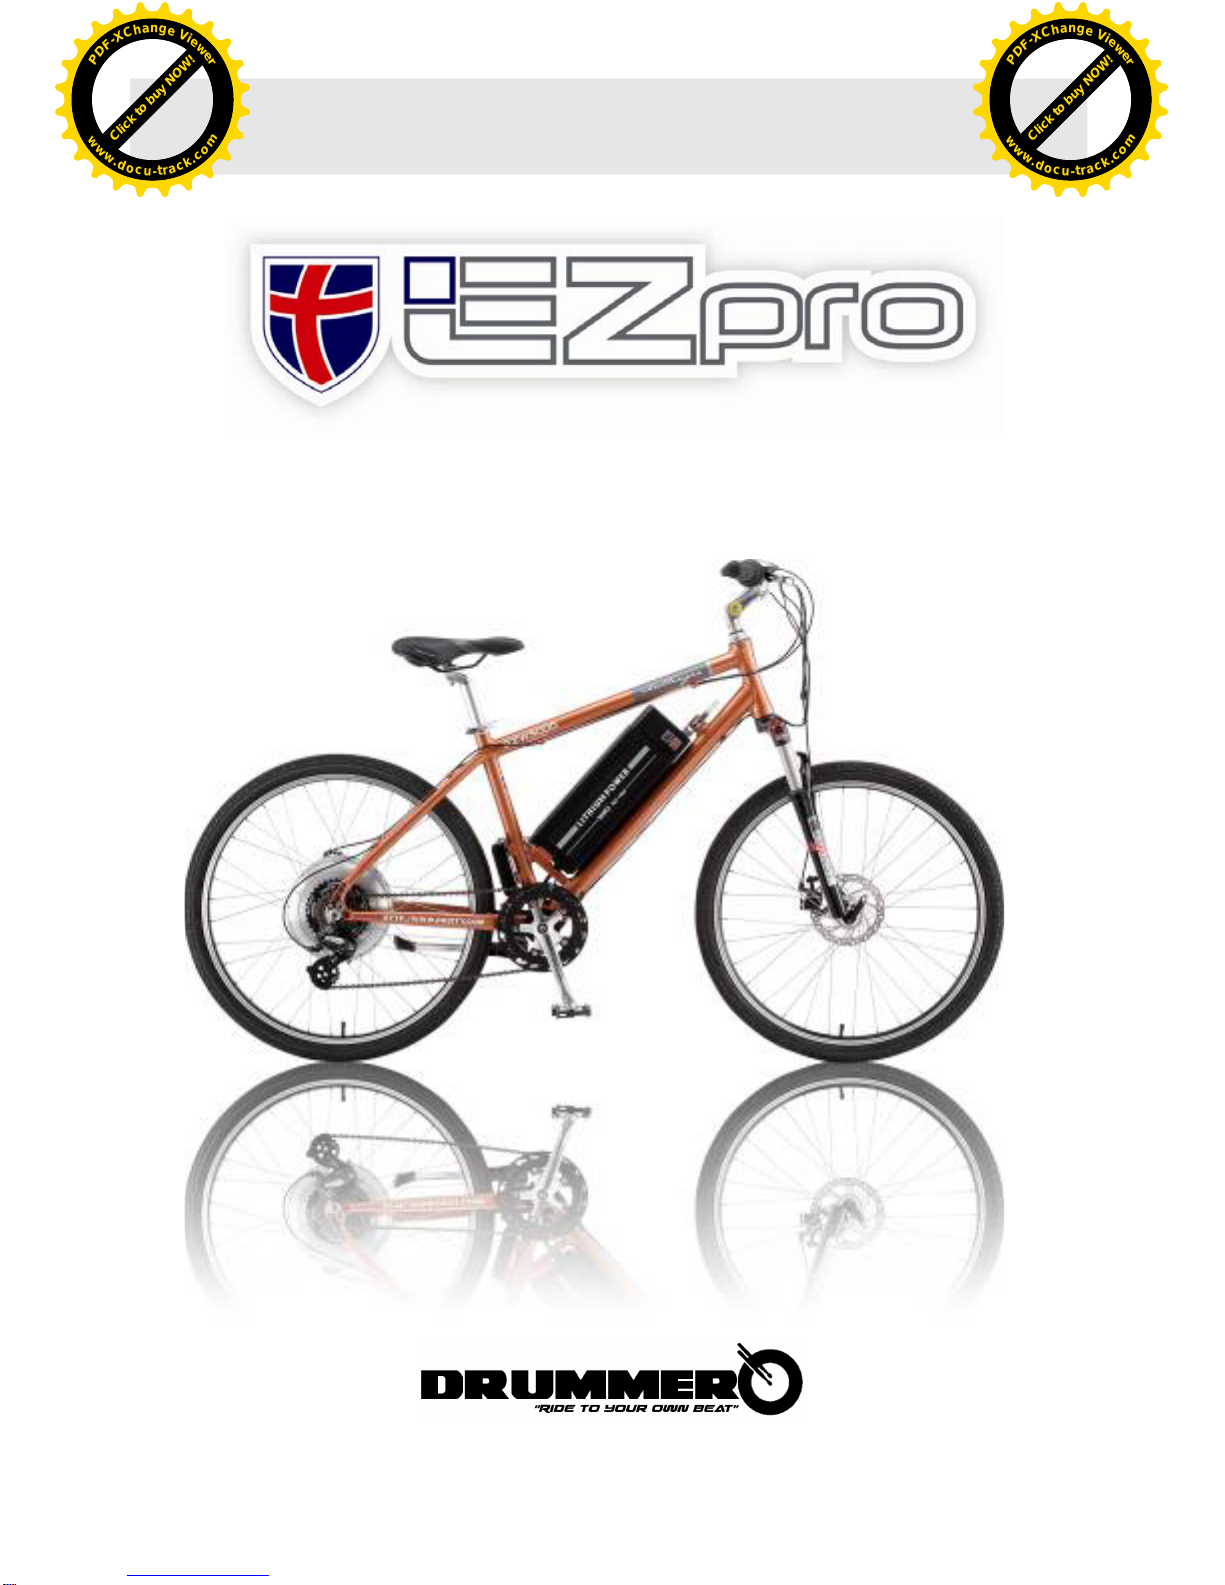
User Manual of Challenger
New Mobility Solution With Powerful Driving System.
Click to buy NOW!
P
D
F
-
X
C
h
a
n
g
e
V
i
e
w
e
r
w
w
w
.
d
o
c
u
-
t
r
a
c
k
.
c
o
m
Click to buy NOW!
P
D
F
-
X
C
h
a
n
g
e
V
i
e
w
e
r
w
w
w
.
d
o
c
u
-
t
r
a
c
k
.
c
o
m
Click to buy NOW!
P
D
F
-
X
C
h
a
n
g
e
V
i
e
w
e
r
w
w
w
.
d
o
c
u
-
t
r
a
c
k
.
c
o
m
Click to buy NOW!
P
D
F
-
X
C
h
a
n
g
e
V
i
e
w
e
r
w
w
w
.
d
o
c
u
-
t
r
a
c
k
.
c
o
m
Page 2
User Manual of Challenger – Table of Contents
I.Forward
03
II. About Challenger bike
◆Name of each part and operation introduction
04
◆Introduction to pedelec system
07
III. Information on riding safety
◆Prior-riding check and routine check
09
12
13
◆Simple adjustment
◆Precautions
IV. Introduction to battery
◆Introduction to the charging operations
14
◆Instructions for use of battery
18
V. Maintenance and care
19
◆Safekeeping and care
◆Scheduled maintenance
21
VI. Simple troubleshooting
22
◆Troubleshooting of bike
◆Troubleshooting of battery and charger
◆Abnormal display of controller and fault elimination form
24
26
VII. Specification form
28
2
Click to buy NOW!
P
D
F
-
X
C
h
a
n
g
e
V
i
e
w
e
r
w
w
w
.
d
o
c
u
-
t
r
a
c
k
.
c
o
m
Click to buy NOW!
P
D
F
-
X
C
h
a
n
g
e
V
i
e
w
e
r
w
w
w
.
d
o
c
u
-
t
r
a
c
k
.
c
o
m
Page 3
I. Foreword
No matter how high place you want to go, EZW5000 is definitely your best partner
for all kinds of challenge. Irreplaceable and incomparable!
◆ Upgraded 36V system, EZW5000 offers longer continuance of battery power and
improves the loading capacity.
◆ Strong 500W brushless hub motor outputs higher horse power, providing speed and
explosiveness.
◆ Equipped with large volume of 14Ah Lithium battery, EZW5000 is easy to extend your
journey up to 100km.
◆ Three pedaling modes cater to different demands: Throttle acceleration (100% electric
power), pedelec (I.P.T.S.), and normal bike.
◆Front suspension fork and front/rear disc brakes system match perfectly, riding safety is
guaranteed.
All-in-one hybrid technology integrated with safe riding concept, EZW5000 not
only presents comfortable and powerful performance but also represents the new lifestyle
of health and sustainability (LOHAS)!
To improve riding enjoyment and pedelec efficiency, the intelligent pedal speed
sensor is used, which responds to power take-off control of pedal speed sensor
synchronously by a central processing unit with artificial intelligence. It means that
depending on change of terrain and riding gear, pedelec system will output relevant
auxiliary power automatically and synchronously, achieving the riding enjoyment of the
rider integrating into E-bike. So it’s not only a 100% special bike, but also an eco-hybrid
two-wheel-drive bike by activating pedelec system. People can not only regard it as a
general recreational bike simply, but also use pedelec system to make the challenging
long-distance riding or slope terrain become much easier and more comfortable. One bike
‧
Many roles!
Thank you again for purchasing our product and welcome you to ride the new
generation of bike. To ensure that your bike is in the best riding state, please read this
manual in detail before using this product. This manual will help you understand the key
use and maintenances of bike more as well as various precautions for riding safety, so as
to create more riding enjoyment and value.
If you have any question about EZpro e-bike, please visit our website or contact us
by email or phone and we will serve you with heart and soul.
3
Click to buy NOW!
P
D
F
-
X
C
h
a
n
g
e
V
i
e
w
e
r
w
w
w
.
d
o
c
u
-
t
r
a
c
k
.
c
o
m
Click to buy NOW!
P
D
F
-
X
C
h
a
n
g
e
V
i
e
w
e
r
w
w
w
.
d
o
c
u
-
t
r
a
c
k
.
c
o
m
Page 4
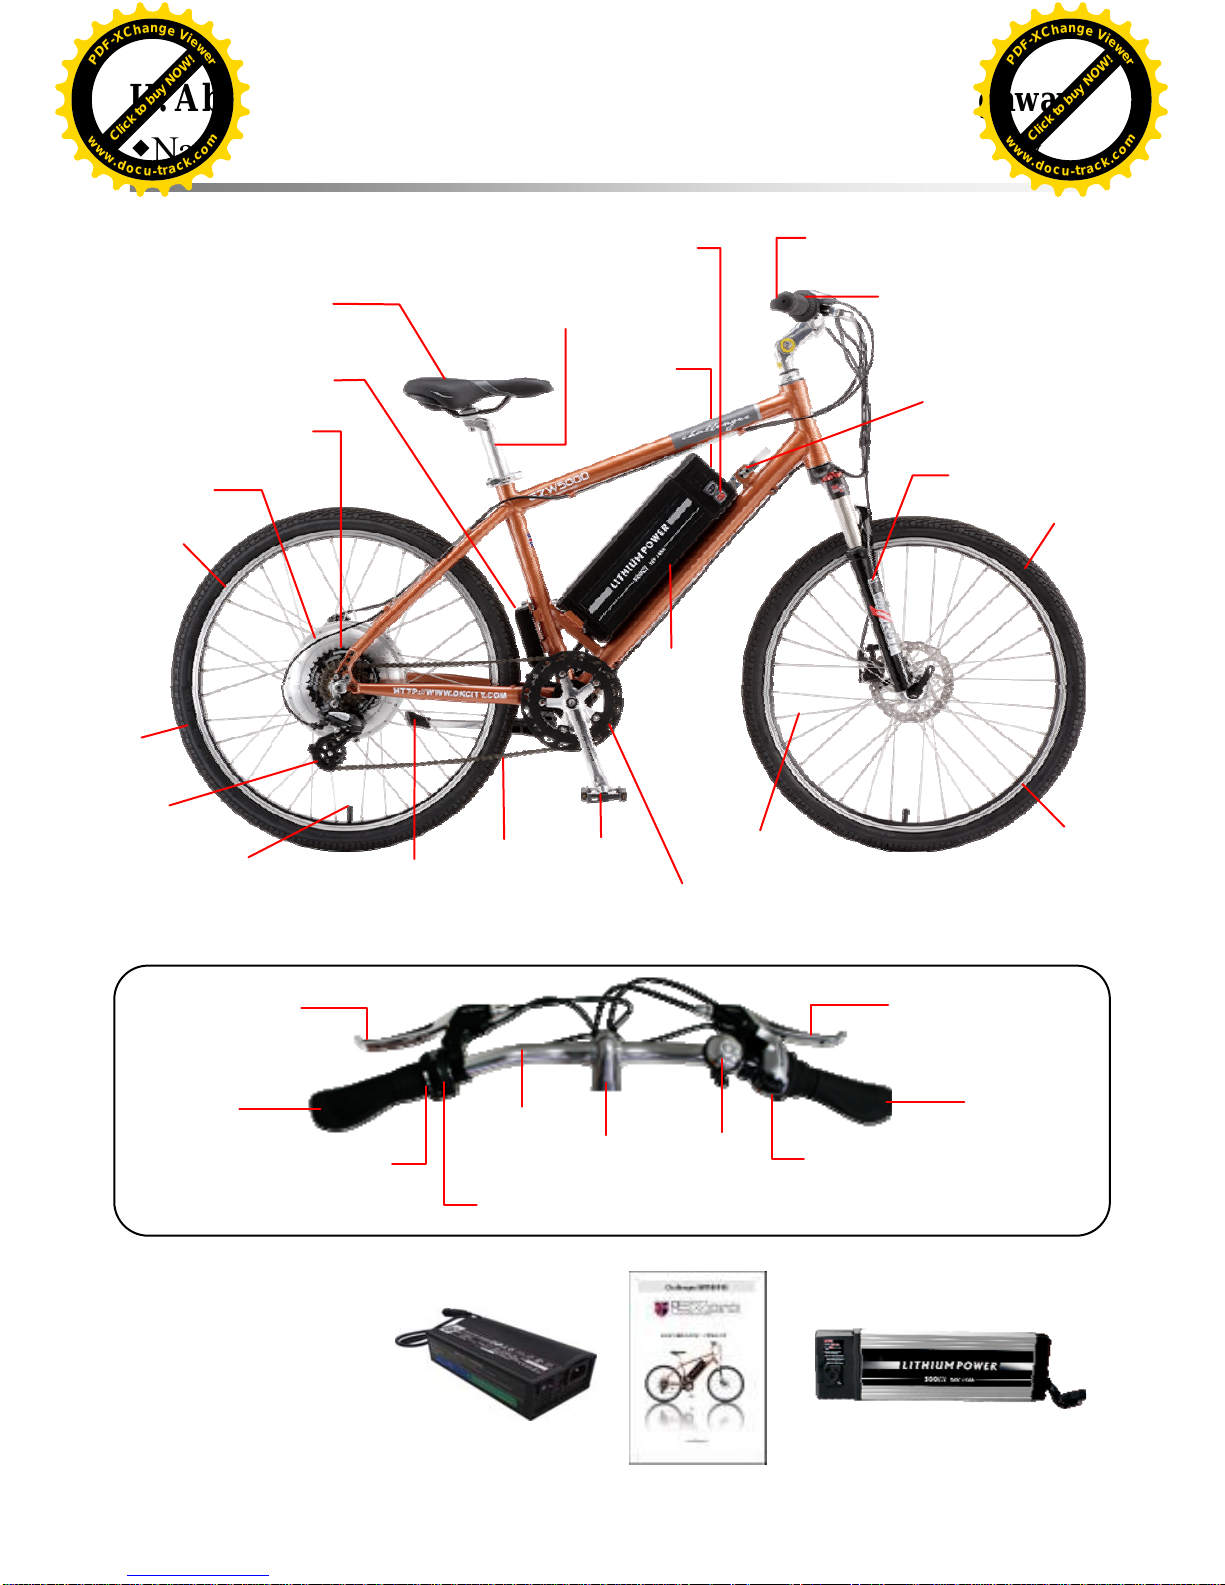
II. About Challenger Applicable Terrain: ground and highway
◆Name of each part and introduction to operation: Bike body
Rim
Va l v e
Handlebar (Refer to the following
detailed picture or p.06)
Saddle
Seat post
Batte
r
y
Pedal
Chainwheel
Chain
Tire
Motor
Spoke
Front fork
Tire
Kickstand
Freewheel
Rear
Quick release
Lower control syste
m
Rim
Battery supply
Controller signal
Switch for
100% electric
power mode
Bell
4
Handlebar
Handlebar
Power-off Brake
lever
Shifter
Power-off
Accele
Stem
Handlebar
Controller signal
Attachment:
1. Charger
2. User Manual
3. Warranty Card
4.
Battery
Click to buy NOW!
P
D
F
-
X
C
h
a
n
g
e
V
i
e
w
e
r
w
w
w
.
d
o
c
u
-
t
r
a
c
k
.
c
o
m
Click to buy NOW!
P
D
F
-
X
C
h
a
n
g
e
V
i
e
w
e
r
w
w
w
.
d
o
c
u
-
t
r
a
c
k
.
c
o
m
Page 5
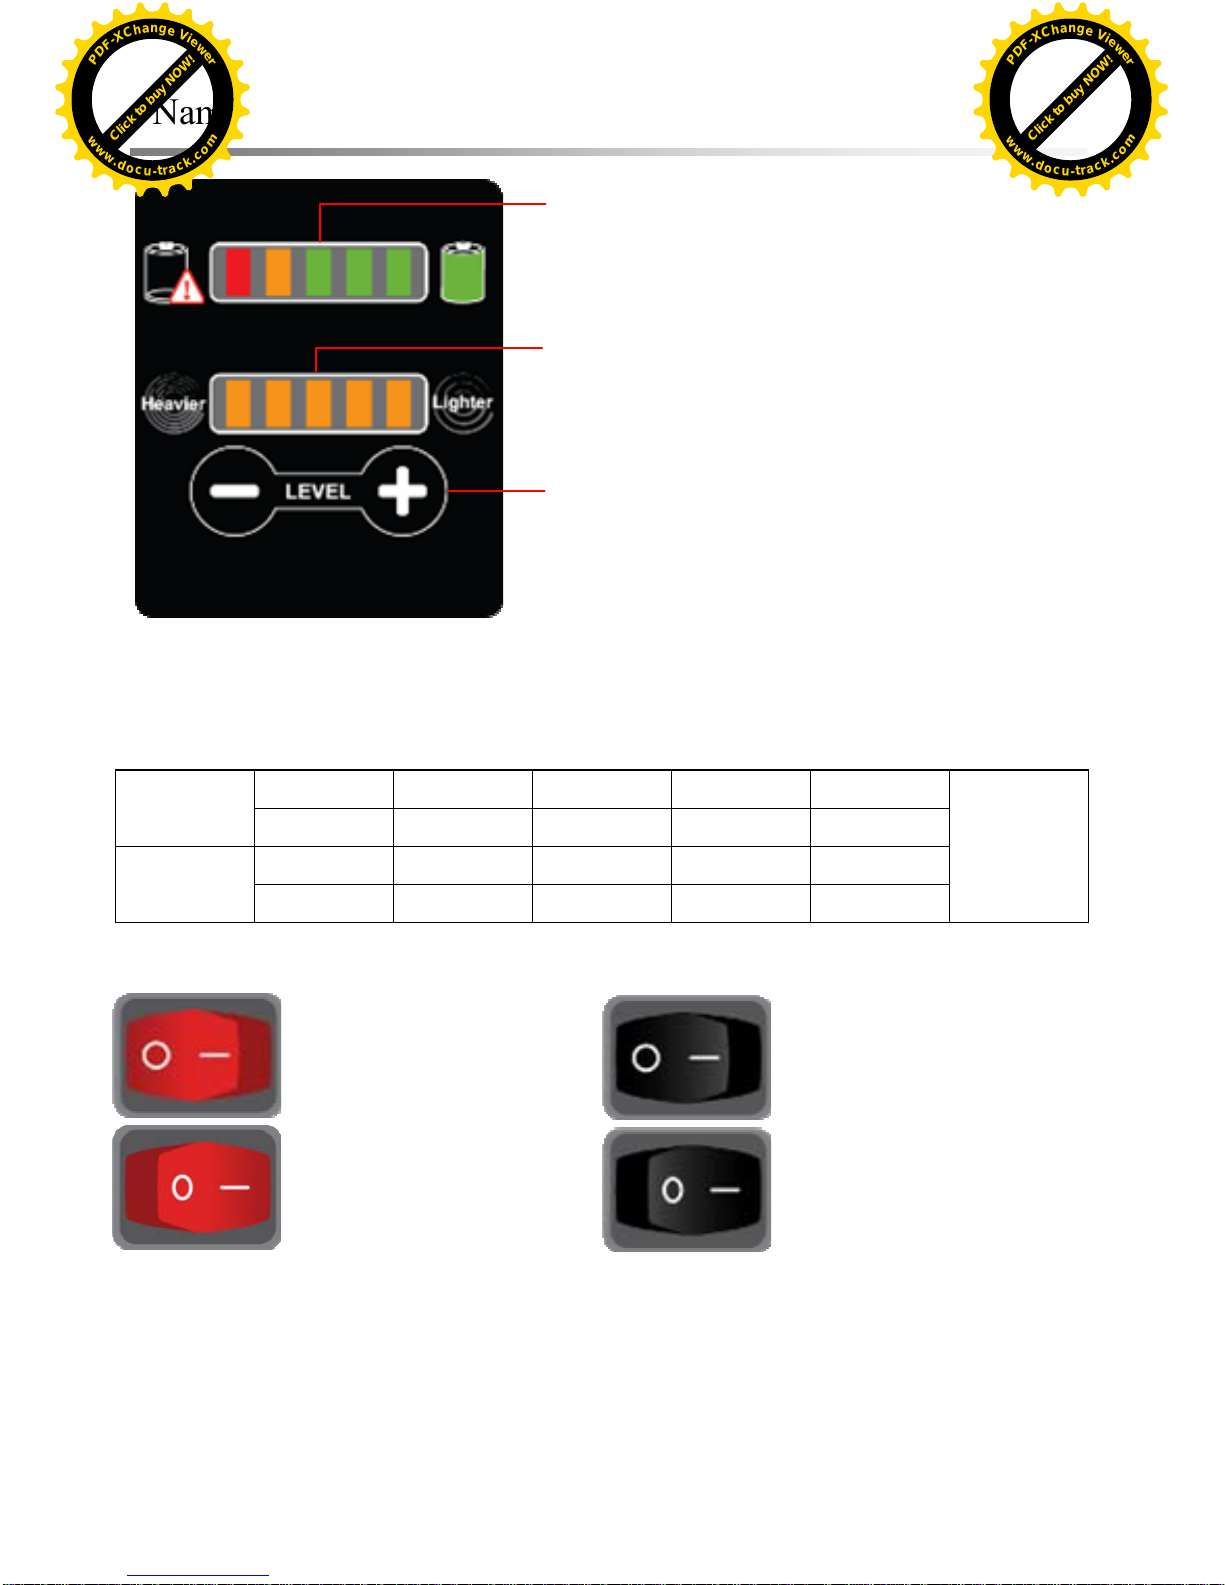
◆Name of each part and operation introduction: Battery
5
Voltage meter:
It represents low (Red signal)-to-high (Green
signal) power from left to right
Torque segments:
One lamp signal represents one segment. The
more lamp signals are, the stronger torque is.
Torque regulator:
To press Plus to increase torque level, 5 segments
at most. To press Minus to decrease segments.
1 2 3 4 5
Battery
capacity
10%↓ 30% 50% 70% 90%↑
1 2 3 4 5
Torque
setting
130W 200W 250W 380W 500W
Remark:
Reference
value
Battery supply:
It’s in the Off state.
No power is supplied.
Activate battery supply
Activate pedelec mode.
Switch for 100% electric power mode:
It’s in the Off state.
Power-assisted speed
sensor may be used.
Activate 100% electric
power mode
Throttle grip may be used
(When battery supply is on)
Caution!
1. It’s advised that all power supply is shut down if you will not ride the bike, to prevent
from operating throttle improperly and micro power consumption of battery.
2. If battery will not be used for a long time, all power supply must be shut down. Take out
battery holder and put it in a cool, ventilated place indoors. Battery should be charged
once within six months as from shipping date to ensure lifetime. It is charged with
70% of power before shipment.
tput
z If yellow signal and red signal are on, it means battery should be charged
z If red signal blink, it means under voltage and charging is urgently needed! Power ou
should be stopped, to avoid overdischarging.
z With memory function, it is needless to re-set again when startup each time.
Click to buy NOW!
P
D
F
-
X
C
h
a
n
g
e
V
i
e
w
e
r
w
w
w
.
d
o
c
u
-
t
r
a
c
k
.
c
o
m
Click to buy NOW!
P
D
F
-
X
C
h
a
n
g
e
V
i
e
w
e
r
w
w
w
.
d
o
c
u
-
t
r
a
c
k
.
c
o
m
Page 6
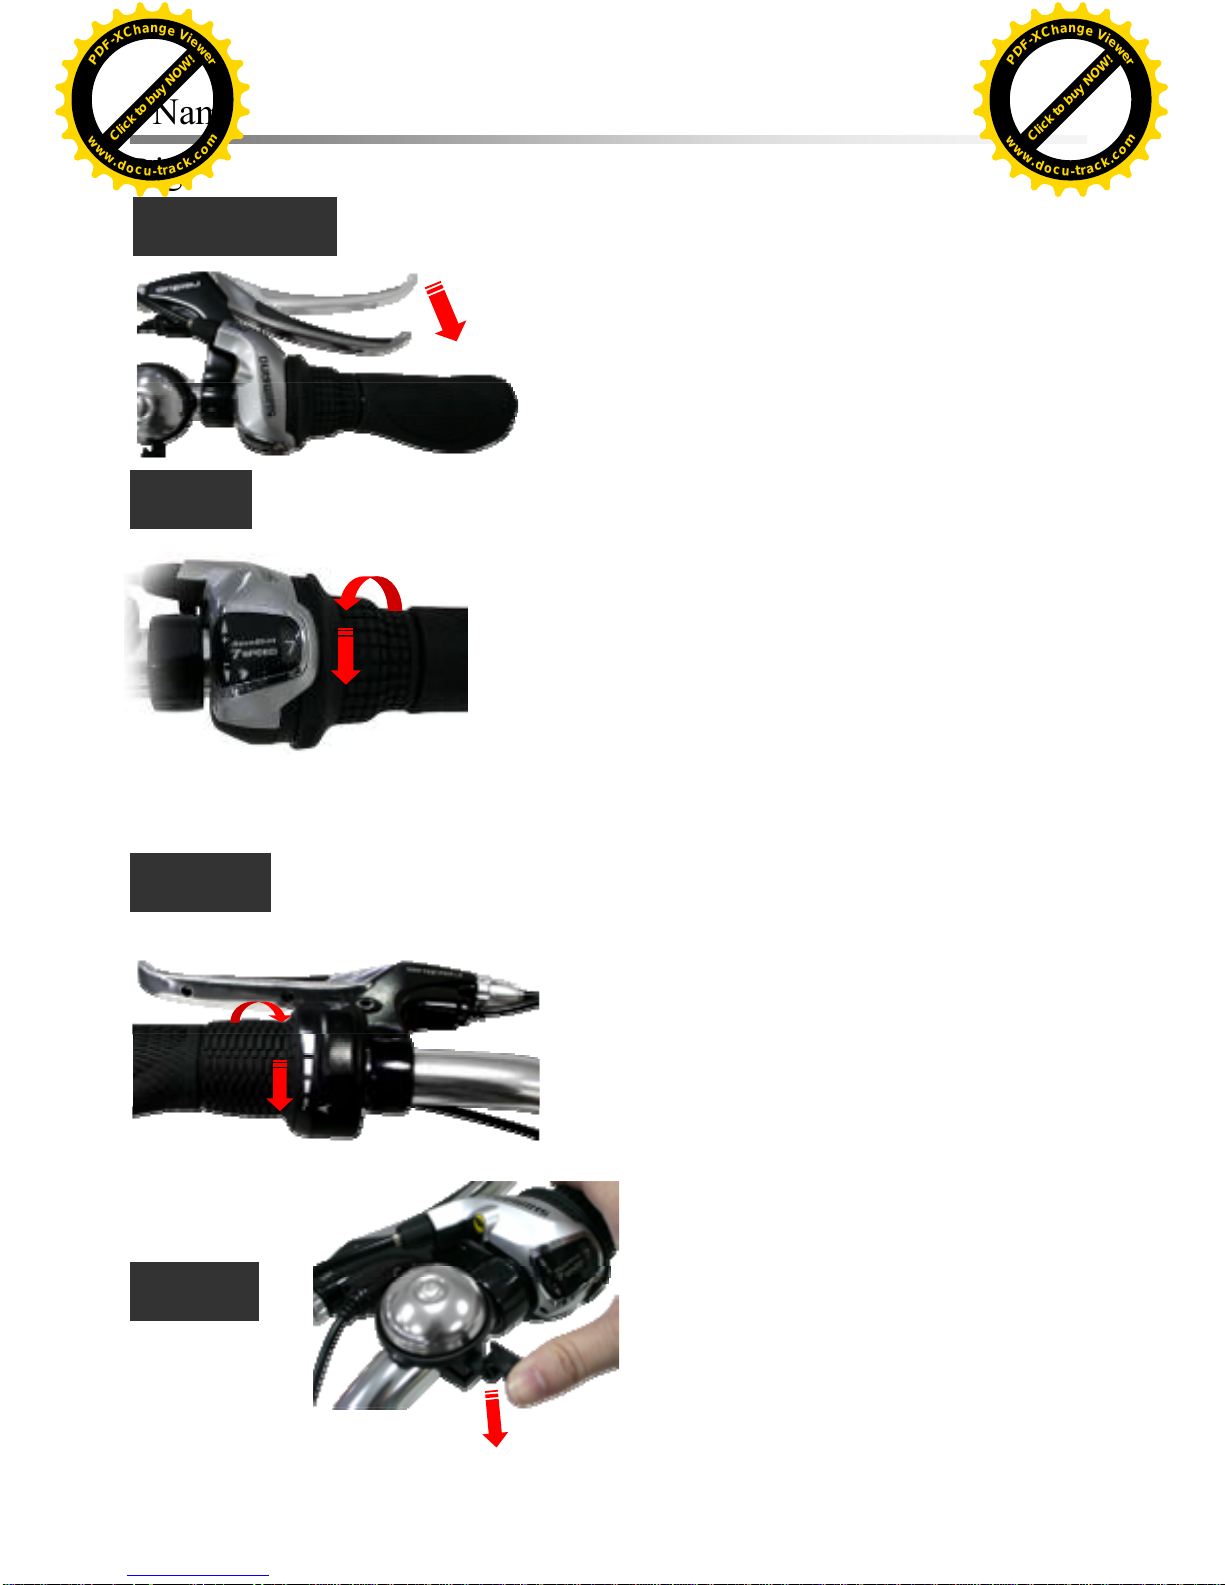
◆Name of each part and operation introduction: Handlebar
Right handlebar:
6
Power of Brake
Grasp the brake power-off lever inward to exert
good brake effect. Do not brake the bike strongly
and abruptly but to slow down the bike gradually.
Form of Shifter: Rotary, 7 segments
While riding, rotate the shifter to change speed.
Rotate the shifter downward to reach a higher
segment and upward to a lower segment.
Left handlebar:
Shifter
To
p
ress the bell downward to make sound
BikeBell
Throttle
Rotate the (left) grip of throttle downward to
make bike go forward and loose the grip to slow
down the bike. If your loose the grip completely,
the bike will stop power output. While riding,
accelerate the bike slowly to maintain riding
safety. It’s advised that all power supply is shut
down if you stop the bike, to prevent from
operating the throttle improperly and micro power
consumption of battery.
(In the 100% electric power mode)
Click to buy NOW!
P
D
F
-
X
C
h
a
n
g
e
V
i
e
w
e
r
w
w
w
.
d
o
c
u
-
t
r
a
c
k
.
c
o
m
Click to buy NOW!
P
D
F
-
X
C
h
a
n
g
e
V
i
e
w
e
r
w
w
w
.
d
o
c
u
-
t
r
a
c
k
.
c
o
m
Page 7
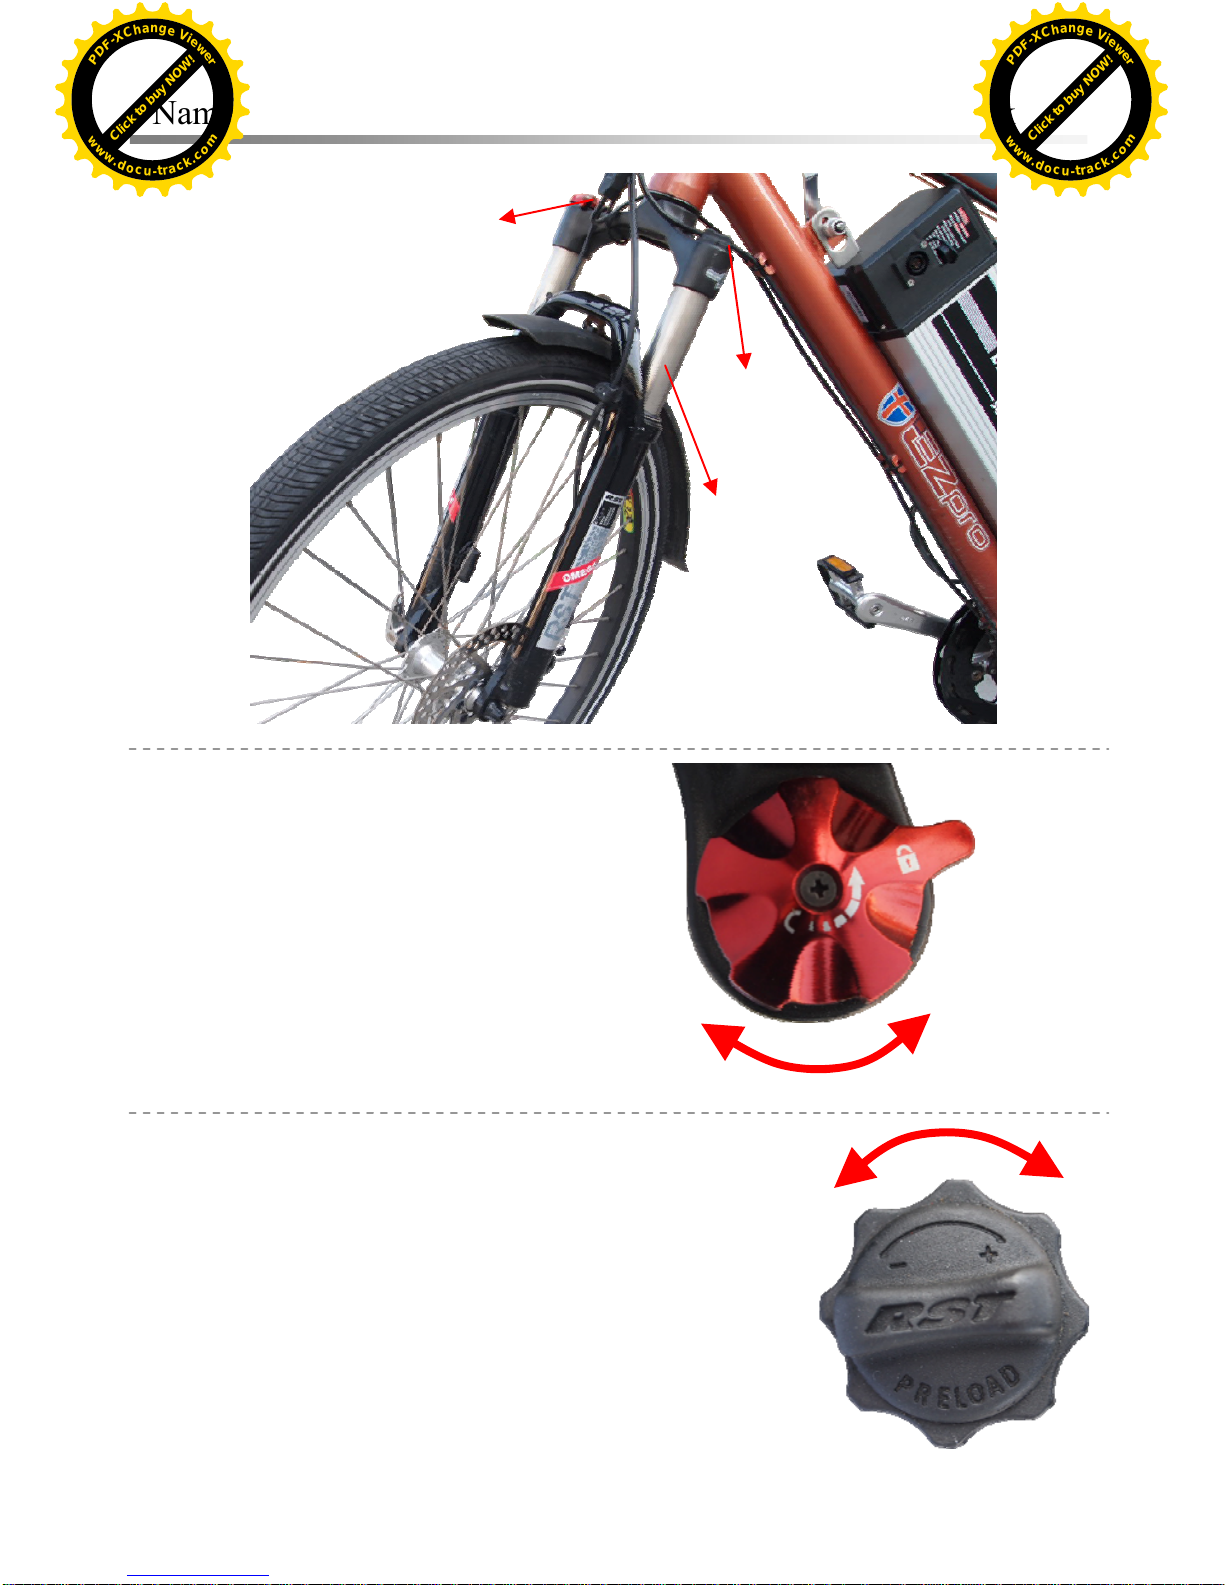
◆Name of each part and operation introduction:Suspension fork
Pre-load
s
y
stem
Lock-out system
Suspension
fork
【Lock-out system】
By using lever to adjust the fork’s
compression from fast to slow
gradually, then till lock-out position in
the end.
7
【Pre-load system】
Adjustment by preload adjuster to improve the
forks’performance which vary from respective
rider’s weight. Turning the adjuster clock-wise to
make the spring stiffer, if spring too soft. Turning
the adjuster counter clock-wise to reduce the
spring tension and make it softer.
Click to buy NOW!
P
D
F
-
X
C
h
a
n
g
e
V
i
e
w
e
r
w
w
w
.
d
o
c
u
-
t
r
a
c
k
.
c
o
m
Click to buy NOW!
P
D
F
-
X
C
h
a
n
g
e
V
i
e
w
e
r
w
w
w
.
d
o
c
u
-
t
r
a
c
k
.
c
o
m
Page 8
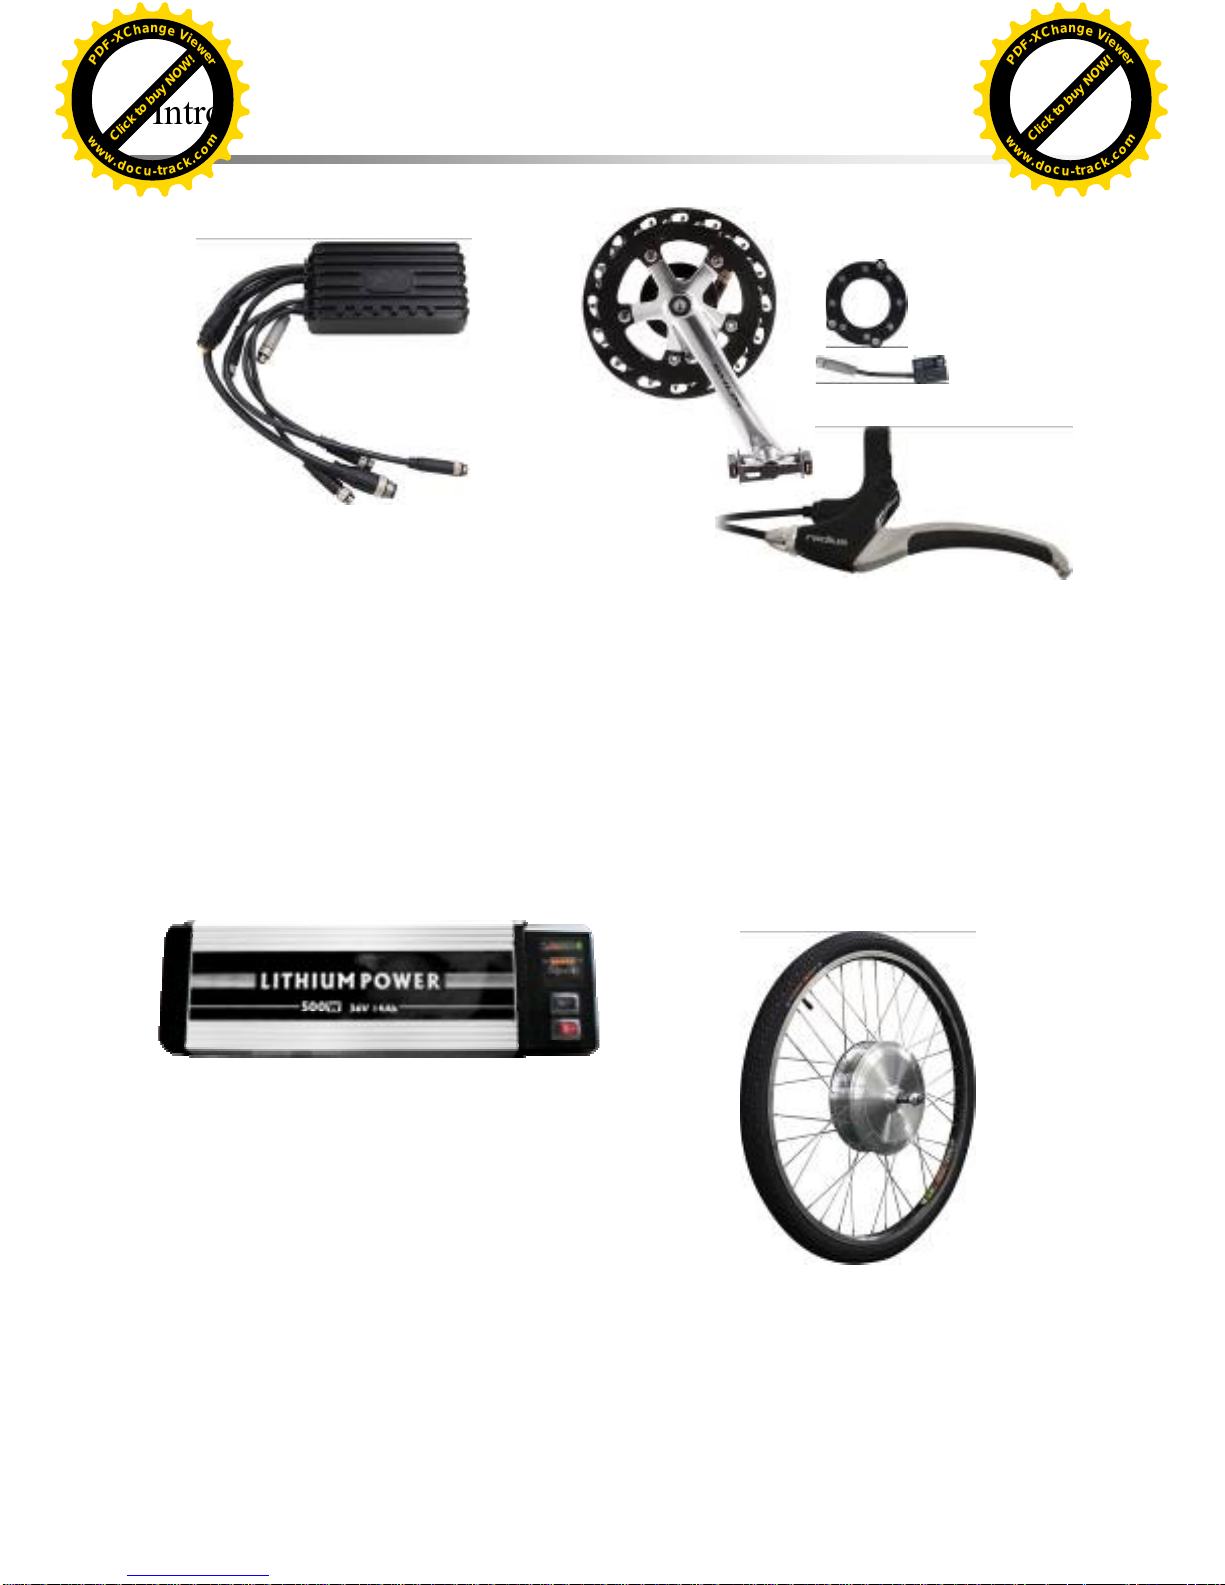
◆Introduction of pedelec system
8
(1) Lower control system
It’s the message transmission hub of
central processing unit, speed sensor
and battery pack. The overall wires
are dustproof and waterproof, with IP
65 protection class
(2) Speed sensor set & power-off lever
It can automatically sense the force
applied by rider on the pedal, provide
assistance with linear acceleration and
make the riding smoothly and fast like
automatic transmission system. Manual
power-off system will ensure more
safety.
(3) Lithium battery pack
It has 36V 14AH high capacity and is
ultra-light, only 4.5 kg. It can be used
for multiple modes and installed on
bike frame. Power consumption under
full charge < 0.7 degree. Endurance
on the flat ground can achieve 100kg.
(4) 500W DC brushless motor
With high energy efficiency, low
wear-out and high durability
Click to buy NOW!
P
D
F
-
X
C
h
a
n
g
e
V
i
e
w
e
r
w
w
w
.
d
o
c
u
-
t
r
a
c
k
.
c
o
m
Click to buy NOW!
P
D
F
-
X
C
h
a
n
g
e
V
i
e
w
e
r
w
w
w
.
d
o
c
u
-
t
r
a
c
k
.
c
o
m
Page 9
III. Information on riding safety
◆Prior-riding check and routine check
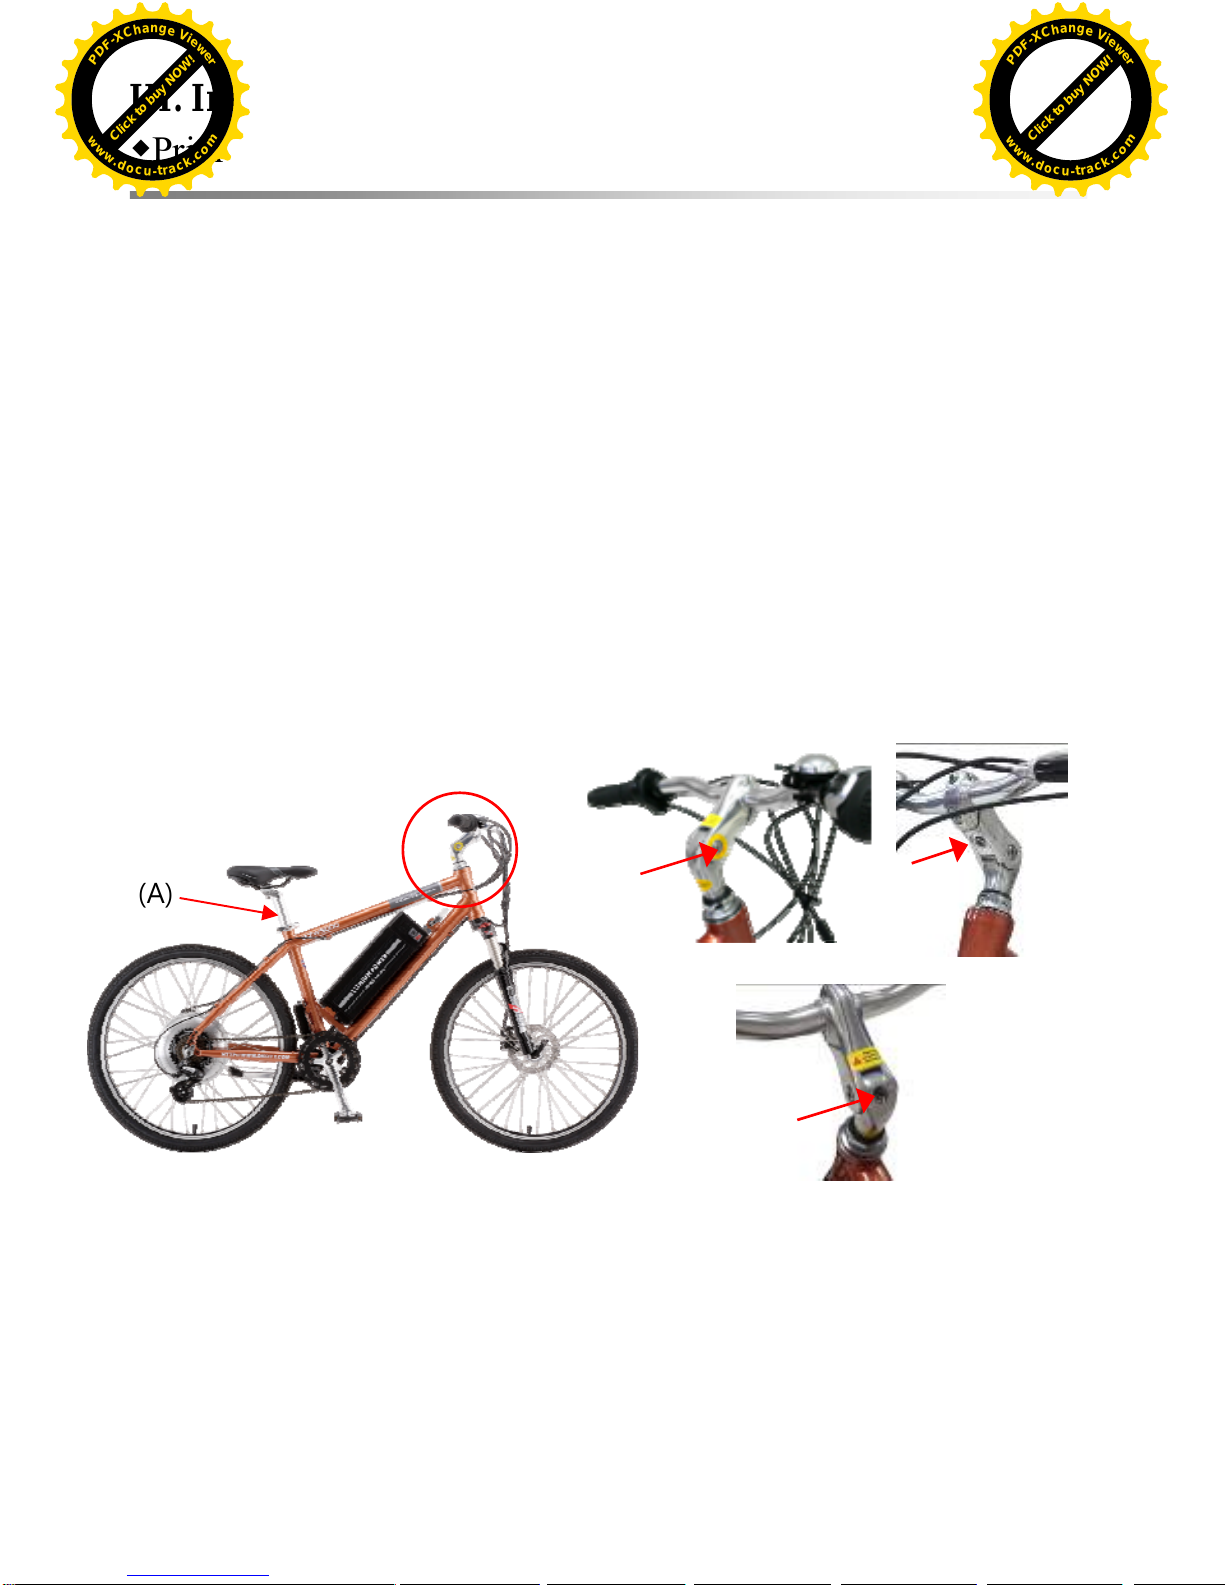
1. Check of saddle
z Height position of saddle: If you sit on the saddle and you can straighten your leg
slightly at the bottom of the pedal stroke, the saddle height is most appropriate. If you
can only step on pedal with tiptoe or you cannot straighten your leg, it’s easy to cause
fatigue or injury and saddle height must be adjusted.
z When you adjust the height of saddle, attention should be paid to safety line (A)
indicated on seat post that should not be exceeded, to avoid danger. See the following
picture for details.
2. Check of handlebars
z To make rider safer and more comfortable, please adjust handlebar to appropriate angle
(See the following Fig. (B)) and confirm that you can rotate handlebar to each
direction.
z To make rider safer and more comfortable, please adjust handlebar height to
appropriate angle (See the following Fig. (C))
9
(A)
(B)
(C)
3. Check of tires
z Tire specification: 26”X1.75
z Tire pressure: 45-60 PSI
Check of the worn-out situation of tires: If groove of tread pattern is worn-out, please
replace tire with new one. It’s better to replace tires when the bike has been running for
about 5,000 km to ensure safety.
Click to buy NOW!
P
D
F
-
X
C
h
a
n
g
e
V
i
e
w
e
r
w
w
w
.
d
o
c
u
-
t
r
a
c
k
.
c
o
m
Click to buy NOW!
P
D
F
-
X
C
h
a
n
g
e
V
i
e
w
e
r
w
w
w
.
d
o
c
u
-
t
r
a
c
k
.
c
o
m
Page 10
◆Prior-riding check and routine check
4. Check of wheel rims
z Rim specification: Double-layer rims made of aluminum alloy
z Check of the worn-out situation of rims: All rims have safe line. If the safe line is
unclear due to abrasive wear, please replace rim.
5. Check of brake system
z Brakes will have weak clamping force if you ride the bike at rainy day, please brake the
bike safely at longer distance and slow down.
z If you ride the bike at too high speed, do not brake the bike strongly and abruptly and
you should slow down the bike gradually.
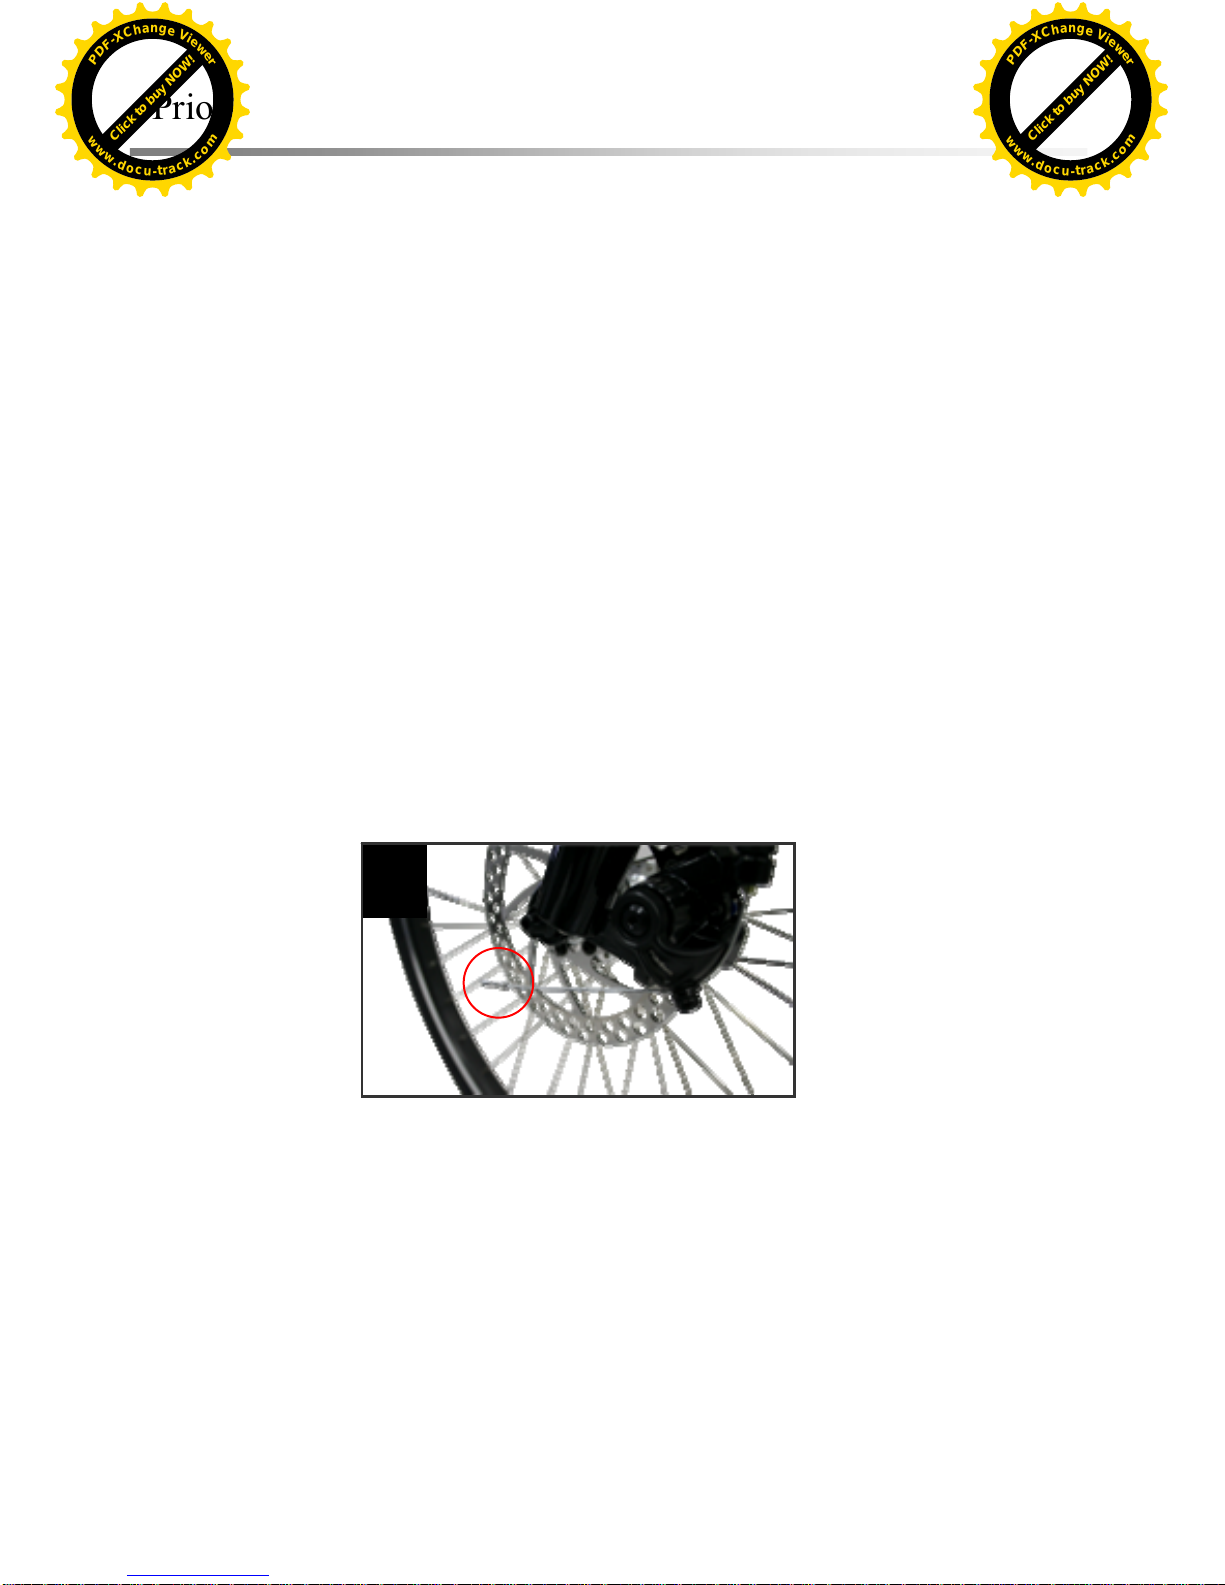
z Brake inner wire (Cable wire): The outlet of inner wire (Cable wire) of brake should
avoid bifurcation. Please mount aluminum sheath (As shown in Fig. 1) at the end of
cable wire. Inner wire (Cable wire) of brake should be lubricated (Stitching machine oil)
on a regular basis, to avoid rustiness or unsmooth actuation.
1
6. Check of chain
z Lubricating time and position of chain: If chain produces abnormal sound, please add a
little lubricating oil to the chain (Special chain lubricant should be used).
10
Click to buy NOW!
P
D
F
-
X
C
h
a
n
g
e
V
i
e
w
e
r
w
w
w
.
d
o
c
u
-
t
r
a
c
k
.
c
o
m
Click to buy NOW!
P
D
F
-
X
C
h
a
n
g
e
V
i
e
w
e
r
w
w
w
.
d
o
c
u
-
t
r
a
c
k
.
c
o
m
Page 11
◆Prior-riding check and routine check
Please carry out the following items to guarantee your own safety.
Check of bike frame body:
z Please confirm whether bike stand can be raised or lowered normally (Please refer to
p.11)
z Hold the left and right levers to check whether brake system is efficient and levers can
be operated flexibly. (Please refer to p.11)
z Check whether front fork moves up and down, to avoid the danger caused by the
clearance between steering gear and front wheel
z Check whether tires are inflated properly, whether tread is damaged or tread patter is
worn-out badly.
z Check whether wheel rim is in round shape. Please replace wheel rim at once if it’s out
of shape.
z Each part of bike must lock with each other, to avoid the danger caused by looseness.
z Adjust saddle height and handlebar angle properly and lock the saddle and handlebar
well (Please refer to p.08)
Check of power system:
z Check whether battery have sufficient power. (Please refer to p.05)
z Whether wires of power system are complete and free of damage and whether each
connector is connected well.
z It’s advised to use the parts from original manufacturer in case of replacement.
Caution! Please purchase the bike with proper size. A bike which is too large
or small is not only hard to control, but also may cause bad effect.
11
Click to buy NOW!
P
D
F
-
X
C
h
a
n
g
e
V
i
e
w
e
r
w
w
w
.
d
o
c
u
-
t
r
a
c
k
.
c
o
m
Click to buy NOW!
P
D
F
-
X
C
h
a
n
g
e
V
i
e
w
e
r
w
w
w
.
d
o
c
u
-
t
r
a
c
k
.
c
o
m
Page 12
◆Simple Adjustment
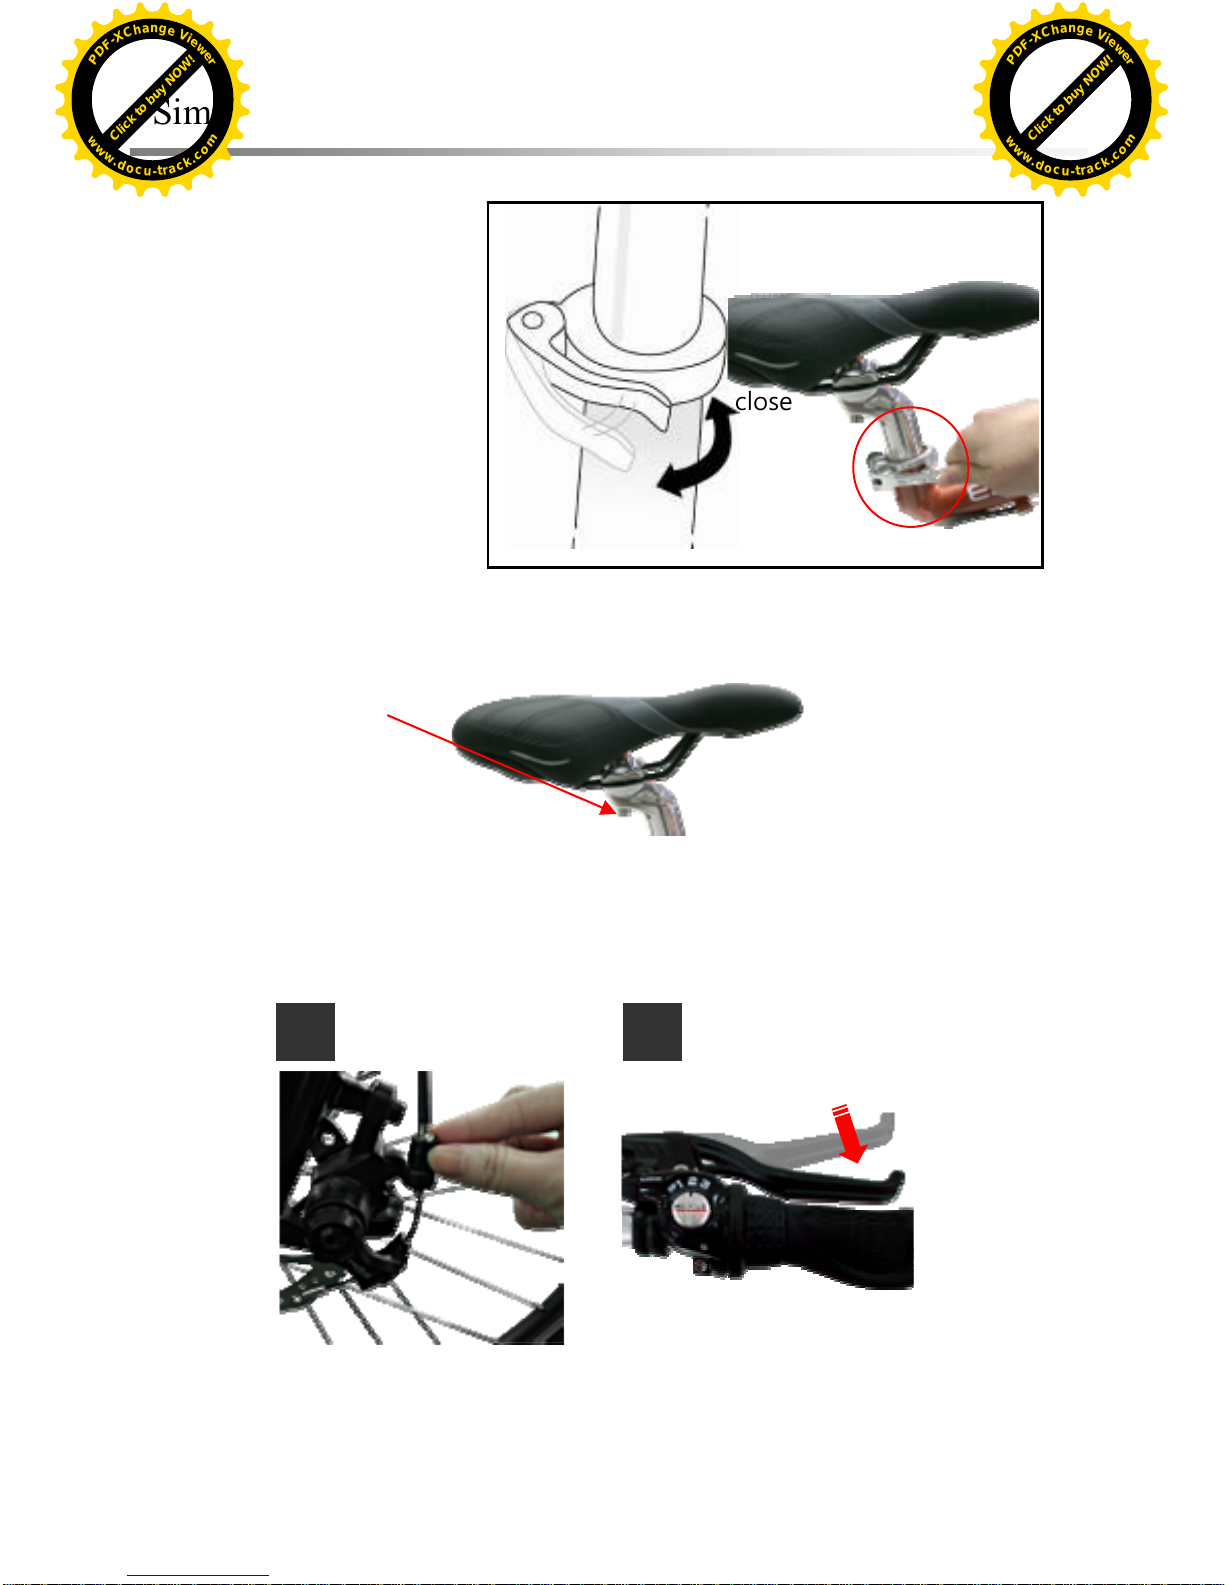
(A)Saddle Height Adjustment:
open
close
(A)
Loose the fixed bolts of
seat post, adjust the saddle to
proper height and then fasten
the fixed bolts.
(B) Adjust saddle angle
Adjustment of brake system:
Loosen the fixed bolts and adjust the brake lever to make tightness of brake moderate.
1 2
Adjust the brake lever to make
tightness of brake moderate.
Loosen the fixed bolts.
12
Click to buy NOW!
P
D
F
-
X
C
h
a
n
g
e
V
i
e
w
e
r
w
w
w
.
d
o
c
u
-
t
r
a
c
k
.
c
o
m
Click to buy NOW!
P
D
F
-
X
C
h
a
n
g
e
V
i
e
w
e
r
w
w
w
.
d
o
c
u
-
t
r
a
c
k
.
c
o
m
Page 13
◆Precautions
To ensure your riding safety, please make sure to read in detail and observe the
following instructions and obey traffic rules. Otherwise, it may give rise to product
damage and endanger your own or others’ life.
z Do not load other persons, to avoid accident.
z While riding the bike, please wear the helmet with the mark of conformity and buckle the belt of
helmet.
z Make sure to carry out routine check and scheduled maintenance to reduce the fault of bike
(Please refer to p.18)
z Do not ride the bike under the influence of alcohol. Please keep good mental conditions while
riding.
z Do not modify bike frame body or remove parts illegally. Structure of bike interacts with
function. Modification without permission will affect the operation and riding safety of bike and
shorten the lifetime of bike.
z Do not disassemble bike body, panel, battery or other parts without instructions indicated in this
manual.
z Do not let hands free or conduct other dangerous actions such as stunt show while riding.
z Do not ride the bike on the too rough pavement, to avoid the danger caused by damage of e-bike.
z Do not brake the bike abruptly at high speed, to avoid crash.
z Do not ride the bike on the water-logged ground, to avoid damp and fault of battery (Please refer
to p.17)
z Continuous slope climbing will cause too high temperature of motor, which will stop power
supply automatically. Slope angle should be less than 13 degrees.
z While riding at night, please use special bike lamp or appropriate bike lamp for safety purpose.
z While riding on public road, please equip the bike with bike lamp and reflector complying with
regulations.
z While riding, attention should be paid to the vehicles that are driven into or out of the lane in
front of you.
z While riding, attention should be paid to whether the door of the vehicle stopped in front of you
is opened suddenly.
z While riding, attention should be paid to any pedestrian who rushes out suddenly.
z While riding, attention should be paid to obstacles such as pits, stones and rails, which may make
you deviate the riding direction at any time.
z If the riding safety is affected by damaged parts while riding, please stop riding.
z It’s advised that parts of the original manufacturer are used in case of replacement.
z The bike is originally designed for urban commuting purpose. Do not use it for cross-country,
competition or on too rough pavement, etc, which will injure you or damage the bike frame.
13
Click to buy NOW!
P
D
F
-
X
C
h
a
n
g
e
V
i
e
w
e
r
w
w
w
.
d
o
c
u
-
t
r
a
c
k
.
c
o
m
Click to buy NOW!
P
D
F
-
X
C
h
a
n
g
e
V
i
e
w
e
r
w
w
w
.
d
o
c
u
-
t
r
a
c
k
.
c
o
m
Page 14
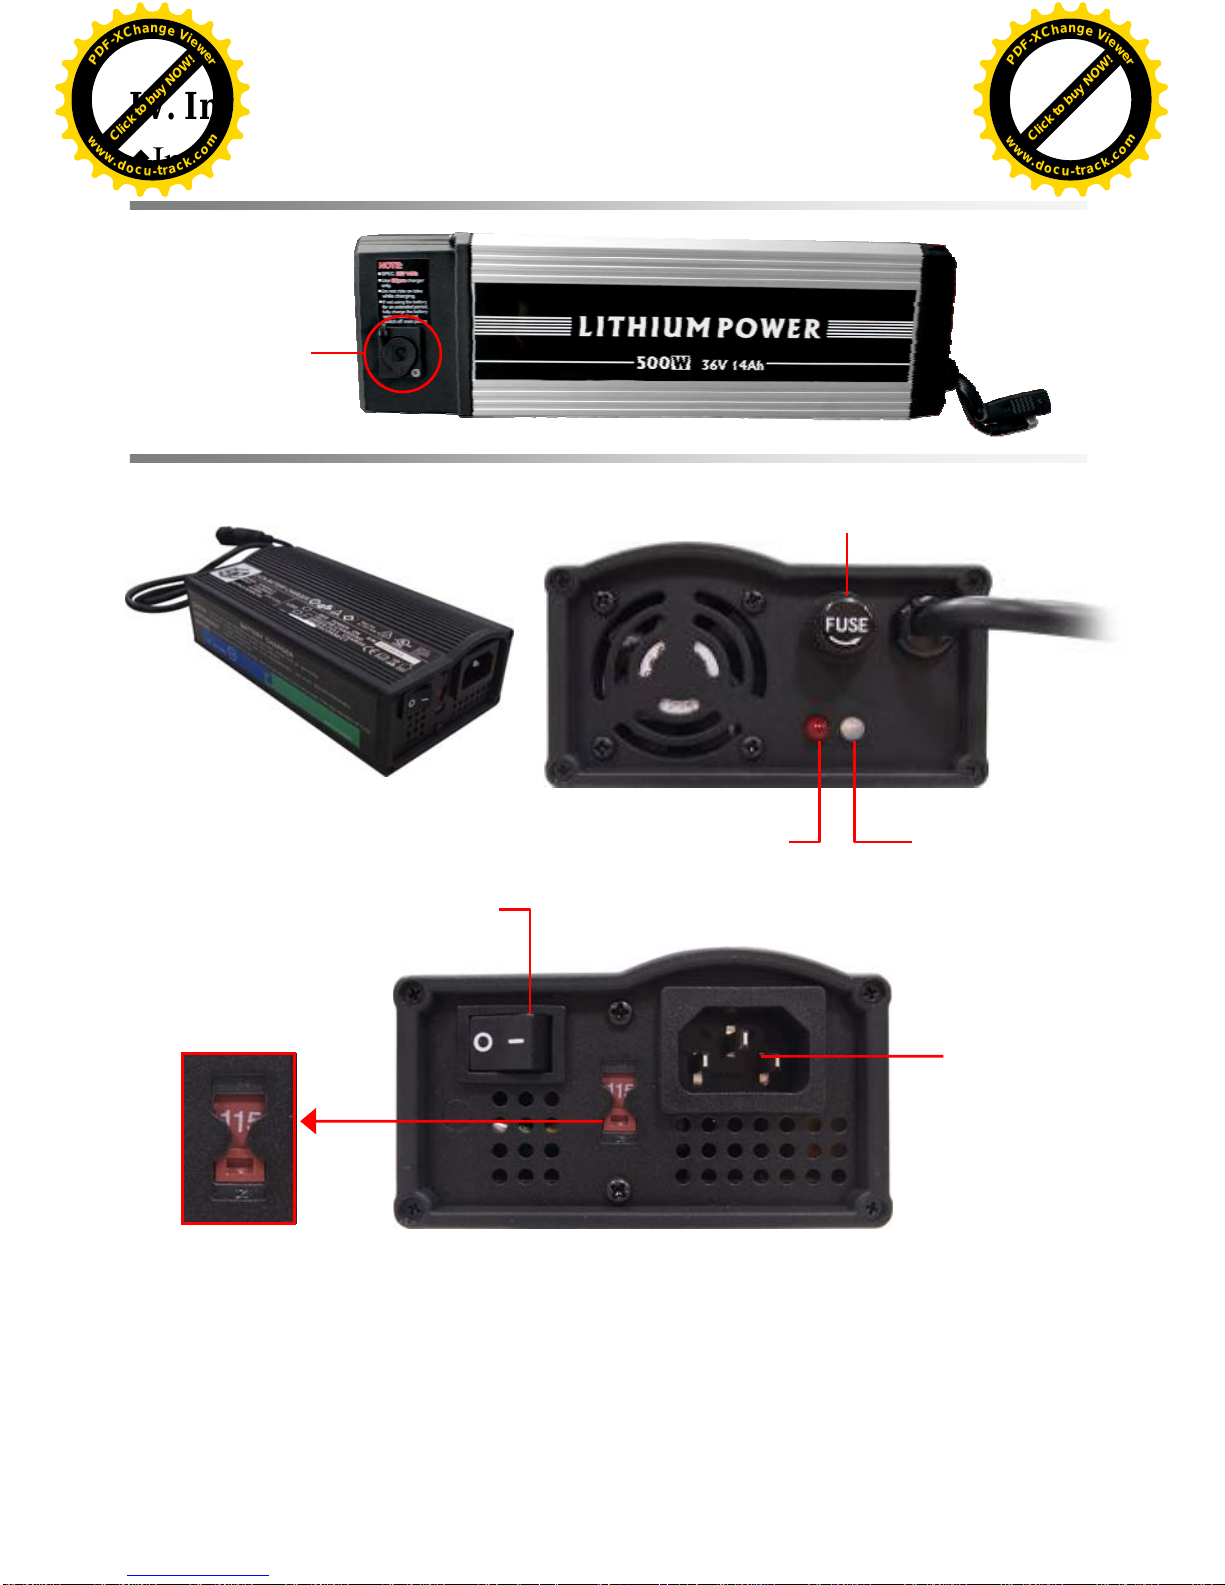
IV. Intr oduction to use of battery
◆Introduction to the charging operation
Charger
connector of
b
atteries
Charger
Fuse
Lamp signal
Indicator
I/O switch
Voltage115/230
Power plug
Pullup or pulldown is possible to switch the correct voltage for socket.
Warning! Please confirm whether AC voltage of socket is consistent with voltage of
charger before charging, to avoid burnout of fuse
14
Click to buy NOW!
P
D
F
-
X
C
h
a
n
g
e
V
i
e
w
e
r
w
w
w
.
d
o
c
u
-
t
r
a
c
k
.
c
o
m
Click to buy NOW!
P
D
F
-
X
C
h
a
n
g
e
V
i
e
w
e
r
w
w
w
.
d
o
c
u
-
t
r
a
c
k
.
c
o
m
Page 15
◆Introduction to the charging operations
Charging procedures:
1. Remove battery from the original equipment.
2. Confirm whether all power lines, battery lines and battery connectors are in the normal
and usable state.
3. Confirm whether output voltage of charger is compatible with the voltage of the
connected battery.
4. Make clear the positive and negative polarity and then connect battery to charger
connector.
5. Confirm whether AC voltage of socket is consistent with the voltage of the selected
charger, connect charger to power supply and turn on I/O switch, and then power
indicator (Red lamp) will light up, which shows startup.
6. When the charging begins, the indicator of the charging state will show the charging
lamp signal and will turn to green lamp after the charging is finished.
Lamp signal instructions:
Power indicator: If red lamp is on constantly, it means that charger starts up normally and
is standby.
Indicator instructions:
Green lamp is on constantly: Standby
Orange lamp flashes: Pre-charging under low voltage
Orange lamp is on constantly: Pre-charging
Orange lamp is on constantly: In the charging process under rated current
Orange lamp is on constantly: In the charging process under rated voltage
Green lamp is on constantly: The charging is finished
Orange lamp flashes: Pre-charging for 1.5 hours and in the charging process under rated
current or rated voltage for 10 hours. State has not yet been changed when the time set by
Timer is up.
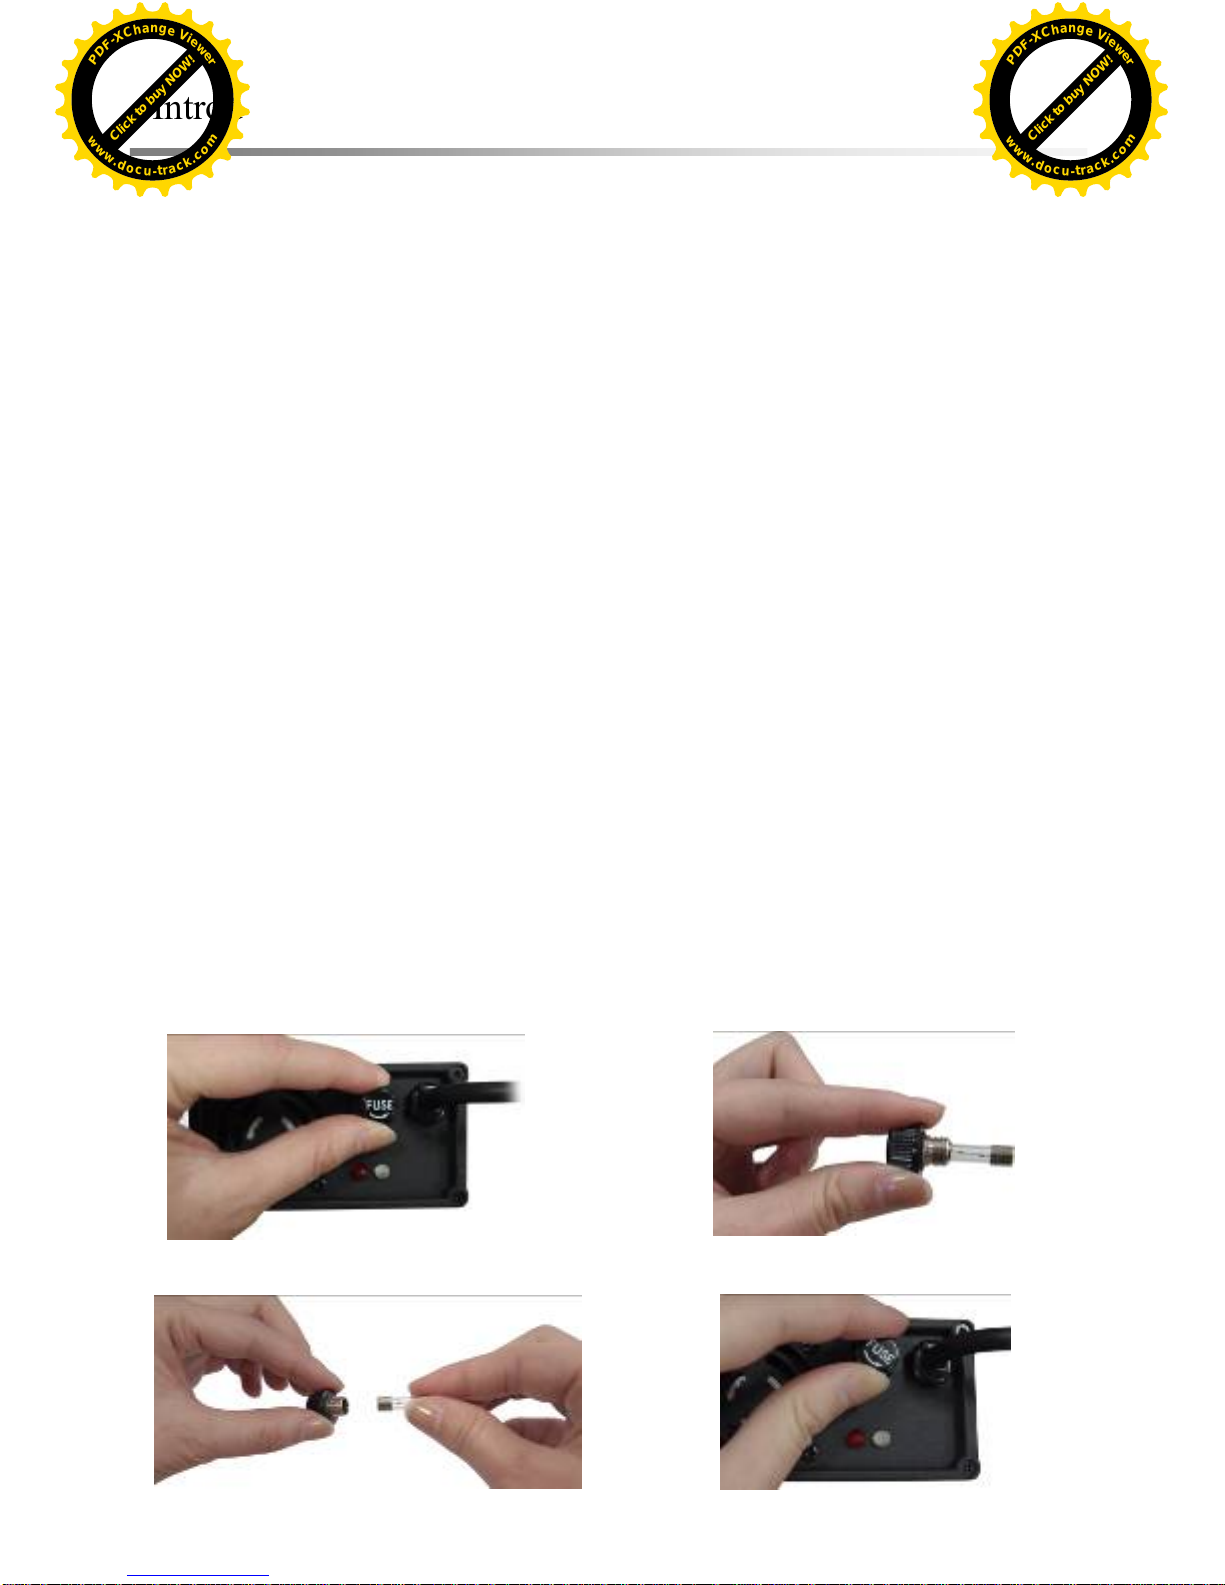
In case of burnout of fuse: (Fuse 10A 250V)
1. Rotate the fuse
2. Take out the fuse
3.Replace the fuse
4.Fasten the fuse
15
Click to buy NOW!
P
D
F
-
X
C
h
a
n
g
e
V
i
e
w
e
r
w
w
w
.
d
o
c
u
-
t
r
a
c
k
.
c
o
m
Click to buy NOW!
P
D
F
-
X
C
h
a
n
g
e
V
i
e
w
e
r
w
w
w
.
d
o
c
u
-
t
r
a
c
k
.
c
o
m
Page 16
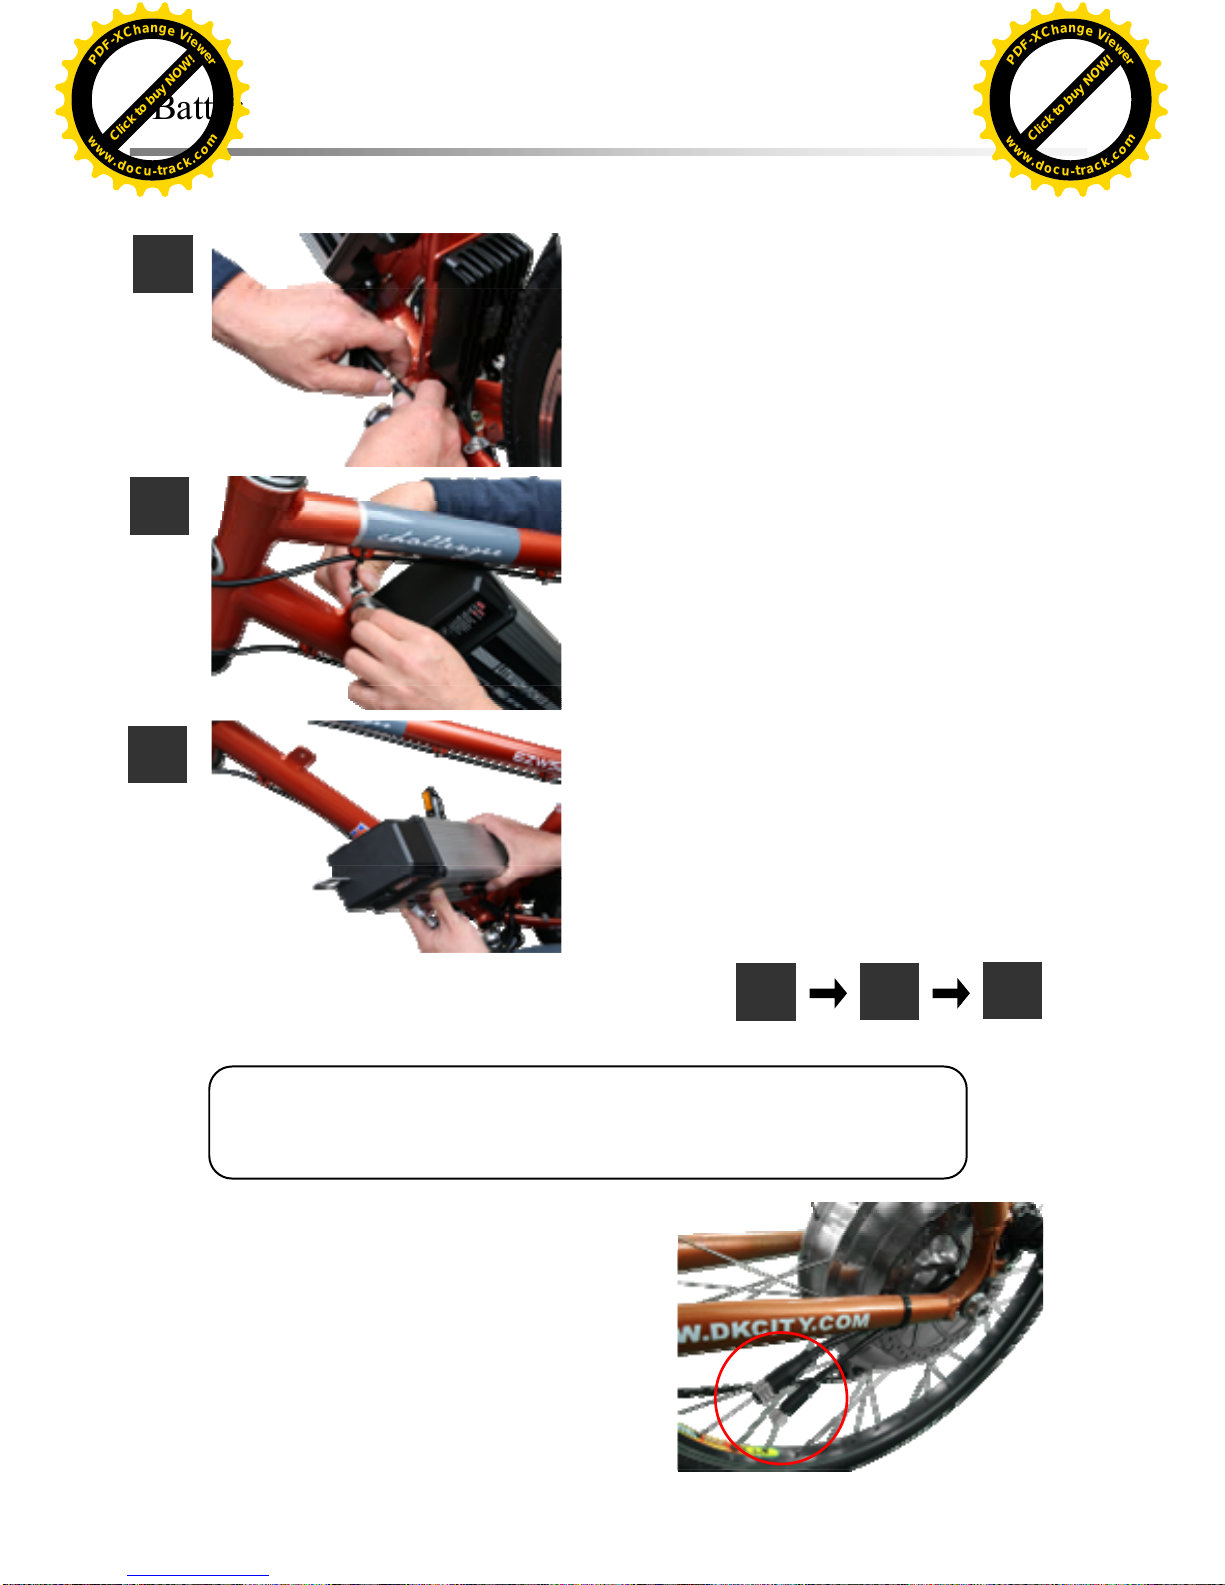
◆Battery assembly/disassembly instructions
Disassembly sequence:
16
Remove the power line of batteries that
connects bike body.
1
Remove the quick release at the front end
of batteries.
2
Remove the batteries from the “left” of
bike body.
3
1
2 3
Reverse action of the disassembly sequence
Caution! Assembly/disassembly must be conducted from the
“
”
Warning!
If the bike is used as general bicycle by
removing the batteries, the wire that c
motor to controller must be disconnec
avoid burnout of controller
onnects
ted, to
Click to buy NOW!
P
D
F
-
X
C
h
a
n
g
e
V
i
e
w
e
r
w
w
w
.
d
o
c
u
-
t
r
a
c
k
.
c
o
m
Click to buy NOW!
P
D
F
-
X
C
h
a
n
g
e
V
i
e
w
e
r
w
w
w
.
d
o
c
u
-
t
r
a
c
k
.
c
o
m
Page 17

◆Introduction of battery
1. Electrical specification of lithium battery
z Nominal voltage: DC36V
z Nominal capacity: 14Ah
z Range of operating voltage: DC30V ~ 42V
2. Accessories of lithium battery
z Power line One
z Charger One
z Charger specification: Input 100 ~ 240VAC,50/60Hz 3A,Output 42V,4.0A
17
Caution!
1. Please read this user manual and safety code in detail before you use lithium
battery module, so as to understand the specifications and precautions of product.
2. According to provisions of transportation regulations, capacity of lithium battery
module must be lower than 50% in transit. So user must charge the bike with the
attached charger for 12 hours before the initial use and then use the bike after it’s
fully charged.
3. Please use the attached charger for charging and do not use the charger of other
manufacturers.
4. After lithium battery is fully charged, do not connect charger to lithium battery
for a long time.
5. The lithium battery are specially used for e-bike and do not use them for other
products.
6. Before use, please ensure that lithium battery is fixed to the bike and confirm
whether output terminal of battery is connected to the terminal of battery holder
properly.
7. If battery is not used for a long time, please charge the battery fully and then turn
off switch and put battery in a cool, ventilated place indoors. Battery should be
charged once a month at least to ensure lifetime.
8. While charging, heating of charger and battery belongs to normal phenomenon.
Click to buy NOW!
P
D
F
-
X
C
h
a
n
g
e
V
i
e
w
e
r
w
w
w
.
d
o
c
u
-
t
r
a
c
k
.
c
o
m
Click to buy NOW!
P
D
F
-
X
C
h
a
n
g
e
V
i
e
w
e
r
w
w
w
.
d
o
c
u
-
t
r
a
c
k
.
c
o
m
Page 18
◆Instructions for use of battery
z Please ensure that battery module is dray. Do not put battery module into water.
z Do not charge the lithium battery module near fire source or in high-temperature
environment, because high temperature will affect the lifetime of battery.
z Do not discard the old battery module that has been replaced to fire source or
high-temperature environment. Please send them to distributor for recycling.
z Do not throw or knock battery module, because strong external force will damage the
casing and internal circuit and protective circuit of battery, which is hardly to ensure
safety of user.
z Do not use other chargers than the attached special one for charging. Using the
chargers of other manufacturers will have bad effect on battery module and then we
will not be responsible for warranty.
z Do not insert metals (e.g. wires, copper coin and clip, etc) into any terminal.
z Do not conduct fire-resistant test and waterproof test for lithium battery module and
charger.
z Do not apply solvent or other chemical agent to battery module. Dry cloth can be used
for cleaning.
z The lithium battery module is developed specially for e-bike and do not use it for other
products.
z Do not touch power line and socket with wet hands.
z Do not place the charger within children’s reach, to avoid accident.
z Do not ride the bike when battery on the bike is charging, to avoid danger caused by
drawing the power line or bike damage.
z If battery is damaged or immersed in water, do not continue to use the battery and you
should send them for repair.
z Do not stack heavy objects on battery, to avoid battery damage.
CATION!To safeguard your own rights and interests, pleasure
make sure to observe the above precautions, which can reduce
accidents and extend the lifetime of batteries.
18
Click to buy NOW!
P
D
F
-
X
C
h
a
n
g
e
V
i
e
w
e
r
w
w
w
.
d
o
c
u
-
t
r
a
c
k
.
c
o
m
Click to buy NOW!
P
D
F
-
X
C
h
a
n
g
e
V
i
e
w
e
r
w
w
w
.
d
o
c
u
-
t
r
a
c
k
.
c
o
m
Page 19
V. Maintenance and care
◆Safekeeping and care
Emphasis of safekeeping and care
Check whether bike body is cracked. Any crack means potential danger and will give rise
to accident. If repair is not conducted or relevant fittings are not replaced in time, there
will be severer danger. Once bike body is cracked, the crack will become larger in a short
time. Rustiness or discoloration may hint the occurring of cracks. If you find a crack,
please replace relevant fittings.
1. Check and observe any rusty position carefully to confirm whether there’s any crack.
Rustiness will quicken the damage of bike body or parts and large cracks.
2. Clean your bike, lubricate relevant fittings and make your bike away from any
corrosive things such as salt.
3. Do not polish, drill or engrave mark on the surface of bike body. Large scratches and
boreholes will cause cracks. Attention should be often paid to these positions or
replace with new fittings.
A bike that’s properly maintained will not produce abnormal sound while riding. Some
cracks (Especially larger cracks) will produce abnormal sound when you ride the bike.
Such abnormal sound is the signal of warning of danger. Attention should be paid to
the source of abnormal sound (even if it’s not caused by cracks), namely eliminate the
cause of abnormal sound as soon as possible.
Caution!
If bike is damaged or needs adjustment, please contact seller for assistance and do
not repair the bike by yourself. Repair and maintenance of bike needs special
knowledge and tools. Non-professional adjustment or repair may damage the bike or
cause accident and heavy casualties.
z If you want to master the main repair techniques:
1. Ask your distributor to provide introduction data of installation and maintenance
of parts of bike or contact manufacturers of parts.
2. Ask your distributor to recommend the books relating to repair of bike.
3. Consult your distributor on the courses relating to repair of bike.
19
Click to buy NOW!
P
D
F
-
X
C
h
a
n
g
e
V
i
e
w
e
r
w
w
w
.
d
o
c
u
-
t
r
a
c
k
.
c
o
m
Click to buy NOW!
P
D
F
-
X
C
h
a
n
g
e
V
i
e
w
e
r
w
w
w
.
d
o
c
u
-
t
r
a
c
k
.
c
o
m
Page 20
◆Maintenance and care
Maintenance and care instructions:
z Do not clean the bike by strong spraying, to avoid damp and damage of battery
system. Dry cloth can be used for cleaning.
z Please use neutral or soft detergent for cleaning, to avoid damage of bike body.
z Do not use seawater or water source containing salt for cleaning. Cold water should be
used, so as to avoid accelerated corrosion.
z After bike has been cleaned or when you store the bike, please keep the bike and
surroundings as dry as possible, to avoid rustiness.
z If long-term storage is required, please remove battery from bike.
z Please avoid exposing the bike to the sun and rain and you should place the bike in
buildings as much as possible.
z If bike is out of use for a long time, please lubricate the gears or screws properly.
Caution! Correct maintenance and care can not only make you bike
keep brand-new appearance, but also maintain the best performance.
20
Click to buy NOW!
P
D
F
-
X
C
h
a
n
g
e
V
i
e
w
e
r
w
w
w
.
d
o
c
u
-
t
r
a
c
k
.
c
o
m
Click to buy NOW!
P
D
F
-
X
C
h
a
n
g
e
V
i
e
w
e
r
w
w
w
.
d
o
c
u
-
t
r
a
c
k
.
c
o
m
Page 21
◆Routine maintenance
While bike is used, many factors will cause the wear and tear, consumption, damage
and looseness of parts. If check and maintenance is not conducted regularly at ordinary
times, lifetime of your bike will be shortened, except the danger that’s easy to occur while
riding.
Generally, the first scheduled maintenance should be conducted within two months
as from the purchase date of bike and the second scheduled maintenance within six
months, and then check and maintenance should be conducted once every six months.
Check items and time:
Symbol definition:
Adjustment(◆) Check(■) Tighten:(▲) Lubricate:(●) Replace:(★)
Maintenance Items New 2months 6months 1year 1.5year
Tire pressure
◆ ◆ ◆ ◆ ◆
Saddle height and angle, Upright
height.
◆ ▲ ■ ◆ ◆ ◆
Front fork revolving, if parts are
loose or not.
▲ ■ ■ ▲
■ ▲
●
■ ▲
If pedals and BB principal axis are
loose or not.
▲ ■ ■ ● ◆ ■
◆ ■
●
If front wheel motor axes and rear
wheel inner shift hub are loose or
not.
▲ ■ ■ ◆ ■ ◆ ■
If chain is too loose or too tight
◆ ■ ● ■ ● ■ ● ■ ●
If front and rear brakes are flexible
or not.
◆ ■ ◆ ◆ ■ ◆ ■
If brake handle(grip distance) is
proper or not.
◆ ■ ◆ ■ ◆ ■ ◆ ■
If brake block is abraded or not.
▲ ■ ■ ◆ ■
◆ ■
★
If big and small Crankset are
abraded or distorted.
■ ■ ■ ■
If wheel rim leaves the center or
distorted.
◆ ■ ■ ◆ ■ ◆ ■
If spokes are loose or broken.
■ ■ ◆ ■ ◆ ■
If frame and front fork are
damaged or not.
■ ■ ■ ■
If attachment or other screws are
loose or not.
▲ ■ ■ ■ ■
21
Click to buy NOW!
P
D
F
-
X
C
h
a
n
g
e
V
i
e
w
e
r
w
w
w
.
d
o
c
u
-
t
r
a
c
k
.
c
o
m
Click to buy NOW!
P
D
F
-
X
C
h
a
n
g
e
V
i
e
w
e
r
w
w
w
.
d
o
c
u
-
t
r
a
c
k
.
c
o
m
Page 22
VI. Simple troubleshooting
◆Troubleshooting of bike
Condition 1: Ride the bike with great effort or there’s no power
Possible cause Fault elimination
Switch of battery is not turned on.
◆Insert battery key and turn on battery supply
◆Press the power supply of LCD control system
◆Select pedelec setting.
Output terminal of battery
disconnects from the input
terminal of battery holder
◆Confirm whether output terminal of battery is connected
to input terminal of battery holder well.
Connector of the wire that
connects battery to other parts is
disconnected
◆Connect the wire well according to arrow instructions on
the wire connector
Battery is dead ◆Use special charger to charge the battery.
Condition 2: There’s no LED lamp signal of batteries
Possible cause Fault elimination
Battery supply is not turned on ◆ Press the switch of battery supply
Battery is dead or have fault
◆Use special charger to charge the battery.
◆If battery cannot be charged, please contact distributor to
replace battery.
22
Click to buy NOW!
P
D
F
-
X
C
h
a
n
g
e
V
i
e
w
e
r
w
w
w
.
d
o
c
u
-
t
r
a
c
k
.
c
o
m
Click to buy NOW!
P
D
F
-
X
C
h
a
n
g
e
V
i
e
w
e
r
w
w
w
.
d
o
c
u
-
t
r
a
c
k
.
c
o
m
Page 23
◆Bike troubleshooting
Condition 3: Battery power display flashes or is off
Possible cause Fault elimination
Battery is dead.
◆Use special charger to charge the battery.
◆The connecting wire of controller is loose or controller
has fault, please check whether connector of wire is
inserted properly.
Condition 4: The traveling distance of e-bike is shortened
Possible cause Fault elimination
Because of long-distance slope
climbing or motor in high load
state for a long time, the bike
stops running very frequently.
◆Road conditions will affect the traveling distance of
e-bike, so it’s normal that the traveling distance of e-bike
is shortened, which is not due to fault.
Tire pressure is insufficient or
flat tire occurs.
◆Inflate the tires to achieve appropriate tire pressure
◆Repair the tire or replace the inner tube
The bike has not been ridden for
a long time, thus causing
insufficient battery power.
◆Even though the bike is not ridden for a long time,
battery will be discharged naturally, thus causing
insufficient power, so traveling distance of e-bike is
shortened.
◆Please use special charger to charge the battery.
Lifetime of battery is expiry due
to long-term use and
charging/discharging times.
◆Please contact distributor to replace battery.
Caution!If fault or effect cannot be eliminated through the above
instructions, please send the bike to original supplier for repair as soon
as possible.
23
Click to buy NOW!
P
D
F
-
X
C
h
a
n
g
e
V
i
e
w
e
r
w
w
w
.
d
o
c
u
-
t
r
a
c
k
.
c
o
m
Click to buy NOW!
P
D
F
-
X
C
h
a
n
g
e
V
i
e
w
e
r
w
w
w
.
d
o
c
u
-
t
r
a
c
k
.
c
o
m
Page 24
◆Troubleshooting of battery and charger
Condition 1: Battery cannot be charged or LED indicator is off
Possible cause Fault elimination
Charger is not connected to power
supply or power line is disconnected.
◆Confirm whether socket and connector between
charger and mains supply is connected properly
◆Confirm whether the LED indicator of charger turns
to red lamp (Indicating the standby state) after
connecting the power supply
The output terminal of charger is
disconnected from battery
◆Confirm whether charger is connected to output
terminal of batter
y properly.
◆Confirm whether LED indicator of charger turns to
orange lamp (Indicating the charging state)
Battery have fault ◆Please contact distributor to replace battery
Condition 2: LED indicator of charger turns to red lamp (indicating the standby state)
and doesn’t turn to orange color (indicating the charging state) after charger
is connected to output terminal of battery properly.
Possible cause Fault elimination
Charge the battery for the first time or
after battereis have not used for a long
time
◆Lamp signal will change automatically several
minutes later
◆If red lamp is on constantly, battery may have fault,
so please contact distributor to replace battery.
Condition 3: LED inciator of charger is off or doesn’t turn to orange lamp (indicating
the charging state) after charger is connected to output terminal of battery.
Possible cause Fault elimination
Charger or battery have fault.
◆Please stop charging and pull out the plug
immediately
◆Contact distributor to replace the charger or battery.
24
Click to buy NOW!
P
D
F
-
X
C
h
a
n
g
e
V
i
e
w
e
r
w
w
w
.
d
o
c
u
-
t
r
a
c
k
.
c
o
m
Click to buy NOW!
P
D
F
-
X
C
h
a
n
g
e
V
i
e
w
e
r
w
w
w
.
d
o
c
u
-
t
r
a
c
k
.
c
o
m
Page 25
◆Troubleshooting of battery and charger
Condition 4: After charging for 3-4 hours, LED indicator of charger is off or doesn’t turn
to green lamp (indicating that the charging has been finished)
Possible cause Fault elimination
Charger or battery have fault.
◆Please stop charging and pull out the plug
immediately
◆Contact distributor to replace the charger or battery.
Condition 5: LED indicator of charger, red lamp and green lamp flash alternately
Possible cause Fault elimination
Charger or battery have fault
◆Please stop charging and pull out the plug
immediately
◆Contact distributor to replace the charger or battery.
Condition 6: The charger indicates that the charging has been finished. But battery power
indicates that all 9 grids are not full
Possible cause Fault elimination
Battery, charger or controller has fault
◆Please contact distributor to replace battery,
charger or controller.
Condition 7: Abnormal sound, odour or smook occur in the charing process
Possible cause Fault elimination
Charger has fault
◆Please stop charging and pull out the plug
immediately
◆Contact distributor to replace the charger
25
Click to buy NOW!
P
D
F
-
X
C
h
a
n
g
e
V
i
e
w
e
r
w
w
w
.
d
o
c
u
-
t
r
a
c
k
.
c
o
m
Click to buy NOW!
P
D
F
-
X
C
h
a
n
g
e
V
i
e
w
e
r
w
w
w
.
d
o
c
u
-
t
r
a
c
k
.
c
o
m
Page 26
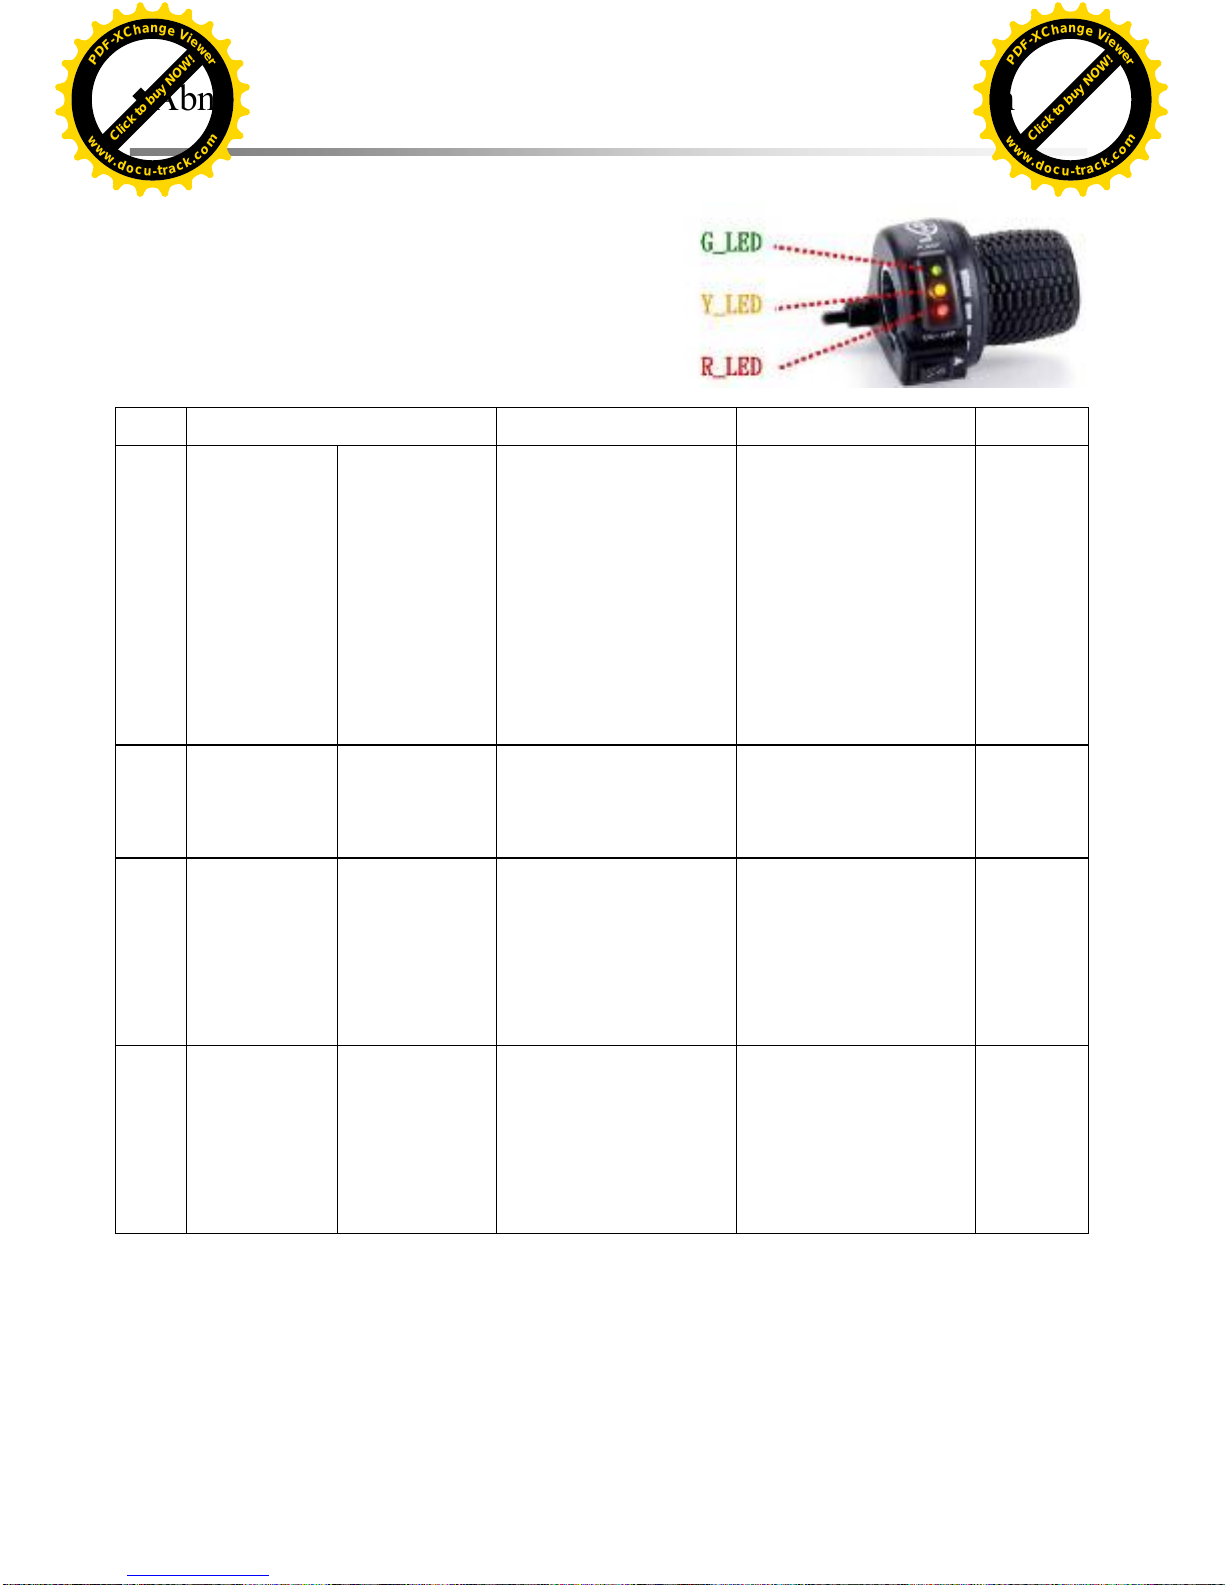
◆Abnormal display of controller and fault elimination form
Abnormal display LED of accelerator:
code LED abnormal display Cause Fault elimination Remark
1 Low voltage R_LED flash
0.5S/0.5S
Battery voltage is too
low
Lithium battery
36V system: Less than
32V
Lead-acid battery
36V system: Less than
30V
Check battery supply:
Replace or charge the
battery.
2 Power-off of
brake system
is abnormal.
G_Y_R_LED
flash
0.5S/0.5S
Brake gets stuck or
short circuit occurs
Check whether brake
has been pressed, and
remove brake wire.
Startup
detection
3 Power-on
accelerator is
abnormal.
Y_LED flash
0.3S/0.3S
Accelerator gets stuck
or short circuit occurs.
Check whether
accelerator turns to
original point and
returns to normal
automatically.
Startup
detection
4 Cancel
pedelec mode
and electric
mode.
Y_LED flash
1S/1S
Battery power indicates
that output of torque is
set to be zero.
(Non-pedelec mode)
The setting device of
power display and
output torque, within 5
segments of output
torque.
Special
function
26
Click to buy NOW!
P
D
F
-
X
C
h
a
n
g
e
V
i
e
w
e
r
w
w
w
.
d
o
c
u
-
t
r
a
c
k
.
c
o
m
Click to buy NOW!
P
D
F
-
X
C
h
a
n
g
e
V
i
e
w
e
r
w
w
w
.
d
o
c
u
-
t
r
a
c
k
.
c
o
m
Page 27

◆Abnormal display of controller and fault elimination form
code LED abnormal display Cause Fault elimination Remark
5 Accelerating
Japan: 24km
EU: 25km
USA: 32km
G_LED
flash
0.3S/0.3S
Motor speed exceeds
the limit speed.
Motor speed is reduced
and returns to normal
automatically.
6 Motor is
overloaded.
Y_R_LED
flash
0.5S/0.5S
Motor has been
overloaded for four
minutes, reducing
output power of motor.
Recover the maximum
output power of motor
(Prevent motor from
exceeding the
temperature) by
re-startup.
Special
function
7 Temperature of
controller is too
high.
G_R_LED
flash
1S/1S
Temperature of
controller exceeds 70℃
Turn down controller
and controller will
return to normal
automatically after
cooling down.
8 Controller/motor
is abnormal.
G_R_LED
flash
1S/1S
Motor is abnormal and
controller is abnormal.
Send back to original
manufacturer for check.
27
Click to buy NOW!
P
D
F
-
X
C
h
a
n
g
e
V
i
e
w
e
r
w
w
w
.
d
o
c
u
-
t
r
a
c
k
.
c
o
m
Click to buy NOW!
P
D
F
-
X
C
h
a
n
g
e
V
i
e
w
e
r
w
w
w
.
d
o
c
u
-
t
r
a
c
k
.
c
o
m
Page 28
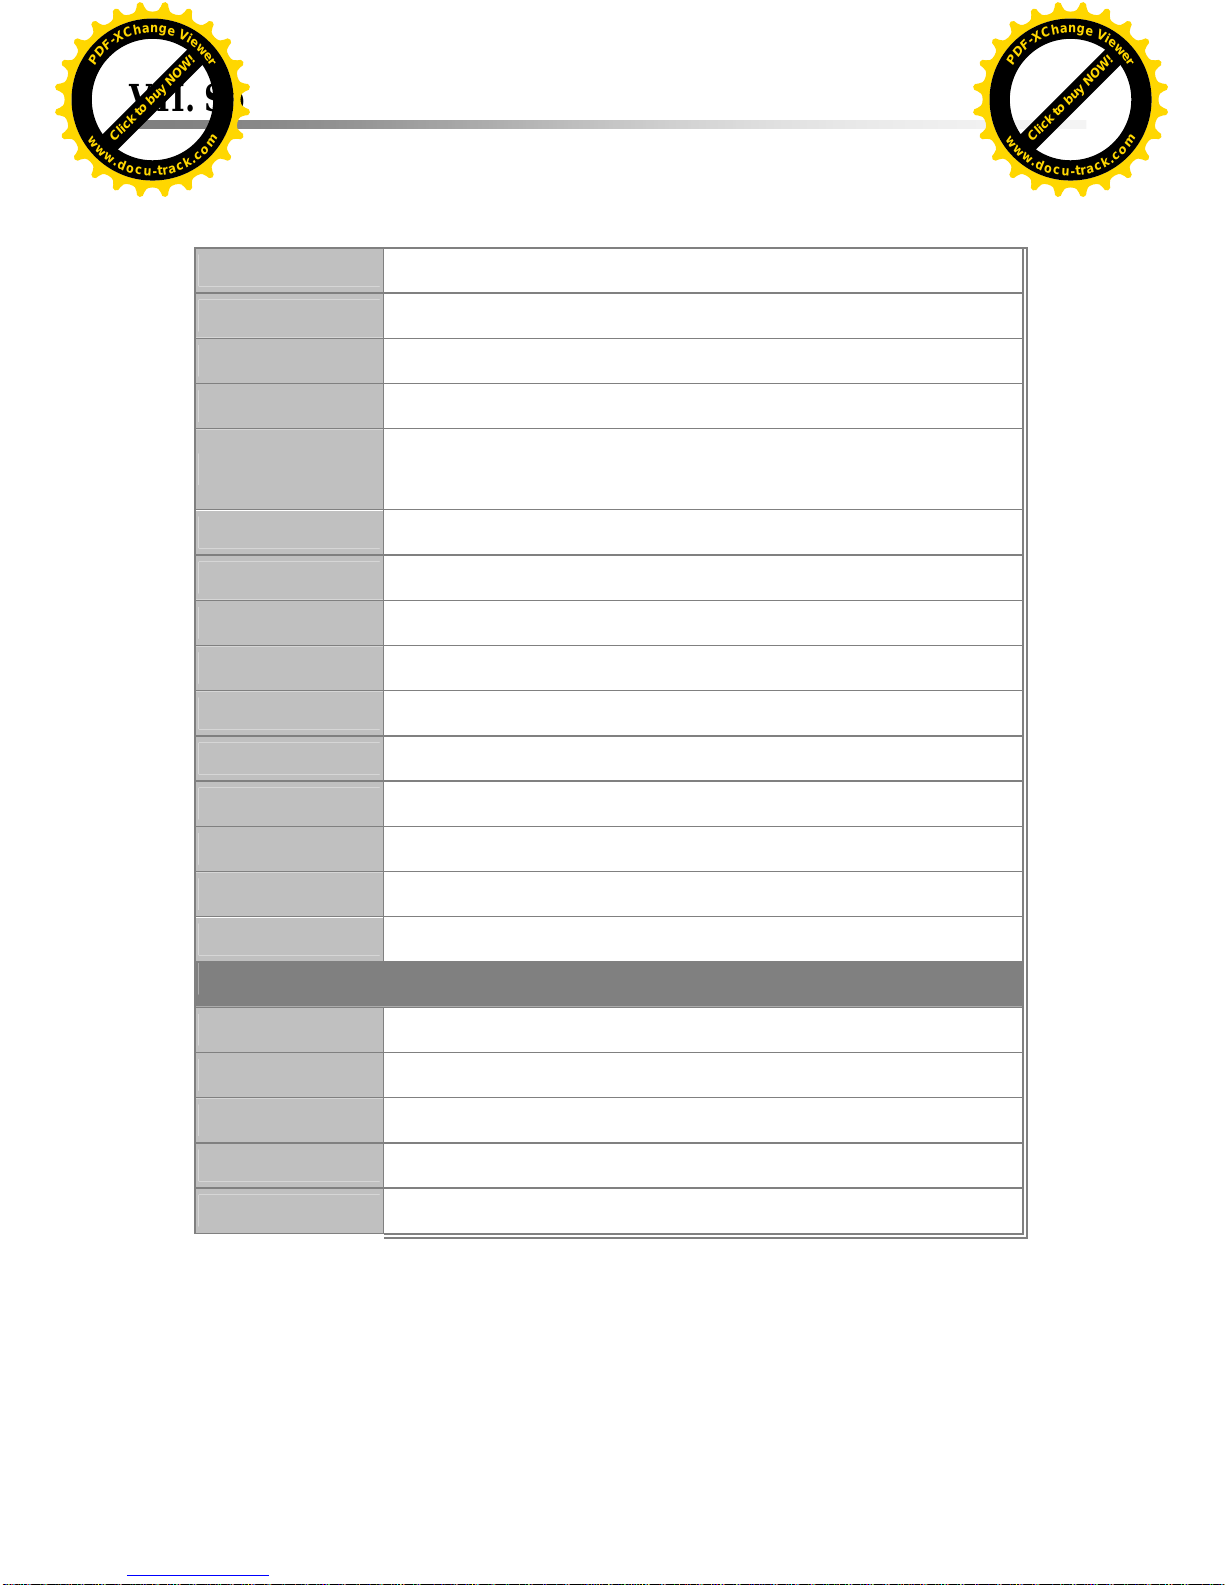
VII. Specification Form
Color
YS-7626-1 ORANGE or YS-9189-1 BLUE
Dimension
26"*17"
Frame
7071 ALU-ALLOY
Front fork
28.6X25.4X185MM SUSPENSION FORK BK
Chain wheel
GEAR 42T 1/2"X3/32" /
CRANK 170MM ALU-ALLOY
Rear derailleur
SHIMANO RD-M310 BK
Shifter
SHIMANO ASLR S43R 7A
Chain
1/2"x3/32" - 116EYES
Brake system
F/R DISC BRAKE
Handlebar
L=620MM H=20MM ALU-ALLOY
Handlebar stem
25.4X85MMX180MM ALU-ALLOY
Seat post
Φ30.4x300mm ALU-ALLOY
Wheel rim
BX-32 26"X36H-AV BK/CNC
Spoke
14G STAINLESS, BRASS NIPPLE
Tire
K841 26"X1.75 A/V BK
Power System Specification
Motor
36V500W DC BRUSHLESS HUB MOTOR
Battery
36V14AH LITHIUM BATTERY
Charger
36V4A CHARGER
Display
LED CONSOLE
Sensor device
SPEED SENSOR
28
2011/10/31 V1.2
Click to buy NOW!
P
D
F
-
X
C
h
a
n
g
e
V
i
e
w
e
r
w
w
w
.
d
o
c
u
-
t
r
a
c
k
.
c
o
m
Click to buy NOW!
P
D
F
-
X
C
h
a
n
g
e
V
i
e
w
e
r
w
w
w
.
d
o
c
u
-
t
r
a
c
k
.
c
o
m
Page 29

29
Click to buy NOW!
P
D
F
-
X
C
h
a
n
g
e
V
i
e
w
e
r
w
w
w
.
d
o
c
u
-
t
r
a
c
k
.
c
o
m
Click to buy NOW!
P
D
F
-
X
C
h
a
n
g
e
V
i
e
w
e
r
w
w
w
.
d
o
c
u
-
t
r
a
c
k
.
c
o
m
 Loading...