


中
使 用 说 明 书
户外休闲腕表系列
Leisure Outdoor Series
Operation Instruction Manual
EN

M008-1

目 录
1.简介 .................................................
2.功能特征
注意事项
.
. 1
.......................................... 1
3.按键及LCD显示 .............................. 2
4.模式选择 .......................................... 3
5.时间功能 .......................................... 4
5.1.选择显示时间 .............................. 4
5.2.时间与日期设置 .......................... 4
6.跑表功能 .......................................... 5
6.1.单段计时 ....................................... 5
6.2.圈计时 ........................................... 6
6.3.查询圈计时数据 .......................... 7
6.4.删除圈计时数据 .......................... 8
7.倒计时功能 ...................................... 8
7.1.设置倒计时初值 .......................... 8
7.2.使用倒计时 .................................. 9
8.闹铃功能 ........................................ 10
8.1.设置闹铃时间 ............................. 10
8.2.开关整点报时、闹铃.................. 10
9. 按键锁定与解锁 ........................... 11
10.打开背景光 .................................. 12
11.防水性 ......................................... 12
12. ...................................... 12
13 产品规格 ...................................... 13

1.简介
感谢您购买该产品,在使用之前请仔细阅
读说明书,了解该产品
本表 是一 款多 功 能 运 动手 表, 不但 具有
时间、日历、存储跑表数据、倒计时、闹铃等
功能,同时它还具有10圈圈计时等跑表功能。
的功能、操作方法及注
意事项。
1
2.功能特征
30米防水
30
两组闹铃
跑表数据
10圈跑表
背景冷光
整点报时
50年日历
两地时间
倒 计 时
10L AP

D
3.按键及LCD显示
按键 :背光/设置
按键 :模式选择
按键 :时间转换/减少
按键 :开始/停止/增加
时间模式 跑表模式
数据模式 倒计时模式
闹铃模式 闹铃符号
键音关闭符号 整点报时符号
按键锁符号
A
C
B
A
B
2
按键
D
按键
C
按键按键
B
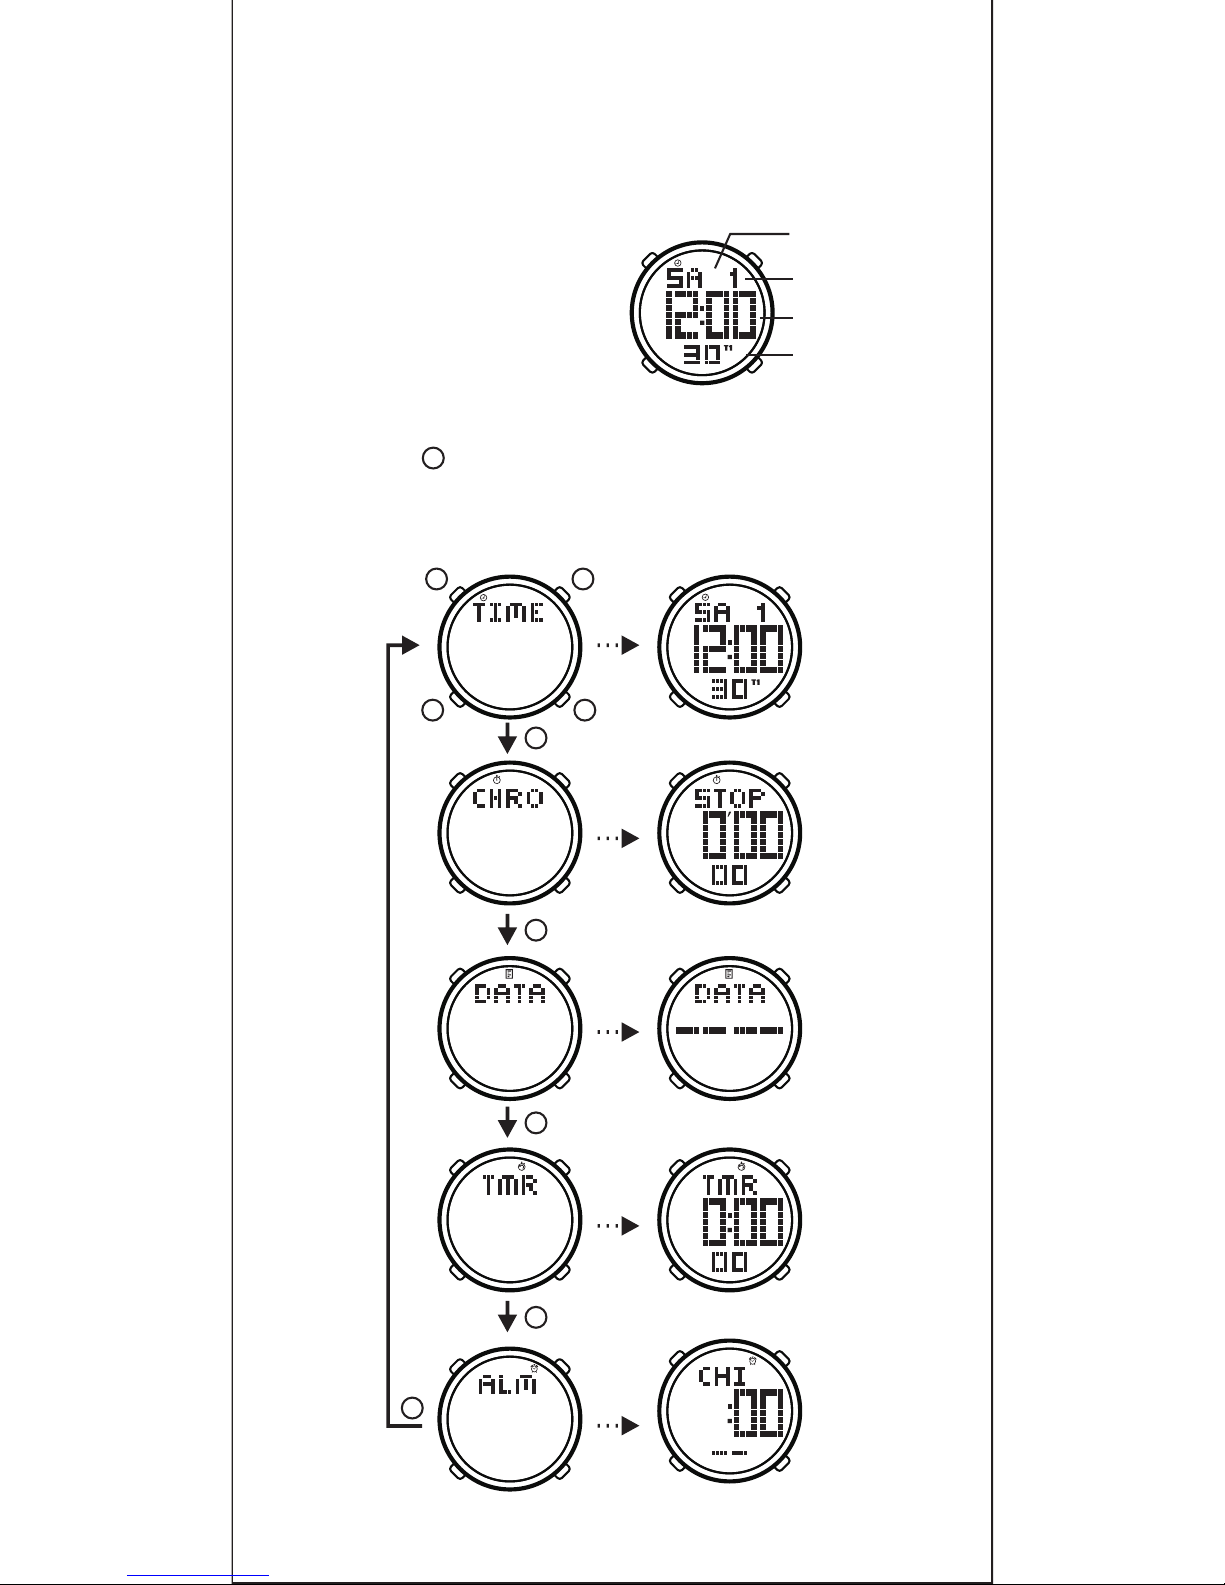
时间模式
按 键可循环选择跑表模式、数据模式、
倒计时模式、闹铃模式、时间模式(先显示模
式标题约1秒,再进入相应模式)。
的功能,先选择相应的
功能模式。
本表一般情况下为
时间模式,显示当前时
间、日期和星期。
星期
日期
时:分钟
秒
数据模式(无记录)
跑表模式
倒计时模式
时间模式
闹铃模式
B
3
DA
4.模式选择
本表为多功能手表,使用时需根据所使用
B
CB
B
B
B
在非时间模式,如果不操作按键,1 - 2分
钟后手表自动返回时间模式( 除跑表运行、倒
计时运行状态外)。
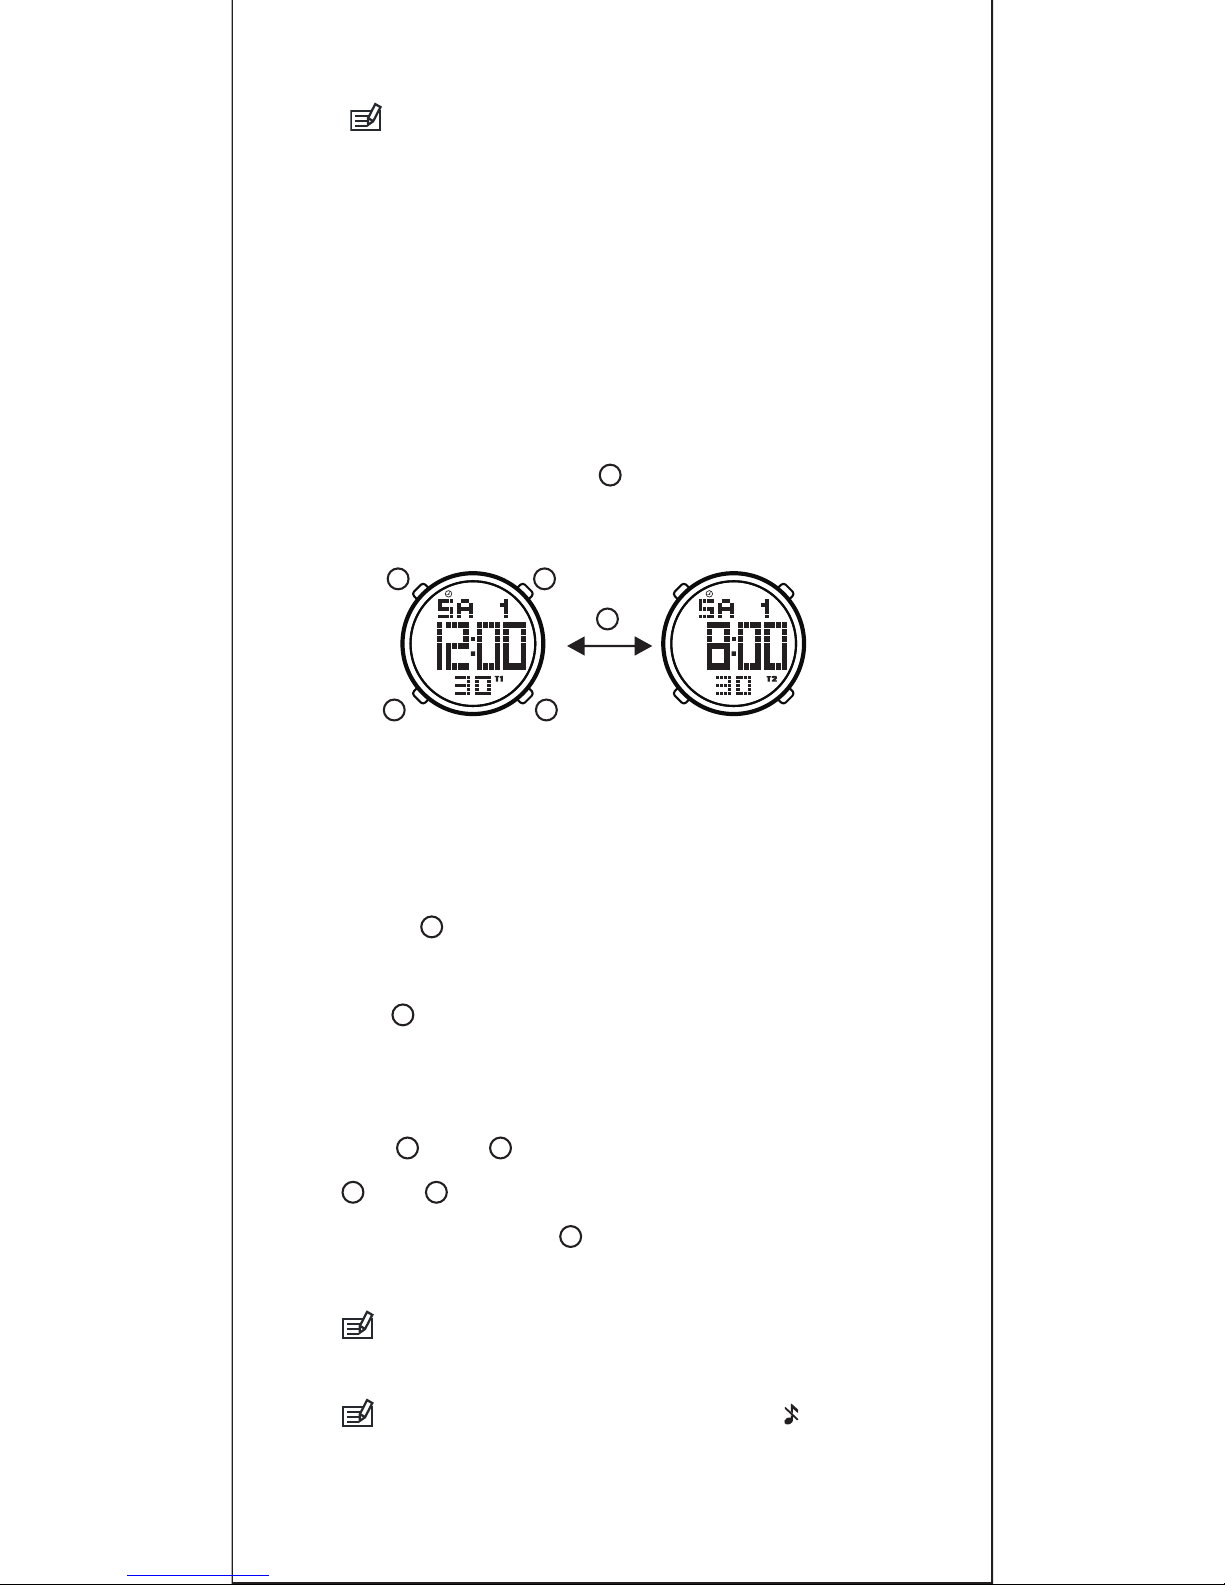
5.时间功能
5.1 选择显示时间
本表可查看不同时区的两地时间,分别使用
T1、T2来标识。
在时间模式,按住 键直至T1(或T2)闪烁停
止,即可显示T1(或T2)时间。
C
T1时间 T2时间
C
4
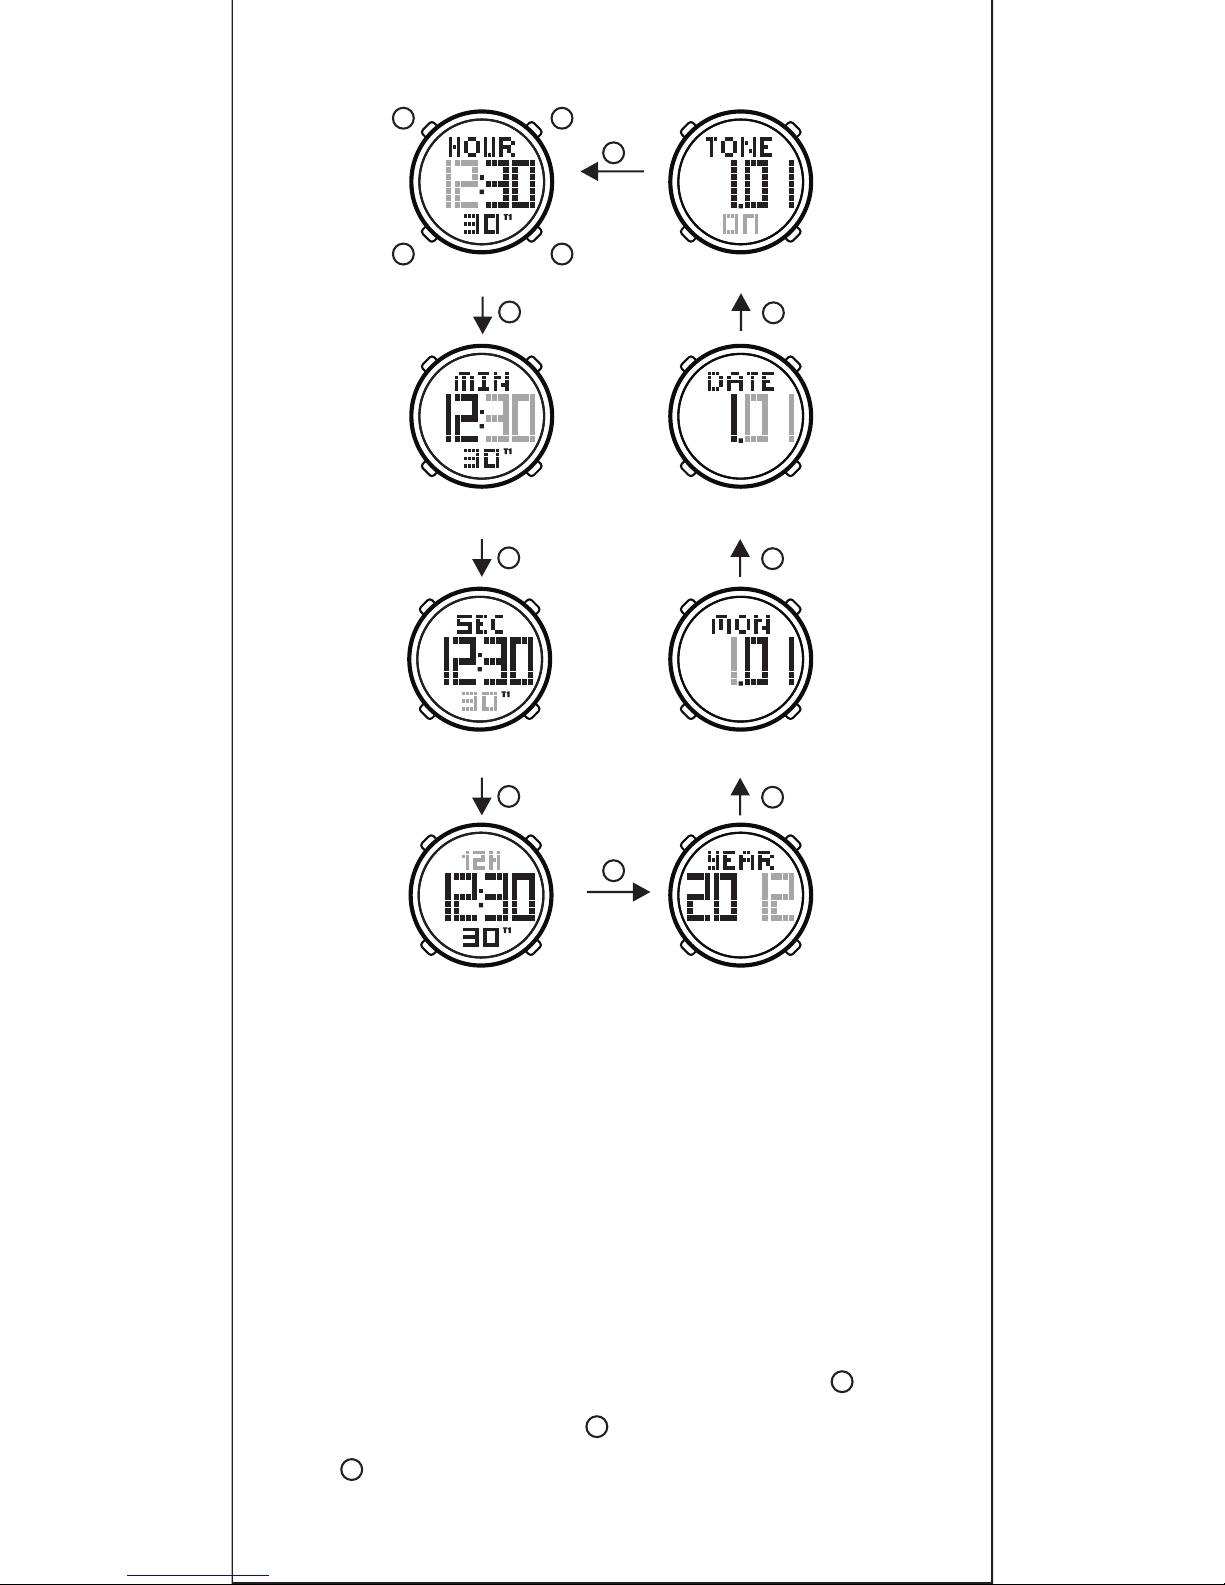
5.2.时间与日期设置
1)在时间模式选择需要设置的时间T1或T2;
2)按住 键直至小时闪烁(闪烁表示进入设置状
态);
3)按 键依次循环选择设置选项: 小时、分钟、
秒、12/24时制、年、月、日、键音开/关(T2没
有秒设置功能);
4)按 键 或 键 改变 设 置 或 调整 数值 ,按 住
键或 键可快速调整数值;
5)设置完成后,按 键保存设置返回时间模式
(星期自动校正)。
本表内含50年(2010-2059)全自动日历,
年、月、日设置后,星期会自动校正。
关闭键音,则在时间模式会显示 ,操作
按键时无“嘀”声。
A
B
C D
C D
A
DA
CB
12/24时制
年设置
B
B
小时设置
分钟设置
秒清零
B
键音开/关
日设置
月设置
B
B
B
B
B
B
5
6.跑表功能
本表内置一个百分之一秒跑表计时器,最
大计时 时 间为99小时59分59秒。根据使 用 方
法可分为单段计时和圈计时两种方式。
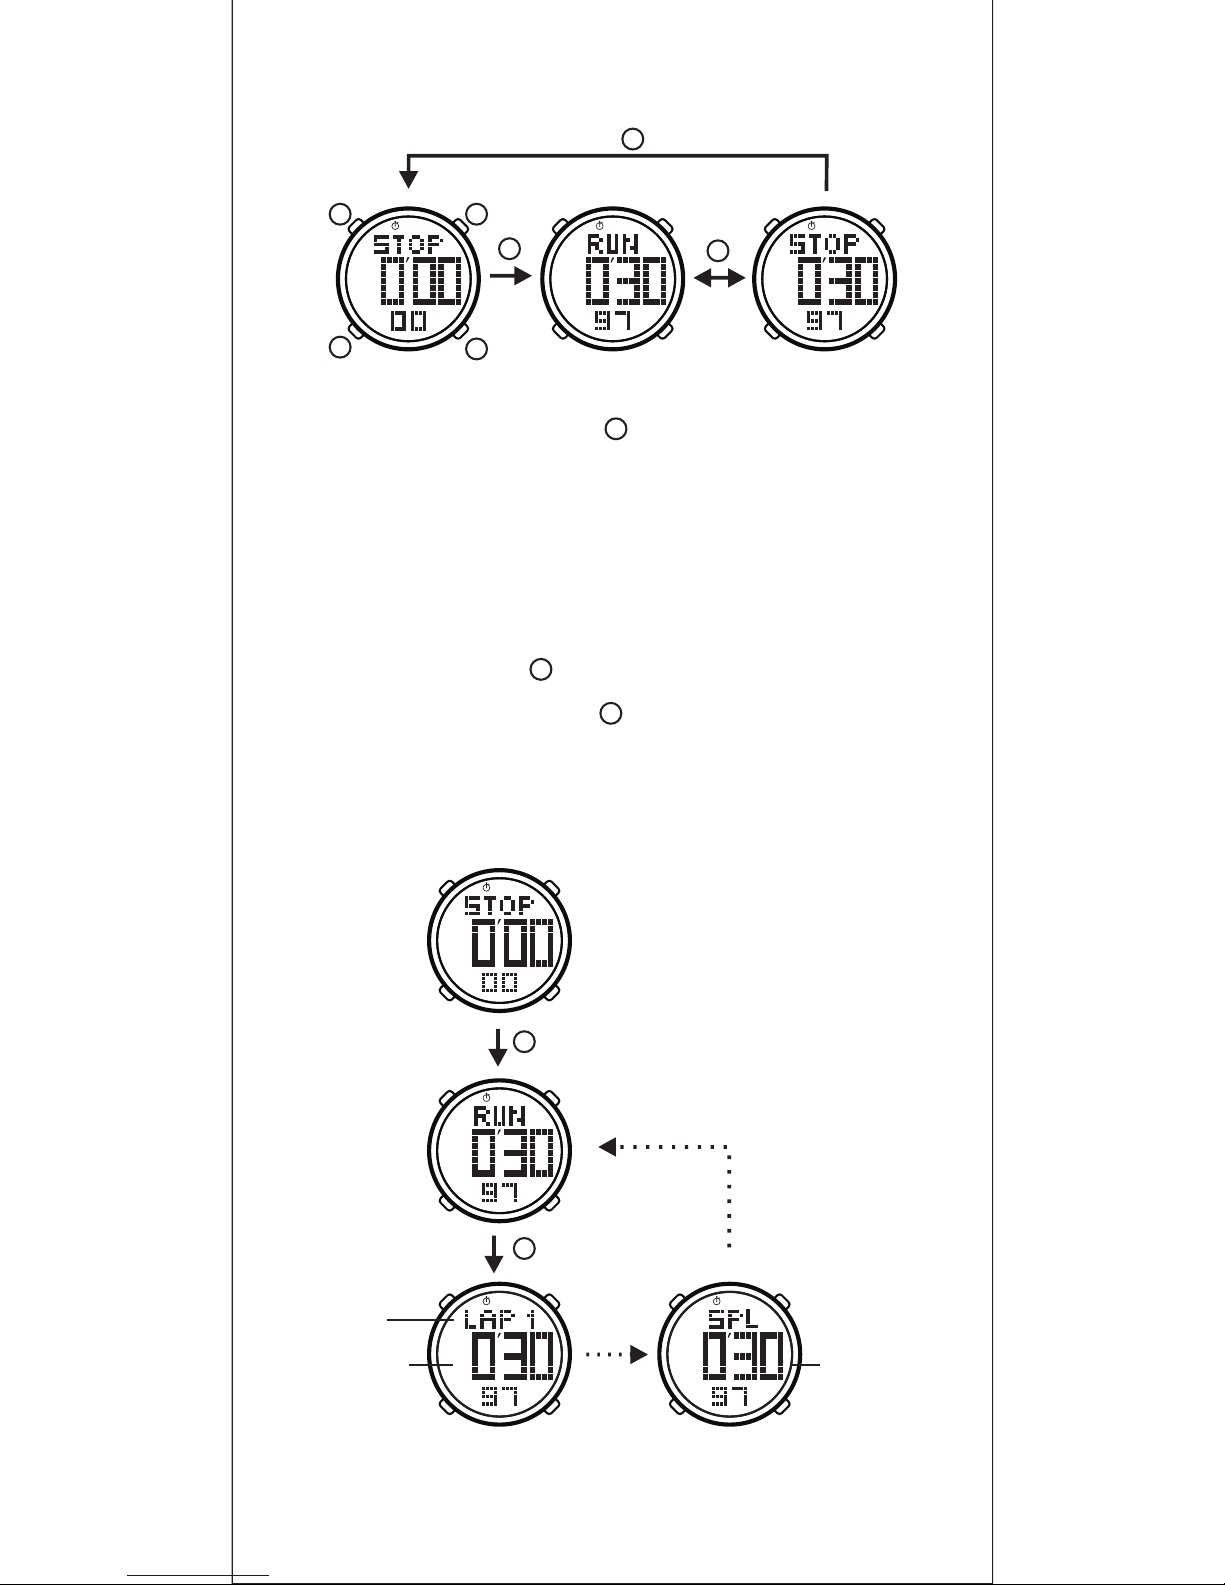
6.1 单段计时
单段计时可用来测量一名选手总的跑步时间,
方法如下:
选择跑表模式(参见第4章节),按 键
跑表开始计时,再按 键跑表停止计时,再按
键跑表继续计时。
D
D
D
A
C
D
D
C
6.2圈计时
在跑道跑步或赛车时,可用圈计时记录每
圈所用时间。本表最多可记录10圈圈计时,使
用方法如下:
1)在跑表模式按 键跑表开始计时;
2)第一圈 结束 时, 按 键跑 表 开 始 下一 圈计
时 ,同时屏幕显示第一圈圈计时约5秒,再显
示总计时约5秒(总计时指各圈所用的时间),然
后自动返回跑表运行状态;
跑表运行
圈记录
D
C
6
C
C
跑表运行
跑表停止
D
D
A
B
C
D
跑表清零
跑表清零
圈号
总计时圈计时
在跑表停止时,按 键跑表数据清零。

D
3)依此类推,每圈结束时按 键,可以实现多圈
计时;
4)最后一圈结束时,按 键计时,再按 键停
止跑表。
每次使用圈计时前,应先将原有的圈计时
数据删除(参见6.4章节),否则新的记录存储在原
有记录后。
本表最多只可记录10圈圈计时,10圈后的
计时都累加到第10圈记录。
C
跑表若未 停 止运行,即 使
退出跑表模式,跑 表仍会继续
计 时 直 至 99小 时 59分 59秒 才
停止。
在时间模式屏幕出现 闪
烁,表示跑表在运行。
6.3. 查询圈计时数据
使用圈计时后,在数据模式可查看圈计时
数据。
选择 数据 模式(参 见 第4章节), 即可 显示
第一圈记录,按 键可按顺序循环查看各圈记
录,各圈圈计时和总计时交替显示。
7
D
C
D
第1圈记录
第10圈记录
D

A
数据删除中 数据已删除
A
7.倒计时功能
本表 可设 定一 时 段 后 倒数 计时,倒数为 零
时,蜂鸣提示;按任意键中断蜂鸣提示。倒计
时最大时段为99小时59分59秒。
7.1. 设置倒计时初值
1)选择倒计时模式(参见第4章节),按住 键直
至小时闪烁(闪烁表示进入设置状态);
2)按 键依次循环选择设置选项: 小时、分钟
和秒;
3)按 键或 键增减数值,按住 键或 键
可快速增减数值;
4)设置完成后,按 键保存设置返回时间模式
(星期自动校正,T2没有秒设置功能)。
倒计时 停 止运行时 ,才可以 设 置倒计 时
初值。
8
在数据模式,按 键可直接转到跑表模式。
C
B C
D
A
C
B
D
A
C D
6.4. 删除圈计时数据
跑表停止时,选择数据模式(参见第4章节)按
住 键直至出现“ ”,表示圈计时
数据已删除。
跑表若未停止运行,数据则无法删除。

D
7.2.使用倒计时
设置好倒计时初值后,按 键开始倒计时,
再按 键倒计时停止,再按 键继续倒计时。
倒计时停止时,按 键恢复倒计时初值。
倒计时结束时蜂鸣器会鸣响数秒。
D D
C
9
小时设置
秒设置
分钟设置
B
B
B
A
倒计时模式
B
A
C
D
倒计时运行
倒计时停止
倒计时初值
D
C
B
A
C
D
D
A

若未停止倒计时,即使退
出倒计时模式,倒计时仍会继
续运行直至倒数为零。
在时间模式屏幕出现 闪
烁,表示倒计时在运行。
10
若不设置倒计时初值,手表会自动从99小
时59分59秒开始倒数计时。
C D
8.1.设置闹铃时间
1)选择闹铃模式(参见第4章节),按 键选择T1
闹铃或T2闹铃;
2)按住 键直至小时闪烁,按 键循环选择设
置选项:小时、分钟;
3)按 键或 键增减数值,按住 键或 键可
快速增减数值;
4)设置完成按 键保存设置并退出。
C
A
B
C D
A
小时设置
设置闹铃后,闹铃自动打开。
8.2. 开/关整点报时、闹铃
若整点报时开启,则到达整点时,蜂鸣两
声提示;若闹铃开启,则到达闹铃时间,蜂鸣
提示约20秒,按任意键中断蜂鸣。
开/关整点报时、闹铃的方法如下:
分钟设置
B
B
A
C
D
A
8.闹铃功能
闹铃功能包含有:整点报时和T1、T2闹铃。
T1闹铃

11
9.按键锁定与解锁
为了防止佩戴手表时不小心碰到按键造成
误操作,可将按键锁定。方法是:
在时间模式按住 键直至 显示,表示按
键已锁定;按键锁定时,按住 键直至 不显
示,表示按键已解锁。
只有在按键解锁下才可以操作其他按键。
D
D
1)选择闹铃模式(参见第4章节),按 键循
环选择整点报时、T1闹铃、T2闹铃;
2)按 键开启/关闭整点报时或闹铃。
T1闹铃开启
整点报时开启
T2闹铃开启
T1闹铃关闭
B
A
C
D
D
整点报时关闭
D
C
C
T 闹铃2 关闭
C
D
D
C
在时间模式,显示 ,表示整点报时开启;
显示 ,表示至少有一组闹铃开启。

A
A
D
按键解锁(不显示 )
按键锁定(显示 )
10.打开背景光
除按键锁定和设置状态
外,按 键可打开背景光约
3秒。
12
11.防水性
本表具有30米防水性。日常梳洗或雨中可
佩戴使用,但不 可 游 泳 、 潜 水 或 桑 拿 等 佩 戴
使用, 不 能 在水中操作按键。
为保持防水性,要定期更换防水圈,一般
是1-2年,如不更换可能会因胶圈老化而受潮。
12.注意事项
警告 -
注意 -
请勿挤压或刺穿废旧电池,更不能
将其投入火中或水中,以免引起火灾。请正确
回收或丢弃废旧电池。
本表虽然符合行业标准,但本产品
与皮肤接触可能产生过敏反应或皮肤刺激。若
发生这种情况,请立即停止使用并咨询医生。
B
A
C
D

13
注意 -
注意 -
注意 -
注意 -
注意 -
注意 -建议 更换电池。
本表由精密零件组装而成,请不要
自行拆卸或粗暴使用。
不要在严寒,酷热,温度骤变的环
境中佩戴。
不要在强磁,强电环境中佩戴。
清洗时,请使用软布及清水,不要使
用洗涤剂,溶剂,杀虫剂等化学品清洗本表。
本表如果出现功能异常,或者内部
出现水珠,水雾等,请找有资质的维修点维修。
找有资质的维修点
手表走时精度:+/-1秒/天 或者 +/-30秒/月
工作温度:0 °C----50 °C (32 °F----122 °F)
存储温度:-10 °C----60 °C (14 °F----140 °F)
电池型号:CR2025
电池存储寿命:约18月
电池使用寿命:约12月
防水等级:30米
13.产品规格

CONTENTS
1. .................. ...............................
2.
1 .
Introduction
Function
Pusher Button and LCD Display
Selecting Mode
Ti m e
Selecting Display Time
Setting Time and Date
S t o p w a t c h
Sto pw atc h
Lap Time
La p Tim e D at a Q ue ry
Lap Time Data Delete
Timer
Countdown Time
Using Timer
Alarm
Setting Alarm
Turn on/off Hourly Chime and Alarm
Button Locked/Unlocked
Turn on EL backlight
Water Resistance
Safety Information
Product Specification
.. . 1
.............................................................. 1
3. ............................... 2
4. ....................................................... 3
5. . . . . . . . . . . . . . . . . . . . . . . . . . . . . . . . . . . . . . . . . . . . . . . . . . .. . . . 4
5.1. .............................. 4
5.2. ........................................ 4
6 . . . . . . . . . . . . . . . . . . . . . . . . . . . . . . . . . . . . . . . . . . . . . . 5
6.1 . ..... ..... ..... ........ ..... ..... ..... ..... ...... 5
6.2. .................................................... 6
6. 3. . ..... .. ..... ..... ..... ... 7
6.4. ...................................... 8
7. ........................................................................ 8
7.1. .......................................... 8
7.2. ................................................ 9
8. ................. ................................... ....... 10
8.1. ............................................. 10
8.2. ............................. 10
9. ............................ 11
10. ....................................................... 12
11. ................................................ 12
12. .................................................... 12
3 ................................................... 13

1. Introduction
We thank you for purchasing our 10 la ps wrist
watch and p lea se rea d t his operatio n instruction to
know the functions, the way of operation and the safety
information of our product.
This is a multi-functional watch combines time,
calendar, recording lap data, timer, alarm, and also
stopwatch function.
1
2. Function
30 Meter Water Resistance
30
2 Sets of Alarm
Stopwatch Data
10 Laps Stopwatch
EL Ba cklig ht
Hourly Chime
50 Years Calendar
D u a l Ti m e
Timer
10L AP

D
3.Pusher Button and LCD Display
:
:
:
:
Button Backlight/Setting
Button Modes
Button Tansfer /Minus
Button Start/Stop/Plus
Time Mode Stopwatch Mode
Data Mode Timer Mode
Alarm Mode Alarm
Turn off Key Tone Hourly Chime
Button Locked
A
C
B
A
B
2
D
C
Button
Button
Button
Button

B
Press button to select stopwatch mode, data
mode, timer mode, alarm mode and time mode. First
displaying the sign of modes and then enter into the
corresponding mode.
4. Selecting Mode
This is a multi-functional watch, so you must select
corresponding mode before
using the function.
U n d e r t h e n o r m a l
circumstance, our watch
is i n t h e t ime m o d e a n d
displaying time, date and week.
Time Mode
Week
Date
Hour Minute
Second
Data Mode (No Record)
Stopwatch Mode
Timer Mode
Time Mode
Alarm Mode
B
3
DA
B
CB
B
B
B

Note: The watch will return to time mode without
button pressing after 1 minute, except from the watch
in s topw a tch mode and t imer mode.
5. Time
5.1. Selecting display time
Our watch has dual time function and identifying
with T1/T2.
In the time mode, press button until T1 (or T2)
stop flashing, begin to displaying T1/T2.
C
Time 1 Time 2
C
4
5.2. Setting time and date
1) Setting T1/T2 in the time mode.
2) Press button until hour begin to flash (Flashing
means enter into the setting status).
3) Press button to set hour, minute, second, 12/24
hour format, year, month, date, turn on/off key tone
(can not set second in T2)
4) Press button or button to change setting status
or revise n umb er, hold on b utt on or button to
revise number quickly.
5) Fishing setting, press button to confirm setting
and back to the mode (calibrating week automatically).
Our watch contains 50 years (2010-2059)
automatic calendar. The week will calibrate
automatically since the year, month and date have
been setting correctly.
Turn off key tone, in the time mode display ,
There will be no tone of the operation.
A
B
C D
C D
A
DA
CB

12/24 Hour Format
Setting Year
B
B
Setting Hour
Setting Minute
Clear Second
B
Turn on/off Key Tone
Setting Date
Setting Month
B
B
B
B
B
B
5
6. Stopwatch
There is a hundredths timer with 1% second stopwatch
in our watch. The maximum time period of the stopwatch
is 99 hours59 minutes 59 seconds. It can further divide into
stopwatch lap chronograph,and lap time according to
the different methods of usage.
6.1. Stopwatch
Stopwatch is available to measure the running time of
one athlete and just operating it as the following steps:
In the stopwatch mode (see chapter 4) press button
To run stopwatch, and press button again to stop
stopwatch, and press bu tto n one more again to
run stopwatch once again.
D
D
D
A
C
D

D
C
Press button to clear the data when the stopwatch
in the stop status.
6.2. Lap time
When running or racing on the track, you can use
lap time to record the time of each track. Our watch
can record 10 lap time and the operating method just
as the following:
1)In the stopwatch mode, press button to begin to
run the stopwatch.
2)At the end of the first lap, press button to beg in
and record the time of next lap. At the same time, our
watch displaying the first lap time for about 5 seconds.
The total time will display for about 5 secondsat the
end of the first lap(total lap time means the the sum of
each lap time), and then it will back to the running status.
Stopwatch Running
Lap Record
C
D
6
C
C
Stopwatch Run
Stopwatch Stop
D
D
A
B
C
D
Stopwatch Cleared
Stopwatch Cleared
Lap NO.
Lap Time
Total Time

D
3)Just as the above mentioned, press button to record
more than one lap time at the end of each lap.
4)At the end of each lap, press button to begin to
run stopwatch, and press button once again to stop
stopwatch.
Note: Please delete the initial lap time record before
using lap time for each time (see chapter 6.4). Otherwise,
the new lap time record will plus to the initial ones.
Note: Our watch can record 10 laps time at most.
th
The la p time will be plus to the 10 lap if there are
more than 10 lap.
C
In the status of stopwatch running,
the stopwatch will continue running
until 99 hours 59 minutes 59 seconds
even if exit the stopwatch mode.
In the time mode, flashing means
the stopwatch in the running status.
6.3. Lap Time Data Query
After using the lap time, you can find the lap time
data in the data mode.
Selecting to the data mode (see chapter 4), our
watc h wi l l di splay the first lap time reco rd. P ress
button , you can query each lap time data sequentially.
Each lap time and the total time will alternate display.
7
D
C
D
The 1st Lap Time Record
th
The 10 Lap Time Record
D

A
7. Timer
Our watch can set a time period for countdown,
When countdown to the zero, there will be hourly chime,
and press any button can stop the chime. The maximum
countdown time period i s 9 9 hours 59 minutes and
59 seconds.
7.1. Countdown time
Selecting to the timer mode (see chapter 4), press
button unt il hour begin flashing (flashing means
enter into setting mode);
2) Press button to set hour, minute and second in turns;
3) Press button or button to plus or minus the
number, hold on button or button to plus or minus
the number quickly;
4) After finishing setting, press button to confirm
and sav e t h e setting a n d bac k t o t h e time mode
(week will be calibrate automatically, and you can not
set second of T2)
Note: You can set initial countdown time in the status
of stop stopwatch only.
8
Note: In th e d ata mode, pr e ss b utton to b a c k
to the stopwatch mode.
6.4. Lap Time Data Delete
When the stopwatch stop, select to the data mode
(see chapter 4), press button u n t i l the watch begin
displaying , it means the lap time data has
been deleted.
Note: The lap time data can not be deleted if not
stop the stopwatch.
C
Data Deleting Data Deleted
A
B C
D
A
C
B
D
A
C D

D
7.2. Using Timer
After finishing setting the initial countdown time,
press button to begin countdown timer, and press
button once again can stop countdown timer, press
button one more again can continue countdown timer.
In the status of stopping countdown, press button
Can back to the initial countdown timer.
There will a chime last for several seconds at the
end of the countdown timer.
D
C
Setting Hour
Setting Second
Setting Minute
B
B
B
A
Timer Mode
B
A
A
C
D
Countdown Timer Running
Countdown Timer Stop
Initial Countdown Time
D
C
B
A
C
D
D
D
9

Note: If you do not stop timer,
the timer will continue to run until
countdown to zero even if exit the
timer mode.
Note: In the time mode, begin
flashing , means the countdown
timer running.
10
Note: Our watch will auto-begin countdown timer
from 99 hour 59 minutes and 59 seconds if there is
no setting the initial countdown time.
C
D
8. Alarm
The alarm includes: hourly chime and alarm of T1/T2.
8.1.Setting Alarm
1) Selecting to the alarm mode (see chapter 4),press
button to select hourly chime, alarm No.1/No.2 in turn.
2) Press button until hour begin flashing, press button
to set hour and minute in turn'
3) Press button or button to plus or minus the number,
hold on button or button to plus or minus the
number quickly;
4) After finishing setting, press button to save
the setting and exit.
C
A
B
A
D
C
Setting Hour
Setting Minute
B
B
A
C
D
A
Turn off Alarm 1
Note:The alarm will automatically turn on since
finish setting the alarm.
8.2. Turn on/off hourly chime and alarm
There will be two chime tone at the point of hour
if the hourly chime has been turned on; There will be a
chime last about 20 seconds at the alarm time if the
alarm has been turned on, and press any button can
stop the chime.
The methods of turn on/off hourly chime and alarm:

11
9. Button Locked/Unlocked
In order to prevent mis-operation due to accidentally
press to the button when wearing the watch, you can
lock the button. The operating methods just as following:
In the time mode, hold on button till displaying
, it means that the button locked.
Under the status of button locked, press button
Till not displaying, it means that the button unlocked.
Only in the status of button unlocked, you can
operate the buttons.
D
D
1)Selecting to the alarm mode (see chapter 4), In the
alarm mode (see chapter 4), press button to select
hourly chime, T1/T2
2)Press button to turn on/off hourly chime and alarm.
C
D
Turn off Alarm of T1
Turn on Alarm of T1
Turn on Hourly Chime
Turn on Alarm of T2
B
A
C
D
D
Hourly Chime
D
C
C
Turn off Alarm of T2
C
D
In the time mode, display ,means turn on hourly
chime; display means a t l eas t one of the alarms
has been turn on.

A
A
D
Button Unlocked
(not displaying )
Button Locked
(displaying )
Apart from the setting status
and the button locked, press button
can turn on EL backlight and the
backlight last about 3 seconds.
12
11. Water resistance
Our watch can waterproof for 30 meters.It is no
problems to wearing our watch while daily grooming
or raining, but not swimming, diving or sauna, or operating
any button under the water.
In order to maintain the waterproof function, Please
replace the water resistance regularly (generally 1-
2 years). If not, the watch may be damp due to the
aging of water resistance.
12. Safety Information
Warning: In order to avoid the fire, please do not
crush, puncture or even throw the used battery in a
fire or in water. And please make it to be recyclable use
or deal with it with reasonable way.
Note: Our watches complies with industrial standards,
but please stop wearing it if there are any allergic reaction
or skin irritation and please consult a doctor.
B
A
C
D
10.Turn on EL backlight

13
Note: Our watch consists of precision electric
parts, please do not attempt to remove or rough
wearing.
Note: Please do not wear our watch in the environment
of severely cold, extremely hot, temperature changing
rapidly.
Note: Please do not wear our watch in the environment
with strong magnetic or strong electric.
Note: When cleaning our watch, please use soft
cloth and clean water without detergent, solvents,
pesticide.
Note: If there are abnormal functions of our watch
or internal exist water mist, please find a qualified
service center to repair.
Note: Please find a qualified service center to
replace battery.
Time +/-1 second/day or +/-30 seconds/month
Operating Temperature 0 °C----50°C (32 °F----122°F)
Storage Temperature -10 °C----60°C (14 °F----140°F)
Battery CR2025
Battery Storage Life 18months
Battery Life 12 months
Water Resistance 30 meter
:
:
:
:
:
:
:
13.Product Specification
 Loading...