

EZ
METER
Watthour Meters
Product Selection Guide
User Manual
Installation Manual
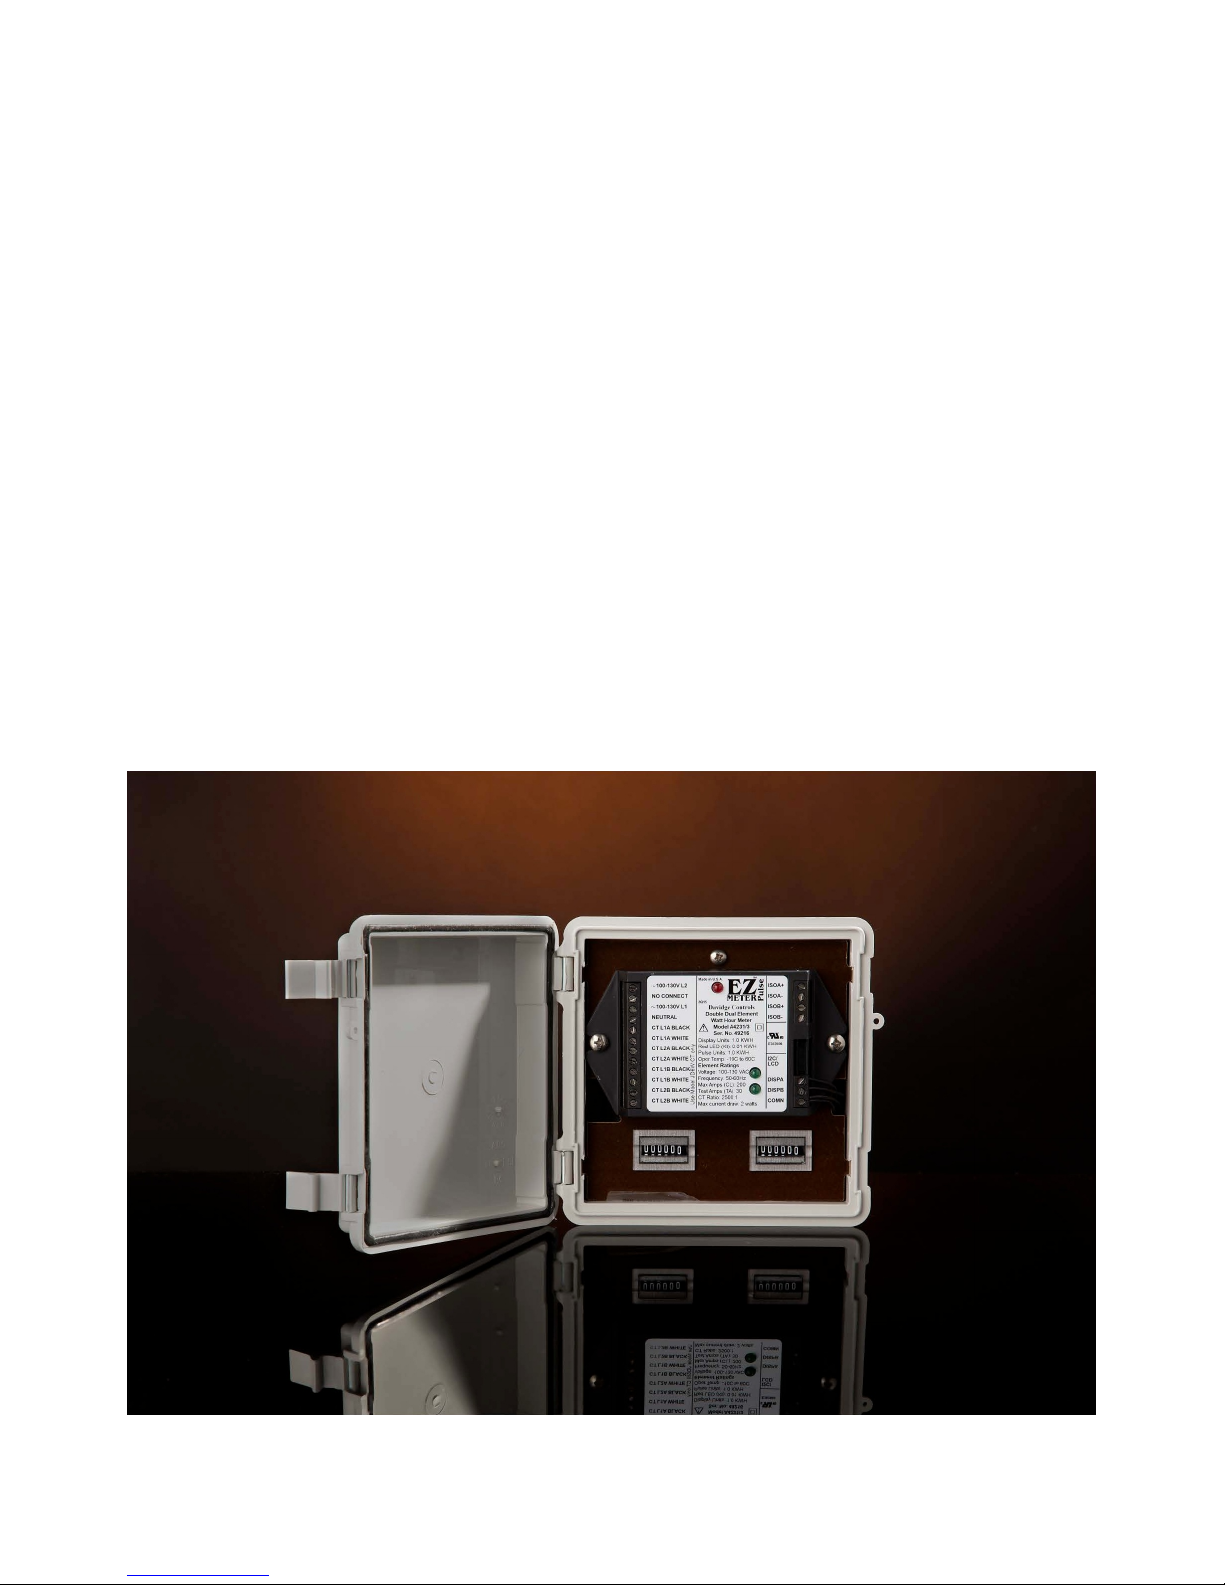
Dual 3-Wire, Single Phase Meter (Model A4231/3)

CAUTIONS
Legends
Serious injury can result from electric shock.
Be sure to turn off the power before installing or
servicing any meter.
Fire can result from loose electrical
connections. Ensure that all connections are
secure.
A loose or improperly connected neutral can
damage equipment and cause fires. Most meters
that count faster than they should are connected
to a bad neutral.
Current transformers (CTs) should not be
placed over wires with current flowing through
them without connecting them to the meter or
twisting the two wires coming from the CTs
together. A very serious shock hazard exists if
the wires are just left loose.
These meters should only be installed by
experienced electricians. If you do not fully
understand these instructions, call Customer
Support at 1-805-688-9696 for clarification.
These symbols appear on meter labels.
1 Caution, risk of Danger
Equipment protected throughout by double
G
insulation
H Alternating Current
Abbreviations & Glossary
Common abbreviations used in this manual
include:
AMR - Automatic Meter Reading System
CT - Current transformer
KWH - Kilowatthour
Element - An input for measuring power,
usually a current transformer (CT)
Contact Information
In most localities, a permit and inspection is
required to install the meters. In some localities,
it is illegal to use an unapproved meter for
revenue billing. Check with your local Weights
EZMeter Technologies
583 N Refugio Road
Santa Ynez CA 93460 USA
1-805-688-9696
& Measures office or other regulatory agency.
www.ezmeter.com
salesinfo@ezmeter.com
Note: This manual applies to meters that have a letter (A-G) as the first character of the model
number. A separate manual is available for meters made prior to 2010 by Davidge Controls.
Rev.6/26/17
Copyright 2017 EZMeter Technologies
i

Contents
CAUTIONS. . . . . . . . . . . . . . . . . . . . . . . . . . . . . . . . . . . . . . . . . . . . . . . . . . . . . . . . . . . . . . . . . . . . . i
Legends. . . . . . . . . . . . . . . . . . . . . . . . . . . . . . . . . . . . . . . . . . . . . . . . . . . . . . . . . . . . . . . . . . . . . . . . i
Abbreviations & Glossary. . . . . . . . . . . . . . . . . . . . . . . . . . . . . . . . . . . . . . . . . . . . . . . . . . . . . . . . . . i
Safety Certification. . . . . . . . . . . . . . . . . . . . . . . . . . . . . . . . . . . . . . . . . . . . . . . . . . . . . . . . . . . Page 3
Accuracy Certification.. . . . . . . . . . . . . . . . . . . . . . . . . . . . . . . . . . . . . . . . . . . . . . . . . . . . . . . . Page 3
A Note for California Users.. . . . . . . . . . . . . . . . . . . . . . . . . . . . . . . . . . . . . . . . . . . . . . . . . Page 3
Limited Warranty.. . . . . . . . . . . . . . . . . . . . . . . . . . . . . . . . . . . . . . . . . . . . . . . . . . . . . . . . . . . . Page 4
Product Selection Guide. . . . . . . . . . . . . . . . . . . . . . . . . . . . . . . . . . . . . . . . . . . . . . . . . . . . . . . Page 5
Automatic Meter Reading (AMR).. . . . . . . . . . . . . . . . . . . . . . . . . . . . . . . . . . . . . . . . . . . . Page 5
Bi-directional Meters. . . . . . . . . . . . . . . . . . . . . . . . . . . . . . . . . . . . . . . . . . . . . . . . . . . . . . . Page 6
Voltage.. . . . . . . . . . . . . . . . . . . . . . . . . . . . . . . . . . . . . . . . . . . . . . . . . . . . . . . . . . . . . . . . . Page 6
Maximum Current and Current Transformers. . . . . . . . . . . . . . . . . . . . . . . . . . . . . . . . . . . . Page 7
Display and Resolution. . . . . . . . . . . . . . . . . . . . . . . . . . . . . . . . . . . . . . . . . . . . . . . . . . . . . Page 7
Enclosures... . . . . . . . . . . . . . . . . . . . . . . . . . . . . . . . . . . . . . . . . . . . . . . . . . . . . . . . . . . . . . Page 8
Model Numbers. . . . . . . . . . . . . . . . . . . . . . . . . . . . . . . . . . . . . . . . . . . . . . . . . . . . . . . . . . . Page 8
Part Number Suffixes for Ordering. . . . . . . . . . . . . . . . . . . . . . . . . . . . . . . . . . . . . . . . . . . Page 11
EZMeter Current Transformers. . . . . . . . . . . . . . . . . . . . . . . . . . . . . . . . . . . . . . . . . . . . . . . . . Page 12
Operating Instructions. . . . . . . . . . . . . . . . . . . . . . . . . . . . . . . . . . . . . . . . . . . . . . . . . . . . . . . . Page 13
Understanding the Meter Electronics Module Label. . . . . . . . . . . . . . . . . . . . . . . . . . . . . . Page 14
Installation Instructions. . . . . . . . . . . . . . . . . . . . . . . . . . . . . . . . . . . . . . . . . . . . . . . . . . . . . . . Page 16
Installing the NEMA4X Enclosure. . . . . . . . . . . . . . . . . . . . . . . . . . . . . . . . . . . . . . . . . . . Page 16
Installing the flush mount enclosure. . . . . . . . . . . . . . . . . . . . . . . . . . . . . . . . . . . . . . . . . . Page 16
A note on different meter types:.. . . . . . . . . . . . . . . . . . . . . . . . . . . . . . . . . . . . . . . . . . . . . Page 16
Installing the CTs.. . . . . . . . . . . . . . . . . . . . . . . . . . . . . . . . . . . . . . . . . . . . . . . . . . . . . . . . Page 16
Electrical Connections. . . . . . . . . . . . . . . . . . . . . . . . . . . . . . . . . . . . . . . . . . . . . . . . . . . . . Page 18
Surge Protection.. . . . . . . . . . . . . . . . . . . . . . . . . . . . . . . . . . . . . . . . . . . . . . . . . . . . . . . . . Page 18
Display Connections. . . . . . . . . . . . . . . . . . . . . . . . . . . . . . . . . . . . . . . . . . . . . . . . . . . . . . Page 18
Isolated Outputs. . . . . . . . . . . . . . . . . . . . . . . . . . . . . . . . . . . . . . . . . . . . . . . . . . . . . . . . . . Page 19
RS-232 and RS-485 Connections. . . . . . . . . . . . . . . . . . . . . . . . . . . . . . . . . . . . . . . . . . . . Page 19
I2C Port Connection. . . . . . . . . . . . . . . . . . . . . . . . . . . . . . . . . . . . . . . . . . . . . . . . . . . . . . Page 20
Wiring Diagrams. . . . . . . . . . . . . . . . . . . . . . . . . . . . . . . . . . . . . . . . . . . . . . . . . . . . . . . . . Page 21
Testing the Installed Meter. . . . . . . . . . . . . . . . . . . . . . . . . . . . . . . . . . . . . . . . . . . . . . . . . . . . Page 25
Page 1

Trouble Shooting. . . . . . . . . . . . . . . . . . . . . . . . . . . . . . . . . . . . . . . . . . . . . . . . . . . . . . . . . . . . Page 26
Installing a Grid Connect NET485 (Ethernet-RS422/485 Adapter). . . . . . . . . . . . . . . . . . . . . Page 27
Connecting Digi Radio Modems to EZMeters. . . . . . . . . . . . . . . . . . . . . . . . . . . . . . . . . . . . . Page 29
Connecting Snap Link Radios to EZMeters. . . . . . . . . . . . . . . . . . . . . . . . . . . . . . . . . . . . Page 31
RS.. . . . . . . . . . . . . . . . . . . . . . . . . . . . . . . . . . . . . . . . . . . . . . . . . . . . . . . . . . . . . . . . . . . . . . . Page 32
Phantom Neutral Installation Guide.. . . . . . . . . . . . . . . . . . . . . . . . . . . . . . . . . . . . . . . . . . . . . Page 36
Obvius AcquiSuite Connections. . . . . . . . . . . . . . . . . . . . . . . . . . . . . . . . . . . . . . . . . . . . . . . . Page 37
Next Century Radio Module. . . . . . . . . . . . . . . . . . . . . . . . . . . . . . . . . . . . . . . . . . . . . . . . . . . Page 38
Modbus Interface Description. . . . . . . . . . . . . . . . . . . . . . . . . . . . . . . . . . . . . . . . . . . . . . . . . . Page 39
Modbus Registers & Summed Accumulator Registers. . . . . . . . . . . . . . . . . . . . . . . . . . . . Page 41
EZMeter Power Suite Quick Start Guide.. . . . . . . . . . . . . . . . . . . . . . . . . . . . . . . . . . . . . . . . . Page 47
Page 2

Safety Certification
Underwriter’s Laboratories (UL)
Most EZMeters have been tested by UL
to UL916 and carry the UL Recognized
Component mark for the United States
(UL916) and Canada (CAN/C22.2 No
1010.1-04). File number is E362606.
Accuracy Certification
A Note for California Users
All meters used in California for which a
charge is made for power must have been
inspected by a Weights & Measures
inspector and placed in service by a
Licensed Service Agent or a Weights &
Measures official. The meter must be
reinspected by Weights and Measures every
ten years. It is a misdemeanor to fail to do
this. See the ezmeter.com website for more
on these requirements.
All EZ Meters are guaranteed to meet
the latest ANSI C12.1 accuracy standard for
electric meters. This standard allows an
error of up to 1% when new and 2% when
field tested.
In California, Maryland and Canada,
meters are regulated by the government
when used for revenue billing. Contact the
local Weights and Measures office. Only
meters that have been Type Approved by the
California Division of Measurement
Standards may be used for revenue billing
within California (all EZ Meters exceed
California’s accuracy requirements, but all
are not type approved).
The only EZMeters that have been
certified for revenue billing in California are
the 200 amp versions of the 120 volt to
neutral meters when using the Model JD6W
current transformer. Approved California
meters are models
A31x3x/yzxx
where x may be any digit, y may be 0 or 3
and z may be 0 or 1. 0 is assumed if x and y
are not present. The CTEP certificate
number is 5674(a)-14.
Page 3
Limited Warranty
EZMeter Technologies warrants its products, if used in accordance with all applicable instructions,
to be free from original defects in material and workmanship for a period of five years from the date
of manufacture. If the product should prove defective in material or workmanship within that
period, EZMeter Technologies will repair or replace the product, in its sole discretion. Service under
this Warranty can only be obtained by your delivering or shipping the product (with all shipping or
delivery charges prepaid) to: EZMeter Technologies, 583 Refugio Road, Santa Ynez, CA 93460.
EZMeter Technologies will pay return shipping charges. Call EZMeter Technologies at (805)
688-9696 for a Return Material Authorization (RMA) before sending any equipment back for repair.
THIS WARRANTY DOES NOT APPLY TO NORMAL WEAR OR DAMAGE RESULTING
FROM ACT OF GOD, ACCIDENT, MISUSE, ABUSE, OR NEGLECT. SELLER MAKES NO
EXPRESS WARRANTIES OTHER THAN THE WARRANTY EXPRESSLY SET FORTH
HEREIN, EXCEPT TO THE EXTENT PROHIBITED BY APPLICABLE LAW. ALL IMPLIED
WARRANTIES INCLUDING ALL WARRANTIES OF MERCHANTABILITY OR FITNESS
ARE LIMITED IN DURATION TO THE WARRANTY PERIOD SET FORTH ABOVE AND
THIS WARRANTY EXPRESSLY EXCLUDES ALL INCIDENTAL AND CONSEQUENTIAL
DAMAGES. (Some states do not allow limitation on how long an implied warranty lasts, and some
states do not allow the exclusion or limitation of incidental or consequential damages so the above
limitations or exclusions may not apply to you. This Warranty gives you specific legal rights, and
you may have other rights which vary from jurisdiction to jurisdiction).
Damage from lightning strikes, power surges, and improperly connecting the meter to the power
source are not covered by the warranty.
Page 4

Product Selection Guide
This chapter provides information to help you choose the best meter for your requirements.
Automatic Meter Reading (AMR). Every EZMeter is available with one of four Automatic Meter
Reading (AMR) capabilities: None, Pulse, EZ Plus, or ModBus.
No AMR requires someone to visit each meter periodically and manually write down the reading
from the display.
A Pulse meter generates an isolated pulse, usually every kwh, which is detected by some type of
data logger or pulse counting radio. EZ Meters are compatible with most type of pulse counting
systems including Oscar, Inovonics and Hexagram. These systems are usually installed at the site
and connected to a billing service via telephone modem or the internet. The pulse is generated by an
optocoupler and mimics a dry-contact closure, except that it is polarity sensitive. Standard pulse
duration is 50 milliseconds. Other pulse lengths are available. Contact the factory.
EZ Plus and Modbus are two separate software protocols used for addressing meters using a
serial interface. Either one is available with an RS-232 or RS-485 interface.
RS-232 is a very common interface that is intended for a single device within about 30 feet.
Because of the addressing scheme used in the EZ Plus and Modbus protocols, multiple meters can
be addressed, but no tests have been conducted to see how many will work. RS-232 meters are not
currently in production, but may be special ordered.
RS-485 is a protocol used commonly in building and industrial control systems. Up to 256
devices can be on one network, even more if repeaters or radio links are used. RS-485 is the most
commonly used serial interface for meter reading. USB to RS-485 adapters are available at low cost
from a number of vendors. TCP/IP to RS-485 adapters are also available allowing a network of
power meters to be connected to the internet. Most telephone modems have an RS-232 port which
requires an RS-232 to RS-485 adapter to connect the meter network to a phone line. Another option
for extending an RS-485 network is to use two radios, something frequently done to avoid trenching
between two buildings. More powerful radios have a range up to seven miles
The modular design of EZMeter communications allows other modules to be developed and
implemented fairly inexpensively. Expect a meter with a built-in radio shortly.
EZ Plus is a relatively easy to implement protocol that will provide all the information available
by Modbus. The free EZMeterReader billing program uses the EZ Plus protocol. The EZMeter
Power Suite package supports both EZ Plus and Modbus. Since it is a binary protocol, there is a
chance it could conflict with an ASCII protocol if sharing the same network. The network must be
1200, 4800, 9600 or 19,200 baud, 8 data bits, 1 stop bit, no parity.
Page 5

Modbus is an old protocol and the de facto standard for building and industrial automation. The
register map is available on page 39. Several third party software vendors offer software already
configured to the EZMeter register map. Meters can be ordered for either big (default) or little
endian and either signed (default) or unsigned integers.
Bi-directional Meters. All one, two and three element meters are available as bi-directional meters
that measure the number of kwh that flow in each direction. These meters are most often used in
conjunction with solar, wind or other alternative energy systems connected to the grid.
Voltage. Each EZMeter must be ordered to match the electric system where it will be installed. The
first character of the model number determines the voltage range the meter can handle.
Note: Each meter model is capable of handling a range of voltages. Select the meter with the
voltage range that includes the voltage you want to measure.
A. 100-130 volts to neutral, 200-260 volts line to line, single output:
Single element: 100-130 volts to neutral, single phase.
Two element: 100-130 volts to neutral, 200-260 volts line to line, single phase or two phases of
a three phase system.
Three element: 100-130 volts to neutral, four wire, three phase wye.
A. 100-130 volts to neutral, 200-260 volts line to line, dual output:
Two element: Two 100-130 volts to neutral, single phase services or
One bidirectional 100-130 volts to neutral, 200-260 volts line to line, single phase or two phases
of a three phase system.
Three element: One 100-130 volts to neutral, single phase plus one 100-130 volts to neutral,
200-260 volts line to line, single phase or two phase of three phase system, or one
bidirectional 100-130 volts to neutral, four wire, three phase wye.
Four Element: Two 100-130 volts to neutral, 200-260 volts line to line, single phase or two
phases of three phase system.
B. Three element only: 100-130 volts to neutral on two legs, 200-260 volts to neutral on the third
leg, 200-260 volts line to line, four wire, three phase delta. Can also be used in place of an A
single output meter with a slight loss of accuracy at the low end on L3.
C. 200-260 volts to neutral, 400-500 volts line to line
Single element: 200-260 volts line to neutral, single phase
Two element: 200-260 volts to neutral, 400-500 volts line to line, or two phases of three phase.
Three element: 200-260 volts to neutral, 400-500 volts line to line, three phase wye
D. 240-300 volts to neutral, 430-500 volts line to line
Single element: 240-300 volts line to neutral, single phase
Two element: 240-300 volts to neutral, 430-500 volts line to line, or two phases of three phase.
Three element: 240-300 volts to neutral, 430-500 volts line to line, three phase wye
When used with the EZMeter Technologies Phantom Neutral module, this meter will monitor
a three-wire, three phase delta service.
Page 6

E. Three element only: 240-300 volts to neutral on two legs, 430-500 volts to neutral on the third
leg, 430-500 volts line to line, four wire, three phase delta.
F. Dual Element only: 200-260 volts line to line, three wire, three phase delta
G. Dual Element only: 440-500 volts line to line, three wire, three phase delta
Maximum Current and Current Transformers. Each EZMeter is calibrated to work with a
specific model current transformer (CT) at any current up to the maximum rating for the meter.
Solid core CTs require that the power be turned off and the wire carrying the load to be measured
must be disconnected, run through the CT, and reconnected. Split core CTs come apart and can be
installed without disconnecting the wires.
Solid core CTs are available for current ranges up to100, 150, 200, 250 or 400 amps. Split core
CT ranges up to 60, 200, 400, 800, 1200 or1600 amps.
CTs can be installed in parallel. If want to measure several circuits in a breaker panel and the
circuits are on the same leg, but opposite sides of the breaker panel, you can use two CTs, one on
each side, so you don’t have to rewire the panel.
The wires on CTs can be extended a reasonable distance as long as the wire resistance does not
exceed one ohm.
Display and Resolution. Each EZMeter can be equipped with either an LCD display or an electromechanical counter that displays accumulated kilowatt hours. Some considerations:
An electro-mechanical counter costs less than an LCD display, but there are a few trade-offs.
The standard counter is rated to work down to 10EC (14EF) and is not suitable for outdoor use in
cold climates. An extended temperature range counter rated down to -30E (-22EF) is available at
added cost. If the temperature drops below the counter’s operating range, the counts will be lost
forever unless you are using an automatic meter reading system. If you have a dual output meter,
the LCD display will actually cost less than two counters. Counters are recommended when a local
display is required, but the meters will be read by an AMR system. They are also recommended for
locations in bright sunlight where an LCD display is difficult to read.
LCD displays have several advantages. Single output meters display accumulated kwh on the
top line of the display while the bottom line cycles through volts, watts, amps, and power factor.
The dual output meters display accumulated kwh for the second channel on the bottom line. If
mounted in a location where the display stops working because of low temperature, the display will
return to normal operation with no loss of kwh when it warms up.
Counters for meters with 0.1 kwh resolution have a red number on the right side to indicate
tenths of kwh. The other numbers are all white. Counters for meters with 1.0 kwh or 0.01 kwh
resolution have all numbers the same color. The LCD displays have a resolution of 0.01 kwh.
Page 7

Enclosures. A variety of enclosures that hold different numbers of meters are available. Most are
NEMA4X rated plastic enclosures with the meters mounted on a plastic panel inside. Use of plastic
enclosures allows AMR radios to be mounted inside. Interior rated enclosures have a clear cover
while exterior rated ones have a solid cover. The LCD displays are available only on the solid door
version.
Available versions are:
5" x 6.9" x 3" enclosure holds one or two meters and one or two displays. An optional fixture
allows the enclosure to be flush mounted in a wall.
6" x 6" x 4" enclosure holds one or two meters and two displays.
12" x 7" x 5" enclosure holds up to four meters and displays. It can hold six meters if two are
mounted on the back of the enclosure with velcro.
13" x 13" x 6" enclosure holds up to eight meters and eight displays.
19" x 15" x 7" enclosure holds up to twelve meters and twelve displays.
Model Numbers. Each digit in a model number specifies a different feature or option. Use the
table below to determine the options in the electronics module of your meter.
First Character - Voltage (see detailed description on page 6)
A = 100-130 volts to neutral, 200-260 line to line
B = 100-130 volts to neutral on two legs, 200-260 volts line to neutral on third leg, 200-260
volts line to line, four wire, three phase delta
C = 200-260 volts to neutral, 400-500 volts line to line
D = 240-300 volts to neutral, 430-500 volts line to line
E = 240-300 volts to neutral on two legs, 400-500 volts to neutral on the third leg, 400-500 volts
line to line, four wire, three phase delta.
F = Dual Element only: 200-260 volts line to line, three wire, three phase delta
G = Dual Element only: 430-500 volts line to line, three wire, three phase delta
Second Character - Number of elements supported
1 = One element
2 = Two element
3 = Three element
4 = Four element (dual two element meter)
Third Character - Display option
0 = No counter driver (AMR only)
1 = One counter (standard meter)
2 = Two counters (dual 2-in-1 meter)
3 = 2 line LCD display (standard meter)
4 = 2 line LCD display (dual 2-in-1 meter)
Page 8

Fourth Character - Maximum rated current (Meter Class)
0 = 60 amps
1 = 100 amps
2 = 150 amps
3 = 200 amps
4 = 250 amps
5 = 400 amps
6 = 800 amps
7 = 1200 amps
8 = 1600 amps
9 = 2000 amps
Fifth Character - Automatic Meter Reading (AMR)
0 = No AMR or AMR through I2C port
1 = Isolated pulse output
2 = RS-485 EZ Plus protocol
3 = RS-485 Modbus protocol
4 = RS-232 EZ Plus protocol
5 = RS-232 Modbus protocol
6 = TinyMesh radio
7 = Next Century radio power/pulse interface
Valid meter model numbers contain at least five characters. The model number may contain up to
five additional characters. If none of the additional characters are present, the “0" value is implied.
Sixth Character - Always a slash / unless there are no additional characters.
Seventh Character - The CT Model.
Additional CT models may be added at any time. Presently the models are:
0 = 4720/4 - 400:1, 250 max amps, solid core, 1" ID (discontinued)
1 = JC16F - 400:1, 100 max amps, split core, 0.6" ID
2 = S0140 - 3000:1, 1600 max amps, split core, 1.25" ID (discontinued)
3 = JD6W - 2500:1, 400 max amps, solid core, 0.7" ID
4 = S0160 - 3300:1, 1600 max amps, split core, 2.0" ID
5 = KFC-203-FD - 2000:1, 400 max amps, split core, 1.2" ID
6 = JC36S3 - 3000:1, 800 max amps, split core, 1.4" ID (special order)
7 = WC3-200 - 400:1, 400 max amps, split core, .94" x .75" inside
8 = WC4-800 - 800:1, 800 max amps, split core, 1.7" x 1.3" inside (special order)
9 = WC5-1600 - 1600:1, 1600 max amps. Split core, 3.5" x 2.0" inside (special order)
A = XH-BCT-1000 - 1000:1, 250 max amps, solid core, 1.0" ID (special order)
B = XH-SCT-T24/200 - 2500:1, 260 max amps, split core, 0.93" x 0.99" inside
C = WC6-2000 - 2000:1, 2000 max amps, split core, 8.4" x 4.7" inside
D = JD7W - 417:1, 250 max amps, solid core, 0.7" ID
E = Eaton Model 417, equivalent to JD7W
Page 9

Eighth Character - Resolution
0 = Display: 1.0 kwh
Isolated: 1.0 kwh
1 = Display: 0.1 kwh
Isolated: 0.1 kwh
2 = Display: 0.01 kwh
Isolated: 0.01 kwh
3 = Display: 0.01 kwh
Isolated: 1.0 kwh
Ninth Character - Parity and Bidirectional
0 = No parity, standard meter
1 = No parity, bidirectional meter
2 = Even parity, standard meter
3 = Even parity, bidirectional meter
4 = Odd parity, standard meter
5 = Odd parity, bidirectional meter
Tenth Character - Baud Rate (Modbus Configuration) or Isolated Pulse Timing.
For Serial Port meters (modbus configuration, EZPlus where noted)
0 = 9600 Baud (little endian, unsigned integers and EZPlus)
1 = 19,200 Baud (little endian, unsigned integers and EZPlus)
2 = 9600 Baud (little endian, signed integers)
3 = 19,200 Baud (little endian, signed integers)
4 = 9600 Baud (big endian, unsigned integers)
5 = 19,200 Baud (big endian, unsigned integer)s
6 = 9600 Baud (big endian, signed integers)
7 = 19,200 Baud (big endian, signed integers)
8 = 4800 Baud (EZPlus only)
9 = 1200 Baud (EZPlus only)
For Isolated Pulse Meters
0 = 50 ms pulse, 150 ms recovery
A-Y = Pulse length is position of letter in alphabet time 129 ms, recovery time is 129 ms longer
than pulse length
Z = Custom pulse length
Page 10

Part Number Suffixes for Ordering. The part numbers above are printed on the meter cases and
enclosures. For ordering and invoicing, a part number suffix consisting of a hyphen (-) and two
digits may be appended to the part number. The first digit is the number of CTs that go with the
meter. The second digit represents the type of mechanical counter that goes with the meter. The
codes are
5 = Counter for 0.1 kwh resolution, one red wheel, standard temperature range (4921/1)
6 = Counter for 1.0 or 0.01 kwh resolution, all white wheels, standard temperature (4921/0)
7 = Only one type 5 counter for dual meter with 4 CTs.
8 = Only one type 6 counter for dual meter with 4 CTs
9 = LCD Counter and ribbon cable
In addition, California approved meters require special marking on the current transformers.
Append a letter “C” to the model number to be sure your meter will pass the state testing procedure.
Page 11
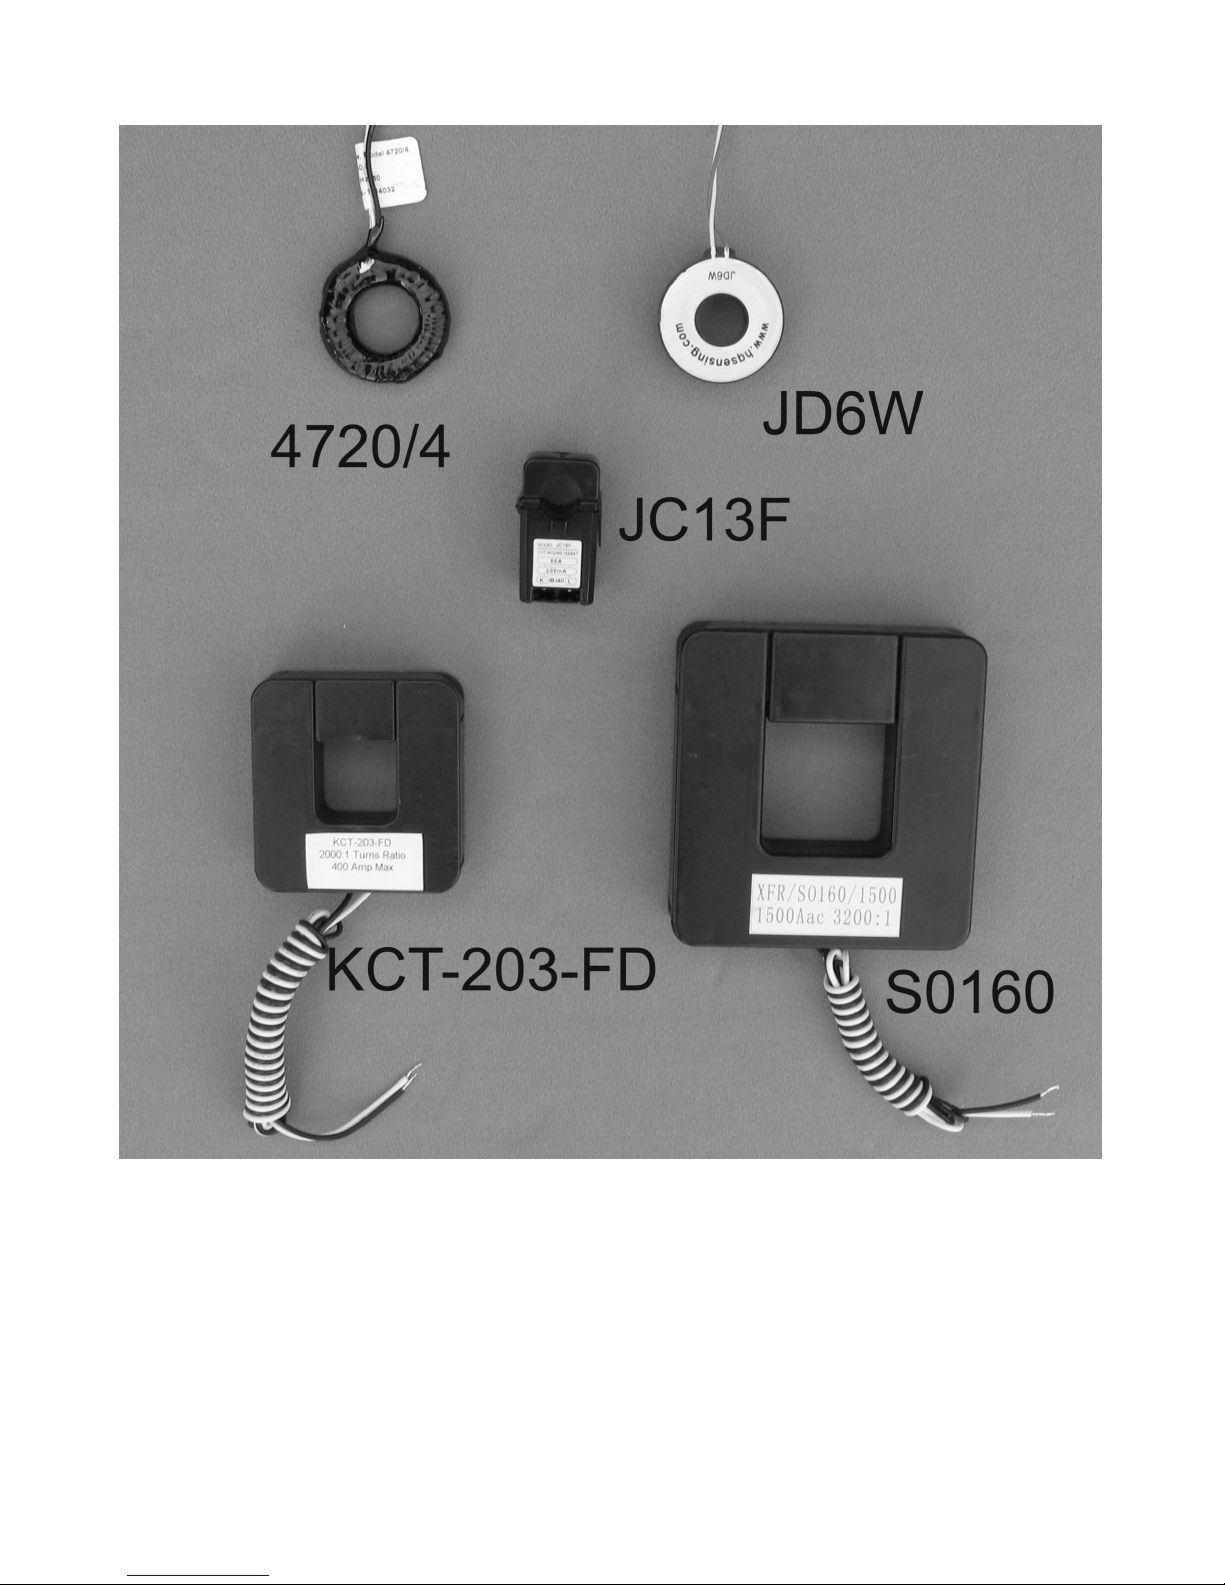
EZMeter Current Transformers. Each meter is manufactured to work with one model of current
transformer (CT). While it is true that a CT with the same turns ratio can be substituted for another
without causing a significant error, for best accuracy, use the CT specified on the meter label. The
meter has been calibrated to account for variations in how the CT responds to different phase
angles, a function of the core material rather than the turns ratio.
The seventh character of the meter model number specifies the CT that should be used. If there is
no character in the seventh position the 4720/4 CT should be used. See the table on page 10.
Page 12
Operating Instructions
After installation, the EZ Meter is simple to operate. You read the meter the same way you read
the odometer in a car. The label on the front of the meter indicates the resolution of the display,
either full kilowatt hours (kwh), tenths of kwh or hundredths of kwh The label on the outside of the
enclosure also states the resolution. The mechanical counters are available with all white digits or
all white except the right hand digit being red which indicates tenths of kwh. Normally, the display
reads in full kwh, except if the right most digit is a different color, it is reading in tenths. And except
if someone did not use the correct display with the meter module. Look at the label to be sure.
To charge a tenant for power used, subtract the meter reading at the beginning of the billing
cycle from the meter reading at the end of the cycle and multiply the difference by the rate per
kilowatt hour.
Whenever power is applied to the L1 terminal, the red LED on the electronics module should
light. The light will flash off then back on every time one of the legs measures 1/100 of a kwh (or
whatever quantity is indicated by the Kt value on the meter label (see below).
For meters made in 2015 and earlier: (see the date code on the label. 4Q15 = Oct-Dec 2015)
If the red LED flashes on and off every second, the meter is detecting a high
phase angle power factor is below .7) on one or more of the legs. This could
indicate a piece of equipment is not operating properly or it could mean that
the CTs and voltage references were not paired properly when using three
phase power. See the installation instructions for curing this condition. To
disable the high phase angle alarm (if you want to test the accuracy of the
meter at a high phase angle), install a jumper between the two pins on the
I2C connector closest to the display connector on the front row.
For meters made after 2015:
Beginning in January 2106, the low power factor warning is only active when reverse current is
detected. This means that if the CTs were installed correctly, the continuous flashing of the red LED
usually indicates that the voltage and current inputs to the meter were not properly matched during
installation and the meter is only recording half (or 2/3) the power being consumed. This only
occurs when the power is supplied from a three phase transformer.
Meters with electro-mechanical displays have a green LED that will flash briefly every time the
display counter advances.
Meters with an RS-485 interface have a bi-color LED that flashes red briefly every time the
meter senses traffic from the serial port. It flashes green when it responds to a request over the serial
port. Meters with an RS-232 interface, and the original RS-485 meters, have a yellow LED that
flashes when the meter responds. If the bi-color LED comes on bright red and stays on, it indicates
the serial connection was not properly installed or the isolated power has failed.
You can clean the outside of the meter enclosure with a general purpose cleanser such as 409 or
Fantastic if necessary. Do not use harsh bathroom cleaners or alcohol.
Page 13

If the meter appears to operate erratically, it is probably because it measures each phase
separately and flashes the red LED when each phase accumulates 1/100 kwh (or other resolution).
The resolution may be different for the red LED, the display and the isolated output. Check the
meter label where the resolution of each will be noted.
If you believe the meter is not measuring correctly, perform the test on page 25 and see the
troubleshooting suggestions on page 26.
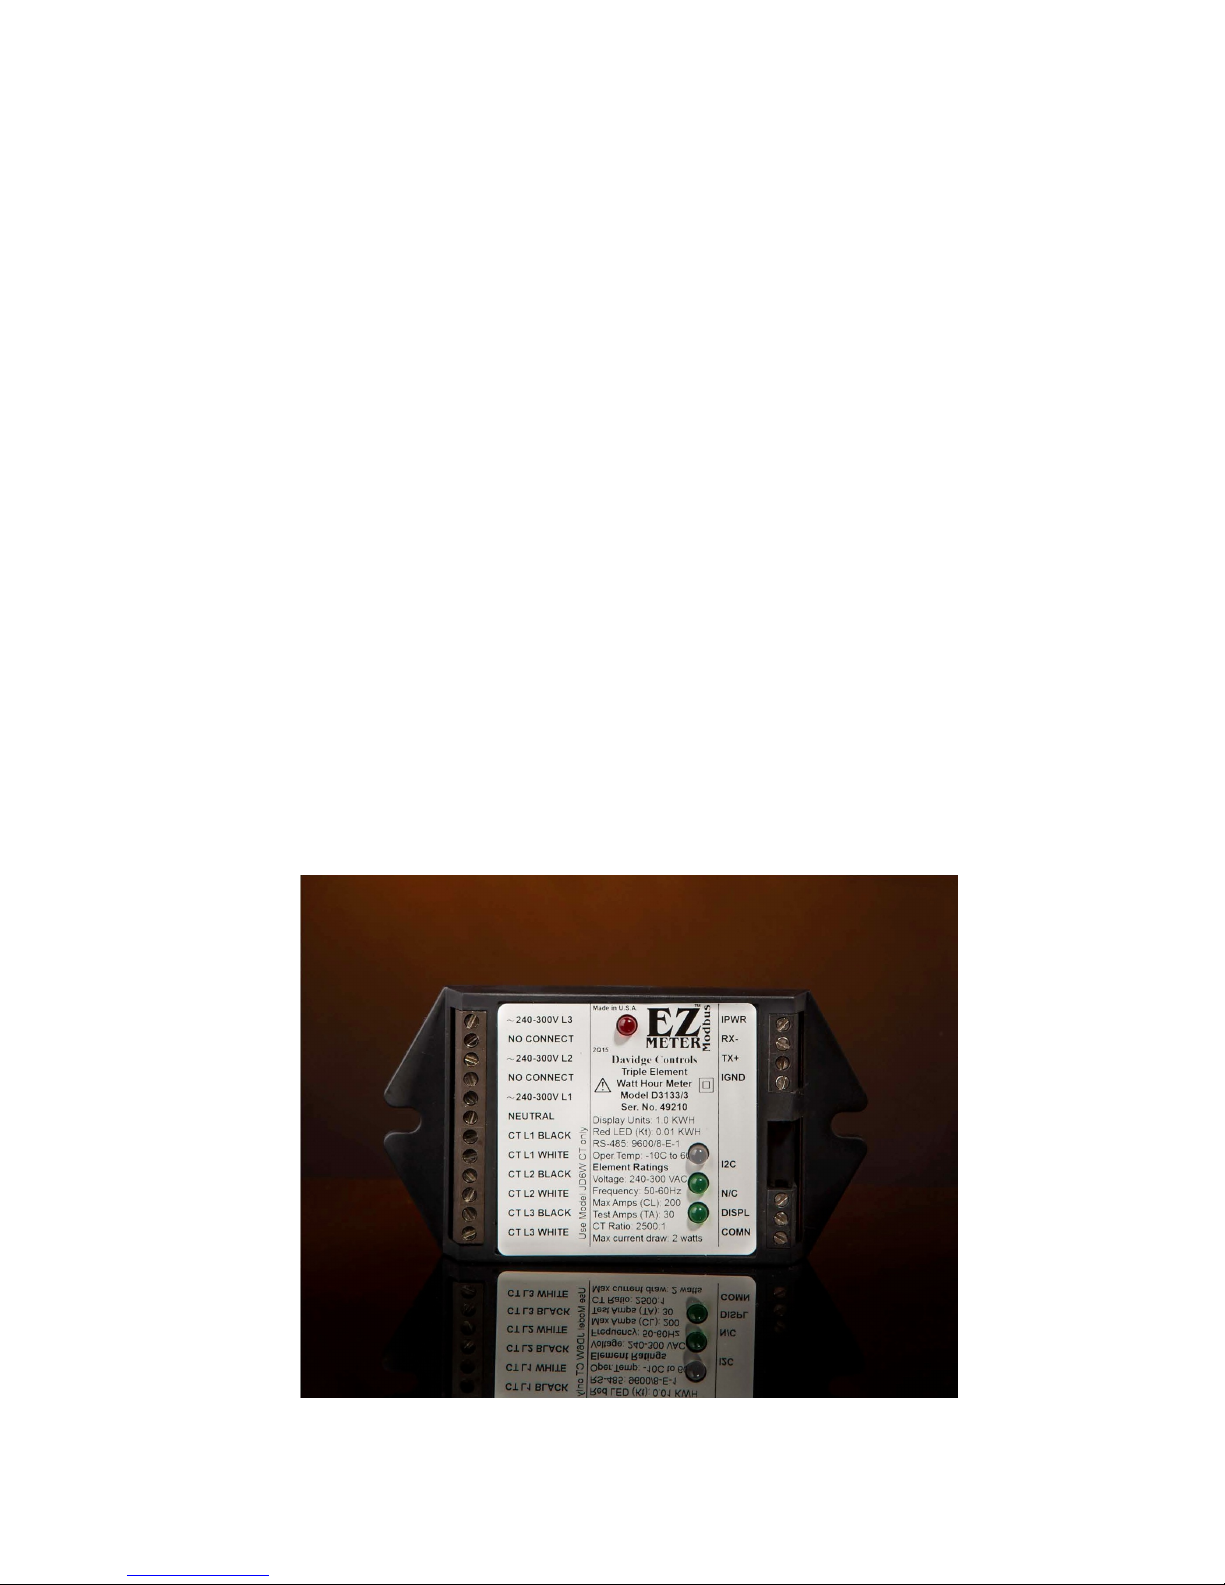
Understanding the Meter Electronics Module Label
The center section on the meter label reveals a lot of data about the meter, but some of it is in
the language used by the metering standards.
Display Units - The resolution of the meter display. Either 1.0, 0.1 or 0.01 KWH. Multiply by the
value show on the display to get the total KWH the meter has recorded. Meters with 1.0 resolution
have all digits the same color and the display shows KWH with no conversion needed. Meters with
0.1 resolution are usually sold with the right hand digit being a different color and is read as if there
were a decimal point before the odd colored digit. Some older meters had the notation Kt: 1000
along with the display resolution. That confusing statement is no longer required by California
Measurement Standards.
Red LED (Kt) - The Red LED serves two functions. If it is flashing about once a second, it
indicates a low power factor on one or more legs. A slower flash indicates the meter has recorded
the amount of energy shown on the label, usually .01 KWH (10 WH) for most meters. It may be as
high as .5 KWH for high voltage, high current meters.
Depending on the type of meter, the next line will provide the isolated output resolution or the type
of serial communication and the default baud rate.
Oper. Temp: - The operating temperature range applies to the electronics module only. The low
temperature is usually lower than the low temperature for the electro-mechanical display.
Voltage - The range of voltages in which the meter will operate measured between line and neutral
(L/N). If there is no neutral, it is the voltage line to line (L/L). For four wire delta meters, the
voltage for the high leg is shown on the left for L3.
Max Amps (CL) - The maximum load (in amps) on each leg that the meter can handle. This is also
referred to as the meter class.
Test Amps (TA) - This is another term from the standards and is set by the manufacturer, usually at
15% of the class rating (maximum amperage).
Max current draw: All EZ Meters use 2 watts or less for operation of the meter.
Page 14

CT Ratio: The turns ratio of the current transformer that is intended for use with this meter.
Vertically printed next to the labeling of the CT terminals is the model number of the current
transformer the meter was calibrated against. Each model of CT has a slightly different phase angle
adjustment which is programmed into the meter during calibration. Using a current transformer
with a different model number, but the same turns ratio may cause an error of a few tenths of one
percent. Using a current transformer with a different turns ratio, or a current transformer with an
internal burden resistor, will cause a significant error.
Page 15

Installation Instructions
These instructions are for meters whose model number begins with a letter, not a number.
The EZ Meter consists of an electronics module, one or more current transformers (CTs), a
display of one or two electro-mechanical or LCD display counters, and an enclosure that holds from
one to 12 meters. If the meter will be mounted outside in direct sunlight, be sure to order a UV
resistant enclosure or paint the standard enclosure. The CTs and display may be mounted in the
same enclosure or mounted in a remote location. A common practice is to mount the CTs in a
breaker panel and mount everything else in a separate adjacent enclosure. A circuit breaker rated at
20 amps or less should be installed before the meter. Be sure no one will be able to turn off the
breaker and defeat the meter. If a fuse is used to protect the meter, it should be a delayed-action fuse
and the meter’s power supply will short hot to neutral for half a cycle (1/120 second) on power up.
Installing the NEMA4X Enclosure: Use the metal brackets provided to mount the enclosure in a
suitable location. Drill a hole anywhere in the side or back of the enclosure for a conduit to connect
to a breaker panel or disconnect box in compliance with local electrical codes. After the meter has
been installed and tested, secure the cover using the screw or small padlock provided. You should
also label each display counter with the unit name or number.
Installing the flush mount enclosure: This enclosure was designed to be recessed into a sheet
rock wall. Cut a 6” square opening in the sheet rock adjacent to a stud. Drill a hole in the back or
side of the enclosure for a conduit. Install the CTs and make the electrical connections as described
below before installing the enclosure in the wall. Fillister head screws with holes are provided so
that the cover may be secured with a seal if required.
A note on different meter types: All EZmeters come with a 12 pin connector for voltage and CT
inputs. There are three voltage inputs and three CT inputs (3&3) or two voltage inputs and four CT
inputs (2&4). The 3&3 configuration must be used whenever a three phase wye or delta load is
being measured. Either configuration can be used for measuring single phase loads, even if the load
uses one or two legs of a three phase service. The 2&4 configuration is most commonly used in
marinas and apartment buildings where two 3-wire 120/240V (or 120/208V) services are close
enough to each other to be monitored by one meter.
Installing the CTs: (See the appropriate Figure on pages 22 and 23.) If you are using solid core
CTs, you must turn off the power to begin your installation. Disconnect one end of the wire (or
wires) with the load to be measured and pass it through the center of the CT and reconnect the
wire(s) where it was attached before. Connect the two wires coming out of the CT to the appropriate
terminals on the electronics module. Begin connecting CTs to CT #1 and continue until all the CTs
for that meter are installed. The CT should be installed with the arrow facing the direction of current
flow or the label facing the source.
Page 16

CTs Are Directional (or Not)
If the meter is otherwise installed correctly, it will accurately record all the power that flows
through the CTs. If you are working with three phase power, even if only one or two legs of it,
you should be sure the arrows or labels are facing in the right direction. The meter has a phase
angle warning that flashes the red LED every second if power factor is below 0.7 and polarity is
reversed. This will happen if the CTs are facing the proper direction, but the voltage and current
sources are not properly matched. (L1 voltage and L1 CT should be on the same phase, etc).
If you want the phase angle warning (red LED flashes) to work all the time, simply install the
CTs backwards. Doing so will cause Modbus and Plus meters to report watts as a negative
number. Rather than physically turning the Cts around if needed, just reverse the black and white
wires where they connect to the meter.
You can install more than one CT on each leg if you need to. You might need to if you were
measuring several circuits in one breaker panel and the wires were not long enough for all to go
through one CT or if you wanted to measure power being used in two separate breaker panels. Just
be sure all the wires on each leg go through CTs that are connected to the same terminal on the
meter and that the direction marks on the CTs are aligned the same. Multiple CTs should be
connected in parallel.
If you run more than one wire through a CT, be sure that the current flow is the same direction
for all wires and that all the wires are the same leg (phase). That means there should be no voltage
variation between the wires (if you touched them together, they would not spark). Failure to do so
will cause the power flowing in one wire to be subtracted from the power flowing in the other wire
instead of being added to it.
The CT wires can be extended if needed. We have tested them at 500 feet and they can probably
be extended even further. If the line resistance is much over one ohm, accuracy of the meter will be
affected, especially at high phase angles. Be sure to install the CT wires in conduit. Connections
should either be soldered or made with gel filled wire nuts. Any resistance in the connection will
cause the meter to read lower than it should. The wire used should meet local codes for insulation.
Any size wire from 22 AWG to 12 AWG may be used. #18 is suggested.
You can install split core CTs without disconnecting the wire. If you have to install them
without turning off power, connect the wires to the meter before securing the two parts of the CT
over the wire carrying the load. Be sure to secure the two parts of the CT so it cannot come apart.
Note: Working in an electric panel that has power connected to it is an OSHA violation.
Do not mix CTs with different turns ratios on the same meter.
Page 17

WARNING
Hazardous voltages exist in CT wires when they are not connected to a meter and current is
flowing through wire passing through the CT. Wire nut the CT wires together if you must
remove the meter and leave the CTs in place. Failure to do so may damage the CT or shock
someone.
Electrical Connections: You need to provide a voltage reference for each phase of the power you
are metering plus connect the neutral to the meter as well. The voltage ranges printed on the
electronics module label (before L1, etc) refer to the voltage between neutral and that terminal and
indicate what meter works with what electrical system. The voltage associated with the meter name
is the most commonly used voltage in the range. See the diagrams on pages 19 and 20 for specific
models. For meters that do not have a Neutral reference, the voltage ranges printed on the label are
line to line voltages.
You can use any size wire from 28 AWG to 12 AWG. Be sure insulation meets local codes.
Each phase should be protected by a circuit breaker or fuse of 20 amps or less. For safety, a switch
or circuit breaker must be installed between the meter and the mains power source. It shall be in
close proximity to the meter and within easy reach of the operator and shall be marked as the
disconnecting device for the equipment. If a fuse is used, it should be a slow-blow type. Connecting
the meter on the protected side of a GFCI may cause the GFCI to trip when power is applied to the
meter.
IMPORTANT
You must ensure that the leg connected to the AC L1 terminal is the same leg which passes
through CT L1, and the same for (AC L2 & CT L2) and (AC L3 & CT L3). This is especially
important when connected to three phase power because the meter will only record 50% of the
power used on legs that are not properly paired. After the installation is complete, turn on a 60
watt or greater load for each leg and observe the red LED. If it is flashing, you most likely did not
wire the meter properly (The flashing LED indicates a power factor of 0.7 or less - optimum
power factor is1.0).
Surge Protection: Like computers, TVs and other electronic devices, EZMeters are subject to
damage from electrical surges. In fact they are particularly likely to be damaged because they are
typically installed as the first piece of electronics that the surge hits when it enters the submetered
electrical distribution system. Consider a whole-house surge protection device or other sacrificial
protection device.
Display Connections: (See Fig 1 and Fig 7) The electro-mechanical counter comes already
connected to the meter. If you purchased an OEM version of the product, connect as shown in the
Page 18

diagrams. If you have a three element, dual output meter, DISP1 is matched with CT #1 and L1
while DISP2 is matched to L2, L3 and the remaining CT(s). If you have a four element, dual output
meter, the power flowing through the CTs marked ‘A’ is displayed on DISPA while the CTs marked
‘B’ display on DISPB.
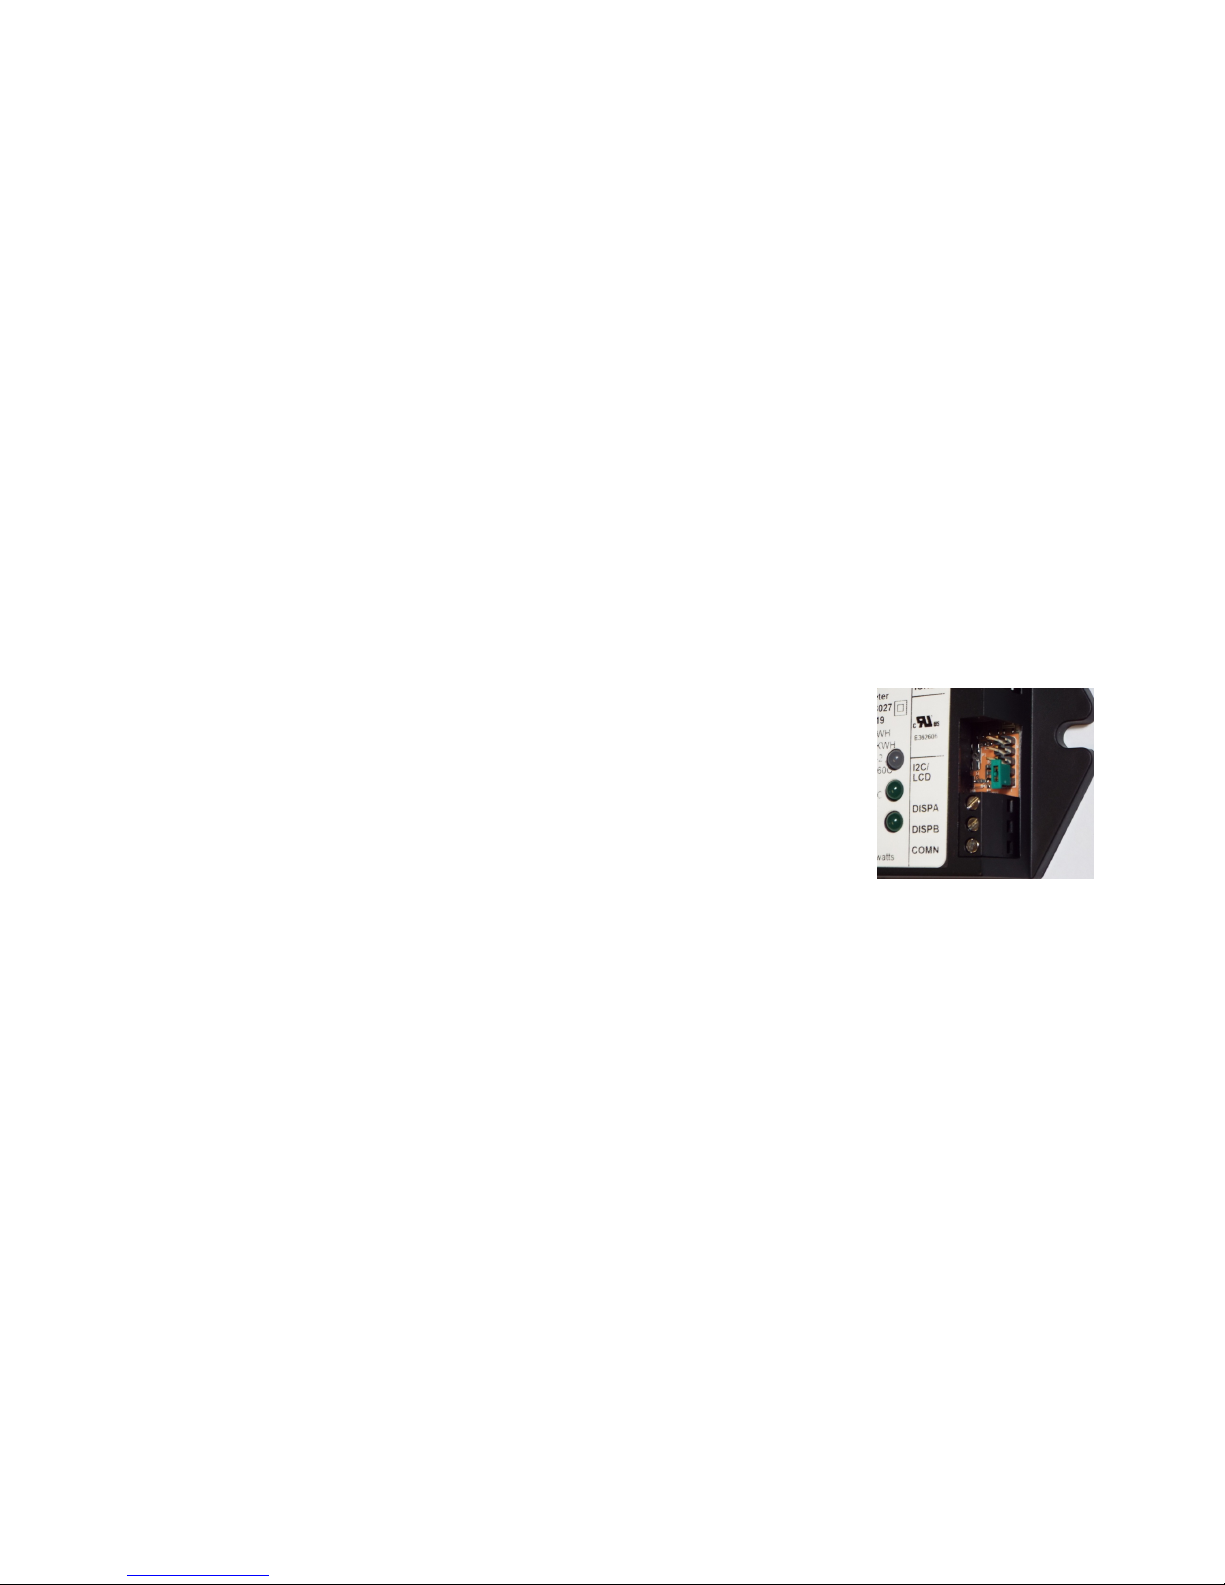
If you have the LCD displays, they connect to the I2C/LCD header. The diagram below shows the
connections. The wire numbers start with the red wire being #1 and continuing sequentially.
Isolated Outputs: (See Fig. 7) If you have a pulse output meter, connect the two wires from the
pulse counting equipment to ISO- and ISO+ respecting polarities. The grounded terminal of the
pulse counting device needs to be connected to the ISO- terminal on the meter. If you have a three
element, dual output meter, connect one set to ISO- and ISO1 and the other set to ISO- and ISO2.
They correspond with DISP1 and DISP2. On four element, dual meters, the terminals are labeled
ISOA, DISPA, and ISOB and DISPB.
RS-232 and RS-485 Connections: (See Fig. 1 and Fig. 10) The serial connections are optically
isolated from the electronics of the meter and require an external power source. Any power supply
capable of delivering 5-18 volts DC and 50 mA per meter will work. Connect the power supply
ground to the IGND terminal and the power supply hot wire to IPWR.
For RS-232, connect the RX- terminal to pin 2 of your DB9 RS-232 Connector, TX+ terminal to
pin 3 and IGND to pin 5.
For RS-485, there does not appear to be a lot of consistency in pin labeling. Some are labeled
Rx+ or Rx- and Tx- or Tx+. Others are labeled A and B. We have seen four-wire RS-422/485
adapters that work when Rx+ and Rx- were connected together and others where Rx+ and B- were
connected together. We have also seen adapters that work when TX+ is connected to Tx on the
adapter and others where TX+ is connected to Rx on the adapter. We suggest you find the proper
configuration on your workbench before installing all the meters in the field.
Connecting a meter to an RS-232 or RS-485 connector can be a lot of hassle. To make the
process easier EZMeter Technologies resells USB to RS-232 and USB to RS-485 adapters made by
FTDI Chip. These adapters have a 1.8 meter wire bundle that can be connected directly to the meter.
Instructions for connecting FTDI Chip
Model USB-RS485-WE-1800-BT
Model USB-RS232-WE-1800-BT
Page 19

For the RS-485 model, connect the orange and brown wires to the A (RX-) terminal, the yellow
and green wires to the B (TX+) terminal, the black wire to the IGND terminal and the red wire to
IPWR (Be sure to check that there is at least 4.8 VDC between IGND and IPWR if there are
multiple meters installed). The brown and green wires install a termination a 120 ohm termination
resistor. For the RS-232 model, the orange and yellow wires are reversed. If a separate DC power
supply is required, connect it to the IGND and IPWR terminals. Instructions and drivers for
Windows, Linux and OS-X are at www.ftdichip.com.
The meters should be connected in daisy chain fashion (the wire should loop from one meter to
the next) with a twisted pair of wires. CAT5 or CAT6 stranded cable is suggested, and telephone
wire will work fine as long as the pairs are twisted.
It is important that twisted pairs be used for connecting the meter. That means use one twisted pair
for both A and B. If you want redundancy, use two twisted pairs in parallel. Do not twist the solid
and striped wires of one pair together for A and another pair for B. That defeats the purpose of using
twisted pairs and will most likely not work unless you have a very short wire run to the meters.
If you have at least a two pair cable, you can run the power from the DC power supply on one of
the pairs. Depending on the length of the cable and the impedance of the RS-485 adapter a 120
ohm resistor may need to be installed across the A and B pins on the last meter in the daisy chain.
These resistors are built into the FTDI USB to RS-485 and Grid Connect NET485 adapters. Install a
120 ohm resistor on the first meter in the daisy chain. Some systems may require two 470 ohm
resistors, one between +5 VDC and the B (TX+) terminals and the other between Ground and the A
(RX-) terminals. See Fig. 10. All the resistors can be connected directly to the meter terminals.
Experiment with different resistor combinations until communication is established. See the RS-485
troubleshooting section for more information.
Maxim Integrated Devices, manufacturer of the RS-485 drivers used in the meters, has a very
helpful document titled Guidelines for Proper Wiring of an RS-485 (TIA/EIA-485-A) Network at
http://www.maximintegrated.com/an763.
Be sure to write down the serial number and Modbus address of each meter and its location. The
EZ Power Suite requires a unique serial number for every meter location.
Application Notes at the end of this document deal with troubleshooting an RS-485 installation,
connecting Digi radios and the NET485 ethernet to RS-485 module.
I2C Port Connection: (Not yet available) The I2C port (Eye Squared See) is used to connect an
LCD display to the meter. The meter should be powered down before connecting the display. The
display will not function until the meter has been powered up again after the display has been
installed. An exception to this applies to Modbus versions of the meter that have previously been
connected to an LCD display. The display can be disconnected while the meter is running, then the
optional configuration dongle can be connected, then the display can be reconnected.
Page 20

Notes on Wiring Diagrams on following pages:
The voltages shown on most of the diagrams are for the allowable voltage range for meters made for
110-120 volt electric systems found in the USA. The voltage shown is for line-to-neutral or line-toline for meters that do not use a neutral. Meters for higher voltages are configured the same way
except a higher voltage range is specified. For instance, Figure 1 specifies Type A, C and D meters.
Type A (the first letter of the model number) is for 110-120 volt to neutral systems, Type C for 220
or 240 volt systems and Type D for 277 volt systems.
Fig. 2 shows a 4 wire delta (hot leg, high leg, stinger leg). Be sure your L3 leg is the high voltage
leg.
Fig 3 and Fig 6 show the same meter as in Fig 1, but with only two or one CTs connected. Be sure
you have power on L1 or the meter won’t work.
Fig 4 shows a 3 wire, 3 phase delta system. This meter only uses two CTs.
Fig 5 shows the same meter as in Fig 4, but with only 1 CT connected.
Fig 7 shows how to connect to the isolated pulse outputs. If you have a single output meter, ISO2
will be labeled ISO+ and ISO1 will be N/C (No Connect).
Fig 8 shows the special purpose dual two element meter with isolated pulse outputs. The
RS232/RS485 versions connect as shown in Fig 1.
Fig 9 shows a three element, bidirectional meter. The power that flows in one direction is displayed
on one counter and power that flows in the opposite direction is displayed on the other counter. This
is the only installation where the direction of the CTs makes a difference.
Fig 10 shows the typical connections needed for an RS-485 network.
Page 21

Page 22

Page 23

Fi
g.
10. RS-485 Network Layout
Page 24

Testing the Installed Meter
After the meter has been installed, it is
a good idea to turn power on the system and
check to see that the meter was connected to
the power line properly. This can be
determined easily by looking at the red LED
in the top, center portion of the label on the
electronics module. This LED should glow a
bright red whenever power is on. If it is
flashing continuously, about one flash per
second, it is indicating a high phase angle.
This could be caused by the load on the
system, but frequently indicates that the
voltage and current inputs are not matched
properly when using three phase power. This
warning requires a current flow of
approximately 60 watts on each leg.
If the meter is receiving power, the next
step is to verify that the meter is operating
properly. You will need a hair drier or other
small appliance that uses approximately 1500
watts or more to be able to do the test in a
reasonably short time. Since the meter
measures each phase separately, you will need
to test each phase individually.
You can get a rough idea of the accuracy
of the meter with the following test. If you
have a high voltage or high current meter, the
red LED may flash at 0.5 kwh or 0.1 kwh
instead of 0.01 kwh. Check the meter label.
You will have to adjust the times for other
resolutions.
WATTS is the wattage shown on the
nameplate of the appliance providing the load.
For example, a 1500 watt heat gun on 120
volts will use 0.01 kwh in 4,320,000 / 120 /
1500 or 24 seconds. If you don’t get this
exact value, it does not mean the meter is
defective. Many name plates are only
approximate. The label on the EZMeter itself
states power consumption of 2 watts, but that
only happens when the serial port is read or
the mechanical counter advances. Another
factor that influences the accuracy of this test
is the power factor of the electricity being
measured. If a big power factor exists, the
test may take several more seconds than what
is calculated, perhaps half again as much.
To check a 120 volt service, turn on your
heater and begin timing when the red LED
flashes the first time. The red LED should
flash again about 24 seconds later (or
whatever time you figured using the formula
above for the load you are testing with).
If you have several meters but don’t have
a voltage meter, you can test several meters
and if they all use the same number of
seconds, you can assume the meters are
working okay even if the time observed is
different than the calculated time. This test
will also correct for variation in the actual
number of watts used by the appliance versus
the number shown on the name plate.
Without getting into phase angle,
resistance and impedance measurements, the
following formula will tell you how many
seconds it should take to count 0.01 kwh:
SECONDS=4,320,000/VOLTS / WATTS
where VOLTS is the AC voltage measured at
the meter (it is important to measure this as
variations up to 10% are common) and where
Page 25

Trouble Shooting
Try the following steps if the meter does not
work. A simple AC voltmeter
will make trouble shooting much easier.
No Red LED
Be sure that line and neutral wires are
connected properly and that power is turned
on. Check this with your voltmeter by
measuring the voltage between the Neutral
and L1 terminals. The voltage should fall in
the range specified for the meter. If it does
not, you have not connected it properly, the
power is not turned on, or you have the wrong
meter for your electrical system. Check the
voltage between the neutral (usually white
wire) and ground. This voltage should be
close to zero.
the meter, at the panel, or where it connects to
ground. Check your neutral. If a CT wire is
shorted to neutral or ground, it will also cause
a very high reading.
The time is wrong when doing the accuracy
check.
Be sure all the terminals are wired
correctly and screwed down tightly.
Be sure the hair dryer or other electrical
load is plugged into the proper circuit and that
it is the only thing drawing current through
the meter.
Be sure the wire to the hair dryer only
passes through the current transformer one
time and that the neutral wire does not pass
through it.
No Green LED
The green LEDs are normally off. They
flash briefly when the mechanical counter
advances..
Green LED flashes but Counter does not
change
The meter is correctly detecting the usage
of power but the mechanical counter is not
moving. Be sure the counter is connected
properly with one wire going to COMN and
one wire going to DISPL When the green
LED flashes, the mechanical counter should
advance. With 2-in1 meters, when the top
green LED flashes, the counter connected to
DISP1 should advance indicating current
measured with the transformer connected to
the CT #1 terminals. When the bottom green
LED flashes, the counter connected to DISP2
should advance.
If the counter is properly connected and
does not advance when it should, replace the
counter with a different one.
I have several meters and one appears to be
reading lower than the others.
If you think one of the meters is reading
low, swap the meter with one that appears to
be reading right.
Communication problems
See the RS485 Troubleshooting Ap Note.
Still doesn’t work
Check at www.ezmeter.com for more
trouble shooting suggestions or call Customer
Support at 1-805-688-9696 between 9:00AM
and 5:00PM Pacific Time, Monday through
Friday. Each meter is covered by a five year
limited warranty (see page 4). There is a
charge for meters that are returned for repair
that are not defective.
Green LED Flashes too often
The most common cause of inaccurate
meters is a poor neutral connection, either at
Page 26

EZMeter Technologies Application Note
Installing a Grid Connect NET485 (Ethernet-RS422/485 Adapter)
Several companies make Ethernet to RS485 adapters that are suitable for connecting EZ Meters
to the internet or a local area network (LAN). Most come with a fixed IP address and setting one up
is both time consuming and difficult. EZMeter Technologies recommends the Grid Connect
NET485 for its ease of setup.
Physical Connections to meter. The NET485 module must be mounted in a location where a
hard-wired LAN connection meets the end of the RS485 network. The A pins must be wired
together and the B pins must also be wired together. The two termination resistor jumpers next to
the green connector should be removed unless you have very long wires for your RS485 network.
NET485 EZMETER DC POWER SUPPLY
TXD A & RXD A A or RXTXD B & RXD B B or TX+
SGND & GND IGND GND
8-24VDC IPWR 8-16VDC
Firmware Setup. An active ethernet cord must be plugged into the NET485 and DC power must
be supplied to the GND and 8-24VDC pins on the green connector before setting up the firmware.
Step 1. Determine and set the IP address. Install the Lantronix DeviceInstaller software on your
computer from the CD that came with the NET485 or download it from the Grad Connect website.
Run the program. It will search your network for your adapter and may take several seconds to find
it. Your device should show up in the main part of the screen with an icon labeled Xport. Double
click on the icon and a list of the devices properties will be displayed. You are looking for the IP
address which is about a third of the way down the page. For subsequent steps, you can use either an
internet browser (Internet Explorer, Firefox, Safari, etc) or you can click on the Web Configuration
tab in the program.
Step 2. If you clicked on the Web Configuration tab, the IP address and port (80) will be
showing in the address box. Click the white arrow with the green background to the right of the
address. If you are using a browser, continue to the next step.
Step 3. Enter ‘admin’ as the user name and leave the password box empty, then click ‘OK’.
Step 4. Set up the Serial Port. Click ‘Serial Settings’ under Channel 1 in the menu on the left
side of the screen. Change the Protocol to ‘RS485 - 2 wire’. Set the baud rate to match whatever is
printed on the label of the EZMeter (They all have to be the same or you won’t be able to
communicate with some of them.) Flow Control should be ‘None’, Data Bits ‘8’, Parity ‘None’, and
Stop Bits ‘1’ for EZPlus meters. Refer to the label for Modbus meters as they may require different
settings. Under Pack Control, the ‘Enable Packing’ box should be unchecked. There should be a
green dot in No for everything under ‘Flush Mode’. Click the ‘OK’ button at the bottom of the page
when you are done.
Page 27

Step 5. Set up the connection data. Click ‘Connection’ on the menu on the left side of the
screen.
Under Connect Mode: Protocol = ‘Yes’, Accept Incoming = ‘Yes’, Password Required = ‘No’,
Active Connect = ‘No’
Under Endpoint Configuration. Local Port is one of the values you will enter into the
EZMeterReader software package to connect to this device. The default is 10001 which is fine unless
you have multiple devices that use this port and you want to be able to access the device over the
internet. Then it will need its own port. Be sure to note the number you assign. Remote Port = ‘0’,
Remote Host = ‘0.0.0.0’ and Auto increment for active content is unchecked.
Do not make any changes to Common Options or Disconnect Mode.
Click ‘OK’ to save any changes you made.
Step 6. Select ‘Network’ on the main menu. Set a DHCP Host Name or Fixed IP Address. A
fixed IP is suggested if your network does not support DHCP host names. Click “Network’ on the
menu. Under IP Configuration, either:
(a) Select ‘Obtain IP address automatically’ and all the ‘Enable’s below it. Enter a name in the
‘DHCP Host Name’ box. This is the name that you will enter in the IP Address field in the EZMeter
Reader program. Or
(b) Select ‘Use the following IP configuration’ and enter the desired IP address. Change the other
values only if your network requires.
Under ‘Ethernet Configuration’ be sure the ‘Auto Negotiate’ box is checked.
Click ‘OK’ to save any changes you made.
Step 7. Setting passwords. This step is optional, but highly recommended if the NET485 device
will be exposed to incoming messages from the internet.
Select ‘Server’ from the menu. Under ‘Server Configuration’ enter a password in the ‘Telnet
Password’ box and again in the box below it.
Click ‘OK’ to save any changes you made.
Note: If you ever come back and change any of the settings in the ‘Advanced’ section, be sure to
re-enter the password before you click the ‘OK’ button. Otherwise the password will be reset to a
blank (empty) password.
Step 8. Apply Settings (Very Important). Click ‘Apply Settings’ on the menu. If you fail to do
this, everything you have done up to this point will not be loaded into the NET 485 device and you
will have wasted your time.
The Grid Connect NET485 can be ordered online from www.gridconnect.com/net485.html or
pre-configured from EZMeter Technologies. When ordered from EZMeter Technologies, a 12 vdc
power supply is included.
Page 28

EZMeter Technologies Application Note
Connecting Digi Radio Modems to EZMeters
The MaxStream division of Digi Corporation makes several radio modems that work as
wireless RS-485 network extenders. The three series, XCite, XStream and XTend all have the
same function with XCite having the shortest, and Xtend being the most powerful. Maximum
range for the different models (from the Digi specifications) are:
Model Indoor/Urban Range Line of Sight Range
Xcite 300 feet 1000 feet
XStream 1500 feet up to 20 miles
XTend 3000 feet up to 40 miles
Choosing the right radio. Adequate range is the most important consideration in choosing a
radio. The range figures above should be considered ballpark figures and not relied on
completely. Interference from other radios and physical objects can severely affect the actual
range of the radios. To get the maximum ranges shown, expensive, directional antennas are
required. Each radio comes with software for configuring the radio and testing communication
between two radios. Before a radio is permanently installed, be sure to use the provided test
program to be sure the radios will communicate with each other.
The other important consideration is the operating temperature rating. For indoor use,
Commercial (0EC to 70EC) is adequate. Outdoor installations generally require the Industrial
(-40EC to 85EC) rating.
Testing the Range. Follow the instructions in the Quick Start Guide to establish
communication. If your computer has an RS-232 port, use it and the included cable for this test.
If your computer does not have an RS-232 port, you will need to configure the radio connected to
the computer for RS-485 and connect it as described below. The radio with the loopback
connector must remain configured for RS-232 during the test.
Connecting a Radio to Your Computer. If the radio will be installed near the computer, it is
usually simpler and cheaper to connect to the radio using RS-232 rather than RS-485. Simply
use the RS-232 cable provided with the radio or purchase a USB to RS-232 adapter. Plug it into
the connector on the radio, set the DIP switch for RS-232 (switch 1 on, the others off) and plug in
the power supply.
If the cable from the computer to the radio will be more than thirty feet long, use RS-485.
We suggest the FTDIChip USB to RS-485 Adapter (Model USB-RS485-WE-1800). Connect
the yellow wire to Pin 2 on the L-COM DB9MT1 adapter, the orange wire to Pin 8, and the black
wire to Pin 5. Set the DIP switch for 2-wire RS-485 by turning all the wires off.
If some meters will be connected directly to a USB to RS-485 adapter (or an ethernet to RS485 adapter) and other meters need the radio link, both radios may be connected as described in
the next section.
Page 29

Connecting a Radio to the Meters. Before connecting a radio to the meter network, it is a good
idea to connect a portable computer to the network to determine that everything is working
properly. It is easier to troubleshoot if you know the problem is in the wiring rather than with the
radios.
These instructions assume the RS-485 network has already been installed and is working.
Connect the B- wire from the meters to Pin 2 on the L-COM BD9MT1 adapter, the A+ wire to
Pin 8, the IGND wire to Pin 5 and the IPWR wire to Pin 9. Be sure to set all the switches on the
DIP switch off for 2-wire RS-485.
Troubleshooting. Troubleshooting is best accomplished by separating the RS-485 network from
the radios and checking each system separately. To test the radios, remove the DB9 adapter from
the radio connected to the meters and install the loopback connector furnished with the radio.
Move switch 1 on the DIP switch to on and be sure there is power to the radio. You will need to
provide power to the radio if it was powered from the same source as the isolated power
connected to the RS-485 connector on the meter. The radio comes with a plug in power supply
as well as a short cord that will connect to a 9 volt battery. Use the software provided with the
radio to test the communication.
Page 30

EZMeter Technologies Application Note
Connecting Snap Link Radios to EZMeters
Snap Link radios produced by Synapse are another cable replacement option for creating an
RS485 network. Product information is available on their website at:
http://www.synapse-wireless.com/iot-development/hardware-products/snaplink
One downside to using Snap Link is that a separate USB to RS485 adapter is required. The USB
port built into each radio is only for providing power, not communications.
The default communication setup for the radios is two-wire RS485, 9600 baud, no parity, one
stop bit. Ordering EZMeters in this configuration makes setting up the system easy right out of
the box. Synapse has configuration programs available on their website for changing any of the
parameters if needed.
A lot of the material in the previous app note regarding Digi radios applies to Snap Link as well.
If you are not familiar with setting up radio networks, read that section.
Connecting to a USB Adapter: Use of the FTDIChip USB-RS485-WE-1800-BT adapter
described earlier is suggested. Connect the orange and brown wires to the left-most pin (TX+)
on the connector on the SnapLink radio. The yellow and green wires go to the next pin (TX-).
The black wire connects to the right-most pin (GND). Install the antenna and connect the
provided USB cable to power and this module is ready to go.
Connecting to a NET485 Ethernet Adapter: See the app note above about installing a NET485
device. The two A pins are jumpered together and connected to the left most pin (TX+) while
the two B pins are connected to the adjacent pin (TX-). GND and SGND on the NET485 should
be connected to the right hand pin on the radio (GND) and the ground of the power supply. Put a
jumper on the TX TERM pin of the NET485.
Connecting to one or more EZMeters. Connect the left-most pin (TX+) on the radio connector
to A or RX- on the meter. Connect the adjacent pin (TX-) to B or TX+ on the meter. Connect the
meter IGND to the right-most pin (GND) of the radio’s connector. Be sure to also connect the
isolated power supply to IPWR and IGND. Test the polarity before making the connection.
The default connection will work in most situations. If there are a lot of radios or long distances
involved, programs available on the Synapse website will configure the radios into a mesh
network with some acting as repeaters and others as simple end points. Consult Synapse’s
technical support for assistance configuring a network.
Page 31

EZMeter Technologies Application Note
RS-485 Trouble Shooting
Ideally, you will hook up your system and it will work the first time. If that doesn’t happen, you
have a few options.
1. Use the EZMeter Access program to communicate with the meters through the EZServer
meter reading and logging utility that is part of the EZMeter Power Suite. This is a little
cumbersome as the program was not designed for troubleshooting.
2. Use the EZServerTester program that was installed in the EZMeter folder on your main drive.
Start the program by double clicking on it. Be sure the EZServer is running (Comm Server in
the main menu of EZMeter Access). You will probably connect to t he server using Localhost
(on the same computer) and pushing the Connect button. The program reads the unit
information from the Access database. Click the buttons to get various data stored in the
meter.
3. Use the EZMeter Configuration Tool program. If it was not installed with the Power Suite
(versions 0.3.0 and earlier), download it from http://www.ezmeter.us/downloads/Setup-
EZMeterConfigTool.exe. This program communicates directly with the meters so make sure
the EZServer program will not interfere by trying to read a meter at the same time. The online
help system will get you started and walk you through it.
4. Read Guidelines for Proper Wiring of an RS-485 (TIA/EIA-485-A) Network , an app note
(763) published by Maxim Integrated Devices, manufacturer of the RS-485 drivers used in
the meters. It is at http://www.maximintegrated.com/an763.
On all systems:
Problem: No communication
1. Verify that the meter is powered up and the red LED is on steady. If it is flashing, it could
indicate that the meter does not have a steady source of power. It can also mean that there is a
high phase angle on one or more of the legs.
2. Verify that there is DC power between the IPWR and IGND terminals on the meter. You
should have between 6 and 18 volts.
3. Verify that there is a DC voltage difference of more than 0.1 volts (100 millivolts) between the
B- and A+ terminals. The voltage between IGND and B- should be over 1 volt and between
IGND and A+ should be higher by at least 0.1 volts.
4. If you are using the FTDI Chip USB to RS-485 dongle, be sure the orange wire is connected to
the A+ terminal, the yellow wire is connected to B- and the black wire is connected to
IGRND. If you are using a different RS-485 device, the Tx and Rx wires may need to be
reversed. Be sure the signal ground from the device is connected to IGRND.
5. If you have no communication with any meter on your system, isolate one meter from the
others and work through this guide until you can communicate with that one meter before
connecting to the others.
6. Be sure the label on the meter specifies that it is for RS-485.
7. Be sure your computer program (EZMeter Reader or EZMeter Access) is configured properly.
a. Be sure that at least one connection has been set up and that all the parameters match what
is printed on the meter label.
Page 32

b. Be sure you have added the meter you are trying to communicate with to the system and
that the serial number (EZ Plus) or Modbus address (Modbus) is entered in the appropriate
space without any hyphens or commas.
c. If you have set up more than one connection for your system, make sure that the meter
under test is part of the meters served by the active connection.
d. Make sure the baud rate for your connection is the same as the baud rate printed on the
front of the meter label. For Modbus meters, also check parity and stop bit settings.
e. EZMeter Reader - Click on the meter you want to read in the list of meters, then click then
Read This Meter button. If you get a reply, the right part of the screen will be refreshed
with new numbers. If you do not get a good reply a window will pop up and tell you what
the problem is.
f. EZMeter Plus - Be sure the server is running (Comm Server in the menu bar). Go to the
Units tab in the Setup window, select a unit and click the Read Now button at the bottom of
the window. The Last Reading data will be updated with the current reading, date and time
if the reading is successful.
8. Be sure you do not have too many devices on the network. Up to 255 meters can be installed
on one network as long as there is nothing else. Each device you add to the network adds
impedance to the line. The original RS485 specification allowed up to 32 devices. Mixing
old, high impedance devices with EZMeters will reduce the maximum number of meters that
can be on one network. Repeaters and radio links can be used to increase the number of
meters.
9. Line termination is important and best discovered by trial and error. It sometimes is not
needed at all and other times is required on very short runs. The first step is to install a 120
ohm resistor across the Tx and Rx terminals on the last meter in the chain. If this does not
solve the problem, add a second 120 ohm resistor across Tx and Rx at the adapter. The
NET485 Ethernet adapters have jumper selectable terminating resistors built in.
Using the FTDI Chip USB to RS485 Dongle:
Note: 120 ohm termination is usually required at the last meter, even if there is only one.
Problem: Lights in Dongle do not flash.
1. Be sure you have installed the latest driver for the device from the FTDI Chip website.
2. Verify the COM port to which the USB device is mapped and that the COM port in the
program are set to same value.
3. Try a different Dongle
Problem: The red light in the Dongle flashes but the green one does not.
1. Verify that the meter is powered up and the red LED is on steady. If it is flashing, it could
indicate that the meter does not have a steady source of power. It can also mean that there is
a high phase angle on one or more of the legs.
2. Verify that the orange wire from the Dongle is connected to the TX- terminal on the meter,
the yellow wire is connected to the RX+ terminal and the black wire is connected to the
IGND terminal.
3. Be sure the serial number (EZ Plus) or Modbus address is correct.
4. Watch the white, bicolor LED on the meter (the one above the two green LEDs). It will flash
red when it receives a signal from the Dongle. If it does not flash, there is a problem with the
wiring somewhere. If it flashes red, it did not recognize its address so it did not respond. The
Page 33

address may have been for another meter or the message received may have been corrupted.
Corrupted messages are usually caused by improper termination.
Problem: Both lights in Dongle flash, but there is no reply.
1. Watch the white, bicolor LED. If it flashes red it is not replying. If the meter replies, the LED
will flash red then green so fast that it looks sort of orange. If the meter has replied, but the
program is not recognizing the response, it is most likely a termination problem.
2. If you have multiple meters, try a different one. Something may have happened to the first
one.
3. Try to isolate the meter from electronic noise. If the yellow LED on the meter never flashes,
but you get an error message indicating Checksum error, noise on the line is probably the
main problem. This can affect both the Dongle and the wiring. A shielded CAT5 or better
wire or rerouting the wiring away from the source of the noise is suggested.
4. Bench test a meter without the all the wire. Connect a meter directly to the RS-485 output.
Connect your DC power to the IGND and IPWR terminals. Connect AC power to the neutral
and L1 terminals on the meter. Cutting the end off a short extension cord works well for this.
Be sure to make sure the neutral is not connected to the L1 terminal. In North America, the
wide blade of your plug is the neutral. If you cannot communicate at this distance, it
indicates the either the meter is bad, the RS-485 adapter is bad, the wiring is not configured
properly or the software is not configured properly (wrong COM port or baud rate).
5. If the meter bench tests OK, reinstall it in the field without connecting the other meters to it.
Connect successive meters until communication fails. Then check the wiring at that location.
Using Other RS485 Adapters
There does not appear to be a standard for the labeling Tx and Rx among manufacturers. We
have tested various adapters and found that we connect Tx on the adapter to Tx on the meter on
some and on others we have to connect Tx on the adapter to Rx on the meter. It can be very
confusing with adapters that can be configured for two-wire RS485 or four-wire RS422. If you
are having trouble, it may be cost effective to get one of the FTDI dongles referred to above.
Mfg Part No: USB-RS485-WE-1800-BT
Digi-Key Part No: 768-1041-ND, $30.00, www.digikey.com
Mouser Electronics Part No: 895-USBRS485WE1800BT, $30.00, www.mouser.com
Page 34

Using an Ethernet to RS485 Adapter (such as the NET485)
Problem: No response from meter
1. Verify IP address is correct. Suggest setting a fixed IP rather than relying on DHCP. Log into
the web server in the adapter. This will verify the IP address. While there:
2. Verify adapter is configured properly for serial communication.
3. Check to be sure firewall is not blocking communication with adapter.
4. Restart the adapter.
5. Verify wiring between adapter and meters is correct. Cat5 or CAT6 twisted pair is suggested.
Twisted pair is a must. TXD A and RXD A should be jumpered together and connected to
A+ on the meter, TXD B and RXD B should be connected to B-, SGND and GND must both
be connect to IGND on the meter.
6. Verify there is 6-18VDC across the IGND and IPWR terminals on the meter.
7. Experiment with termination resistors, either built into the adapter or separate.
8. If not using a NET485, see note above on Using Other RS485 Adapters
9. Read the section above about the FTDI Chip USB to RS485 Dongle. It has a description of
how the LEDs on the meter respond that can be helpful and the discussions about addressing,
wiring problems and termination apply here as well.
Page 35

EZMeter Technologies Application Note
Phantom Neutral Installation Guide
Usage: The EZMeter Technologies Phantom Neutral devices may be used in conjunction with a
standard three phase wye EZMeter to allow connection to a three-wire, three-phase delta electrical
service. It should be used whenever a neutral is not available.
Models: For a 440 to 480 volt, line to line, three wire delta, use a model PN277 in conjunction with
an EZMeters with a model number that begins with the letter D (or E if you already have one). The
PN277 may also be used with EZMeters whose model begins with C for line to line voltages
between 400 and 440 volts.
For 200 to 250 volt, line to line, three wire delta systems, use the PN120 phantom neutral in
conjunction with an EZMeter whose model number begins with A (or B if you already have one).
Note: The phantom neutral and meter should be ordered together. If you are ordering a phantom
neutral to use with a meter that you already have, contact Customer Support for information about
determining the proper match. Failure to properly match the phantom neutral can lead to a meter
error of five percent or more.
Installation: The meter/phantom neutral combination should be installed as close together as is
practical. Connect the three hot wires coming from the electrical service to the L1-A, L2-A, and
L3-A terminals on the phantom neutral. Connect L3-B on the phantom neutral to the L3 terminal
on the meter. Similarly, connect L2-B to the meter L2 terminal and L1-B to the meter L1. Connect
the Neutral terminals on the phantom neutral and the
meter together.
Connect the current transformers (CTs) as shown in the
meter installation instructions being certain to properly
match the L1 CT with the L1 on the phantom neutral and
the meter.
Note: Failure to connect the L1 terminal on the phantom
neutral to the L1 voltage input on the meter will cause an
error of 50% or more and will very likely will produce
voltages inside the meter that would damage it so badly
that it can not be repaired.
The terminals labeled “NO CONNECT” are not
connected to anything internally.
Testing: After the phantom neutral and meter are
installed and powered on, verify the unit is working
properly. The red LED on the meter should be
illuminated (or flashing). Use a voltmeter to verify that
the voltages between neutral and each of the hot legs is
within 1.5 volts. Variations over that amount can lead to
a meter error over 1%.
Page 36

EZMeter Technologies Application Note
Obvius AcquiSuite Connections
The Obvius AcquiSuite can be used with the EZMeter Modbus meters. While not listed on the
Obvius website as a supported meter, it can be used in conjunction with the EMZMeter.mbt format
file (www.ezmeter.us/downloads/EZMeter.mbt).
To connect an EZMeter to an AcquiSuite, you need to provide isolated DC power to IPWR and
IGND; 5-18 VDC will work. Connect RX- (A) on the meter to + on the AcquiSuite and TX+ (B)
connects to -. Connect iGND to Shield. Load the EZMeter.mbt file into the AquiSuite, set the
AcquiSuite Modbus Setup parameters to match what is printed on the meter label and add the
Modbus Address to the Modbus Device List and link it to EZMeter.mbt.
Page 37

EZMeter Technologies Application Note
Next Century Radio Module
Next Century offers a special version of their pulse counting radios that get power from an EZMeter
rather than using a battery that must be replaced on regular intervals. The fifth character of the
EZMeter model number should be a 7 which indicates a special module has been installed in the
meter to provide the regulated 3.3 volts needed to power the radio.
Page 38

EZMeter Technologies Application Note
Modbus Interface Description
The data space for the meter consists of two blocks of registers that may be selectively accessed
using the standard Modbus Functions listed below. Paragraph references are to the document
“MODBUS APPLICATION PROTOCOL SPECIFICATION V1.1b”.
6.3 03 (0x03) Read Holding Registers
6.4 04 (0x04) Read Input Registers
6.6 06 (0x06) Write Single Register
6.12 16 (0x10) Write Multiple registers
The blocks of registers are:
1) Metered Values
2) Device Control Registers
Each block of registers may be located anywhere in the Modbus Register Space by changing
selected registers in the device control block. Default register addresses are:
Metered Values - Registers 1000 to 1047
Control Registers - Registers 2000 to 2084
The above listed instructions all access the same data space so that, for instance, Function 03 (Read
Holding Registers) and Function 04 (Read Input Registers) both address the same register blocks.
Most of the write instructions are restricted and their successful use depends in some cases upon the
successful entering of passwords, etc. Restrictions will be listed in the section which describes the
registers. For details of the correct byte sequence for the Modbus functions and responses, see the
above referenced Modbus Specification.
The following functions are also partially supported:
6.7 07 (0x07) Read Exception Status (Serial Line only)
6.8 08 (0x08) Diagnostics (Serial Line only)
6.8.1 Sub-function codes supported by the serial line devices
6.9 11 (0x0B) Get Comm Event Counter (Serial Line only)
6.10 12 (0x0C) Get Comm Event Log (Serial Line only)
6.13 17 (0x11) Report Slave ID (Serial Line only)
Read Functions 03 and 04.
These read functions may be used to access all defined registers. Registers that are defined but
restricted (such as the current value of passwords) will read back as zeros (0x00). Attempts to read
beyond the defined data blocks will result in the appropriate Modbus exception message.
Page 39

Write Single Register Function 06
This command may be used to write single register values only. It may not be used to write
individual registers in a defined array of registers except that individual pairs of bytes of the
Customer Identification Array may be written with this command as long as the correct priority
level has been established by the previous entry of the appropriate password. In every case where
the use of this function is appropriate, the same action may be achieved using a single register write
with Function 10.
Write Multiple Register Function 10
Within the data block of Metered Value registers, this command is usable only to enter new values
into the sets of registers that carry the values of the resettable Summed Accumulation registers. Not
all meters use all four of these registers and not all meters allow the entry of new data into the SA
registers.
Meter Configuration
The basic metering engine measures the amount of power flowing into or out of each of the (up to )
four current inputs, each cycle of the associated voltage input. The power flowing is accumulated
until a unit of 10 watt hours is reached, and then a count is injected into the associated
Accumulated Power register. There is one register for power flowing into the load and another for
power flowing in the reverse direction. The voltage input associated with each current input varies
by meter model. For instance, a meter that measured the power flowing to four separate loads from
a single phase would use the same voltage input for each of the four power measurement channels,
while a three phase meter would use separate voltage inputs for each of the (in this case) three
power measuring channels. The counts that increment the Accumulated Power registers are also
routed to one or more of a set of four Summed Accumulation (SA) Registers. Depending on the
meter configuration, these SA registers may count up or down in response to input counts, and
Registers 2-4 may be resettable by the user. These registers are intended to accumulate the values
that are used by the customer for total power monitoring. For instance, a three phase,
unidirectional meter would accumulate counts from all six registers associated with its active inputs
into the same SA register. A second register may accumulate the same counts but be resettable via a
Modbus or EZNet command to keep track of the power associated with a particular job. All 12 of
the possible meter registers are readable using Modbus or EZNet communications.
On LCD versions of the meter, the contents of the SA registers are displayed on the LCD. Meters
that have mechanical counters instead of LCDs generally display total power on the mechanical
counter(s), but the meaning of the counts and the units accumulated vary by meter type and
reference must be made to the individual meter data sheet.
The meter also monitors voltage, current, power, frequency and power factor for each input. These
values are averaged for 64 cycles of the input voltage and the values made available via
communications commands. It should be noted that the calculations involved in measuring RMS
values of voltage and current assume that the voltage and current waveforms are sinusoidal. The
measurement of consumed and instantaneous power do not rely on such assumptions.
Page 40

Reg
Offset Reg Address Size Default Value
Dec Dec Hex Regs Description Units Used Used
Metered Values
0 0 0 2 0 Acc. Pwr. Ph. 1 10W h (Imp - Pos) 10 watt hr.
2 2 2 2 0 Acc. Pwr. Ph. 2 10W h (Imp - Pos) 10 watt hr.
4 4 4 2 0 Acc. Pwr. Ph. 3 10W h (Imp - Pos) 10 watt hr.
6 6 6 2 0 Acc. Pwr. Ph. 4 10W h (Imp - Pos) 10 watt hr.
8 8 8 2 0 Acc. Pwr. Ph. 1 10W h (Exp - Neg) 10 watt hr.
10 10 0A 2 0 Acc. Pwr. Ph. 2 10Wh (Exp - Neg) 10 watt hr.
12 12 0C 2 0 Acc. Pwr. Ph. 3 10Wh (Exp - Neg) 10 watt hr.
14 14 0E 2 0 Acc. Pwr. Ph. 4 10Wh (Exp - Neg) 10 watt hr.
16 16 10 2 0 Summed accumulation Counter 1 10 watt hr.
18 18 12 2 0 Summed accumulation Counter 2 10 watt hr.
20 20 14 2 0 Summed accumulation Counter 3 10 watt hr.
22 22 16 2 0 Summed accumulation Counter 4 10 watt hr.
24 24 18 1 0 Phase 1 Voltage 0.1 Volt
25 25 19 1 0 Phase 1 Current 0.1 Amp
26 26 1A 2 0 Phase 1 Power 0.1 Watt
28 28 1C 1 0 Phase 1 Frequency 0.1 Hz.
29 29 1D 1 0 Phase 1 Power Factor x 0.01
30 30 1E 1 0 Phase 2 Voltage 0.1 Volt
31 31 1F 1 0 Phase 2 Current 0.1 Amp
32 32 20 2 0 Phase 2 Power 0.1 Watt
34 34 22 1 0 Phase 2 Frequency 0.1 Hz.
35 35 23 1 0 Phase 2 Power Factor x 0.01
36 36 24 1 0 Phase 3 Voltage 0.1 Volt
37 37 25 1 0 Phase 3 Current 0.1 Amp
38 38 26 2 0 Phase 3 Power 0.1 Watt
40 40 28 1 0 Phase 3 Frequency 0.1 Hz.
41 41 29 1 0 Phase 3 Power Factor x 0.01
42 42 2A 1 0 Phase 4 Voltage 0.1 Volt
43 43 2B 1 0 Phase 4 Current 0.1 Amp
44 44 2C 2 0 Phase 4 Power 0.1 Watt
46 46 2E 1 0 Phase 4 Frequency 0.1 Hz.
47 47 2F 1 0 Phase 4 Power Factor x 0.01
DM GP
Device Control
Registers
0 1000 3E8 4 "operator" Enter Supervisor Password ASCII
4 1004 3EC 4 "password" Enter Master pasword ASCII
8 1008 3F0 1 hidden Enter OEM Password Hex
9 1009 3F1 1 hidden Davidge Password Hex
10 1010 3F2 1 0 Protection Level Hex
11 1011 3F3 2 Ser No+01H Serial number/address Hex
13 1013 3F5 1 0 Modbus Data register base address Hex
14 1014 3F6 1 03E8H Modbus Control register base address Hex
15 1015 3F7 1 DFH Modbus copy of CCMODE Hex
16 1016 3F8 1 0 Response Delay 12.91 msec
17 1017 3F9 5 Varies Modbus Copy of Option Bytes ASCII
22 1022 3FE 1 0 Reset Meter N/A
23 1023 3FF 10 Varies Customer Identification array ASCII
24 1033 409 1 1 Format Av. Pwr and Power Factor signed int Hex
Summed Accumulators by Meter Type
3 ph Unidirectional 3 ph Bidirectional 3 ph Independent 4 Element Dual Meter 3 Element Dual Meter
SA#1
SA#2
SA#3
SA#4
Total Power Total Positive L1 Total A Total L1 Total
not used Total Negative L2 Total B Total L2 + L3 Total
not used Net, #1 - #1 L3 Total A Resettable #1 Resettable
#1 Resettable #3 Resettable Total Power B Resettable #2 Resettable
Table 1: Modbus Registers & Summed Accumulator Registers
Page 41

The configuration of the Modbus registers is listed in Table 1, above. Details of individual registers
are as follows:
The first 12 pairs of registers register the power flowing through the monitored circuits. Each set of
registers contains 4 bytes, counting power in units of 10 watt hours. The counters are arranged so
that they reset to zero when the maximum count of the binary equivalent of 99,999,999 decimal
(corresponding to 999,999.99 KWHrs) is exceeded. Byte order follows Modbus convention with
the least significant byte occupying the low end (right hand side) of the highest number register.
The registers are Read Only. Positive power is defined as when the current phase is within +/- 90
degrees of the voltage vector. An option is provided to change the order in which the four bytes that
report a register are read out from the meter in response to an 03 or a 04 command. If Big Endian is
not selected (See Modbus Operating Modes below), the two Modbus registers are read out in
reverse order to the register containing the lower two bytes of the register number are reported
before the upper two bytes. Under this option the bytes are reported in order 2,1,4,3, where 4 is the
most significant and 1 the least significant.
Acc. Pwr. Ph. 1 10Wh (Imp - Pos)
Acc. Pwr. Ph. 2 10Wh (Imp - Pos)
Acc. Pwr. Ph. 3 10Wh (Imp - Pos)
. Acc. Pwr. Ph. 4 10Wh (Imp - Pos)
These three four of 2 registers each, accumulate positive power on the corresponding phase inputs
The fourth registers is used only in the DM versions of the meter and accumulates positive power
for input 4.
Acc. Pwr. Ph. 1 10Wh (Exp - Neg)
Acc. Pwr. Ph. 2 10Wh (Exp - Neg)
Acc. Pwr. Ph. 3 10Wh (Exp - Neg)
Acc. Pwr. Ph. 4 10Wh (Exp - Neg)
These four pairs of registers work the same as the corresponding positive power registers. They
accumulate power only when the current vector is more than 90 degrees from the voltage vector.
Phases 1 - 3 are used for bidirectional meters, or when a meter is wired incorrectly. The DM
currently meters all power as positive and does not use these four registers.
Summed Accumulation Counter 1
Summed Accumulation Counter 2
Summed Accumulation Counter 3
Summed Accumulation Counter 4
These four pairs of registers form counters that accumulate totals of the power increments that feed
the individual phases. Detailed functioning of these counters varies depending on the meter model.
For instance, on a standard 3 phase meter, SA counters 1 and 2 are both incremented every time any
of the phase input registers are incremented and provide a total power reading. SA Counter 2 is
settable and resettable with a 2 register write to the applicable Modbus register address, if a correct
supervisor password has been entered (see below for entry of passwords). SA Register 1 is never
resettable. On the 3 phase meter mentioned SA registers 3 and 4 are not used.
Page 42

The next four blocks of six registers contain blocks of data that represent the average readings of
voltage, current, power, frequency and power factor for the preceding block of 64 ac line cycles on
each input. The registers are thus updated every 1.07 seconds. The first 6 registers report Channel
1. The values for Ch4 are only significant on a DM meter.
Phase 1 Voltage
This 2 byte number reads the RMS value of the voltage on voltage input 1 in units of 0.1 volts. The
accuracy of the reading is dependent on the voltage waveform and may differ significantly from the
true RMS reading for wave shapes that differ significantly from sinusoidal.
Phase 1 Current
This 2 byte number reads the RMS value of the current on current input 1 in units of 0.1 amps. The
accuracy of the reading is dependent on the current waveform and may differ significantly from the
true RMS reading for wave shapes that differ significantly from sinusoidal.
Phase 1 Power
This pair of Modbus registers should be read as a sign digit followed by a three byte number (high
byte first). For meters configured for unsigned integers, the first digit is either 0 representing
positive power or -1 (0FFH) representing negative power. The next three digits read out the average
true RMS power over the preceding 64 cycle interval in units of 0.1 watts.
Phase 1 Frequency
This register (2 bytes) gives the frequency of the voltage 1 input in units of 0.1 Hz. Note that each
phase is metered and monitored separately and there is no assumption or requirement for each phase
to be the same frequency.
Phase 1 Power Factor
For meters configured for unsigned integers, this register should be read as two separate bytes. The
high byte encodes the Lead or Lag of the current waveform with respect to the voltage. A value of
-1 (0FFH) indicates a LAG condition. A value of zero indicates a power factor of 1 and a value of
+1 indicates a LEAD power factor. The second byte carries the power factor in units of 0.01. Meters
with signed integers report power factor times 100. This value is subject to the same accuracy
considerations as voltage and current.
Page 43

The next three blocks of registers follow the same pattern.
Phase 2 Voltage
Phase 2 Current
Phase 2 Power
Phase 2 Frequency
Phase 2 Power Factor
Phase 3 Voltage
Phase 3 Current
Phase 3 Power
Phase 3 Frequency
Phase 3 Power Factor
Phase 4 Voltage
Phase 4 Current
Phase 4 Power
Phase 4 Frequency
Phase 4 Power Factor
The remainder of the registers are concerned with the control and registration of the meter and
generally will occupy a separate piece of Modbus address space from the above block of power
measurement registers. The first five sets of registers are concerned with establishing priority levels
to permit or inhibit various meter control functions. There are five levels of protected access to the
registers protected by four passwords.
Supervisor Password
This password defaults to “operator” unless changed during meter configuration. Unless a higher
level password has been previously entered correctly, the supervisor password must be written to
the appropriate series of registers ( 7D0 in default configuration) in a 4 register write, to raise the
security level to 1. If a higher level of password has already been entered, then entering a password
into the supervisor password address resets that password to the one entered. At or above security
level 1, the resettable SA counters may be set by writing all zeros to them in a 2 register write.
Master Password
This works the same way as the supervisor password but raises the security level to 2. At this level,
the Modbus base address registers the baud rate, parity and communications mode of the meter and
the Customer Identification Array may be changed. The OEM password is required to change the
master password from its default value of “password”.
OEM Password
This is a 16 bit value that is related to the serial number of the meter and is thus varies from meter
to meter. The value of the password is to be obtained from EZMeter on a need to know basis. It
provides a method of changing the Master Password and the Response Delay, and enables a Hard
Reset which clears the memory of the meter.
Note that the same OEM password is used in EZPlus mode to condition certain functions.
Page 44

EZMeter Password.
The EZmeter password is used during meter configuration only. The password is tied to the
assigned serial number for the meter and so is different from meter to meter, and is generated within
the factory calibration system. It is one register (16 bits) long.
Protection Level
A read of this register gives a single numeric digit in the range 0 to 4 and indicates the current
security level. 0 indicates no passwords successfully entered, 1 the supervisor password, 2 the
master password, 3 the OEM password and 4 the EZMeter Configuration password. A write to this
register sets the priority to 0.
Serial Number/Address
These 2 registers contain four bytes. The first three are the serial number of the meter expressed per
Modbus convention, high byte first. The fourth byte is the current Modbus address of the meter.
The modbus address may be changed by addressing a 2 register write to this register pair. The write
must be a broadcast (to Modbus address 0) with the first three bytes matching the meter serial
number and the fourth byte the new modbus address byte in the range 1 to 247.
Modbus Data Register Base Address
Modbus Control Register Base Address
These two registers are provided as a means of relocating the data register address anywhere within
the Modbus address space. They may be changed only in master protection level and above and
extreme care is advised. They should be written as a two register write and the effect takes place
immediately. The control register base address should always occupy a numerically higher block of
address than that of the data registers. These locations are best changed by means of the
configuration option to change them.
Modbus Operating Mode
The lower byte of this register contains a copy of the communications mode byte for the meter. The
baud rate, parity (in Modbus only) and operating mode (Modbus or EZPlus protocol) are encoded
herein and may be changed by writing the new configuration to this register in OEM protection
level or above, and then executing a “Reset Meter” command.
Bit allocations are:_____________________
bit 2 - 1 Baud Rate
0 - 0 1200
0 - 1 4800
1 - 0 9600
1 - 1 19200
bit 3 - NOT Modbus 8 bit no parity mode. Only effective when bit 5 = 0, Modbus mode
bit 4 - Modbus Registers BIG Endian
bit 5 - not Modbus mode (0 = Modbus)
bit 6 - even parity (0 = odd parity)
bit 7 - enable parity (0 = no parity)
Note that for EZProtocol, the parity bits and endian are ignored. It is always 8 data bits, no parity
and Big Endian.
Page 45

The value of 0FF corresponds to 19,200 baud using EZPlus Protocol. The default value for Modbus
is 0DF (19,200 baud using 8 data bits and a 9th even parity bit).
Response Delay
The lower byte of this register controls the incremental delay (over and above the minimum interdata delay specified in the document “MODBUS Over Serial Line Specification and
Implementation Guide V1.02"), between the end of the data block received from the host and the
time the meter starts to transmit its reply. The number programmed is the incremental delay in units
of 12.91 msec. 0 corresponds to no incremental delay. The maximum delay is 255 x 12.91 msec =
3.3 seconds. The byte may be written only with OEM priority level and above. The change takes
place immediately.
Option Bytes
This nine byte string identifies the Meter Type and its operating mode. The registers may be written
only with EZMeter protection level (config priority).
Reset Meter
The meter may be reset by writing a pair of null characters (00H, 00H) using a single register write
with at least Master priority. This is used to complete changes in communications configuration
(change in baud rate, parity or protocol). It does not change the power accumulation registers, but it
does interrupt the metering operation for approximately 3 seconds.
If 0FFH,0FFH is written with OEM or Config priority, a hard reset is executed. This is a drastic
reset that clears out all the power accumulation registers and restores the meter to its default settings
(as entered during configuration).
Customer Identification Array
This is a 20 byte array of meter memory that may be written to by the customer to record the
location of the meter. It is readable at any level of priority but may be written only with the use of
the Master password.
Summed Accumulators by Meter Type Description
Meter types can be determined by the model number abcde/fg
4 Element Dual Meter - First two numbers (bc) are 42
3 Element dual Meter - First two numbers (bc) are 32
3 Phase Bidirectional - The second character after the slash (g) is an odd number
3 Phase Unidirectional - All others
3 Phase Independent - Special order and identified by serial number
Configuration Tool Program
A utility program that exercises most of the features described is available free of charge. The hex
values of the byte streams sent and received are shown on the screen making it useful for anyone
configuring another meter to work with EZMeters. It can be downloaded from
http://www.ezmeter.us/downloads/Setup-EZMeterConfigTool.exe and is included with the
EZMeter Power suite.
Page 46

EZMeter Power Suite Quick Start Guide
Plan and Test. Reading the installation instructions before installing the meters can save a lot of time later.
Similarly, setting up the software and connecting one or two meters in the shop can save a lot of time and
anxiety later if you have trouble communicating with the meters after they have been installed.
Download the Program. Visit www.ezmeter.us/cgi-bin/ezdownload/ezdownloader.cgi to obtain a license for
the program. Enter your email address, leave the password space empty and click Send. Check your email (look
in the spam folder if you don't see it) and copy the password into the space on the original site. Click Send
again, then fill out the rest of the form. You can change the password if you want to. The facility name you enter
will be hard coded into your database and will appear on all printed reports and invoices. Click the Download
button. Be sure to write down the license number as you will need that the first time you log in.
Installing the Program. Launch the downloaded program and follow the prompts on the screen. Run the
EZMeter Access program when the installer completes.
Logging in the First Time. You will be asked for your license number the first time you log in. You also need
to enter the email address you used to download the software. You can use a different password also. After the
first time, just your email address and password are required. There is a box to check to automatically fill in the
log in info and another to recover your password by email. The computer must be connected to the internet to
validate the license to use the billing and web based features.
System Set Up. It is important to set up the meter reading system in the proper order. Not doing so means that
you have to revisit areas that were partially configured earlier. Click the Setup icon or Configuration | Main
Setup from the menu bar. The tabs are arranged in the order the data should be entered.
Connections. Connections tell the computer how to connect to the meter. Click the New button to add a new
connection and give it a descriptive name. The EZMeter User Manual has specific info on setting up different
types of serial and ethernet connections.
Units. Units can be apartments, offices, slips in a marina or spaces in an RV park. Each unit has a meter
associated with it. For facilities that use the dual single phase meters, two units can be associated with one
meter, either the A or B channel. Each unit needs a descriptive and unique name. Usually these have already
been assigned (Apt A-4, Slip 109, etc). If a large unit has multiple meters, multiple unit names must be assigned
(Slip 109-A, Slip 109-B). When lists of units are sorted, they are sorted alphabetically, not numerically so A01,
A02 ... A10, A1, etc will sort as expected. Without the zero, it sorts A1, A10, A11, ... A2, A20, etc.
Modbus addresses are related to the serial number. If the serial number is an even number of 100s, the Modbus
address is the last two digits of the serial number. For odd number of 100s, the Modbus address is 100 plus the
last two digits. The exception is that if the Modbus address would be 0 or 1, it is 200 or 201. This rule is not
always true as Modbus addresses can be reprogrammed it the field.
The Location field is not required. It is to direct service people to the meter's location. Selected units are
selected for billing or for inclusion in a report. Active meters are read on schedule. The graph color is used in
the web based program. Large facilities need to group units together without repeating colors in the group.
Logging/Schedule. The meters are read by a separate program that runs as a Windows service. The service gets
the schedule for readings from the data entered on this screen. The system will read the meters on whatever
schedule you enter in the center of the screen. Every time you change any of the values here, you must stop and
Page 47

restart the server as it only reads the schedule when it starts up. Click Comm Server in the menu bar and the
program will tell you whether the server is running or not.
EZServer Meter Communication Server Setup. This section controls the service that reads the meters. While
the program can be run as a regular Windows program, that option is advisable only for users who want
occasional readings, perhaps once a month for billing purposes. Running as a service that starts when the
computer starts is the preferred method of operation.
The programs communicate between each other via TCP/IP sockets. The default port for this communication is
15571. If you cannot connect with the server's socket, the port can be changed. Both programs use the value
entered here.
Users. The Users tab manages different people who use the program with either Administrator, Supervisor,
Operator or Visitor privileges for the power management features of the EZMeter Access program, the billing
features and the Power Watch web application. New users get their password by leaving the password field
empty the first time they log in. This also works if they forget their passwords or just want to change them.
Facility. The Facility tab shows information about the facility. The information appears on some reports. Use of
the program is licensed to the facility and the facility name cannot be changed without contacting EZMeter
Technologies at 805-688-9696.
The program is often run on a dedicated computer and provision is made for the EZServer communication
server to reboot the computer once a week if desired. Choose the day of the week and time of day for the reboot
if desired.
Billing. There is a separate Billing Quick Start Guide. A free trial of the billing feature is included with the
initial license. The trial ends 90 days after the program is first downloaded. Call EZMeter Technologies at 805688-9696 to renew the enhanced license. To set up billing, Rates (tariffs), Tenants, and Invoice Setup must first
be run from the Billing menu. The program also supports adding a monthly rent or condominium fee to each
invoice. Billing reports are accessed from the Reports menu.
Web Server. A free 90 day trial of the EZMeter Power Watch web server is also included with in the EZMeter
Power Suite. The server allows anyone with a web browser who is connected to the same network to access the
meter data. The server can also be exposed to the internet by configuring the network router to forward port 80
communication to the computer running the Power Suite. It cannot run on the same computer with another web
server such as Apache or IIS.
Reports. Click the Reports icon or select Reports in the menu bar. A summary of month to date power usage
will appear on the screen with a list of different reports available on the left. Date ranges and summaries can
also be selected. The Save as TSV button at the bottom of the left column will create a tab separated variable
file that can be opened with Microsoft Excel or similar programs.
The View/Print as PDF button on the Reports page will generate a pdf file of whatever is on the screen. PDF
files are opened in the computer’s default pdf viewer which can be used to view, print or rename the file. All
reports are initially saved on the EZMeter/PDFs folder in your Documents folder with the file named for the
subject and date. The pdf viewer must be closed or the file must be renamed before another pdf report can be
generated. On some of the reports, clicking one of the lines will open another window. This feature allows
single invoices to be generated and saved as a pdf file.
Page 48
 Loading...