

EZMAX EZMP 4200P User Manual

Copyright © 2005 EZM A X. All ri g hts reserved.
Advance permission of EZMAX is required to use User’s Guide, photos,
the related documents and software of the product. Any violation may
follow the legal mea sures.
The contents of the User’s Guide are subject to change without prior
notice for furthe r impro ve ment of the prod uct.
EZMAX
http://www.ezmax.co.kr
Table of Contents
Before Use
Product & Accessories ............. ............ .... 2
PC System Requirements ................... .... 3
Safety Precautions .................................. 4
Features .......... ............ ............................ 5
Designation of Parts
Front/Rear View of the Product ................ 7
Side View of the Product ..................... .... 8
Function Icons in Display ...................... .... 9
Preparation
Installing USB Driver ..... ...........................10
Connecting Player to PC ..................... ...12
Manually Installing USB Driver .............. ...13
Using Removable Disk.......................... ...16
Disconnecting USB Cable ..................... ...19
Upgrading Firmware.................. ...............21
Installing LDB Manager ........... ...............23
Using LDB Manager .... ...........................24
Basic Funct i ons
Basic Operation ........... ...........................29
Power On/Off .............. ............ ...............32
Playback Music File ............................. ...33
Using Navigation .. ........................ ........ 36
Voice Recording/Listening ............ ........ 37
MP3 Encoding/Listening ................... 38
Listening to FM Radio .................. ........ 41
Recording/Playback FM Radio ............. 45
Function Menu
Menu Setting ........ ................................ 46
Music File Playback ......... .................... 47
Managing File .... ........................ ........ 48
Detailed Menu Setting ...... .................... 51
Playback Mode Setting .... .................... 52
Sound Setting ...... ........................ ........ 53
Display Setting ............................. ........ 55
Timer Setting ................... ............ ........ 57
Encoding Setting .. ................................ 59
Setting ................. ............ .................... 60
Others
About Battery ................... .................... 63
HOLD Setting Method .................. ........ 64
Troubleshooting ............... .................... 65
Specifications ....... ............ .................... 67
Service (A/S) ........ ................................ 68
Warranty .............. ................................ 69
1

Pr oducts & A ccessor ies
!NOTE: Accessories are subject to change without a prior notice for further
improvements in of this product.
PC System Requirements
Basic requirements should be satisfied to use this player on your PC.
Make sure to c heck the following recomme ndations before its use:
Pentium 200MHZ or above
Windows 98SE / ME / 2000 / XP
(Windows 98SE - Insta ll Drive r)
Mac OS 9 .0 / 10.0
USB Port (2.0 supported)
(Requires PC with a c apacity of more than
PentiumⅢ 1GHZ. Couldn’t be supported
depending on a mainboard. Is n’t supported
without Service Pack 1 under Wi ndo ws XP.)
CD-ROM Drive
Hard Disc Space 20MB or above
(an additional capacity may be required to save the music files .)
64MB RAM or a bove
!NOTE: Memory spaces available may be less than those indicated above since
the firm ware uses some po r tions of t he memory a vaila ble to your PC fo r
the operation by its system.
2
3

Safety Precautions
Listening Cautions…
The output of the product g uarantees the best sounds at i ts proper volume. As
listening with a volume set at a high position for a long time may damage your
sense of hearing, make sure to listen to the music at a proper volume.
Avoid Strong Impact or Vibration
Be careful in handling the product and its accessories since their falling on the floor
or giving an impact on them may result in their serious damages.
Storage
Avoid the places exposed to heat, humidit y o r magnetic field
Cleaning
Wiping the player with chemicals may res ult in discolorations or damages on its
surface.
Wipe out the player with a soft cloth .
Using the Battery…
If you do not use the Player for a lo ng time, do not insert a battery in the Player.
!NOTE: Ne ver try to dissemb le, rep air or remodel it.
4
Features
Multi-Codec Player
Multi-codec player supporting MP3, WMA, ASF(a udio), OGG, WAV format.
FM Transmitter Function(My FM Station)
If you select the embedded FM Transmitte r mode, you can e njoy a high sensitivity
of music wireless through de vice with FM radio(ex. Car a udio, home audio, ordinary
FM radio).
High Quality 3D Sound, MEX (Magic EXpander)
Experience a p rofound sound d ue to an i ntroduction o f MEX which a llows you to
feel 3D expansion effects with richness while keeping the orig inal and stable sound
of the player. 3D Sound MEX is a new 3D effect that does not make you feel tired
even if you liste n to it for a lo ng time .
EL Display
With its i ntroduction of Blue/Yellow 2 Color EL Screen Graphic Display, the player
can command more luxurious and fancy images.
Firmware Upgrade
Upgrade Firmware to add/change/improve functions a nd performance of the Playe r.
Always enjoy the music with its latest version of performance.
Voice Recording
A function of high quality voice recording a llows a clear recording for conferences
and lectures.
5
Features
FM Radio
Conveniently enjoy the FM radio with a variety of functions such as the
manual/automatic frequency search, automatic tune to the radio s tation, and the
station preset.
Easy Navigation
Tree structure a llows you to manage and search a specific song more co nveniently.
Lyric Display(LDB)
You can easily edit, save and display the lyrics of a song in 3 lines o n t he large
display.
6 Preset Equalizer
You ca n produce your own sou nd quality with the 5-ba nd User EQ and 5
recomme nd EQs i ncludi ng Normal, Classic, Pop, Rock and Jazz.
Rem ov able Di sk Device
You can freely upload and download files without a separate manager program
since the player is recognized as a removable dis k when it is connected to the PC.
Dire ct Encoding
You can record an external sound you hear through L INE-IN port of the player, as
from FM radio broadcasting.
6
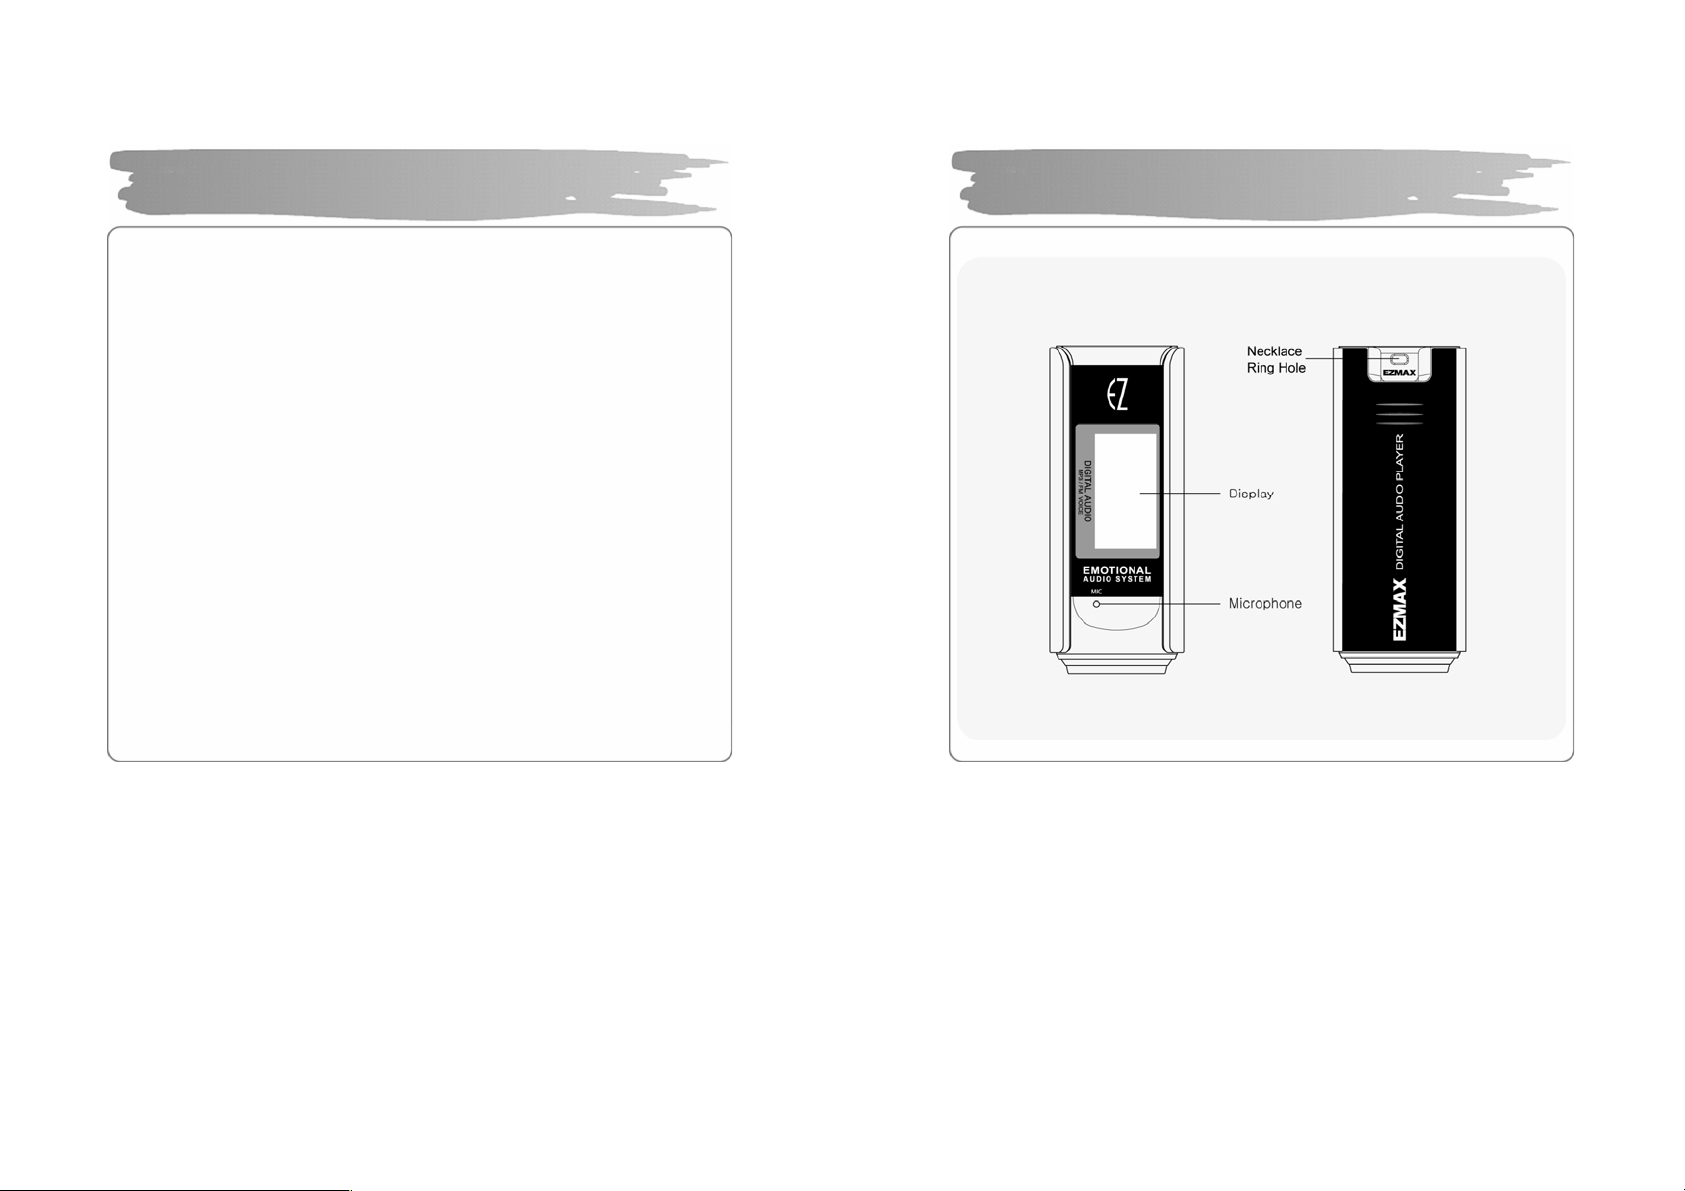
Front/Rear View of the Product
7
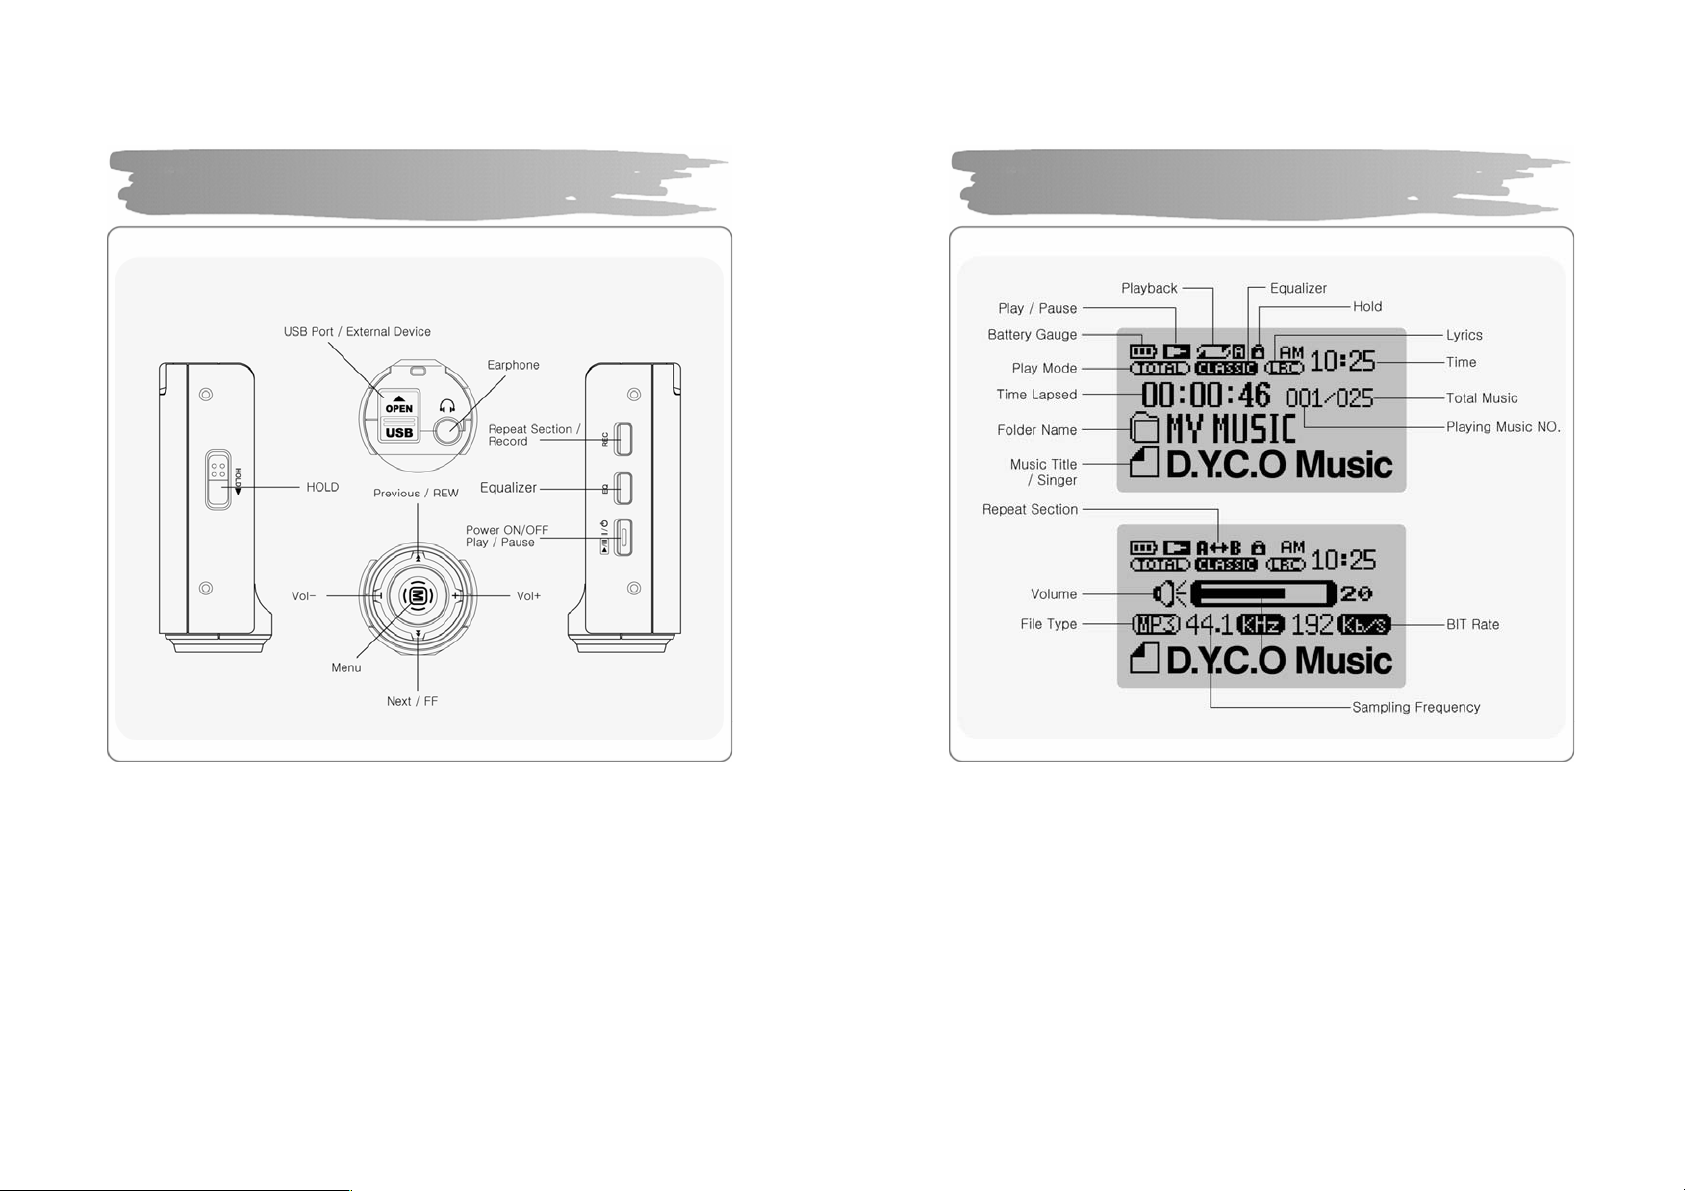
Side View of the Product
8
Function Icons in Display
9
pag
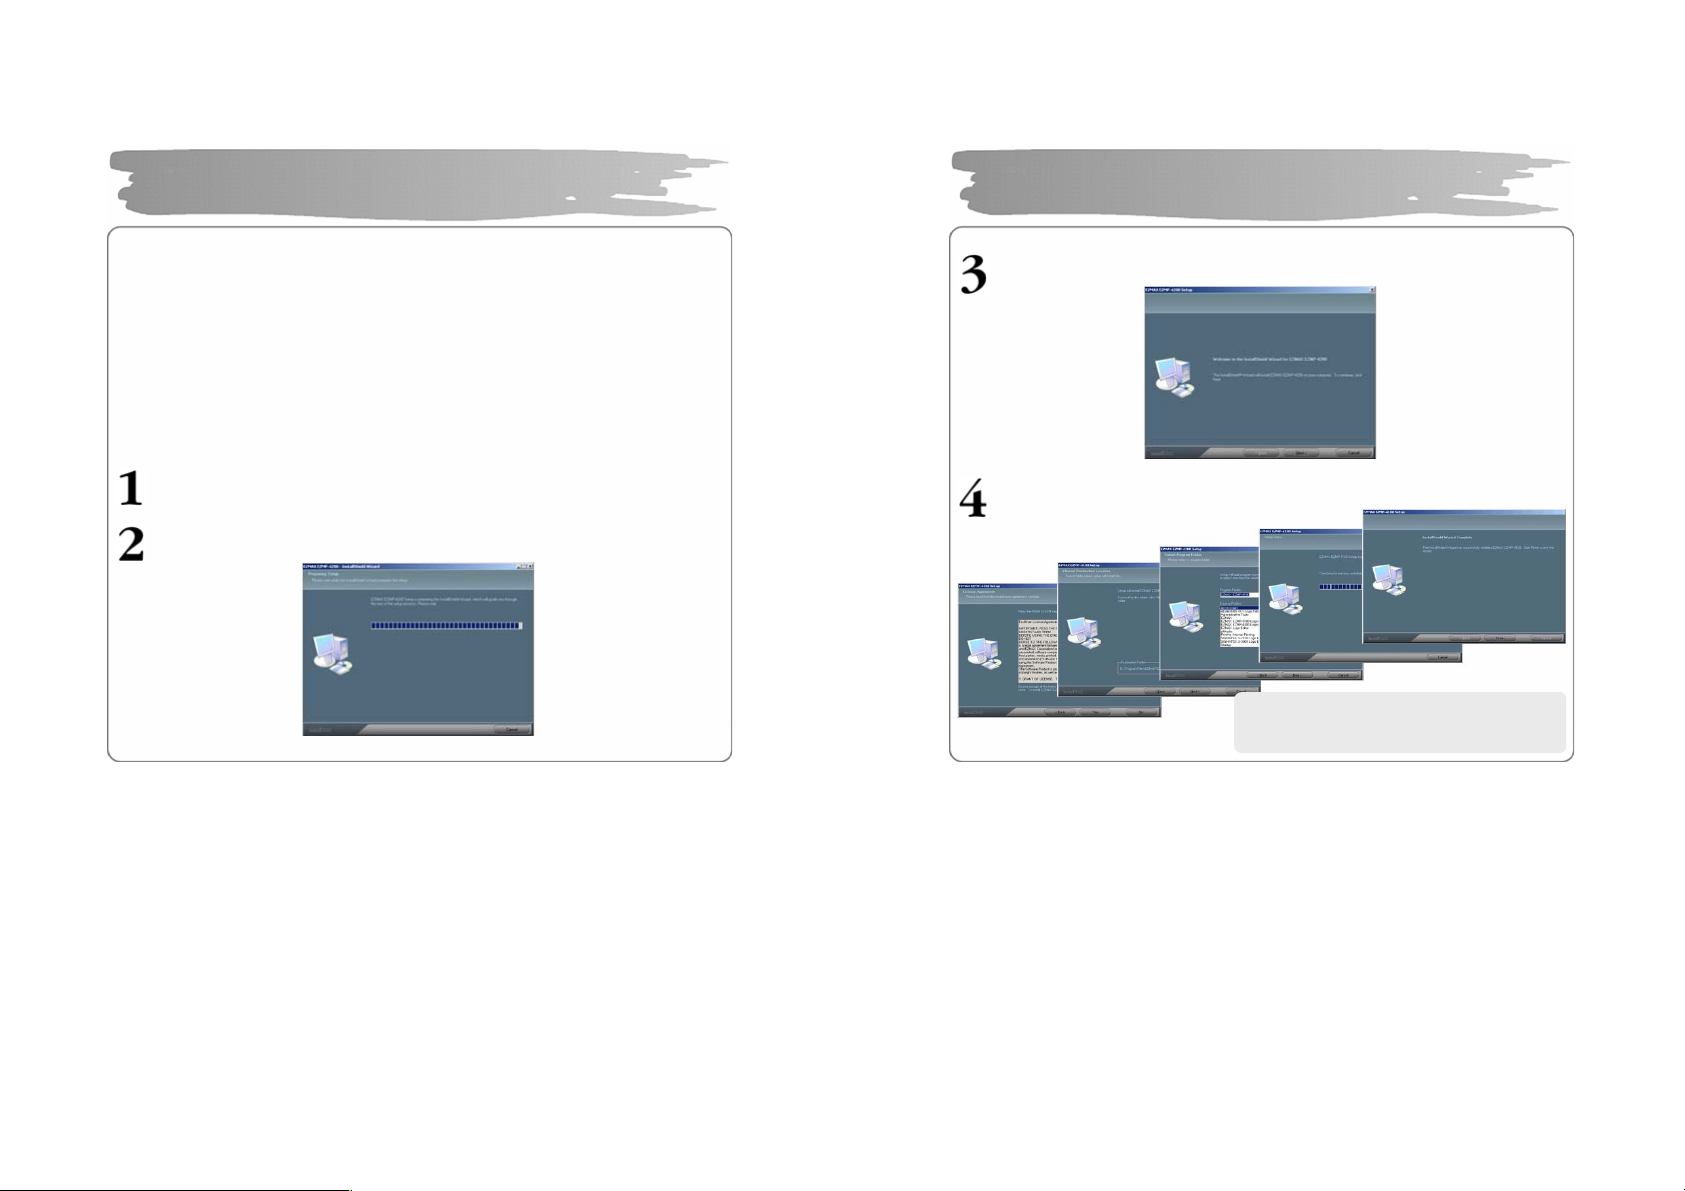
Installing US B Driv er
Make sure to install the USB driver before connecting it to the PC.
When t here appears “Add New Ha rdware Wizard”, press the “Cance l” button and
install Upgrade Manager.
If you install Upgrade Manager, the USB driver will be a utomatically ins talled.
► The dri ver is recognized without i nstallation of a separate p rogram under
Windows ME, 2000, XP, but make s ure to i nstall it if Firmware Upgrade is
required.
► If Upgrade Manager is not insta lled under Wi ndows 98 SE, the player ca nnot be
recognized as a removable disk. Make sure to install Upgrade Ma nager.
Inse rt Ins tal lati o n CD in to CD -ROM D ri ve a nd the n click setup.e xe in t he
folder of Upgrade Manager.
.
The installation will start.
10
Installing US B Driv e r
Click “Next”.
Click ‘Next’ or ‘Yes” i n subsequent windows.
When the installation has bee n done,
connect it to t he PC as show n i n the next
e.
11
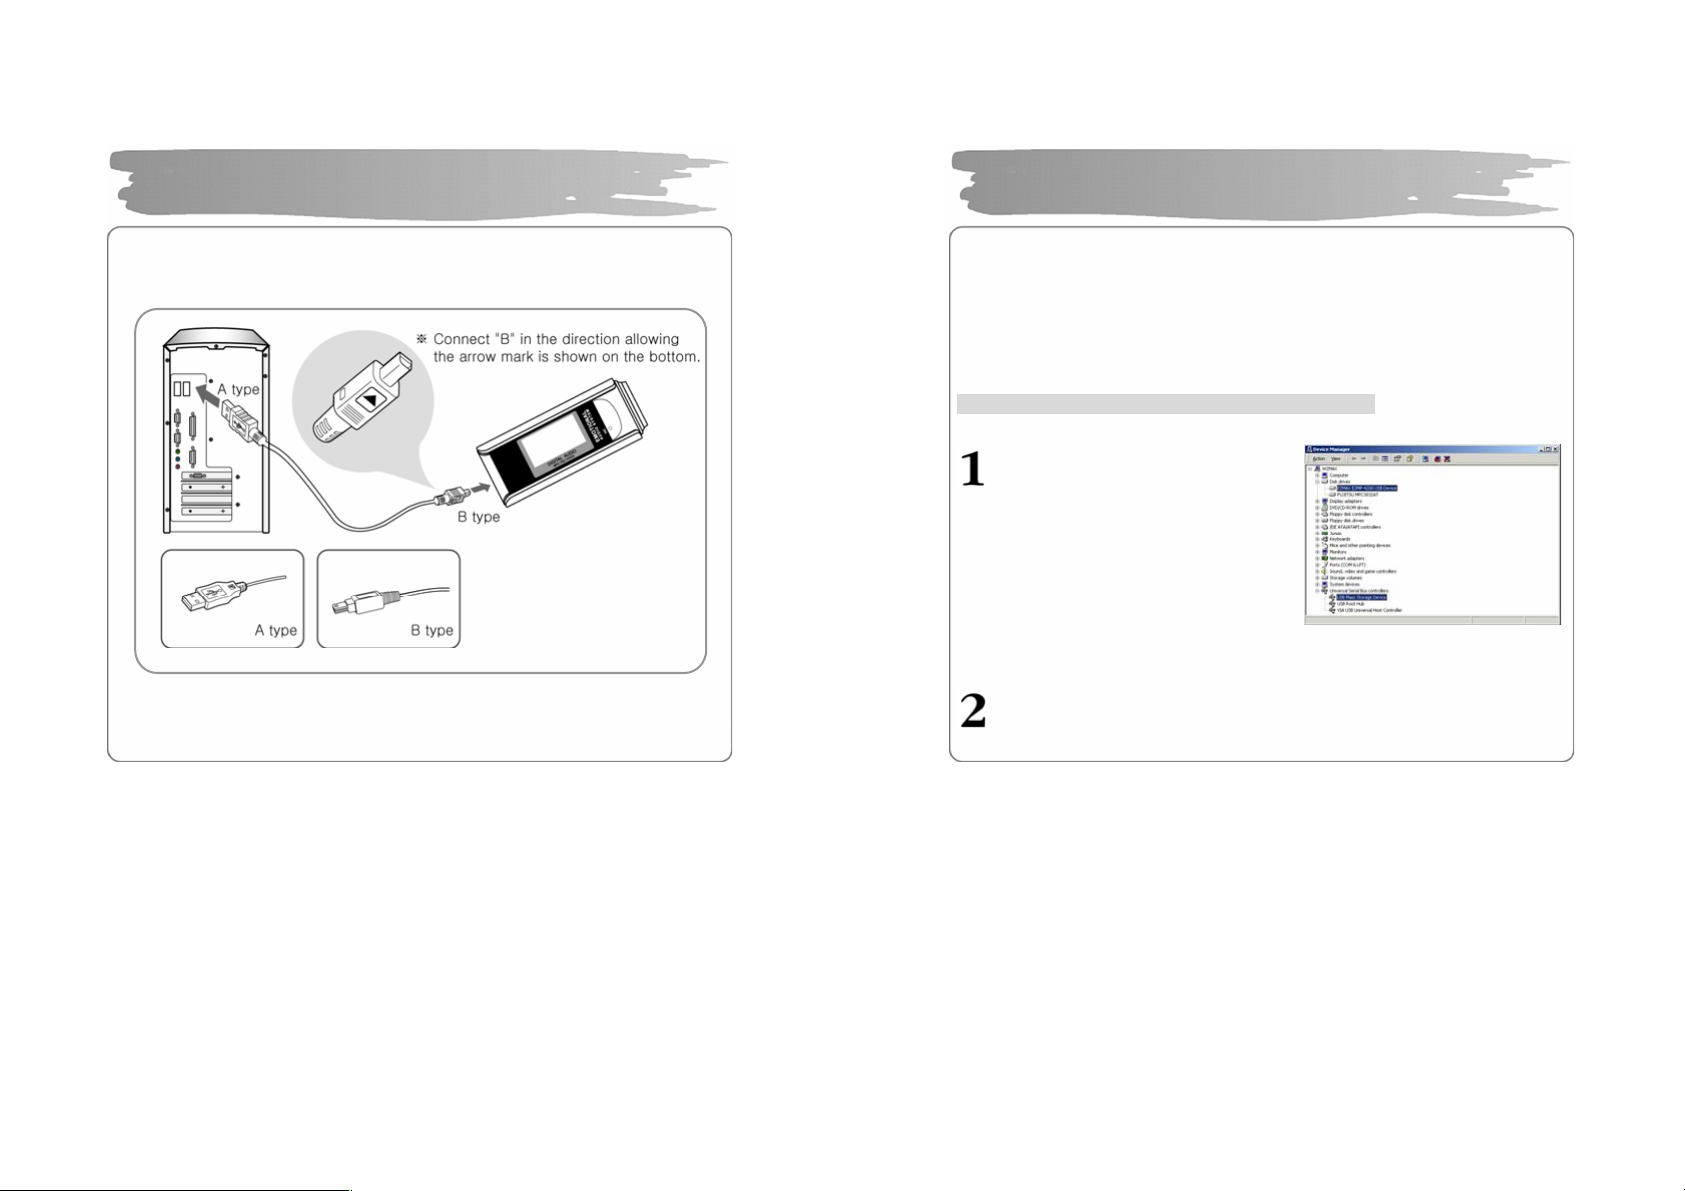
Connecting Player to PC
To download music files (MP3/W MA/A SF/OGG) from the PC, use USB cable
to connect the MP3 Playe r to the USB port of the PC.
(Make sur e to use only USB cable supplied with the MP3 Player.)
Connect ‘A’ of the cable to the USB port on the part of the PC.
Open the cover of the USB port on the part of the player and connect
‘B’ ( a smal ler pa rt) of th e ca b le to the USB por t.
Manually Installing USB
Install the US B driver in the fo llowing w ay when it is not recognize d as a
removable disk.
If there doesn’t appear “EZMAX EZMP-4200 USB Device" in “Disk Drive” of Device
Manager or “USB Mass Storage Device”(Except Window 98SE) in Universal Serial
Bus Controller, or if there does a ye llow exclamation mark or “U nknown Device”, the
driver has not been properly installed. In this case, man ually install the driver.
If an error has occurred while installing USB driver
Check Device Manager.
▪ Windows 98SE/ME
Control Panel→System →Dev ice Mana ger
▪ Windows 2000 (Professional )
Control Panel→System →Hardw are
→Devic e Manager
▪ Windows XP (Professional )
Control Panel→Performance and
Mai nten ance→System
→Har dw are →D e vice Manage r
Check whether there are any device with a exclamation mark or question
mark(unknown device or USB device) in Device Manager.
12
13

Manually Installing USB
Double click the device with a
exclamation or q uestion mark.
Press “Install Driver Again”..
Click ‘Next’ in the subsequent windows. Whe n searching dri ver files as shown
below, click the “Browse” to select C:\Win nt\Inf or C:\Windows\Inf and press
“OK”.
Press “Next”: in the s ubsequent windows to complete the installation of the
USB driver.
14
Manually Installing USB (Win 98SE)
For Windows 98SE
Click ‘Next’ in the subseq uent windows.
Designate the path for searching the driver file to \Upgrade Manager\Drivers o f
CD Drive.
Make sure to restart your system after install ation is completed.
15

Using Removable Disk
Since the player is de tected as a removable disk on the part of PC, you can easily
upload, do wnload, or delete music files or folders in Windows Explorer without a
separate manager program.
Copying files to Player(Download)
1) When you connect the player to the USB cable, it is recognized as a
removable disk in Windows Explo rer.
2) Click t he removable disk to enter into a memory area of the player.
3) Run one more Windows explorer.
4) Select t he file to sa ve,
① Drag and drop it to the removable disk.
② Or, right-click to select Copy. Designate the removable disk and right-
click to select Paste.
5) Then, there will appear a file transfers window, indicating that the file is
being copied to the removable disk.
16
Using Removable Disk
Export File(Upload)
1) Connecting the USB cable to the Player allows the Playe r to be
recognized as a removable disk in the Windows Explorer.
2) Select the removable disk to have access to the me mory area of
the Player.
3) Run one more Windows Explorer.
4) Select a file you want to e xport from the removable disk, and
then:
① Dra g & drop to the disk to which you want to export.
② Or right-click the mo use to select Copy, and select a folder
to which you want to export, and then right-click the mouse
to sel ect Past e .
You can add or delete a folder in the Windows Explorer.
READY Status DOWNLOAD UPLOAD
When you download a music file to the pla yer, wait until there a ppears Ready
on the display as shown below. If you disconnect the USB cable during
DOWNLOAD or UPLOAD, the file may not be properly downloaded. Check
the display(READY) and then disconnect the cable.
17
※
Using Removable Disk
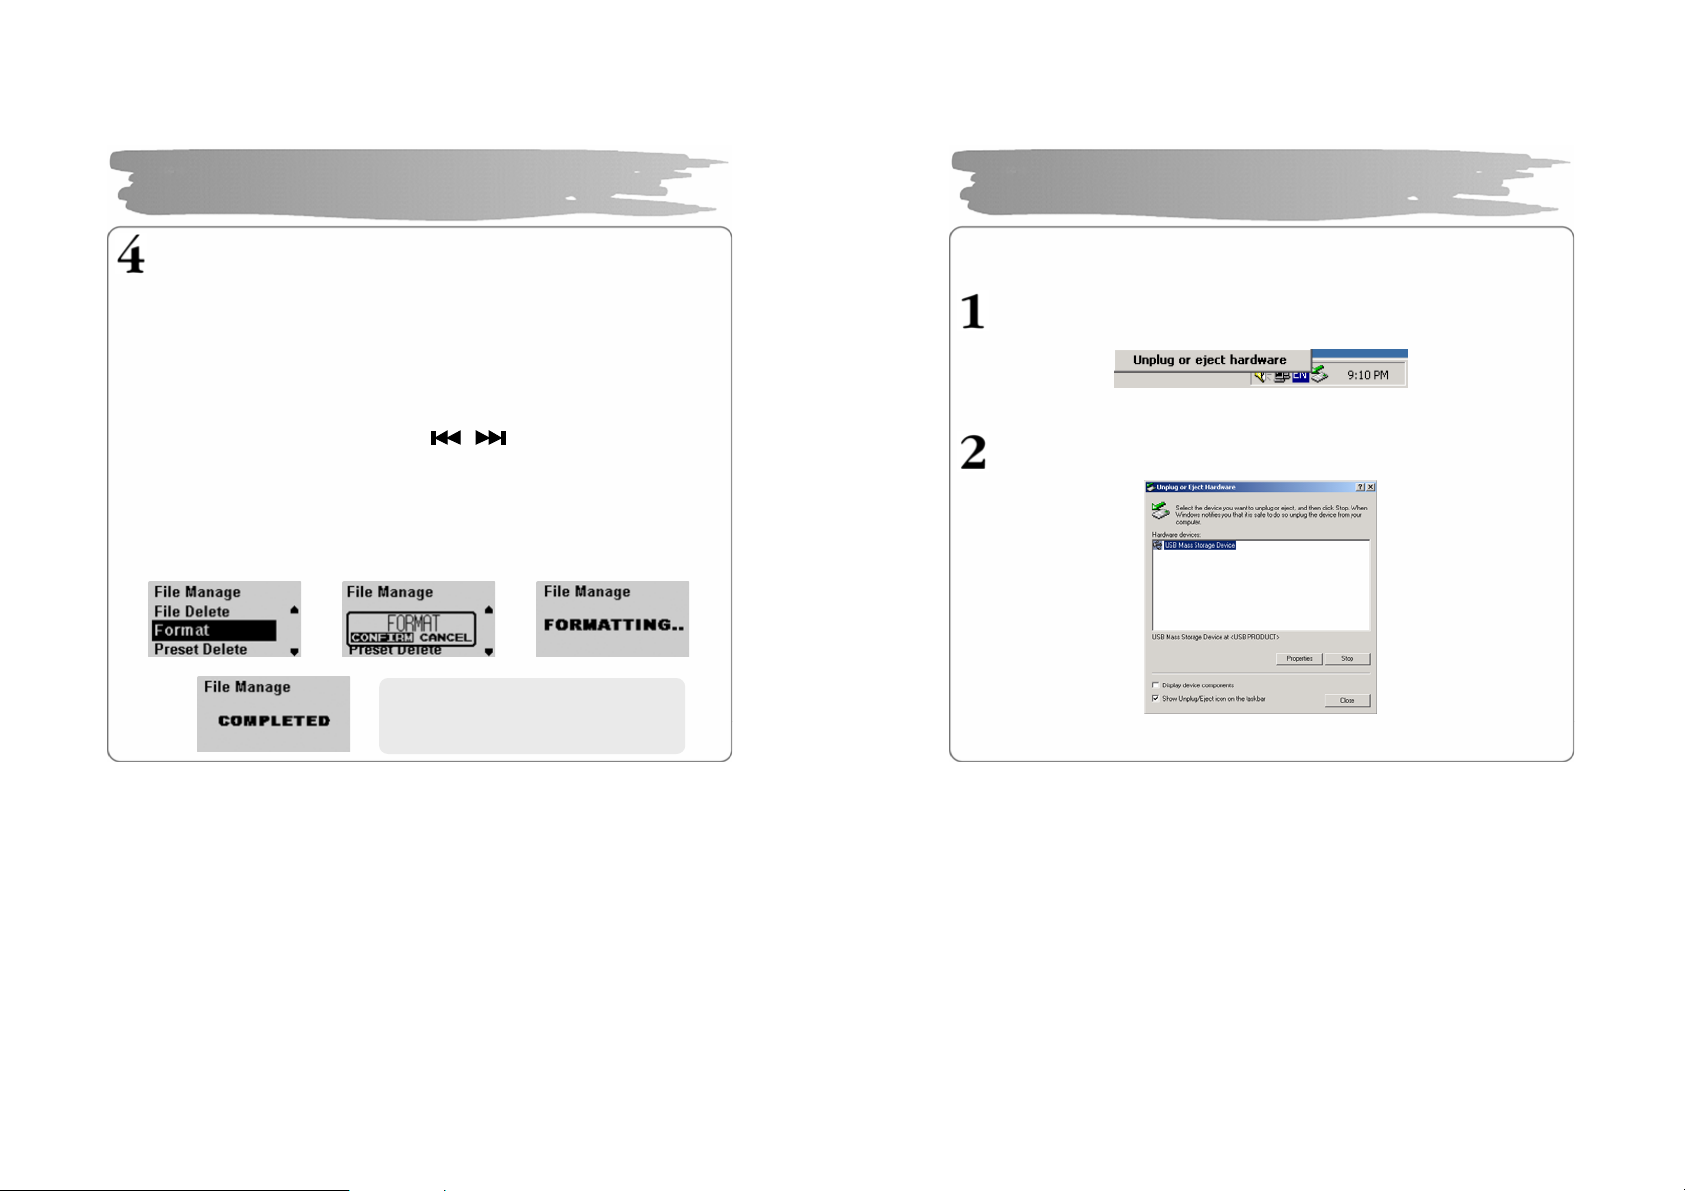
Format P layer
1) Formatting in the Windows
① Select the removable disk, and then right-click t he mouse to
select Format(Select “FAT” as a file system).
② Click Start. (If you remove the USB ca ble while formatting, th e
player could be damaged. Be sure to remove it after the
forma tting has been done.)
2) Formatting in the Player
① Press t he ME NU button to e nte r i nto t he me n u mode.
② Select the File Manager with
MEMU button to e nter in to File Ma nag e menu.
③ Select Format menu with VOL +/- button and then press the MENU
button.
④ After selecting “Confirm”, press the MENU button one more to start
formatting .
button a nd t hen press the
Î Î
Î
Be ca reful si nce formatti ng will
delete all contents permanently.
Disco nnecting U SB Cable
After completing file tra nsfer, disconnect the USB cable in the following way.
Right-click the removable hardware icon on the taskbar of the desktop,
and then select “Remove Hardware Safely”.
After selecting t he de vice to disconnect, click “Stop” .
18
19

D isco nnecting U SB Cable
Click “OK” to confirm the device to s top.
Click “OK” to re move USB cable.
※ A bnormally disconnecting the USB cable may result in damages or a
failure to the pla yer.
The order of music f iles tha t app ears wh en you select a removable
disk in Windows Explorer has nothing to do with the actual
sequence in accordance with the playback.
Upgrading Firmware
Do wnload the la test version of firmware at o ur website (www.ezmax.co .kr )
and unzip it (unzipped to 4 files.)
Co py the unzipp ed latest firm ware fi les into
C:\Program Files\EZMAX\EZMP-4200 folder.
Connect the USB port i n the status of Power-off so that the PC can recognize
the player.
Execute Firmware Upgrade ma nager program.
Wait for the device to search. Connect USB cable.
20
21
 Loading...