


EZLoop 3
rd
Generation Wi-Fi Phone User Manual
Welcome to
EZLoop 3
rd
Generation Wi-Fi Phone User Manual
Reminder!
The User Guide to the EZLoop® 3rd Generation Wi-Fi Phone has b
een designed to make unde
rstanding networking with the
IP Phone
easie
r th
an ever
. Lo
ok for the following ite
ms when readin
g this User
Guide:
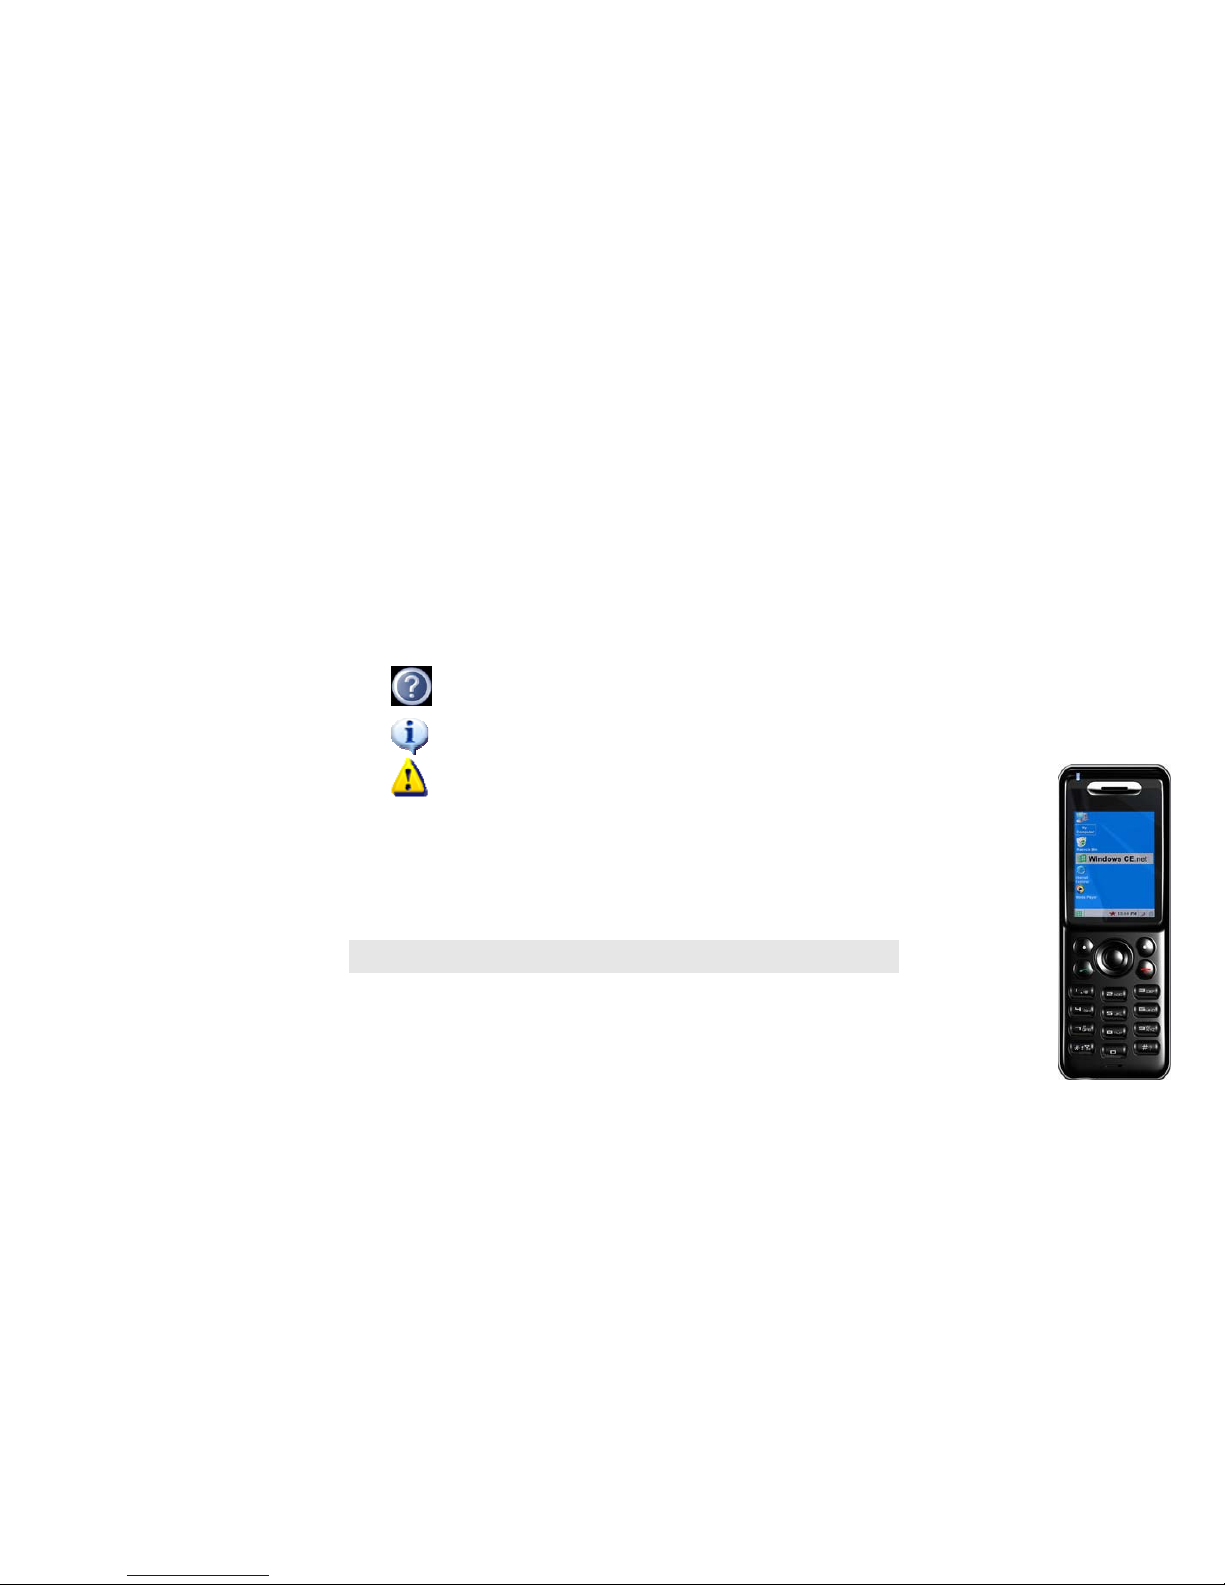
This question mark provides you wi
th a remind
er about something you
might need to do while using the IP Phone.
This c
heckmark me
ans there is
a note of interest
you should
pay special attention to while using the IP Phone
.
Thi
s exclamation po
int me
ans there is a ca
ution or warning and is
something that could damage your IP Phone.
In addition to these symbols, there are definitions for technical terms that
are presented like this:
Also
, each
figure (diagram, screenshot, or
other image) is provid
ed wi
th a fi
gure
number and desc
ription, like
word: definition.
Figure numbers
and descriptions can also
be found in the “List of Figures” section.
Figur
e 0-
1: Sample Figure Description
WARNING:
This product contains chemicals, including lead, known
to the State of Ca
lifor
nia to ca
use
cancer
, and birth defects or
other r
eproductive harm. Wash hands after handli
ng.

Chapte
r 1:
What’s in This User Guide?
1
Chapte
r 2:
EZLoop® 3rd Generation Wi-Fi Phone
Panels
3
Chapter 3: In
stalling and Us
ing the EZLoop® 3rd Generation Wi-Fi Phone
7
Inserting the Battery into the EZLoop® 3rd Generation Wi-Fi Phone
7
Powering
on the EZLoop® 3rd Generation Wi-Fi Phone
8
Navigating the EZLoop® 3rd Generation Wi-Fi Phone
10
Setting up
the EZLoop® 3rd Generation Wi-Fi Phone
12
Using the EZLoop® 3rd Generation Wi-Fi Phone
22
Chapter 4: Configuring t he
EZLoop® 3rd Generation Wi-Fi Phone
25
Instructions for
Confi
guring the EZLoop® 3rd Generation Wi-Fi Phone
25
Status Infor
matio
n 27
How to Access th
e We
b-based Uti
lity
29
Administ
rator Access
29
Setting
s of the EZLoop® 3rd Generation Wi-Fi Phone
30
Chapte
r 5: Fo
r Admi
nistra
tors Only
65
Administ
rator Settings of the EZLoop® 3rd Generation Wi-Fi Phone
65
Accessing th
e Web-base
d Utility
65
Protecti
ng Admi
nistrator Access
66
Appendix A:
Frequently Asked Questi
ons
67
Appendix B: Glos
sary
73

Figure 2-1: Bottom Panel 3
Figure 2-2: Front Pa
nel 4
Figure 2-3: Symbol Selection 5
Figure 2-4: Side Panel 6
Figure 2-5: Back Panel 6
Figure 3-1: Press the Button 7
Figure 3-3: Connect the Power 8
Figure 3-4: Front Pa
nel 10
Figure 3-5: Symbol Selection 11
Figure 3-6: Scan for Wireless Ne
tworks 12
Figure 3-7: Select Wireless Ne
twork 12
Figure 3-8: Connect to Wireless Network 13
Figure 3-9: Enter WEP Ke
y (Secured Ne
twork) 13
Figure 3-10: Enter WPA Ke
y (Secure
d Network) 13
Figure 3-11: Successful Connection 13
Figure 3-12: Select Menu 14
Figure 3-13: Select SIP Settings 14
Figure 3-14: Edit Proxy IP 15
Figure 3-15: Save Proxy IP 15
Figure 3-16: Save Proxy Port 16
Figure 3-17: Save
Re
gister Proxy IP 16
Figure 3-18: Save
Re
gister Proxy Port 17
Figure 3-19: Save Outbound Proxy IP 17
Figure 3-20: Edit Outbound Proxy Port 18

Figure 3-21: Save Expire Time 18
Figure 3-22: Save Phone Number 19
Figure 3-23: Save User Name 19
Figure 3-24: Save Password 20
Figure 3-25: Save SIP Settings 20
Figu
re 3-26: Return to Standby Screen 21
Figu
re 3-27: Standby Screen 21
Figure 3-28: Call Connected 22
Figure 3-29: Line Options 22
Figure 3-30: Second Call 23
Figure 3-31: Unlock Keys 23
Figure 4-1: Front Panel 25
Figure 4-2: Symbol Selection 26
Figu
re 4-3: Standby Screen 27
Figu
re 4-4: Standby Screen 28
Figu
re 4-5: Main Menu 28
Figure 4-6: Call Log 30
Figure 4-7: Call Log Options 30
Figure 4-8: Type of Phone Number 30
Figure 4-9: Sele
ct Phone Book
33
Figure 4-10: Phon
e Bo
ok 33
Figure 4-11: Phon
e Bo
ok Options 33
Figure 4-12: Add Person 34
Figure 4-13: Enter Name 34
Figure 4-14: Select Network Settings 35

Figure 4-15: Network Settings – DHCP 35
Figure 4-16: Network Setting
s - Fixed IP 36
Figure 4-17: Enter IP Ad
dress 36
Figure 4-18: Edit Su
bnet Mask 36
Figure 4-19: Enter Subnet Mask 36
Figure 4-20: Wireless 37
Figure 4-21: Scanning for Wireless Networks 37
Figure 4-22: List of Wireless Networks 37
Figure 4-23: Connecting to Wireless Network 38
Figure 4-24: Enter WEP Ke
y (for Secured Network) 38
Figure 4-25: Enter WPA Ke
y (for Secured Network) 38
Figure 4-26: Connecting to Wireless Network 38
Figure 4-27: Select Default Hotspot 39
Figure 4-28: Detect Hotspot 40
Figure 4-29: Connecting to Hotspot 40
Figure 4-30: Getting IP Address 40
Figure 4-31: Select IE Browser 40
Figure 4-32: Wi-Fi Profiles 41
Figure 4-33: Edit SSID 41
Figure 4-34: Edit Wireless Mode 41
Figure 4-35: Change Authen
tication Mode 42
Figure 4-36: Edit WEP Key 42
Figure 4-37: Enter WEP Key 42
Figure 4-38: Change EAP Type (802.1x) 42
Figu
re 4-39: Edit EAP Type (WPA
-PSK) 43
Figu
re 4-40: Change EAP Type (WPA-PSK) 43
Figure 4-41: Enter SSID 43
Figure 4-42: Change Transmit Key 44
Figure 4-43: Edit WPA Key 44
Figu
re 4-44: Profile Added 45
Figure 4-45: Select Hotspot 46
Figure 4-46: Edit User Name 46
Figure 4-47: Select
Phone Settings 47
Figure 4-48: Phone Settings 47
Figure 4-49: Ring Options 47
Figure 4-50: Ring Types 47
Figure 4-51: Keypad Tone 48
Figure 4-52: Wallpaper 48
Figure 4-53: Change Time
Format 49
Figure 4-54: Change Clock
Type 49
Figure 4-55: Change Time
Zones 49
Figu
re 4-56: Change Daylight Time 49
Figu
re 4-57: Enable NTP 50
Figure 4-58: Disable NTP 50
Figure 4-59: Change Date 50
Figure 4-60: Change Clock 50
Figure 4-61: Select La
nguage 51
Figu
re 4-62: Language 51

EZLoop® 3rd Generation Wi-Fi Phone
Figure 4-63: Password disabled (default) 51
Figure 4-64: Enable Phone
Password 51
Figure 4-65: Set User Password 52
Figure 4-66: User Phone Password 52
Figure 4-67: Phone Pa
ssword (Admin) 52
Figure 4-68: Auto Ke
ylock Setting 53
Figure 4-69: Enable Keylock 53
Figure 4-70: Auto-Provisioning 53
Figure 4-71: Server Type 53
Figure 4-72: Factory Default settings 54
Figure 4-73: Upgrade phon
e 54
Figure 4-74: Upgrade phon
e 54
Figure 4-75: Edit Download URL 55
Figure 4-76: Edit Proxy Port 55
Figure 4-77: Register Proxy Port 56
Figure 4-78: Edit Proxy IP 56
Figure 4-79: Enter Proxy IP 56
Figure 4-80: Enter Re
gister Proxy Port 56
Figure 4-81: Change Outbound Proxy IP 57
Figure 4-82: Outbou
nd Proxy Port 57
Figure 4-83: Web Cam 58
Figure 4-84: Web Cam Options 58
Figure 4-85: Edit Web Cam 58
Figure 4-86: Add Web Cam 58
Figure 4-87: MSN 60
Figure 4-88: Skype 60
Figure 4-89: Web Site 61
Figure 4-90: Visit Web Site 61
Figure 4-91: Auto-Scroll Option 61
Figure 4-92: Web Site Options 62
Figu
re 4-93: Edit Web Site 62
Figure 4-94: Add Web Site 63
Figure 4-95: Information 64
Figu
re 5-1: Admin Login on Web-based utility 65
Figure 5-2: Protect Admin Access 66
Figu
re 5-3: Admin password on Phone 66

Chapter 1: What’s in This User Guide
Tha
nk you for choosing the EZLoop® 3rd Generation Wi-Fi Phone. It will allow you to make Skype/SIP phone
ca
lls using your broadband connection, whether yo
u ar
e at home
, in your office
, or at a public hotspot.
How does th
e IP Pho
ne do this? It co
nnects to
your wireless ro
uter or gateway,
so telephone
servic
e is deli
vered
through your cabl
e or DSL Internet connection. You can al
so surf the Internet with its built-in web browser and
backli
t, full-colo
r screen.
But what does al
l of this mean? Networ
ks are useful to
ols for sharing Internet access a
nd co
mputer resources.
Your voice call
s can share your
high-speed Internet co
nnection. You will be a
ble to make phone ca
lls using the
account you set up with your Internet phone service provider
, even while you’re
surfing the Inter
net on your
co
mputer. So
, ne
twor
ks not only are useful in homes and offices, but also can be fun.
Use the instructions in this User Guide
to
help you conn
ect the IP Phone
afte
r you have
se
t up a
n acco
unt with
your Internet phone service provider
. T
hese in
structio
ns should be
all
yo
u need to ge
t the most out of the
EZLoop® 3rd Generation Wi-Fi Phone.
This guide covers the st
eps for installing the EZLoop® 3rd Generation Wi-Fi Phone.
•
Chapter
1:
What’s in This User Guide
This c
hapter de
scribes
the
IP Phone’s applications and this User Guide.
IP
(inter
net protocol): a
protoc
ol used to
send data ov
er a network.
netw
ork
: a se
ries of computers or
devices connected for the purpose of
data sharing,
storage, a
nd/
or
tr
ansmission between
users.
NO
TE:
For
informatio
n
about your Inter
net phone
serv
ice, refer to the materials
provided by yo
ur Internet
phone serv
ice provider.
1
Chapter 1:
What’s in This User Guide

•
Chapter 2:
EZLoop® 3rd Generation Wi-Fi Phone
Panels
This chapter desc
ribe
s the physical
featur
es of the IP Phone.
•
Chapter
3: Installing and Using the EZLoop® 3rd Generation Wi-Fi Phone
This chapter explains how to install
the IP Phone and use it.
•
Chapter
4:
Config
uring the EZLoop® 3rd Generation Wi-Fi Phone
This ch
apter discusses how to configure the IP Phone’
s setti
ngs.
•
Append
ix A: Troubleshooting
This appendix describes some potent
ial pr
oblems and so
lutions, as well as frequently asked questions,
regarding use of the IP Phone.
•
Append
ix B: Gl
ossary
This appendix gives a br
ief glossary of terms fr
equently used in networ
king.
2
Chapter 1: What’s in This User Guide

Chapter 2: EZLoop® 3rd Generation Wi-Fi Phone Panels
The Bottom Pa
nel
The IP Ph
one’s
headset jack
and USB
port ar
e located on the bottom panel.
Headset
Jack
US
B Port
Figure
2-1: Bo
ttom Panel
Headset Jack
This jack allows yo
u to
connect a headset.
USB Port
The USB po
rt allows you to attach the included power adapter.
3
Chapter 2: EZLoop® 3rd Generation Wi-Fi Phone
Panels
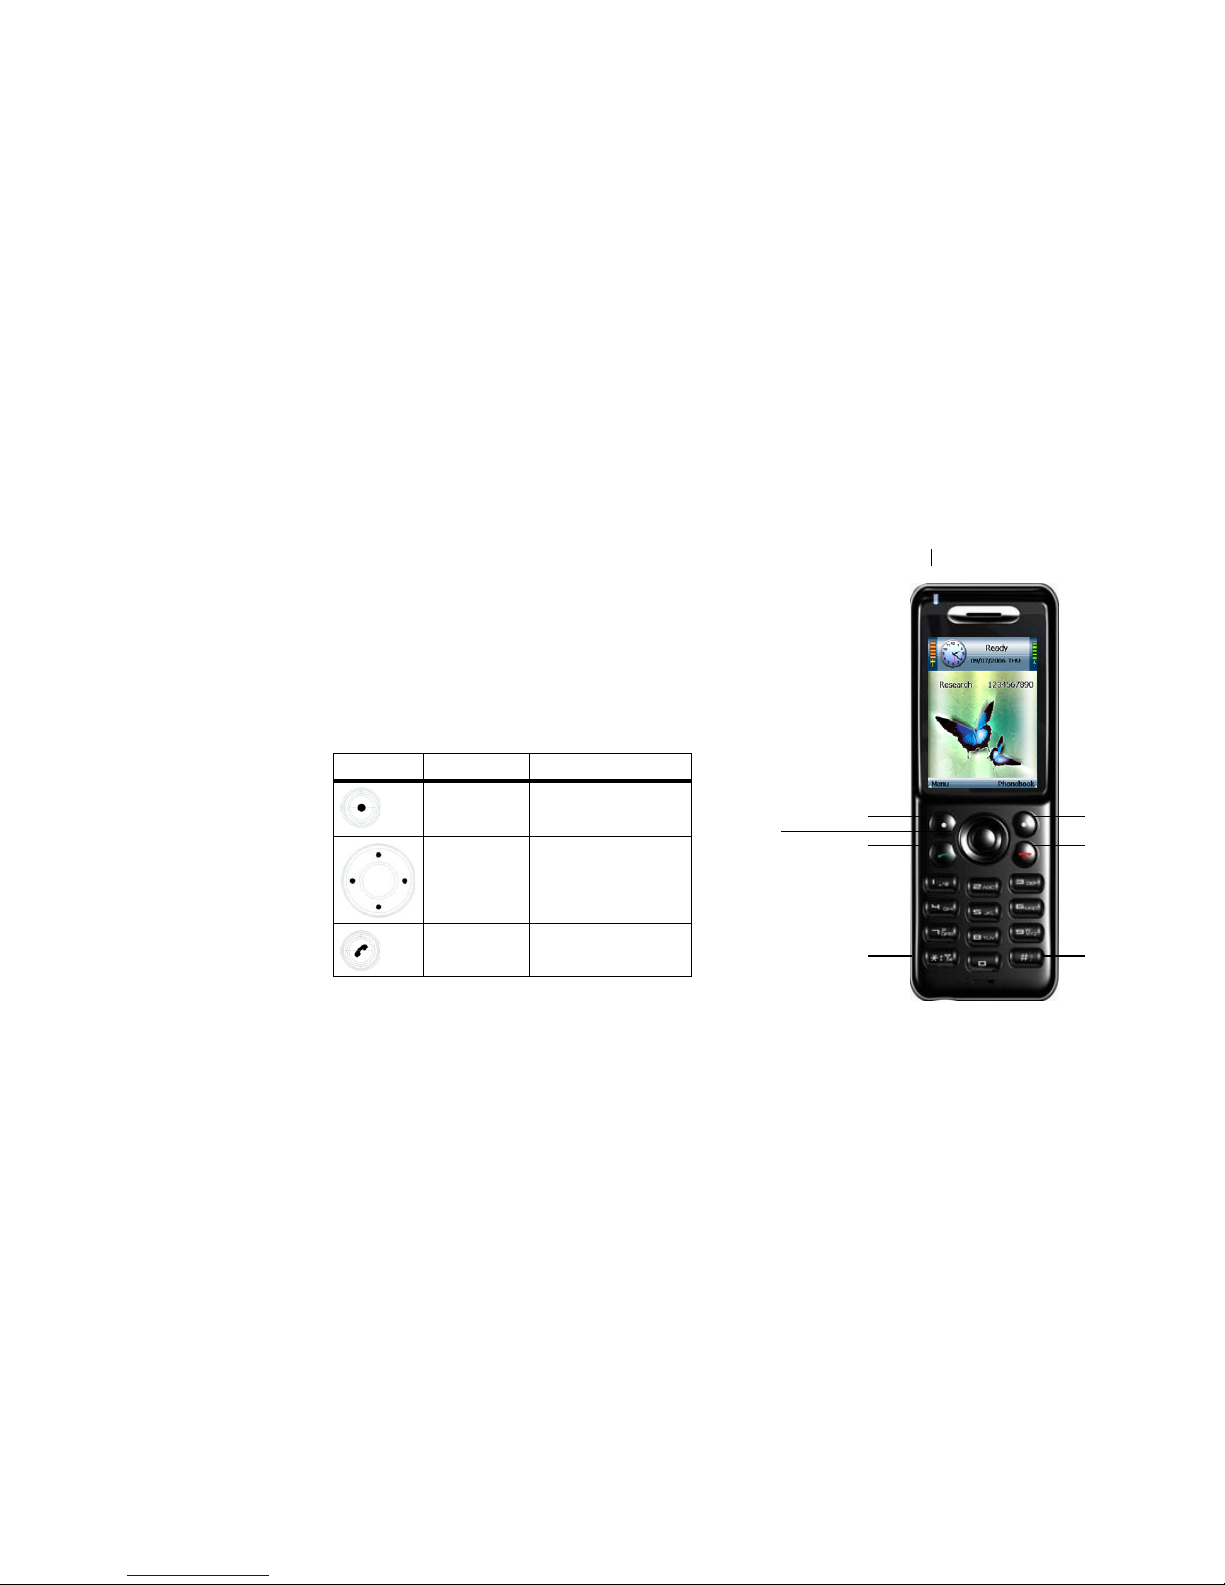
The Fr
ont and Side Panels
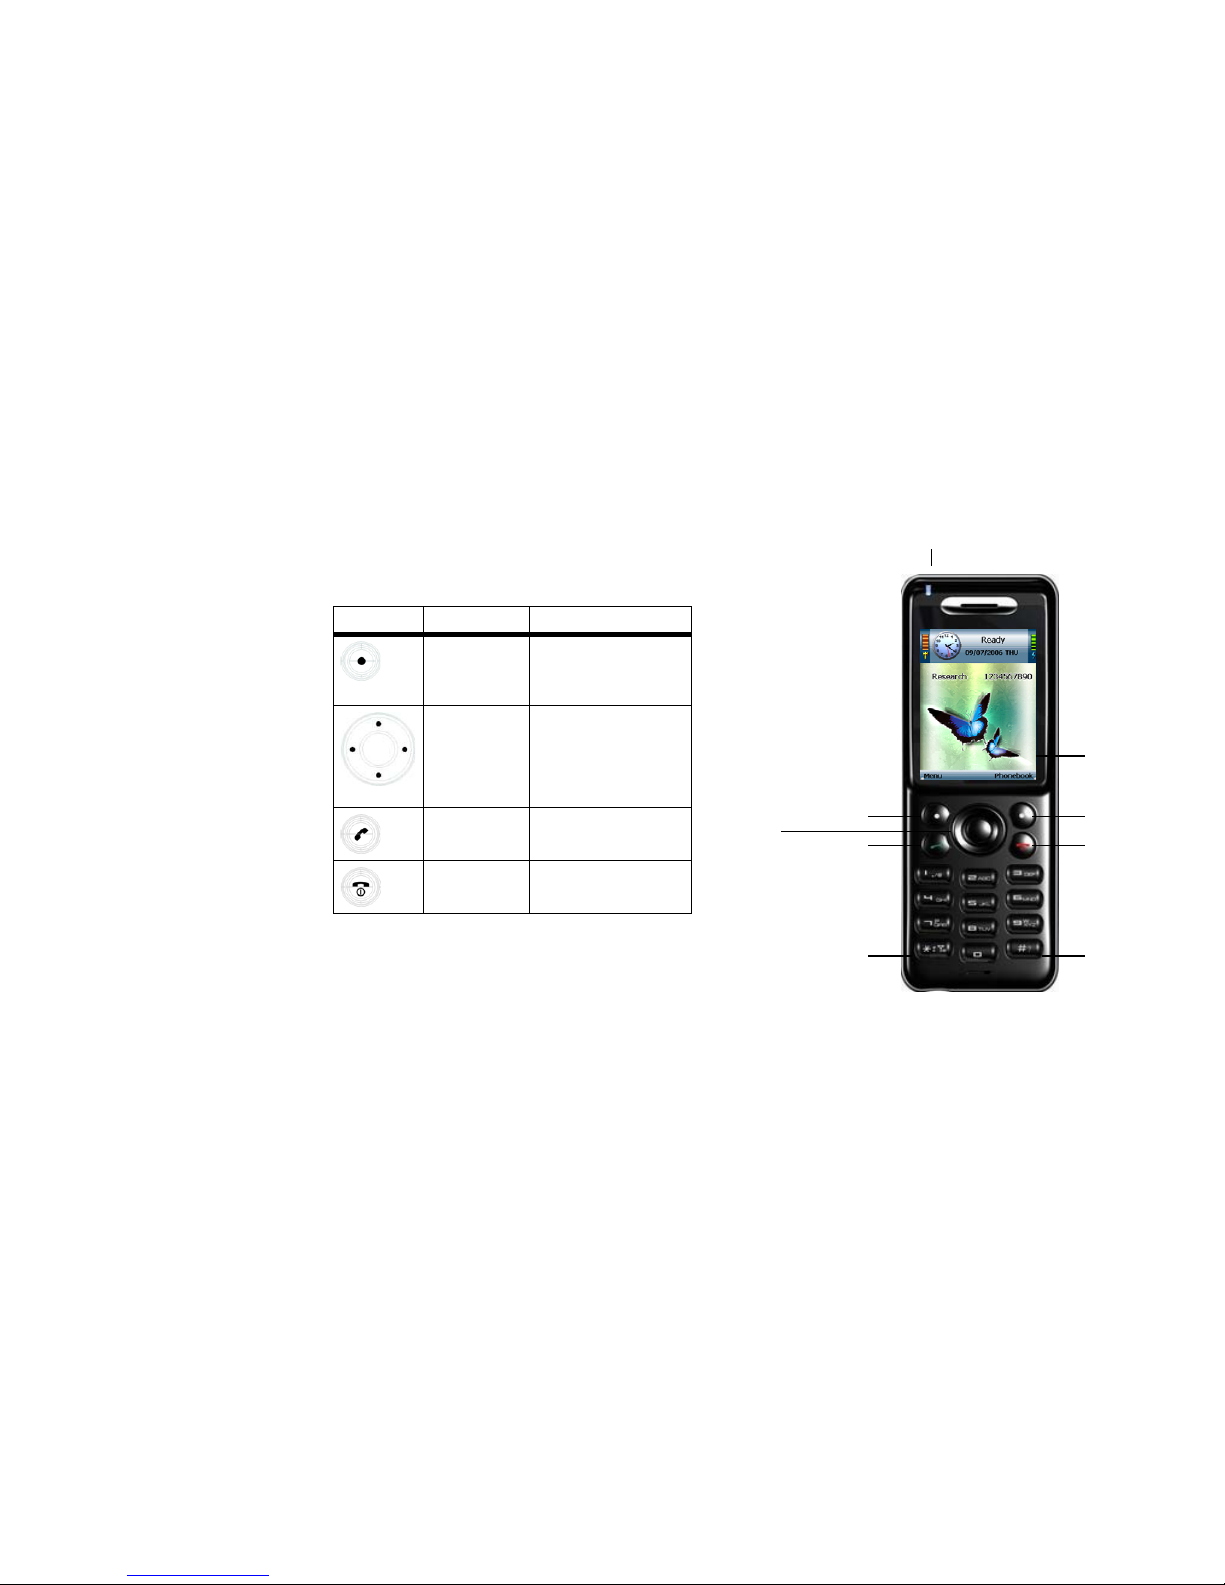
The power LED is located at the top of the IP Phone,
whil
e its buttons are located on the front and side
panels.
Po
wer LED
Blue/Re
d/Purple. The LED is a
solid bl
ue when the IP Phon
e is powered on a
nd ready for
phone ca
lls. It fl
ashes red when the
IP Phone i
s no
t ready for phone calls.
The LED alternates between blue and purple when the IP Pho
ne is po
wered off and
char
ging.
The buttons of the IP Phone
are described in this table.
Ico
n
Butto
n Name Function
Power LED
So
ft Key
Se
lects the appropriate action
show
n on th
e left- or right- ha
nd
side of the scr
een
Navigation Pad
a
nd Center
Soft Key
Soft Key
Na
vigation Pad
and Ce
nter
Selection Key
Lets you navigate menus and
sele
ct your c
hoices
Controls cursor for its web
browser
Selection Key Call
Power
or E
nd Call
Call
Uses
Inter
net phone line
Different Key
Choices or + Sign
Enter Symbol
or Space
Figure 2-2: Front Panel
4
Chap
ter 2: EZLoop® 3rd Generation Wi-Fi Phone
Panels
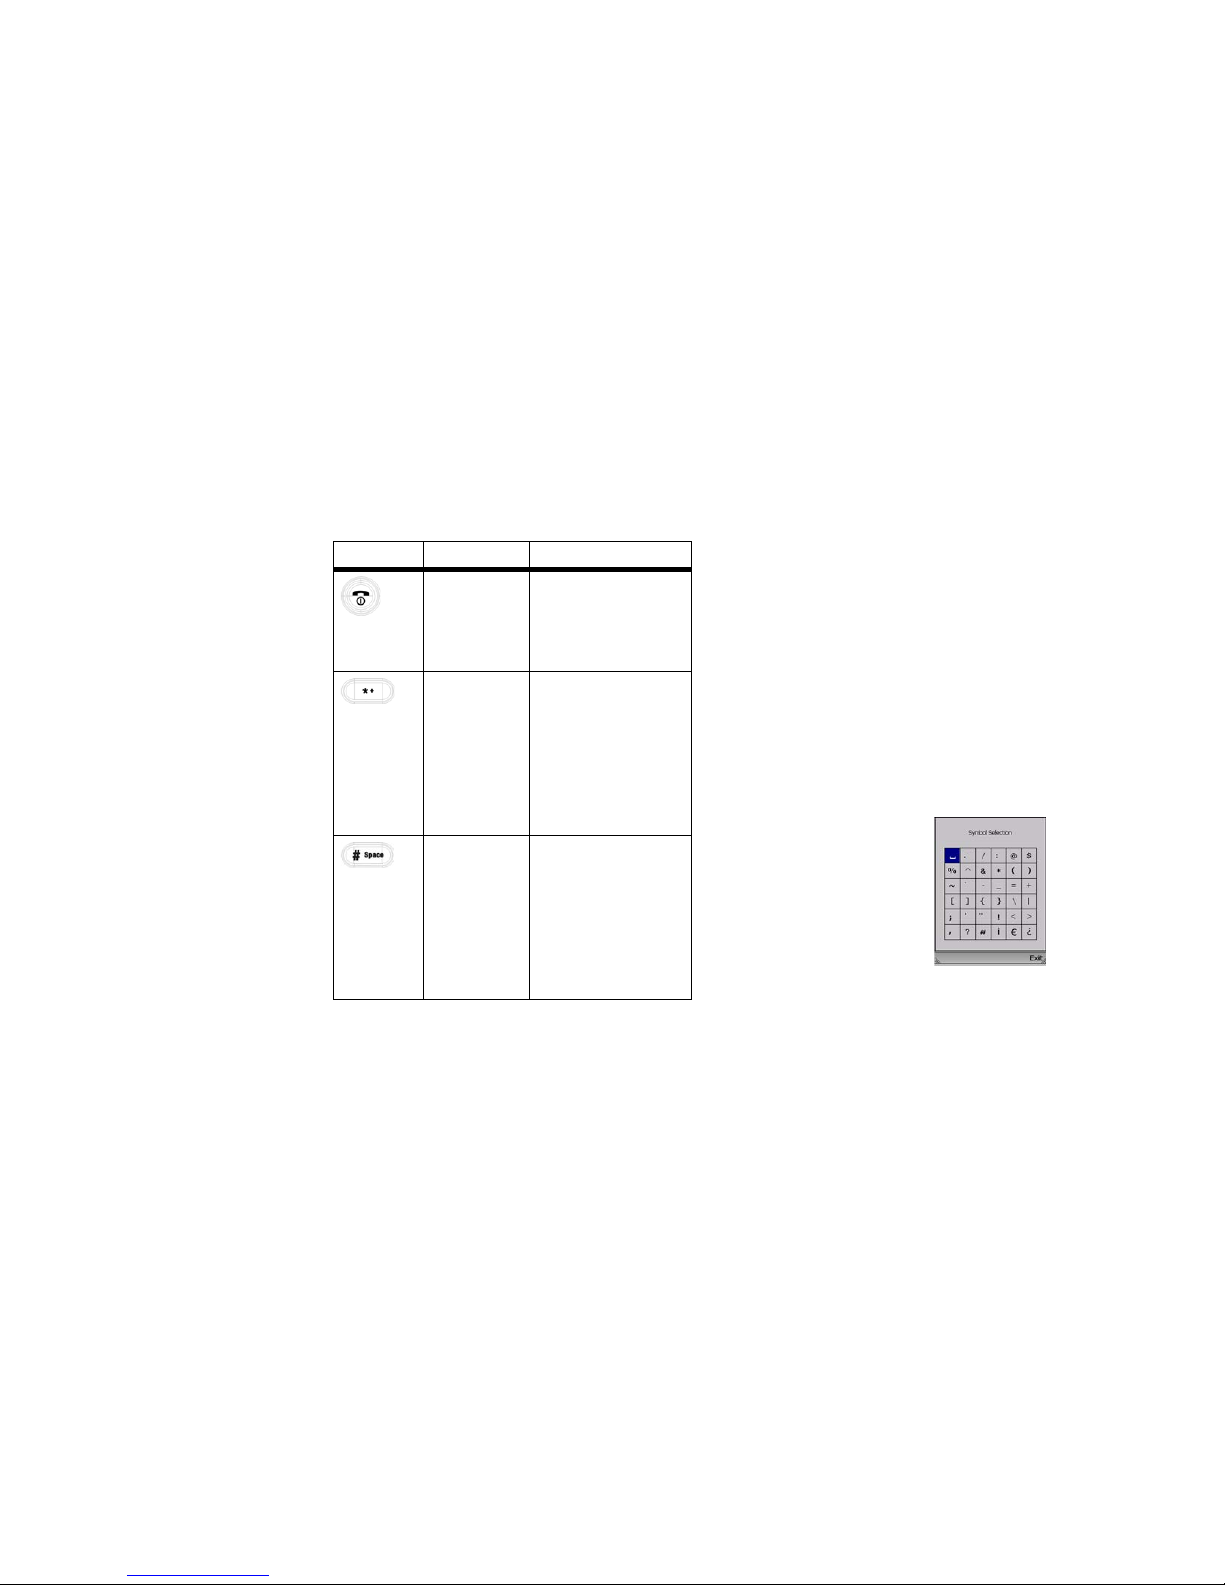
Icon
Butto
n Name Function
Power or End Call
Press and hold this bu
tton
for
two se
conds to power the
IP
Phone on or off. E
nds the
c
a
ll or exits the curr
ent menu
Differ
ent Key
Choi
ces or
+ Sign
Enter Symbol
or
Space
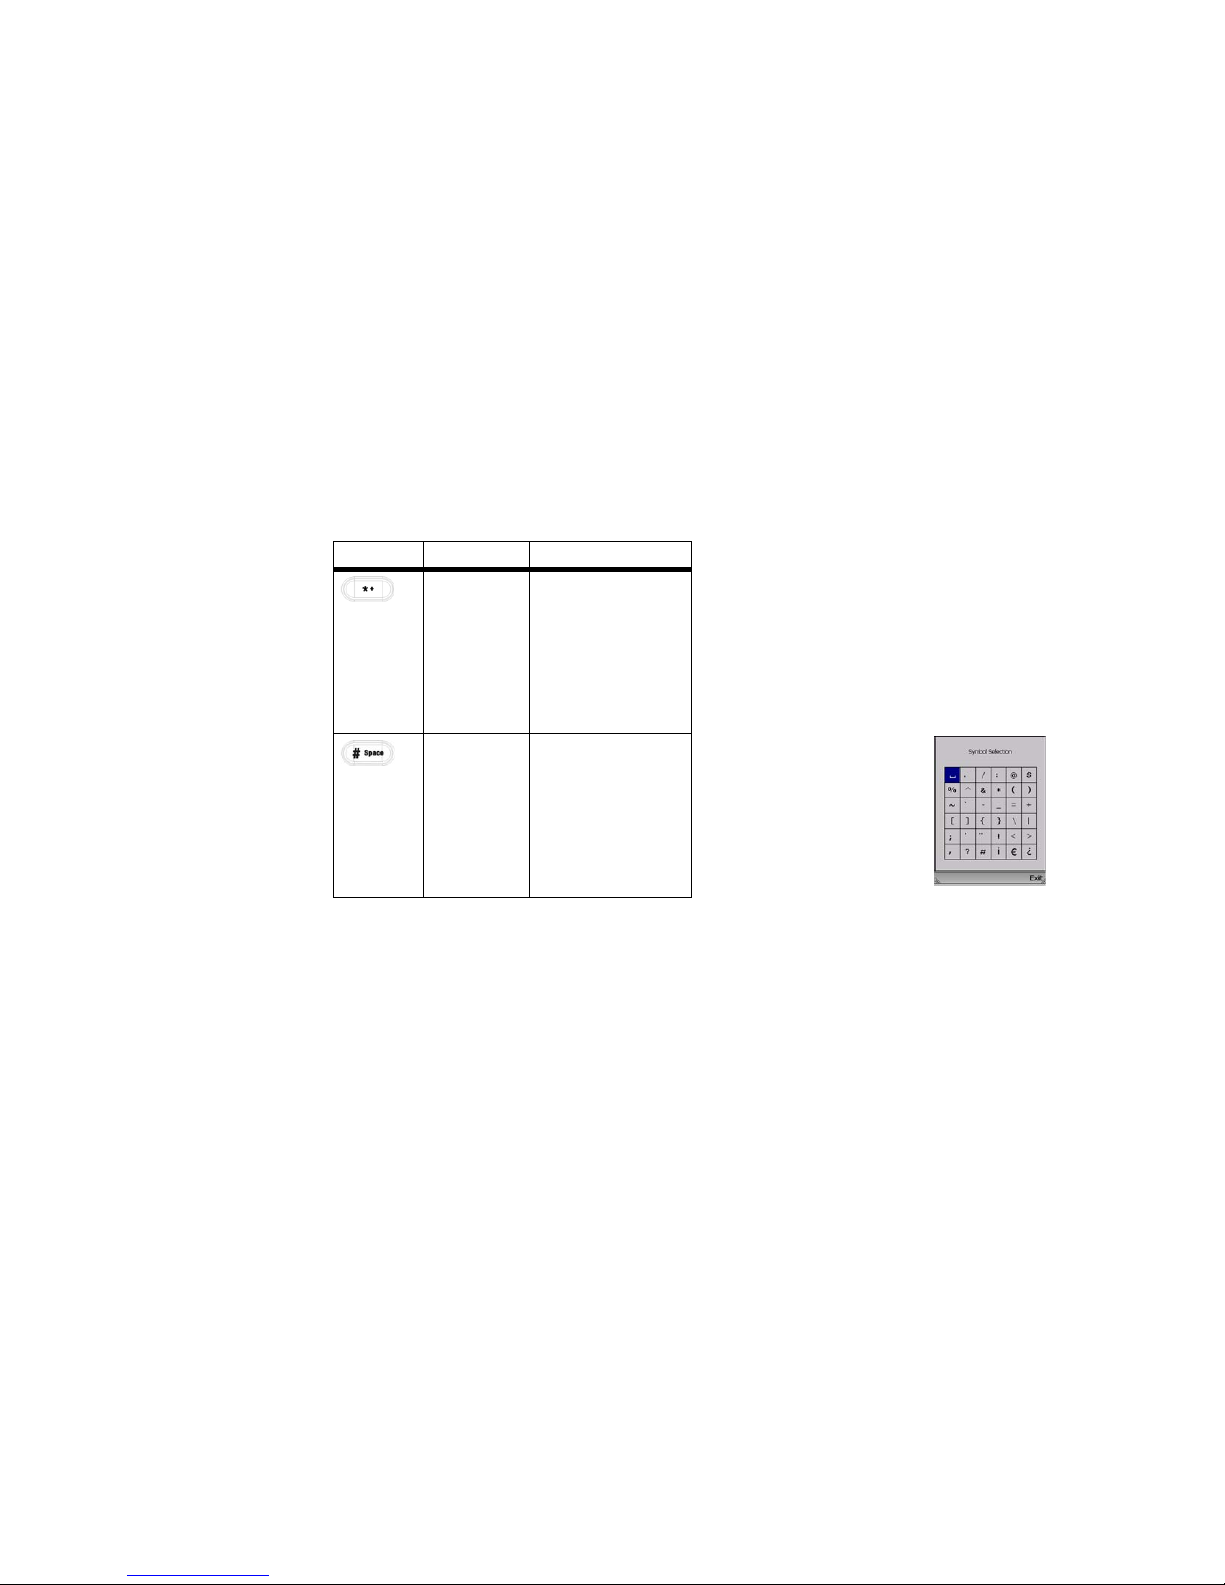
To enter an entry or setting
, use
t
he keypad. Keys 1-9 can
represent upper
c
ase letters
(A,
B, C), lowercas
e letters (a, b, c),
or numbers (1, 2,
3). Press the *
(star) key
to switc
h between
the different c
hoices.
Pr
ess the * (star) key twic
e to
enter the + sign.
Pr
ess the # (pound) key
to op
en
the Symbol Selection menu.
Use the navigation pad to move
t
hrough
the menu. When you
h
a
ve the appropriate symbol
h
i
ghlighted, press the center
sele
ction key.
Pr
ess the # (pound) key twice
to enter a space.
Chapter 2: EZLoop® 3rd Generation Wi-Fi Phone
Panels
Figure 2-3: Symbol
Selection
5
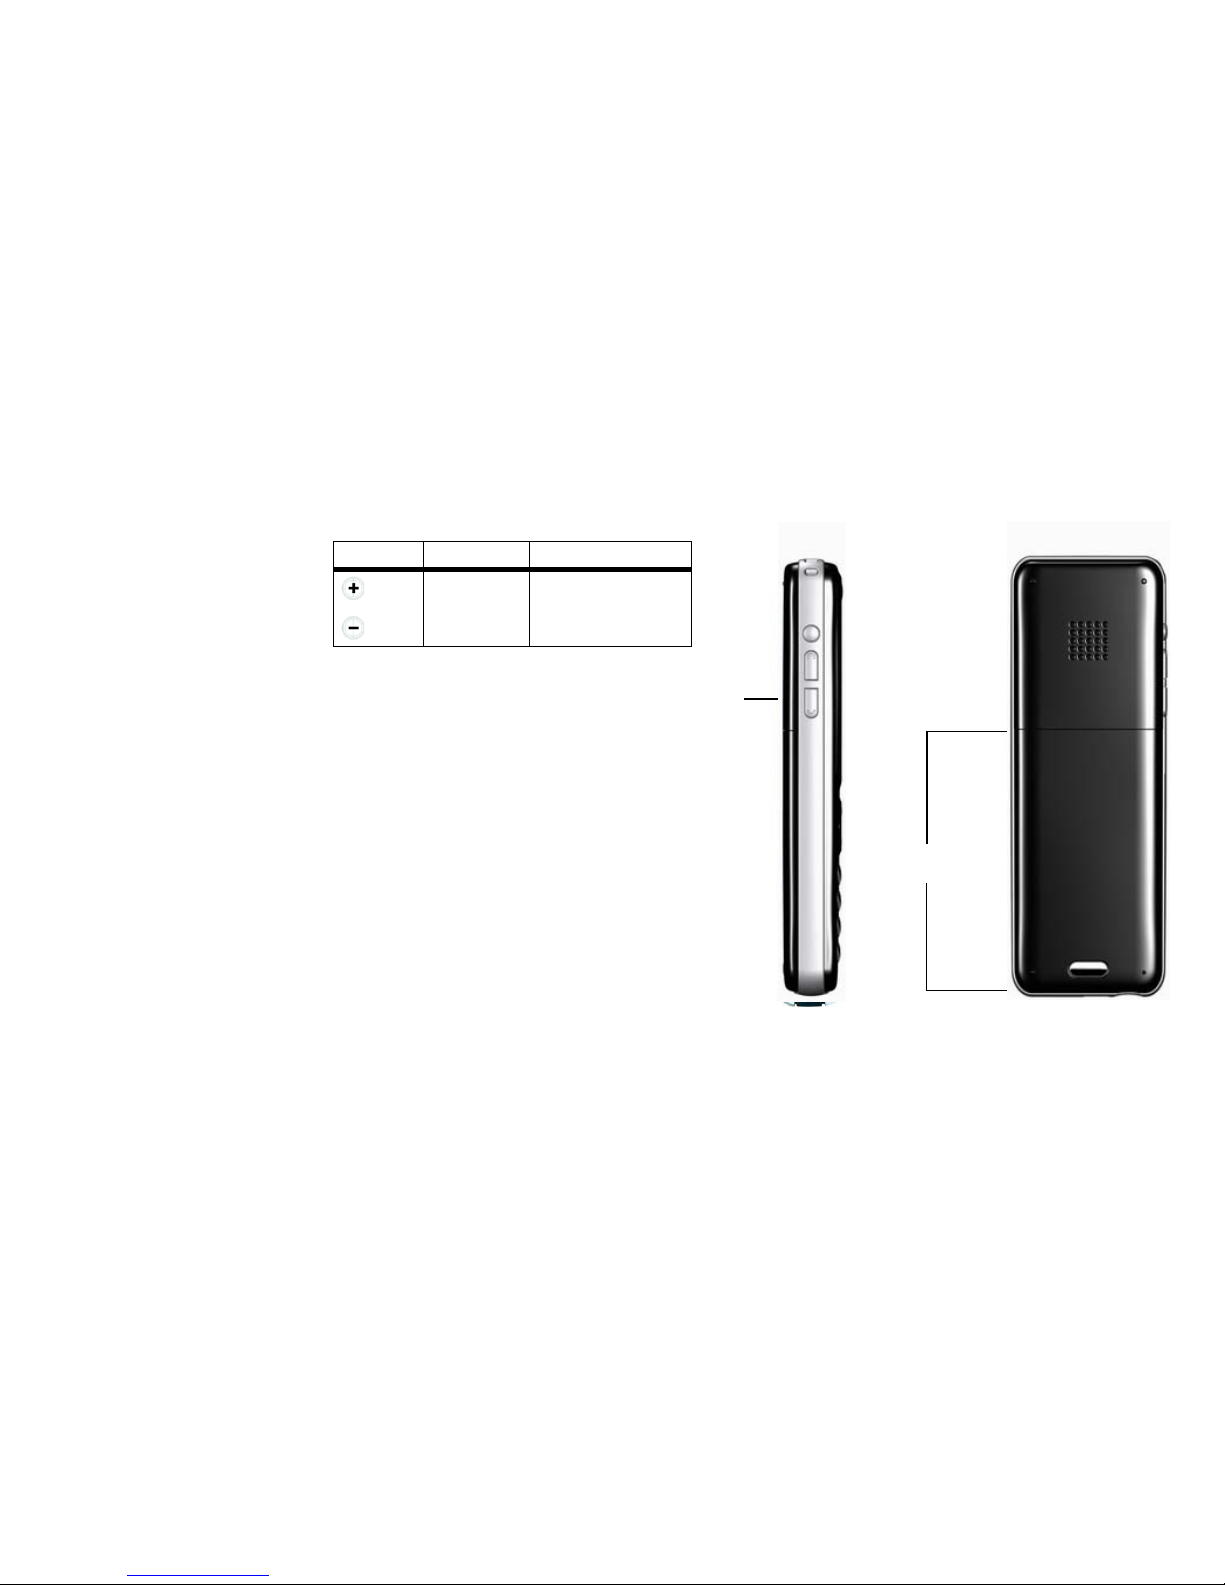
Icon
Butto
n Name Function
Volume
Incr
eases or
decr
ea
ses the volume
The Back Panel
The IP Ph
one’s ba
ttery compartment is lo
cated on th
e back
pane
l
of the IP Phone
. For direction
s on how to insert the battery,
refer
to “Chapter 3: I
nstalling and Using the EZLoop® 3rd
Generation Wi-Fi Phone.”
V
olume
Battery
Compartment
Figure 2-4:
Side Pa
nel
Figure 2-5: Back Panel
6
Chap
ter 2: EZLoop® 3rd Generation Wi-Fi Phone
Panels

Chapter 3: Installing and Using the EZLoop Wi-Fi Phone
This chapter prov
ides instructions for first-
time inst
allation and use of the IP Phone. You will insert the battery into
the
IP Phone and then set it up for your wirele
ss ne
twork and Inter
net phone serv
ice. Th
en you wi
ll
be able
to make
and receive Internet phone calls.
Inse
rting the Battery into the EZLoop® 3rd Generation Wi-Fi Phone
To insert the battery, follow these in
structio
ns:
1.
Remo
ve the co
ver of the batter
y compartment. Push do
wn on the bu
tton a
nd slide the cover do
wnward.
2.
Insert the battery. Make sure the metal contacts of the battery line up with
the metal contacts
of
the
ba
tter
y compartment.
3. Insert the door and slide it upward until it snaps into pl
ace.
Proceed to th
e next section, “Pow
ering on the EZLoop® 3rd Generation Wi-Fi Phone.”
Button
Figure 3-1: Pr
ess
the Button
7
Chapter 3: In
stalling and Using the EZLoop® 3rd Generation Wi-Fi Phone

P
o
wering on the EZLoop® 3rd Generation Wi-Fi Phone
Make sure yo
u have the a
ccount information, includi
ng necessary IP Phone settings, supplied by
your Internet
phone servic
e prov
ider
. If you already have an account set up wi
th your Inter
net phone servic
e prov
ider
, then
proceed to
step 1. If you do not have an account, then go to the website of your
In
ter
net phone servic
e prov
ider
and sign up for
service. After you have
set up an account, proceed to step 1.
1.
Make sure you have the account in
for
mation, incl
uding necessary
IP Phon
e setti
ngs, suppl
ied b
y your
Inter
net phone serv
ice provider.
2.
Plug the USB mini-B co
nne
ctor of the in
clu
ded po
wer adap
ter into the USB
mi
ni-B port of the IP Phone. Then
conne
ct th
e po
wer adapter to a standard electrical outlet.
3. The power
LED will fl
ash, alternat
ing between blue and purple. For the initial charge, al
low the battery to
charge for at least 1
0 hours, so the batter
y will ha
ve a full charge, which is i
ndicated b
y a solidly li
t power
LED. Th
is maximizes battery perfor
manc
e and
life.
NO
TE:
When the batter
y is low on po
wer, it w
ill
emit one warni
ng sound or vibration,
unl
ess the Ring T
ype is set to Silent. (For more infor
mat
ion about Ring T
ypes, refer to
Chapter
4:
Configuring the EZLoop® 3rd Generation Wi-Fi Phone.”)
When the batte
ry is fully char
ged, pr
oceed to “Na
vigating the EZLoop® 3rd Generation Wi-Fi Phone.”
Figure
3-3: Connec
t the Power
8
Chapter 3: In
stalling and Using the EZLoop® 3rd Generation Wi-Fi Phone
Na
vigating the EZLoop® 3rd Generation Wi-Fi Phone
Revi
ew the descri
ptions of the buttons you will use to navigate menus and select your c
hoices.
Icon
Butto
n Name Function
So
ft Key
Press the left or right soft key
to
se
lect the appropri
ate action
show
n on th
e left- or right- ha
nd
side of the scr
een.
Power LED
Na
vigation Pad
and Ce
nter
Selection Key
To navigate menus and control
the cursor for the web browser
,
u
s
e the navigation pad.
Use t
he center selection key to
make menu choices.
Key Choice
Call
Uses Inter
net phone line
Power or End Call
To
exit a menu without making
changes
, press this
but
ton.
Navigation Pad
a
nd Center
Selection K
ey
Soft Key
Call
Soft Key
Power
or E
nd Call
Different
alpha
-numeric
K
ey Choices,
or
+ Sign Figur
e
Figure 3-4: Fr
ont Panel
Enter Symbol or
Space
9
Chapter 3: In
stalling and Using the EZLoop® 3rd Generation Wi-Fi Phone
Icon
Butto
n Name Function
Differ
ent Key
Choi
ces or
+ Sign
Enter Symbol
or
Space
To enter an entry or setting
, use
t
he keypad. Keys 1-9 can
represent upper
c
ase letters
(A,
B, C), lowercas
e letters (a, b, c),
or numbers (1, 2,
3). Press the *
(star) key
to switc
h between
the different c
hoices.
Pr
ess the * (star) key twic
e to
enter the + sign.
Pr
ess the # (pound) key
to op
en
the Symbol Selection menu.
Use the navigation pad to move
t
hrough
the menu. When you
h
a
ve the appropriate symbol
h
i
ghlighted, press the center
sele
ction key.
Pr
ess the # (pound) key twice
to enter a space.
For
more details
, re
fer to “C
hapter 2: EZLoop® 3rd Generation Wi-Fi Phone
Panels.”
Proceed to “Setting up the EZLoop® 3rd Generation Wi-Fi Phone.”
Figure 3-5:
Symbol
Selection
10
Chapter 3: In
stalling and Using the EZLoop® 3rd Generation Wi-Fi Phone
Setting up the EZLoop® 3rd Generation Wi-Fi Phone
Before you be
gin, make sure yo
ur network ha
s an active Intern
et co
nnection.
1.
Press and hold the Power
button for
two seconds.
2.
Th
e IP Phone
wi
ll boot up and automa
ticall
y sc
an for wireless networks.
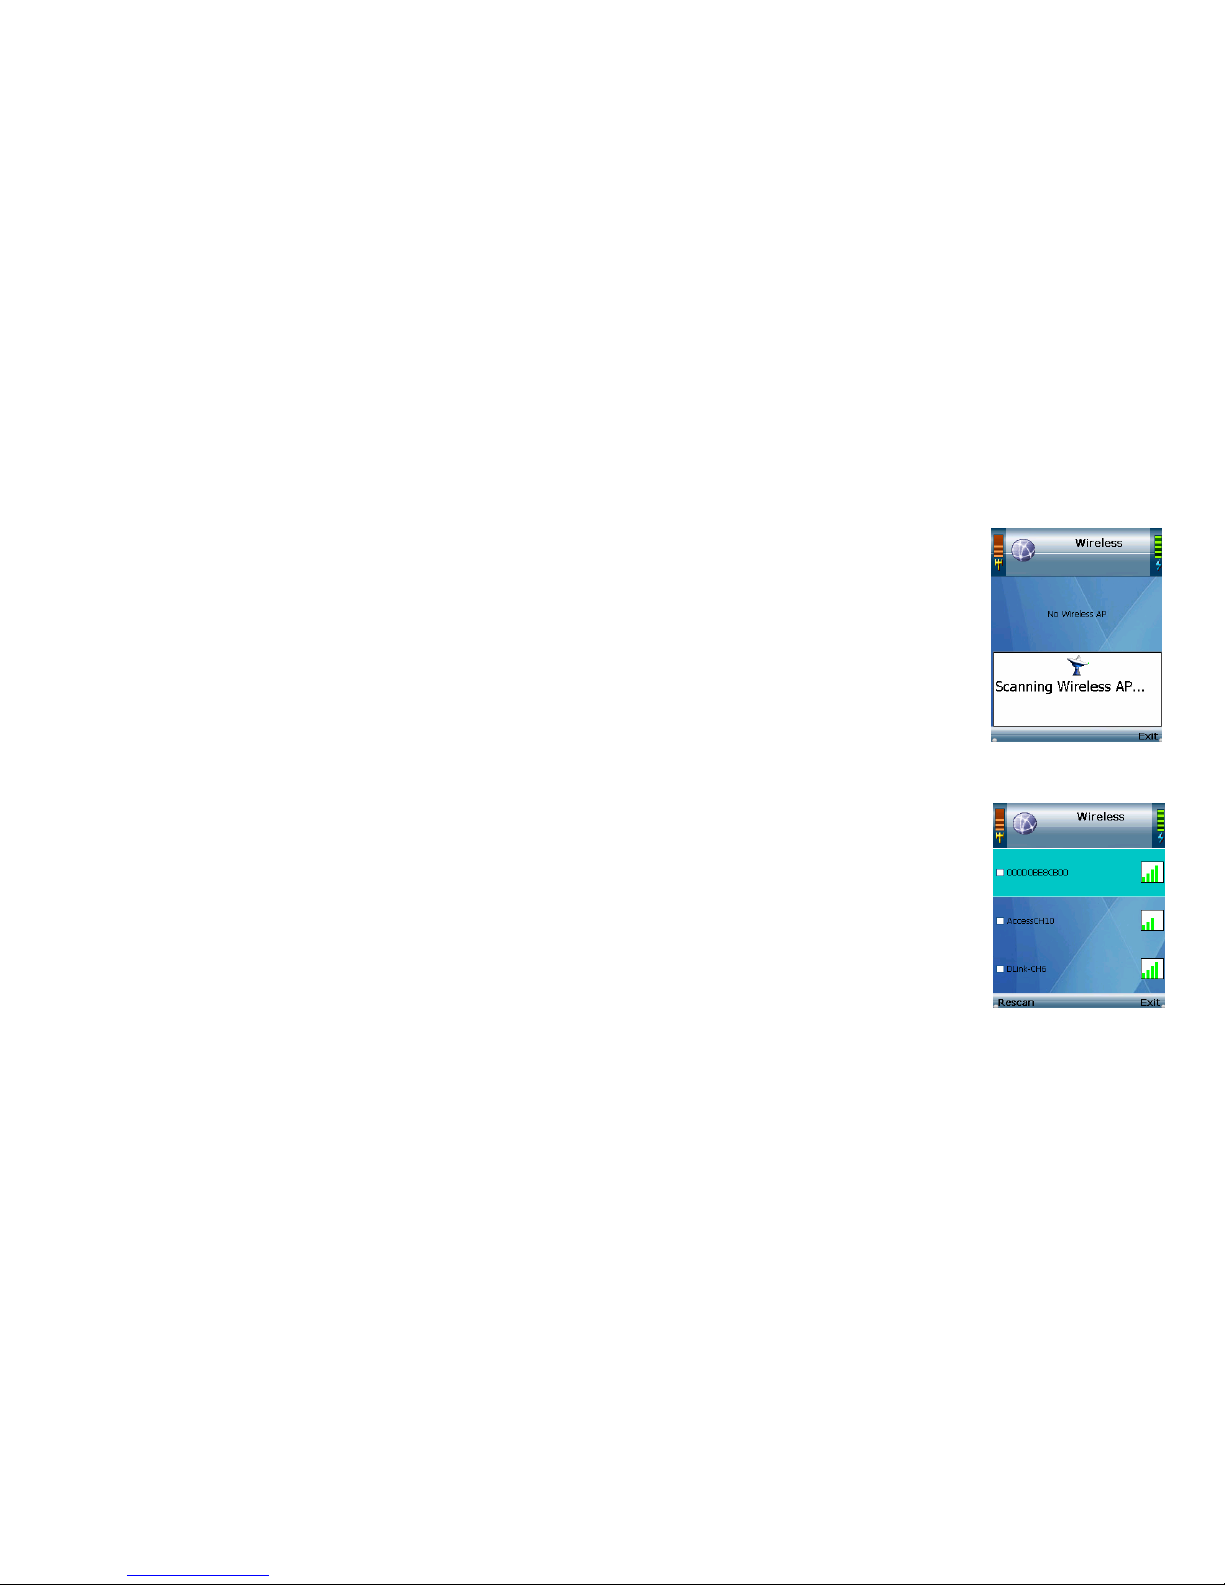
3.
A li
st of wireless netw
orks wi
ll be displayed and sh
ow their wireless ne
twor
k names (also known as Service Set
Identifi
er or
SSID), secu
rit
y status (a lock indicates wireless security), and signal strength, which is indicated b
y a bar
graph.
Figure 3-6: Scan for
Wireless Netw
ork
s
Scroll
through the network c
hoices, a
nd pr
ess the center selection key (in the middle of the navi
gation pad)
to select
the wireless network you want to use.
If the network you want is not shown, select Rescan fo
r a ne
w scan.
Figur
e 3-7: Select
Wireless
Netw
ork
11
Chapter 3: In
stalling and Using the EZLoop® 3rd Generation Wi-Fi Phone

4.
Th
e IP Phone
wi
ll automati
cally connect to the ne
twork
you ha
ve se
lected.
If WEP security is enab
led on
the
se
lected network, a new screen will a
ppear. Using the
navigation
pad, select
the appropriate transmit key number and then move to the WEP Key
fi
eld.
Enter
the
netw
ork’s
WEP
key
. Pr
ess the center selection key.
If
WPA se
curity is enabled on the selected
network, a new screen will appear. Enter the
ne
twork’
s WP
A key
. Pr
ess the ce
nter sele
ction key
.
Figure 3-8: Connect to
Wireless Netw
ork
Figure
3-9: Enter WEP
Ke
y (Secured Network)
5.
You will
be
not
ifi
ed when the IP Phone ha
s connected to
the network, and a chec
kmark
wi
ll
appear ne
xt to the name of the network.
Select Exit.
If you are NO
T an administra
tor
, please proceed to the next
section.
If you
ar
e an ad
ministra
tor, you
will need Admini
strator access to set up SIP settings. If
you do not have
Admin access, please refer to the chapter “For Admini
strators Only”.
Chapter 3: In
stalling and Using the EZLoop® 3rd
Generation Wi-Fi Phone
Figure 3-10: Enter WP
A
Ke
y (S
ecured Network)
Figure 3-11: Successful
Connection
12

6. The standb
y screen will appear
. Select Menu. If you are an administrator,
you need to set up SIP Settings.
You may ha
ve alread
y se
t your passwor
d Have you already set the passwor
d from the Web-based utility?
Figure 3-1
2: Select Menu
7.
Select Phone Se
ttings. Naviga
te the menu choi
ces and select Phone Password
. Pr
ess the Edit soft
key until the te
xt
display
s Yes.
8.
The defaul
t password is “user
”. If you ar
e unsure, ho
wever, c
hange your
passwor
d now.
Pr
ess th
e Return softkey
to
select
the settings for a passwo
rd and return to the menu.
9.
Power do
wn the phone and turn it
back on. Phone Password
displays. Pr
ess
the Call button fo
r 3 seconds.
Phone Passwor
d (Admin.)
display
s. Enter your admin pass
word (factory default is “00
00”).
TIP: Press the
star key ( * ) twic
e to access numeric key presses. Press the
OK
softkey.
10. T
he standby screen appear
s. Select Menu.
11. Phone Settin
gs will be highlig
hted. Navi
gate the menu choices, and then select SI
P Settings
. (SIP stands for
Session Initia
tio
n Protocol.) For SIP Settings, please refer the separated Quick Start Guide.
Figur
e 3-13: Select SIP
Setti
ngs (Please refer the
separated Quick Start Guide.)
13
Chapter 3: In
stalling and Using the EZLoop® 3rd Generation Wi-Fi Phone
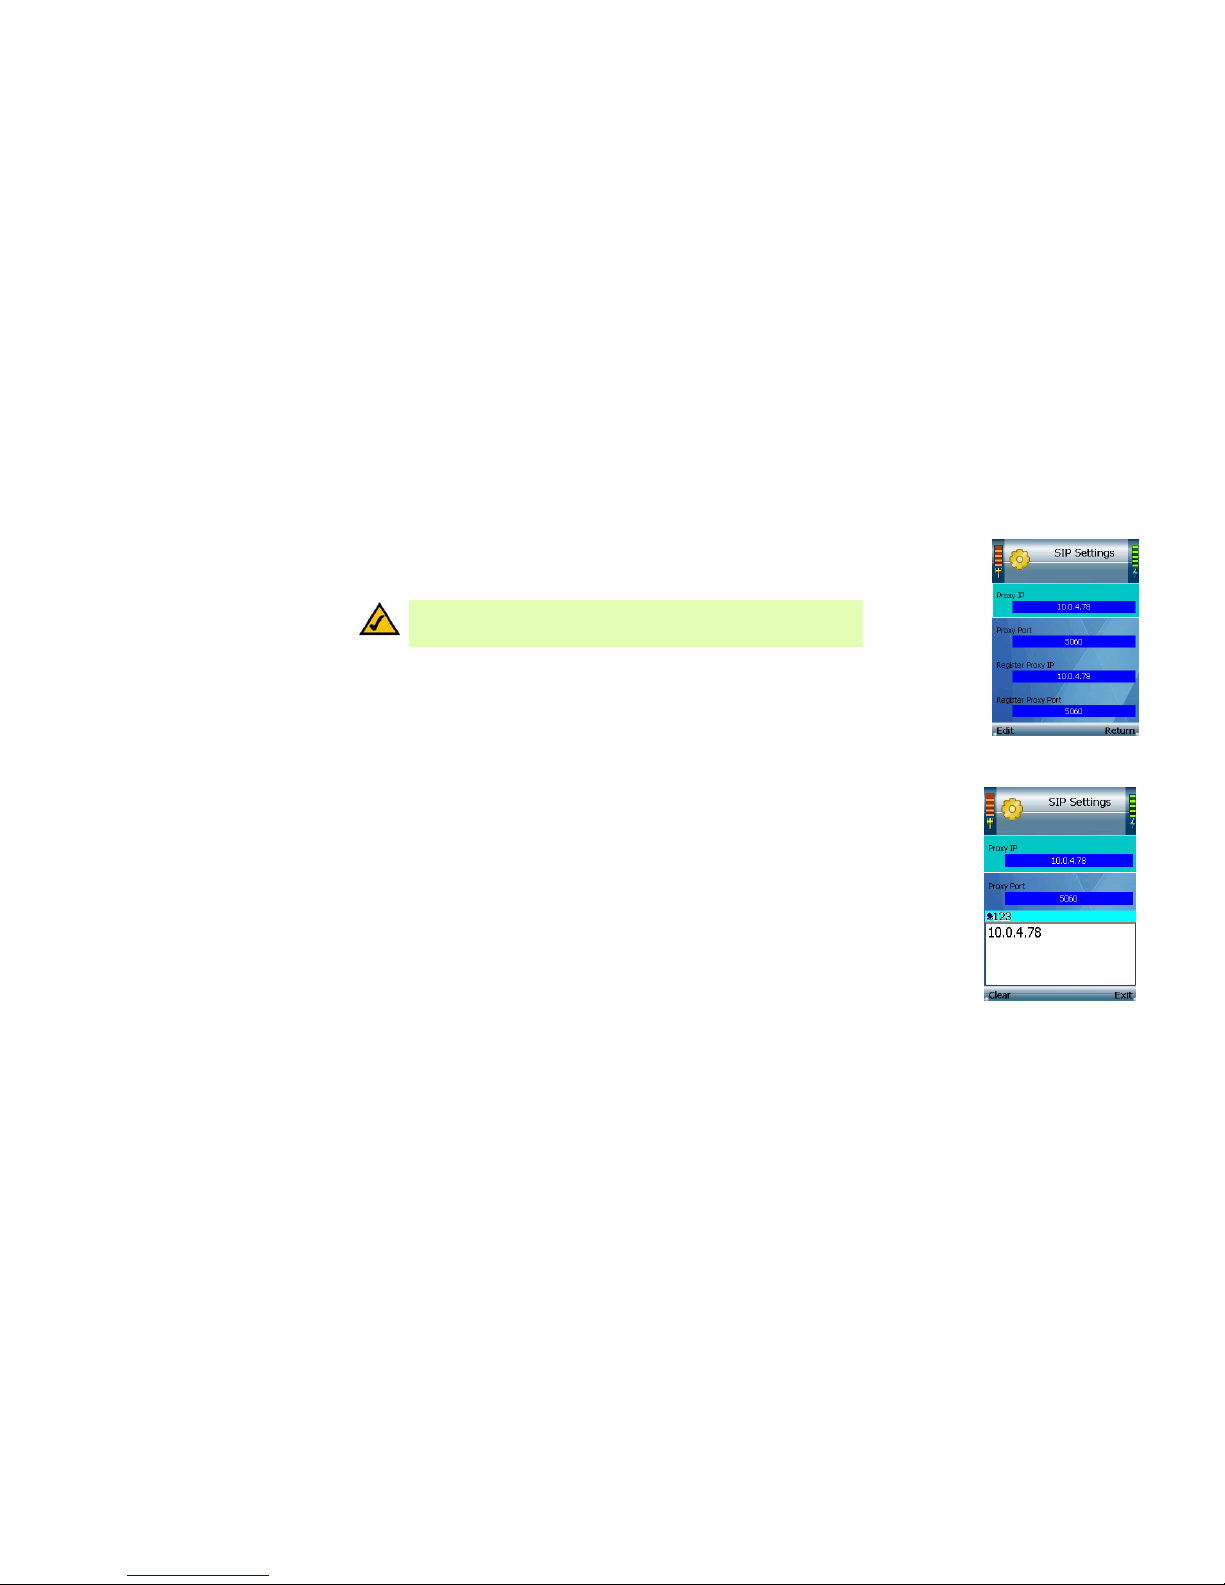
12. A list of SIP settings
will
be displayed. For th
e Proxy IP sett
ing, select Edit.
NO
TE:
The Proxy IP addr
ess and other in
formation should have been su
pplied by your
Inter
net phone serv
ice provider
. If you do not ha
ve this inform
ation, contact your Inter
net
phone serv
ice provider.
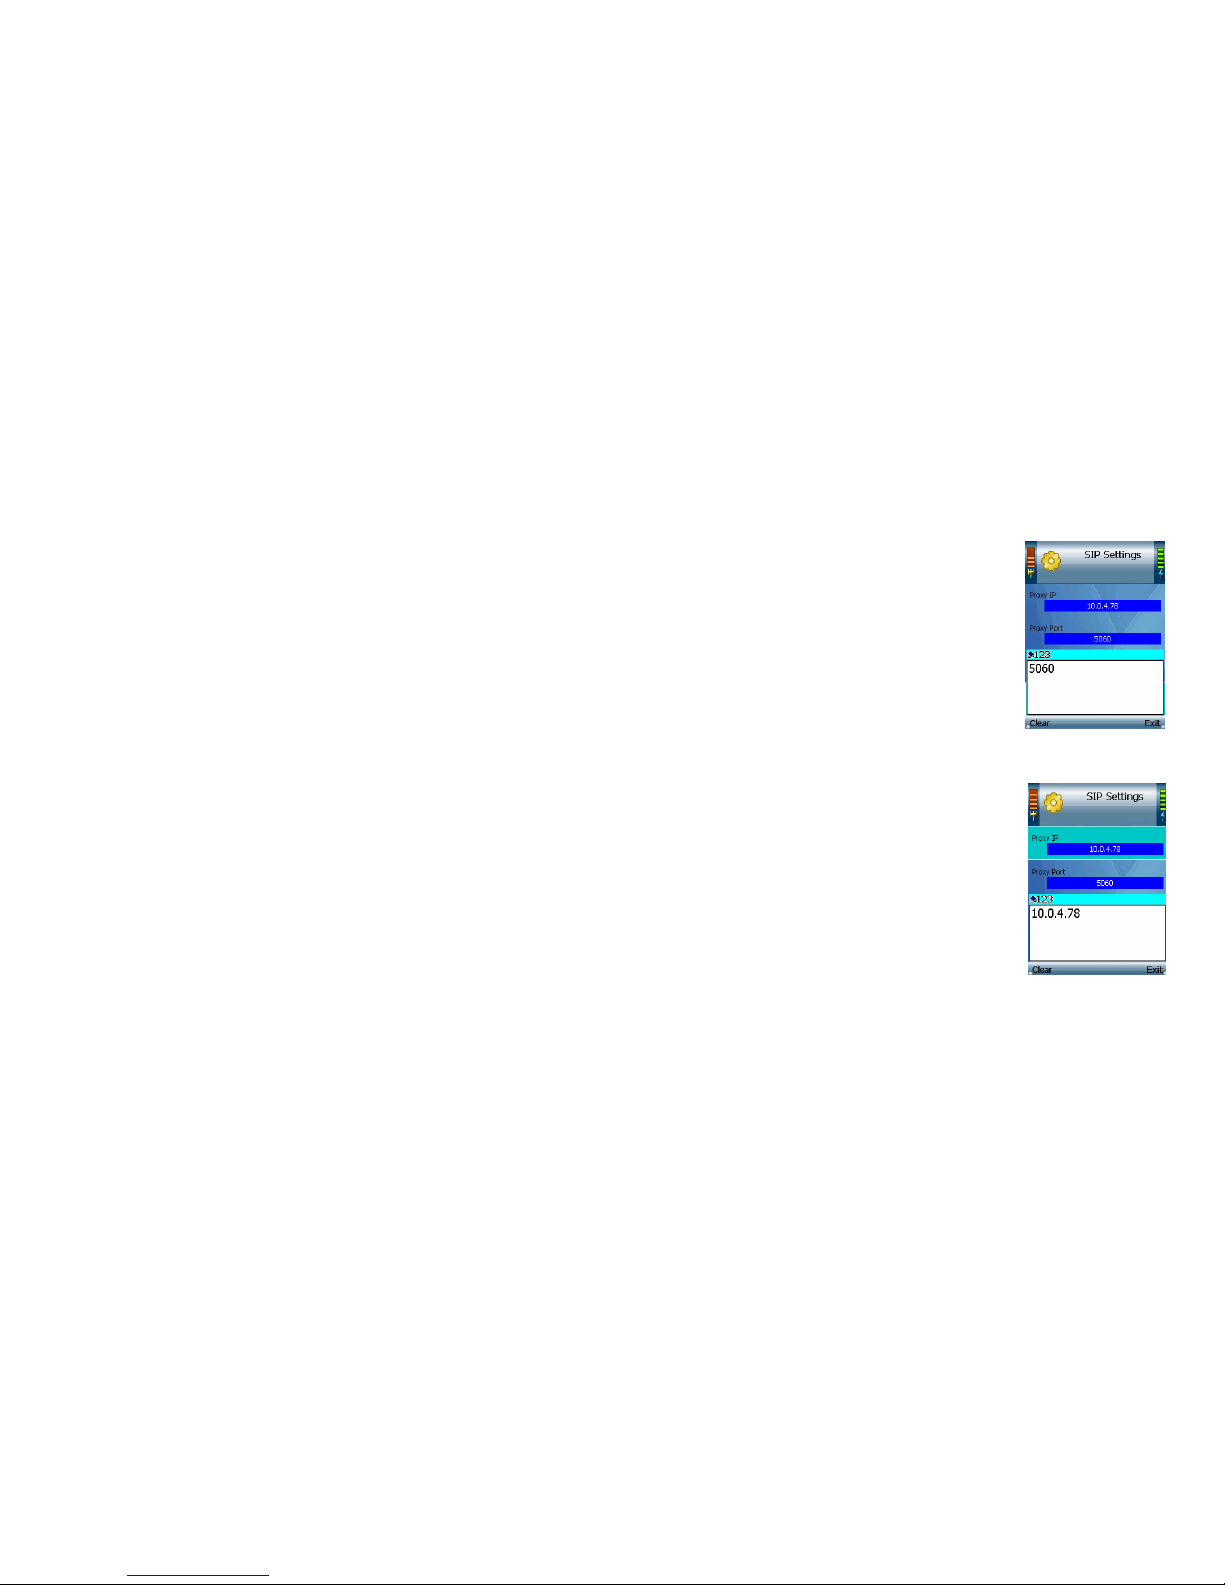
13. Enter the Proxy IP addr
ess in
the new window
, and then press the center selection key.
Figure 3-14: Edit Proxy IP
Figure 3-15: Save
Pr
oxy IP
14
Chapter 3: In
stalling and Using the EZLoop® 3rd Generation Wi-Fi Phone
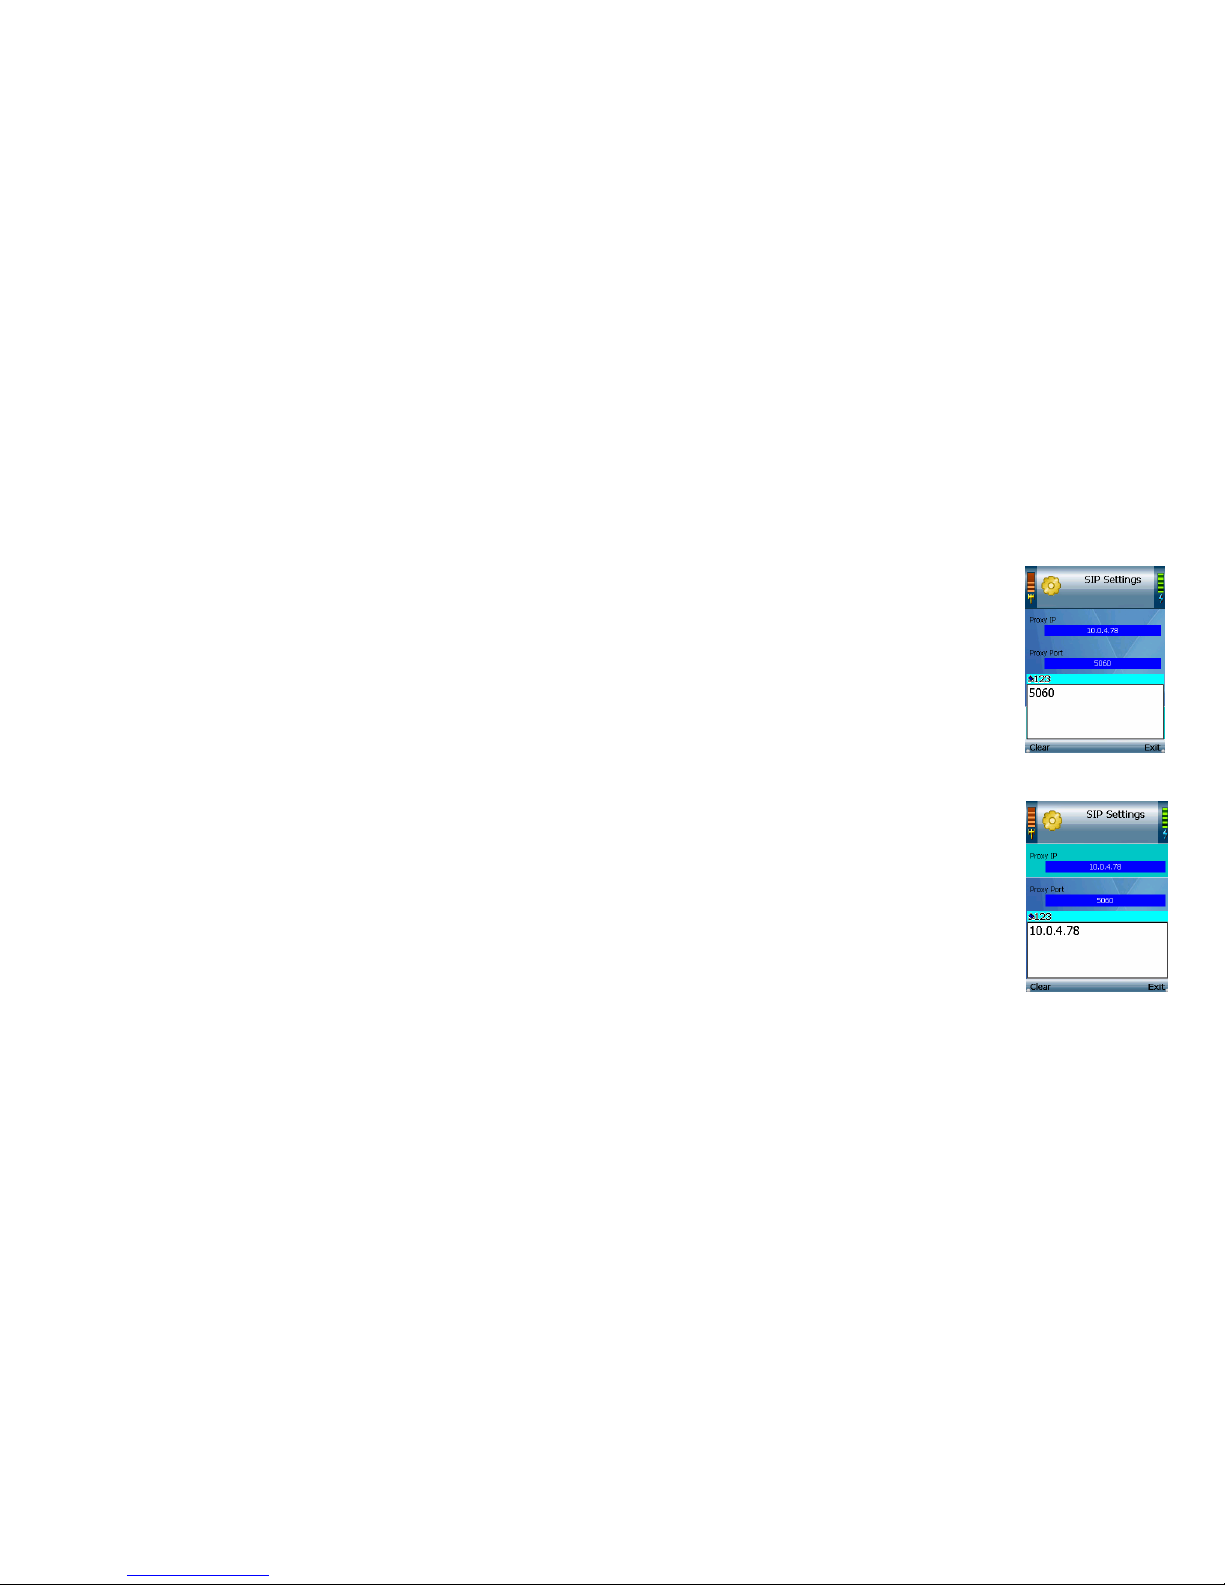
14. Scroll do
wn to Pr
oxy Port, and select Edit.
15. Enter the Proxy Po
rt number address in the new window,
and then press the center selection key.
16. Scroll do
wn to Regist
er Proxy IP
, and select Edit.
17. Enter
the Regi
ster Pr
oxy IP addr
ess in
the new window, and then pr
ess the center selection key.
Figur
e 3-16: Save Proxy
Port
Figure 3-17: Save
Register Pr
oxy IP
15
Chapter 3: In
stalling and Using the EZLoop® 3rd Generation Wi-Fi Phone
18. Scroll do
wn to Register
Proxy Port, and select Edit.
19. Enter
the Regi
ster Pr
oxy Po
rt number in the new window
, and then pr
ess the center selection key.
20. Scroll
do
wn to Outbound Proxy IP
, and select Edit.
21. Enter the Outbound Proxy IP addr
ess in the new window, and then press the center
selection key.
Figure 3-18: Save
Regist
er Pr
oxy Port
Figure
3-19: Save
Ou
tbound
Proxy IP
16
Chapter 3: In
stalling and Using the EZLoop® 3rd Generation Wi-Fi Phone
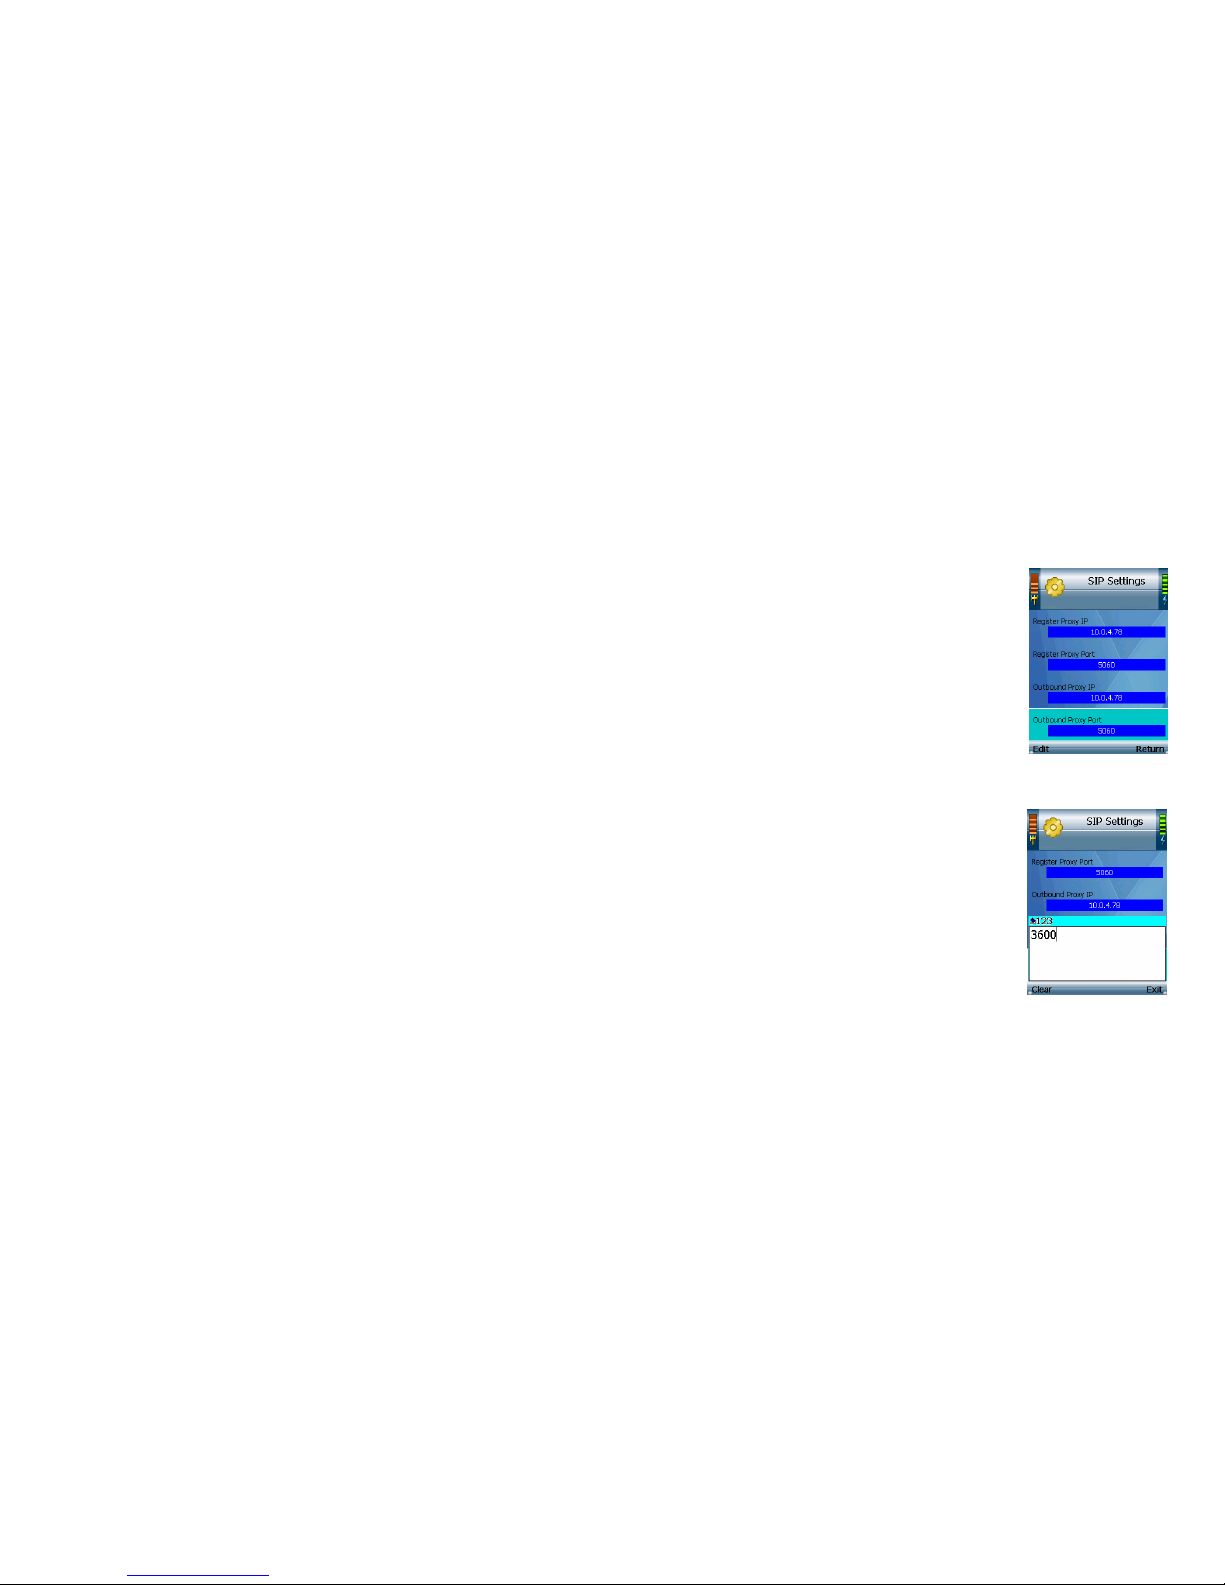
22. Scroll
down to Outbound Proxy Port, an
d select Edit.
23. Enter
the Outbound Proxy Port number
in th
e new wi
ndow,
and then pr
ess the center selection key.
24. If your Internet
phone service provider did not provide an Expire Ti
me setting
, then keep the default setting,
3600
seconds, and proceed to step 22.
If your Inter
net phone serv
ice provider provided an Expire Time se
tti
ng, then scroll down to Expire Time, a
nd
select Edit.
25. Enter the Ex
pire Time in the new window, and then pr
ess the center selection key.
Figur
e 3-20: Edit
Outbo
und Prox
y Port
Figure
3-21: Save
Expire
Time
17
Chapter 3: In
stalling and Using the EZLoop® 3rd Generation Wi-Fi Phone
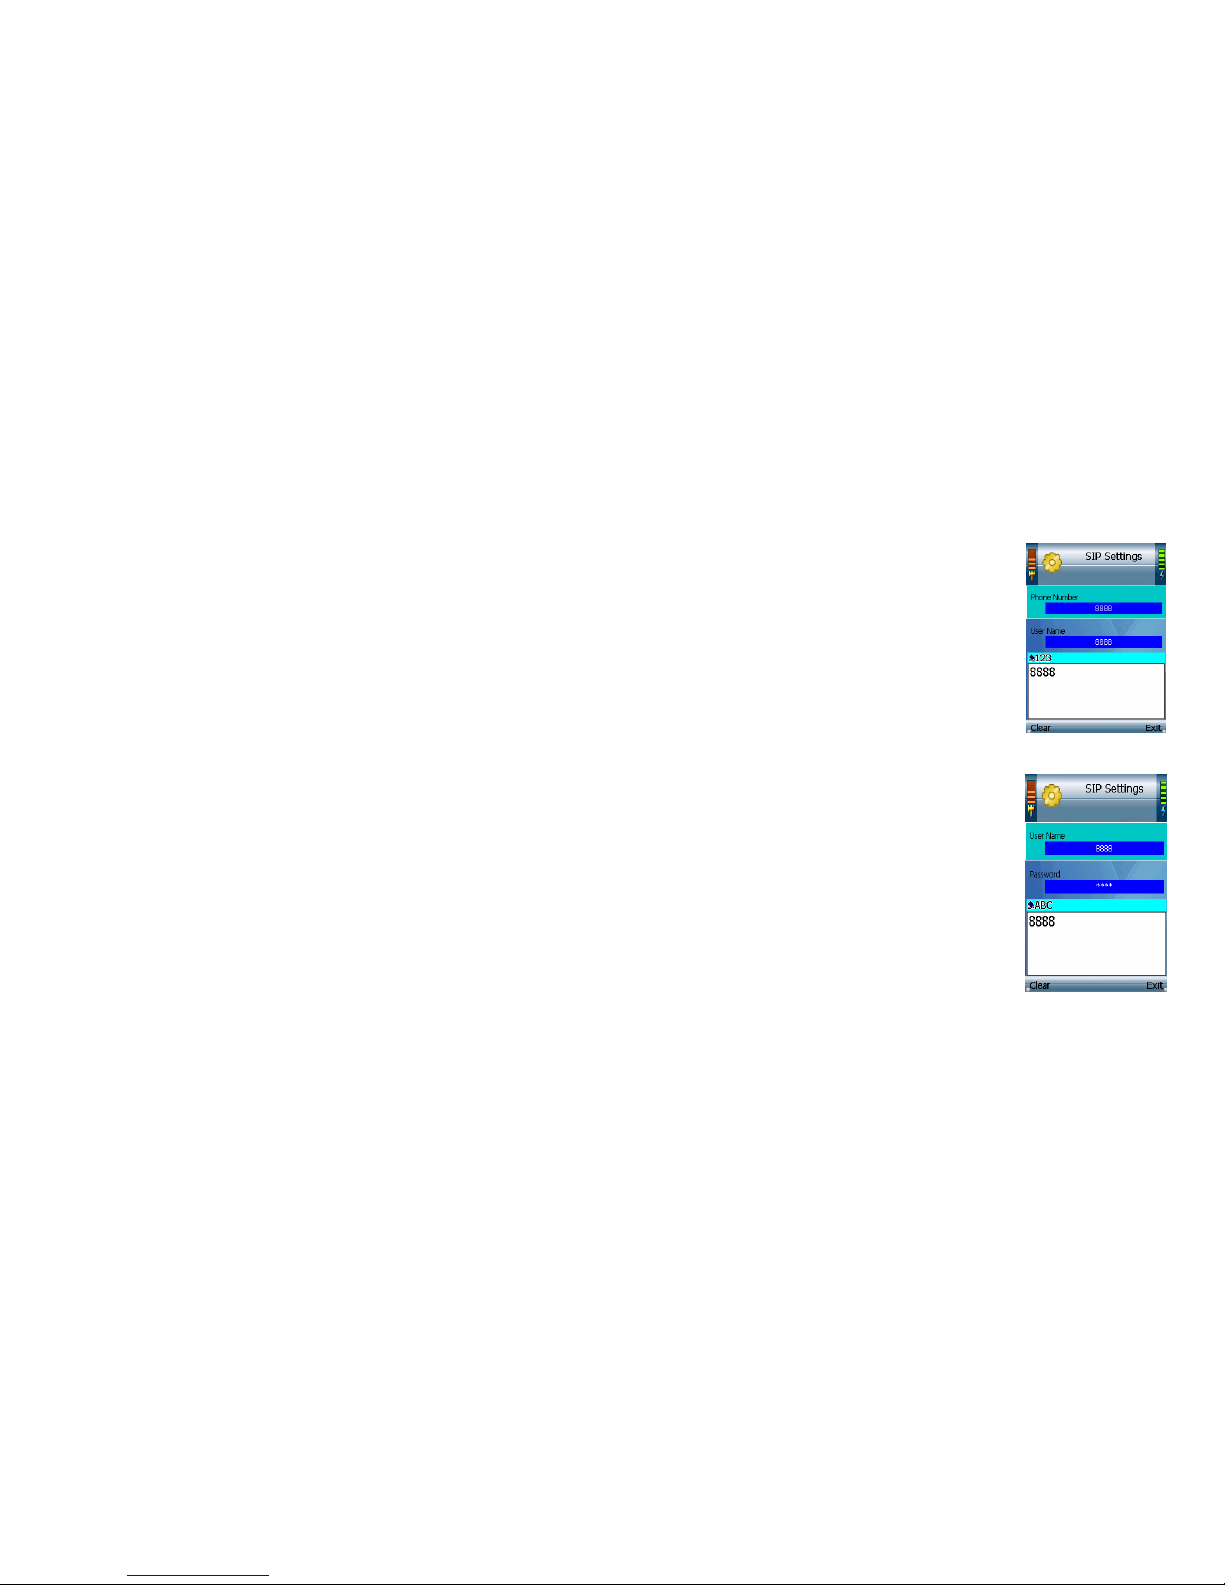
26. Scroll down to Phone Number, and select Edit.
27. Enter the P
hone Number
you will use for Internet ph
one call
s, a
nd then pr
ess the center selectio
n key.
28. Scroll down to Us
er Name
, and select Edit.
29. Enter the User Name in the new window,
and then press the center selection key.
Figure 3-22: Save
Phone
Number
Figure 3-23: Save
User
Name
18
Chapter 3: In
stalling and Using the EZLoop® 3rd Generation Wi-Fi Phone

30. Scroll down to Pass
wor
d, and select Edit.
31. Enter the Pass
word, and then press the center selection key.
32. On the SIP Settings screen, select Return.
Figure 3-24: Save
Password
Figur
e 3-25: Save SIP
Sett
ings
19
Chapter 3: In
stalling and Using the EZLoop® 3rd Generation Wi-Fi Phone

33. On the main menu, select Return.
34. T
he standb
y screen will indicate that the
IP Phone is
ready for
phone call
s.
Th
e installation of the EZLoop® 3rd Generation Wi-Fi Phone
is co
mplete. Pr
oceed to the next
sect
ion
, “Using
the
EZLoop® 3rd
Generation Wi-Fi
Phone.”
Figure 3-26: Re
turn to
St
andb
y Screen
Figure 3-27: Standby
Scr
een
20
Chapter 3: In
stalling and Using the EZLoop® 3rd Generation Wi-Fi Phone

Using the EZLoop® 3rd Generation Wi-Fi Phone
To make a call, enter the phone number you want to call. Then pr
ess the Call
button. When you ar
e on a phone
ca
ll, select
Option
to se
e a list of menu choi
ces. Select
HangUp
to end the call.
To change the volume, use the +
and - bu
ttons on the side pane
l of the IP Phone. For
more information about the
buttons
on the IP Phone, refe
r to “Chapter 2: Getting to Know the EZLoop® 3rd Generation Wi-Fi Phone.”
LineOption
When you are
on a call, you have several options available. Press
the le
ft softkey to make a selection, and press
the
right softkey to r
e
turn to the pr
evious menu. Use the na
vigation pad to scroll through menu choices.
HangUp
. To end the call, select Ha
ngUp.
Mute. To mute the call, select Mute
. Th
en select
UnMute
when you are ready to talk.
Hold
. To put a call on hold, select Hold
. Then select UnHold when you are read
y to return to this call.
Line-2
. When you want to switc
h back a
nd forth between two separate conver
sations, us
e the Line
-2 feature
.
When you ar
e on your first call, select Line-2
to switch to a second line
. A new window will
appear. Enter the
phone number of the second call,
and th
en press the Call button. The
current ca
ll will be
put on hold, and you will
be
switched to
the
second call. Select
Switch to switc
h back
to the firs
t call.
Transfer
. There are two type
s of tran
sfer featur
es av
ailable.
Use the Transfer feature when you want to introduce the
ca
lle
r yo
u are transferring. Use the B
lind TFR
(Tra
nsfer)
feat
ure when yo
u want to transf
er the caller with
out
introduction. When
you are on your call
, select Transfer
. A new window will appear
. Enter
the phone numb
er to
which you want to tr
ansfer the call, and then pr
ess the Call
button. When the second call is answered, speak to the
answering party and select Transfer
. Th
en hang up.
Figure 3-28: Call
Connected
Figure
3-29: Line
Op
tions

21
Chapter 3: In
stalling and Using the EZLoop® 3rd Generation Wi-Fi Phone
Blin
d TFR
. Fo
r a bli
nd transfer, select Blind
TFR
. Di
al the number to whic
h you want
to tr
ansfer the call. Select
Blin
d TFR
again. Then hang up. Wh
en you are on your call, select Blind
TFR
. A new wi
ndo
w wi
ll appear
. Enter
the
phone number to which you want to tr
ansfer the call, and
then press the Call
button. Then hang up.
Conference
. When you are on your call, select Conference. A new window will appear . Enter the phone number
of
the second call, and then pr
ess the
Call
button. When the second call is answered, se
lect Conference.
Second In
coming Call
When you have a second call coming in, you can select Option
to see a list of menu choices. Select HangUp
to
end
the call
.
Keyguard
To lock the keys, press and hold do
wn the # key. To unlock the keys, se
lect Un
lock and then press the *
key.
Voicemail
For
instructions o
n ho
w to check yo
ur voicemail, contact your Internet phone serv
ice provider
.
To co
nfigur
e a
dditional settings, pr
oceed to “Chapt
er 4: Configuring the EZLoop® 3rd Generation
Wi-Fi Phone.”
Figure 3-3
0: Second Call
Figure 3-31: Unlock Ke
ys
22
Chapter 3: In
stalling and Using the EZLoop® 3rd Generation Wi-Fi Phone

Chapter 4: Configuring the
EZLoop® 3rd Generation Wi-Fi
Phone
Fol
low these instructions to
co
nfi
gur
e the IP Phone’
s settings. You will use these
buttons to navi
gate
menus and select your c
hoices.
Power LED
Icon
Butto
n Name Function
So
ft K
ey
Press the left or right soft key to
select the appropri
ate action
show
n on th
e left- or right- ha
nd
side of the scr
een.
Navigation Pad
Soft Key
Key Choice
Soft Key
Na
vigation Pad
and Ce
nter
Selection Key
To navigate menus and control
the cursor for the web browser
,
u
s
e the navigation pad.
Use t
he center selection key to
make menu choices.
a
nd Center
Selection Key
Call
Power
or E
nd Call
Power or End Call
To
exit a menu without making
changes
, press this
but
ton.
Alph
a or
nume
ric K
ey
Choices, +, or *
Sign
Figure
4-1: Fr
ont Panel

Icon
Butto
n Name Function
Differ
ent Key
Choi
ces or
+ Sign
Enter Symbol
or
Space
To enter an entry or setting
, use
t
he keypad. Keys 1-9 can
represent upper
c
ase letters
(A,
B, C), lowercas
e letters (a, b, c),
or numbers (1, 2,
3). Press the *
(star) key
to switc
h between
the different c
hoices.
Pr
ess the * (star) key twic
e to
enter the + sign.
Pr
ess the # (pound) key
to op
en
the Symbol Selection menu.
Use the navigation pad to move
t
hrough
the menu. When you
h
a
ve the appropriate symbol
h
i
ghlighted, press the center
sele
ction key.
Pr
ess the # (pound) key twice
to enter a space.
Figure 4-2: Symbol Selection
26
Chap
ter 4: Configuring the EZLoop® 3rd Generation Wi-Fi Phone

Status Information
The standby screen wi
ll display a vari
ety of informatio
n abou
t the IP Phone.
Wireless Signal Strength
At the top of the screen, the icon on the left indicates wireless si
gnal streng
th.
Time Display
Wireless
Signal
Strength
Battery
Strength
The current time is shown. To change this time and its form
at, analog or digital
, use the main menu.
Status of the IP Phone
The IP Ph
one ha
s three status me
ssages. “Ready” i
ndicates that the IP Phone is ready to make and receive ca
lls.
“Not R
eady” i
ndicates that the IP Phone has no wire
less connection. “Not Register
ed” indicates that the IP
Phone
does not ha
ve a register
ed phone number.
Da
te Display
The date display gi
ves you th
e current date
. You can ch
ange this date using the main menu.
Battery Strength
The icon
on the righ
t of the screen indicates battery streng
th of the IP Phone.
Figure 4-3: Standby
Scr
een
27
Chapter 4: Configuring the EZLoop® 3rd Generation Wi-Fi Phone

Wire
less Network Name
The screen displa
ys the name
of the
wireless ne
twork used by the IP Phone.
Internet
Phone Number
The Internet
phone numbe
r of the
IP Phone
is shown.
Menu
Pr
ess the le
ft soft key button to view the ma
in Menu. It
s choices will be
described in further
detail be
low.
Phonebook
Pr
ess the right soft key to access the Phonebook. Thi
s can also be accessed through the main menu.
Web Browsing
Pr
ess the ce
nter sele
ction key
to launc
h the web brow
ser .
Fi
gur
e 4-4: Standby
Scr
een
Figur
e 4-5: Main Menu
28
Chap
ter 4: Configuring the EZLoop® 3rd Generation Wi-Fi Phone

Overview
For
your convenience,
you can confi
gur
e your EZLoop® 3rd Generation Wi-Fi Phoneeither on the IP phone or you
can use the
Web-based utility provided. The We
b-base
d utility is av
ailable to both users and administrators of the IP
Phone.
NOTE: User has limited acce
ss to Internet Tele
phony Service
Provider (I
TSP)-r
elated
co
nfiguration. You will
need admini
strator’
s access to access al
l setti
ngs.
How
to Access the Web-based Ut
ility
First, you ne
ed the IP Phone’s IP address. Use your EZLoop® 3rd Generation Wi-Fi Phoneto
access th
e
IP address.
From
the main
Menu on the
IP Phone,
select In
formation
and pr
ess the center sele ction
k
ey. The IP
address is listed
here.
To access the Web-based uti
lity of the IP Phone,
fr
om your PC
, launc
h any
Internet browser
. In the
Addr
ess
fi
eld, enter http://
and then the phone’s IP addr
ess. Pr
ess the Enter
key.
To login as a user
, the Lo
gin
screen appears and asks yo
u for your User
Name
and Password. Enter
user
in the
User
field. The default password is user
. Click the Login
button.
To login as
an administrator, from the Login screen
, enter
admin for
username and
your admin
passwor
d. Click the Login
button.
NOTE: The default Admin pass
word is “
0000”, but may have changed if you ha
ve an ITSP.
Administrator Access
Most se
tti
ngs
on the EZLoop® 3rd Generation Wi-Fi Phoneare for th
e e
nd user. Howe
ver,
there are some
settings that require
admini
strato
r privil
eges. Fo
r more information, please se
e the section of this
user guide for
administr
a
tors.
Internet Telephon
y
Service Prov
ider (ITSP):
A
company that provides voic
e
o
v
er I
nternet protocol
services.
29
Chapter 4: Configuring the EZLoop® 3rd Generation Wi-Fi Phone

Settings of the EZLoop® 3rd Generation Wi-Fi Phone
You wi
ll ha
ve ten menu choices: Call Log,
Phone Book, Netw
ork Setti
ngs, Wireless, Phone Settings, SIP Settings
,
Web Site
, Web Cam
, and Information.
Call Log
Scro
ll through these choices a
nd pres
s the le
ft soft key to make a selectio
n. Se
lect Return
to return to
the
pr
evious menu.
Missed
A
li
st of missed calls will be di
splayed. Scroll through the calls to select th
e call you want. Select Option
to see
menu choices for the selected call
. Se
lect Return
to return
to the previous menu.
Option
You have the
se choices: Dial (available
when yo
u have contacts in
the
Phone Book), De
lete (ava
ilabl
e
when yo
u have contacts in the Phone Book), Delete All, and Add to (or Modify) PhoneB
ook
. Se
lec
t
Return
to return to the pr
evious menu.
Dial
. Select Dial
to dial th
e phone number of the selected call.
Delete
. Select Delete to de
lete the se
lecte
d ca
ll.
Figure
4-6: Call Log
Delete All
. Select Delete All to
dele
te all calls.
Add to (or Modify) PhoneBook
. If the call information is new, select Add
to
Ph
oneBook to
add the
phone number to the Phone Book. To select the type of phone number it is, scroll do
wn and select
Figur
e 4-7: Call Log
Options
Figure
4-8: Type of
Phone Number
30
Chap
ter 4: Configuring the EZLoop® 3rd Generation Wi-Fi Phone

Home,
Office,
Mobile,
Home-2,
Office-2
, or Mobile-2
(select Return
if you want to return
to
the
previous
menu). The Add Person screen will
appear. Then fo
llow the instructio
ns for the Phone
Bo
ok settings.
If t
he phone number is already in the Phone Book, select
Modify PhoneBook to modify its entr
y in the Phone
Bo
ok. The Phone Book screen will automaticall
y a
ppear
. Fo
llo
w the instructio
ns fo
r the
Phone Book setti
ngs.
Received
A
li
st of rece
ived call
s will be displayed. Select Option
to see menu ch
oices for th
e selected call
. Se
lect Re
turn
to return to the pr
evious menu.
Option
You ha
ve thes
e choice
s: Dial
(available wh
en yo
u have contacts in the Phone Book), Delete
(available when yo
u
ha
ve contacts in the Phone B
ook
), Delete
Al
l, and Add to (or Mo
dify) PhoneBo
ok. Select Return
to return to the
pr
evious menu.
Dial
. Select Dial
to dial th
e phone number of the selected call.
Delete
. Select Delete to de
lete the se
lecte
d ca
ll.
Delete All
. Select Delete All to
dele
te all calls.
Add to (or Modify) PhoneBook. If
the call
information is new, select Add to PhoneBook to add the phone
number to the Phon
e Bo
ok. To sele
ct the
type of phone number it is, scro
ll down an
d se
lect Home,
Office
,
Mobile,
Home-2,
Office-2
, or Mo
bile-2 (select Return
if you want to return to the pr
evious menu). The Add
Person screen wi
ll appear
. Then follow the instructions for
the
Phone B
ook
se
ttings.
If t
he phone number is already in the Phone Book, select
Modify PhoneBook to modify its entr
y in the Phone
Bo
ok. The Phone Book screen will automaticall
y a
ppear
. Fo
llo
w the instructio
ns fo
r the
Phone Book setti
ngs.
Chapter 4: Configuring the EZLoop® 3rd Generation Wi-Fi Phone
31

Dialed
A
li
st of di
aled
calls wi
ll be di
splayed.
Se
lect Option
to
se
e menu choice
s for the se
lecte
d call. Select
Return
to
return to the pr
evious menu.
Option
You ha
ve thes
e choice
s: Dial
(available wh
en yo
u have contacts in the Phone Book), Delete
(available when yo
u
ha
ve contacts in the Phone B
ook
), Delete
Al
l, and Add to (or Mo
dify) PhoneBo
ok. Select Return
to return to the
pr
evious menu.
Dial
. Select Dial
to dial th
e phone number of the selected call.
Delete
. Select Delete to de
lete the se
lecte
d ca
ll.
Delete All
. Select Delete All to
dele
te all calls.
Add to (or Modify) PhoneBook. If
the call
information is new, select Add to PhoneBook to add the phone
number to the Phon
e Bo
ok. To sele
ct the
type of phone number it is, scro
ll down an
d se
lect Home,
Office
,
Mobile,
Home-2,
Office-2
, or Mo
bile-2 (select Return
if you want to return to the pr
evious menu). The Add
Person screen wi
ll appear
. Then follow the instructions for
the
Phone B
ook
se
ttings.
If t
he phone number is already in the Phone Book, select
Modify PhoneBook to modify its entr
y in the Phone
Bo
ok. The Phone Book screen will automaticall
y a
ppear
. Fo
llo
w the instructio
ns fo
r the
Phone Book setti
ngs.
32
Chap
ter 4: Configuring the EZLoop® 3rd Generation Wi-Fi Phone

Phone Book
You will see a li
st of contacts (whe
n you have contac
ts in the Phone Book
). To search
for an entr
y,
enter the contact’s name in the field provided. The
approp
riate
entr
y will
be sele
cted.
Select Option
to see menu ch
oices. Select Return
to return to the previous
menu.
Option
You have these choices: Edit (avail
able when you have contac
ts in the
Ph
one B
ook),
Add, De
lete
Figur
e 4-9: Select
Ph
one Book
Figure 4-10: Phone
Book
(available wh
en you have contacts in th
e Phone Book), a
nd Mem
Usage. Select
Return
to return to
the
previous
menu.
Edit. Select Edit
to edit
a contact’
s informatio
n: Name
, Home Number, Office Number, M o b ile Number, Home-2
Number
, Office-2
Number , Mobile-2
Number , Speed-Dial Number, Ring Tone, and E-Mail.
Fo
r each se
tting, selec
t
Edit. Enter the a
ppr
opriate
information in the
new
wi
ndow.
Pr
ess the center selection key to sa
ve the new
information, or se
lect Exit to return to the pr
evious menu. After you have finished your edits, select Return
to
return to
the Phone Book screen.
Figure
4-11: Phone
Bo
ok Options
33
Chapter 4: Configuring the EZLoop® 3rd Generation Wi-Fi Phone

Add
. Select Add to add a new contact. Scroll thr ou
gh the different settings
: Name
, Home Number, Office Number,
Mobile Number, Home-2 Number, Office -2 Nu
mber
, Mobile-
2 Number, Speed-Dial Number
, Ring Tone,
and E-Ma
il.
For each
se
tting,
select
Edit
. Enter
the a
ppropriate information i
n the new window. Pr
ess the center sele
ction key
to sa
ve the ne
w infor
matio
n, or select Exit
to return to the previous menu. After
you have entered
all
of the
new
contac
t information, select
Return
to return to the Phone Book screen.
Delete
. To delete
a contact, scro
ll down the entries until the contact is highl
ighted. Select Option and then
select
Delete. Then you will be automatically returned to the Phone Book screen.
Mem Usage. Select Mem Usage to find out how much memor
y has be
en used. The total numbe
r of ph
one bo
ok
entrie
s av
ailable
and number
of entries used will be displayed. Select Exit to return to the Phone Book screen.
Figur
e 4-12: Add Person
Figure
4-13: Enter Name
34
Chap
ter 4: Configuring the EZLoop® 3rd Generation Wi-Fi Phone

Netw
ork Settings
You have two IP Modes av
ailable, DHCP and Fixed IP
. In most cases, you should keep the default
setting,
DHCP
, if your network router or gateway will assign IP addresses to the IP
Phone. If
you want to assi
gn a
st
atic IP a
ddr
ess to th
e IP Phone
, select Fixed IP. To
change
the IP Mode, select
Edit
. The
on-screen
choi
ces will change depending on which IP Mode is selected. Pr
ess
the center selection ke
y to save
the
new
infor
mat
ion, or
se
lect Return
to return
to the previous menu.
DHCP
If DHCP is sele
cted as the IP Mode, there are no other setti
ngs to change
. Select Return
to return to the
pr
evious menu.
ip address
: the a
ddr
ess
used to identify a
computer or device on a
network.
Figure
4-14: Select
Netw
ork Settings
Figure 4-15
: Network
Settings - DHCP
35
Chapter 4: Configuring the EZLoop® 3rd Generation Wi-Fi Phone

Fixed IP
If Fi
xed IP is selected as the IP
Mode
, the screen will show
these setti
ngs: IP A
ddr
ess, Subnet Mask,
Default Gatew
a
y, Primar
y DNS
, and Secondary
DNS.
IP
Address. To add or change the IP Address, select Edit
. Enter the new IP Address in
the new
wi
ndow. Press the center se
lection key to
sa
ve the ne
w infor
mation, or
select
Exit
to return to the
pr
evious menu.
Subn
et Mask
. To add or change the Subnet Mask,
select Edit
. Enter the new Subnet Mask in the
new
wi
ndow. Press the center
selection key to
sa
ve the new inform
ation, or select Exit
to return to the
pr
evious menu.
Default Ga
teway
. To
add or change the Default Gateway,
se
lect Edit
. Enter the ne
w IP address of the
Default Gateway in the new window. Pr
ess the center
selection key to save the ne
w informatio
n, o
r
select Exit
to return to the pr
evious menu.
Primary DNS
. To add or change the Primar
y DNS address, select Edit
. Enter the new DNS IP address
in
the new window.
Pr
ess th
e center selection key to save the ne
w information, or select Exit
to re
turn to
the pr
evious menu.
Secondary DNS
. To add or change the Secondary
DNS addr
ess, select Edit
. Enter the new DNS IP
address in
the new wi
ndow. Press the center
selectio
n key to save the new infor
mation, or sele
ct
Exit
to r
e
turn to the pr
evious menu.
Figure
4-16: Netw
ork
Settings - Fixed IP
Figure 4-17: En
ter IP
Addr
ess
Figure 4-18: Edit Subnet
Mask
Figure 4-19:
Enter
Subnet Mask
36
Chap
ter 4: Configuring the EZLoop® 3rd Generation Wi-Fi Phone

Wi
reless
You ha
ve three
choices, Set Wi-Fi, Profil
es, and Hotspot.
If you want
to s
can for wireless
networks in
your local area, select
Set
Wi-Fi. If you want to set configuratio
n profil
es for different network
setups,
select
Profiles
. The Ho
tspot screen lists the IP Phone’s default hotspots. If you want to save
your user
name and passw
ord for these default hotspots, select Hotspot
. Pr
ess
the left soft key to
make a
sele
ctio
n. Se
lect Return
to return to the previous
menu.
Set
Wi-Fi
After you have sele
cted Set Wi-Fi, the IP Phone wi
ll
scan the local area for wirele
ss access poin
ts o
r
routers. A list of wirele
ss networ
ks, including hotspo
ts, will be
displayed and show their wirele
ss
netw
ork names, security
status (a lock in
dica
tes wirele
ss security),
and signal
strength, which is
indicated b
y a bar graph.
There are three sets of instructio
ns. If yo
u will connect
to
a wirele
ss network,
proceed to this section,
“Connection to a Wi
rele
ss Ne
twork.”
Figure
4-20: Wireless
Figure 4-21:
Scanning
for Wireless
Netw
orks
The IP Ph
one has a
list of default hotspots, which are shown on the Hotspot
screen. If yo
u wi
ll connect to a
default hotspot, proceed to this sectio
n, “Connection to a Default Hotspot.”
If you wi
ll connect to a new hotspot, proceed to this section, “Connection to a New Hotspot.
”
Connection to a Wirele
ss Network
1.
Scroll
through the choi
ces, and pr
ess the center selection key (in the middle of the navigation pad) to select
the wireless network you want to use.
If the network you want is not shown, select Rescan fo
r a ne
w scan.
Figure 4-22: List of
Wireless Netw
orks
37
Chapter 4: Configuring the EZLoop® 3rd Generation Wi-Fi Phone

2.
Th
e IP Phone
wi
ll automati
cally connect to the ne
twork
you ha
ve se
lected.
WEP Security
If WEP security is enab
led on
the
se
lected network, a new screen will a
ppear. Using the
navigation pad, select the app r
opriate transmit key number and then move to the WEP Key
field.
Enter
the netw
ork’s
WEP
key
. Pr
ess the center selection key.
WP
A Security
If
WPA se
curity is enabled on the selected
network, a new screen will appear. Enter the
ne
twork’
s WP
A key
. Pr
ess the ce
nter sele
ction key.
3.
You will
be
not
ifi
ed when the IP Phone ha
s connected to
the network, and a chec
kmark
wi
ll
appear ne
xt to the name of the network.
Select Exit
to return to the Wireless
screen.
Figure 4-23: Connecting
to
Wireless Netw
ork
Figure 4-
25: Enter WP
A
K
ey (for Secured
Figure 4-24
: En
ter WEP
K
ey (for Secured
Ne
twork)
Figure 4-26
: Connecting
to Wireless Netw
ork
38

Connection to a Default Hotspot
Before you be
gin, make sure yo
u ha
ve save
d yo
ur User
Name a
nd Passwor
d for the default hotspo
t you want to
use
.
These login settings ca
n be configured through the Ho
tspot
screen.
1.
Scroll
through the choi
ces, and pr
ess the center selection key (in the middle of the navigation pad) to select
the wireless hotspot you want to use.
If the hotspot you want is not shown, select Rescan
for a ne
w sc
an.
2.
You will
be
not
ifi
ed when the IP Phone ha
s connected
to the hotspo
t, a
nd a checkmark
wi
ll appear next to
the name of the hotspot.
3.
A new windo
w will a
ppear
. On the Select Hotspot
screen, scroll through the choices, and press the center
select
ion key to
select the a
ppropriate ho
tspot.
(If the hotspot you want
is not listed on the Select Hots
pot
screen, procee
d to step 3 of the
fo
llo
wing section,
“Connection to a New Hotspot.”)
4.
Th
e IP Phone
wi
ll automati
cally use your User Name and Passwor
d to log in.
After you have lo
gged in, select Exit
to return to the Wireless screen.
Figure 4-2
7: Select
Default Hotspot
39
Chapter 4: Configuring the EZLoop® 3rd Generation Wi-Fi Phone

Connection to a New Hotspot
1.
Scroll through the c
hoices, and pr
ess the center selection key (i
n the middle of the navigation
pad) to select the wireless hotspot you want to use.
If the hotspot you want is not shown, select Rescan
for a ne
w sc
an.
2.
You will
be
not
ifi
ed when the IP Phone ha
s connected to
the hotspot
, and a checkmar
k
w
ill
appear ne
xt to the name of the hotspot.
3.
A new windo
w will a
ppear
. On the Select Hotspot
screen, select IE Br
owser.
4.
Th
e web browser
will automa
ticall
y open. Fo
llow the
on-scree
n instructio
ns to
access th
e
hotspot.
5.
After you have gained access, you can browse th e In
ternet.
If you want to save the new hotspot’
s setti
ngs, fo
llow these in
structions:
1.
When you are connected to the ne
w hots
pot, view the main menu.
2.
Select Wireless.
3.
Select Pr
ofiles.
4.
Select Option.
5.
Select Save <netw
ork name>.
Then you will be automatically returned to the Wi-Fi
Pr
ofiles screen.
Figure 4-28: Detect
Hotspot
Figure 4-30
: Getting
IP
Addr
ess
Figure
4-29: Connecting
to Hots
pot
40
Chap
ter 4: Configuring the EZLoop® 3rd Generation Wi-Fi Phone

Profiles
You will see a li
st of profil
es (when you have pr
ofiles alread
y configur
ed). Select Option to see menu
c
hoice
s. Select Exit to return to the previous
menu.
You can designate the or
der of th
e profiles sa
ved by
the IP Phone. The next time it is powered on, it wi
ll
use the
first prof
ile to automatically connect to
the
profile’s
wireless network. If that ne
twork
is
not
av
a
ilable,
the IP Ph
one will
tr
y the ne
xt profile.
This wi
ll continue until
it
has connected to a wire
less
network.
Option
You have these choices: Edit (avail
able when you have at l
east one ex
isting profil
e), Add, Delete
(available wh
en you have at least one ex
isting pr
ofile), Connect, Go Down/U
p (avail
able when you ha
ve
more
than one pr
ofile
), and Sa
ve <
network name> (ava
ila
ble when
the IP Phone is co
nnected to a
network lacking a profil
e). The Edi
t a
nd Ad
d options configur
e the same setti
ngs. The Edit
option is
used for c
hanging ex
isting profiles, while the Add option is used for cr
eating new profil
es.
Select
Return
to return to the pr
evious menu.
Edit. Select Edit
to edit a
profile’s
information: SSID (wireless netw
ork name), Wireless Mode,
Authenti
cation Mode
, and Encrypti
on. (Additional setting may be a
vailable depending on the
encr
yption used.) Scroll thro
ugh these choices, and select Edit
to c
hange a sett
ing.
SS
ID. To change the SSID, select Edit
. Enter
the new SSID in the new window
. Press t he center
select
ion key to
save th
e ne
w information, or select Exit to return to the pr
evious menu.
Wireless Mode. You have a choice of Infrastructure and Ad hoc modes. To change th
e Wireless
Mode, select Edit
.
Figure 4-3
2: Wi-Fi
Pr
ofiles
Figure 4-34
: Edit
Wireless Mode
Figure 4-33
: Edit SSID
ssid (ser
vice set
identifier): your wireless
network’
s name.
ad
-hoc
: a group o
f
wireless devices
communicati
ng dire
ctly to
each other (peer
-to-peer
)
wi
thout the use
of an
access po
int.
infrastructure: a
wi
reless
netw
ork that is bridged to
a wired ne
twork via a
n
access point.
41
Chapter 4: Configuring the EZLoop® 3rd Generation Wi-Fi Phone

Authentication Mode
. You have a choice of Auto Switch
, Shar
e Key,
Open System, and WP
A-
PSK. To change the Au
thentication Mode, select Edit.
A ne
w window will o
pen. Scroll thro
ugh
the
mo
des, a
nd sele
ct the ap
propri
ate mode
. Select Save to save the new Authentication Mode, or
select
Exit
to return to
the Edit Profile me
nu wi
thout changing th
e Authenticatio
n Mode.
Proc
eed to the sect
ion for the Authen
ticati
on Mode you have selected.
Auto Switch,
Share Key, or Open System
Encryp
tion
. You have a choice of Di
sabled and WEP
encr
yption. To change the Encry
ption
method, select Edit
. If you select Disabled, there are no other setti
ngs to change. If you select
WEP
, there are two more setti
ngs av
ailable, Key Index and WEP Key.
K
ey Index. For the
index of tr
ansmit keys, you have a
choice of 1-
4. To specify which WEP key
the IP
Phone will use, select
Edit
. A new window will
open. Sc
roll
through the numbers, and
se
lect the approp
riate tran
smit key number.
Select Save to
sa
ve the new transmit key number, or
se
lect Exit
to return to
the Edit Profile me
nu wi
thout changing th
e number.
WEP Key
. T
o enter the WEP Key, select Edit. Enter the new WEP Key in
the new wi
ndow.
Press
the
center select
ion key to save
the new WEP Key, or select Exit
to return to the Edit Profile
menu
without changi
ng the key.
802.1x
. You have a choice of Enable and Disable.
The Enabl
e op
tion configur
es the IP Phone for
a
network using
802.1x authentication. To c
hange the 802.1x setting
, select Edit.
If 802.1x is enabled, configure
the EAP Ty
pe setting
. Select Edit
. You have
a choice of TLS, MD5,
and
PEA
P
. Select Save to save the new EA
P Type
, or select Exit
to return to the Ed
it Pr
ofile menu
without changi
ng the EAP Type.
Figure 4-35: Change
Auth
entication Mode
Figure
4-37
: En
ter WEP
Key
Figur
e 4-36: Edit WEP
Key
Figure 4-38
: Ch
ange
EAP Type
(80
2.1x)
42
Chap
ter 4: Configuring the EZLoop® 3rd Generation Wi-Fi Phone

WPA-PSK
WP
A Key
. To enter the WP
A Key, select Edit. E
nter the new WP
A Key in the new wi
ndow. Pr
ess the
center se
lection ke
y to save the new WP
A Key, or
select Exit
to return to the pr
evious menu.
EAP Type
. To change the EA
P T
ype setting
, select Edit
. You have a choice of TLS, MD5, and
PEAP
. Sele ct Save to sa
ve the new EAP Type
, or select Exit
to return to the Edit Profile menu
without changing the EAP Type.
Hotspot. If you ha
ve default hotspots configur
ed, then this
setting w
ill
be available. To change
the
select
ed hotspot, select Edit
.
Select Return
to return to
the Wi-Fi Pro
files screen.
Add
. Select Add
to create a pro
fil
e a
nd enter its inform
ation: SSID (wireless networ
k na
me),
Figure 4-3
9: Edit EAP
Type (WPA-PSK)
Figur
e 4-40: Ch
ange
EA
P Type
(WPA-PSK)
Wireless Mode
, Authenticati
on Mode
, Key Index, and WEP Key. Scroll through thes
e choices, and select Edit to
c
hange a setting.
SSID. To
enter the SSID, select Edit. Enter
the new SSID in th
e new wi
ndow. Pr
ess the center selection key
to save
the
new inform
ation, or
se
lect Exit
to return
to the previous menu.
Wireless Mode. You have a choice of Infrastructure
and Ad hoc modes. To change the Wireless Mode, select
Edit.
Authentication Mode. Yo
u have a choice of Open System, Auto Swit
ch, Share Key, and WPA-PSK. To
change
the
Authentication Mode
, select Edit
. A new wi
ndo
w wi
ll op
en. Scroll through the modes, and select the
a
ppropriate mode
. Select Save to save the new Authentication Mode
, or select Exit to return to
the Add
Profile
menu
withou
t changing the Authentication Mode.
Proc
eed to the sect
ion for the Authen
ticati
on Mode you have selected.
Chapter 4: Configuring the EZLoop® 3rd Generation Wi-Fi Phone
Figure
4-41: Enter SSID
43

Auto Switch,
Share Key, or Open System
Encryp
tion
. You have a choice of Di
sabled and WEP encr
yption. To change the Encry
ption method, select
Edit
. If you select Disabled, there are no other setti
ngs to change
. If you select WEP,
ther
e are three mor
e
settings available, Key Inde
x, WEP Key
, and 802.1x.
K
ey Index.
For the index of transmit ke
ys, you ha
ve a choice of 1-
4. To
specify which
WEP key the IP Phone
will use,
select Edit
. A new window will open. Scroll th
rough the numbers, and select the appropriate transmit
key number
. Select Save to sa
ve the new tr
ans
mit key number, or select Exit
to return to
the Ad
d Profile
menu
withou
t changing the number.
WEP Key
. T
o enter the WEP Key, select Edit. Enter the new WEP Key in
the new wi
ndow. Press the center
select
ion key to save the new WEP
Key, or select Exit
to return to the Add Profile menu wi
thout changing the
key.
802.1x
. You have
a choice of Enable and Disable. Th
e Enabl
e optio
n co
nfi
gur
es the IP Phone
fo
r a ne
twork
using 8
02.1x authentication. To change the 802.1x setting, select Edit.
If 802.1x is enabled, configure
the E
AP T
ype setting. Select Edit
. You have a choice of TLS, MD5, and PEAP
.
Select Save
to sa
ve the new EAP Type,
or select Exit
to return
to the Add Profile
menu without changing
the
EAP Type.
WPA-PSK
WP
A Key
. To enter the WP
A Key, select Edit. E
nter the new WP
A Key in the new wi
ndow. Pr
ess the center
select
ion key to
save the
new WP
A Key, or select Exit
to return to the previous menu.
Figure 4-43:
Edit WPA
Key
44
Chap
ter 4: Configuring the EZLoop® 3rd Generation Wi-Fi Phone

EAP Type
. To change the EA
P T
ype setting
, select Edit
. You have a choice of TLS,
MD5, and PEAP
. Select Sav
e
to sa
ve the new EAP Type
, or select Exit
to return to the Add Profile menu without changing the EAP Type.
Hotspot. If you ha
ve default hotspots configur
ed, then this
setting will
be available. To change the selected
hotspot, select Edit.
Select Return
to return to
the Wi-Fi Pro
files screen.
Delete. To delete a profile, scroll down the entrie
s until the profile is highl
ighted. Select Option and then select
Delete. Then you will be automatically returned to the Wi-Fi Profiles
screen.
Connect
. To connect using a pr
ofile
, scroll down the en
tries until the profile is highlighted. Select Option and
the
n select
Connect
. The IP Ph
one will automatically conne
ct to
the
approp
riate ne
twor
k. Then you will be
automatically returned to t
he
Wi-Fi Profiles
screen.
Go Down/Up. You can rearrange the order of the profil
es on your list. To move a profile, scroll through the entries
until the profile is hi
ghlighted. Select Option and then select Go
Down or Go Up
to move
the
entry.
Then yo
u will be
aut
omatically returned to the Wi-F
i Profiles screen.
Save <
netw
ork
name>. Whe
n the
IP Phone i
s conne
cted to a networ
k lacking a pro
file,
this opti
on will be
ava
ilable. To
save the network’s settings as a ne
w pr
ofile
, select Option
and
then select Save <netw
ork
name>. Then you will be automatically returned to the Wi-Fi Profiles
screen.
Figure 4-44: Prof
ile
Added
45
Chapter 4: Configuring the EZLoop® 3rd Generation Wi-Fi Phone

Ho
tspot
You will see a li
st of the IP Phone’s default ho
tspots. Scro
ll through these choi
ces and pres
s the le
ft soft key to
make a sele
ctio
n. Se
lect Return
to return to the Wireless screen.
User Name
. To change the User Name
, select Edit.
En
ter the new User Name in the new window. Pr
ess the
ce
nter sele
ction key to sa
ve the ne
w informatio
n, or select Exit
to return to the pr
evious menu.
Password. To change the Pass
word, select Edit
. Enter the new Pass
word in the new window.
Press the center
sele
ction key to sa
ve the ne
w infor
matio
n, or select Exit
to return to the previous menu.
If you want to save
a new hotspot’s
settings, do not use th
is screen. When you are
connected to the ne
w hotspot, select Pr
ofiles
on the Wireless screen. Select
Option
,
and then select Sa
ve <
netw
ork
name>. Then you will be automatically re
turned to
the
Wi-F
i Profiles screen.
Figure 4-45: Select
Hotspot
Figure 4-46
: Edit User
Name
46
Chap
ter 4: Configuring the EZLoop® 3rd Generation Wi-Fi Phone
Settings of the EZLoop® 3rd
Generation Wi-Fi Phone

Phone Settings
You can customize the setti
ngs of the IP
Phone. Yo
u have these choices: Ring Option, Keypad Tone
,
Wall
paper,
Date & Time, Languag
e, Ph
one Password, and Upgrade. Select
Return
to return to the
pr
evious menu.
Ring Option
Scroll through these choices and press the left
soft key to make
a selection. Select Return
to return to
the Phone Settings screen.
EZLoop® 3rd
Generation Wi-Fi
Phone
Ring Types
. There are five di
fferent ring types. The se
lected ring type is indi
cated by
the <*>
symbol.
Scroll through these choi
ces to hear
the actu
al ri
ng style. Highli
ght the ring type you want to
select, and
then press the center selection key to
save yo
ur change
. Select Exit to return to the Ring
Option
menu
without changi
ng the ring type
.
Ring To
nes
. There are seve
n ring tones. The sele
cted ri
ng tone is indi
cated by
the <*> symbol.
Scroll
through these c
hoices to hear the actual ri
ng tone. Highli
ght the ri
ng tone you want to select,
and then
press the center selection key to save your change. Select Exit to return to the
Ring Option
menu
without changing the rin
g tone.
Ring V
olume. There are five ring volume
levels. T
he sele
cted ring volume le
vel is indicated by the
<*> sym
bol. Scroll throug
h these choices to hear the actual ring volume level. Highl
ight the ring
volume level you want to select, and then pr
ess the ce
nter se
lectio
n ke
y to sa
ve your ch
ange.
Sele
ct
Exit to return to
the Ring Option
menu without changing the ring volume le
vel.
Figure
4-47: Select
Phone Settings
Figure 4-4
8: Ph
one
Sett
ings
Figure 4-49: Ring
Options
Figure 4-50
: Ring Types
47
Chapter 4: Configuring the EZLoop® 3rd Generation Wi-Fi Phone


Keypad Tone
To hear the actual keypad tone
, scroll through th
ese choices: Off, Soft, an
d Loud. The selected keypad tone is
indicated by the <*>
symbol. Highli
ght the keypad tone you want to select, and then pr
ess the center selection
key to save your change. Select Exit
to return to
the Phone Settings
menu without c
hanging the keypad tone.
W
allpaper
To see the di
ffer
ent wall
paper choices, hi
ghlight the wallpaper you want to select, and then select Pr
eview
. Click
Exit
to return to
the Wall
paper menu. The selected wall
paper is indi
cated by
the <*>
symbol. Highli
ght the wa
llp
aper
yo
u want to select, and then pr
ess the center selection key to sa
ve your change. Select Exit
to return to
the Phone
Settings
menu without changing the wall
paper.
Figure 4-51: K
eypad
Tone
Figure 4-52: W
all
paper
48
Chap
ter 4: Configuring the EZLoop® 3rd Generation Wi-Fi Phone

Da
te & Time
You ha
ve six choices: Ti
me For
mat, Cloc
k Type, Time
Zones, Daylight Time
, Enable NTP, Date
, and
Clock. Select
Exit
to return to the pr
evious menu.
Time Format
. There are two format
s availa
ble
, 12-Hour and 24-Hour. To change the for
mat,
highli
ght Time Format
, a
nd pr
ess the le
ft soft key.
Clock Type
. T
here are two types availa
ble, Analog and Digital. To c
hange the for
mat, highl
ight Clock
Type, and press the le
ft soft key.
Time Zones. Pr
ess the le
ft soft key to se
lect the Time Zo
ne setting
. A list of multiple time zone
s w
ill
be
displ
ayed. Th
e selected time zone is indicate
d by
the <*> symbol
. Scroll th
rough these choices, and
high
light th
e ti
me zone
. Then se
lect Sett
ings to save
your change
. Select Exit to return to the
Date &
T
ime menu without changi
ng the time zone.
Da
ylight Time
. Press
the left
soft key
to turn on and off Dayl
ight time
.
Figure
4-53: Change
Time Fo
rmat
Figure 4-54: Change
Clock Type
Figure 4-55
: Cha
nge
Time Zones
Figure 4-5
6: Ch
ange
Da
ylight Time
49
Chapter 4: Configuring the EZLoop® 3rd Generation Wi-Fi Phone

En
able NTP. When Yes
displa
ys, Networ
k Timing
Protocol
(NTP) automatically sets the time and date
for your phone.
To disable NTP, pr
ess the le
ft soft key until it displays
No.
Date
. Pr
ess
the left soft key to select the Date sett
ing. A new window displays. Make your changes,
and then pr
ess the
center selection key to
sa
ve your change
. Select Exit to
re
turn to the Date & Tim
e
screen without changing the date.
Clock
. Pr
ess the left soft key to
se
lect the
Clock setti
ng.
A new window displays. Make your
c
hanges, and press the center sele
ction key to sa
ve your changes.
Figure 4-57: En
able NTP
Figure
4-58: Disable
NTP
Figure 4-59: Change
Date
Figure 4-60: Change
Clock
50
Chap
ter 4: Configuring the EZLoop® 3rd Generation Wi-Fi Phone

Language
The selected language is indicated by the <*> symbol. Hi
ghlight th
e language you want to select,
and then press the left soft key to save your change. Select Exit
to return to
the Phone Settings
menu without c
hanging the language.
Figure 4-61:
Select
Lang
uage
Figure
4-62: Langu
age
Phone
Passw
ord
By default, you will not need to enter a password. To
protect your phone so only user
s who know the
passwor
d can use the IP Phone,
you can set a user password.
NOTE: To gain access into administrator mode
, you will
need to configure a user
password.
Figure 4-6
3: Pa
ssword
di
sabled (default)
Figure 4-64
: Enable
Phon
e Password
51
Chapter 4: Configuring the EZLoop® 3rd Generation Wi-Fi Phone

To en
able the user password for the EZLoop® 3rd Generation Wi-Fi Phone
Pr
ess the le
ft soft key to
select the
Ph
one Password
setting. Press the Edit key to display Yes.
To set a new
password, na
vigate to
Password and select Edit
. Enter your new passwor
d and press
the center selection key to save the new
passwo
rd. Pr
ess Exit if you do not want to change the
passwor
d.
The
ne
xt time the IP Ph
one is
powere
d on
, it will ask for the
Pho
ne Password. Enter
yo
ur user
passwor
d in the field provi
ded, an
d then select OK.
To
acce
ss administrator mode to the EZLoop® 3rd Generation Wi-Fi Phone
Some settings used by your Internet Telephony Ser
vice Prov
ider (ITSP) re
quire
administrator
privil
eges.
To gain administrator
acce
ss, first
enable the user password
(see above)
. Reboot the
IP
Phone. Whe
n
you po
wer the phone back on, the User password field di splays. Press and hold the Call but
ton for 3
seco
nds. The Admin
password field displays. Enter your
Admin passwor
d, and then select OK.
NOTE
: The default Admin pass
word is “0000”, but may have changed by y
our ITSP.
Figure 4-65
: Set User
Password
Figure 4-66
: User
Phon
e Password
Figure
4-67: Phone
Password
(Admin)
52
Chap
ter 4: Configuring the EZLoop® 3rd Generation Wi-Fi Phone

Auto KeyLoc
k Settings
If yo
u want to automatically lock yo
ur keys
after 1
0 seconds of
inac
tivity
, select Auto K
eylock
Setti
ngs
. Select the left soft key until Enable di
splays under Auto Keylock. To unloc
k your phone,
pr
ess the le
ft soft key (
Unlock
) a
nd th
e asterisk (*
) key.
TIP: To
lock your phone, yo
u can pr
ess and hold the number (#) key at any time.
Auto-Provisioning
(Adm
in only)
Auto-provisioni
ng do
wnloads specific
phone confi
gurations
from the Internet Service
Provider (I
SP)
to the phone
. The following ar
e the paramete
rs required to set auto-provisioning.
Serv
er Type. The http or https pr
otoc
ol used to acce
ss yo
ur voic
e service provider’s
pro
fil
es.
Server URL
. The Domain name.
File
. The
co
nfi
guratio
n file used by the service provider
.
Resync on Reset
. The
option to resync your ph
one each time yo
u po
wer the ph
one o
n. If yo
u want
thi
s
opti
on, pr
ess the Edi
t softk
ey until
it
di
splays Yes.
Period
. Time in
tervals used to request confi
gur
ation updates when you do not reboot.
Decrypt Key
. The key us
ed to decr
ypt the file
.
Figur
e 4-68: Auto
K
eylock Setting
Figure 4-70:
Au
to-Provisioning
Figure
4-69: Enable
K
eylock
Figure 4-71: Server
Type
53
Chapter 4: Configuring the EZLoop® 3rd Generation Wi-Fi Phone

Factory
De
fault
Factory
default deletes all data entered into the phone after it was shipped to
the fa
ctor
y. Before selecting yes,
make sure you want to delete all data.
NOTE: User
-level
acces (no admi
n access) ca
n only factory de
fault user level data.
Upgrade (Admin only)
Use this screen to upg
rade the firmware
of the
IP Phone.
The
IP Phone is pre-co
nfigured with the correc
t Downl
oad URL
(web address of the do
wnload site) and OS
Image
File (firmw
are upgra
de file
) entries.
NO
TE:
Do not change these settings unl
ess yo
ur Inter
net phone serv
ice provider
has given you new settings.
Figure 4-72
: Factory
Default sett
ings
Plug the USB mini-B connector of the included power adapter into the USB
mini-B port of the IP
Phone. The
n conn
ect the power adapter
to
a standard electric
al outlet.
NO
TE:
If the
upgrade is interrupted, the IP
Phone will revert to its old firmware
,
an
d you can attemp
t the upgra
de ag
ain.
Select Upgrade
to start upg
rading the IP Phone’
s firmware, or select Return to cancel the upg
rade
and r
eturn to the previous menu.
When the upg
rade is complete
, the IP Phone wi
ll automati
cally po
wer it
self off. Wa
it five seconds,
and then powe
r on the IP Phone.
Figure 4-7
3:
Up
grade
ph
one
Figure 4-7
4: Upgrad
e
ph
one
54
Chap
ter 4: Configuring the EZLoop® 3rd Generation Wi-Fi Phone

SIP Settings (Administrators only)
If you have user access only , you can set the Display Name for your SIP Settings. Pr
ess the Edit
key and en
ter the
new display name.
If you ha
ve administrator privileges, you can set SIP Se
ttings to configur
e your In
ter
net phone service.
The
necessary
setu
p inform
ation is supplie
d by your In
ter
net phone serv
ice provider.
If you do not have
this information,
c
o
ntac
t yo
ur Inter
net phone service provider before yo
u make any change
s. Se
lect Return
to
re
turn to the pr
evious
menu.
Proxy IP
. To add or change the Pr
oxy IP addres
s, select Edit
. Enter
the new Proxy IP a
ddr
ess in
the new window
.
Pr
ess the ce
nter sele
ction key to sa
ve the new setting, or select Exit
to return to
the
previo
us screen.
Proxy Port
. To add or change the Proxy Port number,
select Edit
. Enter the new Proxy Port number in the new
wi
ndow. Press the center selection key to
sa
ve the new
setting
, or select Exit to
return to the pr
evious
screen.
Register Proxy IP
. To add or change the Register Proxy IP address,
select Edit
. Enter the new Register Proxy I
P
address in the new window. Pr
ess the center selection key to sa
ve the new setting
, or select Exit to
return to the
pr
evious screen.
Chapter 4: Configuring the EZLoop® 3rd Generation Wi-Fi Phone
Figure 4-7
5: Edit
Down
load URL
Figure
4-76: Edit Pr
oxy
Port
55

Register Proxy Port
. To add or change the Register Proxy Port numb
er , select Edit
. Enter the new
Register Proxy Port number in
the new window. Pr
ess the center selection key to save the new
setting, or select Exit
to return to the pr
evious screen.
Outb
ound Proxy IP
. To add or change the Outbo
und Proxy IP addr
ess, select Edit. Enter the new
Outbound Proxy IP addr
ess in the new window. Pr
ess the center selection key to save the new
setting, or select Exit
to return to the pr
evious screen.
Outb
ound Proxy Port
. To add or change the Outbound Proxy Port number,
select Edit
. Enter the
new Outbound Proxy Port number in
the new window.
Pr
ess th
e center selection key to sa
ve the
new setting, or select Exit
to return to the pr
evious screen.
Expire Time
. If your Inter
net phone serv
ice provider di
d not provide an Expire Time setting, then ke
ep
the default
setting,
3600
seconds. If your Internet phone serv
ice provider provi
ded an Expire Ti
me
setting, then scroll down
to Expire Time, and select Edit. Enter the Expire Time in the new window.
Press the center selection key to
sa
ve the new
setting
, or select Exit to
return to the previous screen.
Displa
y Name
. This is the message displayed on the receiver’s caller
ID.
Phone
Number
. To a
dd or change
the
Pho
ne Number
yo
u wi
ll use for Internet
phone call
s, selec
t
Edit. Enter the new Phone Number in the new window.
Pr
ess th
e center selection key to sa
ve the
new setting, or select Exit
to return to the pr
evious screen.
User Name. User Name is used for authentication agains
t th
e Regi
strati
on Server
. To add or
chan
ge the
User Name
, select Edit. Enter the new User Name in t he ne
w window. Pr
ess the center selection key to
save
the
new
setting
, or select Exit
to return to the pr
evious screen.
Figure
4-77: Register
Proxy Port
Figure
4-79: Enter Proxy
IP
Figure 4-78
: Edit Pr
oxy
IP
Figure 4-80: En
ter
Register Pr
oxy Port
56
Chap
ter 4: Configuring the EZLoop® 3rd Generation Wi-Fi Phone

Password. This is the password used
in co
njunction wi
th the Us
er Name
for the
Re
gistration Server
to
authenticate the IP phone
. To add or change the Password, select Edit
. Enter the new Password in
the new
wi
ndow. Press the center selection key to
sa
ve the new
setting
, or select Exit to
return to the pr
evious
screen.
Payload Type. G
.711a, G.729, and G
.711u are the thr
ee Payload Types available. They ar
e listed in order of
pr
eference. To change the order
of pr
eference, select Edit
until the appr
opriate or
der of prefer
ence is displayed
on-screen.
Packet Time. You have two Pack
et Time lengths av
ailable
, Small and Large. To
change th
e time period, select
Edit until the appropriate Pac
ket Time is displayed on-screen.
DTMF Relay. You can enable or disable the DTMF Rela
y fe
ature. To enable or disa
ble the feature, select Edit. UDP
P
ort. To
add or change the UDP Port number,
select Edit
. Enter the new UDP Port number
in the new window.
Press the center selection key to
sa
ve the new
setting
, or select Exit to
return to the pr
evious
screen. RTP Port
.
To add or ch
ange the RTP Port number,
select Edit. E
nter the new RTP Port number in the new window. Press the
cen
t
er selection key to
sa
ve the new
setting
, or select Exit to
return to the pr
evious
screen.
Session Timer
. The
periodic refresh of SIP sessions through a re-INVITE or UPDA
TE request.
SI
P Format. The default format
should be set to Normal
. The other 2 choices may be used with certain SIP
Proxy Ser
vers.
To change ho
w the cursor work
s, se
lect Op
tion
. If your cursor uses the
Cl
ick
feature, the Drag & Dr
op feature will be
available. If your cu
rsor uses the Drag & Drop feature,
the Click feature will be av
ailable.
Press the left soft key to
select the
new
cursor
feat
ure
, or select Return
to return to the website.
Select Exit to return to
the Web Site
screen.
Figure 4-8
1: Ch
ange
Outbound Pr
oxy IP
Figur
e 4-82: Outbound
Proxy Port
57
Chapter 4: Configuring the EZLoop® 3rd Generation Wi-Fi Phone

Web Cam
Use the IP
Phone to view video from web camer
a. On the Web Cam
screen, a list of
web cameras (if
saved) will be shown. Scroll
through th
ese choices and press the center selection key to view video.
T
o
save th
e settings
for your web camera(s), select Option
to
see menu choices, which will be
described in further detail below.
Se
lect Return
to return to
the previous menu.
Viewing a W
eb Camera
The IP Phone will display video from the web camer
a. Press the right soft key
to return to
the Web
C
a
m screen.
Op
tion
You ha
ve thes
e choice
s: Edi
t (available when you have at least one
web camera saved), Add, and
Delete (ava
ilable when you have at least
one web camera saved). The Edit
and
Add options configure
the same setti
ngs.
The Edit op
tion is used for changi
ng ex
isting entries,
while the Add option is
used
for adding new entries. Select
Return
to return
to the previous menu.
Edit. Select Edit
to edit a web camera’s infor
mat
ion: Name
, URL (web addr
ess), and Port
Number
. Scroll
through these choices, and select Edit
to c
hange a sett
ing
.
Name
. To change the Name, select Edit
. Enter the new Name in the new window. Pr
ess the
center sele
ction key to save the new information, or select
Exit to return to the previous menu.
Figure 4-83
: We
b Cam
Figur
e 4-84
: We
b
Cam
Options
URL
. To
change the URL, select Edit
. Enter the new URL in the new window
. Pr
ess the center
select
ion key to
save th
e ne
w information, or select Exit to return to the pr
evious menu.
Figure
4-85: Edit Web
Cam
Figure
4-86: Add
Web
Cam
58
Chap
ter 4: Configuring the EZLoop® 3rd Generation Wi-Fi Phone

Port Number
. To c
hange the Port Number
, select Edit
. En
ter th
e new Port Number in the new wi
ndow.
Pr
ess
the
center se
lectio
n key to save the new information, or select
Exit
to return to the pr
evious menu. (If you
are not
sure ho
w to change this setti
ng, ke
ep the default, 80.)
Select Return
to return to
the Web Cam
screen.
Add
. Select Add
to create a ne
w entr
y wi
th the following in
formation: Name, URL (w
eb addr
ess), and Port
Number
. Scroll
through these choices, and select Edit
to configure
a setti
ng.
Name
. To enter the Name
, select Edit. Enter the new Name in the n e w wi
ndow. Pr
ess the center selection
key
to save the ne
w informatio
n, or select Exit
to return to the pr
evious menu.
URL
. To
enter the UR
L, select Edit.
Enter the new URL in th
e new wi
ndow. Pr
ess the
center select
ion key t
o
save
the
new inform
ation, or se
lect Exit
to return to the previous menu.
Port Number
. To enter the Port Number, select Edit
. Enter the new Port Number in the new window.
Pr
ess
the
c
e
nter se
lectio
n key to save the new information, or select
Exit
to return to the pr
evious menu. (If you
are not
sure ho
w to change this setti
ng, ke
ep the default, 80.)
Select Return
to return to
the Web Cam
screen.
Delete. To de
lete a
n entry, scroll do
wn until it is highlig
hted.
Select
Option and then select Delete
. Then yo
u will
be
automatica
lly returned to the Web Cam screen.
Chapter 4: Configuring the EZLoop® 3rd Generation Wi-Fi Phone
59

MSN
You can use MSN Messenger to send a
nd receive in
stant messages, see who is online, and edit your MSN contac
t
information. To get started, select MSN
from the Main Menu, and se
lect MSN. The wizard
will
guide you
through
the setup process.
If you need to chan
ge your MSN contact informatio
n, such as email and pa
ssword, select
Settings
from th
e MSN
menu.
SKYPE
Skype uses the Intern
et to make free Skype to Skype internatio
nal call
s. Se
lect Skype from
the Ma
in Me
nu and
se
lect Skype
to get
started. The wizard will guide you th
rough the setup process for a new or exis
ting Sk
ype
account.
If you need to change your Sk
ype contact inform
ation, such as email and passwor
d, select Settings
fr
om the
Skype menu.
Figure 4-87: MSN
Figure 4-88: Skype
60
Chap
ter 4: Configuring the EZLoop® 3rd Generation Wi-Fi Phone

Web Site
A
li
st of web sites (if sa
ved) will be
shown. Scroll th
rough these choice
s a
nd pr
ess the ce
nter
selection key to visit the web site you want. To save fr
equent
ly visited web sites, select Option to
see menu choices, which will be
described in further detail below. Select Return
to return to
the
pr
evious menu.
Visiting a Web Site
When the web site is di
splayed, use the navigation bar belo
w the
Addr
ess
field to control the web
browser, and use the navigation pa
d to control the cursor
. Click the <=
and =>
buttons to mo
ve
between webpages. Cl
ick the red X button to stop l
oadi
ng the current webpage
. Click the green
refresh button to reload the curr
ent webpage. Click the home
button to retur
n to your homepage
.
Click the
search button to run a search . Click the smal
ler capital
A to zoom out, or c
lick the large
r
ca
pital A butto
n to
zoom in
on the we
bpage. Click the minimize
button to
the left
of
the Addr
ess
fi
eld to minimize the Address bar.
Figure 4-89: Web
Site
Figure
4-90: Visit
Web
Site
To auto-scroll, pr
ess and hold down the
center sele
ction key for two seconds until you see an orange na
vigati
on
cursor
. Then use the navigation pad to scroll up and down
the webp
age. To use the cursor as a page up and down
button, pr
ess and hold do
wn the center selection key for an addition
al two seconds until the cursor tur
ns
blue with
a “P” in the center
. T
hen use the navigation pad to mo
ve up and do
wn the webpage.
To visit a different website
, sele
ct the current web address in the Addr
ess
field
. Begi
n entering the new web
address, and a ne
w window will automatica
lly app
ear
. Whe
n you have
fi
nished entering the new web address,
pr
ess the center selection key.
You can also use the Ad
dress
drop-down menu. Se
lect the website you wa
nt. Then pr
ess the center selection key,
or select Option
and then Enter.
Figure 4-91: Auto-Scr
oll
Option
61
Chapter 4: Configuring the EZLoop® 3rd Generation Wi-Fi Phone

To change ho
w the cursor work
s, se
lect Op
tion
. If your cursor uses the
Cl
ick
feature, the Drag & Dr
op feature will be
av
aila
ble. If your c
ursor uses the Drag & Dr
op feature, the click feature will be av
ailable. Press the le
ft soft key to
select the
new
cursor
feat
ure
, or select Return
to return to the website.
Select Exit to return to
the Web Site
screen.
Op
tion
You have these choices: Edit (avail
able when you have at l
east one
web site
saved), Add,
and Delete (ava
ilable
when you ha
ve at least one web si
te saved). The Edit and Add options configur
e the same setti
ngs. The Edit option
is used for changing existing
web site
entries, wh
ile
the
Add opti
on is used for saving new web site
entrie
s. Selec
t
Return
to retu
rn to the previous menu.
Edit. Select Edit
to edit a web si
te’s information: Name
, URL (web address), and Port Number . Scroll through
these choices, and select Edit
to cha
nge a
setting.
Name
. To c
hange the Name
, select Edit
. Enter the new Name in the new window
. Press the center selection
key
to save the ne
w informatio
n, or select Exit
to return to the pr
evious menu.
URL
. To change the URL, select Edit.
Enter the new URL in the new window
. Press the center sele
ction key to
save
the
new inform
ation, or se
lect Exit
to return to the previous menu.
Port Number
. To c
hange the Port Number
, select Edit
. En
ter th
e new Port Number in the new wi
ndow.
Pr
ess
the
c
e
nter se
lectio
n key to save the new information, or select
Exit
to return to the pr
evious menu. (If you
are not
sure ho
w to change this setti
ng, ke
ep the default, 80
.)
Select Return
to return to
the Web Site
screen.
Figure
4-92: Web Site
Options
Figure
4-93: Edit Web
Site
62
Chap
ter 4: Configuring the EZLoop® 3rd Generation Wi-Fi Phone

Add
. Select Add
to cr
eate a new
web site entr
y with
the follow
ing informatio
n: Name,
URL (web addr
ess), and
Port Number.
Scroll
through these choices, and select Edit
to configur
e a setti
ng.
Name
. To enter the Name
, select Edit. Enter the new Name in the n e w wi
ndow. Pr
ess the center selection
key
to save the ne
w informatio
n, or select Exit
to return to the pr
evious menu.
URL
. To
enter the URL, select Edit
. Enter the new URL in the new wi
ndow.
Press the center
se
lectio
n key to
save
the
new inform
ation, or se
lect Exit
to return to the previous menu.
Port Number
. To enter the Port Number, select Edit
. Enter the new Port Number in the new window.
Pr
ess
the
center se
lectio
n key to save the new information, or select
Exit
to return to the pr
evious menu. (If you
are not
sure ho
w to change this setti
ng, ke
ep the default, 80.)
Select Return
to return to
the Web Site
screen.
Delete. To delete a web site
, scroll down the en
tries until the web site is highl
ighted. Select Option
and then
select Delete
. Then you will be automatically returned to the Web Site
screen.
Figure 4-94: Ad
d Web
Site
63
Chapter 4: Configuring the EZLoop® 3rd Generation Wi-Fi Phone

In
formation
The status inform
ation of the IP Pho
ne and its software is displayed on this read-only scre
en. Scro
ll through the
settings to view them. Select Return
to return to the previous menu.
Phone
Number
. Displayed here is the Phone Numb
er of the IP Phone.
IP
Address
. Displayed here is the
IP Addr
ess of the IP Phone.
Wireless AP
. Displayed here is the name of the wireless network use
d by
the
IP Phone
. (This is al
so known as the
SSID.)
MA
C Address
. Displayed here is the MAC Addr
ess of the IP Phone.
eBoot Version
. Displayed here is the version number of the eBoot software.
Imag
e Ve
rsion
. Displayed here is the
ve
rsion number of the image
software
.
SIP Version. Displayed here
is th
e versio
n number of the SI
P software.
UI Version
. Displayed here is the version number of the UI (User Interface) so
ftware.
Figure 4-95: Information
64
Chap
ter 4: Configuring the EZLoop® 3rd Generation Wi-Fi Phone

Chapter 5: For Administrators Only
Administrator Settings of the
EZLoop® 3rd Generation Wi-Fi Phone
In addition to the menu choices for end users, you have acc
ess to SIP Se
ttings, Phon
e Upgrades, and Auto-
Provisioning
. Refer to the rest
of
the user guide to continue setting up the IP
Phone.
Out of the
box, you have complete access to
all se
ttings of the IP Phone. After configuring the SIP
Setting
s and Auto-Provisioning for the phone,
make sure to access the Web-based u
til
ity and tur
n on
the op
tion to
protec
t admin access for a
ll pho
nes.
Accessing the Web-based Utility
For
your convenience,
you can configure admin settings fo
r the
EZLoop® 3rd Generation Wi-Fi
Phone
either on the IP phone or throug
h the Web-based uti
lity provided. The We
b-based utili
ty is
av
ailable for
both
user an
d admin-leve
l access of the IP Phone.
1. Retrieve the phone’s IP address. From
the phone, press the Meny soft key and na
vigate down to
Information and press the cente r selectio
n key.
The IP address is lo
cated here.
2. From a We
b browse
r in the Addr
ess
fiel
d, enter http:// and th
e ip address.
3. The default User Name
is admin
and the Password
is 0000
. You can change your password
later
in this util
ity or th
rough the XML confi
gur
ation file.
Chapter 5: Fo
r Ad
ministra
tors Only
Figure 5-1: Admin Login
on
Web-based utility
65

Pr
otecting Administrator Access
You will want to prote
ct admin level access fo
r all ph
ones no
t used by the ad
ministrator. Se
t this
fr
om the Web-based util
ity
. Login as the admini
strator and from t
he Admi
nistrator tab, select Ye
s
to
protec
t Pho
ne Admin Access.
Also
, become familiar with the different settings
you can confi
gur
e as an administrator using
the
web-based utility.
Out of the
box, the IP phone provides all-level acce
ss. After you choose to
protec
t
the phone (usi
ng the
web-based utilit y), then you will ne
ed to acce
ss admi
n-level
access on the IP Phone through a password.
Figure 5-2: Pr
otect Admin Access
To
gain admini
strator access on the IP Phone, first en
able the user password
thro
ugh Phone Settings. Reboot the
IP
Phone. When you po
wer the phone back on, the User
password field displ
ays. Press and hold the Call
button
for 3
seconds. The
Admin
password field displays. Enter your
Admin passwor
d, and then select OK
.
Figure
5-3: Admin
password on Phone
66
Cha
pter 5: For Administrators Only

Appendix A: Common Problem And Solutions
This appendix provides solu
tions to problems that may oc
cur during the installation a
nd operatio
n of the
EZLoop® 3rd Generation Wi-Fi
Phone. Read the descri
ption below to solve your problems. If you
can't
fi
nd an answer here, c
heck the website of your Inter
net phone
serv
ic
e provi
der or the website at www
..c
om/international.
1.
When
I make a telephone call, the call do
esn’t go throu
gh; instead, I hear a fast busy sign
al.
Go through this checklist until your problem is solved:
•
Fo
llo
w these instructio
ns to reboot your cable or DSL m
odem, IP Phone
, an
d router:
1.
Power off your cable or DSL modem by
unplugging its po
wer adapter.
2.
Power off the router
by
unplugging
it
s power adapter.
3.
Power off the IP Phone by
pr
essing and ho
ldi
ng do
wn th
e Po
wer button for two seconds.
4.
Wait 30 seconds, and then power on your cable or DSL modem by plugging its power adapter
into
an el
ectri
cal outlet.
5.
Wait 30 seconds. Po
wer on the router by plugging
it
s po
wer
adapter into an el
ectri
cal outlet.
6.
Wa
it 10 seconds. Power on the IP Phone by
pr
essing and holding down the Po
wer button for two seconds.
7.
Reboot one of yo
ur networked computers, and check for a
n ac
tive
Inter
net conn
ection.
8.
Pick up the IP Phone and tr
y your call again.
•
Set up
port forwardi
ng on your router
. You must sp
ecify that four port ranges be forwar
ded to the IP
address of the IP Phone. These four port ranges ar
e as follows: 5060-
5061 (UDP
), 53-53
(UDP),
69-
69 (UDP)
, and 10
000-2000
0 (UDP).
If you ha
ve a non- router, refer to its documentation for instructions.
A
ppendix A: Common Problem and Solutions
67

If you ha
ve a ro
uter, th
en follow these instructio
ns:
1.
On on
e of your ne
tworked computers, open
your web browser.
2.
Access the Router’s We
b-ba
sed Uti
lity by
going to http://
192.168.1.1 or
the IP address of the
Router.
3.
A login screen wi
ll app
ear
. Leave the User Name
fiel
d blank. Enter the Router’s
passwor
d (the
default is admin
) in
the Password
fi
eld. Then cl
ick the OK
button.
4.
Click the App
lications & Gaming
ta
b, and then c
lick the Port Ra
nge Forwarding tab.
5.
For each port range you must specify, enter a di
fferent na
me in the Application
field. Then enter the
number or
range of ex
ter
nal port(s) used by
the IP Phone.
6.
Select the protocol you will be using,
UDP.
7.
Enter the IP addr
ess of the IP Phone
. For example ,
if th
e IP Phone’s IP address is 192.168.1.100, you
would enter 100 in the field provi
ded.
8.
Repeat st
eps 5-7 until you ha
ve entered al
l four port ranges for the IP Phone.
Ap
plication
Start and End Protocol
IP Addr
ess
Enable
Internet ph
one 1 5060 to 5061
UDP
(IP
address of IP Phone)
X
Internet ph
one 2
53 to 53
UDP
(IP
address of IP Phone)
X
Internet ph
one 3
69 to 69
UDP
(IP
address of IP Phone)
X
Internet ph
one 4
10000 to 20000
UDP
(IP
address of IP Phone)
9.
Check the Enable
op
tion for the port serv
ices you want to use.
10. When you have completed the configuration, c
lick the Save
Settings bu
tton.
68
A
ppendix A: Common Problem and Solutions

2.
When
I’m on a telephone call, words are dr
opped
intermittently.
Go through this checklist until your problem is solved:
•
Are you using a wireless ro
uter and cordless phone?
If so,
the router and cordless phone may be using
the same fr
equency and interfere with each other
. Move the cordless phone farthe
r aw
ay from the
router.
•
There may be heavy network activity, particularly if you are running a serv
er or using a fi
le shar
ing
program. Try to
limit network or Internet activity during any Intern
et telephone call
. For example,
if you are
running a fi
le shar
ing prog
ram, fi
les may be upload
ing in the background even though you are not
do
wnloading any files, so make sure you exit t
he progra
m before you make an Internet phone call.
•
There may not be enough bandwidth available for your In
ter
net phone call. You may want to test your
bandwidth using one of the bandwidth tests availabl
e online
. If necessary, access your serv
ice account at
your Inter
net phone serv
ice provider’s
website, and reduce the bandwidth
requirements for your
serv
ice.
Fo
r more infor
mation, refe
r to your In
ter
net phone serv
ice provider’s
website.
•
There may be too many wirele
ss ro
uters or access points in your location using the same broadcast
c
hannel. Tr
y changi
ng the c
hannel that your wire
less router or access point uses; refer to the
documentation of your
router or
access po
int for
instructions.
3.
The IP Phone do
es not ring, and
my calls au
tomatically go to v
oicemail.
Go through this checklist until your problem is solved:
•
Check the ringer volume
on the IP Phone
, and make sure it is set to an audible le
vel.
•
Fo
llo
w these instructio
ns to reboot your cable or DSL m
odem, IP Phone
, an
d router:
1.
Power off your cable or DSL modem by
unplugging its po
wer adapter.
2.
Power off the router
by
unplugging
it
s power adapter.
3.
Power off the IP Phone by
pr
essing and ho
ldi
ng do
wn th
e Po
wer button for two seconds.
4.
Wait 30 seconds, and then power on your cable or DSL modem by plugging its power adapter
into
an el
ectri
cal outlet.
5.
Wait 30 seconds. Po
wer on the router by plugging
it
s po
wer
adapter into an el
ectri
cal outlet.
A
ppendix A: Frequently Asked Questions
EZLoop® 3rd
Generation Wi-Fi
Phone
69

6.
Wa
it 10 seconds. Power on the IP Phone by pr
essing and holding down the Po
wer button for
two seconds.
7.
Reboot one of yo
ur networked computers, and check for a
n ac
tive
Inter
net conn
ection.
•
Set up
port forwardi
ng on your router
. You must sp
ecify that four port ranges be forwar
ded to the IP
address of the IP Phone. These four port ranges ar
e as follows: 5060-
5061 (UDP
), 53-53
(UDP),
69-
69 (UDP)
, and 10
000-2000
0 (UDP).
Note: By default, the IP Phone uses a d
ynamic IP a
ddr
ess assigned by
your router. For port forwarding
,
you may need to as
sign a static IP address to
the
IP Phone.
Co
ntact your Internet
ph
one service
provide
r
for assistance.
If you ha
ve a non- router, re
fer to its documentation fo
r instruct
ions. If you ha
ve a router, then follow
these instructions:
1.
On on
e of your ne
tworked computers, open
your web browser.
2.
Access the Router’s We
b-ba
sed Uti
lity by
going to http://
192.168.1.1 or
the IP address of the
Router.
3.
A login screen wi
ll app
ear
. Leave the User Name
fiel
d blank. Enter the Router’s
passwor
d (the
default is admin
) in
the Password
fi
eld. Then cl
ick the OK
button.
4.
Click the App
lications & Gaming
ta
b, and then c
lick the Port Ra
nge Forwarding tab.
5.
For each port range you must specify, enter a di
fferent na
me in the Application
field. Then enter the
number or
range of ex
ter
nal port(s) used by
the IP Phone.
6.
Select the protocol you will be using,
UDP.
7.
Enter the IP addr
ess of the IP Phone
. For example ,
if th
e IP Phone’s IP address is 192.168.1.100, you
would enter 100 in the field provi
ded.
70
A
ppendix A: Common Problem and Solutions

8.
Repeat st
eps 5-7 until you ha
ve entered al
l four port ranges for the IP Phone.
Application
Start and End
Protocol
IP Addr
ess
Enable
Inter
net phone 1 5060 to 5061
UDP
(IP
address of IP Phone)
X
Inter
net phone 2
53 to 53
UDP
(IP
address of IP Phone)
X
Inter
net phone 3
69 to 69
UDP
(IP
address of IP Phone)
X
Inter
net phone 4
10000 to 20000
UDP
(IP
address of IP Phone)
9.
Check the Enable
op
tion for the port serv
ices you want to use.
10. When you have completed the configuration, c
lick the Save
Settings bu
tton.
4.
The pow
er LE
D does not light up.
Go through this checklist until your problem is solved:
•
Remove the IP Phone’
s ba
tter
y from its co
mpartment. Wait five seconds while
the
IP Phone resets itself.
Insert the batter
y and power on the IP Phone.
•
You may be using the wrong po
wer adapter
. Make
sure the powe
r adapter you are using is the one
included with th
e IP Phone.
71
A
ppendix A: Common Problem and Solutions

Frequently Asked Questions
Can I make ca
lls if my In
ternet connection
is down?
No
. Your high-speed Internet co
nne
ction must be active when you make Internet phone calls.
Can I use
th
e IP Ph
one to make a call an
d br
owse the Intern
et at the same time?
No
. Th
e IP Phone supports either call
ing or web browsing,
not both at the same
time. However
, you can receive a
ca
ll while
we
b browsing with the IP Ph
one. Also
, you can make calls with the
IP Phone whil
e browsing the Inter
net
on your computer
. Please
note that yo
ur web browsing may affect the qu
alit
y of your telephone call, depending on
the amount of upstream data tr
affic passing through your Internet connection.
Can I r
eceive calls while my netw
ork
is down?
You cannot dire
ctl
y receive calls while your network is do
wn. However , your
Inter
net phone serv
ice account may
allow
yo
u to
forward calls to
a di
ffer
ent telephone numb
er, such as a cellular phone number.
For more
infor
mation,
visit the website of your Internet
phone service provider.
72
A
ppendix A: Common Problem and Solutions

Appendix B: Glossary
Th
is glossary contains some basic netw
orking term
s you may come across when using this product. For more advanced
terms, see
the complete
gl
ossary
at http://www.
.com/glo
ssary.
Acce
ss Point - A device that allows wireless-equi
pped
computers and other devices to communicate with a wired network.
Also
used to expand the range of a wireless network.
Ad-hoc - A group of wireless devices communica
ting direct
ly with each other (peer-to
-peer) with
out the use of an access
point.
Bandwidth
- The transmission capacity of a given device or netw
ork.
Bit - A binary digit.
B
oot - To start a device and cause it
to start executing instructions.
Broadb
and - An always-on
, fast Inter
net connection.
Browser - An appl
ication program that provides a way
to l
ook at and interact with
all
the information on
the World Wide Web.
Byte - A unit of data that is usually eigh
t bits long
Cable Modem
- A device that connects a computer to
the cable television network, which in tur
n connects to the Internet.
Default Gateway - A device that forw
ards Intern
et tr
affic from your local area network.
DHCP (Dynamic Host Configura
tion P
rotocol) - A networking protocol that all ows
administrators
to assign temporary IP
addres
ses to network computers by “leasi
ng” an IP address to a user for a limited amount of time
, instead of assigning
per
m
anent IP addr
esses.
A
ppendix B: Glossary
73

DMZ (Demi
litarized Z
one) - Remove
s the Router's firewall protection from one PC
, allowing it to be “s
een” from the In
ternet.
DNS (Domain Name Ser
ver) - The IP address of yo
ur ISP's
server
, which tr
anslates the name
s of websites into IP addre
sses
.
Domain
- A specific
name for a netw
ork of
computers.
Downl
oad
- To receiv
e a fi
le tr
ansmitte
d over a ne
twork.
DSL (Digital Subscriber Line) - An always
-on broadband connection ov
er tr
aditional ph
one lines.
Dynamic IP Addr
ess
- A temporar
y IP address assigned by a DHCP server.
En
cryption
- Encoding data tr
ansmitted in a network.
Ethernet
- IEEE stan
dard network protocol that specifies how data is placed on and retrieved
from a common transmission
medium.
Firmwar
e - The programming code tha
t runs a networking device.
FTP (File T
ransfer P
roto
col) - A protocol us
ed to tr
ansfer file
s over a TCP/IP network.
Full Duplex
- The abi
lity
of a netw
orki
ng device
to receive and transmit data simultaneously.
Gateway
- A device that inter
connects netw
orks with di
fferent, incompatible communications protocols.
Half Duplex
- Data tr
ansmission that can occu
r in two directions over a single line, but only one direction at a time. HTTP
(
H
yperText Transport P
rotocol) - The communications protocol used to conn
ect to servers
on the Wo
rld Wide Web.
Infrastr
ucture - A wireless network that is bridged to
a wired ne
twork vi
a an access
point.
IP (Internet P
rotocol) - A protocol used to send data over a network.
IP Addr
ess - The address
used to identify a computer or device on a netw
ork.
74
Appendix B:
Glo
ssary

ISP (I
nternet Service Provider) - A company that provides access to the Intern
et.
ITSP (I
nternet Telepony S
ervice Provider) - A compan
y that provides vo
ice
over I
nternet
protocol serv
ices.
LAN - The computers and networking products that make up your local network.
MAC (Media Access Control) A
ddr
ess
- The unique address that a manufac
tur
er assigns to eac
h networking
device.
Mbps (M
egaBits Per Second) - One million bits per second; a unit of measur
ement for data tr
ans
mis
sion.
Netw
ork
- A series of computers or devi ces co
nnected for the purpose of data shar
ing
, storage,
and/or transmission between
users.
Packet - A unit of data sent over a netw
ork.
Passphr
ase
- Used much like a pass
wor
d, a passphr
ase simplifies the
WEP encr
yption proc
ess by
automatically ge
nerating
the
WEP encr
yption keys for products.
Port
- The connection point on a compute
r or networking device used for plugging in cables or adapters.
RJ-45 (R
egistered Jack-45)
- An
Ether
net connector that holds up to eight wires.
R
oaming - The abi
lity
to take a wireless de
vice from
one
acce
ss point's range to another without losing
the connection.
Ro
uter
- A networ
king device that conne
cts multiple netw
orks
together.
Server
- Any computer whose function in a network is to provide us
er access to files, printi
ng, communications, and other
serv
ices.
SSID (Service Set IDentifier) - Your wireless netw
ork's
name.
Static IP Addr
ess
- A fixed addr
ess assigned to a comp
uter or device that is connected to a network.
Static Routing -
Forwar
ding data in a network via a fixed path.
A
ppendix B: Glossary
EZLoop® 3rd
Generation Wi-Fi
Phone
75

Su
bnet Mask
- An address code that determines
the size of the network.
Switch - 1. A data sw
itch that
connects computing devices to host computers, allowi
ng a
large number of devices to shar
e a
limited number of ports. 2. A device fo
r making, br
eak
ing, or
cha
ngin
g the connections in an el
ectrical
circuit.
TCP (Tra
nsmission Control P
rotocol) - A network protocol for transmitting data that
r
e
quires ac
knowledgement from the re
cipient of data sent.
TCP/IP (Tra
nsmission Control Protocol/Internet P
rotocol) - A set of inst
ructions PCs use to communicate over a netw
ork.
Telnet
- A user c
ommand and TCP/IP protocol used for accessing remote PCs.
TFTP (Trivial File Transfer P
rotocol) - A ve
rsio
n of the TCP/IP FT
P protocol that has no director
y or password capability.
Throug
hput
- The amou
nt of data mo
ved successfu
lly from one node to another in a given time period.
Topology
- Th
e phy
sical layout of a network.
TX Rate - Transmissi
on Rate.
Upgrade
- To replac
e exis
ting software or firmware with
a newer version.
Upload
- To tr
ans
mit a file over a network.
URL (U
niform Resource Locator)
- The address of a
file
located on the Internet.
WA
N (W
ide Area N
etwork)-
Th
e I
nternet.
WEP (Wired E
quivalent P
rivacy) - A met
hod of encrypting network data tr
ansmitted on a
wireless network for grea
ter secu
rity. WLAN (W
ireless L
ocal
Area Network) - A group of
computers and associated devices that communi
cate with eac
h other
wirelessly.
76
Appendix B:
Glo
ssa
ry
 Loading...