

Page 1

13
STEP 4: Arbor Footing Installation
Figure 4.1
Wood Ground Anchor
6x18” deep hole
Pre-Mix Concrete
Blocks of wood, bricks, or stones
Figure 4.2b
Footing with Concrete
Insert the 2 x 3½¨ wood ground anchors into the bottom
of the arbor post and secure with screws through the
predrilled holes. (Figure 4.1)
Move the arbor to its final location (2 people will be needed). Set the
Arbor and mark the positions of the posts, then move the arbor aside
and lay it carefully on it’s side. Dig four holes approximately 6" wide x
18" deep. (Figure 4.2b)
Irvine Arbor
Now move the arbor back into position. Support the arbor plumb and
level over the holes using blocks of wood, bricks, or stones under the
bottom rail of the side panel. (Figure 4.2b)
Fill the holes with wet cement within 3” of your grade (2 bags of Pre-
Mix Concrete-Sold Seperately). The vinyl post bottoms should insert
themselves approximately 1" into the concrete. (Figure 4.2b)
Arbor Assembly Instructions
Please Read Through Before Starting Assembly
Front View Side View
Check Box for these Contents
Description Pcs.
Thank You For Your Purchase
If you have a problem or question
Please call 1 800 483 4674
(Mon-Fri • 8:AM to 4:PM PST)
or visit www.duramaxBP.com
1
Post
2
Roof Rails
3
Side Rails
4
Side Pickets
4.1
Side Pickets
5
Rafters
6
Post Pyramid Caps
7 Rafter Sharp Caps 10
8
Side Picket Caps
9
Screws Pan Head 93mm
10
Screws Pan Head 55mm
11 Snap Cap w/ Washer 26
12 Vinyl Glue 1
13 Wood Ground Anchor 4
4
2
4
6
4
5
8
10
18
8
Tools Required for Assembly
• Cordless Drill • Tape Measure
• Rubber Mallet • Level
• Stool or Ladder • Screw Driver
DuraMax Building Products, A Division of US Polymers Inc. • 1057 S. Vail Ave. Montebello, CA 90640 • DuraMax © 2009
General Information
• When assembling components, place on a non-abrasive surface to avoid scratching.
• While assembling the components do not use excessive force otherwise the components can be damaged.
Page 2
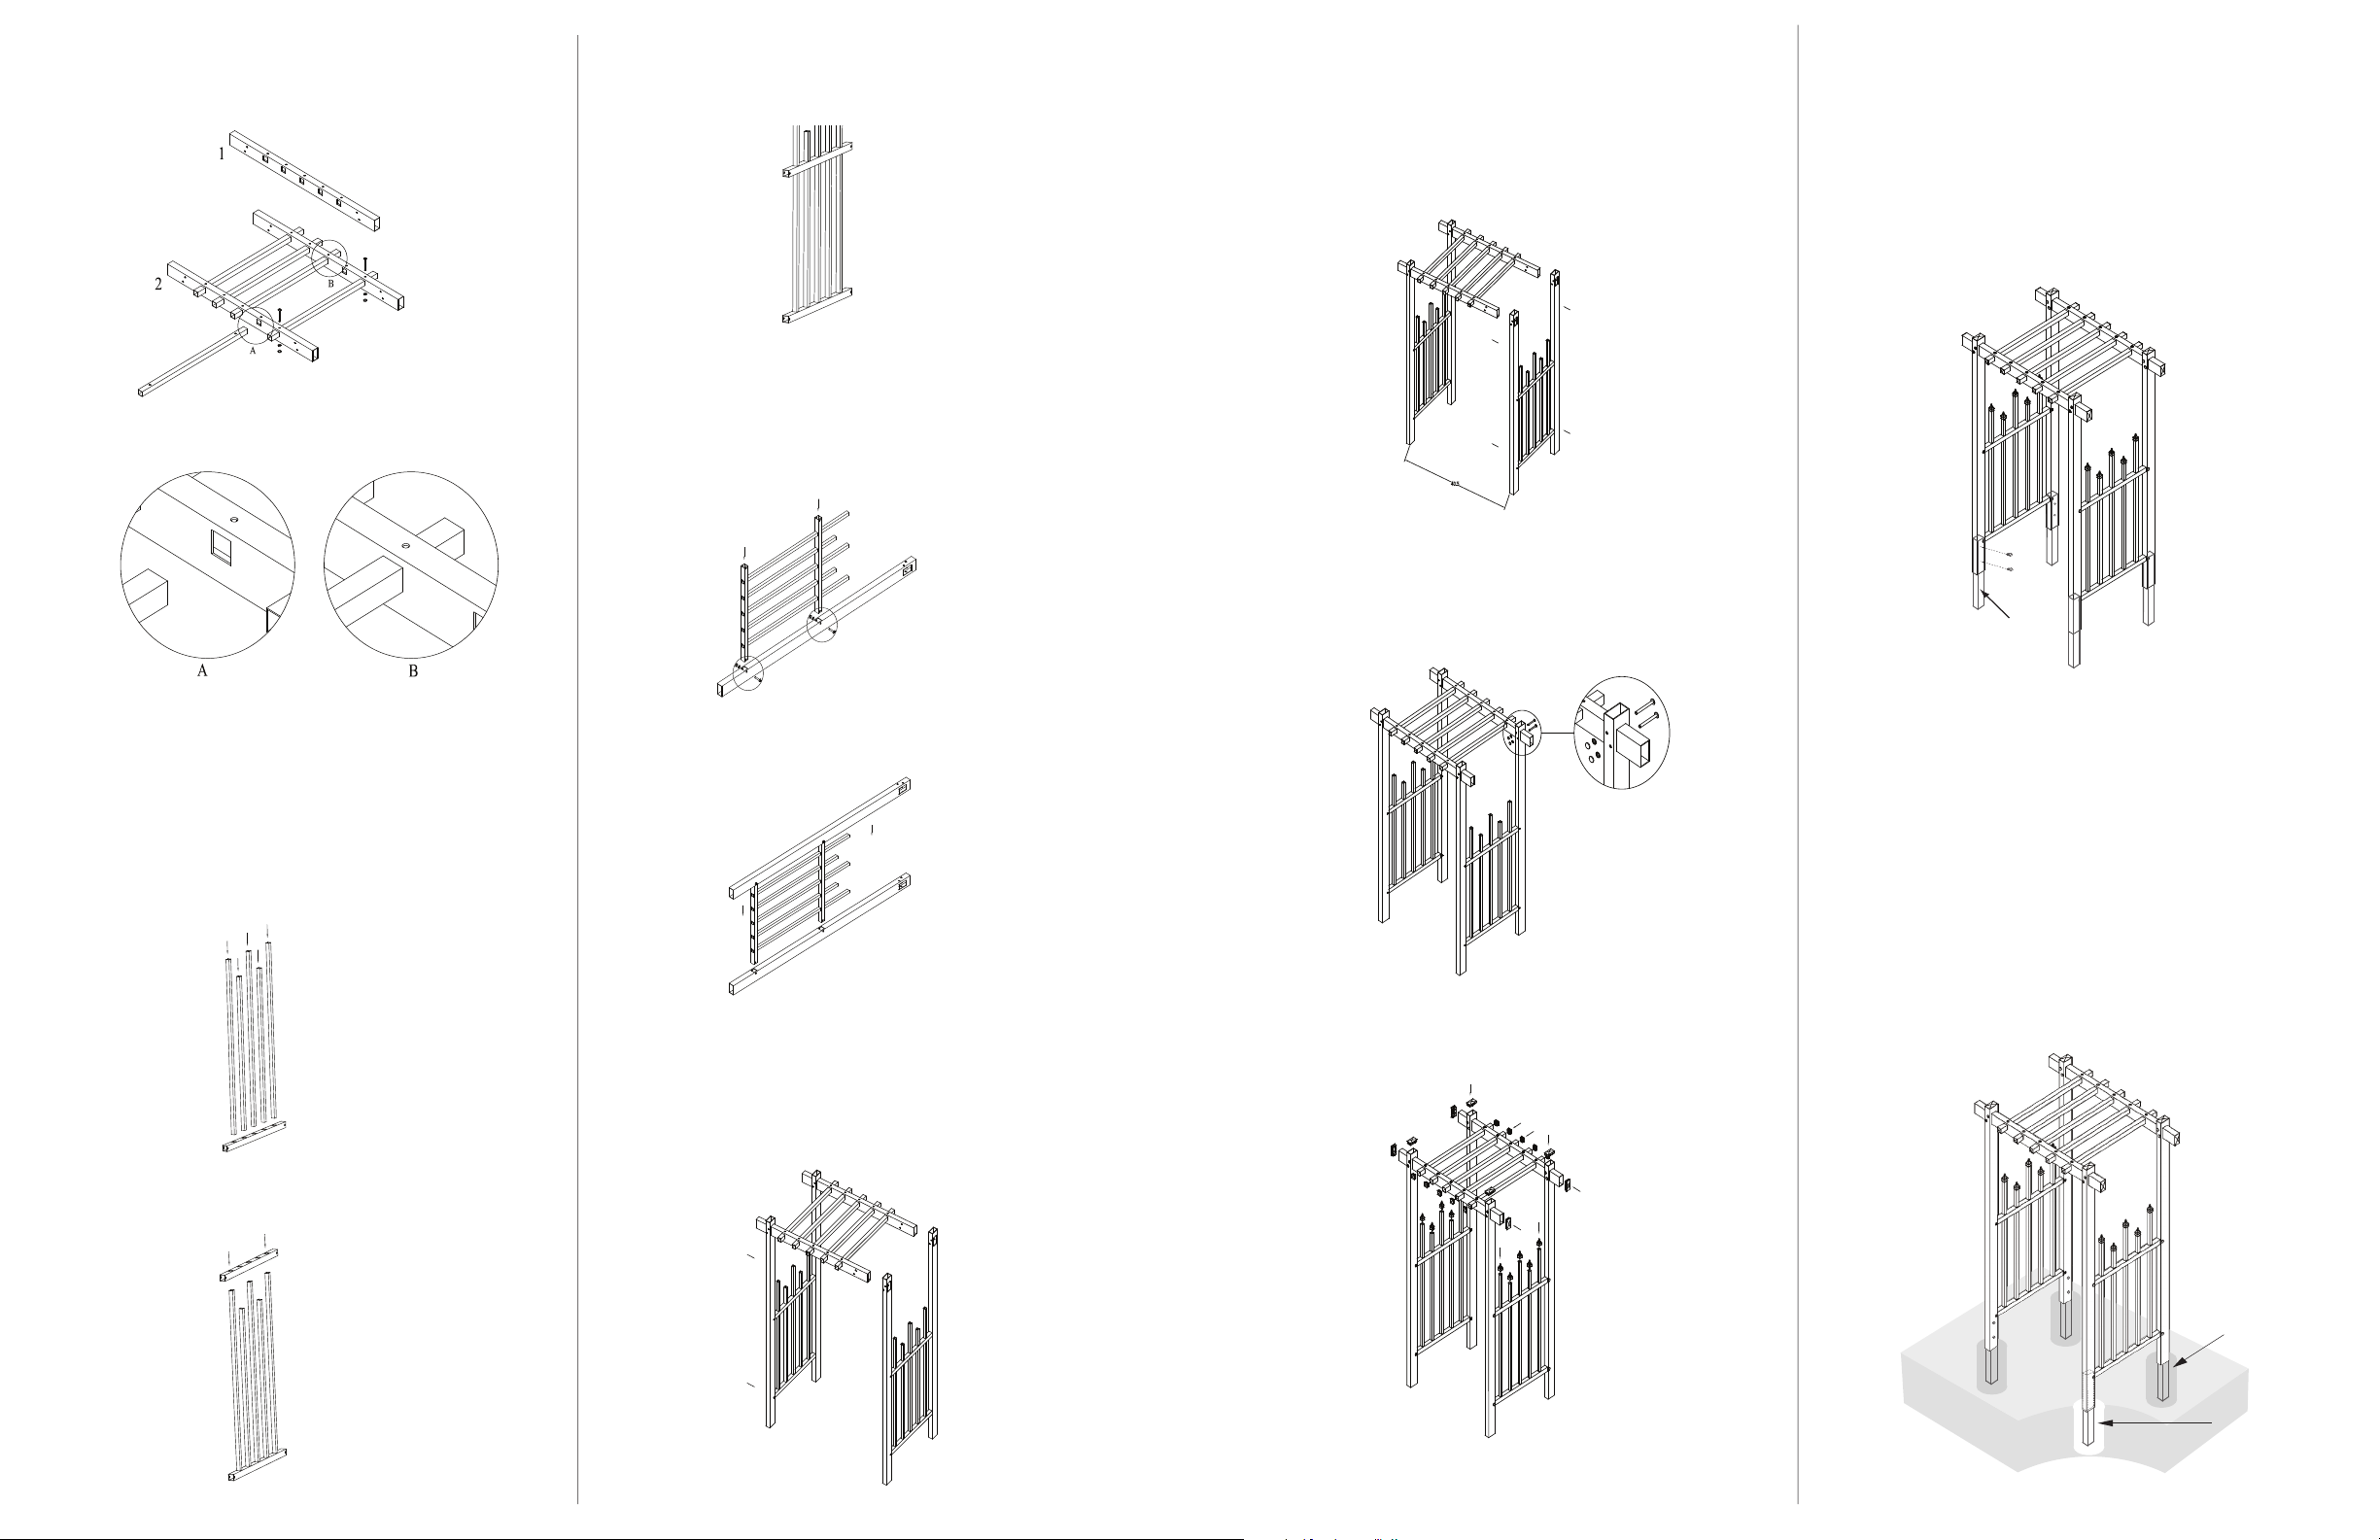
STEP 1: Assemble the Cover
Figure 1.1
Figure 4.1
Wood Ground Anchor
Figure 4.2
6x18” deep hole
Soil
Figure 1.2
Figure 2.1
Figure 2.2
Figure 2.3
Figure 2.4
Figure 2.5
Figure 3.1
Figure 3.2
Figure 3.3
Figure 3.4
Slide the Rafters through the holes in the Roof Rails in the
sequence as shown below. (Figure 1.1)
Ensure proper orientation of both the Rafter & the Roof Rails
as shown in Figure 1.2 (A & B).
Ensure a proper fit as shown in Figure 2.3.
Layout one Post horizontally & insert the Side panel into Post
as shown in Figure 2.4. All the pre-drilled holes should be
aligned.
Install one screw with snap cap and washer per hole.
Push Side Panel Post untill the spacing appears even
between the inside of Post & the first Rafter with remaining
Rafters. (Figure 3.2)
Final adjustment to allow for a 40.5” opening between Posts
(minor variation is allowed).
Fasten Roof Rail to the Post by installing Screws & Snap
Cap Washer (as given in BOM) provided into 2-pre drilled
holes per Post. (Figure 3.3)
STEP 4: Arbor Footing Instructions
Footing into the Ground
Arbor must be well secured to prevent tipping over from wind or other
loads. Four 2 x 3½" wood ground anchors have been provided for
securing the arbor either into the ground or a concrete footing. In
some cases it maybe acceptable to secure the arbor to an existing
structure such as a fence post. If installing your arbor on concrete
or a deck, visit your hardware store for the appropriate galvanized
bracketing hardware.
To prevent the Rafters from shifting position install two screws
with snap cap and washer to both ends of Rafters as shown in
Figure 1.2 above.
STEP 2: Assemble the Side Panels
Layout the Bottom Side Rail horizontally & insert the Five Side
Pickets in the pockets as shown in Figure 2.1.
Insert the Top Side Rail over the ends of vertical Side Pickets.
Repeat the same procedure for the other Side Panel.
STEP 3: Connect the Top Half
to the Side Panels
Insert the assembled Roof Rails through the pockets at the top
of the Posts as shown. You will need a helper. (Figure 3.1)
Press fit the End Caps as shown in Figure 3.4.
Insert the (2 x 3½¨) 4 wood ground anchors into the bottom
of the arbor post and secure with screws through the
predrilled holes. (Figure 4.1)
Move the arbor to its final location (2 people will be
needed). Set the Arbor and mark the positions of the posts,
then move the arbor aside and lay it carefully on it’s side.
Dig four holes approximately 6 x 18" deep. Move the arbor
back into position and level it both vertically and
horizontally. The bottom of the vinyl posts should insert
themselves approximately 4" below the ground level.
(Figure 4.2)
Fill the holes with the excavated soil to cover the ground
anchors. (Figure 4.2)
 Loading...