

ezee Sprint 2008, Forte 2008, Forza 2008, Torq 2008, Quando 2008 User Manual
...
All bikes
model year 2008
user manual
0

Contents:
1. Introduction 3
1.1 Read me first! 3
1.2 Approval and bike conformities 3
2. Getting to know your bike 4
2.1 Box contents 4
2.2 Technical specifications 4
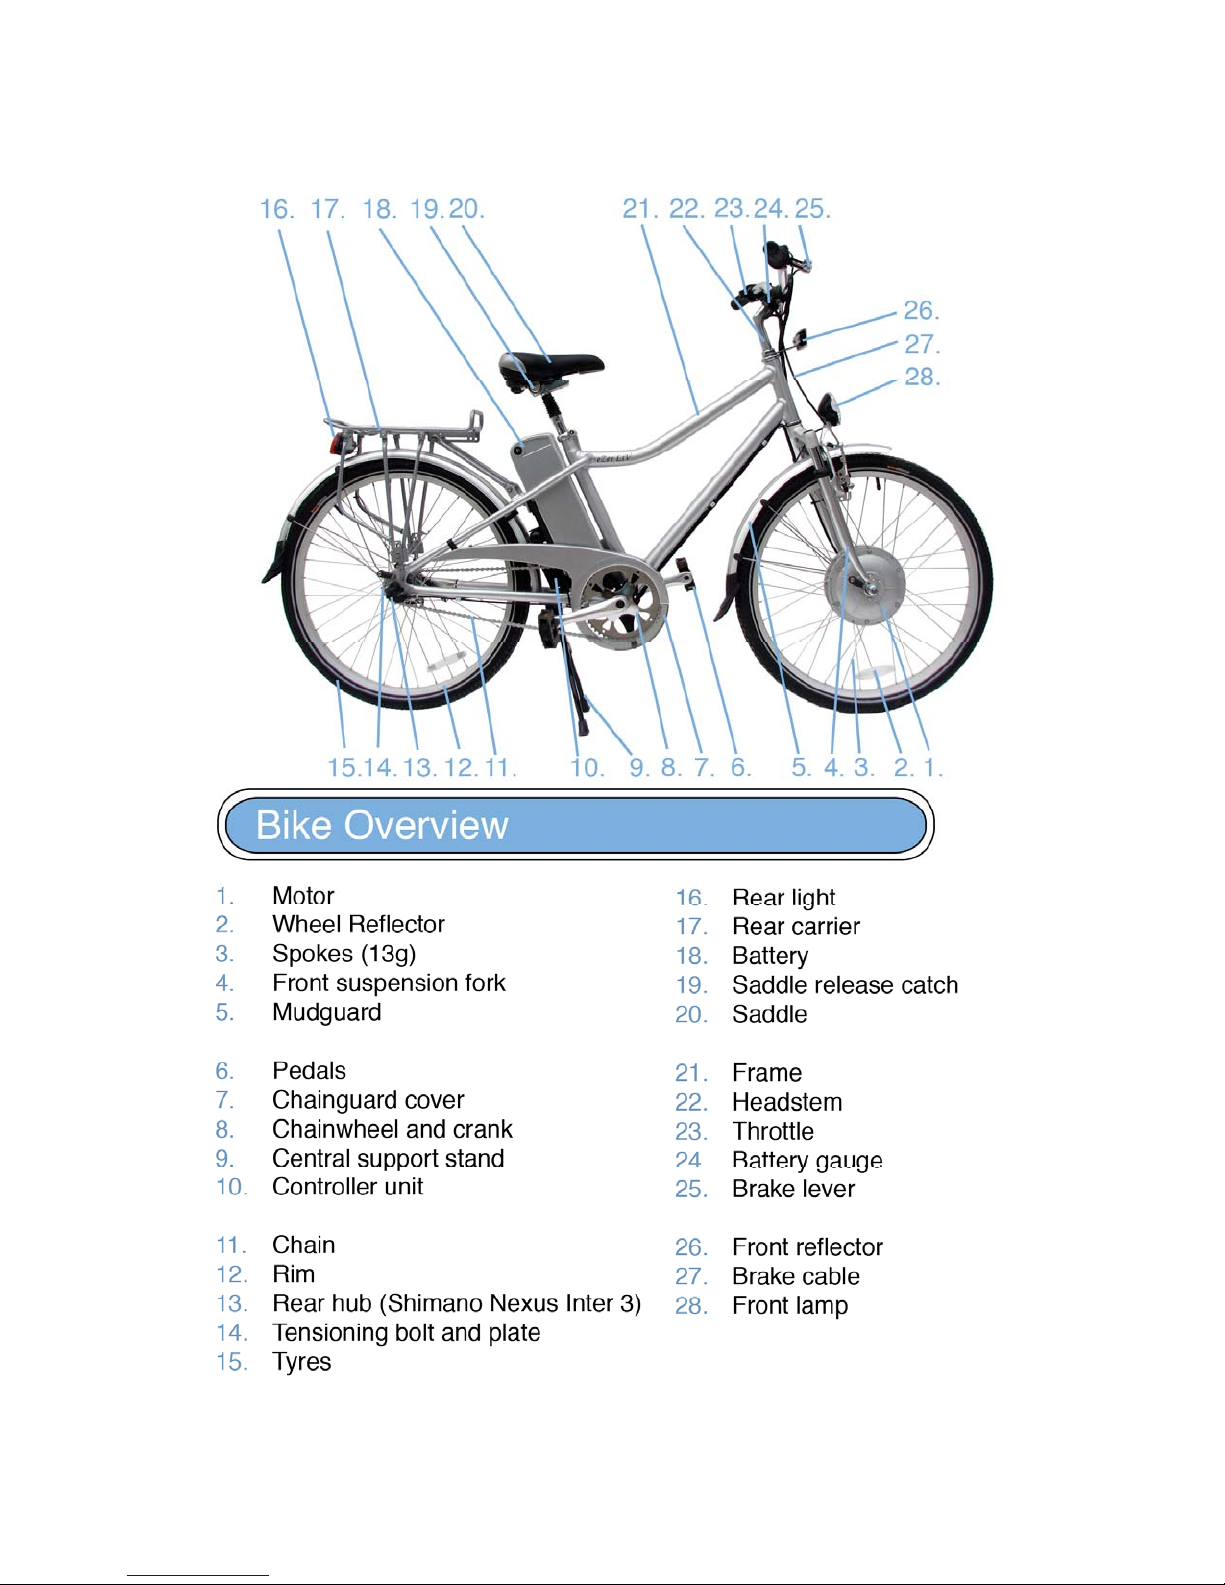
2.3 Bike overview 5
2.4 Battery and charger 6
2.5 Handlebar and stem 6
2.6 Position of serial numbers 6
2.7 Filling out your warranty information 7
3. Setting up and safety
3.1 bike assembly 8
3.2 Fit 9
3.3 Saddle position 9
3.4 Handlebar height and angle 9
3.5 Safety check 10
3.6 Safe and responsible riding
4. Power Assisted Cycling
4.1 Loading the battery
4.2 Pedelec mode
4.3 E-Bike mode
4.4 Brakes
4.5 Gear changing
4.6 Tyres and Inner tubes
4.7 Lighting system
4.8 Kick stand
4.9 Luggage carrier
4.9.1 Transporting your eZeebike
5. Service and Maintenance
5.1 General
5.2 Battery disposal
6. Precaution and procedures
6.1 Emergency equipment and knowledge
6.2 If you get a flat tyre
6.3 Spoke breakage
6.4 Accidents while cycling
6.5 Additional accessories
7. Self Diagnostic System
7.1 Things to avoid
8. Guarantee regulations
1

1. INTRODUCTION
besides being a full-featured bicycle, is integrated with an electric drive system that will increase the
benefits and pleasures of cycling.
friendly vehicle, an ergonomically designed bicycle for comfortable cycling and an economically
efficient vehicle, giving you ideal mileage and mobility at a fraction of regular transportation costs. The
electrical consumption is about 1.0 Kwh for 100 km (62 miles) on e-bike mode.
While cycling an eZee will be simple to use, fun and works much like a standard bike. Please
remember it is also a sophisticated commuting and electronic machine. It is unique, if you haven’t
ridden a bicycle in ages… cycling has changed so much! Therefore please take the time to go
through information on this manual. It
enjoyment.
So read this manual thoroughly, understanding your eZee will give you the best out of every
ride and for years to come.
While we made this manual to be comprehensive, it might not help you out in all situations you might
encounter during the lifetime of your bike. You should never attempt to repair, adjust or modify unless
you’re sure how it’s done properly. Failure to do so could cause damage to the motor, battery set or
the entire bicycle. So if in doubt, consult your local professional bike mechanic, your eZee dealer, or
us direct!
www.ezeebike.com
www.ezeebike.net
ezeebike@gmail.com
1.2 Approval and bike conformities
This eZee LiV power assist cycle fulfils the requirements of the following:
EC Directive: Electro Magnetic Compatibility directive (89/336/EEG)
EU Directive: 2002/24/EC Chapter 1 Article 1 1(h)
ISO 4210:1996 – Safety requirement for bicycles
Hello! Congratulations and welcome to the exciting world of power assist cycling. Your eZee,
eZeebikes are designed for your comfort and safety. It is a zero emission environmentally
help you maximize your bicycle’s performance, safety and
will
2

2 GETTING TO KNOW YOUR BIKE
Take your time to understand what makes up your bike, what are its components, what they do
and where they are located. The more you know your bike, the better you’ll be able to get the most
out of it.
2.1 Box Content
Note: Whether you received your bike fully assembled or in a package. You
should have the following.
a. The bike!
b. This manual
c. Gear technical service instruction (see tech. specs for more details)
d. User manuals for accessories
e. 2 x fuses, set of nylon ties
f. Hex keys 6mm, 5mm, 2.5mm
g. Heat shrink tubing
2.2 Technical Specifications
Classification: Electric powered assist cycle
Motor: DC Brush permanent magnet motor with planetary gears. Nominal 250 watts.
Controller: Overload protection 18 amps
Low voltage protection 31.5 V
Battery:
Charger:
Frame: Al Alloy 6061 T6
Tyres: 26” x 1.95”
Brakes: V-Brakes front, Shimano roller brake rear
Gears: Rear hub, Shimano Nexus Inter 3
Chainwheel: 48T
Chain: ½ x 3/32”
Lighting: LED powered by main battery
Max. Speed: 25km/h (EU) / 20 mph (US)
Range ~40 kms
Nickel Metal Hydride 36V 9Ah
Li Ion 37V 10Ah
NiMH 2 amps charger
Li Ion 2 amps charger
3
2.4 Battery and charger operation
4

Battery detachment, charging & installation
General
Battery
There are no parts inside the battery that you can service. If you suspect a problem, take your battery
to your authorized eZee dealer.
CAUTION:
Please read the following general safety tips for care and maintenance of eZeebike battery.
. Do not place the battery into a fire or near any heat source.
. For cleaning the battery casing, use a cloth moistened with water only. Do not use solvents or
cleaning fluids of any kind.
. Do not attempt to open the casing of the battery. This immediately voids your warranty. There
are no parts inside that you can service.
Danger:
Please note that improper handling poses a high risk of fatal accidents, serious injury or damage to
product and property.
. Do not short-circuit the charger’s plugs and sockets by using metallic objects.
. Do not attempt to disassemble or modify the charger. There are no parts inside that you should
attempt to service, if you suspect a problem, take the charger back to your authorized eZee dealer.
. Do not use the charger to charger batteries other than genuine eZee batteries. Overheating,
fire or electric shock may be the result.
5

. Do not subject the charger to shocks, e.g. by dropping. Do not expose the charger to liquids.
. Do not use a damaged charger or components (e.g. charger casing, cable, plug).
. Do not touch a plug with wet hands (electric shock may be the result).
. Do not apply too much pressure to the cables or the plugs.
. Keep the charger out of reach of children or pets.
. Be sure that the plug is completely inserted into an electric point.
. Do not use the charging plug and/or the plug for a power source when they are dusty. Moisture
absorbed by the dust may conduct electricity, causing fire. Clean with a dry cloth.
. Do not apply voltage other than the rated value to the charger. Do not use sockets, connectors
and other wiring devices with a power source other than standard AC 220~230 volts.
. Do not place the charger in an unstable position.
Using the charger upside-down or stretching the cable tight may result in malfunction, fire or
electric shock. Place the charger firmly on a flat surface.
. Do not cover the charger or put things on it. Overheating or fire may be the result.
1. Plug the charging pin into the battery charging socket.
2. Plug the power cord to the a/c outlet
3. Turn the power on the a/c outlet
4. Switch the charger “on”
Ensure that the grooves on the charging pin match the socket.
Red - Indication that charger is connected to an a/c outlet
Yellow - Charging
Green - Full
When the fuse is blown, the battery will not charge. Remove the fuse cap and the blown fuse (if the
wire in the fuse has snapped) and replace the blown fuse. While spare fuses will be provided with the
purchase of your bicycle, you may wish to purchase extra 30 A fuses from any electrical hardware
store. If you are unsure of which fuse to buy, we strongly recommend you call up your distributor for
advise.
The charging is automatic and there is no danger of over charging. There is no memory effect and the
battery can be charged at any battery level. However, we advise disconnecting the battery and
turning off the charger as soon as the charging process has been completed.
6
 Loading...