

Page 1
www.eZeebike.com
QUANDO
USER MANUAL
Page 2

Contents
Simply moving
Guarantee conditions
Legal regulations
Technical data
Parts Identication
Assembly
Folding
Checklist
Battery charging
How eZeebike works
Maintenance
Troubleshooting
Afterword
3
4
5
6
7
8
11
12
13
16
19
21
23
2
Page 3

3
Congratulations on the purchase of your eZee bike. You’re
one step closer in realizing a whole new way of commuting that is
fast, fun and friendly to the environment.
The hub motor is brushless and uses a technology called
Pulse Wave Modulation control, so that its not subject to wear like
a regular DC motor. Planetary reduction gears incorporated into its
hub gives it a very strong torque, working in unison with your leg
power to atten out those hills and to overcome headwinds.
Under normal cruising conditions (26 kmh, 16 mph), the motor draws about 5 amps at 140 watts with 5 Nm torque and has an
efciency about 80%. Its electric consumption is about 1.0 kwH for
100 km / 62 miles in ebike mode - even less energy than the food
you would consume riding by leg power alone. Making it by far the
most efcient vehicle ever made.
While the eZee pledge to quality means our components are
high value and reliable. Its your part to understand safety implications and the possible risks of cycling. So please take some time and
read this manual. It explains the bike in detail, how to take care of it,
so that you can enjoy using the bike for many years to come.
Simply Moving
Page 4

Guarantee Conditions
The following guarantee conditions complement your legal rights.
How the guarantee applies
As the makers, we guarantee against possible material or construction defects.
Provided the following conditions are satised :
Proof of purchase. The guarantee starts on the date of purchase.
Only the rst owner is entitled to the guarantee.
The bike is guaranteed for 2 years, this comprises of the frame, fork, all
mechanical and electrical parts, except normal wear and tear items.
1 year for the battery up to 70% depth of discharge from its original rated
capacity. This can be vered by the eZee dealer you’ve purchased the bike from.
How the guarantee does not apply
When the bicycle is used negligently or results in damage due to trafc
accident.
Damage ascribed to normal wear and tear.
Poor maintenance, or modications that no longer complies with
regulations or original technical specications.
Damage due to external causes.
The bicycle is put up for hire.
The battery pack is used incorrectly or tempered with. This also applies
during charging.
Compensatory costs arising from damages or accidents, or
cost incurred by loss of the bicycle’s usage.
How the guarantee covers
Original defective parts that are sent to the manufacturer for assessment
will be replaced by the same or equal value part.
Labour and transportation charges are not included. This are borne by
the owner.
eZee exclusively makes the decision whether or not the guarantee
applies.
Guarantee Conditions
4
Page 5

5
Legal Regulations
EU regulations state that your vehicle is an Electric Powered
Assist Cycle (EPAC) when the following conditions are met.
[ EU directive 2002/24/EC Chapter 1 Article 1 1(h) ]
“Cycles with pedal assistance which are equipped with an
auxiliary electric motor having a maximum continuous rated power
of 0.25 kW, of which the output is progressively reduced and nally
cut off as the vehicle reaches a speed of 25 km/h or if the cyclist
stops pedaling.”
With EU compliant conguration, the power assist of an eZee
bike only functions while the rider is pedalling. The means of controlling the assistance is provided with either a dial or throttle system.
USA regulations allow a power assisted maximum speed of
20 mph. eZee bike made for the USA has a motor speed of 250 rpm
for a 20 mph top speed and a maximum rated power of 700 watts.
The power assist can function without the aid of pedalling, however
there’s nothing to stop you from doing so. Putting in some effort will
greatly increase the mileage you get from your battery.
This means you do not require a license or moped certicate,
there is no age limit and you can take cycling paths. It conforms to
regulations of normal bicycles. Legal requirements concerning insur-
ance of your bicycle may differ, so do nd out about the rules and
regulations in your country.
Page 6
Technical Data
Weight
Motor
Battery Pack
Controller
Charger
Interface
Fuse
18 kgs
Electric brushless hub motor
250W
Lithium Ion with battery management circuit
37V 10Ah (370 Wh capacity)
3.1 kgs
Low voltage protection 28 V
Discharge temperature limit -15°C to +55°C
PWM
LED self diagnostic system
Overload protection 20 amps
2 amps
Smart charger
Maximum charge time 6 hrs
charging temperature +5°C +35°C
Forward magnetic motion sensor with 0 -
4.5 V VPA dial or throttle
E-bike throttle with safety ON/OFF switch
Pedelec throttle with light switch
30 amps
Quando
6
Page 7

7
Parts Identifcation
1
2
3
4
5
6
7
8
9
21 20 19 18 17 16 15 14 13 12 11 10
25
24
23
22
25 26 27 28 29 30 31 32 33 34 35
Quando
1 Brake cables
2 Headstem folding mechanism
3 Front LED lighting
4 Mudguards
5 V-Brakes Rims
6 Spokes (13g)
7 Spokes
8 Reectors
9 Tyres 20” x 2.125”
10 Aluminum front fork
11 Bearing race
12 Frame
13 Frame folding mechanism
14 Chainguard
15 Pedal sensor
16 48T Chainwheel and crank
17 Folding pedals
18 Bicycle central stand
19 Chain 1/2 x 3/32
20 Rear V-brakes
21 Chainstay
22 Rear Hub Motor
23 Rear LED lighting
24 Al. luggage rack
25 Controller / Ignition
26 Battery
27 Saddle ip catch
28 Saddle
29 Seat post
30 Seat post clamp (quick x)
31 Headstem
32 Handle grip (Throttle)
33 Handlebars
34 Battery level gauge
35 Brake levers
Page 8

As a folding bike the Quando comes fully assembled in its
carton. After inspecting the bike, recharging the battery and inating
the tyres, ride it out into the world.
Unpack Carefully remove the bicycle by lifting it straight out
of the box. Becareful not to scratch yourself on the carton staples.
Remove the packing material around the bike and stand the bike on
a clean at surface. Be sure to keep any part packages that comes
along with the bike. Discard box and packaging material only.
Dispose responsibly, recycle when possible.
Check This box should contain....the eZee Quando folding
electric bike!
i. Folding pedals
An accessory box containing.
a. 3 Ignition keys
b. 1 Battery charger
c. 1 Power cord
d. 2 Fuses (30 amps)
e. Nylon ties
f. Heat shrink tubes (assorted pre-cut sizes)
g. 1 eZee Quando User Manual
1 Battery, Lithium Ion 37V 10Ah
and check the box again for any additional purchases or variations
that should be included, according to your eZeebike dealer.
Quando
Assembly
8
Page 9
Quando
9
Tools required Tools are the rst step to proper assembly,
you will need a
Allen / Hex key metric set
Philips head screwdriver
Open-end at wrenches metric
measurements 6mm - 17mm
Seat post Insert into the seat tube of the bicycle frame
and align. Tighten clamps and ensure seat is rmly fastened.
You could raise the seat a maximum of about 4” or 100 mm from
the lowest position
Tigtening torque 16 Nm
Do not adjust the seat post beyond its maximum extension
mark.
Assembly
6
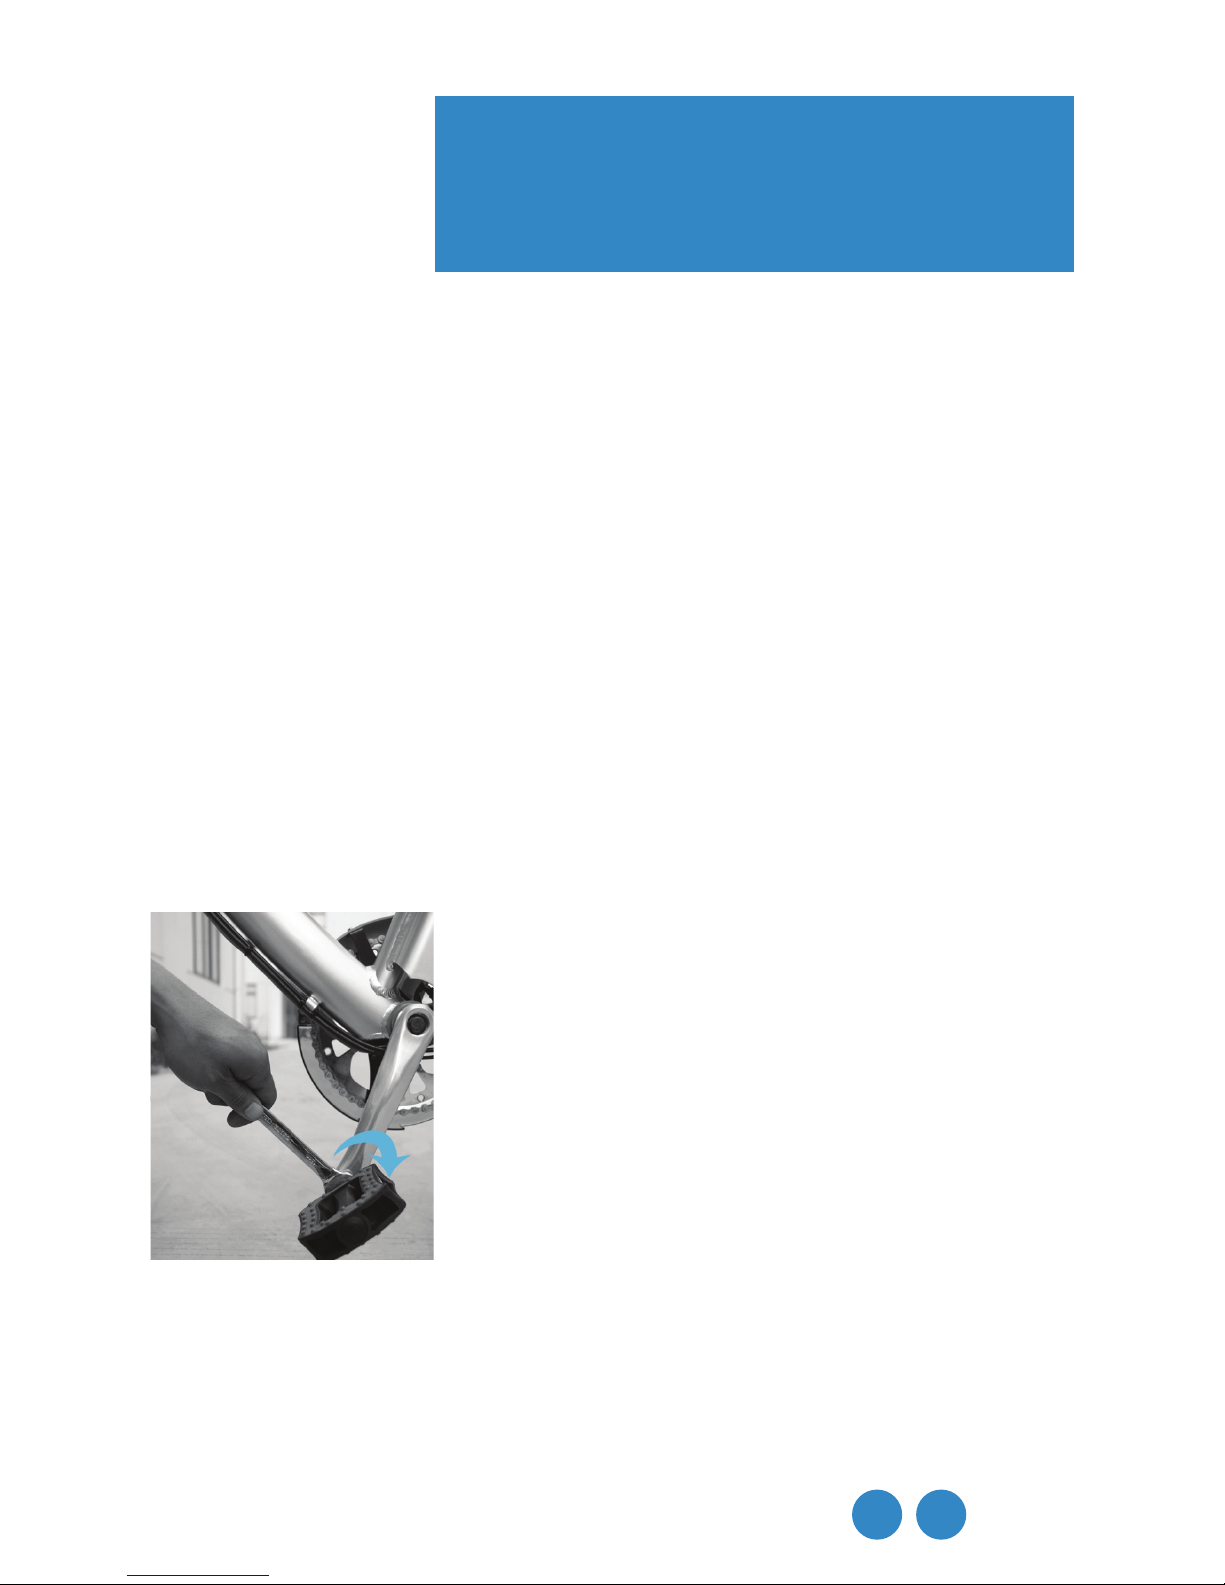
Pedals Pedals are marked “L” and “R”
for left and right respectively. Screw in clockwise for the “R” pedal and counter-clockwise
for “L”. Tighten both with a wrench rmly but
not excessively as the crank threads are made
of aluminum alloy.
Front Mudguard The supports are
attached to the sides and top of the front fork.
The mudguards are made of polycarbonate and should not rattle
when they’re securely fastened.
Brakes One of the most important safety features on
the bicycle. To minimise the risk of injury, its vital to ensure they are
corrected adjusted. Ensure that the V-brake blocks are parellel to
the rim, and that the distance between them do not exceed 2mm,
Quando
Page 10

Quando
Assembly
then tighten the brake mounting bolts. Fine tune with a philips head
screwdriver. Squeeze brakes to test its responsiveness.
If you have little experience with bicycle maintenance. We
recommend you get this done with your local bike shop.
Accessories Install any optional accessories you have
purchased with your bike. Read the manufacturer’s manual
provided.
Battery Insert key into keyhole located by the controller box and turn key counter clockwise while pressing it in, so that
it arrives in the open position. Release the catch located at the un-
derside of the saddle to ip it over. Locate the battery anges in their
slots in the battery holder; then push the battery rmly into the holder
until the connecting pins are rmly in the battery sockets.
The t can be tight when new, so it may be required to apply gentle
pressure. Once the battery is in position, lock into place by turning
the key one click clockwise to the “OFF” position. Ensure that the
key is in “OFF” position until you are ready to ride.
Do not use excessive force to t the battery, which could
result in damaging the connection sockets or pins.
If there is an A/C outlet near to where your bicycle is parked. It may
not be necessary to remove the battery from the bicycle to charge.
Tyres Ensure that the tyres are inated to the correct
pressure of 60 psi. Well inated tyres enhances the comfort, safety
and efciency of your ride.
<
6
10
Page 11
11
Quando
Folding
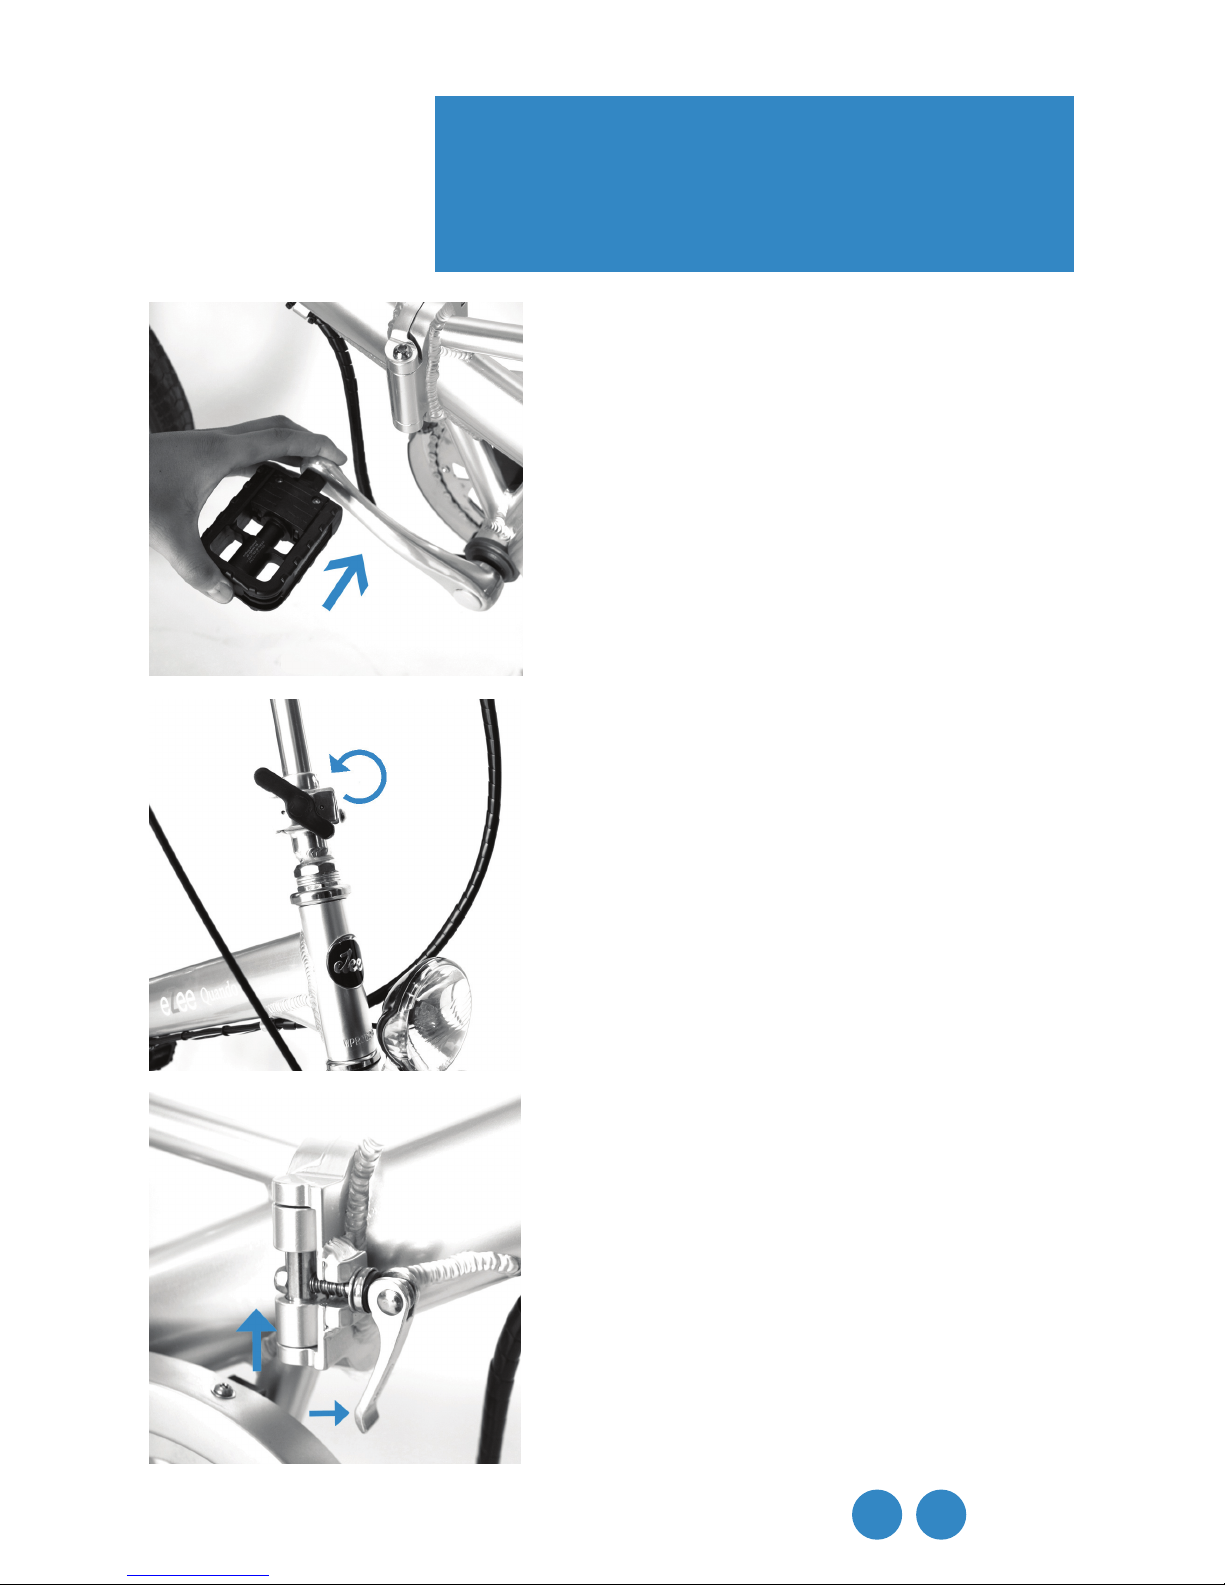
Pedals press pedal inward and
push upwards, to unfold just pull it to
original position
Folding the head stem
Turn handles counter clockwise to
release spring loaded pin clear of its
catch before folding the head stem. Do
not snag on cables.
Frame folding
Ensure you have a rm locking position
with the quick t mechanism. Excessively extreme hard pressure could also
cause the bolt to break beside hurting
your hands to close it. The quick t
could be adjusted with the nut at the
opposing end of the bolt from the han-
dle. Loose t could cause the frame to
separate and also frame will not be
straight.
Page 12

Quando
Checklist
Usage The eZee Quando is best described as a
‘commuters’ bike and is best suited for usage in urban environment
and roads. While cycling, it is your responsbility to be attentive of
your environment and trafc rules, as this concerns the safety of all
who share the paths, especially you.
a. wear shoes that stay on your feet and grip rmly to the pedals. No barefoot or
sandles.
b. dress to be visible on the road and avoid loose clothes that will tangle with
moving parts of the bicycle.
c. keep your speed at levels appropriate to road conditions
d. be aware of wet weather conditions, as these affect braking distance. Brake
earlier than you normally would on dry roads.
e. familiarise with the trafc rules in the country you are riding in.
f. avoid cycling in poor weather and visibility conditions such as fog, night, heavy
rain and snow. keep your lights on in such conditions.
g. familiarise yourself with the usage of the bike and how to maintain it.
Inspect
Before every ride, make a quick inspection of your bike’s mechanical and electronic
features. Be safe, not sorry.
frame & fork Visually check for damage, do not ride if bent or fractured.
wheels and tyres Check for missing or damage spokes. Feel spokes to ensure
tightness. wheels should be true (straight) and tyres inated to its correct pressure.
handlebar and stem Tightened rmly in the ‘face forward’ positions, the handlebars
will rotate the front fork and wheel, ensure that the grips are also rmly seated.
Brakes Squeeze brake levers, gap between brake blocks and rims
should not exceed 2mm.Brake cables should remain unobstructed by other cables or
accessories.
Chain Turn crank arms to ensure chain runs smoothly. Keep the chain
lubricated and clean. Chain tension is adjusted by the tensioning bolt located at the end of
the frame.
Electronics Red light from the controller unit should be illuminated when
the electric bike is ‘ON’. All wires to be fastened securely in place
12
Page 13
13
Battery Charging
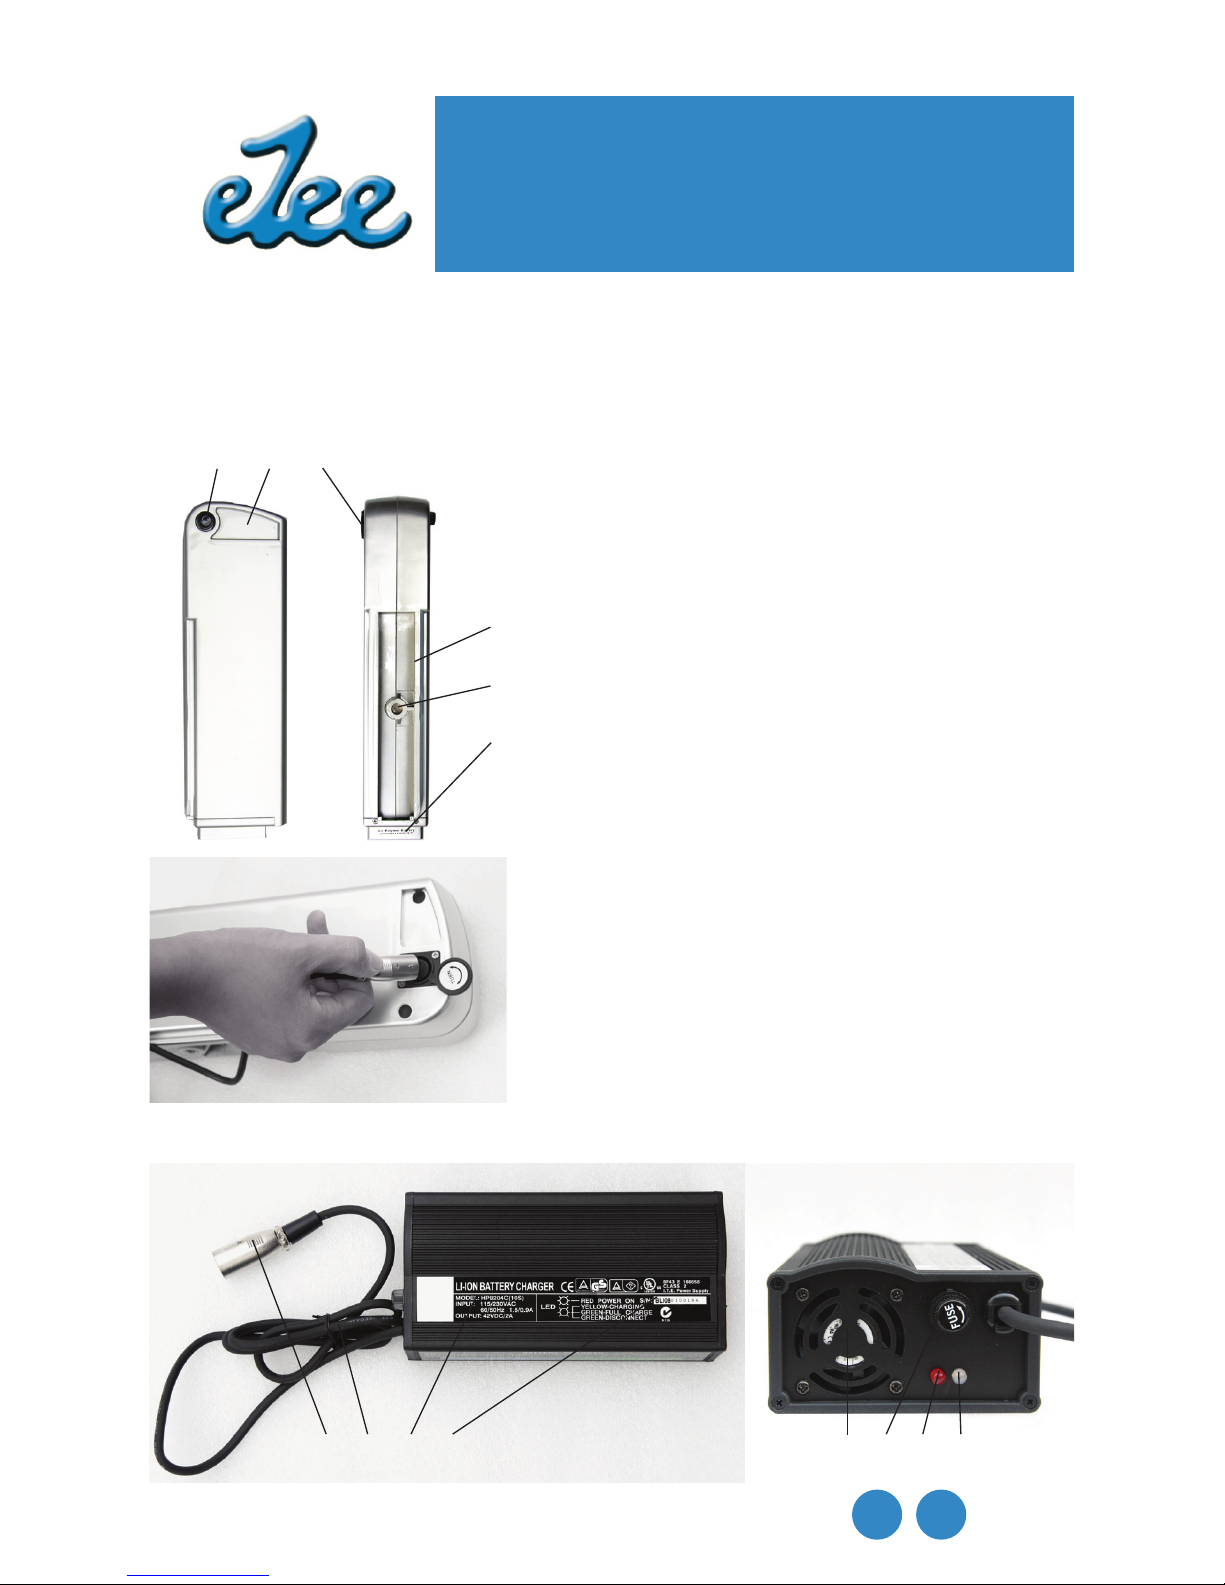
Before your rst ride, the battery needs charging. Bring it to a
wall socket. (220V - 230V AC EU other countries or 115V AC US)
1 2 3
4
5
6
1 Fuse / Fuse holder (30 amps)
2 Battery grip
3 Charging socket
4 Battery slot guides
5 Batter lock slot
6 Serial number, battery information
Insert charging plug into socket on
battery and connect charger power
cord to A/C outlet. Turn on A/C outlet.
Turn the ‘1’ switch on the charger.
It’s important that to follow this
sequence of actions everytime you
charge the battery.
Do not remove the plug by
pulling the cord, always grip the
charging port by its metal body.
<
6
a b c d
e f g h
Page 14
Battery Charging
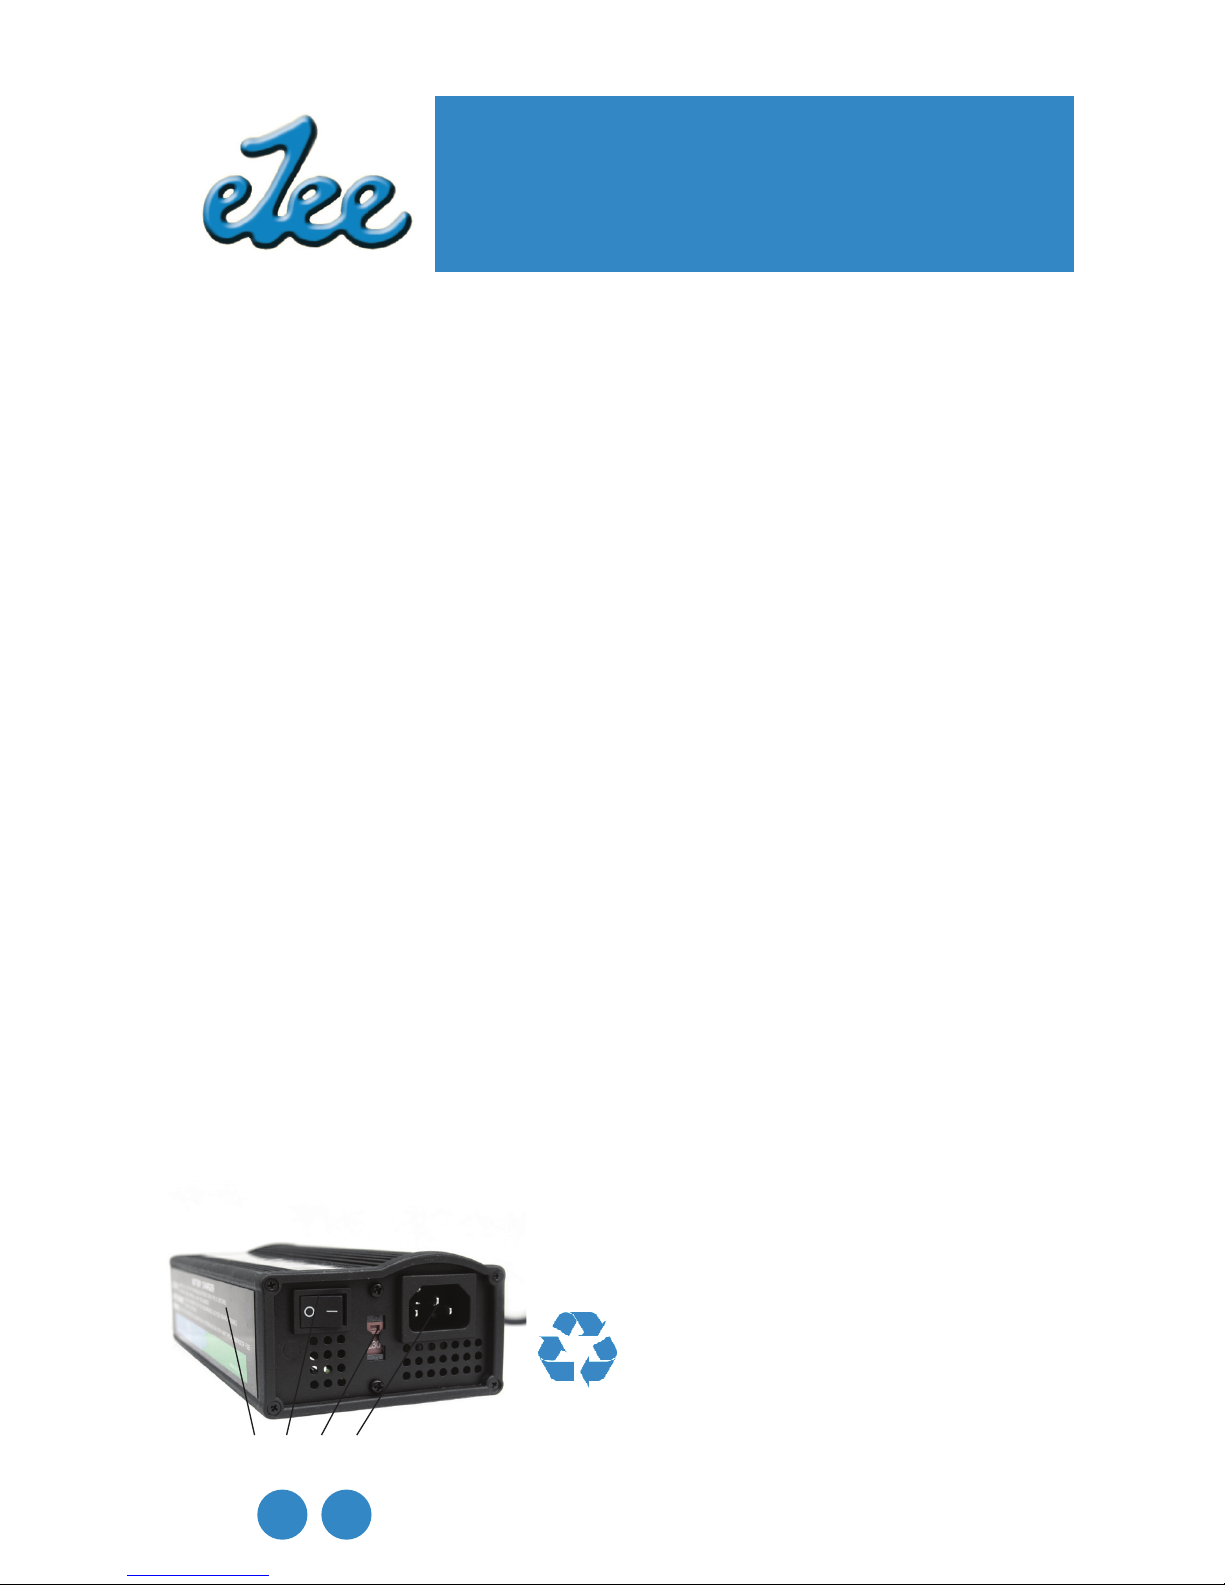
Check the indicator lights on the front of the charger.
RED light indicates that the charger is connected and
running from an A/C outlet.
YELLOW light indicates that the battery is charging
GREEN light indicates that the battery is fully charged
It will take a maximum of 6 hours to fully charge your battery. You
may interrupt the charging at any time.
As Li Ion batteries do not suffer from memory effect, it is not
required for the battery to be empty to commence a recharge.
Top-up charging everytime you’ve completed your cycle ride is
recommended.
Kept in good condition Li Ion battery will perform at least 350 full
charge cycles, with a retention of 70% from its original capacity.
Please use only the Li ion charger as provided.
a. Male charging plug b, Charging cord c. Charger specications
d. Charger serial no. e. Cooling fan f. Fuse 10 Amps
g. Charger ‘ON’ LED h. Charging status LED i. Warning label
j. Power switch k. A/C voltage switch l. Power cord socket
i j k l
A new battery might take 2 - 3
charges before it performs at its
stated capacity.
Dispose your battery
responsibly, refer to your town
council or eZee dealer.
<
14
Page 15

15
Sometimes after temporary disconnection, the charging status light may give a false green reading. To verify that your battery
is fully charged, switch the charger off, wait for the charger lights
to go out and switch it back on again. The charging status light
should quickly return from amber to green, when the battery is fully
charged.
The battery may be also charged on the bicycle, do make
sure that the bicycle is switched off so as to not waste electricity.
If the battery refuses to accept a charge, refer your eZee
dealer for more information.
Battery charging is automatically regulated, there is no
danger of overcharging. It is advised that you disconnect the
battery and switch the charger off as soon as the charging process
is completed.
Do not charge the battery in wet conditions.
Never allow children to play with the battery or charger.
Do not leave your battery in a fully discharge state for long
periods of time. The battery will continue to self-discharge,
resulting in damage.
Battery Charging
6
6
6
Page 16
How eZeebike works
Your rst ride Before you wheel your bike out into the world,
we recommend you practice handling the bike in a safe area away
from obstructions and trafc. The motor may look small, but it’s
powerful! You’ll be riding faster than you think.
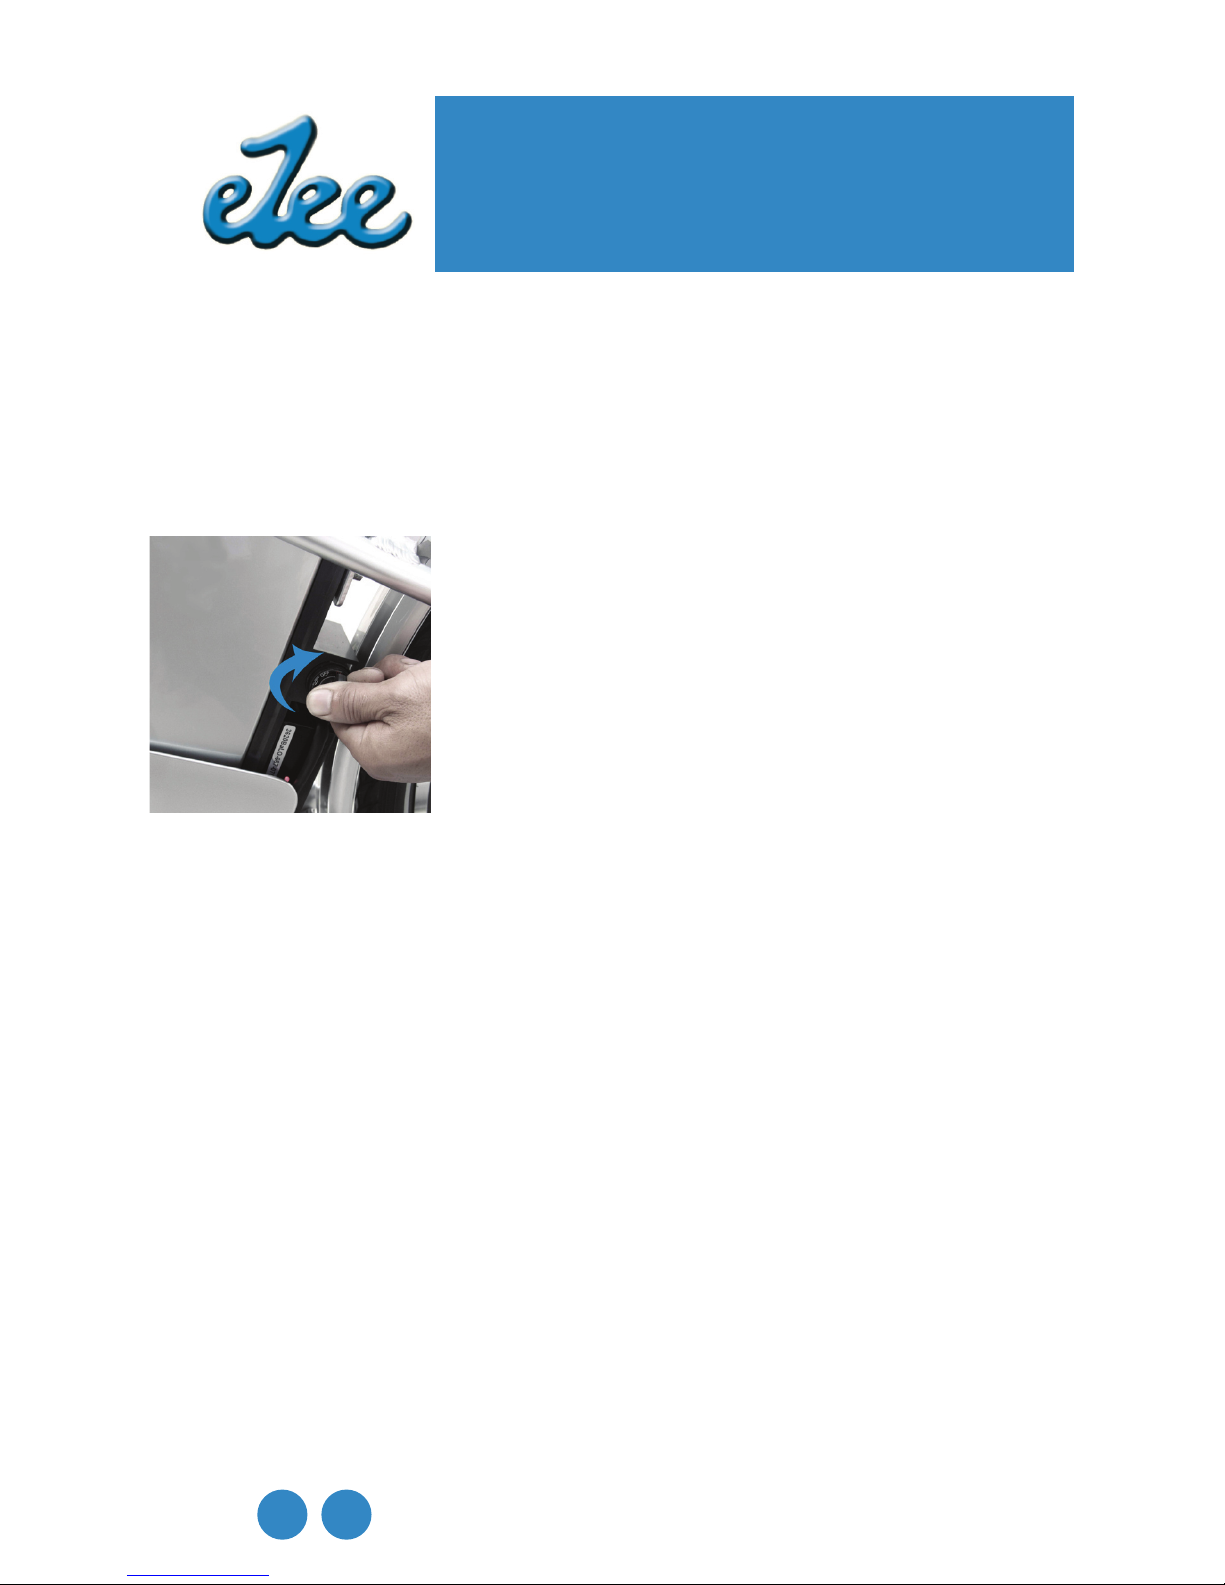
Turn the key to the ‘ON’ position. A red LED
will illuminate below the key socket. If the light
ashes, read the Troubleshooting section of
this manual. If it shines steadily, you’re ready
for the next step.
EPAC / Pedelec As you pedal, rotation on the crank is picked
up by a sensor in the bottom bracket. This allows the drive system
to be engaged. A twist of the throttle then provides power-ondemand, reducing the pedalling effort required.
E-Bike The motor runs as soon as you turn the
throttle. Ensure that you are seated and ready to ride off before
you use the throttle. You may toggle the throttle on and off with the
switch located on it.
In E-bike mode, the range of your bike will be approximately 40
kms (25 miles). The hillier the terrain, the less you pedal, shortens
your range. While EPAC, judicious use of gears, power assistance
all contributes to increasing the mileage you can get out of your
ride. 40 - 60 kms (25 - 40 miles).
16
Page 17

17
How eZeebike works
Variable Power Assist (VPA) In lieu of a throttle, you may
have received or chosen a potentiometer dial. This set-up is only
compatible with EPAC mode eZeebikes.
The dial settings from 0 - 8 correspond accordingly to the level of
continous power assistance acheived by the motor during
pedalling. The level of assistance remains the same throughout
regardless of road conditions until you re-set the dial to another
position. This is especially useful for long treks or when you do not
wish to fuss about with a more sensitive throttle.
You can always choose to ride your bicycle as an ordinary bicycle.
Battery level gauge When riding a fully charged
bicycle, the battery level gauge shows ‘green’. Powerful
acceleration or uphill riding causes the battery voltage to drop and
may bring the level gauge to ‘amber’ or even ‘red’ (in the cases of
very steep hills).
As you continue to cycle and the battery power drops, the level
gauge will correspond to the state of charge remaining. When it re-
mains in ‘amber’ and dips into ‘red’, you have approximately a 1/3
of the charge left. Best to recharge the battery soon.
To prevent the battery from deep discharge, the controller has a
low voltage protection cut-off set at 30.0 V. You may reboot the
bicycle if it cuts off however,
‘Pulsing’, or straining any capacity left in the battery will
deteoriate its quality fairly quickly. Charge often!
6
Page 18

How eZeebike works
Lighting system eZee bikes features wide angle high
performance reectors at the front, sides and rear. Front and rear
LED lights are powered by the main battery, electrical consumption
is negligible, be safe, use them often.
Lock When parking your bicycle, turning the key to
the ‘OFF’ position and removing it will shut the system off and lock
the battery in place. Use a chain lock to further secure your bicycle
when necessary. We also recommend you insure your bike against
theft. Consult your eZee dealer or LBS for more information.
Central support stand This spring loaded stand supports your
eZeebike straight up. Use your feet to depress the stand
downwards and pull the bike in reverse. Ensure the stand is rmly
rested on the ground before leaving the bike.
Do not sit on the bike with the stand parked. The central
support stand is made of aluminum alloy and meant to only take
the weight of the bicycle and not with the rider on it.
Luggage rack The luggage rack provided comes equipped
with a spring loaded catch and elastic strap. If you plan to carry
luggage on the rear, make sure everything is securely fastened
and clear from the rear wheel. There are many useful accessories
that can be tted on the rear rack, from panniers to child seats. Do
however, take note that the load limit is 25 kgs
6
18
Page 19

19
Maintenance
Maintaining your bicycle ensures you’ll get the most out of
every ride and out of the entire life of your eZee bike. How much of
your bike’s maintenance you can do yourself will depend on your
knowledge, skill, experience and whether you have the necessary
tools for the job.
Learning from available cycling literature and joining cycling
communities can be an enjoyable way of improving your skill and
knowledge about maintaining bicycles. Beyond this manual, it is
good to consult your LBS and eZee dealer for advice regularly.
Before every ride Mechanical safety checks, use a fully charged
battery, visual inspection for damages.
Every 150kms (100 miles) Clean the bike, incl. chain rings and
sprocket. Clean and lightly oil the chain and gears.
Every 20 - 30 hours of riding Squeeze the brakes and rock the
bike to check for any looseness with each forward of backward
movement. If the headset is loose, have your dealer check it.
Lift the front wheel and rotate handlebars to check for tightness of
steering, it may be necessary to lubricate ball bearings.
Check and recalibrate the brakes, replace if worn out.
Squeeze spokes in adjoining pairs between your thumb and index
nger. They all should have the same tension. Have your dealer
respoke or true the wheel if necessary.
Check cables for rust, kinks and fraying, have your dealer replace
them if necessary.
<
Page 20

Maintenance
Repairing a punctured tyre If you have a punctured tyre, we
recommend that you get a specialist to carry out the repairs. You
can always of course consult a specialist and carry out the repairs
on your own.
As the rear wheel contains the hub motor, there are additional
steps in the case you require the entire wheel to be removed from
the bike. Located on the underside of the bike, unplug the wires
than run from the motor to controller. There should be 1 x 6 pin
connection and 3 colour coded wire connections (Blue, Yellow,
Green). Unplug these before proceeding to remove the front wheel.
Be mindful of the tightening assembly sequence of washers, nuts
and spacers.
Hub motor and general inspection
After 5,000 kms (3,000 miles) of cycling. We recommend you
arrange to have a thorough inspection of your bicycle by an eZee
dealer. This includes opening up the hub motor to inspect and
lubricate the gears.
Electronic self-diagnostic system
When the bicycle is functioning normally, the red LED that is
situated by the controller is lit continually.
In the case of an electronic malfunction, the controller comes
programmed with diagnostic capabilities to determine where the
fault lies. The red LED will emit a series of blinks, count them and
refer to the table below for its explanation and solutions.
20
Page 21
21
Troubleshooting
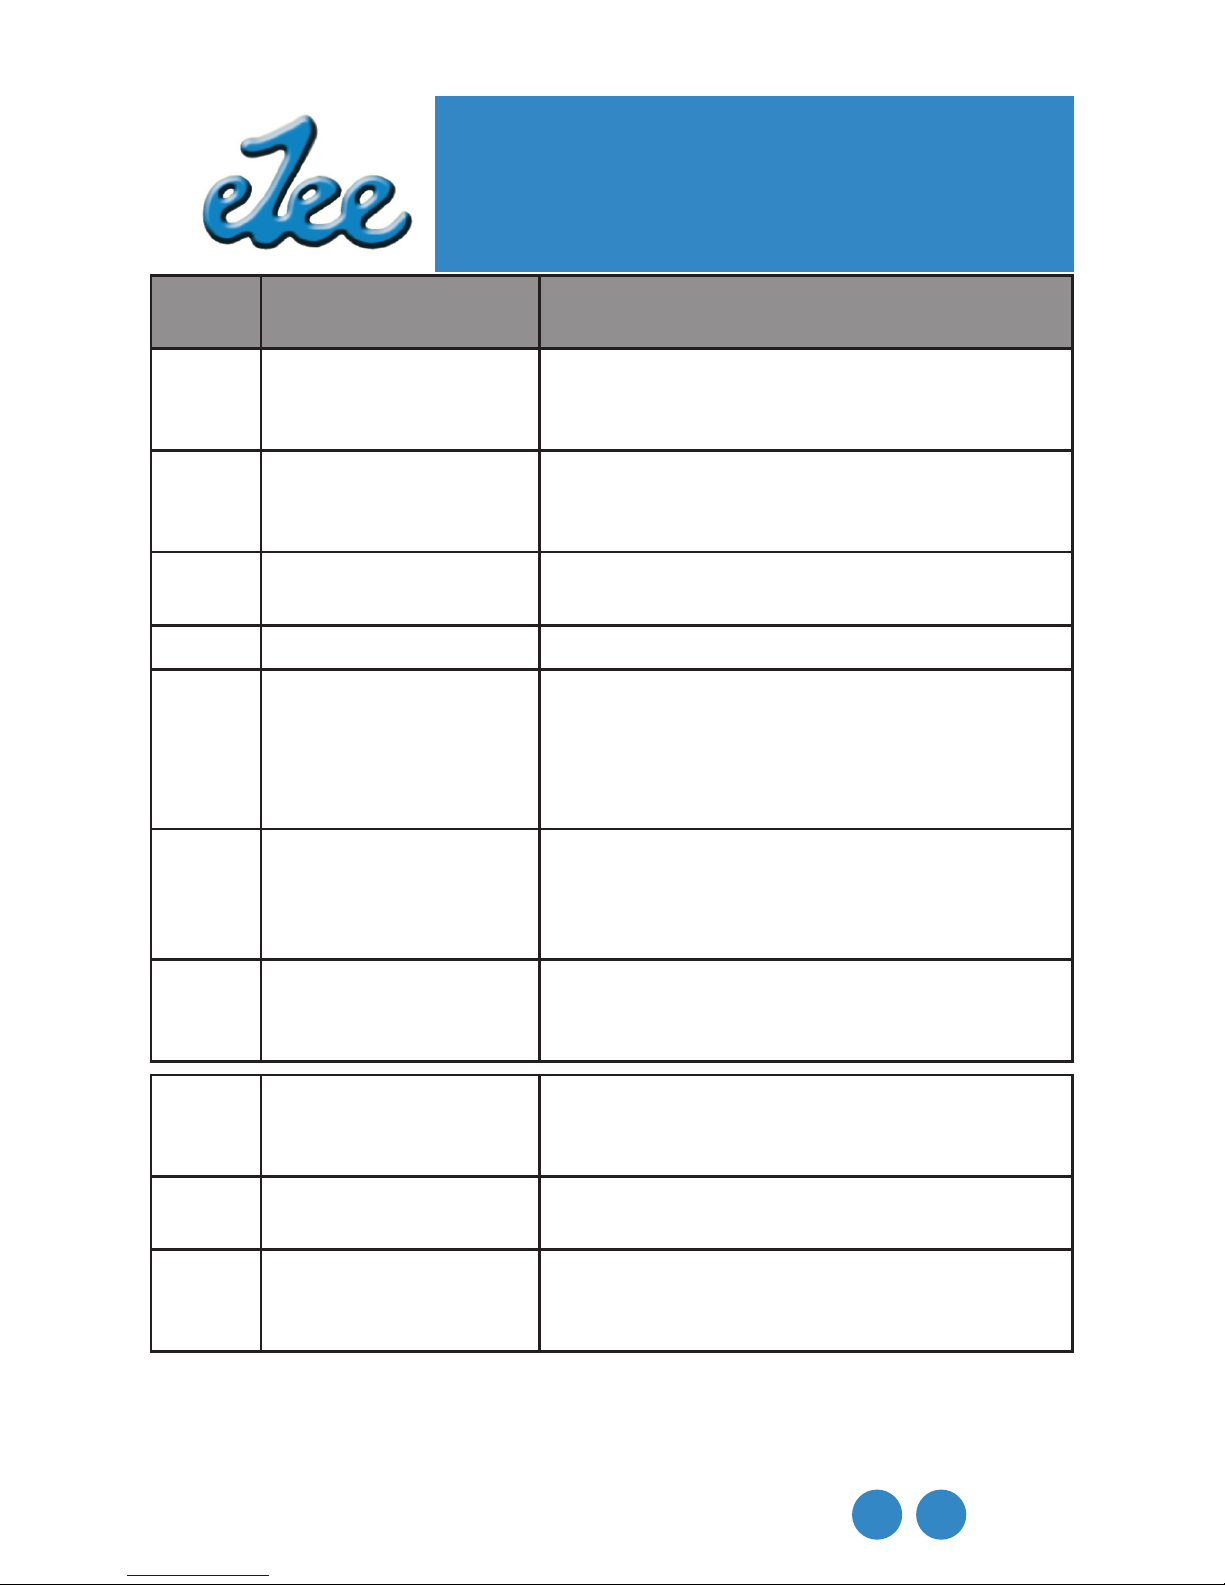
No. of
blinks
Explanation Solution
ON
No response on motor lost connection on 5V wire to motor , check
connectors at front fork
2 Brake lever cut off in
contact
check brake lever spring, brake levers should
return to position (applicable with electric cut-off
levers)
3 Brake lever cut off in
contact
check wiring connection, inspect for damage to
the battery level gauge
4 Throttle not in position check if throttle spring is faulty
5 Throttle failure Ground + signal wire to throttle shorted
5V+ signal wire to throttle shorted
Moisture penetration / leave it to dry
Check throttle connections and cable, or replace
6 low voltage Activated when voltage drops below 30.5 V .This
continue to blink and will stop when voltage
recovers to 34V, Or when the main switch is powered off. Battery charging
7 excessively high voltage Battery voltage is above 44 V./ do not use battery
that is not supplied by eZee, contact your eZee
dealer
8 Hall sensor in motor
faulty
One or more hall sensor disconnected or faulty.
Check connector at the front fork. If connector
is OK, contact your eZee dealer
9 Supply 3 phase wire Check phase wires at the front fork. Contact your
eZee dealer
10 Controller overheating Motor continue to function but the amps directed
will be lessened to reduce the load and cool
controller
Page 22
No. of
blinks
Explanation Solution
11 Thermostat faulty the motor will continue to work, but extreme
temp. arise without thermostat protection may
damage controller - Replace controller
12 Controller failure Motor does not work - Replace controller
2+3 Controller failure Motor does not work - Replace controller
3+4 Stalled motor Extremely overload stalling motor, switch off and
on – reboot
3+5 Supply 3 phase wires It does not show this when system main power is
turned on ,The throttle has to be turned for power
demand as well. Inspect cable and connector for
dislocation or damage.
No Light Power supply faulty /
Controller failure
Inspect battery and power connections for damage / Replace controller
The faults listed may not cover every possible failure. In the event of
moisture or water entering the controller, haphazard signals might
appear. We’ve designed the eZeebike to repel water as much as
possible, encapsulating circuit boards with silicone resins and connections with silicone grease.
Since this manual simply cannot cover every detail that
might occur during the lifetime of your product. Check our websites
and dealers website routinely for updates, or contact us directly for
more detailed questions you might have.
Serial Numbers Record the serial numbers found on your
motor, frame, controller, charger and battery here for reference.
This are important datas for us to understand and troubleshoot
your eZeebike.
22
Troubleshooting
Page 23

23
Afterword
As people all around the world have begun to realize how
easy and benecial it is to ride our electric bike. At eZee, our
mission is simple - to continue to make the best electric bike out
there. We’re on the constant lookout for ways to evolve our bikes,
to nd methods and adapt solutions for our bikes to enrich lives
everywhere.
We also to get to know and thank everyone of you.If you
have anything to ask, to comment or suggest; perhaps you have
an idea, a project to discuss, or simply would like share your stories
and photos with us. Contact us directly, we want to hear from you!
eZee kinetics technology co. ltd.
No. 233 Feng Yong Road
Feng Xian, Shanghai, China 201414
Tel: +86 (0)21 5756 6097
Fax: +86 (0)21 5756 2566
www.eZeebike.com
All rights reserved. eZee kinetics technology co. ltd 2008
Page 24
 Loading...