

Page 1
Copyright 2015. All right reserved
Page 2

I. INTRODUCTION .................................................................................................................... 2
1. Features ................................................................................................................................................ 2
2. Control Panel Overview ....................................................................................................................... 3
3.
Specifications
...................................................................................................................................... 4
II. WARNING ............................................................................................................................. 4
III. SYNCHRONOUS /ASYNCHRONOUS MODE.................................................................... 5
1. Synchronous Mode .............................................................................................................................. 5
2. Asynchronous Mode ............................................................................................................................ 5
IV. MENU OVERVIEW .............................................................................................................. 7
1. Copy...................................................................................................................................................... 7
2. Compare ............................................................................................................................................... 7
3. Co py + Compare................................................................................................................................... 7
4. Dual Source Copy + Compare ............................................................................................................. 8
5. Format + Capacity Check..................................................................................................................... 8
6. Utility..................................................................................................................................................... 9
6.1 Measure Speed ................................................................................................................................... 9
6.2 Quick Erase ........................................................................................................................................ 9
6.3 Full Erase............................................................................................................................................ 9
6.4 Media Information ............................................................................................................................ 10
6.5 System In fo rmation .......................................................................................................................... 10
6.6 System Update ................................................................................................................................. 10
7. Setup................................................................................................................................................... 11
7.1 Copy Area ......................................................................................................................................... 11
7.2 As ynchronous Mode ........................................................................................................................ 11
7.3 Set Type of Format ........................................................................................................................... 12
7.4 Set Cap acity Threshold.................................................................................................................... 12
7.5 Set Slow Out Threshold ................................................................................................................... 13
7.6 Performance .................................................................................................................................... 14
7.7 Button Beep ...................................................................................................................................... 14
7.8 Boo t Password ................................................................................................................................. 14
7.9 Lock Menu ........................................................................................................................................ 15
7.10 Language ........................................................................................................................................ 15
7.11 Clear Set u p ..................................................................................................................................... 16
V. BASIC TROUBLESHOOTING ........................................................................................... 16
1
Page 3

I. Introduction
Fle x Pro i s a 23-targetcom m ercial gr ad e SD/Micro SD duplic ator which only takes up to 1/10
of a r egular dupl icator sp ace. It has higher output capacity and powerful functionalities by
bundle with special designed user menu selections, su ch as Dual Source Copy + Compare,
Format + Capacity Check, and Set Slow Out Threshold.
The com pact and li ght w eigh t Fl ex Pr o SD/ Micr o SD dupl ic ator is ideal for workplaces with
space limitation, lik e small off ic e and ret ail s tor e. With exp and able d esig n, Fl ex Pr o c an be
da isy chained together up to ten units to provide 239 ports fo r duplication, wh ich is 10 times
outpu t c apac ity t h an a s in gle unit m aking your daily job easier and flexible even with huge
quantity duplication demand.
Flex Pro is designed and developed based on the FPGA from the world famous
semic onduct or company XI LINX. E very process i ng c hannel is parallel to eac h ot h er w ith its
own control unit, therefore the duplicator will not sacrifice speed for the increasing number of
targets load ed - always r em ain th e same an d fast cop y s p e ed. Th e duplicat or s u pp or ts fast
cop y wit h mult iple fi le for mats c reated b y three major operat ing s ystems ( W indows/ Linux/
MAC), and makes mirror copies of data efficiently. Furt hermore, this duplicator has been
full y test ed with qu al ity assur ance bef ore leavi ng our manufacturing facili ty.
1. Features
a. Each processing channel has its own control unit and operates independently with
dedicated bandwi dt h of up t o 25MB per second.
b. Standalone operation. No PC or software is required, minimizing possible computer
virus infection.
c. Inst ant power on and of f , no war m-up or cool-down required.
d. E asy to use One-Touch operation.
e. Compare function available for verification of copy accuracy. The newly added Dual
Sourc e Cop y + C ompare f uncti on c an furth er compare th e copi ed media with s econd
source to make sure the copy accuracy against unexpected damage to the source
media.
f. Menu op tions are us er-friendl y an d easi l y ac cessed thr ou gh t he 4-button control panel.
2
Page 4
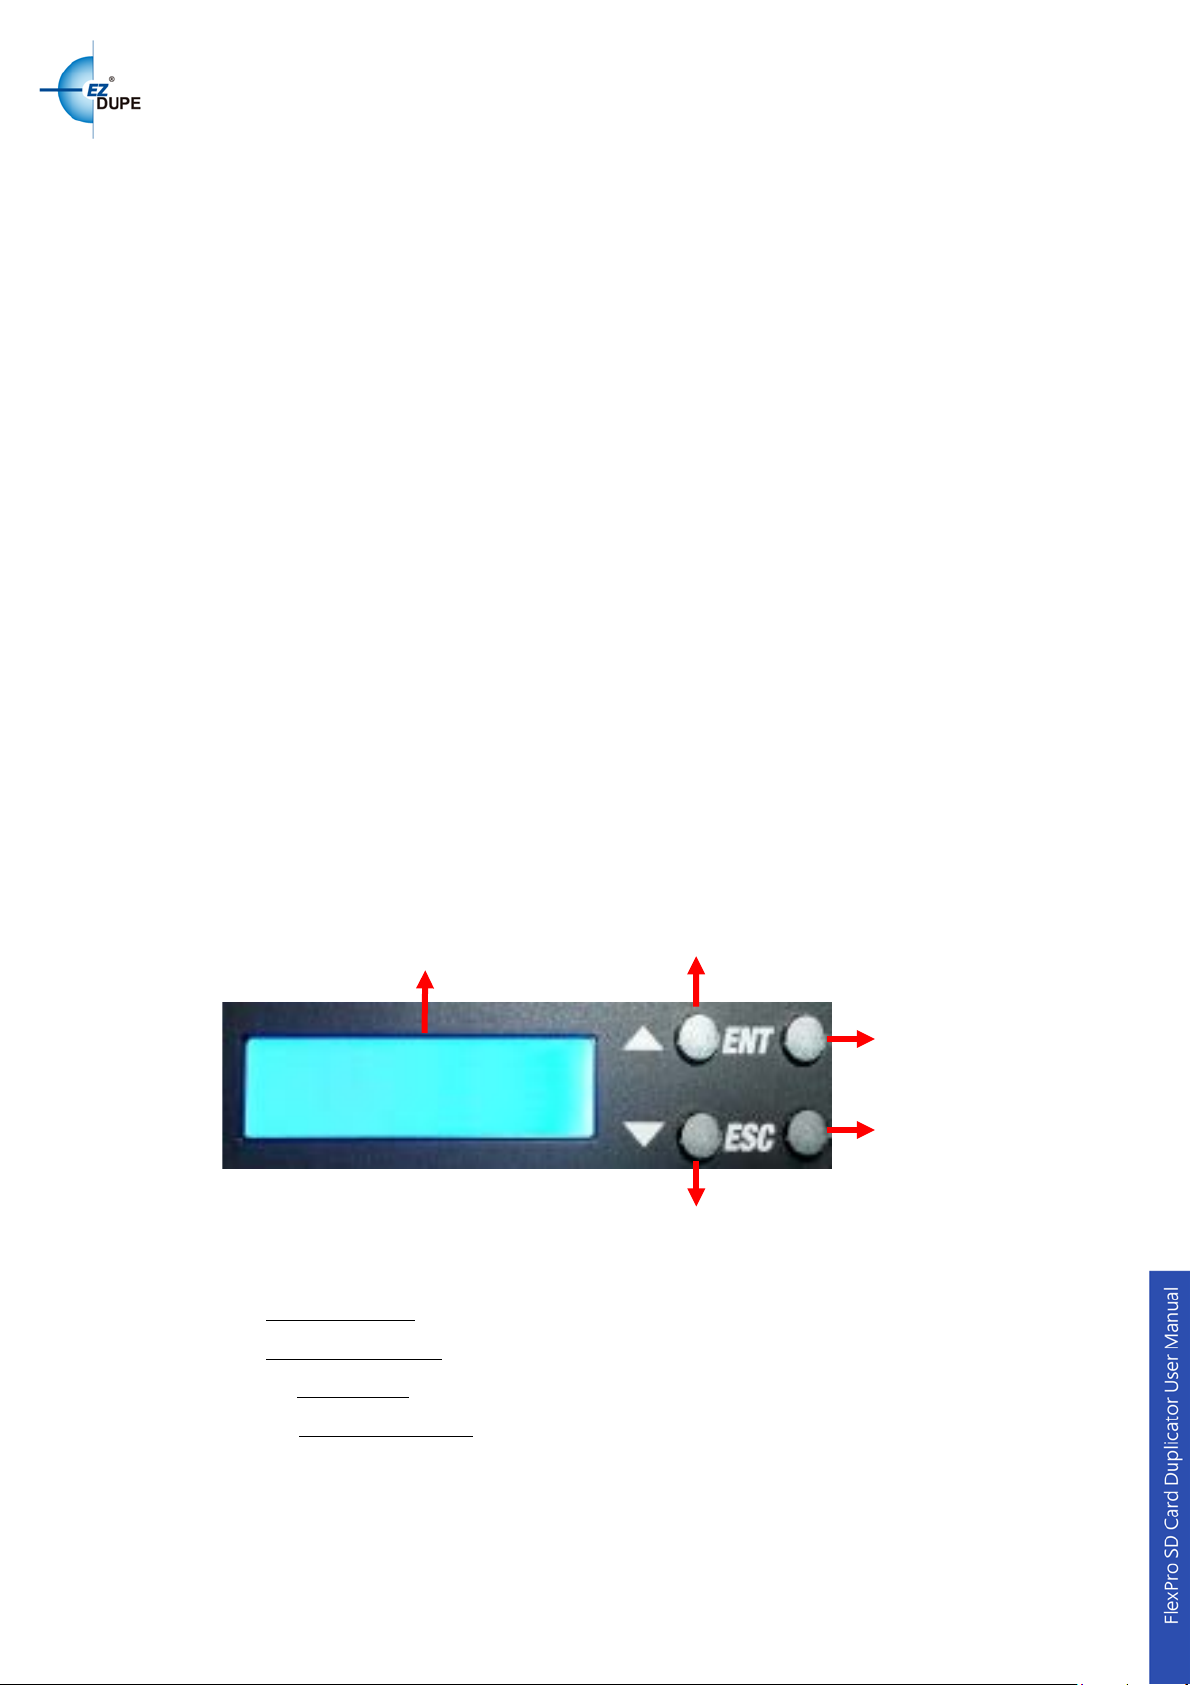
LCD Screen
▼ Button
▲ Button
ENT Button
ESC Button
Use ▲or ▼ button to scroll through the options and view the operation status of each
ch ann el on th e 2-line backlit LCD display.
g. Support Synchronous and Asynchronous copy m o des for best o pe rat ion effi ci ency .
h. Powerful 32-bit CRC checksum to assure data integrity.
i. Heavy-duty hardware construction for commercial production and personal use.
j. External power adapter with full range of voltage (100V-240V) input makes it possible to
duplicate anywh er e ar ou nd the wor l d.
k. Desig ned to save ti me and eff ort in creati ng multi ple copi es quic kly and r eliably, Fl ex
Pro can be daisy chained together to provide up to 239 ports for duplication
l. Unique source data analysis to copy data area only to achi eve high e s t eff ic iency
m. Supports multiple file formats: W indows: FAT 16/32、exFAT、NTFS , Linu x: Ext 2/3/ 4,
Mac: HFS/H FS +
n. Eliminating th e m edi a with s l ow r e ad/write s peed t o expedit e the process f or the rest of
media in the same batch.
2. Control Panel Overview
▲Button: Up, Backward
▼Button: Down, Forwar d:
ENT Button: Enter, OK:
ESC Button: Escape, Cancel:
: To navigate backward in the menu.
To navigate forward in the menu.
Execute the function.
Go back to the previous level in the menu.
3
Page 5
Target
23targets (up to 239 targets by Daisy chain)
Copy Speed
25 MB/s
Copy Mode
Synchronous and Asynchronous
Copy Area
Whole Media, File and System(Fast Copy)
Supported Media
SD/Micro SD card (SD/SDHC/SDXC)
Display
2-line Backlit Monochrome LCD
Control Button
4 push-button control panel (ENT, ESC, UP, DOWN )
Memory
128MB DDR3
Certificate
FCC, CE, UL
Size
172x146x43mm
Weight
0.8Kg
3.
Specifications
Operation Standalone (No PC or Software is required)
Supported File
System Format (for
Fast Copy)
Windows:FAT16/32, exFAT, NTFS
Linux:Ext2/3/4
MAC:HFS/HFS+
Power Ada ptor
Input:AC 10 0-240V; Output:DC 12V/3A
II. Warning
1. The du pl icator tasks m en t i on ed in this user’s m an u al ar e as foll ow in g: C opy, C om p ar e ,
Copy + C ompare, Dual Sourc e C opy + Comp are, F ormat + C apaci ty Ch ec k, an d the
functions under Utility sub menu, such as Measure Speed, Quick Erase, Full Erase and
Media Information.
2. All the tasks can be executed in sync hr onous m ode, an d as ynchr onous mod e (except
Copy + Compare function and Dual Source Copy + Compare).
3. The Gr een LED f lash es d uri ng th e exec uti on proc ess of a t ask. A ft er th e tas k is d one ,
the Green LED will stay solid if the process is successful, otherwi se the Red L ED wi ll be
on if the process is failed.
4
Page 6

4. Press and hold ESC butt on during th e executi on process of a task w i ll st op and exit the
execution of the task.
5. DO NO T unplu g SD or Micro SD card f r om t h e du pl icator d uring th e exec ut ion pr ocess
of a task. I t m ay c ause damage to the duplic ator system and m ed i a.
6. It is strongly recommended that the capacities of the source and target media are equal
or similar.
7. DO NOT plug in SD or Micro SD card until the duplicator boots up. It may cause
abnormal results if a SD or Micro SD card with quality issue is plugged in before or
during the boot up process.
III. Synchronous /Asynchronous Mode
1. Synchronous Mode
Synchronous Mode (default) means t h at th e d up licat or will start t o ex ec ute a tas k after the
source and tar g et devic es h av e been i nsert ed an d the E NT button is pr essed. The t as k w ill
begi n and end at th e sam e time f or all target devic es. Any ot her targ et device plugg ed in
durin g the proces s of a task wi ll n ot be ex ec uted wit h th e t as k.
a. Insert s ourc e device i nt o the s ourc e ch annel an d blan k devices into the target channels
properly. The LCD display will show no source disk when source device is not plugged in
yet, and show the number of target devices inserted when source device plugg ed in .
b. The green LE D wil l be on if the t arg et devic e is pl ug ged in properl y.
c. Selec t t h e tas k from menu, and press E NT butt on to ex ec ut e i t.
d. Duri ng the ex ecut ion pr oc ess, th e status of each targ et devic e c an be chec ked b y using
the ▲ and ▼ buttons.
e. After the task is done, LCD display will show the number of successful and failed
target(s).
2. Asy nchronous Mode
Asynchr onous M ode means th at t he du plic ator will r ead th e dat a f rom s ourc e d evic e int o
system memory buffer and start to execute a task immediately when target device(s)
ins erted . Dupl icator does n ot have t o wait f or all t arget devic e(s) t o be ins erted in order to
start the execution of the task at the same time. No matter the data size of the source device,
5
Page 7

duplicator c an as ync hronousl y execute a t as k if As ync hronous M od e is enabl ed.
a. Insert source device into the source channel, select the task to execute from the menu,
and press ENT button. Duplicator will start to execute the task now.
b. Target devices can be plugged in during the execution process, and will start to execute
the task immediately
c. Target device ca n be re mo ve d whe n it fi nis he s the ex e cut io n pro ce s s and its green LED
is solid on. New target device can be plugged into the same channel for execution of the
task ag ai n.
d. LCD dis play wi ll show the perc entag e of exec ution pr ocess , the nu mber of suc cessf ul
and fail ed t ar g et(s ) . Here t he percent age of ex ecuti on process displayed is only for t he
least processed target device.
e. Duri ng th e executi on process , th e status of eac h t arg et d evice can be ch eck ed by using
the ▲ and ▼ buttons.
f. After the task is done for all target devices, press ESC button to exit from the task. LCD
display will show the total number of successful and failed target(s).
g. Don’t n eed to wait for all target d evices t o be done. Eac h chann el execut es the t as k
asynchronously.
6
Page 8

ENT
Display copy progress
ENT
Sou r ce and target devices inserted
No sou r ce device
:
Copy:4: number of targets
:
Final result
Start Compare automati cally
ENT
Display Copy progress
:
:
Sou r ce and target devices inserted
:
Final result
Sou r ce and target devices inserted
No sou r ce device
:
Compare:4: num ber of targets
10%
Final result
:
ENT
IV. Menu Overview
1. Copy
To copy from source device to target device(s), please go to 7.1 Copy A rea to select the
setting first before this step.
1.Copy
Source Not Ready
1.Copy
Ready device: 4
Copy:4 1100M
0 F:0 10%
P
2. Compare
Result: 01 : 31
Pass
4 Fail:0
1100M: data to be copied
P: number of passed
F: num ber of failed
10%: rate of progress
All tasks are displayed in
the same format
This command allows to compare the copied target devices against the source for
accuracy.
2.Compare
Source Not Ready
2.Compare
Ready device: 4
Compare:41100M
0 F:0 10%
P
3. Copy + Compare
This command allows duplicator to start Copy process first, then follow with Compare
process immediately.
3. Copy + Compare
Ready device: 4
Result: 00 : 54
Pass
Copy&:4 1100M
P
Result: 02 : 25
Pass
4 Fail:0
0 F:0 10%
4 Fail:0
1100M: data to be compared
P: number of passed
F: num ber of failed
: rate of progress
&COMP:41100M
0 F:0 15%
P
after Copy progress is done
7
Page 9

the 1st target port
ENT
Copy from the source on
P:0 F:0 15%
:
Put source devices into Source
:
ENT
:
ENT
Insert source and target devices
:
Final result
4. Dual Source Copy + Compare
Two s ourc e devic es wit h id entic al cont ent wil l be us ed f or this task. One s ourc e devic e is
inserted i nto sourc e port while th e other inserted into t he 1
copy process first and reads data content from the source port; duplicator then starts
compar e process after copy is done, and r eads data content from the 1
comparing the copied devices against the second source, it can find out if the source device
has unexpected damage or not, and avoid the waste of time and media for further
duplication. The rest of procedure is the same as regular Copy + Compare procedure.
st
t arget p ort. Duplicat or starts
st
target port. By
4. Dual Source Copy +>
Ready device: 3
D_Copy:3 1100M
0 F:0 10%
P
D_COMP:31100M
port and 1st target port
the source port
Result: 02 : 25
Pass
3 Fail:0
Compare with the source on
Final result
5. Format + Capacity Check
It wil l format the t ar g et devic es to th e f i l e f or m at accordin g to the syst em S etup( pl ease r efer
to 7.3Set Type of Format), then sort out target devices based on the capacity threshold
(please refer to 7.4Set Capacity Threshold). Duplicator will display the target device which is
not in the capacity range and its red LED will flash. Press ▲▼ button to switch between the
target devic es with smaller capacity to check the data status. The ones without c apacity
issue wi ll no t be di spla ye d to ex pedite the capacity che ck pro ce ss. If Forma t and or Capacity
Check is failed, the red LED will stay solid on.
5.Format + Capacity>
Ready device: 4
Sure to format?
YES
Result: 00 : 02
Pass
4 Fail:0
Format:4
0 F:0 0%
P
Form at Process
8
Page 10

ENT
ENT
ENT
ENT
:
ENT
:
Erase Process
Final result
ENT
ENT
Erase Process
ENT
:
:
6. Utility
6.1 Measure Speed
This function allows to measure the actual Read and Write speed of all devices. It will N O T
alter or er as e exis ting data on the t arg et devic es.
6.Utility
[Utility]
1.Me as u re Sp e ed
[# 0] Read 21.6M
1sec Wr it e 15.1M
Display read /writ e speed
[# 1] Read 20.5M
6.2 Quick Erase
1sec Write 16.1M
Use▲▼to select device
This function erases the table content of file system of the target devices, so it is fast to do
Quick Erase. There is chance that some files can be retrieved by software.
6.Utility
[Utility]
2. Quic k Erase
Sure to erase?
YES
Confirm to erase or not.
Q _ Erase:4
Result: 00 : 02
0 F:0 2%
P
Pass
4 Fail:0
Final result
6.3 Full Erase
This function completely erases the content of target devices. It takes longer time to erase
and the content will not be retrieved by software.
6.Utility
[Utility]
3. Full Erase
Sure to erase?
YES
Confirm to erase or not.
F _ Erase:4
0 F:0 1%
P
Result: 25 : 02
Pass
4 Fail:0
9
Page 11

ENT
ENT
Capacity
ENT
ENT
ENT
ENT
Update complete!
System will reboot
6.4 Media Inform atio n
This function displays the information of selected device media, such as total capacity, file
format and the size of data content.
6.Utility
[Utility]
4. Media Information
[#0] 29.8G
FAT32 20.1G
Use▲▼to select device
Port # Total
6.5 Sy st em Infor m ation
File Format Data Size
This function dis p lays gen eral information of th e du pl icator system, including controller
model, system memory size, and firmwar e ver s i on.
6.Utility
[Utility]
5. System In fo rmation
D0123SD 128MB
V1.05.18
Display system info
Model Memory
Firmware
6.6 System Update
This function allows user to update the firmware of duplicator when necessary. Please obtain
proper firmware file from manufacturer, and save the unzipped file under home folder on
the
the SD or Micro SD card
system format as FAT32). Insert the
(DO NOT save the file under sub folder, format the file
SD or Micr o SD c ard
containing the firmw are int o
the source port of duplicator and press ENT. It will update the system, reboot the
du pl ic at or af ter up d at e, ac t iv e an d oper at e the system under the new firmware.
6.Utility
[Utility]
6. Syst em Update
Update BIOS
Identify disc…
Searching source device
Update BIOS
Complete! Reboot!
10
Page 12

ENT
ENT
7. Setup
7.1 Copy Ar ea
This function allows to select the area on the source device to copy onto the target
devices. You may select “System and Files” to skip all the unoccupied area on the source
device or “Whole Media”. By default, the copy area is set up as System and Files
(default).
System and Files:
The duplicator first analyzes the file format of source device. You may copy only the
system and file area to s ave overall c opy tim e if the file f ormat is FAT16, FAT32, exFAT,
NTFS (Windows), EXT2, EXT3, EXT4 (Linux), and HFS/HFS+ (Mac). Otherwise, the
duplicator will copy the entire source device content to the target devices including
unoccupied space. For instance, the source device has 8GB capacity but with only 50MB
of data in FAT32 file format. The duplicator will copy only the 50MB of dat a area to the
target device, hence shortening overall copy time.
Whole Media:
When selected, the duplicator copies the entire content on the source device, including both
the data and empty spaces. This option is used when you have a source device with
unkn own file format . F or i ns t ance a s ource d evice h as 8GB c apacity an d 50MB of d ata with
unknown file format, the duplicator will copy the whole 8GB of content to target devices.
7.Setup
[Setup]
1. Copy Area
[Copy Area]
System And Files
Use▲▼to change option
[Copy Area]
7.2 Asynchronous Mode
Whole Media
Use▲▼to change op tion
This function enables or dis ables As ynchr onous M ode. By def ault the As ynchron ous Mod e
is disabled. Please refer to Chapter III for the detail of operation on Synchronous and
As ynchr onous M od e.
11
Page 13

ENT
ENT
ENT
ENT
7.Setup
[Setup]
2. Asynchronous Mode
[Asynchronous Mode]
Enable
[Asynchronous Mode]
Disable
Use▲▼to change option
Use▲▼to change option
7.3 Set Type of For mat
This function allows to set u p the t ar get d evice format, and the setting will be applied by
Command 5. Format + Capacity Check under the main menu. The options are FAT32,
exFAT, and Depends On Size. The default setting is Depends On Size.
7.Setup
[Setup]
3. Set Type Of Format
[Set Type Of Format]
Depends On Size
[Set Type Of Format]
FAT32
7.4 Set Capacity Threshold
This functi on all ows t o set u p th e cap acity t hresh old f or Com mand 5. Format + Capa city
Check under main menu. It will be failed when the target device capacity is below the
thres h old r an g e, an d th e r ed LED w ill fl ash to give war ni ng. There are 3 settings.
Capacity: the si ze of devic e c apacit y whic h wi ll be us ed for sor ting, an d opti ons ar e OFF
、
128M、256M、512M、1G、2G、4G、8G、16G、32G、64G、128G、256G、512G、1T、
2T. Th e default is OFF.
Tolerance: the accept abl e rang e of c ap acity for s or ti ng, and options are O FF, 0~50%. Th e
de fault setting is 5%。
Capacity D efiniti on: define the standard for capacity conversion. Options ar e 1MB=1000K
and1MB=1024K. The default is 1MB=1000K。
12
Page 14

Use▲▼to changeo ption
ENT
ENT
ENT
Use▲▼to change option
ENT
Use▲▼to change option
ENT
Use▲▼to change option
ENT
ENT
ENT
ENT
ENT
Use▲▼to change option
Use▲▼to change option
7.Setup
[Setup]
4. Set Cap a cit y Thresh>
[Set Capacity Thr es h> ]
Capacity: OFF
[Set Capacity Thr es h> ]
To lerance: 5%
[Set Capacity Thr es h> ]
Setup Complete!
1M=1000k
7.5 Set Slow Out Threshold
This function allows to set up read/write speed threshold for target devices. When the target
device is causing the cop y or com p are pr oc ess d el ay d u e t o its l ow e r r ead/write s p eed and
the rest of the devices in the same batch have to wait for it, the Slow Out Threshold strategy
will b e appli ed as the f ollowin g: th e s yst em will s top t he c opy or c ompare pr oces s for th at
particular target device when its read/write speed is below the threshold for continuing
numb er of sec onds bas ed on th e setti ng, and its red LED will fl ash t o give warn ing. Th ere
are 3 setti ngs to set up.
Read: set up the lowest read speed,and options are OFF, 1MB/s~25MB/s. The default
setti ng is OFF.
Write: set up the lowest write speed, and options are OFF, 1MB/s~25MB/s. The default
setti ng is OFF.
Duration: set up the period when read or write speed is lower than the threshold for
conti nu in g numb er of tim e, and opti ons ar e 1~20second. The default is 5second.
7.Setup
[Setup]
5. Set Slow Out Thresh>
[Set Slow Out Thresh>]
Read: OFF
[Set Slow Out Thresh>]
W rite: OFF
[Set Slow Out Thresh>]
Setup Complete!
Duration: 5sec
13
Page 15

Use▲▼to change option
ENT
ENT
ENT
Use▲▼to change option
Use▲▼to change option
ENT
ENT
Use▲▼to change option
ENT
ENT
ENT
Use▲▼to change option
Use▲▼to change option
ENT
ENT
7.6 Performance
This function allows to set up the performanc e for Copy function based on the following
modes: Speed, Balance, and Compatibility.
Speed mode is to execute the Copy function at the fastest speed, but may have compatibility
issue with certain brands flash media.
Balanc e m ode is to e xecu t e the Cop y f unct ion at stab l e speed , an d h ave l ess c omp atibil it y
issue with certain brands flash media.
Comp atibilit y mode is t o execut e the Cop y f uncti on at the m ost st able speed, and almost
have no compatible issue with flash media. The default mode is Speed.
7.Setup
[Setup]
6. Performance
[Performance]
Speed
[Performance]
Balance
[Performance]
Setup Complete!
Compatibility
7.7 Button Beep
This function allows to set up button sound from the following options : Button & Warning,
OFF, Warning only. The default setting is B ut ton & Wa rni ng .
7.Setup
[Setup]
7. Button Beep
[Button Beep]
Button & Warning
[Button Beep]
7.8 Boot Pas sword
This function allows to set up pass word f or s yst em boot up t o prev ent the duplicator from
OFF
[Button Beep]
Setup Complete!
Warning Only
14
Page 16

Set password after Enable
ENT
Use▲▼to change option
ENT
ENT
ENT
Use▲▼to change option
ENT
_ _ _ _ _ OK?
Use▲▼to change option
ENT
ENT
ENT
ENT
Set password after Enable
Use▲▼to change option
ENT
unaut horiz ed use. The pas sword must b e 6 char acters long. This f unction only works wit h
sing l e unit op erati on , but not multi pl e units wi th d aisy ch ain.
7.Setup
[Setup]
8. Boot Password
[Boot Password]
Enable
[Boot Password]
Disable
[Boot Password]
==>_
Setup Complete!
7.9 Lock Menu
This function allows to set up password to lock Main Menu. Pr ess an d hol d ESC bu tton for 5
seconds u nd er Mai n Men u, a s c reen for p assword i nput will p op u p. A f ter k ey in pass w or d,
th e syst e m will be loc ked at the curr ent Main Menu. R epeat t he same pr oc e d ure of l ock i n g
Main Menu to unlock the Main Menu if necessary. If no password is keyed in, the system will
skip password input, and continue to lock/unlock Main Menu. The number on the Main
Menu will b ecome # sign when it is lock ed, remin ding it is under locked mo de. This
func tion on ly w orks wit h sin gle un it oper ati on, but not mu ltipl e unit s with daisy ch ain . I t is t o
prevent the duplicator from operational mistake by accident when main menu function is
proc essed, t her efore sub menu f uncti on and s ystem setup will n ot sup port th e Lock Menu
function.
7.Setup
[Setup]
9. Lock Menu
[Lock Menu]
Enable
[Lock Menu]
Disable
[Lock Menu]
==>_ _ _ _ _ _ OK?
Setup Complete!
7.10 Language
This function allows to ch oose th e lang u ag e for disp l ay, an d options are English, Spanish,
Portuguese, and Japanese. English is the default language.
15
Page 17

ENT
ENT
Use▲▼to change option
ENT
ENT
ENT
Use▲▼to change option
ENT
ENT
7.Setup
[Setup]
[Language]
10. Language
Setup Complete!
7.11 Clear Setup
This function resets the duplicator back to factory default settings.
7.Setup
[Setup]
11. Cle ar Setup
Clear Parameter To >
Clear Parameter To >
Setup Complete!
All Paramet ers wer e>
English
Yes
V. Bas i c Troubleshooting
1. The copy s peed of duplic at or dep ends on th e SD/Micr o SD c ar d own read and write
speed. Please change the SD/Micro SD card if the copy speed is very low and
unacceptable.
2. This duplicator device cannot copy any data content with copy protection. For
non-s t and ar d SD/M ic r o S D devices, p leas e selec t Whole M edia from Cop y Area setu p
for duplication.
3. It is r ecomm end ed t o us e the SD/ Mic ro SD card wit h the s am e c ap ac ity for d up licati on,
to avoi d un exp ec ted err ors .
4. Cust omer m ust g et pr e-approved aut horizat ion from m anufact urer in ord er to open the
unit for repair or maintenance. Ot h er wise the w arrant y of th e unit w il l be voided .
5. Cust om er m us t contac t m anuf acturer to obt ain prop er firmware file for s yst em up d ate if
16
Page 18

it is n ec ess ary an d pr ovi de with 6.5 System Inf o. P lease follow th e instructions when
update firmware, and delete the firmware file after the update is done. Without the
consent of the man uf act urer of any behavior in spreading the firmware file is considered
violation of copyright law, and the company will retain the legal recourse liability.
Copyright © 20 15. All rights reserved
17
 Loading...