

Page 1
V3
EZCast Beam V3 Quick Start Guide
This EZCast Beam V3 Quick Start Guide provides a
guideline for basic operation. Please read the guide
thoroughly before operating the projector. Visit
www.EZCast.com for additional information. Product
information is subject to change without prior notice.
Page 2
Thank you for purchasing the EZCast Beam V3 projector. Our product
combines the easy to use interface, portability, and cross platform
compatibility, to let you enjoy projecting media from Android, iOS phones
and tablets, as well as Windows and MacOS laptops, anytime, anywhere.
EZCast app installation
Please visit www.EZCast.com/app to download EZCast app for every
supported platform.
Mobile devices can proceed to the relevant download area by scanning
the QR code below.
(iOS users can search for EZCast in the App Store to download the app)
(Android users can search for EZCast in Google Play to download the
app)
Page 3

Precautions
How to use the projector
1. Do not turn the lens toward human eyes when in operation, to avoid
damaging the eyes caused by the high intensity light source.
2. Do not block the device ventilation to avoid damage to the internal
electronic devices due to overheating.
3. Do not use chemicals, cleaning agents or clean water to clean the
device, and prevent rain water, moisture and mineral-containing liquids
from corroding circuit boards.
4. Please keep the device and its parts and accessories out of reach of
children.
5. Please ensure that the device is operated in a dry and ventilated
environment.
6. Do not store the device in extreme hot or cold conditions. High and low
temperatures may shorten the lifespan of electronic devices. The normal
operating environment is between 5°C~30°C.
7. Do not put the device into any drying equipment (such as dryer,
microwave oven, etc.).
8. Do not squeeze or place heavy objects over the device to avoid
damage to the device.
9. Do not throw, knock or shake the device violently, which may damage
the internal circuit boards.
10. Do not attempt to disassemble the device without permission. If there
is any problem, please contact customer support.
11. Do not repair any product by yourself. If the device or any part does
not work properly, you should consult customer support or return the
device for repair.
12. It is recommanded to shut down for 30minutes after playing for more
than 8 hours.
Never look directly into the projector lens when the lamp is
turned on.The bright light can damage your eyes.Never let
children look into the lens when it is on.
Page 4
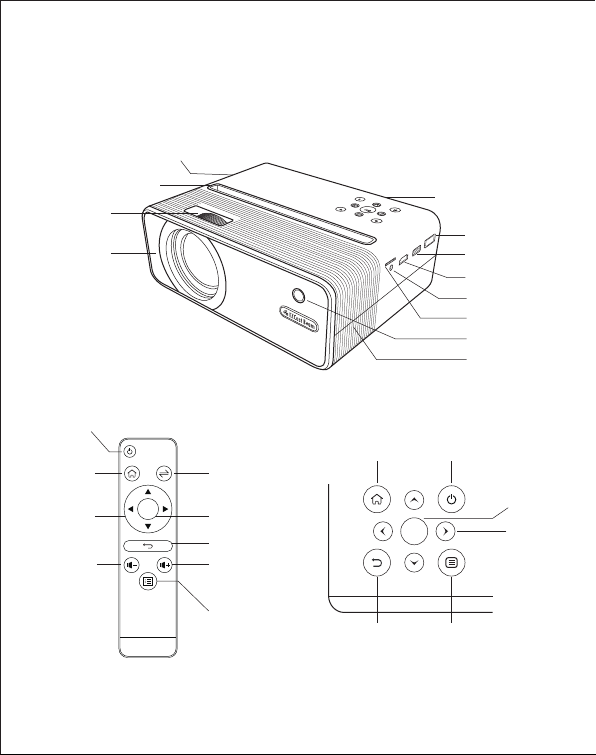
EZCast Beam V3 body and remote
DC
Mobile Stand
Focus Ring
Lens
Power
Home
Arrows
Volume
down
OK
Speaker
mode
Select
Back
Volume
up
Settings
Home
Back
Control Panel
Power
OK
Settings
Wireless Kit
USB
HDMI
Headset Jack
Micro SD
Remote Sensor
Ventilation
(Do not block)
Select
Arrows
Page 5
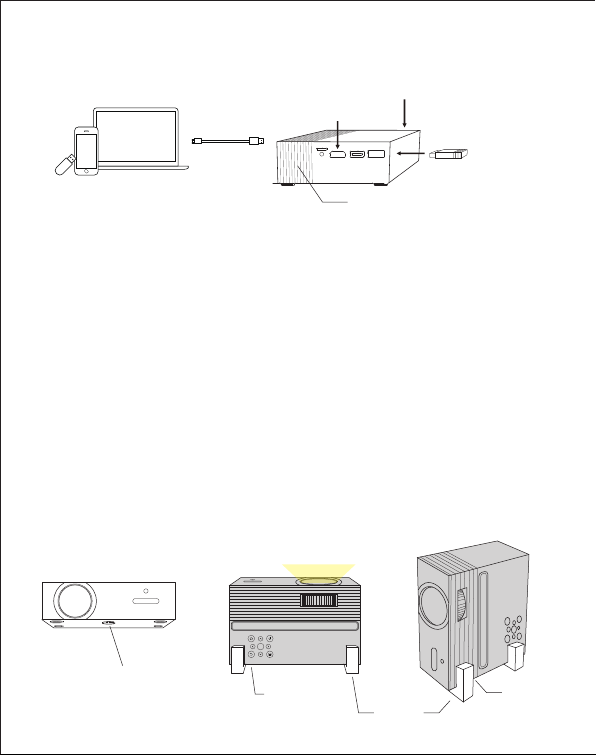
How to set up EZCast Beam V3 projector
DC
HDMI
Wireless
Adapter
Ventilation
Preparation
1. Plug the power to the projector, and the power button will light up.
2. Insert the wireless adapter into the wireless kit port of the projector.
3. To turn on projector, hold the power button of the projector for 3
seconds till you hear the "beep” sound and the light will turn blue.
4. Adjust focus ring until the projection image is clear and focused.
Projector stand and holders
1. Normal mode: When projecting forward, adjust elevation angel by
loosening the projector stand under the projector. When projecting
upward, use the holders to avoid blockage of ventilation.
2. Portrait mode: Equip the projector holders at the bottom to make sure
the ventilation works well.
(Normal mode) (Normal mode) (Portrait mode)
Project forward Project upward
(Do not block)
Projector stand
OK
Ventilation
(Do not block)
Holders
Ventilation
(Do not block)
Page 6
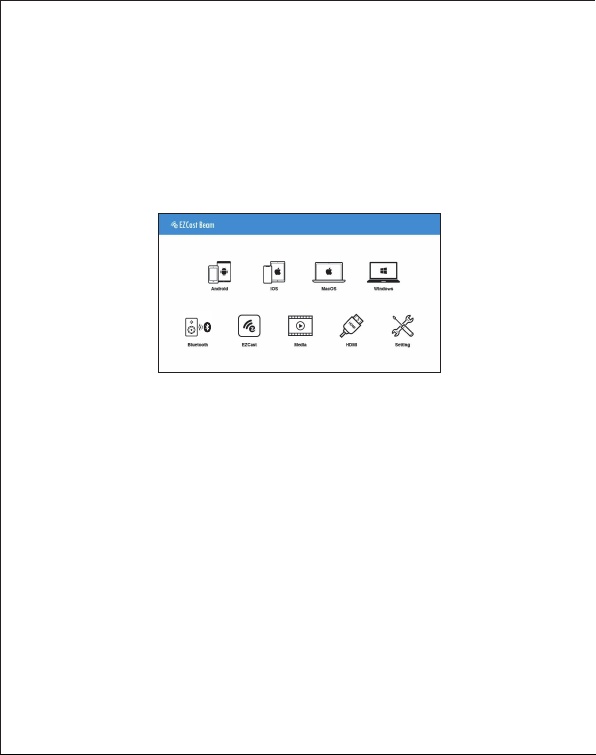
First time settings
1.Select the start-up language.
2. Wi-Fi setting: connect the projector to your router and enter the
password. (Important)
3. After starting up, enter the main menu and select the functions by
arrow keys on the projector or remote control: Android, iOS, MacOS,
Windows, bluetooth, EZCast, Multimedia, HDMI, and Setting, as below
shown:
Power off:
1. Sleeping mode: press the power button and hear the “beep” sound
with the power button still blue.
2. Power off: hold the power button for 3 seconds till you hear the "beep”
sound twice, and the power button turns red.
Multimedia playback
1. Insert a USB flash drive into USB1 port or insert SD Card to SD Card
slot on the projector.
2. Select the "Multimedia">>"USB Disk" or "SD card">>"Video", "Music"
or "Photo" to enter the file folder.
3. Select the file to play with the up and down arrow keys, and press
"OK" to confirm.
4. When playing media, press "OK" to see the menu, and select item by
the left and right keys.
5. Support format: video, audio, and image.
Page 7
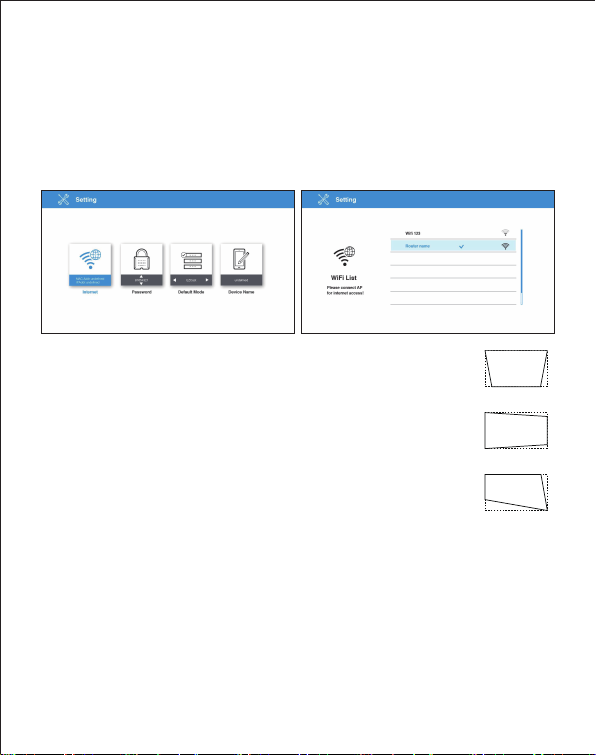
Settings
Select the "Setting" key on the projector or remote control, and press
"OK" to confirm.
1. Wi-Fi setting : Select the "Wi-Fi setting" menu and enter the Wi-Fi
setting interface, select the "Internet", press "OK" key to confirm, and
select the router from AP list and enter the password.
2. Display mode: Swtich standard/ ECO/ bright mode.
3. Portrait mode: Switch on to project vertically. Please
make sure NOT to block the ventilation.
4. V.Keystone: Automatic vertical keystone adjustment
up to ±25 degrees.
5. H. Keystone: Manually adjust horizontal keystone up
to ±14 degrees.
6. 4 Corner Correction: Choose the corner to be adjusted
and use arrows to change the location.
7. Color Setting: Change brightness, Contrast, Saturation,
Sharpness, R/G/B Gain, and R/G/B Offset.
8. Firmware Upgrade: Upgrade via USB drive or through internet.
9. Projector Location: Change to Front/ Front Ceiling/ Rear/ Rear Ceiling
mode.
10. Language: Change language with arrows.
11. Reset All: Choose yes to reset projector to factory default. All saved
changes to Setting are lost.restored. The projector will be restored
to the factory settings, and the data adjusted by the user will not be
saved.
(V. Keystone)
(H. Keystone)
(4 Corner Correction)
Page 8
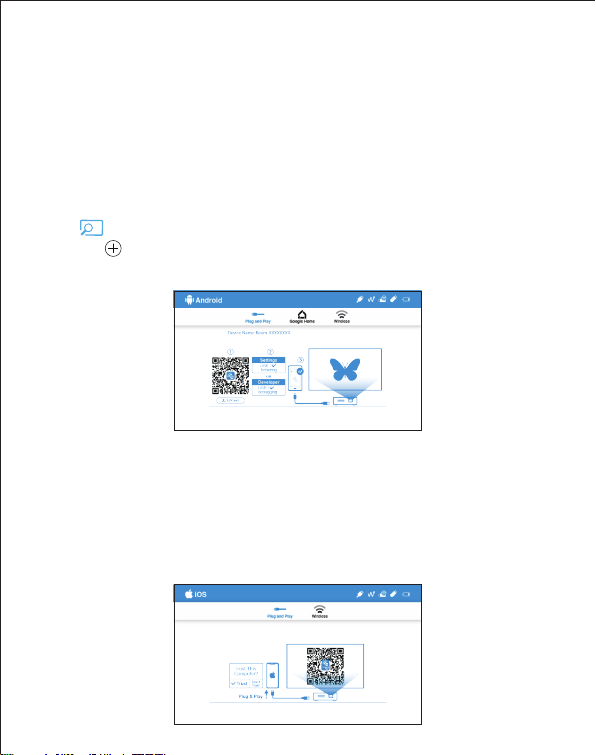
How to Plug and Play (via USB cable)
Android
1. Select the Android on main menu of projector, and then select Plug
and Play menu by pressing "OK" key.
2. Connect your mobile to the projector via mobile USB data cable.
3. Download and install EZCast app from Google Play Store or scan the
QR code shown on screen.
4. Launch EZCast App and follow the guide. If the guide doesn’t pop out,
click at the upper right and click “+” at the upper left.
5. Press and scan the QRCode on your screen.
6. Make sure the SSID and picture shown are correct.
iOS
1. Select the iOS on main menu of projector, and then select Plug and
Play menu by pressing "OK" key.
2. Connect your mobile to the projector via mobile USB data cable, and
then choose "Trust This Computer" to start your projection.
Note: If there’s a black screen after connecting to mobile, please reboot
your mobile and then try again.
Page 9
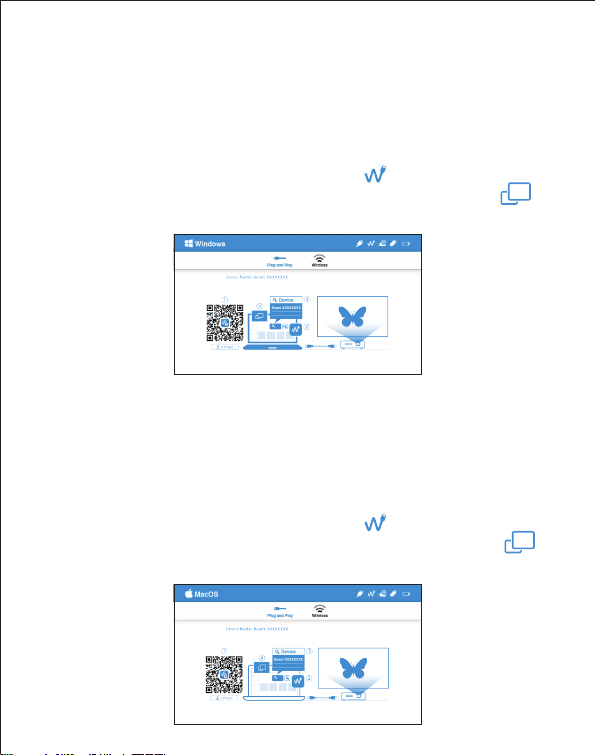
Windows
1. Select Windows on main menu of projector, and then select Plug and
Play menu by pressing"OK" key.
2. Install EZCast app on your PC.
Please visit https://www.ezcast.com/app to download EZCast app.
3. Connect your PC to the projector via USB A-to-A cable.
4. Launch EZcast app on your PC and click icon.
5. Find and select "Beam-XXXX" from “Search device”, and click to
mirror.
MacOS
1. Select MacOS on main menu of projector, and then select Plug and
Play menu by pressing "OK" key.
2. Install EZCast app on your PC.
Please visit https://www.ezcast.com/app to download EZCast app.
3. Connect your PC to the projector via USB A-to-A cable.
4. Launch EZcast app on your PC and click icon.
5. Find and select "Beam-XXXX" from “Search device”, and click to
mirror.
Page 10
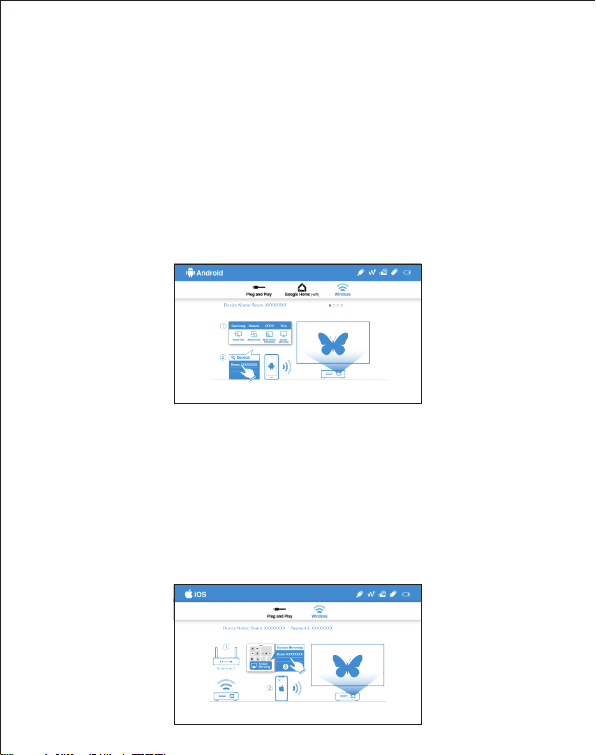
How to Wireless Display
Android
1. Select Android on main menu of projector, and then select Wireless
menu by pressing "OK" key.
2. Select mirroring function in the setting of your phone and
find”Beam-XXXX” device shown on device list to start your mirroring.
Note 1: The naming of mirroring function varies different brands.
Visit https://www.ezcast.com/usage/android/ezmirror for demos.
Note 2: Compatibility: Android 5.0 or above.
iOS
1. Select iOS on main menu of projector, and then select Wireless menu
by pressing "OK" key.
2. Make sure both of your projector and mobile are connected to the
same WiFi router.
3. Go for Screen Mirroring of your mobile and select the ”Beam-XXXX”
shown on the list to start projection.
Note: Compatibility: iOS 12 or above.
Page 11
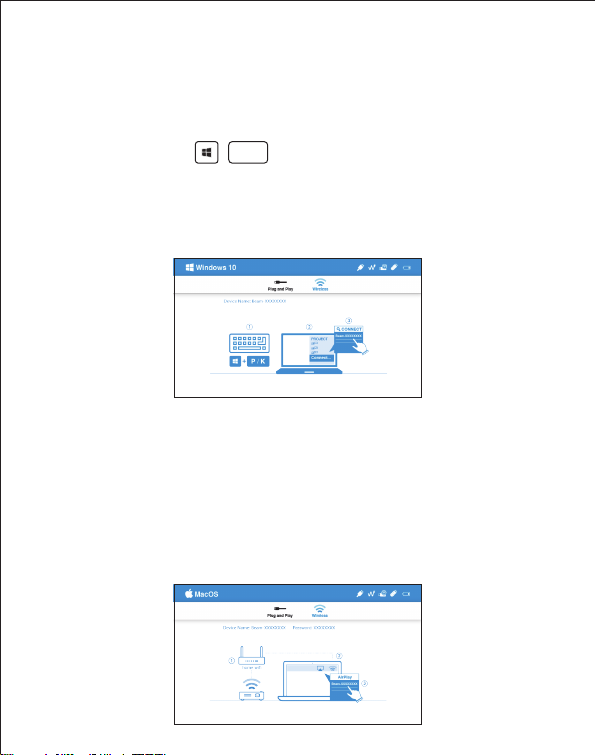
Windows 10
1. Select Windows on main menu of projector, and then select Wireless
menu by pressing "OK" key.
2. Make sure both of your projector and computer are connected to the
same Wi-Fi router.
3. Click quick key by on the computer, and connect to the
P/ K+
device named by “Beam-XXXX” to start your projection.
Note: Please upgrade your windows 10’s operation system to the lastest
version.
MacOS
(1) Select MacOS on main menu of projector, and then select Wireless
menu by pressing "OK" key.
(2) Make sure both of your projector and computer are connected to the
same Wi-Fi router.
(3) Click for Screen Mirroring icon on your computer and select the
”Beam-XXXX” shown on the list to start your projection.
Page 12
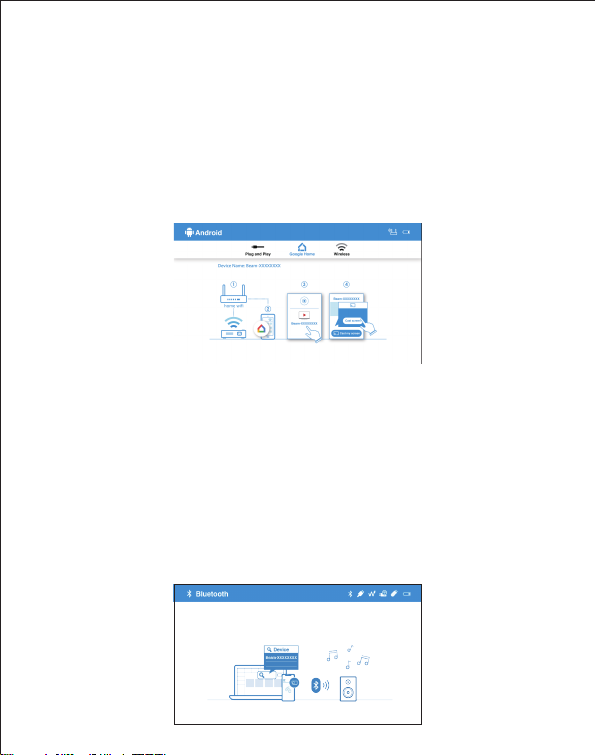
Google Home Screen Mirroring (Android Only)
1. Select Android on main menu of projector, and then select Google
Home menu by pressing "OK" key
2. Make sure both of your projector and mobile are connected to the
same WiFi router
3. Download and install Google Home app from Google Play Store.
4. Launch Google Home app and choose device name: Beam-xxxx >
Cast my screen > Cast screen
Bluetooth
Select “bluetooth” to use Beam V3 as a bluetooth speaker.
Connection:
Turn on bluetooth of your mobile or computer, and find Beam-XXXX to
connect. The projection screen will turn black during connection.
Disconnection:
Press “back” key on projector chassis/ remote control, or disconnect
from the bluetooth list of your mobile or computer. The projection screen
will turn on again after disconneted.
Page 13
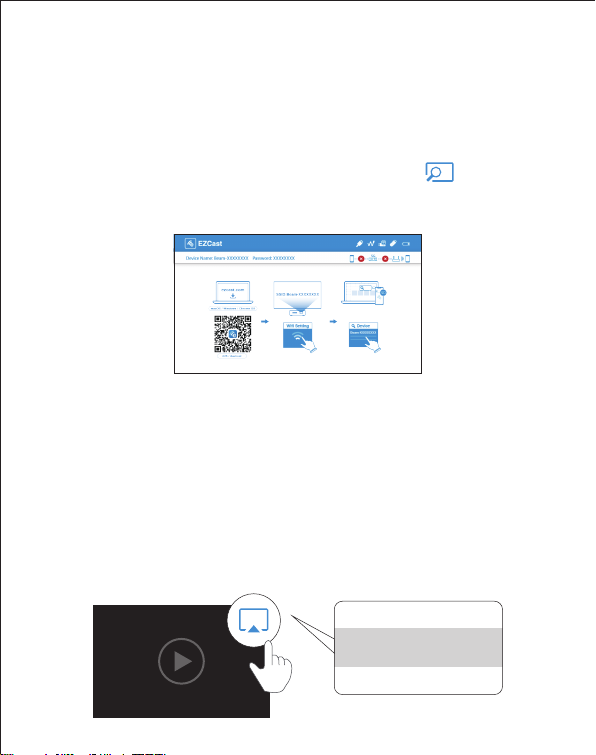
EZCast
(1) Select EZCast on main menu of projector and make sure both of
your projector and mobile are connected to the same Wi-Fi router.
(2) Install EZCast app on your device. Please download the app from
application market for your mobiles or visit https://www.ezcast.com/app
to download EZCastapp for PC.
(3) Launch EZCast app on your device, and then click icon and
select the ”Beam-XXXX” shown on the list to start your projection.
DLNA streaming
(1) Select EZCast on main menu of projector and make sure both of
your projector and mobile are connected to the same Wi-Fi router.
(2) Launch the app that support DLNA, such as QIY, QQTV.
(3) Click the DLNA icon on the video you’d like to play, and select
“Beam-XXXX”.
Note: DLNA icon usually shows in the corner of the video, and looks like
a tv which depends on different apps.
TV
BeamV3-xxxxxxxx
Page 14
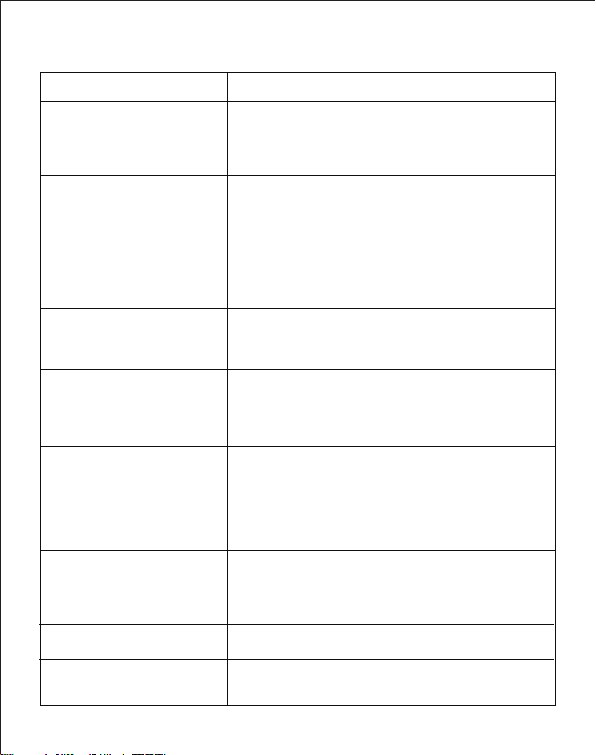
FAQ
Problems
No electricity/can't power on
Unable to screen mirroring
Unable to play online media
Abnormal casting/ black screen
Unable to upgrade online
Cannot focus image
Remote control not functional
Unable to shut down
Solutions
1. Check whether the power cord is connected properly.
2. Press the Power button for 3 seconds till you hear
the "beeping" sound, and then release the button and
wait for the projector to start up.
1. Make sure wireless adapter has been installed to
wireless kit port on the projector.
2. Refer to the Quick Guide to make sure you are using
the correct screen mirroring function.
3. If the screen stutters or lags, the distance between
source and projector is too far.
4. Make sure the phone is connected to the SSID of the
projector.
1. Check whether the network connection is normal.
2. Check whether the wireless adapter is inserted into
the Wireless kit port.
1. Make sure the ventilation works without blocked.
2. Long press the Power button to shut down.
3. Wait for the projector to cool down, and then press
Power button to turn on again.
1. Check if the Wireless adapter is inserted into the
Wireless kit port.
2. Check whether the network connection is normal.
3. Select OTA upgrade in the Setting.
4. Check whether there is a newer firmware version
available to upgrade.
1. Confirm whether the projecting distance is
appropriate, and try to extend the distance between
projector and screen.
2. Check whether the lens is clean.
Replace the batteries of remote control.
Press the Power button for about 10 seconds to force
the shut down.
Page 15
Warranty
1. The defective product is valid for refund and replacement if claimed
with proof of purchase and warranty card within 7 days of purchase, and
the defect was not caused by inappropriate usage or mishandling of
product.
2. Product warranty is limited to 12 months within the purchase date,
and covers the main projector only. The warranty does not cover
accessories and defects caused by inappropriate usage or mishandling
of product. The warranty claim is only valid with proof of purchase and
warranty card.
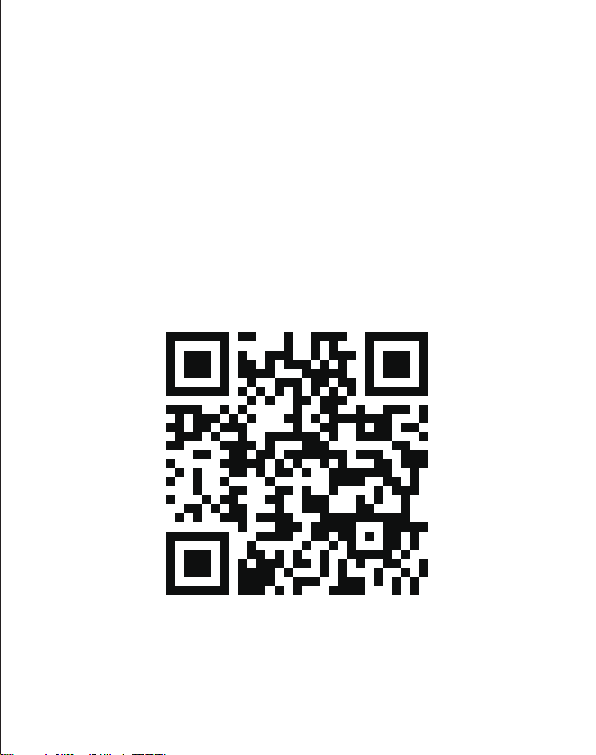
3. Register the warranty online to ensure your rights:
Contact Information
Note: The shipping fee to service center is at your own expense.
 Loading...