

Page 1
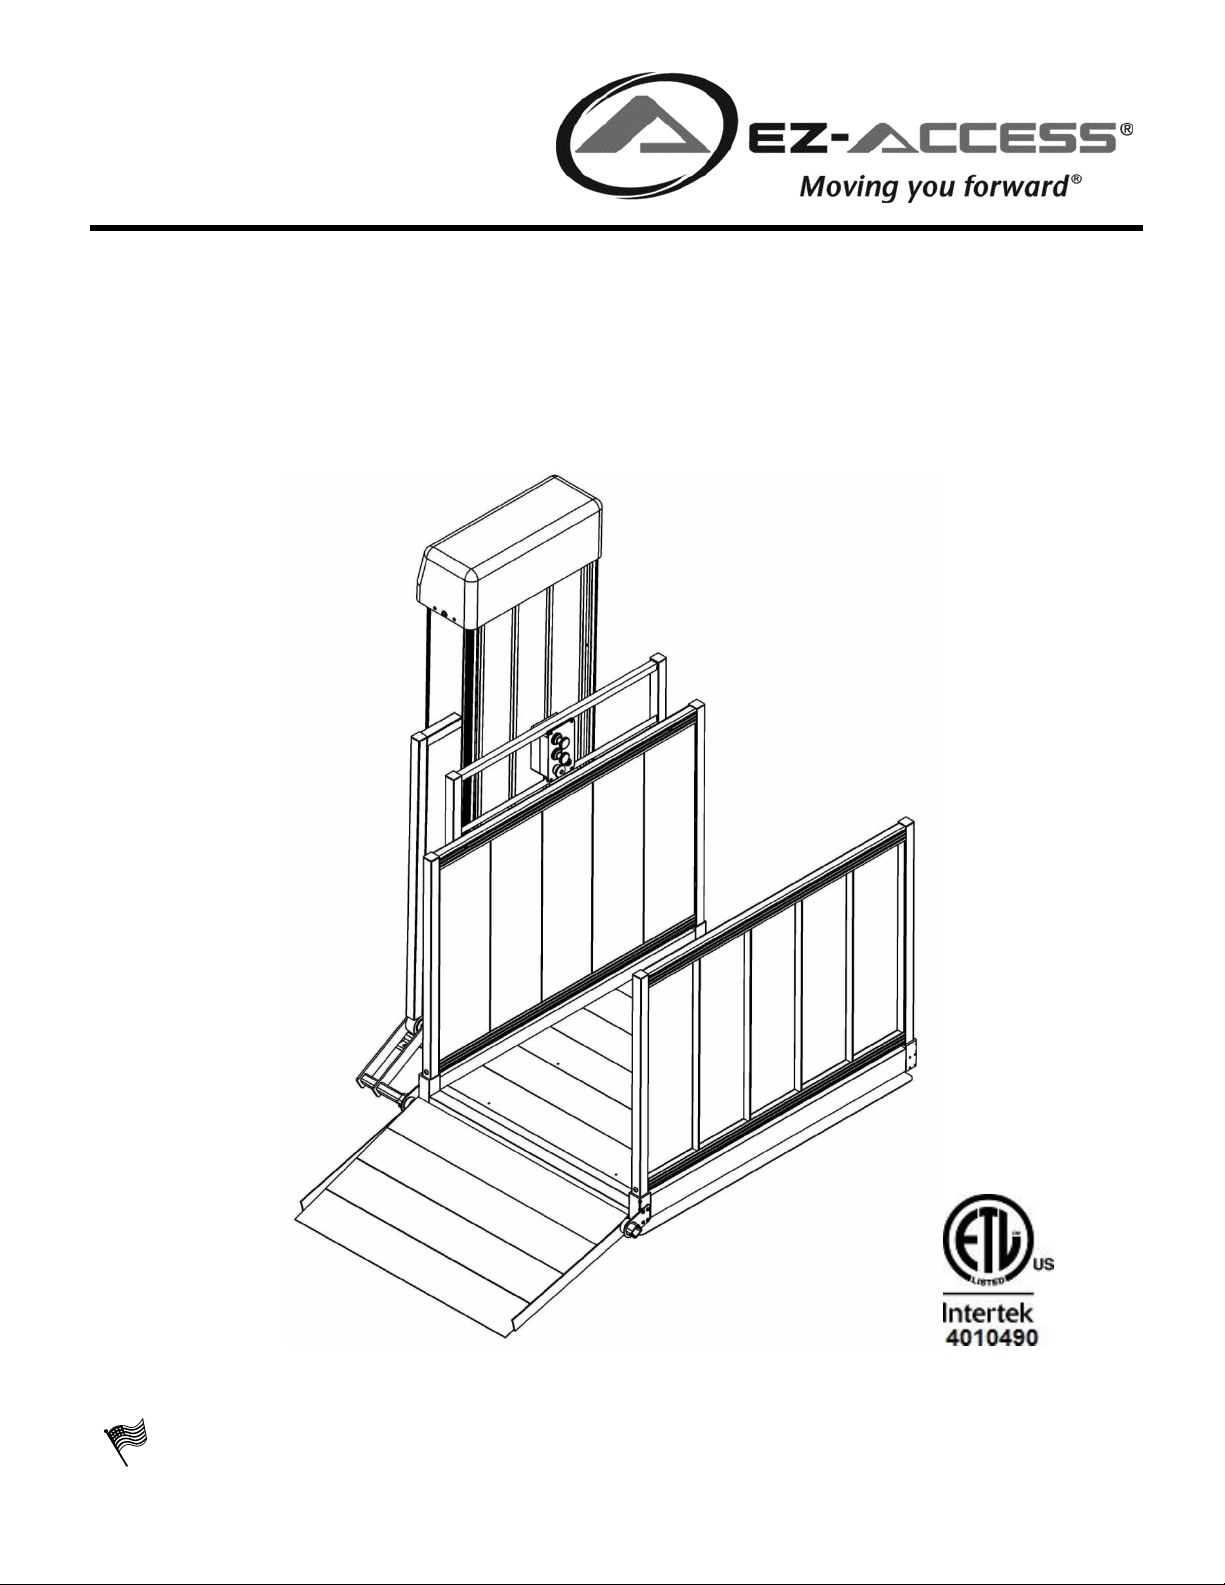
PASSPORT® Vertical Platform Lift (VPL)
User Manual for Models
PL52SP3651, PL72SP3651, PL52TP3860 and PL72TP3860
Manufactured in the USA
© 2012-2013 EZ-ACCESS®, a division of Homecare Products, Inc. All rights reserved.
All text and images contained in this document are proprietary and may not be shared, modified,
distributed, reproduced, or reused without the express written permission of EZ-ACCESS.
12273 REV 05-11-15
Page 2

INTRODUCTION
Congratulations and thank you for purchasing the PASSPORT® Vertical Platform Lift (VPL). At
Homecare Products, Inc., we are proud to offer this select line of assistance equipment designed to
provide you years of trouble-free performance.
This User Manual provides important operation, maintenance, service and safety instructions. It is
important that you read and understand this User Manual before installing and or using the VPL. Refer
to the VPL’s Installation Manual and User Manual as needed. If you have additional questions, your
dealer contact information can be found in Section 3 of this manual.
Unless indicated otherwise, this manual applies to models PL52SP3651, PL72SP3651, PL52TP3860
and PL72TP3860.
Table of Contents
Section 1 - - - - Symbols, Safety and Warnings
Section 2 - - - - Maintenance and Service
Section 3 - - - - Dealer Contact Information
Section 4 - - - - Labeling
Section 5 - - - - Optional Equipment Notice
Section 6 - - - - Optional Equipment - Wireless Remote
Section 7 - - - - Optional Equipment - Top Landing Gate
Section 8 - - - - - - - Top Landing Gate Optional Equipment - Pathway Connector Kit
Section 9 - - - - - - - Top Landing Gate Optional Equipment - Deck Connector Kit
Section 10 - - - - Optional Equipment - Platform Safety Rail
Section 11 - - - - Optional Equipment - Platform Safety Pan Weather Guard
Section 12 - - - - Optional Equipment - Interlock
Section 13 - - - - Optional Equipment - Call/Send Control
Section 14 - - - - - - - Call/Send Control Optional Equipment - Call/Send Control Mounting Kit
Section 15 - - - - Features
Section 16 - - - - Operating Instructions
Section 17 - - - - Emergency Operation
Section 18 - - - - Specifications
Section 19 - - - - Troubleshooting
Section 20 - - - - Main Components Drawing
Section 21 - - - - Warranty
SECTION 1 - SYMBOLS, SAFETY AND WARNINGS
This WARNING symbol may appear in various colors and in conjunction with other symbols. The
warning symbol indicates a failure to obey that safety warning could result in property damage, damage
to equipment, serious personal injury or death. The word WARNING may appear, in capital letters, bold
font, in lieu of the symbol where symbol usage is impractical.
Page 2 of 26
Page 3

This is the NOTE symbol. This symbol may appear in various colors and in conjunction with other
Read the User Manual in its entirety. Understand and learn the location and function of all the features, safety
devices, and labels before operating the VPL.
Do not exceed the weight capacity of 750 pounds (340 Kg.) for this VPL.
Do not use VPL for anything other than its intended purpose of personal residential use for lifting of individuals and
personal mobility devices.
Keep all body parts away from moving components and within the platform guards during VPL operation.
The Platform Safety Rail option must be installed if the VPL is used by a standing occupant.
Never play on or near the VPL.
Turn off power and engage the brake on all mobility devices prior to cycling the VPL.
Remove ice, snow, leaves and other potentially unsafe materials from VPL and landings before each use.
Inspect VPL for damaged, missing, or inoperable parts before each use. Never use a damaged or unstable VPL.
Periodically check all fasteners and verify all nuts, bolts, screws and other fasteners are undamaged and secure.
Do not attempt to repair or modify the VPL. Only qualified technicians may service the VPL. Contact your dealer to
schedule any needed inspections, repairs or service.
Observe and avoid all pinch points.
Whenever not actively using the VPL, turn keyed power switch to “OFF” position and remove key.
Always unplug VPL from electrical outlet before cleaning. Only plug VPL back in when area around VPL is dry.
Never operate VPL with damaged electrical wires, cords, or plugs.
The AC electrical plug on this VPL is grounded and intended to be used only with a properly grounded GFCI outlet.
Do not remove ground pin from AC power cord. If ground pin is broken or missing, immediately contact your dealer
to schedule repairs.
Stop using VPL and immediately and contact your dealer for inspection and service if any defect is suspected.
Do not tamper with or attempt to modify the VPL or any of its systems.
Use VPL only with a qualified helper, if required.
Do not use the VPL to support, attach, or hang planters, baskets, lights, adornments, decorations, clothing, fabrics
or other ornamentals or furnishings.
Components inside the tower must be serviced by a qualified technician. Contact you dealer to schedule any
needed inspections, repairs or service.
Periodic inspections by a qualified technician are highly recommended to help prevent unsafe conditions.
A visual inspection of all bolts and nuts to be sure that they are securely in place must be done by the VPL owner.
If there are any missing or damaged fasteners or other components, they must be replaced by a qualified
technician. Contact your dealer to schedule any needed inspections, repairs or service.
The VPL’s electrical cord must be routed and situated in a manner that poses no hazards. Do not lay power cords
on or across electrically conductive materials, such as metals and always route power cords in such a manner so
no one can trip over them and they are not exposed to risk of accidental or incidental damage.
Before and during VPL operation, ensure all hair, jewelry, shirts, ties, shoe laces and all other forms of clothing and
other personal ornamentation are-not and do-not hang up on anything that may create a hazard.
The VPL is designed exclusively for personal residential use to provide safe access to and from your home.
Using this VPL for anything other than its intended purpose will void the warranty.
Do not use the VPL to support, attach, or hang planters, baskets, lights, adornments, decorations, clothing,
fabrics or other ornamentals or furnishings.
Correct installation, proper use, and following of instructions and obeying safety warnings and of the VPL are
necessary for safe operation.
If service outside the guidelines of this manual is required, please contact your dealer for additional information,
for replacement labels and manuals, or to schedule any needed inspections, repairs or service.
VPL must be anchored to a concrete slab before operating the VPL while it is occupied. Using the VPL while
occupied before installation can be hazardous.
The VPL comes with various product safety labels. Do not remove safety labels or devices. If any labels are
missing, damaged or become illegible they must be replaced. An illegible decal will fail to alert individuals on or
symbols. This indicates a failure to obey all notes could result in improper operation, less than optimum
VPL performance, and at the sole discretion of the VPL manufacturer, may void your warranty. The
word NOTE may appear, in capital letters, in lieu of the symbol where symbol usage is impractical.
SAFETY WARNINGS: The safety warnings throughout this manual are for the protection of people and
property. Failure by any operator to obey all VPL safety warnings will result in a waiver of all liabilities, loss of
your warranty and could result in equipment damage and or failure, injury to property, risk of serious bodily
injury, and or death.
Page 3 of 26
Page 4
around the VPL of a procedure or potential hazard resulting in an unsafe operating condition which could lead
to severe injury or fatality of occupant and or others. Refer to section 4 for images of the labels that should be
found on the VPL. Maintaining all labels and manuals in legible condition is required by the VPL owner and is
essential for safe VPL operation. Contact your dealer for additional information, for replacement labels and
manuals, or to schedule any needed inspections, repairs or service.
Illumination: A minimum illumination at the landing edge of the floor with the landing door open of not less than
50 Ix (5 fc).
Illumination of at least 100 lx shall be provided:
(a) at the drive unit in the location where periodic maintenance and inspection are required;
(b) on the carriage at the seat or platform surface and at the operating devices; and
(c) at the floor level of landing/loading points.
For proper warranty coverage, contact your dealer.
Keep all protective coverings in place, unless servicing the VPL.
The VPL warranty is not transferable.
Attempting to tamper with or modify any portion of the VPL will void your warranty.
Except as described elsewhere in this manual, maintenance must only be performed by qualified technicians.
Contact your dealer to schedule any needed inspections, repairs or service.
Caustics, high alkaline detergents and solutions should not be used to clean aluminum.
There are two holes in the tower used for mounting the guard ramp activating bar which do not have
fasteners in them. This is normal since the guard ramp activating bar can be mounted on either side.
Alkaline based detergents should not be used to clean your VPL.
Calcium chloride is often used to deice and prevent ice from forming on roads. Used properly,
this may be useful to help rid or keep your VPL platform free of frost, ice and snow.
If using a deicing or ice preventing agent, such as Calcium chloride, always check that
the platform is free of ice before using it. Calcium chloride may not always be effective in
removing frost, ice and or snow.
If the VPL was cleaned with soap, rinse all soap from VPL and let VPL dry before using.
Use extra caution while on the VPL platform and guard ramp surfaces are icy or wet.
If cleaning with water, turn off VPL and unplug the AC power before cleaning.
Do not operate VPL if the safety pan is malfunctioning. Contact your dealer immediately, or call
our Technical Support line at 1-800-332-1381, or visit us on the internet at www.ezaccess.com.
SECTION 2 - MAINTENANCE AND SERVICE
1. Except as described elsewhere in this manual, maintenance must be performed only by qualified
technicians. Contact your dealer with questions or to schedule any needed inspections, repairs or service.
2. Annual inspections by a qualified technician are highly recommended to help prevent unsafe conditions
and operation. Contact your dealer with questions or for additional information, to request replacement
labels or manuals, or to schedule any needed inspections, repairs or service.
3. A visual inspection of all bolts and nuts to be sure that they are securely in place must be done by the user
before using. If there are any missing or damaged fasteners or other components, they need to be
replaced by a qualified technician to ensure continued safe operation. Contact your dealer with questions
for additional information, to request replacement labels or manuals, or to schedule any needed
inspections, repairs or service, or call our Customer Service line at 1-800-451-1903, or visit us on the
internet at www.ezaccess.com.
4. Keep the VPL platform free of debris. Sweeping to clear these areas regularly enough to prevent debris
accumulation is required. Wiping with a damp cloth should be sufficient for additional surface cleaning. If
needed, a soft brush with mild soap and water can be used on the platform and guard ramp surfaces.
5. If the platform and guard ramp surface are covered with frost, ice and or snow, remove frost, ice and or
snow before using the VPL.
6. Periodically check and ensure that the safety pan under the platform moves freely up and down and is not
damaged. This is the built in safety device designed to detect obstructions under the platform and stop
platform downward motion.
Page 4 of 26
Page 5
SECTION 3 - DEALER CONTACT INFORMATION
DEALER NAME:
ADDRESS:
TELEPHONE:
INTERNET:
If you need additional assistance, please or call one of the numbers below.
Customer Service: 1-800-451-1903 VPL Technical Support: 1-800-332-1381 Internet: www.ezaccess.com.
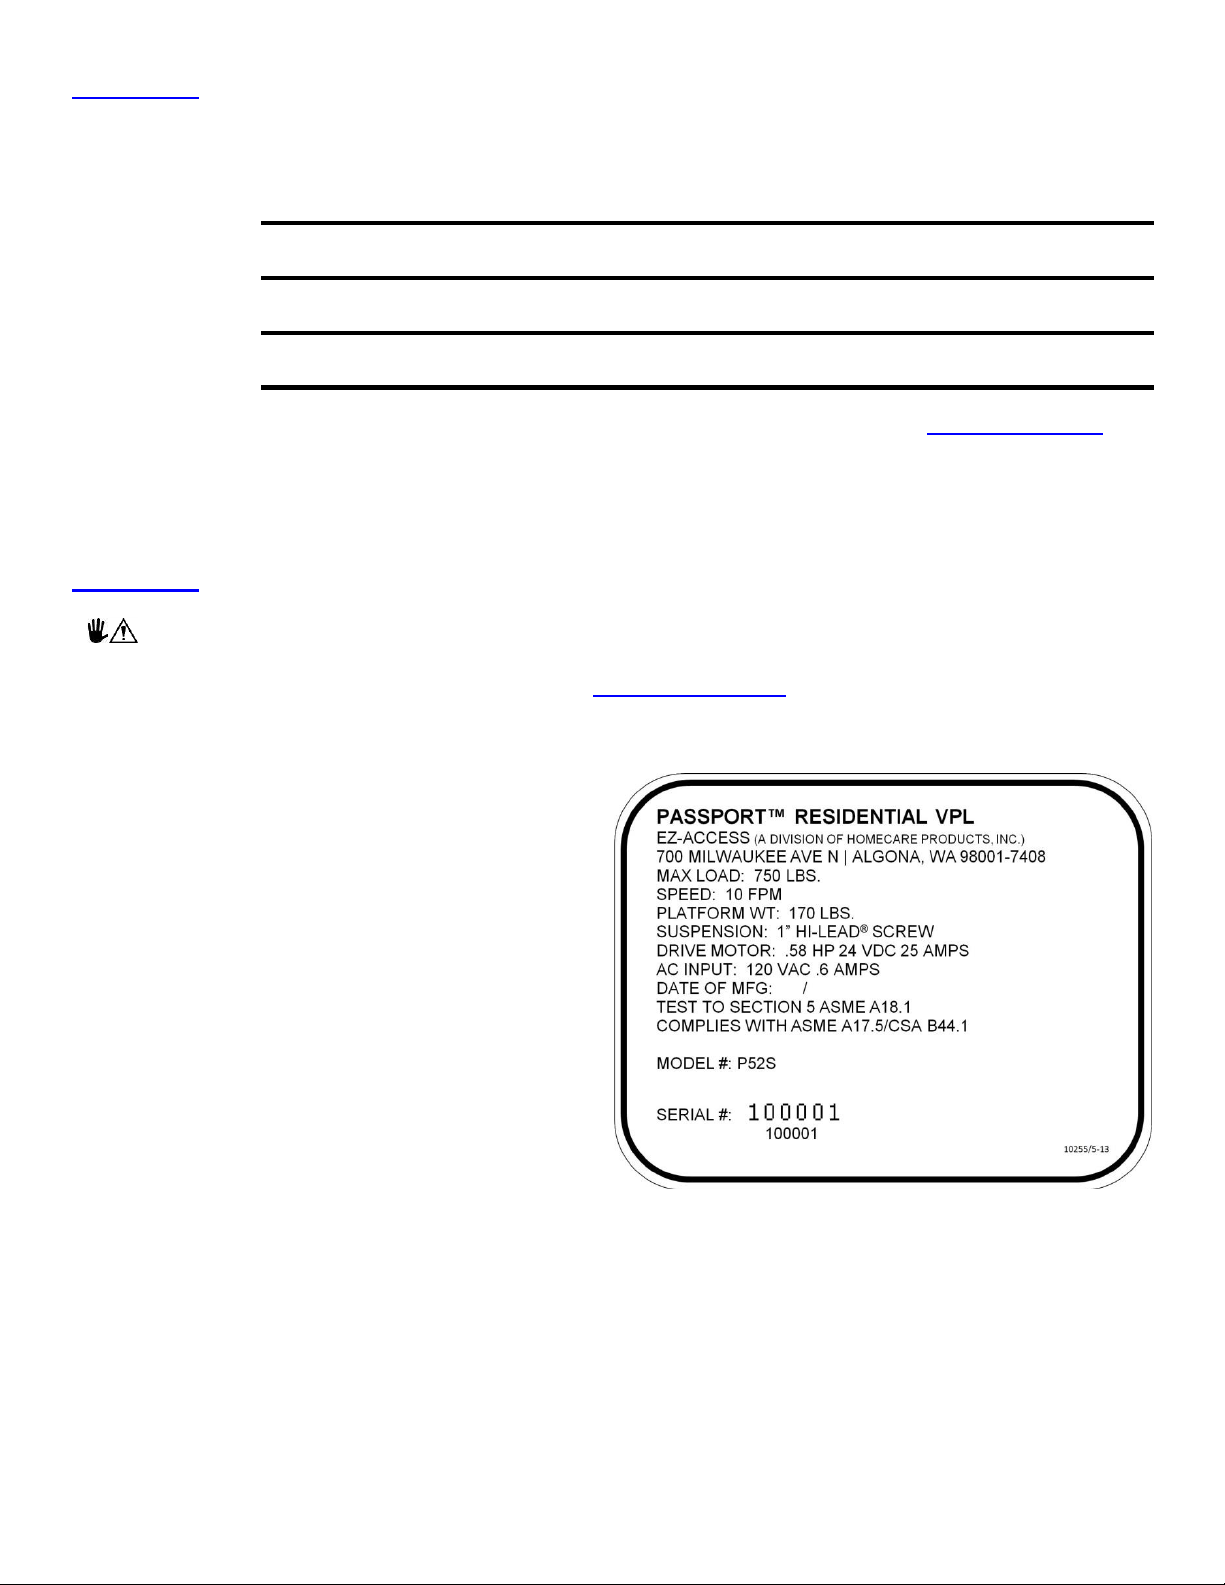
FIG. 4.1 Represents the Serial Number label.
This label contains important information you will need
when talking with your dealer about VPL options,
service and other questions you may have.
To assure you the best possible service, please be
sure to have the Model and Serial Numbers for your
VPL available when you call for technical assistance.
FIG. 4.1
FIRST POINT OF CONTACT SHOULD BE YOUR DEALER.
SECTION 4 - LABELING
The illustrations in this section represent labels affixed to the VPL. If any labels are missing or
otherwise not legible, please contact your dealer for replacements, or call our Customer Service line at
1-800-451-1903, or visit us on the internet at www.ezaccess.com.
Page 5 of 26
Page 6
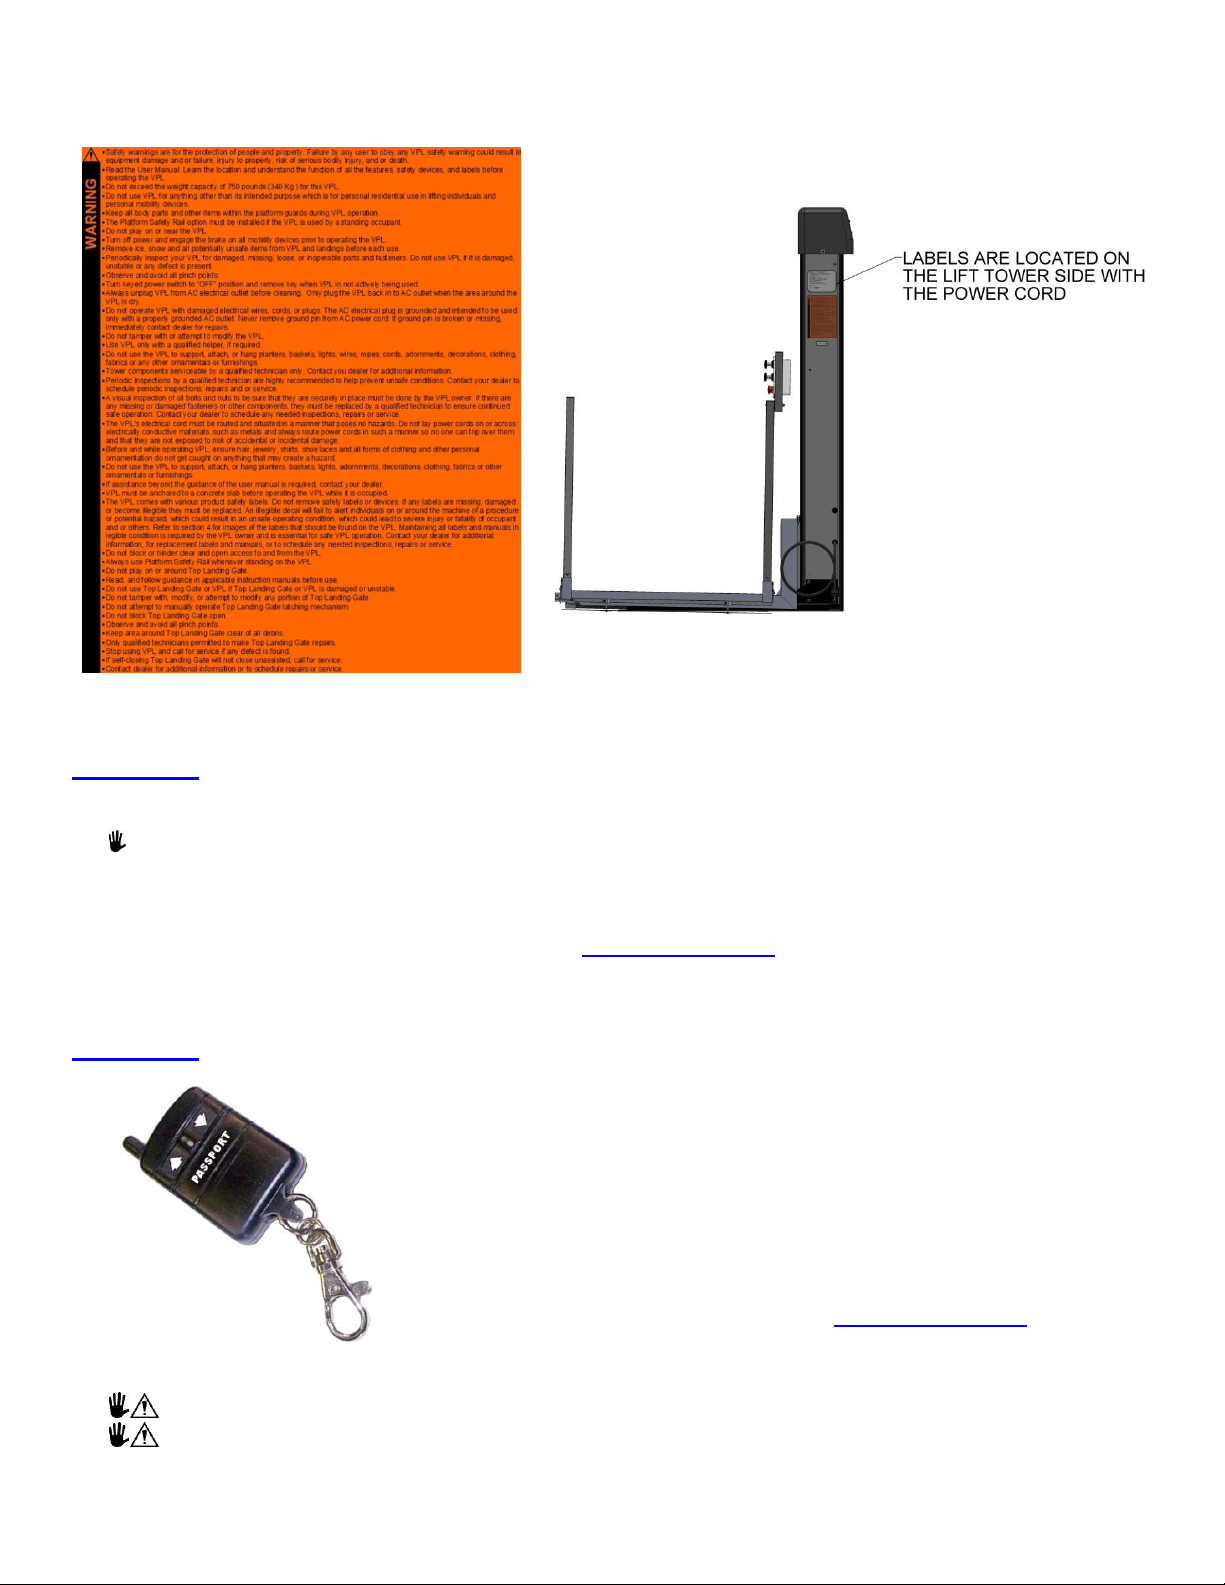
FIG. 4.2 is a depiction of the VPL Standard Safety Label. Your Standard Safety Label will be larger.
FIG. 4.2
FIG. 4.3
The Wireless Remote transmitter FOB (or keyfob) allows operating the
VPL from remote locations, i.e., inside your house or vehicle. To provide
you with all the versatility and coverage you need, the Wireless Remote
option and the Call/Send Control option can be used together.
Need another FOB or a replacement? Additional FOB transmitters are
available. Multiple FOB transmitters are available. For additional
information, please contact your dealer, call our Customer Service line at
1-800-451-1903 or visit us on the internet at www.ezaccess.com.
FIG. 6.1
Do not allow unauthorized persons to use the VPL Wireless Remote transmitter FOB.
Always confirm the area around the VPL is clear of people, animals, and debris before activating
the Wireless Remote transmitter
SECTION 5 – OPTIONAL EQUIPMENT NOTICE
VPL Options are sold separately. Options do not come with a standard VPL.
Check your local codes to determine if your Authority Having Jurisdiction (AHJ) requires installment of
any specific options.
If you would like additional information on any options, please contact your dealer, call our Customer
Service line at 1-800-451-1903 or visit us on the www.ezaccess.com.
SECTION 6 - OPTIONAL EQUIPMENT - WIRELESS REMOTE
Page 6 of 26
Page 7

PROGRAMING YOUR WIRELESS REMOTE TRANSMITTER(S) AND RECEIVER
Your wireless remote comes pre-programmed for your VPL. Replacement and additional wireless remotes may
need programming. Below, and included with each new/replacement wireless remote, is the procedure for
wireless remote programming.
PROGRAMMING INSTRUCTIONS:
Each keyfob transmits its own unique internal address whenever a button on the keyfob is pressed. The
receiver needs to be programmed to respond to the keyfob transmitter it operates with. The following steps
configure the receiver to operate with a keyfob transmitter.
Up to twelve keyfob transmitters can be programmed to one receiver. Please read the entire programming
procedure before starting. Prior to programming the receiver, verify the receiver is connected to the input
power and the long-range antenna is installed into the connector on the receiver. When the receiver enters
program mode, all previously programmed transmitter addresses will be erased.
1. Locate the pushbutton labeled "PROGRAM" on the receiver. Press and hold this button until the red
LED next to the program button illuminates (approximately 5 seconds). The receiver is now in the
transmitter program mode. Release the blue button. At this point all previously programmed transmitter
addresses are erased from the receiver's memory.
2. Press either button on the keyfob transmitter and verify the red LED on the receiver extinguishes and
then illuminates (blinks once). Release the button.
3. Repeat previous step for additional key fob transmitters that will operate with this particular receiver.
The red LED on the receiver will extinguish and illuminate one time for the first transmitter being
programmed, twice for the second, three times for the third, four times for the fourth etc. The receiver
will not respond to transmitters that have already been programmed.
4. If no transmitter switch is pressed for 5 seconds, the receiver will return to normal operation. The red
LED on the receiver will blink rapidly then extinguish. The receiver is now ready for use.
The receiver remembers its programming even if power is disconnected.
Page 7 of 26
Page 8
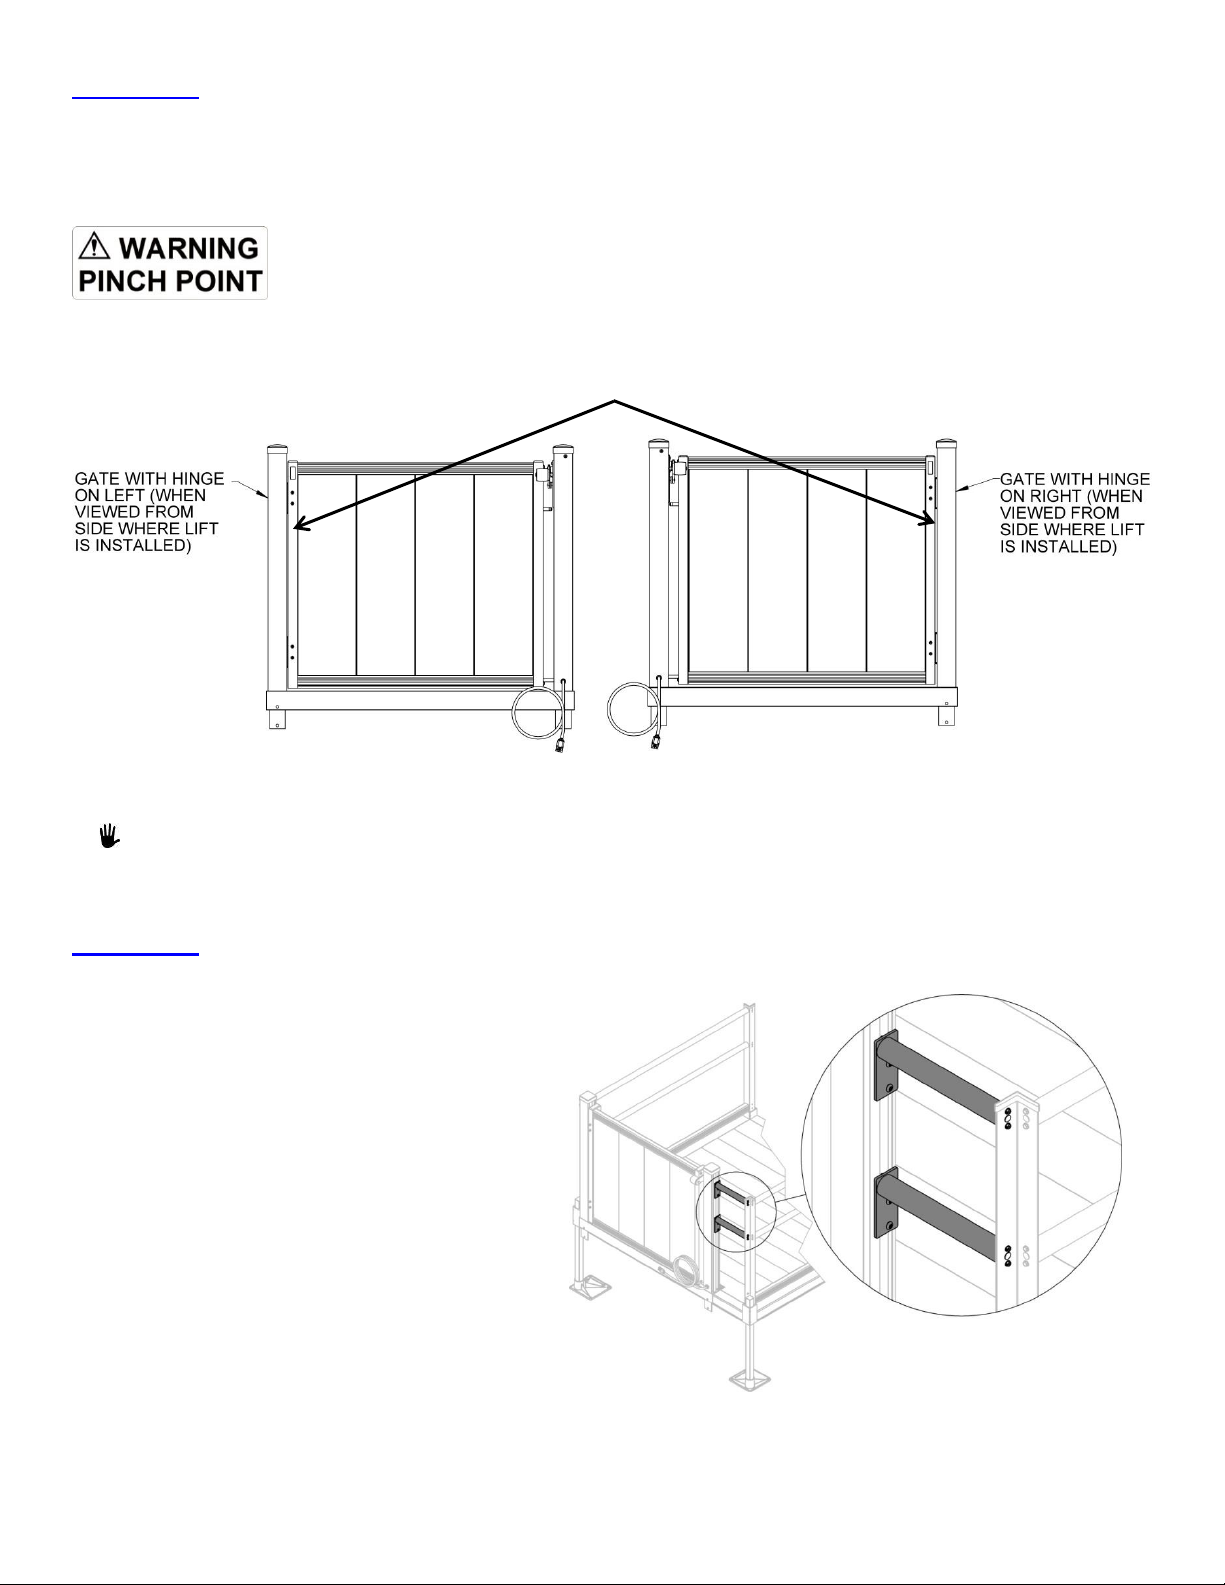
SECTION 7 - OPTIONAL EQUIPMENT – TOP LANDING GATE
Left is an illustration of the “PINCH POINT” warning label affixed to your Top Landing
Gate. VPL owner is responsible for maintaining this label in a legible condition. If you
need replacement labels, please contact your dealer.
FIG. 7.2
FIG. 7.3
Illustrated on the right is the Pathway
Connector Kit. This option is designed to
quickly and easily connect a Top Landing Gate
to a Pathway platform.
FIG. 8.1
The Top Landing Gate, illustrated in below, is designed with your safety in mind. The Top Landing Gate is
used to control the access between the VPL and your upper landing, porch or deck and may be required by
your local building codes. Be sure to check with your dealer regarding applicable building code requirements.
FIG. 7.1
PINCH POINTS
The Top Landing Gate comes in configurations with the hinges on either the Left or Right.
SECTION 8 - TOP LANDING GATE OPTIONAL EQUIPMENT - PATHWAY CONNECTOR KIT
Page 8 of 26
Page 9

SECTION 9 - TOP LANDING GATE OPTIONAL EQUIPMENT - DECK CONNECTOR KIT
FIG. 9.1
The Platform Safety Rail, pictured at
left, option is required to be used by
anyone standing on the VPL.
The Platform Safety Rail is designed exclusively
to provide additional personal stability for those
standing on the VPL.
FIG. 10.1
FIG. 9.1 illustrates the Deck Connector Kit, which is designed to quickly and easily connect a gate post to a
deck.
SECTION 10 - OPTIONAL EQUIPMENT - PLATFORM SAFETY RAIL
Page 9 of 26
Page 10

SECTION 11 - OPTIONAL EQUIPMENT - PLATFORM SAFETY PAN WEATHER GUARD
The Platform Safety Pan Weather
Guard, at right, helps keep the Safety
Pan free of debris.
The Platform Safety Pan Weather
Guard option is made of durable
materials and installs quickly by
simply clipping onto the Safety Pan.
FIG. 11.1
FIG. 12.1
FIG. 12.2
SECTION 12 - OPTIONAL EQUIPMENT - INTERLOCK
A VPL altered to operate with an Interlock, will not operate correctly if connected to a Top Landing Gate.
When using an Interlock, the door must always swing away from the lift regardless of hinge location.
Left Hand or Right Hand Interlock must be specified at the time you place your order for the optional
Interlock. Determine whether the door handle is on the left or right when looking at the door from the VPL
platform before ordering. FIG. 12.1 & 12.2 illustrate the Left Hand and Right Hand and Interlocks.
Page 10 of 26
Page 11

SECTION 13 - OPTIONAL EQUIPMENT - CALL/SEND CONTROL
Multiple Call/Send Controls
can be used with the VPL.
This allows you to “call” the
platform from multiple
locations. (FIG. 13.1)
From the bottom of the
stairs, or landing; simply
press the DOWN button and
the platform descends.
From the top landing, deck,
or porch; simply press the
UP button and the platform
ascends.
FIG. 13.1
FIG. 14.1
SECTION 14 - OPTIONAL EQUIPMENT - CALL/SEND CONTROL MOUNTING KIT
The Call/Send Control Mounting Kit (FIG. 14.1) option is required to quickly attach your Call/Send Control to
your Top Landing Gate post. Multiple Call/Send Controls can be used on the VPL.
The Call/Send Control Mounting Kit can only be installed on the post opposite the hinge. Please contact
your dealer if you have any questions or need additional assistance, or call our Customer Service line at 1-800451-1903 or visit us on the internet at www.ezaccess.com.
Page 11 of 26
Page 12

SECTION 15 - FEATURES
The AC power cord must be connected to a grounded and polarized receptacle.
One “cycle” is the VPL moving up-and-down once or down-and-up once.
VPL cycles and recharge times are highly dependent on outside temperatures and loads.
Low temperatures decrease battery performance and increase charging time.
FIG. 15.1
(VPL Operator Control Panel Features)
Removing the key from the keyed power switch does not disconnect power to the battery
charger. The only way to disconnect power to the battery charger is to unplug the VPL from
the AC outlet.
DESCRIPTION OF FEATURES
1. Power
a. The VPL operates on 24 volts DC power supplied by two 12VDC, 12AH (amp hour) batteries. The
batteries are charged by a built in “smart charger.” Household power (120VAC) is used to operate
the charger and is supplied by an outdoor rated 12’ power cord. AC power requirements are low,
less than ½ amp at 120VAC.
b. In the event of a power failure, the VPL is designed to operate approximately 20 cycles on battery
power before recharging the batteries is required.
c. The batteries require approximately 6 hours to fully charge if totally discharged.
2. Control Panel
a. The VPL Operator Control Panel incorporates operational controls as well as function indicator
lights. Control functions and features are as follows:
b. Keyed Power Switch: When turned to the Power On position, the keyed power switch permits VPL
operation. When turned to the Power Off position the VPL will not ascend or descend.
c. The key is removable in both the On and Off positions. If AC power is disconnected from the VPL,
leaving the key in the On position will discharge the batteries over about 7 days. The batteries will
charge with the key switch in either the On or Off position provided the unit is plugged into AC
power.
Page 12 of 26
Page 13

d. Up and Down Buttons: The force needed to operate these push buttons is minimal. The VPL
It is normal for most of the indicator lights not to illuminate unless either the Up or Down
buttons are pressed.
To disconnect power to the battery charger you must unplug the VPL from the AC outlet.
If the unit does not stop at the correct height and the ENTER/EXIT indicator light is on, the
VPL’s travel limit switches require inspection by a qualified technician.
If a Top Landing Gate is not included in the installation, this indicator light will not
function.
Service is required! Call our VPL Technical Support line at 1-800-332-1381.
platform will travel upward by pressing and holding the Up button in. The VPL platform will travel
downward by pressing and holding the Down button in. The VPL will stop moving if a button is not
pressed in continually.
e. Emergency Stop Button: Pressing the Emergency Stop button will remove power ONLY to the
motor controls. This will stop VPL from moving up or down. The Emergency Stop Button must be
pulled back out to reset for continued operation.
3. Indicator lights
a. The control panel also features a series of bright blue LED indicator lights. These lights are
designed to indicate normal operation as well as alert the user to potential problems. The blue LED
indicator lights are set into green, yellow and red backgrounds on the control panel.
Lights in the green background indicate normal operation modes.
Lights in the yellow background indicate conditions which may be corrected by the user.
Lights in the red background may require repair by a qualified technician.
The VPL will not operate if any of the lights in the yellow or red fields are illuminated.
b. Blue LED indicator lights in the GREEN background:
ON (POWER) indicates the keyed power switch is turned to the On position. This verifies the unit
UP and DOWN: Indicates when either the Up or Down button is pressed. These indicate the up
ENTER/EXIT: Indicates the platform has reached either the lower or upper landing position.
is powered for operation.
or down portions of the controls are activated.
c. Blue LED indicator lights in the YELLOW background:
EMERGENCY STOP: Indicates when either the Up or Down button is pressed and the
Emergency Stop button has been pushed in. The VPL will not operate in this condition. Pulling
the emergency stop button back out will clear the condition and allow VPL operation to continue.
TOP LANDING GATE: Indicates the Up or Down buttons are pushed and Top Landing Gate is
open or not latched. The VPL will not operate in this condition. Closing and latching the Top
Landing Gate will clear the condition and allow VPL operation to continue.
OBSTRUCTION: Indicates the Down button is pushed and an object is detected underneath the
platform. In this condition the unit can only operate in the upward direction. Removing the object
will clear the condition and allow downward travel to proceed.
d. Blue LED indicator lights in the RED background:
OVERLOAD: Indicates motor is drawing excessive current and causing the automatic circuit
breaker to trip. The automatic breaker will reset after a few minutes. This indicates an abnormal
mechanical or electrical condition. If the problem persists, service by a qualified technician is
required.
SERVICE REQUIRED: Lights if either the Up or Down button is pushed and unit has detected a
potentially unsafe condition in the drive system. The VPL can only be operated downward in this
condition.
Page 13 of 26
Page 14

4. Guard Ramp
Do not exceed the VPL’s weight capacity of 750 Lbs.
Use VPL with a qualified helper if required.
Do not use VPL for anything other than lifting people and mobility equipment.
Do not operate VPL if it appears damaged.
Never tamper with or attempt to bypass any control sensors or switches. Doing so can result
in creating a dangerous situation and will void your warranty.
a. The standard VPL is supplied with a 24” Guard Ramp which can be assembled on either end of the
platform allowing access to the VPL from either side. The Guard Ramp operation is automatic.
When the VPL rises, the ramp will fold upward providing a safety measure to help prevent
accidental travel off the platform while the VPL is moving.
5. Obstruction Detection
a. The VPL is supplied with a Safety Pan which is designed to detect an object or obstruction under
the platform and stop downward travel when it comes into contact with the Safety Pan. The VPL will
still be operational in the upward direction, but the object or obstruction must be cleared to resume
downward travel.
6. Emergency Crank
a. In the event of a loss of AC power and the batteries have been fully discharged, the VPL may be
operated up or down using a manual hand crank. This crank is attached inside the power head
cover. As an alternate, a 5/16” hex driver bit on a powered drill can be used to drive the unit up or
down. Refer to Section 17 for additional information on the emergency hand crank before using.
SECTION 16 - OPERATING INSTRUCTIONS
1. Read, understand and observe all safety warnings, notes and recommendations throughout this
manual.
2. UPWARD TRAVEL:
a. Be sure to have a straight, direct path on to the Guard Ramp and Platform.
b. Move far enough onto the center of the Platform to allow the Guard Ramp to fold upward without
contacting the mobility device.
c. Ensure the mobility device and all body parts are completely on the Platform and within the Guard
Walls and off of the Guard Ramp.
d. Verify no part of the mobility device, body parts, or other items extend beyond the platform.
e. Once properly situated on the Platform, turn off power and ensure the brakes are properly set on
the mobility device. (Contact manufacturer of your particular mobility device for assistance).
f. Rotate the keyed power switch to Power On position. The blue LED indicator light in the GREEN
background should now be illuminated.
If you want to travel up, press and hold the UP button. The VPL will operate in the upward
direction and the UP indicator light will illuminate.
g. Continue pressing the up button until the VPL stops automatically at the upper landing. The
ENTER/EXIT indicator LED light should illuminate at this time. Release the Up button.
Page 14 of 26
Page 15

h. Verify the platform and the top landing levels are within 1/2” of each other.
If the platform and the top landing levels are not within 1/2” of each other, do not attempt to
exit the VPL at this time. Raise or lower the VPL until the top landing levels are not within 1/2”
of each other before exiting the platform. If the problem persists, contact you dealer to
schedule any needed inspections, repairs or service.
If desired, you can now turn the VPL keyed power switch key to the Power Off position prior
to exiting
If your installation includes the optional Top Landing Gate: Once the Platform has reached
the upper landing, the Top Landing Gate will automatically unlatch, allowing the gate to open.
The Top Landing Gate is spring loaded and will close by itself once you have passed
through.
The platform must be properly positioned at the upper landing height before the VPL gate can
be operated.
Do not attempt to release the Top Landing Gate latching mechanism manually.
i. Turn the power back on to your mobility device, release the mobility device brakes and travel off the
Platform onto the upper landing.
3. DOWNWARD TRAVEL:
a. If the platform is in the upper landing position the optional Top Landing Gate should swing open by
pulling on it. If the Top Landing Gate does not swing open freely this could be an indication that the
VPL platform may not be at the required height.
b. Open the Top Landing Gate and carefully travel onto the platform. Travel far enough that the
mobility device and all body parts are completely on the VPL platform and the Top Landing Gate
will close fully and latch.
c. Turn off power and ensure the brakes are securely set on the mobility device. (Contact
manufacturer of your particular mobility device for assistance).
d. Rotate the keyed power switch to Power On position. The blue LED indicator light in the GREEN
background should now be illuminated.
e. Press and hold the DOWN button. The VPL will begin moving in the downward direction and the
DOWN indicator light will be illuminated.
f. Continue pressing the DOWN button until the VPL stops automatically at the lower landing. The
ENTER/EXIT indicator LED light will now illuminate. Release the DOWN button.
g. Verify the guard ramp has folded to the down position and is resting on the lower landing surface.
h. Turn the power back on to your mobility device, release the mobility device brakes (contact the
manufacturer of your particular mobility device for assistance) and travel off the Platform onto the
lower landing.
Page 15 of 26
Page 16

4. OPTIONAL CALL/SEND CONTROL
The VPL can be operated in either direction regardless of where the Call/Send Control is
located.
The keyed power switch on the Control Panel must be in the Power On position to operate
the optional VPL with the Call/Send Control.
Do not lay cords on electrically conductive materials, such as metals.
Do not pull on cables.
Route cords so no one can trip over or be entangled in them.
Route cords so they are not exposed to risk of damage.
Remote calls must be mounted in accordance with applicable codes and in safe locations.
CALL/SEND CONTROL
FIG. 16.1
Failure to unplug the VPL from AC power, as described, could result in serious injury or death.
Do not pull on power cables.
Route cords so no one can trip over or be entangled in them
Route power cords so they are not exposed to the risk of damage.
The power cable must be plugged into properly grounded GFCI outlets only.
It takes 28 turns to move the VPL platform 1”. For faster movement of the VPL platform, a
battery or corded power drill with the correct socket may be used instead of the hand crank to
drive the motor shaft.
a. The remote call is an option. Unless you ordered this as an option, it is not included with a standard
VPL. This optional device features remote UP and DOWN buttons.
SECTION 17 - EMERGENCY OPERATION
EMERGENCY OPERATION
1. A speed handle wrench (hand crank) and a 5/16” socket are included with the VPL to allow the platform
to be moved up and or down in the event of power loss to the VPL motor. The crank is stored inside the
cover of the power head.
2. To use the crank, first turn the keyed power switch to the Off position.
3. Unplug the VPL from AC power to avoid accidental starting and potential injury.
4. Remove the power head cover from the top of the VPL tower by removing the bolts on both sides of the
cover (FIG. 17.1).
5. Disconnect the white ground wire from the battery terminal (FIG. 17.2).
6. Remove the crank from inside the power head cover.
7. Place the 5/16” socket onto the drive of the motor and crank to move the VPL. Cranking clockwise
(CW) when facing the hex drive end of the motor will raise the platform and cranking counter clockwise
(CCW) will lower the platform (FIG. 17.3).
Page 16 of 26
Page 17

8. If the VPL is occupied at the time of failure, allow the passenger to safely exit prior to determining the
Always keep the hand crank inside the power head cover so it is available during emergency
situations.
FIG. 17.1
FIG. 17.2
possible cause.
9. Place the hand crank back inside the power head cover and secure the cover with the two bolts
removed in Step 4 above.
10. If unit has failed due to power loss, do not operate until a qualified technician has serviced the VPL.
Contact your dealer to schedule any needed inspections, repairs or service.
FIG. 17.3
Page 17 of 26
Page 18

SECTION 18 - SPECIFICATIONS
MODEL #:
PL52SP3651
PL52TP3860
PL72SP3651
PL72TP3860
TOWER WEIGHT:
216 lbs. (98 kg)
216 lbs. (98 kg)
247 lbs. (112 kg)
247 lbs. (112 kg)
PLATFORM WEIGHT:
168 lbs. (76 kg)
160 lbs. (73 kg)
168 lbs. (76 kg)
160 lbs. (73 kg)
NET WEIGHT:
384 lbs. (175 kg)
376 lbs. (171 kg)
415 lbs. (189 kg)
407 lbs. (185 kg)
TOWER HEIGHT WITH LEGS:
76-1/8” (1931 mm)
76-1/8” (1931 mm)
96-1/8” (2439 mm)
96-1/8” (2439 mm)
TOWER WIDTH WITH LEGS:
33-3/8” (84 cm)
33-3/8” (84 cm)
33-3/8” (84 cm)
33-3/8” (84 cm)
HEIGHT AT MAXIMUM TRAVEL:
97-9/16” (2464 mm)
97-9/16” (2464 mm)
117.75” (299.085 cm)
117.75” (299.085 cm)
PLATFORM “USEABLE” SIZE:
50.75” x 36”
(1289 mm x 914 mm)
59.75” x 36”
(1518 mm x 914 mm)
50.75” x 36”
(1289 mm x 914 mm)
59.75” x 36”
(1518 mm x 914 mm)
FOOTPRINT (RAMP DEPLOYED):
76" X 56"
(1930 mm x 1422 mm)
89" X 56"
(2261 mm x 1422 mm)
76" X 56"
(1930 mm x 1422 mm)
89" X 56"
(2261 mm x 1422 mm)
LANDING TO LANDING LIFTING
HEIGHT:
52”
(132.08 cm)
52”
(132.08 cm)
72”
(182.88 cm)
72”
(182.88 cm)
SPECIFICATIONS UNIVERSAL TO MODELS PL52SP3651, PL52TP3860, PL72SP3651 AND PL72TP3860
MOTOR:
.58 HP 24VDC
CONTROL VOLTAGE:
12 VDC
AC POWER REQUIREMENTS:
120 VAC @ .5 Amps
BATTERY CHARGER:
2 Amp
EMERGENCY OPERATION:
Manual hand crank
DRIVE SCREW LUBRICATION:
Chevron Ulti-plex® Synthetic Grease EP, NLGI Grade 1.5
FIG. 18.1
FIG. 18.2
FIG. 18.3
FIG. 18.4
TABLE 18.1
AC POWER Use ONLY properly installed GFCI receptacles, seen FIG. 18.1 for example.
A correctly functioning AC Diagnostic Plug should indicate one of the following three situations:
Green LEDs indicate proper ground continuity and power status (FIG. 18.2).
Red LEDs indicate ground continuity loss or reversed polarity (FIG. 18.3).
No LED indicates open hot, open neutral, or hot to ground cross (FIG. 18.4).
Page 18 of 26
Page 19

SECTION 19 - TROUBLESHOOTING
Comments:
Comments:
The fuses supplied with the
unit are equipped with LED
indicator lights which
illuminate when the fuse is
blown.
Comments:
Under normal operating
conditions the automatically
resetting breaker (which
supplies power to the VPL
motor) should not trip.
Operating the VPL in an
overloaded weight condition,
mechanical or electrical
issues can cause the
breaker to trip. The breaker
will reset by itself within 1-5
minutes.
Solution:
See “Batteries
Discharged.”
Solution:
Remove the Power Head
Cover and locate fuse #1
(FIG. 19.1). If the fuse
has blown the indicator
light on fuse should
illuminate when the
keyed power switch is in
the Power On position.
Replace the fuse with a 5
amp.
Solution:
Allow unit to sit a few
minutes. The auto reset
breaker should
automatically reset and
the unit should be
operational. If the
breaker does not reset or
continues tripping after
resetting a number of
times, service by a
qualified technician is
required. Consult your
dealer for service
information.
Potential
Cause:
1) Batteries have
discharged.
Potential
Cause:
2) Control panel
power fuse
blown.
Potential
Cause:
Auto reset
breaker has
tripped.
Symptom:
VPL will not operate
and power indicator
light on the Control
Panel does not
illuminate when the
keyed power switch is
turned to the Power
On position.
Symptom:
VPL will not operate
and power indicator
light on the Control
Panel does not
illuminate when the
keyed power switch is
turned to the Power
On position.
Symptom:
VPL will not operate.
Power indicator light
on control panel
illuminates when
keyed power switch is
in the Power On
position and the
overload indicator
illuminates.
Button
Pressed:
UP or
DOWN
Button
Pressed:
UP or
DOWN
Button
Pressed:
UP or
DOWN
Control Panel Display: Control Panel Display: Control Panel Display:
Page 19 of 26
Page 20

Comments:
Up and Down travel is
controlled by limit switch trigger
ramps which trip a series of
switches incorporated into the
carriage. The downward limit is
set at the lowest position and
the upper limit set at maximum
possible height at the factory.
The upper limit is then adjusted
to the required upper landing
height during installation.
Comments:
This is a normal condition and
indicates the proper operation
of the safety pan. A buildup of
leaves or snow can cause this
condition and requires removal
before VPL will operate
correctly.
Comments:
The latch is spring loaded and
will normally rotate into the fully
closed position as the VPL
travels downward and the roller
loses contact with the platform
side wall. If the latch if not fully
closed when the VPL has
traveled down approximately
2", the latch monitor switch will
stop the VPL operation and the
Top Landing Gate indicator
light will illuminate.
Solution:
Adjust upper limit trigger
ramp as needed. Refer to
the VPL Installation Manual.
This adjustment should only
be made by a qualified
technician. Consult your
dealer for service related
information.
Solution:
Run VPL upward, remove
object below platform and
resume operation.
Solution:
Assure latch rotates freely.
Check for damage which
prevents latch from
operating, check that catch
rod on Top Landing Gate
aligns properly with latch. If
latch or catch rod are
damaged they may need to
be replaced. Consult your
dealer for additional
information. WARNING: Do
not operate VPL while
handling the latch.
Potential
Cause:
Upper limit switch
trigger ramp is out
of adjustment
Potential
Cause:
Object underneath
platform contacting
safety pan and
stopping downward
travel
Potential
Cause:
Top Landing
Gate latch is
not rotating to
the fully
closed
position
Symptom:
VPL stops above
or below upper
landing level and
Enter/Exit indicator
light illuminates.
Symptom:
VPL stops during
downward travel
and the
Obstruction light
illuminates when
down button is
pushed.
Symptom:
VPL will only travel
a few inches down
from upper landing
and Top Landing
Gate indicator light
illuminates when
the Up or Down
button is pushed.
Button
Pressed:
UP
Button
Pressed:
DOWN
Button
Pressed:
UP or
DOWN
Control Panel Display: Control Panel Display: Control Panel Display:
Page 20 of 26
Page 21

Comments:
The Top Landing Gate is closed
by spring loaded hinges which are
field adjustable to increase or
decrease closing force. If the Top
Landing Gate is not fully closed
the Top Landing Gate monitor
switch will stop the VPL operation
and the Top Landing Gate
indicator light will illuminate.
Comments:
This situation indicates the upper
limit is set a considerable distance
above its correct position. In order
to correct this adjustment the Top
Landing Gate Bypass Jumper will
need to be temporarily plugged
into the Top Landing Gate
connector so the Top Landing
Gate latch will not stop the travel
of VPL platform during adjustment.
If the jumper is not available, the
roller on the Top Landing Gate
latch can be removed temporarily
during adjustment so the latch is
not actuated.
Comments:
The EMERGENCY STOP
BUTTON disconnects power to
the motor and the VPL will not
operate when the button pushed
in.
WARNING: Pressing the
Emergency Stop Button/Button
DOES NOT disconnect power to
the battery charger. The only way
to disconnect power to the battery
charger is to unplug the VPL from
the AC outlet.
Solution:
Check for free swing operation of
the Top Landing Gate. Also check
that the spring tension on the
hinges is sufficient to fully close Top
Landing Gate. Adjust hinge spring
tension as needed. Check that the
Top Landing Gate latching
mechanism is in the correct position
so that the latch can fully close
around the catch rod. Refer to the
VPL Installation Manual Top
Landing Gate Placement and
Installation section for adjusting the
height of the latching mechanism
and Top Landing Gate.
Solution:
Unplug the Top Landing Gate from
the VPL and plug the Top Landing
Gate Bypass Jumper back into the
plug. Adjust the upper limit trigger
ramp as described in the installation
manual.
WARNING: This type of adjustment
must be done by a qualified
technician. Consult your dealer for
additional information.
Solution:
Pull the EMERGENCY STOP
BUTTON out to deactivate.
WARNING: Pressing the
Emergency Stop Button/Button
DOES NOT disconnect power to
the battery charger. The only way to
disconnect power to the battery
charger is to unplug the VPL from
the AC outlet.
Potential
Cause:
Top Landing
Gate is not fully
closed
Potential
Cause:
The upper limit
is out of
adjustment or
was set after the
Top Landing
Gate was
plugged into the
VPL.
Potential
Cause:
EMERGENCY
STOP BUTTON
is activated
(pushed in).
Symptom:
VPL will only
travel a few
inches down
from upper
landing and Top
Landing Gate
indicator light
illuminates when
the Up or Down
button is
pushed.
Symptom:
VPL stops
above or below
the upper
landing and Top
Landing Gate
indicator light
illuminates.
Symptom:
VPL will not
operate and the
EMERGENCY
STOP indicator
light is
illuminated.
Button
Pressed:
UP or
DOWN
Button
Pressed:
UP
Button
Pressed:
UP or
DOWN
Control Panel Display: Control Panel Display: Control Panel Display:
Page 21 of 26
Page 22

Comments:
The VPL is equipped with a
backup safety nut. This
feature allows the unit to
travel safely in the downward
direction only.
Solution:
Run VPL to the bottom of its
travel and exit the VPL platform.
Call for service immediately! DO
NOT attempt to operate the VPL
until repairs have been
completed by a qualified
technician. Consult your dealer
for service related information.
Potential
Cause:
Failure of the
primary hi-lead
screw nut.
Symptom:
VPL will not travel
upward and service
indicator light is
illuminated.
Button
Pressed:
UP
Control Panel Display:
Page 22 of 26
Page 23

COMMENTS
VPL performance falls off quickly at lower
temperatures. This is inherent to lead acid
batteries. Their ability to supply power and accept
a recharge is diminished as temperature falls.
This VPL is intended for occasional use. If the unit
is cycled too often the charger cannot recharge the
batteries between cycles. The motor can also
overheat. Several continuous cycles are
acceptable as long as the unit is allowed to rest for
45 minutes to one hour before operating. One full
up/down cycle requires approximately 10 to 15
minute for the charger to bring the batteries back to
their charge level before cycling. Colder
temperatures increase the recharge time
considerably.
This type of service must be done by a qualified
technician. Consult your dealer for service related
information.
Under normal temperatures and loads the VPL
should operate approximately 25 cycles before the
batteries become discharged when disconnected
from the 120VAC power source required to operate
the battery charger. The indicator light in the
charger will be red when the batteries are charging
and green once the batteries are fully charged.
NOTE: the lights on the charger can only be
viewed with the power head cover removed.
SOLUTION
See “Batteries Discharged”
Limit number of uses per day.
Limit number of uses per day.
Clean and lubricate the
hi-lead® screw
Plug VPL in, reset GFI (ground
fault interrupter) plug, turn on
or reset household circuit
breaker. Verify AC connections
and voltage in the junction box.
WARNING: The junction box
must be serviced by a qualified
technician. Consult your dealer
for service related information.
POTENTIAL CAUSE
Batteries have discharged
Very cold temperatures
Overuse
Lack of lubrication on the
hi-lead® screw
VPL has been disconnected
from power source
PROBLEM
Slow, erratic operation
Slow, erratic operation
Slow, erratic operation
Slow, erratic operation
Batteries discharged
Page 23 of 26
Page 24

COMMENTS
The charger incorporates both reverse polarity and
overload protection. The charger will reset once
the condition is resolved. It may take a few minutes
before the charger indicator light will come back
on. Conditions other than overload may require
diagnosis and repair by a qualified technician.
Consult your dealer for service related information.
The circuit between the battery charger and the
batteries is fused. The fuse has an LED indicator
which will light when the fuse has blown. Under
normal conditions this fuse should not blow. Look
for problems in the wires connected to the batteries
before replacing the fuse.
The service life of the batteries under normal
conditions is approximately three years. One
indication of a battery is near the end its service life
is that the VPL will operate one or two times
normally and then labor during additional cycles.
Cold weather will make this condition worse. A
newer defective battery will display much same
symptoms although other potential causes
described previously should be explored before
considering battery replacement.
SOLUTION
Green or red indicator on
charger will be illuminated if
charger is receiving
120VAC power. NOTE: the
lights on the charger can
only be viewed with the
power head cover removed.
Remove power head cover
and locate fuse #4 in the
fuse block (FIG 19.1). If the
fuse is illuminated it has
blown and needs to be
replaced.
Check battery age and
performance level. NOTE:
Performance level should
only be checked by a
qualified technician.
POTENTIAL CAUSE
The battery charger is not
operating
Battery charger fuse has blown
Batteries are defective or near
the end of their service life
PROBLEM
Batteries discharged
Batteries discharged
Batteries discharged
Page 24 of 26
Page 25

FIG. 19.1
FIG. 20.1
SECTION 20 - VPL MAIN COMPONENTS DRAWING
Page 25 of 26
Page 26

SECTION 21 - WARRANTY
Your VPL comes with a 2-year Limited Warranty. Contact your dealer with warranty questions,
additional information requested, for replacement labels and manuals, or to schedule any needed
inspections, repairs, or service. Your dealer contact information can be found in Section 3 of this
manual. Or you can call our Customer Service line at 1-800-451-1903 or visit us on the internet at
www.ezaccess.com.
Page 26 of 26
 Loading...