

EYEZONE B1080PX-2 User Manual
1
EYEZONE B1080PX-2
User Manual
Jul 29, 10
2
FCC Notices
It’s herewith confirmed to comply with the requirements of FCC Part 15 Rules. Operation is
subject to the following two conditions:
z This device may not cause harmful interference.
z This device must accept any interference received, including interference that may
cause undesired operation.
Note: This equipment has been tested and found to comply with the limits for a Class B
digital device, pursuant to part 15 of the FCC Rules. These limits are designed to provide
reasonable protection against harmful interference when the equipment is operated in a
residential installation. This equipment generated uses and can radiate radio frequency
energy and if not installed and used in accordance with the instruction manual may cause
harmful interference to radio communications. However, there is no guarantee that
interference will not occur in a particular installation. If this equipment does cause harmful
interference to radio of television reception, which can be determined by turning the
equipment off or on, the user is encouraged to try to correct the interference by one or more
of the following measures:
z Reorient or relocate the receiving antenna.
z Increase the separation between the equipment and receiver.
z Connect the equipment into an outlet on a circuit different from that to which the
receiver is connected.
z Consult the dealer or an experienced radio TV technician for help.
CE Declaration
This product has been assessed against the following Applicable Standards.
EN 55022:2006/A1: 2007(Class B) EN 55024: 1998/ A1:2001/ A2:2003
EN 61000-3-2: 2006 IEC 61000-4-2: 1995/ A1:1998/ A2:2000
EN 61000-3-3: 1995/ A1:2001/ A2:2005 IEC 61000-4-3: 2006
IEC 61000-4-4: 2004
IEC 61000-4-5: 2005
IEC 61000-4-6: 2006
IEC 61000-4-8: 2001
IEC 61000-4-11: 2004
Printed in Taiwan R.O.C.
All contents are subject to change without notice.
All trademarks are the property of their respective owner.
3
CONTENTS
1. Package Contents……………………..……………………….. 4
2. Introduction……………………………….……………………... 4
3. Features………………………………………….……………… 5
4. Hardware Overview…………………..………………………... 6
5. Remote Control…………………………..…………………….. 7
5.1 Entering Text or IP Address…………..…………………… 7
6. Start the B1080PX-2…..……………….………………………. 8
7. Setting Up……………………………………………………….. 9
7.1 Network Setup……………………..….……………………. 9
7.2 FTP Setup…………………………………………………… 14
7.3 Video Setup…………………………..…………………….. 16
7.4 Other Setup………………………………..……………….. 17
8. Using the B1080PX-2……….……………..…………………... 19
8.1 Play Media Files on the CF Card…………………………. 19
8.2 FTP Auto Download Function………………..……………. 22
8.3 RS-232 Function……………………………………..…….. 25
8.4 Log Function……………..…………………………..…….. 26
9. Http Command Function………….………………..………….. 27
9.1 Control………………….………………………..………….. 28
9.2 Network……………………….………………..………….. 29
9.3 Server……………………………………..……..………….. 30
9.4 Time……….………………………………………..……….. 31
9.5 Features……..……………………………………..……….. 32
10. Schedule Function……………....…..……..……….………….. 33
10.1 Install the Schedule Software…….……..……………….. 33
10.2 Start the Schedule Software…..……………...………….. 34
10.3 Apply the Schedule on the B1080PX-2…………..…….. 38
11. Optional Auxiliary Equipment……..……..………..………….. 39
11.1 Play-Button Box………………….……..………..……….. 39
11.2 Touch-Sensor Buttons…..…………………….………….. 40
12. Troubleshooting…………………………………..……………. 42
4
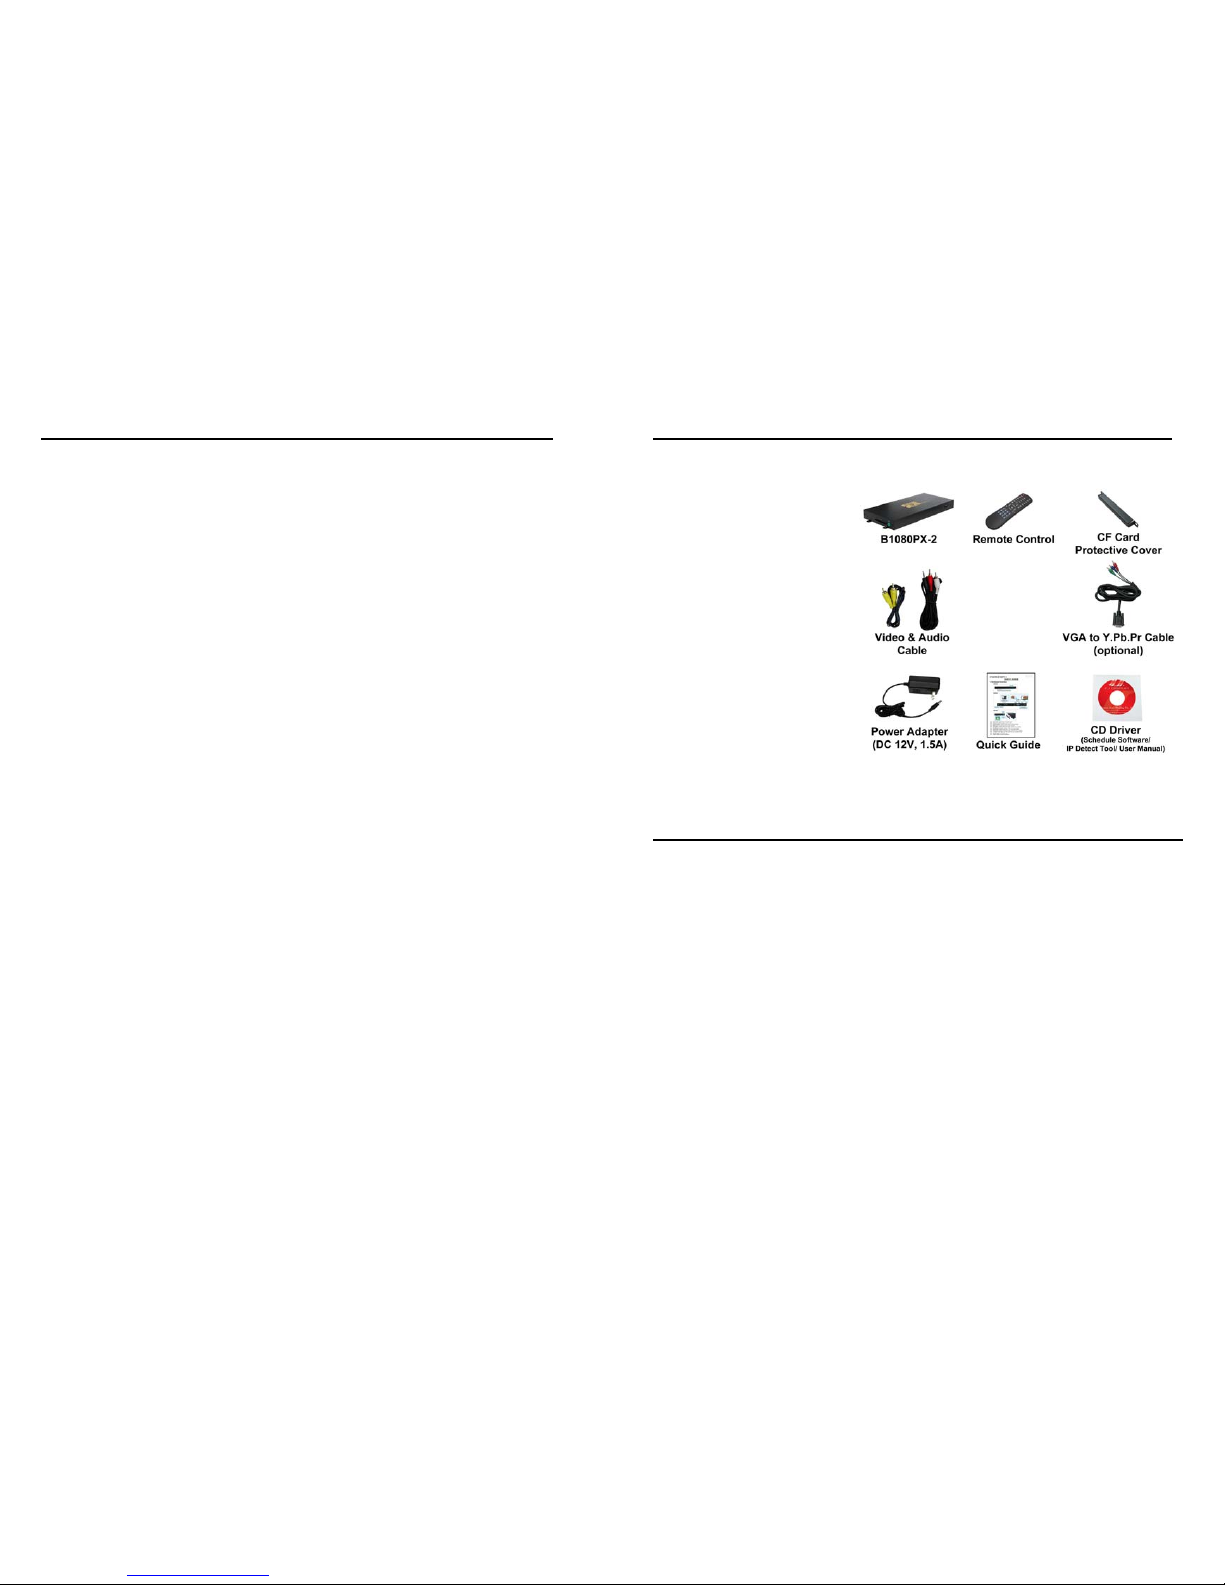
1. PACKAGE CONTENTS
1. B1080PX-2
2. Remote Control
3. CF Card Protective Cover
4. Video & Audio Cable
5. VGA to Y.Pb.Pr Cable (optional)
6. Power Adapter
7. Quick Guide
8. CD Driver
- Schedule Software
- IP Detect Tool
- User Manual
2. INTRODUCTION
The B1080PX Series is a high-class Digital Signage with high-end performance
(40Mbps). The advanced technology provides the smoothest and clearest image for playing
advertising contents. The B1080PX Series is one of the best stand-alone Digital Signage in the
world.
The B1080PX-2 is a full HD digital signage that plays media files from CF memory card
without a computer. The media files can be automatically updated at the specific time from an FTP
server.
By connecting to Video, Y.Pb.Pr, VGA (resolution up to 1360 x 768), HDMI (1080p) and
Audio, you can play the media contents on any display device for advertising, presentations,
training and other media applications.
5
3. FEATURES
High-performance and high stability: With the same resolution and bit rate as Blu-ray players’.
The source of HD WMV9 MP@HL (Main Profile / High Level) supports resolution up to
1920x1080 (1080P) and the maximum bit rate is 40Mbps.
Supports multiple file formats: WMV9 and WMA.
Supports Video, Y.Pb.Pr, HDMI, VGA and Audio output.
HDMI Output: 480P/ 720P/ 1080i/ 1080P.
HDMI 1.1, 1.2 and 1.3 compliant.
VGA output supports resolution up to 1360x768.
Supports RS-232 port for computer control with ASCII command (play, stop, pause…etc).
Schedule Function: The B1080PX-2 will auto play the specific file at the specific date.
Supports Log Function which can record the file and time that was be played.
Connect using an Ethernet network cable at up to 100Mbps.
Supports CF memory cards. (Suggest using the high speed (150X) CF card)
Supports HTTP Control Function
Supports Auto Key Lock Function
Exports the Configuration Value: You can export the configuration value to the CF card.
The configuration value can be modified on your PC, and can be applied to the B1080PX-2 or
others.
Supports FTP Auto Download Function: Connect to Remote FTP server and download data to
the CF card automatically.
Play files and FTP Auto Download Simultaneously: The B1080PX-2 can play files while
downloading.
Embedded FTP Server.
Supports NTP Network (G.M.T) Timer.
Supports Universal Plug and Play (UPnP) and DHCP.
Supports SLIDE SHOW Function.
Bundle Remote Management Software (POP Center)
z Standard Version (free): Manage 5 B1080PX
z Professional Version (need charge): Manage up to 100 B1080PX.
z Upload contents
z Schedule playlists
z Set multi-display modes
z Monitor status and log files of each B1080PX
6
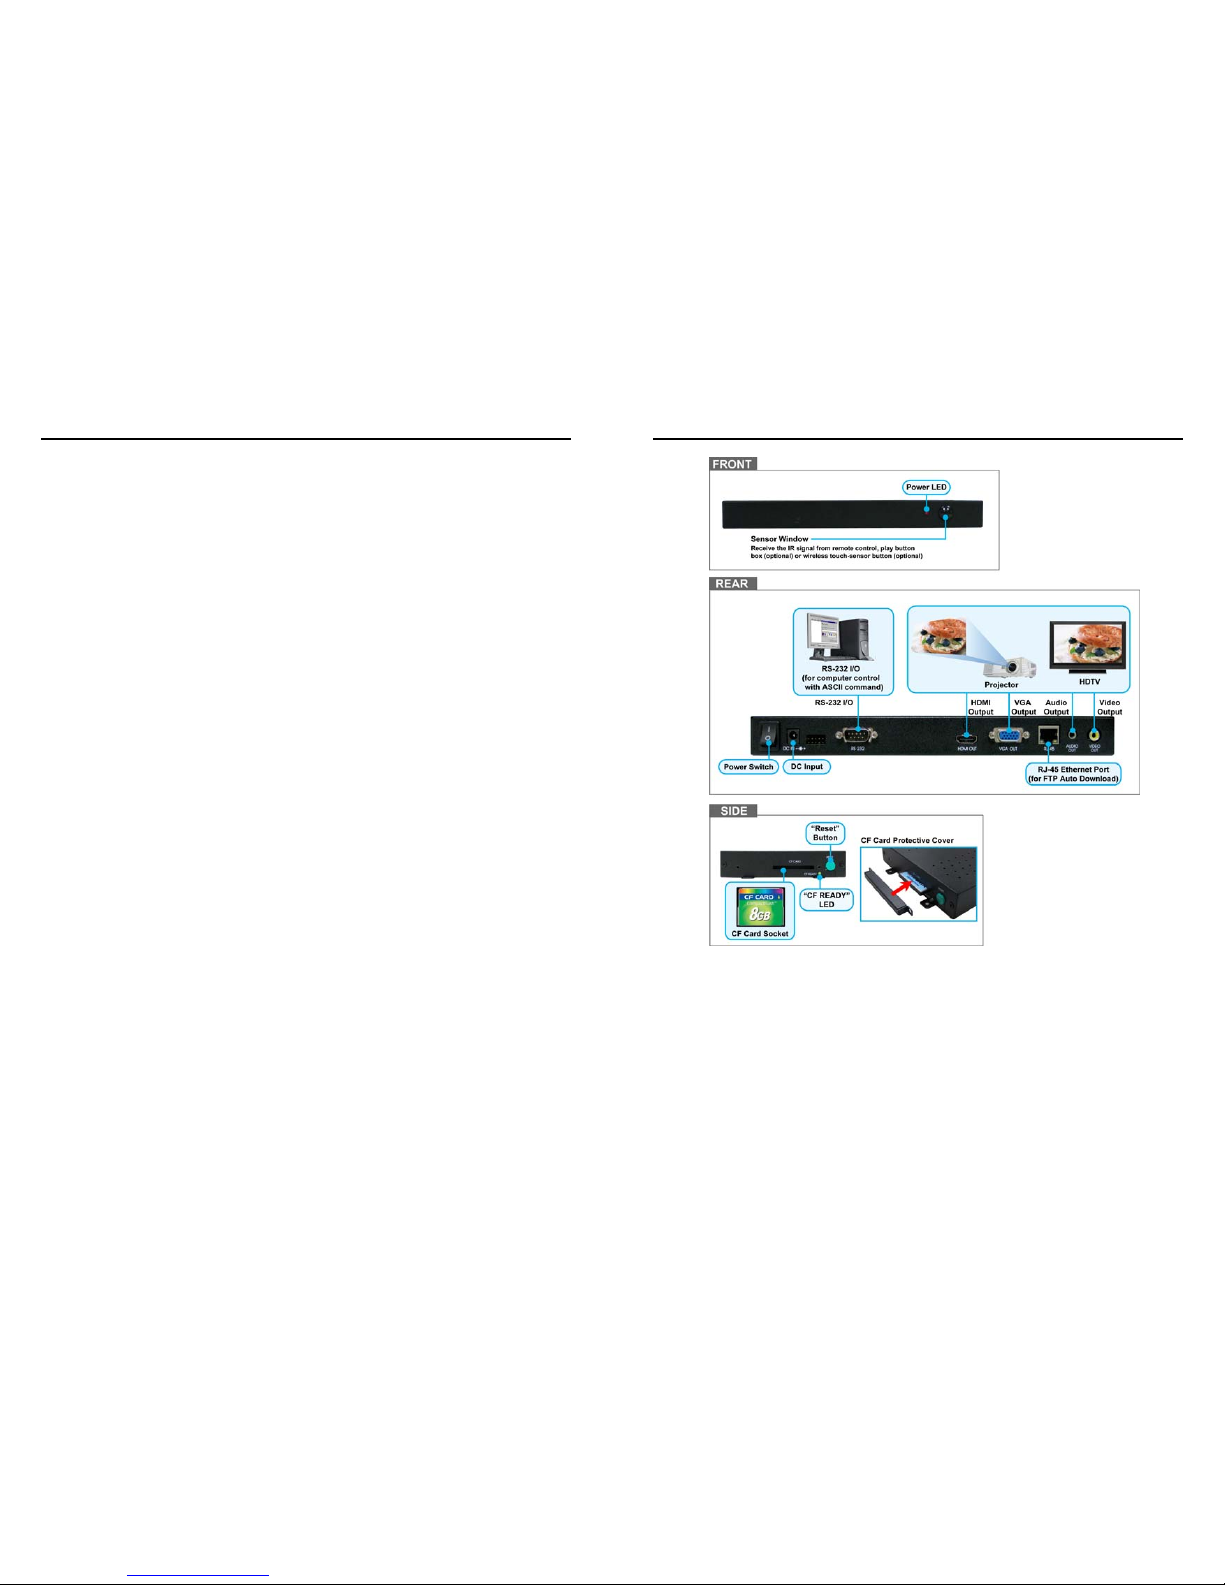
4. HARDWARE OVERVIEW
Power Switch: Toggle between main power on & off.
DC Input: For the power adapter. (DC 12V / 1.5A)
RS-232 Connector: Used for computer control with ASCII command.
HDMI Output: Connects to devices that support HDMI input.
VGA Output: Connects to devices that support VGA input. (LCD、projector)
RJ-45 Ethernet Connector: Connects to router or PC by RJ-45 Cable.
Audio Output: Connects to sound input. (HDTV with amplified speaker)
Video Output: Connects to devices that support Video input. (HDTV、projector)
“CF READY” LED: Steady green confirms that the CF card is inserted correctly.
CF Card Socket: For CF memory card.
“RESET” Button: To restart the B1080PX-2.
7
5. REMOTE CONTROL
1
2
3
4
5
6
7
8
9
10
11
12
13
14
15
16
17
18
19
20
21
22
23
24
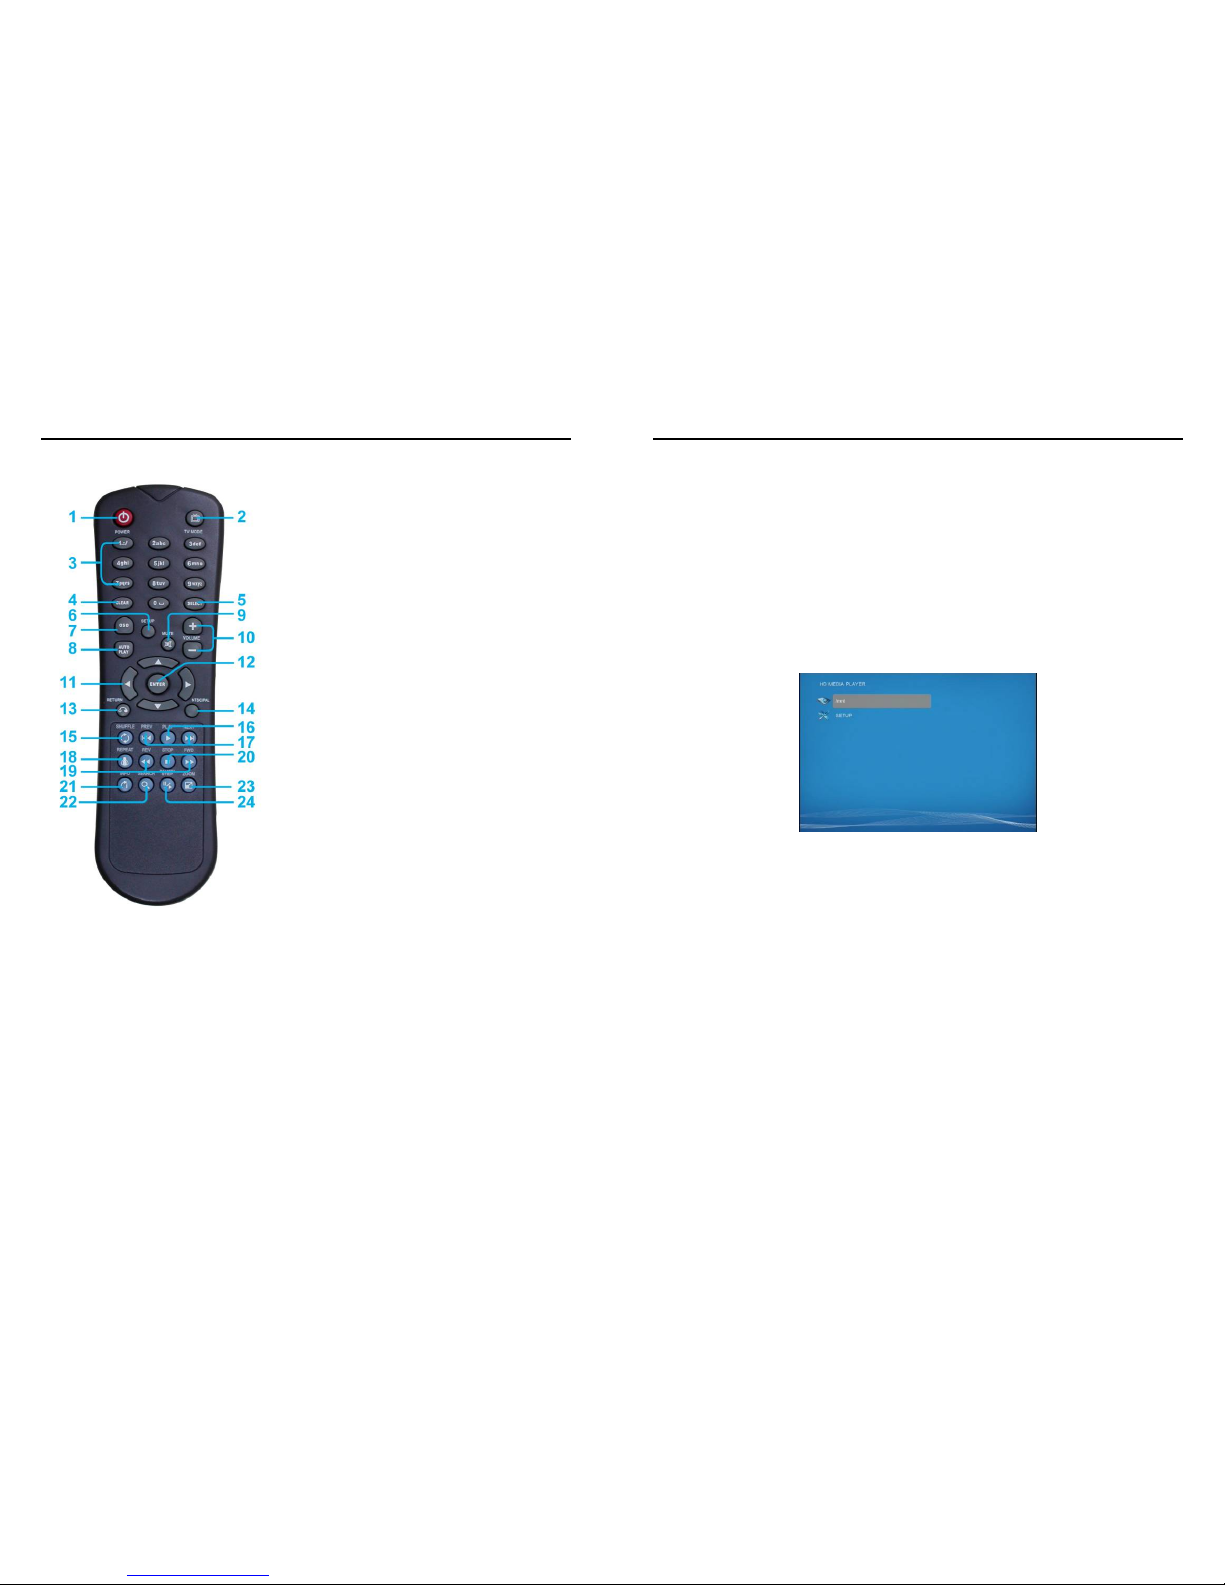
Power on/ off
Select the output mode
Numeric Key
Delete last entry
Select a function or to play the selected file
Open the setup menu Mute sound
OSD display function on/ off
Auto-play function on/ off
Mute sound
Volume up/ down
Move the cursor
Confirm the selection/ entry
Go back one layer
Select the TV type (NTSC/ PAL)
Shuffle on & off
Play the file selected
View the previous/ next file
Play the previous/ next file if in playback
Select the repeat mode
Rewind/ forward movie or music files
Stop playback
Show the information of the file selected
Search video (movie) timeframe
Zoom in/ out on the movie or picture
Pause the playback or play frame by frame
5.1 ENTERING TEXT OR IP ADDRESS
Keys need to be pressed multiple times to enter the letter corresponding to that key.
For Example: To enter the letter “a”. You would press the button “2” twice.
Enter The IP Address
For Example: To enter the IP address “192.168.100.100”.
Step 1: Press “1” once, then “1” is displayed, and the color of “1” is orange.
Step 2: When the color of “1”turns white, press “9” once, then “9” is displayed.
Step 3: Repeat steps 1 and 2 to enter and complete the IP address.
8
6. START THE B1080PX-2
Power On
z Insert the CF memory card that has Picture, Music, Movie or WMV9 files.
z Press the “POWER” button to power on the B1080PX-2, and then press the “TV MODE”
button to select the output mode.
Status After Power On
z Status 1: If the “AUTOPLAY (Movie/ Picture/ All Files)” function is enabled and there are
media files on the CF card or the B1080PX-2 is already connected to the display device, the
B1080PX-2 will auto play media files after power on.
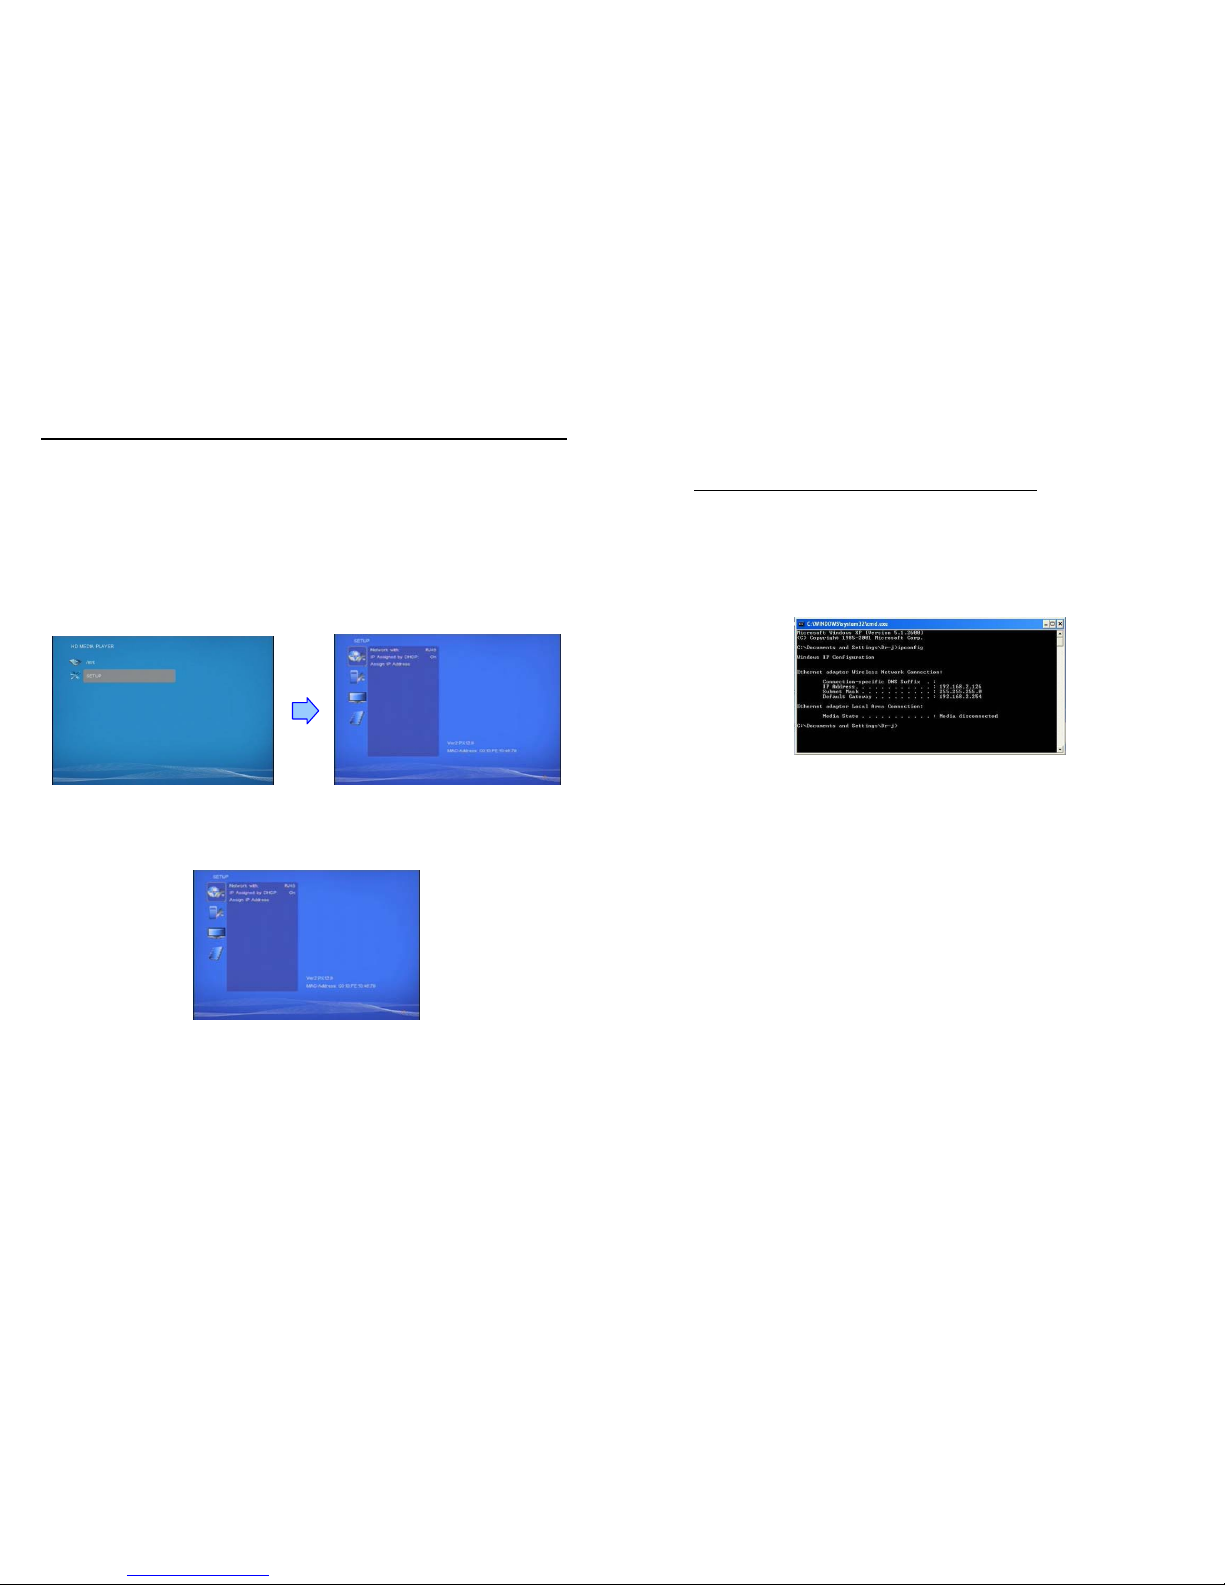
z Status 2: If the “AUTOPLAY” function is disabled, after power on the main menu will appear
as shown in the following figure. There are two groups in the main menu (“/mnt/CF” and
“SETUP”).
Power Off: Press the “POWER” button again to power off.
9
7. SETTING UP
In the main menu, using the “▼” button on remote control to select the “SETUP” item, and then
press the “ENTER” button. You will be presented with the B1080PX-2 settings screen.
You can also press the “SETUP” button on remote control to directly open the settings screen.
(If there is file that is being play, please stop first.)
There are four groups of sub-menu in the main menu (“Network Setup”, “FTP Setup”, “Video
Setup” and “Other Setup”).
In the settings screen, you can use the “▲、▼、
▲、▼
” buttons to select an item, and press the
“ENTER” button to confirm the selection.
Press the “SETUP” button on remote control to save and quit the settings screen.
7.1 NETWORK SETUP
7.1.1 Setting the Network from the OSD Menu
Network with: Select your network connection Disable/ RJ45.
IP Assigned by DHCP: If you have a DHCP-enabled router, please select “On”, and then the
router will automatically assigns an IP address to the B1080PX-2. If you don’t have a
DHCP –enabled router, select “Off” and type the network information in “Assign IP Address”.
10
Assign IP Address: If the B1080PX-2 is connected to a network without a DHCP server or you
want to use Local FTP Server function, enter the fixed IP address, Mask, Gateway and DNS for
the B1080PX-2.
PS. Refer to 5.1 for how to enter IP address by remote control.
NOTE: Before setting the IP address, Mask, Gateway and DNS, check the network information
of your PC. Please follow the steps below to get the network information of your PC.
Step 1: Click on “Start” → “Run” and type in “command”, then press “ENTER”.
The MS-DOS window will appear, type in “ipconfig” and then press “ENTER” to get the network
information.
Step 2: Assign IP Address, Mask (Subnet Mask) and Gateway (Default Gateway) for the
B1080PX-2.
Enter the same values of the Subnet Mask and Gateway, and be careful not to enter the values
of IP address that are already used by other devices on the network.
11
7.1.2 Setting the Network from the IP Detect Tool
With the bundle tool “IP Detect”, user could search B1080PX-2 on the local area network. User could
also change the IP setting via this tool. For example, user might assign a static IP to B1080PX-2 by the
steps as below:
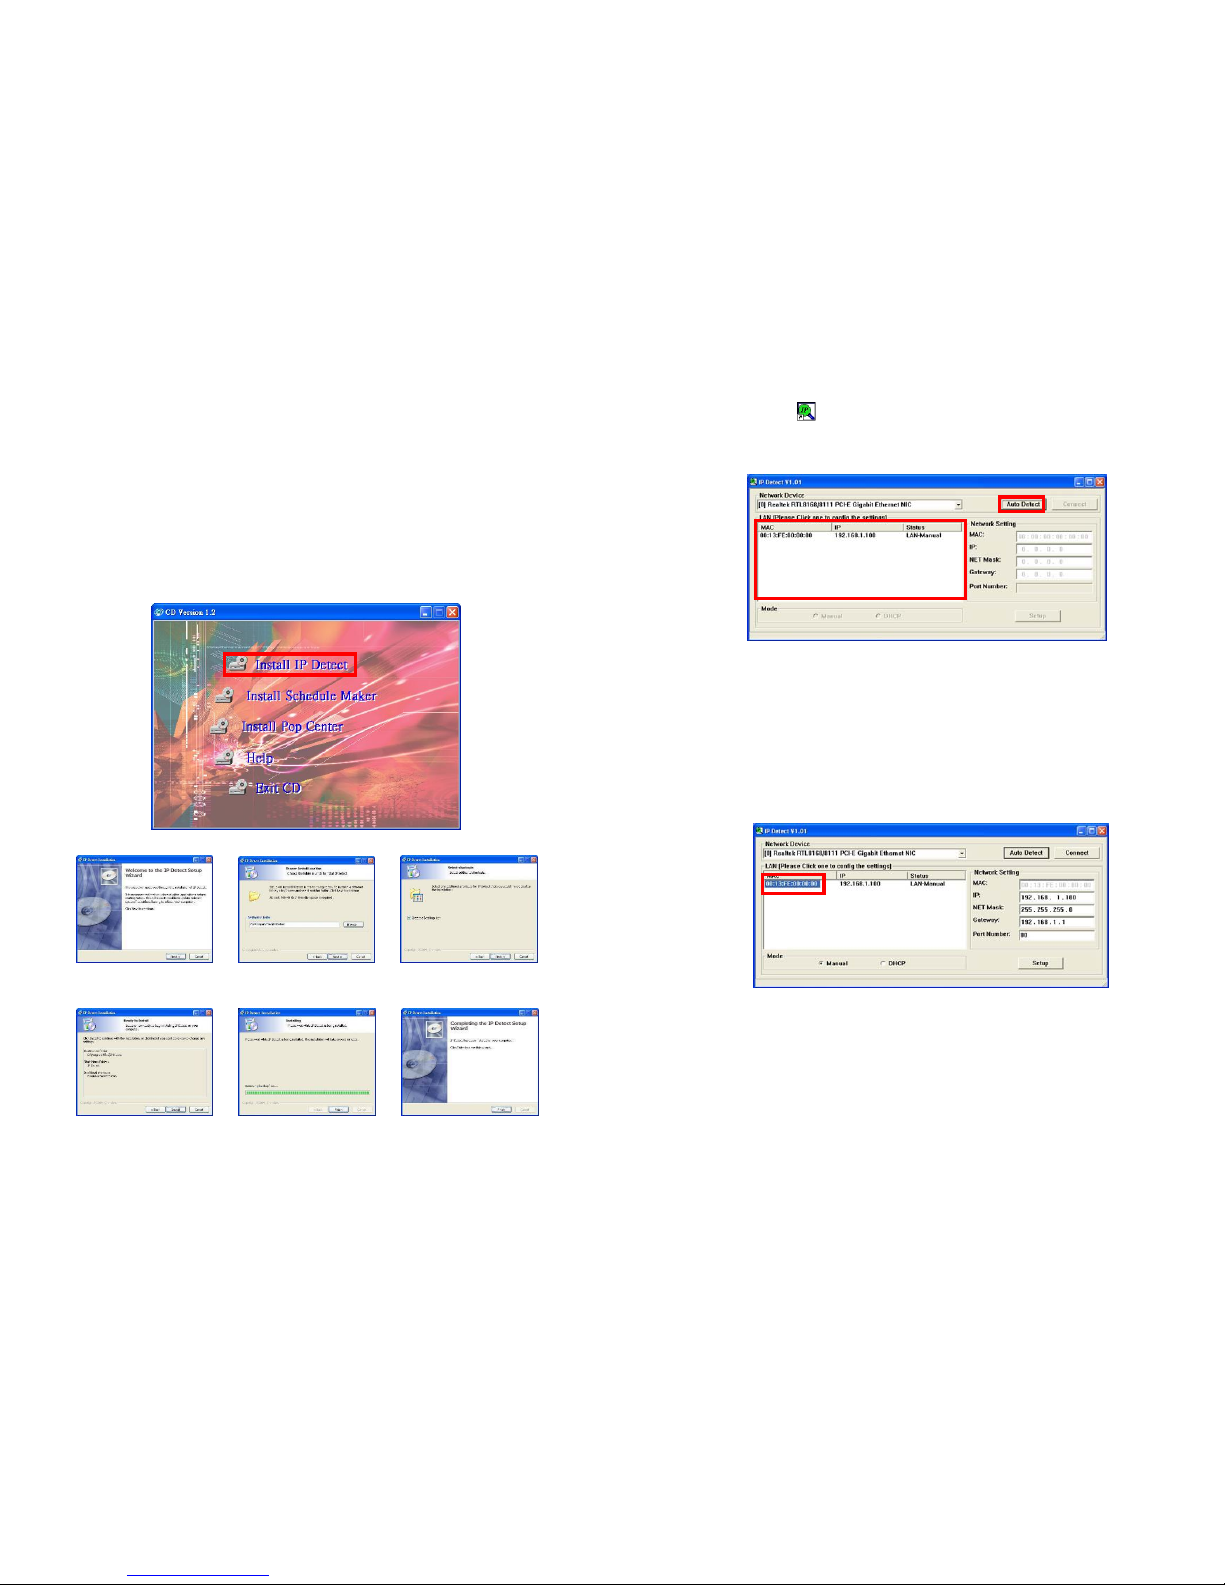
Step1: Insert the driver CD into your CD-ROM drive, then the autorun function will start up the shell
program. If the autorun window does not display, please execute the Autorun.exe program to bring out
the autorun screen.
Step2: Click on the Install IP Detect to install the IP detect tool.
Click Next to continue
Select the installation folder
and click Next to continue
Create a desktop icon and
click Next to continue
Click Install to start the
installation
Installing
Click Finish to complete
the installation
12
Step3: Double click on the icon to start the tool.
Step4: Click on the “Auto Detect” button, then the tool will show all available B1080PX-2 in the local
area network.
NOTE: When use B1080PX-2 under a DHCP-enabled network, user sometimes does not know which
IP address is assigned to B1080PX-2. User could also use this tool as a “Finder”, for locating the IP
address of B1080PX-2. By pressing the “Connect” button, IE browser will show up and access to the
build-in web of B1080PX-2 automatically.
Step5: Select the B1080PX-2 that you want to configure (by identifying the MAC address).
13
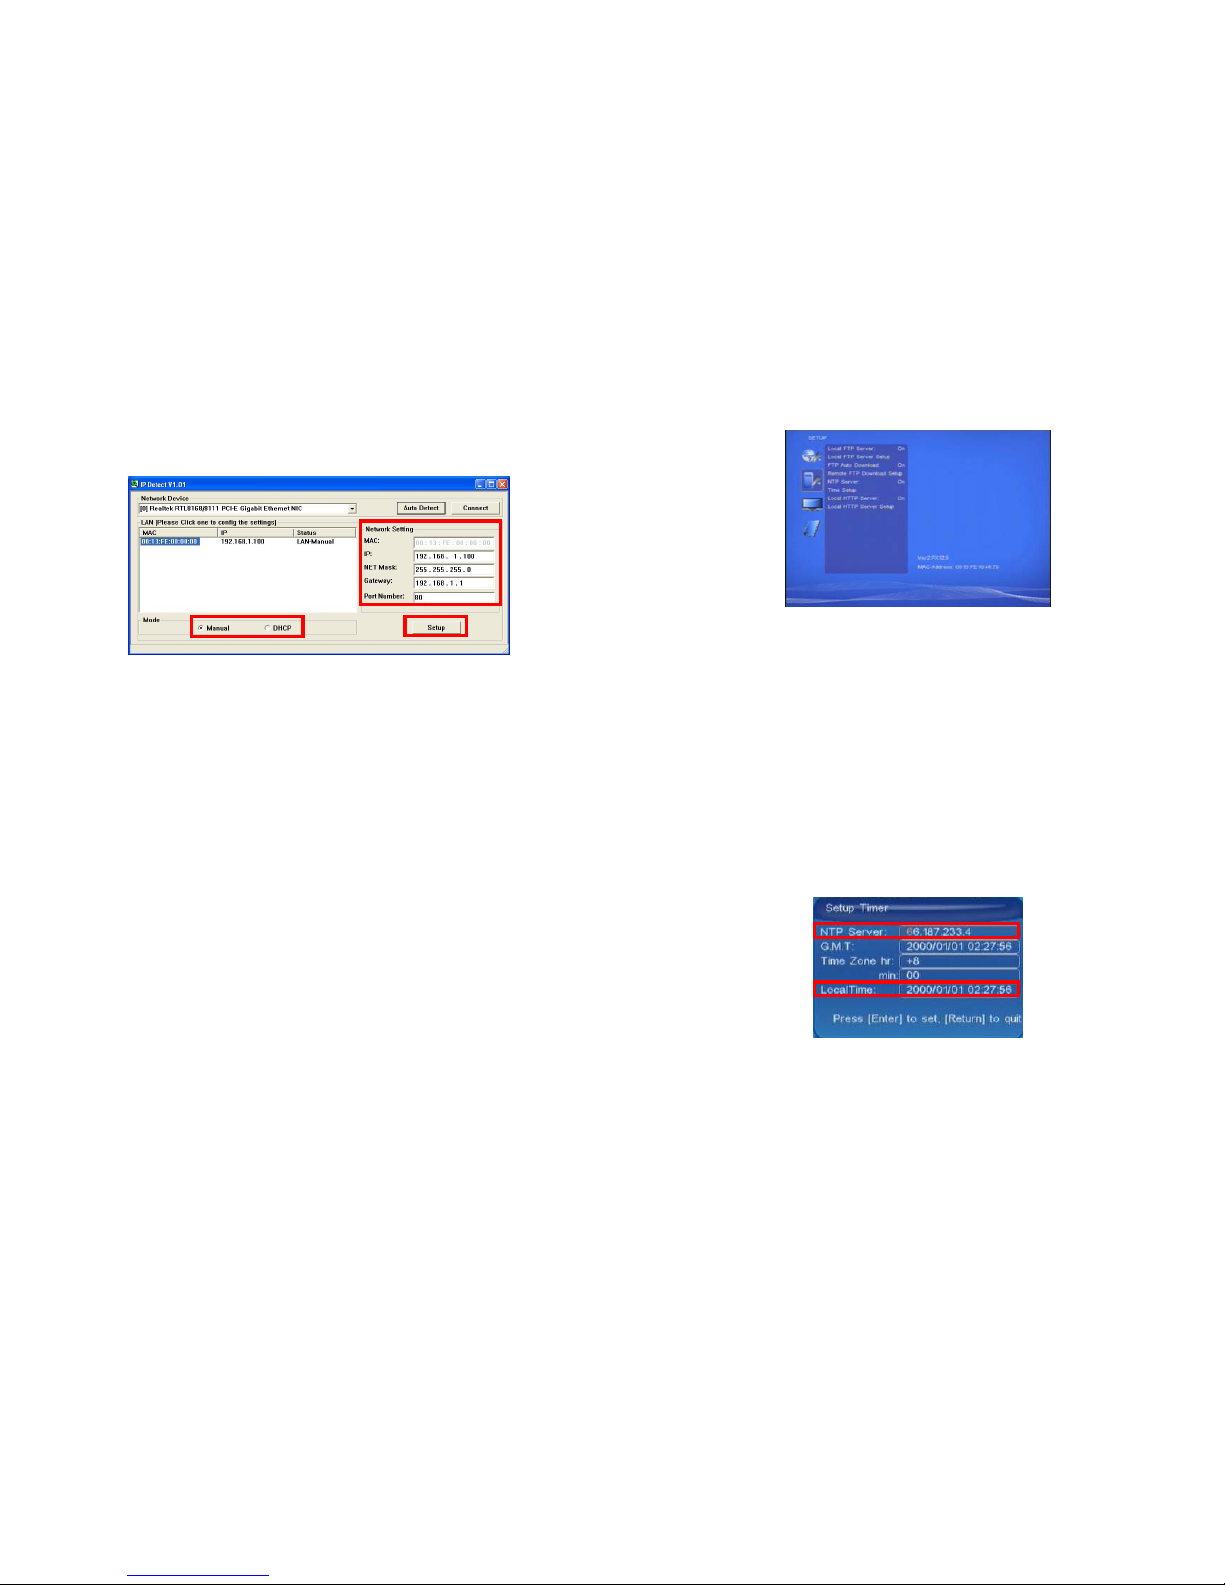
Step6: The default IP mode of B1080PX-2 is DHCP. User should change the mode to “Manual”, if he
wants to assign a static IP address to B1080PX-2. Then enter the preferred “IP”, “Net Mask” and
“Gateway” in the “Network Setting”. Finally, click on the “Setup” button for completing the setting.
NOTE: The IP setting will not show on the OSD menu instantly, but it should be available after
pressing “Setup” button. The prefer IP address will show on the OSD menu when B1080PX-2
restart.
14
7.2 FTP SETUP
Local FTP Server: Turn on/ off the B1080PX-2 server.
(If you use the B1080PX-2 server, please disable the DHCP function and input a fixed IP
address, Mask, Gateway and DNS of the B1080PX-2)
Local FTP Server Setup: Set the “Port”, “User ID” and “Password” of the B1080PX-2.
(The Default Port: 21, User ID: root, Password: admin)
FTP Auto Download: Enable/ Disable the FTP auto download function.
Remote FTP Download Setup
- Server IP: Enter the domain name or IP address of the FTP as was given to you by your
Web hosting provider.
- Port: The default port for FTP is 21. In most cases you should not change this number. If
the FTP site uses a port other than 21, you should enter the correct port.
- User ID: Enter the user name of the Remote FTP server.
- Password: Enter the Password of the Remote FTP server.
- FTP Path: Enter the folder path that you want to share.
NTP Server: Enable/ Disable the NTP server function. (if the B1080PX-2 isn’t connect to
internet, please disable the NTP Server function)
Time Setup: Set the NTP Server and Local Time here.
① NTP Server (the B1080PX-2 must be already connected to the network)
- NTP Server: Enter the NTP server IP address like: 204.152.184.72.
- G.M.T: After B1080PX-2 get the time from NTP server, it will update the G.M.T field.
- Time Zone: Use the Volume +, - and Numeric Key to set the time zone of your location.
(time zone must be set properly for the Auto-Download and Schedule
functions)
①
②
 Loading...