

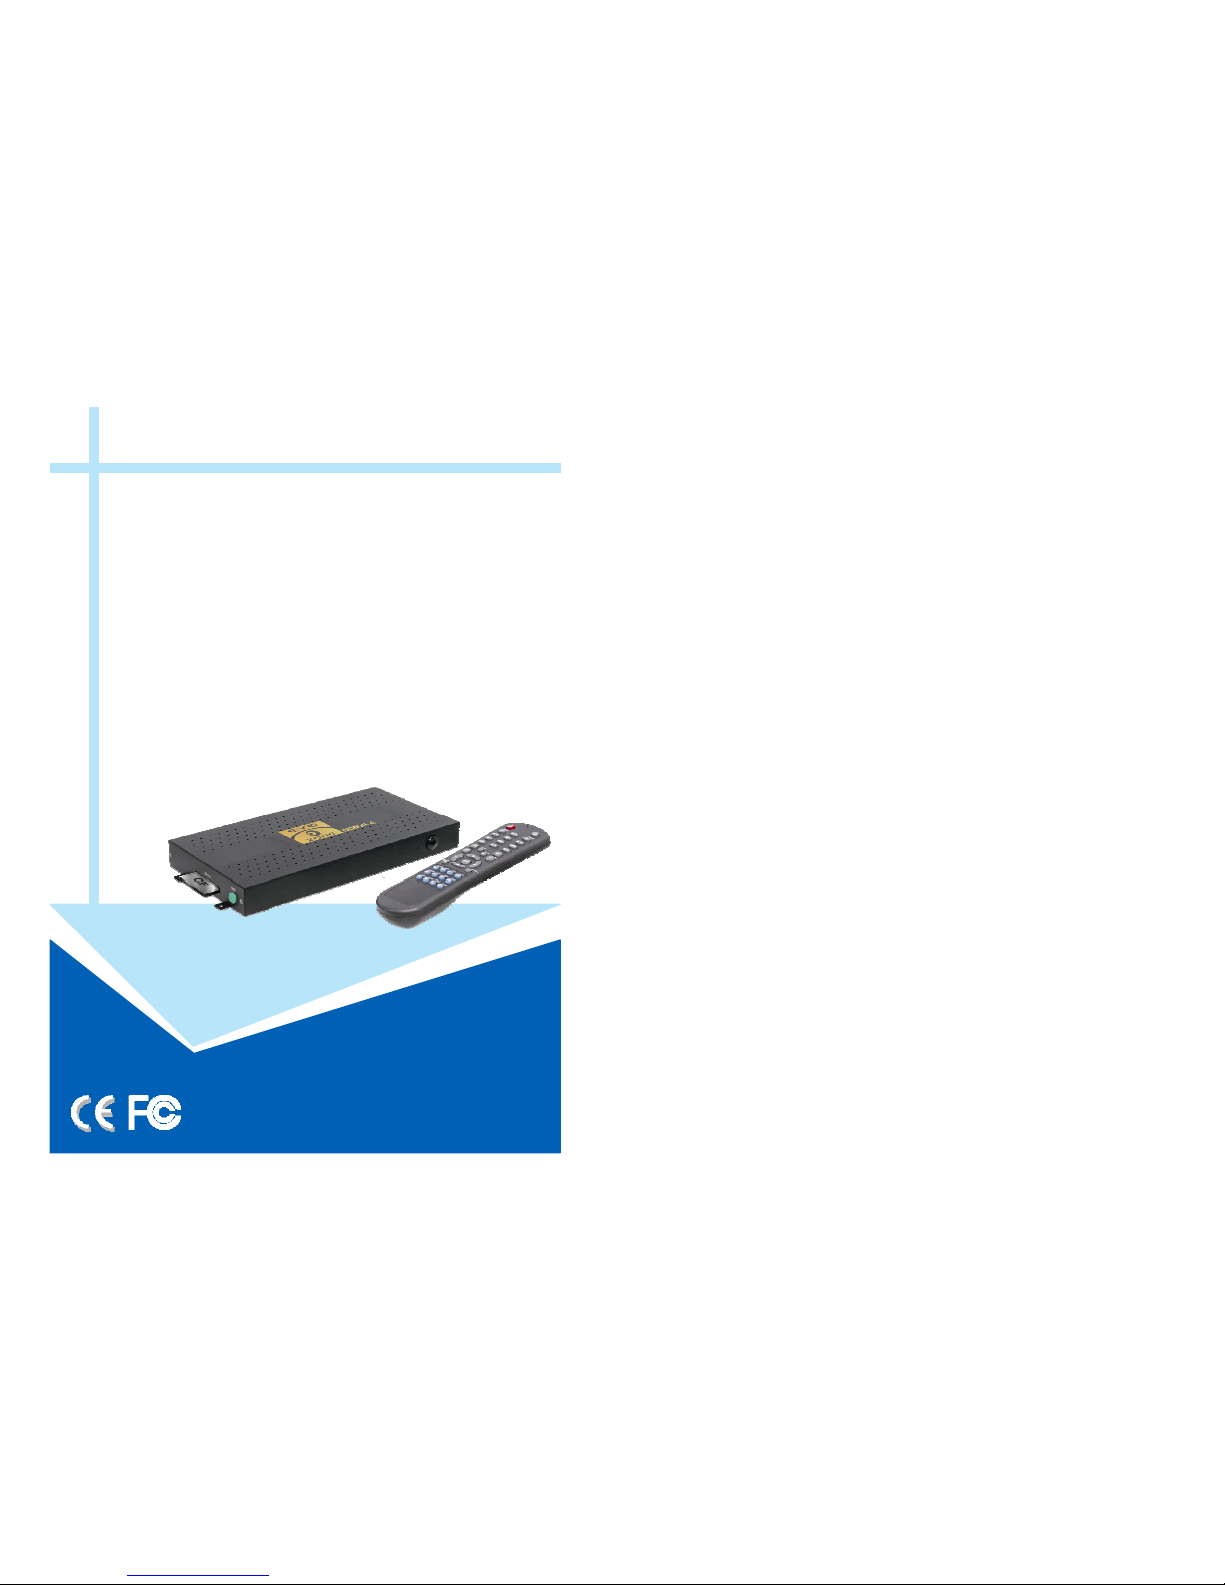
EYEZONE B1080P-4 User Manual
1
EYEZONE B1080P-4
User Manual
Feb 25, 09
F3448118
2
FCC Notices
It’s herewith confirmed to comply with the requirements of FCC Part 15 Rules. Operation is
subject to the following two conditions:
z This device may not cause harmful interference.
z This device must accept any interference received, including interference that may
cause undesired operation.
Note: This equipment has been tested and found to comply with the limits for a Class B
digital device, pursuant to part 15 of the FCC Rules. These limits are designed to provide
reasonable protection against harmful interference when the equipment is operated in a
residential installation. This equipment generated uses and can radiate radio frequency
energy and if not installed and used in accordance with the instruction manual may cause
harmful interference to radio communications. However, there is no guarantee that
interference will not occur in a particular installation. If this equipment does cause harmful
interference to radio of television reception, which can be determined by turning the
equipment off or on, the user is encouraged to try to correct the interference by one or more
of the following measures:
z Reorient or relocate the receiving antenna.
z Increase the separation between the equipment and receiver.
z Connect the equipment into an outlet on a circuit different from that to which the
receiver is connected.
z Consult the dealer or an experienced radio TV technician for help.
CE Declaration
This device complies with CE class B.
EN55022 IEC 61000-4-4
EN61000-3-2 IEC 61000-4-5
EN61000-3-3 IEC 61000-4-6
EN55024 IEC 61000-4-8
IEC 61000-4-2 IEC 61000-4-11
IEC 61000-4-3
Printed in Taiwan R.O.C.
All contents are subject to change without notice.
All trademarks are the property of their respective owner.

3
CONTENTS
1. Package Contents……………………..……………………….. 4
2. Introduction……………………………….……………………... 4
3. Features………………………………………….……………… 4
4. Hardware Overview…………………..………………………... 6
5. Remote Control…………………………..…………………….. 7
5.1 Entering Text or IP Address…………..…………………… 7
6. Start the B1080P-4…………………….………………………. 8
7. Setting Up……………………………………………………….. 9
7.1 Network Setup……………………..….……………………. 9
7.2 FTP Setup…………………………………………………… 11
7.3 Video Setup…………………………..…………………….. 13
7.4 Other Setup………………………………..……………….. 14
8. Using the B1080P-4………………………..…………………... 16
8.1 Play Media Files on the CF Card…………………………. 16
8.2 Multiple Display Zones…………..…………...……………. 19
8.3 Live Video Display….………………………………………. 20
8.4 Download Function…………………………………………. 22
8.5 Play the Media Files on the PC…………………………… 25
8.6 Download/ Upload Media Files…………….……………… 28
8.7 RS-232 Function……………………………………..…….. 31
9. Http Command Function………….………………..………….. 32
9.1 Player Control………………….………………..………….. 33
9.2 Network Setup…………………………………..………….. 35
9.3 Timer Setup………………………………………..……….. 36
10. Schedule Function……………....…..……..……….………….. 37
10.1 Install the Schedule Software…….……..……………….. 37
10.2 Set Up the Schedule Software…..…………...………….. 38
10.3 Apply the Schedule on the B1080P-4.…………..…….. 42
11. Optional Auxiliary Equipment……..……..………..………….. 43
11.1 Play-Button Box (Eyezone BB)………..………..……….. 43
11.2 IR Cable……………………………..……….…………….. 43
11.3 PIR Sensor………………………..……………………….. 44
11.4 Touch-Sensor Buttons…..…………………….………….. 44
12. Troubleshooting…………………………………..……………. 46
4
1. PACKAGE CONTENTS
1. B1080P-4
2. Remote Control
3. Audio Cable
4. S-Video Cable
5. HDMI Cable (optional)
6. Power Adapter
7. User Manual
8. Schedule Software
2. INTRODUCTION
The Eyezone B1080P-4 is a digital media player that plays HD WMV9 and WMA files
from CF memory card without a computer. The Eyezone B1080P-4 supports High Definition movie
hardware decode acceleration, presents for you the smoother and clearer picture, it supports high
resolution video output such as 1080P / 1080i / 720P for movie theater quality video on a big
screen. By connecting to S-Video, Y.Pb.Pr, VGA (resolution up to 1360 x 768), HDMI (1920 x
1080P) and Audio, you can play media files on any display device.
What’s more, the Eyezone B1080P-4 supports multiple display zones, you can play
movie, picture and scrolling text on the screen simultaneously. The B1080P-4 supports live video
display with the input from TV box, DVD player or camera. The scrolling text displays an animated
text message on a bar on bottom of your screen, the information of your product can catch the
customer’s eyes easily, and the text color can be changed (white, yellow, green or rotation).
The Eyezone B1080P-4 can connect to a wired network at speed up to 100Mbps. This
function provides you with maximum throughput for sharing and transferring digital media.
5
3. FEATURES
Supports multiple file formats: HD WMV9 and WMA.
Supports real time A/V input to display live videos from display devices.
Supports S-Video, Y.Pb.Pr, HDMI, VGA and Audio output.
HD Y.Pb.Pr output supports resolution: NTSC Mode(60Hz): 480P/ 720P/ 1080i.
PAL Mode(50Hz): 576P/ 720P/ 1080i.
HDMI Output: 480P/ 720P/ 1080i/ 1080P.
VGA output supports resolution: 640x480/ 800x600/ 1024x768/ 1280x1024/ 1360x768.
Supports RS-232 port for computer control with ASCII command (play, stop, pause…etc).
Supports Multiple Display Zones: Displays the movie, picture (supports png format/
size: 150x400/ 96DPI) and scrolling text on the screen simultaneously.
- Supports two display modes:
Mode 1: Display live videos (or stored videos) with scrolling text.
Mode 2: Display live videos (or stored videos), pictures and scrolling text simultaneously.
- The picture can be repositioned to left or right of the screen.
- The display speed of scrolling text can be adjusted, and scrolling text supports
multi language (English/ Latin/ Japanese).
Touch-Sensor Buttons Function (optional)
- Press one of the touch-sensor buttons, the B1080P-4 will play the corresponding file
automatically.
- Used with various operating environment (glass, plastics and acrylic material, except
metal material), the thickness supports 3mm -5mm, and it can be customized to 5cm for
OEM project.
PIR Sensor Function (optional)
- After sensing approaching subjects, the Eyezone B1080P-4 will play the files
automatically.
- Sensing distance is up to 3 meters with an angle of 45∘.
Schedule Function: The B1080P-4 will auto play the designated file at the designated date.
Connect using an Ethernet network cable at up to 100Mbps.
Supports CF memory cards. (Suggest using the high speed (150X) CF card)
Supports HTTP command function.
Exports the Configuration Value: You can export the configuration value to the CF card.
The configuration can be modified on your PC, and can be applied to the B1080P-4 or others.
Compatible with Windows Media Player 11: Play media files stored in a network computer.
Supports FTP Auto Download Function: Connect to Remote FTP server and download
data to the CF card automatically.
Supports Download Pause / Resume Function: Continue unfinished downloads upon next
session.
Embedded FTP Server.
Supports NTP Network (G.M.T) Timer.
Supports Universal Plug and Play (UPnP) and DHCP.
Supports SLIDE SHOW Function (interval time with 10/ 15/ 30/ 60 seconds).
6
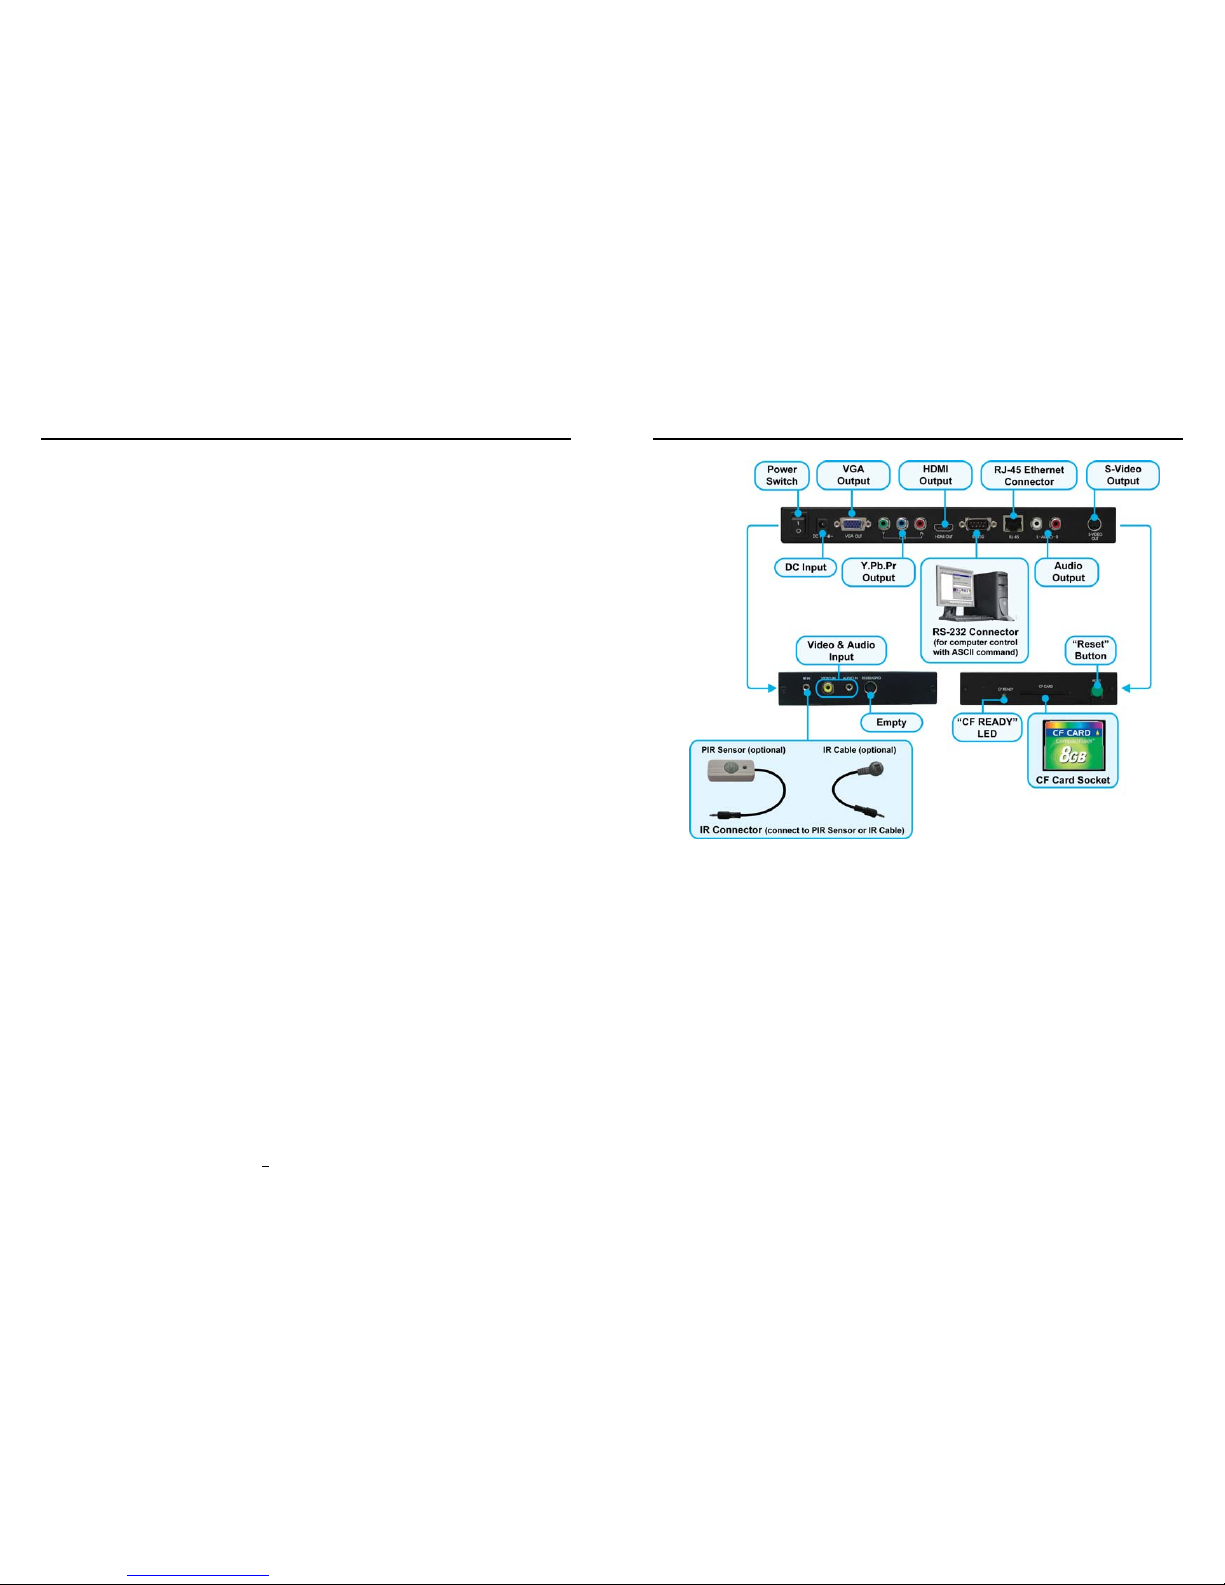
4. HARDWARE OVERVIEW
Power Switch: Toggle between main power on & off.
DC Input: For the power adapter. (DC 12V / 1.5A)
VGA Output: Connects to devices that support VGA input. (LCD、projector)
Y.Pb.Pr Output: Connects to devices that support Y.Pb.Pr input. (HDTV、projector)
HDMI Output: Connects to devices that support HDMI input.
RS-232 Connector: Used for computer control with ASCII command.
RJ-45 Ethernet Connector: Connects to router or PC by RJ-45 Cable.
Audio Output: Connects to sound input. (HDTV with amplified speaker)
S-Video Output: Connects to devices that support S-Video input. (HDTV、projector)
IR Input: Connects to PIR Sensor (optional) or IR Cable (optional).
Video & Audio Input: Connects to display device that support video & audio output. (TV Box,
DVD Player or camera)
“CF READY” LED: Steady green confirms that the CF card is inserted correctly.
CF Card Socket: For CF memory card.
“RESET” Button: To restart the B1080P-4.
7
5. REMOTE CONTROL
1
2
3
4
5
6
7
8
9
10
11
12
13
14
15
16
17
18
19
20
21
22
23
24
Power on/ off
Select the output mode
Numeric Key
Delete last entry
Select a function or to play the selected file
Open the setup menu Mute sound
OSD display function on/ off
Auto-play function on/ off
Mute sound
Volume up/ down
Move the cursor
Confirm the selection/ entry
Go back one layer
Select the TV type (NTSC/ PAL)
Shuffle on & off
Play the file selected
View the previous/ next file
Play the previous/ next file if in playback
Select the repeat mode
Rewind/ forward movie or music files
Stop playback
Show the information of the file selected
Search video (movie) timeframe
Zoom in/ out on the movie or picture
Pause the playback or play frame by frame
5.1 ENTERING TEXT OR IP ADDRESS
Keys need to be pressed multiple times to enter the letter corresponding to that key.
For Example: To enter the letter “a”. You would press the button “2” twice.
Enter The IP Address
For Example: To enter the IP address”192.168.100.100”,.
Step 1: Press “1” once, then “1” is displayed, and the color of “1” is orange.
Step 2: When the color of “1”turns white, press “9” once, then “9” is displayed.
Step 3: Repeat steps 1 and 2 to enter and complete the IP address.
8
6. START THE B1080P-4
Power On
z Insert the CF memory card that has Picture, Music, Movie or WMV9 files.
z Press the “POWER” button to power on the Eyezone B1080P-4, and then press the “TV
MODE” button to select the output mode.
Status After Power On
z Status 1: If the “AUTOPLAY (Movie, Picture, MultiLayer or Video In)” function is enabled and
there are media files on the CF card or the B1080P-4 is already connected to the display
device, the Eyezone B1080P-4 will auto play media files or live video after power on.
z Status 2: If the “AUTOPLAY” function is disabled, after power on the main menu will appear
as shown in the following figure. There are two groups in the main menu (“/mnt/CF” and
“SETUP”).
NOTE: The pop-up window that shows the IP address will appear later, if DHCP mode is selected
when the Eyezone B1080P-4 is turned on.
Power Off: Press the “POWER” button again to power off.

9
7. SETTING UP
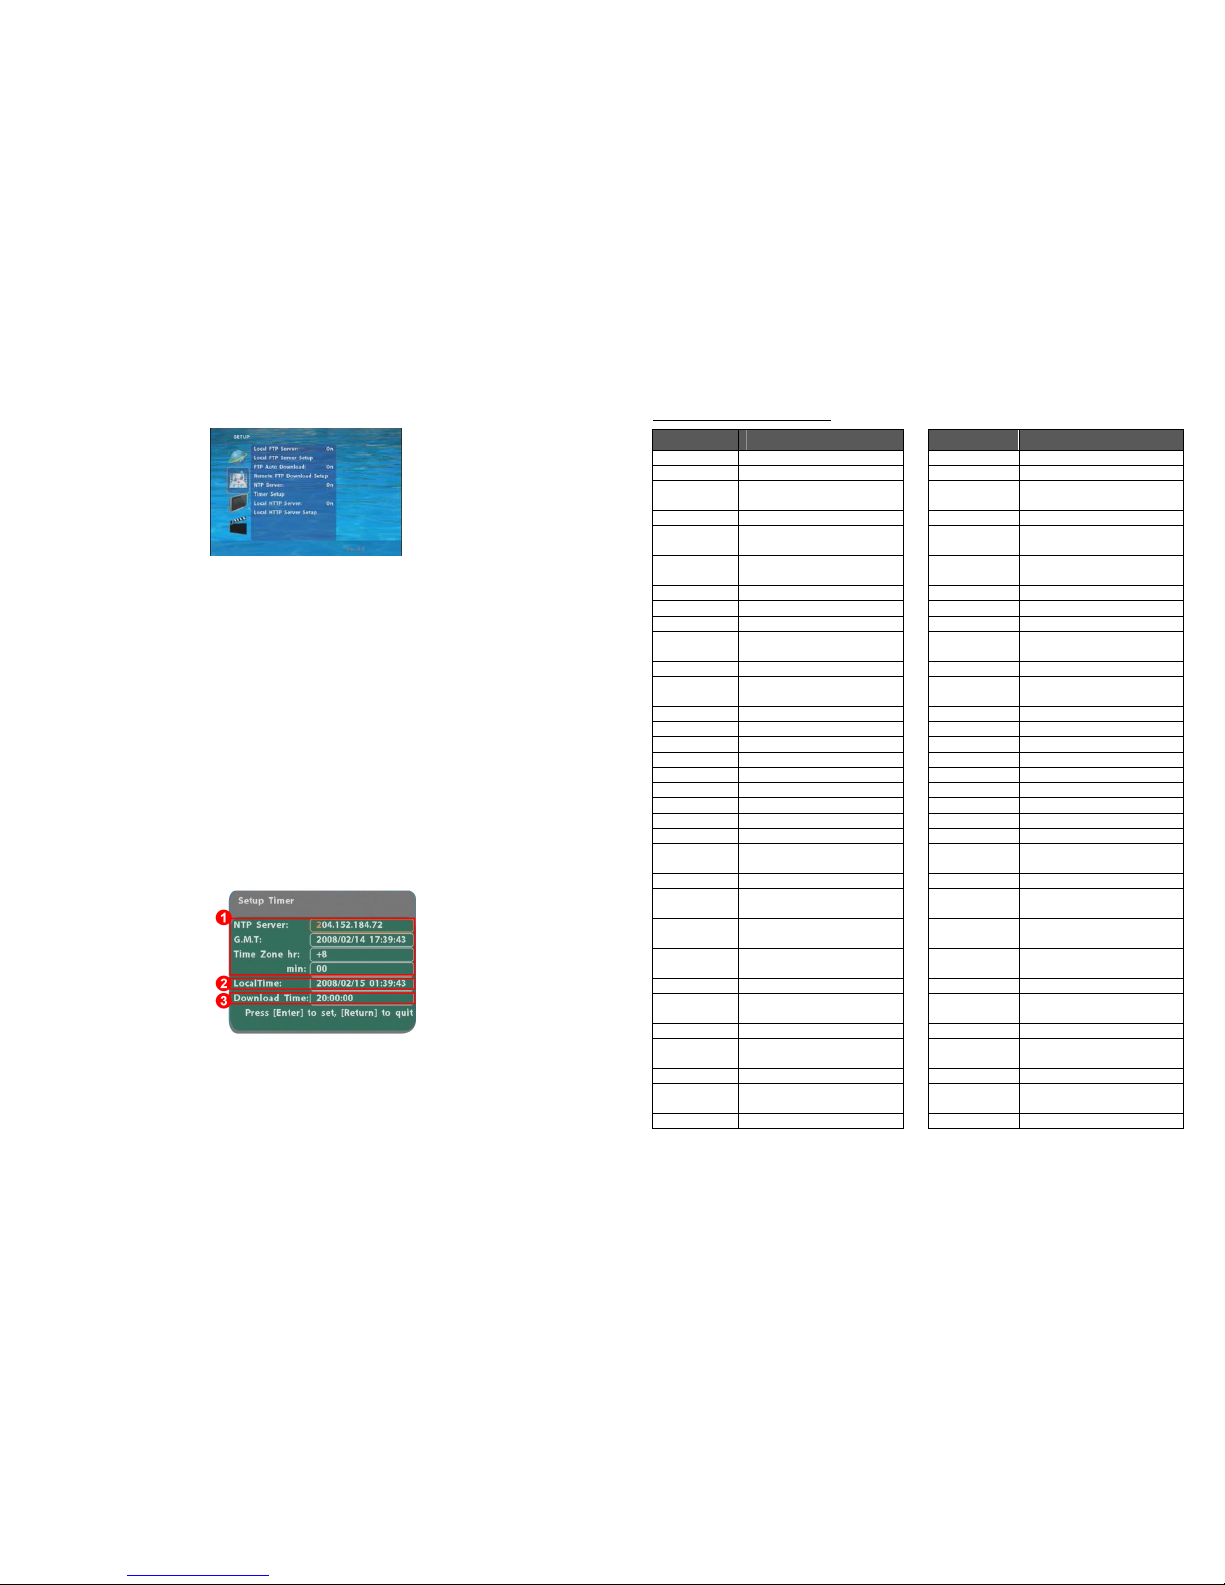
In the main menu, using the “▼” button on remote control to select the “SETUP” item, and then
press the “ENTER” button. You will be presented with the Eyezone B1080P-4 settings screen.
You can also press the “SETUP” button on remote control to directly open the settings screen.
(If there is file that is being play, please stop first.)
There are four groups of sub-menu in the main menu (“Network Setup”, “FTP Setup”, “Video
Setup” and “Other Setup”).
In the settings screen, you can use the “▲、▼、
▲、▼
” buttons to select an item, and press the
“ENTER” button to confirm the selection.
Press the “SETUP” button on remote control to save and quit the settings screen.
7.1 NETWORK SETUP
Network with: Select your network connection Disable/ RJ45.
IP Assigned by DHCP: If you have a DHCP-enabled router, please select “On”, and then the
router will automatically assigns an IP address to the Eyezone B1080P-4. If you don’t have a
DHCP –enabled router, select “Off” and type the network information in “Assign IP Address”.
10
7.1 NETWORK SETUP (continued)
Assign IP Address: If the Eyezone B1080P-4 is connected to a network without a DHCP
server or you want to use Local FTP Server function, enter the fixed IP address, Mask, Gateway
and DNS for the Eyezone B1080P-4.
PS. Refer to 5.1 for how to enter IP address by remote control.
NOTE: Before setting the IP address, Mask, Gateway and DNS, check the network information of
your PC. Please follow the steps below to get the network information of your PC.
Step 1: Click on “Start” → “Run” and type in “command”, then press “ENTER”.
The MS-DOS window will appear, type in “ipconfig” and then press “ENTER”
to get the network information.
Step 2: Assign IP Address, Mask (Subnet Mask) and Gateway (Default Gateway)
for the Eyezone B1080P-4.
Enter the same values of the Subnet Mask and Gateway, and be careful not to enter
the values of IP address that are already used by other devices on the network.
Media Player 11 Server: Enable/ disable the Media Player 11 server.
11
7.2 FTP SETUP
Local FTP Server: Turn on/ off the Eyezone B1080P-4 server.
(If you use the Eyezone B1080P-4 server, please disable the DHCP function and input a fixed
IP address, Mask, Gateway and DNS of the Eyezone B1080P-4)
Local FTP Server Setup: Set the “Port”, “User ID” and “Password” of the Eyezone B1080P-4.
(The Default Port: 21, User ID: root, Password: admin)
FTP Auto Download: Enable/ Disable the FTP auto download function.
Remote FTP Download Setup
- Server IP: Enter the domain name or IP address of the FTP as was given to you by
your Web hosting provider.
- Port: The default port for FTP is 21. In most cases you should not change this number.
If the FTP site uses a port other than 21, you should enter the correct port.
- User ID: Enter the user name of the Remote FTP server.
- Password: Enter the Password of the Remote FTP server.
- FTP Path: Enter the folder path that you want to share.
NTP Server: Enable/ Disable the NTP server function. (if the B1080P-4 isn’t connect to internet,
please disable the NTP Server function)
Time Setup: Set the NTP Server, Local Time and Auto Download Time here.
①
NTP Server (the Eyezone B1080P-4 must be already connected to the network)
- NTP Server: Enter the NTP server IP address like: 204.152.184.72.
- G.M.T: After B1080P-4 get the time from NTP server, it will update the G.M.T field.
- Time Zone: Use the Volume +, - and Numeric Key to set the time zone of your location.
(time zone must be set properly for the Auto-Download and Schedule
functions)
12
NOTE: GMT and applied regions
Time Zone Region Time Zone Region
(GMT-12:00) Eniwetok, Quazalen (GMT+02:00) Helsinki, Riga, Tallinn
(GMT-11:00) Midway, Ireland, Samoa (GMT+03:00) Nairobi
(GMT-10:00) Hawaii
(GMT+03:00)
Moscow, Saint Petersburg,
Volgograd
(GMT-09:00) Alaska (GMT+03:00) Baghdad
(GMT-08:00)
Pacific GMT (U.S. & Canada);
Tijuana
(GMT+03:00) Kuwait, Raid
(GMT-07:00)
Continental GMT (U.S. &
Canada)
(GMT+03:30) Tehran
(GMT-07:00) Arizona (GMT+04:00) Baku, Tbilisi, Ere van
(GMT-06:00) Mexico city (GMT+04:00) Abu Dhabi, Muscat
(GMT-06:00) Saskatchewan (GMT+04:30) Kabul
(GMT-06:00)
Eastern Coast GMT (U.S. &
Canada)
(GMT+05:00) Yekaterinburg
(GMT-06:00) Indiana (Eastern Coast) (GMT+05:00) Islamabad, Karachi, Tashkent
(GMT-04:00) Atlantic GMT (Canada)
(GMT+05:30)
Calcutta, Chennai, Mumbai, New
Delhi
(GMT-04:00) Santiago (GMT+05:45) Katmandu
(GMT-04:00) Caracas, La Paz (GMT+06:00) Sri Jayewardenepura Kotte
(GMT-04:00) Newfoundland (GMT+06:00) Astana, Dakar
(GMT-03:00) Greenland (GMT+08:00) Irkutsk, Ulan Bator
(GMT-03:00) Buenos Aires, Georgetown (GMT+08:00) Kuala Lumpur, Singapore
(GMT-03:00) Brasilia (GMT+08:00) Taipei
(GMT-02:00) Mid-Atlantic (GMT+08:00) Perth
(GMT-01:00) Capo Verde Is. (GMT+09:00) Seoul
(GMT-01:00) Azores (GMT+09:00) Yakutsk
(GMT-00:00)
Greenwich GMT; Dublin,
Edinburgh, Lisbon, London
(GMT+09:00) Osaka, Sapporo, Tokyo
(GMT-00:00) Casablanca, Monrovia (GMT+09:30) Darwin
(GMT+01:00)
Beograd, Bratislava, Budapest,
Ljubljana, Prague
(GMT+09:30) Adelaide
(GMT+01:00)
Brussels, Copenhagen, Madrid,
Paris
(GMT+10:00) Guam, Port Moresby
(GMT+01:00)
Sarajevo, Skopje, Sofia, Vilnius,
Warsaw, Zagreb
(GMT+10:00) Brisbane
(GMT+01:00) Midwest Africa (GMT+10:00) Vladivostok
(GMT+01:00)
Amsterdam, Berlin, Bern, Rome,
Stockholm, Vienna
(GMT+10:00) Canberra, Melbourne, Sydney
(GMT+02:00) Bucharest (GMT+10:00) Hobart
(GMT+02:00) Athens, Istanbul, Minsk
(GMT+11:00)
Magadan, Solomon Is., New
Caledonia
(GMT+02:00) Jerusalem (GMT+12:00) Auckland, Wellington
(GMT+02:00) Cairo
(GMT+12:00)
Fiji, Kamchatka Pen., Marshall
Is.
(GMT+02:00) Harare, Pretoria (GMT+13:00) Nuku'alofa
13
② Local Time: Set the system time manually.
NOTE: If the NTP Server and Local Time have been set, the NTP Server will be the first
priority (the Eyezone B1080P-4 is already connected to the network).
③ Download Time: Set the FTP auto-download time.
Local HTTP Server: Enable/ Disable the HTTP command function.
Local HTTP Server Setup: To se t the “Port”, “User ID” and “Password” of the Eyezone
B1080P-4. (The Default Port: 80, User ID: root, Password: admin)
NOTE: Press the “SETUP” button on the remote control to save the settings, and it will auto exit
the settings screen, then restart the Eyezone B1080P-4.
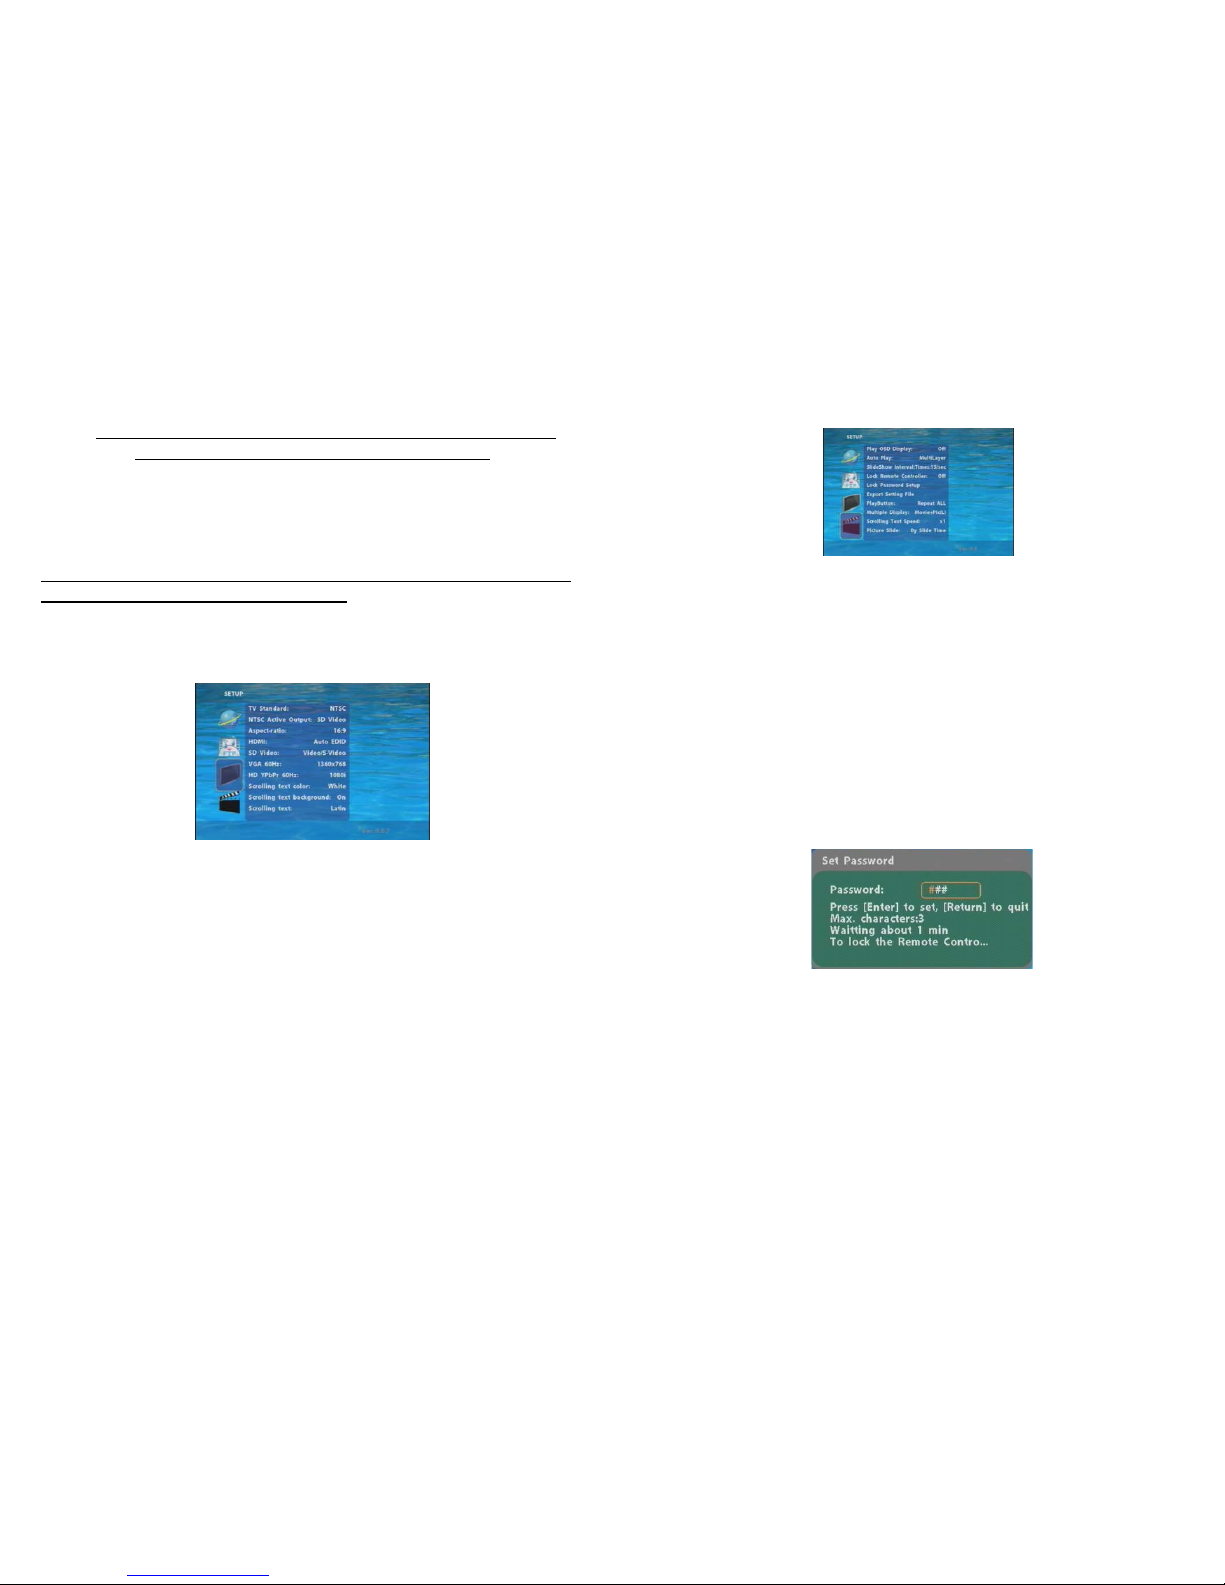
7.3 VIDEO SETUP
TV Standard: Select the output TV video format (NTSC / PAL).
NTSC Active Output: Select the output mode. (HDMI/ SD Video/ VGA/ HD Y.Pb.Pr)
You can also press directly the “TV MODE” button on the remote
control to select output mode.
Aspect-ratio: Select TV mode 4:3 or 16:9.
HDMI: Select the HDMI output resolution among 480i / 480p/ 720p / 1080i/ 1080p.
Select the “Auto EDID”, the Eyezone B1080P-4 will scan the display device
connected and set the correct resolution automatically.
SD Video: Select the SD output mode. (“S-Video” or “Y.Cb.Cr”)
VGA 60Hz: Select the VGA output resolution.
(640*480 / 800*600/ 1024*768/ 1280*1024/ 1360*768)
HD Y.Pb.Pr 60Hz: Select the Y.Pb.Pr output resolution among 480p / 720p / 1080i.
Scrolling text color: Select the text color (white/ yellow/ green/ rotation)
Scrolling text background: Turn on/ off the text background.
Scrolling text: Select the language of scrolling text: Latin (English)/ Japanese.
14
7.4 OTHER SETUP
Play OSD Display: Enable or disable the OSD display.
Auto Play
- Movies: Auto play movie files on the CF card after power on.
- Pictures: Auto play picture files on the CF card after power on (slideshow function).
- MultiLayer: Directly execute Multiple Display function after power on.
- Video In: Auto play the live video from display device after power on
- Off: Turn off the Auto Play function.
SlideShow Interval: Set the time each photo is shown to 10, 15, 30 or 60 seconds.
Lock Remote Controller: Enable/ disable the auto key lock function. (The B1080P-4 will auto
lock when there is no further input for 1 minute.)
Lock Password Setup: Press the “Enter” button to open the “Set Password” window. Enter the
password with numeric buttons and press the “Enter” button to save the new password (The
default password: 123).
 Loading...