

Eyevis EYE-LCD-5500-XSN-LD-F, EYE-LCD-5500-XSN-LD-FX-OPS, EYE-LCD-5500-XSN-LD-FX-700, EYE-LCD-5500-XSN-LD-FX-700-OPS User Manual
Page 1

User Manual
Version 1.0 (May 2015)
Technical changes reserved.
eyeLCD-5500-XSN-LD-FX
EYEVIS LCD LINE
Product variants:
EYE-LCD-5500-XSN-LD-FX
EYE-LCD-5500-XSN-LD-FX-OPS
EYE-LCD-5500-XSN-LD-FX-700
EYE-LCD-5500-XSN-LD-FX-700-OPS
Page 2

Additional Support
For additional support for eyevis products, please contact:
eyevis GmbH
Hundsschleestrasse 23
D-72766 Reutlingen
Germany
Phone: +49 (0)7121-4 33 03-0
Fax: +49 (0)7121-4 33 03-22
Hotline: +49 (0)7121-4 33 03-290 (netPIX & eyeCON)
Hotline: +49 (0)7121-4 33 03-291 (Cubes & Displays)
web: www.eyevis.de
e-mail: info@eyevis.de
service: service@eyevis.de
As at: May 2015
Copyright © 2015 eyevis (eyevis Gesellschaft für Projektions- und Großbildtechnik mbH).
All Rights reserved.
) eyevis user document
If this document is sold with software that includes an end user license agreement, this document as well, as
the software described within it, shall be provided under licence and may only be used or duplicated according
to the terms of the licence. No part of this documentation may be reproduced, stored in databases, or
transferred in any form – electronically, mechanically, on recording media, or in any other way – without prior
written consent of eyevis, unless the licence expressly permits this. Please note that the content of this
document is protected by copyright, even if it is not sold together with software that includes an end user
licence agreement.
The content of this document is solely informative, can be changed at any time without notice, and represents
no obligation on the part of eyevis. eyevis assumes no responsibility or liability for any errors or inaccuracies
that may appear in this document.
eyevis, the eyevis logo and eyeCON are trademarks or registered trademarks of eyevis Deutschland.
All other trademarks are the property of their respective owners.
S
E
R
V
I
C
E
S
U
P
P
O
R
T
Page 3

Table of Content
Safety / Sicherheit / Sécurité 6
Safety precaution . . . . . . . . . . . . . . . . . . . . . . . . . . . . . . . . . . . . . . . . 6
Sicherheitsvorkehrungen
. . . . . . . . . . . . . . . . . . . . . . . . . . . . . . . . 12
Précautions de sécurité
. . . . . . . . . . . . . . . . . . . . . . . . . . . . . . . . . . 18
About our product 23
The LC-Display of eyevis . . . . . . . . . . . . . . . . . . . . . . . . . . . . . . . . . 23
Features of the eyevis display
� � � � � � � � � � � � � � � � � � � � � � � � � � � � � � � � 23
The eyeProcessingUnit - EPU (optional)
. . . . . . . . . . . . . . . . . . . 24
EPU - Key Features
� � � � � � � � � � � � � � � � � � � � � � � � � � � � � � � � � � � � � � � � � � 24
Packaging 25
Unpacking . . . . . . . . . . . . . . . . . . . . . . . . . . . . . . . . . . . . . . . . . . . . . 25
Packing list
. . . . . . . . . . . . . . . . . . . . . . . . . . . . . . . . . . . . . . . . . . . . . 25
Accessory box
� � � � � � � � � � � � � � � � � � � � � � � � � � � � � � � � � � � � � � � � � � � � � � 26
Installation possibilities for EYE-LCD-FX series 27
Optional Front-Service-Mechanism . . . . . . . . . . . . . . . . . . . . . . . 27
Connectors 28
Overview . . . . . . . . . . . . . . . . . . . . . . . . . . . . . . . . . . . . . . . . . . . . . . . 28
Power cord connection
. . . . . . . . . . . . . . . . . . . . . . . . . . . . . . . . . . 28
Input source connections
. . . . . . . . . . . . . . . . . . . . . . . . . . . . . . . . 29
Connectors and controls of EPU
. . . . . . . . . . . . . . . . . . . . . . . . . . 30
Front Panel EPU with Intel® Core™ processor
� � � � � � � � � � � � � � � � � � 30
Front Panel of EPU with Intel® Celeron™ processor
� � � � � � � � � � � � � 31
Indicator LED
. . . . . . . . . . . . . . . . . . . . . . . . . . . . . . . . . . . . . . . . . . . 32
Linking the displays 33
Signal-Daisy-Chain via DisplayPort . . . . . . . . . . . . . . . . . . . . . . . 33
Example Video wall matrix 3x3 displays
� � � � � � � � � � � � � � � � � � � � � � 33
Assigning display IDs
. . . . . . . . . . . . . . . . . . . . . . . . . . . . . . . . . . . . 34
Trigger automatic adjustments of IDs using the OSD
� � � � � � � � � � � 34
Trigger automatic adjustment of IDs with eyeDeviceSetup
� � � � � 34
Trigger automatic adjustment of IDs using a terminal program
� 34
Adjusting automatically assigned IDs
� � � � � � � � � � � � � � � � � � � � � � � � 35
Resetting display IDs
� � � � � � � � � � � � � � � � � � � � � � � � � � � � � � � � � � � � � � � � 35
Operating the Display 36
Setup process . . . . . . . . . . . . . . . . . . . . . . . . . . . . . . . . . . . . . . . . . . 36
Power button functions of the the remote control and EPU
. . 37
Power button functions of the remote control
� � � � � � � � � � � � � � � � � 37
Power button functions of EPU
(*)
� � � � � � � � � � � � � � � � � � � � � � � � � � � � � 37
Controlling the display 38
The Remote Control (RC) . . . . . . . . . . . . . . . . . . . . . . . . . . . . . . . . . 38
Opening the On-Screen-Display (OSD)
� � � � � � � � � � � � � � � � � � � � � � � � 38
Navigating in the OSD menu
� � � � � � � � � � � � � � � � � � � � � � � � � � � � � � � � � 38
Special keys and key sequences
� � � � � � � � � � � � � � � � � � � � � � � � � � � � � � 38
Changing the remote control batteries
. . . . . . . . . . . . . . . . . . . . 39
OSD menu 40
Using the OSD menu . . . . . . . . . . . . . . . . . . . . . . . . . . . . . . . . . . . . 40
Picture menu
. . . . . . . . . . . . . . . . . . . . . . . . . . . . . . . . . . . . . . . . . . . 41
Color Management menu
� � � � � � � � � � � � � � � � � � � � � � � � � � � � � � � � � � � 42
User Color menu
� � � � � � � � � � � � � � � � � � � � � � � � � � � � � � � � � � � � � � � � � � � � 43
Display menu
. . . . . . . . . . . . . . . . . . . . . . . . . . . . . . . . . . . . . . . . . . . 44
PC RGB menu
� � � � � � � � � � � � � � � � � � � � � � � � � � � � � � � � � � � � � � � � � � � � � � � 45
Setup menu
. . . . . . . . . . . . . . . . . . . . . . . . . . . . . . . . . . . . . . . . . . . . 46
Info menu
� � � � � � � � � � � � � � � � � � � � � � � � � � � � � � � � � � � � � � � � � � � � � � � � � � 47
OSD menu
� � � � � � � � � � � � � � � � � � � � � � � � � � � � � � � � � � � � � � � � � � � � � � � � � � 48
Advanced Setup menu
� � � � � � � � � � � � � � � � � � � � � � � � � � � � � � � � � � � � � � 49
Matrix Mode menu
� � � � � � � � � � � � � � � � � � � � � � � � � � � � � � � � � � � � � � � � � 50
Inputs menu
. . . . . . . . . . . . . . . . . . . . . . . . . . . . . . . . . . . . . . . . . . . . 51
TheeyeDeviceSetupsoftware 52
Starting the eyeDeviceSetup software . . . . . . . . . . . . . . . . . . . . 52
The interface of eyeDeviceSetup software
. . . . . . . . . . . . . . . . . 53
The Load/Save area
� � � � � � � � � � � � � � � � � � � � � � � � � � � � � � � � � � � � � � � � � 54
The selection area
� � � � � � � � � � � � � � � � � � � � � � � � � � � � � � � � � � � � � � � � � � � 54
The parameter area
� � � � � � � � � � � � � � � � � � � � � � � � � � � � � � � � � � � � � � � � � 55
Establishing communication
. . . . . . . . . . . . . . . . . . . . . . . . . . . . . 56
Establishing communication
� � � � � � � � � � � � � � � � � � � � � � � � � � � � � � � � � 56
Entering the wall size
� � � � � � � � � � � � � � � � � � � � � � � � � � � � � � � � � � � � � � � � 57
Reading the configurations
� � � � � � � � � � � � � � � � � � � � � � � � � � � � � � � � � � 57
Saving the configuration
� � � � � � � � � � � � � � � � � � � � � � � � � � � � � � � � � � � � 57
Load the configuration
� � � � � � � � � � � � � � � � � � � � � � � � � � � � � � � � � � � � � � 57
Parameters
. . . . . . . . . . . . . . . . . . . . . . . . . . . . . . . . . . . . . . . . . . . . . 58
User
� � � � � � � � � � � � � � � � � � � � � � � � � � � � � � � � � � � � � � � � � � � � � � � � � � � � � � � � 58
Setup
� � � � � � � � � � � � � � � � � � � � � � � � � � � � � � � � � � � � � � � � � � � � � � � � � � � � � � 59
Service
� � � � � � � � � � � � � � � � � � � � � � � � � � � � � � � � � � � � � � � � � � � � � � � � � � � � � 61
Status
� � � � � � � � � � � � � � � � � � � � � � � � � � � � � � � � � � � � � � � � � � � � � � � � � � � � � � 62
Preference
� � � � � � � � � � � � � � � � � � � � � � � � � � � � � � � � � � � � � � � � � � � � � � � � � � 63
Reports
� � � � � � � � � � � � � � � � � � � � � � � � � � � � � � � � � � � � � � � � � � � � � � � � � � � � 64
EYE-LCD-5500-XSN-LD-FX
3
Version 1.0 | May 2015
Page 4
Effects in continuous operation of LCDs 65
Image sticking � � � � � � � � � � � � � � � � � � � � � � � � � � � � � � � � � � � � � � � � � � � � � �65
Mura
� � � � � � � � � � � � � � � � � � � � � � � � � � � � � � � � � � � � � � � � � � � � � � � � � � � � � � � 65
Shade formation
� � � � � � � � � � � � � � � � � � � � � � � � � � � � � � � � � � � � � � � � � � � � 65
Prevention of undesirable effects 66
Evaluation of visual range 67
Pollutions . . . . . . . . . . . . . . . . . . . . . . . . . . . . . . . . . . . . . . . . . . . . . . 67
Tolerance limits for bonded glass surfaces
� � � � � � � � � � � � � � � � � � � � 67
Tolerance limits for optional touch surfaces
� � � � � � � � � � � � � � � � � � � 67
Failure of pixel
. . . . . . . . . . . . . . . . . . . . . . . . . . . . . . . . . . . . . . . . . . 67
Overview acceptable total number of dot defects
. . . . . . . . . . 68
Troubleshooting guide 69
Malfunction or trouble . . . . . . . . . . . . . . . . . . . . . . . . . . . . . . . . . . 69
Warranty terms and conditions 70
Duration and validity of warranty . . . . . . . . . . . . . . . . . . . . . . . . . 70
Proof of purchase
. . . . . . . . . . . . . . . . . . . . . . . . . . . . . . . . . . . . . . . 70
Warranty service or exchange during warranty period
. . . . . . 70
Dead On Arrival (DOA)
� � � � � � � � � � � � � � � � � � � � � � � � � � � � � � � � � � � � � � 70
Return-to-Base-Warranty (Bring-In Warranty)
� � � � � � � � � � � � � � � � �70
Repair and return
� � � � � � � � � � � � � � � � � � � � � � � � � � � � � � � � � � � � � � � � � � � 70
Temporary exchange equipment during repair time
� � � � � � � � � � �70
Warranty on repairs
� � � � � � � � � � � � � � � � � � � � � � � � � � � � � � � � � � � � � � � � �70
Warranty exclusions
. . . . . . . . . . . . . . . . . . . . . . . . . . . . . . . . . . . . . 71
General exclusions
� � � � � � � � � � � � � � � � � � � � � � � � � � � � � � � � � � � � � � � � � � 71
"Image Sticking" (memory) effect and "Mura"
� � � � � � � � � � � � � � � � � 71
Failure of pixel
� � � � � � � � � � � � � � � � � � � � � � � � � � � � � � � � � � � � � � � � � � � � � � 71
Accessories
� � � � � � � � � � � � � � � � � � � � � � � � � � � � � � � � � � � � � � � � � � � � � � � � � 71
Factory-applied serial number
� � � � � � � � � � � � � � � � � � � � � � � � � � � � � � � 71
Service contact
. . . . . . . . . . . . . . . . . . . . . . . . . . . . . . . . . . . . . . . . . 71
Advised procedure for raising a claim
. . . . . . . . . . . . . . . . . . . . . 72
Consider the manual before raising a claim
� � � � � � � � � � � � � � � � � � � 72
Prepare necessary information
� � � � � � � � � � � � � � � � � � � � � � � � � � � � � � � 72
Approval by eyevis
� � � � � � � � � � � � � � � � � � � � � � � � � � � � � � � � � � � � � � � � � � 72
Service code: RMA number
� � � � � � � � � � � � � � � � � � � � � � � � � � � � � � � � � � � 72
Packing
� � � � � � � � � � � � � � � � � � � � � � � � � � � � � � � � � � � � � � � � � � � � � � � � � � � � 72
Transport
� � � � � � � � � � � � � � � � � � � � � � � � � � � � � � � � � � � � � � � � � � � � � � � � � � � 72
Costs not covered by warranty defects
� � � � � � � � � � � � � � � � � � � � � � � �72
Legal and other claims
. . . . . . . . . . . . . . . . . . . . . . . . . . . . . . . . . . 72
Limitations of liability
. . . . . . . . . . . . . . . . . . . . . . . . . . . . . . . . . . . 73
Appendix 74
Technical Specification . . . . . . . . . . . . . . . . . . . . . . . . . . . . . . . . . . 74
Technical Specification EPU
. . . . . . . . . . . . . . . . . . . . . . . . . . . . . . 75
Dimensions
. . . . . . . . . . . . . . . . . . . . . . . . . . . . . . . . . . . . . . . . . . . . . 76
RS232 protocol
. . . . . . . . . . . . . . . . . . . . . . . . . . . . . . . . . . . . . . . . . 77
General description
� � � � � � � � � � � � � � � � � � � � � � � � � � � � � � � � � � � � � � � � � 77
Communication settings
� � � � � � � � � � � � � � � � � � � � � � � � � � � � � � � � � � � � 77
ID assignment
� � � � � � � � � � � � � � � � � � � � � � � � � � � � � � � � � � � � � � � � � � � � � � 77
Description of commands
� � � � � � � � � � � � � � � � � � � � � � � � � � � � � � � � � � � 77
Broadcast
� � � � � � � � � � � � � � � � � � � � � � � � � � � � � � � � � � � � � � � � � � � � � � � � � � 78
Remarks
� � � � � � � � � � � � � � � � � � � � � � � � � � � � � � � � � � � � � � � � � � � � � � � � � � � � 78
RS232 command list
� � � � � � � � � � � � � � � � � � � � � � � � � � � � � � � � � � � � � � � � 79
Timings
. . . . . . . . . . . . . . . . . . . . . . . . . . . . . . . . . . . . . . . . . . . . . . . . 81
Index 84
EYE-LCD-5500-XSN-LD-FX4
User Manual
Page 5
About this manual
Read and pay attention to this manual. It contains important information on
the product. In particular, note all of the safety instructions and warnings.
Keep this manual in a safe place!
Warnings used
NOTICE
Indicates a hazard that could lead to damage or destruction of the product.
The general warning symbol indicates a hazard that could lead to injuries or
death. In the text section, the general warning symbol is used in conjunction
with the warning levels described below.
CAUTION
Indicates a hazard that could lead to minor or moderate injuries.
WARNING
Indicates a hazard that could lead to death or serious injury.
DANGER
Indicates a hazard that leads to immediate death or serious injury.
Symbols used
►
Indicates a single action or multiple actions which do not have to be
performed in any specific order.
1.
2.
3.
Indicates a set of actions that have to be performed in a specific
order.
EYE-LCD-5500-XSN-LD-FX
5
Version 1.0 | May 2015
Page 6

Safety / Sicherheit / Sécurité
Safety
Safety precaution
Electricity is used to perform many useful functions, but it can also cause
personal injuries and property damage if improperly handled. This product has
been engineered and manufactured with the highest priority on safety.
However, improper use can result in electric shock and/or fire. In order to
prevent potential danger, please observe the following instructions when
installing, operating and cleaning the product. To ensure your safety and
prolong the service life of your LCD product, please read the following
precautions carefully before using the product.
) Read instructions — All operating instructions must be read and understood
before the product is operated.
) Keep this manual in a safe place — These safety and operating instructions
must be kept in a safe place for future reference.
) Observe warnings — All warnings on the product and in the instructions
must be observed closely.
) Follow instructions — All operating instructions must be followed.
) Cleaning — Unplug the power cord from the AC outlet before cleaning the
product. Use a dry cloth to clean the product. Do not use liquid cleaners or
aerosol cleaners.
) Attachments — Do not use attachments not recommended by the
manufacturer. Use of inadequate attachments can result in accidents.
) Water and moisture — Do not use the product near water. Do not install the
product in a place where water may splash onto it. Be careful of equipment
which drains water such as an air-conditioner.
) Ventilation — The vents and other openings in the cabinet are designed for
ventilation. Do not cover or block these vents and openings since insufficient
ventilation can cause overheating and/or shorten the life of the product. Do
not place the product on a sofa, rug or other similar surface, since they can
block ventilation openings. Do not place the product in an enclosed place
such as a bookcase or rack, unless proper ventilation is provided or the
manufacturer’s instructions are followed.
) Power cord protection — The power cords must be routed properly to
prevent people from stepping on them or objects from resting on them.
) The LCD panel used in this product is made of glass. Therefore, it can break
when the product is dropped or applied with impact. Be careful not to be
injured by broken glass pieces in case the LCD panel breaks.
) Overloading — Do not overload AC outlets or extension cords. Overloading
can cause fire or electric shock.
) Entering of objects and liquids — Never insert an object into the product
through vents or openings. High voltage flows in the product, and inserting
an object can cause electric shock and/or short internal parts. For the same
reason, do not spill water or liquid on the product.
) Servicing — Do not attempt to service the product yourself. Removing covers
can expose you to high voltage and other dangerous conditions. Request a
qualified service person to perform servicing.
EYE-LCD-5500-XSN-LD-FX6
User Manual
Page 7

) Repair — If any of the following conditions occurs, unplug the power cord
from the AC outlet, and request a qualified service person to perform repairs.
•
When the power cord or plug is damaged.
•
When a liquid was spilled on the product or when objects have fallen into
the product.
•
When the product has been exposed to rain or water.
•
When the product does not operate properly as described in the operating
instructions.
•
Do not touch the controls other than those described in the operating
instructions. Improper adjustment of controls not described in the
instructions can cause damage, which often requires extensive adjustment
work by a qualified technician.
•
When the product has been dropped or damaged.
•
When the product displays an abnormal condition. Any noticeable
abnormality in the product indicates that the product needs servicing.
) Replacement parts — In case the product needs replacement parts, make
sure that the service person uses replacement parts specified by the
manufacturer, or those with the same characteristics and performance as the
original parts. Use of unauthorised parts can result in fire, electric shock and/
or other danger.
) Safety checks — Upon completion of service or repair work, request the
service technician to perform safety checks to ensure that the product is in
proper operating condition.
) Wall mounting — When mounting the product on a wall, be sure to install the
product according to the method recommended by the manufacturer.
) Heat sources — Keep the product away from heat sources such as radiators,
heaters, stoves and other heat-generating products (including amplifiers).
) Batteries — Incorrect use of batteries may cause the batteries to burst or
ignite. A leaky battery may corrode the equipment, dirty your hands or spoil
your clothing. In order to avoid these problems, make sure to observe the
precautions below:
•
Use the specified batteries only.
•
Install the batteries with due attention to the plus (+) and minus (-) sides of
the batteries according to the instructions in the compartment.
•
Do not mix old and new batteries.
•
Do not mix batteries of different types. Voltage specifications of batteries
of the same shape may vary.
•
Replace an exhausted battery with a new one promptly.
•
If you will not use the remote control for a long time, remove the batteries.
•
If leaked battery fluid gets on your skin or clothing, rinse immediately and
thoroughly. If it gets into your eye, bathe your eye well rather than rubbing
and seek medical treatment immediately. Leaked battery fluid that gets
into your eye or your clothing may cause a skin irritation or damage your
eye.
) Usage of the monitor must not be accompanied by fatal risks or dangers that,
could lead directly to death, personal injury, severe physical damage or other
loss, including nuclear reaction control in nuclear facility, medical life support
system, and missile launch control in a weapon system.
) Do not stay in contact with the parts of the product that become hot for long
periods of time. Doing so may result in low-temperature burns.
EYE-LCD-5500-XSN-LD-FX
7
Version 1.0 | May 2015
Page 8

Safety intructions
) The TFT colour LCD panel used in this monitor is made with the application of
high precision technology. However, there may be minute points on the
screen where pixels never light or are permanently lit. Also, if the screen is
viewed from an acute angle there may be uneven colours or brightness.
) Please note that these are not malfunctions but common phenomena of LCDs
and will not affect the performance of the monitor.
) Do not display a still picture for a long period, as this could cause a residual
image.
) Never rub or tap the monitor with hard objects.
) Please understand that eyevis bears no responsibility for errors made during
use by the customer or a third party, nor for any other malfunctions or
damage to this product arising during use, except where indemnity liability is
recognized under law.
) This monitor and its accessories may be upgraded without advance notice.
) Do not use the monitor where there is a lot of dust, where humidity is high,
or where the monitor may come into contact with oil or steam, as this could
lead to fire.
) Ensure that the monitor does not come into contact with water or other
liquids. Ensure that no objects such as paper clips or pins enter the monitor
as this could lead to fire or electric shock.
) Do not place the monitor on top of unstable objects or in unsafe places. Do
not allow the monitor to receive strong shocks or to strongly vibrate. Causing
the monitor to fall or topple over may damage it.
) Do not use the monitor near heating equipment or in places where there is
likelihood of high temperature, as this may lead to generation of excessive
heat and outbreak of fire.
) Do not use the monitor in places where it may be exposed to direct sunlight.
) Please be sure to constantly remove dust and garbage that has attached to
the ventilation opening. If dust collects in the ventilation opening, it may
lead to excessive heat, outbreak of fire, or malfunction. As a standard, clean
the inside of the monitor once every year. If dust collects inside the monitor,
it may lead to excessive heat, outbreak of fire, or malfunction. Please request
a cleaning of the inside of the monitor from an authorized Eyevis servicing
dealer or service centre.
) Images cannot be rotated on this monitor.
) When using in vertical orientation, you will need to prepare appropriately
orientated content in advance.
) Please make sure that the socket-outlet is installed near the System and is
easily accessible. The Power supply cord serves as a disconnect device.
EYE-LCD-5500-XSN-LD-FX8
User Manual
Page 9

The power cord
) Do not damage the power cord nor place heavy objects on it, stretch it or
over bend it.
) Do not use damaged extension cords. Damage to the cord may result in fire
or electric shock.
) Use only the power cord supplied with the monitor.
) Do not use the power cord with a power tap. Adding an extension cord may
lead to fire as a result of overheating.
) Do not remove or insert the power plug with wet hands. Doing so could
result in electric shock.
) Unplug the power cord if it is not used for a long time.
) Do not attempt to repair the power cord if it is broken or malfunctioning.
Refer the servicing to the service representative.
EYE-LCD-5500-XSN-LD-FX
9
Version 1.0 | May 2015
Page 10
NOTICE
This is a class A product according EN 55022: 2010. In a domestic
environment this product may cause radio interference in which case the
user may be required to take adequate counter measures.
NOTICE
To maintain compliance with EMC regulations, use shielded cables to
connect to the following terminals:
PC/AV DVI-D output terminal, PC/AV DVI-D input terminal, PC/AV HDMI
input terminal, PC D-SUB input terminal, PC RGB input terminals, and
RS-232C input/output terminals.
WARNING
If a monitor is not positioned in a sufficiently stable location, it can be
potentially hazardous due to falling. Many injuries, particularly to
children, can be avoided by taking simple precautions such as:
•
Using fixing devices like wall mount brackets recommended by the
manufacturer.
•
Only using furniture that can safely support the monitor.
•
Ensuring the monitor is not overhanging the edge of the supporting
furniture.
•
Not placing the monitor on tall furniture (for example, cupboards or
bookcases) without anchoring both the furniture and the monitor to a
suitable support.
•
Not standing the monitors on cloth or other materials placed between
the monitor and supporting furniture.
•
Educating children about the dangers of climbing on furniture to reach
the monitor or its controls.
WARNING
Especially for child safety
•
Don’t allow children to climb on or play with the monitor.
•
Don’t place the monitor on furniture that can easily be used as steps,
such as a chest of drawers.
•
Remember that children can become excited while watching a program,
especially on a “larger than life” monitor. Care should be taken to place
or install the monitor where it cannot be pushed, pulled over, or
knocked down.
•
Care should be taken to route all cords and cables connected to the
monitor so that they cannot be pulled or grabbed by curious children.
EYE-LCD-5500-XSN-LD-FX10
User Manual
Page 11
Zu diesem Handbuch
Lesen und beachten Sie dieses Handbuch. Darin stehen wichtige
Informationen zum Produkt. Beachten Sie insbesondere alle Sicherheits- und
Warnhinweise.
Bewahren Sie diese Anleitung sorgfältig auf!
Verwendete Warnhinweise
ACHTUNG
Kennzeichnet eine Gefahr, die zur Beschädigung oder Zerstörung des
Produkts führen kann.
Das allgemeine Warnsymbol kennzeichnet eine Gefahr, die zu Verletzungen
oder zum Tod führen kann. Im Textteil wird das allgemeine Warnsymbol in
Verbindung mit den nachfolgend beschriebenen Warnstufen verwendet.
VORSICHT
Kennzeichnet eine Gefahr, die zu leichten oder mittleren Verletzungen
führen kann.
WARNUNG
Kennzeichnet eine Gefahr, die zum Tod oder zu schweren Verletzungen
führen kann.
GEFAHR
Kennzeichnet eine Gefahr, die unmittelbar zum Tod oder zu schweren
Verletzungen führt.
Verwendete Symbole
►
Kennzeichnet einen einzelnen Handlungsschritt oder mehrere
Handlungsschritte, jedoch ohne feste Abfolge.
1.
2.
3.
Kennzeichnet ein Folge von Handlungsschritten, deren
vorgegebene Reihenfolge eingehalten werden muss.
EYE-LCD-5500-XSN-LD-FX
11
Version 1.0 | May 2015
Page 12

Sicherheit
Sicherheitsvorkehrungen
Elektrizität erfüllt viele nützliche Aufgaben, kann aber auch Personen- und
Sachschäden verursachen, wenn sie unsachgemäß gehandhabt wird. Dieses
Produkt wurde mit Sicherheit als oberster Priorität konstruiert und hergestellt.
Dennoch besteht bei unsachgemäßer Handhabung u.U. Stromschlag- und
Brandgefahr. Um mögliche Gefahren zu vermeiden, befolgen Sie beim
Aufstellen, Betreiben und Reinigen des Produkts bitte die nachstehenden
Anleitungen. Lesen Sie im Interesse Ihrer eigenen Sicherheit sowie einer
langen Lebensdauer des LCD-Gerätes zunächst die nachstehenden Hinweise
durch, bevor Sie das Produkt in Verwendung nehmen.
) Bedienungsanleitungen lesen — Nehmen Sie das Produkt erst in Betrieb,
nachdem Sie alle diesbezüglichen Hinweise gelesen und verstanden haben.
) Bedienungsanleitung aufbewahren — Diese Bedienungsanleitung mit den
Sicherheits- und Bedienungshinweisen sollte aufbewahrt werden, damit Sie
im Bedarfsfall jederzeit darauf zurückgreifen können.
) Warnungen beachten — Alle Warnungen auf dem Gerät und in den
Bedienungsanleitungen sind genauestens zu beachten.
) Anleitungen befolgen — Alle Anleitungen zur Bedienung müssen befolgt
werden.
) Reinigung — Ziehen Sie vor dem Reinigen des Produkts das Netzkabel.
Reinigen Sie das Gerät mit einem trockenen Tuch. Verwenden Sie keine
flüssigen Reiniger oder Aerosol-Sprays.
) Zusatzgeräte und Zubehör — Verwenden Sie ausschließlich vom Hersteller
empfohlenes Zubehör. Bei Verwendung anderer Zusatzgeräte bzw.
Zubehörteile besteht evtl. Unfallgefahr.
) Wasser und Feuchtigkeit — Benutzen Sie das Gerät nicht in der Nähe von
Wasser. Montieren Sie das Gerät unter keinen Umständen an einer Stelle, an
der Wasser darauf tropfen kann. Achten Sie dabei besonders auf Geräte, aus
denen zuweilen Wasser tropft, wie etwa Klimaanlagen.
) Belüftung — Die Belüftungsschlitze und andere Öffnungen im Gehäuse
dienen der Belüftung des Geräts.
) Halten Sie diese Öffnungen unbedingt frei, da eine unzureichende Belüftung
zu einer Überhitzung bzw. Verkürzung der Lebensdauer des Produkts führen
kann. Stellen Sie das Gerät nicht auf ein Sofa, einen Lappen oder ähnliche
Oberflächen, da die Belüftungsschlitze dadurch blockiert werden können.
Stellen Sie das Gerät auch nicht in ein umschlossenes Gehäuse, wie z.B. in ein
Bücherregal oder einen Schrank, sofern dort nicht für eine ausreichende
Belüftung gesorgt ist oder die Anweisungen des Herstellers befolgt werden.
) Netzkabel-Schutz — Die Netzkabel sind so zu verlegen, dass sie vor Tritten
geschützt sind und keine schweren Objekte darauf abgestellt werden.
) Das LCD-Panel ist ein Glasprodukt. Es kann daher brechen, wenn es zu Boden
fällt oder einen Schlag oder Stoß erhält. Achtung: bei einem Bruch des LCDPanels besteht durch die Glasstücke Verletzungsgefahr.
) Überlastung — Vermeiden Sie eine Überlastung von Netzsteckdosen und
Verlängerungskabeln. Bei Überlastung besteht Brand- und
Stromschlaggefahr.
) Eindringen von Gegenständen und Flüssigkeiten — Schieben Sie niemals
irgendwelche Gegenstände durch die Gehäuseöffnungen in das Innere des
Geräts. Im Produkt liegen hohe Spannungen vor. Durch das Einschieben von
EYE-LCD-5500-XSN-LD-FX12
User Manual
Page 13

Gegenständen besteht Stromschlaggefahr bzw. die Gefahr von Kurzschlüssen
zwischen den Bauteilen. Aus demselben Grunde dürfen auch keine
Flüssigkeiten auf das Gerät verschüttet werden.
) Wartung — Versuchen Sie auf keinen Fall, selbst Wartungsarbeiten am Gerät
durchzuführen. Durch das Entfernen von Abdeckungen setzen Sie sich hohen
Spannungen und anderen Gefahren aus. Lassen Sie sämtliche
Wartungsarbeiten ausschließlich von qualifiziertem Service-Personal
ausführen.
) Reparaturen — Ziehen Sie in den folgenden Situationen sofort das Netzkabel
und lassen Sie das Produkt von qualifiziertem Service-Personal reparieren:
•
Wenn das Netzkabel oder der Netzstecker beschädigt ist.
•
Wenn Flüssigkeit in das Gerät eingedrungen ist oder Gegenstände in das
Gerät gefallen sind.
•
Wenn das Gerät nass geworden ist (z.B. durch Regen).
•
Wenn das Gerät nicht wie in der Bedienungsanleitung beschrieben
funktioniert.
•
Nehmen Sie nur die in den Bedienungsanleitungen beschriebenen
Einstellungen vor. Unsachgemäße Einstellungen an anderen Reglern
können zu einer Beschädigung führen und machen häufig umfangreiche
Einstellarbeiten durch einen qualifizierten Service-Techniker erforderlich.
•
Wenn das Produkt fallen gelassen oder beschädigt wurde.
•
Wenn das Gerät einen anormalen Zustand aufweist. Jedes erkennbare
anormale Verhalten zeigt an, dass der Kundendienst erforderlich ist.
) Ersatzteile — Wenn Ersatzteile benötigt werden, stellen Sie bitte sicher, dass
der Service-Techniker nur die vom Hersteller bezeichneten Teile oder Teile mit
gleichen Eigenschaften und gleichem Leistungsvermögen wie die
Originalteile verwendet. Die Verwendung anderer Teile kann zu einem Brand,
zu Stromschlag oder anderen Gefahren führen.
) Sicherheitsüberprüfungen — Lassen Sie vom Service-Techniker nach Service-
oder Reparaturarbeiten eine Sicherheitsüberprüfung vornehmen, um
sicherzustellen, dass das Produkt in einem einwandfreien Betriebszustand ist.
) Wandmontage — Bei der Montage des Gerätes an der Wand ist
sicherzustellen, dass die Befestigung nach der vom Hersteller empfohlenen
Methode erfolgt.
) Wärmequellen — Stellen Sie das Produkt nicht in der Nähe von Heizkörpern,
Heizgeräten, Öfen oder anderen Geräten (wie z.B. Verstärkern) auf, die Hitze
abstrahlen.
) Batterien — Durch falsche Anwendung können die Batterien explodieren
oder sich entzünden. Eine undichte Batterie kann Korrosion am Gerät
verursachen sowie Hände und Kleidung verschmutzen. Um diese Probleme
zu vermeiden, beachten Sie bitte die folgenden Sicherheitshinweise:
•
Verwenden Sie nur empfohlene Batterietypen.
•
Achten Sie beim Einlegen der Batterien darauf, dass die Plus- (+) und die
Minus- (-) Seite der Batterien gemäß den Anweisungen im Fachinneren
richtig ausgerichtet sind.
•
Verwenden Sie nicht alte und neue Batterien gemeinsam.
•
Verwenden Sie keine Batterien unterschiedlichen Typs. Batterien derselben
Form können unterschiedliche Spannungswerte besitzen.
•
Ersetzen Sie eine leere Batterie sofort durch eine neue.
•
Wenn Sie die Fernbedienung längere Zeit nicht verwenden, entnehmen Sie
die Batterien.
EYE-LCD-5500-XSN-LD-FX
13
Version 1.0 | May 2015
Page 14

•
Wenn ausgetretene Batterieflüssigkeit auf Haut oder Kleidung gelangt,
müssen Sie diese sofort gründlich mit Wasser spülen. Wenn
Batterieflüssigkeit in die Augen gelangt, dürfen Sie die Augen auf keinen
Fall reiben, sondern am besten mit viel Wasser spülen und sofort einen Arzt
aufsuchen. Batterieflüssigkeit kann Hautreizungen hervorrufen oder
Augenschäden verursachen
) Bei der Verwendung des Monitors ist darauf zu achten, dass Gefahren für Leib
und Leben, Schäden an Gebäuden und anderen Gegenständen sowie eine
Beeinflussung von wichtigen oder gefährlichen Geräten, wie z.B. der
Nuklearreaktionssteuerung in Atomanlagen, lebenserhaltenden Geräten in
medizinischen Einrichtungen oder Raketenabschusssteuerungen in
Waffensystemen vermieden werden.
) Vermeiden Sie es, Teile des Produkts, die sich erwärmen, über längere Zeit
hinweg zu berühren. Dies könnte zu leichten Verbrennungen führen.
Sicherheitshinweise
) Bei der Herstellung des TFT Farb-LCD-Panels dieses Monitors wurde
Präzisionstechnologie eingesetzt. Trotzdem können einzelne Punkte am
Bildschirm überhaupt nicht leuchten oder ständig leuchten. Bei Betrachtung
des Bildschirms aus einem spitzen Winkel können die Farben oder die
Helligkeit unregelmäßig erscheinen. Bitte beachten Sie, dass es sich dabei um
keine Qualitätsmängel handelt, sondern um allgemein bei LCD-Geräten
auftretende Phänomene, welche die Leistung des Monitors in keiner Weise
beeinträchtigen.
) Lassen Sie niemals ein Standbild über längere Zeit hinweg anzeigen, da dies
ein Nachleuchten am Bildschirm zur Folge haben könnte.
) Vermeiden Sie es, den Monitor mit harten Gegenständen abzureiben oder zu
berühren.
) Wir bitten um Ihr Verständnis, dass eyevis über die gesetzlich anerkannte
Leistungshaftung hinaus keine Haftung für Fehler übernimmt, die sich aus
der Verwendung durch den Kunden oder einen Dritten ergeben, und auch
nicht für sonstige Funktionsstörungen oder Schäden, die während der
Verwendung am Gerät entstehen.
) Eine Aktualisierung dieses Monitors und seines Zubehörs ist vorbehalten.
) Verwenden Sie den Monitor nicht an Orten mit hoher Staubentwicklung,
hoher Luftfeuchtigkeit oder an Orten, an denen der Monitor mit Öl oder
Dampf in Kontakt kommen könnte, da dies zu einem Brand führen könnte.
) Achten Sie darauf, dass der Monitor nicht mit Wasser oder anderen
Flüssigkeiten in Berührung kommt. Achten Sie auch darauf, keine
Gegenstände, wie z.B. Büroklammern oder sonstige spitze Gegenstände, in
den Monitor zu stecken. Die Folge könnte ein Brand oder Stromschlag sein.
) Stellen Sie den Monitor nicht auf instabile Gegenstände oder an andere
unsichere Stellen. Setzen Sie den Monitor keinen starken Stößen oder
Erschütterungen aus. Wenn der Monitor hinunterfällt oder umkippt, könnte
er Schaden nehmen.
) Stellen Sie den Monitor nicht in der Nähe von Heizungen oder an anderen
Stellen auf, an denen hohe Temperaturen auftreten, da dies zu einer
übermäßig starken Erhitzung mit der Folge eines Brandes führen könnte.
) Stellen Sie den Monitor nicht an Orten auf, an denen er direktem Sonnenlicht
ausgesetzt ist.
EYE-LCD-5500-XSN-LD-FX14
User Manual
Page 15

) Bitte entfernen Sie regelmäßig Staub und Schmutz von der
Belüftungsöffnung. Wenn sich Staub an der Belüftungsöffnung ansammeln,
kann es zu einer Überhitzung des Geräts und in der Folge zu einem Brand
oder zu Fehlfunktionen kommen.
) Reinigen Sie das Innere des Monitors mindestens einmal jährlich. Wenn sich
Staub im Inneren des Monitors ansammelt, kann es zu einer Überhitzung des
Geräts und in der Folge zu einem Brand oder Fehlfunktionen kommen. Bitte
lassen Sie das Innere des Monitors von einem autorisierten eyevis-Händler
oder einem eyevis Servicecenter reinigen.
) Bilder können auf diesem Monitor nicht gedreht werden. Wenn Sie den
Monitor in vertikaler Ausrichtung verwenden, müssen Sie die Bilder zuvor
entsprechend drehen.
) Bitte achten Sie darauf, dass die Steckdose in der Nähe des Systems ist und
leicht zugänglich ist. Das Netzkabel dient als eine Trennvorrichtung.
Das Netzkabel
) Beschädigen Sie das Netzkabel nicht, stellen Sie keine schweren Gegenstände
darauf, und überdehnen oder knicken Sie es nicht.
) Verwenden Sie keine beschädigten Verlängerungskabel. Ein beschädigtes
Kabel kann einen Brand oder Stromschlag verursachen.
) Verwenden Sie nur das mit dem Monitor gelieferte Netzkabel.
) Verwenden Sie das Netzkabel nicht mit einer Mehrfachsteckdose. Die
Verwendung eines Verlängerungskabels kann aufgrund von Überhitzung zu
einem Brand führen.
) Achten Sie darauf, dass Sie beim Einstecken oder Ausstecken des
Netzsteckers keine nassen Hände haben, um einen Elektroschlag zu
vermeiden.
) Ziehen Sie das Netzkabel aus der Steckdose, wenn Sie das Gerät längere Zeit
über nicht verwenden.
) Führen Sie keine Reparaturversuche an einem beschädigten oder nicht
funktionstüchtigen Netzkabel durch. Überlassen Sie Reparaturarbeiten
ausschließlich dem Kundendienst.
EYE-LCD-5500-XSN-LD-FX
15
Version 1.0 | May 2015
Page 16
ACHTUNG
Dieses Gerät ist ein Produkt der Klasse A gemäß EN 55022: 2010. In
Wohnräumen kann dieses Gerät Störsignale erzeugen, die durch
entsprechende Abhilfemaßnahmen durch den Benutzer beseitigt werden
müssen.
ACHTUNG
Verwenden Sie EMV-gerechte, abgeschirmte Kabel, um die folgenden
Anschlüsse zu verbinden:
PC/AV DVI-D-Ausgangsanschluss, PC/AV DVI-D-Eingangsanschluss, PC/AV
HDMI-Eingangsanschluss, PC D-sub-Eingangsanschluss, PCRGBEingangsanschlüsse und RS-232C-Eingangs-/Ausgangsanschlüsse.
WARNUNG
Wenn ein Monitor nicht auf einer stabilen Unterlage aufgestellt wird,
besteht die Gefahr, dass er kippt oder fällt. Zahlreiche Verletzungen,
besonders bei Kindern, können durch einfache Vorsichtsmaßnahmen
vermieden werden:
•
Bei Verwendung der vom Hersteller empfohlenen
Befestigungsvorrichtungen, wie z.B. Wandhaken.
•
Stellen Sie den Monitor nur auf Möbelstücke, die ausreichend stark sind.
•
Achten Sie darauf, dass der Monitor nicht über den Rand des Möbelstücks,
auf dem er steht, vorsteht.
•
Stellen Sie den Monitor niemals auf ein großes Möbelstück (z.B. einen
Schrank oder in ein Bücherregal), ohne sowohl das
•
Möbelstück als auch den Monitor an einem geeigneten Element sicher zu
verankern.
•
Stellen Sie den Monitor niemals auf ein Tuch oder andere Materialen, die
zwischen dem Monitor und dem Möbelstück, auf dem er steht, liegen.
•
Weisen Sie Kinder eindringlich darauf hin, dass es gefährlich ist, auf ein
Möbelstück zu klettern, um an den Monitor oder seine Regler zu gelangen.
WARNUNG
Wichtige Hinweise für die Sicherheit von Kindern
•
Lassen Sie Kinder niemals auf den Monitor klettern oder am Monitor
spielen.
•
Stellen Sie den Monitor nicht auf Möbelstücke, die leicht als Stufen
verwendet werden könnten, wie zum Beispiel eine Truhe oder Kommode.
•
Bedenken Sie, dass Kinder bei Betrachtung eines Fernsehprogramms – und
ganz besonders bei einem “überlebensgroßen”
•
Monitor – in starke Aufregung verfallen können. Der Monitor sollte so
aufgestellt werden, dass er nicht umgestoßen oder gekippt werden kann.
•
Alle am Monitor angeschlossenen Kabel und Stränge sollten so verlegt
werden, dass neugierige Kinder nicht daran ziehen oder sie ergreifen
können.
EYE-LCD-5500-XSN-LD-FX16
User Manual
Page 17
À propos de ce manuel
Lisez et suivez ces instructions. Ils contient des informations importantes sur le
produit. Faites particulièrement attention à toutes les consignes de sécurité et
aux avertissements.
Conservez ce manuel soigneusement!
Des symboles d`avertissement utilisés
ATTENTION
Indique un danger qui peut endommager ou détruire le produit.
Le symbole d‘avertissement général indique un danger qui pourrait
entraîner des blessures ou la mort. Dans le texte, le symbole
d‘avertissement général est utilisé en conjonction avec les niveaux
d´alerte décrits ci-dessous.
PRÉCAUTION
Indique un danger qui pourrait provoquer des blessures mineures ou
modérées.
AVERTISSEMENT
Indique un danger qui peut provoquer des blessures graves, voire mortelles.
DANGER
Indique un danger qui provoquer la mort ou des blessures graves.
Symboles utilisés
►
Désigne une action unique ou plusieurs d‘actions, qui peuvent être
executées dans un ordre quelconque.
1.
2.
3.
Signifie une série d‘actions qui doivent être exécuteés dans l‘ordre
chronologique.
EYE-LCD-5500-XSN-LD-FX
17
Version 1.0 | May 2015
Page 18

Sécurité
Précautions de sécurité
L’électricité remplit de nombreuses fonctions utiles, mais elle peut provoquer
des blessures et des dégâts matériels si elle n’est pas utilisée correctement. Cet
appareil a été conçu et fabriqué en attachant la plus grande importance à la
sécurité. Cependant, une utilisation inadéquate peut entraîner une décharge
électrique et/ou un incendie. Afin d’éviter tout danger potentiel, veuillez
respecter les consignes suivantes lors de l’installation, de l’utilisation et du
nettoyage de l’appareil. Afin d’assurer votre propre sécurité et de prolonger la
durée de service de votre moniteur LCD, veuillez lire attentivement les
précautions ci-dessous avant d’utiliser l’appareil.
) Lisez ces explications — Vous devez lire et comprendre toutes les
informations relatives au fonctionnement de l’appareil avant de l’utiliser.
) Conservez cette brochure dans un endroit sûr — Ces explications concernant
la sécurité et le fonctionnement doivent être conservées dans un endroit sûr
pour vous y référer en cas de besoin.
) Respectez les avertissements — Tous les avertissements figurant sur l’appareil
et dans ce mode d’emploi doivent être strictement respectés.
) Suivez les instructions — Toutes les explications sur le fonctionnement
doivent être respectées.
) Nettoyage — Débranchez le cordon d’alimentation au niveau de la prise du
secteur avant de nettoyer l’appareil. Servez-vous d’un linge sec, et n’employez
pas de détergents liquides ou en atomiseur.
) Accessoires — N’utilisez pas d’accessoires non recommandés par le fabricant,
car ceci pourrait provoquer des accidents.
) Eau et humidité — N’utilisez pas cet appareil près de l’eau. N’installez pas le
produit à un endroit où il pourrait recevoir de l’eau. Évitez en particulier les
emplacements sous les appareils à vidange d’eau tels que les climatiseurs.
) Ventilation — Des ouïes et autres ouvertures sont prévues dans le coffret de
l’appareil pour sa ventilation. Ne recouvrez pas et ne bouchez pas ces
ouvertures car une ventilation insuffisante peut provoquer une surchauffe et
réduire la durée de vie de l’appareil. Ne placez pas l’appareil sur un sofa, un
tapis ou toute autre surface analogue car ceci pourrait obstruer les
ouvertures de ventilation. Cet appareil n’est pas conçu pour une installation
encastrée; ne le placez donc pas dans un endroit fermé comme une
bibliothèque ou une baie à moins qu’une ventilation adéquate ne soit prévue
et que les consignes du fabricant ne soient respectées.
) Protection du cordon d’alimentation — Faites passer les cordons
d’alimentation à un endroit où ils ne seront pas écrasés ou coincés par
d’autres objets.
) Le panneau de l’écran à cristaux liquides (LCD) de cet appareil est fabriqué en
verre et, par conséquent, il peut se briser si l’appareil tombe ou s’il reçoit un
fort impact. Veillez à ne pas vous blesser par les éclats de verre si le panneau
LCD devait être brisé.
) Surcharge — Ne surchargez pas les prises de courant ou les rallonges car ceci
peut entraîner un risque d’incendie ou d’électrocution.
) Insertion de solides ou de liquides — N’introduisez jamais des objets par les
orifices de cet appareil, car ils pourraient provoquer une électrocution et/ou
un court-circuit en touchant des pièces internes sous haute tension. Pour la
même raison, ne renversez jamais de l’eau ou un liquide sur l’appareil.
EYE-LCD-5500-XSN-LD-FX18
User Manual
Page 19

) Entretien — N’essayez pas de réparer vous-même l’appareil. La dépose des
couvercles peut vous exposer à une haute tension ou à d’autres dangers.
Confiez toute réparation à un personnel qualifié.
) Réparation — Dans les cas suivants, débranchez le cordon d’alimentation au
niveau de la prise secteur et demandez à un personnel qualifié d’effectuer les
réparations.
•
Dégât sur le cordon ou la prise de courant.
•
Infiltration d’un liquide ou pénétration d’un objet à l’intérieur de l’appareil.
•
Exposition de l’appareil à la pluie ou à l’eau.
•
Fonctionnement anormal malgré une conformité aux explications du
mode d’emploi. Ne réglez que les commandes dont il est fait mention dans
le mode d’emploi. Un réglage incorrect des autres commandes peut
provoquer des dégâts qui nécessiteraient des réparations complexes par
un technicien spécialisé.
•
Chute ou dégâts subis par l’appareil.
•
Tout changement notoire ou situation anormale de l’appareil indique
qu’une réparation est nécessaire.
) Pièces de rechange — Lorsque des pièces doivent être remplacées, assurez-
vous que le technicien a utilisé les pièces spécifiées par le fabricant ou des
pièces dont les performances et les caractéristiques sont identiques. Des
changements non autorisés de pièces peuvent entraîner un incendie, une
électrocution et/ou d’autres dangers.
) Contrôles de sécurité — Après une intervention d’entretien ou de réparation,
demandez au technicien de procéder à un contrôle pour être sûr que
l’appareil peut être utilisé en toute sécurité.
) Installation sur paroi — Si l’appareil doit être fixé sur une paroi, installez-le en
respectant la méthode recommandée par le fabricant.
) Sources de chaleur — Tenez l’appareil à l’écart de sources de chaleur, telles
que radiateurs, dispositifs de chauffage, poêles et autres appareils dégageant
de la chaleur (y compris les amplificateurs).
) Piles — Une utilisation incorrecte des piles peut les faire éclater ou prendre
feu. Une pile qui fuit peut causer des corrosions dans l’équipement, des
salissures aux mains ou abîmer vos vêtements. Afin d’éviter ces problèmes,
assurez-vous que les précautions suivantes sont appliquées :
•
Utilisez seulement des piles prescrites.
•
Installez les piles en faisant bien attention aux polarités plus (+) et moins
(-) des piles selon les instructions dans le compartiment.
•
Ne mélangez pas des piles usagées avec des neuves.
•
Ne mélangez pas des piles de différents types. Les spécifications de
voltage des piles de même forme peuvent varier.
•
Remplacez rapidement une pile épuisée par une nouvelle.
•
Si vous n’avez pas l’intention d’utiliser la télécommande pendant une
longue période, retirez les piles.
•
Si le liquide provenant d’une pile qui fuit touche votre peau ou vos habits,
rincez immédiatement et complètement les parties touchées. Si un oeil est
touché, faites immédiatement un bain d’oeil plutôt que de le frotter et
cherchez immédiatement un traitement médical. Le liquide provenant de
la fuite d’une pile qui atteint votre oeil ou vos habits peut causer une
irritation de la peau ou des dommages à votre oeil.
) L’utilisation de ce moniteur ne doit pas entraîner des risques mortels ou des
dangers qui pourraient provoquer directement la mort, des blessures sur le
personnel, des dommages physiques sévères ou d’autres destructions, y
EYE-LCD-5500-XSN-LD-FX
19
Version 1.0 | May 2015
Page 20

compris dans le contrôle des réactions nucléaires dans les installations
nucléaires, dans le système médical de réanimation, et dans le contrôle de
lancement des missiles dans les systèmes d’armes.
) N’entrez pas en contact direct avec les parties du produit ayant chauffé
pendant de longues périodes. Il pourrait en résulter des brûlures à basse
température.
Mesures de sécurité
) Le panneau couleur LCD TFT utilisé dans ce moniteur est fabriqué en
application d’une technologie de grande précision. Cependant, il peut avoir
sur l’écran des points minuscules où les pixels ne s’allument jamais ou restent
allumés en permanence. De même, si on regarde l’écran avec un angle aigu
par rapport à la surface de l’écran, les couleurs et la luminosité peuvent
paraître inégales. Notez que ce n’est pas un dysfonctionnement mais un
phénomène commun des écrans LCD et que cela n’affectera pas les
performances du moniteur.
) N’affichez pas une image fixe pendant une longue période, car cela pourrait
provoquer l’apparition d’une image rémanente.
) Ne frottez pas, ne grattez pas le moniteur avec un objet dur.
) Il faut savoir que la Eyevis décline toute responsabilité en cas d’erreurs
commises durant l’utilisation par le client ou par une tierce personne, ainsi
qu’en cas de dysfonctionnement ou de dommage survenu à ce produit
pendant son utilisation, excepté dans le cas de responsabilité reconnue par la
loi.
) Ce moniteur et ses accessoires sont susceptibles d’évoluer sans avis préalable.
) N’utilisez pas le moniteur dans un endroit où il y a beaucoup de poussières,
où le degré d’humidité est élevé, ou encore là où il pourrait se trouver en
contact avec de l’huile ou de la vapeur, car cela pourrait provoquer un début
d’incendie.
) Assurez-vous que le moniteur ne se trouve pas en contact avec de l’eau ou
d’autres fluides. Assurez-vous qu’aucun objet tel que des agrafes et des
trombones ne pénètre dans le moniteur, car cela pourrait provoquer un
début d’incendie ou un choc électrique.
) N’installez pas le moniteur au dessus des objets instables ou dans des
endroits peu sûrs. Faites attention que le moniteur ne reçoive pas de chocs
violents ni de fortes vibrations. Provoquer la chute du moniteur ou le culbuter
peut l’endommager.
) N’utilisez pas le moniteur à proximité d’un appareil de chauffage ou dans des
endroits où la température est élevée, car cela pourrait conduire à un
dégagement excessif de chaleur et provoquer un début d’incendie.
) N’utilisez pas le moniteur dans des endroits exposés directement à la lumière
du soleil.
) Veillez à nettoyer fréquemment la poussière et les débris accumulés sur les
ouvertures de ventilation. L’accumulation de poussière sur les ouvertures de
ventilation risque d’entraîner une surchauffe, un incendie ou un
dysfonctionnement. Il est recommandé de nettoyer l’intérieur du moniteur
une fois par an. L’accumulation de poussière à l’intérieur du moniteur risque
d’entraîner une surchauffe, un incendie ou un dysfonctionnement. Faites
nettoyer l’intérieur du moniteur par un revendeur Eyevis ou un centre de
services autorisé.
) Il n’est pas possible de faire tourner les images sur ce moniteur. Quand vous
travaillez suivant la direction verticale, prévoyez d’orienter au préalable le
contenu.
EYE-LCD-5500-XSN-LD-FX20
User Manual
Page 21

) Veuillez vous assurer que la prise est installée près du système et est
facilement accessible. Le cordon d‘alimentation est un dispositif de
déconnexion.
Le cordon d’alimentation
) N’endommagez pas le cordon d’alimentation, ne déposez pas d’objets lourds
sur le cordon d’alimentation, ne tirez pas dessus et ne le pliez pas de manière
excessive.
) Ne pas utiliser de rallonges endommagées. Tout endommagement du cordon
d’alimentation peut provoquer un début d’incendie ou un choc électrique.
) Utilisez seulement le cordon d’alimentation fourni avec le moniteur.
) Ne branchez pas le cordon d’alimentation sur une prise multiple. Ajouter une
rallonge peut entraîner une surchauffe et provoquer un début d’incendie.
) Ne débranchez pas ni ne branchez la prise d’alimentation avec des mains
humides. En ce faisant, vous risquez un choc électrique.
) Débranchez le cordon d’alimentation si l’équipement n’est pas utilisé pendant
une longue période.
) Ne tentez pas de réparer le cordon d’alimentation s’il est coupé ou s’il ne
fonctionne pas correctement. Veuillez prendre contact avec le service après
vente et suivre ses recommandations.
EYE-LCD-5500-XSN-LD-FX
21
Version 1.0 | May 2015
Page 22
ATTENTION
Ce produit appartient à la Classe A d‘après la norme EN 55022: 2010. Dans
un environnement résidentiel, il peut provoquer des interférences radio et,
dans ce cas, l’utilisateur peut être obligé de prendre les mesures nécessaires.
ATTENTION
Afin de satisfaire aux normes EMC, utiliser des câbles blindés pour connecter
les bornes suivantes :
Borne de sortie PC/AV DVI-D, borne d’entrée PC/AV DVI-D, borne d’entrée
PC/AV HDMI, borne d’entrée PC D-sub, bornes d’entrée PC RVB, et bornes
d’entrée/sortie RS-232C.
AVERTISSEMENT
Un moniteur placé sur un support instable est dangereux en raison des
risques de chute qu’il présente. De nombreuses blessures, touchant en
particulier les enfants, peuvent être évitées en prenant quelques
précautions simples :
•
Utiliser les dispositifs de fixation tels que les supports muraux fournis par
le fabricant.
•
Utiliser uniquement des meubles capables d’accueillir le moniteur en
toute sécurité.
•
Vérifier que le moniteur ne dépasse pas du bord du meuble sur lequel il
est posé.
•
Ne pas placer le moniteur sur des meubles hauts, armoires ou étagères,
par exemple, sans fixer le meuble concerné et le moniteur à un support
approprié.
•
Ne pas intercaler de tissu ou toute autre matière entre le moniteur et le
meuble sur lequel il est posé.
•
Expliquer aux enfants qu’il est dangereux de grimper sur les meubles pour
atteindre le moniteur ou ses boutons de commande.
AVERTISSEMENT
En particulier pour la sécurité des enfants
•
Ne laissez pas les enfants grimper sur ou jouer avec le moniteur.
•
Ne placez pas le moniteur sur des meubles qui peuvent facilement se
transformer en marches comme une commode avec tiroirs.
•
Souvenez-vous que les enfants s’excitent souvent en visionnant un
programme, surtout sur un moniteur « plus grand que la normale ». Il faut
faire en sorte d’installer le moniteur là où il ne peut pas être poussé, tiré, ni
basculé.
•
Il faut faire en sorte de placer les fils et les câbles connectés au moniteur
de façon à ce que des enfants curieux ne puissent pas les tirer ni les saisir.
EYE-LCD-5500-XSN-LD-FX22
User Manual
Page 23
About our product
The LC-Display of eyevis
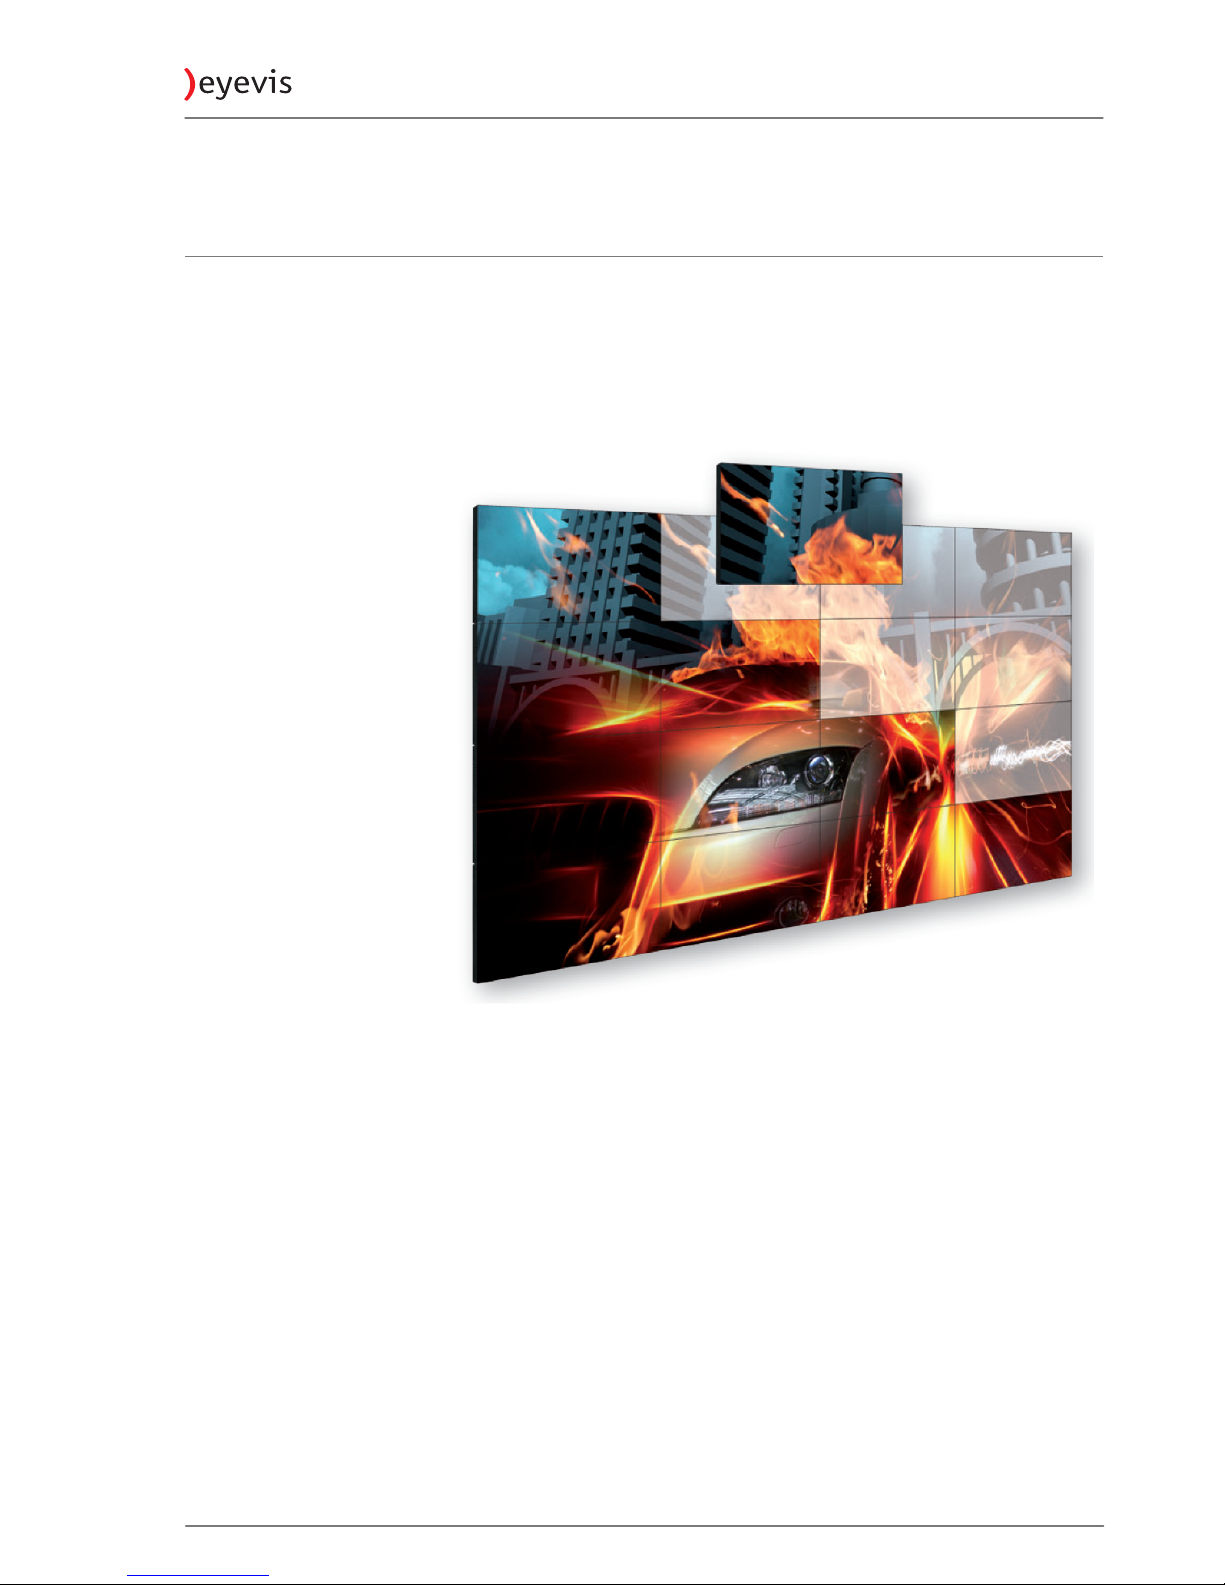
The EYE-LCD-5500-XSN-LD-FX is an extremely-super narrow bezel video wall
LCD by eyevis. With this new display type, the mechanical bezel in a video wall
adds up to 3.5 mm. The new video wall displays provide a screen diagonal of
55 inch (139 cm) with full HD resolution (1920×1080 px). The newly developed
electronics offer an optionally activatable non-sticking mode which in
prevents burn-in effects or image sticking effects caused by the prolonged
representation of static image content.
Features of the eyevis display
High-Resolution Wide-Screen panel
With a resolution of 1920 x 1080 pixels (Full HD) and 16.7 million colours you
can display extremely fine pictures with this TFT LCD display.
Input connection possibilities
•
1x Composite
•
1x HDMI
•
1x Display Port (Output)
•
1x DisplayPort
•
1x DVI-I (digital + analog RGB)
•
1x Y/C
EYE-LCD-5500-XSN-LD-FX
23
Version 1.0 | May 2015
Page 24
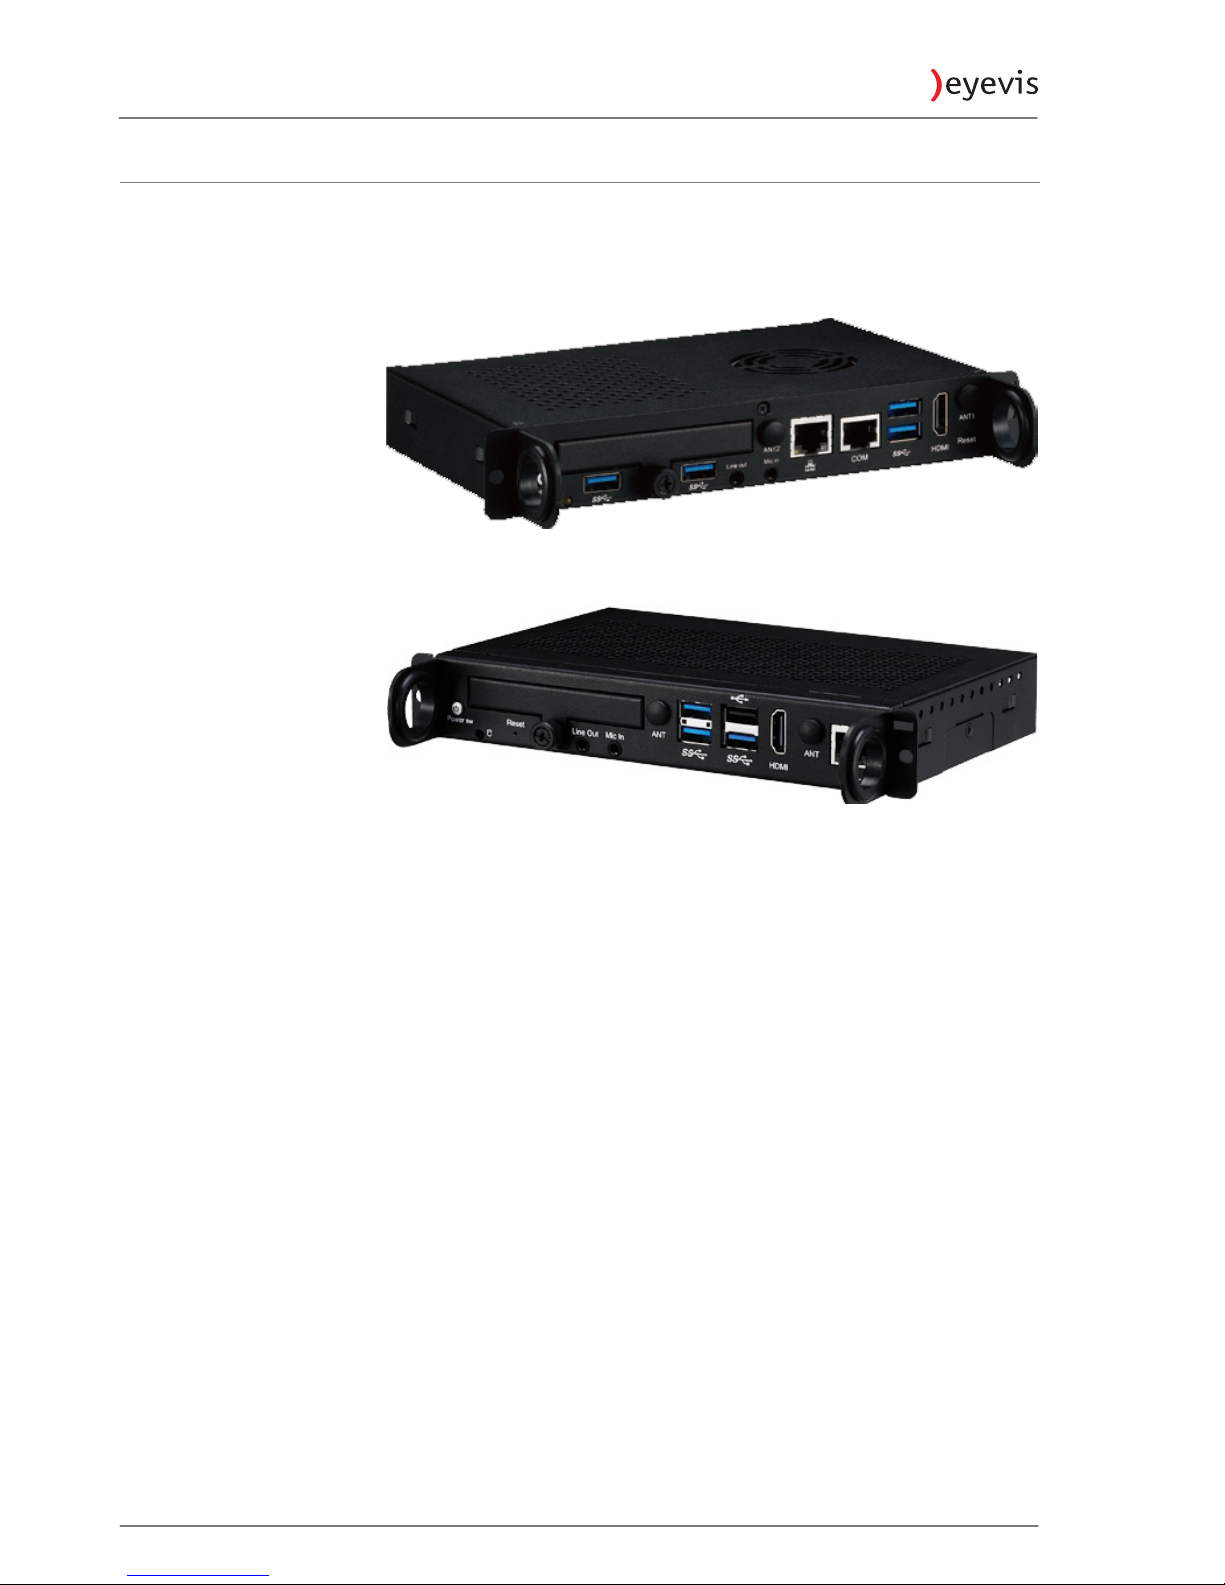
The eyeProcessingUnit - EPU (optional)
eyevis EPU is an OPS-compliant media player powered by Intel® processors. Yet,
eyevis EPU has high scalability, allowing for easy storage capacity expansion
through pluggable 2.5” storage unit. eyevis EPU leverages the Intel® processors
to deliver outstanding graphics whilst limiting the power usage.
Fig. 1: EPU with Intel® Core™ processor
Fig. 2: EPU with Intel® Celeron™ processor
EPU - Key Features
•
Intel® Core™ or Celeron™ processor family
•
Intel® HD Graphics with DirectX 11.1 support
•
Dual DDR3L SO-DIMM support
•
Support for Intel® AMT9.0
EYE-LCD-5500-XSN-LD-FX24
User Manual
Page 25
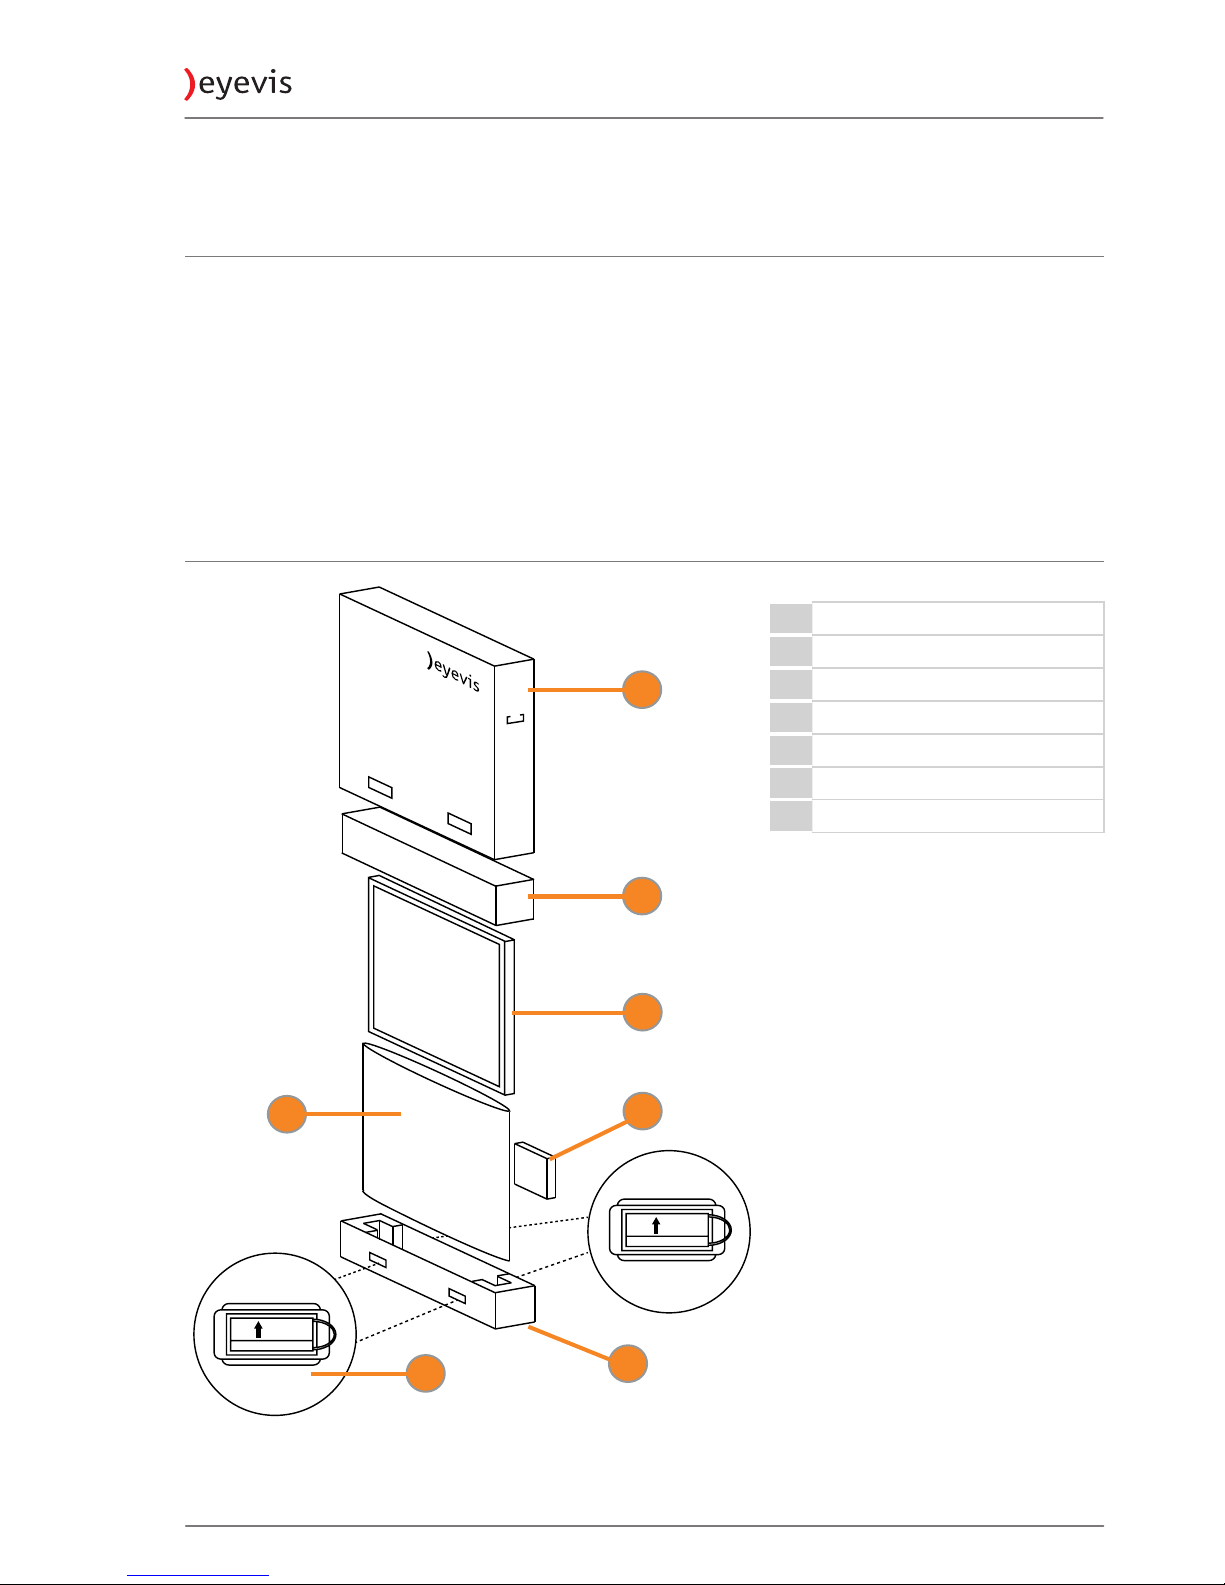
Packaging
Unpacking
The EYE-LCD-Series display is packed with EPE cushion to protect the device
during shipping.
To unpack the device:
1. Before unpacking your device, prepare a stable, level, and clean surface
near a wall outlet.
2. Place the LCD monitor box in an upright position and open from the top of
the box to remove the cushion.
3. Remove the box handles.
4. Remove the foam and take out the accessories bag.
Packing list
UP
UP
1
2
3
4
5
6
7
Fig. 3: View of packaging
Tab. 1: Packing list
1 Carton
2 Cushion top
3 Display
4 Accessory box
5 Poly bag
6 Cushion bottom
7 Carton lock / Handles
EYE-LCD-5500-XSN-LD-FX
25
Version 1.0 | May 2015
Page 26

Accessory box
Tab. 2: Content of accessory box
Item
1x Power cord
1x DVI cable
1x HDMI cable
1x IR Extender
1x Remote Control
2x Batteries (AAA, in remote control included)
1x User Manual
Tab. 3: Overview of box content
Power cord DVI cable
HDMI cable IR extender
OSD remote control
(2x batteries (AAA) inside)
User manual
NOTE
The pictures are for illustration purposes and may differ from the originals.
EYE-LCD-5500-XSN-LD-FX26
User Manual
Page 27

Installation possibilities for EYE-LCD-FX series
The displays from the EYE-LCD-FX series are especially designed for the
assembly of modular video wall systems. Thanks to their mini bezels and
several optimised display characteristics they a perfectly suitable for
applications in control rooms where they can be used even in continuous
operation.
The standard version EYE-LCD-FX series of the displays has a robust, powder
coated metal frame that enables the use of the displays in professional
environments. The display frame has VESA approved holes on the backside
that allow their quick and simple mounting in a video wall system.
Optionally eyevis provides wall-mounting kits for the displays from the
EYE-LCD-FX series. These wall-mounting kits consist of wall-mounting brackets
that have to be fixed to the backside of the display and an according wallfixture. These wall-mount structures are also available as front access versions.
Fig. 4: Wall mounting kit
Optional Front-Service-Mechanism
The displays from eyevis EYE-LCD-FX series are also available with front
maintenance option. This new development allows taking of the display panel
in a combined video wall without the necessity to demount the entire wall.
With a special mechanism even displays in the middle of the wall can be made
accessible for service and maintenance works.
EYE-WHLCD-FS-LAND
(for Landscape Installation)
EYE-WHLCD-FS-POR
(for Portrait Installation)
EYE-LCD-5500-XSN-LD-FX
27
Version 1.0 | May 2015
Page 28

Connectors
Overview
1
4
2 3
1 OPS slot
2 Connectors
3 Connectors and indicator LEDs
4 Mains supply and power switch
Power cord connection
)
NOTE:
Use the supplied power cord to connect your LCD panel to the wall outlet.
►
Plug the female power connector into the male connector at the back of
the LCD panel
EYE-LCD-5500-XSN-LD-FX28
User Manual
Page 29

Input source connections
6
1
2
5
4
3
1 Composite Video
2 Y/C
3 Display Port IN
4 DVI-I
5 HDMI
6 Display Port OUT
EYE-LCD-5500-XSN-LD-FX
29
Version 1.0 | May 2015
Page 30

Connectors and controls of EPU
Front Panel EPU with Intel® Core™ processor
1 Power switch Turns the device on and off.
2
Hard disk
LED
Shows if the hard disk is busy.
3 USB 3.0 Connector for USB devices (mouse, keyboard, stick...)
4 USB 3.0 Connector for USB devices (mouse, keyboard, stick...)
5 Line Out 3,5 mm jack connector for audio output.
6 Mic In 3,5 mm jack connector for audio input.
7 LAN RJ45 connector for Ethernet.
8 COM RS232 connector
9 USB 3.0 2x connector for USB devices (mouse, keyboard, stick...)
10 HDMI HDMI connector for a second display.
11 Reset Hardware reset (use only if the system crashes).
31 4 5 6 7 8 9
10
11
2
EYE-LCD-5500-XSN-LD-FX30
User Manual
Page 31

Front Panel of EPU with Intel® Celeron™ processor
31 4
5
6
7
8
9
2
1 Power switch Turns the device on and off.
2
Hard disk
LED
Shows if the hard disk is busy.
3 Reset Hardware reset (use only if the system crashes).
4 Line Out 3,5 mm jack connector for audio output.
5 Mic In 3,5 mm jack connector for audio input.
6 USB 3.0 Connector for USB devices (mouse, keyboard, stick...)
7 USB 2.0 /3.0 Connector for USB devices (mouse, keyboard, stick...)
8 HDMI HDMI connector for a second display.
9 LAN RJ45 connector for Ethernet.
EYE-LCD-5500-XSN-LD-FX
31
Version 1.0 | May 2015
Page 32

Indicator LED
Condition Power Status
Red Power On, Normal operation
Blinking Red Power On, No signal
Blinking Green Error (e.g. overheat)
Off
Power off
AC off
LED
EYE-LCD-5500-XSN-LD-FX32
User Manual
Page 33

Linking the displays
•
The EYE-LCD-5500-XSN-LD-FX displays are especially designed for fixed
video wall applications.
•
The size of the video wall matrix may range from 1x1 up to 10x10 displays
•
Displays within a video wall matrix have to be addressed consecutively
from 1 - 100
)
NOTE:
For detailed information about addressing of the displays, see „Assigning
display IDs“ on page 34
Signal-Daisy-Chain via DisplayPort
Display Port signals can be daisy-chained through up to max. 100 displays.
)
NOTE:
Daisy-Chain only for Display Port input.
Example Video wall matrix 3x3 displays
Direct signal-daisy-chain for Display Port signals in a display matrix comprising
up to 100 (10x10) displays.
DP
RS232
1
2
3
4
5
6
7
8
9
EYE-LCD-5500-XSN-LD-FX
33
Version 1.0 | May 2015
Page 34

Assigning display IDs
To be able to control a combination of displays with a single interface (control
software or with one remote control) each display has to be assigned a unique
ID. This can be achieved by using automatic ID assignment. Automatic ID
assignment follows the topology of the RS232 cabling of the displays and
increments the ID by one on each device.
►
For the automatic assignment of IDs setup the RS232 daisy chain and
connect the first device in the RS232 daisy chain with the control
computer. Also plug in the IR-receiver for the remote control.
)
NOTE:
It is mandatory the device connected to the control PC is assigned ID 1. Reset
the display IDs if necessary
Trigger automatic adjustments of IDs using the OSD
1. Open the Setup Menu in the OSD
2. Choose “Auto Device ID Enumeration”
You can test the assignment using the remote control and pressing the button
Address. Each device will display its assigned ID.
Trigger automatic adjustment of IDs with eyeDeviceSetup
1. Open the eyeDeviceSetup software and open the serial connection in the
“Preference” tab.
2. Select Display 1 in the display selection area.
3. Press “Read current” to read parameters from the device.
4. In the Tab “User” in the section “ID Settings” press the button of the field
“Auto Display ID”.
5. You can test the assignment using the remote control and pressing the
button “Address”. Each device will display its assigned ID.
Trigger automatic adjustment of IDs using a terminal program
1. Open a terminal program and setup to 115200 Baud 8N1.
2. Send SET(0;Auto Display ID;1).
3. You can test the assignment using the remote control and pressing the
button “Address”.
ª Each device will display its assigned ID.
EYE-LCD-5500-XSN-LD-FX34
User Manual
Page 35

Adjusting automatically assigned IDs
In some cases the automatic ID assignment have to be adjusted manually, e.g.
if the layout of the automatically assigned IDs do not match the logical layout
required by the control software. This can be achieved by manually adjusting
the Display ID in the OSD.
Adjust the ID in the OSD Menu:
1. Enter the section “Setup” of the OSD.
2. Adjust the “Device ID”.
3. To activate the newly assigned ID close the OSD.
Adjust the ID by selecting the device in eyeDeviceSetup:
1. Open the user tab.
2. Enter a new device ID in the “Device ID” field in the ID Settings section.
3. Press “Apply ID” to activate the newly assigned ID.
Adjust the ID via terminal:
1. Open a terminal.
2. Sent the command SET(1;Force Display;5)
ª The ID will be assigned immediately.
Resetting display IDs
In some cases it may be required to reset all IDs to 1. You can perform the
resetting by following ways:
•
Via Terminal:
Reset all display IDs to 1 by sending SET(0;Reset Display ID;1) to the wall.
•
Via eyeDeviceSetup software:
Trigger “Reset Display ID” in the section “ID Settings” in the user tab.
EYE-LCD-5500-XSN-LD-FX
35
Version 1.0 | May 2015
Page 36

Operating the Display
NOTE
The pictures are for illustration purposes and may differ from the originals.
Setup process
1. Plug in the power cable and turn on the main power switch (without
turning on the signal source device(s)).
"I " is power ON
"O" is power OFF
2. Plug in the signal source cables.
3. Then press the power key on the keypad of the display or the power key on
the remote control to turn on the display.
EYE-LCD-5500-XSN-LD-FX36
User Manual
Page 37

4. Turn on the power of the signal source device(s) to begin sending signal to
the display.
Power button functions of the remote control and EPU
Power button functions of the remote control
Starting Status Action Ending State
Display OFF short pressing Display and EPU
(*)
ON
Display ON short pressing Display OFF
Display ON long (>4 sec) pressing
Display OFF and EPU
(*)
shutdown
Power button functions of EPU
(*)
Pressing power button Description
long pressing EPU
(*)
force shutdown
short pressing EPU
(*)
shutdown
NOTE
•
If the display and EPU is turned on by pressing the mains power switch,
the EPU and the display returns to the previous state.
•
The display and EPU are controlled separately via RS232 commands.
(*)
optional accessory
EYE-LCD-5500-XSN-LD-FX
37
Version 1.0 | May 2015
Page 38

Controlling the display
The Remote Control (RC)
The menu functions of the OSD menu can be accessed with the eyevis
Remote-Control (RC).
►
To use the RC connect the IR sensor (see picture on the left) with the IR
input socket of the first daisy-chained display of the video wall.
►
To use the RC aim at the display’s IR-Receiver.
NOTE:
Only one IR sensor may be connected.
Opening the On-Screen-Display (OSD)
►
Press the MENU/EXIT to open the OSD Menu on the screen.
Navigating in the OSD menu
►
Use the arrow buttons (►/▼/◄/▲) to navigate through the menu.
►
Press the check mark button () to select a menu item.
►
Press MENU/EXIT to abort the current operation and return to the previous
menu.
►
For numerical values you can either use the up/down arrow (▼/▲) to
increase or decrease values or insert the values directly on the number
block. If using the arrow buttons for entering numerical values, holding the
keys pressed will toggle larger steps.
Special keys and key sequences
►
You can use the POWER button to activate Standby Mode.
You can reboot the display and read back saved settings at any time:
►
Press the sequence BLUE-RED-YELLOW () to trigger a reset on the
currently selected display.
EYE-LCD-5500-XSN-LD-FX38
User Manual
Page 39

Changing the remote control batteries
NOTE:
The pictures are for illustration purposes and may differ from the originals.
1
Remove the battery cover
Slide back and remove the battery cover in the direction of the
arrow.
2
Insert the batteries
Align and insert two AAA batteries according to their plus and
minus ports (as indicated on the button of the battery case of the
remote control).
3
Close the battery cover
Replace the battery cover in the direction of the arrow and snap it
back into place.
NOTE:
►
Used batteries needed to follow the city rule to be discarded.
►
Battery to be used according to the instruction.
NOTICE
About the remote control
•
Don’t drop, shake or bump.
•
Don’t place on wet materials.
•
Don‘t dismantle.
•
Don’t place in locations with exposure to high-temperature or highhumidity levels.
•
Avoid keeping used, old batteries inside the remote control, causing
leakage of internal liquid resulting metal rust or fatal damage to the
remote control hand unit.
CAUTION
Danger of explosion
Incorrect use of batteries may cause the batteries to explode or to ignite.
EYE-LCD-5500-XSN-LD-FX
39
Version 1.0 | May 2015
Page 40

OSD menu
NOTE
The illustrations and certain descriptions in this manual may vary due to
development process.
Some settings depend on the input signal and/or product version whether are
available or not. Reasons for unavailable settings are following:
•
function is not available for the specific product version
(example: ALC setting only available with connected ALC sensor)
•
setting is not available for specific operating mode
(example: PC RGB setting not available for digital signal type)
•
setting is not adjustable
(example: Colour adjustment is possible for “User Mode” but not for preset)
Available settings are coloured white and unavailable settings are coloured
gray.
Using the OSD menu
For information about using the OSD menu see „The Remote Control (RC)“ on
page 38.
EYE-LCD-5500-XSN-LD-FX40
User Manual
Page 41

Picture menu
The Picture menu is used for making common image adjustments.
►
> Picture >
Picture
Contrast
Contrast adjusts the difference between bright and dark image areas.
Press ◄ or ► to select the desired level and then press ENTER.
Range: 0-100 (Default: 50)
Brightness
Brightness adjusts the pixel colour of the panel.
Press
◄ or ► to select the desired level and then press ENTER.
Range: 0-100 (Default: 50)
Sharpness
Increases or decreases the sharpness of the image.
Press
◄ or ► to select the desired level and then press ENTER.
Range: 0-24 (Default: 12)
Color Management
Colour management contains the settings of colour temperature and
intensity of the RGB colour.
Press
► or ENTER to enter the submenu.
Backlight
Backlight adjusts the brightness of the LCD backlight.
Press
◄ or ► to select the desired level and then press ENTER.
Range: 0-100 (Default: 100)
ALC
(only available in connection with an ALC sensor)
Activates or deactivates the automatic backlight regulation.
Press
◄ or ► to select ON or OFF and then press ENTER.
Options: ON, OFF (Default: OFF)
ALC Value
Adjusts the maximum backlight value for the automatic backlight regulation.
Press
◄ or ► to select the desired level and then press ENTER.
Range: 0-100 (Default: 75)
Local Dimming
Local dimming adjusts the backlight automatically depending on image
content. This increases dynamic contrast.
Press
◄ or ► to switch ON or OFF and then press ENTER.
Options: ON, OFF (Default: OFF)
EYE-LCD-5500-XSN-LD-FX
41
Version 1.0 | May 2015
Page 42

Color Management menu
The Color Management menu is used for making common colour adjustments.
►
> Picture > Color Management >
Picture
Color Management
Color Balance
Selects the colour temperature of the image.
Press ◄ or ► to select the desired option and then press ENTER.
Options: Warm, Normal, Cold and User (Default: Normal)
User Color
User adjustments of the colour temperature and intensity of the RGB colours.
Select colour balance “User” to activate this menu.
Press
► or ENTER to enter the submenu.
Color Saturation
Adjusts the intensity of a specific colour.
Press
◄ or ► to select the desired level and then press ENTER.
Range: 0-100 (Default: 50)
EYE-LCD-5500-XSN-LD-FX42
User Manual
Page 43

User Color menu
The User Color menu is used for making user colour adjustments.
►
> Picture > Color Management > User Color >
Picture
Color Management
User Color
Red Gain
Adjusts the intensity of the red colour of the image.
Press ◄ or ► to select the desired level and then press ENTER.
Range: 0-100 (Default: 100)
Green Gain
Adjusts the intensity of the green colour of the image.
Press
◄ or ► to select the desired level and then press ENTER.
Range: 0-100 (Default: 100)
Blue Gain
Adjusts the intensity of the blue colour of the image.
Press
◄ or ► to select the desired level and then press ENTER.
Range: 0-100 (Default: 100)
Red Offset
Adjusts the red offset.
Press
◄ or ► to select the desired level and then press ENTER.
Range: -50-50 (Default: 0)
Green Offset
Adjusts the green offset.
Press
◄ or ► to select the desired level and then press ENTER.
Range: -50-50 (Default: 0)
Blue Offset
Adjusts the blue offset.
Press
◄ or ► to select the desired level and then press ENTER.
Range: -50-50 (Default: 0)
EYE-LCD-5500-XSN-LD-FX
43
Version 1.0 | May 2015
Page 44

Display menu
The Display menu is used for making common display adjustments.
►
> Display >
Display
Zoom
Adjusts the aspect ratio of the image.
Press
◄ or ► to select the desired option and then press ENTER.
Options: Full Screen, 16:9, 1:1 and Matrix (Default: 1:1)
Game Mode
Activates or deactivates the game mode. Game Mode enables faster
response on external signal sources e.g. PCs, game consoles etc.
Press
◄ or ► to activate or deactivate the option and then press ENTER.
Options: ON, OFF (Default: OFF)
PC RGB
Adjusts the RGB settings of the VGA Mode.
Press
► or ENTER to enter the submenu.
EYE-LCD-5500-XSN-LD-FX44
User Manual
Page 45

PC RGB menu
The PC RGB menu is used for making common RGB adjustments of the PC.
►
> Display > PC RGB >
Display
PC RGB
Timing
Increases or decreases the timing setting of image.
Press ◄ or ► to set the desired timing and then press ENTER.
Mode ID
Shows the Mode ID.
Press
◄ or ► to select the desired ID and then press ENTER.
Auto Adjustment
Activates the auto adjustment of the image.
Press ► or ENTER to start auto adjustment.
H Total
(Only analogue VGA)
Adjusts the total number of pixel per line.
Press
◄ or ► to select the desired level and then press ENTER.
H Pos
(Only analogue VGA)
Adjusts the horizontal position of image.
Press
◄ or ► to select the desired position and then press ENTER.
V Pos
(Only analogue VGA)
Adjusts the vertical position of image.
Press
◄ or ► to select the desired position and then press ENTER.
Phase
(Only analogue VGA)
Adjusts the phase setting of image.
Press
◄ or ► to select the desired level and then press ENTER.
Range: 0-63 (Default: 0)
EYE-LCD-5500-XSN-LD-FX
45
Version 1.0 | May 2015
Page 46

Setup menu
The Setup menu is used for making common setup adjustments.
►
> Setup >
Setup
Info
Shows information about manufacture data, resolution, device temperature.
Press ► or ENTER to display the setup information.
OSD
Enters the submenu for OSD adjustments or factory reset.
Press ► or ENTER to enter the submenu.
Source Scan
Starts an automatic search of signals.
Press
► or ENTER to start scanning of signal sources.
Advanced Setup
Enters the submenu for picture settings and firmware updates.
Press ► or ENTER to enter the submenu.
Audio Settings
Enters the submenu of the audio settings.
Press ► or ENTER to enter the submenu.
LEDs
Activates or deactivates the LEDs at the backside of the device.
Press
◄ or ► to select Disabled or Enabled and then press ENTER.
Options: Enabled, Disabled (Default: Disabled)
Matrix Mode
Adjusts picture settings of the video wall.
Press ► or ENTER to enter the submenu.
Device ID
Setting for manually ID adjustment of the selected display.
Press
◄ or ► to select the desired ID and then press ENTER.
Range: 1-100 (Default: 1)
Auto device ID
Enumeration
Automatic ID adjustment of the video wall.
Press ► to start the automatic device ID enumeration.
EYE-LCD-5500-XSN-LD-FX46
User Manual
Page 47

Info menu
The Info menu shows information about the hardware and software.
►
> Setup > Info >
Setup
Info
Software version
Shows the installed firmware version.
Press ◄ or MENU to leave the submenu.
Software revision
Shows the firmware revision.
Press
◄ or MENU to leave the submenu.
Temperature
Shows the actually temperature of the scaler board.
Press
◄ or MENU to leave the submenu.
Timing
Shows the actually resolution and refresh rate.
Press
◄ or MENU to leave the submenu.
EYE-LCD-5500-XSN-LD-FX
47
Version 1.0 | May 2015
Page 48

OSD menu
The OSD menu is used for making common OSD adjustments.
►
> Setup > OSD >
Setup
OSD
Time Out
Adjusts the automatic time out of the OSD menu.
Press ◄ or ► to select the desired level and then press ENTER.
Range: Off-60s (Default: 60s)
Transparency
Adjusts the transparency of OSD menu.
Press
◄ or ► to select the desired level and then press ENTER.
Range: 0-10 (Default: 0)
Reset to factory
defaults
Resets the values to the factory default.
Press
► or ENTER to start resetting to factory default.
Language
Adjusts the language of OSD menu.
Press
◄ or ► to select the desired language and then press ENTER.
Options: English, German (Default: English)
EYE-LCD-5500-XSN-LD-FX48
User Manual
Page 49

Advanced Setup menu
The Advanced Setup menu is used for making advanced adjustments.
►
> Setup > Advanced Setup >
Setup
Advanced Setup
DVI-I Edid
Switches between digital and analog DVI input signal.
Press ◄ or ► to select the desired option and then press ENTER.
Options: Digital, Analog (Default: Analog)
DP Switch
Selects the DisplayPort version.
Press
◄ or ► to select the desired option and then press ENTER.
Options: DP1.2, DP1.1, Auto (Default: DP1.1)
Smart ISP
Smart ISP starts the update of the firmware.
Press ► or ENTER to start the Smart ISP.
EYE-LCD-5500-XSN-LD-FX
49
Version 1.0 | May 2015
Page 50

Matrix Mode menu
The Matrix Mode menu is used for making matrix adjustments.
►
> Setup > Advanced setup > Matrix Mode >
Setup
Advanced Setup
Matrix Mode
Matrix Mode
Enables or disables the video wall mode.
Press ◄ or ► to enable or disable the option and then press ENTER.
Options: Enabled, Disabled (Default: Enabled)
Matrix size x
Adjusts the horizontal size of the video wall.
Press
◄ or ► to select the desired value and then press ENTER.
Range: 1-10 (Default: 1)
Matrix size y
Adjusts the vertical size of the video wall.
Press
◄ or ► to select the desired value and then press ENTER.
Range: 1-10 (Default: 1)
Matrix position x
Adjusts the horizontal position of the display in the video wall.
Press
◄ or ► to select the desired position and then press ENTER.
Range: 1-10 (Default: 1)
Matrix position y
Adjusts the vertical position of the display in the video wall.
Press
◄ or ► to select the desired position and then press ENTER.
Range: 1-10 (Default: 1)
H cropping %
H cropping aligns the image for avoidance of overlay by the horizontal bezel.
Press
◄ or ► to select the desired value and then press ENTER.
Range: 0.0-10.0 (Default: 0.0)
V cropping %
V cropping aligns the image for avoidance of overlay by the vertical bezel.
Press
◄ or ► to select the desired value and then press ENTER.
Range: 0.0-10.0 (Default: 0.0)
OSD Zoom
Adjusts the size of the OSD menu.
Press
◄ or ► to select the desired option and then press ENTER.
Options: Normal, Big (Default: Normal)
EYE-LCD-5500-XSN-LD-FX50
User Manual
Page 51

Inputs menu
The Inputs menu is used for making input adjustments.
►
> Inputs >
Inputs
DP
Shows connected signals via DisplayPort IN connector.
Press ◄ or ENTER to leave the menu.
HDMI
Shows connected signals via HDMI IN connector.
Press
◄ or ENTER to leave the menu.
DVI
Shows connected signals via DVI-I IN connector.
Press
◄ or ENTER to leave the menu.
VGA
Shows connected signals via VGA IN connector.
Press
◄ or ENTER to leave the menu.
CVBS
Shows connected signals via Composite Video IN connector.
Press
◄ or ENTER to leave the menu.
YC
Shows connected signals via Y/C IN connector.
Press
◄ or ENTER to leave the menu.
EYE-LCD-5500-XSN-LD-FX
51
Version 1.0 | May 2015
Page 52

TheeyeDeviceSetupsoftware
eyevis has developed the eyeDeviceSetup software for setting the displays and
for colour adjustment. The eyeDeviceSetup software provides all the necessary
functions for adjusting the colours, brightness and contrast of the displays.
Starting the eyeDeviceSetup software
1. Open the eyeDeviceSetupsoftware to configure your video wall.
ª The login window appears:
2. Choosing the user level. Two user levels are available:
•
User level: (without password)
This is the normal user level (no service settings are possible).
►
Confirm with OK without entering a password.
•
Administrator: (with password)
This type is intended for advanced, trained personnel. The password
required is available from the eyevis service.
►
Enter the password and confirm with OK.
ª Once the program has been launched, the program interface is
displayed:
Fig. 5: Interface of eyeDeviceSetup software
eyeDeviceSetup.exe
EYE-LCD-5500-XSN-LD-FX52
User Manual
Page 53

The interface of eyeDeviceSetup software
The interface is divided into three areas:
Fig. 6: Interface areas of eyeDeviceSetup software
1
Load/Save area
To load and save configurations and set the video wall size.
2
Selection area
To display the video wall with the devices. The currently active
device is highlighted.
3
Parameter area
Windows with parameters that can be selected with tabs.
EYE-LCD-5500-XSN-LD-FX
53
Version 1.0 | May 2015
Page 54

The Load/Save area
In this area of the window, you can load and save configurations as well as
determine the size of the video wall.
File Configuration Load Loads a configuration file saved on the PC
(for example the saved file of the first system
configuration).
Write Saves a configuration file with the current settings on the
PC.
Wall Size Enters the size of the wall:
•
First number: number of vertical columns
•
Second number: number of horizontal rows
Devices internal database Read archive Reads the default settings of the active device. The
factory device settings can thus be restored at any time.
Read current Reads the current settings of the active device. The
settings are then displayed in the parameter area.
Save all Saves all the current settings in the device.
The selection area
A preview of your wall configuration appears in this part of the screen. A single
device can be selected with the mouse to adjust the settings. If a device is
selected, the current settings can be read by clicking on the Readcurrent
button.
Fig. 7: Visualising a 2 x 2 video wall
To select several devices, click and hold the left mouse button and mark the
area you wish.
EYE-LCD-5500-XSN-LD-FX54
User Manual
Page 55

The parameter area
The settings are displayed and can be changed in this area of the screen. All
settings are segmented in various menus.
For more information see chapter „Parameters“ on page 58.
Buttons Refresh Refreshes the screen content
Update Reloads the settings from the device
Menu User Parameters for adjusting the signal functions.
Setup Basic password, device and scaler settings of the device.
Status Current status information of the device.
Gamma Settings of the individual colours (red, green, blue).
Preference Settings of the communication to the device.
Reports All software status messages are collected in this menu.
EYE-LCD-5500-XSN-LD-FX
55
Version 1.0 | May 2015
Page 56

Establishing communication
This section describes how to establish the communication with the devices
with the help of the eyeDeviceSetup software.
NOTE
The illustrations and certain descriptions in this manual may vary due to
development process.
Establishing communication
►
Open the Preference page.
ª The serial connection via RS232 interface (Useserialport) is selected as
standard.
To use the serial port:
1. In the SerialPort entry field, select the COM port to which the protector is
connected.
2. For the remaining settings, the standard values should match the ones
displayed in the screenshot.
3. Press Applychanges to apply the new settings.
ª You can check if the connection is active on the Reports page.
To establish a connection via Ethernet (optional):
A connection is established to the first device via the Ethernet cable.
1. Select Uselocalareanetwork.
2. Enter the IP address to the connected device (the first device).
3. For the remaining settings, the standard values should match the ones
displayed in the screenshot.
4. Press Applychanges to apply the new settings.
ª You can check if the connection is active on the Reports page.
eyeDeviceSetup.exe
EYE-LCD-5500-XSN-LD-FX56
User Manual
Page 57

Entering the wall size
In the Wallsize field, you can enter the number and layout of the devices:
1. In the first window, select the number of columns, which is 2 in the
example above.
2. In the second window, select the number of rows, which is 2 in the
example above.
Reading the configurations
1. Mark the device you want in the wall view. You can select several devices at
once: Click and hold the left mouse button in a field and mark the relevant
area.
2. Click on Read current...
ª The data of the selected devices are displayed in the view window.
Saving the configuration
Once you have adjusted all the settings, you can save the configuration in a file
on the PC.
1. Click on Write....
2. Select the target location and file name and click on OK.
Load the configuration
You can load adjustments from a file which is saved on the PC.
1. Click on Load....
2. Select the location and name of the desired file and click on OK.
EYE-LCD-5500-XSN-LD-FX
57
Version 1.0 | May 2015
Page 58

Parameters
The settings are displayed and can be changed in this area of the screen.
User
In the User menu, you can find parameters for adjusting the colour values:
Buttons Refresh Refreshes the screen content
Update Reloads the settings from the display
Input Input Set the input source
Source Scan Sets the automatic input scanning on/off
Matrix Enable Matrix Sets the matrix mode on/off
Matrix Size X Sets the matrix size in horizontal direction
Matrix Size Y Sets the matrix size in vertical direction
Matrix Pos X Sets the matrix position in horizontal direction
Matrix Pos Y Sets the matrix position in vertical direction
Matrix Crop X Sets the matrix cropping (%) in horizontal direction
Matrix Crop Y Sets the matrix cropping (%) in vertical direction
OSD Zoom Sets the OSD normal size on/off
ID Settings Auto Display ID Sets the automatic display IDs assignment
Display ID Sets the display ID
Use new ID Activates the new ID for the device
Reset Display ID Reset the display ID
EYE-LCD-5500-XSN-LD-FX58
User Manual
Page 59

Setup
In the Setup menu, settings of basic password, display and scaler can be
performed.
Security Setting User password Administrators can enter a password for users here
when logged in as Admin.
Admin password Administrators can change the admin password here
when logged in as Admin.
Picture Contrast Sets the contrast
Brightness Sets the brightness
Sharpness Sets the sharpness
Backlight Sets the backlight level
ALC Sets the ALC on/off
ALC Value Sets the ALC level
Local Dimming Sets the local dimming on/off
EYE-LCD-5500-XSN-LD-FX
59
Version 1.0 | May 2015
Page 60

Color Management Color Balance Sets the colour balance to predefined setting
•
0=Warm
•
1=Normal
•
2=Cold
•
3=User
Color Saturation Sets the colour saturation
User Red Gain Sets the red gain
User Green Gain Sets the green gain
User Blue Gain Sets the blue gain
User Red Offset Set the red offset
User Green Offset Set the green offset
User Blue Offset Set the blue offset
Scaling Zoom Selects the zoom setting
PC RGB Timing Shows information about timing
Autoadjust Sets the RGB auto adjustments
H Total Sets the total image position in horizontal position
H Position Sets the image position in horizontal position
V Position Sets the image position in vertical position
Phase Sets the phase level of the image
OSD OSD Language Selects the OSD menu language
OSD Transparency Sets the transparency of the OSD menu
OSD Timeout Sets the timeout of the OSD menu
Advanced Setup DVI-I EDID Selects analog or digital for the DVI-I signal
DP Switch Selects the version of DP switch
Reset Defaults Reset the values to factory default
LED Sets the LED on/off
EYE-LCD-5500-XSN-LD-FX60
User Manual
Page 61

Service
In the Service menu, advanced settings for service can be performed.
Advanced Command At program startup Set the action that to be performed at program
startup
Field by field
scanning
Enables/disables using accelerated protocol.
Max number of field Sets the number of fields on eprom size
User error dialog Enables/disables the report communication error as
dialog boxes
Wait for
acknowledgement
Enables/disables the acknowledgment of each
command.
Stop on any error Enables/disables communication stop on any error
Command delay Sets the delay of sending between each command
Support READ ALL Enables/disables the supporting of the READ ALL
protocol
Security Setting Info User password Administrators can enter a password for users here
when logged in as Admin.
Admin password Administrators can change the admin password
here when logged in as Admin.
EYE-LCD-5500-XSN-LD-FX
61
Version 1.0 | May 2015
Page 62

Status
In this menu, you can call up current status information such as fan status,
temperature, firmware etc.
Status Temperature Temperature of the device in °C
Fan 1 Status
•
1 = normal mode
•
0 = error mode
Fan 2 Status
•
1 = normal mode
•
0 = error mode
Fan 1 Speed Information about the fan speed 1 (0 - 255
depending on device temperature)
Fan 2 Speed Information about the fan speed 2 (0 - 255
depending on device temperature)
Info Software Revision Revision of the software
Software Revision Version of the software
Gamma (not supported)
The Gamma program area gives you full control over the gamma curve of the
individual colours (red, green, blue).
NOTE:
This feature is not supported for display video walls.
EYE-LCD-5500-XSN-LD-FX62
User Manual
Page 63

Preference
The communication to the first display is defined in this menu.
Communication Settings Use local area network With an Ethernet connection between the PC
and the first display
•
Socket: Standard 7992
•
First device IP Address: IP address of the
connected display (the first display)
•
Each device has a network board: With an
Ethernet connection when each display has its
own network card.
•
Apply changes: Accepts the new settings
You can check on the Reports page if the
connection is active.
Use serial port With an RS232 interface connection between
the PC and the first display
(this is the standard communication gateway)
•
Serial Port: COM port used
•
Baud rate: Standard is 115200
•
Bits: Standard is data = 8, stop = 1
•
Parity: Standard is None
•
Apply changes: Accepts the new settings
You can check on the Reports page if the
connection is active.
Color analyzer option Probe model
Not Relevant for displays!
Communication port
Percentage of tolerance
of the measures
Display the gradient
color into the gamma
page
Pattern generator Running on machine
(name or IP address)
EYE-LCD-5500-XSN-LD-FX
63
Version 1.0 | May 2015
Page 64

Reports
All software status messages are collected and can be monitored here.
Command sequences can also be generated and sent to a display.
Clear reports Deletes all reports
Send Send Sends the command in the Send field to the
selected display.
File Selects a previously created file from the file
directory. The selected file is added to the Send
window and can then be sent to the selected
displays by clicking on Send.
NOTE:
Only administrators have the authorisation to send commands (logon with
password).
Command sequences are used to control the displays. A separate manual
for serial commands is available to show you how to generate command
sequences. This can be requested from the eyevis service.
EYE-LCD-5500-XSN-LD-FX64
User Manual
Page 65

Effects in continuous operation of LCDs
False installation or use of the display during operating time may bring
undesirable partly visible effects. The internal structure of LCD panel may be
changed by outside influences with partly visible effects.
Image sticking
This phenomenon which named alternatively "image retention", "ghost image",
"memory effect" or "remanent image" appears if the fluid crystals of the panel
depart from the initial position. This undesired effect may occur if same
content is showed continually for long time and thereafter the content
changes. Then possibly old content is still visible as "shade". These effects are
wear marks, which may be intensified by unsuitable usage. It is not a defect!
Image Sticking must not mixed up with "Burn-in", which is a known fact of
plasma displays and cathode ray tubes and is based on completely different
physical mechanisms. Heavy "Image Sticking" may be reversed by long switch
off of the LCD/TFT displays.
Image Sticking of TFT panels is excluded from the warranty.
Mura
Further effect is Mura (a Japanese term for unevenness), which is visible as
cloud formation. These clouds are particularly visible at low brightness. The
most probably for the occurrence of Mura is operating the system in wrong
temperature specifications. These may be caused by to high ambient
temperature as well as poor air supply caused by inconvenient installation or
polluted ventilation system.
Mura of TFT panels is excluded from the warranty.
Shade formation
Dust particle may build up inside the panel caused by high ambient pollution
level. These particles climb up in the panel. This effect starts mostly in corners
of the rim through the different layers by convention and capillary formation.
These pollutions may be reversed by resolving and cleaning of the panel
components in our clean room.
Shade formation of TFT panels by pollution is excluded from the warranty.
EYE-LCD-5500-XSN-LD-FX
65
Version 1.0 | May 2015
Page 66

Prevention of undesirable effects
NOTICE!
Reduce ambient temperature
►
Operate the device at an ambient temperature of max. 25°C.
►
Ensure that the ventilation slots of the display are not covered or polluted
by dust.
NOTICE!
Avoid direct sunlight
This extends the life-time of the display an reduce the risk of undesirable
effects.
►
Do not install or store the device in places with direct sunlight or near
heat sources.
NOTICE!
Operating time of device
The operating time should not be longer than 20 hours a day. The display
should be switched off for 4 hours. This extends the life-time of the display
and reduce the risk of undesirable effects.
►
Switch off or turning the device to Stand-by-mode for 4 hours.
NOTICE!
Avoiding static images
Static images increase the risk of undesirable effects.
►
Activate a screen saver on the computer for these signals if they do not
have to be surveyed as long as they do not change their content (e.g.
logos, pictograms...).
NOTICE!
Scaling of the input signals
Avoid the static black borders on the screen.
►
Scale up signals, that do not have the same native aspect ratio as the
display, to use the entire screen area.
For example, a 4:3 image signal should be scaled up to 16:9 format to fill
the complete screen.
NOTICE!
Reduce the display brightness to 50 %
The reduced brightness enlarges the life-time of the display and allows later
readjustments of the brightness level.
►
Operate the device with brightness to 50% if possible.
half brightness
full brightness
EYE-LCD-5500-XSN-LD-FX
66
User Manual
Page 67

Evaluation of visual range
Pollutions
By the production process and handling of the displays occurs kinds of
pollution in range of vision. It applies to inclusions, blistering, depressions,
marks, scratches. The following tolerance limits is specified for bonded glass
surfaces and optional touch surfaces:
Tolerance limits for bonded glass surfaces
Kind of pollution Critical value
Inclusions / Marks 0,5 < D ≤ 1,2 mm, N ≤ 16
Depressions / Blistering 0,3 < D ≤ 1,2 mm, N ≤ 16
Scratch / Lints 0,15 < W ≤ 0,25 mm, 0,3 < L ≤ 10,0 mm, N ≤ 10
Tab. 1: Critical values of pollutions for bonded glass surfaces
Tolerance limits for optional touch surfaces
Pollution Category Critical value
Inclusions / Marks D ≤ 1,5 mm
Depressions / Blistering D ≤ 1,5 mm
Scratch / Lints W ≤ 0,25 mm, L ≤ 15,0 mm
Tab. 2: Critical values of pollution for touch surfaces
Acceptable total number
[G] of defects
Critical value
Panel size to 55" N ≤ 8, G ≤ 12
Panel size from 56" to 65" N ≤ 9, G ≤ 14
Panel size from 66" to 70" N ≤ 11, G ≤ 15
Panel size from 71" to 82" N ≤ 14, G ≤ 18
Panel size from 83" to 110" N ≤ 16, G ≤ 24
Tab. 3: Acceptable total number of defects for touch surfaces
D = diameter, L = length, W = width, N = number of pollution of a category , G = total number of
mechanical defects or surface pollutions
Failure of pixel
A image point (Pixel) consist of 3 sub pixel with basic colour red, green and
blue. The physical dimension of a pixel (also called pixel pitch) differs
depending on the model (look at the data sheet for more information). If a
pixel failure is larger than 1/2 pixel, it counts as pixel failure according to
definition. 3 kinds of pixel failures are differentiated:
•
Permanently bright pixel.
The bright pixel is permanently and with constant size at black testing
image.
•
Permanent dark pixel.
The pixel appears permanently dark and constant size at red, green and
blue testing image.
•
Two pixels lying next to each other.
Two directly bordering pixels shows a defect.
For more information about acceptable number of dot defects according to ISO
9241 for Class II, see chapter „Overview acceptable total number of dot defects“ on
page 68.
EYE-LCD-5500-XSN-LD-FX
67
Version 1.0 | May 2015
Page 68

Overview acceptable total number of dot defects
Isolated pixel errors can not be eliminated for production reasons. The
standard ISO 9241-307 specify the acceptable total number of dot defects for
classII panels. You can see the tolerance limits in the following table:
Tab. 4: Acceptable total number of defects (ISO9241-307)
Acceptable total number of dot defects according to ISO 9241-307 for classII panels
(in relation to the resolution)
Resolution
Defect type 1 Defect type 2 Defect type 3
Bright dot Black dot
Defect bright
subpixel
Total = 5-n*
n* = 0..[5..11]
Defect black
subpixel
Total = 2xn*
n* = 0..[5..11]
1 million pixel 2 2
5
5-n*
0
0
2xn*
10
XGA 1024 x 768
(0.786 million
pixel)
2 2
4
4-n*
0
0
2xn*
8
SXGA 1280 x 1024
(1.310 million
pixel)
3 3
7
7-n*
0
0
2xn*
14
WXGA 1366 x 768
(1.049 million
pixel)
3 3
6
6-n*
0
0
2xn*
12
WXGA+ 1440 x 900
(1.296 million
pixel)
3 3
7
7-n*
0
0
2xn*
14
HD 1920 x 1080
(2.073 million
pixel)
5 5
11
11-n*
0
0
2xn*
22
Example: Total number of defect subpixel
(In relation to 1 million pixel)
Number of bright subpixel n = 4, then are only 2 black subpixel
allowed (see on right side)
→ 4 bright subpixel + 2 black subpixel
5 bright subpixel + 0 black subpixel
4 bright subpixel + 2 black subpixel
3 bright subpixel + 4 black subpixel
2 bright subpixel + 6 black subpixel
1 bright subpixel + 8 black subpixel
0 bright subpixel +10 black subpixel
EYE-LCD-5500-XSN-LD-FX68
User Manual
Page 69

Troubleshooting guide
Before calling service personnel, please check the following chart for a
possible cause of the trouble you are experiencing.
Symptom Check these things
No picture
•
Check if the power cord is plugged in.
•
Check if the power is not OFF or standby.
•
Check if the auxiliary equipment is connected properly.
•
Check if the input setting is correct.
•
Check if the signal is suitable.
The remote control does not
operate
•
Check if the batteries are inserted matching the + and - marks of the
battery compartment.
•
Check if the batteries are exhausted.
•
Aim at the remote control sensor when using the remote control.
The picture colour is pale, or
not clear
•
Check the picture quality adjustment.
•
Check if the cables are connected correctly.
Malfunction or trouble
CAUTION
Smoke or peculiar smells
If the unit is still used in this condition, it may cause a fire or an electric shock.
►
Remove the power plug from the outlet immediately.
►
Make sure that the smoke or smell has stopped, then contact your dealer
for inspection.
CAUTION
Liquids or objects inside the device
If you continue to use the device after water, other fluids or objects have
been spilled or dropped, this may cause a fire or an electric shock.
►
Remove the power plug from the outlet immediately.
►
Contact your dealer for inspection.
CAUTION
Damage caused by dropping the device
If you continue to use the device after it has been dropped or the housing
has been damaged, it may cause a fire or an electric shock.
►
Remove the power plug from the outlet immediately.
►
Contact your dealer for inspection.
CAUTION
Damaged or hot power cable
If you continue to use the device even though the power cable is damaged or
becomes hot, it may cause a fire or an electric shock.
►
Remove the power plug from the outlet immediately.
►
Contact your dealer for inspection.
EYE-LCD-5500-XSN-LD-FX
69
Version 1.0 | May 2015
Page 70

Warranty terms and conditions
Duration and validity of warranty
The specified product is under warranty for 24 months beginning from the
date of delivery by eyevis, valid for the European Union. 12 months applies to
products that were purchased outside the European Union. Warranty services
during the warranty period do not extend the validity period of the warranty.
Proof of purchase
The sales agreement or the invoice (original invoice with serial number) of the
first purchaser must be presented as proof of purchase to claim warranty
services. If the customer cannot provide this evidence of purchase, the
warranty period is dated back to the date of purchase at the distributor (first
supplier) plus one month.
Warranty service or exchange during warranty period
If the product shows any faults or defects during the warranty period, eyevis
provides the following services in compliance with the warranty:
Dead On Arrival (DOA)
The customer has to inspect each delivery immediately upon receipt. If any
packaging is damaged, the customer has to notify his carrier immediately at
goods receiving. If a defect is detected at first unpacking (packaging is not
damaged), the customer has to notify his specialist supplier (point of purchase)
immediately about the defect. Otherwise the product will be treated under
usual terms of warranty.
Return-to-Base-Warranty (Bring-In Warranty)
Defective parts or products must be sent back carriage free to eyevis. In certain
circumstances, the product can sent back to the specialist supplier (place of
purchase) or to eyevis service center (country of purchase).
If the product requires repair under warranty, the customer is responsible for
the cost of transportation to eyevis. eyevis bears only the one-way costs for
the reshipment of repaired or exchanged products to the customer. During
transit, the goods are at the owner’s risk.
Repair and return
The defective product has to be sent to eyevis by the customer and is repaired
within 21 days. In this case, eyevis bears the costs for required components
that may be required or the arising working time, as well as for the costs for
reshipment to the customer.
Temporary exchange equipment during repair time
(only products under warranty)
Bring-in warranty. The customer can request a temporary exchange product
during the repair time if the product under warranty cannot be repaired within
30 days. Depending on availability, eyevis decides whether the equipment can
be replaced. Any costs of a return delivery for the exchange equipment are
borne by the customer.
Warranty on repairs
As a general rule, repairs or replacements do not extend or restart the warranty
period. The repaired parts/components will be treated under warranty for 3
months for same kind of problems.
EYE-LCD-5500-XSN-LD-FX70
User Manual
Page 71

Warranty exclusions
General exclusions
This warranty covers only malfunction due to any defect in material and/or
workmanship of a product put into circulation by eyevis . A guarantee is
therefore excluded for any faults and defects beyond the responsibility of the
eyevis, particularly in cases of:
•
Improper use, mechanical damages (e.g. marks caused by scratching,
pressure or breaking), improper storing or cleaning, transport damages,
misuse, or any other reason the customer or a third party is to blame for,
especially if the instructions contained in the manual are not adhered to.
•
Display damages caused by the permanent representation of static images
(or partially static images).
•
Failures or fluctuations of the electrical mains supply, the air conditioning
system, or other environmental conditions.
•
Abnormal operating conditions, including smoke (e.g. cigarette smoke)
and dust.
•
Defects caused by normal wear and tear or defects caused by lack of
service and maintenance (e.g. cleaning the filter).
•
Act of God, fire, flood, aggressive chemical, aggressive biological activity,
event of war, vandalism, accidents, etc.
•
Errors of all kinds of using defective or incompatible accessories. (Not
including components delivered from eyevis which are covered by the
product‘s warranty).
•
Attempted repair, setting, change, installation, or maintenance by a person
not authorized by eyevis.
"Image Sticking" (memory) effect and "Mura"
see chapter „Effects in continuous operation of LCDs“ on page 65.
Failure of pixel
see chapter „Evaluation of visual range“ on page 67.
Accessories
Accessories, such as cardboard boxes, packaging, batteries and other
components that are used in connection with this product and that expected
to be exchanged are not covered by this warranty.
Factory-applied serial number
A product that’s serial number is damaged, changed, or removed is no longer
covered by this warranty.
Service contact
The reaction time to claim a right given by this warranty starts with the
customer’s announcement of the claim to eyevis. It is calculated in accordance
with the standard service hours of eyevis.
For information about eyevis service, please visit www.eyevis.de.
EYE-LCD-5500-XSN-LD-FX
71
Version 1.0 | May 2015
Page 72

Advised procedure for raising a claim
Consider the manual before raising a claim
See the sections on "Troubleshooting" and in the manual and check whether
the problem might be solved on-site before raising a claim referring to this
warranty.
Prepare necessary information
If the problem still exists, the customer should try to get support from a
regional eyevis partner.
Please prepare the following information:
•
Product identification (model/type) and serial number of the device
•
Date and place of purchase or eyevis order number (e.g. AUF-...)
•
A description of the problem in hand
•
Pick-up address and contact information
•
A description of the requested service
Approval by eyevis
After performing an analysis of the faults and damages of the device, eyevis
will approve your warranty claim if the necessary requirements are fulfilled.
Service code: RMA number
In case of a defect, the customer will receive a service code the RMA number.
eyevis will prepare the service requested by the customer.
Packing
The customer has to pack the defective device properly in the original box, to
label it as fragile, and to attach the RMA number visibly on the box. eyevis can
provide a new original box on request. The customer is liable for damages
caused by the use of improper or unsuitable packaging.
Transport
The customer arranges the transport of the device to eyevis.
For more information, please contact eyevis.
Costs not covered by warranty defects
eyevis reserves the right to charge the customer for costs incurred due to
complaints concerning defects or faults that are not covered by warranty.
Legal and other claims
There are no other express or implied warranties, representations, or
conditions than those stated in this warranty. Other legal or contractual claims,
including against the seller of the product, are excluded as far as eyevis has
provided service based on this warranty.
This warranty does not affect or have influence on other legal guarantee
claims or other contractual claims of the customer against the seller of the
product. These claims can be made alternatively to the claims referred to in
this warranty document.
EYE-LCD-5500-XSN-LD-FX72
User Manual
Page 73

Limitations of liability
In cases of slight negligent breaches of duty, the liability of eyevis is limited to
the direct, foreseeable, and contract-typical average damage. The slightly
negligent breach of minor contractual obligations excludes the liability.
eyevis will not be liable for any loss, damage or alterations to third party
accessories, hardware or software or programs, data or information stored on
any media or any part of the product, no matter how it occurs, or for any loss
or damage arising from loss of use, loss of profits or revenue, or for any
resulting indirect or consequential loss or damage.
The policy sum regarding all requirements of the warranty does not exceed, at
discretion of eyevis, the original purchase price of the product or alternatively
the costs of substitution of the product.
The warranty shall not apply to repairs or service necessitated by normal wear
and tear or for lack of reasonable and proper maintenance.
As far as the liability of eyevis is excluded or limited, this also applies to the
personal compensation liability of its staff, employees, associated employees,
agents, and auxiliary persons.
The preceding limitations of liability do not apply to the customer’s claims
derived from the Product Liability Act and to claims concerning damages to
the body or health or in case of the loss of the life of the customer.
EYE-LCD-5500-XSN-LD-FX
73
Version 1.0 | May 2015
Page 74

Appendix
Technical Specification
LCD DISPLAY: EYELCD5500XSNLDFX EYELCD5500XSNLDFX700
Panel Type: a-Si TFT LCD IPS-Panel
Installation: 55 inch (ca. 139 cm)
Screen Size: 1209,6 × 680,4 mm
Active Display Area: Landscape or Portrait Installation possible
Display Resolution: Transmissive mode, normally black
Colours: 1,920 × 1,080 Pixel (full HD)
Brightness: 1,07G (10-Bit Colour Processing)
Contrast: 500 cd/m
2
(typ.) 700 cd/m2 (typ.)
Viewing Angle: 1400 : 1 (typ.) 1200 : 1 (typ.)
Response Time: 178° H/V
Backlight: 12 ms
Active Display Area: Direct LED
Backlight Life-Time: > 60,000 hrs (Luminance <50%)
System MTBF: > 60,000 hrs
24/7 Operation*: Yes
CONNECTORS: & CONTROL
Inputs: Video, Y/C, DVI-I (digital/analog), HDMI, DisplayPort, RS232
Outputs: DisplayPort, RS232
Internal Matrix: Yes, 10 × 10
MECHANICAL
Display: 1213,5 × 684,3 × 119,9 mm (W × H × D)
Bezel Width: Bezel-to-Bezel: 1,25 mm bottom/right, 2,25 mm top/left
Weight: 34 kgs
VESA Mount: 400 × 600
ELECTRICAL:
Power Consumption: ca. 210 Watt (max.)
Input Voltage: 100V – 240V AC, 50/60 Hz
Operating Temperature: typ. 0 - 40 °C
Humidity: typ. 10-80 % RH (no condensation)
OTHER:
Handling: Handles for simple and safe transport and installation
Cooling: Low-noise fans
OPTIONS:
OPS Slot: OPS standardized input slot for OPS-PC and additional inputs
Front-Service Option: Full front-service Landscape/Portrait video wall mount
Colour Adjustment: EYE-LCD-CAS colour adjustment system
Touch: Custom infrared touch overlay for video walls
* Electronic components designed for 24/7 operation. Prolonged display of static image contents
may affect the display quality of the device. These effects do not affect the functionality of the
device and are therefore not considered as defects in terms of our warranty conditions.
EYE-LCD-5500-XSN-LD-FX74
User Manual
Page 75

Technical Specification EPU
EPU: EPUCE328X1 EPUI5328X1
CPU Support: Intel® Celeron® Processor J1900 Quad
Core2,0GHz SoC Processor (fan-less)
4th Generation Intel® Core i5-4400E BGA Type
Processor
Main Memory: 8GB DDR3L 1333MHz, unbuffered and non-ECC 8GB DDR3L 1333MHz, unbuffered and non-ECC
I/O Interface-Front: 1× power button / 1× reset button / 3× USB
3,0 / 1× USB2,0 / 1× RJ45 for Gigabit LAN / 1×
HDMI / 1× Audio (Line-out/ Micin) / 1× 2,5“
HDD slot
1× power button / 1× reset button / 4× USB3,0
/ 1× RJ45 for Gigabit LAN / 1× HDMI / 1× Audio
(Line-out/ Mic-in) /1× 2,5“ HDD slot / 1× RJ45
for RS-232
Storage Device: 1× 2,5“ SSD, 32GB, SATA 1× 2,5“ SSD, 32GB, SATA
Operating System: Windows 7 for MetaWall, Windows 7
Embedded, Linux
Windows 7 for MetaWall, Windows 7
Embedded, Linux
EYE-LCD-5500-XSN-LD-FX
75
Version 1.0 | May 2015
Page 76

Dimensions
EYE-LCD-5500-XSN-LD-FX76
User Manual
Page 77

RS232 protocol
General description
The eyevis LC Displays can be controlled using an ASCII-serial protocol. Each
display is assigned an ID and can be addressed in the protocol using this ID.
Commands can either be sent to a single ID or to all devices simultaniously
(broadcast mode). Device with ID 1 is the master and controls and relays
communication between the devices.!
The following user commands are available.
SET Sets parameters and executes commands
GET Recall actual parameter values
SAVE Save parameters permanently in memory
As response there will be the Value, an ACK (success) or NACK (error)
returned.
Command description = case sensitive!
Communication settings
Communication: RS232
115200Baud, 8, n, 1
Connection: 1:1, RxD, TxD, GND
ID assignment
Each display has to be assigned a unique ID. IDs can be assigned automatically
by sending SET(0;Display Auto ID;1) to the first device.
Description of commands
Type(ID;Command;Value)
Instruction GET, SET or SAVE (see “General Description”)
ID Display address
Command Command from the display database
Value Value of the data
Example: Following command will change the values of the variables in the
display:
Command SET(1;Input;0)
Response ACK(1)
Set the current input source to Display Port.
GET(ID;Command)
ID = Display address
Command = Command from the display database
The actual values of the display will be returned.
EYE-LCD-5500-XSN-LD-FX
77
Version 1.0 | May 2015
Page 78

e.g.:
Command GET(1;Input)
Response DATA(1;Input;0)
Query the current input source for display 1. Current Input Source is Display
Port.
SAVE(ID;ALL)
ID = Display address
Command SAVE(1;ALL)
Response ACK(1)
Values are automatically saved after change. Due to different internal
processor design, this separate SAVE command is obsolete. For compatibility,
it’s still implemented and ACK(ID) will be returned always.
Broadcast
Sending commands using ID=0 is a broadcast to all connected devices. Use
carefully to avoid unintended overwriting of existing values. Flow control
needs to be implemented by control system, using ACK reply estimation.
e.g.:
Command GET(0;Input)
Response DATA(1;Input;0)DATA(2;Input;1)….
Command SET(0;Input;0)
Response ACK(1)ACK(2)ACK(3)
Remarks
For the Power-Command the behaviour of the broadcast command differs
from the Power-Command for individual devices. A SET(0;Power;0) will set all
devices to deep-sleep mode. In this mode communication with individual
devices is not possible, especially the Power-Command sent to and individual
ID behind the master device will not work. Please use SET(0;Power;1) to power
on the entire wall again.
EYE-LCD-5500-XSN-LD-FX78
User Manual
Page 79

RS232 command list
Function Command
Possible
Values
Default
Values
Comment
Power
Switch the LCD On or Off Power 0=Off, 1=On 1
Sending to an individual ID will
enable Sleep mode.
SET(0;Power;0) will set the entire
wall to deep sleep mode. Cf.
remarks in the broadcast section
above
Enable Sleep Mode Sleep 1=On,0=Off 0
Enable Standby-Mode that still
allows communication with
individual devices
Input
Input Source
Input
0=DP
1=HDMI
2=DVI
3=VGA
4=CVBS
5=YC
6=SLOT-IN
0
Automatic Input Scanning Source Scan
0=Off
1=On
0
Picture
Contrast Contrast 0-100 50
Brightness Brightness 0-100 50
Sharpness Sharpness 0-24 12
Backlight Backlight 0-100 100
ALC (=Ambient Light
Control) Automatically
control backlight
brightness
ALC 0= Off, 1= On 0
ALC Value ALC Value 0-100
Local Dimming Local Dimming 0= Off, 1= On
Color Management
Color Balance Color Balance
0=Warm
1=Normal
2=Cold
3=User
1
Color Saturation Color Saturation 0-100 50
User Red Gain User Red Gain 0-100 100 Set individually for each device
User Green Gain User Green Gain 0-100 100 Set individually for each device
User Blue Gain User Blue Gain 0-100 100 Set individually for each device
User Red Offset User Red Offset -50-50 0 Set individually for each device
User Green Offset User Green Offset -50-50 0 Set individually for each device
User Blue Offset User Blue Offset -50-50 0 Set individually for each device
ID Settings
Automatically assign
Display IDs trough all
connected Devices
Auto Display ID Trigger by sending value1
Force a new ID on the
Device
Force Display ID Give new ID as argument
Reset assigned display
ID to 1
Reset Display ID Trigger by sending value 1
EYE-LCD-5500-XSN-LD-FX
79
Version 1.0 | May 2015
Page 80

Matrix
Matrix Mode Enable Matrix
0=Off
1=On
0
Matrix Size X Matrix Size X 1-10 1
Matrix Size Y Matrix Size Y 1-10 1
Matrix Position X Matrix Pos X 1-10 1
Set individually for each
device
Matrix Position Y Matrix Pos Y 1-10 1
Set individually for each
device
Matrix Cropping X % Matrix Crop X 1-100 0
Matrix Cropping Y % Matrix Crop Y 1-100 0
OSD Size OSD Zoom
0=Normal
1=Big
0
PC RGB
Timing Timing
Read Only
Format: HxV@Freq
RGB Auto Adjust Autoadjust 1500 Trigger by sending value 1
RGB H-Total H Total 0-5000 2500
RGB H-Position H Position 0-5000 2500
RGB V-Position V Position 0-5000 0
RGB Phase Phase 0-63 1500
OSD
OSD Language OSD Language
0 =English
1=German
0
OSD Transparency
OSD
Transparency
0-10 0
OSD Timeout OSD Timeout 0-10 0
Advanced Setup
DVI-I EDID DVI-I EDID
0=Digital
1=Analog
DP Switch DP Switch
0 = 1.1
1 = 1.2
2 = Auto
Smart ISP Smart ISP Trigger by sending value 1
Reset Factory Defaults Reset Defaults Trigger by sending value 1
Audio Settings
Audio Volume Volume 0-32 20
Max Startup Volume Startup Volume 0-32 32
Input Level Input Level 0-100 50
Audio Delay Audio Delay 0-100 0
Status
Device Temperature Temperature 0-1000 0
Fan 1 Status Fan 1 Status Read only Read Only
Fan 2 Status Fan 2 Status Read only Read Only
Fan 1 Speed Fan 1 Speed 0-255 30
Fan 2 Speed Fan 2 Speed 0-255 30
Info
Software Revision
Software
Revision
Read Only
Software Version Software Version Read Only
Serial Number Serial Number Read Only
EYE-LCD-5500-XSN-LD-FX80
User Manual
Page 81

Timings
Timings (30Hz Table) H-Freq / KHz V-Freq / Hz
Pixelclock /
MHz
4K2K 3840 x 2160 x 30 Hz (only DisplayPort input)
Timings (60Hz Table) H-Freq / KHz V-Freq / Hz
Pixelclock /
MHz
EDTV
480I/525I -720 x 240 x 60I 15,7 59,9 13,4706
576I/625I -720 x 288 x 50I 15,6 50 13,4784
480P -720 x 480 x 60P 31,4 60 26,9412
576P/ -720 x 576 x 50P 31,2 50 26,9568
HDTV
(HDTV) 720P(50Hz) -1280 x 720 x 50P 37,5 50 74,25
(HDTV) 720P(60Hz) -1280 x 720 x 60P 44,9 60 74,085
(HDTV) 1080I(50Hz) -1920 x 1080 x 50I 28,1 50 74,184
(HDTV) 1080I(50Hz) -1920 x 1080 x 50I smpte 295m 31,2 50 74,1312
(HDTV) 1080i Australian -1280 x 1152 x 50P 31,2 25 71,8848
(HDTV) 1080I(60Hz) -1920 x 1080 x 60I 33,7 60 74,14
(HDTV) 1080P(25Hz) -1920 x 1080 x 25P 28,2 25 74,448
(HDTV) 1080P(30Hz) -1920 x 1080 x 30P 33,7 30 74,14
(HDTV) 1080P(60Hz) -1920 x 1080 x 60P 67,5 60 148,5
(HDTV) 1080P(50Hz) -1920 x 1080 x 50P 56 50 147,84
VESA
2560 x 1600 x 60 Hz CVT 98,7 60 268,464
2560 x 1440 x 60 Hz CVT 88,8 59,9 241,536
1600 x 1200 x 60 Hz 75 60 162
1920 x 1200 x 60 Hz 74,5 60 193,104
1600 x 1200 x 60 Hz RB 74 60 130,24
1920 x 1200 x 60 Hz RB 74 60 153,92
1920 x 1080 x 60 Hz -148,5MHz 67,5 60 148,5
1920 x 1080 x 60 Hz -CVT 67,1 60 172,8496
1920 x 1080 x 60 Hz -CVT RB 66,6 60 138,528
1400 x 1050 x 60 Hz 65,3 60 121,7192
1680 x 1050 x 60 Hz 65,3 60 146,272
1400 x 1050 x 60 Hz RB 64,7 60 100,932
1680 x 1050 x 60 Hz Reduce Blanking 64,7 60 119,048
1280 x 1024 x 60 Hz 63,9 60 107,8632
1600 x 1000 x 60 Hz CVT 62,1 60 132,1488
1600 x 1000 x 60 Hz CVT RB 61,6 59,9 108,416
1600 x 900 x 60 Hz RB 60 60 108
1280 x 960 x 60 Hz 60
60 108
1440 x 900 x 60 Hz 55,9 60 106,4336
1440 x 900 x 60 Hz RB 55,5 60 88,8
1280 x 800 x 60 Hz 49,7 59,8 83,496
1280 x 800 x 60 Hz RB 49,3 59,9 70,992
1024 x 768 x 60 Hz 48,3 60 64,9152
1366 x 768 x 60 Hz RB 48 60 72
1280 x 768 x 60 Hz 47,7 60 79,3728
1366 x 768 x 60 Hz 47,7 59,8 85,4784
1360 x 768 x 60 Hz 47,7 60 85,4784
1280 x 768 x 60 Hz - RB 47,3 59,9 68,112
1280 x 720 x 60 Hz 45 60 74,25
1280 x 720 x 60 Hz 44,7 60 74,3808
800 x 600 x 60 Hz 37,8 60,3 39,9168
800 x 600 x 56 Hz 35,1 56,2 35,9424
EYE-LCD-5500-XSN-LD-FX
81
Version 1.0 | May 2015
Page 82

VESA
720 x 576 x 60 Hz 35,9 60 32,7408
640 x 480 x 60 Hz 31,5 60 25,2
848 x 480 x 60 Hz 31 60 33,728
848 x 480 x 60 Hz - RB 29,8 60 30,0384
Timings (70Hz Table) H-Freq / KHz V-Freq / Hz
Pixelclock /
MHz
VESA
1600 x 1200 x 75 Hz 93,7 75 202,392
1600 x 1200 x 70 Hz 87,5 70 189
1400 x 1050 x 75 Hz 82,3 75 156,0408
1680 x 1050 x 75 Hz 82,3 75 186,9856
1680 x 1050 x 75 Hz 82,3 74,9 186,9856
1680 x 1050 x 75 Hz Reduce 81,5 74,9 149,96
1600 x 1200 x 65 Hz 81,2 65 175,392
1280 x 1024 x 76 Hz 81,1 76,1 134,9504
1280 x 1024 x 75 Hz 79,9 75 134,8712
1600 x 1000 x 75 Hz 78,3 74,8 169,128
1280 x 1024 x 72 Hz 76,8 72 132,7104
1280 x 1024 x 70 Hz 74,6 70 128,9088
1152 x 900 x 76 Hz 71,5 76 110,968
1440 x 900 x 75 Hz 70,6 75 136,6816
1152 x 870 x 75 Hz MAC 68,1 75 105,6912
1152 x 864 x 75 Hz 67,5 75 108
1152 x 864 x 70 Hz 63 70 96,768
1280 x 800 x 75 Hz 62,8 74,9 106,5088
1152 x 900 x 66 Hz 61,7 66 94,7712
1280 x 768 x 75 Hz 60,3 74,9 102,2688
1024 x 768 x 75 Hz 60,1 74,9 81,736
1024 x 768 x 75 Hz 60,1 75 78,8512
1280 x 800 x 72 Hz 60 72 102,72
1280 x 800 x 70 Hz 58,3 70 98,8768
1024 x 768 x 72 Hz 57,6 72 78,336
1024 x 768 x 70 Hz 56,4 70,1 74,8992
1280 x 720 x 75 Hz 56,2 74,8 95,3152
800 x 600 x 72 Hz 48,1 72,2 50,024
800 x 600 x 75 Hz 46,8 75 49,4208
640 x 480 x 72 Hz 37,8 72 31,4496
848 x 480 x 72 Hz 36 72 39,168
848 x 480 x 75 Hz 37,7 74,8 41,0176
640 x 480 x 75 Hz 37,5 75 31,5
640 x 480 x 66 Hz 35 66,7 30,24
848 x 480 x 70 Hz 35 70 37,52
640 x 400 x 70 Hz 31,5 70,1 25,2
720 x 400 x 70 Hz 31,5 70 28,35
640 x 350 x 70 Hz 31,5 70 25,2
EYE-LCD-5500-XSN-LD-FX82
User Manual
Page 83

Timings (80Hz Table) H-Freq / KHz V-Freq / Hz
Pixelclock /
MHz
VESA
1400 x 1050 x 85 Hz 93,9 85 179,5368
1280 x 1024 x 85 Hz 91,1 85 157,4208
1280 x 960 x 85 Hz 85,9 85 148,4352
1440 x 900 x 85 Hz 80,4 84,8 156,9408
1152 x 864 x 85 Hz 77,1 84,8 119,6592
1280 x 800 x 85 Hz 71,6 84,9 122,5792
1024 x 768 x 85 Hz 68,6 85 94,3936
1280 x 768 x 85 Hz 68,6 84,8 117,4432
800 x 600 x 85 Hz 53,7 85 56,2776
640 x 480 x 85 Hz 43,2 85 35,9424
640 x 350 x 85 Hz 37,8 85 31,4496
720 x 400 x 85 Hz 37,9 85 35,4744
640 x 400 x 85 Hz 37,8 85 31,4496
1024 x 768 - 43 35,5 86,8 44,872
EYE-LCD-5500-XSN-LD-FX
83
Version 1.0 | May 2015
Page 84

A
ACCESSORIES 71
ACCESSORY BOX 26
APPENDIX 74
DIMENSIONS 76
RS232 PROTOCOL 77
TECHNICAL SPECIFICATION 75
TIMINGS 81
B
BATTERIES
CHANGING 39
BRIGHT PIXEL 67
C
CLAIM 72
COSTS 72
LEGAL 72
LIMITATIONS 73
PACKING 72
RAISING A CLAIM 72
RMA 72
SERVICE 71
TRANSPORT 72
CONFIGURATION
LOADING 57
READING 57
SAVING 57
CONNECTORS 28
INPUTS 28
POWER CORD 28
CONTROLLING 38
COSTS 72
D
DAISY-CHAIN 33
DARK PIXEL 67
DIMENSIONS 76
DISPLAY IDS 34
DOA 70
DOT DEFECTS 68
E
EPU 24
FEATURES 24
EXCHANGE 70
EXCLUSIONS 71
EYEDEVICE SETUP 52
F
FAILURE 67
BRIGHT PIXEL 67
DARK PIXEL 67
FAILURE OF PIXEL 71
PIXEL 67
FEATURES 23
FRONT SERVICE 27
I
IMAGE STICKING 65
INDICATOR LED 32
INSTALLATION 27
K
KEY FEATURES 24
L
LEGAL 72
LIMITATIONS 73
LINKING 33
M
MALFUNCTION 69
MURA 65
O
ON-SCREEN-DISPLAY 38
NAVIGATING 38
OPENING 38
OPERATING 36
SETUP 36
OSD KEYPAD 40
OSD MENU 40
P
PACKAGING 25
PACKING 72
PACKING LIST 25
PIXEL 67
POLLUTIONS 67
R
REMOTE CONTROL 38
RETENTION
IMAGE STICKING 65
MURA 65
OPERATING TIME 66
SHADE FORMATION 65
STATIC IMAGES 66
TEMPERATURE 66
RMA 72
RS232 PROTOCOL 77
S
SERIAL NUMBER 71
SERVICE 71
SHADE FORMATION 65
SOFTWARE 52
T
TECHNICAL SPECIFICATION 74
TIMINGS 81
TOLERANCE LIMITS 67
TRANSPORT 72
TROUBLESHOOTING 69
V
VALIDITY 70
W
WARRANTY 70
ACCESSORIES 71
DOA 70
DURATION 70
EXCHANGE 70
EXCLUSIONS 71
SERIAL NUMBER 71
SERVICE 70
VALIDITY 70
Index
EYE-LCD-5500-XSN-LD-FX84
User Manual
Page 85

Notes:
Page 86

eyevis GmbH
Hundsschleestrasse 23
D-72766 Reutlingen
Germany
Phone: +49 (0)7121-4 33 03-0
Fax: +49 (0)7121-4 33 03-22
Hotline: +49 (0)7121-4 33 03-290 (netPIX & eyeCON)
Hotline: +49 (0)7121-4 33 03-291 (Cubes & Displays)
web: www.eyevis.de
e-mail: info@eyevis.de
service: service@eyevis.de
Version: 1.0 | May 2015
Copyright © 2015 eyevis GmbH.
All rights reserved.
 Loading...